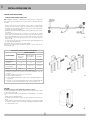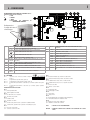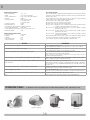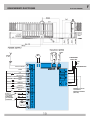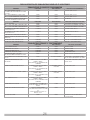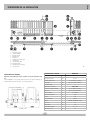
1
K800 24V
con / avec / with / mit
K 24V-CRX
Operatore
Operateur
Operator
Torantrieb
Operador
Alimentazione
Alimentation
Power Supply
Stromspannung
Alimentacion
Peso max cancello
Poids maxi portail
Max gate weight
Max Torgewicht
Peso máx verja
Spinta
Poussée
Thrust
Schubkraft
Empuje
Spinta max
Poussée maxi
Max Thrust
Max Schubkraft
Max Empuje
Coppia max
Couple maxi
Max torque
Max. Drehmoment
Coppia max
Codice
Code
Code
Code
Codigo
K800 24V
230V 50/60Hz
800 kg / 1760 lbs
382 N
550 N
18,5 Nm
AA30091
1
ITALIANO pag. 05 / FRANÇAIS pag. 16 / ENGLISH page 27 / DEUTSCH pag. 38 / ESPAÑOL pag. 49
I
F
ISTRUZIONI DI SICUREZZA IMPORTANTI PER
L’INSTALLAZIONE
INSTRUCTIONS DE SECURITE IMPORTANTES POUR
L’INSTALLATION
ATTENZIONE - PER LA SICUREZZA DELLE PERSONE È IMPORTANTE CHE VENGANO
SEGUITE TUTTE LE ISTRUZIONI
CONSERVARE CON CURA QUESTE ISTRUZIONI
1° -S e non è previsto nel quadro elettronico, installare a monte del medesimo
un’interruttore di tipo magnetotermico (onnipolare con apertura minima dei contatti
pari a 3 mm) che riporti un marchio di conformità alle normative internazionali.
Tale dispositivo deve essere protetto contro la richiusura accidentale (ad esempio
installandolo entro quadro chiuso a chiave).
2° -Per la sezione ed il tipo dei cavi la RIB consiglia di utilizzare un cavo di tipo H05RN-F
con sezione minima di 1,5 mm2 e comunque di attenersi alla norma IEC 364 e alle
norme di installazione vigenti nel proprio Paese.
3° -Posizionamento di un’eventuale coppia di fotocellule: il raggio delle fotocellule deve
essere ad un’altezza non superiore a 70 cm dal suolo e ad una distanza dal piano
di movimento della porta non superiore a 20 cm. Il loro corretto funzionamento deve
essere verificato a fine installazione in accordo al punto 7.2.1 della EN 12445.
4° -Per il soddisfacimento dei limiti imposti dalla EN 12453, se la forza di picco supera
il limite normativo di 400 N è necessario ricorrere alla rilevazione di presenza attiva
sull’intera altezza della porta (fino a 2,5 m max). Le fotocellule in questo caso sono da
applicare come indicato nella norma EN 12445 punto 7.3.2.2).
N.B.: È obbligatoria la messa a terra dell’impianto.
I dati descritti nel presente manuale sono puramente indicativi.
RIB si riserva di modificarli in qualsiasi momento.
Realizzare l’impianto in ottemperanza alle norme ed alle leggi vigenti.
ATTENTION - POUR LA SECURITE DES PERSONNES, IL EST IMPORTANT DE SUIVRE
TOUTES LES INSTRUCTIONS
CONSERVER SOIGNEUSEMENT CES INSTRUCTIONS
1° -Si ce n’est pas prévu dans la centrale, installer en amont de celle-ci un interrupteur
de type magnétothermique (omnipolaire avec ouverture minimum des contacts de 3
mm) qui porte une marque de conformité aux normes internationales. Ce dispositif
doit être protégé contre la re-fermeture accidentelle (par exemple en l’installant dans
un tableau fermé à clé).
2° -En ce qui concerne la section et le type des câbles, RIB conseille d’utiliser un câble de
type H05RN-F ayant une section minumum de 1,5 mm2 et de toute façon, s’en tenir à
la norme IEC 364 et aux normes d’installation en vigueur dans le propre pays.
3° -Positionnement d’un couple éventuel de photocellules: Le rayon des photocellules
doit se situer à une hauteur qui ne doit pas être supérieure à 70 cm du sol et à une
distance du plan de mouvement de la porte qui ne doit pas être supérieure à 20 cm.
Leur bon fonctionnement doit être vérifié en fin d’installation selon le point 7.2.1 de la
EN 12445.
4° -Pour satisfaire aux limites imposées par la EN 12453, si la force de pointe dépasse la
limite de la norme de 400 N, il est nécessaire de recourir au relevé de présence active
sur la hauteur totale de la porte (jusqu’à 2,5 m max). - Les photocellules, dans ce cas,
doivent être appliquées selon le point 7.3.2.2 de la EN 12445
N.B.: La prise de terre sur l’installation est obligatoire.
Les données décrites dans ce manuel sont purement indicatives.
RIB se réserve le droit de les modifier à tout moment.
Réaliser l’installation en conformité aux normes et aux lois en vigueur.
ISTRUZIONI IMPORTANTI DI SICUREZZA PER L’INSTALLAZIONE
ATTENZIONE - L’INSTALLAZIONE NON CORRETTA PUÒ CAUSARE GRAVI DANNI
SEGUIRE TUTTE LE ISTRUZIONI DI INSTALLAZIONE
1° -Questo libretto d’istruzioni è rivolto esclusivamente a del personale specializzato
che sia a conoscenza dei criteri costruttivi e dei dispositivi di protezione contro gli
infortuni per i cancelli, le porte e i portoni motorizzati (attenersi alle norme e alle leggi
vigenti).
2° -L’installatore dovrà rilasciare all’utente finale un libretto di istruzioni in accordo alla
12635.
3° -
L’installatore prima di procedere con l’installazione deve prevedere l’analisi dei
rischi della chiusura automatizzata finale e la messa in sicurezza dei punti pericolosi
identificati (seguendo le norme EN 12453 / EN 12445).
4° -L’installatore prima di installare il motore di movimentazione deve verificare che il
cancello sia in buone condizioni meccaniche e che si apra e chiuda adeguatamente.
5° -
L’installatore dovrà installare l’organo per l’attuazione del rilascio manuale ad
un’altezza inferiore a 1,8 m.
6° -L’installatore dovrà rimuovere eventuali impedimenti al movimento motorizzato del
cancello (es. chiavistelli, catenacci, serrature ecc.)
7° -L’installatore dovrà applicare in modo permanente le etichette che mettono in guardia
contro lo schiacciamento in un punto molto visibile o in prossimità di eventuali comandi
fissi.
8° -Il cablaggio dei vari componenti elettrici esterni all’operatore (ad esempio fotocellule,
lampeggianti, ecc.) deve essere effettuato secondo la EN 60204-1 e le modifiche a
questa apportate dal punto 5.2.2 della EN 12453.
9° -L’eventuale montaggio di una pulsantiera per il comando manuale del movimento
deve essere fatto posizionando la pulsantiera in modo che chi la aziona non si trovi
in posizione pericolosa; inoltre si dovrà fare in modo che sia ridotto il rischio di
azionamento accidentale dei pulsanti.
Tenete i comandi dell’automatismo (pulsantiera, telecomando etc)
10° - fuori dalla portata dei bambini. L’organo di manovra (un interruttore tenuto
chiuso manualmente) deve essere in una posizione che sia visibile dalla parte guidata
ma lontana dalle parti in movimento. Deve essere installato a un’altezza minima di
1,5 m.
11° - Questo apparecchio può essere utilizzato da bambini di età compresa dagli 8 anni e
al di sopra e le persone con ridotte capacità fisiche, sensoriali o mentali, o mancanza
di esperienza e conoscenza se sono stati controllati o istruiti all’uso dell’apparecchio
in modo sicuro e capire i rischi connessi.
12° - I bambini non devono giocare con l’apparecchio.
13° - Pulizia e manutenzione utente non deve essere fatta da bambini senza supervisione.
14° - Non permettere ai bambini di giocare con i comandi fissi. Tenere i telecomandi lontano
dai bambini.
15° - I dispositivi di comando fissi devono essere installati in modo che siano visibili.
16° - Prima di eseguire qualsiasi operazione di installazione, regolazione, manutenzione
dell’impianto, togliere la tensione agendo sull’apposito interruttore magnetotermico
collegato a monte dello stesso.
17° - A fine installazione l’installatore dovrà assicurarsi che le parti della porta non
ingombrino strade o marciapiedi pubblici.
LA DITTA RIB NON ACCETTA NESSUNA RESPONSABILITÀ per eventuali danni
provocati dalla mancata osservanza nell’installazione delle norme di sicurezza e
delle leggi attualmente in vigore.
INSTRUCTIONS IMPORTANTES DE SECURITE POUR L’INSTALLATION
ATTENTION - UNE INSTALLATION NON CORRECTE PEUT CAUSER DE GRAVES
DOMMAGES
SUIVRE TOUTES LES INSTRUCTIONS D’INSTALLATION
1° - Ce livret d’instructions est adressé exclusivement à un personnel spécialisé qui
connaît les critères de construction et les dispositifs de protection contre les accidents
concernant les portails, les portes et les portes cochères motorisés (s’en tenir aux
normes et aux lois en vigueur).
2° - L’installateur devra délivrer à l’utilisateur final un livret d’instruction en accord à la
EN 12635.
3° - L’installateur avant de procéder à l’installation, doit prévoir l’analyse des risques de la
fermeture automatisée finale et la mise en sécurité des points identifiés dangereux (en
suivant les normes EN 12453/EN 12445).
4° - L’installateur, avant d’installer le moteur de mouvement, doit vérifier que le portail de
fer soit en bonnes conditions mécaniques et qu’il s’ouvre et se ferme correctement.
5° - L’installateur devra installer l’organe pour l’exécution de la relâche manuelle à une
hauteur inférieure à 1,8 m.
6° - L’installateur devra retirer d’éventuels obstacles au mouvement motorisé du portail de
fer (ex. verrous, serrures, etc).
7° - L’installateur devra appliquer, de façon permanente, les étiquettes qui mettent en
garde contre l’écrasement, dans un endroit bien visible ou à proximité de commandes
fixes éventuelles.
8° - Le câblage des divers composants électriques externes à l’opérateur (par exemple
photocellules, clignotants, etc) doit être effectué selon la EN 60204-1 et les
modifications apportées à celle-ci dans le point 5.2.2 de la EN 12453.
9° - Le montage éventuel d’un tableau pour la commande manuelle du mouvement doit être
fait en positionnant le tableau de façon à ce que la personne qui l’actionne ne se trouve
pas en position de danger; de plus, il faudra faire en sorte que le risque d’actionnement
accidentel des boutons soit réduit.
10° - Tenir les commandes de l’automatisme (tableau, télécommande, etc) hors de portée
des enfants. L’organe de manoeuvre (un interrupteur tenu fermé manuellement) doit
être dans une position qui soit visible de la partie guidée mais lointaine des parties en
mouvement. Il doit être installé à une hauteur moindre de 1,5 m.
11° - Cet appareil peut être utilisé par des enfants âgés de 8 ans et plus et les personnes
dont les capacités physiques, sensorielles ou mentales réduites, ou manquant
d’expérience et de connaissances si elles sont sans surveillance ou instruction
concernant l’utilisation de l’équipement en toute sécurité et de comprendre les
risques encourus.
12° - Enfants ne doivent pas jouer avec l’appareil.
13° - Nettoyage et entretien utilisateur n’a pas à être effectué par des enfants sans
surveillance.
14° - Ne laissez pas les enfants jouer avec les commandes fixes. Gardez la télécommande
hors de portée des enfants.
15° - Les dispositifs fixes de commande doivent être installés de sorte qu’ils soient visibles.
16° - Avant l’exécution de toute opération d’installation, de réglage, d’entretien de
l’installation, couper le courant en agissant sur l’interrupteur magnétothermique à cet
effet, branché en amont de l’installation.
17° - A la fin de l’installation, l’installateur devra s’assurer que les parties de la porte
n’encombrent pas la rue ou le trottoir public.
LA SOCIETE RIB N’ACCEPTE AUCUNE RESPONSABILITE pour d’éventuels dommages
provoqués par la non-observation dans l’installation, des normes de sécurité et des
lois actuellement en vigueur.
2
G
B
D
IMPORTANT SAFETY INSTRUCTIONS FOR THE
INSTALLATION
ATTENTION - FOR THE SAFETY OF PEOPLE IT IS IMPORTANT TO FOLLOW ALL THE
INSTRUCTIONS
KEEP THESE INSTRUCTIONS WITH CARE
1° - If it is not forecast in the electric gearcase, install a switch of magneto thermic type
upstream, (omni polar with minimum opening of the contacts of 3 mm) with a check of
conformity to the international standards. Such device must be protected against the
accidental lockup (for example by installing inside a locked board).
2° - For the section and the type of the cables RIB advices to use a cable of H05RN-F type
with 1,5 sqmm minimum section and, however, to keep to the IEC 364 and installation
standards in force in your country.
3° - Positioning of a possible couple of photoelectric cells: the radius of the photoelectric
cells must be at a height of no more than 70 cm from the ground and at a distance not
superior to 20 cm from the motion plane of the door. Their correct working must be
verified at the end of the installation in accordance with the point 7.2.1 of the EN 12445
4° - To fulfill the limits set by EN 12453, and in case the peak force exceeds the normative
limit of 400 N it is necessary to have recourse to the active presence survey on the
whole height of the door (up to max 2,5 m) - The photoelectric cells, in this case, must
be applied in accordance with the point 7.3.2.2 of the EN 12445
N.B.: The earthing of the system is obligatory.
The data described in this handbook are purely a guide.
RIB reserves the right to change them in any moment.
Carry out the system in the respect of the standards and laws in force.
WICHTIGE SICHERHEITS ANLEITUNGEN FÜR DIE
INSTALLATIONEN
ACHTUNG - FÜR DIE SICHERHEIT DER PERSONEN IST ES WICHTIG, DASS ALLE
ANWEISUNGEN GENAU AUSGEFÜHRT WERDEN
INSTALLATIONSVORSCHRIFTEN BEACHTET WERDEN
1° - Wenn nicht bereits an der elektrischen Schaltzentrale vorgesehen, muss vor der
Schaltzentrale ein thermomagnetischer Schalter installiert werden (omnipolar, mit
einer minimalen Kontaktöffnung von 3 mm), der ein von den internationalen Normen
anerkanntes Konformitätszeichen besitzt. Solch ein Geraet muss vor Vandalismus
geschuetzt werden (z.B.mit einen Schluesselkatsten in einem Panzergehaeuse).
2° - RIB empfiehlt den Kabeltyp H05RN-F mit einem minimalen Querschnitt von 1,5 mm2
generell sollten die Normative IEC 364 und alle anderen geltenden Montagenormen des
Bestimmungslandes eingehalten werden.
3° - Position des ersten paar Fotozellen: Der sollten nicht hoeher als 70 cm vom Boden sein,
und sollte nicht mehr als 20 cm entfernt von der Achse des Tores sitzen (das gilt fuer
Schiebe und Drehtore). In Übereinstimmung mit dem Punkt 7.2.1 der EN 12445 Norm,
ihr korrektes Funktionieren muß einmal überprüft werden.
4° - In Einklang mit der Norm EN12453, ist es bei Toren notwendig eine komplette
Sicherheitslieiste zu installieren, bei denen mehr als 400 N Kraft aufgewand werden
muessen, um das Tor zum anhalten zu bringen (Maximum von 2,5 m anwenden) - Die
Fotozellen müssen in diesem Fall sein beantragen außen zwischen EN 12445 Punkt
7.3.2.2).
ANMERKUNG: Die Erdung der Anlage ist obligatorisch
Die in diesem Handbuch aufgeführten Daten sind ausschließlich empfohlene Werte. RIB
behält sich das Recht vor, das Produkt zu jedem Zeitpunkt zu modifizieren. Die Anlage muss
in Übereinstimmung mit den gültigen Normen und Gesetzen montiert werden.
IMPORTANT SAFETY INSTRUCTIONS FOR THE INSTALLATION
ATTENTION - THE INCORRECT INSTALLATION CAN CAUSE SERIOUS DAMAGES
FOLLOW ALL INSTALLATION INSTRUCTIONS
1° - This handbook is exclusively addressed to the specialized personnel who knows
the constructive criteria and the protection devices against accidents for motorized
gates, doors and main doors (follow the standards and the laws in force).
2° - The installer will have to issue a handbook to the final user in accordance with the
12635.
3° - Before proceeding with the installation, the installer must forecast the risks analysis
of the final automatized closing and the safety of the identified dangerous points
(Following the standards EN 12453/EN 12445).
4° -Before installing the motion motor, the installer must verify that the gate is in good
mechanical conditions and that it adequately opens and closes.
5° - The installer must install the member for the manual release at a height inferior to
1,8 m.
6° - The installer will have to remove possible impediments to the motorized motion of the
gate (eg. door bolts, sliding bolts, door locks etc.)
7° - The installer will permanently have to put the tags warning against the deflection on a
very visible point or near possible fixed controls.
8° - The wiring harness of the different electric components external to the operator (for
example photoelectric cells, flashlights etc.) must be carried out according to the EN
60204-1 and the modifications to it done in the point 5.2.2 of the EN 12453.
9° - The possible assembly of a keyboard for the manual control of the movement must be
done by positioning the keyboard so that the person operating it does not find himself
in a dangerous position; moreover, the risk of accidental activation of the buttons must
be reduced.
10° -Keep the automatism controls (push-button panel, remote control etc.) out of the
children way. Command device for operating the motor (a switch manually closed)
should be placed in area visible from the guided site and far from moving parts. It
should be placed at least at 1,5 m height.
11° -this appliance can be used by children aged from 8 years and above and persons with
reduced physical, sensory or mental capabilities or lack of experience and knowledge
if they have been given supervision or instruction concerning use of the appliance in
a safe way and understand the hazards involved
12° -children shall not play with the appliance
13° -cleaning and user maintenance shall not be made by children without supervision
14° -do not allow children to play with fixed controls. Keep remote controls away from
children
15° -Fixed command devices should be installed in a well visible way.
16° -Before carrying out any installation, regulation or maintenance operation of the
system, take off the voltage by operating on the special magneto thermic switch
connected upstream.
17° -At the end of the installation, the installer will have to make sure that the parts of the
door do not encumber streets or public sidewalks.
WICHTIGE SICHERHEITS ANLEITUNGEN FÜR DIE INSTALLATIONEN
WARNUNG - UNSACHGEMÄSSE INSTALLATION KANN ZU SCHWEREN VERLETZUNGEN
ALLE INSTALLATIONSANLEITUNGEN BEFOLGEN
1° - Diese Betriebsanleitung dient ausschließlich dem Fachpersonal, welche die
Konstruktionskriterien und die Sicherheits-Vorschriften gegen Unfälle für Tore, Türen
und automatische Tore kennt (geltende Normen und Gesetze beachten und befolgen).
2° - Der Monteur muss dem Endkunde eine Betriebsanleitung in Übereinkunft der EN12635
überreichen.
3° - Vor der Installierung muss für die automatische Schließung und zur Sicherheitsgewährung
der identifizierten kritischen Punkte, eine Risiko Analyse vorgenommen werden mit der
entsprechenden Behebung der identifizierten, gefährlichen Punkte. (die Normen EN
12453/EN 12445 befolgend).
4° -Vor den Bewegungsmotor zu installieren, ist es nötig die mechanischen Zustande von
der Gittertür (Öffnung, Schluss, u.s.w.) zu prüfen.
5° -Das Element für den manuellen Schiebebetrieb muss bei einer geringeren Höhe von
1,80 Metern installiert sein.
6° -Der Installateur muss mögliche Verhinderungen an der Gittertürbewegung (wie z.B.
Riegeln, Schlossen u.s.w.) abnehmen.
7° -Der Installateur muss ständige Etiketten, gegen die Zerdrücken Gefahr, auf einen sehr
sichtbaren Punkt oder in der nähe von stationären Steuerungen anbringen.
8° -Die Verkabelung der verschiedenen externen elektrischen Komponenten zum Operator
(z.B. Fotozellen, Blinker etc.) muss nach EN 60204-1 ausgeführt werden, Änderungen
davon nach Punkt 5.2.2 der EN 12453.
9° -Die eventuelle Montage einer Schalttafel für den manuellen Bewegungsbefehl muss so
angebracht werden, dass der Benutzer sich nicht in einer Gefahrenzone befindet, und
dass, das Risiko einer zufälligen nicht gewollten Aktivierung von Schaltern gering ist.
10° - Alle Steuerungselemente (Schalttafel, Fernbedienung etc.) gehören nicht in Reichweite
von Kindern. Das Schalten Element (einen Schalter dass manuell geschlossen
ist) muss sichtbar aus dem angetriebenen Teil sein, und muss entfernt aus dem
beweglichen Teil sein. Dies Element muss bei einer Höhe von wenigsten 1,50 Metern
installiert sein.
11° - Die Nutzung von diesem Gerät ist erlaubt an Kinder ab 8 Jahre alte. Es ist nötig die
Personen mit physischen und Intellekt Handikapen, auf die möglichen Gefahren zu
warnen.
12° -Die Kinder muss mit diesem Gerät nicht spielen.
13° -Die Kinder muss die Reinigung und die Wartung von diesem Gerät, ohne Aufsicht,
nicht machen.
14° -Die Kinder muss mit den Steuerungen und mit den Fernsteuerungen nicht spielen.
15° -Die fixe Steuerungen muss sichtbare nach der Installation sein.
16° -Vor jeglichem Eingriff, sei es Installation, Regulation oder Wartung der Anlage, muss
vorher die Stromzufuhr unterbrochen werden, den dafür bestimmten MagnetthermoSchalter drücken, der am Eingang der Anlage installiert ist.
17° -Nach der Installation ist es nötig zu prüfen dass Teile von der Gittertür keinen
Hindernis auf Straße oder Bürgersteige verursachen.
DIE FIRMA RIB ÜBERNIMMT KEINE VERANTWORTUNG für eventuelle Schäden,
die entstehen können, wenn die Installierungsvorschriften die den gültigen
Sicherheitsnormen entsprechen, nicht eingehalten werden.
THE RIB COMPANY DOES NOT ACCEPT ANY RESPONSIBILITY for possible damages
caused by the non observance during the installation of the safety standards and of
the laws in force at present.
3
E
S
IMPORTANTES INSTRUCCIONES DE SEGURIDAD
PARA LA INSTALACIÓN
ATENCIÓN PARA LA SEGURIDAD DE LAS PERSONAS ES IMPORTANTE QUE SE
OBSERVEN TODAS LAS INSTRUCCIONES
CONSERVAR CUIDADOSAMENTE ESTAS INSTRUCCIONES
1° -En el caso de que no sea previsto en la central eléctrica, instalar antes de la misma,
un interruptor de tipo magnetotérmico (omnipolar con una apertura mínima de los
contactos de 3 mm) que dé un sello de conformidad con las normas internacionales.
Este dispositivo tiene que estar protegido contro cierres accidentales (por ejemplo
instalándolo dentro de un panel cerrado a llave).
2° -Para la sección y el tipo de los cables, RIB aconseja utilizar cables de tipo H05RN-F con
sección mínima de 1,5 mm2 e igualmente atenerse a la norma IEC 364 y a las normas
de instalación del propio país.
3° -Posicionamiento eventual de un par de fotocélulas. El rayo de las fotocélulas no debe
estar a más de 70 cm de altura desde el suelo y a una distancia de la superficie de
movimiento de la puerta, no superior a 20 cm. El correcto funcionamiento tiene que ser
controlado al final de la instalación de acuerdo con el punto 7.2.1 de la EN 12445.
4° -Para lograr satisfascer los límites impuestos por la EN 12453, si la fuerza de punta
supera el límite normativo de 400 N, es necesario recurrir al control de presencia activa
en toda la altura de la puerta (hasta a 2,5m max). - Las fotocélulas en este caso se
deben colocar como indicado en la EN 12445 punto 7.3.2.2.
PS.: Es obligatorio la puesta a tierra del sistema.
Los datos descritos en el presente manual son sólamente indicativos.
RIB se reserva de modificarlos en cualquier momento.
Realizar el sistema respetando las normas y las leyes vigentes.
IMPORTANTES INSTRUCCIONES DE SEGURIDAD PARA LA INSTALACIÓN
CUIDADO: UNA INCORRECTA INSTALACIÓN PUEDE CAUSAR GRAVES DAÑOS
SEGUIR TODAS LAS INSTRUCCIONES DE INSTALACIÓN
Este manual de instrucciones está exclusivamente dirigido a personal
1° - especializado que conozca los criterios de construcción y de los dispositivos de
protección contra accidentes con cancelas, puertas y portales motorizados (atenerse a
las normas y a las leyes vigentes).
2° - El instalador tendrá que dar al utilizador final un manual de instrucciones de acuerdo
con la 12635.
3° - El instalador antes de proceder con la instalación tiene que hacer un analisis de
los riesgos del cierre automatizado final y la puesta en seguridad de los puntos
identificados como peligrosos (siguiendo las normas EN 12453 / EN 12445).
4° - El instalador antes de instalar el motor de desplazamiento tiene que controlar que la
cancela esté en buenas condiciones mecánicas y que se abra y se cierre en forma
adecuada.
5° - El instalador tendrá que instalar el órgano para el desenganche manual a una altura
inferior a 1,8 m.
6° - El instalador tendrá que quitar eventuales impedimentos para el movimiento motorizado
de la cancela (ej. pistillos, cerraduras, cerrojos, etc.).
7° - El instalador tendrá que colocar de modo permanente rótulos que adviertan de la
posibildad de aplastamiento, en un punto bastante visible o en las cercanías de
eventuales mandos fijos.
8° - El cablaje de los varios componentes eléctricos externos al operador (por ejemplo
fotocélulas, los intermitentes, etc) tiene que ser efectuado según la EN 60204-1 y a
las modificas sucesivas aportadas por el punto 5.2.2 della EN 12453.
9° - El eventual montaje de un panel de mandos para la gestión del movimiento manual
tiene que ser efectuado posicionando el panel en modo de que quien lo accione no se
encuentre en una posición peligrosa; además se tiene que hacer en modo que sea
mínimo el riesgo de accionamiento accidental de los pulsadores.
10° - Tener los mandos del automatismo (panel de mandos, mando a distancia, etc.) lejos
del alcance de los niños. El òrgano de maniobra (un interruptor cerrado manualmente)
tiene que estar en una posiciòn visible desde la parte de maniobra, pero lejana de
las piezas en movimiento. Tiene que ser instalado en una altura mìn. de 1,5 metros.
11° - Esta unidad puede ser utilizado por niños de 8 años o más y las personas con
capacidades físicas, sensoriales o mentales reducidas, o falta de experiencia y
conocimientos que hayan recibido supervisión o instrucciones relativas al uso de
‘equipo de manera segura y comprender los riesgos que implica.
12° - Los niños no deben jugar con el aparato.
13° - Limpieza y mantenimiento de usuarios no tiene que ser hecho por los niños sin
supervisión.
14° - No permita que los niños jueguen con los controles fijos. Mantenga los controles
remotos alejados de los niños.
15° - Los mecanismos de mando fijos tienen que ser instalados de manera visible.
16° - Antes de ejecutar cualquier operación de instalación, ajuste o mantenimiento del
sistema, quitar la corriente accionando el respectivo interruptor magnetotérmico
conectado antes del mismo.
17° - Al final de la instalación, el instalador tendrá que asegurarse de que las partes de la
puerta no estorben calles o aceras públicas.
LA EMPRESA RIB NO SE RESPONSABILIZA por eventuales daños provocados por la
falta de respeto de las normas de seguridad, durante la instalación y de las leyes
actualmente vigentes.
4
I
LAYOUT IMPIANTO
1 - Operatore K
2 - Fotocellule esterne
3 - Cremagliera Modulo 4
4 - Selettore a chiave
5 - Antenna radio
6 - Lampeggiatore
7 - Limitatori di corsa (camme)
8 - Costa meccanica
9 - Costa meccanica
10 - Fotocellule interne
11 - Colonnine per fotocellule
12 - Fermi meccanici
1
CARATTERISTICHE
TECNICHE
CARATTERISTICHE TECNICHE
Operatori irreversibili per cancelli scorrevoli aventi un peso massimo di 800
kg.
L’irreversibilità di questo operatore fa si che il cancello non richieda alcun tipo di
serratura elettrica per un’efficace chiusura.
K800 24V
Peso max cancello
kg
Velocità di traino
m/s
0,1÷0,2
N
550 (con quadro elettronico)
Coppia max
Nm
18,5 (con quadro elettronico)
Cremagliera modulo
M
4
Forza di spinta max
800
230V~ 50Hz
Alimentazione e frequenza
Potenza assorbita dalla linea
W
207 (con quadro elettronico)
Assorbimento
A
0,9 (con quadro elettronico)
Cicli normativi
n°
40 - 38s/2s
Cicli consigliati al giorno
n°
300
Servizio
%
100
Cicli consecutivi garantiti
n°
Lubrificazione a grasso
60-10m
COMLUBE LHITGREASE EP/GR.2
Peso max
kg
13
Rumorosità
db
<70
Temperatura di lavoro
°C
-10 ÷ +55
Grado di protezione
IP
44
Misure in mm
5
I
INSTALLAZIONE K800 24V
CONTROLLO PRE-INSTALLAZIONE
- IL CANCELLO DEVE MUOVERSI SENZA ATTRITI N.B. È obbligatorio uniformare le caratteristiche del cancello alle norme e leggi vigenti.
Il cancello può essere automatizzato solo se in buono stato e se rispondente alla norma
EN 12604.
-
L’anta non deve presentare porte pedonali. In caso contrario occorrerà prendere
opportune precauzioni in accordo al punto 5.4.1 della EN12453 (ad esempio impedire
il movimento del motore quando il portoncino è aperto, grazie ad un microinterruttore
opportunamente collegato in centralina).
- Non bisogna generare punti di intrappolamento (ad esempio tra anta aperta del cancello
e cancellata).
- Oltre ai finecorsa presenti nell’unità, è necessario che a ciascuna delle due posizioni
estreme della corsa sia presente un fermo meccanico fisso che arresti il cancello nel
caso di malfunzionamento dei finecorsa. A tal fine il fermo meccanico deve essere
dimensionato per sopportare la spinta statica del motore più l’energia cinetica del
cancello (12) (2).
- Le colonne del cancello devono avere superiormente delle guide antideragliamento (3)
per evitare involontari sganciamenti.
N.B.: Eliminare fermi meccanici del tipo descritto in figura 3.
Non devono essere presenti fermi meccanici al di sopra del cancello perché non sono
sufficientemente sicuri.
2
Componenti da installare secondo la norma EN12453
USO DELLA CHIUSURA
TIPO DI COMANDO
Persone esperte
(fuori da area
pubblica*)
Persone esperte
(area pubblica)
Uso illimitato
a uomo presente
A
B
non possibile
a impulsi in vista
(es. sensore)
CoE
CoE
C e D, o E
a impulsi non in vista
(es. telecomando)
CoE
C e D, o E
C e D, o E
C e D, o E
C e D, o E
C e D, o E
automatico
* esempio tipico sono le chiusure che non accedono a pubblica via
A: Pulsante di comando a uomo presente (cioè ad azione mantenuta), come cod.
ACG2013
B: Selettore a chiave a uomo presente, come cod. ACG1010
C: Regolazione della forza del motore
D: Coste e/o altri dispositivi di limitazione delle forze entro i limiti della norma EN12453
- Appendice A.
E: Fotocellule, es. cod. ACG8026 (da applicare ogni 60÷70 cm per tutta l’altezza della
colonna del cancello fino ad un massimo di 2,5 m - EN 12445 punto 7.3.2.1)
3
SBLOCCO
Da effettuare dopo aver tolto l’alimentazione elettrica al motore.
Per poter agire manualmente sul cancello è sufficiente inserire l’apposita chiave e ruotarla
3 volte in senso antiorario (4).
Per poter eseguire in modo sicuro la movimentazione manuale dell’anta occorre verificare
che:
- sull’anta siano presenti maniglie idonee;
- tali maniglie siano posizionate in modo da non creare punti di pericolo durante il loro
utilizzo;
- lo sforzo manuale per muovere l’anta non superi i 225N per i cancelli posti su siti privati
ed i 390N per i cancelli posti su siti commerciali ed industriali (valori indicati nel punto
5.3.5 della norma EN 12453).
4
6
I
FISSAGGIO MOTORE E CREMAGLIERA
La cremagliera deve essere fissata a una certa altezza rispetto all’appoggio del motore.
Questa altezza può essere variata grazie a delle asole presenti sulla cremagliera.
La registrazione in altezza viene fatta affinché il cancello, durante il movimento, non si
appoggi sull’ingranaggio di trazione del K (5 e 6).
Per fissare la cremagliera sul cancello eseguire dei fori di Ø 5 mm e filettarli utilizzando
un maschio del tipo M6.
L’ingranaggio di traino deve avere circa 1 mm di agio rispetto alla cremagliera.
Misure in mm
5
Misure in mm
6
FISSAGGIO FINECORSA
Per determinare la corsa della parte mobile si devono posizionare due camme
alle estremità della cremagliera (7).
La regolazione della corsa di apertura e chiusura, si ottiene spostando le medesime sui
denti della cremagliera.
Per bloccare le camme alla cremagliera avvitare a fondo le viti in dotazione.
N.B: Oltre alle camme di fermo elettrico sopraesposte è obbligatoria l’installazione di
fermi meccanici robusti che non permettono la fuori uscita del cancello dalle guide
superiori.
7
MANUTENZIONE
Da effettuare solamente da parte di personale specializzato dopo aver tolto
l’alimentazione elettrica al motore.
Pulire periodicamente, a cancello fermo, la guida di scorrimento da sassi e altra sporcizia.
7
I
COLLEGAMENTI ELETTRICI
K 24V cod. AC08006
FINECORSA DI
APERTURA
E CHIUSURA
SICUREZZA
DI SBLOCCO
MANUALE
M
ANTENNA
433 MHz
ALIMENTAZIONE
230Vac 50Hz
FUSIBILE
T 1,6A
x K800
TRASFORMATORE
SCHERMATURA CAVO D’ANTENNA
COMUNE
24Vac
STOP
FOTOCELLULE
COSTOLA
PEDONALE
CHIUDE
0
10Vac
APRE
COMANDO SINGOLO
BATTERIE DI BACKUP
PER SCHEDA DI RICARICA
BATTERIE (OPZIONALE)
OROLOGIO
A+TEST / AAUTOTEST SICUREZZE
O RISPARMIO
ENERGETICO CON
FUNZIONAMENTO
A BATTERIE
24Vdc 0,4A ±15%
24Vdc 0,4A ±15%
24Vdc 20W
24Vdc 10W
8
I
A - CONNESSIONI
ALIMENTAZIONE RETE ESTERNA ALLA SCHEDA 230 Vac
50/60 Hz (120 Vac 60 Hz a richiesta)
> FASE
F
N
> NEUTRO
F1 > TERRA
T1,6A F USIBILE
SUL
MORSETTO
ALIMENTAZIONE GENERALE
Trimmer TCA
J10
Trimmer RUN
J9
J8
J7
J12
J6
DI
Collegamento e
fissaggio del cavo di
alimentazione.
J5
J11
J4
J1
J2
J1
A-
COMUNE ALIMENTAZIONI ACCESSORI E AUTOTEST COSTA
A+
POSITIVO PER ALIMENTAZIONE ACCESSORI 24Vdc
A+ TEST
+
SIGNAL
J2-J3
J3
J9
MOTOR
CONNETTORE PER MOTORE 24Vdc ED ENCODER 5VDC (NON
UTILIZZARE)
POSITIVO PER ALIMENTAZIONE AUTOTEST COSTA A 24Vdc
J10
X K800
CONNETTORI PER COLLEGAMENTO MOTORE K800
NEGATIVO LAMPEGGIATORE 24Vdc 20W
J11
COM
COMUNE DEI CONTATTI (GND)
POSITIVO LAMPEGGIATORE 24Vdc 20W
STOP
CONTATTO IMPULSO DI STOP (NC)
PHOT
CONTATTO FOTOCELLULE (NC)
SPIA CANCELLO APERTO 24Vdc MAX 10 W
EDGE
CONTATTO COSTA (NC)
PED
CONTATTO IMPULSO DI APERTURA PEDONALE (NO)
BATTERY CONNETTORI PER SCHEDA DI RICARICA BATTERIE (COD. ACG4664
CHARGER OPZIONALE)
CLOSE
CONTATTO IMPULSO DI CHIUSURA (NO)
J4
10V
CONNETTORI PER SECONDARIO TRASFORMATORE A 10 VAC
OPEN
CONTATTO IMPULSO DI APERTURA (NO)
J5
BAT
CONNETTORI PER BATTERIE (OPZIONALI)
KBUT
CONTATTO IMPULSO SINGOLO (NO)
J6
24V
CONNETTORI PER SECONDARIO TRASFORMATORE A 24 VAC
B.I.O.
CONTATTO (NO) DEDICATO AD UN OROLOGIO
J7
J8
J12
SECURITY CONNETTORE PER MICROINTERRUTTORE SBLOCCO MANUALE
LOCK
LIMIT
SWITCH
ANTENNA MORSETTI DEDICATI AL COLLEGAMENTO DI UN ANTENNA 433,92
MHz
CONNETTORE PER FINECORSA ELETTRICI O MAGNETICI
B – SETTAGGI
DIP 8
ON - richiusura immediata dopo transito fotocellule attiva
OFF - richiusura immediata dopo transito fotocellule non attiva
DIP 9
ON - modalità funziona sempre anche con radiocomando
OFF - modalità funziona sempre solo con pulsanti di comando
DIP 10
ON - autotest costa attivo
OFF - autotest costa non attivo
DIP 11
ON - prelampeggio attivo
OFF - prelampeggio non attivo
DIP 12
ON - a disposizione
OFF - a disposizione
DIP 13
ON - funzionalità dedicata a motoriduttore K800 (obbligatorio)
OFF - funzionalità dedicata a motoriduttore K400
DIP 14
ON - abilitazione sistema radio SUN/MOON
OFF - abilitazione sistema radio SUN-PRO
DIP 1 regolazione corsa con finecorsa elettrici o magnetici
(punto C)
DIP 2 programmazione apertura totale (punto D)
DIP 2-1 programmazione tempi apertura pedonale (punto E)
DIP 1-2 memorizzazione/cancellazione codici radio per comando apertura totale (punto
F)
DIP 1-3 memorizzazione/cancellazione codici radio per comando apertura pedonale
(punto G)
MICROINTERRUTTORI DI GESTIONE
DIP 3
ON - partenza graduale attiva
OFF - partenza graduale non attiva
DIP 4
ON - fotocellule attive solo in chiusura
OFF - fotocellule sempre attive
DIP 5
ON - riscaldatore attivo
OFF - riscadatore non attivo
DIP 6
ON - comando radio, pulsante k butt e pedonale in modalità automatica
OFF - comando radio, pulsante k butt e pedonale in modalità passo passo
DIP 7
ON - sensore di corrente attivo
OFF - sensore di corrente non attivo
PROG. > TASTINO PER LA PROGRAMMAZIONE.
MEMORY >MEMORIA ESTRAIBILE CHE CONTIENE I DATI FUNZIONALI ED I CODICI
RADIO.
9
I
SW
> CONNETTORE PER AGGIORNAMENTO SOFTWARE.
RESERVED > CONNETTORE RISERVATO A CONTROLLI IN FABBRICA.
RUN > TRIMMER PER LA REGOLAZIONE DELLA VELOCITÀ DEL MOTORE.
Con questo trimmer è possibile regolare la velocità del motore (di default viene settato a
metà della velocità). La regolazione ha grande utilità per rendere l’automazione conforme
alle norme europee in materia di impatti.
Per cancelli con peso da 0 ÷ 200 kg si consiglia RUN da 1/2 a MAX.
Per cancelli con peso da 200 ÷ 400 kg si consiglia RUN da MIN a 1/2.
Nota: la movimentazione rallentata non è regolabile in quanto calcolata automaticamente.
TCA > TRIMMER DI CHIUSURA AUTOMATICA TOTALE O PEDONALE
Di default non abilitato e led DL3 spento (trimmer ruotato completamente in senso antiorario).
Con questo trimmer è possibile eseguire la regolazione del tempo prima di avere la chiusura
automatica totale o pedonale.
La chiusura automatica totale o pedonale si ottiene solo con porta completamente (totale)
o parzialmente (pedonale) aperta e led DL3 acceso (con trimmer ruotato in senso orario).
Il tempo di pausa può essere regolato da un minimo di 2 secondi ad un massimo di 2 minuti.
Buzzer
Fusibili
F2
F3 E – PROGRAMMAZIONE APERTURA PEDONALE *
1 - Mettere prima il DIP 2 su ON e poi il DIP 1 su ON. Il led DL1 inizia a lampeggiare.
2 - Premere il pulsante pedonale (COM-PED) o il tasto del telecomando dedicato all’apertura
pedonale (se programmato in precedenza) => Il cancello apre.
3 - Premere il pulsante pedonale per fermare il cancello (la corsa di apertura pedonale del
cancello è ora impostata). Dopo 2 secondi il cancello si richiude.
4 - A fine programmazione pedonale rimettere i DIP 1 e 2 su OFF.
* Durante la programmazione le sicurezze sono attive ed il loro intervento ferma la
programmazione (il led DL1 da lampeggiante rimane acceso fisso).
Per ripetere la programmazione posizionare il DIP 1 e 2 su OFF, chiudere il cancello
utilizzando la procedura “REGOLAZIONE CORSA CON FINECORSA ELETTRICI O
MAGNETICI”, ripetere la programmazione sopra descritta.
PARTENZA GRADUALE
Se DIP 3 è su ON, si abilita ad ogni avvio un movimento graduale per 1 secondo.
SEGNALAZIONI LED
DL1 segnalazione programmazione attivata DL2 segnalazione tempo chiusura automatica
DL3 DL4
segnalazione microinterruttore di sblocco manuale
segnalazione cancello in chiusura DL5 DL6
segnalazione cancello in apertura DL7 segnalazione finecorsa di chiusura
segnalazione finecorsa di apertura
DL8 DL9 segnalazione presenza tensione microcontrollore 3,3V
DL10 segnalazione programmazione codici radio DL11
segnalazione programmatore collegato
DL12 segnalazione contatto di stop
segnalazione contatto fotocellule
DL13
DL14 segnalazione contatto costa
PER ESEGUIRE LA CORRETTA PROGRAMMAZIONE SI DEVE
1 - IMPORTANTE: POSIZIONARE IL CANCELLO A CIRCA 20 CM DA FINECORSA DI
CHIUSURA.
2 - Mettete il DIP 2 in posizione ON => il led DL1 inizia a lampeggiare.
3 - Premete il pulsante PROG o il tasto del telecomando dedicato all’apertura totale (se
programmato in precedenza). Il cancello si aprirà e chiuderà 3 volte. NON PASSATE
DAVANTI ALLE FOTOCELLULE MENTRE IL CANCELLO È IN MOVIMENTO.
4 - La programmazione ha termine quando il cancello resta chiuso ed il led DL1 è spento.
5 - Rimettere il DIP 2 su OFF.
N.B.: Se al termine della programmazione muovete il trimmer RUN, allora dovete
ripeterla.
Nota: il punto di inizio rallentamento viene determinato automaticamente dalla centralina in
fase di programmazione tempi e viene attivato 50÷60 cm prima del raggiungimento
del finecorsa di apertura o chiusura.
Per ripetere la programmazione posizionare il DIP 2 su OFF, chiudere il cancello
fermandosi a 20 cm dalla totale chiusura utilizzando la procedura “REGOLAZIONE
CORSA CON FINECORSA ELETTRICI O MAGNETICI”, ripetere la programmazione sopra
descritta.
(rosso)
(rosso)
(rosso)
(rosso)
(verde)
(rosso)
(verde)
(giallo)
(bicolore)
(rosso)
(rosso)
(rosso)
(rosso)
F - PROGRAMMAZIONE CODICI RADIO APERTURA TOTALE (MAX 1000
CODICI)
> segnala svariate funzionalità, si veda tabella segnalazioni visive e sonore.
T 300 mA fusibile di protezione logica funzionale
T 10 A
fusibile di protezione motore
C – REGOLAZIONE CORSA CON FINECORSA ELETTRICI O MAGNETICI
Questo controllo ha il compito di agevolare l’installatore durante la messa in opera
dell’impianto o per eventuali controlli successivi.
1 - Sbloccare l’operatore utilizzando lo sblocco manuale e posizionare le camme di finecorsa
sulla cremagliera così da definire la corsa del cancello.
2 - Portare il cancello a metà corsa e bloccare l’operatore.
3 - Mettere il DIP 1 in posizione ON => il led DL1 inizia a lampeggiare.
4 - Premere e mantenere premuto il pulsantino PROG (il comando è ad uomo presente,
apre-stop-chiude-stop-apre-etc...) => Il cancello parte in alta velocità per poi rallentare
fino al raggiungimento del finecorsa. Verificare che il cancello si fermi nella posizione
desiderata. Se così non fosse, spostare la camme di finecorsa e riprovare. Verificare
anche il finecorsa dalla parte opposta.
5 - È possibile regolare l’alta velocità durante i primi 5 secondi di funzionamento agendo sul
trimmer RUN. Ruotando il trimmer RUN in senso orario, la velocità aumenta. Il trimmer
RUN viene impostato di default a metà corsa.
6 - Al termine rimettere DIP 1 in posizione OFF. Il led DL1 si spegne segnalando l’uscita
dal controllo.
N.B.: Durante questo controllo il pulsante di stop, le coste e le fotocellule non sono
attive.
D – PROGRAMMAZIONE APERTURA TOTALE*
Attenzione: Se gli ingressi STOP, PHOT e EDGE non sono collegati, eseguire dei
ponticelli tra COM-STOP, COM-PHOT e COM-EDGE prima di procedere
con la programmazione.
ATTENZIONE: prima di memorizzare i telecomandi utilizzate il DIP 14 per scegliere
quali telecomandi utilizzare:
DIP 14 su OFF (default): si possono memorizzare telecomandi a codice variabile SUN-PRO:
cod. ACG6210
SUN-PRO 2CH bicanale - tasti rossi e led bianco SUN-PRO 4CH quadricanale - tasti rossi e led bianco cod. ACG6214
SUN-PROX 2CH bicanale - tasti rossi e led giallo cod. ACG6220
cod. ACG6224
SUN-PROX 4CH quadricanale - tasti rossi e led giallo DIP 14 su ON: si possono memorizzare telecomandi a codice fisso SUN e MOON:
SUN 2CH bicanale - tasti blu e led bianco cod. ACG6052
SUN 4CH quadricanale - tasti blu e led bianco cod. ACG6054
SUN CLONE 2CH bicanale - tasti blu e led giallo cod. ACG6056
SUN CLONE 4CH quadricanale - tasti blu e led giallo cod. ACG6058
MOON 2CH bicanale - tasti neri e led giallo
cod. ACG6081
MOON 4CH quadricanale- tasti neri e led giallo cod. ACG6082
ATTENZIONE: non è possibile memorizzare contemporaneamente telecomandi con
codice fisso e telecomandi con codice variabile.
La programmazione dei telecomandi può essere eseguita solo a cancello fermo.
1 - Posizionare prima il DIP 1 su ON e poi il DIP 2 su ON. Il led bicolore DL10 di
programmazione lampeggia rosso per 10 secondi.
2 - Entro questi 10 secondi premere il pulsante del telecomando (normalmente il canale
A). Se il telecomando viene correttamente memorizzato il led bicolore DL10 si accende
verde ed un tono di buzzer conferma la corretta memorizzazione. I 10 secondi per la
programmazione dei codici si rinnovano automaticamente con led bicolore DL10 che
lampeggia rosso per poter memorizzare il telecomando successivo.
3 - Per terminare la programmazione lasciare trascorrere 10 sec., oppure premere per un
attimo il pulsante PROG. Il led bicolore DL10 di programmazione smette di lampeggiare.
4 - Riposizionare DIP 1 su OFF e DIP 2 su OFF.
5 - Fine procedura.
CANCELLAZIONE DI TUTTI I CODICI RADIO DEDICATI ALL’APERTURA TOTALE
La cancellazione può essere eseguita solo a cancello fermo.
1 - Posizionare il DIP 1 su ON e successivamente il DIP 2 su ON.
2 - Il led bicolore DL10 di programmazione lampeggia rosso per 10 secondi.
3 - Entro questi 10 secondi premere e mantenere premuto il pulsante PROG per 5 secondi.
La cancellazione della memoria viene segnalata da due lampeggi di color verde del
10
I
led bicolore DL10 e da 2 toni del buzzer a conferma dell’avvenuta cancellazione.
Successivamente il led bicolore DL10 di programmazione lampeggia rosso per 10
secondi ed è possibile inserire nuovi codici come da procedure sopra descritte.
4 - Riposizionare DIP 1 su OFF e DIP 2 su OFF.
5 - Fine procedura.
SEGNALAZIONE MEMORIA SATURA CODICI RADIO
La segnalazione si può ottenere solo a cancello fermo.
1 - Posizionare prima il DIP 1 su ON e poi il DIP 2 su ON.
2 - Il led bicolore DL10 lampeggia per 6 volte verde segnalando memoria satura (1000 codici
presenti). Successivamente il led bicolore DL10 di programmazione lampeggia rosso per
10 secondi consentendo un eventuale cancellazione totale dei codici.
4 - Riposizionare DIP 1 su OFF e DIP 2 su OFF.
5 - Fine procedura.
G - PROGRAMMAZIONE CODICI RADIO APERTURA PEDONALE (MAX
1000 CODICI)
La programmazione può essere eseguita solo a cancello fermo.
1 - Posizionare prima il DIP 1 su ON e poi il DIP 3 su ON. Il led bicolore DL10 di
programmazione lampeggia verde per 10 secondi.
2 - Premere il pulsante del telecomando (normalmente il canale B) entro i 10 secondi
impostati. Se il telecomando viene correttamente memorizzato il led bicolore DL10 si
accende rosso per un attimo, ed un tono di buzzer conferma la corretta memorizzazione.
I 10 secondi per la programmazione dei codici si rinnovano automaticamente con led
bicolore DL10 che lampeggia verde per poter memorizzare il telecomando successivo.
3 - Per terminare la programmazione lasciare trascorrere 10 sec., oppure premere per un
attimo il pulsante PROG. Il led bicolore DL10 di programmazione smette di lampeggiare.
4 - Riposizionare DIP 1 su OFF e DIP 3 su OFF.
5 - Fine procedura.
CANCELLAZIONE DI TUTTI I CODICI RADIO DEDICATI ALL’APERTURA PEDONALE
La cancellazione può essere eseguita solo a cancello fermo.
1 - Posizionare prima il DIP 1 su ON e poi il DIP 3 su ON. Il led bicolore DL10 di
programmazione lampeggia verde per 10 secondi.
2 - Entro questi 10 secondi premere e mantenere premuto il pulsante PROG per 5 secondi.
La cancellazione della memoria viene segnalata da due lampeggi di color rosso del led
bicolore DL10 e da 2 toni di buzzer a conferma dell’avvenuta cancellazione.
3-
Successivamente il led bicolore DL10 di programmazione rimane attivo verde
lampeggiante per 10 secondi ed è possibile inserire nuovi codici come da procedure
sopra descritte.
4 - Riposizionare DIP 1 su OFF e DIP 3 su OFF.
5 - Fine procedura.
SEGNALAZIONE MEMORIA SATURA CODICI RADIO
La segnalazione si può ottenere solo a cancello fermo.
1 - Posizionare prima il DIP 1 su ON e poi il DIP 3 su ON.
2 - Il led bicolore DL10 lampeggia 6 volte verde segnalando che la memoria è satura (1000
codici presenti). Successivamente il led bicolore DL10 di programmazione rimane attivo
rosso lampeggiante per 10 secondi, consentendo un eventuale cancellazione totale dei
codici.
3 - Riposizionare DIP 1 su OFF e DIP 3 su OFF.
4 - Fine procedura.
FUNZIONAMENTO ACCESSORI DI COMANDO
PULSANTE DI APERTURA (COM-OPEN)
A cancello fermo il pulsante comanda il movimento di apertura. Se viene premuto durante la
chiusura fa riaprire il cancello.
PULSANTE DI CHIUSURA (COM-CLOSE)
A cancello fermo comanda il movimento di chiusura.
PULSANTE DI COMANDO SINGOLO (COM-K BUT)
Se DIP 6 su OFF => esegue una sequenza dei comandi apre-stop-chiude-stop-apre ecc.
Se DIP 6 su ON => esegue l’apertura a cancello chiuso. Se azionato durante il movimento
di apertura non ha effetto. Se azionato a cancello aperto lo chiude. Se
azionato durante la chiusura lo fa riaprire.
TELECOMANDO SIA PER APERTURA TOTALE CHE PEDONALE
Se DIP 6 su OFF => esegue un comando ciclico dei comandi apre-stop-chiude-stop-apre
ecc.
Se DIP 6 su ON => esegue l’apertura a cancello chiuso. Se azionato durante il movimento
di apertura non ha effetto. Se azionato a cancello aperto lo chiude. Se
azionato durante la chiusura lo fa riaprire.
FUNZIONE OROLOGIO - COMANDO B.I.O. (COM-B.I.O.)
La funzione orologio è utile nelle ore di punta, quando il traffico veicolare risulta rallentato (es.
Entrata/uscita operai, emergenze in zone residenziali, parcheggi, ecc.).
MODALITÁ DI APPLICAZIONE FUNZIONE OROLOGIO
Collegando un’interruttore e/o un orologio di tipo giornaliero/settimanale ai morsetti “COMB.I.O.”, è possibile aprire e mantenere aperto il cancello finché l’interruttore o l’orologio
rimane attivo.
Ad automazione aperta vengono inibite tutte le funzioni di comando.
Al rilascio dell’interruttore, o allo scadere dell’ora impostata, si avrà la chiusura immediata
dell’automazione.
PULSANTE APERTURA PEDONALE (COM-PED.BUT)
Comando dedicato ad un’apertura parziale e alla sua richiusura.
Durante l’apertura, la pausa o la chiusura da comando pedonale, è possibile comandare
l’apertura totale utilizzando qualsiasi comando collegato sulla scheda.
Tramite DIP 6 è possibile scegliere la modalità di funzionamento del pulsante di comando
pedonale.
Se DIP 6 su OFF => esegue un comando ciclico dei comandi apre-stop-chiude-stop ecc.
Se DIP 6 su ON => esegue l’apertura a cancello chiuso. Se azionato durante il movimento
di apertura non ha effetto. Se azionato a cancello aperto pedonale lo
chiude. Se azionato durante la chiusura lo fa riaprire.
TRIMMER DI CHIUSURA AUTOMATICA (TCA) TOTALE O PEDONALE di default non
abilitato e led DL3 spento (trimmer ruotato completamente in senso antiorario)
Con questo trimmer è possibile eseguire la regolazione del tempo prima di avere la chiusura
automatica totale o pedonale.
La chiusura automatica si ottiene solo con porta aperta utlizzando i comandi di apertura
totale o pedonale e led DL3 acceso (trimmer ruotato in senso orario per abilitare la funzione).
Dopo aver eseguito l’apertura totale il tempo di pausa può essere regolato da un minimo di
2 secondi ad un massimo di 2 minuti.
Dopo aver eseguito l’apertura pedonale il tempo di pausa varia da un minimo di 2 secondi
ad un massimo di 30 secondi. In base alla posizione del trimmer TCA si avranno dei tempi
proporzionali.
esempio: Con trimmer TCA a metà corsa si avrà 1 minuto di pausa dopo l’apertura totale e
15 secondi di pausa dopo l’apertura pedonale.
SBLOCCO MANUALE (LED DL4)
Sbloccando l’operatore il contatto del microinterruttore di sicurezza J7 si apre (il led DL4 si
spegne) ed i comandi non funzionano.
Dopo aver ribloccato l’operatore ed aver dato un comando, il primo movimento
avverrà a velocità lenta. Solo dopo aver completato questo primo movimento,
l’operatore riprenderà a lavorare alla velocità impostata.
FUNZIONAMENTO DOPO BLACK-OUT
Al momento del black-out lo stato del cancello viene salvato in memoria.
Al ritorno della tensione di rete:
Se il cancello si trova sul finecorsa di apertura o di chiusura, ad un comando il cancello
si chiuderà o aprirà con i dati memorizzati.
Se il cancello si trova in posizione intermedia, dando un comando il cancello si aprirà
lentamente fino a raggiungere il finecorsa di apertura. Dopo aver completato questo primo
movimento, l’operatore riprenderà a lavorare alla velocità impostata.
FUNZIONAMENTO ACCESSORI DI SICUREZZA
FOTOCELLULA (COM-PHOT)
Con fotocellula attivata il buzzer emette 1 tono.
DIP 4 OFF => a cancello chiuso, se un ostacolo interrompe il raggio delle fotocellule, il
cancello non apre. Durante il funzionamento le fotocellule intervengono sia in
apertura (con ripristino del moto in apertura solo dopo aver liberato il raggio
delle fotocellule), che in chiusura (con ripristino del moto inverso solo dopo
aver liberato il raggio delle fotocellule).
DIP 4 ON => a cancello chiuso se un ostacolo è davanti al raggio delle fotocellule e viene
comandata l’apertura, il cancello apre (durante l’apertura le fotocellule non
interverranno). Le fotocellule interverranno solo in fase di chiusura (con
ripristino del moto in apertura dopo un secondo anche se le fotocellule sono
ancora impegnate).
11
I
TCA con led DL3 acceso).
GESTIONE CHIUSURA IMMEDIATA DOPO IL TRANSITO DA FOTOCELLULE
DIP 8 ON e DIP 4 OFF => mentre il cancello apre, transitando davanti alle fotocellule il
cancello si ferma. Completato il transito, dopo 1 secondo il
cancello chiude.
DIP 8 ON e DIP 4 ON => mentre il cancello apre, transitando davanti alle fotocellule il
cancello continua ad aprire. Completato il transito, il cancello si
ferma e dopo 1 secondo di pausa chiude.
Se durante la chiusura si ha un transito veloce (es. Pedone) il cancello riaprirà per due
secondi per poi richiudere nuovamente.
DIP 8 OFF => chiusura immediata dopo il transito dalle fotocellule disabilitata.
COSTA (COM - EDGE)
Con costa attivata il buzzer emette 2 toni.
Se la costa interviene in apertura, comanda il movimento di chiusura per 2 secondi e
poi si ferma.
Se la costa interviene in chiusura, comanda il movimento di apertura per 2 secondi e
poi si ferma.
Se la costa rimane impegnata (contatto NO), nessuna movimentazione automatica è
consentita.
Se la costa non installata, ponticellare i morsetti COM-EDGE.
N.B.: Si raccomanda di verificare la funzionalità delle coste almeno ogni 6 mesi.
ALLARME DA COSTE
Dopo un’inversione a seguito di intervento della costa, il cancello si ferma e la centrale,
segnala l’allarme tramite lampeggiatore acceso per 1 minuto e buzzer acceso per 1 minuto
(con segnalazione sonora di 2 toni ogni 5 secondi).
Durante o dopo il minuto di allarme, è possibile far ripartire il cancello premendo un qualsiasi
pulsante di comando.
MONITORAGGIO “AUTOTEST” COSTE DI SICUREZZA (A+TEST / A-)
Tramite l’ingresso A+TEST ed il DIP 10 su ON, è possibile monitorare la/le costa/e dotata/e
di un proprio alimentatore di controllo collegato ai morsetti A+TEST / A-(24Vdc).
Il monitoraggio consiste in un test funzionale della costa eseguito al termine di ogni completa
apertura del cancello.
Dopo ogni apertura, la chiusura del cancello viene pertanto consentita solo se la/le costa/e
hanno superato il test funzionale.
Attenzione: il monitoraggio dell’ingresso costa può essere abilitato con il DIP 10 in ON,
oppure disabilitato con il DIP 10 in OFF.
Una costa meccanica non può essere monitorata, pertanto il DIP 10 deve essere posizionato
in OFF.
ALLARME AUTOTEST FALLITO
Nel caso l’autotest costa fallisca, il buzzer segnalerà per un minuto (con 4 toni ogni 5
secondi) lo stato di allarme, e non consentirà la chiusura del cancello fino alla risoluzione
del problema.
L’allarme si rinnova a fronte di un comando di chiusura.
SENSORE DI CORRENTE (DIP 7 - ON)
La centrale K 24V è dotata di sensore di corrente autotarante che inverte la marcia del
cancello in caso questo impatti contro cose o persone (in conformità alle norme en vigenti verificare sempre con apposito strumento il rispetto dei valori imposti dalla norma).
Con sensore attivato, in caso di impatto il buzzer emette 3 toni.
Se interviene in apertura, inverte il movimento in chiusura per 2 secondi e poi si ferma.
Se interviene in chiusura, inverte il movimento in apertura per 2 secondi e poi si ferma.
ALLARME DA SENSORE DI CORRENTE
Dopo un’inversione eseguita a seguito dell’intervento del sensore di corrente, il cancello si
ferma in allarme, segnalato dal lampeggiatore acceso per 1 minuto e dal buzzer acceso per
1 minuto (con segnalazione sonora di 3 toni ogni 5 secondi).
Durante o dopo il minuto di allarme, è possibile ristabilire il funzionamento del cancello
premendo un qualsiasi pulsante di comando.
MODALITÀ “FUNZIONA SEMPRE” IN CASO DI GUASTO DELLE SICUREZZE.
DIP 9 - OFF: Se la costa è guasta o impegnata per più di 5 secondi, o se la fotocellula è
guasta o impegnata per più di 60 secondi, i comandi APRE, CHIUDE, K-BUTTON e PEDONALE
funzioneranno solo ad uomo presente.
La segnalazione dell’attivazione di questo funzionamento è data dal led DL1 di programmazione
che lampeggia.
Con questo funzionamento viene consentita l’apertura o la chiusura solo mantenendo premuti
i pulsanti di comando. Il comando radio e la chiusura automatica vengono esclusi.
Al ripristino del contatto delle sicurezze, dopo 1 secondo, viene automaticamente riabilitato
il funzionamento automatico o passo passo e quindi anche il radiocomando e la chiusura
automatica riprendono a funzionare.
DIP 9 - ON: È possibile comandare il cancello anche con il radiocomando mantenendo
premuto il tasto presente sul telecomando fino all’intervento del sistema power saver (circa
8 secondi).
Nota 1: durante questo funzionamento in caso di guasto alle coste (oppure fotocellule) le
fotocellule (oppure coste) funzionano ancora interrompendo la manovra in atto.
Nota 2: il pulsante di stop non è considerato una sicurezza da bypassare in questa modalità,
pertanto se viene premuto o è rotto, non consente alcuna manovra.
La manovra a uomo presente è esclusivamente una manovra di emergenza che deve essere
effettuata per brevi periodi e con la sicurezza visiva del movimento dell’automatismo. Appena
possibile le protezioni guaste devono essere riparate/sostituite per ripristinare il corretto
funzionamento del sistema.
FUNZIONE RISCALDATORE (DIP 5-ON)
Permette all’operatore di operare sempre ad una temperatura idonea al funzionamento.
Questo dispositivo si attiva automaticamente solo a cancello fermo e finecorsa di apertura
o chiusura impegnato, ad una temperatura ambiente motore di 0°C rilevata dal sensore
montato sulla scheda.
Quando il motore è in movimento, il riscaldatore viene disattivato.
Solo dopo 10 secondi che il cancello rimane fermo, il riscaldatore si attiva (a condizione che
la temperatura ambiente motore sia inferiore o uguale a 0°C).
Al raggiungimento dei 3°C il riscaldatore si spegne, mantenendo le condizioni ambientali a
temperatura costante.
SEGNALAZIONI VISIVE E SONORE
LAMPEGGIATORE
Questo quadro elettronico può alimentare solo un lampeggiatore con circuito
N.B.: lampeggiante (ACG7061) con lampada da 24V e 20W massimo. Se si superano i
20W la logica del quadro elettronico ne risulterà compromessa con possibile
blocco delle operazioni.
FUNZIONE PRE-LAMPEGGIO
DIP 11 - OFF => il motore e il lampeggiatore partono contemporaneamente.
DIP 11 - ON => il lampeggiatore parte 3 secondi prima del motore.
SPIA DI SEGNALAZIONE CANCELLO APERTO a 24Vdc (A+ SIGNAL)
Ha il compito di segnalare gli stati di cancello aperto, parzialmente aperto o comunque non
chiuso totalmente. Solo a cancello completamente chiuso si spegne.
Durante la programmazione questa segnalazione é attiva.
N.B.: Max 10 W. Se si eccede con le spie, la logica del quadro elettronico ne risulterà
compromessa con possibile blocco delle operazioni.
BUZZER
Ha il compito di segnalare l’intervento delle sicurezze, lo stato degli allarmi e lo stato di
memorizzazione e cancellazione codici radio.
PULSANTE DI STOP (COM-STOP)
Durante il movimento il pulsante di stop esegue il fermo del cancello.
Se il pulsante di STOP viene premuto a cancello aperto totalmente (o parzialmente utilizzando
il comando pedonale) la chiusura automatica verrà temporaneamente esclusa (se abilitata
tramite trimmer TCA con led DL3 acceso). È quindi necessario dare un nuovo comando per
far richiudere il cancello.
Richiudendo il cancello la chiusura automatica verrà riattivata (se abilitata tramite trimmer
12
TABELLA RIASSUNTIVA ALLARMI E SEGNALAZIONI VISIVE E SONORE
SEGNALAZIONI IN FASE DI PROGRAMMAZIONE
STATO BUZZER
STATO LAMPEGGIATORE
DIP 1 ON (MODO UOMO PRESENTE)
OPPURE GUASTO AD UNA SICUREZZA
(MODO FUNZIONA SEMPRE)
EVENTO
SPENTO
SPENTO
LAMPEGGIA 250 MS ON-OFF
DIP 2 ON (PROGRAMMAZIONE CORSA
TOTALE)
SPENTO
SPENTO
LAMPEGGIA 500 MS ON-OFF
DIP 2 > 1 ON (PROGRAMMAZIONE CORSA
PEDONALE)
SPENTO
SPENTO
LAMPEGGIA 500 MS ON-OFF
PROCEDURA DI PROGRAMMAZIONE
INTERROTTA PER INTERVENTO DI UNA
SICUREZZA
SPENTO
SPENTO
ACCESO FISSO
EVENTO
STATO LED DL1 DI PROGRAMMAZIONE
STATO BUZZER
STATO LAMPEGGIATORE
NESSUN CODICE RADIO INSERITO
SPENTO
SPENTO
STATO LED DL10 BICOLORE DI PRG. RADIO
LAMPEGGIA ALTERNATIVAMENTE ROSSO/
VERDE
DIP 1 > 2 PRG. CODICI RADIO APERTURA
TOTALE
SPENTO
SPENTO
LAMPEGGIA ROSSO PER 10 SECONDI
DIP 1 > 3 PRG. CODICI RADIO APERTURA
PEDONALE
SPENTO
SPENTO
LAMPEGGIA VERDE PER 10 SECONDI
PROGRAMMAZIONE CODICI RADIO
APERTURA TOTALE, ESITO OK
1 TONO
SPENTO
SI ACCENDE VERDE UNA VOLTA
PROGRAMMAZIONE CODICI RADIO
APERTURA PEDONALE, ESITO OK
1 TONO
SPENTO
SI ACCENDE ROSSO UNA VOLTA
CODICE RADIO NON PRESENTE IN MEMORIA
SPENTO
SPENTO
FLASH ROSSO
MEMORIA SATURA DA CODICI RADIO (1000
CODICI MEMORIZZATI)
SPENTO
SPENTO
ESEGUE 6 LAMPEGGI VERDI
CANCELLAZIONE CODICI APERTURA TOTALE
2 TONI
SPENTO
ESEGUE 2 LAMPEGGI ROSSI
CANCELLAZIONE CODICI APERTURA
PEDONALE
2 TONI
SPENTO
ESEGUE 2 LAMPEGGI VERDI
SEGNALAZIONI DURANTE IL FUNZIONAMENTO
EVENTO
STATO BUZZER
STATO LAMPEGGIATORE
PULSANTE DI STOP PREMUTO
SPENTO
SPENTO
LED DL12 SI SPEGNE
STATO LED E USCITA SIGNAL
INTERVENTO FOTOCELLULA
1 TONO
SPENTO
LED DL13 SI SPEGNE
INTERVENTO COSTA
2 TONI
SPENTO
LED DL14 SI SPEGNE
INTERVENTO SENSORE DI CORRENTE
3 TONI
SPENTO
NESSUN LED ABBINATO
GUASTO AD UNA SICUREZZA O SICUREZZA
IMPEGNATA PER UN TEMPO PROLUNGATO
SPENTO
SPENTO
LED DL1 LAMPEGGIA 250 MS ON-OFF
FUNZIONAMENTO CON BATTERIE DI
SOCCORSO A 24Vdc
SPENTO
ATTIVO AL MOVIMENTO
SEGNALAZIONE BATTERIE DI SOCCORSO
SCARICHE
1 TONO OGNI 5 SECONDI PER 1 MINUTO
(SI RINNOVA DANDO UN COMANDO)
SPENTO
ALLARME DA COSTA
2 TONI OGNI 5 SECONDI PER 1 MINUTO
(SI RINNOVA DANDO UN COMANDO)
ATTIVO PER 1 MINUTO LAMPEGGIANTE
NESSUN LED ABBINATO
ALLARME DA SENSORE DI CORRENTE
3 TONI OGNI 5 SECONDI PER 1 MINUTO
(SI RINNOVA DANDO UN COMANDO)
ATTIVO PER 1 MINUTO LAMPEGGIANTE
NESSUN LED ABBINATO
ALLARME DA AUTOTEST FALLITO
4 TONI OGNI 5 SECONDI PER 1 MINUTO
(SI RINNOVA DANDO UN COMANDO)
SPENTO
NESSUN LED ABBINATO
ALLARME MEMORIA NON INSERITA
3 SECONDI ON - 3 SECONDI OFF
SI SPEGNE SOLO SE LA MEMORIA VIENE
INSERITA
SPENTO
NESSUN LED ABBINATO
ALLARME DA AUTOAPPRENDIMENTO
ERRATO
TONO CONTINUO PER 10 SECONDI CON
PAUSA DI 2 SECONDI OFF
SI SPEGNE SOLO SE SI SPOSTA IL DIP 2
in OFF
SPENTO
LED DL1 ACCESO FISSO
SPENTO
SPENTO
LED DL10 BICOLORE ACCESO FISSO CON
COLORE ARANCIONE.
BLOCCO FUNZIONALE
13
USCITA SIGNAL 2 LAMPEGGI 250 MS ONOFF SEGUITI DA PAUSA DI 2 SECONDI
USCITA SIGNAL LAMPEGGIA
CONTINUAMENTE 500 ms ON-OFF
I
CARATTERISTICHE TECNICHE
- Range di temperatura -10 ÷ +55°C
< 95% senza condensazione
- Umidita - Tensione di alimentazione 230V~ ±10% (120V 60Hz a richiesta)
- Frequenza 50/60 Hz
- Potenza trasformatore 150VA - primario 230Vac
1° secondario 24Vac
2° secondario 10Vac
- Assorbimento massimo 100 mA
- Microinterruzioni di rete 100ms
- Potenza massima spia cancello aperto (SIGNAL) 24Vdc 10W
- Carico massimo lampeggiatore 24Vdc 20W
- Corrente disponibile per fotocellule e accessori 24Vdc 500 mA ±15%
24Vdc
- Alimentazione batteria CARATTERISTICHE TECNICHE RADIO
- Frequenza ricezione
433,92MHz
52 ohm
- Impedenza - Sensibilità >1 µV
- Controllo di retroazione PLL
- Codici memorizzabili 1000
RISOLUZIONE PROBLEMI
Dopo aver effettuato tutti i collegamenti seguendo attentamente lo schema ed aver posizionato
il cancello in posizione intermedia, verificare la corretta accensione dei led DL4, DL7, DL8,
DL9, DL12, DL13, DL14.
In caso di mancata accensione di uno dei led, sempre con cancello in posizione intermedia,
verificare quanto segue e sostituire eventuali componenti guasti:
DL4 rosso spento - sblocco manuale aperto (chiuderlo)
DL7 rosso spento - finecorsa che ferma la chiusura guasto
DL8 verde spento - finecorsa che ferma l’apertura guasto
DL9 rosso spento - alimentazione da 3,3 V mancante (verificare la presenza della tensione
secondaria a 10Vac del trasformatore al connettore J4).
DL12 rosso spento - pulsante di stop guasto (in caso lo STOP non sia collegato, eseguire il
ponticello fra COM e STOP).
DL13 rosso spento - fotocellule guaste (in caso le fotocellule non siano collegate, eseguire il
ponticello fra COM e PHOT).
DL14 rosso spento - costa di sicurezza guasta (in caso la costa non sia collegata, eseguire il
ponticello fra COM e EDGE).
Durante il funzionamento a uomo presente, con DIP 1 in ON, verificare che durante l’apertura
si accenda il led verde DL6 e che durante la chiusura si accenda il led rosso DL5.
In caso contrario, eseguire una nuova programmazione di apertura totale.
DIFETTO
SOLUZIONE
Dopo aver effettuato i vari collegamenti e aver dato tensione, tutti i led sono spenti.
Verificare l’integrità dei fusibili F1 e F2.
In caso di fusibile guasto sostituirlo solo con pari valore: F1 = T 1,6A
Le fotocellule non sono accese ed il motore non gira
Verificare l’integrità del fusibile F3.
In caso di fusibile guasto sostituirlo solo con pari valore: F3 = T 10A
Il cancello esegue l’apertura, ma non chiude dopo il tempo impostato
Verificare l’accensione del led DL3. Se è spento ruotare il trimmer in senso orario.
Oppure verificare che le fotocellule non siano impegnate.
Oppure è possibile sia stato premuto il pulsante di STOP a cancello aperto con blocco
momentaneo della chiusura automatica.
Il cancello non apre e non chiude azionando i vari pulsanti APRE-CHIUDE- K-RADIO.
Contatto costa o fotocellula guasto con DIP 4 OFF. Sistemare o sostituire il relativo contatto.
Oppure, controllare che lo sblocco manuale non sia aperto.
F2 = T 300mA
A cancello aperto, azionando il pulsante K, RADIO o il pulsante CHIUDE il cancello non esegue Funzione orologio attiva. Verificare lo stato dell’ingresso B.I.O.
nessun movimento.
Oppure, autotest costa fallito => verificare i collegamenti tra quadro elettronico e alimentatore
per coste. Attenzione: se non si sta utilizzando un alimentatore per coste il DIP 10 deve essere
in posizione OFF.
il cancello entra in allarme per oltre corrente segnalata da 3 toni di BUZZER.
Controllare lo scorrimento del cancello verificando non vi siano attriti. Solo se necessario
posizionare il DIP 7 in OFF per escludere il sensore di corrente.
LED DL1 lampeggia 250ms ON/OFF
DIP 1 in ON. Spostarlo in OFF.
Oppure, una costa o fotocellula è guasta. Il movimento è consentito solo ad uomo presente.
In programmazione tempi, il cancello si ferma ed il buzzer emette un tono da 10 s con pausa Procedura di programmazione errata. Posizionare il DIP 2 in OFF.
di 2 s.
Portare il cancello a circa 20 cm da fine chiusura e ripetere la programmazione.
OPERAZIONE FINALE -
Applicare la guarnizione
La guarnizione deve essere applicata solo al termine dell’installazione, prima di rimontare il carter.
Guarnizione applicata
Chiudere il carter
14
Motore pronto
I
OPTIONAL
Per i collegamenti ed i dati tecnici degli accessori attenersi ai relativi libretti di istruzione.
CREMAGLIERA MOD. 4 IN NYLON
PIASTRA DA CEMENTARE
con angolare zincato in barre da 1 m. Ideale per cancelli fino a 1000 kg / 2200 lbs di
peso.
1m
cod. ACS9000
10 m (1 m x 10)
cod. ACS9001
cod. ACG8107
TOUCH
FIT SLIM
FOTOCELLULE DA PARETE
cod. ACG8032
COPPIA DI COLONNINE PER FIT SLIM
cod. ACG8065
Le fotocellule FIT SLIM hanno la funzione di sincronismo in corrente alternata e portata
di 20 m.
Sono applicabili più coppie di fotocellule ravvicinate grazie al circuito sincronizzatore.
Aggiungere il TX SYNCRO
cod. ACG8029
per sincronizzare fino a 4 coppie di fotocellule.
COSTA MECCANICA L = 2 m - CERTIFICATA EN 13849-2 (2008) - CATEGORIA 3
cod. ACG3015
TELECOMANDO SUN
SUN 2CH
SUN CLONE 2CH
SUN-PRO 2CH
SUN-PROX 2CH
cod. ACG6052
cod. ACG6056
cod. ACG6210
cod. ACG6220
SPARK 24V
SUN 4CH
SUN CLONE 4CH
SUN-PRO 4CH
SUN-PROX 4CH
LAMPEGGIATORE SPARK con scheda intermittente incorporata
SUPPORTO LATERALE
ANTENNA SPARK 433
cod. ACG6054
cod. ACG6058
cod. ACG6214
cod. ACG6224
SCHEDA DI CARICA BATTERIA
cod. ACG7061
cod. ACG7042
cod. ACG5452
BATTERIA
Batteria 2,2Ah 12V
cod. ACG4664
15
cod. ACG9515
F
SCHÉMA DÉTAILLÉ DE L’INSTALLATION
1 - Opérateur K
2 - Photocellules extérieures
3 - Crémaillère Module 4
4 - Sélecteur à clé
5 - Antenne radio
6 - Feu clignotant
7 - Limiteurs de course (cames)
8 - Barre palpeuse mécanique
9 - Barre palpeuse mécanique avec RED
10 - Photocellules intérieures
11 - Potelets de support pour photocellules
12 - Arrêts mécaniques
CARACTÉRISTIQUES TECHNIQUES
Opérateurs irréversibles pour portails coulissants dont le poids maximal est de
800 kg.
Grâce à l’irréversibilité de cet opérateur, le portail ne nécessite aucun type de serrure
électrique pour une fermeture efficace.
1
CARACTERISTIQUES
TECHNIQUES
K800 24V
Poids maxi du portail
kg
Vitesse de traction
m/s
0,1÷0,2
N
550 (avec coffret electronique)
Couple maxi
Nm
18,5 (avec coffret electronique)
Module crémaillère
M
4
Force de poussée maxi
800
230V~ 50Hz
Alimentation et frequence
Puissance absorbée par la ligne
W
207 (avec coffret electronique)
Absorption
A
0,9 (avec coffret electronique)
Cycles normatifs
n°
40 - 38s/38s
Cycles conseillés par jour
n°
300
Service
%
100
Cycles consécutifs garantis
n°
Type d’huile
60/10m
COMLUBE LHITGREASE EP/GR.2
Poids maximum
kg
13
Bruit
db
<70
Temperature de travail
°C
-10 ÷ +55
Indìce de protection
IP
44
Mesures en mm
16
F
INSTALLATION K800 24V
CONTRÔLE PRÉ-INSTALLATION
!! LE PORTAIL DOIT SE DÉPLACER SANS FROTTER !!
N.B. Il est impératif d’uniformiser les caractéristiques du portail avec les normes et les lois
en vigueur. La portail peut être automatisée seulement si elle est en bon état et qu’elle est
conforme à la norme EN 12604.
- Le vantail ne doit pas comporter de portillon intégré. Dans le cas contraire, il sera
opportun de prendre les précautions décrites au point 5.4.1 de la EN 12453 (interdire,
par le biais d’un contact raccordé aux bornes adaptées de la platine électronique, la
mise en marche de l’automatisme si le portillon est ouvert).
- Ne pas générer de zone d’écrasement (par exemple entre le vantail ouvert et la cloture).
- Outre les fins de course présents sur l’opérateur, il est nécessaire d’installer des butées
mécaniques fixes à l’extrémité de chaque course de sorte à arrêter le portail en cas de
dysfonctionnement des fins de course électriques. Pour cela, les butées mécaniques
doivent être dimensionnées de sorte à supporter la poussée statique du moteur ajoutée
à l’énergie cinétique du portail (12) (2).
- Les poteaux du portail doivent avoir des glissières anti-déraillement sur la partie
supérieure (3), afin d’éviter tout décrochage accidentel.
N.B.: Éliminer les arrêts mécaniques du type indiqué, décrit dans la figure 3.
Il ne devra y avoir aucun arrêt mécanique au-dessus du portail, étant donné que les arrêts
mécaniques ne sont pas suffisamment sûrs.
2
Parties à installer conformément à la norme EN12453
USAGE DE LA FERMETURE
TYPE DE COMMANDE
Personne expertes
(au dehors d’une zone
publique*)
Personne expertes
(zone publique)
Usage illimité
homme presente
A
B
non possible
impulsion en vue
(es. capteur)
C ou E
C ou E
C et D, ou E
C ou E
C et D, ou E
C et D, ou E
C et D, ou E
C et D, ou E
C et D, ou E
impulsion hors de vue
(es. boîtier de commande)
automatique
* example typique: fermetures qui n’ont pas d’accès à un chemin public
A: Touche de commande à homme present (à action maintenue), code ACG2013.
B: Sélecteur à clef à homme mort, code ACG1010.
C: Réglage de la puissance du moteur.
D: Barre palpeuse et/ou autres dispositifs de limitation des forces dans les limites de
la norme EN12453- appendice A.
E: Cellules photo-électriques, code ACG8026 (Appliquer chaque 60÷70 cm pour toute
la taille de la colonne de la porte jusqu’à un maximum de 2,5 m - EN 12445 point
7.3.2.1).
3
DÉBLOCAGE
Cette opération ne devra être effectuée qu’après avoir mis le moteur horstension.
Afin de pouvoir agir manuellement sur le portail, il suffit d’introduire la clé, destinée à
cet effet, et de la faire tourner 3 fois dans le sens contraire à celui des aiguilles d’une
montre (4).
Afin de pouvoir manœuvre manuellement le vantail, il est important de vérifier que :
- il soit fourni des poignées adaptées sur le vantail;
- ces poignées doivent être positionnées de sorte à ne pas créer un danger durant leur
utilisation;
- l’effort manuel pour mettre en mouvement le vantail ne doit pas excéder 225N pour les
portes et portails en usage privé, et 390N pour les portes et portails à usage industriel et
commercial (valeurs indiquées au paragraphe 5.3.5 de la norme EN 12453).
4
17
F
FIXATION MOTEUR ET CRÉMAILLÈRE
La crémaillère doit être fixée à une certaine hauteur par rapport au support du moteur.
Cette hauteur peut être modifiée, grâce aux boutonnières présentes sur la crémaillère.
Le réglage en hauteur est effectué afin que, lors du mouvement, le portail ne puisse
appuyer sur l’engrenage de traction du K (5 et 6). Pour fixer la crémaillère sur le portail,
il suffit de faire des trous de Ø 5 mm et de les tarauder en se servant d’un taraud du
type M6.
L’engrenage d’entraînement doit disposer d’environ 1 mm de rayon d’action par rapport
à la crémaillère.
Mesures en mm
5
Mesures en mm
6
FIXATION FIN DE COURSE
Pour déterminer la course de la partie mobile, il faut positionner deux cames
sur les extrémités de la crémaillère (7).
Pour procéder au réglage de la course d’ouverture et de fermeture, il suffit de déplacer les
cames sur les crans de la crémaillère. Pour bloquer les cames sur la crémaillère, visser
à fond les vis, fournies avec l’équipement.
N.B: En plus des cames d’arrêt électrique susmentionnées, il est indispensable d’installer
des arrêts mécaniques solides, qui empêcheront le portail de sortir des glissières
supérieures.
7
ENTRETIEN
Toutes les opérations d’entretien devront être effectuées exclusivement par du
personnel spécialisé et après avoir mis le moteur hors-tension.
Nettoyer périodiquement la glissière en enlevant tous les cailloux ou toute autre saleté
qui pourraient s’y trouver. Cette opération doit être effectuée lorsque le portail est arrêté.
18
BRANCHEMENTS ÉLECTRIQUES
K 24V code AC08006
FIN DE COURSE DE SÉCURITÉ DE
OUVERTURE ET DE DÉBLOCAGE
FERMETURE
MANUEL
M
ANTENNE
433 MHz
ALIMENTATION
230Vac 50Hz
FUSIBILE
T 1,6A
x K800
TRANSFORMATEUR
ENVELOPPE ANTENNE
COMMUN
24Vac
STOP
PHOTOCELLULES
CORDON
PIETON
FERMETURE
0
10Vac
OUVERTURE
COMMANDE UNIQUE
BATTERIES DE SECOURS
POUR CARTE DE
RECHARGE DE BATTERIES
(EN OPTION)
HORLOGE
A+TEST / AAUTOTEST SÉCURITÉS
OU ÉCONOMIES
D’ÉNERGIE AVEC
FONCTIONNEMENT
SUR BATTERIES
24Vdc 0,4A ±15%
24Vdc 0,4A ±15%
24Vdc 20W
24Vdc 10W
19
F
F
A - BRANCHEMENTS
ALIMENTATION RÉSEAU EXTERNE À LA CARTE 230 Vca
50/60 Hz (120 Vca 60 Hz, sur demande)
F
> PHASE
N
> NEUTRE
> TERRE
T1,6A FUSIBLE SUR LA BORNE
D’ALIMENTATION GÉNÉRALE
F1 Trimmer TCA
J10
Trimmer RUN
J9
J8
J7
J12
J6
J5
J11
Connexion et
fixation du câble
d’alimentation
J4
J1
J2
J1
A-
COMMUN ALIMENTATION ACCESSOIRES ET AUTOTEST BARRE
PALPEUSE
J8
LIMIT
SWITCH
CONNECTEUR POUR FINS DE COURSE ÉLECTRIQUES OU
MAGNÉTIQUES
A+
POSITIF POUR ALIMENTATION ACCESSOIRES 24 Vcc
J9
MOTOR
CONNECTEUR POUR MOTEUR 24 Vcc ET ENCODEUR 5 Vcc (NE PAS
UTILISER)
J10
X K800
CONNECTEURS POUR BRANCHEMENT MOTEUR K800
J11
COM
COMMUN DES CONTACTS (GND)
POSOTIF CLIGNOTEUR 24 Vcc 20 W
STOP
CONTACT IMPULSION D'ARRÊT (NF)
TÉMOIN PORTAIL OUVERT 24 Vcc MAX 10 W
PHOT
CONTACT PHOTOCELLULES (NF)
EDGE
CONTACT BARRE PALPEUSE (NF)
PED
CONTACT IMPULSION D'OUVERTURE PIÉTON (NO)
A+ TEST
POSITIF POUR ALIMENTATION AUTOTEST BARRE PALPEUSE À 24 Vcc
NÉGATIF CLIGNOTEUR 24 Vcc 20 W
+
SIGNAL
J2-J3
J3
BATTERY CONNECTEURS POUR CARTE DE RECHARGE BATTERIES (COD.
CHARGER ACG4664 EN OPTION)
J4
10V
CONNECTEURS POUR SECONDAIRE TRANSFORMATEUR À 10 Vca
CLOSE
CONTACT IMPULSION DE FERMETURE (NO)
J5
BAT
CONNECTEURS POUR BATTERIES (EN OPTION)
OPEN
CONTACT IMPULSION D'OUVERTURE (NO)
J6
24V
CONNECTEURS POUR SECONDAIRE TRANSFORMATEUR À 24 Vca
KBUT
CONTACT IMPULSION SIMPLE (NO)
B.I.O.
CONTACT (NO) DÉDIÉ À UNE HORLOGE
J7
SECURITY CONNECTEUR POUR MICRO-INTERRUPTEUR DÉBLOCAGE MANUEL
LOCK
J12
B – PARAMÉTRAGES
DIP 1 réglage course avec fins de course électriques ou
magnétiques (point C)
DIP 2
programmation ouverture totale (point D)
DIP 2-1 programmation temps ouverture piéton (point E)
DIP 1-2 mémorisation/suppression codes radio pour commande ouverture totale (point F)
DIP 1-3 mémorisation/suppression codes radio pour commande ouverture piéton (point G)
MICRO-INTERRUPTEURS DE GESTION
DIP 3
ON - départ progressif actif
OFF - départ progressif non actif
DIP 4
ON - photocellules actives uniquement lors de la fermeture
OFF - photocellules toujours actives
DIP 5
ON - réchauffeur actif
OFF - réchauffeur non actif
DIP 6
ON - commande radio, bouton k butt et piéton en mode automatique
OFF - commande radio, bouton k butt et piéton en mode pas à pas
DIP 7
ON - capteur de courant actif
OFF - capteur de courant non actif
DIP 8
ON - refermeture immédiate après passage photocellule active
OFF - refermeture immédiate après passage photocellule non active
DIP 9
ANTENNA BORNES DÉDIÉES AU BRANCHEMENT D'UNE ANTENNE 433,92 MHz
ON - mode fonctionne toujours, y compris avec radiocommande
OFF - mode fonctionne toujours, uniquement avec les boutons de commande
DIP 10
ON - autotest barre palpeuse actif
OFF - autotest barre palpeuse non actif
DIP 11
ON - préclignotement actif
OFF - préclignotement non actif
DIP 12
ON - disponible
OFF - disponible
DIP 13
ON - fonctionnalité dédiée au motoréducteur K800
OFF - fonctionnalité dédiée au motoréducteur K800
DIP 14
ON - activation système radio SUN/MOON
OFF - activation système radio SUN-PRO
PROG. > TOUCHE POUR LA PROGRAMMATION.
MÉMOIRE >M
EMOIRE AMOVIBLE CONTENANT LES DONNÉES FONCTIONNELLES ET
LES CODES RADIO.
SW
> CONNECTEUR POUR MISE À JOUR LOGICIEL.
RESERVED > CONNECTEUR RÉSERVÉ AUX CONTRÔLES EN USINE.
RUN > TRIMMER POUR LE RÉGLAGE DE LA VITESSE DU MOTEUR.
Ce trimmer permet de régler la vitesse du moteur (réglé par défaut sur la moitié de la vitesse).
La réglage est très utile pour rendre l’automatisation conforme aux normes européennes en
matière de chocs.
20
F
Pour des portails avec poids de 0 ÷ 200 kg on conseille RUN sélectionné de 1/2 à MAX.
Pour des portails avec poids de 0 ÷ 400 kg on conseille RUN sélectionné de MIN à 1/2.
Remarque : il est impossible de régler la manipulation ralentie en ce qu’elle est calculée
automatiquement.
TCA > TRIMMER DE FERMETURE AUTOMATIQUE TOTALE OU PIÉTON
Par défaut, le trimmer n’est pas activé et la led DL3 est éteinte (trimmer complètement
tourné dans le sens contraire des aiguilles d’une montre).
Ce trimmer permet de régler le temps avant la fermeture automatique ou piéton.
La fermeture automatique totale ou piéton s’obtient uniquement avec la porte complètement
(totale) ou partiellement (piéton) ouverte et la led DL3 allumée (avec le trimmer tourné dans
le sens des aiguilles d’une montre).
Il est possible de régler le temps de pause entre un minimum de 2 secondes et un maximum
de 2 minutes.
DÉPART PROGRESSIF
Si DIP 3 est sur ON, à chaque démarrage, s’active un mouvement progressif qui dure 1 seconde.
SIGNALISATIONS LED
DL1 signalisation programmation activée DL2 DL3 signalisation temps fermeture automatique
DL4
signalisation micro-interrupteur de déblocage manuel
DL5 signalisation portail en fermeture DL6
signalisation portail en ouverture signalisation fin de course de fermeture
DL7 signalisation fin de course d’ouverture
DL8 DL9 signalisation présence tension microcontrôleur 3,3 V
DL10 signalisation programmation codes radio
signalisation programmateur branché
DL11
DL12 signalisation contact d’arrêt
signalisation contact photocellules
DL13
DL14 signalisation contact barre palpeuse
(rouge)
(rouge)
(rouge)
(rouge)
(vert)
(rouge)
(vert)
(jaune)
(bicolore)
(rouge)
(rouge)
(rouges)
(rouge)
F-
PROGRAMMATION CODES RADIO OUVERTURE TOTALE (MAX.
1000 CODES)
T 300 mA fusible de protection logique fonctionnelle
T 10 A
fusible de protection moteur
C – RÉGLAGE COURSE AVEC FINS DE COURSE ÉLECTRIQUES OU
MAGNÉTIQUES
Ce contrôle vise à faciliter le travail de l’installateur pendant la pose sur place de l’installation
et pour d’éventuels contrôles ultérieurs.
1 - Débloquer l’opérateur à l’aide du déblocage manuel et placer les cames de fin de course
sur la crémaillère afin à définir la course du portail.
2 - Amener le portail à mi-course et bloquer l’opérateur.
3 - Mettre le DIP 1 sur la position ON => la led DL1 commence à clignoter.
4 - Appuyer sur la touche PROG (commande manuelle, ouvre-arrête-ferme-arrête-ouvreetc.) et la maintenir enfoncée. => Le portail part à une vitesse élevée pour ensuite
ralentir jusqu’à atteindre le fin de course. S’assurer que le portail s’arrête dans la
position souhaitée. Si tel n’est pas le cas, déplacer les cames de fin de course et
réessayer. Contrôler également le fin de course de la partie opposée.
5 - Il est possible de régler la vitesse élevée pendant les 5 premières secondes de
fonctionnement en se servant du trimmer RUN. Pour augmenter la vitesse, tourner le
trimmer RUN dans le sens des aiguilles d’une montre. Le trimmer RUN est défini par
défaut à mi-course.
6 - À la fin, repositionner DIP 1 sur OFF. La led DL1 s’éteint en signalant la sortie du contrôle.
N.B. : Pendant ce contrôle,le bouton d’arrêt, les barres palpeuses et les photocellules
ne sont pas actives.
D – PROGRAMMATION OUVERTURE TOTALE*
E – PROGRAMMATION OUVERTURE PIÉTON *
1 - Positionner d’abord DIP 2 sur ON puis DIP 1 sur ON. La led DL1 commence à clignoter.
2 - Appuyer sur le bouton piéton (COM-PED) ou la touche de la télécommande dediée à
l’ouverture piéton (si programmé précédemment) => Le portail s’ouvre.
3 - Appuyer sur le bouton piéton pour arrêter le portail (la course d’ouverture piéton du
portail sera alors définie). Après 2 secondes le portail se ferme automatiquement.
4 - À la fin de la programmation piéton, repositionner les DIP 1 et 2 sur OFF.
* Pendant la programmation, les sécurités sont actives et leur enclenchement arrête
la programmation (la led DL1 passe d’un état clignotant à un témoin fixe).
Pour répéter la programmation, positionner DIP 1 et DIP 2 sur OFF, fermer le portail
en suivant la procédure « RÉGLAGE COURSE AVEC FINS DE COURSE ÉLECTRIQUES OU
MAGNÉTIQUES », répéter la programmation décrite ci-dessus.
Buzzer > signale plusieurs fonctionnalités, voir le tableau des signalisations
visuelles et acoustiques.
Fusibles
F2
F3 3 - Appuyer sur le bouton PROG ou la touche de la télécommande dediée à l’ouverture totale
(si programmé précédemment). Le portail va ouvrir et fermer 3 fois. NE PAS PASSER
DEVANT LES PHOTOCELLULES LORSQUE LE PORTAIL EST EN MOUVEMENT.
4 - La programmation est terminée lorsque le portail reste fermé et que la led DL1 est
éteinte.
5 - Repositionner le DIP 2 sur OFF.
N.B.: SI à la fin de la programmation vous mouvez le trimmer RUN, donc vous devez
la répéter à nouveau.
Remarque : le point de début du ralentissement est déterminé automatiquement par la
centrale lors de la programmation des temps et s’active à 50÷60 cm avant
d’atteindre le fin de course d’ouverture ou de fermeture.
Pour répéter la programmation, positionner DIP 2 sur OFF, fermer le portail en
s’arrêtant à 20 cm de la fermeture totale en suivant la procédure « RÉGLAGE COURSE
AVEC FINS DE COURSE ÉLECTRIQUES OU MAGNÉTIQUES », répéter la programmation
décrite ci-dessus.
Attention : Si les entrées STOP, PHOT et EDGE ne sont pas branchées, effectuer des
ponts entre COM-STOP, COM-PHOT et COM-EDGE avant de procéder à la
programmation.
1 - IMPORTANT : POUR UNE BONNE PROGRAMMATION, IL EST NÉCESSAIRE DE
POSITIONNER LE PORTAIL À ENVIRON 20 CM DU FIN DE COURSE
DE FERMETURE.
2 - Positionner le DIP 2 sur ON => la led DL1 commence à clignoter.
ATTENTION : avant de mémoriser les télécommandes, utiliser le DIP 14 pour
sélectionner les télécommandes à utiliser :
DIP 14 sur OFF : il est possible de mémoriser des télécommandes à code variable SUNPRO :
cod. ACG6210
SUN-PRO 2CH bicanal - touches rouges et led blanche SUN-PRO 4CH quadricanal - touches rouges et led blanche cod. ACG6214
SUN-PROX 2CH bicanal - touches rouges et led jaune cod. ACG6220
cod. ACG6224
SUN-PROX 4CH quadricanal - touches rouges et led jaune DIP 14 sur ON (par défaut): il est possible de mémoriser des télécommandes à code fixe
SUN et MOON :
SUN 2CH bicanal - touches bleues et led blanche
cod. ACG6052
SUN 4CH quadricanal - touches bleues et led blanche cod. ACG6054
cod. ACG6056
SUN CLONE 2CH bicanal - touches bleues et led jaune SUN CLONE 4CH quadricanal - touches bleues et led jaune cod. ACG6058
cod. ACG6081
MOON 2CH bicanal - touches noires et led jaune
MOON 4CH quadricanal- touches noires et led jaune cod. ACG6082
ATTENTION : il est impossible de mémoriser simultanément des télécommandes à
code fixe et des télécommandes à code variable.
La programmation des télécommandes ne peut être effectuée que si le portail est arrêté.
1 - Positionner d’abord le DIP 1 sur ON puis le DIP 2 sur ON. La led bicolore DL10 de
programmation clignote en rouge pendant 10 secondes.
2-
Pendant ces 10 secondes, appuyer sur le bouton de la télécommande (canal A,
normalement). Si la télécommande a été correctement mémorisée, la led bicolore DL10
s’allume en vert et une tonalité de buzzer confirme la bonne mémorisation. Les 10
secondes pour la programmation des codes se renouvellent automatiquement avec la led
bicolore DL10 qui clignote en rouge pour pouvoir mémoriser la télécommande suivante.
3 - Pour terminer la programmation, laisser s’écouler 10 s ou maintenir le bouton PROG.
enfoncé pendant un moment. La led bicolore DL10 de programmation arrête de clignoter.
4 - Repositionner DIP 1 sur OFF et DIP 2 sur OFF.
5 - Fin de la procédure.
SUPPRESSION DE TOUS LES CODES RADIO DÉDIÉS À L’OUVERTURE TOTALE
La suppression ne peut être effectuée que si le portail est arrêté.
1 - Positionner le DIP 1 sur ON puis, le DIP 2 sur ON.
2 - La led bicolore DL10 de programmation clignote en rouge pendant 10 secondes.
3 - Pendant ces 10 secondes, appuyer sur le bouton PROG et le maintenir enfoncé pendant 5
secondes. La suppression de la mémoire est signalée par deux clignotements verts de la
led bicolore DL10 et par 2 tonalités du buzzer confirmant la suppression effectuée. Ensuite,
la led bicolore DL10 de programmation clignote en rouge pendant 10 secondes. Il sera
21
F
ensuite possible d’insérer de nouveaux codes en suivant les procédures décrites ci-dessus.
4 - Repositionner DIP 1 sur OFF et DIP 2 sur OFF.
5 - Fin de la procédure.
Si DIP 6 sur ON => e ffectue l’ouverture à portail fermé. Si actionné pendant le mouvement
d’ouverture, il ne provoque aucun effet. Si actionné à portail ouvert, il
ferme le portail. Si actionné pendant la fermeture, il rouvre le portail.
SIGNALISATION MÉMOIRE SATURÉE CODES RADIO
La signalisation ne peut être obtenue que si le portail est arrêté.
1 - Positionner d’abord le DIP 1 sur ON puis, le DIP 2 sur ON.
2 - La led bicolore DL10 clignote 6 fois en vert, ce qui indique que la mémoire est saturée
(1000 codes insérés). Ensuite, la led bicolore DL10 de programmation clignote en rouge
pendant 10 secondes, permettant d’effectuer, le cas échéant, la suppression de tous
les codes.
4 - Repositionner DIP 1 sur OFF et DIP 2 sur OFF.
5 - Fin de la procédure.
FONCTION HORLOGE - COMMANDE B.I.O. (COM-B.I.O.)
La fonction horloge est utile dans les heures de pointe, lorsque la circulation est ralentie (par
ex. entrée/sortie d’ouvriers, urgences dans des zones résidentielles, parkings, etc.)
G - P ROGRAMMATION CODES RADIO OUVERTURE PIÉTON
(1000 CODES MAX.)
La programmation ne peut être effectuée que si le portail est arrêté.
1 - Positionner d’abord le DIP 1 sur ON puis le DIP 3 sur ON. La led bicolore DL10 de
programmation clignote en vert pendant 10 secondes.
2 - Appuyer sur le bouton de la télécommande (canal B, normalement) dans les 10 secondes
définies. Si la télécommande a été correctement mémorisée, la led bicolore DL10
s’allume en rouge pendant un moment et une tonalité de buzzer confirme la bonne
mémorisation. Les 10 secondes pour la programmation des codes se renouvellent
automatiquement avec la led bicolore DL10 qui clignote en vert pour pouvoir mémoriser
la télécommande suivante.
3 - Pour terminer la programmation, laisser s’écouler 10 s ou maintenir le bouton PROG.
enfoncé pendant un moment. La led bicolore DL10 de programmation arrête de
clignoter.
4 - Repositionner DIP 1 sur OFF et DIP 3 sur OFF.
5 - Fin de la procédure.
SUPPRESSION DE TOUS LES CODES RADIO DÉDIÉS À L’OUVERTURE PIÉTON
La suppression ne peut être effectuée que si le portail est arrêté.
1 - Positionner d’abord le DIP 1 sur ON puis le DIP 3 sur ON. La led bicolore DL10 de
programmation clignote en vert pendant 10 secondes.
2 - Pendant ces 10 secondes, appuyer sur le bouton PROG et le maintenir enfoncé pendant
5 secondes. La suppression de la mémoire est signalée par deux clignotements rouges
de la led bicolore DL10 et par 2 tonalités du buzzer confirmant la suppression effectuée.
3 - Ensuite, la led bicolore DL10 de programmation clignote en vert pendant 10 secondes.
Il sera ensuite possible d’insérer de nouveaux codes en suivant les procédures décrites
ci-dessus.
4 - Repositionner DIP 1 sur OFF et DIP 3 sur OFF.
5 - Fin de la procédure.
SIGNALISATION MÉMOIRE SATURÉE CODES RADIO
La signalisation ne peut être obtenue que si le portail est arrêté.
1 - Positionner d’abord le DIP 1 sur ON puis, le DIP 3 sur ON.
2 - La led bicolore DL10 clignote 6 fois en vert, ce qui indique que la mémoire est saturée
(1000 codes insérés). Ensuite, la led bicolore DL10 de programmation reste active et
clignote en rouge pendant 10 secondes, permettant d’effectuer, le cas échéant, la
suppression de tous les codes.
3 - Repositionner DIP 1 sur OFF et DIP 3 sur OFF.
4 - Fin de la procédure.
FONCTIONNEMENT ACCESSOIRES DE COMMANDE
BOUTON D’OUVERTURE (COM-OPEN)
À portail arrêté, le bouton commande le mouvement d’ouverture. S’il est enfoncé pendant la
fermeture, cela provoque la ré-ouverture du portail.
MODE D’APPLICATION DE LA FONCTION HORLOGE
En branchant un interrupteur et/ou une horloge quotidienne/hebdomadaire aux bornes
« COM-B.I.O. », il est possible d’ouvrir le portail et de le laisser ouvert jusqu’à ce que
l’interrupteur ou l’horloge reste actifs.
Lorsque l’automatisme est ouvert, toutes les fonctions de commande sont inhibées.
Au relâchement de l’interrupteur ou à la fin de l’heure définie, on a la fermeture immédiate
de l’automatisme.
BOUTON OUVERTURE PIÉTON (COM-PED.BUT)
Bouton dédié à une ouverture partielle et à sa refermeture.
Pendant l’ouverture, la pause ou la fermeture à partir de la commande piéton, il est possible
de commander l’ouverture totale à l’aide de n’importe quelle commande branchée sur la carte.
DIP 6 permet de sélectionner la mode de fonctionnement du bouton de commande piéton.
SI DIP 6 sur OFF => effectue une commande cyclique des commandes ouvre-arrête-fermearrête etc.
Si DIP 6 sur ON => effectue l’ouverture à portail fermé. Si actionné pendant le mouvement
d’ouverture, il ne provoque aucun effet. S’il est actionné à portail
ouvert piéton, il le ferme. Si actionné pendant la fermeture, il rouvre
le portail.
TRIMMER DE FERMETURE AUTOMNATIQUE (TCA) TOTALE OU PIÉTON par défaut non
activé et led DL3 éteinte (trimmer complètement tourné dans le sens contraire des
aiguilles d’une montre)
Ce trimmer permet de régler le temps avant la fermeture automatique totale ou piéton.
La fermeture automatique ne peut être obtenue que si la porte est ouverte, à l’aide des
commandes d’ouverture totale ou piéton et la led DL3 doit être allumée (trimmer tourné dans
le sens des aiguilles d’une montre pour activer la fonction).
Après avoir procédé avec l’ouverture totale il est possible de régler le temps de pause entre
un minimum de 2 secondes et un maximum de 2 minutes.
Après avoir procédé avec l’ouverture piéton le temps de pause change de un minimum de
deux secondes à un maximum de 30 secondes.
Par rapport à la position du trimmer TCA on aura des temps proportionels.
Par example: Avec trimmer TCA à la moitié de la course on aura 1 minute de pause après
l’ouverture totale et 15 secondes de pause après l’ouverture piéton.
DÉBLOCAGE MANUEL (LED DL4)
Debloquer l’operateur. Le contact du micro-interrupteur s’ouvre (la led DL4 s’éteint) et les
commandes ne sont pas actives.
Bloquer l’opérateur et donnant une commande. Le premier mouvement s’effectuera
à une vitesse lente. Ce n’est qu’après avoir terminé ce premier mouvement que
l’opérateur recommencera à fonctionner à la vitesse définie.
FONCTIONNEMENT APRÈS COUPURE DE COURANT
Au moment de la coupure de courant, l’état du portail est enregistré au sein de la mémoire.
Au retour de la tension de secteur :
Si le portail se trouve sur le fin de course d’ouverture ou de fermeture, à l’actionnement
d’une commande, le portail se fermera ou s’ouvrira avec les données mémorisées.
Si le portail se trouve dans une position intermédiaire, l’actionnement d’une commande
fera ouvrir lentement le portail jusqu’à atteindre le fin de course d’ouverture. Une fois ce
premier mouvement terminé, l’opérateur recommencera à fonctionner à la vitesse définie.
FONCTIONNEMENT ACCESSOIRES DE SÉCURITÉ
BOUTON DE FERMETURE (COM-CLOSE)
À portail arrêté, ce bouton commande le mouvement de fermeture.
BOUTON DE COMMANDE SIMPLE (COM-K BUT)
Si DIP 6 sur OFF => effectue une séquence des commandes ouvre-arrête-ferme-arrêteouvre etc.
Si DIP 6 sur ON => effectue l’ouverture à portail fermé. Si actionné pendant le mouvement
d’ouverture, il ne provoque aucun effet. Si actionné à portail ouvert, il
ferme le portail. Si actionné pendant la fermeture, il rouvre le portail.
TÉLÉCOMMANDE POUR OUVERTURE TOTALE ET PIÉTON
SI DIP 6 sur OFF => effectue une commande cyclique des commandes ouvre-arrête-fermearrête-ouvre etc.
PHOTOCELLULE (COM-PHOT)
Avec la photocellule activée, le buzzer émet 1 tonalité.
DIP 4 OFF => à portail fermé, si un obstacle interrompt le rayon des photocellules, le portail
ne s’ouvre pas. Pendant le fonctionnement, les photocellules interviennent
aussi bien en ouverture (avec rétablissement du mouvement en ouverture
uniquement après avoir libéré le rayon des photocellules) qu’en fermeture
(avec rétablissement du mouvement inverse uniquement après avoir libéré
le rayon des photocellules).
DIP 4 ON => à portail fermé, si un obstacle se trouve face au rayon des photocellules
et que l’ouverture est commandée, le portail s’ouvre (pendant l’ouverture,
les photocellules n’interviennent pas). Les photocellules interviennent
uniquement pendant la fermeture (avec rétablissement du mouvement en
ouverture au bout d’une seconde, y compris si les photocellules sont encore
22
F
en train de fonctionner).
GESTION FERMETURE IMMÉDIATE APRÈS LE PASSAGE DEVANT LES PHOTOCELLULES
DIP 8 ON et DIP 4 OFF => lorsque le portail s’ouvre, en passant devant les photocellules, le
portail s’arrête. Une fois le passage terminé, le portail se ferme
au bout d’1 seconde.
DIP 8 ON et DIP 4 ON => alors que le portail s’ouvre, en passant devant les photocellules, le
portail continue à s’ouvrir. Une fois le passage terminé, le portail
s’arrête et se ferme après 1 seconde de pause.
Si pendant la fermeture, le passage est rapide (ex. piéton), le portail se rouvrira pendant deux
secondes pour ensuite se fermer à nouveau.
DIP 8 OFF => fermeture immédiate après le passage devant les photocellules désactivée.
BARRE PALPEUSE (COM - EDGE)
Avec la barre palpeuse activée, le buzzer émet 2 tonalités.
Si la barre palpeuse intervient à l’ouverture, elle commande le mouvement de fermeture
pendant 2 secondes avant de s’arrêter.
Si la barre palpeuse intervient à la fermeture, elle commande le mouvement d’ouverture
pendant 2 secondes avant de s’arrêter.
Si la barre palpeuse reste active (contact NO), aucun mouvement automatique n’est
autorisé.
Si la barre palpeuse n’est pas installée, effectuer un point entre les bornes COM-EDGE.
N.B. : Il est conseillé de vérifier la fonctionnalité des barres palpeuses au moins tous
les 6 mois.
ALARME PROVENANT DES BARRES PALPEUSES
Après une inversion à la suite de l’intervention de la barre palpeuse, le portail s’arrête et
la centrale signale l’alarme au moyen d’un clignoteur qui reste allumé pendant 1 minute et
d’un buzzer actif pendant 1 minute (avec signalisation acoustique de 2 tonalités toutes les
5 secondes).
Pendant et après la minute d’alarme, il est possible de faire repartir le portail en appuyant
sur n’importe quel bouton de commande.
SURVEILLANCE « AUTOTEST » BARRES PALPEUSES DE SÉCURITÉ (A+TEST/A-)
À l’aide de l’entrée A+TEST et du DIP 10 sur ON, il est possible de surveiller la ou les barres
palpeuses toutes dotées d’un l’alimentateur de contrôle branché aux bornes A+TEST /
A-(24 V cc).
La surveillance consiste à effectuer un test fonctionnel de la barre palpeuse à la fin de
chaque ouverture complète du portail.
Après chaque ouverture, la fermeture est donc uniquement autorisée si la ou les barres
palpeuses ont réussi le test fonctionnel.
Attention : la surveillance de l’entrée de la barre palpeuse peut être activée avec le DIP 10
positionné sur ON ou peut être désactivée avec le DIP 10 positionné sur OFF.
Une barre palpeuse mécanique ne peut pas être surveillée, le DIP 10 doit donc être
positionné sur OFF.
ÉCHEC D’ALARME AUTOTEST
En cas d’échec de l’autotest, le buzzer signalera pendant une minute (avec 4 tonalités toutes
les 5 secondes) l’état d’alarme et ne permettra pas de fermer le portail tant que le problème
n’aura pas été résolu.
L’alarme se renouvelle sous l’action d’une commande de fermeture.
CAPTEUR DE COURANT (DIP 7 - ON)
La centrale K 24 V est dotée d’un capteur de courant autocalibrant qui inverse le sens de
marche du portail dans le cas où ce dernier viendrait heurter des choses ou personnes
(conformément aux lois en vigueur, toujours vérifier, à l’aide d’un instrument spécifique, le
respect des valeurs imposées par la norme).
En cas de choc et si le capteur est activé, le buzzer émet 3 tonalités.
S’il est enclenché en ouverture, il inverse le mouvement en fermeture pendant 2 secondes
avant de se fermer.
S’il est enclenché en fermeture, il inverse le mouvement en ouverture pendant 2 secondes
avant de se fermer.
ALARME PROVENANT DU CAPTEUR DE COURANT
Après une inversion effectuée après l’intervention du capteur de courant, le portail s’arrête
en état d’alarme indiqué par le clignoteur qui s’allume pendant 1 minute et par le buzzer
qui reste actif pendant 1 minute (avec signalisation acoustique de 3 tonalités toutes les 5
secondes).
Pendant ou après la minute d’alarme, il est possible de rétablir le fonctionnement du portail
en appuyant sur n’importe quel bouton de commande.
BOUTON D’ARRÊT (COM-STOP)
Pendant le mouvement, le bouton d’arrêt effectue l’arrêt du portail.
Si le bouton STOP est enfoncé lorsque le portail est totalement ouvert (ou partiellement, au
moyen de la commande piéton), la fermeture automatique sera momentanément exclue (si
activée à l’aide du trimmer TCA avec la led DL3 allumée). Il est donc nécessaire d’actionner
une nouvelle commande pour refermer le portail.
En refermant le portail, la fermeture automatique sera réactivée (si activée à l’aide du trmmer
TCA avec la led DL3 allumée).
MODALITÉ « FONCTIONNE TOUJOURS » EN CAS DE PANNE DES SÉCURITÉS.
DIP 9 - OFF : Si la barre est en panne ou qu’elle fonctionne pendant plus de 5 secondes ou si la
photocellule est en panne ou qu’elle fonctionne pendant plus de 60 secondes, les commandes
OUVRE, FERME, K-BUTTON et PIÉTON fonctionneront uniquement en mode manuel.
L’activation de ce fonctionnement est confirmée par le clignotement de la led DL1 de
programmation
Avec ce fonctionnement, il est possible d’ouvrir ou de fermer le portail uniquement en
maintenant les boutons de commande enfoncés. La commande radio et la fermeture
automatique sont exclus.
Au rétablissement du contact des sécurités, au bout d’1 seconde, le fonctionnement
automatique ou pas à pas est automatiquement rétabli ; la radiocommande et la fermeture
automatique recommencent donc à fonctionner.
DIP 9 - ON : Il est possible de commander le portail, y compris avec la radiocommande, en
maintenant enfoncée la touche située sur la télécommande jusqu’à l’intervention du système
économies d’énergie (environ 8 secondes).
Remarque 1 : pendant ce fonctionnement, en cas de pannes des barres palpeuses (ou
photocellules), les photocellules (ou barres palpeuses) fonctionnent encore,
interrompant la manœuvre en cours.
Remarque 2 : le bouton d’arrêt ne doit pas être considéré comme une sécurité à éviter
dans ce mode ; ainsi, s’il est enfoncé ou cassé, aucune manœuvre ne peut
être effectuée.
La manœuvre manuelle est une manœuvre exclusivement d’urgence qui doit être effectuée
pour de courtes périodes avec la sécurité visuelle du mouvement de l’automatisme. Dès que
possible, les protections en panne doivent être réparées/remplacées pour rétablir le bon
fonctionnement du système.
FONCTION RÉCHAUFFEUR (DIP 5-ON)
Il permet à l’opérateur de toujours fonctionner à une température appropriée pour son
fonctionnement.
Ce dispositif s’active uniquement à portail fermé et si le fin de course d’ouverture ou de
fermeture fonctionne, à une température ambiante moteur de 0°C relevée par le capteur
monté sur la carte.
Lorsque le moteur est en mouvement, le réchauffeur est désactivé.
Il s’écoule seulement 10 secondes entre l’arrêt du portail et l’activation du réchauffeur (à
condition que la température ambiante moteur soit inférieure ou égale à 0°C).
Lorsque le réchauffeur atteint 3°C, il s’éteint tout en maintenant les conditions du milieu à
une température constante.
SIGNALISATIONS VISUELLES ET ACOUSTIQUES
CLIGNOTEUR
N.B. : Ce tableau électronique ne peut qu’alimenter un clignoteur doté d’un circuit clignotant
(ACG7061) avec une lampe de 24 V et 20 W maximum. Si les 20 W sont dépassés,
la logique du tableau électronique sera compromise et les opérations risquent
d’être bloquées.
FONCTION PRÉCLIGNOTEMENT
DIP 11 - OFF => le moteur et le clignoteur partent simultanément.
DIP 11 - ON => le clignoteur part 3 secondes avant le moteur.
TÉMOIN DE SIGNALISATION PORTAIL OUVERT à 24 V cc (A+ SIGNAL)
Il a le rôle de signaler les états de portail ouvert, partiellement ouvert ou quoiqu’il en soit
pas fermé totalement. Ce n’est que lorsque le portail est complètement fermé qu’il s’éteint.
Pendant la programmation, cette signalisation est active.
N.B. : Max. 10 W. Si cette valeur est dépassée avec les témoins, la logique du tableau
électronique sera compromise et les opérations risquent d’être bloquées.
BUZZER
Il a le rôle de signaler l’intervention des sécurités, l’état des alarmes et l’état de mémorisation
et de suppression des codes radio.
23
TABLEAU RÉCAPITULATIF SIGNALISATIONS VISUELLES ET ACOUSTIQUES
SIGNALISATIONS EN COURS DE PROGRAMMATION
ÉTAT BUZZER
ÉTAT CLIGNOTEUR
DIP 1 ON (MODE MANUEL PRÉSENT)
OU PANNE D'UNE SÉCURITÉ (MODE FONCTIONNE
TOUJOURS)
ÉVÉNEMENT
ÉTEINT
ÉTEINT
CLIGNOTE 250 MS ON-OFF
DIP 2 ON (PROGRAMMATION COURSE TOTALE)
ÉTEINT
ÉTEINT
CLIGNOTE 500 MS ON-OFF
DIP 2 > 1 ON (PROGRAMMATION COURSE PIÉTON)
ÉTEINT
ÉTEINT
CLIGNOTE 500 MS ON-OFF
PROCÉDURE DE PROGRAMMATION INTERROMPUE
À CAUSE DE L'INTERVENTION D'UNE SÉCURITÉ
ÉTEINT
ÉTEINT
ALLUMÉE FIXE
ÉVÉNEMENT
ÉTAT LED DL1 DE PROGRAMMATION
ÉTAT BUZZER
ÉTAT CLIGNOTEUR
AUCUN CODE INSÉRÉ
ÉTEINT
ÉTEINT
CLIGNOTEMENT ALTERNATIF ROUGE/VERT
ÉTAT LED DL10 BICOLORE DE PRG. RADIO
DIP 1 > 2 PRG. CODES RADIO OUVERTURE TOTALE
ÉTEINT
ÉTEINT
CLIGNOTE EN ROUGE PENDANT 10 SECONDES
DIP 1 > 3 PRG. CODES RADIO OUVERTURE PIÉTON
ÉTEINT
ÉTEINT
CLIGNOTE EN VERT PENDANT 10 SECONDES
PROGRAMMATION CODES RADIO OUVERTURE
TOTALE, RÉSULTAT OK
1 TONALITÉ
ÉTEINT
S'ALLUME EN VERT UNE FOIS
PROGRAMMATION CODES RADIO OUVERTURE
PIÉTON, RÉSULTAT OK
1 TONALITÉ
ÉTEINT
S'ALLUME EN ROUGE UNE FOIS
CODE RADIO NON CONTENU DANS LA MÉMOIRE
ÉTEINT
ÉTEINT
FLASH ROUGE
MÉMOIRE SATURÉE EN CODES RADIO (1000 CODES
MÉMORISÉS)
ÉTEINT
ÉTEINT
EFFECTUE 6 CLIGNOTEMENTS VERTS
SUPPRESSION CODES OUVERTURE TOTALE
2 TONALITÉS
ÉTEINT
EFFECTUE 2 CLIGNOTEMENTS ROUGES
SUPPRESSION CODES OUVERTURE PIÉTON
2 TONALITÉS
ÉTEINT
EFFECTUE 2 CLIGNOTEMENTS VERTS
SIGNALISATIONS PENDANT LE FONCTIONNEMENT
ÉVÉNEMENT
ÉTAT BUZZER
ÉTAT CLIGNOTEUR
ÉTEINT
ÉTEINT
LED DL12 S'ÉTEINT
INTERVENTION PHOTOCELLULE
1 TONALITÉ
ÉTEINT
LED DL13 S'ÉTEINT
INTERVENTION BARRE PALPEUSE
2 TONALITÉS
ÉTEINT
LED DL14 S'ÉTEINT
INTERVENTION CAPTEUR DE COURANT
3 TONALITÉS
ÉTEINT
AUCUNE LED ASSOCIÉE
PANNE D'UNE SÉCURITÉ OU SÉCURITÉ
ENCLENCHÉE PENDANT UNE DURÉE PROLONGÉE
ÉTEINT
ÉTEINT
LED DL1 CLIGNOTE 250 MS ON-OFF
FONCTIONNEMENT AVEC BATTERIES DE SECOURS
À 24 Vcc
ÉTEINT
ACTIF AU MOUVEMENT
SIGNALISATION BATTERIES DE SECOURS
DÉCHARGÉES
1 TONALITÉ TOUTES LES 5 SECONDES
PENDANT 1 MINUTE
(RENOUVELÉ PAR L'ACTIONNEMENT D'UNE
COMMANDE)
ÉTEINT
ALARME PROVENANT DE BARRE PALPEUSE
2 TONALITÉS TOUTES LES 5 SECONDES
PENDANT 1 MINUTE
(RENOUVELÉ PAR L'ACTIONNEMENT D'UNE
COMMANDE)
ACTIF PENDANT 1 MINUTE
CLIGNOTANT
AUCUNE LED ASSOCIÉE
ALARME PROVENANT DU CAPTEUR DE COURANT
3 TONALITÉS TOUTES LES 5 SECONDES
PENDANT 1 MINUTE
(RENOUVELÉE PAR L'ACTIONNEMENT D'UNE
COMMANDE)
ACTIF PENDANT 1 MINUTE
CLIGNOTANT
AUCUNE LED ASSOCIÉE
ÉCHEC ALARME D'AUTOTEST
4 TONALITÉS TOUTES LES 5 SECONDES
PENDANT 1 MINUTE
(RENOUVELÉE PAR L'ACTIONNEMENT D'UNE
COMMANDE)
ÉTEINT
AUCUNE LED ASSOCIÉE
ALARME MÉMOIRE NON INSÉRÉE
3 SECONDES ON - 3 SECONDES OFF
S'ÉTEINT UNIQUEMENT SI LA MÉMOIRE EST
INSÉRÉE
ÉTEINT
AUCUNE LED ASSOCIÉE
ALARME D'AUTOAPPRENTISSAGE INCORRECT
TONALITÉ CONTINUE PENDANT
10 SECONDES AVEC PAUSE DE 2 SECONDES
OFF
S'ÉTEINT UNIQUEMENT SI LE DIP 2 SE
DÉPLACE sur OFF
ÉTEINT
LED DL1 ALLUMÉE FIXE
ÉTEINT
ÉTEINT
LED DL10 BICOLORE ALLUMÉE FIXE DE
COULEUR ORANGE.
BOUTON D'ARRÊT ENFONCÉ
BLOCAGE FONCTIONNEL
24
ÉTAT LED ET SORTIE SIGNAL
SORTIE SIGNAL 2 CLIGNOTEMENTS 250 MS
ON-OFF SUIVIS D'UNE PAUSE DE 2 SECONDES
SORTIE SIGNAL CLIGNOTE EN CONTINU
500 MS ON-OFF
F
CARACTÉRISTIQUES TECHNIQUES
- Plage de température -10 ÷ +55°C
- Humidité < 95 % sans condensation
- Tension d'alimentation 230 V~ ±10 % (120 V 60 Hz, sur demande)
- Fréquence 50/60 Hz
150 VA - primaire 230 Vca
- Puissance transformateur 1er secondaire 24 Vca
2e secondaire 10 Vca
- Absorption maximale 100 mA
- Micro-interruptions de réseau 100 ms
- Puissance maximale témoin portail ouvert (SIGNAL) 24 Vcc 10 W
- Charge maximale clignoteur
24 Vcc 20 W
- Courant disponible pour photocellules et accessoires 24 Vcc 500 mA ±15 %
- Alimentation batterie 24 Vcc
CARACTÉRISTIQUES TECHNIQUES RADIO
- Fréquence réception
433,92 MHz
- Impédance 52 ohm
- Sensibilité >1 µV
- Contrôle de rétroaction PLL
1000
- Codes mémorisables RÉSOLUTION DES PROBLÈMES
Après avoir effectué tous les branchements en suivant attentivement le schéma et après avoir
situé le portail dans une position intermédiaire, vérifier le bon allumage des led DL4, DL7,
DL8, DL9, DL12, DL13 et DL14.
Si une des led ne s'allume pas, procéder aux vérifications suivantes, toujours avec le portail en
position intermédiaire, et remplacer les composants éventuellement en panne :
DL4 rouge éteint - déblocage manuel ouvert (le fermer)
DL7 rouge éteint - fin de course qui arrête la fermeture en panne
DL8 vert éteint - fin de course qui arrête l'ouverture en panne
DL9 rouge éteint - alimentation de 3,3 V absente (vérifier la présence de la tension secondaire
à 10 V ca du transformateur au connecteur J4).
DL12 rouge éteint - bouton d'arrêt en panne (si STOP n'est pas branché, effectuer le pont
entre COM et STOP).
DL13 rouge éteint - photocellules en panne (si les photocellules ne sont pas branchées,
effectuer le pont entre COM et PHOT).
DL14 rouge éteint - barre palpeuse de sécurité en panne (si la barre palpeuse n'est pas
branchée, effectuer le pont entre COM et EDGE).
Pendant le fonctionnement manuel, avec le DIP 1 positionné sur ON, vérifier que pendant
l'ouverture, la led verte DL6 s'allume et vérifier, pendant la fermeture, que la led rouge DL5
s'allume.
Dans le cas contraire, programmer à nouveau l'ouverture totale.
DÉFAUT
SOLUTION
Après avoir effectué les différents branchements et après avoir émis une tension, toutes les Vérifier l'intégrité des fusibles F1 et F2.
led sont éteintes.
En cas de fusible en panne, le remplacer uniquement par un fusible de la même valeur :
F1 = T 1,6 A F2 = T 300 mA
Les photocellules sont allumées et le moteur ne tourne pas.
Vérifier l'intégrité du fusible F3.
En cas de fusible en panne, le remplacer uniquement par un fusible de la même valeur :
F3 = T 10 A
Le portail effectue l'ouverture, mais ne se ferme pas après le temps défini
Vérifier l'allumage de la led DL3. Si elle est éteinte, tourner le trimmer dans le sens des
aiguilles d'une montre.
Ou vérifier que les photocellules ne soient pas en train de fonctionner.
Ou il est possible que le bouton STOP a été enfoncé à portail ouvert, entraînant le blocage
momentané de la fermeture automatique.
Le portail ne s'ouvre pas et ne se ferme pas en actionnant les différents boutons OUVRE- Contact barre palpeuse ou photocellule en panne avec DIP 4 OFF. Ajuster ou remplacer le
FERME-K-RADIO.
contact en question.
Ou contrôler que le déblocage manuel n'a pas été ouvert.
À portail ouvert, en actionnant le bouton K-RADIO ou le bouton FERME, le portail n'effectue Fonction horloge active. Vérifier l'état de l'entrée B.I.O.
aucun mouvement.
Ou échec de l'autotest barre palpeuse => vérifier les branchements entre le tableau
électronique et l'alimentateur des barres palpeuses. Attention : si l'alimentateur pour barres
palpeuses n'est pas utilisé, le DIP 10 doit être positionné sur OFF.
Le portail se met en état d'alarme pour avoir dépassé le courant. Cet état est signalé par Vérifier que le portail coulisse correctement en s'assurant de l'absence de frottements.
3 tonalités de BUZZER.
Uniquement si nécessaire, positionner le DIP 7 sur OFF pour exclure le capteur de courant.
LED DL1 clignote 250 ms ON/OFF
DIP 1 sur ON. Le déplacer sur OFF.
Ou une barre palpeuse ou photocellule est en panne. Le mouvement n'est autorisé qu'en
mode manuel.
Lors de la programmation des temps, le portail s'arrête et le buzzer émet une tonalité de 10 s Procédure de programmation incorrecte. Positionner le DIP 2 sur OFF.
avec une pause de 2 s.
Amener le portail à environ 20 cm de la fin de fermeture et répéter la programmation.
OPÉRATION FINALE -
Appliquer la garniture
La garniture ne devra être appliquée qu’après avoir terminé l’installation, avant de remonter le carter.
Garniture appliquée
Refermer le carter
25
Moteur prêt
OPTIONS
F
Pour les branchements et les données techniques des accessoires, se conformer aux livrets d’instruction correspondants.
CRÉMAILLÈRE MOD. 4 EN NYLON
PLAQUE À CIMENTER
avec angulaire galvanisé en barres de 1m. Idéal pour les portails pesant jusqu’à 1000 kg.
1 m
code ACS9000
10 m (1 m x 10)
code ACS9001
code ACG8107
TOUCH
FIT SLIM
PHOTOCELLULES MURALES
code ACG8032
PAIRE DE POTEAUX POUR FIT SLIM
code ACG8065
Les photocellules FIT SLIM ont la fonction de synchronisme dans le courant à C.A. et les
gammes de 20m.Plusieurs paires sont appliqués, rapprochés les uns des autres grâce
au circuit synchronisé.
Ajouter le TX SYNCRO
code ACG8029
s’il existe plus de deux paires de photocellules (jusqu’à 4).
BARRE PALPEUSE MÉCANIQUE L = 2 m - CERTIFIÉE EN 13849-2 (2008) - CATÉGORIE 3
code ACG3015
EMETTEUR RADIO SUN
SUN 2CH
SUN CLONE 2CH
SUN-PRO 2CH
SUN-PROX 2CH
cod. ACG6052
cod. ACG6056
cod. ACG6210
cod. ACG6220
SPARK
SUN 4CH
SUN CLONE 4CH
SUN-PRO 4CH
SUN-PROX 4CH
cod. ACG6054
cod. ACG6058
cod. ACG6214
cod. ACG6224
FEU CLIGNOTANT SPARK avec carte intermittente incorporée SUPPORT LATERAL ANTENNE SPARK 433
CARTE CHARGEUR BATTERIES
code ACG7061
code ACG7042
code ACG5452
BATTERIE
Batterie 2,2Ah 12V
code ACG4664
26
code ACG9515
G
B
SYSTEM LAY-OUT
1 - K operating device
2 - External photocells
3 - Rack of Module 4
4 - Key selector
5 - Radio antenna
6 - Blinker
7- Limit switch plate (cams)
8 - Mechanical safety strip
9- Mechanical safety strip with RED
10- Internal Photocells
11- Photocell columns
12- Mechanical stops
1
TECHNICAL
DATA
TECHNICAL FEATURES
Max. leaf weight
kg
800
Operating speed
m/s
0,1÷0,2
Max. Thrust force
Irreversible operating devices for sliding gates with a maximum weight of 800
kg / 1766 lbs.
The irreversibility of this operating device allows you to avoid using any electric lock for
an effective closing of the gate.
K800 24V
N
550 (with control panel)
Max. Torque
Nm
18,5 (with control panel)
Rack
M
4
Power absorbed from main line
W
207 (with control panel)
Absorption
A
0,9 (with control panel)
230V~ 50/60Hz
EEC Power supply
120V~ 60Hz
Power supply
2,16”
12,6”
Power absorbed from main line
W
180 (with control panel)
Absorption
A
1,5 (with control panel)
Normative cycles
n°
40 - 38s/38s
Daily operations suggested
n°
300
Service
%
100
Guaranteed consecutive cycles
n°
60/10m
Grease
6,41”
Weight of electroreducer
12,16”
Measurements in mm/inch
11,7”
COMLUBE LHITGREASE EP/GR.2
kg
13
Noise
db
<70
Working temperature
°C
-10 ÷ +55
Protection
IP
44
27
G
B
INSTALLATION K800 24V
CHECKING BEFORE THE INSTALLATION
!! THE GATE SHALL MOVE FRICTIONLESS !!
N.B.: Gate features must be uniformed with the standards and laws in force. The door/
gate can be automated only if it is in a good condition and its conditions comply with the
EN 12604 norm.
- The door/gate leaf does not have a pedestrian door. In the opposite case it is necessary
to take the appropriate steps, in accordance with EN 12453 norm (for instance; by
preventing the operation of the motor when the pedestrian door is opened, by installing
a safety microswitch connected with the control panel).
- Besides the electrical or mechanical limit switches available on the operators, there must
be, on both ends of the installation, a fixed mechanical stopper which stop the gate in
the unlikely event of ill functioning of limit swithces on the operators. For this reason the
fixed mechanical stopper must be of an adeguate size to withstand the static and kinetic
forces generated by the gate (12) (2).
-
Gate columns shall have anti-derailment guides on their top (3), to avoid the
unintentional gate release.
N.B.: Remove mechanical stops like the one in fig. 3.
No mechanical stops shall be on top of the gate, since these mechanical stops are not
safe enough.
2
Parts to install meeting the EN 12453 standard
USE OF THE SHUTTER
Skilled persons
(out of public
area*)
Skilled persons
(public area)
Unrestricted use
A
B
non possibile
with visible impulses
(e.g. sensor)
C or E
C or E
C and D, or E
with not visible
impulses
(e.g. remote control
device)
C or E
C and D, or E
C and D, or E
C and D, or E
C and D, or E
C and D, or E
COMMAND TYPE
with manned
operation
automatic
* a typical example are those shutters which do not have access to any public way
A: Command button with manned operation (that is, operating as long as activated),
like code ACG2013
B: Key selector with manned operation, like code ACG1010
C: Adjustable power of the motor
D: Safety strips and/or other safety devices to keep thrust force within the limits of
EN12453 regulation - Appendix A.
E: Photocells, like code ACG8026 (To apply every 60÷70cm for all the height of the
column of the gate up to a maximum of 2,5m - EN 12445 point 7.3.2.1)
3
RELEASE
To operated after the power supply to the motor has been interrupted.
In order to work manually on the gate, you just need to insert the fitting key and rotate it
3 times counterclockwise (4).
In order to carry out the manual operation of the gate leaf the followings must be checked:
- That the gate is endowed with appropriate handles;
- That these appropriate handles are placed so to avoid safety risks for the operator;
- That the physical effort necessary to move the gate leaf should not be higher than 225
N, for doors/gates for private dwellings, and, 390N for doors/gates for commercial and
industrial sites ( values indicated in 5.3.5 of the EN 12453 norm) .
4
28
G
B
MOTOR AND RACK FITTING
The rack shall be fitted over the motor support, at a certain distance from It.
Its height can be adjusted thanks to the holes In the rack.
The height adjusting is necessary to prevent the gate leaning on the driving gear (5 and
6).
To fix the rack on the gate, drill some Ø 5 mm holes and thread them using an M6 screw
tap.
The driving gear needs some 1 mm clearance from the rack.
Measurements in mm
5
Measurements in mm
6
LIMIT SWITCH FITTING
In order to determine the gate travel length, place two cams at the ends of the
rack (7).
Move the cams on the rack teeth to adjust their opening and closing travel.
To fix the cams to the rack, tighten the screws issued.
N.B: In addition to the electric stop cams mentioned above, you must also install strong
mechanical stops preventing the gate from sliding out from the top guides.
7
MAINTENANCE
To be carried out exclusively by skilled persons after the power supply to the
motor has been interrupted.
Periodically, when the gate is standstill, clean and keep the guide free from stones and
dirt.
29
G
B
ELECTRIC CONNECTIONS
K 24V code AC08006
L.S. OPEN
AND CLOSE
MANUAL
RELEASE
SAFETY
M
ANTENNA
433 MHz
POWER SUPPLY
230Vac 50Hz
FUSE
T 1,6A
x K800
TRANSFORMER
ANTENNA BRAIDING
COMMON
24Vac
STOP
PHOTOCELLS
EDGE
PEDESTRIAN
CLOSE
0
10Vac
OPEN
SINGLE COMMAND
BACKUP BATTERIES
FOR BATTERY CHARGER
BOARD (OPTIONAL)
TIMER
A+TEST / ASAFETY DEVICE
AUTO-TEST OR
ENERGY SAVING
(LOW POWER) WITH
BATTERY OPERATION
24Vdc 0,4A ±15%
24Vdc 0,4A ±15%
24Vdc 20W
24Vdc 10W
30
G
B
A - CONNEXIONS
EXTERNAL MAINS POWER SUPPLY TO BOARD 230 Vac
50/60 Hz (120 Vac 60 Hz on request)
F
> PHASE
N
> NEUTRAL
> EARTH
T1,6A FUSE ON MAIN POWER TERMINAL
F1 Trimmer TCA
J10
Trimmer RUN
J9
J8
J7
J12
J6
J5
J11
Wiring and
fixing of power
supply cable
J4
J1
J2
J1
A-
COMMON WIRE OF ACCESSORIES POWER SUPPLY AND EDGE AUTOTEST
A+
A+ TEST
-
SIGNAL
J2-J3
J4
J8
LIMIT
SWITCH
CONNECTOR FOR ELECTRICAL OR MAGNETIC LIMIT SWITCHES
POSITIVE FOR 24Vdc POWER SUPPLY TO ACCESSORIES
J9
MOTOR
CONNECTOR FOR 24Vdc MOTOR AND 5VDC ENCODER (DO NOT USE)
POSITIVE FOR 24Vdc POWER SUPPLY TO EDGE AUTO-TEST
J10
X K800
CONNECTORS FOR MOTOR K800 CONNECTION
NEGATIVE FLASHER 24Vdc 20W
J11
COM
POSITIVE FLASHER 24Vdc 20W
+
J3
OPEN GATE INDICATOR 24 Vdc MAX 10 W
BATTERY CONNECTORS FOR BATTERY CHARGER BOARD (CODE ACG4664
CHARGER OPTIONAL)
CONTACTS COMMON WIRE (GND)
STOP
STOP PULSE CONTACT (NC)
PHOT
PHOTOCELLS CONTACT (NC)
EDGE
EDGE CONTACT (NC)
PED
PEDESTRIAN OPENING PULSE CONTACT (NO)
CLOSE
CLOSE PULSE CONTACT (NO)
OPEN
OPEN PULSE CONTACT (NO)
10V
CONNECTORS FOR SECONDARY 10 VAC TRANSFORMER
J5
BAT
BATTERY CONNECTORS (OPTIONAL)
KBUT
SINGLE PULSE CONTACT (NO)
J6
24V
CONNECTORS FOR SECONDARY 24 VAC TRANSFORMER
B.I.O.
CONTACT (NO) DEDICATED TO A CLOCK
J7
SECURITY CONNECTOR FOR MANUAL RELEASE SWITCH
LOCK
B – SETTINGS
DIP 1 adjust stroke in line with electrical or magnetic limit
switches (point C)
DIP 2 programme full opening (point D)
DIP 2-1 programme pedestrian opening times (point E)
DIP 1-2 save/delete radio codes for full opening control (point F)
DIP 1-2 save/delete radio codes for pedestrian opening control (point G)
CONTROL MICRO-SWITCHES
DIP 3
ON - gradual start enabled
OFF - gradual start disabled
DIP 4
ON - photocells enabled only when closing
OFF - photocells always enabled
DIP 5
ON - heater enabled
OFF - heater disabled
DIP 6
ON - radio, k butt button and pedestrian control enabled in automatic mode
OFF - radio, k butt button and pedestrian control enabled in step-by-step mode
DIP 7
ON - current sensor enabled
OFF - current sensor disabled
DIP 8
ON - instant re-closing after transit on enabled photocell
OFF - instant re-closing after transit on disabled photocell
J12
ANTENNA TERMINALS DEDICATED TO CONNECTION OF A 433.92 MHz
ANTENNA
DIP 9
ON - mode on always, even with remote control enabled
OFF - mode on always, even with control buttons enabled
DIP 10
ON - edge auto-test enabled
OFF - edge auto-test disabled
DIP 11
ON - pre-flashing enabled
OFF - pre-flashing disabled
DIP 12
ON - available
OFF - available
DIP 13
ON - function dedicated to gear motor K800
OFF - function dedicated to gear motor K400
DIP 14
ON - enable SUN/MOON radio system
OFF - enable SUN-PRO radio system
PROG. > PROGRAMMING KEY.
EXTRACTIBLE MEMORY CONTAINING FUNCTIONAL DATA AND RADIO
MEMORY >
CODES.
SW
31
> CONNECTOR FOR SOFTWARE UPGRADE.
G
B
RESERVED > CONNECTOR RESERVED TO FACTORY CONTROLS.
RUN > TRIMMER FOR MOTOR SPEED ADJUSTMENT.
With this trimmer it is possible to adjust the motor speed (set by default at half the speed).
The adjustment is quite useful to align the automation with the European standards on
impacts.
For gates weighing from 0 to 200 kg is recommended to set the RUN trimmer from
1/2 to MAX.
For gates weighing from 200 to 400 kg is recommended to set the RUN trimmer from
MIN to 1/2.
Note: the slow motion is not adjustable, as it is calculated automatically.
TCA > FULL OR PEDESTRIAN AUTOMATIC CLOSING TRIMMER
Not enabled by default and led DL3 off (trimmer rotated fully counter-clockwise).
With this trimmer it is possible to adjust the time before the full or pedestrian automatic
closing.
Full or pedestrian automatic closing can be enabled only with the door fully (full) or partly
(pedestrian) open and led DL3 on (with trimmer rotated clockwise).
The pause time can be adjusted from a minimum of 2 seconds to a maximum of 2 minutes.
GRADUAL START
If DIP 3 is ON, gradual motion for 1 second is enabled with every start.
LED SIGNALS
DL1 programming signal enabled DL2 DL3 automatic closing time signal
manual unlock micro-switch signal
DL4
DL5 closing gate signal opening gate signal DL6 DL7 closing limit switch signal DL8 opening limit switch signal 3.3V micro-controller voltage presence signal
DL9 DL10 radio code programming signal programmer connected signal
DL11
DL12 stop contact signal
DL13 photocell contact signal
DL14 edge contact signal
Buzzer
Fuses
F2
F3 (red)
(red)
(red)
(red)
(green)
(red)
(green)
(yellow)
(two colours)
(red)
(red)
(red)
(red)
GATE AT ABOUT 20 CM FROM THE CLOSING LIMIT-SWITCH.
2 - Set DIP 2 to ON mode = > led DL1 starts flashing.
3 - Press the PROG button or the remote control button (if previously memorized) dedicated
to the total opening. The gate will open and close 3 times. DO NOT PASS IN FRONT OF
THE PHOTOCELLS WHILE THE GATE IS MOVING.
4 - The programming stops when the gate is closed and led DL1 is off.
5 - Set DIP 2 to OFF.
Note well: If at the end of the programming procedure the trimmer RUN is moved, the
programming procedure must be repeated.
Note: the starting point is calculated automatically by the control unit when programming the
times and is enabled 50 ÷ 60 cm before reaching the opening or closing limit stop.
To repeat the programming procedure, position the DIP 2 in the OFF mode, and
by using the procedure “C – Adjust stroke in line with electrical or magnetic limit
switches” close the gate almost completely, leaving it open for 20 cm. Then, repeat
the programming procedure as described above.
D – PROGRAMME PEDESTRIAN OPENING*
1 - First, set DIP 2 to ON and then DIP 1 to ON. Led DL1 starts flashing.
2 - Press the pedestrian button (COM-PED) or the remote control button (if previously
memorized) dedicated to the pedestrian opening = > The gate opens.
3 - Press the pedestrian button to stop the gate (the pedestrian opening stroke of the gate is
now set). After 2 seconds the gate will automatically close..
4 - When done programming the pedestrian opening, set DIP 1 and 2 to OFF.
* When programming, the safety devices are enabled and their intervention stops the
programming (led DL1 shifts from flashing to on steady).
To repeat the programming procedure, position DIP 1 and DIP 2 to OFF and by using
the procedure “C – Adjust stroke in line with electrical or magnetic limit switches”
close the gate completely. Then, repeat the programming procedure as described
above.
F - FULL OPENING RADIO CODES PROGRAMMING (MAX 1000 CODES)
CAUTION: before you save the remote controls, use DIP 14 to choose which remote
controls to use:
DIP 14 set to OFF: you can save remote controls with variable code SUN-PRO:
SUN-PRO 2CH dual channel - red keys and white led code ACG6210
SUN-PRO 4CH quadruple channel - red keys and white led code ACG6214
SUN-PROX 2CH dual channel - red keys and yellow led code ACG6220
SUN-PROX 4CH quadruple channel - red keys and yellow led code ACG6224
> signals various functions, see table of visual and sound signals.
T 300 mA functional logic safety fuse
T 10 A
motor safety fuse
C – ADJUST STROKE IN LINE WITH ELECTRICAL OR MAGNETIC LIMIT
SWITCHES
This control has the task of facilitating system commissioning or any subsequent adjustments
for the installer.
1 - Unlock the operator using the manual release and position the limit switch cams on the
rack, so as to define the gate stroke.
2 - Bring the gate to mid-stroke position and lock the operator.
3 - Set DIP 1 to ON mode = > led DL1 starts flashing.
4 - Press and hold the PROG button (the command is operator-run, open-stop-close-stopopen-etc...) = > the gate starts at high speed and then slows down until it reaches the
limit stop. Check that the gate stops in the desired position. If not, move the limit switch
cams and try again. Check the limit switch on the opposite side.
5 - You can adjust the high speed during the first 5 seconds of operation by rotating the RUN
trimmer. Rotating the RUN trimmer clockwise, the speed increases. The RUN trimmer is
set by default to mid-stroke.
6 - When done, reset DIP 1 to OFF. Led DL1 goes off signalling exit from the control.
IMPORTANT: During this operation, the stop button, edges and photocells are not
enabled.
D – PROGRAMME FULL OPENING*
Caution: If the inputs STOP, PHOT and EDGE are not connected, run jumpers
between COM-STOP, COM-PHOT and COM-EDGE before you proceed with
programming.
1 - IMPORTANT: TO PROPERLY PROGRAMME THE OPENING, YOU MUST POSITION THE
DIP 14 set to ON (default): you can save remote controls with fixed code SUN and MOON:
SUN 2CH dual channel - blue keys and white led code ACG6052
SUN 4CH quadruple channel - blue keys and white led code ACG6054
SUN CLONE 2CH dual channel - blue keys and yellow led code ACG6056
SUN CLONE 4CH quadruple channel - blue keys and yellow led code ACG6058
MOON 2CH dual channel - black keys and yellow led code ACG6081
MOON 4CH quadruple channel - black keys and yellow led code ACG6082
CAUTION: You cannot save remote controls with fixed code and remote controls with
variable code simultaneously.
The remote controls can be programmed only when the gate is at a standstill.
1 - First, set DIP 1 to ON and then DIP 2 to ON. Programming led DL10 flashes red for 10
seconds.
2- Within these 10 seconds, press the remote control button (normally channel A). If the
remote control has been saved correctly, two-tone led DL1 turns green and a buzzer
tone confirms the saved entry. The 10 seconds for programming the codes are reset
automatically with two-tone led DL10 that flashes red to save the next remote control.
3-
To finish programming, let the 10 sec pass or press briefly the PROG. button.
Programming led DL10 stops flashing.
4 - Reset DIP 1 to OFF and DIP 2 to OFF.
5 - End of sequence.
DELETING ALL RADIO CODES RESERVED TO FULL OPENING
The codes can be deleted only when the gate is at a standstill.
1 - Set DIP 1 to ON and subsequently DIP 2 to ON.
2 - Programming led DL10 flashes red for 10 seconds.
3- Within these 10 seconds, press and hold the PROG button for 5 seconds. Code deletion
is indicated by two green flashes of the two-tone led DL10 and 2 tones of the buzzer to
confirm the deleted entry. Subsequently, programming two-tone led DL10 flashes red for
10 seconds, and you can enter new codes as shown in the following procedures.
4 - Reset DIP 1 to OFF and DIP 2 to OFF.
5 - End of sequence.
32
G
B
RADIO CODE MEMORY FULL SIGNAL
The signal will only be given when the gate is at a standstill.
1 - First, set DIP 1 to ON and then DIP 2 to ON.
2- Led DL10 flashes green 6 times to signal that the memory is full (1000 codes saved).
Subsequently, programming two-tone led DL10 flashes red for 10 seconds, allowing (if
necessary) to delete all the codes.
4 - Reset DIP 1 to OFF and DIP 2 to OFF.
5 - End of sequence.
G - PEDESTRIAN OPENING RADIO CODES PROGRAMMING (MAX 1000
CODES)
The codes can be programmed only when the gate is at a standstill.
1 - First, set DIP 1 to ON and then DIP 3 to ON. Programming two-colour led DL10 flashes
green for 10 seconds.
2 - Press the remote control button (normally channel B) within the pre-set 10 seconds. If the
remote control has been saved correctly, two-tone led DL1 turns red for an instant, and
a buzzer tone confirms the saved entry. The 10 seconds for programming the codes are
reset automatically with two-tone led DL10 that flashes green to save the next remote
control.
3-
To finish programming, let the 10 sec pass or press briefly the PROG. button.
Programming led DL10 stops flashing.
4 - Reset DIP 1 to OFF and DIP 3 to OFF.
5 - End of sequence.
DELETING ALL RADIO CODES RESERVED TO PEDESTRIAN OPENING
The codes can be deleted only when the gate is at a standstill.
1 - First, set DIP 1 to ON and then DIP 3 to ON. Programming led DL10 flashes green for
10 seconds.
2 - Within these 10 seconds, press and hold the PROG button for 5 seconds. Code deletion
is indicated by two red flashes of the two-tone led DL10 and 2 tones of the buzzer to
confirm the deleted entry.
3 - Subsequently, programming two-tone led DL10 flashes green steady for 10 seconds, and
you can enter new codes as shown in the following procedures.
4 - Reset DIP 1 to OFF and DIP 3 to OFF.
5 - End of sequence.
RADIO CODE MEMORY FULL SIGNAL
The signal will only be given when the gate is at a standstill.
1 - First, set DIP 1 to ON and then DIP 3 to ON.
2 - Led DL10 flashes green 6 times to signal that the memory is full (1000 codes saved).
Subsequently, programming two-tone led DL10 flashes red steady for 10 seconds,
allowing (if necessary) to delete all the codes.
3 - Reset DIP 1 to OFF and DIP 3 to OFF.
4 - End of sequence.
OPERATION OF CONTROL ACCESSORIES
OPENING BUTTON (COM-OPEN)
When the gate is at a standstill, the button controls the opening movement. If pressed during
closing, the gate will re-open.
CLOSING BUTTON (COM-CLOSE)
When the gate is at a standstill, the button controls the closing movement.
SINGLE CONTROL BUTTON (COM-K BUT)
If DIP 6 is set to OFF = > it runs a command sequence open-stop-close-stop-open etc.
If DIP 6 is set to ON = > it opens the closed gate. If operated while the gate is opening, the
button has no effect. If operated with the gate open, it closes the
gate. If operated while the gate is closing, it re-opens the gate.
REMOTE CONTROL FOR BOTH FULL AND PEDESTRIAN OPENING
If DIP 6 is set to OFF = > it runs a cyclical command sequence open-stop-close-stop-open
etc.
If DIP 6 is set to ON = > it opens the closed gate. If operated while the gate is opening, the
button has no effect. If operated with the gate open, it closes the
gate. If operated while the gate is closing, it re-opens the gate.
CLOCK FUNCTION - B.I.O. CONTROL (COM-B.I.O.)
The clock function is useful during rush hours, when vehicle traffic is slow (e.g. entrance/exit
of workers, emergencies in residential areas, parking lots, etc.).
ENABLING THE CLOCK FUNCTION
By connecting a switch and/or a daily/weekly clock to the “COM-B.I.O.” terminals, you can
open the gate (and keep it open) until the switch or clock remain enabled.
All command functions are inhibited with open automation.
When releasing the switch, or once the set time has lapsed, the automation will shut down
instantly.
PEDESTRIAN OPENING BUTTON (COM-PED.BUT)
Command reserved to partial opening and re-closing of the gate.
When opening, closing or pausing the pedestrian command, you can control the full opening
using any command connected on the board.
Using the DIP switches 6, you can choose the operating mode of the pedestrian control
button.
If DIP 6 is set to OFF = > it runs a cyclical command sequence open-stop-close-stop etc.
If DIP 6 is set to ON = > it opens the closed gate. If operated while the gate is opening, the
button has no effect. If operated with the gate open in pedestrian
mode, it closes the gate. If operated while the gate is closing, it
re-opens the gate.
FULL OR PEDESTRIAN AUTOMATIC CLOSING TRIMMER (TCA) - Not enabled by default
and led DL3 off (trimmer rotated fully counter-clockwise).
With this trimmer it is possible to adjust the time before the full or pedestrian automatic
closing.
The gate can be closed automatically only with the door open, by operating the full or
pedestrian control and with led DL3 on (trimmer rotated clockwise to enable the function).
Once the gate has been fully opened the pause time can be adjusted from a minimum of 2
seconds to a maximum of 2 minutes.
Once the gate has performed the pedestrian opening, the pause time can be adjusted from
2 seconds till a maximum of 30 seconds.
This time setting before the automatic closing can be done by adjusting the TCA trimmer and
will be in relation to its position.
For instance, with the trimmer positioned half way, the pause time after the complete open
postion would be 1 minute, whilst it will be 15 seconds after the pedestrian opening.
MANUAL RELEASE (LED DL4)
Unlocking the operator, the micro-switch contact will open on J7 (the LED DL4 goes off) and
all controls will not work.
After locking the operator and running a command, the first movement will take place
at slow speed. Only after completing this first movement, the operator will resume
work at the set speed.
OPERATION AFTER BLACK-OUT
At the time of the blackout, gate status is saved in the memory.
When mains voltage is restored:
If the gate is located on the opening or closing limit switch, operating the control will close
or open the gate with the saved data.
If the gate is in intermediate position, operating the control will open the gate slowly until
it reaches the opening limit switch. After completing this first movement, the operator will
resume work at the set speed.
OPERATION OF SAFETY DEVICES
PHOTOCELL (COM-PHOT)
With the photocell enabled, the buzzer emits 1 tone.
DIP 4 OFF = > with gate closed, if an obstacle stops the photocell beam, the gate does not
open. During operation, the photocells intervene both during opening (with
the gate opening only after freeing the photocell beam), and closing (with
reverse motion recovery only after freeing the photocell beam).
DIP 4 ON = > with the gate closed, if an obstacle is in front of the photocell beam and
the control to open the gate is operated, the gate opens (during opening
the photocells will not intervene). The photocells will intervene only during
closing (with the gate opening after 1 second, even if the photocells are still
engaged).
IMMEDIATE GATE CLOSURE AFTER TRANSIT ON PHOTOCELLS
DIP 8 ON and DIP 4 OFF = > while the gate opens, passing in front of the photocells, the
gate will stop. Once it is done transiting, after 1 second the
gate closes.
DIP 8 ON and DIP 4 ON = > while the gate opens, passing in front of the photocells, the
gate will continue to open. Once it is done transiting, the gate
will stop and after a pause of 1 second, close.
If during closing you have a rapid transit (e.g. Pedestrian), the gate will reopen for two
seconds and then close again.
33
G
B
8 OFF => immediate gate closure after transit on photocells disabled.
EDGE (COM-EDGE)
With the edge enabled, the buzzer emits 2 tones.
If the edge intervenes while the gate is opening, it will cause the gate to to stop for 2
seconds and then come to a complete stop.
If the edge intervenes while the gate is closing, it will cause the gate to to open for 2
seconds and then come to a complete stop.
If the edge remains engaged (contact NO), no automatic movement is allowed.
If the edge not installed, jumper connect the COM-EDGE terminals.
IMPORTANT: It is recommended to check that the edges are working properly at least
once every 6 months.
ALARM FROM EDGE
After an inversion following intervention of the edge, the gate stops and the control unit
signals the alarm by activating the flasher for 1 minute and the buzzer for 1 minute (with a
2-tone sound signal every 5 seconds).
During or after the alarm minute, you can reset the gate by pressing any control button.
SAFETY EDGE “AUTO-TEST” MONITORING (A+/A- TEST)
Via the A+ TEST input and with DIP 10 set to ON, you can monitor the edge(s) equipped with
its/their own power unit connected to the A+/A- TEST terminals (24Vdc).
The monitoring consists of a functional test of the edge performed at the end of a complete
gate opening.
After every opening, closing of the gate is only allowed if the edge(s) has passed the
functional test.
Caution: Edge entrance monitoring can be enabled with DIP 10 set to ON, or disabled with
DIP 10 set to OFF.
A mechanical edge cannot be monitored, therefore DIP 10 must be set to OFF.
FAILED AUTO-TEST ALARM
If the edge auto-test fails, the buzzer will sound for a minute (with 4 tones every 5 seconds)
to signal the alarm, and will not allow closure of the gate until you have solved the problem.
The alarm is reset with a closing command.
CURRENT SENSOR (DIP 7 - ON)
The K 24V control unit features a self-calibrating current sensor which reverses the gate’s
movement if this bumps against things or people (in compliance with the applicable en
standards - always check with the aid of the tool that the values are within the standard
limits).
With sensor enabled, in the event of impact, the buzzer emits 3 tones.
If the sensor intervenes while the gate is opening, it will invert the gate’s closing
movement for 2 seconds and then come to a complete stop.
If the sensor intervenes while the gate is closing, it will invert the gate’s opening
movement for 2 seconds and then come to a complete stop.
DIP 9 - ON: You can control the gate also with the remote control by pressing and holding
the key on the remote control until the power saver system is activated (approximately 8
seconds).
Note 1: during this mode, if the edges (or photocells) experience a fault, they will continue to
work, interrupting the command in progress.
Note 2: the stop button is not considered a safety to be bypassed in this mode, therefore if
it is pressed or broken, it does not allow any command.
The operator-run command is exclusively an emergency that must be run only for short
periods and with the visual safety of the automatism. Repair/replace the faulty safety devices
as soon as possible, in order to restore correct system operation.
HEATER FUNCTION (DIP 5-ON)
Allows the operator to always operate at a temperature suitable for the operation.
This device automatically turns on only when the gate is at a standstill and the opening or
closing limit-switch engaged, at an ambient temperature of the motor of 0° C, detected by
the sensor mounted on the board.
When the motor is in motion, the heater is turned off.
After 10 seconds that the gate remains stationary, the heater is activated (if the motor
ambient temperature is less than or equal to 0° C).
When the motor reaches a temperature of 3° C, the heater shuts down, maintaining the
environmental conditions at a constant temperature.
VISUAL AND SOUND SIGNALS
FLASHER
IMPORTANT: This electronic panel can power only one flasher with flashing circuit (ACG7061)
with a 24V and 20W (maximum) lamp. If you exceed 20W, the electronic
panel’s logic will be compromised, with the system possibly stopping.
PRE-FLASHING FUNCTION
DIP 11 - OFF => the motor and flasher start simultaneously.
DIP 11 - ON => the flasher starts 3 seconds before the motor.
GATE OPEN 24Vdc INDICATOR LIGHT (A+ SIGNAL)
The light signals that the gate is open, partly open or not completely closed. Only when the
gate is completely closed does the light turn off.
During programming, this signal is enabled.
IMPORTANT: Max. 10 W. If you pass the limits with the lights, the electronic panel’s
logic will be compromised, with the system possibly stopping.
BUZZER
Signals that the safety devices have triggered an alarm, alarm status and codes saved/
deleted in memory.
CURRENT SENSOR ALARM
After an inversion following intervention of the current sensor, the gate stops due to an alarm,
which is signalled by the flasher turning on for 1 minute and the buzzer for 1 minute (with a
3-tone sound signal every 5 seconds).
During or after the alarm minute, you can reset the gate by pressing any control button.
STOP BUTTON (COM-STOP)
During the movement, the stop button will stop the gate.
If the STOP button is pressed when the gate is fully open (or partially using the pedestrian
command) the automatic closure will be temporarily excluded (if enabled via trimmer ACT
with led DL3 on). It is therefore necessary to give a new command to close the gate.
Closing the gate will re-enable automatic closing (if enabled via trimmer ACT with led DL3
on).
“ON STEADY” MODE IN THE EVENT OF A SAFETY DEVICE FAILURE.
DIP 9 - OFF: If the edge is faulty or engaged for more than 5 seconds, or if the photocell is
faulty or engaged for more than 60 seconds, the OPEN,CLOSE, K-BUTTON and PEDESTRIAN
controls will work if operator-run.
Programming led DL1 will flash to signal that the function has been enabled.
This mode allows opening or closing of the gate only if the control buttons are held pressed.
The radio control and automatic closing are excluded.
When the safety contact is restored, after 1 second, the automatic or step mode are
automatically re-enabled, and therefore also the remote control and automatic closing will
work again.
34
TABLE SUMMARISING ALARMS AND VISUAL AND SOUND SIGNALS
SIGNALS DURING PROGRAMMING SEQUENCE
BUZZER STATUS
FLASHER STATUS
DIP 1 ON (HOLD MODE)
OR FAILURE OF A SAFETY DEVICE (ON
STEADY MODE)
EVENT
OFF
OFF
FLASHES ON-OFF 250 MS
DIP 2 ON (FULL STROKE PROGRAMMING)
OFF
OFF
FLASHES ON-OFF 500 MS
DIP 2>1 ON (PEDESTRIAN STROKE
PROGRAMMING)
OFF
OFF
FLASHES ON-OFF 500 MS
PROGRAMMING SEQUENCE STOPPED DUE
TO INTERVENTION OF A SAFETY DEVICE
OFF
OFF
ON STEADY
BUZZER STATUS
FLASHER STATUS
NO REMOTE CONTROL CODE ENTERED
OFF
OFF
FLASHES INTERMITTENTLY RED/GREEN
DIP 1 > 2 - FULL OPENING REMOTE
CONTROL CODE PROGRAMMING
OFF
OFF
FLASHES RED FOR 10 SECONDS
DIP 1 > 3 - PEDESTRIAN OPENING REMOTE
CONTROL CODE PROGRAMMING
OFF
OFF
FLASHES GREEN FOR 10 SECONDS
FULL OPENING REMOTE CONTROL CODE
PROGRAMMING, OUTCOME OK
1 TONE
OFF
TURNS GREEN ONCE
PEDESTRIAN OPENING REMOTE CONTROL
CODE PROGRAMMING, OUTCOME OK
1 TONE
OFF
TURNS RED ONCE
REMOTE CONTROL CODE NOT PRESENT IN
MEMORY
OFF
OFF
RED FLASH
MEMORY SATURATED BY REMOTE CONTROL
CODES (1000 CODES SAVED)
OFF
OFF
RUNS 6 GREEN FLASHES
FULL OPENING CODE DELETION
2 TONES
OFF
RUNS 2 RED FLASHES
PEDESTRIAN OPENING CODE DELETION
2 TONES
OFF
RUNS 2 GREEN FLASHES
EVENT
PROGRAMMING LED DL1 STATUS
TWO-COLOUR DL10 LED STATUS (FOR REMOTE
CONTROL PROG.)
WARNING SIGNALS DURING OPERATION
EVENT
BUZZER STATUS
FLASHER STATUS
OFF
OFF
LED DL12 TURNS OFF
PHOTOCELL INTERVENTION
1 TONE
OFF
LED DL13 TURNS OFF
EDGE INTERVENTION
2 TONES
OFF
LED DL14 TURNS OFF
CURRENT SENSOR ENABLED
3 TONES
OFF
NO LED COMBINED
FAILURE OF A SAFETY DEVICE OR SAFETY
DEVICE ENGAGED FOR TOO LONG
OFF
OFF
LED DL1 FLASHES ON-OFF 250 MS
RUNNING WITH EMERGENCY BATTERIES
(24 Vdc)
OFF
CURRENTLY ENABLED
SIGNAL OUTPUT FLASHES ON-OFF TWICE FOR
250 MS FOLLOWED BY A PAUSE OF 2 SECONDS
EMERGENCY BATTERIES LOW SIGNAL
1 TONE EVERY 5 SECONDS FOR 1 MINUTE
(RESET BY ACTIVATING A CONTROL)
OFF
SIGNAL OUTPUT FLASHES CONTINUOUSLY ONOFF FOR 500 MS
ALARM FROM EDGE
2 TONES EVERY 5 SECONDS FOR 1 MINUTE
(RESET BY ACTIVATING A CONTROL)
ENABLED FOR 1 MINUTE (FLASHING)
NO LED COMBINED
CURRENT SENSOR ALARM
3 TONES EVERY 5 SECONDS FOR 1 MINUTE
(RESET BY ACTIVATING A CONTROL)
ENABLED FOR 1 MINUTE (FLASHING)
NO LED COMBINED
FAILED AUTO-TEST ALARM
4 TONES EVERY 5 SECONDS FOR 1 MINUTE
(RESET BY ACTIVATING A CONTROL)
OFF
NO LED COMBINED
3 SECONDS ON - 3 SECONDS OFF
TURNS OFF ONLY WHEN THE MEMORY IS
INSERTED
OFF
NO LED COMBINED
CONTINUOUS TONE FOR 10 SECONDS WITH
A PAUSE OF 2 SECONDS OFF
TURNS OFF ONLY IF DIP 2 IS SET TO OFF
OFF
LED DL1 ON STEADY
OFF
OFF
TWO-TONE LED DL10 IS ON STEADY (ORANGE).
STOP BUTTON PRESSED
MEMORY NOT INSERTED ALARM
INCORRECT SELF-DIAGNOSTIC ALARM
FUNCTIONAL BLOCK
35
LED STATUS AND SIGNAL OUTPUT
G
B
TECHNICAL SPECIFICATIONS
-10 ÷ +55°C
- Temperature range - Humidity < 95% without condensation
- Power supply 230V~ ±10% (120V 60Hz on request)
- Frequency 50/60 Hz
- Transformer power 150VA - main 230Vac
1st secondary 24Vac
2nd secondary 10Vac
- Maximum absorption 100 mA
- Network micro-switch 100ms
- Maximum power gate open led (SIGNAL) 24Vdc 10W
24Vdc 20W
- Flasher maximum load - Current available for photocells and accessories 24Vdc 500 mA ±15%
- Battery power supply 24Vdc
RADIO TECHNICAL SPECIFICATIONS
433,92MHz
- Reception frequency
- Impedence 52 ohm
- Sensitivity >1 µV
- Feedback control PLL
- Memory storage (codes) 1000
TROUBLESHOOTING
After making all the connections, carefully following the diagram and having placed the gate
in intermediate position, check the correct lighting of led DL4, DL7, DL8 DL9, DL12, DL13
and DL14.
If one of the led does not turn on, check the following and replace any faulty components if
necessary (perform the inspection with the gate always in intermediate position):
DL4 red off - manual release open (close it)
DL7 red off - limit switch that stops gate closure is faulty
DL8 green off - limit switch that stops gate opening is faulty
DL9 red off - 3.3V power supply missing (check secondary 10Vac voltage presence from
transformer to connector J4).
DL12 red off - stop button fault (if the STOP is not connected, run the jumper between COM
and STOP).
DL12 red off - photocell fault (if the photocells are not connected, run the jumper between
COM and PHOT).
DL14 red off - safety edge fault (if the edge is not connected, run the jumper between COM
and EDGE).
During operation, hold DIP 1 in ON position, make sure that when the gate opens, the green
led DL6 turns on and that when the gate closes, red led DL5 turns on.
Otherwise, perform a new full opening programming sequence.
PROBLEM
SOLUTION
After making the various connections and supplying voltage, all leds are off.
Check the integrity of fuses F1 and F2.
In case of faulty fuse, replace it only with one of the same value: F1 = T 1,6A
The photocells are not lit and the motor does not rotate
Check the integrity of fuse F3.
In case of faulty fuse, replace it only with one of the same value: F3 = T 10A
The gate opens, but does not close after the set time
Check that led DL3 turns on. If it is off, turn the trimmer clockwise.
Or, check that the photocells are not engaged.
It is also possible that you have pressed the STOP button with the gate open, temporarily
blocking the automatic closure.
F2 = T 300mA
The gate does not open and does not close when pressing the various K-RADIO OPEN-CLOSE Edge contact or photocell fault with DIP 4 OFF. Adjust or replace its contact.
buttons.
Or, check that manual release device is not open.
When the gate is open, pressing the K, RADIO button or the CLOSE button, the gate does not Clock function enabled. Check the status of the B.I.O. input.
move.
Or, edge auto-test failed = > check the connections between the electronic panel and power
unit of the edges. Caution: If you are not using a power unit for the edges, DIP 10 must be
set to OFF.
the gate triggers an alarm due to over-current, signalled by 3 buzzer tones.
Check the sliding of the gate, making sure that there is no friction. Only if necessary, set DIP
7 to OFF to exclude the current sensor.
LED DL1 flashes ON-OFF 250ms.
DIP 1 set to ON. Set it to OFF.
Or, an edge or photocell is broken. The movement is allowed only if operator-run.
When programming the time, the gate stops and the buzzer emits a tone for 10 s, with pause Incorrect programming sequence. Set DIP 2 to OFF.
for 2 s.
Bring the gate at about 20 cm from the end closure and repeat the programming sequence.
FINAL OPERATION -
Fit the gasket
The gasket shall be fitted only at the end of the installation, before you mount the case.
The gasket is fitted
Close the case
36
Motor ready
G
B
ACCESSORIES
For the connections and the technical data of the optional equipments follow the relevant handbooks.
NYLON RACK MODULE 4
PLATE TO BE CEMENTED
code ACG8107
with zinc plated angle Iron, In 1 m bars. Ideal for gates up to 1,000 kg / 2,200 lbs weight.
1 m / 3,28”
code ACS9000
10 m / 32,8” (1 m/3,28” x 10)
code ACS9001
TOUCH
FIT SLIM
PHOTOCELLS for the wall-installation
code ACG8032
PAIR OF COLUMNS FOR FIT SLIM code ACG8065
FIT SLIM photocells have synchronism function in AC current and ranges of 20 m.
You can fit many couples close together thanks to the synchronising circuit.
Add the TX SYNCRO
code ACG8029
for more than 2 photocells couples (up to 4).
MECHANICAL STRIP L = 2 m
CERTIFIED EN 13849-2 (2008) CATEGORY 3
RADIO TRANSMITTER SUN
SUN 2CH
SUN CLONE 2CH
SUN-PRO 2CH
SUN-PROX 2CH
cod. ACG6052
cod. ACG6056
cod. ACG6210
cod. ACG6220
code ACG3015
SPARK
SUN 4CH
SUN CLONE 4CH
SUN-PRO 4CH
SUN-PROX 4CH
SPARK BLINKER WITH IN-BUILT INTERMITTENT CARD LATERAL SUPPORT SPARK ANTENNA 433
cod. ACG6054
cod. ACG6058
cod. ACG6214
cod. ACG6224
BATTERY CHARGER BOARD
code ACG7061
code ACG7042
code ACG5452
BATTERY
Battery 2,2Ah 12V
code ACG4664
37
code ACG9515
D
ANLAGEN LAY-OUT
1 - Betriebsgerät K
2 - Externe Fotozellen
3 -Zahnstange Modul 4
4 - Schlüsselwählschalter
5 - Radioantenne
6 - Blinkleuchte
7 - Laufbegrenzer (Nocken)
8 - Mechanische Kontaktleisten
9 - Mechanische Kontaktleisten mit RED
10 - Interne Fotozellen
11 - Standsäulen für Fotozellen
12 - Mechanische Anschläge
TECHNISCHE EIGENSCHAFTEN
Irreversible Betriebsgeräte für Schiebetore mit einem Maximalgewicht von
800 kg.
Durch die Irreversibilität dieses Betriebsgeräts benötigt das Tor zur wirkungsvollen
Verriegelung kein elektrisches Sicherheitsschloss.
1
TECHNISCHE
EIGENSCHAFTEN
K800 24V
Max. Torgewicht
kg
Laufgeschwindigkeit
m/s
0,1÷0,2
N
550 (mit elektronische Steuerung)
Max. Drehmoment
Nm
18,5 (mit elektronische Steuerung)
Zahnstange Modul
M
Max. Schubkraft
800
4
230V~ 50Hz
Stromspannung und frequenz
Stromverbrauch
W
207 (mit elektronische Steuerung)
Stromaufnahme
A
0,9 (mit elektronische Steuerung)
Normative Zyklen
n°
40 - 38s/38s
Max. tägliche Zyklen
n°
300
Service
%
100
Garantierte kontinuierliche Zyklen
n°
Schmiere
Motorgewicht
60/10m
COMLUBE LHITGREASE EP/GR.2
kg
13
Geräusch
db
<70
Betriebstemperatur
°C
-10 ÷ +55
Schutzart
IP
44
Abmessungen in mm
38
D
INSTALLATION K800 24V
VOR DER MONTAGE AUSZUFÜHRENDE ÜBERPRÜFUNGEN
!! DAS TOR MUSS REIBUNGSFREI LAUFEN !!
ANMERKUNG: Es ist erforderlich, die Charakteristiken des Tors an die geltenden Normen
und Gesetze anzupassen. Das Tor kann nur automatisch Angeschlossen werden, wenn es
in einem einwandfreien Zustand ist und der EN12604 entspricht.
- Das Tor welches keine Gehfluegelfunktion hat,in diesem Fall ist es erforderlich das Tor
mit der norm EN12453 in Einklang zu bringen(z.B. das in Bewegung setzen des Motors
per Handsender, wenn der Gehfluegel geoeffnet ist. Das zu vehindern koennen sie
einen Endschalter anschliessen der beim oeffnen des Gehfluegel andere automatischen
funktionen ausser Kraft setzt).
-
Ausser der elektrischen und mechanischen Endschalter, die mit der Steuerung
verbunden werden ist es ratsam einen festen Endanschlagpunkt am Boden zu
befestigen. Der im gegeben Fall einer Fehlfunktion der elektronik den Antrieb mt seinen
kinetischen und statischer Groesse zum halten bringt (12)(2).
Es ist notwendig, am Ende der Führung zwei mechanische Stoppvorrichtungen zu
befestigen (12) (2).
Die Torsäulen müssen oben Vorrichtungen gegen ein Entgleisen besitzen (3), um
unfreiwilliges Aushaken zu vermeiden.
ANMERKUNG: Die in Abb. 3 beschriebenen mechanischen Anschläge entfernen.
Es dürfen keine mechanischen Anschläge über dem Tor vorhanden sein, da diese nicht
ausreichend sicher sind.
2
Komponenten zur Installation nach der Norm EN1253
ANWENDUNG DER SCHLIESSUNG
STEUERUNGSSYSTEM
mit Totmannschaltung
Fachpersonen
(außer einem
öffentlichen
Platz*)
Fachpersonen
(öffentlicher
Platz)
Grenzlose
Anwendung
A
B
nicht möglich
mit sichtbaren
(z.B. Sensor)
C oder E
C oder E
C und D, oder E
mit nicht sichtbaren
Impulsen (Fernsender)
C oder E
C und D, oder E
C und D, oder E
automatisch
C und D,
oder E
C und D, oder E
C und D, oder E
* e in Musterbeispiel dafür sind jene Türe, die keine Zufahrt zu einem öffentlichen
Weg haben
A: Betriebstaste mit Totmannschaltung (das heißt, aktivieren sie eine Funktion,
solange man sie gedrückt hält), wie Kode ACG2013
B: Schlüsselselektor mit Totmannschaltung, wie Kode ACG1010
C: Justierbare Kraft des Motors
D: Kontaktleiste und /oder andere Sicherheitseinrichtungen muessen mit den Norm
EN12453 uebereinstimmen (Anhang A).
E: Photozelle, wie Kode ACG8026 (Jede 60÷70 cm für die ganze Höhe der Spalte des
Gatters bis zu einem Maximum von 2,5 m anwenden - EN 12445 Punkt 7.3.2.1)
3
ENTRIEGELUNG
Die Entriegelung darf erst nach dem Abschalten der elektrischen
Motorstromversorgung erfolgen.
Um das Tor manuell richtig zu pruefen muessen folgende Punkte beachtet werden:
- Das Tor muss einen geeigneten Griff haben.
- Dieser Griff muss so angebracht sein das er kein Risiko ist beim Test.
- Daß die physische notwendige Kraft um das Tor-Blatt zu bewegen nicht höher als
225N ist, für Tore bei privaten Wohnungen, und 390N für Tore für kommerzielle und
industrielle Situationen (Werte nach 5.3.5 vom EN 12453 Norm).
Um das Tor manuell zu bedienen, ist es ausreichend, den passenden Schlüssel
einzuführen und 3 Mal entgegen dem Uhrzeigersinn zu drehen (4).
4
39
D
MOTORBEFESTIGUNG UND ZAHNSTANGE
Die Zahnstange muss gegenüber der Motorhalterung in einer entsprechendenden Höhe
befestigt werden.
Diese Höhe kann mittels an der Zahnstange befestigten Ösen verändert werden.
Die Höhenregulierung muss solange erfolgen, bis das Tor sich während der Bewegung
nicht mehr auf das Zugrad K aufstützt (5, 6).
Um die Zahnstange am Tor zu befestigen, müssen 5-mm-Bohrungen und M6-Gewinde
ausgeführt werden.
Das Zugrad muss ca. 1mm Spiel gegenüber der Zahnstange besitzen.
Abmessungen in mm
5
Abmessungen in mm
6
BEFESTIGUNG DES ENDSCHALTERS
Um den Lauf des mobilen Teils zu beenden, müssen zwei Nocken an den Enden
der Zahnstange positioniert werden (7).
Die Regulierung des Öffnungs- und Schließlaufes wird erhalten, indem diese entlang
der Zahnstangenzähne verschoben werden. Um die Zahnstangennocken festzustellen,
müssen die mitgelieferten Schrauben am Boden befestigt werden.
ANMERKUNG: Außer den o. g. elektrischen Feststellnocken müssen ebenfalls robuste
mechanische Anschläge montiert werden, die ein Herausgleiten des Tors aus den oberen
Führungen verhindern.
7
INSTANDHALTUNG
Die Entriegelung darf nur von spezialisiertem Personal und erst nach dem
Abschalten der elektrischen Motorstromversorgung erfolgen.
Den Führungslauf bei geschlossenem Tor periodisch von Steinen und anderen
Verunreinigungen säubern.
40
ELEKTROANSCHLÜSSE
K 24V Kode AC08006
SICHERUNG DER
Endschalter
MANUELLE
Öffnen und Schließen ENTRIEGELUNG
M
ANTENNE
433 MHz
STROMVERSORGUNG
230Vac 50Hz
FUSE
T 1,6A
x K800
TRANSFORMATOR
ANTENNE Zopfflechten
GEMEINSAME ERDUNGSKONTAKT
24Vac
STOPPSCHALTER
FOTOZELLEN
KONTAKTLEISTE
FUSSGÄNGER
SCHLIEßEN
0
10Vac
ÖFFNEN
EINZELIMPULS
SICHERUNGSBATTERIEN
FÜR BATTERIELADEPLATINE
(EXTRA)
ZEITGESTEUERTE
ÖFFNUNG
A+TEST / ASELBSTTEST DER
SICHERHEITSVORRICHTUNGEN BZW.
ENERGEIEINSPARUNG
BEI BATTERIEBETRIEB
24Vdc 0,4A ±15%
24Vdc 0,4A ±15%
24Vdc 20W
24Vdc 10W
41
D
D
A - VERBINDUNGEN
VERSORGUNG VON EXTERNEM NETZ ZUR PLATINE 230 V
AC 50/60 Hz (120 V AC 60 Hz auf Anfrage)
> PHASE
F
N
> NULLLEITE
> ERDE
T1,6A SICHERUNG AUF DER ALLGEMEINEN
VERSORGUNGSKLEMME
F1 Trimmer TCA
J10
Trimmer RUN
J9
J8
J7
J12
J6
J5
J11
Befestigung des
Stromkabels
J4
J1
J2
J1
A-
ALLGEMEIN KONTAKT FÜR VERSORGUNG VON ZUBEHÖRTEILEN UND
SELBSTTEST KONTAKTLEISTE
J8
LIMIT
SWITCH
STECKVERBINDER FÜR ELEKTRISCHE ODER MAGNETISCHE
ENDSCHALTER
A+
PLUSKONTAKT FÜR DIE VERSORGUNG DER ZUBEHÖRRTEILE 24 V DC
J9
MOTOR
PLUSKONAKT FÜR VERSORGUNG SELBSTTEST KONTAKTLEISTE
24 V DC
STECKVERBINDER FÜR MOTOR 24 V DC UND ENCODER 5 V DC (NICHT
BENUTZEN)
J10
X K800
STECKVERBINDER FÜR ANSCHLUSS MOTOR K800
MINUSKONTAKT FÜR BLINKLEUCHTE 24 V DC 20 W
J11
COM
ALLGEMEIN STECKVERBINDER FÜR KONTAKTE (GND)
STOP
KONTAKT STOPPIMPULS (NC)
PHOT
KONTAKT PHOTOZELLEN (NC)
EDGE
KONTAKT KONTAKTLEISTE (NC)
PED
KONAKT ÖFFNUNGSIMPULS FUSSGÄNGER (NO)
A+ TEST
-
PLUSKONTAKT FÜR BLINKLEUCHTE 24 V DC 20 W
+
SIGNAL
J2-J3
J3
ANZEIGELEUCHTE TOR OFFEN 24 V DC MAX 10 W
BATTERY STECKVERBINDER FÜR BATTERIELADEPLATINE (ART-Nr. ACG4664
CHARGER EXTRA)
CLOSE
KONTAKT SCHLIESSIMPULS (NO)
J4
10V
STECKVERBINDER FÜR HILFSTRANSFORMATOR 10 V AC
OPEN
KONTAKT ÖFFNUNGSIMPULS (NO)
J5
BAT
STECKVERBINDER FÜR BATTERIEN (EXTRA)
KBUT
KONTAKT EINFACHER IMPULS (NO)
J6
24V
STECKVERBINDER FÜR HILFSTRANSFORMATOR 24 V AC
B.I.O.
KONTAKT (NO) FÜR EINE UHR
J7
SECURITY STECKVERBINDER FÜR MIKROSCHALTER MANUELLE ENTRIEGELUNG
LOCK
B – EINSTELLUNGEN
DIP 1 Laufeinstellung mit elektrischen oder magnetischen
Endschaltern (Punkt C)
DIP 2 Programmierung der völligen Öffnung (Punkt D)
DIP 2-1 Programmierung der Fußgängeröffnung (Punkt E)
DIP 1-2 Speicherung/Löschung der Funkcodes für die völlige Öffnung (Punkt F)
DIP 1-3 Speicherung/Löschung der Funkcodes für die Fußgängeröffnung (Punkt G)
MIKROSCHALTER FÜR STEUERUNG
DIP 3
O - Gestaffelter Start aktiv
AUS - Gestaffelter Start nicht aktiv
DIP 4
EIN - Photozellen nur bei Schließung aktiv
AUS - Photozellen immer aktiv
DIP 5
EIN - Heizgerät aktiv
AUS - Heizgerät nicht aktiv
DIP 6
EIN - Funksteuerung, Taste k butt und Fußgänger im Automatik
AUS - Funksteuerung, Taste k butt und Fußgänger in Schrittmodus
DIP 7
EIN - Stromsensor aktiv
AUS - Stromsensor nicht aktiv
DIP 8
EIN - Sofortige Schließung nach Photozellendurchlauf aktiv
AUS - Sofortige Schließung nach Photozellendurchlauf nicht aktiv
DIP 9
J12
ANTENNA KLEMMEN FÜR DEN ANSCHLUSS EINER ANTENNE 433,92 MHz
EIN - Modus auch bei Funksteuerung immer in Betrieb
AUS - Modus auch nur mit Steuertasten in Betrieb
DIP 10
EIN - Selbsttest Kontaktleiste aktiv
AUS - Selbsttest Kontaktleiste nicht aktiv
DIP 11
EIN - Vorblinkleuchte aktiv
AUS - Vorblinkleuchte nicht aktiv
DIP 12
EIN - zur Verfügung
AUS - zur Verfügung
DIP 13
EIN - Betrieb mit Getriebemotor K800
AUS - Betrieb mit Getriebemotor K400
DIP 14
EIN - Freigabe Funksystem SUN/MOON
AUS - Freigabe Funksystem SUN-PRO
PROG. > ZIFFERNTASTATUR FÜR PROGRAMMIERUNG.
MEMORY > AUSZIEHBARER SPEICHER MIT DEN FUNKTIONSTADEN UND FUNKCODES.
SW
> STECKVERBINDER FÜR SOFTWAREAKTUALISIERUNG.
RESERVED > STECKVERBINDER FÜR KONTROLLEN IM WERK.
RUN > TRIMMER FÜR EINSTELLUNG DER MOTORGESCHWINIDIGKEIT.
Mit diesem Trimmer kann die Geschwindigkeit des Motors eingestellt werden (als
Defaultwert wird die halbe Geschwindigkeit eingestellt). Die Einstellung ist sehr nützlich,
um die Automation konform nach den europäischen Normen bezüglich der Auswirkungen
42
D
zu machen.
Für Tore mit einem Gewicht von 0 bis 200 kg wird empfohlen RUN von 1/2 bis MAX
gesetzt.
Für Tore mit einem Gewicht von 200 bis 400 kg wird empfohlen RUN von MIN bis
1/2 gesetzt.
Anmerkung: Die abgebremste Bewegung ist nicht einstellbar, da sie automatisch berechnet
wird.
TCA > TRIMMER ZUR AUTOMATISCHEN VÖLLIGEN SCHLIESSUNG BZW. ZUR
SCHLIESSUNG DES FUSSGÄNGERDURCHGANGS
Standardmäßig nicht freigegeben und LED DL3 abgeschaltet (Trimmer ganz gegen den
Uhrzeigersinn gedreht).
Mit diesem Trimmer kann die Zeit vor der automatischen völligen Schließung bzw. vor der
Fußgängerschließung eingestellt werden.
Die automatische völlige Schließung bzw. die Fußgängerschließung ist nur bei ganzer (völlig)
oder partieller (Fußgänger) Öffnung und bei aufleuchtender LED DL3 möglich (mit Trimmer
im Uhrzeigersinn gedreht).
Die Pausenzeit kann auf einen Mindest- und Höchstwert von 2 Sekunden bis 2 Minuten
eingestellt werden.
GESTAFFELTER START
Wenn der DIP 3 auf EIN gestellt ist, wird bei jedem Start eine gestaffelte Bewegung für 1
Sekunde freigeschaltet.
LEDANZEIGEN
DL1 Programmierung aktiviert DL2 DL3 Automatische Schließzeit
DL4
Mikroschalter automatische Entriegelung
DL5 Tor wird geschlossen DL6 Tor wird geöffnet DL7 Schließungsendschalter DL8 Öffnungsendschalter DL9 Mikrocontroller 3,3 V spannungsführend
DL10 Programmierung Funkcodes DL11 Programmiergerät angeschlossen DL12 Stoppkontakt DL13 Kontakt Photozellen DL14 Kontakt Kontaktleisten (rot)
(rot)
(rot)
(rot)
(grün)
(rot)
(grün)
(gelb)
(zweifarbig)
(rot)
(rot)
(rot)
(rot)
D – PROGRAMMIERUNG DER FUSSGÄNGERÖFFNUNG*
1 - Zuerst den DIP 2 auf EIN, dann den DIP 1 auf EIN stellen. Die LED DL1 beginnt zu blinken.
2 - Drücken Sie die Fußgängertaste (COM-PED) oder die Fernsteuerungstaste gewidmet
Fußgängeröffnung (wenn zuvor programmiert) => Das Tor öffnet sich.
3 - Die Taste Fußgänger drücken, um das Tor anzuhalten (der Lauf für die Fußgängeröffnung
des Tors ist nun eingestellt). Nach zwei Sekunden, schließt das Tor.
4 - Nach der Programmierung Fußgänger den DIP 1 und 2 wieder auf AUS stellen.
* Während der Programmierung sind die Sicherheitsvorrichtungen aktiv. Bei ihrer
Auslösung wird die Programmierung unterbrochen (die LED DL1 der Blinkleuchte
leuchtet fix auf).
Um die Programmierung zu wiederholen, stellen Sie den DIP1 und DIP 2 in OFF;
Schließen das Tor nach dem Verfahren „LAUFEINSTELLUNG MIT ELEKTRISCHEN
ODER MAGNETISCHEN ENDSCHALTERN“. Wiederholen Sie das oben beschriebene
Programmierung.
F - PROGRAMMIERUNG FUNKCODES VÖLLIG ÖFFNUNG (MAX 1000
CODES)
Buzzer > meldet verschiedene Funktionen, siehe Tabelle visuelle und akustische
Signalisierungen.
Sicherungen
F2
T 300 mA Sicherung für Betriebslogikschutz
F3 T 10 A
Sicherung für Motorschutz
C – LAUFEINSTELLUNG MIT ELEKTRISCHEN ODER MAGNETISCHEN
ENDSCHALTERN
Diese Kontrolle soll den Installateur bei der Installation der Anlage und bei etwaigen späteren
Kontrollen unterstützen.
1 - Den Torantrieb mit der manuellen Entriegelung freigeben und die Laufbegrenzernocken
auf der Zahnstange positionieren, um den Lauf des Tors festzulegen.
2 - Das Tor auf auf die halbe Laufhöhe bringen und den Torantrieb verriegeln.
3 - Den DIP 1 auf EIN stellen => die LED DL1 beginnt zu blinken.
4 - Die Taste PROG gedrückt halten (es handelt sich um eine Totmannschaltung, auf-Stoppzu-Stopp-auf usw.) => Das Tor startet mit hoher Geschwindigkeit und bremst dann ab,
bis es den Endschalter erreicht. Überprüfen, ob das Tor in der gewünschten Position
stehen bleibt. Anderenfalls den Laufbegrenzernocken verstellen und den Vorgang
wiederholen. Auch den Endschalter an der gegenüberliegenden Seite überprüfen.
5 - Die hohe Geschwindigkeit kann während den ersten 5 Betriebssekunden mit dem
Trimmer RUN eingestellt werden. Dreht man den Trimmer RUN im Uhrzeigersinn, wird die
Geschwindigkeit erhöht. Der Trimmer RUN wird standardmäßig auf die halbe Laufhöhe
eingestellt.
6 - Am Ende den DIP 1 wieder auf AUS stellen. Die LED DL1 schaltet sich ab, wodurch
angezeigt wird, dass die Kontrolle verlassen wird.
N.B.: Während dieser Kontrolle sind die Stopptaste, die Kontaktleisten und die
Photozellen nicht aktiv.
D – PROGRAMMIERUNG DER VÖLLIGEN ÖFFNUNG*
der Programmierung Brücken zwischen COM-STOP, COM-PHOT und COMEDGE ausführen.
1 - WICHTIG: FÜR DIE KORREKTE PROGRAMMIERUNG MUSS DAS TOR ETWA 20 CM
VOM SCHLIESSENDSCHALTER POSITIONIERT WERDEN.
2 - Den DIP 2 auf EIN stellen => die LED DL1 beginnt zu blinken.
3 - Drücken Sie die PROG-Taste oder die Taste der Fernbedienung, um die Gesamtöffnungs
gewidmet (wenn zuvor programmiert). Das Tor öffnet und schließt 3 mal. NICHT VOR DEN
PHOTOZELLEN DURCHGEHEN, SOLANGE DAS TOR IN BEWEGUNG IST.
4 - Die Programmierung ist abgeschlossen, wenn das Tor geschlossen bleibt und die LED
DL 1 abgeschaltet ist.
5 - Den DIP 2 wieder auf AUS stellen.
N.B.: wenn nach der Programmierung Sie das trimmer RUN bewegen, müssen Sie die
Programmierung wiederholen.
Anmerkung: Der Anfangspunkt Abbremsung wird automatisch vom Steuergerät in der
Programmierphase der Zeiten beendet und 50÷60 cm vor Erreichung des
Öffnungs- und Schließungsendschalters aktiviert.
Um die Programmierung zu wiederholen, stellen Sie den DIP 2 in OFF;
Schließen das Tor hält an 20 cm von insgesamt Schließung nach dem Verfahren
„LAUFEINSTELLUNG MIT ELEKTRISCHEN ODER MAGNETISCHEN ENDSCHALTERN“.
Wiederholen Sie das oben beschriebene Programmierung.
Achtung: Wenn die Eingänge STOP, PHOT und EDGE nicht angeschlossen sind, vor
ACHTUNG: Bevor die benutzten Fernbedienungen gespeichert werden, mit dem DIP
14 die zu benutzenden Fernbedienungen wählen:
DIP 14 auf AUS: Es können Fernbedienungen mit variablen Code SUN-PRO gespeichert
werden:
Art-Nr. ACG6210
SUN-PRO 2CH zwei Kanäle - rote Tasten und weiße LED SUN-PRO 4CH vier Kanäle - rote Tasten und weiße LED Art-Nr. ACG6214
SUN-PROX 2CH zwei Kanäle - rote Tasten und gelbe LED Art-Nr. ACG6220
SUN-PROX 4CH vier Kanäle - rote Tasten und gelbe LED Art-Nr. ACG6224
DIP 14 auf EIN (Default): Es können Fernbedienungen mit festem Code SUN und MOON
gespeichert werden:
SUN 2CH zwei Kanäle - blaue Tasten und weiße LED Art-Nr. ACG6052
SUN 4CH vier Kanäle - blaue Tasten und weiße LED Art-Nr. ACG6054
SUN CLONE 2CH zwei Kanäle - blaue Tasten und gelbe LED Art-Nr. ACG6056
SUN CLONE 4CH vier Kanäle - blaue Tasten und gelbe LED Art-Nr. ACG6058
MOON 2CH zwei Kanäle - schwarze Tasten und gelbe LED Art-Nr. ACG6081
MOON 4CH vier Kanäle - schwarze Tasten und gelbe LED Art-Nr. ACG6082
ACHTUNG: Es können nicht gleichzeitig Fernbedienungen mit fixem Code und
Fernbedienungen mit variablem Code gespeichert werden.
Die Programmierung der Fernbedienungen kann erst bei stillstehendem Tor durchgeführt
werden.
1 - Zuerst den DIP 1 auf EIN, dann den DIP 2 auf EIN stellen. Die zweifarbige LED DL10
Programmierung blinkt für 10 Sekunden rot.
2 - Innerhalb dieser 10 Sekunden die Taste der Fernbedienung drücken (normalerweise der
Kanal A). Wenn die Fernbedienung korrekt gespeichert wird, leuchtet die zweifarbige LED
DL10 grün auf und ein akustisches Buzzersignal bestätigt die korrekte Speicherung. Die
10 Sekunden für die Programmierung der Codes wird automatische erneuert, wenn die
zweifarbige LED DL10 rot blinkt, um die nächste Fernbedienung zu speichern.
3 - Zum Abschluss der Programmierung entweder 10 Sekunden abwarten oder kurz die
Taste PROG betätigen. Die zweifarbige LED DL10 Programmierung hört auf zu blinken.
4 - Den DIP 1 wieder auf EIN, dann den DIP 2 auf AUS stellen.
5 - Ende des Verfahrens.
43
D
LÖSCHUNG ALLER FUNKCODES FÜR DIE VÖLLIGE ÖFFNUNG
Die Löschung kann erst bei stillstehendem Tor durchgeführt werden.
1 - Den DIP 1 auf EIN, darauf den DIP 2 auf EIN stellen.
2 - Die zweifarbige LED DL10 Programmierung blinkt für 10 Sekunden rot.
3 - Innerhalb dieser 10 Sekunden die Taste PROG für 5 Sekunden drücken. Die Löschung
des Speichers wird durch zweimaliges Aufblinken der grünen Farbe der zweifarbigen
LED DL10 und durch 2 akustische Buzzersignale gemeldet, was die erfolgte Löschung
bestätigt. Danach blinkt die zweifarbige LED DL10 Programmierung für 10 Sekunden
rot, wonach die neuen Codes gemäß den oben beschriebenen Verfahren eingegeben
werden können.
4 - Den DIP 1 wieder auf EIN, dann den DIP 2 auf AUS stellen.
5 - Ende des Verfahrens.
SIGNALISERUNG SPEICHER VOLL FUNKCODES
Die Signalisierung ist erst bei stillstehendem Tor möglich.
1 - Zuerst den DIP 1 auf EIN, dann den DIP 2 auf EIN stellen.
2 - Die weiße LED DL10 blinkt 6 Mal grün, um anzuzeigen, dass der Speicher voll ist (es
sind 1000 Codes vorhanden). Darauf blinkt die zweifarbige LED DL10 Programmierung
für 10 Sekunden rot wonach alle Codes gelöscht werden können.
4 - Den DIP 1 wieder auf EIN, dann den DIP 2 auf AUS stellen.
5 - Ende des Verfahrens.
G-
PROGRAMMIERUNG FUNKCODES FUSSGÄNGERÖFFNUNG (MAX
1000 CODES)
Die Programmierung kann erst bei stillstehendem Tor durchgeführt werden.
1 - Zuerst den DIP 1 auf EIN, dann den DIP 3 auf EIN stellen. 2 - Die zweifarbige LED DL10
Programmierung blinkt für 10 Sekunden grün.
2 - Die Taste der Fernbedienung (normalerweise der Kanal B) innerhalb der eingestellten
10 Sekunden betätigen. Wenn die Fernbedienung korrekt gespeichert wird, leuchtet die
zweifarbige LED DL10 kurz rot auf und ein akustisches Buzzersignal bestätigt die korrekte
Speicherung. Die 10 Sekunden für die Programmierung der Codes wird automatische
erneuert, wenn die zweifarbige LED DL10 grün blinkt, um die nächste Fernbedienung
zu speichern.
3 - Zum Abschluss der Programmierung entweder 10 Sekunden abwarten oder kurz die
Taste PROG betätigen. Die zweifarbige LED DL10 Programmierung hört auf zu blinken.
4 - Den DIP 1 wieder auf EIN, dann den DIP 3 auf AUS stellen.
5 - Ende des Verfahrens.
LÖSCHUNG ALLER FUNKCODES FÜR DIE FUSSGÄNGERÖFFNUNG
Die Löschung kann erst bei stillstehendem Tor durchgeführt werden.
1 - Zuerst den DIP 1 auf EIN, dann den DIP 3 auf EIN stellen. Die zweifarbige LED DL10
Programmierung blinkt für 10 Sekunden grüne.
2 - Innerhalb dieser 10 Sekunden die Taste PROG für 5 Sekunden drücken. Die Löschung
des Speichers wird durch zweimaliges Aufblinken der rotten Farbe der zweifarbigen
LED DL10 und durch 2 akustische Buzzersignale gemeldet, was die erfolgte Löschung
bestätigt.
3 - Danach blinkt die zweifarbige LED DL10 Programmierung für 10 Sekunden grüne,
wonach die neuen Codes gemäß den oben beschriebenen Verfahren eingegeben werden
können.
4 - Den DIP 1 wieder auf EIN, dann den DIP 3 auf AUS stellen.
5 - Ende des Verfahrens.
SIGNALISERUNG SPEICHER VOLL FUNKCODES
Die Signalisierung ist erst bei stillstehendem Tor möglich.
1 - Zuerst den DIP 1 auf EIN, dann den DIP 3 auf EIN stellen.
2 - Die zweifarbige LED DL10 blinkt 6 Mal grün, um anzuzeigen, dass der Speicher voll ist (es
sind 1000 Codes vorhanden). Darauf blinkt die zweifarbige LED DL10 Programmierung
für 10 Sekunden rot, wonach alle Codes gelöscht werden können.
3 - Den DIP 1 wieder auf EIN, dann den DIP 3 auf AUS stellen.
4 - Ende des Verfahrens.
FUNKTIONSWEISE DES STEUERUNGSZUBEHÖRS
TASTE ÖFFNEN (COM-OPEN)
Bei stillstehendem Tor steuert die Taste die Öffnungsbewegung. Wird sie während der
Schließung betätigt, öffnet sich das Tor wieder.
Bei Betätigung während der Öffnungsbewegung hat keinerlei Wirkung. Bei Betätigung bei
offenem Tor wird dasselbe geschlossen. Bei Betätigung während der Schließung, wird das
Tor wieder geöffnet.
FERNBEDIENUNG FÜR VÖLLIGE ÖFFNUNG UND FUSSGÄNGERÖFFNUNG
Ist der DIP 6 auf AUS gestellt => wird eine zyklisches Steuerung der Kommandos auf-Stoppzu-Stopp-auf usw. durchgeführt.
Ist der DIP 6 auf EIN gestellt => wird die Öffnung bei geschlossenem Tor durchgeführt.
Bei Betätigung während der Öffnungsbewegung hat keinerlei Wirkung. Bei Betätigung bei
offenem Tor wird dasselbe geschlossen. Bei Betätigung während der Schließung, wird das
Tor wieder geöffnet.
UHRFUNKTION - KOMMANDO B.I.O. (COM-B.I.O.)
Die Uhrfunktion ist während der Stoßzeiten nützlich, wenn der Verkehr gebremst wird (z.B.
Ein-/Ausfahrt der Arbeiter, Notzustände in Wohnbereichen, auf Parkplätzen, usw.).
ANWENDUNGSWEISE DER UHRFUNKTION
Einen Schalter und/oder eine Tages-/Wochenuhr an die Klemmen“COM-B.I.O.” anschließen,
um das Tor offen zu halten, solange der Schalter eingeschaltet bzw. die Uhr aktiv bleibt.
Bei offener Automation werden alle Steuerungsfunktionen blockiert.
Bei Freigabe des Schalters oder bei Ablauf der eingestellten Uhrzeit erfolgt die sofortige
Schließung der Automation.
TASTE ÖFFNUNG FUSSGÄNGERDURCHGANG (COM-PED.BUT)
Kommando für eine partielle Öffnung und Wiederschließung.
Während der Öffnung, der Pause oder der Schließung mit dem Fußgänger-Steuerelement
kann die völlige Öffnung mit irgendeinem an der Platine angeschlossenen Steuerelement
befohlen werden.
Mit dem DIP 6 kann die Funktionsweise der Steuertaste Fußgänger gewählt werden.
Ist der DIP 6 auf AUS gestellt => wird eine zyklisches Steuerung der Kommandos auf-Stoppzu-Stopp usw. durchgeführt.
Ist der DIP 6 auf EIN gestellt => wird die Öffnung bei geschlossenem Tor durchgeführt.
Bei Betätigung während der Öffnungsbewegung hat keinerlei Wirkung. Bei Betätigung
bei offenem Tor wird der Fußgängerdurchgang geschlossen. Bei Betätigung während der
Schließung, wird das Tor wieder geöffnet.
TRIMMER AUTOMATISCHE VÖLLIGE SCHLIESSUNG (TCA) ODER SCHLIESSUNG
DES FUSSGÄNGERDURCHGANGS Standardmäßig nicht freigegeben und LED DL3
abgeschaltet (Trimmer ganz gegen den Uhrzeigersinn gedreht)
Mit diesem Trimmer kann die Zeit vor der automatischen völligen Schließung bzw. vor der
Schließung des Fußgängerdurchgangs eingestellt werden.
Die automatische Schließung erfolgt nur bei offenem Tor mit den Kommandos völlige Öffnung
oder Öffnung des Fußgängerdurchgangs und bei aufleuchtender LED DL3 (Trimmer im
Uhrzeigersinn gedreht, um die Funktion freizuschalten).
Nach der Durchführung der vollständigen Öffnung, kann die Pausenzeit von mindestens 2
Sekunden und höchstens 2 Minuten eingestellt werden.
Nach der Durchführung der Fußgänger Öffnen der Pausenzeit variiert zwischen einem
Minimum von 2 Sekunden bis zu einem Maximum von 30 Sekunden.
Basierend auf dem Standort der Trimmer TCA haben Sie Zeit proportional.
Zum Beispiel: Mit Trimmer TCA auf halbem Weg werden Sie 1 Minute Pause nachdem der
vollständigen Öffnung, und 15 Sekunden Pause nachdem der Fußgängeröffnung.
MANUELLE ENTRIEGELUNG (LED DL4)
Den Antrieb entriegeln. Der Kontakt des Mikroschalters öffnet J7 (die LED DL4 erlischt), und
die Kontrollen funktionieren nicht.
Block Operator und geben Sie einen Befehl. Erfolgt die erste Bewegung langsam.
Erst nach dieser ersten Bewegung arbeitet der Torantrieb mit der eingestellten
Geschwindigkeit weiter.
BETRIEB NACH STROMAUSFALL
Bei einem Stromausfall wird der Zustand des Tors gespeichert.
Bei der Wiederherstellung der Netzspannung:
Befindet sich das Tor am Endschalter Öffnung oder Schließung, öffnet oder schließt sich
das Tor bei einem Kommando mit den gespeicherten Daten.
Befindet sich das Tor in einer Zwischenstellung, wird bei einem Kommando das Tor
langsam geöffnet, bis es den Endschalter Öffnung erreicht. Nach dieser ersten Bewegung
arbeitet der Torantrieb mit der eingestellten Geschwindigkeit weiter.
TASTE SCHLIESSEN (COM-CLOSE)
Bei stillstehendem Tor steuert die Taste die Schließbewegung.
FUNKTIONSWEISE DES SICHERHEITSZUBEHÖRS
TASTE EINZELNE STEUERUNG (COM-K BUT)
Ist der DIP 6 auf AUS gestellt => wird eine Abfolge der Kommandos auf-Stopp-zu-Stopp-auf
usw. durchgeführt.
Ist der DIP 6 auf EIN gestellt => wird die Öffnung bei geschlossenem Tor durchgeführt.
PHOTOZELLE (COM-PHOT)
Bei aktiver Photozelle gibt der Buzzer 1 akustisches Signal aus.
DIP 4 AUS => Wenn ein Hindernis bei geschlossenem Tor den Lichtstrahl der Photozelle
durchbricht, öffnet sich das Tor nicht. Während des Betriebs werden die Photozellen
44
D
sowohl bei der Öffnung (Fortsetzung der Öffnungsbewegung erst nachdem der Lichtstrahl
der Photozellen befreit wurde) als auch bei der Schließung (Fortsetzung der umgekehrten
Bewegung erst nachdem der Lichtstrahl der Photozellen befreit wurde).
DIP 4 EIN => Wenn sich ein Hindernis bei geschlossenem Tor vor dem Lichtstrahl der
Photozellen befindet und die Öffnung befohlen wird, öffnet sich das Tor (während der Öffnung
werden die Photozellen nicht ausgelöst). Die Photozellen werden nur in der Schließphase
ausgelöst (Fortsetzung der Öffnungsbewegung nach einer Sekunde, obwohl die Photozellen
noch belegt sind).
VERWALTUNG DER SCHLIESSUNG NACH DEM DURCHLAUF VON PHOTOZELLEN
DIP 8 EIN und DIP 4 AUS => Während das Tor bei der Öffnung vor den Photozellen durchläuft
bleibt das Tor stehen. 1 Sekunde nach dem Durchlauf schließt
sich das Tor.
DIP 8 EIN und DIP 4 EIN => Während das Tor bei der Öffnung vor den Photozellen durchläuft
öffnet sich das Tor weiter. Nach dem Durchlauf bleibt das Tor
stehen und nach 1 Sekunde Pause schließt es sich.
Wenn während der Schließung ein schneller Durchlauf erfolgt (z.B. Fußgänger), öffnet sich
das Tor für zwei Sekunden wieder und schließt sich dann erneut.
DIP 8 AUS => sofortige Schließung nach dem Durchlauf von den deaktivierten Photozellen.
KONTAKTLEISTE (COM - EDGE)
Bei aktiver Kontaktleiste gibt der Buzzer 2 akustische Signale aus.
Wenn die Kontaktleiste bei der Öffnung ausgelöst wird, steuert sie die Schließbewegung
für 2 Sekunden und bleibt dann stehen.
Wenn die Kontaktleiste bei der Schließung ausgelöst wird, steuert sie die
Öffnungsbewegung für 2 Sekunden und bleibt dann stehen.
Wenn die Kontaktleiste belegt bleibt (Kontakt NO), ist keine automatische Bewegung
zulässig.
Wenn die Kontaktleiste nicht installiert ist, die Klemmen COM-EDGE überbrücken.
N.B.: Es wird empfohlen, die Funktionsweise der Kontaktleisten zumindest alle
6 Monate zu überprüfen.
ALARM VON KONTAKTLEISTEN
Nach der Umkehrung wegen Auslösung der Kontaktleiste bleibt das Tor stehen und das
Steuergerät meldet den Alarm durch das 1-minütige Aufleuchten der Blinkleuchte und durch
die 1-minütige Abgabe eines akustischen Buzzersignals (mit 2 akustischen Signalen im
2-Sekunden-Takt).
Während bzw. nach dem einminütigen Alarm kann das Tor mit einer beliebigen Steuertaste
wieder geöffnet werden.
ÜBERWACHUNG “SELBSTTEST” SICHERHEITSKONTAKTLEISTEN (A+TEST / A-)
Mithilfe des Eingangs A+TEST und dem DIP 10 auf EIN können die Kontaktleisten überwacht
werden, die mit einem eigenen Speisegerät an die Klemmen A+TEST / A- (24 V DC)
angeschlossen sind.
Die Überwachung besteht aus einem Funktionstest der Kontaktleiste, der nach jeder völligen
Öffnung des Tors ausgeführt wird.
Nach jeder Öffnung ist die Torschließung nur möglich, wenn die Kontaktleisten den
Funktionstest positiv bestanden haben.
Achtung: Die Überwachung des Kontaktleisteneingangs kann mit dem DIP 10 auf EIN
freigegeben oder mit dem DIP 10 auf AUS deaktiviert werden.
Eine mechanische Kontaktleiste kann nicht überwacht werden, daher muss der DIP 10 auf
AUS gestellt sein.
ALARM SELBSTTEST FEHLGESCHLAGEN
Wenn der Selbsttest der Kontaktleiste fehlschlägt, meldet der Buzzer den Alarmzustand für
eine Minute (mit 4 akustischen Signalen im 5-Sekunden-Takt) und das Tor kann bis zur
Behebung der Störung nicht geschlossen werden.
Der Alarm wird bei einem Schließkommando erneuert.
STROMSENSOR (DIP 7 - EIN)
Das Steuergerät K 24V ist mit einem selbsteichenden Stromsensor ausgestattet, der den
Lauf des Tors umkehrt, wenn das Tor gegen Dinge oder Personen stößt (gemäß den
geltenden EN-Normen - immer mit dem betreffenden Gerät überprüfen, ob die vorgegeben
Werte von der Norm eingehalten werden).
Bei aktiviertem Sensor gibt der Buzzer bei einem Zusammenstoß 3 akustische Signale aus.
Wenn er bei der Öffnung ausgelöst wird, kehrt er die Schließbewegung für 2 Sekunden
um und bleibt dann stehen.
Wenn er bei der Schließung ausgelöst wird, kehrt er die Öffnungsbewegung für 2
Sekunden um und bleibt dann stehen.
ALARM VON STROMSENSOR
Nach der Umkehrung wegen Auslösung des Stromsensors bleibt das Tor im Alarmzustand
stehen, was durch das 1-minütige Aufleuchten der Blinkleuchte und durch die 1-minütige
Abgabe eines akustischen Buzzersignals (mit 3 akustischen Signalen im 5-Sekunden-Takt)
angezeigt wird.
Während bzw. nach dem einminütigen Alarm kann der Betrieb des Tors mit einer beliebigen
Steuertaste wiederhergestellt werden.
STOPP-TASTE (COM-STOP)
Während des Laufs wird mit der Stopp-.Taste das Tor angehalten.
Wenn die STOPP-Taste bei völlig offenem Tor (oder partiell offenen Tor mit der Taste
Fußgänger) gedrückt wird, wird die automatische Schließung vorübergehend ausgeschlossen
(sofern sie mit dem Trimmer TCA freigegeben wurde und die LED DL3 aufleuchtet). Es muss
daher ein neues Kommando erteilt werden, um das Tor wieder zu schließen.
Bei der Schließung des Tors wird die automatische Schließung wieder aktiviert (sofern sie mit
dem Trimmer TCA freigegeben wurde und die LED DL3 aufleuchtet).
BETRIEBSMODUS “FUNKTIONIERT IMMER” BEI STÖRUNG DER
SICHERHEITSVORRICHTUNGEN.
DIP 9 - AUS: Wenn die Kontaktleiste defekt oder für mehr als 5 Sekunden belegt ist bzw.
wenn die Photozelle defekt oder mehr als 60 Sekunden belegt ist, werden die Funktionen
der Steuertasten AUF, ZU, K-BUTTON und FUSSGÄNGER nur ausgeführt, wenn sie betätigt
werden.
Die Aktivierung dieses Betriebs wird durch die LED DL1 Programmierung angezeigt, die
blinkt.
Bei dieser Betriebsweise ist die Öffnung und Schließung nur möglich, wenn die Steuertasten
betätigt werden. Die Funksteuerung und die automatische Schließung werden ausgeschlossen.
Bei der Rücksetzung des Kontakts der Sicherheitsvorrichtungen wird nach 1 Sekunde
automatisch der automatische oder der Schrittbetrieb freigeschaltet und auch die
Funksteuerung und die automatische Schließung funktionieren wieder.
DIP 9 - EIN. Das Tor kann auch mit der Funksteuerung gesteuert werden. Dabei wird die
Taste auf der Fernbedienung gedrückt, bis das Power-Saver-System ausgelöst wird (etwa
8 Sekunden).
Anmerkung 1: Während dieser Betriebsweise sind bei einer Störung der Kontaktleisten (bzw.
der Photozellen) die Photozellen (bzw. Kontaktleisten) weiterhin in Betrieb und
können das laufende Manöver weiterhin unterbrechen.
Anmerkung 2: Die Stopp-Taste gehört in dieser Betriebsweise nicht zu den überbrückenden
Sicherheitsvorrichtungen. Wenn sie gedrückt wird oder kaputt ist, ist kein
Manöver möglich.
Das Manöver mit Totmannschaltung ist ausschließlich für den Notfall bestimmt. Es
darf nur für kurze Zeiten und bei visueller Sicherheit der Bewegung des Automatismus
durchgeführt werden. Die defekten Schutzvorrichtungen müssen sobald wie möglich
repariert/ausgewechselt werden, um die Betriebstüchtigkeit des Systems wiederherzustellen.
FUNKTION HEIZGERÄT (DIP 5 - EIN)
Der Torantrieb kann mit dieser Funktion immer mit einer geeigneten Temperatur betrieben
werden.
Diese Vorrichtung wird nur bei stillstehendem Tor, bei belegtem Öffnungs- oder
Schließungsendschalter und bei einer Umgebungstemperatur des Motors von 0°C
automatisch aktiviert, die vom Sensor auf der Platine ermittelt wird.
Wenn der Motor läuft, schaltet sich das Heizgerät ab.
Erst 10 Sekunden nach dem Stillstand des Tors schaltet sich das Heizgerät ein (sofern die
Umgebungstemperatur des Motors höchstens 0°C beträgt).
Wenn 3°C erreicht werden, schaltet sich das Heizgerät ab und hält den Temperaturwert der
Umgebungsbedingungen konstant.
VISUELLE UND AKUSTISCHE SIGNALISIERUNGEN
BLINKLEUCHTE
N.B.: Diese Schalttafel kann nur eine Blinkleuchte mit Blinkkreislauf (ACG7061) und einer
Lampe mit höchstens 24 V und 20 W speisen. Werden 20 W überschritten, wird die
Funktion der Schalttafellogik beeinträchtigt, wodurch die Steuerungen blockiert
werden könnten.
FUNKTION VORBLINKEN
DIP 11 - AUS => Der Motor und das Blinklicht starten gleichzeitig.
DIP 11 - EIN => Das Blinklicht startet 3 Sekunden vor dem Motor.
ANZEIGELEUCHTE TOR OFFEN mit 24 V DC (A+ SIGNAL)
Sie hat die Aufgabe, die Zustände Tor offen, Tor partiell offen bzw. nicht völlig geschlossen zu
signalisieren. Nur wenn das Tor ganz geschlossen ist, schaltet sich die Leuchte ab.
Während dieser Programmierung ist diese Signalisierung aktiv.
N.B.: Max 10 W. Wird dieser Wert überschritten, wird die Funktion der Schalttafellogik
beeinträchtigt, wodurch die Steuerungen blockiert werden könnten.
BUZZER
Er meldet die Auslösung von Sicherheitsvorrichtungen, den Zustand der Alarmmeldungen
und den Speicher- und Löschzustand der Funkcodes.
45
ÜBERSICHTSTABELLE DER ALARME UND VISUELLEN UND AKUSTISCHEN SIGNALISIERUNGEN
SIGNALISIERUNGEN WÄHREND DER PROGRAMMIERPHASE
STATUS BUZZER
STATUS BLINKLEUCHTE
DIP 1 > EIN (TOTMANNSCHALTUNG)
ODER DEFEKT EINER
SICHERHEITSVORRICHTUNG (IMMER
AKTIVER MODUS)
EREIGNIS
ABGESCHALTET
ABGESCHALTET
BLINKT 250 MS EIN-AUS
STATUS LED DL 1 PROGRAMMIERUNG
DIP 2 > EIN (LAUFPROGRMAMIERUNG GANZ)
ABGESCHALTET
ABGESCHALTET
BLINKT 500 MS EIN-AUS
DIP 2 > EIN (LAUFPROGRMAMIERUNG
FUSSGÄNGER)
ABGESCHALTET
ABGESCHALTET
BLINKT 500 MS EIN-AUS
PROGRAMMIERVERAHREN UNTERBROCHEN
WEGEN AUSLÖSUNG EINER
SICHERHEITSVORRICHTUNG
ABGESCHALTET
ABGESCHALTET
FIX AUFLEUCHTEND
EREIGNIS
STATUS BUZZER
STATUS BLINKLEUCHTE
KEIN FUNKCODE EINGEGEBEN
ABGESCHALTET
ABGESCHALTET
BLINKT ABWECHSELND ROT/GRÜN
DIP 1 > 2 PRG. FUNKCODES GANZ
ABGESCHALTET
ABGESCHALTET
BLINKT ROT FÜR 10 SEKUNDEN
DIP 1 > 3 PRG. FUNKCODES FUSSGÄNGER
ABGESCHALTET
ABGESCHALTET
BLINKT GRÜN FÜR 10 SEKUNDEN
PROGRAMMIERUNG FUNKCODES OK
1 AKUSTISCHES SIGNAL
ABGESCHALTET
LEUCHTET EIN MAL GRÜN AUF
PROGRAMMIERUNG FUNKCODES
FUSSGÄNGER OK
1 AKUSTISCHES SIGNAL
ABGESCHALTET
LEUCHTET EIN MAL ROT AUF
FUNKCODE NICHT IM SPEICHER
VORHANDEN
ABGESCHALTET
ABGESCHALTET
BLINKT ROT
SPEICHER DER FUNKCODES VOLL (1000
GESPEICHERTE CODES)
ABGESCHALTET
ABGESCHALTET
BLINKT 6 MAL GRÜN
LÖSCHUNG DER CODES VÖLLIGE ÖFFNUNG
2 AKUSTISCHE SIGNALE
ABGESCHALTET
BLINKT 2 MAL ROT
LÖSCHUNG DER CODES
FUSSGÄNGERÖFFNUNG
2 AKUSTISCHE SIGNALE
ABGESCHALTET
BLINKT 2 MAL GRÜN
STATUS ZWEIFARBEIGE LED DL10
PROGRAMMIERUNG FUNK
SIGNALISIERUNGEN WÄHREND DES BETRIEBS
EREIGNIS
STATUS BUZZER
STATUS BLINKLEUCHTE
STOPPTASTE EINGEDRÜCKT
ABGESCHALTET
ABGESCHALTET
LED DL12 SCHALTET SICH AB
AUSLÖSUNG PHOTOZELLE
1 AKUSTISCHES SIGNAL
ABGESCHALTET
LED DL13 SCHALTET SICH AB
AUSLÖSUNG KONTAKTLEISTE
2 AKUSTISCHE SIGNALE
ABGESCHALTET
LED DL14 SCHALTET SICH AB
AUSLÖSUNG STROMSENSOR
3 AKUSTISCHE SIGNALE
ABGESCHALTET
KEINE KOMBINIERTE LED
DEFEKT EINER SICHERHEITSVORRICHTUNG
ODER SICHERHEITSVORRICHTUNG FÜR EINE
LÄNGERE ZEIT BELEGT
ABGESCHALTET
ABGESCHALTET
LED DL1 BLINKT 250 MS EIN-AUS
BETRIEB MIT NOTBATTERIE 24 V DC
ABGESCHALTET
AKTIV BEI BEWEGUNG
SIGNALAUSGANG BLINKT 2 MAL 250 MS
EIN-AUS, GEFOLGT VON 2-SEKUNDENPAUSE
SIGNALISIERUNG NOTBATTERIEN LEER
1 AKUSTISCHES SIGNAL IM 5-SEKUNDEN-TAKT FÜR
1 MINUTE
(WIRD BEI EINEM KOMMANDO ERNEUERT)
ABGESCHALTET
AUSGANGSSIGNAL BLINKT STÄNDIG 500
MS EIN-AUS
ALARM VON KONTAKTLEISTE
2 AKUSTISCHE SIGNALE IM 5-SEKUNDEN-TAKT FÜR
1 MINUTE
(WIRD BEI EINEM KOMMANDO ERNEUERT)
BLINKT FÜR 1 MINUTE
KEINE KOMBINIERTE LED
ALARM VON STROMSENSOR
3 AKUSTISCHE SIGNALE IM 5-SEKUNDEN-TAKT FÜR
1 MINUTE
(WIRD BEI EINEM KOMMANDO ERNEUERT)
BLINKT FÜR 1 MINUTE
KEINE KOMBINIERTE LED
ALARM SELBSTTEST FEHLGESCHLAGEN
4 AKUSTISCHE SIGNALE IM 5-SEKUNDEN-TAKT FÜR
1 MINUTE
(WIRD BEI EINEM KOMMANDO ERNEUERT)
ABGESCHALTET
KEINE KOMBINIERTE LED
ALARM SPEICHER NICHT EINGESCHALTET
3 SEKUNDEN EIN - 3 SEKUNDEN AUS
SCHALTET SICH NUR AUS, WENN DER SPEICHER
EINGESCHALTET WIRD
ABGESCHALTET
KEINE KOMBINIERTE LED
DAUERSIGNAL FÜR 10 SEKUNDEN MIT 2-SEKUNDENPAUS AUS
SCHALTET SICH NUR AUS, ENN DER DIP 2 AUF AUS
GESTELLT IST
ABGESCHALTET
LED DL1 LEUCHTET FIX AUF
ABGESCHALTET
ABGESCHALTET
ZWEIFARBIGE LED DL10 LEUCHTET FIX
ORANGE AUF
ALARM FALSCHE SELBSTERLERNUNG
FUKTIONSSPERRE
46
LEDZUSTAND UND AUSGANGSSIGNAL
D
TECHNISCHE MERKMALE
- Temperaturbereich -10 ÷ +55°C
- Feuchte < 95 % ohne Kondensat
- Versorgungsspannung 230 V~ ±10 % (120 V 60 Hz auf Anfrage)
50/60 Hz
- Frequenz - Transformatorleistung 150 VA - primärer Transformator 230 V AC
1. Hilfstransformator 24 V AC
2. Hilfstransformator 10 V AC
- max. Aufnahme 100 mA
100 ms
- Netzmikroschalter - Höchstleistung Anzeigeleuchte Tor offen (SIGNAL) 24 V DC 10 W
- Höchstlast Blinkleuchte 24 V DC 20 W
- Verfügbarer Strom für Photozellen und Zubehör 24 V DC 500 mA ±15 %
- Batterieversorgung 24 V DC
TECHNISCHE MERKMALE FUNKSTEUERUNG
- Empfangsfrequenz
433,92 MHz
- Impedanz 52 Ohm
- Empfindlichkeit >1 µV
PLL
- Kontrolle Rückkoppelung - Gespeicherte Codes 1000
STÖRUNGSBEHEBUNG
Nachdem alle Anschlüsse genau nach dem Schaltplan ausgeführt wurden und das Tor in die
Zwischenstellung gebracht wurde, überprüfen, ob sich die LED DL4, DL7, DL8, DL9, DL12,
DL13, DL14 korrekt einschalten.
Wenn sich eine der LEDs nicht einschaltet, sind folgende Kontrollen durchzuführen und
die defekten Komponenten auszutauschen, während sich das Tor in der Zwischenstellung
befindet:
DL4 rot abgeschaltet - manuelle Entriegelung offen (schließen)
DL7 rot abgeschaltet - Endschalter, der die defekte Schließung anhält
DL8 grün abgeschaltet - Endschalter, der die defekte Öffnung anhält
DL9 rot abgeschaltet - Ausfall Versorgung 3,3 V (überprüfen, ob die 10 V AC Hilfsspannung
des Transformators am Steckverbinder J4 vorhanden ist).
DL12 rot abgeschaltet - Stopptaste defekt (wenn die Taste STOP nicht angeschlossen ist, eine
Brücke zwischen COM und STOP ausführen).
DL13 rot abgeschaltet - Photozelle defekt (wenn die Photozellen nicht angeschlossen sind,
eine Brücke zwischen COM und PHOT ausführen).
DL14 rot abgeschaltet - Sicherheitskontaktleiste defekt (wenn die Kontaktleiste nicht
angeschlossen ist, eine Brücke zwischen COM und EDGE ausführen).
Während des Betriebs mit Totmannschaltung und bei DIP 1 auf EIN überprüfen, ob sich bei der
Öffnung die grüne LED DL6 und bei der Schließung die rote LED DL5 einschaltet.
Anderenfalls eine neue Programmierung der völligen Öffnung durchführen.
STÖRUNG
BEHEBUNG
Nach Durchführung der verschiedenen Anschlüsse und nach Zufuhr der Spannung sind alle Die Unversehrtheit der Sicherungen F1 und F2 überprüfen.
LEDs ausgeschaltet.
Bei einem Defekt die Sicherung durch eine mit demselben Wert austauschen:
F1 = T 1,6 A F2 = T 300 mA
Die Photozellen sind nicht eingeschaltet und der Motor dreht sich nicht
Die Unversehrtheit der Sicherung F3 überprüfen.
Bei einem Defekt die Sicherung durch eine mit demselben Wert austauschen: F3 = T 10 A
Das Tor öffnet sich, schließt sich aber nach der eingestellten Zeit nicht
Überprüfen, ob sich die LED DL3 einschaltet. Ist sie abgeschaltet, den Trimmer im
Uhrzeigersinn drehen.
Oder überprüfen, ob die Photozellen belegt sind.
Oder es wurde die Taste STOP bei offenem Tor betätigt, wodurch die automatische
Schließung vorübergehend blockiert wird.
Das Tor öffnet und schließt sich nicht bei der Betätigung der verschiedenen Tasten AUF-ZU- Kontakt der Kontaktleiste oder Photozelle defekt bei DIP 4 AUS. Den betreffenden Kontakt
K-RADIO.
reparieren oder auswechseln.
Oder überprüfen, ob die manuelle Entriegelung offen ist.
Wird bei offenem Tor die Taste K, RADIO oder die Taste SCHLIESSEN betätigt, wird keine Uhrfunktion aktiv. Den Zustand des Eingangs B.I.O. überprüfen.
Bewegung ausgeführt.
Oder Selbsttest Kontaktleiste fehlgeschlagen => die Verbindungen zwischen elektronischer
Schalttafel und Speisegerät für Kontaktleisten überprüfen. Achtung: Wenn kein Speisegerät
für Kontaktleisten benutzt wird, muss der DIP 10 in der Position AUS sein.
Das Tor geht wegen Überstrom in den Alarmzustand über, was mit 3 akustischen Signalen des Überprüfen, dass die Laufbewegung des Tors nicht durch Reibungen behindert wird.
BUZZERS gemeldet wird.
Im Bedarfsfall den DIP 7 auf AUS stellen, um den Stromsensor auszuschließen.
LED DL1 blinkt 250 ms EIN-AUS
DIP 1 auf EIN. Auf AUS stellen.
Oder eine Kontaktleiste oder Photozelle ist defekt. Die Bewegung ist nur bei Betätigung
möglich.
Bei der Programmierung der Zeiten bleibt das Tor stehen und der Buzzer gibt für 10 Sekunden Falsches Programmierverfahren. Den DIP 2 auf AUS stellen.
ein akustisches Signal, gefolgt von einer 2-Sekunden-Pause ab.
Das Tor bis etwa 20 cm vom Schließungsende bringen und die Programmierung
wiederholen.
ABSCHLIESSENDE ARBEITEN -
Installation der Dichtung
ie Dichtung darf nur nach Beendigung der Installation montiert werden, vor dem Wiedereinbau
D
des Gehäuses.
Installierte Dichtung
Schließen des Gehäuses
47
Motor betriebsbereit
D
OPTIONEN
Für die Anschlüsse und die technischen Daten der Zubehöre verweisen wir auf die entsprechenden Betriebsanleitungen.
NYLON ZAHNRAD MOD. 4
EINZUZEMENTIERENDE PLATTE
Kode ACG8107
mit verzinkter Ecke, als Stange zu 1m. Ideal für Tore bis zu einem Gewicht von 1000 kg.
1 m
Kode ACS9000
10 m (1 m x 10)
Kode ACS9001
TOUCH
FIT SLIM
WANDFOTOZELLEN
Kode ACG8032
EIN PAAR FOTOZELLEN-STAENDER FÜR FIT SLIM
Kode ACG8065
FIT SLIM Fotozellen haben Synchronismusfunktion im Wechselstrom Strom und Strecken
20m. Dank einer Synchronisiereinrichtung sind mehrere sich gegenseitig annähernde
Paare möglich.
Bei mehr als 2 Fotozellenpaare (bis 4), den TX SYNCRO
Kode ACG8029
MECHANISCHE KONTAKTLEISTE, LÄNGE = 2 m
EN 13849-2 (2008) ZERTIFIZIERT - KATEGORIE 3
FERNSENDER SUN
SUN 2CH
SUN CLONE 2CH
SUN-PRO 2CH
SUN-PROX 2CH
Kode ACG6052
Kode ACG6056
Kode ACG6210
Kode ACG6220
Kode ACG3015
SPARK
SUN 4CH
SUN CLONE 4CH
SUN-PRO 4CH
SUN-PROX 4CH
Kode ACG6054
Kode ACG6058
Kode ACG6214
Kode ACG6224
BLINKER SPARK mit eingebauter wechselsignalkarte
SEITENLAGER
ANTENNE SPARK 433
Kode ACG7061
Kode ACG7042
Kode ACG5452
BATTERIE
BATTERIE-LADEKARTE
Batterie 2,2Ah 12V
Kode ACG4664
48
Kode ACG9515
E
S
DISPOSICIÒN DE LA INSTALACIÒN
1 - Operador K
2 - Fotocélulas externas
3 - Cremallera Módulo 4
4 - Interruptor de llave
5 - Antena de radio
6 - Intermitente
7 - Limitadores de recorrido (leva)
8 - Costa mecánica
9 - Costa mecánica y RED
10- Fotocélulas internas
11- Columnas para las fotocélulas
12- Topes mecánicos
CARACTERÍSTICAS TÉCNICAS
Operadores irreversibles para verjas correderas con un peso máximo de 800
kg.
La irreversibilidad de este operador permite que la verja no requiera ningún tipo de
cerradura eléctrica para un cierre eficaz. (con cuadro electrónico)
1
K800 24V
CARACTERÍSTICAS TÉCNICAS
Peso máx. verja
kg
800
Velocidad de arrastre
m/s
0,1÷0,2
Fuerza de impulso máx.
N
550 (con cuadro electrónico)
Coppia máx.
Nm
18,5 (con cuadro electrónico)
Cremallera módulo
M
Consumo de energía de la línea
W
207 (con cuadro electrónico)
Absorción
A
0,9 (con cuadro electrónico)
Ciclos normativos
n°
40 - 38s/38s
Ciclos diarios sugeridos
n°
300
Servicio
%
100
Ciclos garantizados
n°
60/10m
Engrase
Peso máx.
Medidas en mm
4
230V~ 50Hz
Alimentación y frecuencia
COMLUBE LHITGREASE EP/GR.2
kg
13
Nivel de ruido
db
<70
Temperatura de trabajo
°C
-10 ÷ +55
Nivel de protección
IP
44
49
E
S
INSTALACIÓN K800 24V
CONTROL PRE-INSTALACIÓN
¡¡LA VERJA TIENE QUE MOVERSE SIN ROCES!!
Es obligatorio uniformar las características de la verja a las normas y leyes en vigor. La
puerta puede ser automatizada sólo si se encuentra en buen estado y responde a la
norma EN 12604.
- La puerta no tiene que tener puertas peatonales. De lo contrario se tendrán que tomar
las oportunas precauciones de acuerdo con el punto 5.4.1 de la EN12453 (por ejemplo
impedir el movimiento del motor cuando la puertecilla está abierta, gracias a un
microinterruptor debidamente conectado a la central).
- No hay que generar puntos en los que se pueda quedar atrapado (por ejemplo entre la
puerta de la cancela y la verja).
- Además de los finales de carrera presentes en la unidad, es necesario que en cada una
de las dos posiciones extremas del recorrido haya un seguro mecánico fijo que pare la
cancela en caso de mal funcionamiento del final de carrera. Con este objetivo el seguro
mecánico tiene que ser dimensionado para poder resistir el empuje estático del motor
más la energía cinética de la cancela (12) (2).
- Las columnas de la verja tienen que llevar en su parte superior unas guías antidescarrilamiento (3) para evitar desenganches involuntarios.
N.B.: Eliminar los topes mecánicos del tipo descrito en el Figura 3.
No tiene que haber topes mecánicos por encima de la verja porque no son suficientemente
seguros.
2
Componentes a instalar según la norma EN12453
USO DEL CIERRE
Personas expertas
(fuera de un área
pública*)
Personas
expertas
(área pública)
Uso ilimitado
A
B
non posivel
con impulsos a la vista
(ej. sensor)
CoE
CoE
C e D, o E
con impulso no a la
vista
(ej. telemando)
CoE
C e D, o E
C e D, o E
C e D, o E
C e D, o E
C e D, o E
TYPO DE MANDO
en presencia
alguien
automatico
de
*un ejemplo típico son los cierres que no dan a la calle.
A: Pulsador de mando en presencia de alguien, (es decir con acción mantenida), como
cód. ACG2013.
B: Interruptor de llave en presencia de alguien, como cód. ACG1010.
C: Regulacion de la fuerza del motor.
D: Nervaduras como cód. ACG3010 y / o otros dispositivos que limitan las fuerzas entre
limites de las normas EN 12453 - Appendix A.
E: Fotocélulas, como cód. ACG8026 (Da applicare cada 60÷70 cm por toda la altura de
la puerta hasta un máximo de 2,5 m (EN 12445 punto 7.3.2.1).
3
DESBLOQUEO
A efectuar tras haber cortado la alimentación eléctrica al motor.
Para poder abrir manualmente la cancela, en el caso de que faltase la corriente eléctrica,
con introducir la llave y girarla 3 veces en sentido opuesto a las agujas del reloj (4).
Para poder realizar en modo seguro el desplazamiento manual de la puerta hay que
controlar que:
- Las manillas de la puerta que se han proporcionado sean idóneas;
- Estas manillas no estén posicionadas en modo de crear puntos de peligro durante su
utilizo;
- El esfuerzo manual para mover la puerta no debe superar los 225N para las cancelas
colocadas en lugares privados y los 390N para las cancelas colocadas en sitios
comerciales e industriales (valores indiacados en el punto 5.3.5 de la norma EN 12453).
4
50
E
S
ANCLAJE MOTOR Y CREMALLERA
La cremallera se tiene que anclar a una determinada altura respecto al soporte del motor.
Dicha altura se puede variar gracias a unos ojales presentes en la cremallera.
El ajuste de la altura se efectúa para que la verja durante el movimiento no se apoye sobre
el engranaje de tracción del K (5,6).
Para fijar la cremallera a la verja se practican unos agujeros de ø 5mm y se roscan
usando una roscadora del tipo M6.
El engranaje de arrastre tiene que tener una holgura de alrededor de 1 mm respecto a
la cremallera.
Medidas en mm
5
Medidas en mm
6
FIJACIÓN FINAL DE CARRERA
Para determinar el recorrido de la parte móvil se tiene que colocar dos
limitadores de recorrido en los extremos de la cremallera (7).
La regulación de la abertura y el cierre, se obtiene desplazando la misma sobre los
dientes de la cremallera.
Para fijar las limitadores de tope de recorrido a la verja, atornillar a fondo los tornillos
suministrados.
N.B.: además de los citados limitadores de recorrido eléctricos es obligatorio instalar
unos topes mecánicos resistentes que impidan la salida del la verja de las guías
superiores.
7
MANTENIMIENTO
Tiene que ser efectuado solamente por personal especializado tras haber
cortado la alimentación eléctrica al motor.
Limpiar periódicamente, con la verja parada, la guía de deslizamiento de eventuales
piedras u otras suciedades.
51
E
S
CONEXIONES ELÉCTRICAS
K 24V cód. AC08006
FINAL DE CARRERA SEGURIDAD DE
APERTURA Y CIERRE DESBLOQUEO
MANUAL
COMÚN
M
ANTENA
433 MHz
ALIMENTACIÓN
230Vac 50Hz
FUSIBLE
T 1,6A
x K800
TRASFORMADOR
ARMADURA ANTENA
COMÚN
24Vac
STOP
FOTOCÉLULAS
BANDA
PEATONAL
CIERRE
0
10Vac
ABRE
SOLO COMANDO
BATERÍAS DE RESPALDO
PARA TARJETA DE RECARGA
DE BATERÍAS (OPCIONAL)
RELOJ
A+TEST / AAUTOPRUEBA DE
SEGURIDAD O AHORRO
ENERGÉTICO CON
FUNCIONAMIENTO A
BATERÍAS
24Vdc 0,4A ±15%
24Vdc 0,4A ±15%
24Vdc 20W
24Vdc 10W
52
E
S
A - CONEXIÓN
ALIMENTACIÓN DE RED EXTERNA EN LA TARJETA 230
Vca 50/6 Hz (120 Vca 60 Hz a solicitud)
> FASE
F
N
> NEUTRO
> TIERRA
T1,6A FUSIBLE EN ABARAZADERA DE
ALIMENTACIÓN GENERAL
F1 Conexión y ajuste
del cable de
alimentación
Trimmer TCA
J10
Trimmer RUN
J9
J8
J7
J12
J6
J5
J11
J4
J1
J2
J1
A-
ALIMENTACIÓN COMÚN DE ACCESORIOS Y AUTOPRUEBA DE COSTA
A+
POSITIVO PARA ALIMENTACIÓN DE ACCESORIOS 24Vcd
A+ TEST
-
J9
MOTOR
CONECTOR PARA MOTOR 24Vdc Y DECODIFICADOR 5Vdc (NO
UTILIZAR)
POSITIVO PARA ALIMENTACIÓN DE AUTOPRUEBA COSTA A 24 Vdc
J10
X K800
CONECTORES PARA CONEXIÓN DE MOTOR K800
NEGATIVO LUZ PARPADEANTE 24Vdc 20W
J11
COM
DISPOSITIVO COMÚN DE CONTACTOS (GND)
POSITIVO LUZ PARPADEANTE 24vDC 20W
STOP
CONTACTO IMPULSO DE PARADA (NC)
PHOT
CONTACTO FOTOCÉLULAS (NC)
INDICADOR DE PUERTA ABIERTA 24Vdc MÁX. 10 W
EDGE
CONTACTO DE COSTA (NC)
BATTERY CONECTORES PARA TARJETA DE RECARGA DE BATERÍAS (CÓD.
CHARGER ACG4664 OPCIONAL)
PED
CONTACTO IMPULSO DE APERTURA PEATONAL (NO)
+
SIGNAL
J2-J3
J3
CLOSE
CONTACTO IMPULSO DE CIERRE (NO)
J4
10V
CONECTORES PARA TRANSFORMADOR SECUNDARIO DE 10Vca
OPEN
CONTACTO IMPULSO DE APERTURA (NO)
J5
BAT
CONECTORES PARA BATERÍAS (OPCIONALES)
KBUT
CONTACTO IMPULSO SIMPLE (NO)
J6
24V
CONECTORES PARA TRANSFORMADOR SECUNDARIO DE 24 Vca
B.I.O.
CONTACTO (NO) DEDICADO A UN RELOJ
J7
J8
SECURITY CONECTOR PARA MICROINTERRUPTOR DE DESBLOQUEO MANUAL
LOCK
LIMIT
SWITCH
J12
ANTENNA ABRAZADERAS DEDICADAS A LA CONEXIÓN DE UNA ANTENA
433,92 MHz
CONECTOR PARA FINAL DE CARRERA ELÉCTRICO O MAGNÉTICO
B - FORMULACIÓN
DIP 1 regulación de carrera con final de carrera eléctrico o
magnético (punto C)
DIP 2 programación de apertura total (punto D)
DIP 2-1 programación tiempos de apertura peatonal (punto E)
DIP 1-2 memorización/anulación códigos radio para mando de apertura total (punto F)
DIP 1-3 memorización/anulación códigos radio para mando de apertura peatonal
(punto G)
MICROINTERRUPTORES DE GESTIÓN
DIP 3
ON - partida gradual activa
OFF - partida gradual no activa
DIP 4
ON - fotocélulas activas sólo en cierre
OFF - fotocélulas siempre activas
DIP 5
ON - calentador activo
OFF - calentador no activo
DIP 6
ON - mando radio, interruptor k butt y peatonal en modalidad automática
OFF - mando radio, interruptor k butt y peatonal en modalidad paso a paso
DIP 7
ON - sensor de corriente activo
OFF - sensor de corriente no activo
DIP 8
ON - nuevo cierre inmediato después de tránsito de fotocélulas activo
OFF - nuevo cierre inmediato después de tránsito de fotocélulas no activo
DIP 9
ON - modalidad funciona siempre también con mando por radio
OFF - modalidad funciona siempre sólo con interruptores de mando
DIP 10
ON - autoprueba de costa activa
OFF - autoprueba costa no activa
DIP 11
ON - parpadeo previo activo
OFF - parpadeo previo no activo
DIP 12
ON - a disposición
OFF - a disposición
DIP 13
ON - funcionalidad destinada al motorreductor K800
OFF - funcionalidad destinada al motorreductor K400
DIP 14
ON - habilitación sistema radio SUN/MOON
OFF - habilitación sistema radio SUN-PRO
PROG. > PEQUEÑA TECLA PARA LA PROGRAMACIÓN
MEMORIA >MEMORIA EXTRAIBLE QUE CONTIENE LOS DATOS FUNCIONALES Y LOS
CÓDIGOS DE RADIO.
SW
> CONECTOR PARA ACTUALIZACIÓN DE SOFTWARE.
RESERVADO
53
> CONECTOR RSERVADO A CONTROLES EN FÁBRICA.
E
S
RUN > TRIMMER PARA LA REGULACIÓN DE LA VELOCIDAD DEL MOTOR.
Con este trimmer es posible regular la velocidad del motor (por defecto viene configurado
a mitad de la velocidad). La regulación tiene gran utlidad para que la automatización sea
acorde a las normas europeas en materia de impactos.
Para puertas de 0 hasta 200 kg se recomienda adjustar el trimmer RUN desde 1/2
a MAX.
Para puertas de 200 hasta 400 kg se recomienda adjustar el trimmer RUN del mínimo
a 1/2.
Nota: el movimiento desacelerado no es regulable en cuanto es calculado automáticamente.
TCA > TRIMMER DE CIERRE AUTOMÁTICO TOTAL O PEATONAL
Por defecto no está habilitado y el led DL3 está apagado (trimmer girado completamente en
sentido antihorario).
Con este trimmer es posible realizar la regulación del tiempo antes de tener el cierre
automático total o peatonal.
El cierre automático total o peatonal se obtiene sólo con la puerta completamente (total) o
parcialmente (peatonal) abierta y led DL3 encendido (con trimmer girado en sentido horario).
El tiempo de pause puede ser regulado por un mínimo de 2 segundos hasta un máximo de
2 minutos.
PARTIDA GRADUAL
Si DIP 3 está en ON, se habilita en cada encendido un movimiento gradual por 1 segundo.
SEÑALIZACIONES LED
DL1 señalización programación activada DL2 DL3 señalización tiempo de cierre automático
señalización microinterruptor de desbloqueo manual
DL4
DL5 señalización puerta en cierre DL6
señalización puerta en apertura DL7 señalización final de carrera de cierre
DL8 señalización final de carrera de apertura
DL9 señalización de presencia de tensión microcontrolador 3,3V
DL10 señalización de programación de códigos de radio DL11
señalización de programador conectado
DL12 señalización de contacto de parada
DL13
señalización de contacto de fotocélulas
DL14 señalización de contacto de costa
(color rojo)
(color rojo)
(color rojo)
(color rojo)
(color verde)
(color rojo)
(color verde)
(color amarillo)
(bicolor)
(color rojo)
(color rojo)
(color rojo)
(color rojo)
Buzzer > señala funcionalidades variadas, se observa tabla de señalizaciones
visuales y sonoras.
Fusibles
F2
F3 T 300 mA fusible de protección lógica funcional
T 10 A
fusible de protecció de motor
C – REGULACIÓN DE CARRERA CON FINAL DE CARRERA ELÉCTRICO
O MAGNÉTICO
Este control tiene la tarea de facilitar el instalador durante la puesta en obra de la instalación
o para eventuales controles posteriores.
1 - Desbloquear el operador utilizando el desbloqueo manual y colocar las excéntricas de
final de carrera en la cremallera a fin de definir la carrera de la puerta.
2 - Llevar la puerta a mitad de carrera y bloquear al operador.
3 - Poner el DIP 1 en posición ON => el led DL1 empieza a parpadear.
4 - Presionar y mantener presionado el interruptor pequeño PROG (el mando es de hombre
prsente, abre-para-cierra-para-abre-etc...) => La puerta parte a alta velocidad para
luego desacelerar hasta llegar al final de carrera. Verificar que la puerta se cierre en la
posición deseada. Si no fuera así, llevar las excéntricas de final de carrera y volver a
intentar. Verificar también el final de carrera desde la parte opuesta.
5 - Es posible regular la alta velocidad durante los primeros 5 segundos de funcionamiento
operando sobre le trimmer RUN. Al girar el trimmer RUN en sentido horario, aumenta la
velocidad. El trimmer RUN viene configurado por defecto a mitad de carrera.
6 - Al término volver a poner el DIP 1 en posición OFF. El led DL1 se apaga señalando la
salida del control.
N.B.: Durante este control el interruptor de parada, las costas y las fotocélulas no
están activas.
D – PROGRAMACIÓN DE APERTURA TOTAL*
Atención: Si las entradas PARADA, FOT y COSTA no están conectadas, realizar
puentes entre COM-PARADA, COM-FOT y COM-COSTA antes de proceder
con la programación.
1 - IMPORTANTE: PARA REALIZAR LA PROGRAMACIÓN CORRECTA SE DEBE COLOCAR
LA PUERTA A CASI 20 CM DEL FINAL DE CARRERA DE CIERRE.
2 - Poner el DIP 2 en posición ON => el led DL1 empieza a parpadear.
3-
Presione el interruptor PROG o el botón del mando a distancia (si previamente
memorizado) dedicado a la apertura total. La puerta se abrirá y cerrará 3 veces. NO
PASE DELANTE DE LAS FOTOCÉLULAS MIENTRAS LA PUERTA ESTÁ EN MOVIMIENTO.
4 - La programación termina cuando la puerta queda cerrada y el led DL1 está apagado.
5 - Volver a poner el DIP 2 en OFF.
N.B: Si al final del procedimiento de programación se mueve el trimmer RUN, el
procedimiento de programación se debe que repetir.
Nota: el punto de inicio de desaceleración es determinado automáticamente por la centralina
en la fase de programación de tiempos y se activa 50÷60 cm antes de alcanzar el final
de carrera de apertura o cierre.
Para repetir el procedimiento de programación, coloque el DIP 2 en OFF, y utilizando el
procedimiento de “C – Regulación de carrera con final de carrera eléctrico o magnético”
cerrar la puerta casi por completo, dejándola abierta para 20 cm. A continuación, repetir
el procedimiento de programación como describido anteriormente.
E – PROGRAMACIÓN APERTURA PEATONAL *
1 - Poner primero el DIP 2 en ON y luego el DIP 1 en ON. el led DL 1 empieza a parpadear.
2 - Presionar el interruptor peatonal (COM-PED) o el botón del mando a distancia (si
previamente memorizado) dedicados a la apertura peatonal => Se abre la puerta.
3 - Presionar el interruptor peatonal para detener la puerta (la carrera de apertura peatonal
de la puerta está ahora configurada). Después de 2 segundos, la puerta se cerrará
automáticamente.
4 - Al final de programación peatonal volver a poner los DIP 2 y DIP 1 en OFF.
* Durante la programación los seguros están activos y su intervención detiene la
programación (el led DL1 de luz parpadeante permanece con encedido fijo).
Para repetir el procedimiento de programación, coloque el DIP 2 y DIP 1 en OFF y
utilizando el procedimiento de “C – Regulación de carrera con final de carrera eléctrico o
magnético” cerrar la puerta. A continuación, repetir el procedimiento de programación
como describido anteriormente.
F - PROGRAMACIÓN CÓDIGOS DE RADIO APERTURA TOTAL (MÁX.
1000 CÓDIGOS)
ATENCIÓN: antes de memorizar los telemandos utilizar el DIP 14 para elegir qué
telemandos usar:
DIP 14 en OFF: se puede memorizar telemandos de código variable SUN-PRO:
SUN-PRO 2CH bicanal - teclas rojas y led blanco cód. ACG6210
SUN-PRO 4CH cuatro canales - teclas rojs y led blanco cód. ACG6214
cód. ACG6220
SUN-PROX 2CH bicanal - teclas rojas y led amarillo SUN-PROX 4CH cuatro canales - teclas rojas y led amarillo cód. ACG6224
DIP 14 en ON (por defecto): se puede memorizar telemandos de código fijo SUN y MOON:
SUN 2CH bicanal - teclas azules y led blanco cód. ACG6052
SUN 4CH cuatro canales - teclas azules y led blanco cód. ACG6054
SUN CLONE 2CH bicanal - teclas azules y led amarillo cód. ACG6056
SUN CLONE 4CH cuatro canales - teclas azules y led amarillo cód. ACG6058
MOON 2CH bicanal - teclas negras y led amarillo
cód. ACG6081
MOON 4CH cuatro canales - teclas negras y led amarillo cód. ACG6082
ATENCIÓN: no es posible memorizar simultáneamente telemandos con código fijo y
telemandos con código variable.
La programación de los telemandos puede ser realizada sólo con puerta detenida.
1 - Colocar primero el DIP 1 en ON y luego el DIP 2 en ON. El led bicolor DL10 de
programación parpadea en rojo por 10 segundos2 - En estos 10 segundos presionar el interruptor del telemando (normalmente el canal
A). Si el telemando es correctamente memorizado el led bicolor DL10 se enciende en
verde y un tono de buzzer confirma la memorización correcta. Los 10 segundos para la
programación de los códigos se renuevan automáticamente con led bicolor DL10 que
parpadea en rojo para poder memorizar el telemando posterior.
3 - Para terminar la programación dejar transcurrir 10 seg., o bien presionar por un momento
el interruptor PROG. El led bicolor DL10 de programación deja de parpadear.
4 - Volver a colocar DIP 1 en OFF y DIP 2 en OFF.
5 - Fin de procedimiento.
ANULACIÓN DE TODOS LOS CÓDIGOS DE RADIO DEDICADOS A LA APERTURA TOTAL
La cancelación puede ser realizada sólo con puerta detenida.
1 - Colocar el DIP 1 en ON y posteriormente el DIP 2 en ON.
2 - El led bicolor DL10 de programación parpadea en rojo por 10 segundos.
3-
En estos 10 segundos presionar y mantener presionado el interruptor PROG por
54
E
S
5 segundos. La anulación de la memoria es indicada por dos luces parpadeantes de color
verde del led bicolor DL10y por 2 tonos del buzzer que confirma la anulación realizada.
Posteriormente el led bicolor DL10 de programación parpadea en rojo por 10 segundos
y es posible insertar nuevos códigos como el procedimiento antes descrito.
4 - Volver a colocar DIP 1 en OFF y DIP 2 en OFF.
5 - Fin de procedimiento.
SEÑALIZACIÓN DE MEMORIA SATURADA CON CÓDIGOS DE RADIO
La señalización se puede obtener sólo con puerta detenida.
1 - Colocar antes el DIP 1 en ON y luego el DIP 2 enON.
2 - El led bicolor DL10 parpadea 6 veces señalando la memoria saturada (1000 códigos
presentes). Posteriormente el led bicolor DL10 de programación parpadea de rojo por
10 segundos permitiendo una anulación posible total de los códigos.
4 - Volver a colocar DIP 1 en OFF y DIP 2 en OFF.
5 - Fin de procedimiento.
G-
PROGRAMACIÓN DE CÓDIGOS DE RADIO PARA APERTURA
PEATONAL (MÁX. 1000 CÓDIGOS)
La programación puede ser realizada sólo con puerta detenida.
1 - Colocar primero el DIP 1 en ON y luego el DIP 3 en ON. El led bicolor DL10 de
programación parpadea en verde por 10 segundos.
2 - Presionar el interruptor del telemando (normalmente el canal B) en los 10 segundos
establecidos. Si el telemando es correctamente memorizado el led bicolor DL10 se
enciende de rojo por un momento, y un tono de buzzer confirma la memorización
correcta. Los 10 segundos para la programación de los códigos se renuevan
automáticamente con el led bicolor DL10 que parpadea de verde para poder memorizar
el telemando sucesivo.
3 - Para terminar la programación dejar transcurrir 10 seg., o bien presionar por un momento
el interruptor PROG. El led bicolor DL10 de programación deja de parpadear.
4 - Volver a colocar DIP 1 en OFF y DIP 3 en OFF.
5 - Fin de procedimiento.
ANULACIÓN DE TODOS LOS CÓDIGOS DE RADIO DESTINADOS A LA APERTURA
PEATONAL
La cancelación puede ser realizada sólo con puerta detenida.
1 - Colocar primero el DIP 1 en ON y luego el DIP 3 en ON. El led bicolor DL10 de
programación parpadea en verde por 10 segundos2 - En estos 10 segundos presionar y mantener presionado el interruptor PROG por 5
segundos. La anulación de la memoria es indicada por dos luces parpadeantes de color
rojo del led bicolor DL10 y por 2 tonos de buzzer que confirman la anulación realizada.
Posteriormente, el led bicolor DL10 de programación permanece activo en verde
3-
parpadeante por 10 segundos y es posible insertar nuevos códigos como en los
procedimientos anteriormente descritos.
4 - Volver a colocar DIP 1 en OFF y DIP 3 en OFF.
5 - Fin de procedimiento.
SEÑALIZACIÓN DE MEMORIA SATURADA CON CÓDIGOS DE RADIO
La señalización se puede obtener sólo con puerta detenida.
1 - Colocar antes el DIP 1 en ON y luego el DIP 3 enON.
2 - El led bicolor DL10 parpadea 6 veces indicando que la memoria está saturada (1000
códigos presentes). Posteriormente, el led bicolor DL10 de programación permanece
activo en color rojjo con luz parpadeante por 10 segundos, permitiendo una posible
anulación total de los códigos.
3 - Volver a colocar DIP 1 en OFF y DIP 3 en OFF.
4 - Fin de procedimiento.
FUNCIONAMIENTO DE ACCESORIOS DE MANDO
INTERRUPTOR DE APERTURA (COM-APERTURA)
Con puerta detenida el interruptor ordena el movimiento de apertura. Si se presiona durante
el cierre vuelve a abrir la puerta.
INTERRUPTOR DE CIERRE (COM-CIERRE)
Con puerta detenida ordena el movimiento de cierre.
INTERRUPTOR DE MANDO SIMPLE (COM-K BUTT)
Si DIP 6 está en OFF => realice una secuencia de mandos apertura-parada-cierre-paradaapertura-etc.
Si DIP 6 está en ON => realice la apertura con puerta cerrada. Si es accionado durante el
movimiento de apertura no tiene efecto. Si es accionado con puerta
abierta la cierra. Si es accionado durante el cierre lo vuelve a abrir.
TELEMANDO PARA APERTURA TOTAL O PEATONAL
Si DIP 6 en OFF => realice un mando cíclico de los mandos apertura-parada-cierre-paradaapertura-etc.
Si DIP 6 está en ON => realice la apertura con puerta cerrada. Si es accionado durante el
movimiento de apertura no tiene efecto. Si es accionado con puerta
abierta la cierra. Si es accionado durante el cierre lo vuelve a abrir.
FUNCIÓN RELOJ - MANDO B.I.O. (COM-B.I.O.)
La función reloj es útil en las horas punta, cuando el tráfico vehicular desacelera (por ej.,
Entrada/salida de operarios, emergencias en zonas residenciales, parqueos, etc.)
MODALIDAD DE APLICACIÓN FUNCIÓN RELOJ
Al conectar un interruptor y/o un reloj de tipo diario/semanal a las abrazaderas “COM B.I.O.”,
es posible abrir y mantener abierta la puerta hasta que el interruptor o el reloj permanezcan
activos.
En la automatización abierta se inhiben todas las funciones de mando.
Al liberar el interruptor, o al vencimiento de la hora configurada, se tendrá el cierre inmediato
de la automatización.
INTERRUPTOR APERTURA PEATONAL (COM-PEA.BUT)
Mando dedicado a una apertura parcial y a su nuevo cierre.
Durante la apertura, la pausa o el cierre del mando peatonal, es posible ordenar la apertura
total utilizando cualquier mando conectado a la tarjeta.
A través del DIP 6 es posible elegir la modalidad de funcionamiento del interruptor de mando
peatonal.
Si DIP 6 en OFF => realizar un mando cíclico de mandos apertura-parada-cierre-parada-etc.
Si DIP 6 está en ON => realice la apertura con puerta cerrada. Si es accionado durante
el movimiento de apertura no tiene efecto. Si está accionado con
puerta abierta peatonarl la cierra. Si es accionado durante el cierre
lo vuelve a abrir.
TRIMMER DE CIERRE AUTOMÁTICO (TCA) TOTAL O PEATONAL por defecto no habilitado
y led DL3 apagado (trimmer girado completamente en sentido contrario al reloj)
Con este trimmer es posible realizar la regulación del tiempo antes de tener el cierre
automático total o peatonal.
El cierre automático se obtiene sólo con puerta abierta utilizando los mandos de apertura
total o peatonal y led DL3 encendido (trimmer girado en sentido horario para habilitar la
función)
Una vez que la puerta ha sido completamente abierta el tiempo de pause puede ser regulado
por un mínimo de 2 segundos hasta un máximo de 2 minutos.
Una vez que la puerta ha realizado la apertura peatonal, el tiempo de pausa se puede ajustar
desde 2 segundos hasta un máximo de 30 segundos.
Este tiempo de pausa antes del cierre automático se puede hacer mediante el ajuste del
trimmer TCA y estará en relación con la posición del trimmer.
Por ejemplo, con el trimmer puesto a la mitad del camino el tiempo de pausa despues de
la apertura total serà de 1 minuto, mientras despues de la apertura peatonal será de 15
segundos.
DESBLOQUEO MANUAL (LED DL4)
Desbloque el operador. El contacto del microinterruptor se abre a J7 (el DL4 LED se apaga),
y los controles no están funcionando.
Bloquee el operador y dar un un mando. El primer movimiento será a velocidad lenta.
Sólo después de haber completado este primer movimiento, el operador retomará sus
labores a la velocidad configurada.
FUNCIONAMIENTO DESPUÉS DE APAGÓN
Al momento del apagón, el estado de la puerta es guardado de memoria.
Al retorno de la tensión de red:
Si la puerta se encuentra en el final de carrera de apertura o de cierre, al dar un mando
la puerta se cerrará o abrirá con los datos memorizados.
Si la puerta se encuentra en posición intermedia, dando un mando la puerta se abrirá
lentamente hasta llegar al final de carrera de apertura. Después de haber completado este
primer movimiento, el operador retomará la labor a velocidad configurada.
FUNCIONAMIENTO DE ACCESORIOS DE SEGURIDAD
FOTOCÉLULA (COM-FOT)
Con la fotocélula activada el buzzer emite 1 tono.
DIP 4 OFF => de puerta cerrada, si un obstáculo interrumpe el radio de las fotocélulas, la
puerta no se abre. Durante el funcionamiento las fotocélulas intervienen en la
55
E
S
apertura (con restablecimiento del motor en apertura sólo después de haber
liberado el radio de las fotocélulas) y en el cierre (con restablecimiento del
motor inverso sólo después de haber liberado el radio de las fotocélulas).
DIP 4 ON => de puerta cerrada, si un obstáculo está delante del radio de las fotocélulas y
se ordena la apertura, la puerta se abre (durante la apertura las fotocélulas
no intervendrán). Las fotocélulas intervendrán sólo en la fase de cierre (con
restablecimiento del motor en apertura después de un segundo aún si las
fotocélulas aún están comprometidas).
GESTIÓN CIERRE INMEDIATO DESPUÉS DEL TRÁNSITO DE FOTOCÉLULAS
DIP 8 ON y DIP 4 OFF => mientras la puerta se abre, transitando delante de las fotocélulas la
puerta se detiene Completado el tránsito, después de 1 segundo
la puerta se cierra.
DIP 8 ON y DIP 4 ON => mientras la puerta se abre, transitando delante de las fotocélulas
la puerta continua abriéndose. Completado el tránsito, la puerta se
detiene y después de 1 segundo de pausa se cierra.
Si durante el cierre existe un tránsito veloz (ej. peatón) la puerta se volverá a abrir por dos
segundos para luego cerrarse nuevamente.
DIP 8 OFF => cierre inmediato después del tránsito de la fotocélula deshabilitada
COSTA (COM - COSTA)
Con costa activada el buzzer emite 2 tonos.
Si la costa interviene en la apertura, ordena el movimiento de cierre por 2 segundos y
luego se detiene.
Si la costa interviene en el cierre, ordena el movimiento de apertura por 2 segundos y
luego se detiene.
Si la costa permanece comprometida (contacto NO), no se permite movimiento
automático alguno.
Si la costa no está instalada, realizar un puente con las abrazaderas COM-COSTA.
N.B.: Se recomienda verificar la funcionalidad de las costas al menos cada 6 meses.
ALARMAS DE COSTAS
Después de una inversión a continuación de la intervención de la costa, la puerta se detiene y
la central, indica la alarma a través de la luz parpadeanto encendida por 1 minuto y el buzzer
encendido por 1 minuto (con señalización sonora de 2 tonos cada 5 segundos).
Durante o después del minuto de alarma, es posible mover la puerta presionado cualquier
interruptor de mando.
MONITOREO “AUTOTEST” COSTAS DE SEGURIDAD (A+TEST / A-)
A través del ingreso A+TEST y el DIP 10 en ON, es posible monitorear la/s costa/s
suministrada/s de un alimentador propio de control conectado a las abrazaderas A+TST /
A-(24Vdc).
El monitoreo consiste en una prueba funcional de la costa realizado al final de cada apertura
completa de la puerta.
Después de cada apertura, el cierre de la puerta es permitido sólo si la/s costa/s ha/n
superado la prueba funcional.
Atención: el monitoreo de la entrada de la costa puede ser habilitado con el DIP 10 en ON,
o bien deshabilitado con el DIP 10 en OFF.
Una costa mecánica no puede ser monitoreada, por lo tanto el DIP 10 debe ser colocado
en OFF.
ALARMA AUTOPRUEBA DE FALLO
En el caso falle la autoprueba de costa, el buzzer indicará por un miuto (con 4 tonos cada
5 segundos) el estado de la alarma, y no permitirá el cierre de la puerta hasta la solución
del problema.
La alarma se renueva frente a un mando de cierre.
SENSOR DE CORRIENTE (DIP 7 - ON)
La central K 24 V cuenta con sensor de corriente de autotara que invierta la marcha de la
puerta en caso de que impacte contra cosas o personas (según las normas vigentes, verificar
siempre con un instrumento adecuado el respeto de los valores impuestos por la norma).
Con sensor activado, en caso de impacto el buzzer emite 3 tonos.
Si interviene en apertura, invierte el movimiento en el cierre por 2 segundos y luego se
detiene.
Si interviene en cierre, invierte el movimiento en apertura por 2 segundos y luego se
detiene.
ALARMA DE SENSOR DE CORRIENTE
Después de una inversión realizada a continuación de la intervención del sensor de corriente,
la puerta se detiene en alarma, señalada por la luz parpadeante encendida por 1 minuto y
por el buzzer encendido por 1 minuto (con señalización sonora de 3 tonos cada 5 segundos).
Durante o después del minuto de alarma, es posible restablecer el funcionamiento de la
puerta presionando cualquier interruptor de mando.
INTERRUPTOR DE PARADA (COM-PARADA)
Durante el movimiento el interruptor de parada realiza la parada de la puerta.
Si el interruptor de PARADA es precionado con la puerta totalmente abierta (o parcialmente
utilizando el mando peatonal) el cierre automático se verá temporalmente excluido (si es
habilitada a través del trimmer TCA con led DL3 encendido). Por ende, es necesario dar un
nuevo mando para volver a cerrar la puerta.
Al cerrar la puerta nuevamente el cierre automático se reactivará (si se habilita a través de
trimmer TCA con led DL3 encendido).
MODALIDAD “FUNCIONA SIEMPRE” EN CASO DE AVERÍA DE LOS SEGUROS.
DIP 9 - OFF: Si la costa está averiada o comprometida por más de 5 segundos, o si la
fotocélula está averiada o comprometida por más de 60 segundos, los mandos APERTURA,
CIERRE, K-BUTTON y PEATONAL funcionarán sólo si hay una persona presente.
La señalización de la activación de este funcionamiento es facilitada por el led DL1 de
programación que parpadea.
Con este funcionamiento se permite la apertura o el cierre solo manteniendo presionados
los interruptores de mando. El mando de radio y el cierre automático están excluidos.
Al restablecimiento del contacto de los seguros, después de 1 segundo, se restablece
automáticamente el funcionamiento automático o paso a paso y por ende también el mando
por radio y el cierre automático vuelve a funcionar.
DIP 9 - ON: Es posible ordenar la puerta también con el mando por radio manteniendo
presionada la tecla presente en el telemando hasta la intervención del sistema power saver
(casi 8 segundos).
Nota 1: durante este funcionamiento en caso de avería en las costas (o bien fotocélulas) las
fotocélulas (o bien costas) funcionan aún interrumpiendo la maniobra en el acto.
Nota 2: el interruptor de parada no es considerado un seguro para el bypass en esta
modalidad, por lo tanto se presiona o se rompe, no permite ninguna maniobra.
La maniobra con persona presente es exclusivamente una maniobra de emergencia que
debe ser efectuada por breves periodos y con la seguridad visual del movimiento del
automatismo. Apenas posible las protecciones dañadas debe ser reparadas/sustuidas para
restablecer el correcto funcionamiento del sistema.
FUNCIÓN CALENTADOR (DIP-ON)
Permite al operador trabajar siempre a una temperatura idonea para el funcionamiento.
Este dispositivo se activa automáticamente sólo con puerta detenida y final de carrera de
apertura o cierre comprometido, a una temperatura ambiente del motor de 0°C detectada
por el sensor montado en la tarjeta.
Cuando el motor está en movimiento, el calentador se desactiva.
Sólo después de 10 segundos que la puerta permanece detenida, el calentador se activa
(con la condición que la temperatura ambiente del motor sea inferior o igual a 0°C).
Al llegar a los 3°C el calentador se apaga, manteniendo las condiciones ambientales a
temperatura constante.
SEÑALIZACIONES VISUALES Y SONORAS
LUZ PARPADEANTE
N.B.: Este tablero electrónico puede alimentar solo una luz parpadeante con círculo
parpadeante (ACG7061) con lámpara de 24V y 20W máximo. Si se exceden los
20W la lógica del tablero electrónico no se verá comprometida con un posible
bloqueo de las operaciones.
FUNCIÓN PRE-PARPADEO
DIP 11 - OFF => el motor y la luz parpadeante parten simultáneamente.
DIP 11 - ON => la luz parpadeante parte 3 segundos antes del motor.
INDICADOR DE SEÑALIZACIÓN DE PUERTA ABIERTA a 24Vdc (A+SIGNAL)
Tiene la tarea de señalar los estados de puerta abierta, parcialmente abierta o no obstante
no cerrado totalmente. Sólo se apaga con la puerta completamente cerrada.
Durante la programación esta señalización está activa.
N.B.: Máx. 10 W. Si se excede con los indicadores, la lógica del tablero electrónico se
verá comprometida con un posible bloqueo de las operaciones.
BUZZER
Tiene la tarea de señalar la intervención de los seguros, el estado de las alarmas y el estado
de memorizacion y anulación de los códigos de radio.
56
TABLA SINÓPTICA DE ALARMAS Y SEÑALIZACIONES VISUALES Y SONORAS
SEÑALIZACIONES EN FASE DE PROGRAMACIÓN
ESTADO DE BUZZER
ESTADO DE LUZ PARPADEANTE
DIP 1 ON (MODO PERSONA PRESENTE)
O BIEN AVERÍA DE UN SEGURO (MODO
FUNCIONA SIEMPRE)
EVENTO
APAGADO
APAGADO
PARPADEA 250 MS ON-OFF
DIP 2 ON (PROGRAMACIÓN CARRERA
TOTAL)
APAGADO
APAGADO
PARPADEA 500 MS ON-OFF
DIP 2 > 1 ON (PROGRAMACIÓN CARRERA
PEATONAL)
APAGADO
APAGADO
PARPADEA 500 MS ON-OFF
PROCEDIMIENTO DE PROGRAMACIÓN
INTERRUMPIDA POR INTERVENCIÓN DE UN
SEGURO
APAGADO
APAGADO
ENCEDIDO FIJO
ESTADO DE BUZZER
ESTADO DE LUZ PARPADEANTE
NINGÚN CÓDIGO DE RADIO INSERTADO
APAGADO
APAGADO
PARPADEA ALTERNATIVAMENTE DE ROJO/
VERDE
DIP 1 > 2 PRG. CÓDIGOS RADIO TOTAL
APAGADO
APAGADO
PARPADEA ROJO POR 10 SEGUNDOS
DIP 1 > 3 PRG. CÓDIGOS RADIO PEATONAL
APAGADO
APAGADO
PARPADEA VERDE POR 10 SEGUNDOS
PROGRAMACIÓN CÓDIGOS DE RADIO
TOTAL, RESULTADO OK
1 TONO
APAGADO
SE ENCIENDE DE VERDE UNA VEZ
PROGRAMACIÓN CÓDIGOS DE RADIO
PEATONAL, RESULTADO OK
1 TONO
APAGADO
SE ENCIENDE DE ROJO UNA VEZ
CÓDIGO RADIO NO PRESENTE EN MEMORIA
APAGADO
APAGADO
FLASH ROJO
MEMORIA SATURADA POR CÓDIGOS DE
RADIO (1000 CÓDIGOS MEMORIZADOS)
APAGADO
APAGADO
REALIZA 6 PARPADEOS VERDES
ANULACIÓN CÓDIGOS DE APERTURA TOTAL
2 TONOS
APAGADO
REALIZA 2 PARPADEOS ROJOS
ANULACIÓN CÓDIGOS DE APERTURA
PEATONAL
2 TONOS
APAGADO
REALIZA 2 PARPADEOS VERDES
EVENTO
ESTADO LED DL1 DE PROGRAMACIÓN
ESTADO LED DL10 BICOLOR DE PROG.
RADIO
SEÑALIZACIONES DURANTE EL FUNCIONAMIENTO
EVENTO
INTERRUTOR DE PARADA PRESIONADO
ESTADO DE BUZZER
ESTADO DE LUZ PARPADEANTE
APAGADO
APAGADO
LED DL12 SE APAGA
ESTADO LED Y SALIDA DE SEÑAL
INTERVENCIÓN DE FOTOCÉLULA
1 TONO
APAGADO
LED DL13 SE APAGA
INTERVENCIÓN DE COSTA
2 TONOS
APAGADO
LED DL14 SE APAGA
INTERVENCIÓN SENSOR DE CORRIENTE
3 TONOS
APAGADO
NINGÚN LED UNIDO
AVERÍA EN UN SEGURO O SEGURO
COMPROMETIDO POR UN TIEMPO
PROLONGADO
APAGADO
APAGADO
LED DL1 PARPADEA 250 MS ON-OFF
FUNCIONAMIENTO CON BATERÍAS DE
SOCORRO DE 24 Vdc
APAGADO
ACTIVO AL MOVIMIENTO
SALIDA SEÑAL 2 PARPADEOS 250 MS ONOFF SEGUIDOS DE PAUSA DE 2 SEGUNDOS
1 TONO CADA 5 SEGUNDOS POR 1 MINUTO
(SE RENUEVA DANDO UN MANDO)
APAGADO
SALIDA SEÑAL PARPADEA CONTINUAMENTE
500 ms ON-OFF
ALARMAS DE COSTA
2 TONOS CADA 5 SEGUNDOS POR
1 MINUTO
(SE RENUEVA DANDO UN MANDO)
ACTIVO POR 1 MINUTO PARPADEANTE
NINGÚN LED UNIDO
ALARMA DE SENSOR DE CORRIENTE
3 TONOS CADA 5 SEGUNDOS POR
1 MINUTO
(SE RENUEVA DANDO UN MANDO)
ACTIVO POR 1 MINUTO PARPADEANTE
NINGÚN LED UNIDO
ALARMA DE AUTOPRUEBA FALLIDA
4 TONOS CADA 5 SEGUNDOS POR
1 MINUTO
(SE RENUEVA DANDO UN MANDO)
APAGADO
NINGÚN LED UNIDO
ALARMA MEMORIA NO INSERTADA
2 SEGUNDOS ON 3 SEGUNDOS OFF
SE APAGA SÓLO SI LA MEMORIA ES
INSERTADA
APAGADO
NINGÚN LED UNIDO
TONO CONTINUO POR 10 SEGUNDOS CON
PAUSA DE 2 SEGUNDOS OFF
SE APAGA SÓLO SI SE TRASLADA EL DIP
2 a OFF
APAGADO
LED DL1 ENCENDIDO FIJO
APAGADO
APAGADO
LED DL10 BICOLOR ENCENDIDO FIJO CON
COLOR NARANJA.
SEÑALIZACIÓN DE BATERÍAS DE SOCORRO
DESCARGAS
ALARMA DE AUTOAPRENDIZAJE ERRADO
BLOQUEO FUNCIONAL
57
E
S
CARACTERÍSTICAS TÉCNICAS
- Rango de temperatura -10 ÷ +55°C
- Humedad < 95% sin condensación
- Tensión de alimentación 230V~ ±10% (120V 60Hz a solicitud)
50/60 Hz
- Frecuencia - Potencia de transformador 150VA - primario 230Vac
1° secundario 24Vca
2° secundario 10Vca
- Absorción máxima 100 mA
100ms
- Microinterrupciones de red - Potencia máxima de indicador de puerta abierta (SIGNAL) 24Vdc 10W
- Carga máxima luz parpadeante 24Vdc 20W
- Corriente disponible para fotocélulas y accesorios 24Vdc 500 mA ±15%
- Alimentación de batería 24Vdc
CARACTERÍSTICAS TÉCNICAS DE RADIO
- Frecuencia de recepción
433,92MHz
- Impedancia 52 ohm
- Sensibilidad >1 µV
PLL
- Controll de retroacción - Códigos memorizables 1000
RESOLUCIÓN DE PROBLEMAS
Después de haber efectuado todas las conexiones siguiendo atentamente el diagrama y haber
colocado la puerta en posición intermedia, verificar el encendido correcto de los led DL4, DL7,
DL8, DL9, DL12, DL13, DL14.
En caso de falta de encendido de uno de los led, siempre con la puerta en posición intermedia,
verificar a continuación y reemplazar posibles elementos averiados:
DL4 rojo apagado - desbloqueo manual abierto (cerrarlo)
DL7 rojo apagado - final de carrera que detiene el cierre averiado
DL8 verde apagado - final de carrera que detiene la apertura averiada
DL9 rojo apagado - alimentación de 3,3 V faltante (verificar la presencia de la tensión
secundaria a 10Vac del transformador al conector J4).
DL12 rojo apagado - interruptor de parada averiado (en caso la PARADA no esté conectada,
realizar el puente entre COM y PARADA).
DL13 rojo apagado - fotocélulas averiadas (en caso las fotocélulas no estén conectadas,
realizar el puente entre COM y FOT).
DL14 rojo apagado - costa de seguridad averiada (en caso la costa no esté conectada, realizar
el puente entre COM y COSTA).
Durante el funcionamiento con persona presente, con DIP1 en ON, verificar que durante la
apertura se encienda el led verde DL6 y que durante el cierre se encienda el led rojo DL5.
Caso contrario, realizar una nueva programación de apertura total.
DEFECTO
SOLUCIÓN
Después de haber efectuado las diversas conexiones y haber suministrado tensión, todos los Verificar la integridad de los fusibles F1 y F2.
led se apagan.
En caso de un fusible averiado, reemplazarlo sólo con valores iguales:
F1 = T 1,6A F2 = T 300mA
Las fotocélulas no están encendidas y el motor no gira
Verificar la integridad del fusible F3.
En caso de un fusible averiado, reemplazarlo sólo con valores iguales: F3 = T 10A
La puerta realiza la apertura, pero no cierra después del tiempo establecido
Verificar el encendido del led DL3. Se esta apagado girar el trimmer en sentido horario.
O bien verificar que las fotocélulas no estén comprometidas.
O bien, es posible que esté presionado el interruptor de PARADA con puerta abierta con bloquo
momentáneo del cierre automático.
La puerta no abre y no cierra accionando los diversos interruptores APERTURA-CERRAR-K Contacto de costa o fotocélula averiada con DIP 4 OFF. Sistematizar o sustituir el contacto
RADIO
relativo.
O bien, controlar que el desbloqueo manual no esté abierto.
Con puerta abierta, accionando el interruptor K, RADIO o el interruptor CIERRE la puerta no Función reloj activa Verificar el estado del ingreso B.I.O.
realiza ningún movimiento.
O bien, autoprueba costa averiada => verificar las conexiones entre el tablero electrónico y
alimentador para costas. Atención: si no se está usando un alimentador para costas el DIP 10
debe estar en posición OFF.
la puerta entra en alarma para otra corriente señalada por 3 tonos de BUZZER.
Controlar la fluencia de la puerta verificado que no existan fricciones. Sólo de ser necesario
colocar el DIP 7 en OFF para excluir el sensor de corriente.
LED DL1 parpadea 250ms ON/OFF
DIP 1 en ON. Pasarlo a OFF.
O bien, una costa o fotocélula está averiada. El movimiento se permite sólo con persona
presente.
En programacion de tiempos, la puerta se detiene y el buzzer emite un tono de 10 seg. con Procedimiento de programación errada. Colocar el DIP 2 en OFF.
pausa de 2 seg.
Llevar la puerta a casi 20 cm del fin de cierre y repetir la programación.
OPERACIÓN FINALE -
Aplicar la junta
La junta se tiene que aplicar una vez acabada la instalación y antes de volver a colocar el cárter.
Junta aplicada
Cerrar el cárter
58
Motor preparado
E
S
OPCIONALES
Para las conexiones y datos técnicos de los accesorios, consultar los manuales respectivos.
CREMALLERA MOD. 4 DE NYLON
PLACA A CEMENTAR
cód. ACG8107
con angular galvanizado en barras de 1 metro. Ideal para verjas hasta 1000 kg / 2200lbs
de peso.
1 m
cód. ACS9000
10 m (1 m x 10)
cód. ACS9001
TOUCH
FIT SLIM
FOTOCÉLULAS PARA PARED
cód. ACG8032
PAR DE COLUMNAS PARA FIT SLIM
cód. ACG8065
Las fotocélulas FIT SLIM tienen una funciòn de sincronizaciòn en corriente alterna y
portada de 20 metros. Pueden ser aplicadas màs parejas de fotocélulas cercanas gracias
al circùito de sincronizaciòn.
Añadir el TRANSMISOR TX SLIM SYNCRO
cód. ACG8029
para sincronizar hasta 4 parejas de fotocélulas.
COSTA MECÁNICA L = 2 m
CERTIFICADA EN 13849-2 (2008) - CATEGORÍA 3
TELEMANDO SUN
SUN 2CH
SUN CLONE 2CH
SUN-PRO 2CH
SUN-PROX 2CH
cód. ACG6052
cód. ACG6056
cód. ACG6210
cód. ACG6220
cód. ACG3015
SPARK 24V
SUN 4CH
SUN CLONE 4CH
SUN-PRO 4CH
SUN-PROX 4CH
cód. ACG6054
cód. ACG6058
cód. ACG6214
cód. ACG6224
INTERMITENTE SPARK con tarjeta intermitente incorporada cód. ACG7061
SOPORTE LATERAL
cód. ACG7042
ANTENA SPARK 433 cód. ACG5452
BATERÍA
TARJETA DE CARGA DE LA BATERÍA
Batería 2,2Ah 12V
cód. ACG4664
59
cód. ACG9515
60
61
®
automatismi per cancelli
automatic entry systems
R.I.B. S.r.l.
25014 Castenedolo - Brescia - Italy
Via Matteotti, 162
Tel. ++39.030.2135811
Fax ++39.030.21358279 - 21358278
www.ribind.it - [email protected]
AZIENDA CON SISTEMA
DI QUALITÀ CERTIFICATO
DA DNV
COMPANY WITH QUALITY
SYSTEM CERTIFIED
BY DNV
DICHIARAZIONE DI CONFORMITÁ - DECLARATION OF COMPLIANCE
DÉCLARATION DE CONFORMITÉ - ÜBEREINSTIMMNUGSERKLÄRUNG
DECLARACIÓN DE CONFORMIDAD
Dichiariamo sotto la nostra responsabilità che l’operatore K800 24V è conforme alle seguenti norme e Direttive:
L’opérateur K800 24V se conforme aux normes suivantes:
We declare under our responsibility that K800 24V operator is conform to the following standards:
Wir erklaeren das der K800 24V den folgenden EN-Normen entspricht:
Declaramos, bajo nuestra responsabilidad que el operador K800 24V es conforme a la siguientes normas y disposiciones:
EN 301 489-1
EN 301 489-3
EN 300 220-1
EN 300 220-3
EN 55014-1
2011
2013
2012
2010
2012
EN 55014-2
EN 60335-1
EN 60335-2-103
EN 61000-3-2
EN 61000-3-3
2009
2014
2010
2011
2014
EN 61000-6-1
EN 61000-6-2
EN 61000-6-3
EN 61000-6-4
2007
2006
2013
2013
Inoltre permette un’installazione a Norme - Permit, en plus, une installation selon les normes suivantsYou can also install according to the following rules - Desweiteren genehmigt es eine
Installation der folgenden Normen - Además permite una instalación según las Normas:
EN124532002
EN 12445
2002
EN 13241-1
2011
Come richiesto dalle seguenti Direttive: - Comme demandé par les suivantes Directives:
As requested by the following Directives: - Gemaß den folgenden Richtlinien:
Tal y como requerido por las siguientes Disposiciones:
2006/95/CE
2004/108/CE
Il presente prodotto non può funzionare in modo indipendente ed è destinato ad essere incorporato in un impianto costituito da ulteriori elementi. Rientra perciò nell’Art. 6 paragrafo 2 della
Direttiva 2006/42/CE (Macchine) e successive modifiche, per cui segnaliamo il divieto di messa in servizio prima che l’impianto sia stato dichiarato conforme alle disposizioni della Direttiva.
Le présent dispositif ne peut fonctionner de manière indépendante, étant prévu pour être intégré à une installation constituée d’autres éléments. Aussi rentre-t-il dans le champ d’application
de l’art. 6, paragraphe 2 de la Directive machines 2006/42/CEE et de ses modifications successives. Sa mise en service est interdite avant que l’installation ait été déclarée conforme aux
dispositions prévues par la Directive.
This product can not work alone and was designed to be fitted into a system made up of various other elements. Hence, it falls within Article 6, Paragraph 2 of the EC-Directive 2006/42
(Machines) and following modifications, to which respect we point out the ban on its putting into service before being found compliant with what is provided by the Directive.
Dieses Produkt kann nicht allein funktionieren und wurde konstruiert, um in einen von anderen Bestandteilen zusammengesetzten System eingebaut zu werden. Das Produkt fällt deswegen
unter Artikel 6, Paragraph 2 der EWG-Richtlinie 2006/42 (Maschinen) und folgenden.
Este producto no puede funcionar de manera independiente y se tiene que incorporar en una instalación compuesta por otros elementos. Está incluido por lo tanto en el Art. 6 párrafo 2 de
la Disposición 2006/42/CEE (Maquinaria) y sus siguientes modificaciones, por lo cual destacamos que está prohibido poner la instalación en marcha antes de que esté declarada conforme
a la citada Disposición.
Legal Representative
(Rasconi Antonio)
62
K800 24V
Codice
Denominazione Particolare
CEL1645
Trasformatore lamellare 150VA 230V
CTC1018
Chiavetta 8x7x50
AC08006
Scheda K 24V-CRX
CEL1652
Microswitch a rotella
CTC1123
Seeger E25
ACG1082
Chiave di sblocco K
CEL1654
Trasformatore lamellare 150VA 120V
CTC1164
Spina elastica 6x30
ACG8672
Serratura esagonale
CEL1661
KIT telaio + viti
CTC1205
Molla sblocco
ACG9515
Batteria 24V Optional
CME2046
Vite rullata
CTC1221
Spina cilindrica 10x80
BA01019
Serie accessori per cilindro
CME2026
Albero traino
CTC1243
Guarnizione base K
BA03241
Gruppo finecorsa K
CME2028
Perno di sblocco
CTC1308
Anello di tenuta OR 4100
BA10072
Ingranaggio di traino
CME3066
Flangia anteriore motore
CTC1355
Anelli di rasamento 25x35x0,5
BA10079
Confezione fermi per finecorsa K
CMO2599C
Gruppo motore
CTC1406
Paraolio 10x26x7
BA10088
Carter K completo
CPL1177
Guida porta micro
CVA1325
Cilindro serratura
BA10115
Finecorsa K con fermi mecc.
CPL1178
Tappo ingranaggio traino
CVA1372
Boccole flangia 25X32X40X5X25
CAL1125
Base scorrevole
CPL1225
Supporto scheda
CCA1535
Piastra supporto batteria
CPL1226
Corona elicoidale
CEL1519
Passacavo IP55
CTC1012
Chiavetta 8x7x20
63
Cod. CVA2114 - 09102015 - Rev. 01
K800 24V
Questo prodotto è stato completamente progettato e costruito in Italia · Ce produit a été complètement développé et fabriqué en Italie · This product has been
completely developed and built in Italy · Dieses Produkt wurde komplett in Italien entwickelt und hergestellt · Artìculo totalmente proyectado y producido en Italia
®
automatismi per cancelli
automatic entry systems
25014 CASTENEDOLO (BS) - ITALY
Via Matteotti, 162
Tel. +39.030.2135811
Fax +39.030.21358279
www.ribind.it - [email protected]