1
FT6VS09
F6
F7
F4
F5
F8
G
E
N
D
C
B1
A
B
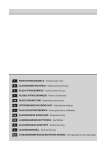
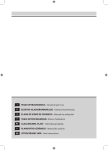
Fig.1
-3-
30 mm
44
B
55
A
580
0
- 77
0-9
00
40 mm
51
50
Min
560+20
- 75 +20
0
3
2
+2
0
50
n
Mi
0
- 88 +2
00
49
50
Min
C
1
4 mm
25 mm
20 mm
Fig.2
Fig.3
Fig.4
-4-
220-240V 1N ~ H05V2V2-F 3G
220-240V 2~ H05V2V2-F 3G
380-415V 3N~ H05V2V2-F 5G
220-240V 3~ H05V2V2-F 4G
Fig.5
-5-
380-415V 2N~ H05V2V2-F 4G
РУССКИЙ
RUS
утиль в соответствии с местными нормативами по
утилизации отходов. За дополнительными сведениями
касательно обработки, утилизации и уничтожения данного
изделия обращайтесь в местное отделение сбора
домашних бытовых приборов или в магазин, в котором
было куплено изделие.
ОБЩИЕ СВЕДЕНИЯ
Внимательно прочтите настоящие инструкции, так
как в них даются важные указания по безопасности
установки, эксплуатации и техобслуживания. Храните
это руководство для консультации с ним в дальнейшем.
Все операции по монтажу/замене (электропроводка)
должны выполняться квалифицированным перосналом
в соответствии с действующими нормативами.
ИНСТРУКЦИИ ПО УСТАНОВКЕ
Данное руководство предназначено для
квалифицированного монтажника, в нем даются указания
по монтажу, регулировке и обслуживанию в соответствии
с действующим законодательством и нормами. Если прямо
под электроплитой из стеклокерамики устанавливается
встроенная духовка или иные теплоизлучающие приборы,
то НЕОБХОДИМО ПРАВИЛЬНО ИЗОЛИРОВАТЬ ЭТИ
ПРИБОРЫ (духовку) ОТ ПАНЕЛИ ИЗ СТЕКЛОКЕРАМИКИ.
Тепло, образуемое духовкой, при замере на правой
стороне панели не должно превышать 60°C. Несоблюдение
данной предосторожности может привести к сбоям в
работе системы СЕНСОРНОГО УПРАВЛЕНИЯ TOUCHCONTROL.
ПРЕДУПРЕЖДЕНИЯ ПО ТЕХНИКЕ
БЕЗОПАСНОСТИ
Рекомендуется пользоваться посудой с плоским дном
и диаметром, равным или слегка превышающим зону
нагрева. Не пользуйтесь посудой с шершавым дном, так
как она может поцарапать термопанель (Рис.3).
Важно:
-предотвращайте выплескивание жидкости, вовремя
убавляя мощность нагрева при закипании или разогреве
жидкостей.
-не оставляйте нагреватели включенными без посуды или
со стоящими на них пустыми кастрюлями и сковородками.
-закончив приготовление пищи, выключите сопротивление
по процедуре, описанной далее.
-О братите внимание на части прибора, до которых
легко можно достать, что могут сильно нагреться при
использовании.
-И збегать вытекания жидкостей, таких как масло
или другие жиры, поскольку это может привести к
возникновению пожара.
-Н е пытаться погасить пламя водой, а прикрыть его
одеялом или противопожарным покрывалом (кошмой).
-Не оставляйте предметов на поверхности варочной
панели, что может привести к возникновению пожара.
-При повреждении кабеля, его замена должна выполняться
квалифицированным персоналом или сервисной службой.
•Размещение (Рис.2):
Электроприбор предназначен для встраивания в рабочую
поверхность, как показано на отдельном рисунке.
Нанесите герметик по всему периметру (размеры для
резки Рис.2B).
Закрепите электроприбор на рабочей поверхности
4 кронштейнами, входящими в комплект поставки;
учитывайте толщину рабочей поверхности (Рис.2A).
Если нижняя сторона прибора доступна, после установки,
с нижней стороны шкафа, то необходимо смонтировать
разделительную панель, при соблюдении указанных
размеров (Рис.2С).
В этом нет необходимости, если прибор устанавливается
под духовкой.
•Электросоединения (Рис.5):
Перед электрическим подключением изделия проверьте
следующее:
-электрический провод заземления должен быть на 2 см
длиннее других проводов;
-характеристики оборудования должны соответствовать
значениям на паспортной табличке, расположенной снизу
рабочей панели;
-оборудование должно быть оснащено эффективным
заземлением, соответствующим нормам м положениям
действующего законодательства.
В случае если электробытовой прибор не оснащен
кабелем, используйте этот тип: “H05V2V2-F” для мощности
до 6400 Ватт сечение кабеля должно составлять минимум
2,5 мм2, а для более высокой мощности - 4 мм2. Температура
провода электропитания ни в одной точке не должна
превышать на 50°C температуру помещения.Оборудование
предназначено для постоянного подключения к сети
электропитания, поэтому необходимо установить
многополярный разъединитель с минимальным
расстоянием между контактами 3 мм, соответствующий
нагрузке, указанной на паспортной табличке, и
действующим нормативам (желто-зеленый провод
заземления не должен прерываться коммутатором).
По завершении монтажа изделия многополярный
Внимание:
-При чистке не использовать пар.
-Е сли панель накренилась, отключите прибор во
избежание поражения электротоком.
-Изделие не расчитано на эксплуатацию детьми или
недееспособными лицами без присмотра.
-Не разрешайте детям играть с изделием.
-Прибор не должен запускаться в работу посредством
в н е ш н е г о т а й м е р а и л и о тд е л ь н о г о п у л ьт а
дистанционного управления.
Данное изделие имеет маркировку соответствия
Европейскому Нормативу 2002/96/ЕС, Утилизация
электрических и электронных изделий (WEEE). Проверьте,
чтобы по окончании его срока службы данное изделие
было сдано в утиль. Этим Вы поможете сохранить
окружающую среду.
Символ на изделии или в прилагающейся к нему
документации означает, что данное изделие не
должно рассматриваться как бытовые отходы, а
должно быть сдано в специальный центр утилизации,
занимающийс я уничтожением элек трических и
электронных приборов. Изделие должно быть сдано в
-6-
разъединитель должен быть легкодоступным.
диод выключится.
ЭКСПЛУАТАЦИЯ И УХОД
-Если варочная панель оснащена трёхконтурными
конфорками:
-Выберите нужную конфорку и настройте мощность при
помощи кнопок “E+” или “E-”.
-После установки мощности нажать на кнопку “F6” для
включения двухконтурной зоны (включится светодиод
“F7”).
-Когда двухконтурная зона включена, можно включить
трёхконтурную зону нажатием на кнопку “F6” (включится
светодиод “F8”).
-Чтобы выключить внешние зоны нагрева, нажать несколько раз кнопку “F6”, пока светодиоды “F7” и “F8” не погаснут.
ВНИМАНИЕ! Порядок включения трёх контуров зоны нагрева следующий: …первый контур, ….второй контур, …
третий контур и в обратном порядке до первого контура.
Пример: если включены два контура зоны нагрева и надо
перейти к одному контуру зоны нагрева, необходимо нажать кнопку “F6” для включения третьего контура зоны нагрева, после чего вернуться к одному контуру повторным
нажатием той же кнопки.
•Эксплуатация:
Используйте систему сенсорного контроля положения,
соответствующего вашим требованиям, учитывая, что
чем больше заданное значение, тем больше температура
нагрева.
•Управления (Pис.1):
A= Кнопка ON/OFF (ВКЛ./ВЫКЛ.)
B= Кнопка Блокировка
B1= Индикатор ВКЛ./ВЫКЛ. блокирующей кнопки
C= Кнопка таймера “-”
D= Кнопка таймера “+”
E= Кнопка выбора конфорки
F4 - F6 = Кнопка выбора двухконтурной или трёхконтурной
зоны нагрева
F5 - F7 = Индикатор активированной двухконтурной
зоны нагрева
F8= Индикатор активированной трёхконтурной зоны
нагрева
G= Дисплей конфорки
N= Дисплей Таймера
-В случае наличия какого-либо предмета на сеносорных
кнопках, варочная панель автоматически переключается
в положение OFF.
В зависимости от имеющейся модели при первом
включении варочная панель может быть в состоянии
безопаснос ти, с вк люченным светодиодным
“Индикатором блокирирующей кнопки” (B1).
Для использования панели необходимо нажать и удержать
в течение 3 секунд сенсорную кнопку “B” пока не погаснет
светодиодный индикатор.
-Когда конфорка переключается в положение OFF, а
температура поверхности стекла превышает 50°, на дисплее соответствующей зоны нагрева загорается световой
индикатор “H”.
•Блокировочная функция:
Во избежание использования варочной поверхности детьми или людьми, нуждающимися в присмотре, можно заблокировать все функции, нажав на блокирующую кнопку “B”.
-Для включения или отключения этой функции, нажать на
кнопку “B” и удержать её около 2 секунд. Когда индикатор
“B1” горит, функция включена.
-Если варочная поверхность включена, и функция блокировки тоже включена, то кнопка “A” (ON/OFF) всё равно
работает.
-Если варочная панель выключается при включённой
блокировочной функции, то при последующем включении
панели блокировочная функция будет включена, следовательно, необходимо будет отключить блокировочную
функцию “B”.
Если прибор не используется хотя бы на протяжении
одной минуты, автоматически включается функция
блокировки.
-П рибор включается нажатием пусковой сенсорной
кнопки “A” (ON/OFF).
На всех экранах появляется ноль, он отображается
на протяжении 10 секунд. Если в течение следующих
десяти секунд не выполняется никакая операция, панель
выключается.
-Конфорка может быть включена при помощи сенсоров
“E+” или “E-” в течение 10 секунд. При использовании
сенсора “E-” на дисплее показывается 9, для сенсора “E+”
на дисплее показывается 1.
-По завершении этой операции можно выбрать настройку
температуры при помощи кнопок “+” или “-”.
-Конфорка может быть выключена в течение 3 секунд,
выбрав значение “0” при помощи сенсора “E-”.
Конфорка может быть так же вк лючена, выбрав
одновременно сенсоры “E+” и “E-”.
-Прибор выключается нажатием главной пусковой сенсорной кнопки “A”(ON/OFF).
Если все конфорки установлены на “0”, через 10 секунд
варочная панель выключается.
•Heat up (Быстрый нагрев):
Функция “Heat up” (Быстрое разогревание) позволяет поддерживать зону нагрева при максимальной температуре в
течение определённого периода времени, после чего температура снижается до заданного пониженного значения.
Чтобы включить функцию “Heat up” (Быстрое разогревание), нажать на кнопку “E+” соответствующей зоны нагрева,
доведя её до значения 9, при последующем нажатии той
же кнопки на дисплее (около 9) появиться в течение 5
секунд десятичный разделитель “•” (точка), означающий,
что функция “Heat up” (Быстрое разогревание) включена.
В течение 5 секунд необходимо выбрать нужный уровень
мощности (от 1 до 8).
При выборе мощности 9, эта функция исключается.
Для отключения функции “Heat up” достаточно держать
нажатой кнопку “+” вплоть до появления позиции 9, на
дисплее отключается десятичное значение.
При включенной функции “Heat up” можно увеличить
ранее заданное температурное значение при помощи
-Если варочная панель оснащена двухконтурными
конфорками:
-Выберите нужную конфорку и настройте мощность при
помощи кнопок “E+” или “E-”.
-После установки мощности нажать на кнопку “F4” для
включения двухконтурной зоны (включится светодиод
“F5”).
-Для её отключения вновь нажать на кнопку “F4”, и свото-
-7-
кнопки “+”.
После нагрева конфорки до заданной температуры
функция “Heat up” автоматически отключается с коротким
звуковым сигналом. Конфорка будет стабильно работать
при заданном уровне мощности.
пятновыводителями.
ФИРМА НЕ НЕСЕТ НИКАКОЙ ОТВЕТСТВЕННОСТИ
ЗА УШЕРБ, ВЫЗВАННЫЙ НЕСОБЛЮДЕНИЕМ
ВЫШЕПРИВЕДЕННЫХ ПРЕДУПРЕЖДЕНИЙ.
•Таймер:
Эта функция позволяет установить время, по истечении
которого зона нагрева выключается.
Для её включения необходимо выполнить следующие
операции:
-Нажать кнопку “D” (+) (на дисплее появится 00), или же
нажать кнопку “C” (-) (на дисплее появится 99).
-На дисплеях всех зон нагрева появится маленькая буква
“t”.
-При помощи кнопки “E”выбрать зону нагрева, на которой
требуется установить таймер.
-Установить уровень нагрева при помощи кнопок “E+” и
“E-”.
-Установить время при помощи кнопок “D” (+) и “C” (-).
-З вуковой сигнал сообщит об истечении заданного
времени (его можно выключить нажатием кнопки “D” (+)
или “C” (-) или “E+” и “E-” соответствующей зоны нагрева).
На дисплее зоны с включённым таймером поочерёдно
будут отображаться маленькая буква “t” и заданный
уровень нагрева.
Для отключения этой функции до истечения заданного
времени нажать на кнопку “C” (-) и довести до ноля
заданное время.
Таймер не может быть включен одновременно на
нескольких зонах нагрева.
•Minute Minder (таймер обратного отсчёта):
Эта функция позволяет установить время, по истечении
которого подаётся звуковой сигнал, а зона нагрева не
выключается.
Для её включения необходимо выполнить следующие
операции:
-Нажать кнопку “D” (+) (на дисплее появится 00), или же
нажать кнопку “C” (-) (на дисплее появится 99).
-Установить время при помощи кнопок “D” (+) и “C” (-).
-З вуковой сигнал сообщит об истечении заданного
времени (его можно выключить нажатием кнопки “D” (+)
или “C”(-).
Для отключения этой функции до истечения заданного
времени нажать на кнопку “C” (-) и довести до ноля
заданное время.
Функция Minute Minder может быть включена даже при
включении всех зон нагрева.
•Уход (Рис.4):
Удалите остатки пищи и брызги жира с поверхности
панели, для этого пользуйтесь скребком, поставляемым
по заказу.
Хорошо очистите зону нагрева с помощью SIDOL, STAHLFIX или аналогичных средств и тряпки для уборки, затем
прополощите водой и вытрите чистой салфеткой.
Специальным скребком (по отдельному заказу) можно
легко и моментально удалить с нагреваемого участка
остатки алюминиевой фольги и пластика, которые
случайно попали на зону нагрева и расплавились, или
остатки сахара и продуктов с высоким содержанием
сахара.
Это поможет избежать повреждения термопанели.
Ни в коем случае нельзя пользоваться абразивными
губками или едкими химическими чистящими средствами,
например, аэрозолями для чистки духовки или
-8-
ITALIANO
I
GENERALITÀ
ISTRUZIONI PER L'INSTALLAZIONE
Leggere attentamente il contenuto del presente libretto in
quanto fornisce importanti indicazioni riguardanti la sicurezza
di installazione, d'uso e di manutenzione. Conservare il libretto
per ogni ulteriore consultazione. Tutte le operazioni relative
all’installazione/sostituzione (connessioni elettriche) devono
essere effettuate da personale specializzato in conformità
delle norme vigenti.
Le presenti istruzioni sono rivolte ad un installatore
specializzato e fungono da guida per l’installazione, la
regolazione e la manutenzione in conformità delle leggi e
delle norme vigenti. Se un forno da incasso o qualsiasi altra
apparecchiatura che genera calore deve essere montato
direttamente sotto il piano di cottura in vetroceramica, È
NECESSARIO CHE TALE APPARECCHIATURA (forno) E IL PIANO
DI COTTURA IN VETROCERAMICA SIANO ADEGUATAMENTE
ISOLATI, in modo tale che il calore generato dal forno, misurato
sul lato destro del fondo del piano di cottura, non superi i 60°C.
Il mancato rispetto di tale precauzione potrebbe determinare
l’errato funzionamento del sistema TOUCHCONTROL.
AVVERTENZE PER LA SICUREZZA
Si consigliano recipienti a fondo piatto dal diametro uguale
o leggermente superiore a quello dell’area riscaldata. Non
utilizzare recipienti con base ruvida, per evitare di graffiare la
superficie termica del piano (Fig.3).
•Posizionamento (Fig.2):
L’elettrodomestico è realizzato per essere incassato in un piano
di lavoro, come illustrato nella figura specifica. Predisporre
materiale sigillante lungo l’intero perimetro (dimensioni del
taglio Fig.2B). Bloccare l’elettrodomestico sul piano di lavoro
mediante i 4 sostegni, tenendo presente lo spessore del piano
di lavoro (Fig.2A). Se la parte inferiore dell'apparecchio, dopo
l'installazione, è accessibile dalla parte inferiore del mobile è
necessario montare un pannello separatore rispettando le
distanze indicate (Fig.2C). Se si installa sotto un forno questo
non è necessario.
Importante:
-e vitare le fuoriuscite di liquido, pertanto per bollire o
riscaldare liquidi, ridurre l’alimentazione di calore.
-non lasciare gli elementi riscaldanti accesi con pentole e
padelle vuote oppure senza recipienti.
-u na volta terminato di cucinare, spegnere la relativa
resistenza tramite il comando indicato in seguito.
-Prestare attenzione alle parti facilmente raggiungibili
dell’apparecchio che durante l’utilizzo si surriscaldano.
-Evitare le fuoriuscite di liquido, come ad esempio l’olio o altri
tipi di grasso, in quanto possono provocare incendi.
-Non tentare di spegnere il fuoco con l’acqua ma spegnere
il piano e coprire la fiamma con un coperchio o una coperta
antincendio.
-Non lasciare oggetti sulla superficie di cottura, può provocare
incendi.
-Se il cavo risulta danneggiato deve essere sostituito da
personale qualificato o dal servizio assistenza.
•Connessioni elettriche (Fig.5):
Prima di effettuare le connessioni elettriche assicurarsi che:
-il cavo elettrico della terra deve essere di 2 cm più lungo
rispetto agli altri cavi;
-le caratteristiche dell’impianto siano tali da soddisfare le
indicazioni sulla targhetta identificativa applicata sulla parte
inferiore del piano di lavoro;
-l’impianto sia dotato di una messa a terra efficiente conforme
alle norme e alle disposizioni di legge in vigore.
Nel caso in cui l’elettrodomestico non sia dotato di cavo,
utilizzare il tipo:
“H05V2V2-F” per potenza fino a 6400 Watt, la sezione del cavo
deve essere minimo 2.5 mm2, mentre per potenze superiori
deve essere 4 mm2.
In nessun punto il cavo deve raggiungere una temperatura di
50°C superiore alla temperatura ambiente.
L' a p p a r e c c h i o è d e s t i n a t o a d e s s e r e c o n n e s s o
permanentemente alla rete elettrica, per questo motivo
è necessario interporre un interruttore omnipolare, con
un’apertura minima di 3mm fra i contatti, appropriato al
carico indicato nella targhetta e conforme alle norme vigenti
(il conduttore di terra giallo/verde non deve essere interrotto
dal commutatore).
Terminata l’installazione dell’apparecchiatura, l'interruttore
omnipolare deve essere facilmente raggiungibile.
Attenzione:
-Non deve essere utilizzato un pulitore a vapore.
-Se la superficie è incrinata, spegnere l'apparecchio per
evitare l'eventualità di scosse elettriche.
-Questo apparecchio non è destinato all'utilizzo da parte
di bambini o persone che necessitano di supervisione.
-Controllare che i bambini non giochino con l'apparecchio.
-L’apparecchio non deve essere messo in funzione
mediante l’utilizzo di un temporizzatore esterno o
comando a distanza separato.
Questo apparecchio è contrassegnato in conformità alla
Direttiva Europea 2002/96/EC, Waste Electrical and Electronic
Equipment (WEEE). Assicurandosi che questo prodotto sia
smaltito in modo corretto, l’utente contribuisce a prevenire
le potenziali conseguenze negative per l’ambiente e la salute.
USO E MANUTENZIONE
Il simbolo sul prodotto o sulla documentazione di
accompagnamento indica che questo prodotto non deve
essere trattato come rifiuto domestico ma deve essere
consegnato presso l’idoneo punto di raccolta per il riciclaggio
di apparecchiature elettriche ed elettroniche. Disfarsene
seguendo le normative locali per lo smaltimento dei rifiuti.
Per ulteriori informazioni sul trattamento, recupero e
riciclaggio di questo prodotto, contattare l’idoneo ufficio
locale, il servizio di raccolta dei rifiuti domestici o il negozio
presso il quale il prodotto è stato acquistato.
•Uso:
Utilizzare il sistema touch control relativo alla posizione
corrispondente alle esigenze di cottura, tenendo presente
che quanto maggiore è il numero selezionato, tanto più
calore viene emanato.
•Funzionamento (Fig.1):
A= Tasto ON/OFF
-9-
B= Tasto Chiave
B1= Indicatore ON/OFF tasto chiave
C= Tasto Timer “-”
D= Tasto Timer “+”
E= Tasto di selezione zona cottura
F4 - F6 = Tasto di selezione doppia o tripla zona cottura
F5 - F7 = Indicatore della doppia zona cottura attiva
F8= Indicatore della tripla zona cottura attiva
G= Display zona cottura
N= Display Timer
-Quando si porta una piastra in posizione OFF e la temperatura
della superficie del vetro è superiore a 50°circa ci sarà una
segnalazione luminosa “H“ sul display della zona di cottura
interessata.
In base al modello che si possiede alla prima accensione il
piano di cottura potrebbe trovarsi in posizione di sicurezza,
con il led della “Spia tasto chiave” (B1) accesa.
Per utilizzare il piano è necessario tenere premuto il sensore B
per 3 secondi fino allo spegnimento del led spia.
Se non si utilizza l'apparecchio per almeno un minuto circa la
funzione chiave si attiva automaticamente.
-L’apparecchio può essere acceso selezionando il sensore
di avvio “A” (ON/OFF). Uno zero appare su tutti i display per
10 secondi. Se non si effettua nessuna operazione entro i 10
secondi successivi il piano si spegne.
-É possibile accendere una piastra, selezionando i sensori
“E+” oppure “E-” entro 10 secondi. Se si usa il sensore “E+”,
il display visualizza la selezione 1, se si usa il sensore “E-”, il
display visualizza la selezione 9.
-E ffettuata questa operazione si possono scegliere le
regolazioni di temperatura con i tasti “+” o “-”.
-La piastra può essere spenta selezionando “0” con il sensore
“E-”, dopo 3 secondi la zona di cottura si spegne.
É anche possibile spegnere una piastra, selezionando
contemporaneamente i sensori “E+” e “E-”.
-Il piano può essere spento selezionando il sensore principale
di avvio “A” (ON/OFF). Se tutte le piastre sono selezionate sullo
“0” il piano si spegne dopo 10 secondi.
-Nel caso in cui il piano è dotato di piastre con doppia
zona:
-Selezionare la piastra desiderata e regolare la potenza con i
tasti “E+” o “E-”.
-Una volta regolata la potenza selezionare il tasto “F4” per
attivare la doppia zona (il led “F5” si accenderà).
-Per disattivala selezionare nuovamente il tasto “F4” e il led si
spegnerà.
•Funzione chiave:
Per evitare l’utilizzo della superficie del piano, da parte dei
bambini o persone che necessitano di supervisione, è possibile
bloccare tutte le funzioni selezionando il tasto chiave “B”.
-Per attivarla o disattivarla selezionare il tasto chiave “B” per
circa due secondi. La funzione è attiva quando l’indicatore
“B1” è acceso.
-Se il piano cottura è acceso e la funzione chiave è attiva, il
tasto “A” (ON/OFF) funziona ugualmente.
-Nel caso in cui si spegne il piano con la funzione chiave attiva,
nella successiva accensione il piano si presenterà con la stessa
inserita quindi, disattivare la funzione chiave “B”.
•Heat up (Riscaldamento veloce):
La funzione “Heat up” permette di avere la zona di cottura al
massimo della temperatura per un certo periodo di tempo,
dopodiché la temperatura scenderà ad un valore inferiore
selezionato.
Per attivare la funzione “Heat up” selezionare il tasto “E+” della
zona di cottura desiderata fino a portarla alla posizione 9,
selezionando ancora il tasto, nel display (accanto al 9) apparirà
per 5 sec. un punto decimale “•”, ciò significa che la funzione
“Heat up” è attiva.
Entro i 5 secondi successivi occorre selezionare il livello di
potenza desiderato (fra 1 e 8). Se si seleziona la potenza 9,
la funzione viene annullata. Per disattivare la funzione “Heat
up” basta selezionare il tasto “+” e tenerlo permuto fino a
portarlo alla posizione 9 e sul display scompare il punto
decimale. Quando la funzione “Heat up” è attiva, è possibile
incrementare il livello di temperatura precedentemente
selezionato premendo il tasto “+”.
Una volta che la zona di cottura sarà pervenuta alla
temperatura selezionata, la funzione “Heat up” si disattiva
automaticamente, emettendo un BIP.
La zona di cottura funzionerà stabilmente al livello di potenza
impostato.
-Nel caso in cui il piano è dotato di piastre con tripla zona:
-Selezionare la piastra desiderata e regolare la potenza con i
tasti “E+” o “E-”.
-Una volta regolata la potenza selezionare il tasto “F6” per
attivare la doppia zona (il led “F7” si accenderà).
-Dopo aver attivato la doppia zona è possibile attivare la tripla
zona selezionando il tasto “F6” (il led “F8” si accenderà).
-Per disattivare le zone estese selezionare più volte il tasto
“F6” finché i led “F7” e “F8” si spegneranno.
ATTENZIONE! La sequenza di attivazione della tripla zona
è la seguente: …1° zona, ….2° zona, …3° zona e poi ritorna
alla 1° zona.
Es.: Se il piano si trova nella 2° zona di cottura e si vuole
tornare alla 1° bisogna selezionare il tasto “F6” portando
l’apparecchio alla 3° zona di cottura e poi selezionare di nuovo
per portarlo alla 1°.
•Timer:
Questa funzione permette di settare il tempo di cottura al
termine del quale la zona si spegne.
Per attivarla eseguire le seguenti operazioni:
-Premere il tasto “D” (+) (sul display apparirà la cifra 00), oppure
premere il tasto “C” (-) (sul display apparirà la cifra 99).
-Nel display di tutte le zone di cottura verrà segnalata una “t”
minuscola.
-Selezionare la zona di cottura che si intende temporizzare
utilizzando il tasto “E”.
-Impostare il livello di cottura con i tasti “E+” e “E-”.
-Impostare il tempo con i tasti “D” (+) e “C” (-).
-La fine del tempo stabilito sarà segnalata da un BIP sonoro
(disattivabile premendo “D” (+) oppure “C” (-) oppure “E+” e
“E-” della zona di cottura stessa).
Sul display della zona con il TIMER attivo si alternerà una “t”
minuscola con il livello di cottura impostato.
Per disattivare la funzione prima del termine del tempo settato
premere il tasto “C” (-) e portare il tempo a zero.
Il Timer può essere attivato solo su una zona di cottura alla
volta.
-Nel caso in cui un oggetto viene posizionato sopra i comandi,
il piano di cottura si porterà automaticamente in posizione
OFF.
•Minute Minder:
Questa funzione permette di settare il tempo di cottura al
termine del quale il piano emetterà un segnale acustico senza
- 10 -
spegnere la zona di cottura.
Per attivarla eseguire le seguenti operazioni:
-Premere il tasto “D” (+) (sul display apparirà la cifra 00), oppure
premere il tasto “C” (-) (sul display apparirà la cifra 99).
-Impostare il tempo con i tasti “D” (+) e “C” (-).
-La fine del tempo stabilito sarà segnalata da un BIP sonoro
(disattivabile premendo “D” (+) oppure “C”(-).
Per disattivare la funzione prima del termine del tempo settato
premere il tasto “C” (-) e portare il tempo a zero.
Il Minute Minder può essere attivato anche con tutte le zone
di cottura accese.
•Manutenzione (Fig.4):
Rimuovere eventuali residui di cibo e gocce di unto dalla
superficie di cottura utilizzando lo speciale raschietto fornito
su richiesta.
Pulire l’area riscaldata nel miglior modo possibile utilizzando
SIDOL, STAHLFIX o prodotti simili ed un panno-carta, quindi
sciacquare con acqua e asciugare con un panno pulito.
Mediante lo speciale raschietto (optional) rimuovere
immediatamente dall’area riscaldata di cottura frammenti di
fogli di alluminio e materiale plastico fusi inavvertitamente o
residui di zucchero o di cibi ad elevato contenuto di zucchero.
In questo modo si evita ogni possibile danno alla superficie
del piano. In nessun caso si devono utilizzare spugnette
abrasive o detergenti chimici irritanti quali spray per forno
o smacchiatori.
SI DECLINA OGNI RESPONSABILITÀ PER EVENTUALI DANNI
PROVOCATI DALLA INOSSERVANZA DELLE SUDDETTE
AVVERTENZE.
- 11 -
DEUTSCH
ALLGEMEINE INFORMATIONEN
Lesen Sie bitte aufmerksam den Inhalt der vorliegenden
Betriebsanleitung, weil sie wichtige Hinweise über die Installation, den Gebrauch und die Wartung erteilt. Bewahren Sie
die Betriebsanleitung zum späteren Nachschlagen auf. Alle mit
der Installation/dem Austausch im Zusammenhang stehende
Vorgänge (Stromanschlüsse) sind laut gültiger Vorschriften
von Fachpersonal auszuführen.
SICHERHEITSWARNUNGEN
Es werden Behälter mit ebenem Boden mit einem Durchmesser, der gleich dem erhitzten Bereich oder etwas größer
ist, empfohlen. Keine Behälter mit rauher Unterseite verwenden, damit die Heizfläche des Kochfelds nicht zerkratzt wird
(Abb.3).
Wichtig:
-Vermeiden, daß Flüssigkeit überläuft; deshalb zum Kochen
oder Erhitzen von Flüssigkeiten die Hitzezufuhr verringern.
-Die Heizelemente nicht brennen lassen, wenn die Töpfe oder
Pfannen leer oder nicht vorhanden sind.
-Wenn das Kochen beendet ist, den zutreffenden Heizkörper
anhand der nachstehend angegebenen Bedienung ausschalten.
-Auf die leicht zu erreichenden Teile des Geräts achten, die
sich während des Betriebs erwärmen können.
-Flüssigkeitsaustritte, wie beispielsweise Öl oder andere
Fettsorten, vermeiden, da diese Brände verursachen können.
-Nicht versuchen, das Feuer mit Wasser zu löschen, sondern
die Ebene ausschalten und die Flamme mit einem Deckel oder
einer feuerfesten Decke ersticken.
-Keine Gegenstände auf der Garoberfläche lassen, dies kann
zu Bränden führen.
-Wenn das Kabel beschädigt ist, muss es von ausgebildetem
Personal oder durch den Kundendienst ausgetauscht werden.
Achtung:
-Es Darf Kein Dampfreinigungsgerät Benutzt Werden.
-Falls die Oberfläche gesprungen ist, das Gerät ausschalten, um etwaige Stromschläge zu vermeiden.
-Das Gerät ist nicht für den Gebrauch durch unbeaufsichtigte Kinder oder unfähige Personen konzipiert.
-Achten Sie bitte darauf, dass Kinder nicht mit dem Gerät
spielen.
-Das Gerät darf nicht über einen externen Timer oder eine
separate Fernsteuerung in Betrieb genommen werden.
Dieses Gerät ist gemäß der EU-Richtlinie 2002/96/EC, Waste
Electrical Electronic Equipment (WEEE) gekennzeichnet. Sorgen Sie bitte dafür, dass das Gerät korrekt entsorgt wird, der
Benutzer trägt dazu bei, den potentiellen negativen Folgen
für Umwelt und Gesundheit vorzubeugen.
Das auf dem Produkt oder auf den Begleitpapieren befindliche Symbol sagt aus, dass dieses Produkt nicht wie
normaler Hausmüll behandelt werden darf, sondern dass
es einer geeigneten Sammelstelle für das Recycling der
elektrischen und elektronischen Geräteteile zugeführt werden
muss. Entsorgen Sie bitte das Altgerät gemäß der lokalen
Richtlinien. Für weitere Informationen hinsichtlich der Behandlung, der Wiederverwertung und des Recycling des
D
Produkts wenden Sie sich bitte an die zuständige lokale
Stelle, an die Sammelstelle für Hausmüll, oder an den Händler,
bei dem Sie das Gerät erworben haben.
INSTALLATIONSANLEITUNG
Die vorliegenden Anweisungen sind für einen Fachinstallateur
gedacht und dienen als Führer für die Installation, Einstellung
und Wartung laut geltender Gesetze und Vorschriften. Falls ein
Einbaubackofen oder irgendein anderes, Hitze erzeugendes
Gerät direkt unter dem Glasfaserkochfeld angebracht wird,
MÜSSEN DIESES GERÄT (Backofen) UND DAS GLASFASERKOCHFELD ZWECKENTSPRECHEND ISOLIERT SEIN, so daß die vom
Backofen erzeugte, rechts hinten am Kochfeld gemessene
Temperatur nicht mehr als 60°C beträgt. Die mangelnde Einhaltung dieser Vorsichtsmaßnahme könnte zu Fehlfunktionen
des TOUCHCONTROL-Systems führen.
•Aufstellung (Abb.2):
Das Elektrogerät ist zur Einlassung in ein Arbeitsfeld konzipiert, wie in der zutreffenden Abbildung zu sehen ist. Längs
des ganzen Umfangs (Schnittmaße Abb.2B) Isoliermaterial
anbringen. Das Elektrogerät anhand der mitgelieferten 4
Haltebügel am Arbeitsfeld befestigen und dabei die Dicke
des Arbeitsfelds berücksichtigen (Abb.2A). Wenn das Unterteil
des Geräts nach der Installation vom Unterteil des Schranks
aus zugänglich ist, muss eine Trennwand eingebaut werden,
unter Einhaltung der vorgeschriebenen Abstände (Abb.2C).
Wenn die Installation hingegen über einem Ofen erfolgt, ist
dies nicht erforderlich.
•Stromanschlüsse (Abb.5):
Vor der Verwirklichung der Stromanschlüsse folgendes
sicherstellen:
-daß das Erdungskabel 2 cm länger als die anderen Kabel ist;
-die Anlagenmerkmale derartig sind, daß sie den Angaben
auf dem Typenschild entsprechen, das an der Unterseite des
Arbeitsfeldes angebracht ist;
-die Anlage über eine wirksame, den geltenden Vorschriften
und Gesetzesbestimmungen entsprechende Erdung verfügt.
Sollte das Elektrogerät nicht mit einem Netzkabel ausgerüstet
sein, ist ein Kabel folgendes Typs zu verwenden:
“H05V2V2-F” für eine Leistung bis zu 6400 Watt. Der Querschnitt des Kabels muss mindestens 2.5 mm2 betragen, für
höhere Leistungen jedoch 4 mm2. Das Kabel darf an keiner
Stelle eine Temperatur erreichen, die die Raumtemperatur um
50°C übersteigt. Das Gerät ist dazu bestimmt, permanent an
die Netzleitung angeschlossen zu werden. Aus diesem Grunde
ist zwischen Stromnetz und Gerät ein allpoliger, der auf dem
Typenschild angegebenen Last und den einschlägigen Richtlinien entsprechender Schalter mit einer Mindestöffnung der
Kontakte von 3 mm zu installieren. (Der gelb/grüne Erdleiter
darf durch diesen Schalter nicht unterbrochen werden).Der
allpolige Schalter muss nach erfolgter Installation des Gerätes
leicht zugänglich sein.
GEBRAUCH UND WARTUNG
•Bedienung:
Das Touch Control System entsprechend der Position verwenden, welche mit den Kochanforderungen übereinstimmt,
wobei zu beachten ist, dass mit der Anwahl einer höheren Zahl
auch die abgegebene Wärme ansteigt.
- 12 -
•Betriebsweise (Abb.1):
A= Taste ON/OFF
B= Taste Schlüssel
B1= Anzeige ON/OFF Schlüsseltaste
C= Timer-Taste “-”
D= Timer-Taste “+”
E= Taste Kochzonen-Wahl
F4 - F6 = Wahltaste doppelte oder dreifache Kochzone
F5 - F7 = Anzeige für doppelte Kochzone aktiviert
F8= Anzeige für dreifache Kochzone aktiviert
G= Display Kochzone
N= Display Timer
zum 1. Zone.
Bsp.: wenn sich das Kochfeld in der 2. Kochzone befindet
und man zur 1. Zone zurückkehren möchte, muss die Taste
“F6” ausgewählt werden, indem das Gerät zur 3. Kochzone
gebracht und dann erneut ausgewählt wird, um sie zum 1.
zu bringen.
-Sollte ein Gegenstand auf den Bedienungen abgelegt werden, so schaltet die Kochfläche automatisch auf OFF.
Je nach eigenem Modell könnte die Kochfläche sich beim
ersten Einschalten in der Sicherheitsstellung befinden, wobei
die LED der “Kontrollleuchte Schlüsseltaste” (B1) aktiviert ist.
Um die Kochfläche benutzen zu können, muss der Sensor
“B” 3 Sekunden gedrückt werden, bis sich die Kontroll – LED
ausschaltet.
Wenn das Gerät für circa mindestens eine Minute nicht benutzt wird, schaltet sich die Schlüsselfunktion automatisch ein.
-Das Gerät kann durch Anwahl des Startsensors “A” (ON/OFF)
eingeschaltet werden. Auf allen Displays erscheint für 10
Sekunden eine Null. Sollte innerhalb der nächsten 10 Sekunden keine Aktion ausgeführt werden, so wird die Kochfläche
ausgeschaltet.
-Durch Anwahl der Sensoren “E+” oder “E-” innerhalb von
10 Sekunden kann eine Kochplatte eingeschaltet werden.
Wenn der Sensor “E+” verwendet wird, zeigt das Display die
Anwahl 1 an; bei Verwendung des Sensors “E-” erscheint auf
dem Display die Anwahl 9.
-Nach diesem Eingriff können mit den Tasten “+” bzw. “-” die
Temperaturregulierungen vorgenommen werden.
-Die Kochplatte kann durch die Anwahl von “0” mit dem
Sensor “E-” ausgeschaltet werden; die Kochzone wird nach 3
Sekunden deaktiviert.
Außerdem ist das Ausschalten einer Kochplatte durch gleichzeitiges Drücken der Sensoren “E+” und “E-” möglich.
-Die Kochfläche kann ausgeschaltet werden, indem der
Hauptsensor für den Start “A” (ON/OFF) gewählt wird. Wenn
alle Kochflächen auf “0” stehen, schaltet die Fläche sich nach
10 Sekunden aus.
-Im Fall, dass das Kochfeld mit Zweizonenplatten ausgestattet ist:
-Die gewünschte Kochplatte auswählen und die Leistung mit
den Tasten “E+” bzw. “E-” einstellen.
-Wenn die Leistung eingestellt ist, die Taste “F4” auswählen,
um die Doppelzone zu aktivieren (das LED “F5” leuchtet auf ).
-Um es zu deaktivieren, wählen Sie die Taste “F4” und das LED
erlischt.
-Im Fall, dass das Kochfeld mit Dreizonenplatten ausgestattet ist:
-Die gewünschte Kochplatte auswählen und die Leistung mit
den Tasten “E+” bzw. “E-” einstellen.
-Wenn die Leistung eingestellt ist, die Taste “F6” auswählen,
um die Doppelzone zu aktivieren (das LED “F7” leuchtet auf ).
-Nachdem die Doppelzone aktiviert ist, kann die Dreifachzone
über die Taste “F6” ausgewählt werden (das LED “F8” leuchtet
auf ).
-Um die ausgedehnten Zonen auszuwählen, mehrmals die
Taste “F6” drücken, bis die LEDs “F7” und “F8” erlöschen.
ACHTUNG! Die Aktivierungssequenz der Dreifachzone ist
folgende: …1. Zone, ….2. Zone, …3. Zone und dann Rückkehr
-Wenn eine Kochplatte auf OFF gestellt wird und die Oberflächentemperatur der Glaskeramik bei über circa 50° liegt,
erscheint eine Leuchtanzeige “H” auf dem Display der jeweiligen Kochzone.
•Schlüsselfunktion:
Um zu verhindern, dass die Plattenoberfläche von Kindern
oder Personen benutzt wird, die dazu überwacht werden
müssen, können alle Funktionen über die Schlüsseltaste “B”
blockiert werden.
-Für die Aktivierung/Deaktivierung wählt man die Taste “B” ca.
2 Sekunden lang. Die Funktion ist aktiviert, wenn der Anzeiger
“B1” eingeschaltet ist.
Wenn das Gerät eingeschaltet ist und die Schlüsselfunktion
aktiviert ist, funktioniert dennoch die Taste “A” (ON/OFF).
-Sollte sich die Kochplatte ausschalten, während die Schlüsselfunktion eingeschaltet ist, ist bei erneutem Einschalten
der Platte dieser immer noch aktiv. Daher muss die Schlüsselfunktion “B” ausgeschaltet werden.
•Heat up (Schnellheizen):
Mittels der Funktion “Heat up” können Sie die Kochzone
über einen bestimmten Zeitraum auf maximaler Temperatur
einschalten; im Anschluss daran wird die Temperatur auf einen
ausgewählten, niedrigeren Wert gesenkt.
Um die Funktion “Heat up” zu aktivieren, die Taste “E+” der
gewünschten Kochzone auswählen, bis er zur Stellung 9
gebracht wird, bei erneuter Wahl der Taste erscheint auf dem
Display (neben der 9) für 5 Sekunden ein Dezimalpunkt “•”, was
bedeutet, dass “Heat up” aktiv ist.
Die gewünschte Leistungsstufe ist nun binnen 5 Sekunden
einzustellen (von 1 bis 8).
Bei Anwahl der Leistungsstufe 9, wird die Funktion annulliert.
Zur Deaktivierung der Funktion Heat up genügt es, die Taste
“+” zu drücken und diese solange gedrückt zu halten, bis die
Einstellung 9 erreicht ist und die Dezimalkommastelle auf
dem Display verschwindet. Ist die Funktion “Heat up” aktiv,
kann eine zuvor angewählte Temperatur durch Drücken der
Taste “+” erhöht werden.
Hat die Kochzone die gewählte Temperatur erreicht, schaltet
sich die Funktion “Heat up” automatisch aus und es ertönt
ein BIP-Ton.
Die Kochzone funktioniert weiter stabil auf der eingestellten
Leistungsstufe.
•Timer:
Diese Funktion ermöglicht die Einstellung einer Garzeit, nach
deren Ablauf sich die Kochzone ausschaltet.
Für deren Aktivierung folgendermaßen verfahren:
-Die Taste “D” (+) drücken (auf dem Display erscheint die Zahl
00), oder die Taste “C” (-) drücken (auf dem Display erscheint
die Zahl 99).
-Auf dem Display aller Kochzonen wird ein kleines “t” angezeigt.
-Die Zone, für die eine Zeiteinstellung vorgenommen werden
soll, mit der Taste “E” auswählen.
-Die Kochstufe mit den Tasten “E+” und “E-” einstellen.
- 13 -
-Die Zeit mit den Tasten “D” (+) und “C” (-) einstellen.
-Der Ablauf der festgelegten Zeitspanne wird durch einen
Piepton angezeigt (er kann durch Drücken von “D” (+) bzw. “C”
(-) bzw. “E+” und “E-” der Kochzone selbst deaktiviert werden).
Auf dem Display der Kochzone mit aktiviertem TIMER wird
abwechselnd ein kleines “t” und die eingestellte Kochstufe
angezeigt.
Für die Deaktivierung der Funktion vor Ablauf der eingestellten Zeit die Taste “C” (-) drücken und die Zeit auf Null stellen.
Der Timer kann nur jeweils für eine Kochzone aktiviert werden.
•Minute Minder:
Diese Funktion ermöglicht die Einstellung einer Garzeit, nach
deren Ablauf die Kochfläche ein akustisches Signal abgibt,
ohne dass die Kochzone ausgeschaltet wird.
Für deren Aktivierung folgendermaßen verfahren:
-Die Taste “D” (+) drücken (auf dem Display erscheint die Zahl
00), oder die Taste “C” (-) drücken (auf dem Display erscheint
die Zahl 99).
-Mit den Tasten “D” (+) und “C” (-) die Zeit einstellen.
-Der Ablauf der festgelegten Zeitspanne wird durch einen
Piepton angezeigt (er kann durch Drücken von “D” (+) bzw.
“C” (-) deaktiviert werden).
Für die Deaktivierung der Funktion vor Ablauf der eingestellten Zeit die Taste “C” (-) drücken und die Zeit auf Null stellen.
Der Minute Minder kann auch aktiviert werden, wenn alle
Kochzonen eingeschaltet sind.
•Wartung (Abb.4):
Eventuelle Speisereste und Fettspritzer mit dem auf Wunsch
gelieferten, speziellen Schaber entfernen.
Den erhitzten Bereich mit Hilfe von SIDOL, STAHLFIX oder
anderen ähnlichen Produkten und einem Papiertuch sorgfältig reinigen, dann mit Wasser nachwischen und mit einem
trockenen Tuch abtrocknen.
Bruchstücke von Aluminiumfolie und aus versehen zerschmolzenes Material aus Kunststoff oder Rückstände von Zucker
oder Speisen mit hohem Zuckergehalt sofort mit Hilfe des auf
Wunsch gelieferten Schabers entfernen.
Auf diese Weise lassen sich etwaige Beschädigungen der
Kochfläche vermeiden.
Keinesfalls Scheuerschwämme oder angreifende chemische
Backofensprays oder Fleckenentferner verwenden.
FÜR SCHÄDEN, DIE AUF DIE NICHTBEACHTUNG DER OBEN
GENANNTEN ANWEISUNGEN ZURUCKZUFÜHREN SIND,
WIRD KEINERLEI VERANTWORTUNG ÜBERNOMMEN.
- 14 -
ENGLISH
GB
GENERAL
INSTALLATION INSTRUCTIONS
Carefully read the contents of this leaflet since it provides
important instructions regarding safety of installation, use
and maintenance.
Keep the leaflet for possible future consultation.
All the operations relating to installation/replacement
(electrical connections) must be carried out by specialised
personnel in conformity with the regulations in force.
These instructions address specialised installers and serve
as a guide for installation, adjustment and maintenance in
conformity with the laws and regulations in force. If a builtin oven or any other appliance that generates heat must
be fitted directly under the glass-ceramic cooktop, THIS
APPLIANCE (oven) AND THE GLASS-CERAMIC COOKTOP
MUST BE SUITABLY INSULATED in such a way that the heat
generated by the oven, measured on the bottom right of
the cooktop, does not exceed 60°C. Failure to respect this
precaution may determine improper functioning of the
TOUCHCONTROL system.
SAFETY WARNINGS
It is recommended to use flat-bottom pans with a diameter
equal to or slightly larger than that of the heated area.
Do not use pans with a rough base to prevent scratching the
heat surface of the cooktop (Fig.3).
Important:
-Avoid spilling liquid, therefore to boil or heat liquids, reduce
the heat.
-Do not leave the heating elements on with empty pots and
pans or without receptacles.
-When you have finished cooking, switch off the relevant
heating element with the control indicated below.
-Pay attention to easy to reach device parts as they over-heat
during use.
-Avoid spilling liquids like, for example, oil or other types of
grease, as they can cause fires.
-Do not attempt to put fires out using water. Turn off the hob
and cover the flame with a lid or fire-proof blanket.
-Do not leave objects on the cooking surface, it may cause
fires.
-If cable is damaged, have qualified personnel or After-Sales
Service replace it.
Attention:
-Steam cleaners must not be used.
-If the surface is cracked, switch off the appliance to prevent electric shock.
-This appliance is not intended for use by young children
or infirm persons without supervision.
-Young children should be supervised to ensure they do
not play with the appliance.
-The appliance is not intended to be operated by means
of external timer or separated remote-control system.
This appliance conforms to the European Directive EC/2002/96,
Waste Electrical and Electronic Equipment (WEEE).
By making sure that this appliance is disposed of in a suitable
manner, the user is helping to prevent potential damage to
the environment or to public health.
The symbol on the product or on the accompanying
paperwork indicates that the appliance should not be
treated as domestic waste, but should be delivered to a
suitable electric and electronic appliance recycling collection
point.
Follow local guidelines when disposing of waste.
For more information on the treatment, re-use and recycling
of this product, please contact your local authority, domestic
waste collection service or the shop where the appliance
was purchased.
•Positioning (Fig.2):
The domestic appliance is designed to be built into a worktop
as illustrated in the specific figure. Apply sealant around
the entire perimeter (cut-out dimensions Fig.2B). Fix the
domestic appliance on the worktop by means of the 4 brackets
provided, taking the thickness of the worktop into account
(Fig.2A). If the lower part of the appliance, after installation, is
accessible via the lower part of the cabinet then it is necessary
to mount a separator panel respecting the distances indicated
(Fig.2C). If the appliance is installed with an oven underneath
then the separator is not necessary.
•Electrical connections (Fig.5):
Before making the electrical connections, check that:
-the ground cable is 2cm longer than the other cables;
-t he system ratings meet the ratings indicated on the
identification plate fixed on the lower part of the worktop;
-the system is fitted with efficient earthing compliant to the
laws and regulations in force.
If the appliance is not fitted with a cable, use type:
“H05V2V2-F” for a power level of up to 6400 Watts. The
cross-section of the cable should be at least 2.5 mm², or 4
mm² for greater power levels. The cable should never reach
a temperature which is 50°C above the temperature of the
room in which it is installed. The appliance is designed for
permanent connection to the electricity supply and should
therefore be fitted with an omnipolar switch which has a
minimum opening of 3mm between contacts. The switch
should be suitable for the charge indicated on the appliance
data plate and must conform to all current legislation (the
yellow/green earth wire must not be interrupted by the
switch). The omnipolar switch must be easy to reach once
the installation process has been completed.
USE AND MAINTENANCE
•Use:
Use the touch control system for the position that corresponds
to cooking needs, keeping in mind that higher the selected
number is and the more heat is given off.
•Functioning (Fig.1):
A= ON/OFF button
B= Key button
B1= key button ON/OFF indicator
C= Timer Button “-”
D= Timer Button “+”
E= Cooking zone selector button
F4 - F6 = Double or triple cooking zone selection button
- 15 -
F5 - F7 = Active double cooking zone indicator
F8= Active triple cooking zone indicator
G= Cooking zone display
N= Timer Display
Based on the model owned, the first time the stove top is
turned on it may be in the safety position, with the LED of
the “Key button warning light” (B1) on.
In order to use the stove top it is necessary to press sensor “B”
for 3 seconds until the warning light turns off.
If the appliance is not used for at least a minute, the key
function activates automatically.
-The appliance may be turned on by selecting start-up sensor
“A” (ON/OFF). A zero appears on all displays for 10 seconds.
If no operation is carried out within the next 10 seconds the
stove top turns off.
-It is possible to turn a stove top element on by selecting the
“E+” or “E-” sensors within 10 seconds. If the “E+” sensor is
used, the display shows selection 1, if the “E-” sensor is used,
the display shows selection 9.
-Once this operation has been completed it is possible to
choose temperature adjustments using the “+” or “-” buttons.
-The stove top element may be turned off by selecting “0”
with the E sensor, after 3 seconds the cooking area turns off.
It is also possible to turn a stove top element off by selecting
the “E+” and “E-” sensors at the same time.
-The stove top may be turned off by selecting the main startup sensor “A” (ON/OFF). If all stove top elements are on “0”,
the stove top turns off after 10 seconds.
-In the event the hob is equipped with double zone plates:
-Select the desired element and adjust the power using the
“E+” or “E-” buttons.
-Once the power has been adjusted select button “F4” to
activate the double zone (LED “F5” will switch on).
-To deactivate it, select button “F4” and the LED will switch
off.
-In the event the hob is equipped with triple zone plates:
-Select the desired element and adjust the power using the
“E+” or “E-” buttons.
-Once the power has been adjusted select button “F6” to
activate the double zone (LED “F7” will switch on).
-After having activated the double zone one can activate the
triple zone by selecting button “F6” (LED “F8” will switch on).
-To deactivate the extended zones select button “F6” several
times until LEDs “F7” and “F8” switch off.
ATTENTION! The activation sequence of the triple zone is
the following: …1st zone, ….2nd zone, …3rd zone and then
it goes back to the 1st zone.
E.g.: if the hob is in the 2nd cooking zone and one wishes to
go back to the 1st one, select button “F6” taking the appliance
to the 3rd cooking zone and then select again to take it back
to the 1st.
-If an object is placed above the controls, the stove top will
automatically change to the OFF position.
-When an element is brought to the OFF position and the glass
surface temperature is above 50°, the cooking area involved
will show an illuminated “H” on its display.
•Key Function:
To prevent children or people- requiring supervision- from
using the cooktop, all functions can be blocked with the
“B” button.
-To activate or deactivate, press the “B” button for
approximately 2 seconds. The function is activated when the
“B1” indicator is turned on.
-If the appliance is on and the key function is activated, the
“A” (ON/OFF) button works in the same way.
-If the hob us shut off with the key function active, the next
time it is started the hob will have the same engaged therefore,
deactivate the key function “B”.
•Heat up (Rapid heating):
The “Heat up” function can be used to set the cooking zone
to its maximum temperature for a specified period of time,
after which the temperature will return to a lower value
selected previously.
To activate the “Heat up” function select button “E+” of the
desired cooking zone until taking it to position 9, selecting
the button again, on the display (next to 9) a decimal point “•”
will appear for 5 sec., this means that the “Heat up” function
is active.
The desired power level (between 1 and 8) should be selected
within 5 seconds. If power level 9 is selected, the function is
disabled.
To deactivate the “Heat up” function, simply select the “+”
button and hold it down until setting 9 is reached and the
decimal point disappears from the display.
When the “Heat up” function is active, the previously selected
temperature level may be increased by pressing the “+” button.
Once the cooking zone has reached the selected temperature,
the “Heat up” function is automatically deactivated and the
hob emits a BEEP.
The cooking zone will operate in a constant manner, at the
set power level.
•Timer:
This function makes it possible to set the cooking time after
which the zone will turn off.
Complete the following steps to activate it:
-Press the “D” (+) button (00 will appear on the display), or
press the “C” (-) button (99 will appear on the display).
-All cooking zone displays will show a lower case “t”.
-Select the cooking zone that the timer will be used on using
the “E” button.
-Set cooking level using the “E+” and “E-” buttons.
-Set cooking time using the “D” (+) and “C” (-) buttons.
-The end of the established cooking time will be signaled by
an acoustic BEEP (that can be deactivated by pressing “D” (+)
or “C” (-) or “E+” and “E-” on that specific cooking zone).
The display of the zone with an active TIMER will alternately
display a lower case “t” and the temperature level that has
been set.
In order to deactivate the function, before the set time ends,
press “C” (-) and bring the time down to zero.
The Timer may only be activated on one cooking zone at
a time.
•Minute Minder:
This function makes it possible to set and acoustic reminder
during the cooking time that will not turn off the cooking zone.
Complete the following steps to activate it:
-Press the “D” (+) button (00 will appear on the display), or
press the “C” (-) button (99 will appear on the display).
-Set cooking time using the “D” (+) and “C” (-) buttons.
-At the end of the established timeframe there will be an
acoustic BEEP (it can be deactivated by pressing “D” (+) or “C”
(-)).
In order to deactivate the function, before the set time ends,
- 16 -
press “C” (-) and change the time to zero.
The Minute Minder can be activated even while all cooking
zones are on.
•Maintenance (Fig.4):
Remove any residues of food and drops of grease from the
cooking surface using the special scraper supplied on request.
Clean the heated area as thoroughly as possible using SIDOL,
STAHLFIX or similar products and a cloth/paper, then rinse
with water and dry with a clean cloth.
Using the special scraper (optional) immediately remove
any fragments of aluminium and plastic material that have
unintentionally melted on the heated cooking area or residues
of sugar or food with a high sugar content.
In this way, any damage to the cooktop surface is prevented.
Under no circumstances use abrasive sponges or irritating
chemical detergents such as oven sprays or stain removers.
THE MANUFACTURER DECLINES ALL RESPONSIBILITY
FOR EVENTUAL DAMAGES CAUSED BY BREACHING THE
ABOVE WARNINGS.
- 17 -
3LIP0349