1
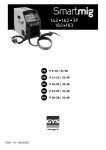
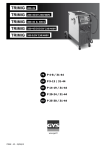
www.gys.fr
FR
EN
DE
ES
RU
V2 - 04/10/2013
Spark MIG 110
I
10
1
2
9
3
4
5
6
7
8
II
2
Spark MIG 110
III
IV
3
1
2
3
Spark MIG 110
FR
description
Merci de votre choix ! Afin de tirer le maximum de satisfaction de votre poste, veuillez lire avec attention ce qui suit:
Le Spark MIG 110 est un poste de soudure traditionnel pour le soudage semi-automatique en courant alternatif en No
Gas uniquement (Fil fourré). Le réglage de cet appareil est simplifié grâce à la solution SMART.
Alimentation électrique
Cet appareil est livré avec une prise 16A de type CEE7/7. Le courant effectif absorbé (I1eff) est indiqué sur l'appareil,
pour les conditions d'utilisation maximales.
Le Spark MIG 110 doit être relié à une prise 230V 1PH AVEC terre protégée par un disjoncteur 10A .
description du poste (FIG-I)
12345-
Potentiomètre de vitesse fil
Panneau de contrôle et Tableau «Smart»
Interrupteur marche/arrêt
Interrupteur de tension
Cordon d’alimentation
6- Sortie torche fixe
7- Câble de masse fixe
8- Moto-dévidoir
9- Support bobine
10- Poignée
soudage semi-automatique en acier (fig-II)
Cet appareil ne peut souder que du fil No Gas de 0,9.
L'utilisation de fil No Gas ne nécessite pas d’apport de gaz.
Cet appareil est livré d'origine pour fonctionner avec un fil Ø 0,9 en No Gaz. Le tube contact, la gorge du galet, la
gaine de la torche sont prévus pour cette application. Un galet spécifique avec 2 gorges de Ø 0,9 est prévu pour cet
appareil. Il possède une gorge en U et l'autre en V, la gorge en U est préconisée pour du fil No Gaz.
procédure de montage des bobines et des torches (fig-III)
• Prendre la poignée de la torche, et retirer la buse (fig III-E) en tournant dans le sens horaire, puis dévisser le tube
contact (fig III-D) en laissant le support et le ressort sur la torche.
• Ouvrir la trappe du poste
FIG III-A : Positionner la bobine sur son support.
• Régler le frein (2) de la bobine pour éviter, lors de l’arrêt du soudage, que l’inertie de la bobine n’emmêle le fil. Ne
pas serrer trop fort ! La bobine doit pouvoir tourner sans faire forcer le moteur.
• Visser le maintien bobine (3).
FIG III-B : Mettre en place le galet moteur.
FIG III-C : Pour régler la pression des galets, procéder comme suit :
• Desserrer la molette au maximum et l’abaisser.
• Insérer le fil de la bobine et le faire sortir de 2cm environ, puis refermer le support de galet.
• Mettre en route l’appareil et actionner le moteur en utilisant la torche.
• Serrer la molette (fig III-C) en restant appuyé sur la gâchette jusqu’à ce que le fil soit entraîné, puis arrêter le serrage.
• Faire sortir le fil de la torche d’environ 5cm, puis mettre au bout de la torche le tube contact (fig III-D), puis la buse
(fig III-E).
Le Spark MIG 110 peut accueillir des bobines de diamètre 100 mm.
Ci-dessous les différentes combinaisons possibles :
Spark MIG 110
No Gas
0,9
UTILISATION (fig IV)
Spark MIG facilite le réglage de la vitesse de fil et de la tension.
• Votre tension (boutons A/ B)
• Votre vitesse de fil, en réglant le potentiomètre (1) sur la zone de couleur indiquée et ajustez si besoin.
Exemples, pour souder de la tôle de 1.0 mm d’épaisseur :
• Mettez le bouton (2) sur la position « A »
• Réglez le potentiomètre (1) sur la zone de la couleur la plus claire et ajustez « au bruit » si besoin.
conseil et protection thermique
• Respecter les règles classiques du soudage.
• Couper l’alimentation en débranchant la prise. A l’intérieur, les tensions et intensités sont élevées et dangereuses.
4
Spark MIG 110
FR
facteurs de marche et environnement d'utilisation
Les postes décrits ont une caractéristique de sortie de type "tension constante". Le facteur de marche selon la norme
EN60974-1 est indiqué dans le tableau suivant :
Spark MIG 110
X%-max
6% - 85A
12%
65A
NB : les essais d’échauffement ont été effectués à température ambiante et le facteur de marche à 40 °C a été déterminé par simulation.
ENTRETIEN
• L'entretien ne doit être effectué que par une personne qualifiée.
• Couper l'alimentation en débranchant la prise avant de travailler sur l'appareil. A l’intérieur, les tensions et intensités
sont élevées et dangereuses.
• Il est conseillé 2 à 3 fois par an d’enlever le capot et dépoussiérer l’intérieur du poste à la soufflette. En profiter pour
faire vérifier la tenue des connexions électriques avec un outil isolé par un personnel qualifié.
• Contrôler régulièrement l'état du cordon d'alimentation. Si le câble d'alimentation est endommagé, il doit être remplacé par le fabricant, son service après vente ou une personne de qualification similaire, afin d'éviter un danger.
sécurité
Le soudage au fil fourré peut être dangereux et causer des blessures graves voire mortelles. Protégez-vous et protégez
les autres. Respecter les instructions de sécurité suivantes:
Rayonnements de l'arc: Protégez-vous à l’aide d’un masque muni de filtres conformes EN 169 ou EN 379.
Pluie, vapeur d’eau, humidité: Utiliser votre poste dans une atmosphère propre (degré de pollution ≤ 3), à plat et
à plus d’un mètre de la pièce à souder. Ne pas utiliser sous la pluie ou la neige.
Choc électrique: Cet appareil ne doit être utilisé que sur une alimentation monophasée 1 phase + 1 neutre avec terre.
Ne pas toucher les pièces sous tension.
Vérifier que le réseau d'alimentation est adapté au poste.
Chutes: Ne pas faire transiter le poste au-dessus de personnes ou d’objets.
Brûlures: Porter des vêtements de travail en tissu ignifugé (coton, bleu ou jeans).
Travailler avec des gants de protection et un tablier ignifugé.
Protéger les autres en installant des paravents ininflammables, ou les prévenir de ne pas regarder l'arc et garder des
distances suffisantes.
Risques de feu: Supprimer tous les produits inflammables de l'espace de travail. Ne pas travailler en présence de gaz
inflammable.
Fumées: Ne pas inhaler les gaz et fumées de soudage. Utiliser dans un environnement correctement ventilé, avec
extraction artificielle si soudage en intérieur.
Précautions supplémentaires: Toute opération de soudage :
• dans des lieux comportant des risques accrus de choc électrique,
• dans des lieux fermés,
• en présence de matériau inflammable ou comportant des risques d'explosion, doit toujours être soumise à l'approbation
préalable d'un "responsable expert", et effectuée en présence de personnes formées pour intervenir en cas d'urgence.
Les moyens techniques de protections décrits dans la Spécification Technique CEI/IEC 62081 doivent être appliqués.
Le soudage en position surélevée est interdit, sauf en cas d'utilisation de plates-formes de sécurité.
Les porteurs de stimulateurs cardiaques doivent consulter un médecin avant d'utiliser
ces appareils. Nous déconseillons toutefois l’utilisation de ces appareils à ces
personnes.
Ne pas utiliser le poste pour dégeler des canalisations.
5
Spark MIG 110
FR
anomalies, causes, remèdes
SYMPTOMES
Le débit du fil de soudage n’est pas
constant.
CAUSES POSSIBLES
Des grattons obstruent l’orifice.
Le fil patine dans les galets.
REMEDES
Nettoyer le tube contact ou le
changer et remettre du produit antiadhésion.
Contrôler la pression des galets ou
les remplacer.
Diamètre du fil non conforme au
galet.
Gaine guide fil dans la torche non
conforme.
Le moteur de dévidage ne fonctionne Frein de la bobine ou galet trop serré. Desserrer le frein et les galets
pas.
Problème d’alimentation
Vérifier que le bouton de mise en
service est sur la position marche.
Mauvais dévidage du fil.
Pas de courant de soudage.
Le fil bouchonne après les galets.
Le cordon de soudage est poreux
Particules d’étincelage très
importantes.
6
Gaine guide fil sale ou endommagée. Nettoyer ou remplacer.
Frein de la bobine trop serré.
Desserrer le frein.
Mauvais branchement de la prise
secteur.
Voir le branchement de la prise et
regarder si la prise est bien alimentée
avec 1 phase et un neutre.
Mauvaise connexion de masse.
Contrôler le câble de masse
(connexion et état de la pince).
Gaine guide fil écrasée.
Vérifier la gaine et corps de torche.
Blocage du fil dans la torche.
Remplacer ou nettoyer.
Pas de tube capillaire.
Vérifier la présence du tube capillaire.
Vitesse du fil trop importante.
Réduire la vitesse de fil
Buse trop encrassée.
Nettoyer la buse ou la remplacer.
Mauvaise qualité du fil.
Utiliser un fil adapté au soudage No
Gas.
État de la surface à souder de
mauvaise qualité (rouille, etc…)
Nettoyer la pièce avant de souder
Tension d’arc trop basse ou trop
haute.
Voir paramètres de soudage.
Mauvaise prise de masse.
Contrôler et positionner la pince de
masse au plus proche de la zone à
souder
Spark MIG 110
EN
Description
Thank you for choosing this machine. To get the best from your machine, please read the following carefully :
The Spark MIG 110 is a traditional machine for semi-automatic welding of flux cored wire only (AC current).
Adjustment and Setting of this machine is easy with its SMART feature.
ELECTRICITY SUPPlY
This machine is supplied with a 16A plug (type CEE7/7). The absorbed current (I1eff) is indicated on the device at
maximum usage.
The Spark MIG 110 must be connected to a 230V 1PH with EARTH protected by a 10A circuit breaker.
DEVicE PRESENtatioN (Fig-I)
12345-
Wire speed regulator
Control panel and table for SMART feature
Power Switch Off/On
Voltage selection
Power cable
6- Fixed torch
7- Fixed earth cable
8- Drive Reel
9- Wire Reel Support
10- Handle
Semi-automatic Welding for Steel (Fig-II)
Machine only suitable for Ø0.9 gasless (cored) wire welding (see picture II - A).
Gasless (cored) wire does not require gas for welding.
Machine is set-up for welding Ø0.9 gasless wire (contact tube, roller and torch sheath supplied specifically for this
application). The roller is specific to this machine and has two grooves, a U shape and a V shape. It is recommended
to use the U shape groove for gasless welding.
Process of Reel and torch assembly (Fig-III)
Remove the Nozzle (fig III-E) from the torch by turning clockwise and then remove the contact tip, leaving the support
and the spring on the torch (fig III-D).
• Open the door of the machine
FIG III-A : Position the reel on to the support.
• Adjust the reel break (2) to avoid reel movement tangling the wire when welding stops. Be careful not to tighten
too much - the reel must rotate without straining the motor.
• Tighten the plastic screw (3).
FIG III-B : Installing the drive roller.
FIG III-C : To select the adjustment of the drive rollers, proceed as follows :
• Loosen the drive roller knob as far as possible.
• Insert the wire until it exits the other side by about 2cm, tighten the knob again slightly.
• Start the motor by pressing the trigger of the torch.
• Tighten the knob (fig III-C) whilst pressing the trigger until the wire starts to move.
Nb : When welding with Aluminium, use the minimum possible pressure to avoid crushing the wire
• Leave approximately 5cm of wire out of the end of the torch, then attach the contact tip suitable for the wire used,
and then the nozzle (fig III-E).
The Spark MIG 110 can accommodate 100mm diameter wire reels.
Below are the different combinations possible :
Spark MIG 110
No Gas
0,9
Directions for Use (Fig IV)
The Spark MIG feature allows you to adjust the voltage and the wire speed.
• The voltage (button A/ B)
• Wire speed - adjust the regulator (1) to the colour zone indicated.
Examples :
To weld 1.0mm thick steel :
• Move button (2) to the « A » position
• Move the regulator (1) to the zone of lightest colour and adjust « by sound » if required
7
Spark MIG 110
EN
Advice and Thermal Protection
• Respect the normal rules of welding
• Leave the machine plugged in after welding to allow it to cool
• Thermal Protection : The LED will illuminate. Cooling will take between 10 and 15 minutes depending on the
ambient temperature.
Duty cycle & Welding Environment during use
• The welding unit describes an output characteristic of "constant current" type. The duty cycles following the standard EN60974-1 (at 40°C on a 10mn cycle) are indicated in the table below :
Spark MIG 110
X%-max
6% - 85A
12%
65A
Note: The machines’ duty cycle has been tested at room temperature (40°C) and has been determined by
simulation
MAINTENANCE
- Maintenance should only be carried out by a qualified person.
- Switch the machine off, ensure it is unplugged, and that the ventilator inside has stopped before carrying out maintenance work. (DANGER High Voltage and Currents).
- JBDC recommends removing the steel cover 2 or 3 times a year to remove any excess dust. Take this opportunity to
have the electrical connections checked by a qualified person with an insulated tool.
- Regularly check the condition of the power supply cord. If damaged, it will need to be replaced by the manufacturer,
its after sales service or a qualified person.
- Ensure the ventilation holes of the device are not blocked to allow adequate air circulation.
Safety
Arc welding can be dangerous and can cause serious and even fatal injuries.
Protect yourself and others. Ensure the following safety precautions are taken:
Arc radiation: Protect yourself with a helmet fitted with filters in compliance with EN169 or EN 379.
Rain, steam, damp: Use your welding unit in a clean/dry environment (pollution factor ≤ 3), on a flat surface, and
more than one meter from the welding work-piece. Do not use in rain or snow.
Electrical shock: This device must only be used with an earthed power supply. Do not touch the parts under high
voltage. Check that the power supply is suitable for this unit.
Falls: Do not place/carry the unit over people or objects.
Burns: Wear protective (fire-proof) clothing (cotton, overalls or jeans).
Wear protective gloves and a fire-proof apron.
Ensure other people keep a safe distance from the work area and do not look directly at the welding arc.
Protect others by installing fire-proof protection walls.
Fire risks: Remove all flammable products from the work area. Do not work in presence of flammable gases.
Fumes: Do not inhale welding gases and fumes. Use the device in a well ventilated environment, with artificial extraction
if welding indoors.
Additional Precautions: Any welding operation undertaken in.....
- rooms where there is an increased risk of electric shocks,
- Poorly ventilated rooms,
- In the presence of flammable or explosive material,
Use should always be approved by a "responsible expert", and made in presence of people trained to intervene in case
of emergency.
Technical protection as described in the Technical Specification CEI/IEC 62081 must be implemented. Welding in raised
positions should not be undertaken, except where safety platforms are used.
8
Spark MIG 110
EN
People wearing Pacemakers are advised not to use this machine, however if
necessary, please seek medical advice prior to use.
Do not use the welding unit to unfreeze pipes.
Troubleshooting
SYMPTOMS
The welding wire speed is not
constant.
POSSIBLE CAUSES
REMEDIES
Debris is blocking up the opening.
Clean out the contact tip or change it
and replace the anti-adherence
product.
Ref.041806
The wire skids in the rollers
Check the roller pressure or replace
it.
- Wire diameter incompatible with
roller
- Covering Wire guide in the torch
incompatible
The wire-feeder motor doesn’t
operate.
Reel or roller brake too tight
Adjust the brake and rollers.
Electrical supply problem.
Check the power switch is in the "On"
position.
Bad wire feeding.
Covering wire guide dirty or damaged Clean or replace
No welding current
The wire jams (after the rollers).
The welding bead is porous.
The arc produces a lot of sparks
Reel brake too tight
Release the brake
Bad connection to the main supply
Check the mains connection and
ensure the supply is 230V (1PH)
power socket.
Bad earth connection.
Check the earth cable (connection
and clamp condition).
Guide wire sheath crushed.
Check the sheath and torch body.
Wire jammed in the torch
Clean or replace.
No capillary tube.
Check the presence of capillary tube.
Wire speed too fast
Reduce the wire speed.
Nozzle dirty
Clean or replace nozzle.
Poor quality wire.
Use suitable wire for no gas welding.
Work piece in bad condition. (rust,
etc…)
Clean the metal before welding.
Arc voltage too low or too high.
See welding settings.
Bad earth connection.
Adjust the earth cable for a better
connection.
9
Spark MIG 110
DE
Beschreibung
Wir freuen uns, dass Sie sich für ein Markengerät der Firma JBDC entschieden haben und danken Ihnen für das
entgegengebrachte Vertrauen. Bitte lesen Sie sorgfältig vor dem Erstgebrauch diese Betriebsanleitung.
Das Spark MIG 110 Gerät ist ein traditionelles halb-automatisch AC-Strom Schweissgerät, geeignet nur zum Fülldraht
Schweißen.
Einfache Einstellung durch die "SMART Lösung“.
Netzanschluss
Dieses Gerät wird mit einem 16A Netzstecker (Typ CEE7-7) geliefert und muss an eine 230V (50/60 Hz) Steckdose mit
Schutzleiter angeschlossen werden.
Die maximale Stromaufnahme (I1eff) finden Sie auf dem Typenschild des Gerätes.
Das Spark MIG 110 müss an einen einphasigen 230V Netzanschluss MIT Erdung angeschlossen werden (Absicherung
10A träge).
Beschreibung des Gerätes (abb-I)
12345-
Ein / AUS Schalter
Bedienfeld und "Smart" Tabelle
Auswahltaste Schweißspannung
Aufnahmedorn für Drahtrolle
Stromkabel
6- Anschluss für fest montierten Brenner
7- Fest montiertes Massekabel
8- Drahtförderrollen
9- Aufnahmedorn für Drahtrolle
10- Handgriff
Halbsynergisches Stahl (Abb.-II)
Dieses Gerät kann nur Fülldraht Ø 0,9 mm Schweißen. Das Schweißen mit Fülldraht verlangt keine Gaszufuhr. Dieses
Gerät ist werksseitig für den Betrieb mit Ø 0,9 mm Fülldraht eingestellt. Das Kontaktrohr, der Brennerhals und die
Führungsseele des Brenners sind für diese Anwendung eingestellt. Dieses Gerät ist mit einer spezifischen Antriebsrolle
mit 2 Drahtaufnahmenuten von Ø 0,9 mm ausgestattet. Diese Antriebsrolle verfügt über eine U- und eine V-förmige
Aufnahmenute. Die U-förmige Aufnahmenute ist bei Fülldraht empfohlen.
Montage der Drahtrollen und Schweissbrenner (Abb-III)
Entfernen Sie zuerst die Gasdüse durch Drehen im Uhrzeigersinn(Abb. V-E). Schrauben Sie dann das Kontaktrohr weg
(Abb. III-D) und lassen Sie den Kontaktrohrhalter und die Feder auf dem Brenner.
• Entfernen Sie den Seitendeckel des Gerätes.
Abb III-A : Positionieren Sie die Drahtrolle auf der Aufnahme.
• Justieren Sie die Drahtrollenbremse (2) um die Drahtrolle bei Schweißstop gegen Nachdrehen zu sichern. Ziehen Sie
diese generell nicht zu fest.
• Kunststoffschraube anziehen.
Abb III-B : Aufstellung der Antriebsrolle.
Abb III-C : Um den Transportandruck korrekt einzustellen, gehen Sie wie folgt vor:
• Lockern Sie die Einstellschraube der Drahtführung.
• Legen Sie den Draht ein und ziehen Sie ca. 2 cm davon heraus, anschließend schließen Sie den Drahtantrieb ohne
festzuziehen.
• Schalten Sie das Gerät ein und betätigen Sie bei eingelegtem Draht den Brennertaster.
• Justieren Sie die Einstellschraube (Abb. III-C) bei betätigtem Brennertaster bis der Draht sauber transportiert wird.
Achtung : Aluminiumdraht muss mit möglichst geringem Anpressdruck zwischen den Drahtförderrollen transportiert
werden, da er sonst deformiert und ungleichmäßig gefördert wird.
• Lassen Sie den Draht ca. 5 cm aus dem Brenner herauskommen und montieren das zu dem benutzten Draht
passende Kontaktrohr (Abb. III-D), sowie die passende Düse (Abb. III-E).
Das Spark MIG 110 Gerät kann Drahtrollen von 100mm betreiben.
Hier ist eine Zusammenfassung der möglichen Kombinationen:
Spark MIG 110
No Gas
0,9
Benutzung (abb-IV)
Spark MIG ermöglicht die einfache Einstellung der Schweißspannung und der Drahtgeschwindigkeit.
• Die Spannung (A/B )
• Die Drahtgeschwindigkeit, indem Sie den Potentiometer (1) auf der angezeigten Farbzone positionieren
Beispiel :
Verschweißen von Blechdicke 1,0mm:
• Wählen Sie Taste (2) auf Position « A »
10
Spark MIG 110
DE
• Positionieren Sie den Potentiometer (1) auf der helleren Farbzone und justieren Sie « nach Geräusch » nach wenn
erforderlich.
Thermischer Schutz
• Beachten Sie die allgemeinen Grundregeln des Schweißens.
• Lassen Sie das Gerät nach dem Schweißen oder während der Thermoschutz aktiv ist am Netz angeschlossen und
eingeschaltet, um die Abkühlung des Gerätes durch den Lüfter zu ermöglichen.
• Thermischer Schutz : Das Symbol leuchtet und die Abkühlzeit beträgt 5 bis 10 Minuten.
Einschaltdauer und Verwendungsumgebung
Die beschriebenen Geräte haben eine Ausgangscharakteristik vom Typ "Konstantspannung“. Die Einschaltdauer nach
der Norm EN60974-1 ist in der Tabelle unten angezeigt:
Spark MIG 110
X%-max
6% - 85A
12%
65A
Bemerkung: Die Erwärmungsprüfungen sind bei Umgebungstemperatur durchgeführt wurden und die Einschaltdauer
wurde bei 40° C im Simulationbetrieb ermittelt.
INSTANDHALTUNG
• Die Instandhaltung sollte nur von qualifiziertem Fachpersonal durchgeführt werden.
• Schalten Sie das Gerät aus, trennen Sie die Stromversorgung und warten Sie bis der Ventilator sich nicht mehr
dreht. Im Gerät sind die Spannungen sehr hoch und deshalb gefährlich.
• Nehmen Sie regelmäßig (2 oder 3-Mal pro Jahr) das Gehäuse ab und reinigen Sie das Innere des Gerätes mit
Pressluft. Lassen Sie regelmäßig Prüfungen des JBDC Gerätes auf seine elektrische Betriebssicherheit von qualifiziertem
Fachpersonal durchführen.
• Prüfen Sie regelmäßig den Zustand der Netzzuleitung. Wenn diese beschädigt ist, muss sie durch den Hersteller,
seinen Reparaturservice oder eine qualifizierte Person ausgetauscht werden, um Gefahren zu vermeiden.
UNFALLPRÄVENTION
Lichtbogenschweissen kann gefährlich sein und zu schweren – unter Umständen auch tödlichen – Verletzungen führen.
Schützen Sie daher sich selbst und andere. Beachten Sie unbedingt die folgenden Sicherheitshinweise:
lichtbogenstrahlung: Gesichtshaut und Augen sind durch ausreichend dimensionierte EN 175 konforme Schutzschirme
mit Spezialschutzgläsern nach EN 169 / 379 vor der intensiven Ultraviolettstrahlung zu schützen.
Umgebung Benutzen Sie das Gerät nur in sauberer und gegen Nässeeinwirkung geschützter Umgebung. Sorgen Sie
stets für einen senkrechten und sicheren Stand des Gerätes auf ebenem Grund und stellen Sie es mindestens einen
Meter vom zu verschweißenen Weksrück auf.
Feuchtigkeit Stromversorgung Nicht bei erhöhter Feuchtigkeit (Regen/Schnee) benutzen. Das Gerät darf nur an
einer dafür geeigneten Stromversorgung betrieben werden. Keine Spannungsführenden Teile berühren. Verwenden
Sie niemals einen beschädigten Brenner, da dies zu Schäden an der Maschine sowie an der Elektrik verursachen kann.
Transport: Unterschätzen Sie nicht das Gewicht der Anlage. Bewegen Sie das Gerät nicht über Personen oder
Sachen hinweg und lassen Sie es nicht herunterfallen oder hart aufsetzen.
Verbrennungsgefahr: Schützen Sie sich durch geeignete trockene Schweißerkleidung (Schürze, Handschuhe,
Kopfbedeckung sowie feste Schuhe).
Tragen Sie auch eine Schutzbrille, wenn Sie Schlacke abklopfen. Schützen Sie andere durch nicht entzündbare
Trennwände.
Nicht in den Lichtbogen schauen und ausreichend Distanz halten.
Brandgefahr: Entfernen Sie alle entflammbaren Produkte vom Schweissplatz und arbeiten Sie nicht in der Nähe von
brennbaren Stoffen und Gasen.
Schweissrauch: Die beim Schweißen entstehenden Gase und der Rauch sind gesundheitsschädlich. Der Arbeitsplatz
sollte daher gut belüftet sein und der entstehende Rauch und die Gase müssen abgesaugt werden.
11
Spark MIG 110
DE
Weitere hinweise: Führen Sie Schweißarbeiten:
- in Bereichen mit erhöhten elektrischen Risiken,
- in abgeschlossenen Räumen,
- in der Umgebung von entflammbaren oder explosiven Produkten,
nur in Anwesenheit von qualifiziertem Rettungs- und/oder Fachpersonal durch. Treffen Sie Vorsichtsmaßnahmen in
Übereinstimmung mit „IEC 62081“. Schweißarbeiten an Gegenständen in größeren Höhen dürfen nur auf professionell
aufgebauten Gerüsten durchgeführt werden.
Halten Sie beim Arbeiten ausreichend Abstand zu Personen mit Herzschrittmacher! Personen
mit Herzschrittmacher dürfen mit dem Gerät nicht ohne ärztliche Zustimmung arbeiten!
Wir raten Personen mit einem Herzschrittmacher davon ab, diese Geräte zu benutzen.
Das Gerät ist nicht geeignet für das Auftauen von Leitungen!
Fehlersuche
Fehler
Drahtvorschubgeschwindigkeit nicht
konstant.
Motor läuft nicht.
Schlechte Drahtförderung.
Kein Schweißstrom.
Drahtstau im Antrieb.
Die Schweißnaht ist porös.
Starke Spritzerbildung.
12
Ursache
Lösungen
Das Kontaktrohr ist verstopft.
Reinigen Sie das Kontaktrohr oder
tauschen Sie es aus und benutzen
Sie Antihaftspray (Art.-Nr. 041806).
Der Draht rutscht im Antrieb durch.
Prüfen Sie den Druck des
Rollenantriebes oder ändern
die Antriebsnut auf die korrekte
Drahtstärke.
Drahtführungsschlauch des Brenners
nicht korrekt.
Bremse der Drahtrolle oder
Rollenantrieb zu fest.
Lockern Sie die Bremse und den
Rollenantrieb.
Versorgungsproblem.
Prüfen Sie, ob der Schalter auf
Position «EIN» ist.
Drahtführungsschlauch verschmutzt
oder beschädigt.
Reinigen Sie den
Drahtführungsschlauch oder
tauschen Sie diesen aus.
Drahtrollen-Bremse zu fest.
Lockern Sie die Bremse.
Fehlerhafte Netzversorgung.
Prüfen der Netzversorgung (Stecker,
Kabel, Steckdose, Sicherung).
Fehlerhafte Masseverbindung.
Prüfen Sie die Masseklemme
(Verbindung und Klemmenzustand).
Seele fehlerhaft.
Prüfen bzw. austauschen.
Draht blockiert im Brenner.
Prüfen, reinigen oder austauschen.
Fehlendes Kapillarrohr.
Prüfen und einsetzen.
Drahtvorschubgeschwindigkeit zu
hoch.
Drahtvorschubgeschwindigkeit
reduzieren.
Schmutzige Gasdüse.
Reinigen oder austauschen.
Schlechte Drahtqualität.
Austauschen gegen geeigneten
Schweißdraht.
Schweißmaterial von schlechter
Qualität (Rost, …)
Schweißgut reinigen.
Lichtbogenspannung zu niedrig oder
zu hoch.
Schweißparameter kontrollieren.
Masse schlecht positioniert.
Positionieren Sie die Masse näher an
der Schweißstelle.
Spark MIG 110
ES
Descripciόn
Gracias por elegir uno de nuestros equipos. Para obtener el rendimiento máximo del mismo, lea con atención el
siguiente documento:
El Spark MIG 110 es un aparato de soldadura tradicional semi automático con corriente alternativa (AC), solamente
para hilo flux (no gas).
El reglaje de este aparato es simple y rápido gracias a la solución SMART
Alimentación eléctrica
Este aparato está entregado con un enchufe 16A de tipo CEE7/7. La corriente realmente absorbida (I1eff) está
señalada en el aparato, para condiciones de uso máximas.
Se debe conectar el Spark MIG 110 a una toma de tierra de 230V 1 fase CON tierra protegida por un disyuntor
de 10A.
Descripción del aparato (FIG-I)
12345-
Potenciómetro de reglaje de velocidad del hilo
Panel de control y tabla "Smart"
Interruptor arranque/paro
Botón selección de tensión
Cable de alimentación
6- Antorcha fijada
7- Cable de masa fijado
8- Devanadera
9- Soporte bobina
10- Asa de transporte
SolDaDURa SEmi-aUtomatica acERo (Fig-II)
Este equipo solo puede soldar hilo No Gaz de 0,9.
No se necesita aportación de gas al utilizar hilo No Gaz.
Este aparato está entrega de origen para funcionar con hilo de Ø 0,9 en No Gaz. El tubo de contacto, la ranura del
rodillo y la funda de la antorcha están previstos para esta aplicación, Un rodillo específico con 2 ranuras de Ø 0,9 está
previsto para este equipo. Tiene una ranura en U y otra en V, la ranura en U está recomendada para hilo no gas.
Procédimiento de montaje de los rodillos y antorchas (Fig-III)
• Tomar el asa de la antorcha, y quitar la boquilla (fig III-E) girándola en el sentido contrario del horario, luego quitar
el
tubo de contacto (fig III-D), dejando el soporte y el muelle en la antorcha en su sitio.
• Abrir la trampa del aparato.
FIG III-A: Colocar el rollo en su soporte.
• Arreglar el freno del rollo (2) para evitar que, al parar la soldadura, el hilo se enrede por causa de inercia del rollo.
¡No apretar demasiado fuerte! El rollo debe girar sin forzar al motor.
• Atornillar el tornillo de plástico (3).
FIG III-B: Colocar el rodillo
FIG III-C: Para arreglar la presión de los rodillos, proceder como sigue:
o Aflojar la ruedecita como máximo
o Colocar el hilo del rollo y sacarlo de aproximadamente 2 cm, luego volver a cerrar el soporte del rodillo.
o Poner en marcha el aparato y accionar el motor utilizando la antorcha.
o Apretar la ruedecita (fig III-C), al mismo tiempo que se aprieta el gatillo, hasta arrastrar el hilo, luego parar la
presión.
NB : Para el hilo de aluminio, poner un mínimo de presión para no aplastar el hilo.
• Sacar el hilo de la antorcha de aproximadamente 5cm, luego poner al cabo de la antorcha el tubo de contacto (fig
III-D) adecuado al hilo utilizado, finalmente la boquilla (fig III-E).
El Spark MIG 110 puede equiparse con rollos de diámetro 100mm
Abajo encontrará las diferentes combinaciones posibles:
Spark MIG 110
No Gas
0,9
Utilizaciόn (Fig-IV)
Spark MIG facilita el reglaje de la velocidad del hilo y de la tensión.
• Su tensión (botones A/ B )
• Su velocidad de hilo, arreglando el potenciómetro (1) en la zona de color indicada y ajustar si es necesario.
Ejemplos :
Para soldar chapa de 1,0mm de espesor:
• Colocar el botón (2) en posición « A »
• Arreglar el potenciómetro (1) en la zona de color más clara y ajustar « al ruido » si es necesario.
13
Spark MIG 110
ES
consejos y proteccion térmica
• Respetar las normas clásicas de soldadura.
• Dejar el equipo conectado detrás de la soldadura o durante la protección térmica para permitir el enfriamiento.
• Protección térmica: el piloto luminoso se enciende y el enfriamiento dura de 5 hasta 10 mn según la temperatura
ambiente.
Factor de marcha y entorno de utilizaciόn
Los aparatos descritos tienen una característica de salida de tipo "tensión constante". Su factor de marcha según la
norma EN60974-1 está indicado en la siguiente matriz :
Spark MIG 110
X%-max
6% - 85A
12%
65A
Nota: las pruebas de calentamiento fueron realizadas con una temperatura ambiente y el factor de funcionamiento a
40°C fue determinado por simulación.
MANTENIMIENTO
• El mantenimiento debe ser efectuado por una persona cualificada.
• Parar la alimentación y desconectar la toma, esperar el paro del ventilador antes de trabajar sobre el equipo. Al
interior,
las tensiones e intensidades son elevadas y peligrosas.
• 2 o 3 veces por año, retirar las carcasas y soplar el polvo. Verificar el buen estado de las conexiones eléctricas con
una
herramienta aislada, por una persona cualificada.
• Controlar regularmente el estado del cordón de alimentación. Si el cable de alimentación está deteriorado, debe ser
remplazado por el fabricante, su servicio postventa o una persona de misma cualificación por evitar el peligro.
SEGURIDAD
La soldadura MIG/MAG puede ser peligrosa y causar lesiones graves y así mismo mortales. Protegerse y proteger a los
demás.
Respetar las instrucciones siguientes de seguridad:
Radiaciones del arco: Protegerse con una mascara con filtros conformes EN 169 o EN 379.
lluvia, vapor de agua, humedad: Utilizar su aparato en una atmosfera limpia (grado de polución inferior a 3), de
plano y situado más de 1 metro de la pieza a soldar. No utilizar bajo lluvia ni nieve.
choque eléctrico: Esta maquina solo debe ser utilizada con una alimentación monofásica de 2 hilos y tierra. No tocar
las piezas bajo tensión. Verificar que la alimentación sea adaptada al equipo.
Nunca utilizar una antorcha en mal estado (defecto de aislamiento eléctrico): existen riesgos de dañar el aparato y la
instalación eléctrica.
caídas: No suspender el equipo encima de personas u objetos.
quemaduras: Llevar ropa de obra adecuada, de tejido ignifugado (cotón, mono de trabajo o vaqueros)
Trabajar con guantes de protección y un delantal ignifugado.
Proteger a los demás biombos no inflamables, o previniéndoles no mirar al arco y mantener distancias suficientes.
Riesgos de fuego: Suprimir todos productos inflamables del espacio de trabajo. No trabajar si hay gas inflamable.
humos: No inhalar los gases y humos de soldadura. Se deberá trabajar en un local bien ventilado, con extracción
artificial si es soldadura en interior.
14
Spark MIG 110
ES
Precauciones Suplementarias: Todas operaciones de soldadura:
- en lugares con importante riesgos de choques eléctricos.
- en lugares cerrados,
- en presencia de materiales inflamables o con riesgos de explosión.
siempre deben ser sujetas a la aprobación de un « experto », y efectuadas en presencia de personas cualificadas
capaces de intervenir en caso de urgencia.
Los medios técnicos de protección especificados en la Especificación Técnica CEI/IEC 62081 deben ser aplicados.
La soldadura en posición sobreelevada está prohibida, excepto en caso de utilización de plataformas de seguridad.
Las personas que tienen un estimulador cardiaco deben acudar al medico antes de
utilizar estos
aparatos. Sin embargo, desaconsejamos a estas personas la utilización de estos
equipos. No utilizar el aparato para descongelar las canalizaciones.
Sintomas, causas posibles, remedios
Anomalías
La salida del hilo de soldadura no es
constante.
El motor de devanado no funciona.
El hilo no se devana bien.
No hay corriente de soldadura.
Se engancha el hilo después de los
rodillos.
El cordón de soldadura es poroso.
Causas
Remedios
Residuos obstruyen el orificio.
Limpiar el tubo de contacto o
cambiarlo y colocar producto antiadherencia.
El hilo desliza en los rodillos.
- Comprobar la presión de los rodillos
o substituirlos.
- Diámetro del hilo no conforme al
rodillo.
- Funda guía de hilo no conforme.
Freno del rollo o del rodillo
demasiado apretado.
Aflojar el freno y los rodillos
Problema de alimentación
Comprobar que el botón de puesta en
marcha está activado.
Funda guía de hilo sucia o
deteriorada.
Limpiar o remplazar.
Freno de rollo demasiado apretado.
Aflojar el freno.
Mala conexión a la toma de corriente. Comprobar la conexión de toma y ver
si ésta misma está bien alimentada
con 1 fase (+tierra).
Mala conexión de la masa.
Comprobar el cable de masa
(conexión y estado de la pinza).
Funda guía de hilo aplastada.
Comprobar la funda y el cuerpo de la
antorcha.
Bloqueo del hilo en la antorcha.
Remplazar o limpiar.
Falta de tubo capilar (acero).
Comprobar la presencia del tubo
capilar.
Velocidad de hilo demasiada
importante
Reducir la velocidad de hilo
Boquilla demasiado sucia.
Limpiar la boquilla o substituirla.
Mala calidad del hilo.
Utilizar un hilo adecuado a la
soldadura NO GAS.
Estado de la superficie para soldar de Limpiar la pieza antes de soldar
mala calidad (óxido, etc…)
Partículas de chispas importantes.
Tensión del arco baja o alta.
Ver los parámetros de soldadura.
Mala toma de masa.
Comprobar y colocar la pinza de
masa lo más cerca posible de la zona
que soldar
15
Spark MIG 110
RU
Описание
Благодарим за Ваш выбор! Чтобы полностью использовать возможности аппарата, внимательно ознакомтесь со
следующей информацией:
Spark MIG 110 – это трансформаторный сварочный аппарат для полуавтоматической сварки на переменном
токе только в режиме Без Газа (флюсовой проволокой). Настройка этого аппарата упрощена благодаря
функции SMART.
ЭЛЕКТРИЧЕСКОЕ ПИТАНИЕ
Этот аппарат поставляетя с вилкой для 16A типа CEE7/7. Эффективное значение потребляемого тока (I1eff)
для
использования при максимальных условиях указано на аппарате.
Аппарат Spark MIG 110 должен быть подключен к однофазной розетке 230В С ЗАЗЕМЛЕНИЕМ,
защищенной 10-амперным предохранителем.
Описание аппарата (рис.I)
12345-
Потенциометр настройки скорости подачи
Панель "Smart" регулировки параметров
Выключатель вкл/выкл
Кнопка выбора напряжения
Шнур питания
6- Выход постоянной горелки
7- Постоянный кабель массы
8- Подающее устройство
9- Держатель катушки
10- Разъем горелки евростандарта
ПОЛУАВТОМАТИЧЕСКАЯ СВАРКА СТАЛИ (РИС-II)
Этот аппарат варит только проволоку Без Газа 0,9мм.
При использовании проволоки Без Газа, нет необходимости в подаче газа.
Этот аппарат поставляется для работы с проволокой Ø 0,9 Без Газа. Контактная трубка, желоб ролика,
проводная трубка горелки соответствуют этому использованию. Специальный ролик с 2-мя желобами для
Ø 0,9 подходит к этому аппарату. Он оснащен одним желобом в виде U и другим в виде V, желоб в виде U
рекомендуется для проволоки Без Газа.
УСТАНОВКА КАТУШЕК И БОБИН (РИС-III)
• Возьмите горелку за рукоятку и снимите наконечник (рис III-E), откручивая по часовой стрелке, затем выньте
контактную трубку (рис III-D), оставив держатель и пружину на месте.
• Откройте люк аппарата
РИС III-A : Установите бобину на держатель.
• Отрегулируйте тормоз (2) бобины так, чтобы при остановке сварки бобина по инерции не запутала
проволоку. Не зажимайте слишком сильно! Бобина должна поворачиваться без усилий для мотора.
• Закрутите держатель бобины (3).
РИС III-B : Установите ведущий ролик.
РИС III-C : Для регулировки давления роликов, следуйте приведенным ниже указаниям:
• Максимально развиньтите колесико и опустите его.
• Вставьте проволоку так, чтобы она выступала примерно на 2 см, затем закройте держатель ролика.
• Включите аппарат и запустите двигатель нажатем на курок горелки.
• Завиньтите колесико (рис III-C), продолжая нажимать на курок, пока проволка не начнет проходить, затем
прекратите завинчивание.
Примечание: для алюминивой проволоки давление должно быть минимальным, чтобы не раздавить ее.
• Выпустите проволоку из горелки на 5 см, затем поместите на конец горелки, подходящую к проволоке
контактную трубку (рис III-D) и наконечник (рич III-E).
Аппарат Spark MIG 110 работает с бобинами диаметром 100мм
Ниже приведены различные возможные комбинации :
Spark MIG 110
No Gas
0,9
ИСПОЛЬЗОВАНИЕ (РИС IV)
Spark MIG облегчает настройку скорости подачи и напряжения.
• Напряжение (кнопки A/ B)
• Скорость подачи с помощью потенциометра (1) в зоне указанного цвета. Откорректируйте при
необходимости.
Примеры:
Для сварки листов толщиной 1,0мм :
16
Spark MIG 110
RU
• Установите кнопку (2) в положение «A»
• Настройте потенциометр (1) на зону самого светлого цвета и, при необходимости, отрегулируйте «на слух».
СОВЕТЫ И ТЕРМОЗАЩИТА
• Соблюдайте общепринятые правила сварки.
• После окончания сварки оставляйте аппарат включенным, чтобы не прерывать процесс охлаждения.
• Термозащита: индикатор горит – длительность охлаждения от 5 до 10 мин в зависимости от температуры
окружающей среды.
ПРОДОЛЖИТЕЛЬНОСТЬ ВКЛЮЧЕНИЯ И СРЕДА ИСПОЛЬЗОВАНИЯ
• Описанные аппараты имеют выходную характеристику типа «постоянное напряжение». ПВ% согласно норме
EN60974-1 указан в нижеприведенной таблице :
Spark MIG 110
X%-max
6% - 85A
12%
65A
Заметка: нагревные испытания были реализованы при температуре окружающей среды, и рабочий фактор 40
°C был определён методом симуляции.
ОБСЛУЖИВАНИЕ
• Техническое обслуживание должно производиться только квалифицированным персоналом.
• Отключите питание, вынув вилку из розетки, и дождитесь остановки вентилятора перед тем, как приступить
к тех. обслуживанию. Внутри аппарата высокие и опасные напряжение и ток.
• Регулярно открывайте аппарат и продувайте его, чтобы очистить от пыли. Необходимо также проверять
все электрические соединения с помощью изолированного инструмента. Проверка должна осуществляться
квалифицированным персоналом.
• Проверяйте состояние провода питания. Если он поврежден, он должен быть заменен производителем, его
сервисной службой или квалифицированным специалистом во избежание опасности.
БЕЗОПАСНОСТЬ
Сварка МИГ/МАГ может быть опасной и вызвать тяжелые и даже смертельные ранения. Защититесь сами и
защитите окружающих.
Соблюдайте следующие правила безопасности :
Лучеиспускание дуги: Защититесь с помощью маски сварщика с фильтрами, соответствующими норме EN 169
или EN 379.
Дождь, пар, влага: Используйте аппарат в чистой среде (степень загрязнённости ≤ 3), на ровной поверхности
и на расстоянии более метра от свариваемой детали. Не использовать под дождём или снегом.
Удар электрическим шоком: Этот аппарат можно подключать только к однофазному питанию c 1 фазой
+ Ноль с заземлением. Не дотрагивайтесь до частей, находящихся под напряжением.
Проверьте, что электрическая сеть подходит для этого аппарата.
Не использовать горелку в плохом состоянии (дефект изоляции электричества), существует риск повреждения
аппарата и электропроводки.
Падение: Не переносить аппарат над людьми или предметами.
Ожоги: Носите рабочую одежду из огнеупорной ткани (хлопок, спецовка или джинсовка).
Работайте в защитных перчатках и фартуке из огнеупорной ткани. Защитите окружающих с помощью защитных
огнестойких экранов или предупредите их не смотреть на дугу и оставаться на безопасном расстоянии.
Риск пожара: Уберите все возгараемые предметы из рабочего пространства. Не работайте в присутствии
возгараемого газа.
Дым: Не вдыхайте сварочные газ и дым. Используйте аппарат в хорошо проветриваемом месте. Если вы варите
в помещении, то должна быть вытяжка
17
Spark MIG 110
RU
Дополнительные предостережения: Любые сварочные работы :
- в помещениях с высоким риском удара электрическим шоком,
- в закрытых помещениях,
- в присутствии возгараемых или взрывоопасных материалов,
всегда должна быть предварительно одобрены «ответственным экспертом» и выполнены в присутствии
людей, специально обученных, чтобы прийти на помощь в случае необходимости. Необходимо использовать
технические средства защиты, описанные в Технической Спецификации CEI 62081.
Сварка на высоте запрещена, кроме случаев использования платформ безопасности
Лица, использующие электрокардиостимуляторы, должны проконсультироваться у
врача перед работой с данными аппаратами.
Однако мы не советуем этим лицам использовать данные аппараты.
Не используйте аппарат для размораживания канализаций.
НЕИСПРАВНОСТИ, ПРИЧИНЫ, УСТРАНЕНИЕ
Аномалии
Подача сварочной проволоки
неравномерна.
Двигатель разматывания не работает.
Плохая подача проволоки.
Возможные причины
Решения
Наплавы металла забивают отверстие. Очистите контактную трубку или
поменяйте ее и смажте составом
против прилипания. Арт. : 041806
Проволока прокручивается в роликах.
- Проверьте давление роликов или
замените их.
- Диаметр проволоки не соответствует
ролику.
- Используется несоответствующая
нитенаправляющая трубка в горелке.
Тормозное устройство бобины или
ролика слишком тугое.
Разожмите тормоз и ролики.
Проблема с подачей
Проверьте, что кнопка пуска в
положении ВКЛ.
Нитенаправляющая трубка загрязнена
или повреждена.
Очистите или замените ее.
Тормозное устройство бобины слишком Разожмите тормоз.
тугое.
Отсутствует сварочный ток.
Проволока застревает после прохода
через ролики.
Пористый сварочный шов.
Значительное количество частичек
искрения.
18
Аппарат неправильно подключен к
сети.
Проверьте подключение к сети, а
также, что питание действительно
однофазном.
Неправильное подключение массы.
Проверьте кабель массы
(подсоединение и клещи).
Нитенаправляющая трубка
расплющена.
Проверьте нитепроводящую трубку и
корпус горелки.
Проволока застревает в горелке.
Прочистите или замените ее .
Отсутствует капиллярная трубка
(сталь).
Проверьте наличие капиллярной
трубки .
Слишком высокая скорость подачи.
Снизьте скорость подачи.
Выпускное сопло газа загрязнено.
Очистите сопло или замените его.
Проволока плохого качества.
Используйте проволоку, подходящую
для сварки NO GAS.
Плохое качество свариваемой
поверхности (ржавчина и тд …)
Зачистите деталь перед сваркой
Натяжение дуги либо слишком низкое,
либо слишком высокое.
См. параметры сварки.
Неправильное закреплание массы.
Проверьте и поместите зажим массы
как можно ближе к зоне сварки.
Spark MIG 110
PIECES DETACHEES / SPARE PARTS / ERSATZTEILE/ PIEZAS DE RECAMBIO/ ЗАПЧАСТИ
13
14
7
5
1
4
3
2
6
10
12
11
9
8
N°
Désignation
Réf.
1
Ensemble Support bobine / Reel stand / Rollenhalter / Soporte de bobina / Подставка для катушки
53268
2
Cordon secteur _ Main cable _ Netzstromkabel _ Cable de alimentación _ Питающий кабель
53269
3
Moto-dévidoir _ Wire feeder _ Drahtvorschub _ Devanadora _ Подающее устройство
53270
4
Interrupteur I/O _ I/O switch _ Ein/Aus Schalter _ Conmutador I/O_ Interuptor I/O _ Выключатель
I/O
52460
5
Voyant thermique _ Thermal light _ Wärmeschütz Kontrollicht _ Piloto térmico_ Индикатор
температурной защиты
6
Sélecteur de puissance / Voltage selector / Auswahltaster Schweiβspannung / Botón selección de
tensión / Кнопка выбора напряжения
52466
7
Bouton potentiomètre_ Potentiometer knob _ Potentiometer _ Potenciómetro botón_ Потенциометр
73102
8
Torche_ Torch_ Brenner_ Antorcha_ Горелка
53277
9
Ensemble pince et câble de masse / Torch and earth clamp set / Brenner und Massekabel / Antorcha
y cable de masa / Горелка и Кабель массы
53271
10
Pieds d’angles gauche _ Left Angle feet _ Winkel-Füsse links _ Pies izquierdos _ Ножки слева
56021x2
11
Pieds d’angles droite _ Right Angle feet _ Winkel-Füsse rechts _ Pies derechos_ Ножки справа
56022x2
51019 (lampe) + 52008
(cache)
12
Transformateur _ Transformer _ Tranformator _ Transformador _ Транформатор
53265
13
Poignée _ handle _ Griff _ Asa _ Рукоятка
71515
14
Circuit _ Board _ Karte _ Tarjeta _ Плата
53264
19
Spark MIG 110
SCHÉMA ÉLECTRIQUE / CIRCUIT DIAGRAM / SCHALTPLAN / DIAGRAMA ELECTRICO /
ЭЛЕКТРИЧЕСКАЯ СХЕМА
20
Spark MIG 110
déclaration de conformité
JBDC atteste que le poste de soudure Spark MIG 110 est fabriqué conformément aux exigences des directives Basse
tension 2006/95/CE du 12/12/2006, et aux directives CEM 2004/108/CE du 15/12/2004. Cette conformité est établie
par le respect des normes harmonisées EN60974-1 de 2005, EN 50445 de 2008, EN 60974-10 de 2007. Le marquage
CE a été apposé en 2013.
FR
EN
declaration of conformity
The equipment described on this manual is conform to the instructions of low voltage 2006/95/CE of 12/12/2006, and
the instructions of CEM 2004/108/CE of the 15/12/2004. This conformity respects the standards EN60974-1 of 2005,
EN 50445 de 2008, EN60974-10 of 2007. CE marking was added in 2013.
DE
Konformitätserklärunh
JBDC erklärt, dass die synergisch geregelten Schweißanlagen Spark MIG 110 richtlinienkonform mit folgenden europäischen Bestimmungen hergestellt wurden: Niederspannungsrichtlinie 2006/95/CE –12.12.2006 und EMV- Richtlinien 2004/108/CE – 15.12.2004 elektromagnetische Verträglichkeit- hergestellt wurden. Diese Geräte stimmen mit
den harmonisierten Normen EN60974-1 von 2005, EN 50445 von 2008, EN60974-10 von 2007 überein. CE Kennzeichnung: 2013
ES
declaracion de conformidad
JBDC certifica que el aparato de soldadura Spark MIG 110 esta fabricado en conformidad con las directivas baja tensión 2006/95/CE del 12/12/2006, y las directivas compatibilidad electromecánica 2004/108/CE del 15/12/2004. Esta
conformidad está establecida por el respeto a las normas EN60974-1 de 2005, EN 50445 de 2008, EN 60974-10 de
2007. El marcado CE fue fijado en 2013.
RU
Декларация о соответствии
JBDC заявляет, что сварочные аппараты Spark MIG 110 произведены в соответствии с директивами Евросоюза
2006/95/CE о низком напряжении от 12/12/2006, а также с директивами CEМ 2004/108/CE от 15/12/2004.
Данное соответствие установлено в соответствии с согласованными нормами EN60974-1 2005 г, EN 50445 2008
г, EN 60974-10 2007 г. Маркировка ЕС нанесенна в 2013 г.
01/03/2013
Société JBDC
134 BD des Loges
53941
Saint-Berthevin
France
Nicolas BOUYGUES
Président Directeur Général
21
Spark MIG 110
FR
conditions de garantie France
• La garantie n’est valable que si le bon a été correctement rempli par le vendeur.
• La garantie couvre tout défaut ou vice de fabrication pendant 1 an, à compter de la date d’achat (pièces et main
d’œuvre).
• La garantie ne couvre pas les erreurs de tension, incidents dus à un mauvais usage, chute, démontage ou toute autre
avarie due au transport.
• La garantie ne couvre pas l’usure normale des pièces (Ex. : câbles, pinces, etc.).
En cas de panne, retournez l’appareil à la société JBDC (port dû refusé), en y joignant : Le présent certificat de garantie
validé par le vendeur. Une note explicative de la panne.
Après la garantie, notre SAV assure les réparations après acceptation d’un devis.
herstellergarantie
Die Garantieleistung des Herstellers erfolgt ausschließlich bei Fabrikations- oder Materialfehlern, die binnen 12 Monate
nach Kauf angezeigt werden (Nachweis Kaufbeleg). Nach Anerkenntnis des Garantieanspruchs durch den Hersteller
bzw. seines Beauftragten erfolgen eine für den Käufer kostenlose Reparatur und ein kostenloser Ersatz von Ersatzteilen.
Der Garantiezeitraum bleibt aufgrund erfolgter Garantieleistungen unverändert. Ausschluss: Die Garantieleistung
erfolgt nicht bei Defekten, die durch unsachgemäßen Gebrauch, Sturz oder harte Stöße sowie durch nicht autorisierte
Reparaturen oder durch Transportschäden, die infolge des Einsendens zur Reparatur, hervorgerufen worden sind. Keine
Garantie wird für Verschleißteile (z. B. Kabel, Klemmen, Vorsatzscheiben etc.) sowie bei Gebrauchsspuren übernommen.
Das betreffende Gerät bitte immer mit Kaufbeleg und kurzer Fehlerbeschreibung ausschließlich über den Fachhandel
einschicken. Die Reparatur erfolgt erst nach Erhalt einer schriftlichen Akzeptanz (Unterschrift) des zuvor vorgelegten
Kostenvoranschlags durch den Besteller. Im Fall einer Garantieleistung trägt JBDC ausschließlich die Kosten für den
Rückversand an den Fachhändler.
22
Spark MIG 110
icones/symbols/zeichnenerlärung/simbolos graficos/cиMBOльl
A
Ampères - Amps - Ampere - Amperios - Ампер
V
Volt - Volt - Volt - Voltios - Вольт
Hz
Hertz - Hertz - Hertz - Hertz - Герц
IP21
Protégé contre l’accès aux parties dangereuses avec un doigt, et contre les chutes verticales de
gouttes d'eau - Protected against rain and against fingers access to dangerous parts - Geschützt
gegen Berührung mit gefährlichen Teilen und gegen senkrechten Wassertropfenfall - protegido
contra el acceso a las partes peligrosas con los dedos, y contra las caídas verticales de gotas de
agua. - Аппарат защищен от доступа рук в опасные зоны и от вертикального падения капель
воды Сварка на постоянном токе
Courant de soudage continu - Welding direct current - Gleichschweißstrom - La corriente de soldadura es continua - Сварка на постоянном токе
Uo
Tension assignée à vide - Rated no-load voltage - Leerlaufspannung - Tensión asignada de vacío Напряжение холостого хода
U1
Tension assignée d’alimentation - rated supply voltage - Netzspannung - Tensión de la red Напряжение сети
I1max
I1eff
EN60 974-1
I1eff
I1max
Courant d’alimentation assigné maximal (valeur efficace) - Rated maximum supply current (effective
value) - Maximaler Versorgungsstrom (Effektivwert) - Corriente máxima de alimentación de la red Максимальный сетевой ток (эффективная мощность)
Courant d’alimentation effectif maximal - Maximum effective supply current - Maximaler tatsächlicher Versorgungsstrom - Corriente de alimentación efectiva máxima - Максимальный
эффективный сетевой ток
L’appareil respecte la norme EN60974-1 - The device complies with EN60974-1 standard relative
to welding units - Das Gerät entspricht der Norm EN60974-1 für Schweißgeräte - El aparato está
conforme a la norma EN60974-1 referente a los aparatos de soldadura - Аппарат соответствует
европейской норме EN60974-1
Courant d’alimentation assigné maximal (valeur efficace). - Rated maximum supply current (effective value). - Maximaler Versorgungsstrom (Effektivwert). - Corriente máxima de alimentación de la
red. - Максимальный сетевой ток (эффективная мощность)
Courant d’alimentation effectif maximal. - Maximum effective supply current. - Maximaler tatsächlicher Versorgungsstrom. - Corriente de alimentación efectiva máxima. - Максимальный
эффективный сетевой ток.
Transformateur-redresseur monophasé - Single-phase converter-rectifier - Einphasiger Trafo/
Frequenzumwandler - Transformador-rectificador monofásico - однофазный инвертор, с
трансформацией и выпрямлением.
Transformateur-redresseur triphasé - Tri-phase converter-rectifier - Einphasiger Trafo/Frequenzumwandler - Transformador-rectificador trifásico - однофазный инвертор, с трансформацией и
выпрямлением. - Trasformatore-raddrizzatore tri-fase
X(40°C)
Facteur de marche selon la norme EN 60974-1 (10 minutes – 40°C) - Duty cycle according to the
standar EN 60974-1 (10 minutes – 40°C) - Einschaltdauer gemäß EN 60974-1 (10 Minuten – 40°C)
- Factor de marcha según la norma EN 60974-1 (10 minutos – 40°C). - ПВ% по норме EN 60974-1
(10 минут – 40°С)
I2 : courant de soudage conventionnnel correspondant - I2 : corresponding conventional welding current - I2 : entsprechender Schweißstrom - I2 : Corrientes correspondientes - I2 : Токи,
соответствующие Х*
U2 : Tensions conventionnelles en charges correspondantes - U2 : conventional voltages in corresponding load - U2 : entsprechende Arbeitsspannung - U2 : Tensiones convencionales en carga - U2
: соответствующие сварочные напряжения*
23
Spark MIG 110
FR
Convient au soudage dans un environnement avec risque accru de choc électrique. La source de
courant elle-même ne doit toutefois pas être placée dans de tels locaux. - Adapted for welding
in environment with increased risks of electrical shock. However, the welding source must not be
placed in such places. - Geeignet für Schweißarbeiten im Bereich mit erhöhten elektrischen Risiken.
Trotzdem sollte die Schweißquelle nicht unbedingt in solchen Bereichen betrieben werden. - Adaptado a la soldadura en un entorno que comprende riesgos de choque eléctrico. La fuente de corriente ella misma no debe estar situada dentro de tal locales. - Адаптирован для сварки в среде с
повышенным риском электрошока. Однако сам источник питания не должен быть расположен
в таких местах.
Appareil conforme aux directives européennes. - The device complies with European Directive.
- Gerät entspricht europäischen Richtlinien. - El aparato está conforme a las normas europeas. Устройство соответствует европейским нормам.
Conforme aux normes GOST (Russie). - Conform to standards GOST / PCT (Russia). - in Übereinstimmung mit der Norm GOST/PCT. - Conforme a la normas GOST (PCT) (Rusia). - Продукт
соответствует стандарту России (РСТ).
L’arc électrique produit des rayons dangereux pour les yeux et la peau (protégez-vous !). - The electric arc produces dangerous rays for eyes and skin (protect yourself !). - Der elektrische Lichtbogen
verursacht Strahlungen auf Augen und Haut (Schützen Sie sich !). - El arco produce rayos peligrosos
para los ojos y la piel (¡ Protéjase !). - Электрическая дуга производит опасные лучи для глаз и
кожи (защитите себя!). - Внимание! Сварка может вызвать пожар или взрыв.
Attention, souder peut déclencher un feu ou une explosion. - Caution, welding can produce fire or
explosion. - Achtung! Schweißen kann Feuer oder Explosion verursachen. - Cuidado, soldar puede
iniciar un fuego o una explosión. - Внимание! Сварка может вызвать пожар или взрыв.
Attention ! Lire le manuel d’instruction avant utilisation. - Caution ! Read the user manual.
- Achtung! Lesen Sie die Betriebsanleitung. - Cuidado, leer las instrucciones de utilización. Внимание ! Читайте инструкцию по использованию.
Produit faisant l'objet d'une collecte sélective- Ne pas jeter dans une poubelle domestique. - Separate collection required, Do not throw in a domestic dustbin. - Für die Entsorgung Ihres Gerätes gelten besondere Bestimmungen (Sondermüll). Es darf nicht mit dem Hausmüll entsorgt werden. - Este
aparato es objeto de una recolección selectiva. No debe ser tirado en un cubo doméstico. - Продукт
требует специальной утилизации. Не выбрасывать с бытовыми отходами.
ACCESSOIRES / ACCESSORIES / Zubehör
Spark MIG 110
086104
044081
041929
Special No Gas (x1) = 041868
24
041875