1
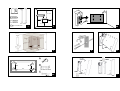
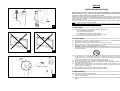
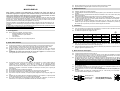
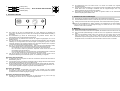
- GB Environment and recycling
Please help us to protect the environment by disposing of the packaging in accordance with
the national
regulations for waste processing.
Recycling of obsolete appliances
Appliances with this label must not be disposed off with the general waste. They must be
collected separately and disposed off according to local regulations.
STYLO
-ITutela dell'ambiente e riciclaggio
Affinché il vostro apparecchio non subisca danni durante il trasporto, esso è stato imballato
con cura. Per contribuire alla tutela del nostro ambiente, vi chiediamo di smaltire in modo
appropriato il materiale utilizzato per l'imballaggio dell'apparecchio.
Smaltimento degli apparecchi usati
Gli apparecchi che recano il contrassegno riportato a fianco non devono essere smaltiti
insieme ai rifiuti urbani, ma vanno raccolti e smaltiti separatamente. Lo smaltimento degli apparecchi
usati va eseguito a regola d'arte, in conformità con le prescrizioni e leggi vigenti localmente in materia.
- NL Milieu en recycling
Wij verzoeken u ons bij de bescherming van het milieu behulpzaam te zijn. Verwijder de
verpakking daarom overeenkomstig de voor de afvalverwerking geldende nationale
voorschriften.
Recycling van oude toestellen
Toestellen met dit kenmerk horen niet thuis in de vuilnisbak en zijn apart in te zamelen en te
recyclen. De recycling van oude toestellen moet steeds vakkundig en volgens de ter plaatse
geldende voorschriften en wetgeving plaats vinden.
-FEnvironnement et recyclage
Nous vous demandons de nous aider à préserver l'environnement. Pour ce faire, merci de
vous débarrasser de l'emballage conformément aux règles nationales relatives au traitement
des déchets.
Collecte et recyclage des produits en fin de vie
Les appareils munis de ce symbole ne doivent pas être mis avec les ordures ménagères,
mais doivent être collectés séparément et recyclés. La collecte et le recyclage des produits en fin de vie
doivent être effectués selon les dispositions et les décrets locaux.
-DEntsorgung von Altgeräten in Deutschland
Geräte mit dieser Kennzeichnung gehören nicht in die Restmülltonne und sind getrennt zu
sammeln und zu entsorgen.
Die Hersteller sorgen im Rahmen der Produktverantwortung für eine umweltgerechte
Behandlung und Verwertung der Altgeräte.
Im Rahmen des Elektro- und Elektronikgerätegesetzes (ElektroG) und zum Schutz unserer
Umwelt ist eine kostenlose Rückgabe bei Ihrer kommunalen Sammelstelle möglich.
-EMedio ambiente y reciclaje
Ayúdenos a proteger el medio ambiente eliminando el embalaje con arreglo a la legislación
nacional sobre tratamiento de residuos.
Eliminación de aparatos viejos
No tirar los aparatos que lleven esta identificación junto con la basura no clasificada. Se
deben recoger y eliminar de forma especial. La eliminación de aparatos viejos se debe
realizar de forma adecuada y competente, de acuerdo con las normas y leyes locales vigentes.
STYLO_5/08062011
Please retain these instructions in a safe place for future reference.
Si prega di conservare con cura questo libretto di istruzioni per future
consultazioni.
Bewaar deze gebruiksaanwijzing zorgvuldig voor toekomstig gebruik.
Conserver cette notice pour toute consultation ultérieure.
Es wird gebeten, diese Gebrauchsanleitung für ein zukünftiges Nachschlagen
sorgfältig aufzubewahren.
Conservar las instruccione de uso.
n°1
min. 50cm
TOP
min. 15cm
n°4-5x60mm
min.
15cm
min.
15cm
n°4-8x50mm
n°2
n°1-2,2x4,5mm
min. 15cm
1
2
4b
7
6
5
3
2
click!
clik!
Y1
Y2
X
W
4 mm
H
clik!
4a
1
click!
7
ENGLISH
OPERATING INSTRUCTIONS
2
Before operating the heater, please read these instructions thoroughly to avoid damage and
hazardous situations. Any use of this heater other than that stipulated in this instruction manual
may cause fire, electric shock or injury, and voids all warranties.
Warranty does not apply to any defect, deterioration, loss, injury or damage caused by, or as a result of,
the misuse or abuse of this heater. The rights dictated by State law are not prejudiced. None of the terms
of this warranty are to be taken as excluding any conditions or warranties implied by State law, which
cannot be excluded or modified.
Before any operation remove the packaging and check product integrity. In case of defects or damages
do not try to repair it yourself but contact your dealer.
Do not let children play with the packaging and protect the environment by disposing of the packaging in
accordance with the national regulations for waste processing.
1
4
3
8
1. Your product
Other than the heater you have chosen the package includes (picture 1):
- N° 2 metal brackets for wall mounting;
- N° 4 nylon plug expansion 8x50mm;
- N° 4 5x60mm cross head screws to fix wall brackets ;
- N° 1 2,2x4,5mm cross head screw to lock the transp arent cover;
Refer to your dealer is something is broken or missing.
2. For your safety
This appliance is intended for normal household use and not for use in commercial/industrial
enviroment, in vehicles or on board ships or aircrafts.
Make sure that the mains power supply matches the rated input: 230V AC, 50Hz.
Never allow animals or children to play with or touch the product. Attention! The panel may
become very hot while it is working (approximately 80°C = 176°F);
WARNING: In order to avoid overheating, do not cover the heater. Do not hang anything on
the heater and do not cover it while it’s working. This is clearly written on the cover of the product
or shown by the symbol
9
10
This product may not be used by people (children included) with reduced physical, sensorial or
mental capacities, or with inadequate experience and knowledge, unless they are under the
supervision of a person responsible for their safety or have been suitably instructed by the latter.
Children must be supervised to ensure they do not play with the product.
To prevent overheating, never cover the product inappropriately (pictures 9 and 10).
Do not use the product in rooms saturated with explosive gas, vapours generated by solvents or
paints or flammable vapours/gas.
If the cable and/or plug are damaged, do not repair them yourself but take the product to the
technical service or a qualified repair centre and have them repaired by specialised personnel in
order to avoid any risk of damage.
Always position the product so that the plug is immediately accessible.
Never position this appliance immediately underneath a power socket.
3. Safe positioning
11
Only use the product in its horizontal position;
This product is fitted with a double electrical insulation circuit (class II) and therefore does not
require an earth connection;
Always make observe the minimum distances from walls, furniture and/or objects, as indicated in
picture 2.
Never install the product on a surface made from wood or synthetic material.
This product is water resistant to IP24. It may therefore be used in bathrooms or other areas
subject to humidity provided it is never installed within the perimeter of bathtubs or showers
(Volume 1 of figure 2).
It must never be possible for people in the bath tub or shower to reach the adjustment knobs.
4. Installation
After carefully reading section 3, proceed with installation following the sequence shown in figures
4 to 7.
Distances indicated in picture 4a are:
Model
X (mm)
Y1 (mm)
Y2 (mm)
H
STYLO 5
320
293
183
45
W
70
STYLO 10
200
293
293
45
250
STYLO 15
450
293
293
45
250
STYLO 20
650
293
293
45
250
Note: The front surface of the carton box may be cut and used as a template to mark the exact
holes position on the wall (picture 4b);
To release the appliance from its brackets use a screw driver to push downwords the locking
springs (picture 8-1) and then pull the product towards you (picture 8-2).
5. Electrical connections
N
Using the thermostat
In a room with a temperature in excess of 28°C, the thermostat does not turn on the appliance
even if it is at maximum.
Vice-versa, in a room with a very low temperature (below 5°C), the thermostat keeps the heater
constantly on, even if it is at minimum.
Looking for the most comfortable thermostat set, do not move the thermostat too often (< 1h) and
wait that stable conditions are reached in the room before changing the set again.
Using the pilot wire
The product must be powered at a voltage of 230V AC 50Hz.
The product must be supplied with a cable and plug or with a cable for installation. If a product with
plug is installed in France, connect it to the mains power supply by cutting off the plug and using a
suitable connection box.
If the product is supplied with a cable for installation, connect it to the mains power supply using a
3-wire cable (Brown=Live, Blue=Neutral, Black=Pilot wire) and a connection box. If you do not
wish to use the pilot wire functions, just connect the phase and the neutral wires: the
product will work correctly even without the external programmer.
In bathrooms, kitchens or other humid areas, install the connection terminal at least 25cm off the
floor.
The electrical connection to the mains power supply must also include a 2-pole switch with a
minimum contact aperture of 3mm. As a priority, always abide you national wiring rules.
It is forbidden to connect the appliance to the earth circuit. DO NOT CONNECT THE PILOT WIRE
(BLACK) TO THE EARTH CIRCUIT.
If the product is powered through a 30mA differential switch, make sure the pilot wire is also
controlled by the differential switch.
L
The product is fitted with a main on/off pushbutton (A), a knob to set wished temperature (B) and a
led showing the operating status (C).
The main pushbutton (A) controls the supply of the entire product. When switched on the internal
electronics is ready to be used. The main pushbutton (A) deactivates the product apart of any
possible input coming from the pilot wire.
The thermostat (B) maintains the required ambient temperature by automatically turning the
appliance on and off. The more the knob is moved clockwise, the higher the temperature will be.
The highest position of the thermostat corresponds to approximately 28°C, the bottom one to about
5°C.
The indicator led (C) gives different information by changing the way it lights on and exactly:
The light is on and red when the product is heating to reach desired temperature;
The light is off if the desired temperature has been reached or the main pushbutton (A) is in
the off position;
The light continuously flashes in red colour if temperature electronic sensor is broken. The
product must be repaired by an authorised service only;
In case you want to prevent the access to heater's controls it is possible to lock the transparent
cover with a screw as shown in picture 11.
Phase (brown)
Pilot wire (black) – DO NOT CONNECT TO EARTH
Neutral (blue)
If the product is fitted with a power cable without plug, it can also be controlled with specific
programmers. The behaviour of the product depends on the voltage applied between the pilot wire
and the neutral wire.
Using the remote (optional)
The optional remote control allows to set a "comfort" or "eco" temperature for each hour of the
day, all days independently.
Operating mode could be easily switched from the remote to the pilot wire and vice-versa.
With just one remote it is possible to transmit the same program to all the products of this series
you have installed. All details about programming are included in the instruction manual of the
remote control.
To use the remote control an optional receiver must be purchased and installed on every product.
7. What to do in case of malfunctions
In the event of overheating, the safety device on the appliance automatically disables the heating
elements.
The product will resume automatic operation as soon as the temperature returns below the safety
limit.
Attention: the functioning led will not be switched off by the operation of the safety device.
If you notice irregular operation, damage to the heating panel or to the structure of the appliance,
disconnect the product from the mains power supply and contact your technical assistance centre or
dealer.
6. Using the product
8. Maintenance
C
B
A
This product does not require any special maintenance.
Clean the product, especially the heating panel, with a dry cloth once every 6 months.
If the product requires repairing, contact an authorised technical service centre.
2
2
When replacing the power cable, use a 2x1.00mm or 3x1.00mm H05VV-F HAR type, depending
on the version. This operation, for cables both with and without plugs, must be performed by
qualified personnel and never by the end user in order to avoid damaging the appliance and
jeopardising personal safety.
ITALIANO
3. Posizionamento sicuro
Utilizzate il prodotto solo in posizione orizzontale;
Il prodotto è costruito in doppio isolamento elettrico (classe II) e, pertanto, non richiede il
collegamento di terra;
Fate sempre attenzione affinché siano rispettate le distanze minime da pareti, mobili e/o oggetti
riportati in figura 2.
Non installate mai il prodotto su superfici di legno o di materiale sintetico.
Il prodotto ha un grado IP24 di protezione all’acqua. Può pertanto essere utilizzato nei bagni o nei
luoghi umidi ma mai installato all’interno del perimetro di vasche o docce (Volume 1 di figura 3).
Le manopole di regolazione non devono in nessun caso essere accessibili da parte di persone che
siano all’interno della vasca da bagno o della doccia.
ISTRUZIONI PER L’USO
Si prega di leggere attentamente queste istruzioni, prima di utilizzare il prodotto, in modo da
evitare danneggiamenti o comunque il verificarsi di situazioni di pericolo. Qualsiasi utilizzo del
prodotto diverso da quanto indicato nel presente manuale può causare incendi, pericoli elettrici o
ferite e rende nulla qualsiasi garanzia.
La garanzia non si applica ad alcun difetto, deterioramento, perdita, ferimento o danneggiamento
riconducibili ad un uso non corretto del prodotto. Rimangono garantiti tutti i diritti di legge in materia.
Nessuna condizione di garanzia può escludere o modificare le condizioni di garanzia regolamentate da
leggi dello Stato che non possono essere a nessun titolo escluse o modificate.
Prima di ogni operazione, rimuovere con cura l’imballo e controllare la perfetta integrità del prodotto. Nel
caso si evidenziassero dei difetti o danni, non installare né cercare di riparare l’apparecchiatura, ma
rivolgersi al rivenditore.
Non lasciare l’imballo alla portata dei bambini e smaltirne le parti in conformità con le disposizioni vigenti.
4. Installazione
Dopo aver letto attentamente le avvertenze di cui al precedente paragrafo 3 procedete al fissaggio
rispettando la sequenza illustrata nelle figure da 4 a 7.
Le misure di cui alla figura n° 4a sono:
1. Il vostro prodotto
Il prodotto viene fornito dotato di (figura 1):
N°2 staffe metalliche per l'installazione a muro;
N°4 tasselli in nylon da 8x50mm;
N°4 viti per tasselli da 5x60mm;
N°1 vite 2,2x4,5mm per fissare il tettuccio trasp arente
2. Per la Vostra sicurezza
Questo prodotto non deve essere utilizzato da persone (bambini inclusi) con capacità fisiche,
sensoriali o mentali ridotte, o con inadeguata esperienza e conoscenze, che non siano sotto la
supervisione di una persona responsabile per la loro sicurezza o che non siano da essa stati
adeguatamente istruiti. I bambini devono essere sorvegliati per assicurarsi che non giochino con il
prodotto.
Per evitare surriscaldamenti non ricoprite mai il prodotto in modo improprio (fig. 9 e10).
Non utilizzate il prodotto in stanze sature di gas esplosivi, di vapori generati da solventi e vernici o
comunque di vapori/gas infiammabili.
Se il cavo e/o la spina sono danneggiati e devono essere riparati, non eseguite questa operazione
da soli, riportate il prodotto presso il centro di assistenza tecnica, o comunque in un centro di
riparazioni qualificato, perché è richiesto l’intervento di personale specializzato al fine di evitare
qualunque rischio di danneggiamento.
Il prodotto deve essere posizionato in modo tale che la presa di alimentazione sia sempre
raggiungibile.
Non collocate mai questo apparecchio immediatamente al di sotto di una presa di corrente
elettrica.
X (mm)
Y1 (mm)
Y2 (mm)
H
STYLO 5
320
293
183
45
W
70
STYLO 10
200
293
293
45
250
STYLO 15
450
293
293
45
250
STYLO 20
650
293
293
45
250
Nota: La parte frontale della scatola di cartone può essere tagliata ed utilizzata come dima per
contrasssegnare sul muro l'esatta posizione dei fori (picture 4b);
Per rimuovere il prodotto dalle sue staffe usate un cacciavite per premere verso il basso i ganci a
molla (figura 8-1) e successivamente tirate il prodotto verso di voi (figura 8-2).
Qualora il prodotto sia danneggiato o qualche accessorio mancante contattate immediatamente il
vostro rivenditore.
Questo prodotto è per uso domestico e non è adatto per l'utilizzo in ambienti
commerciali/industriali o su veicoli, imbarcazioni o aeromobili.
Assicuratevi che l’alimentazione di rete corrisponda ai dati di targa: 230V AC, 50Hz.
Non lasciate mai che animali o bambini giochino o tocchino il prodotto. Attenzione! Durante il
funzionamento il pannello può diventare molto caldo ( circa 80°C = 176°F);
IMPORTANTE: per evitare surriscaldamenti non ricoprite mai il prodotto. Non appoggiate mai
alcun oggetto o coperta sull’apparecchio mentre è in funzione. Questo è chiaramente scritto
sull’apparecchio o illustrato dal simbolo
Modello
5. Collegamenti elettrici
Il prodotto deve essere alimentato con la tensione di 230V AC 50Hz.
Il prodotto può essere fornito dotato di cavo con spina oppure di cavo per l’installazione. Nel caso
un prodotto con spina debba essere installato in Francia, il collegamento elettrico con la rete di
alimentazione deve essere eseguito tagliando la spina in dotazione e utilizzando una apposita
scatola di connessione.
Quando il prodotto viene fornito con il cavo per l’installazione, il collegamento deve essere
effettuato usando un cavo a 3 fili (Marrone=Fase, Blu=Neutro, Nero=Filo pilota) e una scatola di
connessione. Se non si desidera utilizzare le funzionalità del filo pilota limitarsi al
collegamento della fase e del neutro: il prodotto funzionerà correttamente anche senza la
presenza del programmatore esterno.
In locali umidi, nei bagni o nelle cucine, il morsetto di collegamento deve essere installato ad
almeno 25cm dal pavimento.
Il collegamento elettrico con la rete deve inoltre prevedere l’utilizzo di un interruttore bipolare con
una distanza minima di apertura fra i contatti di almeno 3mm. Rispettate sempre in modo prioritario
le regole di installazione vigenti nel vostro paese.
La connessione di terra è vietata. NON COLLEGATE A TERRA IL FILO PILOTA (NERO).
Se il prodotto deve essere alimentato attraverso un interruttore differenziale da 30mA di sicurezza,
accertarsi che anche il filo pilota sia sotto il controllo dell’interruttore differenziale.
L
N
Fase (marrone)
Filo Pilota (nero) – NON CONNETTERE LA TERRA
Neutro (blu)
6. Uso del prodotto
Il funzionamento del prodotto riprenderà automaticamente non appena la temperatura sarà scesa
al di sotto dei limiti di sicurezza.
Attenzione: l'intervento del protettore termico non causa lo spegnimento del led di funzionamento.
Se notate un funzionamento anomalo, il danneggiamento del pannello riscaldante o della struttura
dell’apparecchio, scollegate il prodotto dalla presa di corrente e contattate il servizio di assistenza od il
vostro rivenditore.
8. Manutenzione
C
B
A
Il prodotto è dotato di un interruttore generale (A), di un selettore per l'impostazione della
temperatura desiderata (B) e di una spia luminosa di funzionamento (C).
L'interruttore generale (A) controlla l'alimentazione dell'intero prodotto; Quando il pulsante viene
premuto l'elettronica di controllo è pronta per essere utilizzata.
L'interruttore generale (A) disattiva il prodotto indipendentemente da qualsiasi comando possa
essere inviato tramite il filo pilota.
Il termostato (B) mantiene la temperatura ambiente desiderata accendendo e spegnendo
automaticamente l’apparecchio. Più il selettore viene spostato verso destra, più la temperatura
assicurata sarà elevata. La posizione massima del termostato corrisponde a circa 28°C, quella
minima a circa 5°C.
-
La spia luminosa (C) fornisce differenti informazioni di funzionamento in base alla modalità di
accensione e precisamente:
Il led è acceso e di colore rosso quando il prodotto riscalda per raggiungere la temperatura
ambiente desiderata;
Il led è spento quando la temperatura ambiente desiderata è stata raggiunta o l'interruttore
generale (A) è spento;
Il led lampeggia di colore rosso quando il sensore elettronico della temperatura è danneggiato. Il
prodotto deve essere riparato da un centro di assistenza qualificato.
Qualora si desideri impedire l'accesso ai comandi è possibile bloccare il tettuccio trasparente con
una vite come illustrato nella figura 11.
Uso del termostato
In una stanza ove la temperatura supera i 28°C è no rmale che il termostato, anche se posizionato
al massimo, non accenda il prodotto.
Viceversa, in una stanza con una temperatura troppo bassa (sotto i 5°C) è normale che il
termostato mantenga l’apparecchio continuamente acceso, anche se posizionato al minimo.
Per una comfortevole regolazione del termostato ambiente (B) non modificate la sua posizione con
eccessiva frequenza (<1h) ma attendete sempre che la temperatura della stanza si sia stabilizzata
prima di effettuare ulteriori variazioni.
Uso del Telecomando (opzionale)
Il telecomando opzionale consente di definire una temperatura "comfort" o "eco" di funzionamento
per ogni ora del giorno, per ogni giorno della settimana.
La modalità di funzionamento può essere facilmente cambiata da telecomando a filo pilota e
viceversa.
Con un solo telecomando è possibile trasmettere la medesima programmazione a tutti i prodotti
della serie acquistati; Tutte le informazioni di dettaglio per la programmazione vengono fornite
insieme al telecomando.
Per poter utilizzare il telecomando è necessario acquistare, per ogni prodotto da controllare, l'unità
ricevente opzionale.
7. Sicurezza in caso di funzionamento anormale
In caso di surriscaldamento il sistema di protezione dell’apparecchio disattiva automaticamente gli
elementi riscaldanti.
Questo prodotto non richiede particolare manutenzione.
Vi raccomandiamo di pulire il prodotto ogni 6 mesi ed in particolare modo il pannello riscaldante
utilizzando un panno asciutto.
Qualora sia necessario riparare il prodotto contattate un centro di assistenza autorizzato.
Se deve essere sostituito il cavo di alimentazione ricordatevi che deve obbligatoriamente essere
utilizzato un cavo tipo 2x1.00 mm2 3x1.00mm2 H05VV-F HAR in funzione della versione
acquistata. Questa operazione, sia per i cavi dotati di spina che non, deve essere eseguita da
personale qualificato e mai dall’utente finale in modo da prevenire ogni rischio di danneggiamento
e possibile pericolo.
Placez l’appareil de façon à ce que la prise de courant soit toujours accessible.
Ne placez jamais cet appareil juste en–dessous d’une prise de courant.
FRANÇAIS
MODE D’EMPLOI
Avant d’utiliser le radiateur, lisez attentivement les instructions afin d’éviter tout danger ou
d’utilisation inappropriée de l’appareil. Toutes utilisations autres que celles décrites dans cette
notice seront considérées comme dangereuses et risquent de causer des incendies, des chocs
électriques ou des blessures et ne seront pas couverts par la garantie.
La garantie ne s’applique pas en cas de défaut, détérioration, dommages causés en raison d’un usage
impropre ou d’un abus dans l’utilisation du radiateur. Vous pouvez disposer de droits reconnus par la loi
de votre pays. Aucune disposition de la présente garantie ne peut avoir pour effet d’exclure quelque
garantie ou droit reconnu d’ordre public par la législation de votre pays.
Avant toute opération, otez l’emballage du produit et vérifiez si l’appareil n’est pas endommagé. En cas
de défaut, de choc ou de dommage, n’essayez pas de réparer l’appareil vous-même et contactez votre
revendeur.
Ne laissez pas les enfants jouer avec les emballages et protegez l’environnement en jetant les cartons et
les calages dans les endroits appropriés pour le recyclage.
3. Emplacement sûr
N’utilisez l’appareil qu’en position horizontal.
L’appareil dispose d’une double isolation électrique (classe II) et ne nécessite donc d'aucune mise
à la terre.
Respectez toujours scrupuleusement les distances minimales du mur, des meubles et(ou) objets
illustrés par la figure 2.
Ne montez jamais l’appareil sur des surfaces en bois ou en matériaux synthétiques.
L’appareil a un degré d’imperméabilité IP24. Vous pouvez donc l’utiliser dans les salles de bains et
les pièces humides mais vous ne devez jamais l'installer dans le périmètre des baignoires ou
douches (Volume 1 de la figure 2).
Les appareils de chauffage susceptibles d’être utilisés dans les salles de bains doivent être
installés de façon telle que les interrupteurs et autres dispositifs de commandes ne puissent pas
être touchés par une personne qui se trouve dans la baignoire ou la douche.
4. Installation
Lisez avec attention les avertissements du paragraphe 3 ci-dessus avant de procéder à la fixation
en suivant les instructions illustrées par les figures 4 à 7.
Les distances indiquées dans la figure 4a sont :
1. Votre appareil
Dans le carton de l ‘appareil, vous devez trouver :
2 fixation métalliques pour la fixation au mur;
4 cheville à expansion en nylon 8x50mm
4 vis 5x60mm
1 vis 2,2x4,5mm
Modèle
X (mm)
Y1 (mm)
Y2 (mm)
H
STYLO 5
320
293
183
45
W
70
-
STYLO 10
200
293
293
45
250
Contactez votre revendeur s’il vous manque des pièces.
STYLO 15
450
293
293
45
250
STYLO 20
650
293
293
45
250
2. Pour votre sécurité
Cet appareil est destiné à un usage strictement domestique. Il ne doit pas être utilisé dans des
locaux industriels ou commerciaux ainsi que dans des véhicules (automobile, bateau, avion).
Vérifiez si la tension du secteur est la même que celle de l'appareil. 230V AC, 50Hz.
Ne laissez jamais les enfants ou les animaux domestiques toucher ou jouer avec l’appareil.
Attention ! Lorsque l’appareil est en fonction, le panneau est parfois très chaud (80°C = 176°F
env.)
ATTENTION :afin d’éviter toute surchauffe, ne couvrez pas l’appareil. Il est clairement inscrit
sur l ‘appareil NE PAS COUVRIR ou le symbole ci dessous
Cet appareil n’est pas prévu pour être utilisé par des personnes (y compris enfants) dont les
capacités physiques, sensorielles ou mentales sont réduites, ou des personnes dénuées
d’expérience ou de connaissance, sauf si elles ont pu bénéficier, par l’intermédiaire d’une
personne responsable de leur sécurité, d’une surveillance ou d’instruction préalable concernant
l’utilisation de l’appareil. Il convient de surveiller les enfants pour s’assurer qu’ils ne jouent pas
avec l’appareil.
Ne pas introduire d’objet à l’intérieur de l’appareil
Ne pas joindre d’accessoires ou de dispositifs qui ne soient pas prévu par le fabricant.
Ne pas utiliser d’adaptateur ou de rallonge pour éviter tout risque de surchauffe.
Pour éviter le risque de surchauffe, ne recouvrez jamais l’appareil de façon impropre (image 9 et
10).
N’utilisez pas cet appareil dans des atmosphères saturées en gaz explosifs, en vapeurs produits
par des solvants ou des peintures, ni en vapeurs/gaz inflammables.
Si le câble d’alimentation est endommagé, il doit être changé par le fabricant, son service de
maintenance ou une personne de qualification similaire afin d’éviter un danger.
Note: La face avant du carton d'emballage peut être découpé et utilisé comme gabarit pour
marquer la position exacte des trous sur le mur (image 4b);
Pour ôter l’appareil de la fixation murale, utilisez un tournevis pour presser les crochets à ressort
(image 8-1)puis tirer l’appareil vers vous.
5. Branchements électriques
L’appareil doit être alimenté en 230V AC 50 Hz.
L’appareil peut être fourni avec un câble muni de fiche ou d'un câble pour installation. Si l’appareil
muni de fiche doit être installé en France, pour effectuer le branchement électrique sur le secteur il
vous faut couper la fiche et utiliser une boîte de connexion adéquate.
Si l’appareil est fourni avec un câble pour installation, effectuez le branchement avec un câble à 3
fils (Marron= Phase, Bleu = Neutre, Noir = Conducteur pilote) et une boîte de connexion. Si vous
ne voulez pas utiliser les fonctionnalités du fil pilote, il vous suffit de brancher la phase et le
neutre. L’appareil fonctionnera correctement même sans programmeur extérieur. IL EST
RECOMMANDE DE FAIRE INTERVENIR UN ELECTRICIEN PROFESSIONNEL OU TOUT
AUTRE PERSONNE AYANT LES QUALIFICATIONS NECESSAIRES POUR L INSTALLATION
Dans les pièces humides, les salles de bains ou les cuisines, installez la borne de branchement à
25 cm minimum du sol.
Le branchement électrique sur le secteur doit aussi prévoir un interrupteur bipolaire, avec une
distance minimum d’ouverture entre les contacts de 3 mm.
Le branchement à la terre est interdit. NE PAS BRANCHER LE FIL PILOTE (NOIR) À LA
TERRE.
Si l’appareil piloté est protégé par un différentiel 30mA (ex : salle de bain), il est nécessaire de
connecter l’alimentation du fil pilote sur ce différentiel.
L
N
Phase (marron)
Fil pilote (noir) –
Neutre (bleu)
NE PAS BRANCHER LE FIL
PILOTE (NOIR) A LA TERRE
6. Usage de l’appareil
ECO
ABAISSEMENT DE 3°C
PAR RAPPORT À LA
TEMPÉRATURE
CONFIGURÉE PAR LE
THERMOSTAT
SEMI-ONDE NÉGATIVE
DU SIGNAL
ALTERNATIF
HORS GEL
MAINTIENT DE LA
TEMPÉRATURE À
ENVIRON 7°C
SEMI-ONDE POSITIVE
DU SIGNAL
ALTERNATIF
STOP
L’APPAREIL EST
ÉTEINT
SIGNAL ALTERNATIF
COMPLET 230V
C
B
A
Le produit est équipé d'un bouton-poussoir marche/arrêt (A), d’un bouton pour régler température
souhaitée (B) et d’une led indiquant l'état de fonctionnement (C).
Le bouton principal (A) contrôle l’alimentation électrique de l’appareil.
Dans le cas ou le bouton (A) est désactivé, l’appareil ne peut pas être controlé par le fil pilote.
Le thermostat (B) maintient la température ambiante souhaitée en contrôlant les périodes de
chauffe de l’appareil. Plus le curseur est placé vers la droite, plus la température sera élevée. La
position la plus forte du thermostat (à droite) correspond à peu près à 28°C, et la plus basse (à
gauche) à 5°C.
Le témoin lumineux (C) s’illumine de differentes façons afin de donner des informations sur le
fonctionnement de l’appareil :
•
La lumière est allumée en rouge quand l’appareil chauffe pour atteindre la température
souhaitée.
•
Le voyant est éteint si la température désirée est atteinte ou le bouton principal (A) est en
position d'arrêt
•
Le temoin clignote en rouge pour indiquer que la sonde de température est défectueuse.
L’appareil doit être réparé par le service technique de votre revendeur ou par celui du
fabricant seulement.
Si vous voulez empêcher l'accès aux commandes du radiateur, il est possible de verrouiller le
couvercle transparent avec une vis comme indiqué sur la photo 11.
Usage du thermostat
Dans une pièce où la température dépasse 28°C il es t normal que le thermostat, même réglé sur
le maximum, ne mette pas l’appareil en fonction.
Vice et versa, dans une pièce où la température est trop basse (au-dessous de 5°C) il est normal
que le thermostat maintienne sans arrêt l’appareil allumé, même s’il est réglé au minimum.
Afin d’obtenir une bonne température de confort avec votre thermostat, ne changez pas trop
fréquemment le réglage de celui-ci. Attendez au moins 1 heure pour que la température de la
pièce se stabilise puis ajustez de nouveau votre thermostat.
Usage du fil pilote
Si l’appareil est muni d’un câble de connexion dépourvu de fiche, il peut être aussi commandé par
des programmeurs spéciaux. Le comportement de l’appareil dépend de la tension appliquée entre
le conducteur pilote et le conducteur neutre, conformément au tableau suivant :
ORDRES
REÇUS
ABSENCE DE SIGNAL
OSCILLOSCOPE
Réf/Neutre
MODE
OBTENU
TEMPÉRATURE DE
CHAUFFAGE
CONFORT
TEMPÉRATURE
CONFIGURÉE PAR LE
THERMOSTAT
EMISSION CYCLIQUE
D’UN SIGNAL
ALTERNATIF COMPLET
Tc=300S To=3S
EMISSION CYCLIQUE
D’UN SIGNAL
ALTERNATIF COMPLET
Tc=300S To=7S
CONFORT – 1°C
To
Tc
CONFORT - 2°C
ABAISSEMENT DE 1°C
PAR RAPPORT À LA
TEMPÉRATURE
CONFIGURÉE PAR LE
THERMOSTAT
ABAISSEMENT DE 2°C
PAR RAPPORT À LA
TEMPÉRATURE
CONFIGURÉE PAR LE
THERMOSTAT
Utilisation de la télécommande (en option) :
La télécommande optionnelle permet de sélectionner des modes « confort » et « éco » pour
chaque heure de la journée et chaque différent jour de la semaine.
Le mode de programmation peut facilement se permuter entre le fil pilote et la télécommande.
Avec une seule télécommande, il est possible de controler tous les appareils installés dans la
maison avec le même programme ou avec un programme adapté à chaque pièce. Tous les
détails d’utilisation de la télécommande sont décrits avec précision dans le manuel de la
télécommande.
Pour utiliser la télécommande, un récepteur (en option) doit être acheter et installer sur chaque
appareil à contrôler.
7. Sécurité en cas de fonctionnement anormal
En cas de surchauffe le système de protection de l’appareil désactive automatiquement l’élément
chauffant et interrompt ainsi le fonctionnement de l’appareil.
L'appareil recommence à fonctionner automatiquement dès que la température superficielle
descend au-dessous de la limite de sécurité.
Attention : le témoin lumineux ne sera pas éteint par le système de protection de l’appareil.
Si vous remarquez que le fonctionnement est anormal, que le panneau chauffant ou le châssis de
l’appareil sont endommagés, débranchez l’appareil de la prise de courant et adressez-vous au service
après-vente ou à votre revendeur.
8. Entretien
Cet appareil n’a besoin d’aucun entretien particulier.
Nous vous recommandons de nettoyer l'appareil tous les 6 mois, en particulier le panneau
chauffant, à l'aide d'un chiffon sec.
Si l'appareil doit être réparé, adressez-vous à un service après-vente.
Si vous devez remplacer le câble d’alimentation n’oubliez que vous devez obligatoirement utiliser
2
2
un câble de, 2 x 1.00 mm H05VV-F HAR ou 3 x 1.00 mm H05VV-F HAR selon la version que
vous avez achetée. Qu’il s’agisse des câbles munis ou dépourvus de fiche. Si le câble
d’alimentation est endommagé, il doit être changé par le fabricant, son service de maintenance ou
une personne de qualification similaire afin d’éviter un danger.
DEUTSCH
BETRIEBSANLEITUNG
Lesen Sie bitte vor Inbetriebnahme des Gerätes die folgende Betriebsanleitung sorgfältig durch,
um Schäden und Gefahrensituationen zu vermeiden. Das Gerät darf nur entsprechend den
Anweisungen in dieser Betriebsanleitung benutzt werden, da es andernfalls zu Bränden,
Stromschlägen oder Verletzungen kommen kann und die Garantie dabei verloren geht.
Keine Garantie wird übernommen für Mängel, Verschlechterungen, Verlust, Verletzungen oder Schäden,
die durch unsachgemäße Benutzung des Gerätes verursacht wurden oder darauf zurückzuführen sind.
Die vom Landesgesetz vorgegebenen Rechte werden nicht beeinträchtigt. Keine der Klauseln dieser
Garantiebestimmungen wird durch die vom Landesgesetz vorgeschriebenen Bestimmungen oder
Garantien außer Kraft gesetzt, die nicht ausgeschlossen oder geändert werden können.
Vor Inbetriebnahme entfernen Sie bitte die Verpackung und vergewissern Sie sich, dass das Gerät
vollständig ist. Versuchen Sie nicht Defekte oder Schäden selbst zu reparieren, sondern wenden Sie sich
in einem solchen Fall an Ihren Händler.
Erlauben Sie es nicht, dass Kinder mit der Verpackung spielen und schützen Sie die Umwelt, indem Sie
die Verpackung entsprechend den landesüblichen Bestimmungen über die umweltgerechte Entsorgung
von Abfall entsorgen.
1. Ihr Gerät
Außer Ihrer Heizung enthält die Verpackung noch folgende Teile (Bild 1):
- N° 2 Metallwinkel für die Wandmontage;
- N° 4 Kunststoffdübel 8x50mm;
- N° 4 5x60mm Kreuzschlitzschrauben für die Wandbefe stigung;
- N° 1 2,2x4,5mm schraube
Wenden Sie sich bitte an Ihren Händler, wenn Teile beschädigt sind oder fehlen.
2. Zu Ihrer eigenen Sicherheit
Dieses Gerät ist für den Einsatz unter normalen Bedingungen in Wohnungen und nicht in Betriebsoder Industrieambienten, in Kraftfahrzeugen, auf Schiffen oder in Flugzeugen vorgesehen.
Achten Sie darauf, dass das Stromnetz mit der Nenneingangsspannung übereinstimmt: 230V AC,
50Hz.
Verhindern Sie auf jeden Fall, dass Tiere oder Kinder mit dem Gerät spielen oder es berühren.
Achtung! Die Heizplatte kann während des Betriebs sehr heiß werden (ca. 80°C = 176°F);
WARNUNG: Decken Sie das Heizgerät niemals ab, um Hitzestaus zu vermeiden. Hängen Sie
nichts an das Gerät und decken Sie es niemals zu, so lange es läuft. Dies ist deutlich auf der
Geräteabdeckung angegeben und durch folgendes Symbol markiert
Das Gerät darf nur dann von Personen (einschl. Kindern) mit körperlichen, sensorischen oder
geistigen Behinderungen oder unzureichender Erfahrung oder Kenntnis benutzt werden, wenn sie
von einer für ihre Sicherheit verantwortlichen Person beaufsichtigt werden oder von dieser
entsprechend eingewiesen worden sind. Kinder müssen beaufsichtigt werden, um zu verhindern,
dass sie an dem Gerät herumspielen.
Um Hitzestaus zu vermeiden, sollte das Gerät niemals in ungeeigneter Weise abgedeckt werden
(Bild 9 und 10).
Benutzen Sie das Gerät nicht in Räumen, in denen explosionsgefährliche Gase, Dämpfe von
Lösungsmitteln oder Farben oder brennbare Dämpfe/Gase auftreten können.
Reparieren Sie defekte Kabel und/oder Stecker nicht selbst, sondern bringen Sie das Gerät zu
einem Kundendienst oder einem qualifizierten Reparaturzentrum und lassen Sie es von
Fachpersonal reparieren, damit es nicht zu Beschädigungen kommt.
Montieren Sie das Gerät immer so, dass der Stecker sofort zugänglich ist.
Bringen Sie das Gerät nicht direkt unter einer Steckdose an.
3. Sichere Montage
Benutzen Sie das Gerät nur in horizontal Stellung;
Das Gerät ist mit einem doppelten elektrischen Isolationsschaltkreis versehen (Klasse II) und
benötigt deshalb keine Masseverbindung;
Beachten Sie immer den in Bild 2 gezeigten Mindestabstand zu Wänden, Möbeln und/oder
anderen Gegenständen.
Installieren Sie das Gerät niemals auf einer Holz- oder Kunststofffläche.
Das Gerät ist wasserdicht bis IP24. Es kann somit in Bädern oder anderen Feuchteräumen benutzt
werden, vorausgesetzt es befindet sich nicht in unmittelbarer Nähe von Badewannen oder
Duschen (Volumen 1, Bild 2).
Die Bedientasten dürfen von Personen in der Wanne oder unter der Dusche keinesfalls erreichbar
sein.
4. Installation
Nachdem Sie Abschnitt 3 genau durchgelesen haben, können Sie mit der Installation in der in Bild
4a bis 7 gezeigten Reihenfolge beginnen.
Modell
X (mm)
Y1 (mm)
Y2 (mm)
H
STYLO 5
320
293
183
45
W
70
STYLO 10
200
293
293
45
250
STYLO 15
450
293
293
45
250
STYLO 20
650
293
293
45
250
ACHTUNG: Sie können die Frontfläche des Kartons als Bohrschablone nutzen, um die genaue
Position der Löcher zur Wandbefestigung zu markieren!!
Um das Gerät von den Halterungen zu befreien, mit einem Schraubenzieher die Sperrfedern (Abb.
8-1) nach unten drücken und das Gerät zu sich hin ziehen (Abb. 8-1).
5. Elektrische Anschlüsse
Das Gerät muss mit einer Spannung von 230V AC 50Hz betrieben werden.
Das Gerät muss mit einem Kabel mit Stecker oder einem Installationskabel geliefert werden. Soll
ein Gerät mit Stecker in Frankreich installiert werden, so muss der Stecker abgeschnitten und das
Gerät über einen entsprechenden Anschlusskasten an das Netz angeschlossen werden.
Wird das Gerät mit einem Installationskabel geliefert, so ist dieses über ein 3-adriges Kabel und
einen Anschlusskasten an das Netz anzuschließen (Braun=Phase, Blau=Nullleiter,
Schwarz=Prüfader), Wenn Sie die Prüfaderfunktionen nicht benutzen wollen, schließen Sie
nur die Phase und den Nullleiter an, das Gerät funktioniert auch einwandfrei ohne externen
Programmierer.
In Bädern, Küchen oder anderen Feuchtebereichen installieren Sie die Anschlussbuchse
mindestens 25cm über dem Boden.
Der elektrische Anschluss an das Netz muss auch einen 2-poligen Schalter mit einer
Mindestkontaktöffnung von 3mm aufweisen. Beachten Sie vor allem die örtlichen
Verdrahtungsregeln.
Das Gerät darf nicht an die Erdleitung angeschlossen werden. SCHLIESSEN SIE DIE
PRÜFADER (SCHWARZ) NIEMALS AN DIE ERDLEITUNG AN.
Wenn das Gerät über einen 30mA Differentialschalter betrieben wird, achten Sie darauf, dass
auch die Prüfader an den Differentialschalter angeschlossen ist.
L
N
Phase (braun)
Prüfader (schwarz) – NICHT AN ERDE ANSCHLIESSEN
Nullleiter (blau)
Der Betriebsmodus kann auf einfache Weise von Remote auf Prüfader und umgekehrt
umgeschaltet werden.
Es genügt eine Remote-Einstellung, um das gleiche Programm anschließend auf alle installierten
Geräte dieser Serie zu übertragen. Einzelheiten über die Programmierungen sind in der
Bedienungsanleitung der Remote-Steuerung enthalten.
Zum Einsatz der Fernsteuerung muss auf allen zu regelnden Geräten ein als Sonderzubehör
lieferbares Empfängerteil installiert werden.
6. Betrieb des Gerätes
7. Verhalten im Fall von Störungen
Bei Überhitzung schaltet die Sicherheitsvorrichtung die Heizelemente automatisch ab.
Das Gerät läuft automatisch wieder an, sobald die Temperatur unter den Sicherheitsgrenzwert fällt.
Achtung: Die LED Funktion wird nicht ausgeschaltet, wenn die Sicherheitsvorrichtung anspricht.
Wenn Sie Unregelmäßigkeiten im Betrieb, Schäden an der Heizplatte oder am Gerät feststellen,
trennen Sie das Gerät von der Spannungsversorgung und wenden Sie sich an Ihr Technical
Assistance Centre oder Ihren Händler.
C
B
A
Das Produkt ist mit einem On-Off-Hauptschalter (A), einem Drehregler zur Einstellung der
gewünschten Temperatur (B) und mit einem Led zur Anzeige des aktuellen Betriebszustands (C)
ausgestattet.
Die Netzdrucktaste (A) steuert die Stromversorgung des gesamten Gerätes. Wenn sie
eingeschaltet wird, ist die interne Elektronik betriebsbereit.
Die Netzdrucktaste (A) deaktiviert das Gerät bis auf mögliche Eingangssignale, die von der
Prüfader kommen.
Das Thermostat (B) dient der Beibehaltung der gewünschten Raumtemperatur, indem die Einheit
selbsttätig ein- und ausgeschaltet wird. Wird der Regler im Uhrzeigersinn gedreht, so wird die
Temperatur gesteigert. Die maximale Einstellung des Thermostats entspricht einer Temperatur
von etwa 28°C, wogegen die tiefste Stufe etwa 5°C e ntspricht.
Das Led (C) zeigt verschiedene Betriebszustände , indem sich die Art des Aufleuchtens ändert,
(schnell oder langsam blinkend, kontinuierlich aufleuchtend, nicht aufleuchtend) und zwar:
Die LED leuchtet rot, wenn das Gerät bis auf die gewünschte Temperatur aufheizt;
Das Licht erlischt, sobald die gewünschte Temperatur erreicht wurde oder wenn der
Hauptschalter (A) auf Off gesetzt wird;
Die LED blinkt dauerhaft rot, wenn der elektronische Temperaturfühler defekt ist. Das Gerät
muss von einem zugelassenes Technical Service Centre repariert werden;
Falls Sie die Zugang an der Regler der Konvektoren vorbeugen möchten, können Sie die
transparente Abdeckung mit einer Schraube sperren, wie in Abbildung 11 dargestellt.
Benutzung des Thermostats
In einem Raum mit einer Temperatur von über 28°C sc haltet das Thermostat das Gerät auch bei
Maximalstellung nicht ein.
In einem Raum mit einer sehr niedrigen Temperatur (unter 5°C) dagegen lässt das Thermostat das
Gerät ständig eingeschaltet, auch wenn es auf Minimal steht.
Bei der Ermittlung der Einstellung des Thermostats für maximalen Komfort sollte das Thermostat
nicht allzu schnell verstellt (< 1h) werden; warten Sie vor jeder neuen Einstellung zunächst ab, bis
sich die jeweils eingestellte Temperatur im gesamten Raum stabilisiert hat.
Benutzung der Prüfader
Ein Gerät mit einem Anschlusskabel ohne Stecker kann ebenfalls mit Hilfe spezieller
Programmierer gesteuert werden. Das Gerät reagiert in diesem Fall entsprechend der zwischen
der Prüfader und dem Nullleiter angelegten Spannung.
Benutzung der Remote-Funktion (Option)
Mit Hilfe der optionalen Remote-Funktion kann für jede Stunde am Tag und für alle Tage
unabhängig eine "comfort" oder "eco" Temperatur eingestellt werden.
8. Wartung
Dieses Gerät benötigt keine spezielle Wartung.
Wischen Sie das Gerät, insbesondere die Heizplatte, alle 6 Monate mit einem trockenen Tuch ab.
Wenn das Geräte reparaturbedürftig ist, wenden Sie sich an ein zugelassenes Technical Service
Centre.
2
2
Wenn das Anschlusskabel ersetzt werden muss, benutzen Sie ein 2x1.00mm oder 3x1.00mm
Kabel Typ H05VV-F HAR je nach Version. Kabel mit oder ohne Stecker dürfen nur von
qualifiziertem Fachpersonal ausgetauscht werden. Diese Arbeit darf niemals vom Benutzer selbst
durchgeführt werden, um Schäden am Gerät und Gefahr für Leib und Leben zu vermeiden.