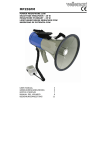
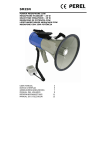
1
ENGLISH
w
m
.co
sat
f
l
.se
ww
GERMAN
W
REV. 2.0
DUTCH
User’s manual
Bedienungsanleitung
Manual utilisateur
Manuale utente
Gebruikershandleiding
SPANISH
c
i
t
a
m
o
t
u
A
FRENCH
a
n
n
e antenna
t
n
A rtable
e
t
i
ll e and po
e
t
a st hom
S
t
Flaorld smalle
ENGLISH
Contents
1. General Information
Introduction . . . . . . . . . . . . . . . . . . . . . . . . . . . . . . . . . . . . . . . . . . . . . . . . . . . . . . . . . . . . . . . . . . . . . . . . . . . . . . . . . . . . . 2
Proper use and operation . . . . . . . . . . . . . . . . . . . . . . . . . . . . . . . . . . . . . . . . . . . . . . . . . . . . . . . . . . . . . . . . . . . . . . . 3
Safety Notes . . . . . . . . . . . . . . . . . . . . . . . . . . . . . . . . . . . . . . . . . . . . . . . . . . . . . . . . . . . . . . . . . . . . . . . . . . . . . . . . . . . . . 4
GERMAN
1-1.
1-2.
1-3.
2. Contents
Accessory Include . . . . . . . . . . . . . . . . . . . . . . . . . . . . . . . . . . . . . . . . . . . . . . . . . . . . . . . . . . . . . . . . . . . . . . . . . . . . . . . 5
Name of parts . . . . . . . . . . . . . . . . . . . . . . . . . . . . . . . . . . . . . . . . . . . . . . . . . . . . . . . . . . . . . . . . . . . . . . . . . . . . . . . . . . . 6
FRENCH
2-1.
2-2.
3. Operating Instruction
3-1.
3-2.
3-3.
Connection Diagram . . . . . . . . . . . . . . . . . . . . . . . . . . . . . . . . . . . . . . . . . . . . . . . . . . . . . . . . . . . . . . . . . . . . . . . . . . . 7
Functional Description . . . . . . . . . . . . . . . . . . . . . . . . . . . . . . . . . . . . . . . . . . . . . . . . . . . . . . . . . . . . . . . . . . . . . . . . . . 8
Quick Reference . . . . . . . . . . . . . . . . . . . . . . . . . . . . . . . . . . . . . . . . . . . . . . . . . . . . . . . . . . . . . . . . . . . . . . . . . . . . . . . . . 10
SPANISH
4. Program update
4-1.
4-2.
Connection Diagram for updating . . . . . . . . . . . . . . . . . . . . . . . . . . . . . . . . . . . . . . . . . . . . . . . . . . . . . . . . . . . . . 11
Update Process . . . . . . . . . . . . . . . . . . . . . . . . . . . . . . . . . . . . . . . . . . . . . . . . . . . . . . . . . . . . . . . . . . . . . . . . . . . . . . . . . 12
DUTCH
5. Trouble Shooting
5-1.
Trouble Shooting
............................ . . . . . . . . . . . . . . . . . . . . . . . . . . . . . . . . . . . . . . . . . . . . . . . . . . .
14
6. Specifications
6-1.
6-2.
Dimension . . . . . . . . . . . . . . . . . . . . . . . . . . . . . . . . . . . . . . . . . . . . . . . . . . . . . . . . . . . . . . . . . . . . . . . . . . . . . . . . . . . . 15
Specifications . . . . . . . . . . . . . . . . . . . . . . . . . . . . . . . . . . . . . . . . . . . . . . . . . . . . . . . . . . . . . . . . . . . . . . . . . . . . . . . . . . . 15
1. General Information
1-1. Introduction
These instructions describe the functions and operation of the SNIPE auto skew satellite system.
Correct and safe operation of the system can only be ensured by following these instructions.
Your SNIPE is an intelligent satellite TV reception antenna system which can align itself towards a
preset satellite automatically as long as the system is located within the footprint of this satellite.
The SNIPE only occupies requisite space while it performs the necessary adjustments with the
slim and agile antenna body.
For general operation, please ensure that the system always has a clear view to the sky. If the
satellite‘s signal beam is interrupted by obstacles such as mountains, buildings or trees, the unit
will not function and no TV signal will be received
The first few pages of these instructions contain information about using the general functions of
your SNIPE, followed by an explanation of all the adjustment options. The last pages of the
instructions cover various technical aspects of the SNIPE.
2
ENGLISH
1-2. Proper use and operation
This product has been designed for portable use and fixed installation on vehicles with
maximum speeds of 130 km/h. It is designed to automatically aim an antenna at geostationary
The power to the system is supplied by a standard vehicle electrical system with a rated
voltage of 12 or 24 Volts DC. For installations where a main connection is provided, a suitable
GERMAN
television satellites.
230 Volt AC to 12 DC Volt power adaptor must be used.
Use of the equipment for any other purpose to the one specified is not permitted.
FRENCH
• It is not permitted to change the overall device by removing or adding individual components.
• The use of any other components to those originally installed is not permissible.
SPANISH
Please also note the following instructions from the manufacturer :
• Installation must only be performed by sufficiently qualified personnel. All instructions in the supplied Installation
Instructions, which is separately provided, must be carefully followed.
• The product does not require any regular maintenance. Housings and enclosures must not be opened. Checks
• For car mounting system, all of the relevant and approved guidelines of the automotive industry must be
DUTCH
and maintenance work should always be carried out by a qualified specialist.
observed and complied with
• The equipment must only be installed/operated on hard vehicle roofs/ground which are sufficiently strong and
inherently stable.
• Avoid to clean your vehicle with the mounted satellite system in a single-bay or drive-through car wash or with a
high-pressure cleaner..
3
1-3. Safety Notes
In order to ensure that your SNIPE works properly you must ensure that it is correctly used and connected
follow the Operating Instructions in this manual.
When it is correctly installed, the antenna automatically assumes the rest position when the ignition is
switched on and locks itself there. If the system cannot fully retract or cannot retract at all due to a fault,
then it is your responsibility to check that the antenna is safely and properly stowed.
Please note also that different legal requirements apply to the operation of electrical and electronic
equipment in different countries. As the user of this equipment, you yourself are responsible for ensuring
compliance with the relevant laws and regulations.
The manufacturer accepts no liability for direct or indirect damage or for consequential damage to the
system itself, motor vehicles or other equipment or goods resulting from the connection of unsuitable
battery systems or installation/wiring errors.
4
ENGLISH
2. Contents
2-1. Accessory Include
Controller
Cigarette lighter adaptor
Receiver cable
(12m – Grey color)
Carrying case
Base Pads
GERMAN
Main unit
Manual
Option
User manual
Option 1 : Car mounting plate accessories
Allen wrench
M6 × 15 , M4 × 16, M4 ×20
Installation
manual
Cable gland
Controller bracket
Cable holder
DUTCH
Mounting plate
SPANISH
Please check your purchasing package. These option parts are not included in the basic package.
(Please contact your local dealer/shop for more information on option package)
FRENCH
Controller cable
(12m – Black color)
Car mounting plate
installation manual
Option 2 : Home power adaptor
Adaptor
5
2-2. Name of parts
Main unit
LNB
Skew pivot : -60° ~ +60°
Elevation : 15° ~ 90°
Main body :
360° turning
Mounting plate :
Car mounting
plate installation
Base
to Receiver
to Controller
Controller
GPS state light
Power switch
HOME state light
Satellite light
Bracket :
Car mounting
plate installation
HOME button
Satellite Up/Down button
to Main unit
USB port :
OK button
For F/W upgrade
Power port :
DC 12~24V
6
ENGLISH
3. Operating Instruction
3-1. Connection Diagram
GERMAN
MAIN UNIT
TV
RECEIVER
FRENCH
Receiver cable
(Grey color)
(Black color)
Controller
CONTROLLER
SPANISH
Controller cable
Controller
Adaptor or Cigarette light adaptor
DUTCH
Use the black color controller cable to connect between the controller and
antenna.
The controller cable looks similar to the antenna cable but you can distinguish
them by the color and labeling.
Portable use
Attach 4 Base Pads to the bottom plate
7
3-2. Functional Description
A. Power On
Function
Description
“Power” Switch
i. When the all cable connections are completed, switch on
with the “Power Switch” button on the top of the controller.
“Home State”
Light Solid ON
ii. If the position of antenna was in home position, “Home
state light” will be solid on to show it is ready to use.
“Home State”
Light Solid ON
Solid ON
◆
Operation
iii. If the position of antenna was not in the home position,
“Home state light” will flash, and the antenna will return to
the home position within a maximum 2 minutes. Then
“Home state light” will be solid on.
The "Home position" means antenna folded completely to the body part which is the basic position for
carrying in hard case.
B. Selecting the satellite
Function
Description
Operation
i. Once antenna and controller are connected, you can select
& change the satellite as you require.
“Satellite
Up / Down button” Light ii. Select the desired satellite using the “Up/Down” buttons,
then press the “OK” button to accept the setting.
“OK” Button
iii. If you select the wrong satellite, you can re-search target
satellite using the “Up/Down” button, then press the “OK”
button to accept the new setting.
C. Searching the satellite
Function
Description
Operation
i. After the satellite selection, “Home State” light will go off
and the LED light of the selected satellite will start flashing.
“Satellite” light
ii. Once selected satellite has been found, the LED light of the
satellite will become solid.
8
ENGLISH
D. Changing the satellite
Description
Operation
“Satellite
Up / Down button” Light i. If you want to change desired satellite, you can change the
target satellite using the “Up/Down” buttons, then press
the “OK” button to select the new satellite.
“OK” Button
Function
Description
“HOME” Button
Operation
i. Whenever you wish to return the antenna back to the Home
position, press and hold the“Home” button for a few seconds.
SPANISH
F. GPS LED light
Function
FRENCH
E. Back to Home position
GERMAN
Function
Description
Operation
i. GPS LED confirms the current location from 24 GPS satellites
in the world.
DUTCH
“GPS” light
ii. When your SNIPE identifies a GPS signal, GPS LED light will
remain on, regardless if the antenna is pausing or moving.
GPS can help to search for the satellite faster & catch the
optimum satellite signal, and assist SNIPE to acheive the
best elevation & skew angle.
iii. Also, while program updating, the GPS LED light will flash
to show the update procedure is processing. During this
time, GPS LED light on doesn’t mean the unit is communicating with GPS satellite.
9
3-3. Quick Reference
Classification
Description
1. Take out the antenna from carrying case, and place it on the flat ground(or
mount it on the top of the camper) facing South & no obstacle.
2. Connect the left port of the antenna, which located at the rear of the main
unit, to the controller using controller cable.
a. One end of the controller cable connect to "controller" port of the main unit
of the antenna.
b. The other end of the controller cable connect to the port of the controller.
Setting
&
Connecting
3. Connect the power cable to controller .
a. If you use the power source from a car or caravan etc, use the cigarette
lighter adaptor to connect the power to controller.
b. Otherwise use a suitable 12 Volt DC adaptor to connect the power to
controller.
4. Connect between the right port of the antenna, which located at the rear of
the main unit, to the receiver using receiver cable.
1. Switch on with the “Power switch” button on the top of the controller.
2. Upon power on, all LED will flash twice.
3. Wait until “HOME State” light & one “Satellite LED” light, which you set
previously or the first satellite in the controller (Turksat), remain solid on.
Operating
(Searching the satellite)
4. Select the desired satellite using the “UP/DOWN” buttons, then press the
“OK” button to select.
5. The satellite LED light will start to flash, wait until it stays solid on.
6. When the satellite LED light stays solid on, the selceted satellite has been
located and a signal can be seen on the satellite TV.
WARNING
When you move SNIPE, the flat dish of the antenna must be be in the Home
position.
NOTE
Car Mounting Instruction will be provided separately.
NOTE
SNIPE will be automatically folded back to HOME position if the vehicle
moves faster than 10km/h, when the reception of GPS is stable.
NOTE
Purchase Power Adapter separately from us, or if you purchase it on your
own, purchase ONLY 18V / 3.3A which is certified.
10
ENGLISH
4. Program update
4-1. Connection Diagram for updating
“USB port is used for firmware upgrade only”
GERMAN
MAIN UNIT
FRENCH
(Black color)
Controller
SPANISH
Controller cable
Controller
CONTROLLER
B type
DUTCH
Adaptor or Cigarette lighter adaptor
USB cable
A type
PC
Simply connect the Controller to PC using USB cable.
USB cable is not included in the package.
11
4-2. Update Process
Using SNIPE Update Program, refresh the satellite data of your SNIPE.
i. Update Program download
① Download the SNIPE Update Program
to your PC from our homepage
(www.self-sat.com).
※ Download driver file, if your OS does not
support it.
② Download the newest satellite data to
your PC from our homepage.
※ Be sure your product location and download
correct location file.
③ Connect the controller to your PC using USB cable, then install the SNIPE Update Program you
downloaded.
ii. Update the 10 satellites which are pre-stored
④ Run the SNIPE update program.
⑤ Click “file” on left-upper side on program,
and click "open" to select folder which
contains downloaded satellite data.
⑥ Select folder and click the “OK” button.
⑦ When folder is opened, select file and
click the “Open” button.
⑧ The data of 10 satellites are shown to
you, but they are not modifiable by
yourself.
⑨ Check the Port Setting, then click the
“CONNECT” button.
12
ENGLISH
FRENCH
⑪ Wait until green bar reaches to the end
and "Send OK" message box is popping
up.
GERMAN
⑩ Once “SEND_DATA” button is activated,
click the “SEND_DATA” button.
⑫ Once "Send OK" message box is shown,
update is completed.
SPANISH
iii. Update USER 1~2
• USER 1~2 are for extra addition of your
desired satellites which are not pre-stored.
DUTCH
• After download the SNIPE update program,
start it.
Then tick the box on USER 1~2 which
you wish to update, and write the
satellite data in the box by yourself.
Then follow the procedure from ⑨ as
above.
• To get detailed information of satellite data, please contact your local distributor.
NOTE
Do not turn off the power or disconnect the cable before update procedure finished.
How to update satellite information can be changed by reflecting the
newest satellite information.
Please make sure to get how to update the product through our web site
(www.self-sat.com)
13
5. Trouble shooting
There are a number of common issues that can affect the signal reception quality or the
operation of the SNIPE. The following sections address these issues and potential
solutions.
A. No function when you power on the Controller
i. Check again all the cable connections have been made correctly.
Connection between the power and controller
Connection between the controller and the antenna. Make sure that the left port of the antenna
should be connected to the controller.
ii. Check if the cigarette lighter adaptor or adaptor has been damaged.
B. Fail to search the selected satellite
i. Satellite signals can be blocked or degraded by buildings, trees.
Make sure there are no obstructions in a southward direction.
ii. Check your program of Controller often, and get the latest updates for your SNIPE
C. Mechanical problems
i. If the antenna does not move into desired position.
Try to power OFF/ON again.
ii. If the antenna makes a noise whilst remaining static.
Try to power OFF/ON again. If problem persists, please contact your local distributor for assistance.
D. Other issues
i. If the system has been improperly wired, it will not operate properly. Contact your local
distributor for assistance of cable damage.
14
ENGLISH
6. Specifications
6-1. Dimension
188mm
GERMAN
MAX 422mm
MIN 188mm
126mm
316mm
FRENCH
454mm
6-2. Specification
Weight
454 x 316 x 188 mm
Main Unit / Basic Package /
Full Package (with optional parts)
10.1Kg / 15.6Kg / 19.1Kg
Stationary
Antenna Gain
33.7 dBi @ 12.7GHz
Min EIRP
50 dBw
Polarization
Linear (Horizontal / Vertical)
LNB Output
1 output(optional 2 output)
LNB Input Frequency
10.7 ~ 12.75 GHz
LNB Output Frequency
950 ~ 2,150 MHz
Angle Range
15° ~ 90° / 360° / -60° ~ +60°
Search Speed
Elevation / Azimuth / Skew
DUTCH
Work Condition
SPANISH
Dimensions
6°/s / 12°/s / 15°/s
Satellite Searching Time
180 seconds (max.)
Power Requirement
DC 12~24V
Power Consumption
30W (in searching)
Operating Temperature
-30°C ~ +60°C
15
ENGLISH
Inhalt
1. Allgemeine Informationen
Produktvorstellung . . . . . . . . . . . . . . . . . . . . . . . . . . . . . . . . . . . . . . . . . . . . . . . . . . . . . . . . . . . . . . . . . . . . . . . . . . . . . . 2
Bestimmungsgemäße Verwendung . . . . . . . . . . . . . . . . . . . . . . . . . . . . . . . . . . . . . . . . . . . . . . . . . . . . . . . . . . . . 3
Sicherheitsanweisungen . . . . . . . . . . . . . . . . . . . . . . . . . . . . . . . . . . . . . . . . . . . . . . . . . . . . . . . . . . . . . . . . . . . . . . . . 4
GERMAN
1-1.
1-2.
1-3.
2. Verpackungsinhalt
Lieferumfang . . . . . . . . . . . . . . . . . . . . . . . . . . . . . . . . . . . . . . . . . . . . . . . . . . . . . . . . . . . . . . . . . . . . . . . . . . . . . . . . . . . . 5
Teilebezeichnung . . . . . . . . . . . . . . . . . . . . . . . . . . . . . . . . . . . . . . . . . . . . . . . . . . . . . . . . . . . . . . . . . . . . . . . . . . . . . . . 6
FRENCH
2-1.
2-2.
3. Bedienungsanweisungen
3-1.
3-2.
3-3.
Anschlussdiagramm . . . . . . . . . . . . . . . . . . . . . . . . . . . . . . . . . . . . . . . . . . . . . . . . . . . . . . . . . . . . . . . . . . . . . . . . . . . . . 7
Funkti . . . . . . . . . . . . . . . . . . . . . . . . . . . . . . . . . . . . . . . . . . . . . . . . . . . . . . . . . . . . . . . . . . . . . . . . . . . . . . . . . . . . . . . . . . . . 8
Kurzanleitung . . . . . . . . . . . . . . . . . . . . . . . . . . . . . . . . . . . . . . . . . . . . . . . . . . . . . . . . . . . . . . . . . . . . . . . . . . . . . . . . . . . 10
SPANISH
4. Program-Update
4-1.
4-2.
Anschlussdiagramm für das Update . . . . . . . . . . . . . . . . . . . . . . . . . . . . . . . . . . . . . . . . . . . . . . . . . . . . . . . . . . . 11
Update-Vorgang . . . . . . . . . . . . . . . . . . . . . . . . . . . . . . . . . . . . . . . . . . . . . . . . . . . . . . . . . . . . . . . . . . . . . . . . . . . . . . . . . 12
DUTCH
5. Störungsbehebung
5-1.
Störungsbehebung
.......................... . . . . . . . . . . . . . . . . . . . . . . . . . . . . . . . . . . . . . . . . . . . . . . . . . . .
14
6. Technische Daten
6-1.
6-2.
Abmessungen . . . . . . . . . . . . . . . . . . . . . . . . . . . . . . . . . . . . . . . . . . . . . . . . . . . . . . . . . . . . . . . . . . . . . . . . . . . . . . . . . . . 15
Technische Daten . . . . . . . . . . . . . . . . . . . . . . . . . . . . . . . . . . . . . . . . . . . . . . . . . . . . . . . . . . . . . . . . . . . . . . . . . . . . . . . 15
1. Allgemeine Informationen
1-1. Produktvorstellung
Die Betriebsanleitung beschreibt die Funktion und Bedienung des automatischen, selbstnachführenden Satelliten-Systems SNIPE.
Der korrekte und sichere Betrieb des Systems ist nur gewährleistet, wenn die folgenden
Anweisungen für Installation und Betrieb befolgt werden.
Ihr SNIPE ist ein intelligentes Satellitenempfangssystem, das sich automatisch auf die
gespeicherten Satelliten ausrichten kann, sofern es sich in der Ausleuchtzone befindet.
Dank seiner innovativen Technologie lässt sich SNIPE auf nahezu jedem Fahrzeug problemlos und einfach montieren. Da die Nachführfunktion mit einer schlanken und agilen
Antenne durchgeführt wird, weist SNIPE einen geringen Platzbedarf auf.
Für den allgemeinen Betrieb, stellen Sie bitte sicher, dass das System immer eine klare Sicht
auf den Himmel. Wenn der Satelliten-Signal-Strahl durch Hindernisse wie Berge, Gebäude
oder Bäume unterbrochen wird, wird das Gerät nicht funktionieren und kein TV-Signal
empfangen werden.
Bei der ersten Hälfte der Anleitung handelt es sich um Informationen über allgemeine
Funktionen und Bedienung, während die zweite Hälfte der Anleitung die technische
Aspekte des SNIPE behandelt.
2
ENGLISH
1-2. Bestimmungsgemäße Verwendung
Das vorliegende Produkt wurde für einen mobilen Einsatz und für eine Festinstallation auf
einem Fahrzeug mit einer Höchstgeschwindigkeit von weniger als 130 km/h konzipiert. Es
SNIPE kann mit einer Standard-Fahrzeugspannung von 12 oder 24V versorgt werden. Falls
es in einem Fahrzeug mit einer Netzspannung von 230V betrieben werden soll, muss ein
GERMAN
richtet seine Antenne vollautomatisch auf die geostationären Satelliten in Europa aus.
Spannungswandler 230V auf 12V eingesetzt werden.
Das vorliegende Produkt darf nur für den in dieser Anleitung beschriebenen Zweck verwendet werden.
FRENCH
• Jede Änderung des Geräts durch Hinzufügen oder Entfernen von Teilen ist nicht gestattet
• Die Verwendung von jeglichen Bauteilen, die ursprünglich nicht eingebaut sind, ist nicht gestattet.
SPANISH
Beachten Sie bitte folgende Hinweise des Herstellers:
• Die Installation am Fahrzeug sollte nur von einem qualifizierten Fachpersonal durchgeführt werden. Alle
Anweisungen in dieser Anleitung müssen befolgt werden.
• Das Gerät bedarf keiner Wartung. Das Gehäuse des Geräts darf auf keinen Fall geöffnet werden. Mit der Prüfung
• Falls es auf einem Fahrzeug installiert wird, müssen alle relevanten und vorgeschriebenen Richtlinien der
DUTCH
oder Wartung sollte eine qualifizierte Fachperson beauftragt werden.
Automobilindustrie beachtet werden.
• Das Gerät sollte nur auf einem festen Fahrzeugdach/-boden installiert und betriebt werden, das/der eine
ausreichende Stabilität aufweist.
• Falls SNIPE auf einem Fahrzeug angebracht ist, ist es zu vermeiden, das Fahrzeug in einer Bürstenwaschanlage,
Waschstraße oder mit Hochdruckreinigern zu waschen.
3
1-3. Sicherheitsanweisungen
Um einen einwandfreien Betrieb des SNIPE zu gewährleisten, müssen Sie sich vergewissern, dass alle
Komponenten gemäß der vorliegenden Anleitung richtig angeschlossen sind.
Wenn das System ordnungsgemäß installiert ist, nimmt die Antenne automatisch ihre vorgesehene
Ruheposition an, sobald es eingeschaltet wird. Falls die Antenne nicht vollständig eingefahren wird oder
aufgrund Fehler nicht eingefahren werden kann, haben Sie die Verantwortung, sich zu vergewissern, dass
die Antenne sicher und ordnungsgemäß eingefahren ist.
Falls das Gerät im Ausland betrieben wird, beachten Sie bitte die dafür geltenden gesetzlichen
Bestimmungen. Sie übernimmt als Nutzer des Geräts die Verantwortung dafür, das Gerät in Beachtung
der relevanten Gesetze und Vorschriften zu betreiben.
Der Hersteller haftet nicht für Verluste oder Schäden, die durch Anschluss an ungeeigneten Stromquellen,
Einsatz falscher Anschlusskabel oder unsachgemäße Installation mittelbar oder unmittelbar an dem
Gerät, Fahrzeug oder anderen Geräten entstanden sind.
4
ENGLISH
2. Verpackungsinhalt
2-1. Accessory Include
Zigarettenanzünder-Kabel
Empfängerkabel
(12m - Graue Farbe)
Transportkoffer
Basispolster
GERMAN
Controller
Haupteinheit
Manual
Option
Option 1: Auto Montageplatte Zubehör
Inbusschlüssel
M6 × 15 , M4 × 16, M4 ×20
Installation
manual
Kabelverschraubung
Controller halterung
Kabelhalter
DUTCH
Befestigungsplatte
SPANISH
Bitte überprüfen Sie Ihren Einkauf Paket. Diese Option Teile sind nicht im Basispaket enthalten.
(Bitte wenden Sie sich an Ihren Fachhändler / shop Weitere Informationen zum Optionspaket)
FRENCH
Betriebsanleitung
Controllerkabel
(12m - Schwarze Farbe)
Car Montageplatte
Installationsanleitung
Option 2: Home Netzteil
Adapter
5
2-2. Teilebezeichnung
Haupteinheit
LNB
Neigung/Drehung : -60° ~ +60°
Erhebung : 15° ~ 90°
Hauptteil :
360° Drehung
Befestigungsplatte :
zum Anbau an Wohnmobile/-wagen
Sockel
Zum Satellitenempfänger
Zum Controller
Controller
GPS-Statusanzeige
Netzschalter
HOME-Statusanzeige
Satellitenanzeige
leuchtet auf
Halterung :
Car Montageplatte
Installation
HOME-Taste
Satelliten Auf/Ab-Tasten
Zur Haupteinheit
USB-Anschluss :
OK-Taste
Für das Firmware-Update
Stromanschluss :
DC 12~24V
6
ENGLISH
3. Bedienungsanweisungen
3-1. Anschlussdiagramm
GERMAN
Haupteinheit
Fernseher
Empfänger
FRENCH
Empfängerkabel
(Graue Farbe)
Controllerkabel
Controller
Controller
SPANISH
(Schwarze Farbe)
Controller
Verbinden Sie die Antenne mit dem controller über das schwarze controllerkabel.
DUTCH
Adapter oder Zigarettenanzünder
Beim Anschließen müssen Sie auf die Beschriftung und die Farbe der Kabel
achten, weil die beiden Kabel die gleiche Form aufweisen.
Mobiler Einsatz
Bringen 4 Basispolster an der Bodenplatte
7
3-2. Funktionsbeschreibung
A. Inbetriebnahme
Funktion
Beschreibung
Bedienung
Netzschalter
i. Wenn alle Kabel fertig angeschlossen sind, schalten Sie den
Netzschalter auf der Geräteoberseite ein.
HOME-Statusanzeige
leuchtet auf
ii. Wenn sich die Antenne in der Parkposition befindet,
leuchtet die „HOME-Statusanzeige“ auf, die eine Betriebsbereitschaft anzeigt.
HOME-Statusanzeige
leuchtet auf
leuchtet auf
iii. Wenn sich die Antenne nicht in der Parkposition befindet,
blinkt die „HOME-Statusanzeige“ und fährt die Antenne
innerhalb 2 Minuten in Parkposition. Und dann leuchtet
die „HOME-Statusanzeige“ auf.
◆ Die HOME (bzw. PARK)-Position stellt die Grundposition dar, in der die Antenne zum Verstauen im Koffer oder
zum Transport abgeklappt wird.
B. Auswahl des Satelliten
Funktion
Beschreibung
Mit den Auf/Ab-Tasten
den gewünschten
Satelliten auswählen
Bedienung
i. Sobald der Verbindungsaufbau zwischen der Antenne
und dem Controller abgeschlossen ist, ist die Auswahl des
Satelliten oder die Umschaltung zwischen verschiedenen
Satelliten möglich.
ii. Wählen Sie mit den Auf/Ab-Tasten den gewünschten Satelliten
aus, und bestätigen Sie mit der OK-Taste die Auswahl.
OK-Taste
iii. Wenn Sie den falschen Satelliten ausgewählt haben,
können Sie erneut mit den Auf/Ab-Tasten den gewünschten Satelliten auswählen und mit der OK-Taste die
Auswahl bestätigen.
C. Suchen des Satelliten
Funktion
Beschreibung
Satellitenanzeige
leuchtet auf
Bedienung
i. Nach der Auswahl des Satelliten beginnt der Suchvorgang
und die HOME-Statusanzeige erlischt und die entsprechende Satellitenanzeige blinkt.
ii. Wenn der Suchvorgang abgeschlossen ist, leuchtet die
Satellitenanzeige auf.
8
ENGLISH
D. Umschalten zwischen Satelliten
Beschreibung
Mit den Auf/Ab-Tasten
den gewünschten
Satelliten auswählen
OK-Taste
Bedienung
i. Wenn Sie auf einen anderen Satelliten umschalten
möchten, wählen Sie mit den Auf/Ab-Tasten den gewünschten Satelliten aus, und bestätigen Sie mit der OK-Taste
die Auswahl.
Funktion
Beschreibung
HOME-Taste
Bedienung
i. Wenn Sie die Antenne in die Parkposition zurückfahren
möchten, halten Sie die HOME-Taste für ein paar Sekunden
gedrückt.
SPANISH
F. GPS-LED-Anzeige
Funktion
Beschreibung
FRENCH
E. Zurückfahren der Antenne in die Parkposition
GERMAN
Funktion
Bedienung
i. Die GPS-LED bestätigt die Bestimmung der aktuellen
Position über 24 GPS-Satelliten.
DUTCH
GPS-Anzeige
ii. Wenn SNIPE die GPS-Signale identifiziert, leuchtet die
GPS-LED unabhängig vom Betriebszustand der Antenne
auf.
GPS trägt zur Beschleunigung des Suchvorgangs und zum
Auffangen des besten Satellitensignals bei, sodass SNIPE
den benötigten Erhebungs- und Azimutwinkel besser
berechnen kann.
iii. Während des Programm-Update-Vorgangs blinkt die
GPS-LED-Anzeige, was allerdings nicht auf den Empfang der
GPS-Signale hinweist.
9
3-3. Kurzanleitung
Zuordnung
Beschreibung
1. Die Antenne aus dem Koffer herausnehmen und auf ebenen Boden in die
Richtung Süden aufstellen, wo keine Hindernisse im Weg stehen.
2. Den linken Anschluss auf der Antenne-Rückseite mit dem Antennenkabel an
dem Controller anschließen.
Installation
&
Anschluss
a. Schließen Sie den Stecker des Controllerkabels an der Buchse auf der
Antenne-Rückseite mit einer Beschriftung „Controller“ an.
b. Schließen Sie den Stecker am anderen Ende des Kabels an der Buchse am
Controller an.
3. Den Controller an die Stromversorgung anschließen.
a. Wenn das Gerät von einer Fahrzeugstromquelle betrieben wird, den
Controller an den Zigarettenanzünder anschließen.
b. Wenn das Gerät zu Hause betrieben wird, den Controller an Netzteil
anschließen.
4. Den rechten Anschluss auf der Antenne-Rückseite mit dem Empfängerkabel
an dem Empfänger anschließen.
1. Den Netzschalter auf der Geräteoberseite einschalten.
2. Beim Einschalten des Geräts blinken alle LEDs zwei Mal.
Bedienung
(Suchen des Satelliten)
3. Warten bis HOME-Statusanzeige und Satelliten-Statusanzeige aufleuchtet.
Der Satellit kann entweder der Satellit, auf den sich die Antenne zuletzt
ausgerichtet hat, oder der erste Satellit auf dem Controller (Turksat) sein.
4. Den gewünschten Satelliten auswählen und mit der OK-Taste bestätigen.
5. Wenn die Satelliten-Anzeige blinkt, warten bis sie aufleuchtet.
6. Wenn die Satelliten-Anzeige aufleuchtet, können Sie Ihr Satellitenfernsehen
genießen.
Achtung
Wenn Sie ein Fahrzeug mit SNIPE in Gang setzen, müssen Sie sich stets
vergewissern, dass sich die Antenne in Parkposition befindet.
Hinweis
Car Montageanleitung wird gesondert werden können.
Hinweis
SNIPE automatisch gefaltet werden zurück zur HOME-Position, wenn das Fahrzeug
bewegt sich schneller als 10 km / h, wenn der Empfang von GPS-stabil ist.
10
Hinweis
Wenn Sie das Gerat zu Hause betreiben mochten, mussen Sie sich einen
Netzadaptor mit einerAusgangsspannung/-leistung von 18V/3,33A besorgen. Verwenden Sie NUR einen zertifizierten 18V/3,3A adaptor.
ENGLISH
4. Program-Update
4-1. Anschlussdiagramm für das Update
“Der USB-Anschluss für das Upgrade nur verwendet werden”
GERMAN
Haupteinheit
FRENCH
(Schwarze Farbe)
SPANISH
Controller
Controller
Controllerkabel
Controller
Typ B
DUTCH
Adapter oder Zigarettenanzünder
USB-Kabel
Typ A
PC
Einfach den Controller mit einem PC per USB-Kabel verbinden.
Das USB-Kabel ist im Lieferumfang nicht enthalten.
11
4-2. Update Process
Halten
i. Sie mit Hilfe des SNIPE Update-Programms die Satellitendaten Ihres SNIPE stet aktuell.
i. Update-Programm herunterladen
① Laden Sie das SNIPE Update-Programm
von unserer Website
(www.self-sat.com) runter.
※ Den Treiber herunterladen Datei, wenn Ihr
Betriebssystem nicht unterstützt.
② Laden Sie die aktuellen Satellitendaten
von unserer Website auf Ihren PC runter.
※ Achten Sie darauf, Ihr Produkt Lage und Download
richtigen Stelle Datei.
③ Verbinden Sie den Controller mit Ihrem PC per USB-Kabel, und installieren Sie das SNIPE Update-Programm,
das Sie runtergeladen haben.
ii. Aktualisieren der Daten der von Ihnen gespeicherten 10 Satelliten
④ Führen Sie das SNIPE Update-Programm.
⑤ Klicken Sie auf "Datei" auf der linken oberen
Seite auf Programm, und klicken Sie auf
"Öffnen", um Ordner, die heruntergeladen
Satelliten Daten enthält wählen.
⑥ Wählen Sie den entsprechenden Ordner
aus, und klicken den OK-Schalter an.
⑦ Wenn der Ordner geöffnet ist, wählen
Sie die Datei aus und klicken Sie den
OK-Schalter an.
⑧ Die Daten von 10 Satelliten Ihnen angezeigt,
aber sie sind nicht veränderbar selber.
⑨ Überprüfen Sie die Port-Einstellung,
dann klicken Sie auf die Schaltfläche
"Verbinden".
12
ENGLISH
FRENCH
⑪ Warten Sie, bis grüne Balken reicht bis
zum Ende und "Senden OK" Meldungsfeld
Aufspringen.
GERMAN
⑩ Once "SEND_DATA"-Taste aktiviert ist,
klicken Sie auf "SEND_DATA"-Taste.
⑫ Once "Senden OK"-Meldung angezeigt
wird, wird Update abgeschlossen.
SPANISH
iii. Aktualisieren der Benutzer 1~2
• USER 1~2 sind für zusätzliche Zugabe von
Ihnen gewünschten Satelliten, die nicht im
Voraus gespeichert.
DUTCH
• Nach dem Download der SNIPE UpdateProgramm starten.
Dann kreuzen Sie das Kästchen am USER 1 ~ 2,
die Sie aktualisieren möchten, und schreiben Sie
die Satelliten-Daten in der Box selber.
Dann folgen Sie den Vorgang ab ⑨ wie oben.
• Für weitere Informationen zu Satellitendaten
wenden Sie sich bitte an Ihren Vertragshändler.
HINWEIS
Schalten Sie nicht die Macht oder das Kabel vor dem Update-Vorgang beendet.
Wie Satelliten-Informationen zu aktualisieren, können durch die Spiegelung des neuesten Satelliten-Informationen geändert werden.
Bitte vergewissern Sie sich, um, wie das Produkt über unsere Website zu
aktualisieren.
13
5. Störungsbehebung
Es gibt eine Reihe Ursachen, die die Signalempfangsqualität oder den Betrieb des SNIPE
beeinträchtigen können. Der folgende Abschnitt befasst sich mit den häufigsten
Ursachen und deren eventuellen Lösungen.
A. Keine Reaktion, wenn der Controller eingeschaltet wird
i. Sämtliche Anschlüsse erneut überprüfen.
Die Verbindung zwischen der Macht und Controller
Die Verbindung zwischen dem Controller und der Antenne. Stellen Sie sicher, dass der linke
Anschluss der Antenne an den Controller angeschlossen werden soll.
ii. Überprüfen, ob das Zigarettenanzünder / Adapter kabel beschädigt ist.
B. Fehler bei Ausrichtung (Satelliten-Suche)
i. Hindernisse, wie Gebäude oder Bäume, können die Satellitensignale blockieren oder die
Qualität des Signalempfangs beeinträchtigen. Vergewissern Sie sich, dass die Umgebung
in südlicher Richtung frei von Hindernissen ist.
ii. Aktualisieren Sie das Programm des Controllers, sodass die Satellitendaten des SNIPE stets
aktuell bleiben.
C. Mechanische Probleme
i. Die Antenne hängt in einer bestimmten Position fest und bewegt sich nicht.
Schalten Sie den Netzschalter aus und wieder ein.
ii. Die Antenne macht während der Bewegung knackende Geräusche und hängt in einer
Stellung fest.
Schalten Sie den Netzschalter aus und wieder ein. Bei weiter bestehenden Problemen wenden
Sie sich an Ihren Vertragshändler.
D. Weitere Ursachen
i. Wenn die Kabel des Systems nicht ordnungsmäßig angeschlossen sind, läuft das System
nicht einwandfrei. Im Falle eines Kabelschadens, wenden Sie sich bitte an Ihren
Vertragshändler.
14
ENGLISH
6. Technische Daten
6-1. Abmessungen
188mm
GERMAN
MAX 422mm
MIN 188mm
126mm
316mm
FRENCH
454mm
6-2. Technische Daten
Gewicht
454 x 316 x 188 mm
Haupteinheit / Basic Package /
Komplettsatz (mit optionaler Teile)
10.1Kg / 15.6Kg / 19.1Kg
stationär
Antennengewinn
33.7 dBi @ 12.7GHz
Min EIRP
50 dBw
Polarisation
Linear (horizontal / vertikal)
LNB-Ausgang
1 Ausgang (optional 2 Ausgänge)
LNB Eingangsfrequenz
10.7 ~ 12.75 GHz
LNB Ausgangsfrequenz
950 ~ 2,150 MHz
Winkelbereich
15° ~ 90° / 360° / -60° ~ +60°
Suchgeschwindigkeit
DUTCH
Betriebsbedingung
SPANISH
Abmessungen
Erhebung / Azimut / Schiefe 6°/s / 12°/s / 15°/s
Satellitensuchzeit
180 Sekunden (max.)
Spannungsversorgung
DC 12~24V
Stromverbrauch
30W (während des Suchlaufs)
Betriebstemperatur
-30°C ~ +60°C
15
ENGLISH
Sommaire
1. Informations générales
Introduction . . . . . . . . . . . . . . . . . . . . . . . . . . . . . . . . . . . . . . . . . . . . . . . . . . . . . . . . . . . . . . . . . . . . . . . . . . . . . . . . . . . . . 2
Utilisation et fonctionnement . . . . . . . . . . . . . . . . . . . . . . . . . . . . . . . . . . . . . . . . . . . . . . . . . . . . . . . . . . . . . . . . . . . 3
Notice de sécurité . . . . . . . . . . . . . . . . . . . . . . . . . . . . . . . . . . . . . . . . . . . . . . . . . . . . . . . . . . . . . . . . . . . . . . . . . . . . . . . 4
GERMAN
1-1.
1-2.
1-3.
2. Contenu
Accessoires Inclus . . . . . . . . . . . . . . . . . . . . . . . . . . . . . . . . . . . . . . . . . . . . . . . . . . . . . . . . . . . . . . . . . . . . . . . . . . . . . . . 5
Nom des pièces . . . . . . . . . . . . . . . . . . . . . . . . . . . . . . . . . . . . . . . . . . . . . . . . . . . . . . . . . . . . . . . . . . . . . . . . . . . . . . . . . 6
FRENCH
2-1.
2-2.
3. Instructions de fonctionnement
3-1.
3-2.
3-3.
7
Diagramme de Connection
......................... . . . . . . . . . . . . . . . . . . . . . . . . . . . . . . . . . . . . . . . . . . . . . . . . . .
Fonctionnalités . . . . . . . . . . . . . . . . . . . . . . . . . . . . . . . . . . . . . . . . . . . . . . . . . . . . . . . . . . . . . . . . . . . . . . . . . . . . . . . . . . 8
Rapide tour de référence . . . . . . . . . . . . . . . . . . . . . . . . . . . . . . . . . . . . . . . . . . . . . . . . . . . . . . . . . . . . . . . . . . . . . . . 10
SPANISH
4. Mise à jour programme
4-1.
4-2.
Diagramme de connection pour mise à jour . . . . . . . . . . . . . . . . . . . . . . . . . . . . . . . . . . . . . . . . . . . . . . . . . . . 11
Comment mettre à jour? . . . . . . . . . . . . . . . . . . . . . . . . . . . . . . . . . . . . . . . . . . . . . . . . . . . . . . . . . . . . . . . . . . . . . . . . 12
DUTCH
5.Quelques solutions
5-1.
suelsues solutions
............................ . . . . . . . . . . . . . . . . . . . . . . . . . . . . . . . . . . . . . . . . . . . . . . . . . . .
14
6. Spécifications
6-1.
6-2.
Dimensions . . . . . . . . . . . . . . . . . . . . . . . . . . . . . . . . . . . . . . . . . . . . . . . . . . . . . . . . . . . . . . . . . . . . . . . . . . . . . . . . . . . . . 15
Spécifications . . . . . . . . . . . . . . . . . . . . . . . . . . . . . . . . . . . . . . . . . . . . . . . . . . . . . . . . . . . . . . . . . . . . . . . . . . . . . . . . . . . 15
1. Informations générales
1-1. Introduction
Ces instructions décrivent les fonctions et le fonctionnement du système satellite
d'inclinaison automatique de la contre polarité.
Le fonctionnement correct et sûr du système ne peut être assuré que par l'instruction
suivante, pour l'installation et le fonctionnement à la fois.
Votre SNIPE est un système de réception intelligent de la télévision par satellite, qui peut
s'aligner vers un satellite prérégler automatique aussi longtemps à condition que le système
soit situé dans la zone du signal de ce satellite.
Grâce à sa technologie innovante, SNIPE est facile à monter sur presque n'importe quel
véhicule à moteur. La SNIPE occupe seulement l'espace nécessaire pendant qu'elle exécute
les ajustements nécessaires avec une antenne mince et agile.
Pour le fonctionnement général, s'il vous plaît s'assurer que le système a toujours une vue
dégagée sur le ciel. Si le faisceau de signal du satellite est interrompue par des obstacles tels
que les montagnes, bâtiments ou d'arbres, l'appareil ne fonctionnera pas et aucun signal TV
sera reçu.
Les premières pages de ces instructions contiennent des informations sur l'utilisation des
fonctions générales de votre snipe, suivie par une explication de toutes les options
d'ajustement. Les dernières pages des instructions couvrent les différents aspects
techniques de la SNIPE.
2
ENGLISH
1-2. Utilisation appropriée et fonctionnement
Ce produit a été conçu pour être utilisé en usage portable et/ou une installation fixe sur les
véhicules dont la vitesse maximale est de 130 kilomètres par heure. Il permet de pointer
recevables en Europe.ATTENTION: la réception ne peut se faire que véhicule arrêté.La vitesse
maximale s'entend antenne repliée à la position Home / ne pas rouler antenne dépliée.
GERMAN
automatiquement l'antenne vers des satellites géostationnaires de transmission directe
La puissance electrique dont le système a besoin est fournie selon le système standard de
véhicule avec une tension nominale de 12 ou 24 Volts. Pour les installations où une connexion réseau au système électrique du véhicule est prévu, un convertisseur de puissance
appropriée 230-Volt à 12 Volt-doit être utilisé.
• Il n'est pas permis de changer l'ensemble du dispositif en supprimant ou en ajoutant des composants individuels.
• L'utilisation de tous les composants autres que ceux installés à l'origine n'est pas admissible.
SPANISH
Merci de noter également les instructions suivantes fournies par le fabricant:
FRENCH
L'utilisation de l'équipement pour toute autre fin que celle spécifiée n'est pas autorisée.
• L'installation doit être effectué uniquement par un personnel suffisamment qualifié. Toutes les remarques
fournies dans la partie instructions d'utilisation, qui font partie du mode d'emploi, doivent être scrupuleusement
respectées.
travaux d'entretien doivent toujours être effectués par un spécialiste qualifié.
DUTCH
• Le produit ne nécessite aucun entretien régulier. Boîtiers et coffrets ne doivent pas être ouverts. Contrôles et
• Pour le système de fixation pour vehicules, toutes les directives pertinentes et approuvées de l'industrie automobile doivent être observées et respectées.
• L'équipement doit être installé uniquement ou exploité sur les toits de véhicules durs ou au sol qui sont suffisamment dur et stable en soi.
• Évitez de nettoyer votre véhicule avec le système de satellites monté dans une station de lavage automatique de
voiture ou avec un nettoyeur haute pression ..
3
1-3. Notice de sécurité
Afin d'être sûr que votre SNIPE fonctionne correctement, vous devez vous assurer qu'elle est correctement
branchée, suivez les instructions de fonctionnement dans ce manuel.
Quand elle est correctement installée, l'antenne prend automatiquement la position de repos lorsque le
contact est allumé et elle se verrouille. Si le système ne peut pas rétracter complètement ou ne peut pas se
rétracter pour quel cause que ce soit, alors il est de votre responsabilité de vérifier que l'antenne est en
bien rangée en toute sécurité.
Merci de noter également que les différentes exigences légales s'appliquent à l'exploitation
d'équipements électriques et électroniques dans les différents pays. En tant d'utilisateur de cet équipement, vous êtes responsable de veiller au respect des lois et des règlements pertinents.
Le fabricant décline toute responsabilité pour les dommages directs ou indirects subi par le système
lui-même, les véhicules à moteur ou d'autres équipements ou de biens résultant de la connexion de
systèmes de batteries inappropriées ou d'installation / câblage par erreur.
4
ENGLISH
2. Contenu
2-1. Accessoires Inclus
Contrôleur bras de fixation
Câble du récepteur
(12m - couleur Gris)
Mallette de transport
Base Pads
GERMAN
Contrôleur
Unité principale
Manual
Option
Manuel d'utilisation
Option 1: Accessoire Auto, plaque de montage
Clé de montage
M6 × 15 , M4 × 16, M4 ×20
Installation
manual
Presse-étoupe
Contrôleur bras de fixation
Support de câble
DUTCH
Plaque de fixation
SPANISH
S'il vous plaît vérifier votre Colis lors de l'achat. Ces pièces d'option ne sont pas incluses dans le forfait de base.
(Veuillez contacter votre revendeur local / magasin pour plus d'informations sur les accessoires en option)
FRENCH
Câble du controleur
(12m - Couleur noire)
manuel d'installation de
la plaque pour véhicule
Option 2: Adaptateur secteur
Adaptateur
5
2-2. Nom des pièces
unité principale
LNB
pivot d'inclinaison : -60° ~ +60°
élévation : 15° ~ 90°
Corps :
360° tournant
Plaque de montage :
l'installation camping-car
Maintenir le corps
Eponge absorbante des chocs
vers le récepteur
vers le contrôleur
Contrôleur
voyant état du GPS
Bouton marche/arrêt
voyant état du produit
voyant du stellite
Bras de fixation
Installation de la plaque
de fixation voiture
Touche de retour position
Touche de position satellite haut/bas
vers unité principale
Port USB :
Touche OK
Pour F / W de mise à jour
Port d'alimentation :
DC 12 ~ 24V
6
ENGLISH
3. Instructions d'exploitation
3-1. Schéma de raccordement
GERMAN
unité principale
Télé
Recepteur satellite
FRENCH
Câble du récepteur
(couleur grise)
(couleur noir)
Contrôleur
Contrôleur
SPANISH
Câble du controleur
Contrôleur
Utilisez le câble de couleur noir du contrôleur pour relier ce dernier à l'antenne.
DUTCH
Adaptateur ou Prise allume cigar
Les deux câbles du contrôleur et du récepteur semblent identiques , merci de les
identifier par leur couleurs respectives.
Utilisation pour la portabilité
Monter 4 Coussin de la Base en dessous de la
plaque
7
3-2. Description des fonctonalités
A. Mise sous tension
Fonctionnalités
Description
interrupteur
d'alimentation
i. Une fois tous les câbles connectés, merci de mettre en
marche le produit en appuyant sur le bouton de mise sous
tension situé en haut des la plage des boutons du contrôleur.
Statut "HOME"
voyant allumé fixe
ii. Quand l'antenne est en position initiale "HOME", le voyant
fixe reste allumé pour indiquer que le produit est prêt à
être utilisé.
Statut "HOME"
voyant allumé fixe
fixe ON
◆
Operation
iii. Quand l'antenne n'est pas en position initiale "Home", le
voyant clignote, et l'antenne reviendra en position dans 2
minutes maximum, il suffit d'attendre et ne rien faire, le
voyant sera allumé en fixe à la suite.
La position initiale signifie que l'antenne est couchée complètement , ceci sera la position demandée pour
pouvoir mettre le produit et le ranger dans la mmalette de transport ou bien pour le montage sur un véhicule.
B. Séléction de satellites
Fonctionnalités
Description
Utilisation
i. Une fois antenne et contrôleur reliés, vous pouvez
selectionnez et changez de satellites comme vous voulez.
voyant
"selection satellite haut/bas" ii. Selectionnez le satellite voulu en appuyant sur les boutons
"haut/bas", puis appuyez sur le bouton "OK" our confirmer
votre choix.
Bouton "OK"
iii. Dans le cas où vous avez selectionné un faux satellite par erreue,
vous pouvez rechercher le satellite voulu en utilisant les boutons
"haut/bas", puis en appuyant sur "OK" pour confirmer votre choix.
C. Recherche de satellite
Fonctionnalités
Description
Utilisation
i. Après la sélection du satellite, "en position initiale" la lumière
s'éteindra et le voyant LED du satellite sélectionné clignote.
voyant "satellie"
ii. Une fois le satellite trouvé, le voyant LED du satellite
devient fixe.
8
ENGLISH
D. Chnagement de satellite
Description
Utilisation
voyant
i. Si vous voulez changer le satellite désiré, vous pouvez
"choix du satellite Haut/bas"
changer le satellite cible à l'aide du bouton"HAUT/BAS",
puis appuyez sur la touche «OK» pour confirmer le
Bouton "OK"
nouveau satellite.
Fonctionnalités
Description
Bouton “HOME”
Utilisation
i. Si vous voulez remettre l'antenne en "position initale",
appuyez sur le bouton "HOME" en appuyant longuement.
SPANISH
F. Voyant LED GPS
Fonctionnalités
FRENCH
E. Revient en position initiale
GERMAN
Fonctionnalités
Description
Utilisation
i. GPS LED confirme l'emplacement actuel parmi 24 satellites
dans le monde.
DUTCH
voyant "LED"
ii. Lorsque votre SNIPE identifie le signal GPS, le voyant LED GPS se
fixe, peu importe si votre antenne est à l'arrêt ou en mouvement.
le GPS permet de chercher le satellite rapidement et trouver le
meilleur signal satellite, et d'aider la SNIPE à avoir la meilleur
position d'élévation et un angle d'élévation optimum.
iii. En outre, lors de le mise à jour du programme, le voyant GPS
LED clignote pour indiquer que la procédure mise à jour est en
cours. Pour cette fois, le voyant GPS LED ne veut pas dire
communiquer avec le GPS par satellite ..
9
3-3. Référence rapide
Classification
Description
1. Sortez l'antenne de la mallette de transport, et la placer sur un terrain plat
vers le Sud et avec aucun obstacle devant.
2. Connecter le port gauche de l'antenne, qui est situé àl'arrière de l'unité
principale, et le contrôleur en utilisant le câble du contrôleur.
Installation
et
Connection
a. Connectez un bout du câble contrôleur au port « contrôleur » à l’arrière du
produit.
b. Connectez l’autre bout au port situé à l’arrière du contrôleur même.
3. Branchez le câble d'alimentation au contrôleur.
a. Si vous utilisez la source d'alimentation de la voiture, en utilisant la prise allume cigare
pour connecter le contrôleur.
b. Si vous utilisez à la maison, en utilisant le câble adaptateur pour connecter la source
au contrôleur. (Adaptateur non inclus- Consultez la section «Remarque» ci-dessous)
4. Connectez entre le port droit de l'antenne, qui est situé dans la partie arrière,
et le récepteur en utilisant un câble de récepteur.
1. Allumer avec le bouton "interrupteur d'alimentation" sur le dessus du contrôleur.
2. Lors de la mise sous tension, tous les voyant LED clignotent à 2 reprises.
En fonctionnement
(recherche de satellite)
3. Attendre à ce que le voyant LED "position initiale HOME" e celui du "Satellite",
selon votre choix intial depuis le contrôleur (Turksat), devient en position fixe.
4. Choisir le satellite voulu en utilisant la toucje "HAUT/BAS", puis appuyez sur la
touche "OK" pour confirmer votre choix.
5. Quand le voyany LED satellite clignote, veuillez attendre jusqu'à ce qu'il soit fixe.
6. Quand le voyany LED satellite devient fixe, vous pouvez regarder la télé depuis le satellite.
AVERTISSEMENT
Quand vous bougez ou manipulez la SNIPE, veuillez vous assurez qu'elle
est toujours en position initiale avant de la redémarrer.
NOTE
Les instructions de montage sur les vehicules sont fournis séparément.
NOTE
REMARQUE: SNIPE sera automatiquement repliée à la position HOME si le véhicule
se déplace plus vite que 10km / h, lorsque la réception du GPS est stable.
10
NOTE
Merci d'acheter un adaptateur secteur 18V/3;33A pour une utilization secteur
separement. On utilise uniquemen des adaptateur secteur 18V/3,3A certifies.
ENGLISH
4. Mise à jour
4-1. Diagramme de connection pour mise à jour
Le port USB est utilisé pour la mise à jour uniquement.
GERMAN
Unité principale
FRENCH
(couleur noir)
contrôleur
SPANISH
Câble du controleur
contrôleur
Contrôleur
Type B
DUTCH
Adaptateur ou Prise allume cigar
câble USB
Type A
PC
Connecté simplement le contrôleur au OC en utilisant un câble USB.
Le câble USB n'est pas inlus dans la boîte.
11
4-2. Progression mise à jour
En mettent à jour votre SNIPE, cela rafraichit la data des satellites de votre produit.
i. Mise à jour du programme de téléchargement
① Téléchargez le programme de mise à
jpur de votre SNIPE depuis notre site internet
(www.self-sat.com)
※ Télécharger le fichier pilote, si votre système
d'exploitation ne prend pas en charge.
② Téléchargez les dernières mise à jour des
satellites depuis notre site internet.
※ Assurez-vous que l'emplacement du produit
et le téléchargement de fichiers bon endroit.
③ Connectez le contrôleur à votre PC en utilisant un câble USN, et téléchargez par la suite le
programme de mise à jour de la SNIPE.
ii. Mise à jour des 10 satellites pré-enregistrés.
④ Exécutez le programme de mise à SNIPE.
⑤ Cliquez sur "file" sur le côté supérieur
gauche sur le programme et cliquez sur
"Ouvrir" pour sélectionner le dossier qui
contient les données satellitaires téléchargés.
⑥ Choisir le fichier et clickez sur 'OK" pour
confirmer.
⑦ Une fois le dossier ouvert, choisir le
fichier et clickez sur le bouton "ouvrir".
⑧ Les données de 10 satellites sont présentés
à vous, mais ils ne sont pas modifiables
par vous-même.
⑨ Vérifiez le paramétrage des ports, puis
cliquez sur le bouton "CONNECT".
12
ENGLISH
FRENCH
⑪ Attendez jusqu'à ce que la barre verte
atteint à la fin et "Envoi OK" boîte de
message est popping up.
GERMAN
⑩ Une fois "SEND_DATA" bouton est activé,
cliquez sur le "SEND_DATA" bouton.
⑫ Une fois le message "Envoi OK" est
affichée, la mise à jour est terminée.
SPANISH
iii. Mise à jour USER 1~2
• USER 1~2 sont pour l'addition supplémentaire
de vos satellites désirés qui ne sont pas
pré-enregistré.
DUTCH
• Une fois le téléchargement de la mise à jour
du programme SNIPE, démarrez-le.
Puis cocher la case USER 1 ~ 2 que vous
souhaitez mettre à jour, et d'écrire les
données satellitaires dans la boîte par
vous-même.
Suivez ensuite la procédure à partir ⑨ comme ci-dessus.
• Pour obtenir des informations détaillées des données satellitaires, merci de contacter votre
distributeur local.
REMARQUE
REMARQUE: Ne mettez pas l'appareil hors tension ou de débrancher le câble
avant la procédure mise à jour terminée
Comment mettre à jour les informations par satellite peut être changé en
réfléchissant les dernières informations par satellite.
S'il vous plaît assurezvous d'obtenir la mise à jour du produit via notre site web.
13
5. Solutions aux problèmes
Il ya un certain nombre de problèmes communs qui peuvent affecter la qualité de réception du signal ou le fonctionnement de la SNIPE. Les sections suivantes traitent de ces
questions et les solutions possibles.
A. Pas de réaction lors de la mise en tension du contrôleur.
i. Vérifiez de nouveau que toutes les connections on été proprement faites.
Connexion entre l'alimentation et le contrôleur
Connexion entre le contrôleur et l'antenne. Assurez-vous que le port gauche de l'antenne doit être
connecté au contrôleur.
ii. Vérifiez si la prise allume cigare / Adaptateur a été endommagée
B. Défaut de rechercher le satellite sélectionné
i. Les signaux des satellites peuvent être bloqués ou dégradés par les bâtiments, les arbres.
Assurez-vous qu'il n'ya aucune obstruction dans la direction vers le sud.
ii. Veuillez vérifier la version de votre logiciel régulièrement, et téléchargez les mises jours.
C. Problème méchanique
i. Dans e cas où l'antenne ne tourne pas sur certines positions.
Essayez d'éteindre et de rallumer votre produit par le biais du bouton ON/OFF.
ii. Dans le cas où l'antenne faitt un bruit lors du mouvement ou qu'elle a été coincée dans une
certaine position.
Essayez d'éteindre et de rallumer votre produit par le biais du bouton ON/OFF, s'il ne fonctionne pas,
merci de contacter votre distributeur pour assistance .
D. Autres
i. Si le système a été mal câblé, il ne fonctionnera pas correctement. Veuillez contactez votre
distributeur local pour de l'assistance.
14
ENGLISH
6. Spécifications
6-1. Dimensions
188mm
GERMAN
MAX 422mm
MIN 188mm
126mm
316mm
FRENCH
454mm
6-2. Spécifications
Poids
454 x 316 x 188 mm
Unité principale / Package basic /
Forfait complet (avec les pièces en option)
10Kg / 15.6Kg / 16.9Kg
à l'arrêt
Gain de l'antenne
33.7 dBi @ 12.7GHz
Min EIRP
50 dBw
Polarisation
Linéaire (Horizontale/ Vericale)
Sortie LNB
1 sortie (2 sorties optionel)
Fréquence d'entrée LNB
10.7 ~ 12.75 GHz
Fréquence de sortie LNB
950 ~ 2,150 MHz
rayon d'angle
15° ~ 90° / illimité (360°) / -60° ~ +60°
Vitesse de recherche
DUTCH
Condition de fonctionnement
SPANISH
Dimensions
Elevation/azimuth/inclinaison 6°/s / 12°/s / 15°/s
Temps de recherche du satellite
180 secondes (max.)
Energie requise
DC 12~24V
Consommation d'énergie
30W (en mouvement)
Tepérature de fonctionnement
-30°C ~ +60°C
15
ENGLISH
Contenidos
1. Informaciones Generales
Introducción . . . . . . . . . . . . . . . . . . . . . . . . . . . . . . . . . . . . . . . . . . . . . . . . . . . . . . . . . . . . . . . . . . . . . . . . . . . . . . . . . . . . . 2
Uso y funcionamiento adecuados . . . . . . . . . . . . . . . . . . . . . . . . . . . . . . . . . . . . . . . . . . . . . . . . . . . . . . . . . . . . . . 3
Notas de Seguridad . . . . . . . . . . . . . . . . . . . . . . . . . . . . . . . . . . . . . . . . . . . . . . . . . . . . . . . . . . . . . . . . . . . . . . . . . . . . . . 4
GERMAN
1-1.
1-2.
1-3.
2. Contenidos
Accessorios incluidos . . . . . . . . . . . . . . . . . . . . . . . . . . . . . . . . . . . . . . . . . . . . . . . . . . . . . . . . . . . . . . . . . . . . . . . . . . . . 5
Nombre de las piezas . . . . . . . . . . . . . . . . . . . . . . . . . . . . . . . . . . . . . . . . . . . . . . . . . . . . . . . . . . . . . . . . . . . . . . . . . . . . 6
FRENCH
2-1.
2-2.
3. Instrucción de Operación
3-1.
3-2.
3-3.
Diagrama de Conexión. . . . . . . . . . . . . . . . . . . . . . . . . . . . . . . . . . . . . . . . . . . . . . . . . . . . . . . . . . . . . . . . . . . . . . . . . . . 7
Descripción Funcional . . . . . . . . . . . . . . . . . . . . . . . . . . . . . . . . . . . . . . . . . . . . . . . . . . . . . . . . . . . . . . . . . . . . . . . . . . . 8
Referencia Rápida . . . . . . . . . . . . . . . . . . . . . . . . . . . . . . . . . . . . . . . . . . . . . . . . . . . . . . . . . . . . . . . . . . . . . . . . . . . . . . . 10
SPANISH
4. Actualización del Programa
4-1.
4-2.
Diagrama de Conexión para Actualización . . . . . . . . . . . . . . . . . . . . . . . . . . . . . . . . . . . . . . . . . . . . . . . . . . . . . 11
Proceso de Actualización . . . . . . . . . . . . . . . . . . . . . . . . . . . . . . . . . . . . . . . . . . . . . . . . . . . . . . . . . . . . . . . . . . . . . . . . 12
5-1.
Solución de Problemas . . . . . . . . . . . . . . . . . . . . . . . . . . . . . . . . . . . . . . . . . . . . . . . . . . . . . . . . . . . . . . . . . . . . . . . . . . 14
6. Especificaciones
6-1.
6-2.
Dimensión . . . . . . . . . . . . . . . . . . . . . . . . . . . . . . . . . . . . . . . . . . . . . . . . . . . . . . . . . . . . . . . . . . . . . . . . . . . . . . . . . . . . . . . 15
Especificaciones . . . . . . . . . . . . . . . . . . . . . . . . . . . . . . . . . . . . . . . . . . . . . . . . . . . . . . . . . . . . . . . . . . . . . . . . . . . . . . . . . 15
DUTCH
5. Solución de Problemas
1. Informaciones Generales
1-1. Introducción
Estos instrucciones describen las funciones y operaciones del sistema SNIPE, un sistema de
satélite via inclinación automática.
Sólo la observación correcta de las instrucciones de instalación y de operación puede garantizar un funcionamiento correcto y seguro del sistema.
Su SNIPE es un sistema inteligente de televisión por satélite que, por su vez, puede alinearse
hacia un satélite preestablecido de forma automática, siempre y cuando el sistema se
encuentra dentro de la huella de este satélite.
Gracias a su innovadora tecnologia, SNIPE es fácil de montar en casi cualquier vehículo de
motor. SNIPE sólo ocupa el espacio necesario y realiza los ajustes necesarios con un cuerpo
de antena delgado y ágil.
Para el funcionamiento general, asegúrese de que el sistema siempre tiene una vista clara
del cielo. Si el haz del satélite de la señal es interrumpida por obstáculos tales como montañas, edificios o árboles, la unidad no funcionará y no hay señal de TV serán recibidas.
Las primeras páginas de las instrucciones contienen informaciones sobre el uso de las
funciones generales de SNIPE, seguido por una explicación de todas las opciones de ajuste.
Las últimas páginas de las instrucciones se refieren a diversos aspectos técnicos de SNIPE.
2
ENGLISH
1-2. Uso y funcionamiento adecuados
Este producto ha sido diseñado para uso portátil o fijo en vehículos con velocidade máxima
de 130 km/h. Su diseño es para apuntar automaticamente a una antena de televisión en
La alimentación al sistema es suministrado por un sistema de vehículo eléctrico estándar con
una tensión nominal de 12 o 24 voltios. Para las instalaciones en que se prevé una conexión
GERMAN
satélites geoestacionarios que se transmiten directamente a Europa.
a la red al sistema eléctrico del vehículo, debe se utilizar un convertidor de potencia de 230
voltios para 12 voltios.
El uso del equipo para cualquier otro propósito distinto al especificado no está permitido.
FRENCH
• No se permite cambiar el dispositivo en todo ou parte mediante eliminación o adición de componentes individuales.
• El uso de cualquier otro componente que no sea el que fue instalado originalmente no está permitido.
SPANISH
Tenga también en cuenta las siguientes instrucciones del fabricante:
• La instalación sólo debe ser realizado por personal suficientemente cualificado. Todas las instrucciones que
aparecen en las Instrucciones de Instalación, que forman parte de las Instrucciones de Operación, deben se leer
cuidadosamente.
de mantenimiento siempre deben llevarse a cabo por un especialista calificado.
DUTCH
• El producto no requiere ningún mantenimiento regular. Las cajas no deben ser abiertos. Los controles y trabajos
• Para el sistema de montaje para automóvil, todas las directrices pertinentes a la industria del automóvil deben ser
observadas y cumplidas.
• El equipo debe ser instalado/operado en una superficie dura del vehículo, donde es suficientemente fuerte y
estable por sí.
• Evite limpiar el vehículo com el sistema de satélite montado en una sola raya o máquina de lavado de autos o con
un limpiador de alta presión.
3
1-3. Notas de Seguridad
Con el fin de asegurarse de que SNIPE funciona correctamente, usted debe asegurarse de que el está
conectado correctamente, siguiendo las Instrucciones de Operación de este manual.
Cuando se instala correctamente el equipo, la antena supone automáticamente la posición de reposo al
motor encenderse y, allí, bloquéase. Si el sistema no se puede retraer por completo o en absoluto debido
a alguna falla, entonces es su responsabilidad comprobar que la antena fue acondicionada correctamente
y con seguridad.
Tenga también en cuenta que hay diferentes requisitos legales aplicables a la operación de equipos
eléctricos y electrónicos en cada uno de los países. Siendo usuario de este equipo, usted es responsable de
asegurar el cumplimiento de las leyes y reglamentos pertinentes a su país.
El fabricante no acepta responsabilidad por los daños directos o indirectos o daños consequenciales al
sistema en sí, vehículos de motor u otro equipo o mercancía resultante de conexión de sistemas de
baterías inadecuadas o errores de instalación/cablado.
4
ENGLISH
2. Contenidos
2-1. Accessorios incluidos
Controlador
Controlador soporte
Cable receptor
(12m - Color gris)
Caja de transporte
Almohadillas de la Base
GERMAN
Unidad principal
Manual
Opción
Manual de instrucciones
Opción 1: montaje del coche accesorios de la placa
Llave Allen
M6 × 15 , M4 × 16, M4 ×20
Installation
manual
Prensaestopas
Controlador soporte
Portacables
DUTCH
Placa de montaje
SPANISH
Por favor revise su paquete de compra. Estas piezas opcionales no están incluidos en el paquete básico.
(Por favor, póngase en contacto con su distribuidor local / tienda para obtener más información sobre el
paquete opcional)
FRENCH
Cabo de controlador
(12m - Color negro)
Car placa de montaje
manual de instalación
Opción 2: Adaptador de potencia Inicio
Adaptador
5
2-2. Nombre de las piezas
Unidad principal
LNB
Pivote de inclinación : -60° ~ +60°
Elevación : 15° ~ 90°
Cuerpo principal :
360° de inflexión
Placa de montaje :
Instalación en coche de camping
Cuerpo de mantenimiento
Esponja para absorción de golpes
Para Receptor
Para Controlador
Controlador
Estado de luz GPS
Interruptor del encendido
Estado de luz HOME
Luz "Satélite"
Soporte
Car placa de montaje
instalación
Botón HOME
Botón Arriba/Abajo del satélite
Para unidad principal
Puerto USB :
Botón OK
Para actualización de F/W
Puerto de alimentación :
DC 12~24V
6
ENGLISH
3. Instrucción de Operación
3-1. Diagrama de Conexión
GERMAN
Unidad principal
TV
Receptor
FRENCH
Cable receptor
(Color gris)
(Color negro)
Controlador
Controlador
SPANISH
Cabo de controlador
Controlador
DUTCH
Adaptador o Toma de cigarillo
Conecte el controlador y antena utilizando el cable del controlador preto.
Como los cables del controlador y de la antena son iguales, verifique las colores
de etiqueta y de cable.
Uso portátil
Adjuntar 4 Almohadillas de la Base a la placa
inferior
7
3-2. Descripción Funcional
A. Encender
Función
Descripción
Interruptor del encendido
i. Cuando todas las conexiones de los cables se hayan
completadas, poner en marcha con el botón de “Interruptor del encendido” en la parte superior del controlador.
Encender luz sólida del
"Estado HOME"
ii. Si la posición de la antena está en posición de reposo,
“Estado de luz HOME” será sólido demonstrando que está
listo para usar.
Encender luz sólida del
"Estado HOME"
Encender luz sólida
◆
Operación
iii. Si la posición de la antena no está en posición de reposo,
“Estado de luz HOME” puede ser intermitente, y la antena
va a estar de vuelta en su posición incial en un máximo de
2 minutos. Entonces, “Estado de luz HOME” será sólido.
La posición de HOME significa que la antena está doblada por completo a la parte del cuerpo y es una posición
básica para transporte en estuche rígido o montado en el coche.
B. Selección de Satélite
Función
Descripción
Operación
i. Una vez que la antena y Controlador se comunican, puede
seleccionar y cambiar el satélite que desee.
Luz "Botón Arriba/Abajo
del satélite"
ii. Seleccione el satélite deseado utilizando las botones
“Arriba/Abajo”, luego pulse el botón “OK” para aceptar el ajuste.
Botón OK
iii. Si seleccionar satélite equivocado, puede volver a la
búsqueda de satélites de destino mediante los botones de
“Arriba/Abajo”. Luego, presione el botón “OK” para aceptar
la nueva configuración.
C. Búsqueda del satélite
Función
Descripción
Operación
i. Después de la selección de satélite, la luz “estado de HOME”
estará se apagando y la luz LED del sastélite seleccionado
parpadeará.
Luz "Satélite"
ii. Una vez seleccionado el satélite seleccionado, la luz LED
del satélite parpadeará.
8
ENGLISH
D. Cambiando satélite
Descripción
Operación
Luz "Botón Arriba/Abajo
i. Si desea cambiar el satélite, puede cambiar el de destino
del satélite"
con botones de “Arriba/Abajo” y después presione el
botón “OK” para aceptarlo.
Botón OK
Función
Descripción
Botón HOME
Operación
i. Cada vez que desees a volver la antena en posición inicial,
pulse botón “Home” y mantengalo por unos segundos.
SPANISH
F. Luz LED de GPS
Función
FRENCH
E. Regreso a la posición inicial
GERMAN
Función
Descripción
Operación
i. LED de GPS confirma la ubicación actual de 24 GPS’s en el
mundo.
DUTCH
Luz de GPS
ii. Cuando SNIPE identificar la señal GPS, LED de GPS será
solido, no importando si la antena está en pausa o en
movimiento.
GPS ayuda a buscar mejores condiciones de satélites más
rápidamente y alcanzar un mejor señal de satélite, más alla
de ayudar a SNIPE encontrar mejor ángulo de inclinación y
de elevación.
iii. Además, mientras que el programa hace actualización, la
luz LED de GPS se parpadeará para mostrar que el proceso
de actualización está siendo procesado. En este tiempo, la
luz LED de GPS no significa que está comunicándose con
los satélites GPS.
9
3-3. Referencia Rápida
Clasificación
Descripción
1. Saque la antena de la Caja de Transporte y póngala en el terreno plano hacia
el cielo del sur y deje libre de todos obstáculos.
2. Conecte el conector de izquierda en lado trasero con el controlador,
utilizando el cable de antena.
Instalando
y
Conectando
a. Conecte una punta del cable del controlador al conector con indicación
“Controlador”.
b. Conecte la otra punta al conector del Controlador.
3. Conecte el cable de alimentación para controlador.
a. Si utiliza la fuente de alimentación del vehículo, conecte la antena y
controlador a través de toma de cigarillo
b. Si usa en casa, usar el cabo de adaptador para conectar al controlador.
4. Conecte el conector trasero de derecha con receptor a través del cabo de
receptor.
1. Ascenda el interruptor superior del controlador.
2. Tras el encendido, todas las LED’s parpadearán dos veces
3. Espere hasta que “Estado HOME” y “LED de Satélite” se ascendan(el satélite
que fue seleccionado y, se fuera primera vez, el que está más arriba).
Operating
(Searching the satellite)
4. Seleccione el satélite deseado utilizando las teclas “Arriba/Abajo” luego
presione el botón “OK” para aceptar.
5. Cuando la luz LED de satélite empiezar a parpadear, espere hasta que se
convierta en sólido.
6. Cuando la luz LED del satélite se solidifica, empiezar a ver la televisión por
satélite!
ADVERTENCIA
Cuando se mueve SNIPE, asegúrese de que la posición de la antena estea
en posición inicial.
NOTA
La instrucción de montaje del coche se proporciona por separado.
NOTA
SNIPE se retirarán automáticamente a la posición HOME si el vehículo se
mueve más rápido de 10 km / h, cuando la recepción de GPS es estable.
NOTA
Para utilizarla en su casa, por favor compre, por parte, un adaptador acima
de 18V/3.33A. Utilice solo el adaptador certificado de 18V/3.3A.
10
ENGLISH
4. Actualización del Programa
4-1. Diagrama de Conexión para Actualización
Puerto USB se utiliza para actualizar el firmware sólo.
GERMAN
Unidad principal
FRENCH
(Color negro)
Controlador
SPANISH
Cabo de controlador
Controlador
Controlador
Tipo B
DUTCH
Adaptador o Toma de cigarillo
USB cable
Tipo A
PC
Basta conectar el controlador con PC a través de cable USB.
El cable USB no está incluido en el paquete.
11
4-2. Proceso de Actualización
Utilizando el programa de actualización SNIPE, actualize todos los datos de
los satélites de su SNIPE.
i. Descarga de la actualización del programa
① Descargue el programa de actualización
SNIPE a su PC desde la página principal
(www.self-sat.com).
※ Descargue el archivo del controlador, si su
sistema operativo no lo soporta.
② Descargue los nuevos datos obtenidos por
satélite en su PC desde nuestra página web.
※ Asegúrese de que la ubicación del producto
y el archivo de descarga ubicación correcta.
③ Conecte el controlador el PC con controlador mediante cable USB y instale el programa de
actualización de SNPIE que ha descargado.
ii. Actualización de 10 informaciones de satélites que están armacenadas previamente
④ Ejecute el programa de actualización SNIPE.
⑤ Haga clic en "Archivo" en la parte superior
izquierda sobre el programa y haga clic en
"Abrir" para seleccionar la carpeta que
contiene los datos descargados por satélite.
⑥ Seleccione la carpeta y haba clic en
botón “Aceptar”.
⑦ Cuando la carpeta se abre, seleccione el
archivo y haga clic en el botón “Abrir”.
⑧ Los datos de 10 satélites se muestran a
usted, pero no se pueden modificar por
sí mismo.
⑨ Compruebe la configuración del puerto, a
continuación, haga clic en el botón
"CONNECT"
12
ENGLISH
FRENCH
⑪ Espere hasta que la barra verde llega
hasta el final y "Enviar OK" cuadro de
mensaje está apareciendo.
GERMAN
⑩ Una vez "SEND_DATA" botón está activado,
haga clic en el "SEND_DATA" botón.
⑫ A vez "Enviar OK" cuadro de mensaje se
muestra, la actualización se ha
completado
SPANISH
iii. Actualización de los usuarios 1~2
• USUARIO 1~2 son para la adición extra de
los satélites deseados que no han sido
almacenadas previamente.
DUTCH
• Después de descargar el programa de
actualización SNIPE, inícielo.
A continuación, marque la casilla USER 1 ~
2 que desea actualizar y escribir los datos
de los satélites de la caja por su cuenta.
A continuación, siga el procedimiento
desde el ⑨ que el anterior.
• Para obtener informaciones detalladas de los datos obtenidos por satélite, póngase en contacto con
su distribuidor local.
NOTA
NOTA: No apague la unidad ni desconecte el cable antes de que termine el
procedimiento de actualización.
Cómo actualizar la información por satélite puede ser cambiado por que
refleja la más reciente información de los satélites.
Por favor, asegúrese de obtener la forma de actualizar el producto a través
de nuestro sitio web.
13
5. Solución de Problemas
Hay una serie de problemas comunes que pueden afectar a la calidad de recepción del
señal o del funcionamiento de SNIPE. En las secciones siguientes se abordan estas
questiones y sus soluciones posibles.
A. No hay reaccion cuando se enciendoe el controlador.
i. Verifique de nuevo todas las conexiones de los cables están correctas.
La conexión entre la alimentación y el controlador
La conexión entre el controlador y la antena. Asegurarse de que el puerto izquierdo de la antena debe
estar conectada al controlador.
ii. Verifique se la toma de cigarrillo / adaptador ha sido dañado.
B. Dejar de buscar el satélite seleccionado
i. "Las señales del satélite pueden ser bloqueadas o degradadas por los edifícios o los
árboles. Asegúrese de que no hay obstáculos a la dirección hacia el sur."
ii. Revise su programa de controlador a menudo y obtenga las últimas actualizaciones a SNIPE.
C. Problemas mecánicos
i. Si la antena no se mover en cierta posición.
Intente de apagar y encender de nuevo.
ii. Si la antena hacer ruido, mientras que el movimento se bloqueó en cierta posición.
Intente de apagar y encender de nuevo. Si no funciona, por favor póngase en contacto con su
distribuidor local para obtener ayuda.
D. Otros problemas
i. Si el sistema ha sido mal conectado, no funcionará correctamente. Póngase en contacto
con su distribuidor local para la asistencia de los daños en los cables.
14
ENGLISH
6. Especificaciones
6-1. Dimensión
188mm
GERMAN
MAX 422mm
MIN 188mm
126mm
316mm
FRENCH
454mm
6-2. Especificación
Peso
454 x 316 x 188 mm
Unidad principal / Paquete Básico /
Full Package (con piezas opcionales)
10Kg / 15.6Kg / 16.9Kg
Estacionario
Antena Gain
33.7 dBi @ 12.7GHz
Min EIRP
50 dBw
Polarización
Linear (Horizontal / Vertical)
Salida LNB
1 salida (2 salidas opcionales)
Frecuencia de entrada de LNB
10.7 ~ 12.75 GHz
Frecuencia de salida de LNB
950 ~ 2,150 MHz
Rango de ángulo
15° ~ 90° / ilimitado (360°) / -60° ~ +60°
Velocidad de búsqueda
Elevación / Azimut / Inclinación
DUTCH
Condición de trabajo / estacionario
SPANISH
Dimensión
6°/s / 12°/s / 15°/s
Tiempo de búsqueda por satélete
180 segundos (máx.)
Requisitos de energía
DC 12~24V
Consumo de energía
30 W (en la búsqueda)
Temperatura de funcionamiento
-30°C ~ +60°C
15
ENGLISH
Inhoud
1. Algemene informatie
Introductie . . . . . . . . . . . . . . . . . . . . . . . . . . . . . . . . . . . . . . . . . . . . . . . . . . . . . . . . . . . . . . . . . . . . . . . . . . . . . . . . . . . . . . . 2
Correct gebruik en bediening . . . . . . . . . . . . . . . . . . . . . . . . . . . . . . . . . . . . . . . . . . . . . . . . . . . . . . . . . . . . . . . . . . . 3
Veiligheid . . . . . . . . . . . . . . . . . . . . . . . . . . . . . . . . . . . . . . . . . . . . . . . . . . . . . . . . . . . . . . . . . . . . . . . . . . . . . . . . . . . . . . . . 4
GERMAN
1-1.
1-2.
1-3.
2. Inhoud
Onderdelenlijst . . . . . . . . . . . . . . . . . . . . . . . . . . . . . . . . . . . . . . . . . . . . . . . . . . . . . . . . . . . . . . . . . . . . . . . . . . . . . . . . . . 5
Namen van de onderdelen . . . . . . . . . . . . . . . . . . . . . . . . . . . . . . . . . . . . . . . . . . . . . . . . . . . . . . . . . . . . . . . . . . . . . . 6
FRENCH
2-1.
2-2.
3. Gebruiksaanwijzing
3-1.
3-2.
3-3.
Aansluitschema . . . . . . . . . . . . . . . . . . . . . . . . . . . . . . . . . . . . . . . . . . . . . . . . . . . . . . . . . . . . . . . . . . . . . . . . . . . . . . . . . 7
Functiebeschrijving . . . . . . . . . . . . . . . . . . . . . . . . . . . . . . . . . . . . . . . . . . . . . . . . . . . . . . . . . . . . . . . . . . . . . . . . . . . . . 8
Beknopte bedieningsinstructies . . . . . . . . . . . . . . . . . . . . . . . . . . . . . . . . . . . . . . . . . . . . . . . . . . . . . . . . . . . . . . . . 10
SPANISH
4. Firmware update
4-1.
4-2.
Aansluitschema voor het bijwerken van . . . . . . . . . . . . . . . . . . . . . . . . . . . . . . . . . . . . . . . . . . . . . . . . . . . . . . . 11
Werk proces . . . . . . . . . . . . . . . . . . . . . . . . . . . . . . . . . . . . . . . . . . . . . . . . . . . . . . . . . . . . . . . . . . . . . . . . . . . . . . . . . . . . . 12
DUTCH
5. Probleem oplosser
5-1.
Probleem oplosser
........................... . . . . . . . . . . . . . . . . . . . . . . . . . . . . . . . . . . . . . . . . . . . . . . . . . . .
14
6. Technische specificaties
6-1.
6-2.
Afmetingen
Specificaties
................................... . . . . . . . . . . . . . . . . . . . . . . . . . . . . . . . . . . . . . . . . . . . . . . . . . .
................................... . . . . . . . . . . . . . . . . . . . . . . . . . . . . . . . . . . . . . . . . . . . . . . . . . .
15
15
1. Algemene informatie
1-1. Introductie
Deze instructies beschrijven de functies en het gebruik van de SATENNE SNIPE, het vollautomatische satellietsysteem met autoskew.
Correct en veilig gebruik van het systeem kan alleen worden gewaarborgd door het volgen
van de instructies, zowel voor installatie als voor het gebruik.
Uw SATENNE SNIPE is een intelligent satelliet-tv ontvangst systeem welke zichzelf automatisch kan uitrichten naar een voorgeprogrammeerde satelliet, zolang het systeem zich
binnen het bereik bevindt van de satelliet
Dankzij z’n innovatieve technologie, is de SATENNE SNIPE op vrijwel ieder voertuig gemakkelijk te monteren. De SATENNE SNIPE neemt door zijn compacte bouw slechts minimale
ruimte in beslag om zichzelf uit te richten
Voor algemene werking, moet u ervoor zorgen dat het systeem altijd een duidelijk zicht op
de hemel heeft. Als de satelliet het signaal van straal wordt onderbroken door obstakels,
zoals bergen, gebouwen of bomen, zal het toestel niet werken en geen tv-signaal wordt
ontvangen.
De eerste pagina’s van deze instructies bevatten informatie over de algemene functies van
uw SATENNE SNIPE, gevolgd door een uitleg over de opties om de SATENNE SNIPE aan te
passen. De laatste pagina’s beslaan verschillende technische aspecten van de SATENNE
SNIPE
2
ENGLISH
1-2. Correct gebruik en bediening
Dit product is ontwikkeld voor draagbaar gebruik en gemonteerd op voertuigen tot een
snelheid van 130 km/u. Het systeem is ontworpen om automatisch te richten op de geostaDe stroomvoorziening van het systeem word verzorgd door het stroomcircuit van het
voertuig met een gelijkspanning van 12V of 24V vanuit de accu. Wanneer het voertuig op
GERMAN
tionaire televisie satellieten die direct boven Europa uitzenden.
een 230VAC netaansluiting aangesloten is, kan er ook een 230V naar 12V omvormer
gebruikt worden.
Het gebruik van de apparatuur voor elk ander doel dan het gespecificeerde is niet
• Het is niet toegestaan om de SNIPE te veranderen door er componenten aan toe te voegen of te verwijderen.
Het gebruik van componenten anders dan de origineel geïnstalleerde is niet toegestaan.
SPANISH
Let ook op de volgende instructies van de fabrikant:
FRENCH
toegestaan.
• Installatie mag enkel gedaan worden door voldoende gekwalificeerd personeel. Alle instructies welke onderdeel
• zijn van de gebruiksaanwijzing moeten nauwlettend gevolgd worden.
Het product heeft geen regulier onderhoud nodig. De behuizing mag niet geopend worden. Controles en
Voor het monteren op voertuigen moet rekening gehouden worden met de wettelijke richtlijnen.
DUTCH
• onderhoud moet door een gekwalificeerde specialist uitgevoerd worden.
• Het systeem kan enkel geïnstalleerd/gebruikt worden op een sterke stabiele ondergrond of op een hard dak van
• een voertuig.
Vermijd het schoonmaken van uw voertuig met een geïnstalleerd satelliet systeem in een wasstraat of wasbox
• met een hogedrukreiniger.
3
1-3. Veiligheid
Om er zeker van te zijn dat uw SNIPE juist werkt, moet u controleren dat deze correct is aangesloten
volgens de gebruiksaanwijzing in deze handleiding.
Als het systeem correct is geïnstalleerd, zal het automatisch de ruststand opzoeken als de motor gestart
word en zal zich in deze positie vergrendelen. Het systeem sluit zich ook als er harder dan 6 km/u mee
gereden wordt. Als het systeem zichzelf niet volledig of helemaal niet kan sluiten door een storing, dan is
het uw verantwoordelijkheid om ervoor te zorgen dat de antenne veilig en juist weggeborgen wordt.
Let er ook op dat wettelijke voorschriften van het gebruik van elektrische en elektronische apparaten
kunnen verschillen per land. Het is uw verantwoordelijkheid, als gebruiker van het product, om zich van
de wetten en regels op de hoogte te stellen en deze na te leven.
De fabrikant en importeur zijn niet aansprakelijk voor directe, indirecte of vervolgschade aan het product
zelf, het voertuig of andere materialen die het gevolg zijn van een ongeschikte accu cq.stroomvoorziening
of foutieve installatie.
4
ENGLISH
2. Inhoud
2-1. Onderdelenlijst
Bediening beugel
Ontvangerkabel
(12m - grijs)
Draagtas
Kussentjes van de Basis
GERMAN
Bediening
Antenne
Manual
Optie
Gebruikershandleiding
Optie 1: Auto montageplaat accessoires
Inbussleutel
M6 × 15 , M4 × 16, M4 ×20
Installation
manual
Kabelwartel
Controller bracket
kabelhouder
DUTCH
Montageplaat
SPANISH
Controleer uw inkooppakket. Deze optie onderdelen zijn niet opgenomen in het basispakket.
(Gelieve uw plaatselijke dealer / winkel te contacteren voor meer informatie over de optie-pakket)
FRENCH
Antennekabel
(12m - zwart)
Auto montageplaat
installatiehandleiding
Optie 2: Home stroomadapt
Adaptor
5
2-2. Namen van de onderdelen
Antenne
LNB
Skew pivot : -60° ~ +60°
Skew : 15° ~ 90°
Rotatie :
360° turning
Montageplaat :
Voor camper/caravan installatie
Vaste basisdeel
Schokabsorberend rubber
Naar de satelliet ontvanger
Naar de bediening
Bediening
GPS status
Aan-/uitknop
Ruststand LED
Satelliet selectie LED
Beugel
Auto montageplaat
installatie
Inklap knop
Satelliet keuzeknoppen
Naar de antenne
USB poort :
Ok knop
Voor firmware update
Stroomingang :
DC 12~24V
6
ENGLISH
3. Stroomingang
3-1. Aansluitschema
GERMAN
Antenne
TV
Satelliet ontvanger
FRENCH
Satelliet ontvanger kabel
(12m - grijs)
(12m - zwart)
Bediening
Bediening
SPANISH
Antennekabel
Bediening
DUTCH
Adapter or Stroomkabel met sigarettenplug
Gebruik de zwarte kabel om de besturing aan de schotel te koppelen.
Gebruik een andere kleur kabel, of markeer ze, om onderscheid te houden
voor de kabel naar de receiver.
portable gebruik
Bevestig 4 Kussentjes van de Basis op de
bodemplaat
7
3-2. Functiebeschrijving
A. Aanzetten
Functie
Beschrijving
Werking
Aan/uit knop
i. Als alle kabels correct zijn aangesloten, zet de aan/uit knop
boven op de bediening in de aan positie.
Ruststand LED
brandt continu
ii. Als de antenne in de ruststand staat, zal de LED continu
branden om aan te geven dat het systeem klaar is voor
gebruik.
Ruststand LED knippert iii. Als de antenne niet in de ruststand staat, kan de LED
knipperen, de antenne zal binnen 2 minuten terugkeren
in de ruststand. Zodra de antenne weer in de ruststand
staat. zal de LED continu branden.
Continue
◆
De ruststand houdt in dat de antenne volledig voor transport in de koffer of in geval van dakmontage dat het
veilig is om mee te gaan rijden.
B. Selecteren van de satelliet.
Functie
Beschrijving
Werking
i. Zodra de antenne en de bediening gekoppeld zijn, kunt u
uw keuze maken uit de verschillende satellieten.
Satelliet keuzeknoppen ii. Selecteer de gewenste satelliet door middel van de satelliet
keuzeknoppen en druk dan bij de gewenste satelliet op OK
om de keuze te accepteren.
OK knop
iii. Als u een verkeerde keuze maakt kunt u opnieuw een
keuze maken met de keuze knoppen. Druk daarna
wederom op de OK knop om de keuze te bevestigen.
C. Het zoeken van de satelliet
Functie
Beschrijving
Werking
i. Na het selecteren van de satelliet gaat de ruststand LED uit
gaan en gaat de LED van de geselecteerde satelliet knipperen.
Satelliet selectie
ii. Zodra de gewenste satelliet is gevonden gaat de LED van
de satelliet continu branden.
8
ENGLISH
D. Veranderen van satelliet
Beschrijving
Werking
Satellietkeuze knoppen i. Als u de gewenste satelliet wilt veranderen, kunt u de
keuze van de satelliet veranderen door middel van de
keuze knoppen. Druk daarna op de OK knop om de
OK knop
nieuwe satelliet te bevestigen.
Functie
Beschrijving
Rustknop
Werking
i. Wanneer u de antenne in zijn ruststand wilt brengen druk
dan op de “HOME” knop en houd deze een paar seconden
ingedrukt.
SPANISH
F. GPS LED
Functie
FRENCH
E. Terug naar de ruststand
GERMAN
Functie
Beschrijving
Werking
i. De GPS LED bevestigt de huidige locatie ten opzichte van
24 GPS satellieten.
DUTCH
GPS LED
ii. Wanneer uw SNIPE een GPS signaal identificeert, gaat de
GPS LED continu branden, ongeacht of de antenne
stilstaat of beweegt. GPS zorgt ervoor dat de SNIPE de
satellieten sneller vindt en het beste signaal opvangt.
De ingebouwde GPS functie helpt bovendien met het
zoeken naar de beste elevatie hoek en skewhoek.
iii. Tijdens het updaten van de firmware knippert de GPS LED om
aan te geven dat de update procedure bezig is.
9
3-3. Beknopte bedieningsinstructies.
Soort
Beschrijving
1. Haal de antenne uit de draagkoffer en plaats deze op een vlakke stabiele ondergrond richting
het zuiden. Controleer dat er zich geen obstakels tussen de antene en de satelliet bevinden.
Installatie
en
aansluiting
2. Maak de verbinding tussen de antenne en de bediening.
a. Sluit de bijgeleverde zwarte kabel aan op de linker connector, gezien
vanaf de achterkant van de antenne.
b. Sluit het andere deel van de kabel aan op de bediening.
3. Sluit de stroomkabel aan op de bediening.
a. Sluit bij gebruik in een voertuig de stroomkabel met sigarettenplug aan.
b. Sluit bij gebruik in huis de adapter aan.
4. Sluit de rechter connector van de antenne aan op de satelliet ontvanger met
meegeleverde kabel.
1. Zet de bediening aan met de aan-/uitknop.
2. Alle LEDs knipperen tweemaal
Gebruik
(Het zoeken naar
de satellieten)
3. Wacht tot de LEDs van de ruststand en een satelliet continu branden. Het
geheugen van de bediening zorgt ervoor dat de laatst gebruikte satelliet
wordt weergegeven.
4. Selecteer de gewenste satelliet door middel van de keuzeknoppen en druk
daarna op de OK knop om uw keuze te bevestigen.
5. De LED van de gekozen satelliet knippert tijdens het zoekproces.
6. Zodra de LED continu brandt kunt u TV kijken.
WAARSCHUWING
Wanneer u de SNIPE gaat verplaatsen, zorg er dan voor dat de antenne in
zijn ruststand staat.
Opmerking
De montage instructies voor het installeren op voertuigen wordt er apart bijgeleverd.
Opmerking
SNIPE zal automatisch worden gevouwen terug naar HOME positie als het
voertuig beweegt sneller dan 10 km / u wanneer de ontvangst van GPS stabiel is.
Opmerking
Apart worden aangeschaft Power Adapter van ons, of als u het te kopen op
uw eigen, kopen ALLEEN 18V / 3,3 A, die is gecertificeerd.
10
ENGLISH
4. Firmware update
4-1. Aansluitschema voor het bijwerken van
"USB-poort wordt gebruikt voor firmware upgrades alleen"
GERMAN
Antenne
FRENCH
(12m - zwart)
Bediening
SPANISH
Antennekabel
Bediening
Bediening
Type B
DUTCH
Adapter or Stroomkabel met sigarettenplug
USB-kabel
Type A
PC
De SNIPE is voorzien de meest up-to-date satelliet software en is
bovendien dusdanig slim geprogrammeerd dat een wijziging van de
satelliet operators niet direct tot een update noodzaken. In het geval
een satelliet toch niet meer gevonden kan worden door de SNIPE, kunt u
eenvoudig zelf een firmware update uitvoeren.
Op de website (www.self-sat.com) vindt u meer informatie over de
update procedure.
11
4-2. Werk proces
Met behulp van SNIPE updateprogramma, vernieuwt de satelliet gegevens van uw SNIPE.
i. Update programma downloaden
① Download de SNIPE updateprogrammanaar
uw pc via de homepage
(www.self-sat.com).
※ Downloaden stuurprogramma-bestand,
als je OS ondersteunt deze functie niet.
② Download de nieuwste satelliet gegevens
naar uw PC via de homepage.
※ Zorg ervoor dat uw product locatie en
download juiste locatie bestand.
③ Sluit de controller aan op uw pc via eenUSB-kabel en installeer de updateSNIPE Programma
dat u gedownload.
ii. Werk de 10 satellieten die vooraf zijn opgeslagen
④ Voer het SNIPE update-programma
⑤ Klik op "bestand" op de linker-bovenzijde
op het programma, en klik op "open"
naar de map waarin gedownloade
satelliet data bevat te selecteren
⑥ Selecteer de map en klik op "OK" knop.
⑦ Wanneer de map wordt geopend,
selecteer het bestand en klik op de
knop "Openen".
⑧ De gegevens van 10 satellieten worden
weergegeven voor u, maar ze zijn niet
aanpasbaar door uzelf.
⑨ Controleer de poortinstellingen, klik
vervolgens op de "CONNECT" knop.
12
ENGLISH
FRENCH
⑪ Wacht tot groene balk reikt tot het
einde en "Verzenden OK" message box
verschijnen die je.
GERMAN
⑩ Once “SEND_DATA” button is activated,
click the “SEND_DATA” button.
⑫ Zodra "Verzenden OK" message box
wordt weergegeven, wordt update voltooid.
SPANISH
iii. Werk USER 1 ~ 2
• USER 1~2 zijn voor een extra toevoeging
van de gewenste satellieten, die niet
vooraf zijn opgeslagen.
DUTCH
• Na het downloaden van de update-programma
SNIPE, starten.
Vink dan het vakje op USER 1 ~ 2 die u
wilt bijwerken, en schrijf de satellietgegevens
in de doos zelf.
Volg dan de procedure vanaf ⑨ zoals
hierboven.
• For at få detaljerede oplysninger af satellitdata,bedes du kontakte din lokale forhandler.
OPMERKING
Schakel de stroom uit en koppel de kabel voor update-procedure voltooid.
Hoe satelliet-informatie bij te werken kan worden gewijzigd door
alsgevolg van de nieuwste satelliet informatie. Zorg ervoor dat u te krijgenhoe het product bij te werken via onze website (www.self-sat.com).
13
5. Probleemoplosser
Er zijn een aantal veelvoorkomende zaken de signaalkwaliteit of het functioneren van de
SNIPE kunnen beïnvloeden.
A. De aan/uitknop reageert niet.
i. Controleer of alle kabels goed zijn aangesloten
Verbinding tussen het vermogen en de Bediening
Verbinding tussen de Bediening en de antenne. Zorg ervoor dat de linker-poort van de antenne moet
worden aangesloten op de Bediening.
ii. Controleer of de sigaar jack / adapter is beschadigd.
B. De schotel kan de gewenste satelliet niet vinden.
i. Satellietsignalen kunnen geblokkeerd of verzwakt worden door gebouwen, bomen en
andere obstakels. Controleer of u vanuit de antenne vrij zicht op de satelliet heeft.
ii. Controleer op www.self-sat.com of er een firmware update dient plaats te vinden.
C. Mechanische problemen
i. In het geval dat de antenne niet meer beweegt.
Probeer dan de stroom aan en uit te zetten.
ii. In het geval dat de antenne een geluid maakt terwijl deze niet beweegt.
Probeer dan de stroom aan en uit te zetten. Als dit niet werkt neem dan contact op met uw lokale
verkoper voor assistentie.
D. Andere zaken
i. Als het systeem verkeerd is aangesloten zal het niet correct werken, neem contact op met
uw lokale verkoper voor assistentie en controle van de kabels.
14
ENGLISH
6. Technische specificaties
6-1. Afmetingen
188mm
GERMAN
MAX 422mm
MIN 188mm
126mm
316mm
FRENCH
454mm
6-2. Specificaties
Gewicht
454 x 316 x 188 mm
Hoofdeenheid / Basispakket /
Full Package (met optionele onderdelen)
10.1Kg / 15.6Kg / 19.1Kg
Stationair
Versterking signaal (Gain)
33.7 dBi @ 12.7GHz
Min. uitgestraald vermogen (EIRP)
50 dBw
Polarisatie
Lineair (Horizontaal/Verticaal)
LNB uitgang
1 aansluiting (optioneel 2e aansluiting)
Frequentiebereik input
10.7 ~ 12.75 GHz
Frequentiebereik output
950 ~ 2,150 MHz
Draaibereik
Elevatie/Rotatie/Skew 15˚-90˚/onbegrensd (360) / -60 ˚±60˚
Draaisnelheid
Elevatie/ Rotatie/ Skew
DUTCH
Type systeem
SPANISH
Afmetingen
6°/s / 12°/s / 15°/s
Maximale zoektijd
3 minuten
Ingangsspanning
DC 12~24V
Stroomverbruik tijdens zoeken
30W (in searching)
Werktemperatuur
-30°C ~ +60°C
15
Automatic
Flat Satellite Antenna


![[1] Mode démploi à l'intérieur Operating instructions inside](http://vs1.manualzilla.com/store/data/006907352_1-3dd17949c020c13ceeff0fd985491ad1-150x150.png)