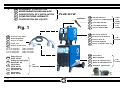
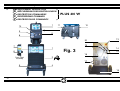
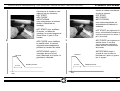
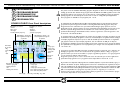
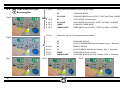
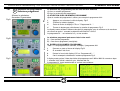
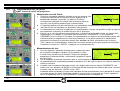
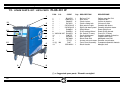
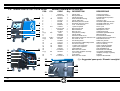
1
SYNERGIC MIG SERIES
Instruction Manual
WIRE FEEDER
PLUS 90
AMP 500 DGT TORCH
Betriebsanleitung
Livret d'Instructions
Manuale Istruzioni
Manual de instrucciones
PLUS 401 W
PLUS 502 W
This manual must be completed by the “CE Operating and service maual”
Diese Betriebsanleitung muß durch die ”CE Betriebs- und Wartungsanleitung”
Wartungsanleitung” ergänzt werden.
Ce livret doit etre integré avec "Livret 'usage et manutention CE"
Questo manuale deve essere integrato dal ”Manuale d’uso e manutenzione CE”
El presente manual debe ser adjuntado al “Manual de uso y manutención CE”
Sol Welding
Printed in date 02/10/08
Rev.
Rev. 01
Warning!
COOLER UNIT
GB
Warning! When working with the cooling unit, it should exclusively be used the coolant supplied by Sol Welding.
D
Warnung! Nur Sol Welding - Kühlflußigkeit in Wasserkühler
verwenden.
F
Attention! Pour le groupe réfrigérant, utiliser exclusivement
du liquide réfrigérant fourni par Sol Welding.
I
Attenzione! Per il gruppo refrigerante, utilizzare esclusivamente liquido refrigerante fornito da Sol Welding.
E
Atencion! En los grupos de refigeración utilize unicamente el
refrigerante proveido por Sol Welding.
Instruction Manual / Betriebsanleitung / Livret d'Instructions / Manuale Istruzioni / Manual de instrucciones
SYNERGIC MIG SERIES
INDEX
PAR.
DESCRIPTION / INDICE
Page
Introduction - Einleitung - Prémisse - Introduzione - Introducción - _______________________________________________ 4
Routine maintenance - Regelmäßige Wartung
4
Maintenance ordinaire - Manutenzione ordinaria - Manutención ordinaria - ______________________________________ 5
1.
General precautionary steps - Allgemeinesicherheit Smassnahmen 6
Precautions generales - Precauzioni generali - Precauciones generales __________________________________________ 7
2.
Electrical power safety regulations - Vorschriften für die elektrische Sicherheit 8
Normes de securite electriques - Norme di sicurezza elettriche - Normas de seguridad eléctricas______________________ 9
3.
Fire prevention safety regulations - Brandschutzvorschriften 8
Normes de securite anti-incendie - Norme di sicurezza antincendio - normas de seguridad anti incendio_______________ 9
4.
Equipment composition - Komponenten der Anlage Composition de l’installation - Composizione impianto - Composición del Equipo ___________________________________ 10
5.
Adjustment description - Beschreibung der Einstellungen Description commandes - Descrizione comandi - Descripción de conabdos _______________________________________ 12
6.
Connection to the main supply - Netzanschluß Raccordement à la ligne d’ usage -- Allacciamento alla linea di utenza - Conexión a la red de alimentacion ________________ 17
TIG installation - WIG Installation Installation TIG - Installazione TIG - Instalación TIG __________________________________________________________ 18
7.
8.
STICK installation - ELEKTRODE Installation Installation ELECTRODE - Installazione ELETTRODO - Instalación ELECTRODO __________________________________ 19
9.
MIG / MAG installation - MIG / MAG Installation 23
Installation MIG / MAG - Installazione MIG / MAG - Instalación MIG / MAG ______________________________________ 24
10.
Programming - Programmierung Programmation - Programmazione - Programación__________________________________________________________ 25
11.
Other functions - Verschiedene Funktionen 60
Autres fonctions - Altre funzioni - Otras funciones __________________________________________________________ 61
12.
Technical specifications - Tecnische Daten Détails techniques - Specifiche tecniche - Datos Técnicos _____________________________________________________ 62
13.
Spare parts list - Ersatzteil Liste Liste de pièces - Lista pezzi - Lista de precios _____________________________________________________________ 64
Electric schemes - Schaltplaene Schema electrique - Schemi elettrici - Esquemas eléctricos ___________________________________________________ 75
3
Instruction Manual / Betriebsanleitung / Livret d'Instructions / Manuale Istruzioni / Manual de instrucciones
Introduction
Einleitung
Power sources type PLUS 401 W - PLUS 502 W are suited for TIG Lift-arc, Electrode,
MIG/MAG and PULSED welding in the range of 400/500A.
•
•
•
Die Schweißgeneratoren PLUS 401 W - PLUS 502 W wurden für Anwendungen Pulse
Mig, Mig/Mag,Wig und Elektrode in dem Leistungsbereich bis 400/500A entwickelt.
Interconnecting cable can be long up to 4 mt. Higher lengths can be agreed
with our sales / assistance centres.
The correct functioning of the water cooler is granted for a maximum height of
7 mt.
It is forbidden to use the equipment for different application from
the ones listed in this manual.
•
Der Verbindungs-Schweißkabelsatz kann bis zu 4 m lang sein. Größere Länge
konnen mit Kundendienstabteilung vereinbart werden.
• Die Förderhöhe der Kühleinheit beträgt max 7 m.
• Jede von den aufgelisteten Anwendungen abweichende Art der
Anwendung ist verboten und kann die Sicherheit bei der Arbeit und die
Zuverlässigkeit der Anlage beeinträchtigen.
A different use from the one hereafter described can compromise the
security of work and the reliability of the equipment.
GB
Contact the service centre for advice and precautions, in case the unit must be
installed and used in site conditions.
It is suggested to make a maintenance cleaning of the unit every 2-3 months of
work, for this operation, please contact the Sol Welding service centre.
D
Falls Installation und Betrieb unter besonders schwierigen Bediengungen
erfolgen, sollten Sie sich für Hinweise und Vorsichtsmaßnahmen an das
Kundendienstzentrum wenden.
Eine ordentliche Wartung ist alle 2-3 Monate zu planen und nach Absprache mit
dem Kundendienstzentrum vorzunehmen.
ROUTINE MAINTENANCE
REGELMÄßIGE WARTUNG
Prevent metal powder from accumulating inside the equipment.
Vermeiden Sie, dass sich Metallstaub in der Stomquelle ansammelt.
Disconnect the power supply before every operation !
Carry out the following periodic controls on the power source:
• Clean the power source inside by means of low-pressure compressed
air and soft bristel brushes.
• Check the electric connections and all the connection cables.
For the use and maintenance of the pressure reducers, consult the specific manuals.
4
SYNERGIC MIG SERIES
Vor jedem Wartungseingriff die Stromzuführung von der
Anlage trennen.
Die Stromquelle regelmäßig prüfen:
• Den Generator innen mit Druckluft bei niedrigem Druck und mit weichen
Pinseln reinigen.
• Elektrische Verbindungen und Anschlußkabel prüfen.
Für die Instandhaltung und den Gebrauch der Gas Druckreduzierer die ent
sprechenden Anleitungen zu Hilfe nehmen.
Instruction Manual / Betriebsanleitung / Livret d'Instructions / Manuale Istruzioni / Manual de instrucciones
F
E
SYNERGIC MIG SERIES
Prémisse
Introduzione
Les générateurs type PLUS 401 W - PLUS 502 W sont développés pour des applications Tig Lift-arc, électrode, Mig/Mag et Mig Pulse avec une gamme allant jusqu’à
400/500A.
• Le faisceau câbles de connexion peut avoir une longueur allant jusqu’à 4 m.
Des longueurs supérieures peuvent être concordées avec le centre d’assistance.
• La prédominance de l’unité de refroidissement est de 7 m. max.
• Toute application différente de celles qui sont indiquées n’est
pas autorisée et peut compromettre la sécurité de travail et la
fiabilité de l’installation.
S’adresser au centre d’assistance pour des conseils et des précautions d’usage, dans les cas où l’installation et l’usage devraient se dérouler dans des
conditions particulièrement difficiles.
Il est conseillé d’exécuter une procédure d’entretien ordinaire tous les 2-3 mois à établir
avec le centre d’assistance.
I generatori tipo PLUS 401 W - PLUS 502 W sono sviluppati per applicazioni TIG
Lift-arc, Elettrodo, Mig/Mag e Mig pulsato con gamma fino a 400/500A.
•
I
Il fascio cavi di collegamento può essere lungo fino a 4 m. Lunghezze superiori
possono essere concordate con il centro di assistenza.
• La prevalenza dell'unità di raffreddamento è di max 7 m.
• Ogni applicazione diversa da quelle elencate non è consentita e
può compromettere la sicurezza di lavoro e l'affidabilità dell'im
pianto.
Rivolgersi al centro di assistenza per consigli e precauzioni d’uso, qualora l’installazione e l’uso dovessero svolgersi in condizioni particolarmente gravose.
È consigliata una procedura di manutenzione ordinaria ogni 2-3 mesi da concordare
con il centro di assistenza.
MAINTENANCE ORDINAIRE
Eviter l’accumulation de poussière metallique à proximité et sur les ailettes d’aération.
Couper l’alimentation électrique de l’installation avant
toute intervention!
Contrôles périodiques sur le générateur:
• Effectuer le nettoyage interne avec de l’air comprimé à basse pression
et des pinceaux souples.
• Contrôler les connexions électriques et tous les câbles de branchement.
Pour la maintenance et l’utilisation des réducteurs de pression, consulter
les manuels spécifiques.
MANUTENZIONE ORDINARIA
Evitare che si accumuli polvere metallica all’ interno dell’impianto.
Introducción
MANUTENCIÓN ORDINARIA
El generador tipo PLUS 401 W - PLUS 502 W fueron crea-dos para aplicaciones
TIG Lift-arc, Electrodo, Mig/Mag y Mig pulsados con gama hasta 400/500A.
- El paquete de mangueras puede ser de un largo de hasta 4 m. Larguras superiores
pueden ser convenudas con el centro de asistencia.
- La unidad de enfriamiento puede alcanzar un de máx. 7 m.
- Cada aplicación diferente de aquéllas enunciadas no es permitida y puede
comprometer la seguridad del trabajo y la fiabilidad de la instalación.
Dirigirse al centro de asistencia por consejos y precauciones de empleo en los
casos condiciones particulares y extremas.
Es aconsejada un procedimiento de manutención ordinaria cada 2-3 meses, favor concordar con el centro de asistencia.
Evitar la acumulación polvo metálico en el interior de la instalación.
Togliere alimentazione all’impianto prima di ogni intervento !
Controlli periodici al generatore:
• Effettuare la pulizia interna utilizzando l’aria compressa a bassa pressione
e pennelli a setola morbida.
• Controllare le connessioni elettriche e tutti i cavi di collegamento.
Per la manutenzione e l’uso dei riduttori di pressione consultare i manuali
specifici.
¡Atención! Antes de abrir la soldadora, apáguela, desconéctela
de la red y coloque un rótulo de aviso para que nadie la encienda.
Controles periódicos al generador:
• Efectuar la limpieza interior utilizando aire comprimido a baja presión y
pinceles a cerda blanda.
• Controlar las conexiones eléctricas y todos los cables de enlace.
Para la manutención y el empleo de los reductores de presión consultar los corre
spondientes manuales.
5
Instruction Manual / Betriebsanleitung / Livret d'Instructions / Manuale Istruzioni / Manual de instrucciones
GB
1. GENERAL
PRECAUTIONARY STEPS
1.
Welding operations can cause risks for the health of welders and other
operators working nearby if they are not performed correctly.
To avoid professional diseases it is therefore advisable to observe the basic
safety regulations.These can be summed up as follows:
Wenn Schweißvorgänge nicht sachgemäß ausgeführt werden, stellen
sie ein Gesundheitsrisiko für das Schweißpersonal und für alle
Personen dar, die sich in unmittelbarer Nähe befinden.
Daher wird dringend geraten, einige grundlegende
Sicherheitsvorschriften einzuhalten, die wie folgt zusammengefasst
werden können:
- Surround the area exposed to fumes and radiation caused by the welding process with special ANTI-REFLECTION screens or, if possible, carry
out welding in rooms or areas specifically prepared for this purpose.
- Protect your entire body with non-flammable clothes and accessories
(e.g. masks, helmets etc), which should not have pockets or protruding
parts and should fit as tightly as possible. Use rubber footwear so as to
obtain maximum isolation.
- Reduce the formation of welding fumes and gas by using non-treated,
clean and rust-free pieces of metal. Otherwise, use masks to help
breathing. Create a ventilation or aeration system that will allow for
proper flow and exchange of air.
6
SYNERGIC MIG SERIES
D
ALLGEMEINE SICHERHEITSMASSNAHMEN
- Der Bereich, der während des Schweißens Rauch bzw. Strahlung
ausgesetzt ist, muß mit speziellen ANTI-REFLEKTIONS-Schirmen
umgeben werden. Falls möglich sollte das zu schweißende Material in
speziell hierfür vorgesehene Räume bzw. Bereiche gebracht werden.
- Der Körper ist mit möglichst eng anliegender Kleidung oder mit
zusätzlichen Schutzmaßnahmen (Schutzmasken, Schutzhelmen usw.)
voll- kommen zu schützen; ferner ist zur entsprechenden Isolierung
Gummi-Schuhwerk zu tragen.
- Die Bildung von Rauch und Gasen ist einzuschränken, indem unbehandelte, saubere und rostfreie
Metallstücke verwendet werden; andernfalls wird zur besseren
Atmung die Verwendung von Schutzmasken empfohlen.
Außerdem ist ein Ventilator- oder Lüftungssystem zu schaffen, das
einen guten Luftaustausch ermöglicht.
Instruction Manual / Betriebsanleitung / Livret d'Instructions / Manuale Istruzioni / Manual de instrucciones
F
SYNERGIC MIG SERIES
1. PRECAUTIONS GENERALES
1. PRECAUZIONI GENERALI
Les opérations de soudure, si elles ne sont pas effectuées correctement,
représentent un risque pour la santé des opérateurs et de ceux qui se
trouvent à proximité immédiate.
Il est donc recommandé d’observer quelques normes de sécurité fondamentales, qui sont les suivantes:
Le operazioni di saldatura, se non opportunamente eseguite, rappresentano un rischio per la salute di operatori e di quanti si trovano
nelle immediate vicinanze.Si raccomanda pertanto, di osservare
alcune fondamentali norme di sicurezza riassumibili in:
-Limiter la zone exposée à des fumées et des radiations provenant de la
soudure en la délimitant avec des écrans spéciaux ANTI REFLET ou, si
possible, réserver à ces processus industriels, des locaux prévus à cet effet.
-Protéger toutes les parties du corps, avec des vêtements ou des accessoires (masques, casques, etc.) et dans la mesure du possible adhérents au
corps; utiliser des chaussures de caoutchouc afin de garantir une isolation.
-Limiter la formation de fumées et gaz en utilisant des pièces de métal
non traitées, propres et dépourvues de rouille ; dans le cas contraire, il est
recommandé d’utiliser des masques pour favoriser la respiration.
Réaliser de plus un système de ventilation ou aération qui permette une
bonne circulation de l’air.
-Limitare l’area esposta a fumi e radiazioni provenienti dalla saldatura
delimitandola con speciali schermi ANTI RIFLESSO o, se possibile,
riservare a questi processi industriali appositi locali
I
-Proteggere il corpo, in tutte le sue parti, con indumenti o accessori
(maschere, elmetti ecc.) e possibilmente aderenti al corpo; utilizzare
scarpe di gomma al fine di risultare opportunamente isolati.
-Limitare la formazione di fumi e gas utilizzando pezzi di metallo non
trattati, puliti e privi di ruggine; in caso contrario si raccomanda l’utilizzo di maschere per favorire la respirazione.
Realizzare inoltre un sistema di ventilazione o aerazione che permetta un buon ricambio d’aria.
1. PRECAUCIONES GENERALES
E
Las operaciones de soldadura que no son ejecutadas en modo apropiado, representan un riesgo para la salud de los operadores y de las personas que se encuentren en
las inmediatas mediaciones. Se recomienda por lo tanto tener presente las siguientes normas de seguridad:
- Limitar el área expuesta a humos y radiaciones procedentes de la soldadura delimitándola con especiales pantallas ANTI REFLEJO o si es posible, reservar locales
adecuados a estos procesos industriales.
- Llevar calzado resistente y aislante, incluso en condiciones de la humedad
- Proteger las manos con guantes aislantes
- Proteger los ojos de los rayos ultravioleta mediante un escudo con el filtro prescrito
- Utilizar únicamente ropa apropiada (poco inflamable)
- Utilizar protectores auditivos si el nivel de ruido es elevado
- Limitar la formación de humos y gas utilizando trozos de metal no tratados, limpios y faltos de óxido; en caso contrario se recomienda entregar al operador de máscaras
para favorecer la respiración.
- Contar con un sistema de ventilación o aireación adecuado que permita un buen recambio del aire.
7
Instruction Manual / Betriebsanleitung / Livret d'Instructions / Manuale Istruzioni / Manual de instrucciones
SYNERGIC MIG SERIES
2. ELECTRICAL POWER
SAFETY REGULATIONS
2.
VORSCHRIFTEN FÜR DIE
ELEKTRISCHE SICHERHEIT
- Avoid working with cables that are worn or frayed and make sure all phase
and grounding connections are correctly made with standard plugs.
- Niemals mit schad haften Kabeln arbeiten, der Anschluss von Phasen
und Erdleiter ist ordnungsgemäß mit einem Normstecker
auszuführen.
- Never wind torch or earth cables around he body.
- Die Schweißbrennerkabel oder das Werkstückkabel dürfen niemals
um den Körper gewickelt werden.
- Avoid operating in damp or wet environments without the proper precautionary measures.
- Avoid operating with a welding set which is not protected by panels or covers
so as to safeguard the hardware and, of course, the welder himself.
GB
3. FIRE PREVENTION - SAFETY
REGULATIONS
- Have suitable fire-extinguishers located in the work area and periodically
check their efficiency.
- Position the generator on a stable, flat horizontal surface, making sure that
aeration is sufficient and that over-heating is not caused by obstructions of the
rear panel.
- Follow all the regulations applicable when welding has to be carried out on
containers of lubricants or flammable substances.
- Es sollte niemals ohne entsprechende Schutzmaßnahmen in feuchten
oder nassen Räumen gearbeitet werden.
D
- Es sollte niemals mit dem Schweißgerät bei geöffnetem Gehäuse
gearbeitet werden, um die Sicherheit für Anlage und Bediener zu
gewährleisten.
3.
BRANDSCHUTZVORSCHRIFTEN
- Der Arbeitsbereich sollte mit entsprechenden Feuerlöschern
ausgestattet sein, die regelmäßig auf ihre Funktionstüchtigkeit zu
überprüfen sind.
- Das Schweißgerät auf eine stabile, waagerechte Fläche stellen und
sicherstellen, dass eine ausreichende Luftzufuhr vorhanden ist. Die
Platte an der Rückseite nicht abdecken, damit es nicht zu einer
Überhitzung kommt.
- Falls Schweißungen an Behältern für brennbare Stoffe
ausgeführt werden müssen, sind die entsprechenden Vorschriften
einzuhalten.
8
Instruction Manual / Betriebsanleitung / Livret d'Instructions / Manuale Istruzioni / Manual de instrucciones
F
SYNERGIC MIG SERIES
2. NORMES DE SECURITE ELECTRIQUES
2. NORME DI SICUREZZA ELETTRICHE
-Eviter de travailler avec des câbles détériorés et réaliser correctement la
connexion des phases et de la terre avec une fiche normalisée.
-Ne jamais enrouler les câbles de torche ou de masse autour du corps.
-Eviter de travailler dans des lieux humides ou mouillés sans les précautions
adéquates.
-Eviter de travailler avec la soudeuse dépourvue de panneaux ou couvertures
de protection pour sauvegarder la sécurité de l’installation et de l’utilisateur.
-Evitare di lavorare con cavi che siano in qualunque modo deteriorati e
realizzare correttamente la connessione delle fasi e della terra con una
spina normalizzata.
-Non avvolgere mai i cavi di torcia o di massa sul corpo.
-Evitare di operare in luoghi umidi o bagnati senza le adeguate precauzioni.
-Evitare di operare con la saldatrice priva di pannelli o coperture di
protezione per salvaguardare la sicurezza dell’impianto e dell’operatore.
3. NORMES DE SECURITE ANTI-INCENDIE
- Equiper la zone de travail avec des extincteurs prévus à cet effet et en
contrôler périodiquement l’efficacité.
- Positionner sur un plan solide et horizontal le générateur en s’assurant
qu’il y a une bonne aération et en évitant la surchauffe en obstruant le
panneau arrière.
- Adopter toutes les normes nécessaires dans le cas où il faudrait effecteur
la soudure sur des conteneurs de lubrifiants ou combustibles en général.
- Follow all the regulations applicable when welding has to be carried out
on containers of lubricants or flammable substances.
I
3. NORME DI SICUREZZA ANTINCENDIO
- Attrezzare l’area di lavoro con degli appositi estintori e controllarne
periodicamente l’efficenza.
- Posizionare su un piano solido e orizzontale il generatore assicurandosi che ci sia una buona aerazione ed evitarne il surriscaldamento
ostruendo il pannello posteriore.
- Adottare tutte le norme necessarie nel caso in cui si debbano eseguire
saldature su contenitori di lubrificanti o combustibili in genere.
2. NORMAS DE SEGURIDAD ELÉCTRICAS
E
-
Evitar trabajar con cables que sean deteriorados de cualquier modo y realizar correctamente la conexión de las fases y la tierra con una espina normalizada.
No enredar nunca los cables de la antorcha o de la masa sobre el cuerpo.
Evitar obrar en lugares húmedos o mojados sin las adecuáis precauciones.
Evitar obrar con la soldadora sin los paneles o coberturas de protección de modo de salvaguardar la seguridad de la instalación y el operador.
3. NORMAS DE SEGURIDAD ANTI INCENDIO
- Equipar el área de trabajo con los correspondientes extintores y controlando periódicamente los mismos.
- Posicionar el generador sobre un plano sólido y horizontal cerciorándose que se encuentre correctamente ventilado, no obstruir el panel posterior, peligro de
sobrecalentamiento.
- Adoptar todas las normas de seguridad necesarias en el caso en que se tengan que ejecutar soldaduras sobre contenedores de lubricante o combustibles.
9
SYNERGIC MIG SERIES
Instruction Manual / Betriebsanleitung / Livret d'Instructions / Manuale Istruzioni / Manual de instrucciones
4.
GB
D
F
I
E
EQUIPMENT COMPOSITION
KOMPONENTEN DER ANLAGE
COMPOSITION DE L’INSTALLATION
COMPOSIZIONE IMPIANTO
COMPOSICIÓN DEL EQUIPO
Fig. 1
GB
D
F
I
E
Interconnecting Cable:
Verbindungskabel:
Faisceau de cables:
Fascio cavi:
MIG/MAG
GB
D
F
I
E
AMP 500 DGT Torch
GB
D
F
I
E
Wire Feeder PLUS 90
GB
D
F
I
E
Cooler Unit
Schweißbrenner AMP 500 DGT
Torche AMP 500 DGT
Torcia AMP 500 DGT
Antorcha AMP 500 DGT
3 MT long
code:
TO403TO
4 MT long
code:
TO404TO
Drahtvorschub PLUS 90
Dévidoir PLUS 90
code:
V14760TF
Trainafilo PLUS 90
Avance de alambre PLUS 90
Paquete de mangueras:
1,5 m 70 mmq H2O
4,0 m 70 mmq H2O
10 m 70 mmq H2O
15 m 70 mmq H2O
code:
code:
code:
code:
V10690FC
V10700FC
V10710FC
V10720FC
Power Source
GB PLUS 401 W
Schweissstromquelle
D PLUS 401 W
F Générateur
PLUS 401 W
I Generatore
PLUS 401 W
E Generador
PLUS 401 W
10
PLUS 401 W
code:
V14054GE
Wasserküehler
Unité de refroidissement
Unità di raffreddamento
Unidad de enfriamiento
code:
V12870KI
SYNERGIC MIG SERIES
Instruction Manual / Betriebsanleitung / Livret d'Instructions / Manuale Istruzioni / Manual de instrucciones
4.
GB
D
F
I
E
EQUIPMENT COMPOSITION
KOMPONENTEN DER ANLAGE
COMPOSITION DE L’INSTALLATION
COMPOSIZIONE IMPIANTO
COMPOSICIÓN DEL EQUIPO
Fig. 2
GB
D
F
I
E
Interconnecting Cable:
Verbindungskabel:
Faisceau de cables:
PLUS 502 W
MIG/MAG
GB
D
F
I
E
AMP 500 DGT Torch
GB
D
F
I
E
Wire Feeder PLUS 90
Schweißbrenner AMP 500 DGT
Torche AMP 500 DGT
Torcia AMP 500 DGT
Antorcha AMP 500 DGT
3 MT long
code:
TO403TO
4 MT long
code:
TO404TO
Drahtvorschub PLUS 90
Dévidoir PLUS 90
code:
V14760TF
Trainafilo PLUS 90
Avance de alambre PLUS 90
Fascio cavi:
Paquete de mangueras:
1,5 m 70 mmq H2O
4,0 m 70 mmq H2O
10 m 70 mmq H2O
15 m 70 mmq H2O
code:
code:
code:
code:
V10690FC
V10700FC
V10710FC
V10720FC
Power Source
GB PLUS 502 W
Schweissstromquelle
D PLUS 502 W
F
I
E
Générateur
PLUS 502 W
Generatore
PLUS 502 W
Generador
PLUS 502 W
code:
V10620GE
11
SYNERGIC MIG SERIES
Instruction Manual / Betriebsanleitung / Livret d'Instructions / Manuale Istruzioni / Manual de instrucciones
5.
GB
D
F
I
E
ADJUSTMENT DESCRIPTION
BESCHREIBUNG DER EINSTELLUNGEN
DESCRIPTION COMMANDES
DESCRIZIONE COMANDI
DESCRIPCION DE COMANDOS
10
1
PLUS 401 W
11
12
9
2
8
20
13
19
7
1
6
14
15
Fig. 3
18
Front Panel
assembly
3
17
5
4
16
12
SYNERGIC MIG SERIES
Instruction Manual / Betriebsanleitung / Livret d'Instructions / Manuale Istruzioni / Manual de instrucciones
5.
GB
D
F
I
E
ADJUSTMENT DESCRIPTION
BESCHREIBUNG DER EINSTELLUNGEN
DESCRIPTION COMMANDES
DESCRIZIONE COMANDI
DESCRIPCION DE COMANDOS
10
1
PLUS 502 W
11
12
9
2
8
19
13
7
1
6
3
17
Fig. 4
18
20
15
Front Panel
assembly
5
14
4
16
13
Instruction Manual / Betriebsanleitung / Livret d'Instructions / Manuale Istruzioni / Manual de instrucciones
5.
GB ADJUSTMENT DESCRIPTION
D BESCHREIBUNG DER EINSTELLUNGEN
POS. 1 =
POS. 2 =
POS. 3 =
POS. 4
POS. 5
POS. 6
POS. 7
POS. 8
=
=
=
=
=
POS. 9 =
POS. 10 =
GB
POS. 11
POS. 12
POS. 13
POS. 14
POS. 15
POS. 16
POS. 17
POS. 18
POS. 19
=
=
=
=
=
=
=
=
=
POS. 20 =
control Panel ( see Page 25 )
MIG Torch Socket
water Tank Cap
(on PLUS 401 W open the lateral door)
negative output Socket ( - )
positive output Socket ( + )
(*) RS232 socket for program download
(*) switch to allow the software download
quick release connectors for inlet (blue) and
outlet (red)
positive output STICK ( + ) (OPTIONAL)
7 poles socket for AMP 500 DGT torch connection
(MIG/MAG Torch with digital control)
See Page 27
“INCH WIRE” push button
side panel for spool
Power Source main Switch “ON - OFF”
power Supply Cable
positive output Socket ( + ) for Wire Feeder
gas tank position slot
fast-on fittings Power Source / Wire Feeder
gas tank securing chain
7 poles socket for serial Wire Feeder connection
(to be used only with Wire Feeder type PLUS 90)
14 poles socket for Wire Feeder connection
(*) Use it only for Software download.
Remove the front panel (4 screws) to find the download switch and the RS232
connector.
For any other informations, please contact our nearest service point.
14
SYNERGIC MIG SERIES
D
POS. 1 = Bedienungspaneel ( Siehe Seite 25 )
POS. 2 = Binzel-Anschluß für MIG Brenner
POS. 3 = Abschraubbare Kappe für Wassernachfüllung
(Öffnen Sie bei dem Mod. PLUS 401 W die Abdeckhaube)
POS. 4 = Minus Ausgangsbuchse (-)
POS. 5 = Plus Ausgangsbuchse (+)
POS. 6 = (*) RS232 Buchse für Programmeinspeisung
POS. 7 = (*) Drucktaste zum Laden der Programmen
POS. 8 = Wasserschnellkupplungen Vorlauf (blau) und
Rücklauf (rot)
POS. 9 = Plus Ausgangsbuchse für Elektrodenkabel (OPTIONAL)
POS. 10 = 7 polige Anschlussdose für den Schweißbrenner vom
Typ AMP 500 DGT (MIG/MAG Schweißbrenner mit
digitaler Steuerung). Siehe Seite 27
POS. 11 = Drahteinschleichentaster “INCH WIRE“
POS. 12 = Drahtspulenkasten
POS. 13 = Hauptschalter „Ein-Aus“
POS. 14 = Netzkabel
POS. 15 = Plus Ausgangsbuchse (+) für Drahtvorschub
POS. 16 = Stellvorrichtung GASFLASCHE
POS. 17 = Schnellkupplungen Wasser Stromquelle/Drahtvorschub
POS. 18 = Befestigungskette der Gasflasche
POS. 19 = 7 polige Buchse für Drahtvoschubkoffer seriale
Anschluß (nur bei Drahtvorschub Typ PLUS 90)
POS. 20 = Kabel 14x1 (Zwischenschlauchpaket)
(*) Für Software-Neubearbeitungen benutzen.
Die 4 Schrauben wegnehmen und das Frontpanel entfernen, um die Drucktaste
erreichen und die Steckdose RS 232 an PC verbinden zu können.
Für mehrere Anweisungen, bitte setzen Sie sich in Verbindung mit Kundendienst.
Instruction Manual / Betriebsanleitung / Livret d'Instructions / Manuale Istruzioni / Manual de instrucciones
F
I
5.
DESCRIPTION COMMANDES
DESCRIZIONE COMANDI
POS. 1 =
POS. 2 =
POS. 3 =
POS. 4
POS. 5
POS. 6
POS. 7
POS. 8
=
=
=
=
=
POS. 9 =
F
SYNERGIC MIG SERIES
POS. 10 =
POS. 11
POS. 12
POS. 13
POS. 14
POS. 15
POS. 16
POS. 17
POS. 18
POS. 19
=
=
=
=
=
=
=
=
=
POS. 20 =
panneau de contrôle ( voir à la Page 25 )
prise BINZEL pour la connection de la torche MIG
bouchon pour l’alimentation de l’eau
(sur PLUS 401 W ouvrir le même panneau latérale)
prise de sortie négative ( - )
prise de sortie positive ( + )
(*) prise RS232 pour chargement des programmes
(*) interrupteur pour déchanger les programmes
raccords des connexions rapides envoi (bleus) et
retour (rouge).
prise de sortie positive Électrode ( + )
(OPTIONAL)
prise 7 pôles pour connection torche AMP 500 DGT
(Torche MIG/MAG avec contrôle digitale)
Voir à la Page 27
bouton pour l’enroulement du fil “INCH WIRE”
espaçe pour la bobine
interrupteur général du générateur “OUVERT-FERMÉ”
câble de l’ alimentation
prise de sortie positive ( + ) pour dévidoir
niche pour logement bouteille GAZ
connections rapides eau Générateur / Dévidoir
chaîne pour fixation bouteille
prise 7 pôles pour la connection sérielle Dévidoir
(à utiliser seulement avec le Dévidoir type PLUS 90)
prise 14 pôles pour la connection au Dévidoir
(*) Utilizer pour la mise à jour du software enlever le panneau frontal, ôtant les 4 vis, pour
acceder à l’ interrupteur et à la prise RS232 qu’il faut connecter à l’ordinateur.
Pour d’autres renseignements, contacter le centre d’assistance.
I
POS. 1 = pannello di controllo ( vedi Pag. 25 )
POS. 2 = presa BINZEL per allacciamento torcia MIG
POS. 3 = tappo per rabbocco acqua
(su PLUS 401 W aprire lo sportello laterale)
POS. 4 = presa di uscita negativo ( - )
POS. 5 = presa di uscita positivo ( + )
POS. 6 = (*) presa RS232 per scaricamento programmi
POS. 7 = (*) interruttore per scaricamento programmi
POS. 8 = raccordi rapidi mandata (blu) e ritorno
(rosso) acqua
POS. 9 = presa di uscita positivo ELETTRODO ( + )
(OPZIONALE)
POS. 10 = presa 7 poli per collegamento torcia AMP 500
DGT (Torcia MIG/MAG con controllo digitale)
Vedi Pag. 27
POS. 11 = pulsante avanzamento filo “INCH WIRE”
POS. 12 = vano porta bobina
POS. 13 = int. principale generatore “ACCESO-SPENTO”
POS. 14 = cavo di alimentazione
POS. 15 = presa di uscita positivo ( + ) per Trainafilo
POS. 16 = vano per alloggiamento bombola GAS
POS. 17 = raccordi rapidi acqua Generatore / Trainafilo
POS. 18 = catena per fissaggio bombola
POS. 19 = presa 7 poli per collegamento seriale Trainafilo
(da utilizzare solo per Trainafilo tipo PLUS 90)
POS. 20 = presa 14 poli per collegamento Trainafilo
(*) Utilizzare per aggiornamenti software.
Rimuovere il pannello frontale, togliendo le 4 viti, per l’accesso all’interruttore
e alla presa RS 232 da collegare al PC.
Per ulteriori informazioni contattare il centro di assistenza.
15
Instruction Manual / Betriebsanleitung / Livret d'Instructions / Manuale Istruzioni / Manual de instrucciones
5.
E
E
DESCRIPCION DE COMANDOS
POS. 1 = panel de control ( ver Pag. 25)
POS. 2 = presa BINZEL para conexión de antorcha MIG
POS. 3 = tapón del liquido refrigerante
(con PLUS 401 W abrir la ventanilla lateral)
POS. 4 = presa de salida negativa (-)
POS. 5 = presa de salida positiva (+)
POS. 6 = (*) presa RS232 para descarga de programas
POS. 7 = (*) interruptor para descargar los programas
POS. 8 = acoples rápidos (entrada y salida de agua)
POS. 9 = presa de salida positivo ELECTRODO ( + )
(OPTIONAL)
POS. 10 = toma 7 polos para la conexión antorcha AMP 500 DGT
(Antorcha MIG/MAG con control digital)
Ver Pag. 27
POS. 11 = pulsador para avance de alambre “INCH WIRE”
POS. 12 = vano lleva bobina
POS. 13 = int. principal del generador "ENCENDIDO-APAGADO"
POS. 14 = cable de alimentación
POS. 15 = presa de salida positiva (+) para Avance de alambre
POS. 16 = espacio para la ubicación del tubo de GAS
POS. 17 = acoples rápidos para el liquido refrigerante
Generador / Avance de alambre
POS. 18 = cadena para la instalación del tubo
POS. 19 = presa de 7 pines para conexión serial del alimentador de alambre
(disponible unicamente en la versión PLUS 90)
POS. 20 = presa de14 pines para conexión de la alimentación de alambre
(*) Utilizar para actualizar el software.
Quitar el panel frontal, quitando los 4 tornillos, para acceder a el interruptor y a el enchufe RS 232 da connecter
a el ordenador.
Por ulterior informacion contactar el centro de asistencia.
16
SYNERGIC MIG SERIES
Instruction Manual / Betriebsanleitung / Livret d'Instructions / Manuale Istruzioni / Manual de instrucciones
GB
F
SYNERGIC MIG SERIES
6. CONNECTION TO THE MAIN SUPPLY
6.
Before connecting the equipment to the main supply, check that the data
on the machine plate correspond to the supply voltage and frequency and
that its main switch is on the "0" position.
The connection to the main supply must be made by using the cable supplied with the machine, by connecting:
- the yellow-green wire to the earth;
- the remaining wires to the line.
Connect a suitable plug to the primary cable and fix to a socket fitted
with fuses or automatic switch; the earth terminal must be connected to
the earth connector (yellow-green) of the main supply.
Überprüfen Sie vor dem Anschluß, ob die Daten des Leistungsschildes
mit der vorhandenen Spannung und Frequenz übereinstimmen und ob
der Hauptschalter in der "O"-Position steht.
Der Anschluß wird mit dem mitgelieferten Kabel vorgenommen, wobei
- der 3. Leiter (grün-gelb) für die Erdungvorgesehen ist
- die Leiter für den Stromanschluß.
Eine genormte dreipolige Steckvorrichtung mit ausreichender und mit
angemessenem Nennstrom an das Netzkabel anschließen. Der Pulsanlage
einen Schutzschalter mit angemessener Absicherung gegen Kurzschluß
und Uberlastung vorschalten.
D
NETZANSCHLUß
Note: Additional main cable extensions must have an adequate section.
In no case must the extension section be smaller than the one of the
main cable supplied.
Zur Beachtung : Bei einer eventuellen Verlängerung des Netzkabels
muß der Querschnitt höher als der des mitgelieferten Kabels sein.
6. RACCORDEMENT A’ LA LIGNE D’ USAGE
6. ALLACCIAMENTO ALLA LINEA DI
UTENZA
Après raccorder l'implantation à la ligne d'usage, controller que la tension et la
fréquence de réseau correspondent à celles réportes sur la plaque de l'implantation et que l'interrupteur soit sur la position "0".
Le raccordement à le réseau peut etre exécuté avec le cable tripolare en dotation à l'implantation raccordant:
- le conducteur jaune-vert à l'implantation de terre;
- le restants deux conducteurs à le réseau.
Raccorder au cable d'alimentation un'épine normalisée de portée adéquate et
prédisposer une prise de réseau dotée de fusibles ou interrupteur automatique.
Assurer que le terminal de terre soit raccordé au
conducteur de terre (JAUNE-VERT) de la ligne d'alimentation.
Nota: eventuels prolonges du cable d'alimentation doivent etre de selection
adequate, en aucun cas inferieur à celle du cable en dotation.
I
Prima di collegare I'impianto alla linea di utenza controllare che la tensione e la frequenza di rete corrispondano a quelle riportate sulla targa
dati dell'impianto e che I'interruttore sia sulla posizione "0".
L'allacciamento alla rete può essere eseguito mediante il cavo in dotazione all'impianto collegando:
- il conduttore giallo-verde all'impianto di terra;
- i restanti conduttori alla rete.
Collegare al cavo di alimentazione una spina normalizzata di portata adeguata e predisporre una presa di rete dotata di fusibili o interruttore
automatico. Assicurarsi che il terminale di terra sia collegato al conduttore di terra (GIALLO-VERDE) della linea di alimentazione.
Nota: eventuali prolunghe del cavo di alimentazione devono essere di
sezione adeguata, in nessun caso inferiore a quella del cavo in dotazione.
17
Instruction Manual / Betriebsanleitung / Livret d'Instructions / Manuale Istruzioni / Manual de instrucciones
SYNERGIC MIG SERIES
6. CONEXIÓN A LA RED DE ALIMENTACION
E
7.
GB
F
18
Antes de conectar el equipo a la línea de alimentación, controlar que la tensión y la frecuencia de red correspondan a las indicadas en el placa de especificaciones (ubicada
en la parte posterior del generador) y que interruptor se encuentre en la posición" 0." La conexión a la red puede ser realizada a través del cable en dotación conectando:
- el conductor amarillo-verde a la instalación de tierra;
- los restantes conductores a la red.
Conectar al cable de alimentación una espina normalizada de alcance adecuado (amperios), predisponer una toma de red dotada de fusibles o interruptor automático.
Cerciorarse que el terminal de tierra sea conectado al conductor de tierra (AMARILLO-VERDE) de la línea de alimentación.
0Nota: En el caso de utilizar cables para prolongar la alimentación, los mismos deben ser de sección apropiada y bajo ningún caso, de sección menor a la del cable presente
en la instalación original.
GB
D
F
I
E
TIG INSTALLATION
WIG INSTALLATION
INSTALLATION TIG
INSTALLAZIONE TIG
INSTALACIÓN TIG
Refer to Fig. 3-4 (see pages 12-13).
1) Do not connect the Wire Feeder.
2) Connect the Ground Cable to Socket ( 5 ).
3) Connect the TIG Torch to Socket ( 4 ).
4) Refer to Par. 10 for Welding parameter.
Faire référence aux Fig. 3-4 (voir à la Page 12-13).
1) Ne connecter pas le Dévidoir.
2) Connecter le câble de masse à la prise ( 5 ).
3) Connecter la torche TIG à la prise ( 4 ).
4) Régler les paramètres de la soudure en faisant référence au Par. 10.
D
Auf Bilder 3-4 (Siehe Seite 12-13).
1) Drahtvorschubkoffer N I C H T anschließen.
2) Massekabel an Ausgangsbuchse ( 5 ) anschließen.
3) WIG-Schlauchpaket an Ausgangsbuchse ( 4 ) anschließen.
4) Schweißparameter einstellen wie in Absatz 10 beschrieben.
I
Fare riferimento alle Fig. 3-4 (vedi pagg. 12-13).
1) Non collegare il Trainafilo.
2) Collegare il cavo di massa alla presa ( 5 ).
3) Collegare la torcia TIG alla presa ( 4 ).
4) Regolare i parametri di saldatura facendo riferimento al Par. 10.
E
Hacer referencia a la Fig. 3-4 (ver Pag. 12-13).
1) No conectar el avance de alambre
2) Conectar el cable de masa a la presa ( 5 )
3) Conectar la antorcha TIG a la presa ( 4 )
4) Regular los parámetros de soldadura haciendo referencia al Par. 10.
Instruction Manual / Betriebsanleitung / Livret d'Instructions / Manuale Istruzioni / Manual de instrucciones
8.
GB
F
GB
D
F
I
E
SYNERGIC MIG SERIES
STICK INSTALLATION
ELEKTRODE INSTALLATION
INSTALLATION ELECTRODE
INSTALLAZIONE ELETTRODO
INSTALACIÓN ELETTRODO
Refer to Fig. 3-4 (see pages 12-13).
1) Connect the Ground Cable to Socket ( 4 ).
2) Connect the Electrode Holder to Socket ( 5 ) of the Power Source or
Socket ( 9 ) of the Wire Feeder. (Optional).
3) Refer to Par. 10 for Welding parameter.
Faire référence aux Fig. 3-4 (voir à la Page 12-13).
1) Connecter le câble de masse à la prise ( 4 ).
2) Connecter la pince PORTE ÉLECTRODE à la prise ( 5 ) du générateur ou
à la prise ( 9 ) du dévidoir. (Optional).
3) Régler les paramètres de la soudure en faisant référence au Par. 10.
D
Auf Bilder 3-4 (Siehe Seite 12-13).
1) Massekabel an Ausgangsbuchse ( 4 ) anschließen.
2) Elektrodenkabel an Ausgangsbuchse ( 5 ) am Schweißgerät oder an
Ausgangsbuchse ( 9 ) anschließen. (Optional).
3) Schweißparametern wie in Absatz 10 beschrieben einstellen.
I
Fare riferimento alle Fig. 3-4 (vedi pagg. 12-13).
1) Collegare il cavo di massa alla presa ( 4 ).
2) Collegare la pinza PORTAELETTRODO alla presa ( 5 ) del genera
tore o alla presa ( 9 ) del trainafilo. (Opzionale).
3) Regolare i parametri di saldatura facendo riferimento al Par. 10.
E
Hacer referencia a la Fig. 3-4 (ver Pag. 12-13).
1) Conectar el cable de masa a la presa ( 4 )
2) Conectar la pinza PORTAELETTRODO a la presa ( 5 ) del generador
o a la toma ( 9 ) del avance de alambre. (Optional).
3) Regular los parámetros de soldadura haciendo referencia al Par. 10.
19
Instruction Manual / Betriebsanleitung / Livret d'Instructions / Manuale Istruzioni / Manual de instrucciones
Die Funktionen:
HOT START
ARC FORCE
ANTISTICKING
ermöglichen das Zünden und
Verschweißen jeder Elektrode in
jeder Lage!
Start welding considering that
the functions:
HOT START
ARC FORCE
ANTISTICKING
are automatic and autoregulating with respect to the
electrode being welded.
HOT START: Um das Zünden des
Lichtbogens zu erleichtern,
erhöht sich der Startstrom
automatisch für 0,3 Sekunden um
Prozentwert.
HOT START:
to improve the
arc stricking, at the start of the
welding the current is increased
of % value for 0,3 seconds.
GB
ARC FORCE:
to improve the
ARC FORCE: Um die
Lichtbogenstabilität zu
gewährleisten, wird der
Schweißstrom während des
Tropfenüberganges erhöht.
D
arc stability, the current is automatically increased during the
drop transfer.
ANTISTICKING: after 2
Hot Start
0,3 sec
Start
20
SYNERGIC MIG SERIES
seconds of short circuit between
the electrode and the work piece,
the power source stops.
Hot Start
0,3 sec
Welding Current
Start
ANTISTICKING:
Im Falle eines
Kurzschlusses zwischen
Elektrode und Werkstück,
schaltet die Stromquelle aus
Sicherheitsgründen innerhalb von
2 Sekunden ab.
Welding Current
Instruction Manual / Betriebsanleitung / Livret d'Instructions / Manuale Istruzioni / Manual de instrucciones
F
Commencer à souder en considerant que les fonctions:
HOT START
ARC FORCE
ANTISTICKING
sont automatiques et autoadaptées à l'électrode en
soudage.
Iniziare a saldare considerando che le funzioni :
HOT START
ARC FORCE
ANTI STICKING
sono tutte automatiche ed
autoadattate all’elettrodo in
saldatura.
HOT START: pour améliorer
l'insertion, au début du
soudage, le courant augmente
d’une valeur % pour 0,3 secondes.
HOT START: per migliorare l'innesco, all'inizio della saldatura la
corrente aumenta di un valore %
per 0,3 secondi.
ARC FORCE: pour améliorer
la stabilité d'arc, le courant
augmenté automatiquement
pendant le transfert du metal.
Hot Start
0,3 sec
Start
SYNERGIC MIG SERIES
I
ARC FORCE: per migliorare la
stabilità d'arco, la corrente
viene aumentata automaticamente durante il trasferimento
del metallo.
ANTISTICKING: après 2
secondes de court circuit
entre l'électrode et la pièce, le
générateur s'éteinde.
ANTISTICKING: dopo 2
Hot Start
0,3 sec
Welding Current
secondi di corto circuito tra
l'elettrodo ed il pezzo, il generatore si spegne.
Welding Current
Start
21
Instruction Manual / Betriebsanleitung / Livret d'Instructions / Manuale Istruzioni / Manual de instrucciones
Iniciar a soldar considerando que
las funciones:
HOT START
ARC FORCE
ANTI STICKING
son REGULABLES en el panel
frontal con el fin de optimizar la
prestación del
electrodo usado.
HOT START: para mejorar la ignición, al inicio de la soldadura la
corriente viene aumentada den un
valor porcentual de la corriente de
soldadura por un tiempo de 0,3
segundos.
E
ARC FORCE: para mejorar la
estabilidad del arco, la corriente se
aumenta automáticamente durante
el transferencia del metal.
Hot Start
ANTI STICKING: después de 2
segundos de cortocircuito entre el
electrodo y la pieza, el generador
se apaga.
0,3 sec
Start
22
Welding Current
SYNERGIC MIG SERIES
Instruction Manual / Betriebsanleitung / Livret d'Instructions / Manuale Istruzioni / Manual de instrucciones
9.
GB
SYNERGIC MIG SERIES
GB MIG / MAG INSTALLATION
D MIG / MAG INSTALLATION
Refer to Fig. 3-4 (see pages 12-13).
1) Connect the Power Source to Wire Feeder with Interconnecting
Cable (15-19-20).
2) Connect the Ground Cable to Socket ( 4 ).
3) Connect the MIG Torch to Socket ( 2 ).When using water cooled torch,
connect the pipes of water flow and return to the fittings ( 8 ).
If the torch AMP 500 DGT is being used, connect the plug 7 poles to
the socket ( 10 ).
4) Make sure the wire rolls have the same diameter of the welding wire.
5) Press the “INCH WIRE” button ( 11 ) to push the wire up to the torch
head.
D
Auf Bilder 3-4 (Siehe Seite 12-13).
1) Drahtvorschub an Stromquelle mittels des
Zwischenschlauchpaketes (15-19-20) anschließen.
2) Massekabel an Ausgangsbuchse ( 4 ) anschließen.
3) MIG Schlauchpaket an Anschluß ( 2 ) anschließen. Im Fall von
wassergekühltem Schlauchpaket, die Wasserschläuche an den
Schnellkupplungen ( 8 ) anschließen.Verbinden Sie beim Einsatz
des Schweißbrenners AMP 500 DGT die 7-polige Anschlussdose
mit der Steckdose ( 10 ).
4) Überprüfen Sie ob die Drahtvorschubrollen mit dem gewählten
Drahtdurchmesser übereinstimmen.
5) Den „INCH WIRE“ Taster ( 11 ) im Drahtspulenkasten drücken
bis der Draht am Ende des Brenners herausragt.
6) Connect the gas hose of the interconnecting
cable to the gas cylinder.
6) Das Gasrohr des Zwischenschlauchpaketes mit
der Gasflasche verbinden
7) Regulate the gas flow at the appropriate value
(10 - 14 l/min).
7) Gasfluß einstellen (10-14 l/min).
8) Refer to Par. 10 for Welding parameter.
8) Schweißparametern wie in Absatz 10 beschreiben einstellen.
23
Instruction Manual / Betriebsanleitung / Livret d'Instructions / Manuale Istruzioni / Manual de instrucciones
9.
F
F
I
E
INSTALLATION MIG / MAG
INSTALLAZIONE MIG / MAG
NSTALACIÓN MIG / MAG
Faire référence aux Fig. 3-4 (voir à la Page 12-13).
1) Connecter le Générateur au Dévidoir avec le faisceau de câbles (15-19-20).
2) Connecter le câble de masse à la prise ( 4 ).
3) Connecter la torche MIG à la prise ( 2 ). Dans le cas où la torche est
refroidissée à eau, connecter les tubes de “aller et retour”, aux connec
tions. ( 8 ). Si on utilise la torche AMP 500 DGT, connecter la Épine 7
poles avec la prise ( 10 ).
4) Verifier que les galets de l’enroulement du Dévidoir correspondent au diamètre du fil qui doit être utilisé.
5) Appuyer sur le bouton “INCH WIRE” ( 11 ) pour faire avancer le fil
jusqu’à l’extrémité de la torche.
6) Connecter le tube
7) Régler le débit de
à gaz du faisceau
gaz à la valeur
des câbles à la
appropriée
bouteille à gaz.
(10 - 14 l/min).
8) Régler les paramètres de la soudure en faisant référence au Par. 10.
E
I
Fare riferimento alle Fig. 3-4 (vedi pagg. 12-13).
1) Collegare il Generatore al Trainafilo con il fascio cavi (15-19-20).
2) Collegare il cavo di massa alla presa ( 4 ).
3) Collegare la torcia MIG alla presa ( 2 ). Nel caso di torcia raffreddata ad acqua, collegare i tubi di “mandata e ritorno”, ai raccordi
( 8 ). Se si utilizza la torcia AMP 500 DGT, collegare la spina 7
poli alla presa ( 10 ).
4) Controllare che i rulli di trascinamento del Trainafilo corrispondano al diametro del filo da utilizzare.
5) Premere il pulsante “INCH WIRE” ( 11 ) per far avanzare il filo
fino all’estremità della torcia.
7) Regolare il flusso
6) Collegare il
del gas al valore
tubo gas del fascio
appropriato
cavi alla bombola
(10 - 14 l/min).
di gas.
8) Regolare i parametri di saldatura facendo riferimento al Par. 10.
Hacer referencia a la Fig. 3-4 (ver Pag. 12-13).
1) Conectar el Generador al avance de alambre por medio del paquete de mangueras (15-19-20).
2) Conectar el cable de masa a la presa ( 4 ).
3) Conectar la antorcha MIG a la presa ( 2 ), en el caso de utilizar una antorcha refrigerada con líquido, conectar los tubos de "ida y vuelta" a los acoples
rápidos ( 8 ). Si se ulitiza la antorcha AMP 500 DGT, conectar el conector 7 polos a la toma ( 10 ).
4) Controlar que los rodillos de arrastre del alambre correspondan al diámetro de alambre a utilizar.
5) Pulsar el interruptor "INCH WIRE" ( 11 ) para hacer avanzar el alambre hasta la extremidad de la antorcha.
6) Conectar el tubo
gas de el haz cables
a la bombona de el
gas.
24
SYNERGIC MIG SERIES
7) Regular el flujo
del gas en valor
apropiado
(10 - 14 l/min).
8) Regular los
parámetros de soldadura haciendo referencia al Par. 10.
Instruction Manual / Betriebsanleitung / Livret d'Instructions / Manuale Istruzioni / Manual de instrucciones
GB
D
F
I
E
10.
PROGRAMMING
PROGRAMMIERUNG
PROGRAMMATION
PROGRAMMAZIONE
PROGRAMACIÓN
GB
Push Button for selection:
- Voltage
- Thickness
- Inductance
- Job point (9 program)
LED Display 1 showing the
actual regulation through the
Set function
D
F
Le générateur dispose de 480 programmes de soudure, qui sont définis sur la base du matériel, du gaz
et du diamètre du fil. Chaque programme contient les 2 caractéristiques de régulation Pulsato et Mig, et
sur chaque programme la personne qui est en train de travailler peut aussi mémoriser ses régulations
(job), jusqu’au nombre de 9 pour chaque programme, avec un maximum de 900 job sur la poste.
Les Programmes spécifiques peuvent être installés par le Centre d’ assistence, pour résoudre des applications particulières. Ces programmes sont les programmes pour l’usager et ils sont disponibles du numéro
1 au numéro 10.
I
Il generatore ha disponibili 480 programmi di saldatura, definiti su materiale, gas e diametro del
filo. Ogni programma contiene le 2 caratteristiche di regolazione Pulsato e Mig e su ogni programma l’utente può anche memorizzare le proprie regolazioni (job), fino a 9 su ogni programma
con un massimo di 900 job sulla macchina.
Programmi specifici possono essere caricati dal centro di assistenza, per risolvere applicazioni
particolari.Tali programmi sono i programmi utente disponibili nei numeri da 1 a 10.
E
El generador tiene disponible 480 programas de soldadura, definidos en fusión del material, el gas y el
diámetro del alambre de aporte. Cada programa contiene las 2 características de regulación, la de pulsado y la de MIG. Dentro de cada programa el usuario puede memorizar sus propios parámetros (JOB),
se pueden almacenar hasta 9 JOB (personalizaciones) por programa, alcanzando un máximo de 900
JOB en la máquina.Diversos programas especiales pueden ser cargados por el centro de
asistencia para resolver aplicaciones particulares.Tales programas son los denominados programas usuario, disponibles en los posiciones 1 a 10.
LED Display 2 showing the
actual regulation through the
Set function
LED:
- 2 Step cycle
- 4 Step cycle
- 2/4 Step with
crater filler
- Timer
Push Button
for selection:
- Mig
- Pulser Mig
- Tig
- Stick
Encoder for
general
regulation
Puch Button for selection:
- Number of program
- Welding material
- Gas
- Welding wire diameter
LCD Display
Push Button for selection:
- 2 Step cycle
- 4 Step cycle
- 4 Step cycle with crater filler
- Timer without crater filler function
- Timer with crater filler function
LED: Mig - Pulser Mig - Tig - Stick
The power source has available 480 welding programs. Programs are based on the welding material, the
welding gas and the wire diameter. Every program has both MIG Puls and MIG regulations and in each
program the final user can memorise up to 9 job points (for a total of 900 job points in the machine).
Specific programs can be loaded by the service centre in order to comply with special applications.
These programs are available as user programs from 1 to 10.
Im Schweißgerät sind 480 auf Material, Gas und Drahtdurchmesser abgestimmte Programme
gespeichert. In jedem Programm sind Puls- sowie Mig Charakteristik vorgegeben. Für jedes
Programm kann der Schweißer seine persönlichen Einstellungen (Jobs) speichern, bis zu 9
Kombinationen für jedes Programm, mit einer maximalen Speicherkapazität von 999 Jobs in der
Maschine. Spezielle Programme können zusätzlich vom Service Center geladen werden um
spezifische Anwendungen durchzuführen. Diese sind die sogenannten „Users Programms“ und
sind von Nr. 1 bis Nr. 20 abrufbar.
POWER SOURCE Front Panel descriptions
Push Button for selection:
- Current
- Wire speed
- Arc lenght
- Double pulsation frequency
SYNERGIC MIG SERIES
25
Instruction Manual / Betriebsanleitung / Livret d'Instructions / Manuale Istruzioni / Manual de instrucciones
10.
GB
D
F
I
E
PROGRAMMING
PROGRAMMIERUNG
PROGRAMMATION
PROGRAMMAZIONE
PROGRAMACIÓN
GB
WIRE FEEDER PLUS 90 Front Panel description
LED Display 1 showing the
actual regulation through the
Set function
Encoder for
general
regulation
LED Display 2 showing the
actual regulation through the
Set function
26
LED:
- Voltage
- Thickness
- Inductance
- Job point (9 program)
By softly pressing the encoder on the left it is possible to change the following parameters:WELDING
CURRENT,WIRE SPEED, ARC LENGTH and DOUBLE PULSATION.
By turning the same encoder it is possible to regulate the chosen parameter.
With the encoder on the right it is possible to change ARC LENGTH,THICKNESS, CHOKE and JOB
POINTS.The regulation of the front panel of the wirefeeder is automatically repeated on the front panel
of the power source and viceversa.
D
Durch drücken des linken Drehknopfes können folgende Parameter ausgewählt werden:
Schweißstrom, Drahtgeschwindigkeit, Lichtbogenlänge und Doppelpulsierung.
Durch drehen des Drehknopfes kann der jeweilige Parameterwert verstellt werden.
Durch drücken des rechten Drehknopfes können folgende Parameter ausgewählt werden:
Schweißspannung, Materialstärke, Drossel und Jobnummer.
Durch drehen des Drehknopfes kann der jeweilige Parameterwert verstellt werden.
Die Einstellungen am Drahtvorschubgerät werden automatisch auf die Stromquelle übertragen.
F
L’encoder de gauche change la visualisation du display parmi LE COURANT, LA VITESSE DU FIL,
LA LONGUEUR DE L’ARC et LA DOUBLE PULSATION avec une simple pression sur le potentiomètre.
La rotation du potentiomètre règle le paramètre choisi.
L’encoder de droite a la même fonction, mais avec les grandeures TENSION DE L’ARC, ÉPAISSEUR,
INDUCTANCE et N° DE JOB.
La régulation du panneau frontal est répétée dans le panneau frontal du générateur et vice versa.
I
L’encoder di sinistra cambia la visualizzazione del display tra CORRENTE, VELOCITÀ’ FILO,
LUNGHEZZA D’ARCO e DOPPIA PULSAZIONE alla semplice pressione della manopola.
La rotazione della manopola, regola il parametro impostato.
L’encoder di destra ha la stessa funzione, ma con le grandezze TENSIONE D’ARCO, SPESSORE,
INDUTTANZA e N° DI JOB.
La regolazione del pannello frontale é replicata sul pannello frontale del generatore e viceversa.
E
El encoder de la izquierda cambia la visualización del display entre CORRIENTE,VELOCIADAD DEL
ALAMBRE, LARGO DEL ARCO y DOBLE PULSACION con la simple presión del mismo.
La rotación del encoder regula el valor del parametro visulizado.
El encoder de la derecha cumple la misma función sobre los parámetros TENSION DE ARCO, ESPESOR,
INDUCTANCIA y N° DE JOB.
La regulación del panel frontal es visulizada tambien en el panel frontal del generador y viceversa.
Encoder for
general
regulation
LED:
- Current
- Wire speed
- Arc lenght
- Double pulsation frequency
SYNERGIC MIG SERIES
Instruction Manual / Betriebsanleitung / Livret d'Instructions / Manuale Istruzioni / Manual de instrucciones
GB
D
F
I
E
10.
PROGRAMMING
PROGRAMMIERUNG
PROGRAMMATION
PROGRAMMAZIONE
PROGRAMACIÓN
AMP 500 DGT MIG/MAG TORCH
description
GB
By using the torch AMP 500 DGT it is possible to carry out from the distance the regulation of the following:
- CURRENT if LED A flickers.
- ARC VOLTAGE if LED V flickers.
- WIRE SPEED if LED
flickers.
- ARC LENGTH if LED Arc flickers.
- N° JOB by pressing the Push-Button ( SET - ) until the display reads
(all the LED are off).
The JOB should be memorized on the frontal panel of the generator.
- INDUCTANCE by pressing the Push-Button ( SET + ) until the display reads
(all the LED are off).
To select the size to be regulated, press the Push-Buttons ( SET + ) or ( SET - ) and carry out the regulation with
the Push-Buttons ( + ) and ( - ).The display shows the regulated value. Each regulation is seen on the frontal
panel of the wire feeder and vice versa.
NOTE: It not possible to carry out the regulation described above during the welding.The display shows the real
welding current.
D
Mit dem Schweißbrenner vom Typ AMP 500 DGT können sie mit einer Fernsteuerung folgende
Einstellungen vornehmen:
- Strom, wenn die LED-Anzeige A blinkt.
- Lichtbogenspannung wenn die LED-Anzeige V blinkt.
- DRAHT-geschwindigkeit wenn die LED-Anzeige
blinkt.
- Drahtvorschubgeschwindigkeit, wenn die LED-Anzeige Arc blinkt.
- Anzahl der JOB’s durch Betätigen des Tasters (SET -) solange bis auf dem Display die Aufschrift
erscheint (alle LED-Anzeigen sind ausgeschaltet). Die Jobs müssen auf der Bedienerfront des Geräts
gespeichert werden.
- INDUKTIVITÄT durch Betätigen des Tasters (SET -) bis auf dem Display die Aufschrift
erscheint
(alle LED-Anzeigen sind ausgeschaltet).
Betätigen Sie zur Auswahl der Parameter die Taster (SET +) oder (SET -) und führen Sie die Einstellung
mit den Tastern (+) und (-) aus. Das Display zeigt den eingestellten Wert an. Jede Einstellung wird auf der
Bedienerfront des Drahtvorschubs und umgekehrt wiederholt.
Hinweis: Es ist nicht möglich, die oben beschriebenen Einstellungen während des Schweißvorgangs
auszuführen. In diesem Fall zeigt das Display die tatsächliche Schweißspannung an.
(Torch with digital control)
Digital
Display
LED
Current
A
V
Arc
LED
Arc lenght
LED
Voltage
LED
Wire speed
Push-Button
( SET - )
Push-Button
( SET + )
Push-Button
(+)
Push-Button
(-)
SYNERGIC MIG SERIES
27
Instruction Manual / Betriebsanleitung / Livret d'Instructions / Manuale Istruzioni / Manual de instrucciones
SYNERGIC MIG SERIES
F
Avec la torche AMP 500 DGT on peut régler à distance:
- COURANT si le LED A étincèle.
- TENSION DE L'ARC si le LED V étincèle.
- VITESSE DU FIL si le LED
étincèle
- LONGUEUR DE L’ARC si le LED Arc étincèle.
- N. du JOB en puissant sur le bouton (SET) jusqu'à sur le display on voit le symbole
(tous les LED sont éteints).
Les JOB doivent être mémorisés sur le panneau frontal du générateur.
- INDUCTANCE en puissant le bouton (SET+) jusqu'à sur le display on voit le symbole
(TOUS LES led SONT éteints).
Pour choisir la grandeur qui doit être réglée, on doit presser les boutons (SET+) ou (SET-) et faire la régulation avec les boutons (+) et (-). Le display indique la valeur qui a été
réglée. Chaque régulation est répétée sur le panneau frontal du dévidoir et vice-versa.
NOTE: ce n'est pas possible faire les régulations décrites çi-dessous pendant la soudure, dans ce cas çi le display indique le courant réel de soudure
I
Tramite la torcia AMP 500 DGT é possibile eseguire a distanza le regolazioni di:
- CORRENTE se LED A lampeggia
- TENSIONE D’ARCO se LED V lampeggia
- VELOCITA’ FILO se LED
lampeggia
- LUNGHEZZA D’ARCO se LED Arc lampeggia
- N° JOB premendo il pulsante ( SET - ) fino a che sul display compare la scritta
(tutti i LED sono spenti).
I JOB devono essere memorizzati sul pannello frontale del generatore.
- INDUTTANZA premendo il pulsante ( SET + ) fino a che sul display compare la scritta
(tutti i LED sono spenti).
Per scegliere la grandezza da regolare, premere i pulsanti ( SET + ) o ( SET - ) ed eseguire la regolazione con i pulsanti ( + ) e ( - ). Il display indica il valore regolato. Ogni regolazione é replicata sul pannello frontale del trainafilo e viceversa.
NOTA: non è possibile eseguire le regolazioni descritte sopra durante la saldatura, in questo caso il display indica la corrente reale di saldatura.
E
Con la antorcha AMP 500 DGT es posible ejecutar a distanzia las regulaciones de:
- CORRIENTE si el LED A titila.
- TENSION DEL ARCO si el LED V titila.
- VELOCIDAD DEL HILO si el LED
titila.
- LONGITUD DEL ARCO si el LED Arc titila.
- N° JOB presionando el pulsante ( SET - ) hasta que se lea
en el visualizador. (todos los LED se encuentran apagados).
Los JOB deben ser memorizados en el panel frontal del generador.
- INDUCTANCIA presionando el pulsante ( SET + ) hasta que se lea
en el visualizador (todos los LED se encuentran apagados).
Para seleccionar el tamaño a regular, presionar los pulsantes ( SET + ) o ( SET - ) y ejecutar la regulación con los pulsantes ( + ) y ( - ).
El visualizador indicará el valor regulado. Cada regulación se visualiza en el panel frontal de la debanadora y viceversa.
NOTA: durante la soldadura no es posible ejecutar la regulación descripta. El visualizador será, en este caso, el que indicará la corriente real de la soldadura.
28
Instruction Manual / Betriebsanleitung / Livret d'Instructions / Manuale Istruzioni / Manual de instrucciones
10.1
GB Program selection
D Programmwahl
SYNERGIC MIG SERIES
The program selection can be done in 2 ways:
A) – By means of program number.
B) – By means of program research (recommended).
Turn on the Power Source
Stromquelle einschalten
A) SELECTION WITH PROGRAM NUMBER
Fig.A
GB
1
Press the button next to the display (Fig.B).
2
The SET led lights up.
3
Move the arrow on the LCD display on “Program N°…”
4
Select with the Encoder the program number (Fig.C).
The display shows the program description with MIN and MAX Current and after 1 sec. other information: material, gas, wire diameter will show up on display.
If welding is performed, the program N° will be memorised.
Die Programmwahl kann auf zwei Arten erfolgen:
A) - Durch Eingabe der Programm-Nummer (wenn die Programm-Nr. bekannt ist, z. B. "304")
B) - Durch die Programmsuche
Fig.B
A) - Programmwahl durch Eingabe der Programm-Nr.
3
D
1
2
Fig.C
1
Eine der Pfeiltasten neben dem Display drücken. (Fig. B).
2
Die "SET"-LED leuchtet.
3
Mit den Pfeiltasten den Cursorpfeil im Display auf "PROG:" bringen.
4
Mit dem Drehknopf die Programm-Nr. wählen.(Fig. C).
Daraufhin zeigt das Display die PRG.-Beschreibung mit MIN- und MAX-Schweißstrom und
nach ca. einer Sekunde die Daten für Material, Gas und Drahtdurchmesser an.
Die gewählte Programm-Nr. wird nach Beginn des Schweißvorgangs automatisch gespeichert.
4
29
SYNERGIC MIG SERIES
Instruction Manual / Betriebsanleitung / Livret d'Instructions / Manuale Istruzioni / Manual de instrucciones
10.1
GB Program selection
D Programmwahl
B) SELECTION WITH PROGRAM RESEARCH
Turn on the Power Source
Stromquelle einschalten
GB
Fig.A
1
With the display button, turn the set led ON and position the arrow on the MAT.
description Fig.A.
2
3
4
5
6
Select the material with the Encoder (Fig.B).
Move the arrow on the GAS description (Fig.C).
Select the gas with the Encoder.
Move the arrow to the “WIRE....” description.
Select the correct wire diameter with the Encoder.
At this point you can read the selected program number in the upper line of the display.
The program is memorised as soon as you start welding.
1
B) Programmwahl durch die Programmsuche
1
1
Fig.B
D
2
Fig.C
2
2
3
4
5
6
Eine der Pfeiltasten neben dem Display drücken. Die "SET"-LED leuchtet.
Mit den Pfeiltasten den Cursorpfeil im Display auf "Mat:" bringen (Fig. A).
Mit dem Drehknopf das gewünschte Material wählen (Fig. B).
Mit den Pfeiltasten den Cursorpfeil im Display auf "Gas:" bringen (Fig. C).
Mit dem Drehknopf das gewünschte Gas wählen (Fig. D).
Mit den Pfeiltasten den Cursorpfeil im Display auf "Wire mm:" bringen (Fig. E).
Mit dem Drehknopf den gewünschten Drahtdurchmesser wählen (Fig. E).
Daraufhin wird die gefundene Programm-Nr. in der obersten Zeile angezeigt.
Die gewählte Programm-Nr. wird nach Beginn des Schweißvorgangs automatisch gespeichert.
Fig.D
Fig.E
6
3
3
30
4
4
5
5
5
5
Instruction Manual / Betriebsanleitung / Livret d'Instructions / Manuale Istruzioni / Manual de instrucciones
10.1
GB Program selection
D Programmwahl
Fig.A
SYNERGIC MIG SERIES
USER PROGRAMS
GB
1
The first 10 programs are user programs and are personalised by the service centre.
1
To select the user program ( from 1 to 10 ) push the button 1 in Fig. A next to the display and select
one of the 10 programs with the Encoder. Every user program has a particular description, which can be
personalised by the authorised service centre.
2
In order to pass from the first 10 programs to the other additional programs, operate in the same way as
above by using the button 2 in Fig. B when the arrow of the display is pointed on the first upper description.
Anwenderbezogene Programme
Fig.B
D
Die ersten 10 Programme sind anwenderbezogen. Sie werden vom Service-Center programmiert u. eingespielt.
1
Mit den Pfeiltasten den Cursorpfeil in die oberste Zeile bringen. Pfeiltaste (1) nochmals drücken.
Wählen Sie eines der Programme mit dem Drehknopf . Jedes der Programme hat eine personalisierte
Beschreibung.
2
Um die anwenderbezogenen Programme zu verlassen, bringen Sie den Cursorpfeil mit den Pfeiltasten
wieder in die oberste Zeile und drücken nochmals Pfeiltaste (1).
ACHTUNG: Die anwenderbezogenen Programme müssen vom Service-Center freigeschaltet sein.
2
10.2
The 2 LEDS A and B in Fig.A indicate that the regulation of the Encoder is activated and shown on display. The
specific parameter regulation is shown by the led underneath the display.
Ex: A on and A2 on enable the regulation through the potentiometer in A2 Fig. B. If the led A or B is off, the
relative display only indicates the preset value of A1 A2 A3 A4 ~ B1 B2 B3 B4. If you weld after setting a new
value, A1 and B1 will show the real current and voltage and keep this information stored in the display also after
welding is complete. It is possible to regulate:
Current (A1), Wire speed (A2), Voltage (B1), Thickness (B2).
During welding the display shows the real current and voltage and keep them stored in the memory at the end of
the welding only if A1 and B1 led’s are selected “ON”.
GB Preset and regulations
D Preset und Einstellungen GB
A
B
Fig.A
A1 A2 A3 A4
B1 B2 B3 B4
D
Durch Drücken der Tasten A oder B wird in den Eingabemodus für die Werte A1 - A4 bzw. B1 - B4 gewechselt.
Drücken Sie A bzw. B. so oft, bis die LED des zu verändernten Wertes A1 - A4 bzw. B1 - B4 leuchtet.
Leuchtet z. B. A und A3 so ist der Wert für die Lichtbogenlänge über den Drehknopf einstellbar.
Leuchtet eine der LED´s A1 - A4 bzw. B1 - B4, jedoch nicht A oder B, so werden die voreingestellten
Programmwerte angezeigt.
Wird nach einer Parameteränderung geschweißt, zeigen die Display´s A und B die aktuellen Strom- und
Spannungs-werte an, diese werden auch nach dem Schweißen gehalten. A1 (Schweißstrom), A2
(Drahtgeschwindigkeit), B1 (Spannung) sowie B2 (Materialstärke) sind auch während dem Schweißen einstellbar.
31
Instruction Manual / Betriebsanleitung / Livret d'Instructions / Manuale Istruzioni / Manual de instrucciones
10.2
Fig.B
Fig.C
Fig.D
32
SYNERGIC MIG SERIES
GB Preset and regulations
D Preset und Einstellungen
- With the push button A select the
parameter you like do change
GB - The Display A indicates the value
- Select the desired value with the
Encoder
- Adjust the value on the Display A
- Display B shows the synergic regulaGB tion (Voltage) of the new setting +
thickness (B1 or B2)
- Adjust the voltage on the Display B
GB - Display A shows the relative value for
wire speed + current (A1 or A2)
D
- With the push button A select the
parameter you like do change
- The Display A indicates the value
- Select the desired value with the
Encoder
D
- Während der Werteänderung in Display A
wird automatisch der synergische
Wert (Volt) im Display B angepaßt.
D
- Wählen Sie die Spannung im Display B
- Display A zeigt die synergischen Werte für
Drahtgeschwindigkeit und Strom an.
SYNERGIC MIG SERIES
Instruction Manual / Betriebsanleitung / Livret d'Instructions / Manuale Istruzioni / Manual de instrucciones
10.3
Arc length regulation:
GB User Regulations
D Weitere Einstellungen
1
2
Select A3 led (arc length).
With the Encoder adjust the arc length (from –99 to +99), simultaneously the preset voltage
shows the new value if selected.
The arc length value is memorised as soon as you start welding.
GB Arc choke regulation:
1
(allows to obtain a longer or shorter arc)
(allows to obtain a “harder” or “softer” arc)
3
4
Select B3 led.
Adjust the choke (from -9 to +9) taking into consideration that by increasing the value > 0,
the arc becomes thinner and softer.
5
Whereas by decreasing the value < 0 the arc becomes wider and harder.
6
Get back to current and voltage regulation.
7
Adjust the welding parameter if necessary.
The choke value is memorised as soon as you start welding.
Lichtbogenlänge: (Einstellung der Lichtbogenlänge)
1
2
LED A3 aktivieren.
Gewünschten Wert (von -99 bis +99) mit dem Drehknopf einstellen. Ist B1 ausgewählt,
zeigt Display B die entsprechende Voltanpassung an.
Die neue Lichtbogenlänge wird beim nächsten Schweißen gespeichert.
D
2
Lichtbogendrossel: (Einstellung eines weicheren/härteren Lichtbogens)
3
4
LED B3 aktivieren.
Gewünschten Wert (von -9 bis +9) mit dem Drehknopf einstellen.
Hoher Drosselwert ergibt weichen, konzentrierten Lichtbogen, niedriger Drosselwert
5
ergibt härteren, breiteren Lichtbogen.
6
Durch aktivieren von A1 oder B1 zur Strom- u. Spannungseinstellung zurückkehren.
7
Schweißparameter anpassen, falls erforderlich.
Der neue Drosselwert wird beim nächsten Schweißen gespeichert.
3
6
4
5
7
33
Instruction Manual / Betriebsanleitung / Livret d'Instructions / Manuale Istruzioni / Manual de instrucciones
10.4
SYNERGIC MIG SERIES
GB Double pulsation ( TWIN )
D Doppelpuls-System ( TWIN )
1
1
Select A4 led.
If the led twinkles the program is already set for double pulsation.
2
Adjust the frequency of the double pulsation through the Encoder.
The display will shows the frequency (from 0,5 Hz to 5 Hz), whereas the pulsation of
the A4 led visualises the frequency repetition of the double pulsation.
GB The double pulsation value is memorised as soon as you start welding.
Please Note:
The double pulsation starts at the end of the first up-slope and finishes at the end of the
highest time of twin pulse if torch switch is released.
The parameters of the double pulsation can be modified by the user and can be different
from eachother in the same program if they are memorised into the job points.
1
2
D
2
34
LED A4 aktivieren.
Blinkt die LED, ist das Doppelpuls-System aktiv. Ansonsten durch Drehknopf einschalten.
Pulsfrequenz mit dem Drehknopf einstellen. Display zeigt die Pulsfrequenz (von 0.5 bis 5 Hz)
an. Die Pulsierung der LED A4 zeigt die Frequenz der Doppelpulsierung an.
Der Doppelpuls-Wert wird beim nächsten Schweißen gespeichert.
Beachten Sie bitte:
Die Doppelpulsierung startet sobald die erste Rampe (UP-Slope) beendet ist und endet wenn der
Brennertaster betätigt wird, am Ende der Schweißzeit.
Die Doppelpuls-Parameter können im selben Programm über Unterprogramme (JOBS) unterschiedlichhinterlegt werden.
Instruction Manual / Betriebsanleitung / Livret d'Instructions / Manuale Istruzioni / Manual de instrucciones
10.5
SYNERGIC MIG SERIES
GB Welding Characteristic
D Schweißart
Fig.A
1
GB
Fig.B
Functions PULS MIG, MIG/MAG, TIG and STICK can be selected from the front panel.
1
It is possible to go from MIG PULS to MIG/MAG by pressing the button 1 in Fig. A. The
PROGRAM NUMBER and the PARAMETERS of MATERIAL, GAS and WELDING DIA
METER remain the same. There is a change into the SYNERGICAL shape and of the
MIN. and MAX. welding current.
2
It is possible to go from MIG/MAG to TIG by pressing the button 2 in Fig. B . The current
and the cycle operate in a standard way as in MIG and PULS MIG. The POST-GAS can
be adjusted on the LCD DISPLAY.
3
It is possible to go from TIG to STICK by pressing the button 3 in Fig. C . The HOT
START and the ARC FORCE can be adjusted on the LCD DISPLAY.
The parameters are memorised as soon as you start welding.
2
D
Fig.C
Die Funktionen MIG/MAG, MIG-Puls, WIG und Elektrode können am Bedienpanel gewählt werden.
1
Aus der Puls-Funktion kommen Sie mittels Taste (1) zur MIG/MAG-Funktion (Fig. A).
PROGRAMM-NR., MATERIAL, GAS UND DRAHTDURCHMESSER BLEIBEN GLEICH,
ES ÄNDERN SICH SYNERGIE SOWIE MINIMUM UND MAXIMUM DES
SCHWEISSTROMES.
2
Aus der MIG/MAG-Funktion kommen Sie mittels Taste (2) zur WIG-Funktion (Fig. B). DER
STROM UND DER SCHWEISSZYKLUS FOLGEN DEN ÜBLICHEN REGELN WIE BEI
MIG/MAG
BZW. MIG-PULS. ZUSÄTZLICH IST DAS GASNACHSTRÖMEN (POST-GAS) REGELBAR.
3
Aus der WIG-Funktion kommen Sie mittelsTaste (3) zur ELEKTRODE-Funktion (Fig. C).
Am Display sind Einstellungen für HOT-START UND ARC-FORCE vorhanden.
3
Die Funktion wird beim nächsten Schweißen gespeichert.
35
Instruction Manual / Betriebsanleitung / Livret d'Instructions / Manuale Istruzioni / Manual de instrucciones
10.6
GB TORCH SWITCH cycle
D Brennerzyklus
Fig.A
1 Fig.A
Select one of the following cycles with the button:
2T
STANDARD MODE
2T SLOPE
STANDARD MODE with SLOPES, START and FINAL CURRENT
4T
LATCH MODE “semiautomatic”
3 Fig.C
4T SLOPE
LATCH MODE with SLOPES, START and FINAL CURRENT
4 Fig.D
TIMER
STANDARD TIMER MODE
5 Fig.E
TIMER SLOPE
TIMER MODE with SLOPES, START and FINAL CURRENT
1 Fig.A
Wählen Sie mit der Taste den gewünschten Modus:
GB 2
1
SYNERGIC MIG SERIES
Fig.B
Fig.B
2
Fig.C
STANDARD MODUS
2T
SLOPE STANDARD MODUS mit Rampen, Start- u. Endstrom
2 Fig.B
4T
EINRAST MODUS
3 Fig.C
4T
SLOPE EINRAST MODUS mit Rampen, Start- u. Endstrom
4 Fig.D
TIMER
STANDARD MODUS mit Timer
5 Fig.E
TIMER SLOPE
STANDARD MODUS mit Timer, Rampen, Start- u. Endstrom
Fig.D
3
36
D
2T
Fig.E
4
5
Instruction Manual / Betriebsanleitung / Livret d'Instructions / Manuale Istruzioni / Manual de instrucciones
10.7
GB JOB POINTS
D Unterprogramme (JOBS)
Fig.A
1
1
1
Fig.B
2
Einstellung der Unterprogramme (Jobs)
ADJUSTMENTS WITH JOB POINTS:
Job points are preset user adjustments.
Every program can store a max. of 9 Job
points
In order to select the Job points:
Select led B4.
1
2
With the Encoder scroll on the right
display the available job points.
When a job point is selected, in the front
panel you can read the preset parameters of
the corresponding job point.
Into the job point it is possible to
memorise:
- Current-voltage, wire speed and thickness
- Type of welding MIG/MAG or pulse
GB MIG/MAG
- Torch Switch Cycle
- Arc Length
- Double pulsation and frequency
- Arc choke
- Pregas
- Postgas
- Burn Back Time
- Soft start
- Double Pulsation parameter (if in use)
(Balance % low and wave shape)
- Start current
- Up slope time (if in use) “first slope”
- Craterfiller time (if in use)
- Final current (if in use)
- Timer time (if in use)
Please Note:
The machine can store up to 900 Job points
SYNERGIC MIG SERIES
D
Jobs sind anwenderbezogene Einstellungen.
Jedes (Haupt)-Programm kann max. 9 Jobs
enthalten.
In order to select the Job points:
LED B4 aktivieren.
1
2
Durch betätigen des Drehknopfes
werden die verfügbaren Jobs angezeigt.
Nach Auswahl eines Jobs können
die entsprechenden Parameter am Bedienpanel
abge-lesen werden.
Für jeden Job sind folgende
Parameter speicherbar:
- Stromspannung, Drahtgeschwindigkeit,
Materialstärke
- Schweißart
MIG/MAG
- Brennerzyklus
- Lichtbogenlänge
- Doppelpuls-Funktion mit Frequenz
- Lichtbogendrossel
- Gasvorströmzeit (PREGAS)
- Gasnachströmzeit (POSTGAS)
- Drahtrückbrandzeit (Burn Back)
- Zündgeschwindigkeit (SOFT START)
- Doppelpuls-Parameter (falls Funktion aktiv)
- Startstrom
- Startrampe (falls Funktion aktiv)
- Endrampe (falls Funktion aktiv)
- Endstrom
- Timerzeit (falls Funktion aktiv)
Bitte beachten Sie:
Das System kann bis zu 900 Jobs verwalten.
37
Instruction Manual / Betriebsanleitung / Livret d'Instructions / Manuale Istruzioni / Manual de instrucciones
10.7
SYNERGIC MIG SERIES
GB JOB POINTS
D Unterprogramme (JOBS)
Storage of the Job Points:
1
2
1
GB
2
3
4
Once the correct parameters are selected, push the Encoder for at
least 3 seconds. The LCD Display will show:
The bold number on the second line is the suggested number to
2
memorise the job point (as default the suggested job is the current
Job point in use).
Select the number you wish to memorise with the Encoder.
Save the changes by pressing the Encoder. If the selected number already has a job point, there will
be a star below the number.
In this case it will not be possible to save the Job point and on the third line you will read ”OVERWRITE”.
If you pressing on the Encoder the new Job Point will overwrite the old one. If “ESC” (not “ENTER “)
function’s selected by press on the Encoder you go back to the Job selection and it will be possible to
choose another number. If you wish to overwrite, move the arrow to the third line “OVERWRITE” with the
button and then press the Encoder. (5).
3
D
4
5
38
Speichern der Unterprogramme (Jobs)
1 Sobald die gewünschten Parameter eingestellt haben, halten
Sie den Drehknopf für mindestens 3 Sekunden gedrückt. Das
Display zeigt:
2
Die fett geschriebene Nummer in der zweiten Zeile gibt die für
die Speicherung vorgeschlagene Job-Nr. an.
2 Wählen Sie mit dem Drehknopf die von Ihnen gewünschte Job-Nr. für die Speicherung.
3 Drücken Sie den Drehknopf zum speichern. Ist die Job-Nr. bereits belegt, wird unter der
Job-Nr. ein Sternchen angezeigt.
4 In diesem Fall wird in der dritten Zeile "OVERWRITE" angezeigt. Sollen die alten Daten durch Ihre
neuen Einstellungen überschrieben werden, drücken Sie den Drehknopf.
Möchten Sie nicht überschreiben, gehen Sie mit den Pfeiltasten zur Zeile "ESC" und drücken Sie
den Drehknopf.
Sie können nun eine andere Job-Nummer wählen und dann wie oben beschrieben, speichern.
Instruction Manual / Betriebsanleitung / Livret d'Instructions / Manuale Istruzioni / Manual de instrucciones
10.8
SYNERGIC MIG SERIES
Sub menu (adjustment). Some additional adjustments are available in the submenu with reference to the Job
GB Sub Menu Adjustments
D Einstellungen im Untermenüe Point in use or to the manual regulation.
1
Fig.A
Keep pressed the push button relative to the welding process Fig. A. After 3 sec. you will read on
the display:
A
2
1
GB
2
The arrow will show the parameter that is possible to adjust trough the Encoder.
Parameters can be chosen with the up/down buttons.
3
Choose a line by moving the arrow.
4
Make the adjustment trough Encoder.
5
Move the arrow down to show other options.
6
If requested, activate the double pulsation with the button A.
Here below please read the parameters of the double pulsation:
T on % (balance) of frequency, V off % (low current level) of Iset, T up 1-20 (current change speed)
The above parameters are available only when double Pulsation is activated.
Fig.B
3
Untermenue (Einstellung). Einige zusätzliche Einstellungen sind im Untermenü vorhanden und beziehen sich
auf den gewählten Job oder die freie Einstellung.
1
Taste "Schweißart" für mind. 3 Sekunden drücken. Daraufhin ist
im Display zu lesen:
Fig.C
4
PREGAS TIME
POSTGAS TIME
BURN BACK TIME AT THE END OF WELDING
WIRE SPEED
2
4
Gasvorströmzeit
Gasnachströmzeit
Drahtrückbrandzeit
Drahtgeschwindigkeit
D
Fig.D
6
5
Der Pfeil im Display zeigt auf den jeweils aktiven Parameter, der durch den Drehknopf eingestellt werden kann.
Die Parameter können durch die Pfeiltasten NACH OBEN und NACH UNTEN neben dem Display gewählt werden.
3
Wählen Sie einen Parameter durch die Pfeiltasten
4
Wählen Sie die Einstellung durch den Drehknopf
5
Mit der Pfeiltaste NACH UNTEN werden weitere Parameter im Display angezeigt.
6
Wenn gewünscht, Doppelpuls-Funktion mit Taste A aktivieren
Parameter der Doppelpuls-Funktion:
T on % (Frequenzbalance), V off % (Niedriger Stromstand ) of Iset, T up 1-20 (Geschwindigkeit des Stromwechsels)
Die vorgenannten Parameter sind nur bei aktivierter Doppelpuls-Funktion verfügbar.
39
Instruction Manual / Betriebsanleitung / Livret d'Instructions / Manuale Istruzioni / Manual de instrucciones
10.8
GB Up slope and Down Slope Adjustment
D Einstellung der Rampen
2
GB
7
8
8
SYNERGIC MIG SERIES
Sub menu (adjustment)
7
Press the button arrow down to visualise the up-slope and down-slope adjustments.
You will read on the display:
START CURRENT
UP SLOPE TIME from I start to I real
DOWN SLOPE TIME from I real to I stop
FINAL CURRENT (crater filler current)
The above parameters are available only when up-slope and down-slope is active.
Select the cycle. Make the necessary adjustments.
8
The timer parameter is available only when the timer cycle is active.
Select the cycle. Make the necessary adjustments.
9
The display can stay in the submenu function also during welding.
10
To go out of the submenu, press the choice button. All parameters are memorised in the free Job Point as soon as
you start welding. If you wish to memorise the parameters in one particular Job Point, follow the instructions for the
storage of the Job Points. The parameters are memorised in the Job Point as soon as you start welding (conti
nuous storage). To save all parameters in a particular Job Point, follow the relative instructions.
Please Note: When the power source is switched on, all parameters refer to the last welding process.
Untermenü (Einstellung)
7
Drücken Sie die Pfeiltaste NACH UNTEN bis die folgenden Zeilen
im Display zu lesen sind:
9
2
9
10
40
D
STARTSTROM
Zeit Startrampe (von I start auf I real)
Zeit Endrampe (von I real auf I stop)
ENDSTROM (Kraterfüller-Strom)
Die oben genannten Parameter sind nur verfügbar, wenn der Brennerzyklus mit Rampen aktiv ist.
Aktivieren Sie den Zyklus, und machen Sie die entsprechenden Einstellungen.
8
Die Timer-Parameter sind nur verfügbar, wenn der entsprechende Brennerzyklus aktiv ist.
Aktivieren Sie den Zyklus, und machen Sie die entsprechenden Einstellungen.
9
Das Display kann auch während des Schweißens im Untermenü-Modus bleiben.
10
Um den Untermenü-Modus zu verlassen, den Taster Schweißart kurz drücken.
Beim Schweißbeginn werden die Einstellungen im ersten freien Job gespeichert.
Sollen die Werte in einem bestimmten Job gespeichert werden, gehen Sie bitte entsprechend der Anleitung
für das Speichern von Jobs, vor.
Beachten Sie: Beim Einschalten der Stromquelle, stellt das System automatisch das zuletzt geschweißte Programm ein.
Instruction Manual / Betriebsanleitung / Livret d'Instructions / Manuale Istruzioni / Manual de instrucciones
10.1
F
I
Selection des programmes
Selezione programmi
SYNERGIC MIG SERIES
La sélection des programmes peut être faite en deux manières
A) Avec un numéro programme
B) Avec la recherche des programmes
Allumer le générateur
Accendere il generatore
A) SÉLECTION AVEC UN NUMÉRO PROGRAMME
Ayant le numéro du programme à utiliser, par exemple le programme 304 :
Fig.A
F
1
Appuyer sur un bouton à côté du display. Fig.B
2
S’allume le led des réglages.
3
Porter la flèche du display LCD sur " Programme N... ".
4
Tourner le bouton pour sélectionner le numéro du programme Fig.C
Le display montre d’abord l’élément descriptif du programme avec le minimum et le maximum
de courent et après 1 seconde les données officielles MT GAS Ø.
Le programme N…. est mémorisé s’il y a une soudure.
La selezione programmi può essere fatta in due modi:
A) – Con numero programma
B) – Con ricerca programmi (consigliato)
Fig.B
A) RICERCA CON NUMERO PROGRAMMA
Dato il n° del programma da utilizzare, esempio, il programma 304:
3
I
1
2
Fig.C
1
Premere un tasto a fianco del display.Fig.B
2
Si accende il led di set.
3
Portare la freccia del display LCD su “Programma N°…”
4
Con la manopola selezionare il numero programma.Fig.C
Il display mostra prima il dato descrittivo del programma con il MIN e MAX di corrente e dopo
1 secondo i dati ufficiali: materiale, gas, diametro del filo.
Il programma N° viene memorizzato se avviene una saldatura.
4
41
Instruction Manual / Betriebsanleitung / Livret d'Instructions / Manuale Istruzioni / Manual de instrucciones
10.1
E
SYNERGIC MIG SERIES
Selecion de programas
Ver fig. pág. precedente
La selección de programas puede ser realizada de dos modos:
A) – Con el número del programa
B) – Con la búsqueda programas (aconsejado)
A) BUSQUEDA CON EL NUMERO DE PROGRAMA
Dado
1
2
3
4
E
el número del programa a utilizar, por ejemplo, el programa 304:
Presionar la tecla ubicada a la izquierda del display. Fig. B.
Se enciende el led de set
Llevar el cursor del display LCD a la posición “Programma n°……”
Por medio del encoder, seleccionar el número del programa. Fig. C.
El Display muestra en primera instancia el dato descriptivo del programa con el MIN y el MAX de corriente, luego de 1 segundo se visualiza el
MT, GAS y diam. El programa n° se memoriza si se procede a soldar.
Ver fig. pág. siguiente
B) CON LA BÚSQUEDA PROGRAMAS
1
2
3
4
5
6
Presionar las teclas del display encendiendo de ese modo el led de set, luego
colocar la en la línea MAT …. Fig. A.
Por medio del encoder buscar el material de aporte Fig. B
Colocar el cursor en la línea gas Fig. C
Seleccionar el gas deseado por medio del encoder
Colocar el cursor en la línea “WIRE … “
Seleccionar le diámetro de alambre deseado por medio del encoder
Una vez inseridos estos parámetros, en la línea superior aparecerá el n° de programa buscado.
El programa vendrá memorizado al iniciar el proceso de soldadura.
42
SYNERGIC MIG SERIES
Instruction Manual / Betriebsanleitung / Livret d'Instructions / Manuale Istruzioni / Manual de instrucciones
10.1
F
I
Selection des programmes
Selezione programmi
B) SÉLECTION AVEC LA RECHERCHE DES PROGRAMMES
Allumer le générateur
Accendere il generatore
F
Fig.A
1
Avec les boutons du display, ouvrir le led set et sélectionner la flèche dans la
ligne MAT...Fig.A
2
3
4
5
6
Avec le bouton rechercher le matériel d’apport Fig.B
Déplacer la flèche dans la ligne gas Fig.C
Tourner le bouton pour la recherche du gaz
Déplacer la flèche dans la ligne " WIRE... "
Tourner le bouton pour la recherche du diamètre désiré
À ce point dans la ligne en haut on voit le numéro du programme recherché.
Le programme se mémorise pendant la première soudure.
1
B) SELEZIONE CON RICERCA PROGRAMMI
1
1
Con i tasti del display accendere il led set e selezionare la freccia nella
riga MAT…….Fig.A
2
3
4
5
6
Con la manopola ricercare il materiale d’apporto Fig.B
Spostare la freccia nella riga gas Fig.C
Con la manopola ricercare il gas
Spostare la freccia nella riga “WIRE....”
Con la manopola cercare diametro desiderato.
Fig.B
I
2
Fig.C
2
A questo punto nella riga in alto appare il N° programma ricercato.
Il programma si memorizza alla prima saldatura.
Fig.D
Fig.E
6
3
3
4
4
5
5
5
5
43
Instruction Manual / Betriebsanleitung / Livret d'Instructions / Manuale Istruzioni / Manual de instrucciones
10.1
SYNERGIC MIG SERIES
F Selection des programmes
I Selezione programmi
E Selecion de programas
F
Fig.A
PROGRAMMES POUR L’USAGER
Les premières 10 positions sont réservez aux programmes les plus utilisée et ces qui sont personnalisé par
l’usager. Dans chacune de ces position il est possible d’apporter toutes les variantes désiré. Pour la mémorisation voir le centre assistance Sol Welding. Touts les programmes qui se trouvent à partire de la position 21
jusqu au dernier, peuvent être utilisées, avec des ajustement si désiré, mais net peuvent être variées définitivement.
1
Pour sélectionner un des premier 10 programme appuyer sur le bouton 1 voir fig.A, en haut à côté du
display, et puis sélectionner un parmi les 10 programmes avec le bouton. Chaque programme usager,
possède une description personnalisée avant les données du programme.
2
Pour passer de premiers 10 programmes aux programmes suivants, utiliser le même système, avec
le bouton en haut 2 dans la Fig. B quand la flèche du display indique la première ligne en haut.
1
I
Fig.B
PROGRAMMI UTENTE
I primi 10 programmi sono programmi utente , personalizzati dal centro di assistenza.
1
Per passare ai programmi utente ( da 1 a 10 ) premere il tasto 1 in fig.A in alto a fianco del display, e
quindi, selezionare uno dei 10 programmi con la manopola. Ogni programma utente ha prima dei dati
programma una sua descrizione personalizzata. I programmi utente possono essere personalizzati
dal centro di assistenza.
2
2
E
PROGRAMAS DEL USUARIO
Los primeros 10 programas son los definidos por el usuario, los mismos son personalizados por el centro de
asistencia.
1
Para pasar a los programas del usuario ( del 1 al 10 ) presionar el pulsante 1 (fig.A) que se encuen
tra ubicado cerca del display. Seleccionar uno de los 10 programas por medio del encoder.
Cada programa del usurio cuenta con una descripción personalizada del programa.
Los programas del usuario pueden ser personalizados por el centro de asistencias.
2
44
Per passare dai primi 10 agli altri programmi, usare lo stesso sistema, con il pulsante 2 in fig.B quando la freccia del display indica la prima riga in alto.
Para retornar a los programas standard, ubicar el cursor del LCD en la primera línea del display, presionando luego el pulsante 2 (fig.B).
Instruction Manual / Betriebsanleitung / Livret d'Instructions / Manuale Istruzioni / Manual de instrucciones
10.2
F
I
E
F
Les deux led A et B Fig.A indiquent que le réglage par le potentiomètre est active. Le réglage est relative au led
allumé.
Ex : A2 allumées permettent le réglage de la longueur de l’arc. Si les led A ou B ne sont pas allumés, le display
indique seulement la valeur de A1 A2 A3 A4 ou B1 B2 B3 B4. Si, après un réglage, on effectue une soudure A1
et B1 visualisent les valeurs réelles de courant et de tension, en tenant en mémoire les données, même
à la fin de la soudure. Les paramètres de travail peuvent être réglé de façon synergique en réglant une seule
des valeurs suivantes:
Courant (A1), Vitesse du fil (A2), Tension de l’arc (B1), Epaisseur de la tôle (B2).
Pendant la soudure, le display montre la valeur réelle du courant et de la tension en les gardent en mémoire
jusqu’à la fin de la soudure, La lecture relative peut être effectué en sélectionnent A1 ou B1.
I
I 2 led A e B fig.A indicano che la regolazione della manopola è attiva e visualizzata sul display. La regolazione è
relativa al led acceso sotto al display.
ES: A acceso e A2 acceso abilitano la regolazione tramite manopola di A2 fig.B.
Se il led A o B non è acceso il relativo display indica solo il preset della grandezza A1 A2 A3 A4 ~ B1 B2 B3 B4.
Se dopo una regolazione si esegue una saldatura, A1 e B1 visualizzano i valori reali di corrente e di tensione e
mantengono in memoria i dati anche alla fine della saldatura.
Il parametro di lavoro può essere regolato per:
Corrente (A1), Velocità del filo (A2),
Tensione d’arco (B1),
Spessore (B2).
Durante la saldatura il display mostra il valore di corrente e tensioni reali e li mantiene memorizzati alla fine della
stessa, solo se sono selezionate le visualizzazioni di corrente e tensione con i relativi led A1 e B1.
E
Al encontrarse encendidos los leds A y B indicados en la Fig. A, indican que la regulación por medio del encoder esta activa, visualizándose la misma en el display. La regulación activa es aquella relativa al led encendido
debajo del display.
Ej.: El led A encendido conjuntamente con el led A2 habilitan la regulación de A2 por medio del encoder (Fig. B)
Si el led A o B no se encuentran encendidos, en el correspondiente display viene visualizado la magnitud estipulada para A1 A2 A3 A4 – B1 B2 B3 B4.
Si después de efectuar una regulación, se procede a soldar, los display correspondientes visualizan los valores
reales de corriente y tensión, manteniendo estos datos en memoria después de terminado el proceso de soldadura. El parámetro puede ser regulado por:
Corriente (A1),
Velocidad del alambre (A2),
Tensión del arco (B1), Diámetro del alambre (B2).
Durante el proceso de soldadura el display muestra los valores de tensión y corriente reales manteniéndolos
memorizados al finalizar el proceso, si y solo si han sido seleccionados con precedencia la visualización de corriente y tensión con los relativas leds A1 y B1.
Reglages
Preset e regolazioni
Presetaje y regulacion
A
B
Fig.A
A1 A2 A3 A4
B1 B2 B3 B4
SYNERGIC MIG SERIES
45
Instruction Manual / Betriebsanleitung / Livret d'Instructions / Manuale Istruzioni / Manual de instrucciones
10.2
F
I
E
Reglages
Preset e regolazioni
Presetaje y regulacion
F
- Avec le bouton sélectionner ce qui
on veut régler
- Le Display A indique la valeur
- Avec le potentiomètre choisir la
valeur désirée
E
- Por medio del pulsante seleccionar el
parámetro a regular
- En el display viene visualizado el
valor correspondiente
- Por medio del encoder colocar el
valor deseado
Fig.B
Fig.C
F
E
Fig.D
46
- Régler la valeur sur le Display A
- Le deuxième Display indique la
régulation (Tension) en synergie
I
I
SYNERGIC MIG SERIES
- Con il pulsante selezionare cosa si
intende regolare
- Il Display A indica il valore
- Con la manopola impostare il valore
desiderato
- Regolare il valore sul Display A
- Il secondo Display indica la
regolazione (Tensione) in sinergia
- Regular el valor en el display A
- El segundo display muestra la regula
ción de la tensión en sinergia
F
- Régler la tension sur le Display B
- Le Display A indique la valeur relative
à la vitesse fil + corant
E
- Regular la tensión en el display B
- El display A muestra el valor relativo a
dicha tensión en función del alambre
y corriente.
I
- Regolare la tensione sul Display B
- Il Display A indica il valore relativo per
la velocità filo + corrente
SYNERGIC MIG SERIES
Instruction Manual / Betriebsanleitung / Livret d'Instructions / Manuale Istruzioni / Manual de instrucciones
10.3
F
I
Réglages de la longueur de l’arc:
Reglages ponctuelles
Regolazioni utente
1
2
F
1
(Permet d’ obtenir un arc plus long ou plus court)
Sélectionner le led A3 (longueur de l’arc)
Par intermédiaire du potentiomètre régler la longueur de l’arc (de –99 à +99) ; la valeur s’affiche sur le
voyant supérieur. La nouvelle valeur de longueur de l’arc se mémorise à la première soudure.
Réglages de la l’inductance de l’arc:(Permet d’ obtenir un arc plus “énergique” ou plus “doux”)
3
4
5
6
7
Sélectionner le led B3
Par intermédiaire du potentiomètre régler la valeur de l’inductance, en considèrent que
sa valeur l’arc se contracte et il devient plus doux.
En diminuent la valeur de l’inductance l’arc s’élargit et il devient plus dur.
Retourner à la régulation du courant et de tension.
Exécuter les éventuelles corrections si nécessaires.
La nouvelles donnée se mémorise au moment de la première soudure.
en augmentent
Regolazione lunghezza d’arco:
1
2
(Permette di ottenere un arco più lungo o più corto)
Selezionare il led A3 (lunghezza d’arco)
Tramite la manopola regolare la lunghezza dell’arco (da –99 a +99), in corrispondenza se é visualizza
to, il preset di tensione mostra la nuova lunghezza d’arco.
Il dato di lunghezza d’arco si memorizza alla prima saldatura.
I Regolazione induttanza d’arco: (Permette di ottenere un arco più “energico” o più “soffice”)
2
3
4
5
6
7
Selezionare il led B3
Regolare l’induttanza considerando che con l’incremento dell’induttanza l’arco si restringe e diventa piu’
morbido
mentre con il decremento dell’induttanza l’arco si allarga e diventa piu’ spinto
ritornare alla regolazione di corrente e tensione.
eseguire le eventuali correzzioni del parametro di saldatura.
Il dato si memorizza alla prima saldatura.
3
6
4
5
7
47
Instruction Manual / Betriebsanleitung / Livret d'Instructions / Manuale Istruzioni / Manual de instrucciones
10.3
SYNERGIC MIG SERIES
E Regulación Usuario
Ver fig. pág. precedente
Regulación del largo de arco:
(para obtener a la salida de la antorcha un alambre más largo o más corto)
1
2
Seleccionar el led A3 (largo de arco)
Por medio del encoder regular el largo del arco (desde -99 a +99), en correspondencia, si se encuentra visualizado, la regu
lar la tensión se muestra el nuevo valor de largo de arco. El valor del dato regulado viene salvado en memoria con la primera
soldadura.
E Regulación de la inductancia del arco:
(para obtener un arco más enérgico o más suave)
3
4
5
6
7
Seleccionar el led B3
Regular la inductancia considerando que la incrementar el valor de la misma el arco se vuelve menos enérgico
Mientras que disminuyendo el valor de la misma, el arco de ensancha, haciéndolo más enérgico
Regresar a la regulación de corriente y tensión
Proseguir con eventuales correcciones de los parámetros de soldadura
Los parámetros se memorizan al iniciar el proceso de soldadura.
48
Instruction Manual / Betriebsanleitung / Livret d'Instructions / Manuale Istruzioni / Manual de instrucciones
10.4
F La double pulsation (TWIN)
I Doppia pulsazione ( TWIN )
E Doble pulsación (TWIN)
1
2
F
1
2
2
E
Selezionare il led A4. Se il led lampeggia, significa che il programma é già regolato
per doppia pulsazione.
Tramite la manopola, regolare la frequenza della doppia pulsazione.
Il dato sul display indica la frequenza (da 0,5 Hz a 5 Hz), mentre la pulsazione del led A4 indica
visivamente la frequenza di ripetizione della doppia pulsazione. Il dato si memorizza alla prima
saldatura.
NOTA: la doppia pulsazione, inizia alla fine della prima rampa (up-slope), e finisce al comando
del pulsante torcia alla fine del suo tempo alto. I dati della doppia pulsazione, sono variabili dall’utente e possono essere diversi al’interno di uno stesso programma, se vengono memorizzati
nei Jobs.
1
2
Sélectionner le led A4. Si le led clignote, il signifie que le programme est déjà régulé
pour la double pulsation.
Par intermédiaire du potentiomètre, régler la fréquence de la
double pulsation. La valeur s’affiche et le clignotement du led
change de fréquence.
La nouvelles donnée se mémorise au moment de la première soudure.
NOTE : la double pulsation, commence à la fin de la première rampe (up-slope), et termine
avec la commande du bouton de la torche à la fin de son temps haut.
Pour un même programme on peut utiliser différente valeurs de la double pulsation. Si
souhaité, pour le même programme, on peur mémoriser le différente valeur à l’intérieure des
Job Points
1
I
SYNERGIC MIG SERIES
Seleccionar el led A4 Si en este momento el led se encuentra intermitente, significa
que el programa ya ha sido regulado para doble pulsación.
Por medio del encoder regular la frecuencia de la doble pulsación.
El dato visualizado en el display indica la frecuencia (0.5 Hz a 5 Hz), mientras que la pulsación
del led A4 visualiza en el display la frecuencia de repetición del la doble pulsación.
El valor viene memorizado al inicia el proceso de soldadura.
NOTA: la doble pulsación inicia al finalizar la rampa de salida (up-slope), finalizando el mismo
por medio del pulsante de la antorcha una vez finalizado su tiempo de alto.
Las variables de la doble pulsación son reguladas por el usuario, pudiendo tener diversos valores dentro de un mismo programa si los mismos vienen memorizados en los Jobs.
49
Instruction Manual / Betriebsanleitung / Livret d'Instructions / Manuale Istruzioni / Manual de instrucciones
10.5
F
I
E
Caracteristique de la soudure
Caratteristica di saldatura
Características de la soldadura
F
Les fonctions MIG PULSATO, MIG/MAG, TIG ET ÉLECTRODE, peuvent être sélectionnées directement
sur le panneau frontal.
1
À partir de la position pulsé, en appuyant sur le bouton 1 Fig. A on passe en fonction MIG/MAG.
Le numéro programme reste le même, ainsi que le matériel sélectionné, le gaz et le diamètre du
fil. Changent toutefois la synergie; le minimum et le maximum de courent soudable par le même
programme.
2
À partir de la position MIG/MAG, en appuyant sur le bouton 1, Fig.B on passe en fonction TIG. Le
courant et le cycle sont réglés à la manière comme pour le MIG et le MIG PULSE. Dans la
fonction TIG, sur le display, on dispose de la régulation du post-gaz.
3
À partir de la position TIG en appuyant sur le bouton 1 Fig.C on passe à la sélection de la fonction
ARC ELECTRODE. sur le display on trouve la possibilité pour le régulage du hot start et de l’ arc
force.
La nouvelles donnée se mémorise au moment de la première soudure.
I
Le funzioni MIG PULSATO, MIG/MAG, TIG ed ELETTRODO, sono selezionabili direttamente dal pannello
frontale.
1
Dalla posizione pulsato premendo il pulsante 1 Fig. A, si passa alla caratteristica MIG/MAG. Il
NUMERO PROGRAMMA rimane lo stesso, come pure il MATERIALE, il GAS ed il DIAMETRO,
cambia però la SINERGIA ed il MINIMO e MASSIMO.
2
Dalla posizione MIG/MAG, premendo il pulsante 2 Fig. B, si passa alla caratteristica TIG, la corrente ed il CICLO sono regolati nel modo convenzionale, come per MIG e MIG PULSATO, nel
display LCD é disponibile la regolazione del POST-GAS.
3
Dalla posizione TIG premendo il pulsante 3 Fig. C, si passa alla selezione della caratteristica elettrodo; sul display LCD sono disponibili le regolazioni di HOT START e di ARC FORCE.
L’impostazione si memorizza alla prima saldatura.
E
Las funciones MIG PULSADO, MIG/MAG, TIG y ELECTRODO, se seleccionan directamente desde el
panel frontal.
1
Presionando el pulsante 1 de la Fig. A, se pasa del modo PULSADO al modo MIG/MAG. tanto el
PROGRAMA, el MATERIAL, el GAS Y el DIAMETRO del ALAMBRE permanecen invariables, los
valores que cambian automaticamente son la SINERGIA, el MINIMO Y MAXIMO.
2
Presionando el pulsante 2 de la Fig. B, se pasa del modo MIG/MAG al modo TIG, la corriente y el
CICLO se regulan de modo similar que en los modos MIG PULSADO y MIG/MAG, en el display
LCD se encuantra la regulacion del valor de POST-GAS.
3
Presionando el pulsante 3 de la Fig. C, se pasa del modo TIG al modo ELECTRODO, en el
display LCD se dispone de los valores de HOT START y de ARC FOCE modificables por medio
del encoder.
Los parámetros se memorizan al iniciar el proceso de soldadura.
Fig.A
1
Fig.B
2
Fig.C
3
50
SYNERGIC MIG SERIES
SYNERGIC MIG SERIES
Instruction Manual / Betriebsanleitung / Livret d'Instructions / Manuale Istruzioni / Manual de instrucciones
10.6
1 Fig.A
F Cycle du BOUTON DE LA TORCHE
I Ciclo PULSANTE TORCIA
E Ciclo PULSANTE ANTORCHA
F
Fig.A
2
3
4
5
Fig.B
Fig.C
Fig.D
Fig.E
Sélectionner le cycle désiré à travers le bouton 1, en passant à chaque pression à
travers les différentes mode de travail
2 Temps
mode standard sens rampes
2 Temps + rampes
mode standard avec rampes de courants de démarrage et de clôture.
4 Temps
mode 4 temps sens rampes
4 Temps + rampes
mode 4 temps avec rampes de courants de démarrage et de clôture.
TIMER
mode standard 2 temps, avec temporisation.
TIMER + rampes
mode 4 temps avec rampes de courants de démarrage et de clôture,
avec temporisation.
1
1 Fig.A
I
Fig.B
2
Fig.B
Fig.C
Fig.D
Fig.E
1 Fig.A
E
Fig.C
2
3
4
5
2
3
4
5
Fig.B
Fig.C
Fig.D
Fig.E
Tramite il pulsante, selezionare il ciclo desiderato passando ad ogni pressione
attraverso i vari modi di lavoro:
2T
modo standard
2T SLOPE
modo standard con rampe e correnti INIZIALE e FINALE
4T
modo LATCH
4T SLOPE
modo LATCH con rampe e correnti INIZIALE e FINALE
TIMER
modo standard TEMPORIZZATO
TIMER SLOPE
come sopra ma con RAMPE e CORRENTI INIZIALE e FINALE
Seleccionar mediante el pulsante el ciclo deseando, pasando al presionar por diversos
modos de trabajo:
2T
modo standard
2T SLOPE
modo standard con RAMPAS y CORRIENTES INICIAL y FINAL
4T
modo LATCH
4T SLOPE
modo LATCH con RAMPAS y CORRIENTES INICIAL y FINAL
TIMER
modo standard con TEMPORIZADOR
TIMER SLOPE
modo standard con TEMPORIZADOR con RAMPAS y CORRIENTES INICIAL y FINAL
Fig.E
Fig.D
3
4
5
51
Instruction Manual / Betriebsanleitung / Livret d'Instructions / Manuale Istruzioni / Manual de instrucciones
10.7
F
Programmation des de la
machine par les JOB POINTS
I
JOB Sistemi di lavoro
nei programmi
Fig.A
1
1
1
Fig.B
2
52
F
SYNERGIC MIG SERIES
RÉGLAGE À TRAVERS JOB POINTS:
REGOLAZIONE TRAMITE JOB POINTS:
Les Job Points sont des sous-mémoires à
disposition de l’utilisateur, qui lui permettent la
mémorisation des touts les paramètres spécifiques à chaque travaux. Chaque programme
permet la mémorisation de 9 Job Points.
Sélection des Job:
1
Sélectionner le led B4
2
Par intermédiaire du potentiomètre positionner le curseur sur la gauche des Jobs qui
ont été précédemment programmes.
Au moment de la sélection du Job Point touts
les paramètres et les fonctions correspondantes s’affichent sur le panneau frontale.
Dans les Job on peut mémoriser:
- Courant tension vitesse du fil et son
épaisseur
- Type de soudure Mig ou Mag Pulsé
- Cycle de la torche
- Longueur de l’arc
- Fonction ON/OFF de la double pulsation
avec la fréquence choisi
- Paramètres de la double pulsation (Balance
en pourcentage et forme de l’onde)
- Valeurs de l’inductance de l’arc
- Valeur du pré-gaz
- Valeur du post-gaz
- Valeur de l’évanouissement
- Valeurs de démarrage
- Courant de démarrage
- Temps de la rampe de démarrage
- Temps de la rampe de clôture
- Courant finale
- Temporisation pour soudure par points
I Job sono regolazioni utente prememorizzate.
Ogni programma può contenere fino a 9 Job.
Selezione dei Job:
Selezionare il led B4.
1
2
Tramite la manopola far scorrere sul
display di sinistra i Jobs disponibili nel programma.
Alla selezione del Job, corrisponde immediatamente la nuova impostazione del pannello
frontale prememorizzata nel Job stesso.
Nel Job sono memorizzabili:
- Corrente-tensione, velocità filo e spessore
- Tipo di saldatura Mig o Mag Pulsato
- Ciclo pulsante torcia
- Lunghezza dell’arco
- Doppia pulsazione e frequenza
- Valori d’induttanza d’arco
- Valore di pregas
- Valore di postgas
- Valore di BBT
- Correttore di velocità di innesco
- Parametri della doppia pulsazione
(Balance % low e forma d’onda)
- Corrente di inizio
- Tempo di rampa di inizio
(se usata)
- Tempo di rampa di Craterfiller (se usata)
- Corrente finale
- Tempo di Timer (se usato)
NOTA:
Il sistema gestisce fino a 900 Jobs
I
Instruction Manual / Betriebsanleitung / Livret d'Instructions / Manuale Istruzioni / Manual de instrucciones
10.7
SYNERGIC MIG SERIES
E JOB - Sistemas de trabjo en los programas
Ver fig. pág. precedente
REGULACION POR MEDIO DE JOBS POINTS:
E
Los Jobs son regulaciones personalizables pre-memorizadas.
Cada programa puede contener un total de 9 jobs.
Selección del Job.
1
Seleccionar el led B4.
2
Con ayuda del encoder visualizar en el display de la derecha los jobs disponibles en el programa. Con la selección
del job, el panel frontal visualizará la nueva configuración
predeterminada por el mismo job.
En el job se pude memorizar:
- Corriente-tensión, velocidad del alambre y espesor
- Tipo de soldadura MIG o MIG pulsado
- Ciclo del pulsante antorcha
- Largo del arco
- Doble pulsación y frecuencia
- Valores de inductancia del arco
- Valores de pre-gas
- Valores de post- gas
- Valores de BBT
- Corrector de velocidad de ignición
- Parámetros de la doble pulsación (si la misma es usada)
- Balance, %low y forma de onda)
- Corriente inicial
- Tiempo de rampa inicial (si es usada)
- Tiempo de rampa Craterfiller (si es usada)
- Corriente final
- Tiempo del temporizador Timer (si es usado)
Nota:
El sistema gestiona hasta un total de 900 Jobs
53
Instruction Manual / Betriebsanleitung / Livret d'Instructions / Manuale Istruzioni / Manual de instrucciones
10.7
F
I
SYNERGIC MIG SERIES
Programmation des job points
JOB Sistemi di lavoro nei programmi
Mémorisation des Job Points
1
2
1
2
F
3
4
3
Choisire le programme approprié, procéder à tous les réglages d’arc
nécessaires, sélectionner les fonctions voulues. Appuyer sur le
potentiomètre pendant 3 secondes. Le display LCD montre
2
l’inscription de 9 positions Le numéro dans la deuxième ligne (en
mis-gras) c’est la position proposée pour la mémorisation.
Si la position proposé n’est pas celle désirée, par intermédiaire du potentiomètre sélectionner le numéro du
Job Point où l’on veut mémoriser les paramètres sélectionnées.
La mémorisation est confirmée en appuyant sur le potentiomètre. Lorsque une position est déjà occupé par
des paramètres au dessous du numéro on peut voir un astérisque.
Dans le cas ou l’on veut effectuer une mémorisation à l’intérieure d’un Job déjà occupé, au moment de la
mémorisation, sur le display, à la troisième ligne on pourra lire: "OVERWRITE". Si l’on sélectionne
ORERWRITE avec le curseur et l’on appui sur le potentiomètre, les données du Job précédent serons définitivement perdus et remplacé par les nouveaux paramètres. Si l’on désire conserver la mémorisation
précédente et mémoriser les nouvelles donnes dans un autre Job Point, sélectionner avec le curseur
"ESC" appuyer sur le potentiomètre, sélectionner en numéro de Job qui n’est pas marqué d’un astérisque.
Positionner le curseur sur " ENTER " et appuyer sur le potentiomètre (5).
Memorizzazione dei Job:
1
4
I
2
3
4
5
54
Una volta impostati i parametri da memorizzare, premere per alme
no 3 secondi la manopola. Il display LCD presenterà la scritta:
Il numero nella seconda riga (in neretto) é relativo alla posizione
2
proposta per la memorizzazione ( come default é proposto il numero
del Job in uso).
Con la manopola selezionare la posizione dove si vuole memorizzare.
La memorizzazione é confermata premendo la manopola. Se il Job è già occupato, al di sotto del numero è
visibile un asterisco.
In questo caso la memorizzazione non avviene, ed il display nella terza riga mostra:”OVERWRITE” che
significa che se si procede con ENTER il vecchio dato del Job viene perso a benefi cio del nuovo. La freccia
in questo caso non indica piu’ “ENTER“, bensì “ESC”.
Premendo subito la manopola si rientra nella selezione del Job da memorizzare con la possibilità di sceglie
re un altro numero. Se invece l’intenzione è quella di sovrascrivere, è necessario con il tasto ⁄ riportare la
freccia di regolazione nella 3° riga “OVERWRITE” e quindi premere la manopola (5).
Instruction Manual / Betriebsanleitung / Livret d'Instructions / Manuale Istruzioni / Manual de instrucciones
10.7
SYNERGIC MIG SERIES
E JOB - Sistemas de trabjo en los programas
Ver fig. pág. precedente
Memorización de los Jobs:
1 Una na vez configurados los parámetros a memorizar, presionar el encoder al menos por un tiempo de 3 segundos.
En el display LCD se leerá:
el número de la segunda línea (en negrita)
es la posición propuesta para memorizar
2
el Job (como predefinido es propuesto el
valor del Job en uso)
E
2
Con el encoder seleccionar la posición en el cual se desea memorizar el Job.
3
La memorización se confirma al presionar el encoder.
Si el Job ya se encuentra ocupado, debajo del número del mismo se visualizará un asterisco.
4
En este caso, la memorización no viene concluida, por lo que le la tercera línea del display se leerá “OVERWRITE”, en el
caso de proceder con el ENTER, los datos del precedente Job prevalecen respecto a los de nuevo Job. En este caso, el
cursor no se encuentra predefinidamente sobre el “ENTER”, sino que se encuentra sobre “ESC”. Presionando la opción ESC,
se entra nuevamente en el Job, permitiendo de ese modo seleccionar un número alternativo para la memorización.
En el caso que se desee sobrescribir el Job precedente con el Job nuevo, ubicar el cursor en la tercera línea “OVERWRITE”
y presionar el encoder (5).
55
Instruction Manual / Betriebsanleitung / Livret d'Instructions / Manuale Istruzioni / Manual de instrucciones
10.8
F
I
Fig.A
Dans le sous-menu sont disponibles des régulations secondaires de travaille.
1
Appuyer sur le bouton 1 pendent trois secondes. Le display change son inscription avec :
Reglages dans sous-menus
Regolazioni da sottomenù
TEMPS DU PRE-GAZ
2
A
SYNERGIC MIG SERIES
TEMPS DU POST-GAZ
BRULURE DU FIL A LA FIN DE LA SOUDURE
VITESSE D’ APPROCHE DU FIL
1
F
2
Fig.B
3
Sottomenù (regolazione)
Le regolazioni secondarie sono disponibili nel sottomenù e sono relative al Job in uso o a regolazione libera.
1
Premere e tener premuto il pulsante tipo di saldatura. Dopo 3 secondi il display
Fig.C
4
2
4
I
Fig.D
6
5
56
La flèche à l’intérieure du display indiquera la fonction que l’on peut régler. Avec le potentiomètre ajuster la
valeur. Avec les boutons " flèche vers le haut et flèche vers le bas 3 " positionner la flèche, qui se trouve, à
l’intérieure du display à gauche de la fonction que l’on désire varier. Avec le potentiomètre ajuster la valeur.
3
Choisir la fonction en déplaçant la flèche
4
Avec le potentiomètre ajuster la valeur.
5
Déplacer la flèche pour vérifier les autres valeurs.
6
Pour verifier les valeures de la double pulsation, introduire cette dernière avec le bouton A
Les paramètres relatifs à la double pulsation sont les suivants :
T on % (équilibre), V off % (niveau de courant bas), T up 1-20 (vitesse de changement de courant)
Ces données sont disponibles seulement si la double pulsation est sélectionnée.
TEMPO DI PREGASIFICAZIONE
TEMPO DI POS GASIFICAZIONE
BRUCIATURA FILO ALLA FINE DELLA SALDATURA
VELOCITA’ DI APPROCCIO FILO
La freccia indicherà il parametro che è possibile regolare con la manopola, con i
tasti ⁄ vengono scelti i parametri.
3
Scegliere la riga spostando la freccia
4
Eseguire la regolazione
5
Spostare la freccia in basso per visualizzare le altre variabili
6
Per visualizzare le variabili della doppia pulsazione inserirla con il pulsante A
I parametri relativi alla doppia pulsazione sono:
T on % (bilanciamento), V off % (livello di corrente bassa), T up 1-20 (velocità di cambiamento corrente)
Questi dati sono disponibili solo se la doppia pulsazione è selezionata.
Instruction Manual / Betriebsanleitung / Livret d'Instructions / Manuale Istruzioni / Manual de instrucciones
10.8
SYNERGIC MIG SERIES
E Regulccion del submenu
Ver fig. pág. precedente
Submenú (regulación)
Las regulaciones secundarias se encuentran en el submenú. Las mismas son relativas al Job en
uso o a regulación libre.
1
Presionar y mantener presionado el pulsante de tipo de soldadura al menos por 3 segundos. Después de 3 segundos el display visualizara las siguientes opciones:
TIEMPO DE PREGASIFICACION
TIEMPO DE POST GASIFICACION
2
QUEMADURA ALAMBRE AL FINAL DE LA SOLDADURA
VELOCIDAD DE ACERCAMIENTO DEL ALAMBRE
E
3
4
5
6
El cursor indicara el parámetro que es posible regular por medio del encoder, los parámetros se seleccionan por medio de las teclas.
Seleccionar la línea moviendo el cursor
Proceder a la regulación
Desplazar el cursor hacia el final de la pantalla para visualizar las demás variables posibles de regular
Para visualizar los parámetros de la doble pulsación presionar el pulsante A
Parámetros relativos a la doble pulsación:
T on % (iniciación)
V off % (nivel de corriente baja)
T uo1-20 (velocidad de cambio de corriente)
Estos parámetros son disponibles únicamente si la
doble pulsación se encuentra seleccionada.
57
Instruction Manual / Betriebsanleitung / Livret d'Instructions / Manuale Istruzioni / Manual de instrucciones
10.8
F
I
Regleges dans sous-menus des rampes
Impostazione delle rampe
2
F
7
8
8
7
SYNERGIC MIG SERIES
Appuyer sur le bouton flèche ver le bas, le display présente les
inscriptions de la figure 7 suivantes:
COURANT DE DÉMARRAGE
TEMPS DE RAMPE DE MONTÉ
TEMPS DE RAMPE DE DESCENTE
COURANT FINAL DE CLÔTURE DU CRATÈRE
Ces données sont disponibles seulement si le cycle des rampes est sélectionné. Procéder à la sélection du cycle si
le réglage est nécessaire. Procéder de la même façon pour le réglage du temporisateur.
8
Le paramètre relatif au temporisateur est disponible seulement si le cycle du temporisateur est sélectionné.
Procéder à la sélection du cycle.
9
S’il est nécessaire, effectuer le réglage
Le display peut rester dans la visualisation du sous-menu aussi pendant la soudure.
10
Pour sortir du sous-menu, appuyer sur le bouton 10. Toutes les données sot mémorisées à la première soudure en
position le Job libre. Si les données doivent être mémorisées dans un Job spécifique, effectuer la procédure de
mémorisation Job.
Note: avec l’allumage du générateur le programme et toutes les impostationes retournent à la dernière soudure faite.
Sottomenù (regolazione)
7
Premere il tasto freccia down per visualizzare le regolazioni delle rampe, il display presenta le scritte della figura:
9
2
9
I
10
58
CORRENTE DI INIZIO SALDATURA
TEMPO DI RAMPA INIZIALE DA I start a I nominale
TEMPO DI RAMPA FINALE DA I nominale a I stop
CORRENTE FINALE (Corrente di crater filler)
Questi dati sono disponibili solo se il ciclo delle rampe è selezionato.
Procedere alla selezione del ciclo se é necessaria la regolazione.
8
Il parametro relativo al timer é disponibile solo se é selezionato il ciclo del timer. Procedere alla selezione del ciclo.
9
Se é necessaria, eseguire la regolazione.
Il display può rimanere nella visualizzazione del sottomenù anche durante la saldatura
10
Per uscire dal sottomenù premere il pulsante di scelta caratteristica. Tutti i dati sono memorizzati alla prima salda
tura nel Job di regolazione libero. Se devono essere memorizzati su un Job specifico, eseguire la procedura di
memorizzazione Job. i dati sono memorizzati alla saldatura nel Job o (memorizzazione continua).
Per memorizzare il tutto in un Job particolare, seguire la procedura Job.
Nota: all’accensione del generatore il programma e tutte le impostazioni ritornano all’ultima saldatura eseguita.
Instruction Manual / Betriebsanleitung / Livret d'Instructions / Manuale Istruzioni / Manual de instrucciones
10.8
SYNERGIC MIG SERIES
E Regulacion de las rampas
Ver fig. pág. precedente
Submenú (regulación)
Presionar el pulsante (flecha abajo) para visualizar la regulación del las rampas. En el display se visualizará:
7
CORRENTE INICIAL DE SOLDADURA
TIEMPO DE RAMPA INICIAL DE I start a I nominal
2
TIEMPO DE RAMPA FINAL DE I nominal a I stop
CORRIENTE FINAL (Corriente de carterfiller)
E
8
9
10
Estos parámetros se encuentran disponibles si y solo si el ciclo rampa se encuadra activo. Activar el modo rampa si es
necesario regular estos parámetros.
El parámetro Timer (temporizador) será disponible si el modo timer se encuentra activo.
Si es necesario, proceder a la regulación. Durante el proceso de soldadura el display puede permanecer en la
visualización de submenú
Para salir del submenú, presionar el pulsante tipo de soldadura.
En el caso de encontrarse en un Job de regulación libre, los valores de los parámetros vienen memorizados al iniciar el
proceso de soldadura. Si dichos parámetros deben ser memorizados en un Job especifico, proceder con la rutina de
memorización de Jobs.
Nota: al conectar el generador, los parámetros de regulación se encontrarán en aqullos regulados en el último proceso de
soldadura.
59
Instruction Manual / Betriebsanleitung / Livret d'Instructions / Manuale Istruzioni / Manual de instrucciones
11.
11. WEITERE FUNKTIONEN
OTHER FUNCTIONS
Extra functions of the Power Sources:
a) Überhitzungs-Schutz
Dieser Schutz schaltet ein wenn die interne Temperatur die voreingestellten Werte übersteigt. In diesem Fall wird die Stromversorgung
unterbrochen. Der Schutz wird automatisch aufgehoben wenn die
Temperatur wieder unter den voreingestellten Wert sinkt. Beim
Einschalten des Schutzes zeigt die Maschine „AL. HFA“ auf der
Digitalanzeige.
a) Overtemperature protection
When the internal temperature of the Power Source rises over the pre-set
value, the output current is interrupted. Functioning is automatically.
Temperature drops below the pre-set value. If, during the over temperature, the wire fedeer is connected, the display will show: “AL-HFA”.
GB
b) Protection for LACK OF WATER
A protection system is activated when there is lack of water or any fault in
the cooling circuit of the torch with the visualisation of “AL. CFA”.
c) “POWER SAVING SYSTEM” protection
Power Sources are provided with an automatic shut down system.
The power source enters the Stand By function when the power saving system activates.The absorbed power supply goes down to 20VA.
The Inverter / chopper, the ventilation and the water cooling unit stop
working, avoiding ware out and introduction of dust in the equipment.The
power source turns on automatically just by pressing the torch push button or when the electrode makes contact with the work piece.
The stand by time lapse can be adjusted by service center.
60
SYNERGIC MIG SERIES
D
b) Wassermangelschalter
Dieser Schutz schaltet ein wenn kein Wasser mehr vorhanden ist
oder wenn ein Defekt im Wasserkreislauf auftritt.
Beim Einschalten dieses Schutzes zeigt die Maschine „AL. CFA“ auf
der Digitalanzeige.
c) Power saving system Funktion
Die Anlage hat ein automatisches Selbstausschaltungssystem. Diese
Funktion setzt die Stromquelle in Stand By, und reduziert dadurch die
Stromaufnahme auf 20 VA. Der Inverter/Chopper, der Ventilator und
die Wasserpumpe schalten ab und vermeiden dadurch einen unnötigen Verschleiß der Teile sowie eine unnötige Staubaufnahme.
Die Anlage startet automatisch wieder beim Betätigen des
Brennertasters oder bei Behrührung der Elektrode mit dem
Werkstück.
Der stand-by Zeitraum kann vom Kundendienst festgestellt werden.
Instruction Manual / Betriebsanleitung / Livret d'Instructions / Manuale Istruzioni / Manual de instrucciones
11.
F
AUTRES FONCTIONS
11.
SYNERGIC MIG SERIES
ALTRE FUNZIONI
Le Générateur dispose d’autres fonctions supplémentaires qui peuvent se résumer ainsi:
I Generatori dispongono di altre funzioni supplementari riassumibili in:
a) Protection pour ECHAUFFEMENT.
Cette protection intervient si les températures internes au Générateur dépassent les
valeurs programmées. Dans ce cas, la fourniture de courant est interrompue. Cette protection est enlevée automatiquement avec le retour des températures dans les limites
prévues, pas avant 1,5 min après l’intervention. L’entrée en fonction de la protection
pour échauffement, est affichée par le message “AL. HFA “ sur les display du
Générateur.
a) Protezione per SOVRATEMPERATURA.
Questa protezione interviene se le temperature interne al Generatore
superano i valori prestabiliti. In questo caso l’erogazione di corrente viene
interrotta. Questa protezione viene rimossa automaticamente con il rientro
delle temperature nei limiti previsti. L’intervento di questa protezione, viene
visualizzata con la scritta “AL. HFA “ sui display del Generatore.
b) Protection pour L’ABSENCE DE L’EAU.
Cette protection survient avec l’absence de l’eau ou quand il y a une anomalie dans
le circuit de refroidissement de la torche. L’intervention de cette protection est visualisée avec l’inscription “AL. CFA”.
c) Funzione di “POWER SAVING SYSTEM”
Les postes Générateur ont un systéme d’extintion automatique qui porte le générateur
dans la position de stand-by; ça signifie que l’absorption de courant est réduite à 20VA.
L’inverter / chopper, la ventilation et l’unité de réfroidissement s’arrêtent, avec le résultat d’éviter soit l’usure soit l’accumulation de poussière dans l’equipement. Le poste
fonctionne automatiquement à la pression du bouton torche ou bien avec le cotact de
l’électrode avec la pièce à sauder. Le temps après lequel le Générateur entre en stand
by peut être régulé par le centre d’assistence.
11. OTRAS FUNCIONES
I
b) Protezione per MANCANZA ACQUA
Questa protezione interviene in caso di mancaza acqua o anomalia nel
circuito di raffreddamento della torcia. L’intervento di questa protezione,
viene visualizzata con la scritta “AL. CFA”.
c) Funzione di “POWER SAVING SYSTEM”
I generatori sono provvisti di un sistema di spegnimento automatico. Lo spegnimento automatico mette il generatore nella funzione di Stand By, ossia
l’assorbimento da rete viene ridotto a soli 20VA. L’Inverter / chopper, la ventilazione e l’unità di raffreddamento si fermano, con il risultato di evitare sia
usura che accumuli di polvere nell’impianto. Il generatore si ripristina in modo
automatico, alla pressione del pulsante torcia oppure con il contatto dell’elettrodo con il pezzo in saldatura. Il tempo dopo il quale il generatore entra
in stand by é regolabile dal centro di assistenza.
Los Generadores cuentan con otras funciones suplementarias sintetizables en:
a) Protección por SOBRECALENTAMIENTO Esta protección interviene si las temperaturas interiores del Generador superan los valores preestablecidos. En este caso la
erogación de corriente es interrumpida. Esta protección es removida automáticamente con el regreso de las temperaturas en los límites previstos. La intervención de esta protección es visualizada con la inscripción "A. EL. HFA” sobre los display del Generador.
E
b) Protección por FALTA AGUA Esta protección interviene en caso de falta de agua o de anomalía en el circuito de enfriamiento de la antorcha. La intervención de esta
protección es visualizada con la inscripción "A. EL. CFA."
c) Función de "POWER SAVING SYSTEM" Los generadores son provistos de un sistema de apagado automático. El apagado automático pone el generador en la función
de Stand By (en espera), y la absorción de red se reduce a solo 20VA. Al entra en la función Stand by, el Inverter / chopper, la ventilación y la unidad de enfriamiento se apagan
con el objeto de evitar tanto la usura como también la acumulación de polvo en la instalación. El generador se restablece de modo automático presionando el pulsante de la antorcha o bien con el contacto del electrodo con la pieza a soldar. El tiempo después del cual el generado entra en modo de espera es responsabilidad del centro de asistencia.
61
SYNERGIC MIG SERIES
Instruction Manual / Betriebsanleitung / Livret d'Instructions / Manuale Istruzioni / Manual de instrucciones
12.
TECHNICAL SPECIFICATIONS - TECNISCHE DATEN DÉTAILS TECHNIQUES - SPECIFICHE TECNICHE - DATOS TECNICOS
Power Source Type / Generatore tipo
Code / Codice
Power supply / Tensione di alimentazione ( -10% / +10% )
Phases / Fasi
Fuses / Fusibili
Rated Duty Cycle in 10 min / Duty cycle in 10 min
Rated secondary current / Corrente di uscita nominale
Permanent Sec. Current 100% / Corrente di uscita permanente 100%
Rated power / Potenza nominale
Permanent power 100% / Potenza permanente
Overload protection / Protezione
TIG Regulation field / Range di regolazione TIG
STICK Regulation field / Range di regolazione ELETTRODO
MIG - MAG Regulation field / Range di regolazione MIG - MAG
NO LOAD voltage (S) (K) / Tensione a vuoto (S) (K)
Max secondary current / Massima corrente di uscita
Short circuit limit / Limite di corto circuito
Stick electrode possibility / Elettrodo saldabile
Protection class / Classe di protezione
Insulating class / Classe di isolamento
Hot start / Hot start
Anti sticking / Anti sticking
Arc force / Arc force
2/4 times / 2/4 tempi
Adjustable Start level / Livello di start regolabile
Adjustable Up Slope / Rampa di salita regolabile
Adjustable Down Slope / Rampa di discesa regolabile
Adjustable Post Gas / Post gas regolabile
Double level / Doppio livello
Remote control receptacle / Presa comando a distanza
Digital Amperometer / Amperometro digitale
Width - Height - Length / Larghezza - Altezza - Lunghezza
Weight / Peso
V
A
40 °C
A
A
KVA
KVA
A
A
A
V
A
A
Ø
mm
Kg
PLUS 401 W
V14054GE
400
3
T20
ED 50%
350
250
14,9
9,4
Thermal
10-400
20-400
15-400
100
400
420
6
IP23
H
OK
OK
OK
OK
OK
OK
OK
OK
OK
Optional
OK
470 x 720 x 980 (*)
69 (*)
PLUS 502 W
V10620GE
230 400 460
3
T50 T28 T24
ED 60%
500
380
21
14,3
Thermal
10-500
20-500
15-500
65
550
580
6
IP23
H
OK
OK
OK
OK
OK
OK
OK
OK
OK
Optional
OK
470 x 720 x 980 (*)
130 (*)
(*) Without Wire Feeder / Senza Trainafilo
Height with Wire Feeder 1230 mm / Altezza con Trainafilo 1230 mm
Weight with Wire Feeder 90 Kg PLUS 401 W - 151 Kg PLUS 502 W / Peso con Trainafilo 90 Kg PLUS 401 W - 151 Kg PLUS 502 W
62
Instruction Manual / Betriebsanleitung / Livret d'Instructions / Manuale Istruzioni / Manual de instrucciones
12.
SYNERGIC MIG SERIES
TECHNICAL SPECIFICATIONS - TECNISCHE DATEN DÉTAILS TECHNIQUES - SPECIFICHE TECNICHE - DATOS TECNICOS
WIRE FEEDER TYPE / TRAINO TIPO
Code / Codice
Rated duty cycle in 10 min. / Duty cycle nominale in 10 min.
Rated current / Corrente di uscita nominale
Protection class / Classe di protezione
Maximum wirefeeder speed / Massima velocità filo
Wire Spool / Bobina filo utilizzabile
N° of Drive Rolls / N° rulli traino
Width - Height - Length / Larghezza - Altezza - Lunghezza
Weight / Peso
Wire Feeder PLUS 90
40°C
A
m/min
Kg
mm
Kg
V14760TF
60%
500
IP23
20
15
4
240 x 520 x 605
21
63
Instruction Manual / Betriebsanleitung / Livret d'Instructions / Manuale Istruzioni / Manual de instrucciones
13.
SPARE PARTS LIST / LISTA PEZZI
PLUS 401 W
POS.
1
13
2
3
12
4
11
5
10
6
C.S.
CODE
1
B102GO
2
C956CA10
3
B043CE
4
D273CS
5
C974PA10S
6
C973PA10S
7
D038RU
8
D035RU
9 X25-X26-X27 R006PR
10
D367PF
11
D218CA
11
D376MA
11
E727P
12 (*) M2
P247
13
C551MA01
Q.ty DESCRIPTION
1
1
2
1
1
1
2
2
3
1
1
1
1
1
1
Bull eye D16
Blue cover
Plastic laches
Plastic sliding lock
Blue panel of right
Right side lower panel
D200 Wheel
D125 rotating Wheel
Dix Socket 70 mmq
Pastic black panel
Blue Cap D29
Black Knob D30
7
8
(*) = Suggested spare parts / Ricambi consigliati
64
DESCRIZIONE
Golfare maschio D16
Copertura blu
Cernira in plastica
Chiusura a slitta
Pannello blu destro
Pannello inferiore destro
Ruota D200 fissa
Ruota D125 girevole
Presa Dix 70 mmq
Pannello frontale in plastica
Cappuccio blu D29
Manopola nera D30
Encoder with push-button Encoder con pulsante
Front Panel assembly Premontato pannello frontale
Black Handle
Maniglia nera
9
9
SYNERGIC MIG SERIES
Instruction Manual / Betriebsanleitung / Livret d'Instructions / Manuale Istruzioni / Manual de instrucciones
13.
SPARE PARTS LIST / LISTA PEZZI
PLUS 401 W
POS.
14
23
22
15
21
16
20
9
19
18
SYNERGIC MIG SERIES
17
C.S.
CODE
Q.ty DESCRIPTION
DESCRIZIONE
14
15
S1
C1002PP
K336IN
1
1
X1
-
C957PL10S
W054
C958BA01
B165AT
1
1
1
1
19
-
B166AT
1
20
21
-
B041CA
C961PB
1
1
Pannello posteriore
Interruttore rotativo 32A
con manopola rossa
Pannello blu di sinistra
Cavo di alimentazione
Basamento nero
Attacco rapido rosso
ingresso uscita acqua
Attacco rapido blu
ingresso uscita acqua
Catena fissaggio bombola
Staffa porta bombola
16
17
18
19
22
23
X28
X24
J162PR
J264PR
1
1
Back Panel
Rotative switch 32A
with red Knob
Blue panel of left
Power supply cable
Black base
Water in-let / out-let
red pressure socket
Water in-let / out-let
blue pressure socket
Bottle fastening chain
Clamp for gas
cylinder trolley
7 poles receptacle
14 poles receptacle
Presa 7 poli
Presa 14 poli
(*) = Suggested spare parts / Ricambi consigliati
65
SYNERGIC MIG SERIES
Instruction Manual / Betriebsanleitung / Livret d'Instructions / Manuale Istruzioni / Manual de instrucciones
13.
29
SPARE PARTS LIST / LISTA PEZZI
PLUS 401 W
POS.
C.S.
CODE
Q.ty DESCRIPTION
24
24
25 (*)
26
P1
WSH
B146TA
B147GU
K274EP
K275FL
1
1
1
1
Plastic cap 3/4
Rubber water stopper
Pump AC 400 V
Inhibit water switch
27
28
29
FAN 3
C976SE
P204
K098VE
1
1
1
Water tank
Radiator assembly
Fan motor AC 230V
(not visible)
24
28
25
26
27
(*) = Suggested spare parts / Ricambi consigliati
66
DESCRIZIONE
Tappo serbatoio 3/4
Guarnizione 3/4
Pompa AC 400 V
Flussostato mancanza
acqua
Serbatoio acqua
Assemblato radiatore
Motoventilatore AC 230V
(non visibile)
SYNERGIC MIG SERIES
Instruction Manual / Betriebsanleitung / Livret d'Instructions / Manuale Istruzioni / Manual de instrucciones
13.
SPARE PARTS LIST / LISTA PEZZI
PLUS 401 W
POS.
C.S.
CODE
30 (*) PCB 1 S294 PCB
31 (*) FAN 1-2 K018VE
32
A114M
33
XL1
M281XL
39
38
35 (*)
36 (*)
M1
PCB 3
Analog control PCB
Fan motor 230V
Inverter module
Power Inductor
(not visible)
M284TP 1 Power transformer
(not visible)
P194
1 Inverter assembly
S233C PCB 1 Relay interface PCB
37 (*)
PCB 4
S203A PCB 1
38 (*)
T2
M278TA
1
Power supply filter
PCB
Auxiliary Transformer
39 (*)
F1-2
K060FU
2
Fuse 3,15A
34
30
37
31
31
Q.ty DESCRIPTION
T1
1
2
1
1
DESCRIZIONE
Scheda di controllo
Motoventilatore 230V
Modulo inverter
Induttanza di potenza
(non visibile)
Trasformatore potenza
(non visibile)
Assemblato inverter
Scheda interfaccia
relay
Scheda filtro trifase
Trasformatore
ausiliario
Fusibile 3,15A
32
33
36
35
34
Inverter Assembly
code: P194
(*) = Suggested spare parts / Ricambi consigliati
67
Instruction Manual / Betriebsanleitung / Livret d'Instructions / Manuale Istruzioni / Manual de instrucciones
1
2
3
4
13.
POS.
11
5
10
6
9
7
SPARE PARTS LIST / LISTA PEZZI
C.S.
CODE
13
14
15
DESCRIPTION
DESCRIZIONE
1
C551MA01
2
D218CA
2
D376MA
2
E727P
1
B102GO
4
C753CA10
5
C755PL10S
6
D038RU
7
X26-27-28 R006PR
8
D035RU
9
D372PF
10 (*)
M2
P197
11
S1
K336IN
1
1
1
1
1
1
1
2
3
2
1
1
1
12
13
1
2
Handle
Blue Cap D29
Black Knob D30
Encoder with push-button
Bull eye D16
Blue Cover
DX blue Panel
D200 Wheel
Dix Socket 70 mmq
D125 rotating Wheel
Plastic black Panel
Front Panel Assembly
Rotative switch 32A
with red Knob
Plastic Cap 3/4
Water inl-et / out-let
pressure Socket
7 poles Receptacle
SX blue Panel
14 poles Receptacle
Power supply Cable
Fan Motor AC 230V
Fan Motor Grid
Manico
Cappuccio blu D29
Manopola nera D30
Encoder con pulsante
Golfare maschio D16
Capotta blu
Pannello laterale DX blu
Ruota D200 fissa
Presa Dix 70 mmq
Ruota D125 girevole
Pannello plastico nero
Premontato pann. frontale
Interruttore rotativo 32A
con manopola rossa
Tappo plastico 3/4
Attacco rapido ingresso
uscita acqua
Presa 7 poli da pannello
Pannello laterale SX blu
Presa 14 poli da pannello
Cavo di alimentazione
Motoventilatore AC 230V
Griglia per motoventilatore
-
B146TA
B001RA
14
X15
J162PR
1
15
C754PL10S 1
16
X24
J264PR
1
17
X1
W054
1
18 (*) FAN1-2 K018VE
2
18
K019GR
2
16
18
7
17
68
PLUS 502 W
Q.ty
8
12
SYNERGIC MIG SERIES
(*) = Suggested spare parts / Ricambi consigliati
SYNERGIC MIG SERIES
Instruction Manual / Betriebsanleitung / Livret d'Instructions / Manuale Istruzioni / Manual de instrucciones
19
20
21
13.
POS.
22
23
24
25
28
27
29
19
20
21
22
23
24
25
26
27
28
29
30
(*)
(*)
(*)
(*)
SPARE PARTS LIST / LISTA PEZZI
C.S.
CODE
F1...4
K060FU
PCB 1 S294 PCB
T2
M278TA
SH1
M023SH
MT1
K001TE
PCB 3 S203B PCB
C1-2-3-4 E519CE
M1
A011M
XL1
M281XL
D1
K015PR
C713SE
S4
K275FL
Q.ty
DESCRIPTION
DESCRIZIONE
4
1
1
1
1
1
4
1
1
1
1
1
Fuse 3,15 A
Analog control PCB
Auxiliary Transformer
Hall Sensor 300 A
Contactor 40 A TH
Power supply Filter PCB
Capacitor 15000uF 100V
Chopper Module 500 A
Power Inductor
Bridge Rectifier 500 A
Water Tank
Inhibit water switch
(not visible)
Pump Motor AC 230V
3 elements Radiator
Main Transformer
Fusibile 3,15 A
Scheda di controllo
Trasformatore ausiliario
Sonda Hall 300 A
Teleruttore 40 A TH
Scheda filtro trifase
Condensatore 15000uF 100V
Modulo Chopper 500 A
Induttanza di potenza
Ponte raddrizzatore 500 A
Serbatoio acqua
Flussostato mancanza acqua
(non visibile)
Elettropompa AC 230V
Radiatore 3 elementi
Trasformatore di potenza
26
30
31
31 (*)
32
33
PUMP
T1
K031EP
K033RA
M079TP
PLUS 502 W
1
1
1
32
33
19
(*) = Suggested spare parts / Ricambi consigliati
69
Instruction Manual / Betriebsanleitung / Livret d'Instructions / Manuale Istruzioni / Manual de instrucciones
13.
10
SPARE PARTS LIST/ LISTA PEZZI
1
2
9
8
3
7
4
5
6
18
11
17
C.S.
CODE
1
2
3
4
5
6
6
6
7
8
9
9
10
11
11
12
13
14
15
16
17
18
19
20
21
X4
X10
M2
PCB 2
EVA
X2
X1
X6
M1
P1
-
(*)
(*)
(*)
22
23
16
12
15
13
WIRE FEEDER PLUS 90
POS.
(*)
Q.ty
DESCRIPTION
DESCRIZIONE
B043CE
C1214PL10S
D471PF
R165AT
D273CS
B166AT
B165AT
B002RA
J162PR
C1213PL10S
D376MA
D218CA
P242
D400MA
C1029IN
S302 PCB
K210EV
D479RU
C751ST
R006PR
J350SP
J165SP
D057AS
C1211BA01
K331MT
2
1
1
1
2
2
2
2
1
1
2
2
1
1
1
1
1
4
1
1
1
1
1
1
1
K084PU
C1212CA10
1
1
Plastic hinge
Blue panel of left
Plastic front panel
Euro connection hausing
Plastic sliding lock
Blue water pressure socket
Red water pressure socket
F1/8 - F1/8 connector
7 poles receptacle
Blue panel of rigth
Black knob D30
Blue cap D29
Front panel assembly
Plastic handle
Aluminum handle insert
Wire feeder tachometer interface PCB
Gas valve AC 24V
D60 rotating wheel
Interconnecting cable olding bracket
Dix Socket 70 mmq
14 poles male receptacle
7 poles male receptacle
Spool holder dx
Black base wire feeder
Drive motor complete assembly
(see next page)
Push Button
Blue cover wire feeder
Cerniera in plastica
Pannello blu di sinistra
Pannello frontale in plastica
Attacco euro
Chiusura a slitta
Raccordo rapido femmina blu
Raccordo rapido fem. rosso
Raccordo F1/8 - F1/8
Presa 7 poli
Pannello blu di destra
Manopola nera D30
Cappuccio blu D29
Premontato pannello frontale
Manico inclinato
Inserto manico inclinato
Scheda interfaccia tachimetrica
Elettrovalvola AC 24V
Ruota D60 girevole
Staffa fissaggio fascio cavi
Presa Dix 70mmq
Spina 14 poli da pannello
Spina 7 poli da pannello
Aspo portabobina dx
Basamento nero trainafilo
Assemblato motoriduttore
completo (Vedi pag. seguente)
Pulsante
Copertura blu trainafilo
(*) = Suggested spare parts / Ricambi consigliati
23
22
19
14
20
21
70
SYNERGIC MIG SERIES
Instruction Manual / Betriebsanleitung / Livret d'Instructions / Manuale Istruzioni / Manual de instrucciones
13.
SYNERGIC MIG SERIES
Spare parts list / Lista pezzi
4 ROLLS WIREFEEDER GROUP LAYOUT Code: K331MT
71
Instruction Manual / Betriebsanleitung / Livret d'Instructions / Manuale Istruzioni / Manual de instrucciones
13.
SYNERGIC MIG SERIES
Spare parts list / Lista pezzi
4 ROLLS WIREFEEDER GROUP LAYOUT Code: K331MT
POS.
1
2
3
3a
4
4a
5
6
7
7
9
10
11
12
13
13
14
15
16
17
18
19
20
21
22
23
24
72
C.S.
CODE
MOTOR
V14780PI
V14781PR
V14782PR
V14783PR
V14784PR
V14785PR
V14786PI
V14787PR
V13910RU
V13920RU
V14788IN
V14789IN
V14790RU
V14791PE
V14792DI
V14793DI
V14794VI
V14717VI
V14795PE
V14796AL
V14797VI
V14798VI
V14799VI
V14800GU
V14801VI
V14722TU
K267MT
Q.ty
DESCRIPION
1
2
1
1
1
1
1
1
2
2
1
2
2
2
2
2
2
2
2
2
2
2
1
1
1
1
1
4-R Feed plate no. 2, nylon
Pressure Device complete for 4-R Nylon
Pressure arm left
Pressure arm left complete
Pressure arm right
Pressure arm right complete
Safety coverplate
Feed roll protection no. 2
Steel roll 0,8 - 1,0 mm (see next page for rolls available)
Steel roll 1,2 - 1,6 mm (see next page for rolls available)
Main Gear Drive 30mm motor axle
Drive gear complete DR 37/40mm, standard
Pressure roll 37mm
Axle pressure arm
Spacer front, Alu, 37mm
Spacer back, Alu, 37mm
Screw M5x16
Screw M5x10
Axle to geared adapter
Axle Shaft Pressure Arm for 4-roll Nylon
Fixing Screw safety coverplate
Screw M5x30
Screw M6x25
Intermediate guide
Fixing screw main gear
Inlet guide tube, nylon
Motor 42V + Tachometer
Piastra 4-R no. 2, nylon
Gruppo pressore completo
Pressore sinistro vuoto
Pressore sinistro completo
Pressore destro vuoto
Pressore destro completo
Piastra di sicurezza
Protezione rulli no. 2
Rullo 0,8 - 1,0 mm (vedi pag. seguente per rulli disponibili)
Rullo 1,2 - 1,6 mm (vedi pag. seguente per rulli disponibili)
Ingranaggio principale motore 30mm
Ingranaggio standard DR 37/40mm
Rullo pressore 37mm
Perno pressore
Distanziale frontale 37mm
Distanziale posteriore 37mm
Vite M5x16
Vite M5x10
Perno adattatore
Albero pressore 4 rulli nylon
Vite fissaggio piastra di sicurezza
Vite M5x30
Vite M6x25
Guida intermedia
Vite di fissaggio ingranaggio principale
Tubetto guidafilo in nylon
Motore 42V + Tachimetrica
Instruction Manual / Betriebsanleitung / Livret d'Instructions / Manuale Istruzioni / Manual de instrucciones
SYNERGIC MIG SERIES
WIRE FEEDER
ROLLS AVAILABLE
73
Instruction Manual / Betriebsanleitung / Livret d'Instructions / Manuale Istruzioni / Manual de instrucciones
13.
SYNERGIC MIG SERIES
INTERCONNECTING CABLE
SPARE PARTS LIST / LISTA PEZZI
1,5 mt 70 mmq H2O code: V10690FC
INTERCONNECTING CABLE
FASCIO CAVI
4,0 mt 70 mmq H2O code: V10700FC
10 mt 70 mmq H2O code: V10710FC
15 mt 70 mmq H2O code: V10720FC
1
2
3
POS.
10 9
8
7
6
5
4
Electric scheme INTERCONNECTING CABLE
X1
X2
POWER CABLE
1
2
3
4
5
6
7
8
9
10
11
12
13
14
1
2
3
4
5
6
7
X3
X5
TO MACHINE
74
X4
X6
1
2
3
4
5
6
7
8
9
10
11
12
13
14
1
2
3
4
5
6
7
TO WIRE FEEDER
1
2
3
4
5
6
7
8
8
9
9
9
10
C.S.
CODE
Q.ty
DESCRIPTION
DESCRIZIONE
X1-2
X3
X5
X4
X6
SI49306SP
F147CM
F059T
J265SP
J163SP
F060T
J266PR
B008AT
B017FA
B024PG
B023DA
B025OR
J164PR
2
(*)
(*)
1
1
(*)
1
4
5
1
1
1
1
70 mmq Dix Plug
Cable 16x1
White pipe 5x11
14 poles plug
7 poles plug
Cables covering pipe 38x41
14 poles socket
Pipe Holder D6
Big Band D11
Pipe Holder D6 for gas con.
3/8 nut for gas connector
O-ring for gas connector
7 poles socket
Spina Dix 70 mmq
Cavo multiplo 16x1
Tubo retinato bianco 5x11
Spina volante 14 poli
Spina volante 7 poli
Tubo copricavi 38x41
Presa volante 14 poli
Portagomma D6
Fascetta grande D11
Portagomma D6 per racc. gas
Dado 3/8 per raccordo gas
O-ring per raccordo gas
Presa volante 7 poli
( * ) = Changes according to the length / varia a seconda della lunghezza
26V AC
0V AC
0RS
RS485-2B
RS485-2A
N.C.
N.C.
X28
1
1
2
3
4
5
6
7
RS485
RECEPTACLE
X17
10W
C1
+
C4
+
-
1
1
J15
S294 PCB
MIG PLUS
ANALOG CONTROL PCB
PCB 1
45V
0V
13V
230V
1
J10
26V
0V
COOLER
UNIT
PART
X15
12
1
J5
X8
1
J12
X9
1
X16
BB
AA
(+)
(-)
X10
1
J9B
1
HS4
X11
HEATSINK
1
J9A
INHIBIT
WATER
SWITCH
HS2
HEATSINK
SECONDARY
DIODES
34 WAYS
FLAT
CABLE
CABLE 2
X14
4
5
J17
FS1
FUSES
SOCKET
F1 F2
J16
2
X13
INHIBIT
6
5
INHIBIT
4
0V
3
GROUND
X3
1
J1
FS1
M1
INVERTER
ASSEMBLY
CODE: P194
+
X25
FO7
FO8
J11
FO9
1
FO29
S233C PCB
RELAY INTERFACE PCB
RELAY
PCB 3
CONTACT
X12
T1
MAIN
TRANSFORMER
XL1
INDUCTOR
1
X26
(OPTIONAL)
S2
KEY
SWITCH
II
FO11
SH1
HALL
SENSOR
P1
TEST
GAS
(NOT
MOUNTED)
S1
MAIN
SWITCH
FAN1
X20
1
FO6
FO37
J4
FO16
FO12
W6
W5
SOLDER POINTS
W7
W8
W9
W10
AC 230V
7
8
9
10
11 12
R3 R4
R5 R6
4x47R
50W
J2
ELECTRIC SCHEME
PLUS 401 W
CODE: V14054GE
FS2
AS
ALLUMINIUM SUPPORT
Description:
Document : \ 401PLU_1.SCH
electric scheme
PLUS 401 W
+
C3
0,047uF
2000V
4
FAN2
AC 230V
Part code: V14054GE
X27
SHB SHUNT
X30
X4
C2
0,047uF
2000V
FO4
J5
X19
-
FO21
FO5
X1
Via Meucci, 26
Costabissara – VI - Italy -
PRIMARY
SIDE
FO20
S203A PCB
POWER SUPPLY
FILTER PCB
PCB 4
AC 230V
HEATSINK
PRIMARY
SIDE
FO3
FO10
FAN3
POWER
SUPPLY
HS1
HEATSINK
X21
400V
1
SWITCH
I
230V
2
RECTIFER
BRIDGE
3-PHASES
S301 PCB
INVERTER PCB
PCB 2
3
X2
PUMP
1
J11
HS3
D1
SW1
THERMAL
1
6
P1
1
N.C.= NOT CONNECTED
X29
A MOTOR (+)
X29
B MOTOR (-)
INTERCONNECTING
CABLE
C 26AC
RECEPTACLE
D 0T
I
B A K J
E 0V AC
F GAS VALVE
L
N
G TORCH SWITCH
C
H
H TORCH SWITCH
I TACHO-IN
J Vout WF
D E M F
G
K 0T SIGN
L N.C.
M INCH WIRE
N INCH WIRE
TO WIRE
FEEDER
INTERCONNECTING
CABLE RECEPTACLE
J14
42V
0V
12
X7
1
T2
D2
AUXILIARY
BRIDGE
TRANSFORMER
RECTIFIER
4A
460V
0V
AA
400V
X22
RS 232
CONNECTOR
J3
2X
220uF 63V
1
PROGRAM
DOWNLOAD
S3
SOLDERING
POINTS
~
~
BB
M2
FRONT PANEL
ASSEMBLY
CODE: P247
S289A PCB
AND
S290 PCB
FRONT PANEL
J2
PCB
PCB 5
50 WAYS
FLAT CABLE
CABLE 1
J2
1
J13
+
1
1
J19
R1
22K 10W
R2
10K
J18
1
X23
X5
1
Sheet
of
1
Drawing : Campesato
Signature:
Date: 03/06/08
Note :
REV:
01
X29
ELECTRIC SCHEME
PLUS 502 W
CODE: V10620GE
SUPPLY VOLTAGES
TERMINAL
CONFIGURATION
1 1
J17
1
J14
POWER SUPPLY
230V
FS1
0V
F1
230V
F2
400V
0V
13V
26V
0V
42V
400V
230V
460V
CH
W2
U1
V2
W1
U2
1
J9B
J18
1
1
J5
M3
WATER
COOLER
UNIT
CODE:V8510UR
4
5
6
2
3
6 5 4 3 2 1
X4
W1
1
J9A 1
F3
POWER SUPPLY
460V
FS1
0V
F1
230V
400V
F2
460V
U1
V2
W1
U2
X20
RS 232
CONNECTOR
X9
(-)
J16
1
J12
X10
1
J13
1
X11
M1
CHOPPER
MODULE
CODE: A011M
FS2
FUSES
F4 SOCKET
THERMAL
SWITCH
(OPTIONAL)
S2
KEY
SWITCH
HS1
P1
TEST NOT
GAS MOUNTED
FAN1
FS1
FUSES
SOCKET
1
J1
S002
PCB
E
XL1
INDUCTOR
X26
3
G
X29
HS2
FAN2
-
C5
0,047uF
2000V
SH1
HALL
SENSOR
J1
S002
PCB
E
G
+
X23
F2
1
PTC1
S203B PCB
POWER SUPPLY
FILTER PCB
PCB 3
1
1
J1
J2
FS2
HS3
25R
THERMAL
SWITCH
R
S
T
X3
MT1
CONTACTOR
X1
Part code: V10620GE
Description:
J1
R8
+
3K3
10W C1
G
25R
X2
1
HEATSINK
F1
S1
MAIN
SWITCH
Via Meucci, 26
Costabissara – VI - Italy -
X21
SW1
X12
X13
PTC2
POWER
SUPPLY
R
S
T
PROGRAM
DOWNLOAD
S3
X22
CH
W2
J11 1
X14
U2
V1
S289A PCB
AND
S290 PCB
FRONT PANEL
J2
PCB
PCB 2
50 WAYS
FLAT CABLE
CABLE 1
(+)
CH
X4
M2
FRONT PANEL
ASSEMBLY
CODE: P197
1
J3
PUMP
V2
X18
SOLDERING
POINTS
X15
S4
U1
X7
S294 PCB
J2
MIG PLUS
ANALOG CONTROL PCB
PCB 1
INHIBIT
WATER
SWITCH
W2
1
1
F2
V1
X6
X17
X16
POWER SUPPLY
400V
FS1
0V
F1
230V
400V
460V
1
J19
1
J10
0V
V1
A MOTOR (+)
X29
B MOTOR (-)
INTERCONNECTING
CABLE
C 26AC
RECEPTACLE
D 0T
B A K J I
E 0V AC
N
F GAS VALVE
L
G TORCH SWITCH
H
C
H TORCH SWITCH
I TACHO-IN
J Vout WF
D E M F G
K 0T SIGN
L N.C.
M INCH WIRE
TO WIRE
N INCH WIRE
FEEDER
INTERCONNECTING
CABLE RECEPTACLE
X25
X25
RS485
1 26V AC
RECEPTACLE
2 0V AC
2
1
3 0RS
4 RS485-2B
5 RS485-2A
5
3
6 N.C.
7 N.C.
RS485
7 4
6
RECEPTACLE
J15
T2
AUXILIARY
TRANSFORMER
460V
N.C.= NOT CONNECTED
X5
CH
SW2
U
V
W
WINDINGS PRIMARY
S002
E
PCB
S002 PCB
3 x CHOPPER PCB
PCB 4, PCB 5, PCB 6
-
+
X27
+
C2
+
C3
+
C4
C1,C2,C3,C4
3x15000uF
100V
R7
10K
10W
T1
MAIN TRANSFORMER
Document : \ 502PLU_3.SCH
electric scheme PLUS 502 W
+
C5
0,047uF
2000V
X28
+
TO WIRE
FEEDER
D1 RECTIFIER
BRIDGE
1
Sheet
of
1
Drawing : Campesato
Signature:
Date: 19/05/08
Note :
REV:
03
1
J1
X6
X7
J6
S299 PCB
WIRE FEEDER 082
FRONT PANEL PCB
1
PCB 1
M2
FRONT PANEL
ASSEMBLY
CODE: P242
J2
TO AMP DGT
MIG/MAG TORCH
1
1
26V AC
2
0V AC
3
0RS
4
RS485-2B
5
RS485-2A
6
N.C.
7
N.C.
X6
RS485
RECEPTACLE
1
2
3
5
X10
26V AC
1
0V AC
2
0RS
3
RS485-2B
X1
X8
1
4
J2
5
RS485-2A
N.C.
6
N.C.
7
X5
S302 PCB
TACHOMETER
INTERFACE
PCB
X9
1
J3
X10
PCB 2
J1
RS485
RECEPTACLE
2
1
5
3
SOLDERING
POINTS
6
N.C.= NOT CONNECTED
A
MOTOR (+)
B
MOTOR (-)
C
26AC
D
0T
E
0V AC
F
GAS VALVE
G
TORCH SWITCH
H
TORCH SWITCH
I
TACHO-IN
J
Vout WF
K
0T SIGN
L
N.C.
M
INCH WIRE
N
INCH WIRE
4
7
TO
MACHINE
X1
INTERCONNECTING
CABLE
RECEPTACLE
K
J
A
I
B
N
7
4
L
6
EVA
TACHO
GAS VALVE
AC 24V
P1
INCH
WIRE
H
G
+
E
D
X2
+
M1
TORCH
SWITCH
+
X4
BINZEL
RECEPTACLE
Part code: V14760TF
Description:
F
M
MOTOR
Via Meucci, 26
Costabissara – VI - Italy -
C
+
TO MACHINE
X3
STICK
TORCH
Document : \ WFPL90.SCH
electric scheme WIRE FEEDER PLUS 90
ELECTRIC SCHEME
WIRE FEEDER PLUS 90
CODE: V14760TF
1
Sheet
of
1
Drawing : Campesato
Signature:
Date: 19/05/08
Note :
REV:
00
NOTE
Sol Welding S.r.l.
Via Meucci 26
36030 Costabissara
Vicenza (Italy)
Tel. - - 39 0444 290411
Fax - - 39 0444 557460
p.i. 02195260241
[email protected] - www.solwelding.com
Part code
Printed in date 02/10/08
T1311M
Rev. 01