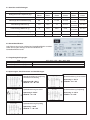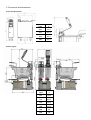
1
IS490
Cooking Systems with Oil
Basic+ & Elegance S+
Installation and user manual
Installations- und Bedienungsanleitung
Manuel d’installation et mode d’emploi
Manuale d'installazione e uso
Lincat Ltd
Whisby Road
Lincoln
LN6 3QZ
Tel +44 (0) 1522 503250
Fax +44 (0) 1522 875530
[email protected]
1. Beschreibung
Description
Description
Descrizione
Heizkörperhalter
Boîtier corps
de chauffe
Helating element
holder
Porta elemento
riscaldante
Friteusendeckel
Couvercle
Cover lid
Coperchio
Bedienpanel
Panneau de
commande
Control panel
Pannello di
controllo
Ablasshahn
Vanne de
vidange
Drain valve
Valvola di
scarico
Einlaufbogen
Tube de refoulement Drain tube
Entleerungsschlauch Tuyau de vidange
Evacuation tube
Tubo di scarico
Tubo di evacuazione
Auffangbehälter
Bac de récupération Drain vat
Bacinella di
recupero
Korbaufhängung
Support panier
Basket support
Supporto
cestello
Einlagegitter
Grille de fond
Grid
Griglia
Frittierkorb
Panier
Frying basket
Cestello
Feinfilter
Filtre fin
Fine filter
Filtro a grana fine
Korbfilter
Filtre grossier
Coarse filter
Filtro a grana grossa
Position des
Einlaufbogens
Position du tube
de refoulement
Position of the
drain tube
Posizione canale
di scolo
Schnellkupplung
Raccord rapide
Quick connection
Connessione rapida
Entleerungsschlauch
Mit Einlaufbogen
Tuyau de vidange
avec tube de
refoulement
Entsorgung des Altöls
Evacuation des
Huiles usagées
Evacuation tube
with drain tube
Evacuation of
used oil
Tubo di scarico
con canale di scolo
Scarico olio usato
Inhaltsverzeichnis
Index
Index
Indice
1.
Beschreibung
Description
Description
Descrizione
2
2.1
2.2
2.3
2.4
2.5
2.6
Ausführungen und Abmessungen
Gewichte und Füllmengen
Geräteidentifikation
Umgebungsbedingungen
Spannungen, Anschlussarten
Netzabsicherung
Elektrischer Anschluss
Sicherheitsvorschriften und
Warnhinweise
Exécutions et variantes
Poids et contenances
Identification de l’appareil
Conditions ambiantes
Tensions, types de raccordement
Fusibles d’alimentation
Raccordement électrique
Prescription de sécurité
Executions and dimensions
Weights and filling data
Identification of the appliance
Ambient conditions
Voltages, types of connection
Main fuses
Electrical connection
Safety regulations
Esecuzioni e dimensioni
Peso e dati
Identificazione apparecchio
Condizioni ambiente
Tensioni, tipi di connessione
Fusibili principali
Connessione elettrica
Normative sulla sicurezza
Bestimmungsgemässe Verwendung
der Friteuse
Spezifische Gefahren und Weisungen
Personensicherheit
Sicherheitseinrichtungen
Autorisierte Personen
Aufgabenbereich des Personals
Utilisation conforme de la friteuse
Specified use of the fryer
Uso specifico della friggitrice
Dangers et consignes spécifiques
Sécurité des personnes
Dispositifs de sécurité
Personnes autorisées
Domaine de compétence du
personnel
Exploitant
Utilisateur de la friteuse
Personnel d’entretien
Formation et qualification minimales
du personnel autorisé
Exploitant
Utilisateur de la friteuse
Personnel d’entretien
Obligation de maintenance
Disponibilité du mode d’emploi
Specific dangers and instructions
Personnel safety
Safety equipment
Authorized personnel
Area of responsibility of personnel
Pericoli e istruzioni specifiche
Sicurezza personale
Dispositivi di sicurezza
Personale autorizzato
Area di responsabilità del
personale
Owner/operator
Proprietario/operatore
Operator of the deep fryer
Operatore friggitrice
Maintenance personnel
Personale addetto alla manutenzione
Minimum training and qualifications Requisiti minimi di formazione e
of the authorized personnel
qualifiche del personale autorizzato
Owner/operator
Proprietario/operatore
Operator of the deep fryer
Operatore friggitrice
Maintenance personnel
Personale addetto alla manutenzione
Duty of maintenance
Compiti inerenti la manutenzione
Availability of operating manual
Disponibilità del manuale d'uso
3.
3.1
3.2
3.3
3.4
3.5
3.6
Betreiber
Bediener der Friteuse
Unterhaltspersonal
Minimale Ausbildung & Qualifikation
des Personals
3.7.1 Betreiber
3.7.2 Bediener der Friteuse
3.7.3 Unterhaltspersonal
Wartungspflicht
3.8
Verfügbarkeit der
3.9
Bedienungsanleitung
3.6.1
3.6.2
3.6.3
3.7
4.
4.1
4.2
Installation und Inbetriebnahme
Installation des Gerätes
Inbetriebnahme nach der Installation
Installation et mise en service
Installation de l’appareil
Mise en service après l’installation
Installation and starting up
Installation of the appliance
Starting up after the installation
Installazione e avviamento
Installazione apparecchio
Avviamento dopo l'installazione
5.
5.1
5.2
Bedienung der Friteuse
Bedienpanel
Einschalten des Bedienpanels
Utilisation de la friteuse
Panneau de commande
Mise en marche du panneau de
commande
Use of the fryer
Control panel
Switch on of the control panel
Utilizzo friggitrice
Pannello di controllo
Accensione pannello di controllo
6.
6.1
6.2
Reinigung und Unterhalt
Reinigungsarbeiten
Intervalle des Frittierölwechsel
Cleaning and maintenance
Cleaning intervals
Frying oil exchange
Pulizia e manutenzione
Intervalli di pulizia
Sostituzione olio di frittura
6.3
6.4
Periodische Kontrollen
Wartung
Maintenance
Opérations de nettoyage
Intervalle de renouvellement de
l’huile de friture
Contrôles périodiques
Service après-vente
Periodic checks
Maintenance
Controlli periodici
Manutenzione
7.
Kundendienst
Dépannage
After sales service
Servizio di assistenza clienti
2. Ausführungen und Abmessungen
Standfriteusen :
Typ
L
211
197.5
311
297.5
411
397.5
422
397.5
Einbaufriteusen :
Type
L
211
197.5
311
297.5
411
397.5
422
397.5
522
495
622
592
2.1 Gewichte und Füllmengen
Typ
211
311
411
422
522
622
Nettogewicht ohne Optionen (kg)
ST 47
EB 40
ST 56
EB 47
ST 69
EB 62
ST 79
EB 68
ST - EB 87
ST - EB 94
Anzahl Körbe
1
1
2
2
2
2
Füllmenge des Fritierkorbes (Kg)
0.9
1.5
2 x 0.9
2 x 0.9
1 x 0.9
1 x 1.5
2 x 1.5
Fritierölmenge Minimum (l)
7.5
12.5
17
2 x 7.5
1 x 7.5
1 x 12.5
2 x 12.5
Fritierölmenge Maximum (l)
9
14.5
20.5
2x9
1x9
1 x 14.5
2 x 14.5
Stundenleistung TK – Frites (Kg)
17 – 22
27 – 32
34 – 44
34 – 44
44 – 54
54 – 64
Stundenleistung gekühlte – Frites (Kg)
20 – 25
30 – 35
40 - 50
40 - 50
50 – 60
60 – 70
2.2 Geräteidentifikation
Jede Friteuse ist mit einer eindeutigen Geräteidentifikation versehen.
Halten Sie bei jeder Anfrage an den Kundendienst die
Geräteidentifikation bereit.
2.3 Umgebungsbedingungen
Typ
Temperatur mini. ( °C )
Temperatur max. ( °C )
Feuchtigkeit max.. ( %)
211 – 311 – 411 – 422 – 522 – 622
+5
+ 60
60
2.4 Spannungen, Anschlussarten und Ausführungen
Standardausführung Dreiphasig
mit Neutral und Erdung
Spannung 3N~ 400 V
50/60Hz - 3L + N + PE
Spezialausführung ohne Neutral
Spannung 3~ 400 V
50/60Hz - 3L + PE
Spezialausführung für Schiff
Spezialausführung Dreiphasig
Spannung 3~ 440 V
50/60Hz - 3L + PE
Spannung 3~ 230 V
50/60Hz - 3L + PE
Spezialausführung Einphasig
Spannung ~ 230V
50/60Hz - L + N + PE
2.5 Netzabsicherung
211 / 422
( 422 mit zwei Anschlusskabel)
Typ
311
411 / 422
( 422 mit einem Anschlusskabel)
Leistung
7.5 KW
9 KW
11 KW
11.4 KW
15 KW
15 KW
18 KW
22 KW
AC 230V
32.6 A
39.1 A
-
-
-
-
-
-
3AC 230V
18.8 A
22.6 A
27.6 A
28.6 A
37.65 A
37.65 A
-
-
3AC 400V
10.8 A
13 A
15.8 A
16.5 A
21.7 A
21.7 A
26 A
31.6 A
3NAC 400V
10.8 A
13 A
15.8 A
16.5 A
21.7 A
21.7 A
26 A
31.6 A
3AC 440V
9.9 A
11.8 A
14.5 A
15 A
19.7 A
19.7 A
23.6 A
28.9 A
Typ
522 (mit zwei Anschlusskabel)
Leistung
3N ~ 400V
522 (mit zwei Anschlusskabel)
622 (mit zwei
Anschlusskabel)
7.5 kW
+
11.4 kW
9 kW
+
11.4 kW
11 kW
+
11.4 kW
7.5 kW
+
15 kW
9 kW
+
15 kW
11 kW
+
15 kW
2 x 11.4
kW
2 x 15 kW
10.8 A
+
16.5 A
13 A
+
16.5 A
15.8 A
+
16.5 A
10.8 A
+
21.7 A
13 A
+
21.7 A
15.8 A
+
21.7 A
2 x 16.5 A
2 x 21.7 A
2.6 Elektrischer Anschluss
Der Elektroanschluss darf nur durch einen Elektriker oder eine ähnlich qualifizierte Person erfolgen. Beim Anschluss
des Gerätes ist wie folgt vorzugehen:
a) Ueberprüfen, ob die Daten des Stromnetzes in Bezug auf Spannung und Frequenz mit den Angaben auf dem
Typenschild des Gerätes übereinstimmen. Das Typenschild befindet sich hinter der Türe auf dem Abdeckblech.
b) Anschluss nach EN 60335-1 und örtlichen Vorschriften, d.h.:
Montage eines Netzsteckers für entsprechende Nennstromstärke an das Anschlusskabel, Anschluss über
Steckdose. Der Stecker muss nach der Montage der Friteuse zugänglich sein. Es ist empfehlenswert einen
Fehlerstromschutzschalter zu installieren. (bei Maschinen, die die Ableitströme von 10mA überschreiten).
Bei Festanschluss ist ein Hauptschalter für allpolige Trennung mit einem Kontaktabstand von min. 3 mm
vorzusehen. Der Elektroanschluss muss mindestens einer Gummischlauch-Leitung, Typ H05RN-F, entsprechen.
c)
Erlaubt die Erdung des Gerätes (oder Schutzleiter). Sie ist unentbehrlich für Ihre Einrichtung. Vervollständigt
durch eine Differentialvorrichtung schützt sie die Benutzer, wenn ein Fehler an einem Gerät vorkommt. Der
Fehlerstrom läuft in Richtung Erde aus und verursacht die Auslösung des Differentials."
d) Wenn die Netzanschlussleitung dieses Gerätes beschädigt wird, muss sie durch den Hersteller oder seinen
Kundendiest oder eine ähnlich qualifizierte Person ersetzt werden, um Gefährdungen zu vermeiden.
3. Sicherheitsvorschriften und Warnhinweise
Die folgenden Warnsymbole sind ggf. an der Friteuse angebracht:
Hochspannung
Warnung vor gefährlicher elektrischer Spannung. Stromschläge führen zu schweren Verletzungen oder zum
Tod. Nur autorisiertes Fachpersonal darf Arbeiten an elektrischen Installationen durchführen.
Befolgen Sie die fachspezifischen Sicherheitsvorschriften! Trennen Sie die Friteuse vom Netz, bevor Sie
Arbeiten an elektrischen Installationen durchführen.
Heisse Oberfläche / Heisse innere Bauelemente
Warnung vor Hitze, die zu Verletzungen führen kann. Lassen Sie heisse Oberflächen und Bauteile abkühlen,
bevor Sie Arbeiten an diesen Bauelementen ausführen oder tragen Sie hitzefeste Handschuhe.
Heisses Frittieröl
Warnung vor heissem Frittieröl, das zu Verletzungen führen kann. Lassen Sie das heisse Frittieröl abkühlen,
bevor Sie Arbeiten an eingetauchten Bauelementen ausführen oder tragen Sie eine Brille.
HINWEIS
Der Hersteller hat zum Zeitpunkt der Auslieferung der Friteuse ggf. an allen relevanten Orten der Friteuse
Warnsymbole (Kleber) angebracht. Sollten sich während des Betriebs der Friteuse oder im Zuge von
Reinigungsarbeiten Warnsymbole ablösen, ist der Betreiber der Friteuse gehalten, diese Warnsymbole
umgehend neu aufzukleben !
3.1 Bestimmungsgemässe Verwendung der Friteuse
Die Friteuse dient ausschliesslich zum Fritieren von frischen und tiefgekühlten Nahrungsmitteln, welche beim
durchgeführten Frittierungsprozess weder personen-, noch sach- und umweltgefährdend reagieren. Die Friteuse ist
ausschliesslich für den beaufsichtigten Betrieb zugelassen. Eine andere Benutzung der Friteuse gilt als nicht
Bestimmungsgemäss. Zur Bestimmungsgemässen Verwendung gehört auch das Beachten der Betriebsanleitung und
das Einhalten der vom Hersteller vorgeschriebenen Wartungs- und Instandsetzungsvorschriften.
3.2 Spezifische Gefahren und Weisungen
ACHTUNG
Die Friteuse ist ausschliesslich für den beaufsichtigten Betrieb zugelassen.
Enthält der Ölauffangbehälter heisses Frittieröl müssen bei dessen Handhabung Schutzkleidung,
Schutzhandschuhe und Schutzbrille getragen werden. Die Friteuse niemals mittels Wasser aus einer Brause,
einem Wasserschlauch oder Hochdruckreiniger abspritzen.
Es besteht Brandgefahr bzw. der Sicherheitsthermostat schaltet die Friteuse ab, wenn die Friteuse ohne vorheriges
Einfüllen von Fett oder Frittieröl bis über die untere Ölstandmarke in Betrieb gesetzt wird. Während des Betriebs darf
der Frittierölstand nicht unter die untere Ölstandmarke absinken. Es besteht Brandgefahr bzw. der
Sicherheitsthermostat schaltet die Friteuse ab. Während des Betriebs darf der Frittierölstand nicht über die obere
Ölstandmarke ansteigen. Es besteht beim Eintauchen von Frittiergut Überlauf- bzw. Überschäumgefahr. Abgenutztes,
verunreinigtes Frittieröl ist erhöht entzündlich und neigt zum überschäumen. Bei einem Frittierölbrand niemals mit
Wasser einen Löschversuch einleiten, sondern sofort die Frittier-beckenabdeckung auflegen oder einen Feuerlöscher
mit spezieller Füllung (Halon) bzw. eine Löschdecke einsetzen.
ACHTUNG
Einbringen von zu viel gefrorenem oder zu nassem Frittiergut in das heisse Frittieröl führt zu Aufschäumen
des heissen Frittieröls und mindert die Qualität der frittierten Nahrungsmittel. Die Standfriteuse nicht im
aufgeheizten Zustand verschieben. Es besteht Überschwappgefahr des heissen Frittieröls. Beim
Frittierölablassen muss das Frittieröl auf eine Temperatur unter als 175 °C abgekühlt sein
(Verbrennungsgefahr). Tauchheizung niemals mittels Stahlbürste oder durch Abbrennen (Trockenlauf)
reinigen. Nachweislich unsachgemässe Reinigung der Tauchheizung schliesst allfällige
Gewährleistungsansprüche aus.
ACHTUNG
Die zwei Ölbecken dürfen nie gleichzeitig in den unteren Ölauffangbehalter abgelassen werden, jedes
Becken muss einzeln nacheinander abgelassen werden, da sonst der Ölauffangbehalter üeberlaufen würde.
3.3 Personensicherheit
ACHTUNG
Die Friteuse kann bei falscher Bedienung schwere oder tödliche Verletzungen des Personals verursachen.
Das Personal, das die Friteuse bedient und wartet, muss für den korrekten Umgang mit der Friteuse geschult
sein und muss die Sicherheitsvorschriften in dieser Betriebsanleitung gelesen und verstanden haben, bevor
mit der Bedienung oder der Wartung der Friteuse begonnen wird.
Verändern oder entfernen Sie nie Sicherheitseinrichtungen. Schalten Sie keine Sicherheitseinrichtungen durch
Veränderungen an der Friteuse aus. Entfernen Sie nie Warnsymbole, welche ggf. an der Friteuse angebracht sind
(nationalitätsabhängig). Ersetzen Sie fehlende oder defekte Warnsymbole umgehend.
Betreiben Sie die Friteuse nie in schadhaftem Zustand.
Melden Sie Unregelmässigkeiten, insbesondere solche, die die Sicherheit betreffen, sofort Ihrem Vorgesetzten.
3.4 Sicherheitseinrichtungen
Nebst den an der Friteuse ggf. angebrachten Warnsymbolen (nationalitätsabhängig) verfügt die Friteuse über
folgende Sicherheitseinrichtungen:
Hauptschalter
Sicherheitsrelais
Sicherheitsthermostat
3.5 Autorisierte Personen
An und mit der Friteuse dürfen nur Personen arbeiten, die für die jeweiligen Arbeiten autorisiert sind. Die Personen
sind dann autorisiert, wenn sie die in diesem Kapitel aufgelisteten minimalen Ausbildungs- und Wissensanforderungen
erfüllen und Ihnen ein fester Aufgabenbereich zugeteilt ist.
"Dieses Gerät ist nicht dafür bestimmt, durch Personen (einschliesslich Kinder) mit eingeschränkten physischen,
sensorischen oder geistigen Fähigkeiten oder mangels Erfahrung und/oder mangels Wissen benutzt zu werden, es
sei denn, sie werden durch eine für ihre Sicherheit zuständige Person beaufsichtigt oder erhielten von ihr
Anweisungen, wie das Gerät zu benutzen ist. Kinder sollten beaufsichtigt werden, um sicherzustellen, dass sie nicht
mit dem Gerät spielen."
3.6 Aufgabenbereich des Personals
3.6.1 Betreiber
Als übergeordnete juristische Person ist der Betreiber verantwortlich für die bestimmungsgemässe Verwendung der
Friteuse und für die Ausbildung sowie den Einsatz der berechtigten Personen. Er legt die Kompetenzen und
Weisungsbefugnisse der berechtigten Personen für seinen Betrieb fest.
3.6.2 Bediener der Friteuse
Ihm obliegen folgende Arbeiten:
Er richtet die Friteuse auf die aktuell zu frittierenden Nahrungsmittel ein bzw. um, falls er andere Nahrungsmittel
verarbeiten möchte als jene, die der Lieferant bei Lieferung der Friteuse eingerichtet hat.
Er beschickt die Friteuse mit den zu frittierenden Nahrungsmitteln.
Er fährt die Prozesse an und überwacht diese.
Er lokalisiert Probleme und organisiert die Problembehebung.
Er füllt Frittieröl in die Friteuse ein.
Er überwacht die Frittierölqualität und führt Frittierölnachfüllung, -reinigung und -filtrierung durch.
3.6.3 Unterhaltspersonal
Ihm obliegen folgende Arbeiten:
Es reinigt, wartet und repariert die Friteuse entsprechend den Kapiteln „Wartung und Störungsbehebung“.
Es demontiert, lagert und entsorgt die Friteuse.
.
3.7 Minimale Ausbildung und Qualifikation des berechtigten Personals
3.7.1 Betreiber
Er ist eine betriebswirtschaftlich ausgebildete Person in Kaderfunktion.
Er hat einschlägige Erfahrung in der Gefahrenbeurteilung und Personalführung.
Er hat das Kapitel Sicherheitsvorschriften gelesen und verstanden.
3.7.2 Bediener der Friteuse
Dies ist eine Person, welche über die Bedienung der Friteuse instruiert und über die bestehenden Gefahren orientiert
ist.
3.7.3 Unterhaltspersonal
Dies sind Personen, welche eine einschlägige Berufslehre absolviert haben und mit dem Unterhalt der Friteuse
vertraut sind und durch ihre Tätigkeit über die entsprechenden Qualifikationen verfügen. Unterhaltsarbeiten an der
elektrischen Ausrüstung der Friteuse dürfen nur von einer Elektrofachkraft oder von unterwiesenen Personen unter
Leitung und Aufsicht einer Elektrofachkraft gemäss den elektrotechnischen Regeln vorgenommen werden.
3.8 Wartungspflicht
Der Betreiber ist verpflichtet, die Friteuse in regelmässigen Abständen zu warten und zu reinigen.
Die Friteuse nur in einwandfreiem und unbeschädigtem Zustand betreiben.
Nur Originalverbrauchsmaterial und Originalersatzteile verwenden.
Nach Wartungs- und Instandsetzungsarbeiten die Sicherheitseinrichtungen auf korrekte Funktion prüfen.
3.9 Verfügbarkeit der Bedienungsanleitung
Ein Exemplar dieser Betriebsanleitung muss dem Personal jederzeit am Einsatzort der Friteuse zur Verfügung stehen.
4. Installation und Inbetriebnahme
4.1 Installation des Gerätes
Bei der Installation des Gerätes sind folgende Punkte zu beachten:
a) Das Frittiergerät muss beim Aufstellen ausnivelliert werden. Die 4 Füsse können auf die gewünschte Höhe
eingestellt werden. Die Gesamthöhe zwischen Frittierbecken und Boden kann von minimal 850mm bis auf maximal
900mm eingestellt werden.
b) Ein Mindestabstand von 30 mm zur Wand oder anderen Apparaten ist einzuhalten.
c) Das Gerät darf nicht auf einer brennbaren Unterlage stehen. Es gelten zusätzlich die örtlichen Sicherheits- und
Bauvorschriften.
d) Die Friteuse ist ein feststehendes Gerät. Die eingebauten Rollen der hinteren Füsse dienen lediglich zum Vor- und
Zurückschieben. Bei Friteusen mit 4 Rollen (je 2 Bock- und Lenkrollen), sind beim Aufstellen die Bremsen der beiden
vorderen Rollen zu blockieren.
e) Die Standard-Ausführung unseres Frittiergerätes mit festen Füssen, kann problemlos nachträglich mit Rollen
ausgerüstet werden.
Achtung:
Gemäss den internationalen Vorschriften, dürfen die Friteusenmodelle 211 und 311 nicht frei aufgestellt
werden; sie sind daher auf den Boden oder gegen eine Wand zu fixieren (VDE Anforderung).
4.2 Inbetriebnahme nach der Installation
Entfernen Sie alle allfällig noch vorhandenen Verpackungsrückstände. Gerätedeckel von Ölbecken entfernen und Korb
aus Ölbecken nehmen. Reinigen Sie das Ölbecken, den Frittierkorb sowie allfälliges weiteres Zubehör mit einem
Lebensmittel verträglichen Reinigungsmittel. ABLASSHAHN SCHLIESSEN. Ölbecken bis zur Markierung MAX mit
Frittieröl auffüllen oder Frittierfett auf die Heizelemente legen. Die Niveaumarkierung (MIN/MAX) ist auf Seitenwand
des Ölbeckens zu sehen.
Achtung:
Bei Fettgebrauch auf Position Fettschmelzzyklus immer Fisch- oder Heizkörpergitter entfernen.
Fett muss in direktem Kontakt mit dem Heizkörper sein.
5 Bedienung der Friteuse
5.1 Bedienpanel
Start / Stop
Pumpe
Reset / Initialisierung
Sicherheitsthermostat
Kontroll Lampe
Heizung
Ein / AUS
Schalter
Regelthermostat
5.2 Bedienen der Steuerung
Nach dem anschliessen an das Stromnetz muss der Sicherheitsthermostat
initialisiert werden.
Mit der EIN Taste wird das Bedienpanel unter Spannung gesetzt.
Die grüne LED Lampe signalisiert dass das Panel Betriebsbereit ist.
Die „Standby“ Position ist gleichzeitig der Fettschmelzzyklus. Dieser ermöglicht
Fett / Oel schonend auf 60°C aufzuheizen. Die Heizung wechselt zwischen
einer Heiz- und Ruhephase. Somit wird Fett schonend verflüssigt und Fett / Oel
ohne Rauchentwicklung aufgewärmt und deren Lebensdauer erhöht.
Die Orange LED „Heizmodus“ blickt während der Aufheizphase.
Sobald die Endtemperatur erreicht ist bleibt das LED konstant.
Die Anwahl der gewünschten Frittiertemperatur erfolgt mittels drehen des
Wahlschalters auf eine .
Hinweis: Die Funktion „Standby“ läuft automatisch im Hintergrund ab auf
60°C und heizt erst danach mit voller Leistung auf die eingestellte
Temperatur.
Die Orange LED „Heizphase“ blinkt während dem aufheizen.
Sobald die eingestellte Temperatur erreicht ist, wird die LED fix.
Zum Abschalten der Friteuse:
. Drehen sie den Wahlschalter in Position „0“
. Drücken Sie die „OFF“ Taste.
Die grüne LED erlischt und das Bedienpanel ist nun ausser Betrieb.
Hinweis: Bei jeder Handhabung des Steuerkastens muss das Bedienpanel ausser Betrieb sein.
6. Reinigung, Unterhalt
6.1 Reinigungsarbeiten, täglich oder je nach Einsatzdauer des Gerätes
ACHTUNG
Ausschliesslich nichtätzende, nichtscheuernde Reiniger verwenden.
Ausschliesslich nichtscheuernde Lappen verwenden.
Ausschliesslich Reiniger verwenden, welche im Lebensmittelbereich zugelassen sind.
Reinigungsarbeiten immer erst durchführen, wenn das Frittieröl und die Friteuse auf eine Temperaturniveau
abgekühlt haben bei dem keine Verbrennungen entstehen können.
Reinigungsbereich
Äussere Flächen und Abdeckungen
Bedientableau inklusive aller
Bedienelemente
Schnellkupplung (Option Pumpe)
Fritierbecken
Fritierkorb
Fritierkorbhalter
Fritierölbeckenabdeckung
Innere Flächen und Abdeckungen
Anschlusskabel
Ölauffangbehälter
Fritteusenumfeld
Reinigungsarbeiten
Mittels feuchtem Lappen reinigen
Mittels feuchtem Lappen reinigen
Reinigungsmittel/ Heisses Wasser
Reinigungsmittel/ Heisses Wasser
Spülmaschine/ Heisses Wasser
Spülmaschine/ Heisses Wasser
Spülmaschine/ Heisses Wasser
Mittels feuchtem Lappen reinigen
Mittels feuchtem Lappen reinigen
Spülmaschine/ Heisses Wasser
Säubern Sie mit harter und weicher Bürste und feuchten Tüchern
und befolgen Sie Spezialanweisungen wenn notwendig
6.2 Intervalle des Frittierölwechsel
Filtrieren
Erneuern - Auswechseln
Täglich bzw. je nach Gebrauchsintensität
Je nach Abnutzung und Sättigung
6.3 Periodische Kontrollen
Ölauffangbehälter
Frittierölqualität
Frittierbecken
Einlaufbogen und Schnellkupplung
Tauchheizung
Sauberkeit, Füllstand
Gemäss Hygienevorschriften
Sauberkeit, abgesunkene Fritiergutreste
Sauberkeit, Funktion, Dichtheit
Oberfläche
6.4 Wartung
Wir empfehlen einen regelmässigen Unterhalt durch einen Kundendienst machen zu lassen, je nach
Gebrauchsintensität des Gerätes.
Gelegentlicher Gebrauch
Mittlerer Gebrauch
Intensive Nutzung
Weniger als 8 h pro
Tag
8 bis 12 h pro Tag
Mehr als 12 h pro Tag
Einen Unterhaltsdienst pro Jahr
1 bis 2 Unterhaltsdienste pro Jahr
1 Zwischenservice sowie einen Basisdienst pro Jahr
7. Kundendienst
Wenden Sie sich bei Betriebsstörungen an ihren Händler oder an die nächste Servicestelle. Vermeiden Sie aber
Fehlmeldungen und prüfen Sie deshalb vor Anforderung eines Monteurs, ob
- die Sicherungen der elektrischen Zuleitung intakt sind
- der Stecker eingesteckt ist
- der Apparat richtig in Betrieb gesetzt wurde
- Oelstand kontrollieren, eventuell unter MIN-Markierung
Wichtig !
Bitte geben Sie bei jeder Meldung an die Servicestelle den Apparatetyp und die Apparatenummer an, die Sie auf dem
Datenschild am Panel hinter der Türe finden.
2. Exécutions, variantes et mesures
Friteuses sur pieds :
Type
L
211
197.5
311
297.5
411
397.5
422
397.5
Friteuses à encastrer :
Type
L
211
197.5
311
297.5
411
397.5
422
397.5
522
495
622
592
2.1 Poids et contenances
Type
211
Nombre de Panier
Pieds 47
Enc. 40
1
311
Pieds 56
Enc. 47
1
411
Pieds 69
Enc. 62
2
422
Pieds 79
Enc. 68
2
522
Pieds - Enc. 87
2
622
Pieds - Enc. 94
2
Capacité par panier de friteuse (Kg)
0.9
1.5
2 x 0.9
2 x 0.9
1 x 0.9
1 x 1.5
2 x 1.5
Quantité d’huile niveau minimum (l)
7.5
12.5
17
2 x 7.5
1 x 7.5
1 x 12.5
2 x 12.5
Quantité d’huile niveau maximum (l)
9
14.5
20.5
2x9
1x9
1 x 14.5
2 x 14.5
Rendement p/h avec frites congelées (Kg)
17 – 22
27 – 32
34 – 44
34 – 44
44 – 54
54 – 64
Rendement p/h avec frites précuites (Kg)
20 – 25
30 – 35
40 - 50
40 - 50
50 – 60
60 – 70
Poids net, sans accessoires (kg)
2.2 Identification de l'appareil
Chaque friteuse est dotée d'une plaquette technique pour
l’identification de l'appareil.
Toujours mentionner cette identification d'appareil lorsque
vous faites appel au service après-vente.
2.3 Conditions ambiantes
Type
Température mini. (°C)
Température max. (°C)
Humidité max. (%)
211 – 311 – 411 – 422- 522 – 622
+5
+ 60
60
2.4 Tensions, types de raccordement et exécutions
Exécution standard triphasée
avec Neutre
Tension triphasée 3N~ 400 V
50/60Hz - 3L + N + PE
Exécution spéciale sans neutre
Tension triphasée 3~ 400 V
50/60Hz - 3L + PE
Exécution spéciale pour bateau
Exécution spéciale triphasée
Tension triphasée 3~ 440 V
50/60Hz - 3L + PE
Tension triphasée 3~ 230 V
50/60Hz - 3L + PE
Exécution spéciale
monophasée
Tension monophasée ~ 230V
50/60Hz - L + N + PE
2.5 Fusible d'alimentation
Type
211 / 422
( 2 câbles d’alimentation)
311
411 / 422
(1 câble d’alimentation)
Puissance
7.5 KW
9 KW
11 KW
11.4 KW
15 KW
15 KW
18 KW
22 KW
AC 230V
32.6 A
39.1 A
-
-
-
-
-
-
3AC 230V
18.8 A
22.6 A
27.6 A
28.6 A
37.65 A
37.65 A
-
-
3AC 400V
10.8 A
13 A
15.8 A
16.5 A
21.7 A
21.7 A
26 A
31.6 A
3NAC 400V
10.8 A
13 A
15.8 A
16.5 A
21.7 A
21.7 A
26 A
31.6 A
3AC 440V
9.9 A
11.8 A
14.5 A
15 A
19.7 A
19.7 A
23.6 A
28.9 A
522 (2 câbles d’alimentation)
Type
Puissance
3N ~ 400V
522 (2 câbles d’alimentation)
622 (2 câbles
d’alimentation)
7.5 kW
+
11.4 kW
9 kW
+
11.4 kW
11 kW
+
11.4 kW
7.5 kW
+
15 kW
9 kW
+
15 kW
11 kW
+
15 kW
2 x 11.4 kW
2 x 15 kW
10.8 A
+
16.5 A
13 A
+
16.5 A
15.8 A
+
16.5 A
10.8 A
+
21.7 A
13 A
+
21.7 A
15.8 A
+
21.7 A
2 x 16.5 A
2 x 21.7 A
2.6 Raccordement électrique
Le raccordement électrique doit être fait par un électricien ou une autre personne qualifiée qui assurera une installation
conforme aux normes. Procédez comme suit:
a) Vérifiez si les spécifications du réseau électrique correspondent à celles indiquées sur la plaquette signalétique de
la machine. Cette plaquette se trouve sur le panneau derrière la porte.
b) Raccordement selon normes IEC resp. CEI 335-1 et prescriptions locales, c'est-à-dire :
Montage d'une fiche sur le câble d’alimentation, elle doit être dimensionnée à la puissance et au courant nominal de
la friteuse. La fiche doit être accessible après l’installation de la friteuse. En amont de l’alimentation de la friteuse, un
disjoncteur de courant de fuite (FI : 10mA de courant de fuite) est recommandé. Prévoir lors de l'installation un
interrupteur principal à proximité de la friteuse, avec séparation de tous les pôles, écartement des contacts 3 mm au
minimum. Le câble de raccordement doit être au moins un câble du type H07RN-F.
c)
Permet le raccordement de la terre (ou conducteur de protection), elle est indispensable à votre installation.
Complétée par un dispositif différentiel, elle protège les utilisateurs lorsqu'un défaut survient à un appareil. le
courant de défaut s'écoule vers la terre et provoque le déclenchement du différentiel.
d) Si la conduite de raccordement au secteur de cet appareil est endommagée, elle doit être remplacée par le fabricant
ou son service après vente ou une personne qualifiée tout aussi pour éviter des risques .
3. Prescriptions de sécurité
Les symboles suivants sont éventuellement appliqués sur la friteuse:
Haute tension
Avis de tension électrique dangereuse. Décharges électriques provoquant des lésions graves ou la mort.
Les interventions sur les installations électriques doivent être assurées uniquement par des techniciens
autorisés.
Respectez les prescriptions de sécurité spécifiques à ce domaine d'activité ! Débranchez la friteuse du
secteur avant de procéder à des interventions sur les installations électriques.
Surface chaude / Constituants intérieurs chauds
Avis de chaleur pouvant conduire à des blessures. Laissez les surfaces et les constituants chauds se
refroidir avant d'intervenir dessus ou portez des gants anti-chaleur
Huile de friture chaude
Avis d'huile de friture chaude pouvant conduire à des blessures. Laissez l'huile de friture chaude se refroidir
avant d'intervenir sur des constituants immergés ou portez des lunettes
NOTA
Au moment de la livraison de la friteuse, tous les symboles d'avertissement (autocollants) correspondants
ont été apposés par le fabricant aux emplacements appropriés. Si des symboles d'avertissement sont défaits
pendant l'utilisation de la friteuse ou au cours d'opérations de nettoyage, l'exploitant de la friteuse est tenu de
remplacer immédiatement!
3.1 Utilisation conforme de la friteuse
La friteuse sert exclusivement à faire frire des denrées alimentaires fraîches ou surgelées qui ne manifestent pas de
réactions constituant des risques corporels, matériels et environnementaux lors du processus de friture. La friteuse est
homologuée uniquement pour une utilisation sous surveillance. Toute autre utilisation de la friteuse est considérée
comme non conforme. L'utilisation conforme implique également le respect du mode d'emploi et des prescriptions de
maintenance et de réparation établies par le fabricant.
3.2 Dangers et consignes spécifiques
AVERTISSEMENT
La friteuse est homologuée uniquement pour une utilisation sous surveillance. Si le bac de récupération
d'huile contient de l'huile de friture chaude, il faut porter des vêtements, des gants et des lunettes de
protection lors de son maniement. Ne jamais asperger la friteuse avec le jet d'eau d'une douche, d'un flexible
ou d'un nettoyeur haute pression.
La mise en service de la friteuse avant son remplissage préalable de graisse ou d'huile de friture au-dessus du niveau
MIN représente un risque d'inflammation ou conduit à une coupure de la friteuse par le thermostat de sécurité. L'huile
ne doit pas descendre en dessous du niveau MIN pendant l'utilisation. Cela représente un risque d'inflammation ou
conduit à une coupure de la friteuse par le thermostat de sécurité. L'huile ne doit pas dépasser le niveau MAX pendant
l'utilisation. Cela constitue sinon un risque de débordement d'huile ou de mousse lors de l'immersion du produit à frire.
L'huile de friture usagée et dégradée est plus facilement inflammable et tend à la saturation (mousse). Ne jamais lutter
contre une inflammation d’huile avec de l’eau. Fermer immédiatement le couvercle de la cuve ou utiliser un extincteur
à agent spécial (halon) ou une couverture anti-feu.
ATTENTION
Un panier rempli de produits trop humides ou trop surgelés (avec des cristaux de glace) provoque un
moussage abondant de l’huile chaude, ce qui porte préjudice à la qualité la friture et un risque de
débordement. Ne pas déplacer la friteuse lorsque l’huile est chaude. Cela constitue un risque de
débordement de l'huile de friture chaude. Pour vidanger ou pomper de l'huile de friture, celle-ci doit être
refroidie à une température ne dépassant pas 175 °C.
Ne jamais nettoyer le chauffage par immersion à l'aide d'une brosse métallique ou par pyrolyse (marche à sec).
Tout nettoyage non conforme avéré du chauffage par immersion exclut toute prestation de garantie.
ATTENTION
Les deux cuves ne doivent pas etre dechargées au meme temps dans le bac de recuperation huile, mais
une à la fois. Autrement l'huile debordera.
3.3 Sécurité des personnes
AVERTISSEMENT
En cas d'utilisation erronée, la friteuse peut occasionner des lésions graves ou mortelles. Le personnel qui
utilise et entretient la friteuse doit être formé à son maniement correct et doit avoir lu et compris les
instructions de sécurité du présent mode d'emploi avant de commencer à utiliser ou à entretenir la friteuse.
Ne jamais modifier ou retirer des dispositifs de sécurité. Ne pas couper des dispositifs de sécurité en procédant à des
modifications sur la friteuse. Ne jamais retirer des symboles d'avertissement apposés sur la friteuse (selon les pays).
Remplacer immédiatement les symboles d'avertissement manquants ou défectueux.
Ne jamais utiliser une friteuse en mauvais état. Signaler immédiatement à son supérieur hiérarchique de toutes les
irrégularités, surtout celles qui concernent la sécurité.
Pour remplacer des composantes électriques et mécaniques, séparer la friteuse du secteur électrique. Vérifier toutes
les fonctions de sécurité une fois les opérations d'entretien terminées.
3.4 Dispositifs de sécurité
En plus des symboles d'avertissement apposés sur la friteuse (selon les pays), la friteuse est dotée des dispositifs de
sécurité suivants:
Interrupteur principal
Contacteur de sécurité
Thermostat de sécurité
3.5 Personnes autorisées
Seules peuvent travailler sur et avec la friteuse des personnes autorisées pour le travail concerné. Pour être
autorisées, les personnes doivent remplir les exigences minimales de formation et de connaissance énumérées dans
ce chapitre et s'être vues attribuer un domaine de compétence défini.
"Cet appareil n'est pas prévu à l'usage des personnes (enfants y compris) avec des possibilités physiques,
sensorielles ou mentales réduites, ou le manque d'expérience et de connaissance, à moins qu'ils aient été donnés la
surveillance ou l'instruction au sujet de l'utilisation de l'appareil par une personne chargée de leur sûreté. Des enfants
devraient être dirigés pour s'assurer qu'ils ne jouent pas avec l'appareil."
3.6 Domaine de compétence du personnel
3.6.1 Exploitant
Personne juridiquement responsable, l'exploitant est responsable de l'utilisation conforme de la friteuse ainsi que de la
formation et de l'affectation des personnes autorisées. Il définit les compétences et les domaines d'attribution des
personnes autorisées pour son entreprise.
3.6.2 Utilisateur de la friteuse
Les tâches suivantes lui sont attribuées :
Il remplit d'huile de friture la friteuse.
Il surveille la qualité de l'huile de friture et procède à sa remise à niveau, à sa purification et à son filtrage.
Il démarre et surveille la friture.
Il prépare la friteuse pour le produit à frire
Il alimente la friteuse en produits à frire.
Il localise les problèmes et organise leur élimination.
3.6.3 Personnel d'entretien
Les tâches suivantes lui sont attribuées:
Il nettoie, entretient et répare la friteuse conformément aux opérations décrites aux chapitres "Maintenance et
Dépannage".
Il démonte, entrepose et élimine la friteuse.
3.7 Formation et qualification minimales du personnel autorisé
3.7.1 Exploitant
C'est une personne formée dans la gestion d'entreprise exerçant une fonction d'encadrement. Il possède l'expérience
correspondante dans l'évaluation des risques et la gestion du personnel. Il a lu et compris le chapitre "Prescription de
sécurité".
3.7.2 Utilisateur de la friteuse
C'est une personne qui est instruite sur l'utilisation de la friteuse et qui est sensibilisée aux risques potentiels.
3.7.3 Personnel d'entretien
Ce sont des personnes qui ont suivi une formation professionnelle correspondante, qui sont familiarisées avec
l'entretien de la friteuse et qui disposent des qualifications correspondantes du fait de leur activité. Les opérations
d'entretien sur l'équipement électrique de la friteuse doivent être réalisées uniquement par un électricien ou par une
personne instruite sous la conduite et la surveillance d'un électricien conformément aux règles de l'électrotechnique.
3.8 Obligation de maintenance
L'exploitant est tenu d'assurer la maintenance et le nettoyage de la friteuse à intervalles réguliers. La friteuse doit être
utilisée uniquement en parfait état, c'est-à-dire sans dommage. Utiliser uniquement des consommables ou des pièces
de rechange d'origine. Vérifier le bon fonctionnement des dispositifs de sécurité après des opérations de maintenance
et de réparation.
3.9 Disponibilité du mode d'emploi
Un exemplaire du mode d'emploi doit être tenu à tout instant à disposition du personnel sur le lieu d'utilisation de la
friteuse.
4. Installation et Mise en service
4.1 Installation de l’appareil
Lors de la mise en place de l’appareil veuillez tenir compte des points suivants :
a) La friteuse doit être placée de niveau et sa hauteur doit être adaptée selon le désir de l’utilisateur. Facilement
réalisable grâce aux quatre pieds réglables. La hauteur du plateau de la friteuse, par rapport au sol varie entre
850mm au minimum et 900 au maximum.
b) Distance minimum à respecter entre l’arrière de la friteuse et la paroi murale ou avec un autre appareil: 30 mm.
c) La friteuse ne doit pas reposer sur une surface inflammable, respectez les prescriptions de sécurité et de
construction locales.
d) La friteuse doit avoir un emplacement fixe. Si la friteuse est équipée avec l’option roulettes (2 roues fixes et 2 roues
directionnelles), les freins des deux roues avants doivent être bloqués. Le rôle des roulettes est de faciliter
l’entretien et le nettoyage de la friteuse.
e) Il est toujours possible de modifier une friteuse exécution standard avec des pieds et de l’équiper avec l’option
roulettes.
Attention:
En raison d’un équilibre insuffisant, les friteuses du type 211 & 311 ne peuvent être laissées sans une
fixation permanente. Elles doivent être fixées au sol ou au mur (exigence VDE).
4.2 Mise en service après l'installation
Eliminez tous les résidus d'emballage éventuellement encore présents. Retirer le couvercle et le panier de la cuve.
Nettoyez la friteuse et les accessoires fournis avec un produit de nettoyage non corrosif agréer pour le secteur
alimentaire. FERMER LE ROBINET DE VIDANGE. Remplir la cuve d'huile jusqu'à la marque MAX. Le niveau d'huile
(MIN/MAX) est visible sur les côtés à l'intérieur de la cuve.
Attention:
Si vous voulez fondre de la graisse en position "Cycle de fonte de graisse" ne mettez pas la grille sur les
corps de chauffe. La graisse doit être en contact direct avec les corps de chauffe et répartie sur toute sa surface.
5 Utilisation de la friteuse
5.1 Panneau de commande
Bouton
Pompe
Réinitialisation
sécurité
Indicateur de
chauffe
Bouton
ON/OFF
Sélection de la
température
5.2 Utilisation de la commande
Dès le raccordement avec le réseau d’alimentation électrique il est nécessaire
de réinitialiser la sécurité.
Le touche « ON »permet de mettre sous tension la commande de la friteuse.
La Led verte indique que la régulation de température est opérationnelle.
La sélection du mode « Standby » permet d’atteindre la température de 60°C en
alternant les phase de chauffage et repos. Ainsi dans le cas d’utilisation de la
graisse celle-ci prendra son état liquide sans dégagement de fumée ou
dégradation.
La led orange « indicateur de chauffe » clignote pendant la phase de chauffage.
Dès que la consigne est atteinte elle devient fixe.
La sélection de la température de cuisson est réalisée en positionnant le
curseur sur la consigne souhaitée.
Remarque : La fonction « Standby » est obligatoire, dès que la température de
l’huile est égale à 60°C, la friteuse chauffe en continue pour atteindre la
consigne.
La led orange « indicateur de chauffe » clignote pendant la phase de chauffage.
Dès que la consigne est atteinte elle devient fixe.
Pour arrêter la friteuse :
. Placer le curseur sur la position « 0 »
. Appuyer sur la touche « OFF »
La Led verte s’éteint, la régulation de température est alors hors service.
Remarque : Avant toute manipulation du boîtier de commande il est impératif de placer la régulation de température
hors service.
6. Maintenance
6.1 Opérations de nettoyage quotidien ou selon ‘intensité d’utilisation
ATTENTION
. Utiliser exclusivement des produits de nettoyage non corrosifs, non abrasifs.
. Utiliser exclusivement des chiffons non abrasifs.
. Utiliser exclusivement des produits de nettoyage homologués pour un usage alimentaire.
. Les opérations de nettoyage doivent avoir lieu une fois que l'huile de friture soit refroidie à un niveau de
température excluant toute brûlure.
Parties à nettoyer
Surfaces extérieures et couvercles
Panneau de commande
Accouplement rapide (option pompe)
Cuve de friteuse
Corps de chauffe
Panier de friteuse
Fixation du panier de friteuse
Couvercle de friture
Surfaces intérieures et couvercles
Cordon de raccordement
Bac de récupération d’huile
Environnement de la friteuse
Opérations de nettoyage
Nettoyer avec un chiffon humide
Nettoyer avec un chiffon humide
Détergent / Eau chaude
Détergent / Eau chaude
Détergent / Eau chaude
Lave-vaisselle / Eau chaude
Lave-vaisselle / Eau chaude
Lave-vaisselle / Eau chaude
Nettoyer avec un chiffon humide
Nettoyer avec un chiffon humide
Lave-vaisselle / Eau chaude
Nettoyer avec un balai, une brosse et chiffon humide, respecter
les éventuelles consignes spéciales.
6.2 Intervalle de „renouvellement de l'huile de friture“
Filtrage
Renouvellement
Tous les jours ou selon l’intensité d’emploi
Selon la dégradation et la saturation
6.3 Contrôles périodiques
Bac de récupération d’huile
Qualité de l’huile de friture
Cuve de friture
Option Tubulure d’entrée
Corps de chauffe
propreté, niveau de remplissage
selon les directives sanitaires
propreté, dépôt de produit frit
propreté, fonction, colmatage, étanchéité après mise en place
Surface
6.4 Service après-vente
Il est conseillé de réaliser un entretien régulier par un technicien du service après-vente selon l’utilisation de la friteuse.
Friteuse en usage faible
Friteuse en usage moyen
Friteuse en usage intensif
Moins de 8 h par jour
De 8 à 12 h par jour
Plus de 12 h par jour
Un service d’entretien par an
Un à deux services d’entretien par an
Un service intermédiaire plus un service de base par an
7. Dépannage
En cas de panne, adressez-vous à votre installateur ou le centre de réparation le plus proche. Cependant, avant
d’appeler le monteur inutilement, veuillez contrôler :
- si les fusibles du secteur sont intacts,
- si la fiche électrique est bien connectée,
- si la machine à été mise en marche correctement,
- si le niveau d’huile est correct.
Important !
Si vous faites appel au service de réparation, indiquez le type et le numéro de votre machine. Vous trouverez ces
indications sur la plaquette signalétique appliquée sur le panneau derrière la porte.
2. Executions and dimensions
Floor standing fryers:
Type
L
211
197.5
311
297.5
411
397.5
422
397.5
Built-in fryers:
Type
L
211
197.5
311
297.5
411
397.5
422
397.5
522
495
622
592
2.1 Weights and filling data
Type
211
Number of baskets
FL 47
BI 40
1
311
FL 56
BI 47
1
411
FL 69
BI 62
2
422
FL 79
BI 68
2
522
FL - BI 87
2
622
FL - BI 94
2
Filling qty per basket (Kg)
0.9
1.5
2 x 0.9
2 x 0.9
1 x 0.9
1 x 1.5
2 x 1.5
Frying oil qty at minimum level (l)
7.5
12.5
17
2 x 7.5
1 x 7.5
1 x 12.5
2 x 12.5
Frying oil qty at maximum level (l)
9
14.5
20.5
2x9
1x9
1 x 14.5
2 x 14.5
Production of frozen chips per hour (Kg)
17 – 22
27 – 32
34 – 44
34 – 44
44 – 54
54 – 64
Production of cooled chips per hour (Kg)
20 – 25
30 – 35
40 - 50
40 - 50
50 – 60
60 – 70
Net weight without options (kg)
2.2 Identification of the appliance
Every deep fryer is provided with a technical identification plate.
Always have this identification plate available when making
enquiries to our customer services department.
2.3 Ambient conditions
Type
Min Temperature. ( ˚C )
Max Temperature. ( ˚C )
Max humidity.. ( %)
211 – 311 – 411 – 422 – 522 - 622
+5
+ 60
60
2.4 Voltages, types of connection and versions
Standard version three phase
with neutral and earth
Voltage three-phase 3N~400 V
50/60Hz - 3L + N + PE
Special version for ships
Voltage three-phase 3~440 V
50/60Hz : 3L + PE
Special single-phase version
Voltage single-phase ~ 230V
50/60Hz - L + N + PE
Special version without neutral
Voltage three-phase 3~ 400 V
50/60Hz - 3L + PE
Special version three-phase
without neutral
Voltage three-phase 3~ 230 V
50/60Hz - 3L + PE
2.5 Mains fuses
Type
211 / 422
( 422 with two supply cables)
311
411 / 422
( 422 with one supply cable)
Power
7.5 KW
9 KW
11 KW
11.4 KW
15 KW
15 KW
18 KW
22 KW
AC 230V
32.6 A
39.1 A
-
-
-
-
-
-
3AC 230V
18.8 A
22.6 A
27.6 A
27.6 A
37.65 A
37.65 A
-
-
3AC 400V
10.8 A
13 A
15.8 A
15.8 A
21.7 A
21.7 A
26 A
31.6 A
3NAC 400V
10.8 A
13 A
15.8 A
15.8 A
21.7 A
21.7 A
26 A
31.6 A
3AC 440V
9.9 A
11.8 A
14.5 A
14.5 A
19.7 A
19.7 A
23.6 A
28.9 A
522 (with two supply cables)
Type
Power
3N ~ 400V
522 (with two supply cables)
622 (with two supply
cables)
7.5 kW
+
11.4 kW
9 kW
+
11.4 kW
11 kW
+
11.4 kW
7.5 kW
+
15 kW
9 kW
+
15 kW
11 kW
+
15 kW
2 x 11.4
kW
2 x 15 kW
10.8 A
+
16.5 A
13 A
+
16.5 A
15.8 A
+
16.5 A
10.8 A
+
21.7 A
13 A
+
21.7 A
15.8 A
+
21.7 A
2 x 16.5 A
2 x 21.7 A
2.6 Electrical connection
The electrical connection of the machine must be done by an electrician or a qualified person who can ensure that the
installation meets the required standards. Proceed as follows:
a) Check if the specifications of the electrical mains correspond to those given on the rating plate. This plate is located
on the control panel inside the door.
b) Connect according to IEC or CEI 335-1 standards and local regulations, i.e.: Fit a mains plug to the connection
cable, corresponding to the power of the rated current. Plug into the mains socket. The plug must be accessible
after installing the fryer. The manufacturer recommends to connect the fryer to a fault-current protective switch (for
machines which exceeds 10mA of dispersion current). For permanent installation: connect to a main switch with all
the poles isolated; minimum distance of the contacts 3 mm. The connection cable should at least be an H05RN-F
type.
c)
Allows he connection of the ground (Earth connection). It is essential for your installation. Supplemented by a
differential device, it protects the users when an electrical defect occurs on an appliance. The fault current
runs out towards the ground and causes the release of the differential.
d) If the supply cord is damaged, it must be replaced by the manufacturer, its service agent or similarly qualified
persons in order to avoid a hazard.
3. Safety regulations
The following warning symbols are fitted to the deep fryer as appropriate:
High voltage
Warning of dangerous electrical voltage
Electric shocks lead to serious injury or death.
Only authorized specialist personnel may carry out work on electrical installations.
Follow the specific technical safety instructions!
Always disconnect the deep fryer from the mains power before carrying out work on electrical installations.
Hot surfaces / hot internal components
Warning of heat which can lead to injuries. Always allow hot surfaces to cool down before carrying out work
on these components; or wear heat resistant gloves.
Hot frying oil
Warning of hot frying oil which can lead to injuries. Always allow the hot frying oil to cool down before
carrying out work on submerged components-or wear safety glasses.
Advice
The manufacturer has mounted warning symbols (stickers) at all the relevant positions on the deep fryer
before delivery. If during operation or within the scope of cleaning work any of these warning symbols
become detached the operator of the deep fryer is obliged to apply these warning symbols again
immediately!
3.1 Specified use of the deep fryer
The deep fryer is exclusively intended for the frying of fresh and deep-frozen foods which during the frying process do
not react to endanger people, material assets or the environment. The deep fat fryer is exclusively authorized for
supervised operation. Any other use of the deep fryer is regarded as non-specified. The observance of the operating
manual and the following of the maintenance and repair instructions from the manufacturer are also part of the
specified use.
3.2 Specific dangers and instructions
WARNING
The deep fryer is exclusively authorized for supervised operation. If the oil receptacle pot contains hot frying
oil, protective clothing, gloves and safety glasses must be worn while handling. Never hose down the deep
fryer with water from a spray head, a water hose or a high-pressure cleaner. There is a danger of fire and/or
the safety thermostat will switch off the deep fryer if it is started up without first filling it with fat or frying oil to
the maximum oil level mark.
During operation the frying oil level must not fall below the minimum oil level mark. There is a danger of fire and/or the
safety thermostat will switch off the deep fryer. During operation the frying oil level must not go above the upper oil
level mark. There is a danger of overflowing or frothing over. Used, contaminated frying oil is increasingly likely to
ignite and also tends to froth over. If the frying oil ignites never try to quench it with water but instead immediately put
on the frying pot cover or use a fire extinguisher with a special filling (Halon) or use a quenching cover.
CAUTION
If too much deep-frozen or wet frying product is put into the hot frying oil, frothing over of the hot frying oil will
occur and this will reduce the quality of the fried food. Do not move the deep fryer in the heated state. This
leads to a risk of the hot oil slopping over. For safe draining or transferring the frying oil it must have cooled
down to a temperature below 175 °C.
Never clean the submerged heater with a steel brush or by burning off (dry operation).Verifiable improper
cleaning of the submerged heater will lead to the exclusion of all guarantee.
CAUTION
The two oiltanks have never to be drained at the same time, but one by one, otherwise the oil would overflow
from the below oil collector.
3.3 Personnel safety
WARNING
If incorrectly operated, the deep fryer can cause serious or fatal injuries to personnel. The personnel who
operate and maintain the deep fryer must be trained in the correct operation and handling of the appliance
and must have read and understood the safety regulations in this operating manual before starting work on or
with it.
Never change or remove safety devices. Do not switch off safety devices by making changes to the deep fryer. Never
remove warning symbols which may have been fitted to the deep fryer (depending upon country). Immediately replace
missing or defective warning symbols.
Never operate the deep fryer in a damaged condition. Report immediately any irregularities, especially those which
affect safety, to your managers.
When exchanging electrical or mechanical components ensure that the deep fryer is disconnected from the mains
power supply. Always check all safety functions after completing servicing work.
3.4 Safety equipment
Apart from the warning symbols applied to the deep fryer (depending upon the country) it is also fitted with the
following safety equipment:
Main switch
Safety contactor
Safety thermostat
3.5 Authorized personnel
Only those personnel who have been authorized for the respective work may work on and with the deep fryer.
Personnel are seen as authorized if they fulfil the minimum training and knowledge requirements as listed in this
section and have been assigned a fixed area of responsibility.
"This appliance is not intended for use by persons (including children) with reduced physical, sensory or mental
capabilities, or lack of experience and knowledge, unless they have been given supervision or instruction concerning
use of the appliance by a person responsible for their safety. Children should be supervised to ensure that they do not
play with the appliance."
3.6 Area of responsibility of personnel
3.6.1 Owner/operator
The owner/operator is the legally, higher-ranking person who is responsible for the specified use of the deep fryer and
for the training as well as the tasks of the authorized personnel. He establishes the competencies and authorities to
issue directives of the authorized personnel with respect to his operation.
3.6.2 Operator of the deep fryer
He is responsible for the following work:
He fills frying oil into the deep fryer.
He monitors frying quality and tops up the frying oil and carries out cleaning and filtering.
He starts up the process and monitors it.
He prepares the deep fryer for the product to fry
He loads the deep fryer with the food to be fried.
He localizes problems and organizes their rectification.
3.6.3 Maintenance personnel
He is responsible for the following work:
The cleaning, maintenance and repair of the deep fryer according to the work described in Sections “Cleaning and
Maintenance”
The dismantling, storing and disposal of the deep fryer.
3.7 Minimum training and qualifications of the authorized personnel
3.7.1 Owner/operator
He is a person trained in business management (in a management function).
He has the relevant experience in assessing dangers and in personnel management.
He has read and understood the section “Safety regulations”.
3.7.2 Operator of the deep fryer
This is a person who has been instructed in the operation of the deep fryer and is aware of the existing dangers.
3.7.3 Service personnel
These are people who have completed successfully the relevant occupational training, are familiar with the servicing of
the deep fryer and have the necessary qualifications from their tasks. Servicing work on the electrical equipment of the
deep fryer may only be carried out according to the electro technical regulations by electrical specialists or by trained
personnel under the leadership and supervision of an electrician.
3.8 Duty of maintenance
The owner/operator is obliged to clean and maintain the deep fryer at regular intervals. To only operate the deep fryer
in perfect and undamaged condition. To only use original consumables and original spare parts. To check the safety
equipment after maintenance and repair work.
3.9 Availability of operating manual
A copy of this operating manual must be available at all times to the personnel at the installation location of the deep
fat fryer.
4. Installation and starting up
4.1 Installation of the appliance
When installing the machine, please take into consideration the following points:
a) The fryer has to stand evenly and its height can be easily adapted according to user's request thanks to the four
adjustable legs. The height of the fryer varies between 850mm min. and 900mm max. counted from the floor.
b) Minimal distance to respect between the back of the fryer and a wall or another device: 30 mm.
c) The fryer should not stand on an inflammable surface. Please comply with local safety and construction regulations.
d) In case the fryer is equipped with castors (2 swivel and 2 fixed castors), brakes have to be set on the two front
castors. The advantage of the castors is to facilitate servicing and cleaning of the fryer.
e) It is possible to modify a fryer with standard feet and to mount castors. In this case, do not forget to use washers
together with the fixing screws.
Warning:
Because of insufficient stability, the fryer models 211 and 311 cannot be left without a permanent fixation.
They have to be fixed with the two elements added to the fryer (VDE compliance).
4.2 Starting up after the installation
Remove any remains of packaging which are still around . Remove the lid of the tank. Take the basket out of the tank.
Clean the deep fryer and the accessories, which accompany the delivery, with a non caustic cleaning agent, which is
permitted for the food area. CLOSE THE DRAIN VALVE. Fill the tank with frying oil of the MAX. level or place the fat
for frying on the heating elements. The MIN/MAX level is visible inside of the tank.
Warning:
If you are in the « fat melting cycle » (FMC), always remove the fish grill, respectively the grid over the
heating elements. The fat should be in direct contact with the heating element.
5 Use of the fryer
5.1 Control panel
Start / Stop
Oil pump
Reset / Initializing
Safety thermostat
Control light
heating element
ON / OFF
Button
Working thermostat
5.2 Use of the control panel
After connection of the fryer to the supply network, the control panel must be
initialized by pressing the red “Reset” button.
Press the “ON” Button to put the control panel under tension.
The green LED light indicates that the control panel is ready to use.
The „Standby“ position is also the fat melting cycle (FMC). This position allows
to heat up slowly to 60°C. The heating element switch on and off during this
cycle in order to melt fat and to heat up fat and oil without smoke and increase
the lifetime of the fat and oil.
The orange LED „Heating phase“ is blinking during the FMC mode.
The LED becomes fix as soon as the end temperature is reached.
By turning the knob clock wise you can select the requested frying temperature.
Remark: The FMC is running automatically in the background, even by choosing
a higher temperature. The full heating phase starts only after having reached the
60°C.
The orange LED „Heating phase“ is blinking during the FMC mode.
The LED becomes fix as soon as the end temperature is reached.
Set off of the fryer:
. Turn the temperature selector into the „0“ position
. Press the „OFF“ button in order to set off the fryer
The green LED goes off and the control panel is no more under tension.
Remark: By any handling of the control box, the control panel must be set off.
6. Cleaning and maintenance
6.1 Cleaning intervals, daily or according the duration of use of the appliance
CAUTION
Only use non-caustic, non-abrasive cleaner.
Only use non-abrasive cleaning cloths.
Only use cleaners which are permitted for the food area.
Always carry out cleaning work only after the frying oil and the deep fryer have cooled down to a temperature
level at which no scalding can occur.
Cleaning area
External surfaces and covers
Control panel
Fast coupling (option pump)
Frying pot
Frying basket
Frying basket holder
Frying oil pot cover
Internal surfaces and covers
Connecting cables
Oil receptacle container
Deep fryer surrounds
Cleaning work
Clean with damp cloth
Clean with damp cloth
Cleaning agent / hot water
Dishwashing/ hot water
Dishwashing/ hot water
Dishwashing/ hot water
Dishwashing/ hot water
Clean with damp cloth
Clean with damp cloth
Dishwashing/ hot water
Clean with hard and soft brushes and damp cloths and follow
special instructions if necessary
6.2 Frying oil exchange
Filtration
Exchange
Daily or according to the intensity of use
According to the saturation
6.3 Periodic checks
Oil catcment container
Frying oil quality
Frying pot
Drain pipe and fast coupling
Submerged heating
Cleanliness, filling level
According to hygiene regulations
Cleanliness, settled frying residues
Cleanliness, function, sealing after installation
Surface
6.4 Maintenance
We recommend a regular maintenance service by a after sales service company, according to the intensity of use of
the equipment.
Occasional use
Middle use
Intensive use
Less than 8 h per day
8 to 12 h per day
More than 12 h per day
A maintenance service per year
One to two maintenance service per year
One intermediate service as well as one basis service per
year
7. After sales service
In the case of a breakdown, contact your local dealer or the nearest repair centre. However, before contacting it,
check:
- that the fuses have not gone
- if the electric plug is pushed right in
- if the machine has been started correctly
- if the oil level is correct
Important!
If you call the repair centre, give the type and number of your machine. You will find these on the small plate on the
panel behind the door.
2. Esecuzioni e dimensioni
Friggitrici da pavimento:
Tipo
L
211
197.5
311
297.5
411
397.5
422
397.5
Friggitrici built-in:
Tipo
L
211
197.5
311
297.5
411
397.5
422
397.5
522
495
622
592
2.1 Peso e dati
211
FL 47
BI 40
1
311
FL 56
BI 47
1
411
FL 69
BI 62
2
422
FL 79
BI 68
2
522
FL - BI 87
2
622
FL - BI 94
2
Quantità di riempimento per cestello (Kg)
0.9
1.5
2 x 0.9
2 x 0.9
1 x 0.9
1 x 1.5
2 x 1.5
Quantità olio di frittura a livello minimo (l)
7.5
12.5
17
2 x 7.5
1 x 7.5
1 x 12.5
2 x 12.5
Quantità olio di frittura al livello massimo (l)
9
14.5
20.5
2x9
1x9
1 x 14.5
2 x 14.5
Produzione di patatine congelate/ora (Kg)
17 – 22
27 – 32
34 – 44
34 – 44
44 – 54
54 – 64
Produzione di patatine scongelate/ora (Kg)
20 – 25
30 – 35
40 - 50
40 - 50
50 – 60
60 – 70
Tipo
Peso netto senza opzioni (kg)
Numero di cestelli
2.2 Identificazione apparecchio
Ogni friggitrice è munita di targhetta con i dati tecnici di
funzionamento. In caso di richiesta di informazioni al nostro
ufficio di assistenza clienti, avere sempre a portata di mano
la targhetta con i dati.
2.3 Condizioni ambiente
Tipo
Temperatura minima ( °C )
Temperatura massima( °C )
Umidità max ( %)
211 - 311 - 411 - 422 - 522 - 622
+5
+ 60
60
2.4 Tensioni, tipi di connessione e versioni
Versione standard 3 fasi
con neutro e terra
Voltaggio tre-fasi 3N~400 V
50/60Hz - 3L + N + PE
Versione speciale per navi
Voltaggio tre-fasi 3~440 V
50/60Hz - 3L + PE
Versione speciale singola fase
Voltaggio singola-fase ~ 230V
50/60Hz - L + N + PE
Versione speciale senza neutro
Voltaggio tre-fasi 3~ 400 V
50/60Hz - 3L + PE
Versione speciale 3 fasi
senza neutro
Voltaggio tre-fasi 3~ 230 V
50/60Hz - 3L + PE
2.5 Fusibili principali
Tipo
211 / 422
311
(422 con due cavi di alimentazione)
411 / 422
(422 con un cavo di alimentazione)
Potenza
7.5 KW
9 KW
11 KW
AC 230V
32.6 A
39.1 A
-
3AC 230V
18.8 A
22.6 A
27.6 A
27.6 A
37.65 A
3AC 400V
10.8 A
13 A
15.8 A
15.8 A
3NAC 400V
10.8 A
13 A
15.8 A
3AC 440V
9.9 A
11.8 A
14.5 A
Tipo
Potenza
3N ~ 400V
522 (con due cavi di
alimentazione)
11.4 KW
-
18 KW
22 KW
37.65 A
-
-
21.7 A
21.7 A
26 A
31.6 A
15.8 A
21.7 A
21.7 A
26 A
31.6 A
14.5 A
19.7 A
19.7 A
23.6 A
28.9 A
-
15 KW
-
15 KW
-
-
522 (con due cavi di
alimentazione)
622 (con due cavi di
alimentazione)
7.5 kW
+
11.4 kW
9 kW
+
11.4 kW
11 kW
+
11.4 kW
7.5 kW
+
15 kW
9 kW
+
15 kW
11 kW
+
15 kW
2 x 11.4
kW
2 x 15 kW
10.8 A
+
16.5 A
13 A
+
16.5 A
15.8 A
+
16.5 A
10.8 A
+
21.7 A
13 A
+
21.7 A
15.8 A
+
21.7 A
2 x 16.5 A
2 x 21.7 A
2.6 Connessione elettrica
La connessione elettrica dell'apparecchio deve essere eseguita esclusivamente da un elettricista o da una persona
qualificata, in grado di garantire il rispetto degli standard richiesti. Procedere nel modo che segue:
a) Verificare che le caratteristiche tecniche della rete elettrica corrispondano a quelle indicate sulla targhetta dei dati
di funzionamento. La targhetta dei dati di funzionamento è posizionata sul pannello di controllo all'interno dello sportello.
b) Collegare ai sensi delle norme IEC o CEI 335-1 e della regolamentazione locale vigente: Collegare la spina al cavo di
connessione, in base alla potenza della corrente nominale. Inserire nella presa. La spina deve essere accessibile dopo
l'installazione della friggitrice. Il produttore raccomanda di collegare la friggitrice ad un dispersore di corrente (per
elettrodomestici che superano una corrente di dispersione di 10 mA). Per installazione permanenti: collegare ad un
interruttore principale con tutti i poli isolati, distanza minima dei contatti 3 mm. Il cavo di connessione deve essere di
tipo H05RN-F.
c)
Collegare a terra. È elemento essenziale per l'installazione. L'apparecchio è integrato con un dispositivo
differenziale per proteggere l'utente in caso di guasto elettrico. La corrente di fuga si disperde verso terra
causando lo sblocco del differenziale.
d) Se il cavo è danneggiato, è necessario farlo sostituire dal produttore, dal tecnico dell'assistenza o da persona
qualificata per evitare eventuali pericoli.
3. Normative sulla sicurezza
Sulla friggitrice sono inseriti i seguenti simboli di pericolo:
Alta tensione
Pericolo tensione elettrica.
Le scosse elettriche sono causa di lesioni gravi o mortali.
Solo il personale qualificato autorizzato può eseguire l'installazione elettrica.
Rispettare le istruzioni tecniche specifiche per la sicurezza!
Prima di eseguire qualsiasi connessione elettrica, scollegare sempre la friggitrice dalla rete.
Superfici calde / componenti interni caldi
Segnalazione di superfici calde che possono causare lesioni. Prima di eseguire qualsiasi lavoro sui
componenti far raffreddare le superfici calde o indossare guanti resistenti al calore.
Olio di frittura bollente
Segnalazione di olio bollente che può causare lesioni. Prima di eseguire qualsiasi lavoro sui componenti
immersi nell'olio, far raffreddare l'olio di frittura o indossare occhiali di protezione.
Consiglio
Prima della consegna, il produttore ha inserito adesivi con simboli di pericolo nei punti specifici della
friggitrice. Se durante il funzionamento o nell'ambito dei lavori di pulizia, gli adesivi con i simboli di pericolo
dovessero staccarsi, l'operatore della friggitrice è tenuto immediatamente ad applicarli nuovamente!
3.1 Uso specifico della friggitrice
La friggitrice è progettata esclusivamente per la frittura di cibo fresco e congelato che nel corso del processo di frittura
non abbia effetti nocivi su persone, oggetti o ambiente. La friggitrice è omologata esclusivamente per funzionare sotto il
controllo del personale autorizzato. Qualsiasi altro uso della friggitrice è considerato non specifico. Il rispetto del manuale
d'uso e la conformità alle indicazioni del produttore in materia di manutenzione e riparazione sono anch'essi parte
dell'uso specifico.
3.2 Pericoli e istruzioni specifiche
ATTENZIONE
La friggitrice è omologata esclusivamente per funzionare sotto il controllo del personale autorizzato. Se il
raccoglitore dell'olio contiene olio di frittura bollente, indossare abbigliamento protettivo, guanti e occhiali di
sicurezza durante la sua manipolazione. Non lavare mai la friggitrice con acqua proveniente da un tubo flessibile
di spruzzatore o pulitore ad alta pressione. Pericolo di incendio. Il termostato di sicurezza disattiva la friggitrice
se avviata senza essere riempita con grasso o olio di frittura fino al segno di livello massimo.
Durante il funzionamento, il livello dell'olio di frittura non deve scendere al disotto del segno di livello minimo.
Pericolo di incendio e/o di disattivazione della friggitrice per mezzo del termostato di sicurezza. Durante il
funzionamento, il livello dell'olio di frittura non deve superare il segno di livello massimo. Pericolo di fuoriuscita o
formazione di troppa schiuma. L'olio di frittura usato e contaminato ha una maggiore probabilità di incendiarsi e di
formare schiuma. Se l'olio di frittura si incendia non cercare di temprare con acqua ma coprire immediatamente
con il coperchio della vasca o utilizzare un estintore ad idrocarburi alogenati.
AVVERTENZA
Nel caso in cui venga inserita una quantità eccessiva di prodotto congelato o non asciutto, l'olio potrebbe formare
della schiuma che andrà a ridurre la qualità del cibo fritto. Non spostare la friggitrice quando è calda. Questo
potrebbe causare la fuoriuscita di olio bollente. Per svuotare la vasca dell'olio di frittura o per travasarlo in piena
sicurezza, farlo raffreddare ad una temperatura inferiore ai 175°C. Non pulire il dispositivo riscaldatore con una
spazzola metallica né eliminare i residui di bruciatura. L'accertata pulizia del riscaldatore sommerso, effettuata
in modo inopportuno, porta all'esclusione della garanzia completa.
AVVERTENZA
Le due vasche non vanno mai scaricate contemporaneamente nel contenitore di recupero dell'olio ma una alla
volta onde evitare che l'olio debordi fuori.
3.3 Sicurezza personale
ATTENZIONE
Se utilizzata in modo non corretto, la friggitrice può causare lesioni gravi o mortali al personale. Il personale che
utilizza la friggitrice e ne esegue la manutenzione deve essere addestrato per poter utilizzare e sottoporre a
manutenzione correttamente l'apparecchio ed è tenuto a leggere le norme sulla sicurezza incluse nel presente
manuale d'uso e a comprenderne il contenuto prima di iniziare ad utilizzarla o ad effettuare lavori su di essa.
Non sostituire né rimuovere i dispositivi di sicurezza. Non disattivare i dispositivi di sicurezza apportando modifiche alla
friggitrice. Non rimuovere mai i simboli di pericolo inseriti sulla friggitrice (in base al paese). Sostituire immediatamente i
segnali di pericolo mancanti o danneggiati.
Non mettere mai in funzione la friggitrice se danneggiata. Riferire immediatamente ai dirigenti eventuali inconvenienti,
specialmente quelli inerenti la sicurezza.
Nel sostituire componenti meccanici o elettrici, accertarsi che la friggitrice sia disconnessa dall'alimentazione principale.
Controllare sempre le funzioni di sicurezza dopo aver completato il lavoro di manutenzione.
3.4 Dispositivi di sicurezza
Oltre ai segnali di pericolo applicati alla friggitrice (in base al paese), l'apparecchio è anche munito dei seguenti dispositivi
di sicurezza:
Interruttore principale
Contattore di sicurezza
Termostato di sicurezza
3.5 Personale autorizzato
Solo il personale autorizzato può utilizzare la friggitrice ed effettuare lavori su di essa. Il personale è autorizzato se
soddisfa i requisiti minimi di conoscenza e formazione, così come previsti in questa sezione. Ad ognuno è assegnata
un'area specifica di responsabilità. "Il presente apparecchio non può essere utilizzato da persone (inclusi i bambini) con
ridotte capacità fisiche, sensoriali e mentali o da chi manca di esperienza e conoscenza a meno che venga garantita
un'attività di supervisione da parte di una persona responsabile per la loro sicurezza che ha dato istruzioni sull'uso
dell'apparecchio. È essenziale controllare che i bambini non giochino con l'apparecchio".
3.6 Area di responsabilità del personale
3.6.1Proprietario/operatore
Il proprietario/operatore è la persona di grado più elevato legalmente responsabile per l'uso specifico della friggitrice
nonché per la formazione e l'assegnazione dei compiti al personale autorizzato. Definisce le competenze e l'autorità a
fornire direttive al personale autorizzato in merito al funzionamento dell'apparecchio.
3.6.2 Operatore friggitrice
È responsabile delle seguenti operazioni:
Riempie la friggitrice di olio di frittura.
Controlla la qualità di frittura, aggiunge olio al livello superiore ed esegue operazioni di pulizia e filtrazione.
Avvia il processo e lo monitorizza.
Prepara la friggitrice per l'operazione di frittura.
Carica la friggitrice con il cibo da friggere.
Identifica gli inconvenienti e ne organizza la risoluzione.
3.6.3 Personale addetto alla manutenzione
È responsabile delle seguenti operazioni:
pulizia, manutenzione e riparazione della friggitrice in conformità alle procedure descritte nelle Sezioni "Pulizia e
Manutenzione".
Smontaggio, immagazzinamento e smaltimento della friggitrice.
3.7 Requisiti minimi per formazione e qualifiche del personale autorizzato
3.7.1 Proprietario/operatore
Si tratta della persona addetta alla gestione aziendale (funzione direttiva).
Ha esperienza specifica nella valutazione delle situazioni di pericolo e nella gestione del personale.
Ha letto la sezione "Normative sulla sicurezza" e ne ha compreso il significato.
3.7.2 Operatore friggitrice
È la persona che ha ricevuto istruzioni sul funzionamento della friggitrice, acquisendo consapevolezza dei pericoli
à ciò inerenti.
3.7.3 Personale addetto all'assistenza tecnica
Si tratta di persone che hanno completato con successo la formazione specifica, hanno familiarità con le procedure di
assistenza tecnica della friggitrice e hanno le qualifiche necessarie per i compiti specifici. Le operazioni di assistenza
tecnica sui dispositivi elettrici della friggitrice possono essere eseguite solo in conformità alla normativa vigente da parte
di esperti nel campo elettrico o da personale a ciò addestrato, sotto la supervisione di un elettricista.
3.8 Compiti inerenti la manutenzione
Il proprietario/operatore è tenuto ad eseguire operazioni di pulizia e manutenzione della friggitrice, ad intervalli regolari.
A mettere in funzione la friggitrice solo in condizioni perfette e se non è danneggiata. Ad utilizzare solo beni di consumo e
pezzi di ricambio originali. A controllare i dispositivi di sicurezza dopo le operazioni di manutenzione e riparazione.
3.9 Disponibilità del manuale d'uso
È necessario che una copia del presente manuale d'uso sia sempre a disposizione del personale nei punti di installazione
della friggitrice.
4. Installazione e avviamento
4.1 Installazione dell'apparecchio
Quando si procede all'installazione dell'apparecchio, prendere in considerazione quanto segue:
a) posizionare la friggitrice su un piano stabile regolandone l'altezza in base alla richiesta dell'utente con i quattro piedini
regolabili. L'altezza della friggitrice varia da 850mm min. a 900mm max. dal pavimento.
b) Distanza minima da rispettare tra il retro della friggitrice e una parete o altro dispositivo: 30 mm.
c) Non posizionare la friggitrice su una superficie infiammabile. Rispettare le normative locali in materia di sicurezza e
costruzione.
d) Nel caso in cui la friggitrice sia munita di ruote piroettanti (2 girevoli e 2 fisse), è necessario predisporre freni sulle due
ruote anteriori. Il vantaggio delle ruote è quello di facilitare le operazioni di manutenzione e pulizia della friggitrice.
e) È possibile modificare una friggitrice con piedi standard e munirla di ruote. In questo caso, non dimenticare di
utilizzare rondelle e viti di fissaggio
Attenzione:
A causa di una stabilità non sufficiente, i modelli di friggitrice 211 e 311 non possono essere privi di fissaggio
permanente. Devono essere fissati con i due elementi forniti (conformità VDE).
4.2 Avviamento dopo l'installazione
Rimuovere qualsiasi oggetto inerente l'imballaggio nei pressi dell'apparecchio. Togliere il coperchio del serbatoio. Estrarre
il cestello dal serbatoio. Pulire la friggitrice e gli accessori forniti in dotazione con un detergente non caustico, utilizzabile
per gli alimenti. CHIUDERE LA VALVOLA DI SCARICO Riempire il serbatoio con olio di frittura fino al livello MAX o
inserire il grasso per friggere sugli elementi riscaldanti. Il livello MIN/MAX è visibile all'interno del serbatoio.
Attenzione:
Nel "ciclo di scioglimento grassi" (FMC), rimuovere sempre la griglia del pesce, nello specifico la griglia sugli
elementi riscaldanti. Il grasso deve essere a contatto diretto con l'elemento riscaldante.
5 Utilizzo della friggitrice
5.1 Pannello di controllo
Start / Stop
Pompa olio
Reset / Inizializzazione
Termostato di sicurezza
Spia
resistenza
Pulsante
ON / OFF
Termostato
di lavoro
5.2 Utilizzo del pannello di controllo
Dopo aver collegato la friggitrice alla rete di alimentazione, il pannello di
controllo deve essere inizializzato premendo il tasto rosso "Reset".
Premere "ON" per mettere sotto tensione il pannello di controllo.
L'accensione del LED verde indica che il pannello di controllo è pronto all'uso.
La posizione di "Standby" è anche nel ciclo di scioglimento grassi (FMC). Questa
posizione permette il riscaldamento lento fino a 60°C. L'elemento riscaldante si
accende e spegne durante il ciclo per sciogliere il grasso e riscaldare grasso e olio
senza produrre fumo e aumentando la durata di grasso e olio.
In modalità FMC, il LED arancione "Fase di riscaldamento" lampeggia.
La luce del LED diventa fissa al raggiungimento della temperatura finale.
Per selezionare la temperatura richiesta di frittura, girare la manopola in senso orario.
Note: Il Ciclo FMC funziona automaticamente in background, anche scegliendo una
temperatura più alta. La fase di riscaldamento completo si avvia solo dopo aver
raggiunto i 60°C.
In modalità FMC, il LED arancione "Fase di riscaldamento" lampeggia.
La luce del LED diventa fissa al raggiungimento della temperatura finale.
Disattivazione della friggitrice:
. Posizionare il selettore della temperatura su "0".
. Premere "OFF" per disattivare la friggitrice
Il LED verde si spegne e il pannello di controllo non è più sotto tensione.
Note: Maneggiare la scatola dei comandi solo con il pannello di controllo spento.
6. Pulizia e manutenzione
6.1 Intervalli di pulizia giornalieri o in base alla durata dell'apparecchio
AVVERTENZA
Utilizzare solo un detergente non caustico e non abrasivo.
Utilizzare esclusivamente un panno per pulire non abrasivo.
Utilizzare solo detergenti per uso alimentare.
Eseguire le operazioni di pulizia solo dopo aver fatto raffreddare l'olio di frittura e la friggitrice ad un livello
di temperatura che non scalda.
Area di pulizia
Superfici esterne e coperchi
Pannello di controllo
Accoppiamenti (pompa opzionale)
Vasca di frittura
Cestello frittura
Portacestello di frittura
Coperchio vasca olio di frittura
Superfici interne e coperchi
Cavi di collegamento
Raccoglitore olio
Corpo esterno friggitrice
Procedura di pulizia
Pulire con un panno umido
Pulire con un panno umido
Detergente / acqua calda
Lavastoviglie / acqua calda
Lavastoviglie / acqua calda
Lavastoviglie / acqua calda
Lavastoviglie / acqua calda
Pulire con un panno umido
Pulire con un panno umido
Lavastoviglie / acqua calda
Pulire con spazzola e panno umido. Se richiesto, rispettare le
istruzioni specifiche
6.2 Sostituzione olio di frittura
Filtraggio
Sostituire
Ogni giorno o in base alla frequenza di uso
In base al grado di saturazione
6.3 Controlli periodici
Contenitore di raccolta olio
Qualità olio di frittura
Vasca di frittura
Canale di scolo e accoppiamento
Elemento riscaldante sommerso
Pulizia, controllo livello
In base alle normative in materia di igiene
Pulizia, sedimenti di fritti residui
Pulizia, funzionalità, tenuta dopo installazione
Superficie
6.4 Manutenzione
Consigliamo un servizio di manutenzione regolare da parte del servizio di assistenza clienti, in base alla frequenza
di uso dell'apparecchio.
Uso occasionale
Uso medio
Uso frequente
inferiore a 8 ore/giorno
Manutenzione una volta l'anno
dalle 8 alle 12 ore/giorno Manutenzione una o due volte ogni anno
superiore a 12 ore/giorno Manutenzione intermedia e di base ogni anno
7. Servizio di assistenza clienti
In caso di danni, contattare il rivenditore di zona o il centro di riparazione più vicino. Prima di chiedere assistenza,
controllare:
- che i fusibili non siano bruciati
- che la spina sia correttamente inserita
- che l'apparecchio sia stato avviato correttamente
- che il livello di olio sia corretto
Importante!
Se si chiede assistenza al centro di riparazione, indicare il modello e il numero dell'apparecchio. Tali informazioni sono
indicate sulla targhetta posta sul pannello dietro lo sportello.
Câblage et raccordement de la commande
Respecter la polarité des sondes:
Fil conducteur vert correspond au (+)
Fil conducteur blanc correspond au (-)
8. Anschlüsse auf Steuerprint
Polarität der Sonden beachten:
Grünes Kabel entspricht (+)
Weisses Kabel entspricht (-)
Rispettare la polarità delle sonde:
Cavo verde corrisponde a (+)
Cavo bianco corrisponde a (-)
Connessione alla scheda PCB
Schutz Heizung
Contacteur chauffage
Contactor of heating elements
Contattore delle resistenze
K21
Prüfspitze art K / Sonde type K
/ Probe type K / Sonda tipo K
(Arbeits und Sicherheithermostat)
(Thermostat de travail et de sécurité)
(Control and safety thermostat)
(Termostato di lavoro e sicurezza)
S1 - S3
Pumpe
Pompe
Pump
Pompa
Haupt-Versorgungsmaterial / Alimentation
/ Main Supply / Interruttore principale
M
AL
Weiss-Blanc-White-Bianco = (-)
Grun-Vert-Green-Verde = (+)
Energiekontrol / Controle d'energie
/ Energie Control / Controllo energia
SW23
Switch
Switch
Interruttore
SW21-22 Schalter
Schutz Sicherheit
Contacteur sécurité
Contactor of safety
Contattore di sicurezza
K11
Steuerteil / Cable commande / Cable of command
/ Cavo di comando
2-1 = Weiss-Blanc-White-Bianco
2-2 = Braune-Brun-Brown-Marrone
2-3 = Grun-Vert-Green-Verde
2-4 = Gelb-Jaune-Yellow-Giallo
2-5 = Grau-Gris-Grey-Grigio
2-6 = Rose-Rose-Pink-Rosa
2-7 = Blau-Bleu-Blue-Blu
2-8 = Rot-Rouge-Red-Rosso
2-9 = Schwarz-Noir-Black-Nero
Respect the polarity of the probes:
Green wire corresponds to (+)
White wire corresponds to (-)
Connections on PCB board
3~440 V / 3L + PE / 50 - 60Hz
9. Elektro Schema
Wiring
3~400 V / 3L + N + PE / 50 - 60Hz
Schéma électrique
diagram
elettrico
3~230 V / 3L + PE / 50 - 60Hz
Schema
X11
AL
PE L1 L3
L
Wiring
230 V / L + N + PE / 50 - 60Hz
Schéma électrique
für 15 kW friteusen
3~400 V / 3L + PE / 50 - 60 HZ pour friteuse 15 kW
3~230 V / 3L + PE / 50 - 60 HZ for 15 kW fryers
per friggitrici 15 kW
R1 - 3
K11
K21
PE
N=L3
L1
L2
L3
9. Elektro Schema
diagram
Schema
elettrico
plus
plus
plus
, Easy
plus
, Profi
plus
plus
ID 30
Led pompe clignote rapidement
Pump led fast blinking
Die Lampe der Pumpe blinkt schnell
Lampeggiamento rapido led pompa
Leds pompe et chauffage clignotent rapidement
Leds pump, heater fast blinking
Die Lampe der Pumpe und Temperatur blinkt schnell
Lampeggiamento rapido led pompa, riscaldatore
Driver de la pompe détecte une consommation de courant trop élevée
Pump driver reports over current
Der Pumpeantrieb erkennt eine hoehe Stromaufnahme
Il driver pompa rileva sovracorrente
Manipulation du rotacteur lorsque la pompe est pilotée
Operation of rotary switch while pump is "ON"
Drehung von Drehschalter während Pumpe is "ON"
Attivazione interruttore a rotazione con pompa accesa
Driver du lift détecte une consommation de courant trop élevée
Lift driver reports over current
Der Hebungsantrib erkennt eine hoehe Stromaufnahme
Il driver del sollevatore rileva sovracorrente
Problème lié au fonctionnement du software
Problem of the Software
Softwareprobleme
Inconveniente con il software
Problème de communication entre interface bouttons et la régulation
Communication between CTRL and HMI board brocken
Fehlt die Kommunikation zwieschen die Platinen CTRL und HMI
Interruzione comunicazione tra CTRL e HMI
Pompe
Pump
Pumpe
Pompa
Pompe
Pump
Pumpe
Pompa
Lift
Soft
Communication
Communication
Kommunikation
Comunicazione
Led sécurité clignote rapidement
Safety led fast blinking
Die Sicherheitslampe blinkt schnell
Lampeggiamento rapido led sicurezza
ID 20
Led chauffage Clignote rapidement
Heater led fast blinking
Sicherheitslampe der Temperatur blinkt schnell
Lampeggiamento rapido led riscaldatore
Relay driver détecte un court-circuit / surchauffe
Reklay driver detects short circuit / over temperature
Das Relais erkennt einen Kurzschluss / Hoehere Temperatur
L'eccitatore del relé rileva un corto circuito / sovratensione
Corps de chauffe
Heater error
Fehler des Heizkoerper
Errore resistenza
ID 100
ID 110
ID 32
ID 20
Led chauffage Clignote rapidement
Heater led fast blinking
Sicherheitslampe der Temperatur blinkt schnell
Lampeggiamento rapido led riscaldatore
Détection que le contacteur ne peut être piloté
Relay driver detecs that contactor can not be switched "ON"
Die Einschalter geht nicht in Position "ON"
L'eccitatore del relé rileva la mancata attivazione del contattore
> 250°C ID21
Vision
Position corps de chauffe
Heater up
Heizkoerper oben
xxxxxxxxxx
Led sécurité "ON"
Safety led "ON"
Sicherheitslampe"ON"
Led sicurezza "ON"
Led sécurité clignote rapidement
Safety led fast blinking
Die Sicherheitslampe blinkt schnell
Lampeggiamento rapido led sicurezza
Basic
Thermocouple n'est pas connecté
Thermocouple is not connected
Die Thermoelement ist nicht verbindet
Termocoppia non connessa
Remarque
Remark
Bemerkung
Note
Sonde
Probe
Sonde
Sonda
Surchauffe
Over-temperature
Hoehere Temperatur
Surriscaldamento
Erreur
Error
Fehler
Errore
Message d'erreurs pour la gamme Basic , Easy , Profi
& Vision
plus
plus
plus
Error message Basic , Easy , Profi & Vision
plus
plus
plus
Fehelrmeldung fuer Typen Basic , Easy , Profi
& Vision
plus
plus
plus
Messaggi d'errore per serie Easy , Profi
& Vision