1
OPTN300TEA01
Z
TN-300
OWNER'S MANUAL
ENGLISH
ANALOG TURNTABLE
MODE D’EMPLOI
BEDIENUNGSANLEITUNG
FRANÇAIS
MANUAL DEL USUARIO
MANUALE DI ISTRUZIONI
BRUKSANVISNING
ESPAÑOL
GEBRUIKSAANWIJZING
I
3
0
SKAT
G
AN
DEUTSCH
I–
N
T
ITALIANO
NEDERLANDS
SVENSKA
IMPORTANT SAFETY INSTRUCTIONS
1) Read these instructions.
2) Keep these instructions.
3) Heed all warnings.
4) Follow all instructions.
CAUTION: TO REDUCE THE RISK OF ELECTRIC
SHOCK, DO NOT REMOVE COVER (OR BACK).
NO USER-SERVICEABLE PARTS INSIDE. REFER
SERVICING TO QUALIFIED SERVICE PERSONNEL.
M
The lightning flash with arrowhead in an
equilateral triangle is intended to alert the
user to the presence of uninsulated “dangerous voltage” within the product’s enclosure
that could be of sufficient magnitude to constitute a risk of electric shock to persons.
V
The exclamation point in an equilateral triangle is intended to alert the user to the
presence of important operating and maintenance (servicing) instructions in the literature
accompanying the appliance.
WARNING: TO PREVENT FIRE OR SHOCK HAZARD,
DO NOT EXPOSE THIS APPLIANCE TO RAIN OR
MOISTURE.
CAUTION
oo DO NOT REMOVE THE EXTERNAL CASES OR
CABINETS TO EXPOSE THE ELECTRONICS. NO USER
SERVICEABLE PARTS ARE INSIDE.
oo IF YOU ARE EXPERIENCING PROBLEMS WITH THIS
PRODUC T, CONTAC T THE STORE WHERE YOU
PURCHASED THE UNIT FOR A SERVICE REFERRAL.
DO NOT USE THE PRODUCT UNTIL IT HAS BEEN
REPAIRED.
oo USE OF CONTR OLS OR ADJUSTMENTS OR
PERFORMANCE OF PROCEDURES OTHER THAN
THOSE SPECIFIED HEREIN MAY RESULT IN
HAZARDOUS RADIATION EXPOSURE.
2
5) Do not use this apparatus near water.
6) Clean only with dry cloth.
7) Do not block any ventilation openings. Install in
accordance with the manufacturer's instructions.
8) Do not install near any heat sources such as radiators, heat registers, stoves, or other apparatus
(including amplifiers) that produce heat.
9) Do not defeat the safety purpose of the polarized
or grounding-type plug. A polarized plug has two
blades with one wider than the other. A grounding
type plug has two blades and a third grounding
prong. The wide blade or the third prong are provided for your safety. If the provided plug does not
fit into your outlet, consult an electrician for replacement of the obsolete outlet.
10)Protect the power cord from being walked on or
pinched particularly at plugs, convenience receptacles, and the point where they exit from the
apparatus.
11)Only use attachments/accessories specified by the
manufacturer.
12)Use only with the cart, stand, tripod, bracket, or table specified by
the manufacturer, or sold with the
apparatus. When a cart is used, use
caution when moving the cart/
apparatus combination to avoid
injury from tip-over.
13)Unplug this apparatus during lightning storms or
when unused for long periods of time.
14)R efer all servicing to qualified service personnel.
Servicing is required when the apparatus has been
damaged in any way, such as power-supply cord or
plug is damaged, liquid has been spilled or objects
have fallen into the apparatus, the apparatus has
been exposed to rain or moisture, does not operate
normally, or has been dropped.
oo The apparatus draws nominal non-operating
power from the AC outlet with its POWER or
STANDBY/ON switch not in the ON position.
oo The mains plug is used as the disconnect device,
the disconnect device shall remain readily
operable.
oo Caution should be taken when using earphones or
headphones with the product because excessive
sound pressure (volume) from earphones or headphones can cause hearing loss.
CAUTION
ENGLISH
oo Do not expose this apparatus to drips or splashes.
oo Do not place any objects filled with liquids, such
as vases, on the apparatus.
oo Do not install this apparatus in a confined space
such as a book case or similar unit.
oo The apparatus should be located close enough
to the AC outlet so that you can easily reach the
power cord plug at any time.
IN USA/CANADA, USE ONLY ON 120 V SUPPLY.
Apple and Mac OS are trademarks of Apple Inc., registered in the
U.S. and other countries.
Microsoft and Windows are either registered trademarks or trademarks of Microsoft Corporation in the United States and/or other
countries.
Other company names and product names in this document are
the trademarks or registered trademarks of their respective owners.
3
IMPORTANT SAFETY INSTRUCTIONS (continued)
Model for USA
This device complies with part 15 of the FCC Rules. Operation
is subject to the following two conditions: (1) This device may
not cause harmful interference, and (2) this device must accept
any interference received, including interference that may cause
undesired operation.
This equipment has been tested and found to comply with the
limits for a Class B digital device, pursuant to Part 15 of the FCC
Rules. These limits are designed to provide reasonable protection against harmful interference in a residential installation. This
equipment generates, uses, and can radiate radio frequency
energy and, if not installed and used in accordance with the
instructions, may cause harmful interference to radio communications. However, there is no guarantee that interference will not
occur in a particular installation. If this equipment does cause
harmful interference to radio or television reception, which can
be determined by turning the equipment off and on, the user is
encouraged to try to correct the interference by one or more of
the following measures:
• R eorient or relocate the equipment and/or the receiving
antenna.
•Increase the separation between the equipment and receiver.
• Connect the equipment into an outlet on a circuit different
from that to which the receiver is connected.
• Consult the dealer or an experienced radio/TV technician for
help.
Declaration of Conformity
Responsible party: TEAC AMERICA, INC.
Address: 1834 Gage Road, Montebello, California,
U.S.A.
Telephone number : 1-323-726-0303
This device complies with Part 15 of the FCC Rules. Operation
is subject to the following two conditions: (1) this device may
not cause harmful interference, and (2) this device must accept
any interference received, including interference that may cause
undesired operation.
Model for Canada
Industry Canada’s Compliance Statement:
This Class B digital apparatus complies with Canadian ICES-003.
DECLARATION OF CONFORMITY
We, TEAC AUDIO EUROPE, Liegnitzer Straße 6, 82194
Gröbenzell, Germany declare in own responsibility,
the TEAC product described in this manual is in compliance with
the corresponding technical standards.
CAUTION
Changes or modifications to this equipment not expressly approved
by TEAC CORPORATION for compliance will void the user’s warranty.
4
For European Customers
Disposal of electrical and electronic equipment
(a)All electrical and electronic equipment should be disposed
of separately from the municipal waste stream via collection
facilities designated by the government or local authorities.
(b)By disposing of electrical and electronic equipment correctly,
you will help save valuable resources and prevent any potential negative effects on human health and the environment.
(c)Improper disposal of waste electrical and electronic equipment can have serious effects on the environment and
human health because of the presence of hazardous substances in the equipment.
(d)The Waste Electrical and Electronic Equipment
(WEEE) symbol, which shows a wheeled bin that has
been crossed out, indicates that electrical and electronic equipment must be collected and disposed of
separately from household waste.
(e)Return and collection systems are available to end users. For
more detailed information about the disposal of old electrical and electronic equipment, please contact your city office,
waste disposal service or the shop where you purchased the
equipment.
Disposal of batteries and/or accumulators
(a)Waste batteries and/or accumulators should be disposed of
separately from the municipal waste stream via collection
facilities designated by the government or local authorities.
(b)By disposing of waste batteries and/or accumulators correctly, you will help save valuable resources and prevent
any potential negative effects on human health and the
environment.
(c)Improper disposal of waste batteries and/or accumulators
can have serious effects on the environment and human
health because of the presence of hazardous substances in
them.
(d)The WEEE symbol, which shows a wheeled bin that
has been crossed out, indicates that batteries and/
or accumulators must be collected and disposed of
Pb, Hg, Cd
separately from household waste.
If a battery or accumulator contains more than the
specified values of lead (Pb), mercury (Hg), and/or cadmium
(Cd) as defined in the Battery Directive (2006/66/EC), then
the chemical symbols for those elements will be indicated
beneath the WEEE symbol.
(e)Return and collection systems are available to end users. For
more detailed information about the disposal of waste batteries and/or accumulators, please contact your city office, waste
disposal service or the shop where you purchased them.
Contents
Thank you for choosing TEAC. Read this manual carefully to get the best performance from this unit.
IMPORTANT SAFETY INSTRUCTIONS . . . . . . . . . . . . . . . . . . . 2
Before use. . . . . . . . . . . . . . . . . . . . . . . . . . . . . . . . . . . . . . . . . . . . . 5
Preparing the record player. . . . . . . . . . . . . . . . . . . . . . . . . . . . 7
Notes about record styluses . . . . . . . . . . . . . . . . . . . . . . . . . . . 9
Connections. . . . . . . . . . . . . . . . . . . . . . . . . . . . . . . . . . . . . . . . . 10
Names and functions of parts. . . . . . . . . . . . . . . . . . . . . . . . 11
Handling records. . . . . . . . . . . . . . . . . . . . . . . . . . . . . . . . . . . . 13
Changing the cartridge. . . . . . . . . . . . . . . . . . . . . . . . . . . . . . 14
Included items
Check to be sure the box includes all the supplied
accessories shown below. Please contact the store
where you purchased this unit if any of these accessories are missing or have been damaged during
transportation.
Rubber mat × 1
45 RPM adapter × 1
Counterweight × 1
ENGLISH
Turntable cover. . . . . . . . . . . . . . . . . . . . . . . . . . . . . . . . . . . . . . 12
Before use
Headshell × 1
AT95E MM cartridge (made by Audio-Technica)
preinstalled
Basic operation. . . . . . . . . . . . . . . . . . . . . . . . . . . . . . . . . . . . . . 15
Turntable × 1
Recording with a computer. . . . . . . . . . . . . . . . . . . . . . . . . . 17
Turntable cover × 1
Troubleshooting. . . . . . . . . . . . . . . . . . . . . . . . . . . . . . . . . . . . . 18
Rubber feet for turntable cover × 2
Specifications. . . . . . . . . . . . . . . . . . . . . . . . . . . . . . . . . . . . . . . . 19
Hinges × 2
Audio cable × 1
USB cable × 1
AC adapter (GPE053A-120050-Z) × 1
Owner’s manual (this document) × 1
oo Keep this manual in a safe place for future reference.
Warranty card × 1 (for customers in the USA and
Canada only)
oo See the back of this document for information
about the warranty in Europe and other countries
or areas.
5
Before use (continued)
Precautions for use
Maintenance
oo Do not place anything on the turntable cover. Objects
on the cover might cause noise due to vibrations or
fall off, especially during playback.
If the surface of the unit gets dirty, wipe it with a soft
cloth or use diluted mild liquid soap. Allow the surface
of the unit to dry completely before using.
oo Avoid placing the unit in direct sunlight, close to a
source of heat or in other similar conditions. Do not
place the unit on top of an amplifier or other equipment that might generate heat that exceeds the
operating temperature range of this unit. Doing so
could cause discoloration, deformation or malfunction.
oo Do not use chemical cleaning cloths, thinner or similar substances as they could damage the surface of
the unit.
oo As the unit could become warm during operation,
always leave sufficient space around it for ventilation.
When installing this unit, leave a little space (at least
20 cm (8”)) between it and other devices and walls to
allow good heat dissipation.
When placing it in a rack, for example, leave at least
35 cm (13 3/4”) open above it and 10 cm (4”) open
behind it. Failure to provide these gaps could cause
heat to build up inside and result in fire.
VV CAUTION
For safety, disconnect the power cord from the socket
before cleaning.
Product registration
Customers in the USA, please visit the following TEAC
website to register your TEAC product online.
http://audio.teac.com/support/registration/
oo DO NOT MOVE THE UNIT DURING PLAYBACK. During
playback, the record rotates. Do not lift or move the
unit during playback. Doing so may damage the
record, the stylus, the cartridge or the unit.
oo Always remove the record before relocating or moving this unit. Moving the unit with a record on the
turntable could damage the record, the stylus and
the cartridge or could cause a malfunction.
oo The voltage supplied to the unit should match the
voltage as printed on the rear panel. If you are in any
doubt regarding this matter, consult an electrician.
6
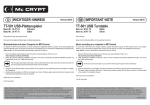
Preparing the record player
Keep the unit in standby while setting it up ( E on
pages 10 and 11).
1 Place it on a flat surface.
4 Place the rubber mat.
Place the protective rubber mat that is included
with the turntable on it before use.
Since the heights of this unit's feet cannot be
adjusted, be sure to place it on a flat surface.
2 Install the turntable.
Align the turntable with the center shaft and install
it.
Turntable
ENGLISH
Center shaft
Top
oo The rubber mat has a top and a bottom. As
shown in the illustration, the side with the ridged
concentric circles should be placed down.
5 Install the counterweight.
Place the counterweight over the end of the tone
arm and turn it clockwise to tighten it.
3 Loop the belt around the motor pulley.
Counterweight
Use a finger to pull the rubber belt that is wrapped
around the sub-platter through the round opening
and loop it around the motor pulley.
oo Be careful not to let the rubber become twisted.
oo Rotate the turntable several times to make sure
that it is secure.
6 Install the headshell.
Round opening
Motor pulley
Rubber belt
Insert the headshell on the end of the tone arm and
turn the nut to secure it in place.
Nut
Headshell
7
Preparing the record player (continued)
Balancing the tone arm and adjusting
the stylus pressure
5 Turn the counterweight and adjust so
that the tone arm is level.
I–
Cue lever
SKAT
I
G
0
T
N
AN
I
3
SKAT
G
0
I–
3
T
Stylus pressure adjustment ring
Center line
Anti-skating
N
AN
Counterweight
oo Remove the cartridge stylus protection cover
before making adjustments.
oo Be careful not to let the cartridge stylus touch
the unit.
1 Set the anti-skating dial to zero.
SKAT
I
G
I–
SKAT
I
G
AN
T
N
3 Lift the cue lever and shift the tone arm
to the left slightly.
0
Clasp
7 Turn the stylus pressure adjustment
ring so that the center line aligns with 0
on the scale.
3
3
I–
0
T
N
AN
2 Move the tone arm clasp to the right to
release the tone arm.
6 Return the tone arm to its original position, and move the tone arm clasp to
the left to lock it in place.
oo Be careful not to let the counterweight turn.
4 Lower the cue lever.
8
Notes about record styluses
8 Turn the counterweight so that the
stylus pressure adjustment ring scale
matches the stylus pressure specified
for the cartridge.
oo The stylus pressure of the included cartridge is
2.0 g.
So, turn it to 2 on the counterweight scale when
using the included cartridge.
oo Record styluses are precision parts, so handle them
carefully to avoid bending or damaging their tips. If
a stylus becomes bent or damaged, it might not be
able to follow the audio groove precisely and could
damage records or cause other malfunction.
oo If a stylus becomes dirty, use a commercially available stylus cleaner or similar product to clean it.
oo Do not rub the stylus tip forcefully with anything
hard. Do not wipe the stylus with thinner or other
chemicals. Doing so could harm it.
Replacing the stylus
I
3
0
SKAT
G
AN
ENGLISH
I–
N
T
9 Adjust the anti-skating dial.
Start with it set at 2 and adjust it during record playback (page 15) to the position where the left and
right volumes are balanced.
The included cartridge is an Audio-Technica AT95E.
Purchase a replacement stylus for the AT95E cartridge at the retailer where you purchased this unit, for
example.
Follow the replacement instructions in the manual of
the replacement stylus.
N
TI–SKA
T
ING
0
3
A
CAUTION
oo Since loud noises could suddenly occur, put the unit
into standby before changing the stylus.
oo Be careful not to hurt your hand or the equipment.
oo Be careful not to allow small children to accidentally
swallow styluses.
9
Connections
E
B C
When PHONO EQ is ON
Connect to audio input jacks of
amplifier, etc.
When PHONO EQ is THRU
Connect to PHONO inputs of
amplifier, etc.
D
A
Included AC adapter
(GPE053A-120050-Z)
Amplifier
L
VV Precautions when making connections
oo Do not plug the unit in until after making all
connections.
oo Carefully read the manuals of the devices that you
are connecting and follow their instructions when
making connections.
R
A Analog audio output jacks (L/R)
B PHONO EQ (audio output setting) switch
These output analog audio signals.
The PHONO EQ switch setting changes the type of
output signal.
Use the included audio cable (or commerciallyavailable ones) to connect other equipment to the
output jacks of this unit.
White (L)
Red (R)
ON
Signals that have been amplified by the built-in
equalizer amp are output from the analog audio
output jacks (L/R).
THRU
The MM cartridge signal is output directly through
the analog audio output jacks (L/R).
Use this when connecting to equipment that has
PHONO inputs.
White (L)
Red (R)
oo When shipped new from the factory, this is set to
ON.
CAUTION
When set to ON, if connected to the PHONO inputs
of an amplifier, for example, the output from speakers and headphones will be very loud, which could
damage equipment or harm hearing.
10
Names and functions of parts
a
b
C USB port (USB B type)
Connect this to the USB port of a computer to convert the audio signal from this unit to digital and
output it to the computer (page 17).
I
G
0
SKAT
3
I–
N
AN
c
T
D DC input connector
i
j
oo Unplug the power cord from the outlet when
you are not planning to use the unit for an
extended period of time.
oo Do not use any AC adapter other than the one
included (GPE053A-120050-Z).
VV Be sure to connect the power cord to an AC
outlet that supplies the correct voltage.
Connection to an outlet that supplies incorrect voltage could cause fire or electric shock.
Hold the power plug when plugging it into an
outlet or unplugging it. Never pull or yank on
the power cord.
Unplug the power cord from the outlet when
you are not planning to use the unit for an
extended period of time.
aTurntable
Place records centered on the turntable.
bCounterweight
c Stylus pressure adjustment ring
d Anti-skating dial
e Cue lever
Use this lever to lift the tone arm and to lower it to
the record.
f Tone arm holder
E STANDBY/ON button
Press the STANDBY/ON button to turn the unit on
or put it in standby.
This is a rest for the tone arm. Gently push the clasp
to the right to release the tone arm before playing a
record.
g Tone arm
h Rotation speed setting knob
Set the rotation speed (RPM) suitable for the record.
i START/STOP turntable rotation knob
jHeadshell
11
ENGLISH
After completing all other connections, connect the
included AC adapter (GPE053A-120050-Z) to this
jack.
Confirm that the power plug of the AC adapter is
plugged into a power outlet.
d
e
f
g
h
Turntable cover
Attaching the rubber feet
Opening and closing the turntable
cover
Rubber feet attachment points
Open
Rubber foot
As shown in the illustration, attach rubber feet to the
left and right sides of the turntable cover.
Opening
Attaching the turntable cover
Hold the front edge of the turntable cover and gently
lift it open completely until it stops.
The turntable cover will stay open in this position.
Turntable cover
Closing
Main unit
Hinge
1 Insert the hinges completely into the
hinge holders at the left and right ends
of the back of the main unit.
2 Align the tops of the hinges with the
turntable cover hinge holders and
insert them.
Removing the turntable cover
Hold both edges of the turntable cover and lift it slowly
to remove it along with the hinges from the unit. Then,
remove the hinges from the turntable cover.
12
Gently lower the turntable cover until it is closed.
VV Be careful not to pinch your hand, for example, when opening and closing the turntable
cover.
Handling records
Holding records
Precautions
When holding a record or removing it from its sleeve,
avoid touching the grooves by holding the record by
its label and edge with one hand or by holding it by its
edge with both hands.
Label
Grooves
Cleaning
oo Fingerprints and dust on a record can cause noise
and the sound to skip, as well as damage the record
itself and the stylus. Use a commercially available
record cleaner to clean records. Do not use thinner or
anything other than a record cleaner. Such chemicals
could harm the surface of the record.
oo When using a record cleaner, wipe the surface of the
record in a circular motion, following the grooves.
13
ENGLISH
Outer edge
oo Do not leave records in places that are exposed to
direct sunlight or are very hot or very humid. Leaving
a record in such a condition for a long time could
result in warping or other damage.
oo Do not stack multiple records or place heavy objects
on top of them. Do not leave records at an angle for
long amounts of time either. Doing so could result in
warping or other damage.
oo Do not allow hard objects to directly touch the audio
grooves. Doing so could cause scratches.
oo After you finish playing a record, always put it back
into its sleeve for storage. Leaving a record unprotected could result in warping or scratching.
oo Do not use cracked records.
Changing the cartridge
To change the cartridge, first remove the headshell from
the tone arm.
oo We recommend that you keep the cartridge needle
protective cap on while changing the cartridge.
Headshell
Screws
Nuts
Shell leads
Cartridge
1 Disconnect the shell lead terminals
from the cartridge.
2 Loosen the screws and remove the
cartridge.
3 Attach the new cartridge and tighten
the screws.
See the illustration below for the position of the
screws when attached.
2.0 ± 0.5 mm
14
4 Connect the shell lead terminals to the
cartridge.
oo The signals and colors of the shell leads are
shown below.
Signal
Left channel +
Left channel −
Right channel +
Right channel −
Color
White
Blue
Red
Green
5 Balance the tone arm and adjust the
stylus pressure.
Follow the procedures in “Balancing the tone arm
and adjusting the stylus pressure” on page 8.
Basic operation
Playing records
1 Press the STANDBY/ON button on the
back of the unit to turn it on.
4 Set according to the rotation speed
(RPM) of the record.
The rotation speed can be set to 33 1/3 or 45 RPM.
2 Open the turntable cover slowly.
oo When the START/STOP rotation knob is set to
START, the turntable will start rotating and the
blue LED will light.
VV B
e careful not to pinch your hand, for example, when opening and closing the turntable
cover.
6 Move the tone arm clasp to the right to
release the tone arm.
SKAT
I
G
0
I–
3
T
N
When playing a 45 RPM large-hole single record,
use the included adapter.
AN
3 Place a record on the turntable.
Clasp
Continued on the next page e
15
ENGLISH
5 Turn the START/STOP rotation knob to
START to start the turntable.
Basic operation (continued)
SKAT
1 Slightly lift the cue lever or the headshell hook and return the tone arm to
its resting position.
I
G
0
I–
3
T
When playback finishes
N
AN
7 Lift the cue lever.
8 Move the tone arm to the edge of the
record or the track where you want to
start playback.
0
SKAT
I
3
I–
G
oo You can also leave the cue lever down and move
the raised tone arm over the record and then
lower the tone arm slowly to start playback.
T
N
Tone arm
AN
Cue lever
Cue lever
Tone arm
2 Turn the START/STOP rotation knob to
STOP to stop the turntable.
9 Lower the cue lever.
Lower the tone arm slowly until the stylus touches
the record and playback begins.
oo We recommend that you close the turntable
cover during record playback to avoid dust.
VV Do not place anything on the turntable cover.
Objects on the cover might cause noise due
to vibrations or fall off, especially during
playback.
CAUTION
oo During playback, do not touch the tone arm or the
rotating record.
oo Do not stop turntable rotation during playback.
During record playback, feedback could occur if
the volume is too loud. If this happens, lower the
volume of the amplifier.
16
oo When the turntable stops, the blue LED will also
become unlit.
Recording with a computer
Connect this record player to a computer using the
included USB cable to convert audio signals from a
record to digital data and send them to the computer.
Supported operating systems
Computers running the following operating systems
can be connected by USB to this unit.
Mac OS X
OS X Lion 10.7
OS X Mountain Lion 10.8
OS X Mavericks 10.9
(as of September 2014)
Use with operating systems other than these is not
guaranteed.
oo This unit will run with the standard OS driver, so there
is no need to install a special driver.
Connecting with a computer
1 Turn the computer on.
Confirm that the operating system is working
correctly.
2 Use the USB cable to connect the computer and this unit.
When they are connected, the computer will automatically detect this unit’s USB port and identify it
as “USB Audio CODEC”.
oo To record audio from this record player using a computer, you must first install software that can be
used for audio recording on the computer. You may
purchase the audio recording software that you
prefer separately or download free software, such as
Audacity (http:// audacity.sourceforge.net/), from the
Internet. As free software, Audacity is not supported
by TEAC.
oo When connected to a computer by USB and recording audio, do not do any of the following. Doing so
could cause the computer to malfunction. Always
quit the computer recording software before doing
the following.
u Disconnect the USB cable
u Put the unit into standby
Computer settings
The following example explains the settings to make
using Windows 7.
1 From the Start menu, select Control
Panel.
2 Click “Sound”.
3 Click the “Recording” tab, and confirm
that “USB Audio CODEC” is set as the
“Default Device”.
4 Select “Microphone USB Audio CODEC”,
and click the Properties button.
5 Click the “Advanced” tab.
6 From the “Default Format” pull-down
menu, select “2 channel, 16 bit, 48000 Hz
(DVD quality)”.
7 Click “OK”.
17
ENGLISH
Windows OS
Windows 7 (32-bit, 64-bit)
Windows 8 (32-bit, 64-bit)
Windows 8.1 (32-bit, 64-bit)
(as of September 2014)
3 Press this unit’s STANDBY/ON button to
turn it on.
Troubleshooting
If you experience a problem with this unit, please check
the following items before requesting service. Something
other than this unit could also be the cause of the problem. Please also check that the connected devices are also
being used properly.
If it still does not operate correctly, contact the retailer
where you purchased the unit.
No power.
ee Confirm that the AC adapter is plugged into an outlet. Then, press the STANDBY/ON button to turn the
unit on (page 10).
There is no sound.
ee When connecting this unit's analog audio output
jacks to the audio input jacks of an amplifier or other
equipment, set the PHONO EQ (audio output setting) switch to ON (page 10).
Playback is not possible; there is noise.
ee Confirm that the stylus cover (made of white plastic) has been removed.
ee Clean the stylus (page 9).
ee If the stylus is worn-out, replace it (page 9).
ee Place the unit as far away as possible from TVs,
microwave ovens and other devices that emit electromagnetic waves.
18
The pitch is wrong.
ee Set the rotation speed (RPM) to match the record
(page 15).
The sound is skipping.
ee Vibrations will cause skipping. Place this unit in a
stable location.
ee If the record is dirty, wipe it clean.
ee Do not use scratched records.
ee Balance the tone arm and readjust the stylus pressure (page 8).
If the stylus pressure is lower than the value designated by the cartridge, skipping is more likely to
occur.
Specifications
Turntable
General
Drive system. . . . . . . . . . . . . . . . . . . . . . . . . . . . . . . . . . . Belt drive
Motor. . . . . . . . . . . . . . . . . . . . . . . . . . . . . . . . . . . . . . . . DC motor
Rotation speed. . . . . . . . . . . . . . . . . . . . . . 33 1/3 rpm, 45 rpm
Rotation speed variation. . . . . . . . . . . . . . . . . . . . . . . . . . . . ±2%
Wow and flutter. . . . . . . . . . . . . . . . . . . . . . . . . . . . . . . . . . . 0.2%
SN ratio. . . . . . . . 67 dB or higher (A-weighted, 20 kHz LPF)
Turntable. . . . . . . . . . . . . . . . . . . . . . . . . . . . Aluminum die-cast
30cm (12”) diameter
AC adapter power
Input . . . . . . . . . . . . . . . . . . . AC 100 V–AC 240 V, 50-60 Hz
Output. . . . . . . . . . . . . . . . . . . . . . . . . . . . . . . . . 12 V, 500 mA
Power consumption
Standby. . . . . . . . . . . . . . . . . . . . . . . . . . . . . . . . . 0.5 W or less
On (START). . . . . . . . . . . . . . . . . . . . . . . . . . . . . . 1.5 W or less
Weight. . . . . . . . . . . . . . . . . . . . . . . . . . . . . . . . 4.9 kg (10 7/8 lb)
Operating temperature range . . . . . . . . . . . . . . . 5°C to 35°C
Dimensions (W × H × D) (including protrusions)
420 × 356 × 117 mm (16 5/8” × 14 1/8” × 4 5/8”)
Tone arm
Cartridge
Type. . . . . . . . . . . . . . . . . . . . . . . . . . . . . . . . . . . . . . . . . . . . . . . . MM
Output voltage. . . . . . . . . . . . . . . . . . . . . . . . . . . 2.5 mV ±3 dB
Stylus pressure . . . . . . . . . . . . . . . . . . . . . . . . . . . . . . . 2.0 ±0.5 g
Cartridge weight . . . . . . . . . . . . . . . . . . . . . . . . . . . . . 5.7 ±0.5 g
Included headshell weight. . . . . . . . . . . . . . . . . . . . . . . . . . 10 g
(including screws, nuts and wires)
Output voltage
PHONO EQ THRU. . . . . . . . . . . . . . . . . . . . . . . . . 2.5 mV ±3 dB
PHONO EQ ON. . . . . . . . . . . . . . . . . . . . . . 155 mV (−16 dBV)
Output jacks. . . . . . . . . . . . . . . . . . . . . . . . . . . . . . . . . . . . . . . RCA
USB port
USB port that can receive power from computer USB
buses (Full Speed). . . . . . . . . . . . . . . . USB connector type B
USB bus power support . . . . . . . . . . . . . . . . . . . . 5 V, 500 mA
oo Use the included USB cable to connect the unit to a
computer to receive power from it.
ENGLISH
Arm type
Static-balanced straight-pipe tone arm
Effective arm length. . . . . . . . . . . . . . . . . . . . . . . . . . . 223 mm
Stylus pressure variation range. . . . . . . . . . . . . . . . . . . . 0–5 g
Acceptable cartridge weight. . . . . . . . . . . . . . . . . . . 3.5–6.5 g
oo Performance data is specified at 20°C.
Included accessories
Rubber mat × 1
45 RPM adapter × 1
Counterweight × 1
Headshell × 1
AT95E MM cartridge (made by Audio-Technica)
preinstalled
Turntable × 1
Turntable cover × 1
Rubber feet for turntable cover × 2
Hinges × 2
Audio cable × 1
USB cable × 1
AC adapter (GPE053A-120050-Z)× 1
Owner’s manual (this document) × 1
Warranty card × 1 (for customers in the USA and
Canada only)
oo Specifications and appearance are subject to change
without notice.
oo Weight and dimensions are approximate.
oo Illustrations in this owner's manual might differ
slightly from production models.
19
INSTRUCTIONS DE SÉCURITÉ IMPORTANTES
oo N'exposez pas cet appareil aux gouttes ni aux éclaboussures.
oo Ne placez pas d'objet rempli de liquide sur l'appareil, comme par
exemple un vase.
oo N’installez pas cet appareil dans un espace confiné comme une
bibliothèque ou un meuble similaire.
oo L’appareil tire un courant nominal de veille de la prise secteur
quand son interrupteur POWER ou STANDBY/ON n’est pas en
position ON.
oo L’appareil doit être placé suffisamment près de la prise de courant
pour que vous puissiez à tout moment atteindre facilement la
fiche du cordon d’alimentation.
oo La fiche secteur est utilisée comme dispositif de déconnexion et
doit donc toujours rester disponible.
oo Des précautions doivent être prises pour l'emploi d'écouteurs ou
d'un casque avec le produit car une pression acoustique (volume)
excessive dans les écouteurs ou dans le casque peut provoquer
une perte d’audition.
Pour les consommateurs européens
Mise au rebut des équipements électriques et électroniques
(a)Tout équipement électrique et électronique doit être traité
séparément de la collecte municipale d'ordures ménagères
dans des points de collecte désignés par le gouvernement ou
les autorités locales.
(b)En vous débarrassant correctement des équipements électriques et électroniques, vous contribuerez à la sauvegarde de
précieuses ressources et à la prévention de potentiels effets
négatifs sur la santé humaine et l'environnement.
(c)Le traitement incorrect des déchets d'équipements électriques et électroniques peut avoir des effets graves sur
l'environnement et la santé humaine en raison de la présence
de substances dangereuses dans les équipements.
(d)Le symbole de déchets d'équipements électriques
et électroniques (DEEE), qui représente une poubelle à roulettes barrée d'une croix, indique que les
équipements électriques et électroniques doivent
être collectés et traités séparément des déchets
ménagers.
(e)Des systèmes de retour et de collecte sont disponibles pour
l'utilisateur final. Pour des informations plus détaillées sur la
mise au rebut des vieux équipements électriques et électroniques, veuillez contacter votre mairie, le service d'ordures
ménagères ou le magasin dans lequel vous avez acquis
l'équipement.
Mise au rebut des piles et/ou accumulateurs
(a)Les piles et/ou accumulateurs hors d'usage doivent être
traités séparément de la collecte municipale d'ordures
ménagères dans des points de collecte désignés par le gouvernement ou les autorités locales.
Modèle pour le Canada
Cet appareil numérique de la classe B est conforme à la norme
NMB-003 du Canada.
DÉCLARATION DE CONFORMITÉ
Nous, TEAC AUDIO EUROPE, Liegnitzer Straße 6,
82194 Gröbenzell, Allemagne, déclarons sous
notre propre responsabilité que le produit TEAC décrit dans
ce mode d'emploi est conforme aux normes techniques lui
correspondant.
ATTENTION
Les changements ou modifications apportés à cet équipement et
dont la conformité n’est pas expressément approuvée par TEAC
CORPORATION invalideront la garantie de l’utilisateur.
20
(b)En vous débarrassant correctement des piles et/ou accumulateurs hors d'usage, vous contribuerez à la sauvegarde de
précieuses ressources et à la prévention de potentiels effets
négatifs sur la santé humaine et l'environnement.
(c)Le traitement incorrect des piles et/ou accumulateurs hors
d'usage peut avoir des effets graves sur l'environnement et la
santé humaine car ils contiennent des substances
dangereuses.
(d)Le symbole de déchets d'équipements électriques
et électroniques (DEEE), qui représente une poubelle
à roulettes barrée d'une croix, indique que les piles
Pb, Hg, Cd
et/ou accumulateurs doivent être collectés et traités
séparément des déchets ménagers.
Si une pile ou un accumulateur contient plus que les valeurs
spécifiées de plomb (Pb), mercure (Hg) et/ou cadmium (Cd)
telles que définies dans la directive sur les batteries (2006/66/
EC), alors les symboles chimiques de ces éléments seront
indiqués sous le symbole DEEE.
(e)Des systèmes de retour et de collecte sont disponibles pour
l'utilisateur final. Pour des informations plus détaillées sur la
mise au rebut des piles et/ou accumulateurs, veuillez contacter votre mairie, le service d'ordures ménagères ou le magasin
dans lequel vous les avez achetés.
Sommaire
Nous vous remercions d’avoir choisi TEAC. Lisez ce
mode d'emploi avec attention pour tirer les meilleures
performances de cette unité.
INSTRUCTIONS DE SÉCURITÉ IMPORTANTES. . . . . . . . . . 20
Avant l’utilisation. . . . . . . . . . . . . . . . . . . . . . . . . . . . . . . . . . . . 21
Préparation de la platine. . . . . . . . . . . . . . . . . . . . . . . . . . . . . 23
Notes sur les pointes pour disque. . . . . . . . . . . . . . . . . . . . 25
Branchements. . . . . . . . . . . . . . . . . . . . . . . . . . . . . . . . . . . . . . . 26
Nomenclature et fonctions des parties. . . . . . . . . . . . . . . 27
Couvercle de la platine . . . . . . . . . . . . . . . . . . . . . . . . . . . . . . 28
Manipulation des disques. . . . . . . . . . . . . . . . . . . . . . . . . . . . 29
Changement de cellule. . . . . . . . . . . . . . . . . . . . . . . . . . . . . . 30
Avant l’utilisation
Éléments fournis
Vérifiez que vous disposez bien de tous les accessoires
représentés ci-dessous. Veuillez contacter le magasin
dans lequel vous avez acheté cette unité si l'un de ces
accessoires manque ou a été endommagé durant le
transport.
Tapis en caoutchouc × 1
Adaptateur 45 tr/min × 1
Contrepoids × 1
Porte-cellule × 1
Cellule à aimant mobile AT95E (fabriquée par
Audio-Technica) déjà montée
Plateau × 1
Enregistrement avec un ordinateur. . . . . . . . . . . . . . . . . . 33
Couvercle de la platine × 1
Guide de dépannage. . . . . . . . . . . . . . . . . . . . . . . . . . . . . . . . 34
Patins en caoutchouc pour couvercle de platine × 2
Caractéristiques techniques. . . . . . . . . . . . . . . . . . . . . . . . . . 35
Charnières × 2
FRANÇAIS
Fonctionnement de base. . . . . . . . . . . . . . . . . . . . . . . . . . . . 31
Câble audio × 1
Câble USB × 1
Adaptateur secteur (GPE053A-120050-Z) × 1
Mode d'emploi (ce document) × 1
oo Conservez ce mode d'emploi dans un endroit sûr
pour vous y référer ultérieurement.
Garantie × 1 (pour les consommateurs aux USA et au
Canada uniquement)
oo Voir au dos de ce document les informations
concernant la garantie en Europe et dans d'autres
pays ou régions.
21
Avant l’utilisation (suite)
Précautions d'emploi
Entretien
oo Ne placez rien sur le couvercle de la platine. Les
objets posés sur le couvercle peuvent provoquer du
bruit dû aux vibrations ou tomber, en particulier lors
de la lecture.
Si la surface de l'unité est sale, essuyez-la avec un chiffon doux ou utilisez un détergent liquide léger dilué.
Laissez la surface de l'unité sécher complètement avant
utilisation.
oo Évitez d'exposer l'unité directement au soleil, de la
placer près d'une source de chaleur ou dans d'autres
conditions similaires. N’installez pas l’appareil au-dessus d’un amplificateur ou d'un équipement pouvant
dégager une chaleur qui dépasse la température de
fonctionnement de cette unité. Cela pourrait causer
une décoloration, une déformation ou un mauvais
fonctionnement.
oo N’utilisez pas de lingettes de nettoyage imbibées
de produits chimiques, de diluant ou de substances
similaires car cela pourrait endommager la surface de
l’unité.
oo Il est possible que l’unité chauffe durant l’utilisation,
laissez donc toujours un espace suffisant autour
d'elle pour sa ventilation. Quand vous installez cette
unité, laissez un peu d'espace (au moins 20 cm) entre
elle et les murs et d'autres appareils afin de permettre une bonne dissipation thermique.
Si vous la placez par exemple dans un rack, laissez au
moins 35 cm de libre au-dessus de l'unité et 10 cm
derrière elle. Sans ces espaces, la température peut
monter, risquant d'entraîner un incendie.
oo NE DÉPLACEZ PAS L'UNITÉ DURANT LA LECTURE.
Durant la lecture, le disque tourne. Ne soulevez et ne
déplacez pas l'unité durant la lecture. Vous risqueriez
d'endommager le disque, la pointe, la cellule ou
l'unité.
oo Retirez toujours le disque avant de déplacer ou de
transporter cette unité. Transporter cette unité avec
un disque sur la platine pourrait endommager le
disque, la pointe, la cellule ou provoquer un dysfonctionnement.
oo La tension d’alimentation doit correspondre à la tension imprimée sur le panneau arrière. Si vous avez
des doutes à ce sujet, consultez un électricien.
22
VV ATTENTION
Par sécurité, débranchez le cordon d'alimentation de la
prise secteur avant tout nettoyage.
Enregistrement du produit
Si vous êtes client aux USA, veuillez enregistrer votre
produit sur le site web TEAC suivant :
http://audio.teac.com/support/registration/
Préparation de la platine
Maintenez l'unité en veille pendant son installation
( E en pages 26 et 27).
1 Placez-la sur une surface plane.
4 Placez le tapis en caoutchouc.
Placez le tapis de protection fourni sur le plateau
avant utilisation.
Comme la hauteur des pieds de cette unité ne peut
pas être réglée, veillez bien à la placer sur une surface plane.
2 Installez le plateau.
Alignez le plateau avec l'axe central et installez-le.
Axe central
Plateau
Dessus
5 Installez le contrepoids.
3 Enroulez la courroie autour de la poulie
du moteur.
Placez le contrepoids à l'extrémité du bras de lecture et tournez-le dans le sens horaire pour le visser.
Contrepoids
En passant par l'ouverture ronde, utilisez un doigt
pour tirer sur la courroie en caoutchouc enroulée
autour du sous-plateau et la faire passer autour de
la poulie du moteur.
oo Faites bien attention à ne pas tordre le caoutchouc.
oo Faites tourner plusieurs fois le plateau pour vous
assurer que le montage est sûr.
6 Installez le porte-cellule.
Insérez le porte-cellule à l'autre extrémité du bras
de lecture et tournez l'écrou pour le fixer en place.
Ouverture ronde
Poulie de moteur
Courroie en
caoutchouc
Écrou
Porte-cellule
23
FRANÇAIS
oo Le tapis en caoutchouc a un dessus et un dessous. Comme représenté dans l'illustration, le
côté avec les nervures circulaires concentriques
doit être tourné vers le bas.
Préparation de la platine (suite)
Équilibrage du bras de lecture et
réglage de la pression de la pointe
5 Tournez le contrepoids jusqu'à ce que
le bras de lecture soit à l'horizontale.
I–
Lève-bras
SKAT
I
G
0
T
N
AN
I
3
SKAT
G
0
I–
3
T
Bague de réglage de pression de pointe
Ligne centrale
Antipatinage
N
AN
Contrepoids
oo Retirez le cache de protection de la pointe de la
cellule avant de faire les réglages.
oo Veillez bien à ne pas laisser la pointe de la cellule
toucher l'unité.
1 Réglez la molette d'antipatinage sur
zéro.
SKAT
I
G
I–
SKAT
I
G
AN
T
N
3 Soulevez le lève-bras et poussez le bras
de lecture légèrement vers la gauche.
0
Crochet de blocage
7 Tournez la bague de réglage de pression
de la pointe pour que la ligne centrale
s'aligne avec le 0 sur la graduation.
3
3
I–
0
T
N
AN
2 Repoussez le crochet de blocage vers la
droite pour libérer le bras de lecture.
6 Ramenez le bras de lecture à sa position d'origine et rabattez le crochet de
blocage sur la gauche pour verrouiller
le bras.
oo Veillez à ne pas faire tourner le contrepoids.
4 Baissez le lève-bras.
24
Notes sur les pointes pour disque
8 Tournez le contrepoids afin que la graduation de la bague de réglage de
pression de la pointe corresponde à la
valeur de pression de pointe spécifiée
pour la cellule.
I
G
0
SKAT
3
I–
Remplacement de la pointe
9 Réglez la molette d'antipatinage.
N
ATTENTION
TI–SKA
T
ING
0
3
A
Commencez en la réglant à 2 et ajustez-la durant la
lecture d'un disque (page 31) sur la position qui
donne un bon équilibre entre les volumes gauche et
droit.
La cellule fournie est une AT95E Audio-Technica.
Achetez une pointe de rechange pour la cellule AT95E
par exemple chez le revendeur auprès duquel vous
avez acquis cette unité.
Suivez les instructions de remplacement dans le
manuel de la pointe de rechange.
oo Comme de forts bruits pourraient soudainement se
produire, mettez l'unité en veille avant de changer la
pointe.
oo Faites attention de ne pas abîmer vos mains ou
l'équipement.
oo Veillez à ne pas permettre à de petits enfants d'avaler
accidentellement les pointes.
25
FRANÇAIS
T
N
AN
oo La pression de pointe pour la cellule fournie est
de 2,0 g.
Donc, tournez le contrepoids jusqu'à la graduation 2 si vous utilisez la cellule fournie.
oo Les pointes pour disque sont des pièces de précision
à manipuler avec précaution pour éviter de tordre
ou d'endommager leur extrémité. Si une pointe est
tordue ou endommagée, elle pourrait ne plus être
en mesure de suivre précisément le sillon audio et
pourrait endommager les disques ou causer d'autres
dysfonctionnements.
oo Si une pointe est sale, utilisez un nettoyant pour
pointe du commerce ou un produit similaire pour la
nettoyer.
oo Ne frottez pas fort sur la pointe avec un objet dur.
N'essuyez pas la pointe avec un diluant ou d'autres
produits chimiques. Cela pourrait l'endommager.
Branchements
E
B C
Quand PHONO EQ est sur ON
Branchez les prises d'entrée audio
de l'amplificateur, etc.
Quand PHONO EQ est sur THRU
Branchez les entrées PHONO d'un
amplificateur, etc.
Amplificateur
D
A
Adaptateur secteur fourni
(GPE053A-120050-Z)
L
VV Précautions lors des branchements
oo Ne mettez l'unité sous tension qu'une fois tous les
branchements effectués.
oo Lisez attentivement les modes d'emploi des appareils que vous branchez et suivez leurs instructions
quand vous faites les branchements.
R
A Prises de sortie audio analogique (L/R)
B Sélecteur PHONO EQ (réglage de sortie
audio)
Ces prises produisent les signaux audio analogiques.
Le réglage du sélecteur PHONO EQ change le type
de signal produit.
Utilisez le câble audio fourni (ou un modèle du commerce) pour raccorder d'autres appareils aux prises
de sortie de cette unité.
Blanc (L)
Rouge (R)
ON
Les signaux ayant été amplifiés par l'ampli égaliseur
intégré sont produits par les prises de sortie audio
analogique (L/R).
THRU
Le signal de la cellule à aimant mobile est directement produit par les prises de sortie audio
analogique (L/R).
Utilisez cette option pour le branchement d'un équipement ayant des entrées PHONO.
Blanc (L)
Rouge (R)
oo À la sortie d'usine, ce sélecteur est réglé sur ON.
ATTENTION
Avec un réglage sur ON, si le branchement est fait
aux entrées PHONO d'un amplificateur, par exemple,
le son produit par les enceintes et le casque sera
très fort, ce qui peut endommager l'équipement ou
l'audition.
26
Nomenclature et fonctions des parties
a
b
C Port USB (USB type B)
Branchez-le au port USB d'un ordinateur pour
convertir le signal audio de cette unité en numérique et l'envoyer à l'ordinateur (page 33).
I
G
0
SKAT
3
I–
N
AN
c
T
D Connecteur d'entrée CC
Après avoir fait tous les autres branchements,
branchez à cette prise l'adaptateur secteur fourni
(GPE053A-120050-Z).
Vérifiez que le bloc d'alimentation de l'adaptateur
secteur est branché dans une prise secteur.
d
e
f
g
h
i
j
oo Débranchez le cordon d’alimentation de la prise
secteur si vous avez l’intention de laisser l’appareil inutilisé de façon prolongée.
FRANÇAIS
oo N’utilisez aucun adaptateur secteur autre que
celui fourni (GPE053A-120050-Z).
VV Veillez à brancher le cordon d'alimentation
dans une prise secteur fournissant la tension correcte. Le branchement à une prise
fournissant une tension incorrecte pourrait
entraîner un incendie ou une électrocution.
Tenez le cordon d'alimentation par sa fiche
quand vous le branchez ou le débranchez.
Ne tirez jamais sur le cordon lui-même.
Débranchez le cordon d’alimentation de la
prise secteur si vous avez l’intention de laisser
l’appareil inutilisé de façon prolongée.
a Plateau tourne-disque
Placez les disques au centre du plateau.
bContrepoids
c Bague de réglage de pression de pointe
d Molette d’antipatinage
eLève-bras
Utilisez ce levier pour soulever le bras de lecture et
l'abaisser sur le disque.
f Support de bras de lecture
E Touche STANDBY/ON
Appuyez sur la touche STANDBY/ON pour allumer
l'unité ou la mettre en veille (standby).
C'est un support pour poser le bras de lecture.
Poussez délicatement le loquet vers la droite pour
libérer le bras de lecture avant de lire un disque.
g Bras de lecture
hBouton de réglage de vitesse de
rotation
Règle la vitesse de rotation (tr/min) adaptée au
disque.
i Bouton START/STOP de rotation du
plateau
jPorte-cellule
27
Couvercle de la platine
Montage des patins en caoutchouc
Ouverture et fermeture du couvercle de
la platine
Points de fixation des patins en caoutchouc
Ouvrir
Patin en caoutchouc
Comme représenté dans l’illustration, montez les patins
en caoutchouc sur les côtés gauche et droit du couvercle de la platine.
Ouverture
Fixation du couvercle de la platine
Couvercle de la
platine
Tenez le bord avant du couvercle de la platine et soulevez-le délicatement pour l'ouvrir complètement jusqu'à
ce qu'il s'arrête.
Le couvercle de la platine restera ouvert dans cette
position.
Fermeture
Unité
principale
Charnière
1 Insérez les charnières à fond dans
les porte-charnières aux extrémités
gauche et droite de l'arrière de l'unité
principale.
2 Alignez le haut des charnières avec les
porte-charnières du couvercle de la
platine et insérez-les.
Dépose du couvercle de la platine
Maintenez les deux bords du couvercle de la platine
et soulevez-le lentement pour l'extraire, avec les charnières, de l'unité. Ensuite, retirez les charnières du
couvercle de la platine.
28
Abaissez doucement le couvercle de la platine jusqu'à
ce qu'il soit fermé.
VV Veillez à ne pas vous pincer les doigts, par
exemple lors de l'ouverture et de la fermeture
du couvercle de la platine.
Manipulation des disques
Tenue des disques
Précautions
Lors de la prise en mains d'un disque ou sa sortie de la
pochette, évitez de toucher le sillon en maintenant le
disque d'une main entre son étiquette et son bord, ou
en le tenant avec les deux mains par son bord.
Étiquette
Sillon
Bord extérieur
oo Les traces de doigts et la poussière sur un disque
peuvent provoquer du bruit et des sauts de son, ainsi
qu'endommager le disque lui-même et la pointe.
Utilisez un nettoyant pour disque du commerce pour
nettoyer les disques. N'utilisez pas de diluant ni autre
chose qu'un nettoyant pour disque. De tels produits
chimiques pourraient abîmer la surface du disque.
oo Lors de l'utilisation d'un nettoyant pour disque,
balayez la surface du disque de façon circulaire, en
suivant le sillon.
29
FRANÇAIS
Nettoyage
oo Ne laissez pas les disques dans des lieux exposés
directement à la lumière du soleil ou qui sont très
humides ou très chauds. Laisser longtemps un
disque dans de telles conditions peut le faire gondoler ou lui causer d'autres dommages.
oo N'empilez pas plusieurs disques et ne placez pas
d'objets lourds dessus. Ne laissez pas non plus
les disques de façon prolongée en position inclinée. Cela pourrait les faire gondoler ou leur causer
d'autres dommages.
oo Ne laissez pas des objets durs entrer en contact
direct avec le sillon audio. Cela pourrait entraîner des
rayures.
oo Une fois que vous avez fini de lire un disque, replacez-le toujours dans sa pochette pour le rangement.
Laisser un disque sans protection pourrait le faire
gondoler ou le rayer.
oo N'employez pas de disques fendus.
Changement de cellule
Pour changer la cellule, commencez par détacher le
porte-cellule du bras de lecture.
oo Nous vous recommandons de conserver le capuchon de protection de la pointe de cellule en place
lors du remplacement de la cellule.
Porte-cellule
Vis
Écrous
Fils de porte-cellule
Cellule
1 Déconnectez de la cellule les fils du
porte-cellule.
2 Desserrez les vis et retirez la cellule.
3 Montez la nouvelle cellule et serrez les
vis.
Voir l'illustration ci-dessous pour la position des vis
après montage.
2,0 ± 0,5 mm
30
4 Raccordez les fils du porte-cellule à la
cellule.
oo Les signaux et les couleurs des fils du porte-cellule sont représentés ci-dessous.
Signal
Canal gauche +
Canal gauche −
Canal droit +
Canal droit −
Couleur
Blanc
Bleu
Rouge
Vert
5 Équilibrez le bras de lecture et réglez la
pression de la pointe.
Suivez les procédures décrites dans « Équilibrage
du bras de lecture et réglage de la pression de la
pointe » en page 24.
Fonctionnement de base
Lecture des disques
1 Appuyez sur la touche STANDBY/ON à
l'arrière de l'unité pour la mettre sous
tension.
La vitesse de rotation peut être réglée sur 33 1/3 ou
45 tr/min.
5 Tournez le bouton START/STOP en
position START pour faire démarrer le
plateau.
FRANÇAIS
2 Ouvrez lentement le couvercle de la
platine.
4 Réglez la vitesse de rotation (tr/min) en
fonction du disque.
oo Quand le bouton START/STOP est réglé sur START,
le plateau commence à tourner et la LED bleue
s'allume.
VV V
eillez à ne pas vous pincer les doigts, par
exemple lors de l'ouverture et de la fermeture
du couvercle de la platine.
6 Repoussez le crochet de blocage vers la
droite pour libérer le bras de lecture.
SKAT
I
G
0
I–
3
T
N
Pour lire un 45 tr/min à grand trou central, utilisez
l'adaptateur fourni.
AN
3 Placez un disque sur le plateau.
Crochet de blocage
Suite à la prochaine page e
31
Fonctionnement de base (suite)
SKAT
Lorsque la lecture est terminée
1 Soulevez légèrement le lève-bras ou
la patte du porte-cellule et ramenez le
bras de lecture à sa position de repos.
I
G
0
I–
3
T
N
AN
7 Soulevez le lève-bras.
8 Amenez le bras de lecture sur le bord
du disque ou de la plage dont vous souhaitez lancer la lecture.
0
SKAT
I
3
I–
G
oo Vous pouvez aussi laisser le lève-bras baissé et
amener le bras de lecture au-dessus du disque
puis l'y poser lentement pour lancer la lecture.
T
N
Bras de lecture
AN
Lève-bras
Lève-bras
Bras de lecture
2 Ramenez le bouton START/STOP sur
STOP pour arrêter le plateau.
9 Abaissez le lève-bras.
Abaissez lentement le bras de lecture jusqu'à ce
que la pointe touche le disque et que la lecture
commence.
oo Nous vous recommandons de fermer le couvercle de la platine durant la lecture d'un disque
pour éviter la poussière.
VV Ne placez rien sur le couvercle de la platine.
Les objets posés sur le couvercle peuvent
provoquer du bruit dû aux vibrations ou tomber, en particulier lors de la lecture.
ATTENTION
oo Durant la lecture, ne touchez pas le bras de lecture ni
le disque qui tourne.
oo N'arrêtez pas la rotation du plateau durant la lecture.
Durant la lecture du disque, une réinjection du
signal (« larsen ») peut se produire si le volume
est trop fort. Si cela se produit, baissez le volume
de l'amplificateur.
32
oo Quand le plateau s'arrête, la LED bleue s'éteint.
Enregistrement avec un ordinateur
Branchez cette platine tourne-disque à un ordinateur au moyen du câble USB fourni pour convertir les
signaux audio d'un disque en données numériques et les
envoyer à l'ordinateur.
Systèmes d'exploitation pris en charge
Des ordinateurs fonctionnant sous les systèmes d'exploitation suivants peuvent être connectés par USB à
cette unité.
Windows
Windows 7 (32 bits, 64 bits)
Windows 8 (32 bits, 64 bits)
Windows 8.1 (32 bits, 64 bits)
(à date de septembre 2014)
Le fonctionnement avec des systèmes d'exploitation
autres que ceux-ci n'est pas garanti.
oo Cette unité fonctionnera avec le pilote standard du
système d'exploitation (OS), donc il n'y a pas besoin
d'installer un pilote spécial.
Branchement à un ordinateur
1 Mettez l'ordinateur sous tension.
Vérifiez que le système d'exploitation fonctionne
correctement.
2 Utilisez le câble USB pour relier l'ordinateur à cette unité.
Quand ils sont connectés, l'ordinateur détecte automatiquement le port USB de cette unité et l'identifie
comme « USB Audio CODEC ».
oo Pour enregistrer de l'audio avec un ordinateur depuis
cette platine tourne-disque, vous devez installer un
logiciel permettant l'enregistrement audio sur l'ordinateur. Vous pouvez acheter un logiciel d’enregistrement
audio ou en télécharger un gratuit, comme Audacity
(http://audacity.sourceforge.net/), sur internet. TEAC
n’assure pas d’assistance pour Audacity.
oo Lorsqu'un ordinateur est connecté par USB et enregistre de l'audio, n'effectuez aucune des opérations
suivantes. Cela pourrait entraîner un mauvais fonctionnement de l'ordinateur. Quittez toujours le logiciel
d'enregistrement de l'ordinateur avant de faire ce qui
suit.
u Déconnecter le câble USB
u Mettre l'unité en veille
Réglages de l'ordinateur
L'exemple suivant explique les réglages à faire quand
on utilise Windows 7.
1 Dans le menu Démarrer, sélectionnez
Panneau de configuration.
2 Cliquez sur « Son ».
3 Cliquez sur l'onglet « Enregistrement »
et vérifiez que « USB Audio CODEC »
est défini comme « Périphérique par
défaut ».
4 Sélectionnez « Microphone USB Audio
CODEC » et cliquez sur le bouton
Propriétés.
5 Cliquez sur l'onglet « Statistiques
avancées ».
6 Dans le menu déroulant « Format par
défaut », sélectionnez « canal 2, 16 bits,
48000 Hz (Qualité DVD) ».
7 Cliquez sur « OK ».
33
FRANÇAIS
Mac OS X
OS X Lion 10.7
OS X Mountain Lion 10.8
OS X Mavericks 10.9
(à date de septembre 2014)
3 Appuyez sur la touche STANDBY/ON de
cette unité pour l'allumer.
Guide de dépannage
Si vous avez un problème avec cette unité, veuillez
vérifier les points suivants avant de demander une intervention. Le problème pourrait aussi venir d'ailleurs que
de cette unité. Vérifiez aussi que les appareils qui lui sont
connectés sont correctement employés.
Si cette unité ne fonctionne toujours pas correctement,
contactez le revendeur chez qui vous l'avez achetée.
Pas d’alimentation.
ee Vérifiez que l'adaptateur secteur est branché à une
prise secteur. Puis appuyez sur la touche STANDBY/
ON pour allumer l’unité (page 26).
Il n'y a pas de son.
ee Pour brancher les prises de sortie audio analogique de
cette unité aux prises d'entrée audio d'un amplificateur ou autre équipement, réglez le sélecteur PHONO
EQ (réglage de sortie audio) sur ON (page 26).
La lecture est impossible, il y a du bruit.
ee Vérifiez que le cache de la pointe (en plastique blanc)
a été retiré.
ee Nettoyez la pointe (page 25).
ee Si la pointe est usée, remplacez-la (page 25).
ee Éloignez autant que possible l'unité des téléviseurs, fours à micro-ondes et autres appareils qui
émettent des ondes électromagnétiques.
34
La hauteur est incorrecte.
ee Réglez la vitesse de rotation (tr/min) adaptée au
disque (page 31).
Le son saute.
ee Des vibrations entraînent des sauts. Placez cette
unité dans un endroit stable.
ee Si le disque est sale, nettoyez-le.
ee N'employez pas de disques rayés.
ee Équilibrez le bras de lecture et réajustez la pression
de la pointe (page 24).
Si la pression de la pointe est plus basse que la
valeur prévue pour la cellule, il y a plus de risques
de saut.
Caractéristiques techniques
Platine
Générales
Système d'entraînement. . . . . . . . . . . . . . . . . . . . Par courroie
Moteur. . . . . . . . . . . . . . . . . . . . . . . . . . . . . . . . . . . . . . moteur CC
Vitesse de rotation. . . . . . . . . . . . . . 33 1/3 tr/min, 45 tr/min
Variation de la vitesse de rotation. . . . . . . . . . . . . . . . . . ±2 %
Pleurage et scintillement . . . . . . . . . . . . . . . . . . . . . . . . . . 0,2 %
Rapport signal/bruit
67 dB ou plus (pondération A, filtre passe-bas 20 kHz)
Plateau. . . . . . . . Aluminium moulé de 30 cm de diamètre
Adaptateur secteur
Entrée . . . . . . . . . . . . . . . . . CA 100 V – CA 240 V, 50-60 Hz
Sortie. . . . . . . . . . . . . . . . . . . . . . . . . . . . . . . . . . . 12 V, 500 mA
Consommation électrique
En veille. . . . . . . . . . . . . . . . . . . . . . . . . . . . . . . 0,5 W ou moins
En service (START) . . . . . . . . . . . . . . . . . . . . 1,5 W ou moins
Poids. . . . . . . . . . . . . . . . . . . . . . . . . . . . . . . . . . . . . . . . . . . . . 4,9 kg
Température de fonctionnement. . . . . . . . . . . . . 5°C à 35°C
Dimensions (L × H × P) (hors tout). . . 420 × 356 × 117 mm
Bras de lecture
Type de bras
Bras de lecture à tubulure droite et équilibrage statique
Longueur utile du bras. . . . . . . . . . . . . . . . . . . . . . . . . . 223 mm
Plage de variation de pression de la pointe. . . . . . . . . 0-5 g
Poids de cellule acceptable. . . . . . . . . . . . . . . . . . . . . 3,5-6,5 g
Type. . . . . . . . . . . . . . . . . . . . . . . . . . . . . . . . MM (aimant mobile)
Tension de sortie. . . . . . . . . . . . . . . . . . . . . . . . . . 2,5 mV ±3 dB
Pression de la pointe. . . . . . . . . . . . . . . . . . . . . . . . . . 2,0 ±0,5 g
Poids de la cellule. . . . . . . . . . . . . . . . . . . . . . . . . . . . . 5,7 ±0,5 g
Poids avec porte-cellule. . . 10 g (vis, écrous et fils compris)
Tension de sortie
PHONO EQ THRU. . . . . . . . . . . . . . . . . . . . . . . . . 2,5 mV ± 3 dB
PHONO EQ ON. . . . . . . . . . . . . . . . . . . . . . . 155 mV (−16 dBV)
Prises de sortie . . . . . . . . . . . . . . . . . . . . . . . . . . . . . . . . . . . . . RCA
Port USB
Port USB pouvant recevoir une alimentation par le bus
USB de l'ordinateur (pleine vitesse)
Connecteur USB type B
Prise en charge de l'alimentation par bus USB. . 5 V, 500 mA
oo Utilisez le câble USB fourni pour relier l'unité à un
ordinateur en vue d'être alimentée par lui.
Accessoires fournis
Tapis en caoutchouc × 1
Adaptateur 45 tr/min × 1
Contrepoids × 1
Porte-cellule × 1
Cellule à aimant mobile AT95E
(fabriquée par Audio-Technica) déjà montée
Plateau × 1
Couvercle de la platine × 1
Patins en caoutchouc pour couvercle de platine × 2
Charnières × 2
Câble audio × 1
Câble USB × 1
Adaptateur secteur (GPE053A-120050-Z) × 1
Mode d'emploi (ce document) × 1
Garantie × 1 (pour les consommateurs aux USA et au
Canada uniquement)
FRANÇAIS
Cellule
oo Les données de performance sont spécifiées à 20 °C.
oo Caractéristiques techniques et aspect sont sujets à
changements sans préavis.
oo Le poids et les dimensions sont des valeurs
approchées.
oo Les illustrations de ce mode d'emploi peuvent légèrement différer des modèles de production.
35
INSTRUCCIONES IMPORTANTES DE SEGURIDAD
Modelo para EE. UU.
Este dispositivo cumple con el apartado 15 de las Normas de
la FCC. El funcionamiento está sujeto a las dos siguientes condiciones: (1) este dispositivo no puede causar interferencias
perjudiciales y (2) este dispositivo debe aceptar cualquier interferencia recibida, incluyendo aquellas que puedan producir un
funcionamiento no deseado.
Se ha comprobado que este equipo cumple con los límites establecidos para los dispositivos digitales de Clase B, de acuerdo
con el apartado 15 de las Normas de la FCC. Estos límites están
diseñados para proporcionar una protección razonable contra
interferencias perjudiciales en instalaciones residenciales. Este
equipo genera, utiliza y puede irradiar energía de radiofrecuencia y, si no se instala y se utiliza de acuerdo con las instrucciones,
puede causar interferencias perjudiciales en las comunicaciones por radio. Sin embargo, no se puede garantizar que dichas
interferencias no se produzcan en instalaciones particulares.
Si este equipo causa interferencias perjudiciales en la recepción de radio o televisión, que se comprueban apagando y
encendiendo el equipo, se recomienda al usuario que intente
corregirla mediante una o varias de las siguientes medidas:
• Reoriente o recoloque el equipo y/o la antena receptora.
• Aumente la separación entre el equipo y el receptor.
• Conecte el equipo a una toma de electricidad situada en un
circuito eléctrico diferente al del receptor.
• Consulte al distribuidor o solicite ayuda a un técnico de radio/
TV con experiencia.
Declaración de conformidad
Parte responsable: TEAC AMERICA, INC.
Dirección: 1834 Gage Road, Montebello, California,
U.S.A.
Número de teléfono: 1-323-726-0303
Este dispositivo cumple con el apartado 15 de las Normas de
la FCC. Su funcionamiento está sujeto a las dos siguientes condiciones: (1) este dispositivo no puede causar interferencias
perjudiciales y (2) este dispositivo debe aceptar cualquier interferencia recibida, incluyendo aquellas que puedan producir un
funcionamiento no deseado.
DECLARACIÓN DE CONFORMIDAD
TEAC AUDIO EUROPE, Liegnitzer Straße 6, 82194
Gröbenzell, Alemania, declara bajo su plena responsabilidad que el producto TEAC descrito en este manual cumple
con las normas técnicas correspondientes.
PRECAUCIÓN
Cualquier cambio o modificación efectuada en este equipo que no
haya sido expresamente aprobada por TEAC CORPORATION para
confirmar que cumple todos los requisitos exigidos invalidará la
garantía del usuario.
36
Para consumidores europeos
Deshacerse de aparatos eléctricos y electrónicos
(a)Todos los aparatos eléctricos y electrónicos deben ser eliminados separados del resto de basura común y únicamente en
los "puntos limpios" o bajo los procedimientos especificados
por el gobierno o autoridades municipales locales.
(b)Con la eliminación correcta de los equipos eléctricos y electrónicos estará ayudando a conservar recursos muy valiosos
y a evitar los posibles efectos negativos en la salud humana y
en el medio ambiente.
(c)La eliminación incorrecta de los equipos eléctricos y electrónicos puede producir efectos muy dañinos en el medio
ambiente y en la salud humana a causa de las sustancias peligrosas que pueden encontrarse en estos equipos.
(d)El símbolo de Eliminación de Aparatos Eléctricos y
Electrónicos (WEEE en inglés), identificado por un
cubo de basura con ruedas tachado, indica que
los equipos eléctricos y electrónicos deben ser eliminados de forma totalmente independiente con
respecto a la basura doméstica.
(e)Existen sistemas para la eliminación y recogida de este tipo
de aparatos a disposición del usuario final. Si necesita más
información acerca de la forma de deshacerse de aparatos
eléctricos y electrónicos antiguos, póngase en contacto
con su Ayuntamiento, con la correspondiente empresa del
servicio de recogida de residuos o con el comercio en el que
adquirió ese aparato.
Deshacerse de pilas y/o acumuladores
(a)Las pilas y/o acumuladores gastados deben ser eliminados
separados del resto de basura común y únicamente en los
"puntos de recogida" o bajo los procedimientos especificados por el gobierno o autoridades municipales locales.
(b)Con la eliminación correcta de las pilas y/o acumuladores
gastados estará ayudando a conservar recursos muy valiosos
y a evitar los posibles efectos negativos en la salud humana y
en el medio ambiente.
(c)La eliminación incorrecta de las pilas y/o acumuladores gastados puede producir efectos muy dañinos en el medio
ambiente y en la salud humana con motivo de las sustancias
peligrosas que pueden encontrarse en estos equipos.
(d)El símbolo WEEE, identificado por un cubo de basura
con ruedas tachado, indica que las pilas y/o acumuladores gastados deben ser eliminados de forma
totalmente independiente con respecto a la basura Pb, Hg, Cd
doméstica.
Si una pila o un acumulador contienen más cantidad de
los valores especificados de plomo (Pb), mercurio (Hg), y/o
cadmio (Cd) según está definido en la Directiva relativa a las
pilas (2006/66/EC), entonces los símbolos químicos correspondientes a estos elementos estarán indicados debajo del
símbolo WEEE.
(e)Existen sistemas para la eliminación y recogida a disposición
del usuario final. Si necesita más información acerca de la
forma de eliminar pilas y/o acumuladores gastados, póngase
en contacto con su Ayuntamiento, con la correspondiente
empresa del servicio de recogida de residuos o con el comercio donde se adquirieron.
Índice
Gracias por elegir TEAC. Lea este manual atentamente
para obtener el mejor rendimiento de esta unidad.
INSTRUCCIONES IMPORTANTES DE SEGURIDAD. . . . . . 36
Antes de su utilización. . . . . . . . . . . . . . . . . . . . . . . . . . . . . . . 37
Preparación del reproductor de discos de vinilo. . . . . . 39
Notas sobre las agujas para discos. . . . . . . . . . . . . . . . . . . 41
Antes de su utilización
Artículos incluidos
Asegúrese de que la caja incluye todos los accesorios
suministrados que se describen a continuación. Por
favor, póngase en contacto con el establecimiento
donde adquirió esta unidad si falta cualquiera de estos
accesorios o si han sufrido desperfectos durante el
transporte.
Conexiones. . . . . . . . . . . . . . . . . . . . . . . . . . . . . . . . . . . . . . . . . . 42
Alfombrilla de goma × 1
Nombres y funciones de las partes. . . . . . . . . . . . . . . . . . . 43
Adaptador de 45 RPM × 1
Tapa del plato giradiscos. . . . . . . . . . . . . . . . . . . . . . . . . . . . . 44
Contrapeso × 1
Manejo de los discos de vinilo. . . . . . . . . . . . . . . . . . . . . . . 45
Cabezal × 1
Cambio de la cápsula. . . . . . . . . . . . . . . . . . . . . . . . . . . . . . . . 46
Funcionamiento básico. . . . . . . . . . . . . . . . . . . . . . . . . . . . . . 47
Cápsula AT95E MM (fabricada por Audio-Technica)
preinstalada
Grabación con un ordenador. . . . . . . . . . . . . . . . . . . . . . . . 49
Plato giradiscos × 1
Solución de posibles fallos. . . . . . . . . . . . . . . . . . . . . . . . . . . 50
Tapa del plato giradiscos × 1
Especificaciones. . . . . . . . . . . . . . . . . . . . . . . . . . . . . . . . . . . . . 51
Patas de goma para la tapa del plato giradiscos × 2
Bisagras × 2
Cable de audio × 1
ESPAÑOL
Cable USB × 1
Adaptador de corriente (GPE053A-120050-Z) × 1
Manual del usuario (este documento) × 1
oo Conserve este manual en un lugar seguro para
futuras consultas.
oo No exponga este aparato a salpicaduras ni goteras.
oo No coloque objetos que contengan líquidos, como por ejemplo
jarrones, sobre el aparato.
oo No instale este aparato en lugares cerrados tales como estanterías o similares.
oo Este aparato libera corriente nominal no válida para el funcionamiento a través de la toma de corriente, aún cuando el
interruptor de encendido y activación (POWER o STANDBY/ON)
no esté en la posición de encendido (ON).
oo Este aparato debe situarse lo suficientemente cerca de una toma
de electricidad como para poder alcanzar fácilmente el cable de
corriente en cualquier momento.
oo El enchufe que se conecta a la red es el dispositivo de desconexión, por lo que deberá permanecer siempre en prefecto
estado de uso.
oo Deberá llevar cuidado si utiliza auriculares con este producto, ya
que una excesiva presión sonora (volumen) procedente de los
mismos puede causar perdidas de audición.
Tarjeta de garantía × 1 (solo para clientes de EE. UU. y
Canadá)
oo Consulte la contraportada de este manual para
información sobre la garantía en Europa y otros
países o zonas.
37
Antes de su utilización (continuación)
Precauciones de uso
Mantenimiento
oo No coloque nada sobre la tapa del plato giradiscos.
Los objetos situados sobre la tapa podrían causar
ruido debido a las vibraciones o caerse, especialmente
durante la reproducción.
Si la superficie de la unidad se ensucia, límpiela con
un paño suave o utilice un jabón líquido suave diluido.
Deje que la superficie de la unidad se seque por completo antes de usarla.
oo Evite situar la unidad directamente a la luz del sol,
cerca de una fuente de calor o en condiciones similares. No coloque la unidad encima de un amplificador
u otros equipos que puedan generar calor que exceda
el margen de la temperatura de funcionamiento de
esta unidad. Si lo hace podría causar que la unidad se
decolore, se deforme o que funcione incorrectamente.
oo No utilice paños de limpieza impregnados con productos químicos, disolvente o sustancias similares ya
que podría dañar la superficie de la unidad.
oo Dado que la unidad podría calentarse durante el
funcionamiento, deje siempre espacio suficiente a
su alrededor para una correcta ventilación. Cuando
instale la unidad, deje un poco de espacio (al menos
20 cm) entre la unidad y otros dispositivos y paredes para permitir una buena disipación del calor.
Cuando la coloque en un rack, por ejemplo, deje al
menos 35 cm libres por encima de la unidad y 10 cm
libres por detrás. Si no deja estos espacios libres, el
calor puede acumularse en su interior y provocar
fuego.
oo NO MUEVA LA UNIDAD DURANTE LA REPRO
DUCCIÓN. Durante la reproducción, un disco de
vinilo gira. No levante ni mueva la unidad durante
la reproducción. Si lo hace, podría dañar el disco, la
aguja, la cápsula o la unidad.
oo Quite siempre el disco antes de mover esta unidad o
cambiarla de sitio. Si mueve la unidad con un disco
en el plato giradiscos podría dañar el disco, la aguja
y la cápsula o podría causar un mal funcionamiento.
oo El voltaje suministrado a la unidad debe coincidir
con el voltaje impreso en el panel posterior. Si tiene
dudas al respecto, consulte a un electricista.
38
VV PRECAUCIÓN
Por seguridad, desconecte el cable de corriente de la
toma de electricidad antes de proceder a la limpieza.
Registro del producto
Los clientes de EE. UU., por favor visiten el siguiente sitio
web de TEAC para registrar su producto en línea:
http://audio.teac.com/support/registration/
Preparación del reproductor de discos de vinilo
Mantenga la unidad en modo de reposo (standby) hasta
que la configure ( E en las páginas 42 y 43).
1 Colóquela sobre una superficie nivelada.
4 Coloque la alfombrilla de goma.
Coloque la alfombrilla protectora de goma incluida
sobre el plato giradiscos antes de utilizarlo.
Dado que no se puede ajustar la altura de los pies de
esta unidad, asegúrese de colocarla en una superficie
nivelada.
2 Instale el plato giradiscos.
Alinee el plato giradiscos con el eje central e instálelo.
Eje central
Giradiscos
Parte
superior
oo La alfombrilla de goma tiene una parte superior y
una inferior. El lado con los círculos concéntricos
debe colocarse hacia abajo, tal como se muestra
en la ilustración.
5 Instale el contrapeso.
ESPAÑOL
3 Fije la correa alrededor de la polea del
motor.
Coloque el contrapeso en el extremo del brazo y
gírelo hacia la derecha para apretarlo.
Contrapeso
Utilice un dedo para tirar de la correa de goma que
está envuelta alrededor del subplato a través de la
abertura redonda y colóquela alrededor de la polea
del motor.
oo Lleve cuidado para que la goma no se retuerza.
oo Gire el plato varias veces para confirmar que se
ha puesto bien.
6 Instale el cabezal.
Abertura redonda
Polea del motor
Correa de goma
Introduzca el cabezal en el extremo del brazo de
lectura y gire la tuerca para fijarlo en su sitio.
Tuerca
Cabezal
39
Preparación del reproductor de discos de vinilo (continuación)
Cómo equilibrar el brazo y ajustar la
presión de la aguja
5 Gire el contrapeso y ajústelo de manera
que el brazo quede nivelado.
I–
Palanca de altura
SKAT
I
G
0
T
N
AN
I
3
SKAT
G
0
I–
3
T
Anillo de presión de la aguja
Línea central
Control antideslizamiento
N
AN
Contrapeso
oo Quite la cubierta de protección de la aguja de la
cápsula antes de hacer los ajustes.
oo Lleve cuidado para que la aguja de la cápsula no
toque la unidad.
1 Ajuste la rueda antideslizamiento en
cero.
SKAT
7 Gire el anillo de ajuste de presión de
la aguja de modo que la línea central
quede alineada con el 0 de la escala.
I
G
3
I–
0
T
N
AN
2 Desplace la abrazadera de sujeción del
brazo hacia la derecha para liberar el
brazo.
6 Vuelva a poner el brazo en su posición
original y desplace la abrazadera de
sujeción del brazo hacia la izquierda
para fijarlo en su sitio.
SKAT
I
G
0
I–
3
T
N
3 Levante la palanca de altura y desplace
el brazo ligeramente hacia la izquierda.
AN
Abrazadera
oo Lleve cuidado de no girar el contrapeso.
4 Baje la palanca de altura.
40
Notas sobre las agujas para discos
8 Gire el contrapeso de forma que la
escala del anillo de ajuste de presión de
la aguja coincida con la presión especificada para la cápsula.
SKAT
I
G
0
I–
3
T
N
AN
oo La presión de la aguja de la cápsula que viene
incluida con la unidad es de 2,0 g.
Por tanto, cuando utilice la cápsula incluida, gire
la escala del contrapeso hasta el número 2.
oo Las agujas para los discos de vinilo son piezas de
precisión, por tanto deberá manejarlas con cuidado
para evitar que se doblen o se dañen sus puntas. Si
una aguja se dobla o se daña su punta, podría no ser
capaz de seguir los surcos de audio con precisión y
podría dañar los discos o provocar otras anomalías
de funcionamiento.
oo Si una aguja se ensucia, para limpiarla utilice un limpiador de agujas o un producto similar de los que se
pueden adquirir en establecimientos comerciales.
oo No frote la punta de la aguja con nada duro ni con
excesiva fuerza. No limpie la aguja con disolvente y
otras sustancias químicas. Si lo hace podría dañarla.
Sustitución de la aguja
9 Ajuste la rueda antideslizamiento.
ING
0
3
A
TI–SKA
T
N
La cápsula incluida es una Audio-Technica AT95E.
Compre una aguja de repuesto para la cápsula AT95E
en el establecimiento donde haya comprado esta unidad, por ejemplo.
Siga las instrucciones de sustitución de la aguja que vengan en su manual.
PRECAUCIÓN
oo Puesto que se pueden producir ruidos repentinos a
alto volumen, ponga la unidad en reposo (standby)
antes de cambiar la aguja.
oo Lleve cuidado de no lastimarse la mano o dañar el
equipo.
oo Lleve cuidado de no permitir que los niños pequeños puedan tragarse las agujas accidentalmente.
41
ESPAÑOL
Comience con ella puesta en 2 y ajústela durante la
reproducción de un disco (página 47) a la posición donde los volúmenes de la izquierda y de la
derecha estén equilibrados.
Conexiones
B C
Si PHONO EQ está en ON
Se conecta a los terminades de
entrada de audio de un amplificador, etc.
Si PHONO EQ está en THRU
Se conecta a las entradas PHONO
de un amplificador, etc.
D
A
Adaptador de corriente
incluido
(GPE053A-120050-Z)
Amplificador
L
R
A Terminales de salida de audio analó-
gico (L/R) (izquierda/derecha)
VV Precauciones al hacer las conexiones
oo No enchufe la unidad a la corriente hasta que no
haya terminado de hacer todas las conexiones.
oo Lea atentamente los manuales de los dispositivos
que está conectando y siga sus instrucciones para
hacer las conexiones.
B Terminal PHONO EQ (ajuste de salida de
audio)
Por estos terminales entran y salen las señales de
audio analógico.
El ajuste del interruptor PHONO EQ cambia el tipo
de señal de salida.
Utilice el cable de audio incluido (o uno de los que
se pueden adquirir en establecimientos comerciales) para conectar otros equipos a los terminales de
salida de esta unidad.
Blanco (L)
Rojo (R)
E
Blanco (L)
Rojo (R)
ON
A los terminales de salida de audio analógico (L/R)
(izquierda/derecha) se envían las señales que se han
amplificado mediante el amplificador-ecualizador
integrado.
THRU
A los terminales de salida de audio analógico (L/R)
(izquierda/derecha) se envía directamente la señal
de la cápsula magnética.
Utilice este ajuste cuando conecte esta unidad a un
equipo que tenga entradas PHONO.
oo Cuando la unidad sale de fábrica, su ajuste predeterminado es ON.
PRECAUCIÓN
Cuando está puesto en ON, si se conectan las salidas de audio analógico a las entradas PHONO de un
amplificador, la salida de sonido por los altavoces y
los auriculares será a gran volumen, lo que puede
dañar el equipo o producir daños auditivos.
42
Nombres y funciones de las partes
a
b
C Puerto USB (tipo USB B)
Conecte este puerto al puerto USB de un ordenador para convertir la señal de audio de esta unidad
a digital y enviarla al ordenador (página 49).
I
G
0
SKAT
3
I–
N
AN
c
T
D Conector de entrada de corriente DC IN
12V
d
e
f
g
h
Una vez terminadas todas las demás conexiones, conecte el adaptador de corriente incluido
(GPE053A-120050-Z) a este terminal.
Confirme que el enchufe del adaptador de corriente
está enchufado en una toma de corriente.
oo Desenchufe el cable de corriente de la toma de
electricidad cuando no vaya a utilizar la unidad
durante un largo periodo de tiempo.
E Botón STANDBY/ON
Pulse el botón STANDBY/ON para encender (ON) o
poner en reposo (STANDBY) la unidad.
j
a Plato giradiscos
Coloque los discos de vinilo centrados en el plato.
bContrapeso
c Anillo de ajuste de presión de la aguja
ESPAÑOL
oo No utilice ningún otro adaptador de corriente
que no sea el incluido (GPE053A-120050-Z).
VV Asegúrese de conectar el cable de corriente
a una toma de electricidad que suministre el
voltaje correcto.
La conexión a una toma con el voltaje incorrecto puede originar fuego o descargas
eléctricas.
Sujete el bloque del enchufe al enchufarlo
o desenchufarlo de una toma de electricidad. No tire nunca del cable de corriente.
Desenchufe el cable de corriente de la toma
de electricidad cuando no vaya a utilizar la
unidad durante un largo periodo de tiempo.
i
d Rueda antideslizamiento
e Palanca de altura
Utilice esta palanca para levantar el brazo y bajarlo
sobre el disco.
fSujeción del brazo
Esta pieza es donde descansa el brazo del giradiscos. Empuje con suavidad la abrazadera hacia la
derecha para liberar el brazo del giradiscos antes de
reproducir un disco.
gBrazo
h Mando de ajuste de la velocidad de giro
Con él se ajusta la velocidad de giro (RPM) adecuada para cada disco de vinilo.
i Control START/STOP de inicio/parada
de giro del plato
jCabezal
43
Tapa del plato giradiscos
Colocación de las patas de goma
Apertura y cierre de la tapa del plato
giradiscos
Puntos de sujeción de las patas de goma
Abrir
Pata de goma
Como se muestra en la ilustración, encaje las patas de
goma en los laterales izquierdo y derecho de la tapa del
plato giradiscos.
Montaje de la tapa del plato giradiscos
Tapa del plato
giradiscos
Unidad
principal
Sujete el borde frontal de la tapa del plato giradiscos y
levántela suavemente para abrirla hasta que no tenga
más recorrido.
La tapa permanecerá abierta en esta posición.
Cierre
Bisagra
1 Inserte las bisagras por completo en
las sujeciones situadas en los extremos
izquierdo y derecho de la parte posterior de la unidad principal.
2 Alinee las partes de arriba de las bisagras con las sujeciones que para ellas
hay en la tapa del plato giradiscos e
insértelas.
Cómo quitar la tapa del plato giradiscos
Sujete ambos bordes de la tapa del plato giradiscos y
levántela lentamente para separarla de la unidad junto
con las bisagras. A continuación, quite las bisagras de la
tapa del plato giradiscos.
44
Apertura
Baje suavemente la tapa hasta que se cierre.
VV Lleve cuidado de no pillarse la mano, por
ejemplo, cuando cierre la tapa del plato
giradiscos.
Manejo de los discos de vinilo
Cómo sujetar los discos de vinilo
Cuando coja un disco de vinilo o lo saque de su funda,
evite tocar los surcos sujetando el disco por su etiqueta
central y por el borde con una mano o sujetándolo por
los bordes con ambas manos.
Etiqueta
Surcos
Borde exterior
Limpieza
Precauciones
oo No deje los discos de vinilo en sitios donde estén
expuestos directamente a la luz del sol o que sean
muy calurosos o húmedos. Si deja un disco de vinilo
bajo tales condiciones durante mucho tiempo podría
deformarse o sufrir otros daños.
oo No apile múltiples discos de vinilo o sitúe objetos
pesados sobre ellos. Tampoco deje los discos inclinados en ángulo durante excesivo tiempo. Si lo hace,
podrían deformarse o sufrir otros daños.
oo No permita que objetos duros toquen directamente
los surcos de audio. Si esto ocurre, los discos se pueden rayar.
oo Después de que haya terminado de reproducir un
disco, vuelva siempre a guardarlo en su funda. Dejar
un disco de vinilo sin protección puede causar que
se deforme o se raye.
oo No utilice discos que estén rotos.
ESPAÑOL
oo Las huellas de dedos y el polvo en un disco de vinilo
pueden causar ruido y hacer que el sonido salte, así
como producir daños al propio disco y a la aguja.
Utilice un limpiador de discos de vinilo de los que
se pueden adquirir en establecimientos comerciales
para limpiar los discos. No utilice disolvente ni nada
que no sea un limpiador específico para discos de
vinilo. Dichos productos químicos podrían dañar la
superficie del disco.
oo Cuando utilice un limpiador de discos de vinilo, limpie la superficie del disco con movimiento circular,
siguiendo los surcos.
45
Cambio de la cápsula
Para cambiar la cápsula, primero quite el cabezal separándolo del brazo.
oo Le recomendamos que mantenga puesta la cubierta
protectora de la aguja mientras cambia la cápsula.
Cabezal
Tornillos
Tuercas
Cables del cabezal
Cápsula
1 Desconecte los terminales cableados
del cabezal de la cápsula.
2 Afloje los tornillos y quite el cabezal.
3 Acople la nueva cápsula y apriete los
tornillos.
En la ilustración que viene a continuación puede
ver la posición de los tornillos una vez acoplada la
cápsula.
2,0 mm ± 0,5 mm
46
4 Conecte los terminales cableados del
cabezal.
oo Las señales y los colores de los cables del cabezal
se muestran a continuación:
Señal
Canal izquierdo +
Canal izquierdo −
Canal derecho +
Canal derecho −
Color
Blanco
Azul
Rojo
Verde
5 Equilibre el brazo y ajuste la presión de
la aguja.
Siga el procedimiento del apartado "Cómo equilibrar el brazo y ajustar la presión de la aguja" de la
página 40.
Funcionamiento básico
Reproducción de discos de vinilo
1 Pulse el botón STANDBY/ON situado
en la parte posterior de la unidad para
encenderla.
2 Abra la tapa del plato giradiscos lentamente.
4 Ajuste la velocidad de rotación (RPM)
según las especificaciones del disco.
La velocidad de rotación puede fijarse en 33 1/3 o
45 RPM.
5 Gire el mando START/STOP a START
para que el giradiscos se ponga en
movimiento.
VV L
leve cuidado de no pillarse la mano cuando
cierre la tapa del plato giradiscos.
6 Desplace la abrazadera que sujeta el
brazo hacia la derecha para liberarlo.
SKAT
I
G
0
I–
3
T
N
Cuando reproduzca un disco sencillo ("single") de
45 RPM con agujero central grande, utilice el adaptador incluido.
AN
3 Coloque un disco en el plato giradiscos.
Abrazadera
Continúa en la página siguiente e
47
ESPAÑOL
oo Cuando el mando giratorio START/STOP se
ponga en START, el plato giradiscos empezará a
girar y se encenderá el indicador azul.
Funcionamiento básico (continuación)
I
Palanca de altura
Cuando termina la reproducción
1 Levante ligeramente la palanca de
altura o el gancho del cabezal para volver a poner el brazo en su posición de
descanso.
I–
oo También puede dejar la palanca de altura bajada
y desplazar el brazo elevándolo manualmente
sobre el disco y después bajarlo lentamente para
comenzar la reproducción.
8 Desplace el brazo hacia el borde del
disco o la canción donde desee comenzar la reproducción.
SKAT
I
G
0
T
N
AN
Brazo
3
SKAT
G
0
I–
3
T
N
AN
7 Levante la palanca de altura.
Palanca de altura
Brazo
2 Gire el mando START/STOP a STOP para
detener el giradiscos.
9 Baje la palanca de altura.
Baje el brazo lentamente hasta que la aguja toque
el disco y empezará la reproducción.
oo Recomendamos que cierre la tapa del plato giradiscos durante la reproducción para evitar que
entre polvo.
VV No coloque nada sobre la tapa del plato giradiscos. Los objetos situados sobre la tapa
podrían causar ruido debido a las vibraciones o caerse, especialmente durante la
reproducción.
PRECAUCIÓN
oo Durante la reproducción no toque ni el brazo ni el
disco.
oo No detenga el giro del plato durante la reproducción.
Durante la reproducción de los discos puede
producirse realimentación (pitidos conocidos
también como "acoples") si el volumen es demasiado alto. Si esto ocurre, baje el volumen del
amplificador.
48
oo Cuando se detenga el giradiscos, el indicador
azul se apagará.
Grabación con un ordenador
Conecte este reproductor de discos de vinilo a un ordenador utilizando el cable USB incluido para convertir las
señales de audio de un disco de vinilo a datos digitales
y enviarlos al ordenador.
Sistemas operativos compatibles
Se pueden conectar a esta unidad mediante USB ordenadores que tengan los siguientes sistemas operativos:
Sistemas operativos Windows
Windows 7 (32 bits, 64 bits)
Windows 8 (32 bits, 64 bits)
Windows 8.1 (32 bits, 64 bits)
(a septiembre de 2014)
Mac OS X
OS X Lion 10.7
OS X Mountain Lion 10.8
OS X Mavericks 10.9
(a septiembre de 2014)
No está garantizado el funcionamiento con otros sistemas operativos distintos a los mencionados.
Conexión con un ordenador
1 Encienda el ordenador.
Confirme que el sistema operativo funciona bien.
2 Utilice el cable USB para conectar el
ordenador y esta unidad.
Cuando estén conectados, el ordenador detectará
automáticamente el puerto USB de esta unidad y la
identificará como "USB Audio CODEC".
oo Para grabar audio desde este reproductor de discos
de vinilo utilizando un ordenador, deberá primer
instalar el software que vaya a utilizar para grabar
audio en el ordenador. Puede optar por comprar el
programa de grabación de audio que prefiera o descargarse por internet un programa gratuito, como por
ejemplo Audacity (http:// audacity.sourceforge.net/).
TEAC no ofrece soporte de ningún tipo para programas de software gratuito como Audacity.
oo Cuando esta unidad se encuentre conectada a un
ordenador mediante USB y esté grabando audio,
no realice ninguna de las acciones mencionadas a
continuación, ya que puede causar anomalías de
funcionamiento en el ordenador. Salga siempre del
software de grabación del ordenador antes de:
u Desconectar el cable USB
u Poner la unidad en reposo (standby)
ESPAÑOL
oo Esta unidad funcionará con el controlador (driver)
estándar del sistema operativo, por lo que no hay
necesidad de instalar un controlador especial.
3 Pulse el botón STANDBY/ON de esta
unidad para encenderla.
Ajustes del ordenador
Los siguientes ejemplos explican los ajustes a realizar si
se utiliza Windows 7.
1 Desde el menú "Inicio", seleccione
"Panel de control".
2 Pulse "Sonido".
3 Haga clic en la pestaña "Grabar" y confirme que "USB Audio CODEC" es el
"Dispositivo predeterminado".
4 Seleccione "Microphone USB Audio
CODEC" y haga clic en el botón
Propiedades.
5 Haga clic en la pestaña "Opciones
avanzadas".
6 Desde el menú desplegable "Formato
predeterminado", seleccione "canal 2,
16 bit, 48000 Hz (Calidad de DVD)".
7 Haga clic en "Aceptar".
49
Solución de posibles fallos
Si experimenta algún problema con esta unidad, por
favor compruebe los apartados siguientes antes de solicitar asistencia técnica. La causa del problema podría
no ser esta unidad. Por favor, compruebe también que
los dispositivos conectados están siendo utilizados
correctamente.
Si aún así la unidad no funciona correctamente, póngase
en contacto con el establecimiento donde adquirió la
unidad.
No enciende.
ee Confirme que el cable de corriente está enchufado
a una toma de electricidad. A continuación, pulse
el botón STANDBY/ON para encender la unidad.
(página 42).
No sale sonido.
ee Cuando conecte los terminales de salida de audio
analógico de esta unidad a los terminales de audio
de un amplificador u otro equipo ponga el interruptor PHONO EQ (ajuste de salida de audio) en ON
(página 42).
La reproducción no es posible; hay ruido.
ee Confirme que ha quitado la cubierta de la aguja (de
plástico blanco).
ee Limpie la aguja (página 41).
ee Si la aguja está gastada, cámbiela (página 41).
ee Coloque la unidad lo más lejos posible de televisiones, hornos microondas y otros dispositivos que
emitan ondas electromagnéticas.
50
El tono (afinación) de reproducción es incorrecto.
ee Ajuste la velocidad de rotación (RPM) según corresponda al disco (página 47).
El sonido salta.
ee Las vibraciones pueden causar saltos. Coloque esta
unidad en un lugar estable.
ee Si el disco está sucio, límpielo.
ee No utilice discos rayados.
ee Equilibre el brazo y vuelva a ajustar la presión de la
aguja (página 40).
Si la presión de la aguja es menor que el valor según
la cápsula es muy probable que se produzcan saltos
en la reproducción.
Especificaciones
Plato giradiscos
General
Sistema de tracción. . . . . . . . . . . . . . . . . . tracción por correa
Motor. . . . . . . . . . . . . . . . . . . . . . . . . . . . . . . . . . . . . motor de CC
Velocidad de rotación . . . . . . . . . . . . . . . 33 1/3 rpm, 45 rpm
Variación de velocidad de rotación. . . . . . . . . . . . . . . . . . ±2%
Lloro y centelleo. . . . . . . . . . . . . . . . . . . . . . . . . . . . . . . . . . . 0,2%
Relación señal/ruido. . . . . . . . . . . . . . . . . . . . 67 dB o superior
(ponderado A, 20 kHz LPF)
Plato giradiscos. . . . . . . . . . . . . . . . . . . . . . . . aluminio fundido
30 cm de diámetro
Adaptador de corriente
Entrada. . . . . . . . . . . . . . . . . CA 100 V-CA 240 V, 50-60 Hz
Salida. . . . . . . . . . . . . . . . . . . . . . . . . . . . . . . . . . . 12 V, 500 mA
Consumo de corriente
En reposo (standby). . . . . . . . . . . . . . . . . . . 0,5 W o menos
Encendido (en funcionamiento). . . . . . . 1,5 W o menos
Peso. . . . . . . . . . . . . . . . . . . . . . . . . . . . . . . . . . . . . . . . . . . . . . 4,9 kg
Margen de temperatura de funcionamiento . . . de 5°C a 35°C
Dimensiones (an. × al. × pro.) (incluyendo salientes)
420 × 356 × 117 mm
Brazo
Tipo de brazo
Brazo de tubo recto con equilibrio estático
Longitud efectiva del brazo. . . . . . . . . . . . . . . . . . . . 223 mm
Margen de variación de la presión de la aguja. . . . . . 0-5 g
Peso aceptable de la cápsula . . . . . . . . . . . . . . . . . . 3,5-6,5 g
Cápsula
Voltaje de salida
PHONO EQ THRU. . . . . . . . . . . . . . . . . . . . . . . . . 2,5 mV ±3 dB
PHONO EQ ON. . . . . . . . . . . . . . . . . . . . . . 155 mV (−16 dBV)
Terminales de salida. . . . . . . . . . . . . . . . . . . . . . . . . . . . . . . . RCA
Puerto USB
El puerto USB puede recibir alimentación de un bus
USB de un ordenador (velocidad completa)
conector USB tipo B
Alimentación compatible con bus USB . . . . . 5 V, 500 mA
oo Utilice el cable USB incluido para conectar la unidad
a un ordenador para poder recibir alimentación procedente del mismo.
Accesorios incluidos
Alfombrilla de goma × 1
Adaptador de 45 RPM × 1
Contrapeso × 1
Cabezal × 1
Cápsula AT95E MM (fabricada por Audio-Technica)
preinstalada
Plato giradiscos × 1
Tapa de plato giradiscos × 1
Patas de goma para la tapa del plato giradiscos × 2
Bisagras × 2
Cable de audio × 1
Cable USB × 1
Adaptador de corriente (GPE053A-120050-Z) × 1
Manual del usuario (este documento) × 1
Tarjeta de garantía × 1 (solo para clientes de EE. UU. y
Canadá)
ESPAÑOL
Tipo. . . . . . . . . . . . . . . . . . . . . . . . . . . . . . . . . . . MM (magnética)
Voltaje de salida. . . . . . . . . . . . . . . . . . . . . . . . . . 2,5 mV ±3 dB
Presión de la aguja. . . . . . . . . . . . . . . . . . . . . . . . . . . . . . 2 ±0,5 g
Peso de la cápsula. . . . . . . . . . . . . . . . . . . . . . . . . . . . 5,7 ±0,5 g
Peso del cabezal incluido. . . . . . . . . . . . . . . . . . . . . . . . . . . 10 g
(con tornillos, tuercas y cables)
oo Datos de rendimiento especificados a 20°C.
oo Las especificaciones y el diseño están sujetos a cambios sin previo aviso.
oo El peso y las dimensiones son aproximados.
oo Las ilustraciones de este manual pueden diferir ligeramente de los modelos de producción.
51
WICHTIGE SICHERHEITSHINWEISE
oo Setzen Sie den TN-300 nicht Tropf- oder Spritzwasser
aus.
oo Stellen Sie keine Vasen oder andere mit Flüssigkeiten
gefüllte Gefäße auf den TN-300.
oo Installieren Sie den TN-300 nicht in geschlossenen
Regalsystemen oder ähnlichen Möbelstücken.
oo Der TN-300 bezieht auch dann einen geringen Ruhe
strom aus dem Netz, wenn sich der POWER- oder
STANDBY/ON-Schalter nicht in der ON-Position befindet.
oo Der Verwendungsort des TN-300 sollte in der Nähe
der Wandsteckdose sein, so dass Sie jederzeit den
Netzstecker erreichen.
oo Der Netzstecker dient als Verbindungs-/Trennglied
zur Spannungsversorgung. Achten Sie darauf, dass er
stets in einwandfreiem Zustand ist.
oo Achten Sie bei der Verwendung von Kopfhörern
auf Ihr Gehör. Zu hoher Schalldruck von Ohr- oder
Kopfhörern kann Hörschäden oder Hörverlust verursachen.
Für Kunden in Europa
Entsorgung von elektrischen Altgeräten und Batterien
(a)Wenn das Symbol einer durchgestrichenen Abfall
tonne auf einem Produkt, der Verpackung und/
oder der begleitenden Dokumentation angebracht
ist, unterliegt dieses Prod ukt den europäischen
Richtlinien 2002/96/EC und/oder 2006/66/EC sowie nationalen Gesetzen zur Umsetzung dieser Richtlinien.
(b)Diese Richtlinien und Gesetze schreiben vor, dass Elektround Elektronik-Altgeräte sowie Batterien und Akkus nicht in
den Hausmüll (Restmüll) gelangen dürfen. Um die fachgerechte Entsorgung, Aufbereitung und Wiederverwertung
sicherzustellen, sind Sie verpflichtet, Altgeräte und entladene
Batterien/Akkus über staatlich dafür vorgesehene Stellen zu
entsorgen.
(c)Durch die ordnungsgemäße Entsorgung solcher Geräte, Bat
terien und Akkus leisten Sie einen Beitrag zur Einsparung
wertvoller Rohstoffe und verhindern potenziell schädliche
Auswirkungen auf die Gesundheit der Allgemeinheit und die
Umwelt, die durch falsche Abfallentsorgung entstehen können. Die Entsorgung ist für Sie kostenlos.
(d)Falls der Gehalt an Blei (Pb), Quecksilber (Hg) und/
oder Cadmium (Cd) in Batterien/Akkus die in der
Richtlinie zur Batterieentsorgung (2006/66/EC) anPb, Hg, Cd
gegebenen, zulässigen Höchstwerte übersteigen,
wird die Bezeichnung des entsprechenden chemischen Ele
ments oder der Elemente unterhalb der durchgestrichenen
Abfalltonne angegeben.
(e)Weitere Informationen zur Wertstoffsammlung und Wieder
verwertung von Altgeräten, Batterien und Akkus erhalten Sie
bei Ihrer Stadtverwaltung, dem für Sie zuständigen Abfall
entsorgungsunternehmen oder der Verkaufsstelle, bei der Sie
das Produkt erworben haben.
KONFORMITÄTSERKLÄRUNG
TEAC AUDIO EUROPE, Liegnitzer Straße 6,
82194 Gröbenzell, Deutschland, erklärt in
eigener Verantwortung, dass das in dieser Anleitung
beschriebene TEAC-Produkt geltenden technischen
Normen entspricht.
ACHTUNG
Änderungen oder Modifikationen dieses Produkts,
deren Zulässigkeit nicht ausdrücklich von der TEAC
CORPORATION genehmigt wurde, können das Erlöschen
der Garantie zur Folge haben.
52
Inhaltsverzeichnis
Danke, dass Sie sich für TEAC entschieden haben. Lesen
Sie diese Bedienungsanleitung bitte sorgfältig durch,
um den gesamten Leistungsumfang des TN-300 nutzen
zu können.
WICHTIGE SICHERHEITSHINWEISE. . . . . . . . . . . . . . . . . . . . 52
Vor der ersten Inbetriebnahme . . . . . . . . . . . . . . . . . . . . . . 53
Vorbereiten des Plattenspielers. . . . . . . . . . . . . . . . . . . . . . 55
Tonabnehmernadeln. . . . . . . . . . . . . . . . . . . . . . . . . . . . . . . . 57
Anschlüsse. . . . . . . . . . . . . . . . . . . . . . . . . . . . . . . . . . . . . . . . . . 58
Bedienelemente und deren Funktion. . . . . . . . . . . . . . . . 59
Die Staubschutzhaube. . . . . . . . . . . . . . . . . . . . . . . . . . . . . . . 60
Der Umgang mit Schallplatten. . . . . . . . . . . . . . . . . . . . . . . 61
Vor der ersten Inbetriebnahme
Lieferumfang
Vergewissern Sie sich, dass alle nachfolgend aufgeführten Zubehörartikel im Lieferumfang enthalten sind.
Sollte ein Teil des Zubehörs fehlen oder beschädigt sein,
wenden Sie sich bitte an den Händler, bei dem Sie den
TN-300 erworben haben.
Plattentellermatte (Gummi) × 1
Single-Puck (45 UpM Adapter) × 1
Gegengewicht × 1
Tonabnehmerkopf × 1
AT95E MM-Tonabnehmersystem (Hersteller: AudioTechnica) vorinstalliert
Wechseln des Tonabnehmersystems. . . . . . . . . . . . . . . . . 62
Plattenteller × 1
Grundlegende Bedienung. . . . . . . . . . . . . . . . . . . . . . . . . . . 63
Staubschutzhaube × 1
Aufnahmen mithilfe eines Computers erstellen. . . . . . 65
Abstandshalter aus Gummi für die Staubschutzhaube
×2
Hilfe bei Funktionsstörungen. . . . . . . . . . . . . . . . . . . . . . . . 66
Technische Daten . . . . . . . . . . . . . . . . . . . . . . . . . . . . . . . . . . . 67
Scharniere × 2
Audiokabel × 1
USB-Kabel × 1
Netzadapter (GPE053A-120050-Z) × 1
Bedienungsanleitung (dieses Dokument) × 1
oo Bewahren Sie die Bedienungsanleitung an einem
sicheren Ort auf, so dass Sie jederzeit griffbereit ist.
53
DEUTSCH
Garantiekarte × 1 (nur für Kunden in den USA und
Kanada)
oo Informationen für Kunden in Europa sowie anderen Ländern und Regionen finden Sie auf der Rück
umschlagseite dieser Anleitung.
Vor der ersten Inbetriebnahme (Fortsetzung)
Hinweise zur Verwendung
oo Stellen Sie keine Objekte auf die Plattenspielerhaube,
da diese, aufgrund von Erschütterungen – besonders
während der Wiedergabe – Störgeräusche verursachen oder herunterfallen können.
oo Vermeiden Sie Aufstellungsorte, an denen der Plat
tenspieler direkter Sonne oder der Einwirkung anderer Wärmequellen ausgesetzt ist. Stellen Sie den
TN-300 nicht auf einen Verstärker oder ein anderes
Gerät, dessen abgestrahlte Wärme die zulässige Be
triebstemperatur des TN-300 übersteigt. Andern
falls riskieren Sie Verfärbungen, Verformungen sowie
Fehlfunktionen.
oo Achten Sie stets auf ausreichenden Belüftungsabstand,
da der TN-300 während des Betriebs warm werden
kann. Der Abstand zu Wänden und anderen Geräten
sollte mindestens 20 cm betragen, um gute Wärme
ableitung zu gewährleisten.
Bei Installation in Rack- oder Regalsystemen sollte der
Abstand oberhalb des TN-300 mindestens 35 cm und
der dahinter mindestens 10 cm betragen. Andernfalls
kann es im Geräteinneren zu einem Wärmestau kommen, der möglicherweise einen Brand verursachen
kann.
oo BEWEGEN SIE DEN TN-300 NICHT WÄHREND DER
SCHALLPLATTENWIEDERGABE. Während der Wieder
gabe dreht sich die Schallplatte. Bewegen und heben Sie den TN-300 während der Wiedergabe nicht
an, da dies Schäden an Schallplatte, Tonabnehmer
nadel, -system sowie dem TN-300 verursachen kann.
oo Nehmen Sie vor einem Transport oder Wechsel des
Aufstellungsorts die Schallplatte vom Plattenteller.
Wird der TN-300 mit darauf befindlicher Schallplatte
transportiert, können Schallplatte, Tonabnehmerna
del sowie -system beschädigt oder Fehlfunktionen
verursacht werden.
oo Die Spannung, an der Sie den TN-300 betreiben, sol
lte mit der auf der Geräterückseite angegebenen Be
triebsspannung übereinstimmen. Kontaktieren Sie im
Zweifelsfall einen Elektrofachmann.
54
Pflegehinweis
Falls die Gehäuseoberfläche des TN-300 verschmutzt
ist, verwenden Sie zum Reinigen ein weiches, trockenes
Tuch oder ein mit milder Seifenlösung getränktes Tuch.
Achten Sie darauf, dass die Gehäuseoberfläche vor der
erneuten Inbetriebnahme komplett trocken ist.
oo Verwenden Sie zum Reinigen niemals chemische Rei
nigungstücher, Verdünner oder ähnliche Substanzen,
da diese das Gehäuse des TN-300 beschädigen können.
VV ACHTUNG
Aus Sicherheitsgründen sollte vor dem Reinigen der
Netzstecker gezogen werden.
Vorbereiten des Plattenspielers
Während der Vorbereitungsarbeiten sollte sich der Plat
tenspieler im Bereitschaftsmodus (Standby) befinden
(siehe E auf den Seiten 58 und 59).
1 Stellen Sie den TN-300 auf einen stabilen, waagrechten Untergrund.
4 Legen Sie die Plattentellermatte aus
Gummi auf den Plattenteller.
Legen Sie vor Inbetriebnahme des Plattenspielers die
im Lieferumfang befindliche Gummi-Schutzmatte auf
den Plattenteller.
Achten Sie auf waagrechte Aufstellung, da die Stand
füße des TN-300 nicht höhenverstellbar sind.
2 Installieren des Plattentellers.
Positionieren Sie den Plattenteller über der Mittel
achse und senken Sie ihn langsam ab.
Mittelachse
Plattenteller
oben
oo Die Plattentellermatte besitzt eine Ober- und eine
Unterseite. Wie in der Abbildung gezeigt, gehört
die Seite mit den heraus stehenden, konzentrischen Kreisen nach unten.
5 Installieren des Gegengewichts.
3 Führen Sie den Riemen um die Riemen
welle des Motors.
Schieben Sie das Gegengewicht über das Ende des
Tonarms, und schrauben Sie es im Uhrzeigersinn fest.
Gegengewicht
DEUTSCH
Ziehen Sie den Gummi-Riemen, der um den Rie
menteller (Sub-Teller) herum liegt, mit einem Finger
durch die runde Öffnung und führen ihn über die
Riemenwelle des Motors.
oo Achten Sie darauf, dass sich der Riemen nicht
verdreht.
oo Drehen Sie den Plattenteller einige Male, um die
korrekte Führung des Riemens sicher zu stellen.
6 Installieren des Tonabnehmerkopfes.
Stecken Sie den Tonabnehmerkopf in die Tonarm
buchse und verriegeln Sie die Buchse.
runde Öffnung
Riemenwelle
Gummi-Riemen
Buchse
Tonabnehmerkopf
55
Vorbereiten des Plattenspielers (Fortsetzung)
Ausbalancieren des Tonarms und
Einstellen der Auflagekraft
5 Balancieren Sie den Tonarm durch Dre
hen des Gegengewichts so aus, dass er
exakt waagrecht ist.
I
0
Tonarmlift
1 Stellen Sie die Anti-Skating-Justierung
auf Null.
SKAT
oo Achten Sie darauf, dass die Abtastnadel nicht den
Plattenteller oder das Chassis berührt.
6 Führen Sie den Tonarm auf die Tonarm
stütze (Ruheposition) zurück und verriegeln Sie ihn, indem Sie die Tonarm
verriegelung nach links schieben.
G
AN
0
I–
SKAT
I
G
4 Senken Sie den Tonarm mithilfe des Ton
armlifts ab.
T
N
3 Heben Sie den Tonarm mithilfe des Ton
armlifts an und schieben Sie ihn ein wenig nach links.
7 Drehen Sie den Auflagekraft-Justierring,
bis der Skalenwert „0“ und die Mitten
markierung übereinstimmen.
3
Tonarmverriegelung
56
oo Entfernen Sie den Abtastnadelschutz, bevor Sie
die Einstellungen vornehmen.
I
3
I–
0
T
I
N
AN
2 Schieben Sie die Tonarmverriegelung
nach rechts, so dass der Tonarm frei
schwingen kann.
SKAT
G
AN
I–
N
T
3
SKAT
G
0
I–
3
T
Auflagekraft-Justierring
Mittenmarkierung
Anti-Skating-Justierung
N
AN
Gegengewicht
oo Achten Sie beim Einstellen des Auflagekraft-Justier
rings darauf, das sich das Gegengewicht nicht mitdreht.
Tonabnehmernadeln
8 Drehen Sie am Gegengewicht, bis der
Skalenwert des Justierrings die für das
Tonabnehmersystem angegebene Auf
lagekraft anzeigt.
SKAT
I
G
0
I–
3
T
N
AN
oo Für das mitgelieferte, vormontierte Tonabnehmer
system wird eine Auflagekraft von 2,0 Gramm
empfohlen.
Drehen Sie bei Verwendung des mitgelieferten
Tonabnehmersystems am Gegenwicht, bis der
Skalenwert „2“ angezeigt wird.
oo Tonabnehmernadeln sind Präzisionsbauteile und sehr
empfindlich. Eine verbogene Nadel oder abgebrochene Nadelspitze wird nicht mehr einwandfrei in der
Plattenrille geführt und kann daher Ihre Schallplatten
dauerhaft beschädigen oder Fehlfunktionen verursachen.
oo Reinigen Sie eine verschmutzte Tonabnehmernadel
mithilfe einer speziellen, im Fachhandel erhältlichen
Nadelbürste oder einem entsprechenden Produkt.
oo Reiben Sie nicht mit harten Gegenständen über die
Tonabnehmernadel und reinigen Sie die Nadel nicht
mit Lösungsmitteln oder anderen Chemikalien. An
dernfalls riskieren Sie, dass die Nadel dauerhaft beschädigt wird.
Wechseln des Nadelträgers
9 Stellen Sie den Anti-Skating-Wert ein.
VORSICHT
TI–SKA
ING
3
0
oo Versetzen Sie den TN-300 vor einem Nadelträger
wechsel in den Standby-Modus, da während der Mon
tage unerwartet hohe Kontaktpegel auftreten können.
oo Achten Sie beim Nadelträgerwechsel darauf, dass Sie
sich nicht an der Hand verletzen oder die Tonarm-/
Tonabnehmerkombination beschädigen.
oo Achten Sie darauf, dass Kleinkinder einen Nadelträger
nicht versehentlich verschlucken.
57
DEUTSCH
N
T
A
Beginnen Sie mit einem Anti-Skating-Wert von „2“
und stellen Sie während der Wiedergabe einer Schall
platte (siehe Seite 63) den Wert ein, bei dem der
rechte und linke Kanal gleich laut wiedergegeben
werden.
Das vorinstallierte Tonabnehmersystem ist ein AudioTechnica AT95E.
Eine Austauschnadel für das AT95E erhalten Sie beispielsweise bei dem Händler, bei dem Sie Ihren TN-300
erworben haben.
Befolgen Sie die Hinweise in der Installationsanleitung
des Austauschnadelträgers.
Anschlüsse
B C
Bei aktiviertem PHONO EQ (ON)
Verbinden Sie diese Ausgänge mit den
Eingängen eines Verstärkers, usw.
D
A
Bei deaktiviertem PHONO EQ (THRU)
Verbinden Sie diese Ausgänge mit den
PHONO-Eingängen eines Verstärkers,
usw.
Mitgelieferter Netzadapter (GPE053A-120050-Z)
Verstärker
L
R
A Analoge Audioausgänge (L/R)
VV Vorsichtsmaßnahmen beim Anschließen
oo Stellen Sie die Netzverbindung erst her, nachdem
alle Anschlüsse vorgenommen wurden.
oo Lesen und beachten Sie die Hinweise in den Bedie
nungsanleitungen aller Komponenten, mit denen
Sie den TN-300 verbinden.
B PHONO EQ-Schalter (Ausgangssignal
An diesen Anschlüssen liegt das analoge Ausgangs
signal an.
Mit Hilfe des PHONO EQ-Schalters kann die Aus
gangssignal-Entzerrung gewählt werden.
Verwenden Sie das mitgelieferte Audiokabel (oder
ein handelsübliches Audiokabel), um diese An
schlüsse mit den Eingängen eines Verstärkers, usw.
zu verbinden.
weiß (L)
rot (R)
E
weiß (L)
rot (R)
einstellung)
ON
Das MM-Tonabnehmersignal wird vom internen
Phono-Vorverstärker verstärkt und entzerrt, bevor es
an den Analogausgängen (L/R) anliegt.
THRU
Das MM-Tonabnehmersignal liegt direkt an den
Analogausgängen (L/R) an.
Verwenden Sie diese Einstellung, wenn der verwendete Verstärker, usw. einen PHONO-Eingang besitzt.
oo Im Auslieferungszustand befindet sich der Schal
ter in der ON-Stellung.
VORSICHT
Wenn sich der Schalter in der ON-Stellung befindet
und der TN-300 am PHONO-Eingang eines Verstär
kers, usw. angeschlossen ist, können über die Laut
sprecher sowie Kopfhörer unerwartet hohe Pegel
wiedergegeben werden, wodurch Ihr Gehör oder
das Audiosystem Schaden nehmen können.
58
Bedienelemente und deren Funktion
a
b
C USB-Port (USB Typ B)
Verbinden Sie diesen Port mit dem USB-Port eines
Computers, um das digitalisierte Ausgangssignal des
TN-300 zum Computer zu senden (siehe Seite 65).
I
G
0
SKAT
3
I–
N
AN
c
T
DGleichspannungseingang
Schließen Sie den im Lieferumfang befindlichen
Netzadapter (GPE053A-120050-Z) hier an, nachdem
Sie alle anderen Anschlüsse vorgenommen haben.
Vergewissern Sie sich, dass der Netzstecker des
Netzadapters mit einer Steckdose verbunden ist.
d
e
f
g
h
i
j
oo Ziehen Sie den Netzstecker aus der Steckdose,
falls Sie beabsichtigen, den TN-300 über einen
längeren Zeitraum nicht zu verwenden.
a Plattenteller (mit Matte)
Legen Sie Schallplatten zentriert auf den Plattenteller.
b Gegengewicht
c Auflagekraft-Justierring
d Anti-Skating-Justierung
eTonarmlift
Verwenden Sie diesen Hebel zum Anheben oder
Absenken des Tonarms.
fTonarmstütze
ESTANDBY/ON-Druckschalter
Mit Hilfe des STANDBY/ON-Druckschalters kann der
TN-300 eingeschaltet oder in den Bereitschaftsmodus
(Standby) versetzt werden.
Wenn der Plattenspieler nicht in Gebrauch ist, sollte
der Tonarm stets auf dieser Stütze aufliegen. Schie
ben Sie den an der Stütze befindlichen Haltebügel,
vor Wiedergabe einer Schallplatte, behutsam nach
rechts, um den Tonarm zu entriegeln.
gTonarm
hGeschwindigkeitswahlschalter
Wählen Sie die Umdrehungszahl (UpM), gemäß des
wiederzugebenden Schallplattentyps.
i START/STOP-Schalter (Motor An/Aus)
jTonabnehmerkopf
59
DEUTSCH
oo Verwenden Sie ausschließlich den mitgelieferten
Netzadapter (GPE053A-120050-Z).
VV Achten Sie darauf, dass die Steckdose, an der
Sie den TN-300 betreiben möchten, die korrekte Spannung liefert. Anschluss an einer
Steckdose, die nicht die korrekte Spannung
liefert, kann einen Brand oder Stromschlag
verursachen. Halten Sie beim Herstellen oder
Trennen der Verbindung stets den Netzste
cker fest. Ziehen Sie niemals am Netzkabel.
Trennen Sie das Netzkabel von der Steck
dose, wenn der TN-300 über einen längeren
Zeitraum nicht verwendet werden soll.
Die Staubschutzhaube
Anbringen der Abstandshalter
Öffnen und Schließen
der Staubschutzhaube
Aussparungen für die Abstandshalter
geöffnet
Abstandshalter
Stecken Sie die Abstandshalter, wie in der Abbildung
gezeigt, in die jeweilige Aussparung an der linken und
rechten Seite der Staubschutzhaube.
Anbringen der Staubschutzhaube
Staubschutz
haube
Öffnen
Ergreifen Sie die Staubschutzhaube an der Vorderkante
und klappen Sie sie vorsichtig nach oben, bis Sie einen
Widerstand spüren.
Die Staubschutzhaube bleibt in dieser Position geöffnet.
Schließen
TN-300
Scharnier
1 Setzen Sie die Scharniere in die linken
und rechten Scharnierbeschläge an der
Rückseite des TN-300 ein.
2 Positionieren Sie die Scharnieraufnah
men der Haube exakt über den Schar
nier en, und schieben Sie die Haube
vorsichtig auf die Scharniere.
Entfernen der Staubschutzhaube
Halten Sie die Haube an beiden Seiten fest, und ziehen
Sie sie vorsichtig, zusammen mit den Scharnieren, nach
oben aus den Scharnierbeschlägen. Ziehen Sie an
schließend die Scharniere aus der Staubschutzhaube.
60
Klappen Sie die Schutzhaube langsam nach unten, bis
sie komplett geschlossen ist.
VV Achten Sie beim Schließen der Haube darauf,
dass Sie nicht beispielsweise Ihre Hand ein
klemmen.
Der Umgang mit Schallplatten
Handhabung von Schallplatten
Achten Sie beim Anfassen einer Schallplatte darauf, dass
Sie die Rille nicht berühren. Halten Sie Schallplatten stets
am Label und an der Außenkante oder mit beiden Hän
den an der Außenkante fest.
Label
Rille
Kante
Reinigungshinweise
Hinweise zum Umgang und zur
Aufbewahrung
oo Setzen Sie Schallplatten nicht über längere Zeitspan
nen direkter Sonne, hohen Temperaturen oder Feuch
tigkeit aus. Längere Aufbewahrung unter solchen
Bedingungen verursacht Verformungen sowie andere
Schäden.
oo Stapeln Sie Schallplatten nicht, stellen Sie keine schweren Gegenstände darauf und vermeiden Sie Schräg
lagerung über längere Zeiträume, da hierdurch Ver
formungen sowie andere Schäden verursacht werden
können.
oo Vermeiden Sie direkten Kontakt von harten sowie
spitzen Gegenständen und der Rille, da hierdurch
Kratzer verursacht werden können.
oo Bewahren Sie Schallplatten, zum Schutz vor Staub,
Kratzern und Verformung, bei Nichtgebrauch stets in
der jeweils zugehörigen Plattenhülle auf.
oo Verwenden Sie keine schadhaften Schallplatten.
DEUTSCH
oo Fingerabdrücke und Staub können störende Neben
geräusche verursachen und die Nadel aus der Rille
„werfen“, wodurch Schallplatte und Tonabnehmer
nadel beschädigt werden können. Falls erforderlich,
reinigen Sie Schallplatten mithilfe einer im Fachhan
del erhältlichen Plattenbürste. Verwenden Sie niemals
Verdünner oder andere Chemikalien, da diese die
Oberfläche von Schallplatten beschädigen können.
oo Reinigen Sie Schallplatten in kreisenden Bewegun
gen, der Rille folgend, von außen nach innen.
61
Wechseln des Tonabnehmersystems
Trennen Sie zum Wechseln des Tonabnehmersystems
den Tonabnehmerkopf vom Tonarm.
oo Es wird empfohlen, den Nadelschutz während des
Tonabnehmertauschs aufgesteckt zu lassen.
Tonabnehmerkopf
Schrauben
Muttern
Tonabnehmerkabel
Tonabnehmersystem
1 Ziehen Sie die Tonabnehmerkabel vorsichtig vom Tonabnehmersystem ab.
2 Lösen Sie die Schrauben und entfernen
Sie das Tonabnehmersystem.
3 Installieren Sie das neue Tonabnehmer
system und ziehen Sie die Schrauben
wieder fest.
Folgende Abbildung zeigt die Positionen der Schrau
ben bei installiertem Tonabnehmersystem:
2,0 ± 0,5 mm
62
4 Schließen Sie die Tonabnehmerkabel
am Tonabnehmersystem an.
oo Signalverteilung und Farbkodierung der Tonab
nehmerkabel sind, wie folgt:
Signal
linker Kanal +
linker Kanal −
rechter Kanal +
rechter Kanal −
Farbe
weiß
blau
rot
grün
5 Balancieren Sie den Tonarm aus und
stellen Sie die Auflagekraft ein.
Folgen Sie den Anweisungen im Abschnitt: „Ausba
lancieren des Tonarms und Einstellen der Auflage
kraft“ auf Seite 56.
Grundlegende Bedienung
Schallplattenwiedergabe
1 Betätigen Sie zum Einschalten des Plat
tens pielers den STANDBY/ON-Druck
schalter auf der Geräterückseite.
2 Öffnen Sie langsam die Staubschutz
haube.
4 Stellen Sie die auf der Schallplatte angegebene Umdrehungszahl (UpM) ein.
Als Umdrehungszahl kann 33 1/3 oder 45 gewählt
werden.
5 Drehen Sie den START/STOP-Schalter
in die START-Position, um den Platten
tellerantrieb zu starten.
oo Wenn sich der START/STOP-Schalter in der STARTPosition befindet, beginnt der Plattenteller sich
zu drehen und die blaue LED leuchtet.
6 Schieben Sie die Tonarmverriegelung
nach rechts, so dass der Tonarm frei auf
der Tonarmstütze aufliegt.
SKAT
I
G
0
I–
3
T
N
Verwenden Sie bei Wiedergabe einer 45 UpM-Single
ohne Single-Stern den mitgelieferten Single-PuckAdapter.
AN
3 Legen Sie eine Schallplatte auf den
Plattenteller.
Tonarmverriegelung
Fortsetzung auf der nächsten Seite e
63
DEUTSCH
VV A
chten Sie beim Schließen der Haube darauf,
dass Sie nicht beispielsweise Ihre Hand einklemmen.
Grundlegende Bedienung (Fortsetzung)
SKAT
Beenden der Wiedergabe
1 Heben Sie den Tonarm mithilfe des Ton
armlifts oder des Bügels am Tonabneh
merkopf vorsichtig an und führen Sie
ihn auf die Tonarmstütze zurück.
I
G
0
I–
3
T
N
AN
7 Heben Sie den Tonarm mithilfe des Ton
armlifts an.
0
SKAT
I
3
I–
G
oo Sie können den Tonarm auch vorsichtig anheben
und an der gewünschten Position behutsam auf
die Schallplatte absenken, ohne zuvor den Ton
armlift zu bedienen.
T
N
Tonarm
AN
Tonarmlift
Tonarmlift
Tonarm
8 Positionieren Sie die Abtastnadel über
der Einlaufrille oder am Beginn des
Titels, den Sie wiedergeben möchten.
2 Drehen Sie den START/STOP-Schalter
in die STOP-Position, um den Platten
tellerantrieb zu stoppen.
9 Senken Sie den Tonarm mithilfe des Ton
armlifts langsam ab.
Senken Sie den Tonarm vorsichtig ab, bis die Abtast
nadel die Schallplatte berührt.
oo Zur Vermeidung von Staub kann die Schutzhaube
während der Schallplattenwiedergabe geschlos
sen bleiben.
VV Stellen Sie keine Gegenstände auf die Haube,
da sie, besonders während der Wiedergabe,
aufgrund von Erschütterungen, Störgeräusche
verursachen oder herunterfallen können.
VORSICHT
oo Berühren Sie während der Wiedergabe nicht den Ton
arm oder die sich drehende Schallplatte.
oo Halten Sie den Plattenteller während der Wiedergabe
nicht an.
Schallplattenwiedergabe bei zu hoher Lautstärke
kann Rückkopplungen verursachen. Reduzieren
Sie in diesem Fall die Lautstärke am Verstärker.
64
oo Sobald der Antriebsmotor ausgeschaltet wird, er
lischt auch die blaue LED.
Aufnahmen mithilfe eines Computers erstellen
Verwenden Sie das mitgelieferte USB-Kabel, um den USBPort des Plattenspielers mit dem USB-Port eines Compu
ters zu verbinden und das digitalisierte Ausgangssignal
des TN-300 zum Computer zu senden.
Unterstützte Betriebssysteme
Computer mit folgenden Betriebssystemen können via
USB mit dem TN-300 verbunden werden.
Windows OS
Windows 7 (32-Bit, 64-Bit)
Windows 8 (32-Bit, 64-Bit)
Windows 8.1 (32-Bit, 64-Bit)
(Stand: September 2014)
Mac OS X
OS X Lion 10.7
OS X Mountain Lion 10.8
OS X Mavericks 10.9
(Stand: September 2014)
Für andere Betriebssysteme kann die einwandfreie Funk
tion nicht zugesagt werden.
oo Der TN-300 nutzt den Standardtreiber dieser Betriebs
systeme. Die Installation eines speziellen Treibers ist
nicht erforderlich.
3 Schalten Sie den TN-300 mithilfe des
STANDBY/ON-Druckschalters ein.
Bei korrekter Verbindung erkennt der Computer die
USB-Verbindung automatisch und identifiziert sie
als „USB Audio CODEC“.
oo Um das Audiosignal des Plattenspielers auf einem
Computer aufzeichnen zu können, muss darauf eine
Audio-Aufnahmesoftware installiert sein. Sie können
eine entsprechende Applikation kaufen oder eine
Freeware-Anwendung, wie Audacity (http:// audacity.
sourceforge.net/), aus dem Internet laden. TEAC bietet
für Freeware-Produkte jedoch keinen Support an.
oo Vermeiden Sie bei bestehender USB-Verbindung und
während der Aufzeichnung von Audiodaten folgende Maßnahmen, da hierdurch Fehlfunktionen des
Computers verursacht werden. Die Aufnahmesoft
ware sollte grundsätzlich beendet werden, bevor
eine der folgenden Maßnahmen durchgeführt wird:
u Trennen der USB-Verbindung
u Aktivieren des Standby-Modus
Computer-Einstellungen
Folgendes Beispiel veranschaulicht die erforderlichen
Einstellung bei Verwendung von Windows 7:
1 Wählen Sie im Startmenü „Systemsteue
rung“.
1 Schalten Sie den Computer ein.
2 Klicken Sie auf „Ton an“.
Vergewissern Sie sich, dass Computer und Betriebs
system ordnungsgemäß funktionieren.
2 Verwenden Sie das USB-Kabel, um den
Computer und den TN-300 zu verbinden.
3 Klicken Sie auf die Registerkarte „Auf
zeichnung“ und bestätigen Sie, dass
„USB Audio CODEC“ als „Standardgerät“
eingestellt ist.
4 Wählen Sie „Mikrofon USB Audio CODEC“
aus und klicken Sie auf die „Eigenschaf
ten“-Schaltfläche.
5 Klicken Sie auf die Registerkarte „Erwei
tert“.
6 Wählen Sie im „Standardformat“-PullDown-Menü den Eintrag „2-Kanal, 16Bit, 48000 Hz (DVD-Qualität)“.
7 Klicken Sie auf „OK“.
65
DEUTSCH
Anschließen des Computers
Hilfe bei Funktionsstörungen
Sollten Funktionsstörungen auftreten, versuchen Sie bitte, anhand folgender Hinweise, selbst Abhilfe zu schaffen,
bevor Sie den Service kontaktieren. Eine Störung kann
auch durch externe Einflüsse sowie andere Geräte verursacht werden. Vergewissern Sie sich bitte, dass Geräte, die
Sie zusammen mit dem TN-300 verwenden, ordnungs
gemäß angeschlossen sind und betrieben werden.
Sollte der TN-300 dennoch nicht einwandfrei funktionie
ren, kontaktieren Sie den Händler, bei dem Sie ihn erwor
ben haben.
Keine Spannung
ee Vergewissern Sie sich, dass der Netzadapter an einer funktionsfähigen Steckdose angeschlossen ist.
Schalten Sie den TN-300 anschließend mithilfe des
STANDBY/ON-Druckschalters ein (siehe Seite 58).
Keine Wiedergabe
ee Falls die analogen Audioausgänge mit den Audio
eingängen eines Verstärkers oder anderen Geräts
verbunden sind, stellen Sie den PHONO EQ-Schalter
(Ausgangssignaleinstellung) auf die ON-Position
(siehe Seite 58).
Keine oder verrauschte Wiedergabe
ee Vergewissern Sie sich, dass der Abtastnadelschutz
(weiße Kunststoffkappe) nicht aufgesteckt ist.
ee Reinigen Sie die Abtastnadel (siehe Seite 57).
ee Ersetzen Sie abgenutzte Abtastnadeln frühzeitig
(siehe Seite 57).
ee Wählen Sie einen Aufstellungsort, der möglichst weit
von TV-, Mikrowelle- und anderen Geräten, die elek
tromagnetische Strahlung erzeugen, entfernt ist.
66
Die Tonhöhe stimmt nicht.
ee Stellen Sie die auf der Schallplatte angegebene Um
drehungszahl (UpM) ein (siehe Seite 63).
Tonsprünge/Tonaussetzer
ee Erschütterungen können die Ursache sein. Platzie
ren Sie den TN-300 an einem stabilen Ort.
ee Reinigen Sie verschmutzte Schallplatten.
ee Verwenden Sie keine verkratzten Schallplatten.
ee Balancieren Sie den Tonarm erneut aus und justieren
Sie erneut die Auflagekraft (siehe Seite 56). Falls die
Auflagekraft geringer ist, als für das installierte Tonab
nehmersystem angegeben, erhöht sich die Gefahr,
dass die Nadel aus der Rille „springt“.
Technische Daten
Plattenspieler
Allgemein
Antriebssystem. . . . . . . . . . . . . . . . . . . . . . . . . . Riemenantrieb
Motor. . . . . . . . . . . . . . . . . . . . . . . . . . . . . . . . Gleichstrommotor
Geschwindigkeiten. . . . . . . . . . . . . . . . 33 1/3 UpM, 45 UpM
Veränderbare Geschwindigkeit . . . . . . . . . . . . . . . . . . . . ±2 %
Gleichlaufschwankung . . . . . . . . . . . . . . . . . . . . . . . . . . . . 0,2 %
Rauschabstand. . . . . . . . . . . . . . . . . . . . . . . . 67 dB oder mehr
(A-bewertet, 20 kHz LPF)
Plattenteller . . . . . . . . . . . . . . . . . . . . . . Aluminum-Druckguss
30 cm Durchmesser
Netzadapter-Spannungsversorgung
Eingang. . . . . . . . . . . . . . . . . AC 100 V–AC 240 V, 50-60 Hz
Ausgang. . . . . . . . . . . . . . . . . . . . . . . . . . . . . . . . 12 V, 500 mA
Leistungsaufnahme
Standby. . . . . . . . . . . . . . . . . . . . . . . . . . 0,5 W oder weniger
On (START). . . . . . . . . . . . . . . . . . . . . . . . 1,5 W oder weniger
Gewicht. . . . . . . . . . . . . . . . . . . . . . . . . . . . . . . . . . . . . . . . . . 4,9 kg
Betriebstemperaturbereich. . . . . . . . . . . . . . . . 5° C bis 35° C
Abmessungen (B × H × T) (inklusive vorstehender Teile)
420 × 356 × 117 mm
Tonarm
Tonarmtyp
Statisch ausbalancierter, gerader Tonarm
Effektive Tonarmlänge. . . . . . . . . . . . . . . . . . . . . . . . . . 223 mm
Auflagekraft-Variationsbereich. . . . . . . . . . . . . . . . . . . . . 0–5 g
Zulässiges Tonabnehmergewicht. . . . . . . . . . . . . . 3,5–6,5 g
Tonabnehmersystem
Typ. . . . . . . . . . . . . . . . . . . . . . . . . . . . . . . . . . . . . . . . . . . . . . . . . MM
Ausgangsspannung. . . . . . . . . . . . . . . . . . . . . . . 2,5 mV ±3 dB
Auflagekraft. . . . . . . . . . . . . . . . . . . . . . . . . . . . . . . . . . 2,0 ±0.5 g
Tonabnehmergewicht. . . . . . . . . . . . . . . . . . . . . . . . 5,7 ±0.5 g
Gewicht des mitgelieferten Tonabnehmerkopfes
10 g (inklusive Schrauben, Muttern und Kabeln)
Ausgangsspannung
USB-Port
Der USB-Port wird vom USB-Bus des Computers mit
Spannung versorgt (Full Speed). . . . USB-Anschluss Typ B
USB-Bus Spannungsversorgung . . . . . . . . . . . . . 5 V, 500 mA
oo Verwenden Sie das mitgelieferte USB-Kabel, um den
TN-300 mit einem Computer zu verbinden und den
USB-Port mit Spannung zu versorgen.
Mitgeliefertes Standardzubehör
Plattentellermatte (Gummi) × 1
Single-Puck (45 UpM Adapter) × 1
Gegengewicht × 1
Tonabnehmerkopf × 1
AT95E MM-Tonabnehmersystem (Hersteller: AudioTechnica) vorinstalliert
Plattenteller × 1
Staubschutzhaube × 1
Abstandshalter aus Gummi für die Staubschutzhaube
×2
Scharniere × 2
Audiokabel × 1
USB-Kabel × 1
Netzadapter (GPE053A-120050-Z) × 1
Bedienungsanleitung (dieses Dokument) × 1
Garantiekarte × 1 (nur für Kunden in den USA und
Kanada)
DEUTSCH
PHONO EQ THRU. . . . . . . . . . . . . . . . . . . . . . . . . . 2,5 mV ±3 dB
PHONO EQ ON. . . . . . . . . . . . . . . . . . . . . . . 155 mV (−16 dBV)
Anschlüsse. . . . . . . . . . . . . . . . . . . . . . . . . . . . . . . . . RCA (Cinch)
oo Leistungsdaten spezifiziert bei 20° C.
oo Änderungen in Design und technischer Ausstattung
vorbehalten.
oo Gewichtsangaben und Abmessungen sind Nähe
rungswerte.
oo Abbildungen der Bedienungsanleitung können ge
ringfügig von den Produktionsmodellen abweichen.
67
IMPORTANTI ISTRUZIONI DI SICUREZZA
oo Non esporre questo apparecchio a gocce o spruzzi
d’acqua.
oo Non appoggiare sopra l'apparecchio oggetti contenenti acqua o liquidi di altro genere.
oo Non installare questo apparecchio in uno spazio
ristretto come una libreria o luoghi simili.
oo L'apparecchio consuma una insignificante quantità di
corrente con l'alimentazione POWER o STANDBY/ON
non in posizione ON.
oo Questo apparecchio deve essere collocato sufficientemente vicino alla presa di corrente affinché questa
possa essere raggiunta con facilità in ogni momento.
oo La spina è utilizzata come dispositivo di scollegamento e deve rimanere sempre operabile.
oo Si deve usare cautela quando si usano auricolari o
cuffie con il prodotto poiché una eccessiva pressione
sonora (volume) negli auricolari o in cuffia può causare la perdita dell'udito.
Per gli utenti europei
Smaltimento delle apparecchiature elettriche ed
elettroniche
(a)Tutte le apparecchiature elettriche ed elettroniche devono
essere smaltite separatamente dai rifiuti urbani mediante
impianti di raccolta designati dal governo o dalle autorità
locali.
(b)Con lo smaltimento corretto di apparecchiature elettriche
ed elettroniche, si contribuisce a risparmiare preziose risorse
ed evitare potenziali effetti negativi sulla salute umana e
l’ambiente.
(c)Gli impianti di smaltimento improprio di rifiuti elettrici ed
elettronici possono avere gravi conseguenze sull’ambiente e
sulla salute umana a causa della presenza di sostanze pericolose nelle apparecchiature.
(d)Il simbolo RAEE (Rifiuti Apparecchiature Elettriche
ed Elettroniche), che mostra un bidone con ruote
barrato, indica che le apparecchiature elettriche ed
elettroniche devono essere raccolte e smaltite separatamente dai rifiuti domestici.
(e)I centri di raccolta sono disponibili per gli utenti finali. Per
informazioni più dettagliate circa lo smaltimento delle vecchie apparecchiature elettriche ed elettroniche, contattare
il negozio dove è stato acquistato l’apparecchio o l’autorità
locale.
Smaltimento delle pile e/o accumulatori
(a)I rifiuti di pile e/o accumulatori devono essere smaltiti separatamente dai rifiuti urbani mediante impianti di raccolta
designati dal governo o dalle autorità locali.
DICHIARAZIONE DI CONFORMITÀ
Noi, TEAC Audio Europe, Liegnitzer Straße
6, 82194 Gröbenzell, Germania dichiariamo
sotto la nostra responsabilità, che il prodotto TEAC
descritto in questo manuale è conforme ai corrispondenti standard tecnici.
(b)Lo smaltimento corretto dei rifiuti di pile e/o accumulatori
contribuisce a risparmiare preziose risorse ed evitare potenziali effetti negativi sulla salute umana e l’ambiente.
(c)Lo smaltimento non corretto dei rifiuti di pile e/o accumulatori possono avere gravi conseguenze sull’ambiente e sulla
salute umana a causa della presenza di sostanze pericolose in
essi.
ATTENZIONE
(d)Il simbolo RAEE, che mostra un contenitore con ruote
barrato, indica che le pile e/o accumulatori devono
essere raccolti e smaltiti separatamente dai rifiuti
Pb, Hg, Cd
domestici.
Se una pila o accumulatore contiene più dei valori
specificati di piombo (Pb), mercurio (Hg) e/o di cadmio (Cd)
come definito nella direttiva 2006/66/CE, i simboli chimici di
questi elementi verranno indicati sotto il simbolo RAEE.
Cambiamenti o modifiche a questa apparecchiatura
non espressamente approvati da TEAC CORPORATION
invalideranno la garanzia dell'utente.
(e)I centri di raccolta sono disponibili per gli utenti finali. Per informazioni più dettagliate circa lo smaltimento dei rifiuti di pile e/o
accumulatori, contattare il negozio dove è stato acquistato l’apparecchio o l’autorità locale.
68
Indice
Grazie per aver scelto TEAC. Leggere attentamente
questo manuale per ottenere le migliori prestazioni da
questo apparecchio.
IMPORTANTI ISTRUZIONI DI SICUREZZA. . . . . . . . . . . . . . 68
Prima dell’uso . . . . . . . . . . . . . . . . . . . . . . . . . . . . . . . . . . . . . . . 69
Preparazione del giradischi . . . . . . . . . . . . . . . . . . . . . . . . . . 71
Note sugli stili. . . . . . . . . . . . . . . . . . . . . . . . . . . . . . . . . . . . . . . 73
Collegamenti. . . . . . . . . . . . . . . . . . . . . . . . . . . . . . . . . . . . . . . . 74
Nomi e funzioni delle parti. . . . . . . . . . . . . . . . . . . . . . . . . . . 75
Coperchio giradischi. . . . . . . . . . . . . . . . . . . . . . . . . . . . . . . . . 76
Maneggiare i dischi. . . . . . . . . . . . . . . . . . . . . . . . . . . . . . . . . . 77
Sostituzione della cartuccia. . . . . . . . . . . . . . . . . . . . . . . . . . 78
Prima dell’uso
Accessori inclusi
Controllare che la scatola comprenda tutti gli accessori
in dotazione indicati di seguito. Si prega di contattare il
negozio dove è stata acquistata l’unità se uno qualsiasi
di questi accessori è mancante o è stato danneggiato
durante il trasporto.
Tappetino di gomma × 1
Adattatore 45 giri × 1
Contrappeso × 1
Conchiglia × 1
AT95E MM cartuccia (realizzata da Audio-Technica)
preinstallata
Operazioni di base. . . . . . . . . . . . . . . . . . . . . . . . . . . . . . . . . . . 79
Piatto × 1
Registrazione con un computer. . . . . . . . . . . . . . . . . . . . . . 81
Coperchio giradischi × 1
Risoluzione dei problemi . . . . . . . . . . . . . . . . . . . . . . . . . . . . 82
Piedini in gomma per il coperchio giradischi × 2
Specifiche. . . . . . . . . . . . . . . . . . . . . . . . . . . . . . . . . . . . . . . . . . . 83
Cerniere × 2
Cavo audio × 1
Cavo USB × 1
Alimentatore CA (GPE053A-120050-Z) × 1
Manuale di istruzioni (questo documento) × 1
oo Conservare questo manuale in un luogo sicuro per
future consultazioni.
Cartolina di garanzia × 1 (per i clienti negli Stati Uniti
e Canada)
oo Vedere il retro di questo documento per informazioni sulla garanzia in Europa e in altri paesi o aree.
ITALIANO
69
Prima dell’uso (continua)
Precauzioni per l’uso
Manutenzione
oo Non collocare alcun oggetto sul coperchio giradischi.
Gli oggetti sul coperchio potrebbero causare disturbi
a causa di vibrazioni o cadere, soprattutto durante la
riproduzione.
Se la superficie dell’unità si sporca, pulirla con un panno
morbido o utilizzare sapone liquido neutro diluito.
Lasciare asciugare completamente la superficie dell’unità prima di utilizzarla.
oo Evitare di collocare l’unità alla luce solare diretta,
vicino a una fonte di calore o in altre condizioni simili.
Non collocare l’unità sopra un amplificatore o altri
dispositivi che possono generare calore superiore
alla temperatura di funzionamento di questa unità.
Ciò potrebbe causare scolorimento, deformazione o
malfunzionamento.
oo Non utilizzare panni chimici, solventi o sostanze
simili perché potrebbero danneggiare la superficie
dell’unità.
oo Poiché l’unità potrebbe divenire calda durante il funzionamento, lasciare sempre uno spazio sufficiente
intorno per la ventilazione. Quando si installa questa
unità, lasciare un po‘ di spazio (almeno 20 cm) dagli
altri dispositivi e le pareti per consentire una buona
dissipazione del calore.
Quando si colloca in un rack, per esempio, lasciare
almeno 35 cm sopra e 10 cm dietro. Il mancato rispetto
di queste precauzioni potrebbe causare un surriscaldamento interno e provocare incendi.
oo NON SPOSTARE L’UNITÀ DURANTE LA RIPRODUZIONE.
Durante la riproduzione, il disco ruota. Non sollevare o
spostare l’unità durante la riproduzione. Ciò potrebbe
danneggiare il disco, lo stilo, la cartuccia o l’unità.
oo Rimuovere sempre il disco prima di trasferirsi o spostare l’unità. Spostamento dell’unità con un disco sul
giradischi potrebbe danneggiare il disco, lo stilo e la
cartuccia o potrebbe causare malfunzionamenti.
oo Il voltaggio fornito all’unità deve corrispondere alla
tensione indicata sul pannello posteriore. Se si è in
dubbio riguardo a ciò, consultare un elettricista.
70
VV CAUTELA
Per motivi di sicurezza, scollegare il cavo di alimentazione dalla presa di corrente prima di pulirla.
Preparazione del giradischi
Tenere l’unità in standby durante la configurazione ( E a
pagina 74 e a pagina 75).
1 Metterla su una superficie piana.
4 Posizionare il tappetino di gomma.
Posizionare il tappetino protettivo di gomma che è
incluso con il giradischi prima dell’uso.
Dal momento che le altezze dei piedini di questa
unità non possono essere regolate, assicurarsi di
posizionarla su una superficie piana.
2 Installare il piatto giradischi.
Allineare il piatto giradischi con l’albero centrale e
installarla.
Albero centrale
Piatto
Sopra
oo Il tappetino di gomma ha una parte superiore e
una inferiore. Come mostrato in figura, il lato con
i cerchi concentrici increspati deve essere collocato verso il basso.
5 Installare il contrappeso.
Posizionare il contrappeso all’estremità del braccetto e ruotarlo in senso orario per stringerlo.
3 Avvolgere la cinghia attorno alla puleggia del motore.
Contrappeso
Usare un dito per tirare la cinghia di gomma che è
avvolta intorno al piatto inferiore attraverso l’apertura rotonda e avvolgerla intorno alla puleggia del
motore.
oo Fare attenzione a non torcere la gomma.
oo Ruotare il piatto diverse volte per assicurarsi che
sia sicuro.
6 Installare la conchiglia.
Apertura rotonda
Puleggia del motore
Cinghia in gomma
Dado
Conchiglia
71
ITALIANO
Inserire la conchiglia alla fine del braccetto e ruotare
il dado per fissarla.
Preparazione del giradischi (continua)
Bilanciare il braccetto e regolare la pressione dello stilo
5 Ruotare il contrappeso e regolarlo in
modo che il braccetto rimanga in equilibrio.
I
0
Levetta
1 Impostare la ghiera anti-skating a zero.
SKAT
oo Rimuovere il coperchio della cartuccia di protezione stilo prima di eseguire regolazioni.
oo Fare attenzione a non lasciare che lo stilo tocchi
l’unità.
6 Riportare il braccetto alla sua posizione
originale e spostare il fermo del braccetto verso sinistra per bloccarlo.
I
G
3
I–
0
T
I
N
AN
2 Spostare il braccetto dal fermo verso
destra per lasciarlo libero.
SKAT
G
AN
I–
N
T
3
SKAT
G
0
I–
3
T
Anello di regolazione della pressione
Linea centrale
Anti-skating
N
AN
Contrappeso
Fermo
7 Ruotare l’anello di regolazione della
pressione dello stilo in modo che la linea
centrale sia allineata con lo 0 (zero) della
scala.
4 Abbassare la levetta.
72
SKAT
I
G
0
I–
3
T
N
AN
3 Sollevare la levetta e spostare leggermente il braccetto verso sinistra.
oo Fare attenzione a non lasciare che il contrappeso
giri.
Note sugli stili
8 Ruotare il contrappeso in modo che la
pressione dello stilo indicata sulla scala
di regolazione corrisponda al peso specificato per il tipo di cartuccia.
SKAT
I
G
0
I–
3
T
N
AN
oo Il peso da impostare per lo stilo della cartuccia in
dotazione è di 2,0 g.
Quindi, ruotare su 2 della scala del contrappeso
quando si utilizza la cartuccia in dotazione.
oo Gli stili per dischi sono componenti di precisione,
pertanto bisogna maneggiarli con cura onde evitare
di piegarli o danneggiare la loro punta. Se uno stilo
si piega o viene danneggiato, potrebbe non essere in
grado di seguire il solco in modo preciso e potrebbe
danneggiare i dischi o causare altri malfunzionamenti.
oo Se uno stilo raccoglie lo sporco del disco, usare un
detergente per stili disponibile in commercio o un
prodotto simile per pulirlo.
oo Non strofinare la punta dello stilo con forza usando
oggetti duri. Non pulire lo stilo con sostanze chimiche solventi o altri. In questo modo si potrebbe
danneggiarlo.
9 Regolare il selettore di anti-skating.
N
TI–SKA
ING
3
0
La cartuccia in dotazione è una Audio-Technica AT95E.
Si consiglia di acquistare uno stilo di ricambio per la
cartuccia AT95E presso il rivenditore che vende questa
unità.
Seguire le istruzioni di sostituzione nel manuale dello
stilo di ricambio.
T
A
Iniziare con un’impostazione a 2 e regolare l’anti-skating durante la riproduzione del disco (pagina
79) nella posizione in cui il bilanciamento sinistro/destro del volume è centrale.
Sostituzione dello stilo
CAUTELA
73
ITALIANO
oo Poiché potrebbero verificarsi forti rumori, mettere l’unità in standby prima di cambiare lo stilo.
oo Fare attenzione a non ferire le dita o danneggiare l’apparecchiatura.
oo Non permettere a bambini piccoli di ingerire accidentalmente uno stilo.
Collegamenti
E
B C
Quando PHONO EQ è su ON
Collegare alle prese di ingresso
audio dell’amplificatore ecc.
D
A
Alimentatore AC
incluso
(GPE053A-120050-Z)
Quando PHONO EQ è su THRU
Collegare agli ingressi PHONO
dell’amplificatore ecc.
L
Amplificatore
VV Precauzioni durante i collegamenti
oo Collegare l’unità solo dopo aver effettuato tutti gli
altri i collegamenti.
oo Leggere attentamente i manuali dei dispositivi che
si vogliono collegare e seguire le relative istruzioni
quando si effettuano i collegamenti.
R
A Prese di uscita audio analogiche (L/R)
B PHONO EQ (interruttore di impostazione
di uscita audio)
Questi sono segnali audio analogici di uscita.
L’impostazione del selettore PHONO EQ cambia il
tipo di segnale in uscita.
ON
I segnali amplificati dall’equalizzatore incorporato
vengono emessi dalle prese di uscita audio analogiche (L/R).
THRU
Il segnale di una cartuccia MM viene emesso direttamente attraverso le prese di uscita audio analogica
(L / R).
Utilizzare questa impostazione quando si collega
un’apparecchiatura dotato di ingressi PHONO.
Usare il cavo audio in dotazione (o quelli disponibili
in commercio) per collegare altre apparecchiature
alle prese di uscita di questa unità.
Bianco (L)
Rosso (R)
Bianco (L)
Rosso (R)
oo Al momento della spedizione dalla fabbrica, questo è impostato suON.
CAUTELA
Quando è impostato su ON, se viene collegato agli
ingressi PHONO di un amplificatore, per esempio,
l’uscita dagli altoparlanti o cuffie sarà molto forte,
per cui si potrebbero danneggiare le apparecchiature o l’udito.
74
Nomi e funzioni delle parti
a
b
CPorta USB (USB tipo B)
Collegare questa alla porta USB di un computer per
convertire il segnale audio in digitale e mandarlo al
computer (pagina 81).
I
G
0
SKAT
3
I–
N
AN
c
T
D Connettore di ingresso DC
Dopo aver completato tutti gli altri collegamenti, collegare l’alimentatore AC incluso (GPE053A-120050-Z)
a questa presa.
Verificare che la spina di alimentazione dell’alimentatore AC sia inserito in una presa di corrente.
d
e
f
g
h
i
j
oo Scollegare il cavo di alimentazione dalla presa di
corrente quando non si prevede di utilizzare l’unità per un lungo periodo di tempo.
oo Non utilizzare un alimentatore AC diverso da
quello in dotazione (GPE053A-120050-Z).
VV Assicurarsi di collegare il cavo di alimentazione a una presa AC che fornisca la giusta
tensione. Il collegamento a una presa che
fornisce una tensione non corretta può provocare incendi o scosse elettriche.
Tenere la spina quando la si collega a una
presa. Non tirare o strattonare il cavo di alimentazione.
Scollegare il cavo di alimentazione dalla presa
di corrente quando non si prevede di utilizzare l’unità per un lungo periodo di tempo.
aPiatto
Posizionare il disco centrato sul piatto.
bContrappeso
c Anello per regolare il peso sullo stilo
d Selettore anti-skating
eLevetta
Usare questa levetta per sollevare il braccetto e per
abbassarlo sul disco.
f Supporto per il braccetto
E Pulsante STANDBY/ON
gBraccetto
h Manopola di regolazione della velocità
di rotazione
Impostare la velocità di rotazione (RPM) adatta per
il disco.
i Manopola START/STOP di rotazione del
giradischi
jConchiglia
75
ITALIANO
Premere il pulsante STANDBY/ON per accendere
l’unità o metterla in standby.
Questo è un supporto per il braccetto nella posizione di riposo. Spingere delicatamente il fermo
verso destra per rilasciare il braccetto prima di suonare un disco.
Coperchio giradischi
Fissaggio dei piedini in gomma
Apertura e chiusura del coperchio
giradischi
Punti di fissaggio dei piedini in gomma
Aperto
Piedino in gomma
Come mostrato nella figura, fissare i piedini in gomma ai
lati sinistro e destro del coperchio giradischi.
Apertura
Montaggio del coperchio giradischi
Tenere il bordo anteriore del coperchio giradischi e sollevarlo delicatamente sino al suo completo arresto.
Il coperchio giradischi rimarrà aperto in questa posizione.
Coperchio
giradischi
Chiusura
Unità
principale
Abbassare delicatamente il coperchio giradischi fino alla
completa chiusura.
Cerniera
1 Inserire completamente le cerniere nei
supporti alle estremità destra e sinistra
della parte posteriore dell’unità principale.
2 Allineare la parte superiore delle cerniere
con supporti del coperchio giradischi e
inserirle.
Rimozione del coperchio giradischi
Tenere entrambi i bordi del coperchio giradischi e sollevarlo lentamente per rimuoverlo insieme alle cerniere
dall’unità. Poi, rimuovere le cerniere dal coperchio giradischi.
76
VV F
are attenzione alle dita durante l’apertura e
la chiusura del coperchio giradischi.
Maneggiare i dischi
Come tenere i dischi
Precauzioni
Quando si tiene un disco o lo si rimuove dalla custodia, evitare di toccare i solchi tenendolo per l’etichetta
e il bordo con una mano o tenendolo per i bordi con
entrambe le mani.
Etichetta
Solchi
Bordo esterno
oo Non lasciare i dischi in luoghi esposti alla luce solare
diretta o molto caldi o molto umidi. Lasciare a lungo
un disco in tale condizioni può provocare deformazioni o altri danni.
oo Non impilare più dischi o collocare oggetti pesanti su
di loro. Non lasciare i dischi in posizione angolata per
lunghi periodi di tempo. Ciò potrebbe causare deformazioni o altri danni.
oo Non lasciare che oggetti duri vengano in contatto
direttamente con i solchi. Ciò potrebbe graffiarli.
oo Dopo aver terminato la riproduzione di un disco,
rimetterlo sempre nella sua custodia per una corretta conservazione. Lasciare un disco non protetto
potrebbe causare deformazioni o graffi.
oo Non utilizzare dischi incrinati.
Pulizia
oo Le impronte digitali e la polvere su un disco possono
causare rumore e salti, così come danneggiare il disco
stesso e lo stilo. Usare un pulisci-dischi reperibile in
commercio per pulire i dischi. Non usare solventi o
qualcosa di diverso da un pulisci-dischi. Tali sostanze
potrebbero danneggiare la superficie del disco.
oo Quando si utilizza un pulisci-dischi, pulire la superficie
del disco con un movimento circolare, seguendo i
solchi.
ITALIANO
77
Sostituzione della cartuccia
Per cambiare la cartuccia, rimuovere prima la conchiglia
dal braccetto.
oo Si consiglia di mantenere il cappuccio di protezione
dell’ago della cartuccia durante la sostituzione.
Conchiglia
Viti
Dadi
Guide della conchiglia
Cartuccia
1 Scollegare i terminali della conchiglia
dalla cartuccia.
2 Allentare le viti e rimuovere la cartuccia.
3 Fissare la nuova cartuccia e serrare le
viti.
Vedere la figura seguente per la posizione delle viti
quando sono fissate.
2,0 ± 0,5 mm
78
4 Collegare i terminali della conchiglia alla
cartuccia.
oo I segnali e i colori dei fili della conchiglia sono
riportati di seguito.
Segnale
Canale sinistro +
Canale sinistro −
Canale destro +
Canale destro −
Colore
Bianco
Blu
Rosso
Verde
5 Bilanciare il braccetto e regolare la
pressione dello stilo.
Seguire le procedure descritte in “Bilanciare il braccetto e regolare la pressione dello stilo” a “Bilanciare
il braccetto e regolare la pressione dello stilo” a
pagina 72.
Operazioni di base
Riproduzione di dischi
1 Premere il pulsante STANDBY/ON sul
retro dell’unità per accenderla.
2 Aprire lentamente il coperchio del
giradischi.
4 Impostare in base alla velocità di rotazione (RPM) del disco.
La velocità di rotazione può essere impostata a
33 1/3 o 45 giri.
5 Girare la manopola START/STOP su
START per avviare il giradischi.
oo Quando la manopola di rotazione START/STOP è
impostata per l’avvio, il piatto inizierà a ruotare e
il LED blu si accenderà.
VV F
are attenzione alle dita, per esempio, durante
l’apertura e la chiusura del coperchio giradischi.
6 Spostare il fermo del braccetto verso
destra per rilasciare il braccetto.
3 Posizionare un disco sul piatto.
SKAT
I
G
0
I–
3
T
N
AN
Durante la riproduzione di un 45 giri, utilizzare l’adattatore incluso.
ITALIANO
Fermo
Continua a pagina seguente e
79
Operazioni di base (continua)
SKAT
Quando la riproduzione termina
1 Sollevare leggermente la levetta o il
gancio posto sulla conchiglia e riportare il braccetto in posizione di riposo.
I
G
0
I–
3
T
N
AN
7 Sollevare la levetta.
0
SKAT
I
3
I–
G
oo È possibile lasciare la levetta abbassata e spostare
manualmente il braccetto sopra il disco e poi
abbassare lentamente il braccetto per avviare la
riproduzione.
T
N
Braccetto
AN
Levetta
Levetta
Braccetto
8 Spostare il braccetto verso il bordo del
disco o sul brano desiderato per avviare
la riproduzione.
2 Girare su STOP la manopola di rotazione START/STOP per fermare il piatto.
9 Abbassare la levetta.
Abbassare il braccetto lentamente fino a quando lo
stilo tocca il disco e inizia la riproduzione.
oo Si consiglia di chiudere il coperchio giradischi
durante la riproduzione per evitare che la polvere
si depositi sul disco.
VV Non collocare nulla sul coperchio giradischi.
Gli oggetti sul coperchio potrebbero causare disturbi a causa di vibrazioni o cadere,
soprattutto durante la riproduzione.
CAUTELA
oo Durante la riproduzione, non toccare il braccetto o il
disco in rotazione.
oo Non interrompere la rotazione del piatto durante la
riproduzione.
Durante la riproduzione di dischi, potrebbe verificarsi un feedback se il volume è troppo alto. Se
questo accade, abbassare il volume dell’amplificatore.
80
oo Quando il piatto si arresta, il LED blu si spegne.
Registrazione con un computer
Collegare questo giradischi a un computer tramite il cavo
USB incluso per convertire i segnali audio in dati digitali e
inviarli al computer.
Sistemi operativi supportati
I computer che eseguono i seguenti sistemi operativi
possono essere collegati tramite USB a questa unità.
Windows
Windows 7 (32 bit, 64 bit)
Windows 8 (32 bit, 64 bit)
Windows 8.1 (32 bit, 64 bit)
(da settembre 2014)
Mac OS X
OS X Lion 10.7
OS X Mountain Lion 10.8
OS X Mavericks 10.9
(da settembre 2014)
L’uso di sistemi operativi diversi da questi non è garantito.
oo Questa unità funzionerà con il driver standard del
sistema operativo, quindi non è necessario installare
un driver speciale.
Collegamento a un computer
1 Accendere il computer.
Verificare che il sistema operativo funzioni correttamente.
2 Usare il cavo USB per collegare il computer e l’unità.
3 Premere il pulsante STANDBY/ON di
questa unità per accenderla.
Quando sono collegate, il computer rileverà automaticamente la porta USB di questa unità e di
identificarla come “USB Audio CODEC”.
oo Per registrare l’audio da questo giradischi utilizzando
un computer, è necessario installare un software
da usare per la registrazione audio nel computer.
È possibile acquistare separatamente il software di
registrazione audio preferito o scaricare da Internet
il software gratuito come, per esempio, Audacity
(http://audacity.sourceforge.net/). Il software gratuito
Audacity non è supportato da TEAC.
oo Quando si collega a un computer tramite USB e si effettua una registrazione audio, non eseguire una delle
seguenti operazioni. Ciò potrebbe causare malfunzionamenti del computer. Chiudere sempre il software di
registrazione nel computer prima di procedere.
u Scollegare il cavo USB
u Mettere l’unità in standby
Impostazioni del computer
L’esempio seguente spiega le impostazioni per l’utilizzo
con Windows 7.
1 Dal menu Start, selezionare il Pannello
di controllo.
2 Fare clic su “Audio”.
4 Selezioanre “Microfono USB Audio
CODEC” e fare clic sul pulsante Proprietà.
5 Fare clic su “Avanzate”.
6 Dal menu a discesa “Formato predefinito” selezionare “2 canali, 16 bit,
48000 Hz (qualità DVD)”.
7 Cliccare su “OK”.
81
ITALIANO
3 Fare clic su “Registrazione” e verificare
che “USB Audio CODEC” sia impostato
come “Dispositivo predefinito”.
Risoluzione dei problemi
Se si verificano problemi con questa unità, si prega di
controllare i seguenti punti prima di richiedere assistenza. Qualcosa di diverso potrebbe essere la causa del
problema. Si prega di verificare che anche i dispositivi
collegati vengano utilizzati correttamente.
Se l’unità persiste a non funzionare correttamente, contattare il rivenditore presso il quale è stata acquistata.
Assenza di alimentazione.
ee Verificare che l’alimentatore sia collegato a una presa
di corrente. Quindi, premere il pulsante STANDBY/
ON per accendere l’unità (pagina 74).
Nessun suono.
ee Quando si collegano le prese di uscita audio analogiche di questa unità alle prese di ingresso audio di
un amplificatore o di un altro apparecchio, impostare l’interruttore PHONO EQ (impostazione di
uscita audio) su ON (pagina 74).
La riproduzione non è possibile; c’è del rumore.
ee Verificare che il coperchio dello stilo (in plastica
bianca) sia stato rimosso.
ee Pulire lo stilo (pagina 73).
ee Se lo stilo è logoro, sostituirlo (pagina 73).
ee Posizionare l’unità il più lontano possibile da televisori,
forni a microonde e altri dispositivi che emettono
onde elettromagnetiche.
82
L’intonazione è errata.
ee Impostare la velocità di rotazione (RPM) in modo
che corrisponda a quella del disco (pagina 79).
Il suono salta.
ee Le vibrazioni causano salti. Collocare l’unità in un
luogo stabile.
ee Se il disco è sporco, pulirlo.
ee Non utilizzare dischi graffiati.
ee Bilanciare il braccetto e regolare la pressione dello
stilo (pagina 72).
Se la pressione dello stilo è inferiore al valore
designato per la cartuccia, è più probabile che si
verifichino salti.
Specifiche
Giradischi
Generali
Sistema di trazione . . . . . . . . . . . . . . . Trasmissione a cinghia
Motore. . . . . . . . . . . . . . . . . . . . . . . . . . . . . . . . . . . . . . Motore DC
Velocità di rotazione. . . . . . . . . . . . . . . . . 33 1/3 rpm, 45 rpm
Variazione della velocità di rotazione. . . . . . . . . . . . . . . . ±2%
Wow & flutter. . . . . . . . . . . . . . . . . . . . . . . . . . . . . . . . . . . . . . 0,2%
Rapporto SN. . . . 67 dB o superiore (pesato A, 20 kHz LPF)
Piatto. . . . . . . . . . . . . . . . . . . . . . . . . . . . . . Alluminio pressofuso
diametro 30 cm
Adattatore di alimentazione AC
Ingresso . . . . . . . . . . . . . . . . AC 100 V–AC 240 V, 50-60 Hz
Uscita. . . . . . . . . . . . . . . . . . . . . . . . . . . . . . . . . . . 12 V, 500 mA
Consumo
Standby. . . . . . . . . . . . . . . . . . . . . . . . . . . . . . . . 0,5 W o meno
Acceso (START) . . . . . . . . . . . . . . . . . . . . . . . . 1,5 W o meno
Peso. . . . . . . . . . . . . . . . . . . . . . . . . . . . . . . . . . . . . . . . . . . . . . 4,9 kg
Temperatura di esercizio. . . . . . . . . . . . . . . . . . . da 5°C a 35°C
Dimensioni (L × A × P) (incluse le parti sporgenti)
420 × 356 × 117 mm
Braccetto
Tipo di braccetto
Braccetto dritto bilanciato staticamente
Lunghezza del braccio effettiva. . . . . . . . . . . . . . . . 223 mm
Campo di variazione di pressione dello stilo. . . . . . . . 0-5 g
Peso della cartuccia accettato. . . . . . . . . . . . . . . . . . 3,5–6,5 g
Cartuccia
Tipo. . . . . . . . . . . . . . . . . . . . . . . . . . . . . . . . . . . . . . . . . . . . . . . . MM
Tensione di uscita. . . . . . . . . . . . . . . . . . . . . . . . . 2,5 mV ±3 dB
Pressione dello stilo. . . . . . . . . . . . . . . . . . . . . . . . . . . 2,0 ±0,5 g
Peso della cartuccia. . . . . . . . . . . . . . . . . . . . . . . . . . . 5,7 ±0,5 g
Peso della conchiglia inclusa. . . . . . . . . . . . . . . . . . . . . . . . 10 g
(compresi viti, dadi e fili)
Tensione di uscita
PHONO EQ THRU. . . . . . . . . . . . . . . . . . . . . . . . . 2,5 mV ±3 dB
PHONO EQ ON. . . . . . . . . . . . . . . . . . . . . . 155 mV (−16 dBV)
Prese di uscita. . . . . . . . . . . . . . . . . . . . . . . . . . . . . . . . . . . . . RCA
Porta USB
Accessori in dotazione
Tappetino di gomma × 1
Adattatore 45 giri × 1
Contrappeso × 1
Conchiglia × 1
AT95E MM cartuccia (realizzata da Audio-Technica)
preinstallata
Piatto × 1
Coperchio giradischi × 1
Piedini in gomma per il coperchio giradischi × 2
Cerniere × 2
Cavo audio × 1
Cavo USB × 1
Alimentatore CA (GPE053A-120050-Z) × 1
Manuale di istruzioni (questo documento) × 1
Cartolina di garanzia × 1 (per i clienti negli Stati Uniti e
Canada)
oo Le specifiche e l’aspetto sono soggetti a modifiche
senza preavviso.
oo Peso e dimensioni sono approssimativi.
oo Le illustrazioni in questo manuale potrebbero differire leggermente dai modelli di produzione.
83
ITALIANO
Porta USB che può ricevere alimentazione dal bus USB
del computer (Full Speed). . . . . . . . Connettore USB tipo B
Supporto di alimentazione bus USB. . . . . . . . . 5 V, 500 mA
oo Usare il cavo USB in dotazione per collegare l’unità a
un computer per ricevere l’alimentazione.
oo Dati relativi al funzionamento a 20 ° C.
BELANGRIJK VOOR UW VEILIGHEID
oo Stel dit apparaat niet bloot aan regen of spatten.
oo Plaats geen met vloeistof gevulde voorwerpen zoals
vazen op het apparaat.
oo Plaats het apparaat niet in een afgesloten ruimte
zoals een kast o.i.d.
oo Ook uitgeschakeld neemt het apparaat een geringe
stroom op wanneer de POWER of STANDBY/ON
schakelaar niet op ON staat.
oo Plaats het apparaat dicht genoeg bij een stopcontact
om snel de stekker uit te kunnen trekken in geval van
nood.
oo De stekker fungeert als hoofdschakelaar en dient
altijd bereikbaar te zijn.
oo Wees altijd voorzichtig met het afspeelniveau bij
oortelefoons of hoofdtelefoons in combinatie
met dit product. Excessieve geluidsdruk (volume)
van oortelefoons of hoofdtelefoon kan leiden tot
gehoorverlies.
Voor Europese gebruikers
Verwerking van elektrische en elektronische apparatuur
(a)Alle elektrische en elektronische apparatuur dient te worden
gescheiden van het normale huisvuil en te worden ingele
verd bij door de overheid daartoe aangewezen locaties.
(b)Door elektrische en elektronische apparatuur op de juiste
manier af te voeren, draagt u bij aan het juiste gebruik van
grondstoffen en voorkomt u een negatief effect op ons milieu
en de volksgezondheid.
(c)Onjuiste verwerking van gebruikte elektrische en elektroni
sche apparatuur kan het milieu en de volksgezondheid
ernstig schaden door de aanwezigheid van gevaarlijke stoffen
in de apparatuur.
(d)Het symbool van Gebruikte Elektrische en Elektro
nische Apparatuur (WEEE), dat een kliko met wieltjes
voorstelt met een kruis er doorheen, geeft aan dat
het apparaat niet met het huisvuil mag worden
afgevoerd, maar op de daarvoor aangewezen plaats
dient te worden ingeleverd.
(e)Inlever- en verzamelplaatsen zijn voor eindgebruikers
beschikbaar gesteld. Nadere informatie over het afvoeren
van gebruikte elektrische en elektronische apparatuur kan uw
gemeente u geven en ook de leverancier waar u de appara
tuur heeft aangeschaft.
Verwerking van lege batterijen en/of accu’s
(a)Alle lege batterijen en/of accu’s dienen te worden geschei
den van het normale huisvuil en te worden ingeleverd bij
door de overheid daartoe aangewezen locaties.
(b)Door lege batterijen en/of accu’s op de juiste manier af te
voeren, draagt u bij aan het juiste gebruik van grondstof
fen en voorkomt u een negatief effect op ons milieu en de
volksgezondheid.
CONFORMITEITSVERKLARING
Wij, TEAC AUDIO EUROPE, Liegnitzer
Straße 6, 82194 Gröbenzell, Duitsland
verklaren voor eigen verantwoording dat het TEAC
product dat wordt beschreven in deze handleiding
voldoet aan de betreffende technische normen.
LET OP
Wijzigingen of modificaties aan deze apparatuur die
niet uitdrukkelijk door TEAC zijn goedgekeurd, laten de
gebruikersgarantie vervallen.
84
(c)Onjuiste verwerking van gebruikte batterijen en/of accu’s kan
het milieu en de volksgezondheid ernstig schaden door de
aanwezigheid van gevaarlijke stoffen in de apparatuur.
(d)Het symbool van Gebruikte Elektrische en Elektro
nische Apparatuur (WEEE), dat een kliko met wieltjes
voorstelt met een kruis er doorheen, geeft aan dat
Pb, Hg, Cd
batterijen en/of accu’s niet met het huisvuil mogen
worden afgevoerd, maar op de daarvoor aangewe
zen plaats dienen te worden ingeleverd.
Wanneer een batterij of accu meer dan de gespecificeerde
hoeveelheid lood (Pb), kwik (Hg) en/of cadmium (Cd) als
aangegeven in de Richtlijn Batterijen (2006/66/EC) dan wor
den deze symbolen voor chemische elementen aangegeven
onder het WEEE symbool.
(e)Inlever- en verzamelplaatsen zijn voor eindgebruikers
beschikbaar gesteld. Nadere informatie over het afvoeren
van gebruikte batterijen en/of accu’s kan uw gemeente u
geven en ook de leverancier waar u de apparatuur heeft
aangeschaft.
Inhoud
Dank u voor het gebruik van TEAC. Lees deze handleiding aandachtig om dit apparaat zo goed mogelijk te
kunnen gebruiken.
BELANGRIJK VOOR UW VEILIGHEID. . . . . . . . . . . . . . . . . . . 84
Vóór gebruik. . . . . . . . . . . . . . . . . . . . . . . . . . . . . . . . . . . . . . . . . 85
De draaitafel voorbereiden . . . . . . . . . . . . . . . . . . . . . . . . . . 87
Opmerking over draaitafelnaalden. . . . . . . . . . . . . . . . . . . 89
Aansluitingen . . . . . . . . . . . . . . . . . . . . . . . . . . . . . . . . . . . . . . . 90
Namen en functies van onderdelen. . . . . . . . . . . . . . . . . . 91
Draaitafelkap. . . . . . . . . . . . . . . . . . . . . . . . . . . . . . . . . . . . . . . . 92
Omgaan met grammofoonplaten . . . . . . . . . . . . . . . . . . . 93
Vóór gebruik
Meegeleverde onderdelen
Controleer of de verpakking alle hieronder weergegeven accessoires bevat. Neem contact op met de winkel
waar u dit apparaat heeft gekocht als een van deze
accessoires ontbreekt of tijdens transport is beschadigd.
Rubber mat × 1
45 RPM adapter × 1
Contragewicht × 1
Elementhouder × 1
AT95E MM element (gefabriceerd door AudioTechnica) voorgeïnstalleerd
Het element verwisselen . . . . . . . . . . . . . . . . . . . . . . . . . . . . 94
Draaitafel × 1
Basisbediening. . . . . . . . . . . . . . . . . . . . . . . . . . . . . . . . . . . . . . 95
Draaitafelkap × 1
Opnemen met een computer . . . . . . . . . . . . . . . . . . . . . . . 97
Rubber voeten voor draaitafelkap × 2
Problemen oplossen. . . . . . . . . . . . . . . . . . . . . . . . . . . . . . . . . 98
Scharnieren × 2
Specificaties. . . . . . . . . . . . . . . . . . . . . . . . . . . . . . . . . . . . . . . . . 99
Audiokabel × 1
USB-kabel × 1
Netadapter (GPE053A-120050-Z) × 1
Gebruikershandleiding (dit document) × 1
oo Bewaar de handleiding op een veilige plaats om in
de toekomst te kunnen raadplegen.
Garantiekaart × 1 (alleen voor klanten in Verenigde
Staten en Canada)
oo Zie de achterzijde van dit document voor informatie over de garantie in Europa en andere landen of
gebieden.
NEDERLANDS
85
Vóór gebruik (vervolg)
Voorzorgsmaatregelen vóór gebruik
Onderhoud
oo Plaats geen objecten op de draaitafelkap. Objecten
op de kap kunnen storing veroorzaken als gevolg
van trillingen of ze kunnen van de kap vallen, vooral
tijdens afspelen.
Als het oppervlak van het apparaat vuil wordt, veeg dit
dan schoon met een zachte doek, of gebruik verdunde
milde zachte zeep. Laat het oppervlak van het apparaat
volledig opdrogen alvorens het te gebruiken.
oo Plaats het apparaat niet in direct zonlicht of dicht
bij een hittebron of in andere vergelijkbare situaties.
Plaats het apparaat niet bovenop een versterker of
andere apparatuur die meer warmte produceert
dan het bedrijfstemperatuurbereik van dit apparaat.
Hierdoor kan verkleuring, vervorming of kunnen
defecten ontstaan.
oo Gebruik geen chemische reinigingsdoekjes, oplosmiddel of soortgelijke substanties, omdat deze het
oppervlak van het apparaat kunnen beschadigen.
oo Omdat het apparaat tijdens gebruik warm kan
worden moet u er voldoende ruimte omheen vrij
laten voor ventilatie. Laat bij het installeren van dit
apparaat enige ruimte (minstens 20 cm) tussen het
apparaat en de wand en andere apparatuur om voldoende warmteafvoer mogelijk te maken.
Laat bij plaatsing in een rek minstens 35 cm ruimte
open aan de bovenkant en 10 cm aan de achterkant.
Als er niet voldoende ruimte is kan zich hitte ontwikkelen, die zelfs kan resulteren in brand.
oo VERPLAATS HET APPARAAT NIET TIJDENS AFSPELEN.
Tijdens afspelen draait de plaat. Het apparaat tijdens
afspelen niet optillen of verplaatsen. Hierdoor kan
de grammofoonplaat, de naald, het element of het
apparaat beschadigen.
oo Verwijder altijd de plaat alvorens het apparaat te
verplaatsen. Als het apparaat wordt verplaatst met
een grammofoonplaat op de draaitafel kan de
grammofoonplaat, de naald of het element worden
beschadigd of kan er een defect optreden.
oo Het voltage waarmee het apparaat wordt gevoed
moet overeenkomen met het voltage dat op het
achterpaneel wordt vermeld. Neem bij twijfel contact
op met een elektricien.
86
VV LET OP
Trek voor uw veiligheid vóór het schoonmaken de stekker uit het stopcontact.
De draaitafel voorbereiden
Zet het apparaat op standby tijdens de installatie ( E op
pagina’s 90 en 91).
1 Plaats het op een vlakke ondergrond.
4 Plaats de rubber mat.
Plaats voor gebruik de meegeleverde rubber
beschermmat op de draaitafel.
Omdat de hoogte van de voeten van het apparaat
niet kan worden aangepast moet het op een vlakke
ondergrond worden geplaatst.
2 Installeer de draaitafel.
Hou de draaitafel boven de middenas en installeer
deze.
Middenas
Draaitafel
Bovenkant
oo De rubberen mat heeft een boven- en onderkant. Zoals in de illustratie te zien is, moet de
zijde met de geribbelde concentrische cirkels
omlaag worden geplaatst.
5 Installeer het contragewicht.
Draai het contragewicht met de klok mee op het
uiteinde van de draaitafelarm om het vast te maken.
3 Sla de snaar om de motorpoelie.
Contragewicht
Trek met uw vinger de rubber snaar die zich rond
de subschotel bevindt door de ronde opening en
lus deze om de motorpoelie.
oo Zorg dat het rubber niet wordt gedraaid.
oo Draai de draaitafel verschillende keren rond om
te zorgen dat de snaar goed zit.
6 Installeer de elementhouder.
Ronde opening
Motorpoelie
Rubber snaar
Installeer de elementhouder aan het uiteinde van
de draaitafelarm en draai de moer aan om de elementhouder vast te maken.
Moer
NEDERLANDS
Elementhouder
87
De draaitafel voorbereiden (vervolg)
De draaitafelarm balanceren en de
naalddruk aanpassen
5 Draai aan het contragewicht en stel dit
zo in dat de draaitafelarm horizontaal is.
I–
Armlift
SKAT
I
G
0
T
N
AN
I
3
SKAT
G
0
I–
3
T
Ring voor aanpassing naalddruk
Middellijn
Anti-skating
N
AN
Contragewicht
oo Verwijder eerst de naaldbescherming van het
element alvorens de instelling te maken.
oo Laat de naald van het element geen contact
maken met het apparaat.
1 Zet de anti-skatingdraaiknop op nul.
SKAT
I
G
I–
SKAT
I
G
AN
T
N
3 Breng de armlift omhoog en verplaats
de draaitafelarm enigszins naar links.
0
Armbeugel
7 Draai aan de ring om de naalddruk aan
te passen zodat de middellijn gelijk ligt
met 0 op de schaal.
3
3
I–
0
T
N
AN
2 Beweeg de armbeugel voorzichtig
naar rechts om de draaitafelarm vrij te
maken.
6 Breng de draaitafelarm terug in de
oorspronkelijke positie en beweeg de
draaitafelarmklem naar links om de arm
te vergrendelen.
oo Zorg dat het contragewicht niet draait.
4 Breng de armlift omlaag.
88
Opmerking over draaitafelnaalden
8 Draai het contragewicht zo dat de ring
voor aanpassing van de naalddruk
overeenkomt met de naalddruk die
voor het element wordt gespecificeerd.
SKAT
I
G
0
I–
3
T
N
AN
oo De naalddruk van het meegeleverde element is
2,0 g.
Draai dus tot 2 op de schaal van het contragewicht bij gebruik van het meegeleverde element.
oo Grammofoonnaalden zijn precisieonderdelen die
voorzichtig moeten worden behandeld, om verbuigen of beschadiging van de punt te voorkomen. Als
een naald verbogen of beschadigd raakt, kan deze
wellicht de geluidsgroeven niet meer nauwkeurig volgen en kunnen grammofoonplaten worden
beschadigd of kunnen er andere defecten optreden.
oo Gebruik als een naald vuil wordt naaldreiniger of een
vergelijkbaar product om de naald te reinigen.
oo Wrijf nooit met een hard voorwerp langs de naald.
Veeg de naald niet af met verdunner of andere chemicaliën. Hierdoor kan de naald beschadigen.
De naald vervangen
9 Pas de anti-skatingdraaiknop aan.
N
LET OP
TI–SKA
T
ING
0
3
A
Start met deze knop op 2 en pas dit tijdens het
afspelen van een grammofoonplaat (pagina 95)
aan tot de positie waar de geluidsvolumes links en
rechts in balans zijn.
Het meegeleverde element is een Audio-Technica AT95E.
Koop een vervangende naald voor het AT95E-element
bijvoorbeeld bij de leverancier waar u dit apparaat heeft
gekocht.
Volg voor vervanging de instructies in de handleiding
van de vervangende naald.
oo Schakel het apparaat op standby alvorens de naald te
vervangen, omdat er zich hierbij luide geluiden kunnen voordoen.
oo Zorg dat u uw hand niet bezeert of het apparaat
beschadigt.
oo Pas op dat kinderen niet per ongeluk naalden
inslikken.
NEDERLANDS
89
Aansluitingen
E
B C
Als PHONO EQ is ON
Aansluiten op audioingangen
van versterker, etc.
Als PHONO EQ is THRU
Aansluiten op de PHONOingangen van de versterker, etc.
D
A
Meegeleverde netadapter
(GPE053A-120050-Z)
Versterker
L
VV Voorzorgsmaatregelen voor het aansluiten
oo Steek de stekker van het apparaat niet in het stopcontact voordat u alle aansluitingen heeft voltooid.
oo Lees de handleidingen van de apparatuur waarmee
u aansluitingen tot stand brengt zorgvuldig en volg
de instructies op bij het realiseren van de aansluitingen.
R
A Analoge audio-uitgangen (L/R)
B Schakelaar PHONO EQ (audio-uitgang
instelling)
Deze verzenden analoge audiosignalen.
De instelling van de schakelaar PHONO EQ wijzigt
het type uitgangssignaal.
Gebruik de meegeleverde audiokabel (of een in de
handel verkrijgbare audiokabel) om andere apparatuur op de uitgangen van dit apparaat aan te sluiten.
Wit (L)
Rood (R)
ON
Signalen die zijn versterkt door de ingebouwde
toonregelingsversterker worden weergegeven via
de analoge audio-uitgangen (L/R).
THRU
Het signaal van het MM-element wordt direct via
de analoge audio-uitgangen (L/R) weergegeven.
Gebruik dit bij aansluiting op apparatuur met
PHONO-ingangen.
Wit (L)
Rood (R)
oo Bij aflevering vanaf de fabriek is dit ingesteld op
ON.
LET OP
Indien ingeschakeld en aangesloten op de PHONOingangen van bijvoorbeeld een versterker kan
de weergave via luidsprekers en hoofdtelefoons
zeer luid zijn, wat de apparatuur of uw gehoor kan
beschadigen.
90
Namen en functies van onderdelen
a
b
C USB-poort (USB B-type)
Aansluiten op de USB-poort van een computer om
het audiosignaal van dit apparaat om te zetten naar
digitaal signaal en te verzenden naar de computer
(pagina 97).
I
G
0
SKAT
3
I–
N
AN
c
T
DDC-ingang
Voltooi eerst alle andere aansluitingen en sluit dan
de meegeleverde netadapter (GPE053A-120050-Z)
op deze ingang aan.
Controleer of de stekker van de netadapter in het
stopcontact is gestoken.
d
e
f
g
h
i
j
oo Trek de stekker uit het stopcontact als u het apparaat voor langere tijd niet gaat gebruiken.
oo Gebruik geen andere netadapter dan de meegeleverde (GPE053A-120050-Z).
VV Zorg dat het netsnoer wordt aangesloten op
een stopcontact dat het juiste voltage levert.
Aansluiten op een stopcontact dat het verkeerde voltage levert kan brand of elektrische
schokken veroorzaken.
Houd de stekker vast als het snoer in het
stopcontact wordt gestoken of eruit wordt
getrokken. Trek nooit met kracht aan het netsnoer.
Trek de stekker uit het stopcontact als u het
apparaat voor langere tijd niet gaat gebruiken.
aDraaitafel
Plaats grammofoonplaten gecentreerd op de draaitafel.
b Contragewicht
c Ring voor aanpassing naalddruk
d Anti-skatingknop
eArmlift
Gebruik deze lift om de draaitafelarm op te tillen en
op de grammofoonplaat te laten zakken.
fArmhouder
E Toets STANDBY/ON
Druk op de toets STANDBY/ON om het apparaat in
te schakelen of op standby te zetten.
Hier rust de draaitafelarm op. Beweeg de beugel
voorzichtig naar rechts om de draaitafelarm vrij te
maken, alvorens een grammofoonplaat af te spelen.
gDraaitafelarm
Stel het juiste toerental (RPM) voor de grammofoonplaat in.
i Draaiknop START/STOP draaitafel
jElementhouder
91
NEDERLANDS
h Toerental instelknop
Draaitafelkap
De rubber voeten bevestigen
De draaitafelkap openen en sluiten
Bevestigingspunten rubber voeten
Openen
Rubber voet
Bevestig de rubber voeten aan de linker- en rechterkant
van de draaitafel, zoals in de illustratie wordt weergegeven.
Houd de voorkant van de draaitafelkap vast en heel
deze voorzichtig open totdat hij stuit.
De draaitafelkap blijft in deze positie openstaan.
De draaitafelkap bevestigen
Sluiten
Draaitafelkap
Hoofd
apparaat
Scharnier
1 Steek de scharnieren volledig in de
scharnierhouders aan de linker en rechter achterkant van het hoofdapparaat.
2 Breng de bovenkanten van de
scharnieren op één lijn met de scharnierhouders van de draaitafelkap en
schuif deze erin.
De draaitafelkap verwijderen
Houd de draaitafelkap aan beide kanten vast en wil deze
langzaam omhoog om te verwijderen uit de scharnieren
van het apparaat. Verwijder vervolgens de scharnieren
van de draaitafelkap.
92
Openen
Laat de draaitafelkap voorzichtig zakken tot deze is
gesloten.
VV Voortkom dat uw hand klem komt te zitten,
bijvoorbeeld bij het openen en sluiten van de
draaitafelkap.
Omgaan met grammofoonplaten
Grammofoonplaten vasthouden
Vermijd het aanraken van de groeven als een grammofoonplaat uit de hoes wordt gehaald en wordt
vastgehouden. Houd de grammofoonplaat vast bij het
etiket en aan de zijkant of met beide handen aan de
zijkanten.
Etiket
Groeven
Buitenkant
Voorzorgsmaatregelen
oo Bewaar grammofoonplaten niet op plaatsen die
blootstaan aan direct zonlicht of die uitzonderlijk
heet of vochtig zijn. Als een grammofoonplaat aan
dergelijke condities wordt blootgesteld kan deze vervormen of op een andere manier schade oplopen.
oo Grammofoonplaten niet op elkaar stapelen of onder
zware objecten plaatsen. Grammofoonplaten niet
voor langere tijd schuin bewaren. Hierdoor kan vervorming of andere schade ontstaan.
oo Zorg dat de groeven niet in direct contact komen met
harde objecten. Hierdoor kunnen krassen ontstaan.
oo Bewaar een grammofoonplaat na afspelen altijd in de
hoes. Een onbeschermde grammofoonplaat kan vervormen of er kunnen krassen op komen.
oo Gebruik geen platen met krassen.
Reinigen
oo Vingerafdrukken en vuil op een grammofoonplaat
kunnen ruis en het haperen van het geluid veroorzaken, maar ook de plaat zelf en de naald beschadigen.
Gebruik in de handel verkrijgbare platenreiniger om
grammofoonplaten te reinigen. Gebruik geen oplosmiddel of andere vloeistoffen dan platenreiniger.
Dergelijke chemicaliën kunnen het oppervlak van de
plaat beschadigen.
oo Veeg over het oppervlak van de grammofoonplaat
met de platenreiniger in een ronde beweging in de
richting van de groeven.
NEDERLANDS
93
Het element verwisselen
Verwijder voor het verwisselen van het element eerst
de elementhouder van de draaitafelarm.
oo We adviseren om de naaldbescherming op de naald
te laten terwijl u het element verwisselt.
Elementhouder
Schroeven
Moeren
4 Sluit de aansluitingen van de element
houder aan op het element.
oo De signalen en kleuren van de elementaansluitingen worden hieronder weergegeven.
Signaal
Kleur
Linker kanaal +
Wit
Linker kanaal −
Blauw
Rechter kanaal +
Rood
Rechter kanaal −
Groen
Houderaansluitingen Element
1 Maak de aansluitingen van de elementhouder los van het element.
2 Maak de schroeven los en verwijder het
element.
3 Maak het nieuwe element vast en draai
de schroeven aan.
Zie de onderstaande illustratie voor de positie van
de schroeven als deze worden bevestigd.
2,0 ±0,5 mm
94
5 Balanceer de draaitafelarm en pas de
naalddruk aan.
Volg de aanwijzingen in volgende aanwijzingen in
“De draaitafelarm balanceren en de naalddruk aanpassen” op pagina 88.
Basisbediening
Grammofoonplaten afspelen
1 Druk op de toets STANDBY/ON aan de
achterkant van het apparaat om het in
te schakelen.
4 Stel het juiste toerental (RPM) voor de
grammofoonplaat in.
Het toerental kan worden ingesteld op 33 1/3 of 45
RPM (omwentelingen per minuut).
5 Draai de draaiknop START/STOP naar
START om de draaitafel te starten.
2 Open de draaitafelkap langzaam.
oo Als de draaiknop START/STOP naar START wordt
gedraaid begint de draaitafel te draaien en de
blauwe LED gaat branden.
VV V
oortkom dat uw hand klem komt te zitten,
bijvoorbeeld bij het openen en sluiten van de
draaitafelkap.
6 Beweeg de armbeugel voorzichtig
naar rechts om de draaitafelarm vrij te
maken.
SKAT
I
G
0
I–
3
T
N
Gebruik bij het afspelen van een 45-toeren-single
met een groot middengat de meegeleverde adapter.
AN
3 Plaats een grammofoonplaat op de
draaitafel.
Armbeugel
NEDERLANDS
Wordt vervolgd op de volgende pagina e
95
Basisbediening (vervolg)
SKAT
Als het afspelen is voltooid
1 Breng de armlift omhoog of til de elementhouder aan de haak op en breng
de draaitafelarm naar de rustpositie.
I
G
0
I–
3
T
N
AN
7 Breng de armlift omhoog.
8 Breng de draaitafelarm naar de rand
van de grammofoonplaat of naar de
track vanaf waar u met afspelen wilt
starten.
0
SKAT
I
3
I–
G
oo De armlift kan ook omlaag blijven, waarbij de
draaitafelarm handmatig boven de grammofoonplaat kan worden gebracht.
T
N
Draaitafelarm
AN
Armlift
Armlift
Draaitafelarm
2 Draai de draaiknop START/STOP naar
STOP om de draaitafel te stoppen.
9 Breng de armlift omlaag.
Breng de draaitafelarm langzaam omlaag tot de
naald op de plaat terechtkomt en het afspelen
begint.
oo Wij adviseren om tijdens het afspelen van grammofoonplaten de draaitafelkap te sluiten om
stofvorming te vermijden.
VV P laats geen objecten op de draaitafelkap.
Objecten op de kap kunnen storing veroorzaken als gevolg van trillingen of ze kunnen
van de kap vallen, vooral tijdens afspelen.
LET OP
oo Raak tijdens afspelen de draaitafelarm of de draaiende grammofoonplaat niet aan.
oo Stop het draaien van de draaitafel niet tijdens afspelen.
Als het geluidsvolume te hoog is, kan tijdens
het afspelen van een grammofoonplaat feedback optreden. Als dit gebeurt, verlaag dan het
volume van de versterker.
96
oo Als de draaitafel stopt gaat de blauwe LED uit.
Opnemen met een computer
Sluit deze draaitafelarm aan op een computer om met
behulp van de meegeleverde USB-kabel audiosignalen
te converteren van een grammofoonplaat naar digitale
data en naar een computer te verzenden.
Ondersteunde besturingssystemen
Computers met de volgende besturingssystemen kunnen via USB op dit apparaat worden aangesloten.
Windows
Windows 7 (32-bit, 64-bit)
Windows 8 (32-bit, 64-bit)
Windows 8.1 (32-bit, 64-bit)
(vanaf september 2014)
Mac OS X
OS X Lion 10.7
OS X Mountain Lion 10.8
OS X Mavericks 10.9
(vanaf september 2014)
Als u niet een van de bovenstaande besturingssystemen
gebruikt, is de werking niet gegarandeerd.
oo Dit apparaat werkt met het standaard OS-stuurpro
gramma, dus er hoeft geen speciaal stuurprogramma
te worden geïnstalleerd.
Aansluiten op een computer
1 Schakel de computer in.
Controleer of het besturingssysteem correct werkt.
2 Sluit de computer en dit apparaat op
elkaar aan met de USB-kabel.
3 Druk op de toets STANDBY/ON van dit
apparaat om het in te schakelen.
Als de verbinding tot stand is gebracht, detecteert
de computer automatisch de USB-poort van dit
apparaat en wordt deze geïdentificeerd als “USB
Audio CODEC”.
oo Om audio van deze draaitafel met een computer te
kunnen opnemen moet u eerst software installeren
waarmee audio op de computer kan worden opgenomen. U kunt de audio-opnamesoftware van uw
eigen keus afzonderlijk kopen of gratis software zoals
Audacity (http:// audacity.sourceforge.net/) van internet downloaden. Audacity is gratis software die niet
wordt ondersteund door TEAC.
oo Vermijd het volgende als er verbinding is met een
computer via USB en er audio wordt opgenomen.
Hierdoor kan de computer onjuist gaan functioneren. Sluit de opnamesoftware op de computer altijd
af, alvorens de volgende handelingen te verrichten.
u De USB-kabel losmaken
u Schakel het apparaat op standby
Computerinstellingen
Het volgende voorbeeld behandelt de instellingen die
moeten worden gemaakt met behulp van Windows 7.
1 Selecteer Configuratiescherm in het
menu “Start”.
2 Klik op “Geluid”.
3 Klik op het tabblad “Opnemen” en
controleer of “USB Audio CODEC” is
ingesteld als “Standaardapparaat”.
5 Klik op het tabblad “Geavanceerd”.
6 Selecteer in het vervolgkeuzemenu
“Standaard indeling” “16 bit, 48000 Hz
(DVD-kwaliteit)”.
7 Klik op “OK”.
97
NEDERLANDS
4 Selecteer “Microphone USB Audio CODEC”
en klik op de toets “Eigenschappen”.
Problemen oplossen
Als u een probleem met dit apparaat ervaart, controleer dan eerst de volgende onderdelen alvorens service
aan te vragen. Er kan ook een andere oorzaak voor het
probleem zijn dan dit apparaat. Controleer ook of de aangesloten apparaten op de juiste manier worden gebruikt.
Als er nog steeds niet correct werkt, neem dan contact op met de leverancier waar u het apparaat heeft
gekocht.
Geen stroom.
ee Controleer of de netadapter in het stopcontact is
gestoken. Druk vervolgens op de toets STANDBY/
ON om het apparaat in te schakelen (pagina 90).
Er wordt geen geluid voortgebracht.
ee Zet bij aansluiten van de analoge audio-uitgangen
van dit apparaat op de analoge audioingangen van
een versterker of andere apparatuur de schakelaar
PHONO EQ (instelling audioingang) op ON (pagina
90).
Afspelen is niet mogelijk; er is ruis te horen.
ee Controleer of het witte plastic kapje van de naald is
verwijderd.
ee Reinig de naald (pagina 89).
ee Als de naald is versleten, vervang deze dan (pagina
89).
ee Plaats dit apparaat zover mogelijk van TV’s, magnetrons en andere apparatuur die elektromagnetische
golven uitzendt.
98
De toonhoogte is niet correct.
ee Stel het toerental (RPM) in zoals op de grammofoonplaat aangegeven (pagina 95).
Het geluid hapert.
ee Trillingen kunnen haperingen veroorzaken. Plaats
dit apparaat op een stabiele locatie.
ee Als de plaat verontreinigd is, veeg deze dan schoon.
ee Gebruik geen grammofoonplaten met krassen.
ee Balanceer de draaitafelarm en pas de naalddruk
opnieuw aan (pagina 88).
Als de naalddruk lager is dan voor het element aanbevolen, kan het geluid sneller gaan haperen.
Specificaties
Draaitafel
Algemeen
Aandrijving. . . . . . . . . . . . . . . . . . . . . . . . . . . . Snaaraandrijving
Motor. . . . . . . . . . . . . . . . . . . . . . . . . . . . . . . Gelijkstroommotor
Toerental. . . . . . . . . . . . . . . . . . . . . . . . . . . . 33 1/3 rpm, 45 rpm
Toerental variatie. . . . . . . . . . . . . . . . . . . . . . . . . . . . . . . . . . ±2 %
Wow en flutter. . . . . . . . . . . . . . . . . . . . . . . . . . . . . . . . . . . . 0,2 %
Signaal/ruisverhouding. . . . . . . . . . . . . . . . . . 67 dB of hoger
(A-gewogen, 20 kHz LPF)
Draaitafel. . . . . . . . . . . . . . . . . . . . . . . . . . . Gegoten aluminium
30 cm diameter
Vermogen netadapter
Ingang. . . . . . . . . . . . . . . . . . . . . . AC 100–240 V, 50–60 Hz
Uitgang. . . . . . . . . . . . . . . . . . . . . . . . . . . . . . . . . 12 V, 500 mA
Opgenomen vermogen
Standby. . . . . . . . . . . . . . . . . . . . . . . . . . . . . . 0,5 W of minder
On (START). . . . . . . . . . . . . . . . . . . . . . . . . . . 1,5 W of minder
Gewicht. . . . . . . . . . . . . . . . . . . . . . . . . . . . . . . . . . . . . . . . . . 4,9 kg
Temperatuurbereik voor gebruik. . . . . . . . . . . 5 °C tot 35 °C
Afmetingen (B × H × D, inclusief uitstekende delen)
420 × 356 × 117 mm
Draaitafelarm
Type arm
Rechte draaitafelarm met statische balans
Effectieve armlengte. . . . . . . . . . . . . . . . . . . . . . . . . . . 223 mm
Variatiebereik naalddruk. . . . . . . . . . . . . . . . . . . . . . . . . . 0–5 g
Toegestaan gewicht element. . . . . . . . . . . . . . . . . . 3,5–6,5 g
Element
Type. . . . . . . . . . . . . . . . . . . . . . . . . . . . . . . . . . . . . . . . . . . . . . . . MM
Uitgangsvoltage. . . . . . . . . . . . . . . . . . . . . . . . . . 2,5 mV ±3 dB
Naalddruk. . . . . . . . . . . . . . . . . . . . . . . . . . . . . . . . . . . . 2,0 ±0,5 g
Gewicht element. . . . . . . . . . . . . . . . . . . . . . . . . . . . . 5,7 ±0,5 g
Inclusief gewicht elementhouder . . . . . . . . . . . . . . . . . . 10 g
(inclusief schroeven, moeren en bedrading)
Uitgangsvoltage
PHONO EQ THRU. . . . . . . . . . . . . . . . . . . . . . . . . 2,5 mV ±3 dB
PHONO EQ ON. . . . . . . . . . . . . . . . . . . . . . 155 mV (−16 dBV)
Uitgangen. . . . . . . . . . . . . . . . . . . . . . . . . . . . . . . . . . . . . . . . . RCA
USB-poort
USB-poort die voeding kan ontvangen van computer
USB-poorten (volledige snelheid)
USB-aansluiting type B
Ondersteuning USB-voeding . . . . . . . . . . . . . . . 5 V, 500 mA
oo Sluit het apparaat met de meegeleverde USB-kabel aan
op een computer om hierdoor voeding te ontvangen.
oo Prestatiegegevens zijn gespecificeerd bij 20 °C.
Meegeleverde accessoires
Rubber mat × 1
45 RPM adapter × 1
Contragewicht × 1
Elementhouder × 1
AT95E MM element (gefabriceerd door AudioTechnica) voorgeïnstalleerd
Draaitafel × 1
Draaitafelkap × 1
Rubber voeten voor draaitafelkap × 2
Scharnieren × 2
Audiokabel × 1
USB-kabel × 1
Netadapter (GPE053A-120050-Z) × 1
Gebruikershandleiding (dit document) × 1
Garantiekaart × 1 (alleen voor klanten in Verenigde
Staten en Canada)
99
NEDERLANDS
oo Specificaties en uiterlijk kunnen worden gewijzigd
zonder voorafgaande kennisgeving.
oo Gewicht en afmetingen zijn benaderingen.
oo Afbeeldingen in deze gebruikershandleiding kunnen
enigszins afwijken van de productiemodellen.
VIKTIGA SÄKERHETSINSTRUKTIONER
oo Utsätt inte denna apparat för dropp eller stänk.
oo Ställ inga föremål som innehåller vätska, t.ex. vaser,
på apparaten.
oo Installera inte apparaten i ett slutet utrymme såsom en
bokhylla eller liknande.
oo Apparaten drar nominella icke-operativ ström från
vägguttaget med dess STRÖM eller STANDBY/
ON-knappen inte i ON-läge.
oo Apparaten ska placeras tillräckligt nära vägguttaget
så att du lätt kan nå nätsladden när som helst.
oo Nätkontakten används som frånkopplingsenhet och
frånkopplingsenheten ska vara driftsduglig.
oo Försiktighet bör iakttas vid användning av öronsnäckor
eller hörlurar med produkten eftersom överdrivet ljudtryck (volym) från öronsnäckor eller hörlurar kan orsaka
hörselskador.
For kunder i Europa
Kassering av elektrisk och elektronisk utrustning
(a)Alla elektriska och elektroniska produkter bör kasseras separat från hushållsavfall, helst via insamlingsanläggningar som
bestämts av regeringen eller lokala myndigheter.
(b)Genom att avyttra elektrisk och elektronisk utrustning på rätt
sätt, kommer du att spara värdefulla resurser och förhindrar
eventuella negativa effekter på människors hälsa och på
miljön.
(c)Felaktig kassering av avfall från elektriska och elektroniska
produkter kan få allvarliga effekter på miljön och människors
hälsa. Detta på grund av förekomsten av farliga ämnen i
utrustningen.
(d)Symbolen för elektriskt och elektroniskt avfall
(WEEE), som visar en soptunnan som har kryssats
över, indikerar att elektrisk och elektronisk utrustning måste samlas in och kasseras separat från
hushållsavfallet.
(e)Återlämnings- och insamlingssystem finns tillgängliga för
slutanvändare. För mer detaljerad information om avfallshantering av gammal elektrisk och elektronisk utrustning, var god
kontakta din kommun, renhållningsverket eller den butik där
du köpte utrustningen.
Avfallshantering av batterier och/eller ackumulatorer
(a)Förbrukade batterier och/eller ackumulatorer bör kasseras
separat från hushållsavfall, helst via insamlingsanläggningar
som bestämts av regeringen eller lokala myndigheter.
FÖRSÄKRAN OM ÖVERENSSTÄMMELSE
Vi, TEAC AUDIO EUROPE, Liegnitzer Straße
6, 82194 Gröbenzell, Tyskland, försäkrar på
vårt eget ansvar, att TEAC-produkten som
beskriv i denna manual överensstämmer med motsvarande tekniska standard.
FÖRSIKTIGHET
Ändringar eller modifieringar av denna utrustning som
inte uttryckligen godkänds av TEAC CORPORATION för
samtycke kommer att göra användarens garanti ogiltig.
100
(b)Genom att kassera förbrukade batterier och/eller ackumulatorer på rätt sätt hjälper du till att spara värdefulla resurser och
förhindrar eventuella negativa effekter på människors hälsa
och på miljön.
(c)Felaktig avfallshantering av förbrukade batterier och/eller ackumulatorer kan få allvarliga effekter på miljön och människors
hälsa på grund av förekomsten av farliga ämnen i dem.
(d)WEEE symbolen, som visar en soptunnan som har
kryssats över, visar att batterier och/eller ackumulatorer måste samlas in och kasseras separat från
Pb, Hg, Cd
hushållsavfallet.
Om ett batteri eller ackumulatorn innehåller mer än
de specificerade värdena av bly (Pb), kvicksilver (Hg) och/eller
kadmium (Cd) enligt definitionen i batteridirektivet (2006/66/
EC), kommer de kemiska symbolerna för dessa element visas
under WEEE symbolen.
(e)Återlämnings- och insamlingssystem finns tillgängliga för
slutanvändare. För mer detaljerad information om avfallshantering av förbrukade batterier och/eller ackumulatorer,
kontakta din kommun, renhållningsverket eller den butik där
du köpte dem.
Innehåll
Tack för att du har valt TEAC. Läs noggrant denna bruksanvisning, för att få ut enhetens bästa prestanda.
VIKTIGA SÄKERHETSINSTRUKTIONER. . . . . . . . . . . . . . . . 100
Före användning . . . . . . . . . . . . . . . . . . . . . . . . . . . . . . . . . . . 101
Förbereda skivspelaren. . . . . . . . . . . . . . . . . . . . . . . . . . . . . 103
Anmärkning om skivstylusar. . . . . . . . . . . . . . . . . . . . . . . . 105
Anslutningar . . . . . . . . . . . . . . . . . . . . . . . . . . . . . . . . . . . . . . . 106
Namn/funktion på enhetens delar. . . . . . . . . . . . . . . . . . 107
Skivspelarens skydd . . . . . . . . . . . . . . . . . . . . . . . . . . . . . . . . 108
Hantera skivor. . . . . . . . . . . . . . . . . . . . . . . . . . . . . . . . . . . . . . 109
Före användning
Medföljande delar
Kontrollera lådan för att vara säker på att den innehåller
all medföljande tillbehör nedan. Kontakta butiken där
du köpte enheten om något av dessa tillbehör saknas
eller har skadats under transporten.
Gummimatta × 1
45 RPM-adapter × 1
Motvikt × 1
Headshell × 1
Förinstallerad AT95E MM-patron (tillverkad av
Audio-Technica)
Byta patron. . . . . . . . . . . . . . . . . . . . . . . . . . . . . . . . . . . . . . . . . 110
Skivspelare × 1
Grundläggande användning. . . . . . . . . . . . . . . . . . . . . . . . 111
Skivspelarskydd × 1
Spela in med datorn. . . . . . . . . . . . . . . . . . . . . . . . . . . . . . . . 113
Gummifot för skivspelarens lock × 2
Felsökning. . . . . . . . . . . . . . . . . . . . . . . . . . . . . . . . . . . . . . . . . . 114
Gångjärn × 2
Specifikationer. . . . . . . . . . . . . . . . . . . . . . . . . . . . . . . . . . . . . .115
Ljudkabel × 1
USB-kabel × 1
Nätadapter (GPE053A-120050-Z) × 1
Bruksanvisning (detta dokument) × 1
oo Förvara bruksanvisningen på ett säkert ställe för
framtida referens.
Garantisedel × 1 (endast för kunder i USA och Kanada)
oo Se baksidan av detta dokument för information om
garantin i Europa och andra länder eller områden.
SVENSKA
101
Före användning (fortsättning)
Försiktighetsåtgärder för användning
Underhåll
oo Placera inget på skivspelarens skydd. Föremål på
skyddet skulle kunna orsaka buller på grund av vibrationer eller falla ner, framför allt vid uppspelning.
Om enhetens yta blir smutsig, torka av den med en
mjuk trasa eller använd utspädd och mild, flytande tvål.
Låt enhetens yta torka helt innan du använder enheten.
oo Undvik att placera enheten i direkt solljus, nära till
värmekällor eller i liknande förhållanden. Placera inte
enheten på en förstärkare eller annan utrustning som
kan generera värme som överskrider driftstemperaturnivån av denna enhet. Om du gör så, kan det komma
till missfärgningar, deformering och fel funktion.
oo Använd inte kemiska rengöringstrasor, förtunnare
eller liknande ämnen, eftersom de kan skada enhetens yta.
oo Eftersom enheten kan bli varm vid bruk, låt det alltid
vara tillräckligt plats runt den, så att den kan ventilera. När du installerar den här enheten, lämna lite
utrymme (minst 20 cm) mellan enheten och andra
enheter och väggar för att möjliggöra god värmeavledning.
När du placerar den i en hylla, lämna till exempel
minst 35 cm öppet ovanför och 10 cm öppet bakom.
Underlåtenhet att tillhandahålla dessa luckor kan
orsaka att värme alstras inuti och orsaka brand.
oo FLYTTA INTE ENHETEN UNDER UPPSPELNINGEN.
Skivan roterar medan uppspelning. Lyft eller flytta
inte enheten under uppspelningen. Detta skadar
väldigt mycket grammofonskivan, stylusen, patronen
eller enheten.
oo Innan du omplacerar eller flyttar på enheten, skall
du alltid ta ut skivan. Om du flyttar enheten med en
grammofonskiva på skivspelaren, skulle grammofonskivan, stylusen eller patronen kunna skadas och
orsaka felfunktion.
oo Spänningen som försörjer enheten skall matcha
spänningen som står på den bakre panelen. Om du
tvivlar angående detta, kontakta en elektriker.
102
VV FÖRSIKTIGHET
För säkerhets skull dra ut nätsladden ur vägguttaget
före rengöring.
Förbereda skivspelaren
Håll enheten i vänteläge medan du konfigurerar ( E på
sidorna 106 och 107).
1 Placera den på en flat yta.
4 Placera gummimattan.
Placera den skyddande gummimattan som medföljer skivspelaren före användning.
Eftersom höjden på enheten fötter inte kan justeras,
kontrollera att du placerar den på en flat yta.
2 Installera skivspelaren.
Justera skivspelaren till mellanhandtaget och installera den.
Centerhandtag
Skivspelare
Ovansida
oo Gummimattan har en övre sida och en nedre sida.
Som det visas på bilden, sidan med den räfflade
koncentriska cirkeln skall placeras nedåt.
5 Installera motvikten.
Placera motvikten över kanten av tonarmen och vrid
den medurs för att dra åt den.
3 Linda bältet runt motorremskivan.
Motvikt
Använd ett finger för att dra gummibältet så att den
är lindad runt subdisken genom den runda öppningen och linda den runt motorremskivan.
oo Var försiktigt att gummit inte vrids.
oo Vrid med skivspelaren flera gånger för at kontrollera att den är säkrad.
6 Installera headshellen.
Rund öppning
Motorremskiva
Gummibälte
Placera headshellen på änden av tonarmen och vrid
med muttern för att säkra den på plats.
Mutter
Headshell
SVENSKA
103
Förbereda skivspelaren (fortsättning)
Balansera ut tonarmen och justera
stylustrycket
5 Vrid med motvikten och justerade den
att tonarmen är vågrät.
I–
Spak till tonarmslyften
SKAT
I
G
0
T
N
AN
I
3
SKAT
G
0
I–
3
T
Justeringsring för stylustrycket
Mittlinje
Anti-skak
N
AN
Motvikt
oo Ta bort patronstylusens skyddslock innan du
justerar.
oo Var försiktigt att patronstylusen inte kommer i
kontakt med enheten.
1 Ställ in anti-skak-ratten till noll.
SKAT
I
G
I–
SKAT
I
G
AN
T
N
3 Lyft tonarmen och sätt den lite till
vänster.
0
Spänne
7 Vrid med justeringsringen för stylus
trycket, så att mittlinjen står på 0 på
skalan.
3
3
I–
0
T
N
AN
2 Flytta tonarmens spänne till höger för
att lossna tonarmen.
6 Sätt tonarmen till dess originalposition
och flytta med tonarmens knäppen till
vänster, för att låsa den på plats.
oo Var försiktigt att motvikten inte vrids.
4 Sänk tonarmen.
104
Anmärkning om skivstylusar
8 Vrid med motvikten, så att justeringringens skala för stylustrycket matchar
stylustrycket som specificeras för
patronen.
SKAT
I
G
0
I–
3
T
N
AN
oo Stylustrycket av den medföljande patronen är
2,0 g.
Vrid den till 2 på motviktsskalan, när du använder
den medföljande patronen.
oo Inspelningsstylus är exakta delar, alltså skall du hantera dem försiktigt för att förhindra att deras spetsar
böjs eller skadas. Om stylusen blir böjd eller skadad,
kommer den att kanske inte kunna följa ljudräfflorna
exakt och skulle kunna skada skivorna eller orsaka
annan felfunktion.
oo Om stylusen blir smutsig, använd en kommersiellt
tillgänglig stylusrengörare eller liknande produkt för
att rengöra den.
oo Skrubba inte stylusens spets med våld med något
hårt. Torka inte av stylusen med en förtunnare eller
andra kemikalier. Det skulle kunna skada den.
Byta ut stylusen
9 Justera anti-skak-ratten.
N
FÖRSIKTIGHET
TI–SKA
T
ING
0
3
A
Starta med den inställd till 2 och justera medan du
spelar upp skivan (sida 111) till positionen där den
vänstra och högra volymen är balanserad.
Den medföljande patronen är en Audio-Technica AT95E.
Köp en ersättningsstylus för AT95E-patronen hos till
exempel återförsäljaren där du köpte denna enhet.
Följ anvisningarna för byte i manualen för ersättningsstylus.
oo Tryck på STANDBY/ON-knappen för att ställa enheten
i vänteläge.
oo Var försiktigt att du inte skadar din hand eller utrustningen.
oo Tillåt inte att små barn utav olyckshändelse sväljer små
stylusar.
SVENSKA
105
Anslutningar
E
B C
När PHONO EQ är ON
Anslut ljudingångsjacken till förstärkaren o.s.v.
När PHONO EQ är THRU
Anslut PHONO-ingångar till förstärkaren o.s.v.
Förstärkare
D
A
Medföljande nätadapter
(GPE053A-120050-Z)
L
VV Försiktighetsåtgärder när du gör anslutningar
oo Anslut inte enheten tills du har gjord alla anslutningar.
oo Läs noga igenom bruksanvisningarna för de enheter som du ansluter och följ deras instruktioner när
du gör anslutningar.
R
A Analoga ljudutgångskontakter (L/R)
B PHONO EQ-brytare (inställning för ljud-
utmatning)
Dessa matar ut analoga ljudsignaler.
Inställningen för PHONO EQ-brytare ändrar typen
av utmatningssignalen.
Använd den medföljande ljudkabel (eller kommersiellt tillgängliga kablar) för att ansluta den andra
utrustningen till utgångsjacken på denna enhet.
Vit (L)
Röd (R)
ON
Signaler som har förstärkts av den inbyggda frekvenskorrigeringen matar ut från det analoga
ljudutgångsjacket (L/R).
THRU
MM-patronsignalen matas ut direkt genom det analoga ljudutgångsjacket (L/R).
Använd denna när du ansluter utrustning som har
PHONO-ingångar.
Vit (L)
Röd (R)
oo Vid leverans från fabriken, är detta inställt på ON.
FÖRSIKTIGHET
När inställd på ON, om du ansluter PHONO-ingången
till till exempel en förstärkare, kommer utmatningen
från högtalarna och hörlurarna vara väldigt hög. Det
skulle kunna skada utrustningen eller din hörsel.
106
Namn/funktion på enhetens delar
a
b
C USB-port (USB B-typ)
Anslut denna till USB-porter på datorn för att konvertera ljudsignalen från denna enhet till digital och
mata den till datorn (sida 113).
I
G
0
SKAT
3
I–
N
AN
c
T
DDC-ingångskontakt
Efter att du har slutfört alla andra anslutningar, anslut
den medföljande nätadaptern (GPE053A-120050-Z)
till detta jack.
Bekräfta att strömkontakten av nätadaptern är
ansluten till strömuttaget.
d
e
f
g
h
i
j
oo Koppla från nätsladden från uttaget om du inte
skall använda enheten över en längre tidsperiod.
oo Använd inte en annan nätadapter än den som
medföljde (GPE053A-120050-Z).
VV Var noga med att ansluta nätsladden till
ett eluttag som levererar rätt spänning.
Anslutning till ett uttag som levererar fel
spänning skulle kunna orsaka brand eller
elektrisk chock.
Håll stickkontakten när du ansluter den till
ett eluttag eller drar ut den. Dra eller ryck
aldrig i nätsladden.
Koppla från nätsladden från uttaget om du
inte skall använda enheten över en längre
tidsperiod.
aSkivspelare
Lägg en skiva i mitten på skivspelaren.
b Motvikt
c Justeringsring för stylustrycket
d Anti-skak-ratt
e Spak till tonarmslyften
Använd denna spak för att lyfta tonarmen och sänka
den till skivan.
fTonarmhållare
ESTANDBY/ON-knapp
Tryck på STANDBY/ON-knappen för att sätta på enheten eller sätta den i vänteläget.
Detta är vilopositionen för tonarmen. Tryck mjukt
spännet till höger för att lossna tonarmen innan du
spelar upp skivan.
gTonarm
h Ratt för inställning av rotations-
hastighet
Ställ in rotationshastigheten (RPM), så att den passar
skivan.
i START/STOP-ratt för skivspelarens
rotation
SVENSKA
jHeadshell
107
Skivspelarens skydd
Montera gummifoten
Öppna och stänga skivspelarens skydd
Monteringspunkter för gummifoten
Öppen
Gummifot
Montera gummifoten på vänster och höger sida av
skivspelarens lock som det visas i bilden.
Håll framkanten av skivspelarens skydd och lyft den försiktigt för att öppna den helt tills den stoppas.
Skivspelarens skydd kan vara öppet i denna position.
Sätta på skivspelarens skydd
Stänga
Skivspelarens
skydd
Huvud
enhet
Sänk mjukt skivspelarens skydd tills den stängs.
VV var försiktig att du inte klämmer din hand
när du t ex öppnar och stänger skivspelarens
skydd.
Gångjärn
1 Sätt gångjärn komplett i gångjärnhållarna på vänster och höger slut av
huvudenhetens baksida.
2 Rätta upp toppen av gångjärn med
skivspelarens gångjärnhållare och sätt
in dem.
Ta bort skivspelarens skydd
Håll båda kanter av skivspelarens skydd och lyft den
sakta för att ta bort den tillsammans med gångjärn
från enheten. Sedan ta bort gångjärn från skivspelarens
skydd.
108
Öppna
Hantera skivor
Hålla skivor
Försiktighetsåtgärder
När du håller en skiva eller tar ut den från sitt omslag,
undvik att röra räfflorna genom att hålla skivan vid dess
etikett och kanten med en hand eller genom att hålla
den vid dess kant med båda händer.
Etikett
Räfflor
Yttre kant
oo Lämna inte skivorna på platser där de utsätts för direkt
solljus eller på väldigt varma och fuktiga platser. Om
du lämnar en skiva under sådana omständigheter
under en längre tid, kan det orsaka att den blir skev
eller andra skador.
oo Lägg inte flera skivor på varandra eller placera inte
tunga objekt på dem. Lämna inte heller skivor i ett
hörn för en längre tidsperiod. De skulle kunna bli
skeva eller skadade på ett annat sätt.
oo Låt inte hårda objekt direkt röra vid ljudräfflorna. Det
skulle kunna orsaka repor.
oo När du har spelat klart en skiva, placera den alltid
tillbaka i sitt omslag för lagring. Om du lämnar skivor
oskyddade, kan de bli skeva eller repiga.
oo Använd inte spruckna skivor.
Rengöring
oo Fingeravtryck eller damm på en skiva kan orsaka
buller och ljudet kan hoppa samt kan skivan skadas
och även stylusen. Använd en kommersiellt tillgänglig skivrengörare för att rengöra skivor. Använd inte
en förtunnare eller något annat än en skivrengörare.
Sådana kemikalier kan skada skivans yta.
oo Om du använder en skivrengörare, torka av skivan yta
i kretsrörelse, genom att följa räfflorna.
SVENSKA
109
Byta patron
För att byta patron, ta först bort headshellen från tonarmen.
oo Vi rekommenderar att du låter patronnålens skyddslock vara på, medan du byter patronen.
Headshell
Skruvar
Muttrar
Skalkoppling Patron
1 Koppla från skalkopplingens terminal
från patronen.
2 Lossna skruvar och ta bort patronen.
3 Sätt in ny patron och dra åt skruvarna.
Se bilderna nedan, vilken position skruvarna skall ha
när de är monterade.
2,0 ±0,5 mm
110
4 Anslut skalkopplingens styrterminal till
patronen.
oo Signalen och färgen på skalkopplingen visas
nedan.
Signal
Vänster kanal +
Vänster kanal −
Höger kanal +
Höger kanal −
Färg
Vit
Blå
Röd
Grön
5 Balansera ut tonarmen och justera stylustrycket.
Följ anvisningarna i “Balansera ut tonarmen och justera stylustrycket” på sidan 104.
Grundläggande användning
Spela upp skivor
1 Tryck på STANDBY/ON-knappen på baksidan av enheten för att sätta på den.
2 Öppna försiktigt skivspelarens skydd.
VV V
ar försiktig att du inte klämmer din hand
när du t ex öppnar och stänger skivspelarens
skydd.
4 Ställ in enligt skivans rotationshastighet (RPM).
Rotationshastigheten kan ställas in på 33 1/3 eller
45 RPM.
5 Vrid med START/STOP-ratten till START
för att starta skivspelaren.
oo När START/STOP-ratten är inställd på START, kommer skivspelaren att börja rotera och den blå
LED-lampan kommer att lysa.
6 Flytta tonarmens spänne till höger för
att lossna tonarmen.
3 Lägg en skiva på skivspelaren.
SKAT
I
G
0
I–
3
T
N
AN
När du spelar 45 RPM enskilda skivor med stora hål,
använd den medföljande adaptern.
Spänne
SVENSKA
Fortsättning på nästa sida e
111
Grundläggande drift (fortsättning)
SKAT
1 Lyft lätt tonarmen eller headshell-kroken och sätt tillbaka tonarmen till dess
viloposition.
I
G
0
I–
3
T
När uppspelningen avslutas
N
AN
7 Lyft tonarmen.
8 Flytta tonarmen till skivans kant eller
spåret där du vill starta uppspelningen.
9 Sänk tonarmen.
0
SKAT
I
3
I–
G
oo Du kan också låta spaken vara nere och flytta den
höjda tonarmen över skivan och sedan sänka
tonarmen mjukt för att starta uppspelningen.
T
N
Tonarm
AN
Spak till tonarmslyften
Spak till tonarmslyften
Tonarm
2 Vrid med START/STOP-ratten till STOP
för att stoppa skivspelaren.
Sänk tonarmen långsamt till stylusen rör vid skivan
och uppspelningen börjar.
oo Vi rekommenderar att du stänger locket till
skivspelaren medan du spelar upp skivan för att
undvika damm.
VV Placera inget på skivspelarens skydd. Föremål
på skyddet skulle kunna orsaka buller på
grund av vibrationer eller falla ner, framför
allt vid uppspelning.
FÖRSIKTIGHET
oo Medan uppspelning, rör inte vid tonarmen eller den
roterande skivan.
oo Stoppa inte skivspelarens rotation medan uppspelning.
Medan skivan spelas upp, kan det komma till
återkoppling, om volymen är för hög. Om detta
händer, sänk förstärkarens volymen.
112
oo När skivspelaren stoppar, kommer den blåa LEDlampan sluta lysa.
Spela in med datorn
Anslut skivspelaren till en dator med den medföljande
USB-kabeln för att konvertera ljudsignaler från skivan till
digital data och skicka dem till datorn.
Operativsystem som stöds
Datorer som kör med de följande operativsystem kan
anslutas med USB till denna enhet.
Windows
Windows 7 (32 bitars, 64 bitars)
Windows 8 (32 bitars, 64 bitars)
Windows 8.1 (32 bitars, 64 bitars)
(sedan september 2014)
Mac OS X
OS X Lion 10.7
OS X Mountain Lion 10.8
OS X Mavericks 10.9
(sedan september 2014)
Användning med andra operativsystem än de ovan
garanteras inte.
oo Denna enhet kommer att köras med standard OSdrivrutin, så det finns ingen anledning att installera
en speciell drivrutin.
Ansluta till datorn
1 Sätt på datorn.
Kontrollera att operativsystemet fungerar korrekt.
2 Använd USB-kabeln för att ansluta
datorn till denna enhet.
3 Tryck på enhetens STANDBY/ON-knapp
för att slå på den.
När de är anslutna, kommer datorn att automatiskt
identifiera enhetens USB-port och identifiera den
som ”USB Audio CODEC”.
oo För att spela in ljud från skivspelaren med en dator,
måste du först installera programvaran som kan
användas för ljudinspelning på datorn. Du kan köpa
programvaran för ljudinspelning som du föredrar
separat eller ladda ned en gratis programvara som
Audacity (http://audacity.sourceforge.net/) från
Internet. Som gratis programvara, stöds Audacity inte
av TEAC.
oo Vid anslutning till en dator med USB och när du spelar in ljud, gör inget av det följande. Det kan få datorn
att sluta fungera. Stäng alltid datorn programvara för
inspelning innan du gör följande.
u Koppla bort USB-kabeln
u Sätt enheten i vänteläge
Datorninställningar
Följande exempel förklarar inställningar som skall göras
med Windows 7.
1 Från Startmenyn, välj Kontrollpanel.
2 Klicka på ”Ljud”.
3 Klicka på fliken ”Inspelning” och
kontrollera att ”USB Audio CODEC” är
inställd som ”Standardenhet”.
4 Välj ”Microphone USB Audio CODEC”
och klicka på knappen ”Egenskaper”.
5 Klicka på fliken ”Avancerad”.
6 Från listmenyn ”Standardformat”, välj
”2 kanal, 16 bit, 48 000 Hz (DVD-kvalitet)”.
7 Klicka ”OK”.
SVENSKA
113
Felsökning
Om du får problem med enheten, kontrollera följande
innan du begär service. Något annat än denna enhet
kan också orsaka problemet. Vänligen kontrollera att de
anslutna apparat också används korrekt.
Om denna enhet fortfarande inte fungerar korrekt, kontakta återförsäljaren, där du köpte enheten.
Allmänt
ee Bekräfta att nätadaptern är ansluten till uttaget.
Tryck sedan på STANDBY/ON-knappen för att slå på
enheten (sida 106).
Inget ljud.
ee När du ansluter denna enhetens analoga ljudutgångsjack till ljudingångsjack på en förstärkare eller
annan utrustning, ställ PHONO EQ-brytaren (inställning för ljudutmatning) till ON (sida 106).
Uppspelning är inte möjlig; det finns buller.
ee Bekräfta att stylusens skydd (gjord utav vit plast) har
tagits bort.
ee Rengör stylusen (sida 105).
ee Om stylusen är sliten, byt ut den (sida 105).
ee Placera enheten så lång borta från teven, mikron och
andra apparat som utstrålar elektromagnetiska vågor
som det går.
114
Tonhöjden är fel.
ee Ställ in rotationshastigheten (RPM), så att den passar
skivan (sida 111).
Ljudet hoppar.
ee Vibrationer kan orsaka hoppande. Placera denna
enhet på en stabil plats.
ee Om skivan är smutsig, torka av den rent.
ee Använd inte repiga skivor.
ee Balansera ut tonarmen och justera om stylustrycket
(sida 104).
Om stylustrycket är lägre än värdet avsedd för patronen, kommer skivan mer sannolikt att hoppa.
Specifikationer
Skivspelare
Allmänt
Drivrutinsystem. . . . . . . . . . . . . . . . . . . . . . . . . . . Banddrivrutin
Motor. . . . . . . . . . . . . . . . . . . . . . . . . . . . . . . . . . . . . . . . DC-motor
Rotationshastighet . . . . . . . . . . . . . . . . . . 33 1/3 rpm, 45 rpm
Variation i rotationshastighet . . . . . . . . . . . . . . . . . . . . . . ±2 %
Svaj. . . . . . . . . . . . . . . . . . . . . . . . . . . . . . . . . . . . . . . . . . . . . . . 0,2 %
S/N-förhållande. . . . . . . . . 67 dB(A, 20 kHz LPF) eller högre
Skivspelare. . . . . . . . . . . . . . . . . . . . . . . . . . Aluminiumgjutjärn
30 cm diameter
Ström från nätadaptern
Ingång. . . . . . . . . . . . . . . . . . . . . . AC 100–240 V, 50–60 Hz
Utgång. . . . . . . . . . . . . . . . . . . . . . . . . . . . . . . . . 12 V, 500 mA
Strömförbrukning
Viloläge. . . . . . . . . . . . . . . . . . . . . . . . . . . . 0,5 W eller mindre
På (START). . . . . . . . . . . . . . . . . . . . . . . . . 1,5 W eller mindre
Vikt. . . . . . . . . . . . . . . . . . . . . . . . . . . . . . . . . . . . . . . . . . . . . . . 4,9 kg
Intervall för drifttemperatur. . . . . . . . . . . . . . . . . . . . . 5–35 °C
Mått (B × H × D, inklusive utskjutande delar)
420 × 356 × 117 mm
Tonarm
Armtyp
Statiskt balanserad tonarm med rakt rör
Effektiv armlängd. . . . . . . . . . . . . . . . . . . . . . . . . . . . . . . 223 mm
Variationsintervall av stylustrycket . . . . . . . . . . . . . . . . . 0–5 g
Acceptabel patronvikt. . . . . . . . . . . . . . . . . . . . . . . . . 3,5–6,5 g
Patron
Typ. . . . . . . . . . . . . . . . . . . . . . . . . . . . . . . . . . . . . . . . . . . . . . . . . MM
Utmatningsspänning. . . . . . . . . . . . . . . . . . . . . . 2,5 mV ±3 dB
Stylustryck. . . . . . . . . . . . . . . . . . . . . . . . . . . . . . . . . . . . . 2,0–0,5 g
Patronvikt . . . . . . . . . . . . . . . . . . . . . . . . . . . . . . . . . . . . 5,7 ±0,5 g
Inkluderad headshell-vikt. . . . . . . . . . . . . . . . . . . . . . . . . . . 10 g
(inklusive skruvar, muttrar och kablar)
Utmatningsspänning
PHONO EQ THRU. . . . . . . . . . . . . . . . . . . . . . . . . 2,5 mV ±3 dB
PHONO EQ ON. . . . . . . . . . . . . . . . . . . . . . 155 mV (−16 dBV)
Utgångskontakter. . . . . . . . . . . . . . . . . . . . . . . . . . . . . . . . . RCA
USB-port
USB-porten kan ta emot ström från datorns USB-bussar
(full hastighet). . . . . . . . . . . . . . . . . . . . . USB-anslutning Typ B
USB-buss och strömstöd. . . . . . . . . . . . . . . . . . . . . 5 V, 500 mA
oo Använd den medföljande USB-kabeln för att ansluta
enheten till en dator för att motta ström från den.
oo Prestandadata är specificerade vid 20 °C.
Medföljande tillbehör
Gummimatta × 1
45 RPM-adapter × 1
Motvikt × 1
Headshell × 1
Förinstallerad AT95E MM-patron (tillverkad av
Audio-Technica)
Skivspelare × 1
Skivspelarskydd ×1
Gummifot för skivspelarens lock × 2
Gångjärn × 2
Ljudkabel × 1
USB-kabel × 1
Nätadapter (GPE053A-120050-Z) × 1
Bruksanvisning (detta dokument) × 1
Garantisedel × 1 (endast för kunder i USA och Kanada)
oo Specifikationer och utseende kan ändras utan föregående meddelande.
oo Vikt och mått är ungefärlig.
oo Illustrationer i denna bruksanvisning kan skilja sig
något från produktionsmodellerna.
SVENSKA
115
WARRANTY/GARANTIE/GARANTÍA/GARANTIE/GARANZIA/GARANTIE/GARANTI
Europe/Europa
This product is subject to the legal warranty regula
tions of the country of purchase. In case of a defect
or a problem, please contact the dealer where you
bought the product.
Ce produit est sujet aux réglementations concernant
la garantie légale dans le pays d’achat. En cas de
défaut ou de problème, veuillez contacter le reven
deur chez qui vous avez acheté le produit.
Las condiciones de garantía de este aparato están
sujetas a las disposiciones legales sobre garantía del
país en el que ha sido adquirido. En caso de garantía,
debe dirigirse al establecimiento donde adquirió el
aparato.
Dieses Gerät unterliegt den gesetzlichen Gewährleis
tungsbestimmungen des Landes, in dem es erworben
wurde. Bitte wenden Sie sich im Gewährleistungsfall an
den Händler, bei dem sie das Gerät erworben haben.
Questo apparecchio è conforme alle norme sulla
garanzia vigenti nel rispettivo Paese in cui esso è stato
acquistato. Si prega di rivolgersi al proprio commer
ciante, presso il quale è stato acquistato l’apparecchio,
nel caso in cui si voglia richiedere una prestazione in
garanzia.
Dit product valt onder de wettelijke garantievoor
schriften van het land waar het is aangeschaft. Neem
bij een defect of probleem contact op met de leve
rancier waar u het product heeft gekocht.
För denna produkt gäller det lagliga garantiregleringar
av landet där köpet gjordes. Vid fel eller problem kon
takta vänligen återförsäljaren, där du köpte produkten.
In other countries/areas
This warranty gives you specific legal rights, and you
may also have other rights that vary by country, state
or province.
If you have a warranty claim or request, please con
tact the dealer where you bought the product.
该保证书赋予了顾客特定的合法权利,并且因国
家,州或省等地域的不同,顾客可能拥有其他权
利。如需申请或要求保修,请与购买本产品的销
售店进行联系。
Z
TEAC CORPORATION
1-47 Ochiai, Tama-shi, Tokyo 206-8530 Japan
TEAC AMERICA, INC.
1834 Gage Road, Montebello, California 90640 U.S.A.
TEAC AUDIO EUROPE
Liegnitzer Straße 6, 82194 Gröbenzell, Germany
Phone: +81-42-356-9156
Phone: +1-323-726-0303
Phone: +49-8142-4208-141
This device has a serial number located on its rear panel. Please record the serial number
and retain it for your records.
Model name: TN-300
Serial number:
0914.MA-2111A