1
HP107_e.book Page 1 Tuesday, October 19, 2004 10:41 PM
Owner’s Manual
(p. 1)
Bedienungsanleitung
(p. 41)
Mode d’emploi
(p. 81)
Manuale dell’utente
(p. 121)
Manual del Usuario
(p. 161)
Handleiding
(p. 201)
Copyright © 2004 ROLAND CORPORATION
All rights reserved. No part of this publication may be reproduced in any form
without the written permission of ROLAND CORPORATION.
HP107_e.book Page 2 Tuesday, October 19, 2004 10:41 PM
WARNING: To reduce the risk of fire or electric shock, do not expose this apparatus to rain or moisture.
CAUTION
RISK OF ELECTRIC SHOCK
DO NOT OPEN
ATTENTION: RISQUE DE CHOC ELECTRIQUE NE PAS OUVRIR
CAUTION: TO REDUCE THE RISK OF ELECTRIC SHOCK,
DO NOT REMOVE COVER (OR BACK).
NO USER-SERVICEABLE PARTS INSIDE.
REFER SERVICING TO QUALIFIED SERVICE PERSONNEL.
The lightning flash with arrowhead symbol, within an
equilateral triangle, is intended to alert the user to the
presence of uninsulated “dangerous voltage” within the
product’s enclosure that may be of sufficient magnitude to
constitute a risk of electric shock to persons.
The exclamation point within an equilateral triangle is
intended to alert the user to the presence of important
operating and maintenance (servicing) instructions in the
literature accompanying the product.
INSTRUCTIONS PERTAINING TO A RISK OF FIRE, ELECTRIC SHOCK, OR INJURY TO PERSONS.
IMPORTANT SAFETY INSTRUCTIONS
SAVE THESE INSTRUCTIONS
WARNING - When using electric products, basic precautions should always be followed, including the following:
1.
2.
3.
4.
5.
6.
7.
8.
9.
Read these instructions.
Keep these instructions.
Heed all warnings.
Follow all instructions.
Do not use this apparatus near water.
Clean only with a dry cloth.
Do not block any of the ventilation openings. Install in
accordance with the manufacturers instructions.
Do not install near any heat sources such as radiators,
heat registers, stoves, or other apparatus (including
amplifiers) that produce heat.
Do not defeat the safety purpose of the polarized or
grounding-type plug. A polarized plug has two blades with
one wider than the other. A grounding type plug has two
blades and a third grounding prong. The wide blade or the
third prong are provided for your safety. When the provided
plug does not fit into your outlet, consult an electrician for
replacement of the obsolete outlet.
10. Protect the power cord from being walked on or pinched
particularly at plugs, convenience receptacles, and the
point where they exit from the apparatus.
11. Only use attachments/accessories specified by the
manufacturer.
12. Never use with a cart, stand, tripod, bracket,
or table except as specified by the
manufacturer, or sold with the apparatus.
When a cart is used, use caution when
moving the cart/apparatus combination to
avoid injury from tip-over.
13. Unplug this apparatus during lightning storms or when
unused for long periods of time.
14. Refer all servicing to qualified service personnel. Servicing
is required when the apparatus has been damaged in any
way, such as power-supply cord or plug is damaged, liquid
has been spilled or objects have fallen into the apparatus,
the apparatus has been exposed to rain or moisture, does
not operate normally, or has been dropped.
For the U.K.
IMPORTANT: THE WIRES IN THIS MAINS LEAD ARE COLOURED IN ACCORDANCE WITH THE FOLLOWING CODE.
BLUE:
NEUTRAL
BROWN: LIVE
As the colours of the wires in the mains lead of this apparatus may not correspond with the coloured markings identifying
the terminals in your plug, proceed as follows:
The wire which is coloured BLUE must be connected to the terminal which is marked with the letter N or coloured BLACK.
The wire which is coloured BROWN must be connected to the terminal which is marked with the letter L or coloured RED.
Under no circumstances must either of the above wires be connected to the earth terminal of a three pin plug.
HP107_e.book Page 1 Tuesday, October 19, 2004 10:41 PM
Owner’s Manual
Thank you, and congratulations on your choice of the Roland Digital Piano HP107e.
Main Features
Piano Sounds with Rich Resonance and Wide-ranging Expressiveness
The stereo sampling piano sound generator realistically reproduces even the sound of the hammers
striking the strings, producing the tones of a high-quality concert grand piano. Maximum polyphony of 128 notes ensures that you can use the pedal freely without running out of notes.
This instrument is receptive to all the subtle nuances that a performer might use, and skillfully
reproduces them—whether it be slight variations in touch or the resonance in the strings when the
keys are released, or the type of resonance heard when the pedals are released (Piano Resonance).
In addition, this instrument features a “Grand Sound” speaker system, and simulates the full,
three-dimensional nature of a concert grand piano (Grand Space), which together help to deliver a
sound with even greater clarity and power (Dynamic Emphasis).
Pursuing the Playing Feel of a Grand Piano
This instrument features a progressive hammer action keyboard, which duplicates the touch of a
grand piano, with a heavier touch in the lower register, and a lighter touch in the upper register. In
addition, on the HP107e, even the distinctive “click” that you feel when pressing a key on a grand
piano has been faithfully simulated (escapement mechanism).
The instrument features two kinds of key touch control; key response, which changes the keys’
apparent weighting, and “hammer response function,” which reproduces the piano hammers’ subtle movements. The pedal is designed for good-feeling response, and allows subtle performance
nuances to be expressed.
Expressiveness Only a Digital Instrument Can Provide
Before using this unit,
carefully read the sections
entitled: “Using the unit
safely” (p. 2) and “Important
notes” (p. 4). These sections
provide important
information concerning the
proper operation of the unit.
Additionally, in order to feel
assured that you have
gained a good grasp of every
feature provided by your
new unit, Owner’s manual
should be read in its
entirety. The manual should
be saved and kept on hand
as a convenient reference.
The HP107e lets you add just the right sounds to the piano for an effect that is full and rich.
You can layer different instrument sounds over the piano sound, layer sounds one octave higher,
and use a pedal to control the volume.
Comfortable for Use with Headphones
Special effects applied to the sound when headphones are used make listening through headphones comfortable, not fatiguing. And in addition to an indicator on the Front panel that lights up
when you connect a pair of headphones, the HP107e also provides a convenient hook where you
can keep your headphones when they’re not in use.
A Variety of Helpful Practice Features and Built-in Piano Songs
A metronome function and “two-track recorder,” the built-in songs for a collection of scores (60
songs included), and other features let you experience piano lessons in ways possible only with a
digital piano.
Copyright © 2004 ROLAND CORPORATION
All rights reserved. No part of this publication may be reproduced in
any form without the written permission of ROLAND CORPORATION.
HP107_e.book Page 2 Tuesday, October 19, 2004 10:41 PM
Using the unit safely
Used for instructions intended to alert
the user to the risk of death or severe
injury should the unit be used
improperly.
Used for instructions intended to alert
the user to the risk of injury or material
damage should the unit be used
improperly.
* Material damage refers
other adverse effects
respect to the home
furnishings, as well
animals or pets.
to damage or
caused with
and all its
to domestic
• Before using this unit, make sure to read the
instructions below, and the Owner’s Manual.
...........................................................................................................
• Do not open or perform any internal modifications on the unit.
...........................................................................................................
• Do not attempt to repair the unit, or replace parts
within it (except when this manual provides specific instructions directing you to do so). Refer all
servicing to your retailer, the nearest Roland Service Center, or an authorized Roland distributor,
as listed on the “Information” page.
...........................................................................................................
• Never use or store the unit in places that are:
• Subject to temperature extremes (e.g., direct sunlight in an enclosed vehicle, near a heating duct,
on top of heat-generating equipment); or are
• Damp (e.g., baths, washrooms, on wet floors); or
are
• Humid; or are
• Exposed to rain; or are
• Dusty; or are
• Subject to high levels of vibration.
...........................................................................................................
• This unit should be used only with a rack or stand
that is recommended by Roland.
...........................................................................................................
• Make sure you always have the unit placed so it is
level and sure to remain stable. Never place it on
stands that could wobble, or on inclined surfaces.
...........................................................................................................
• The unit should be connected to a power supply
only of the type described in the operating instructions, or as marked on rear of the unit.
...........................................................................................................
• Use only the attached power-supply cord. Also,
the supplied power cord must not be used with
any other device.
...........................................................................................................
The
symbol alerts the user to important instructions
or warnings.The specific meaning of the symbol is
determined by the design contained within the
triangle. In the case of the symbol at left, it is used for
general cautions, warnings, or alerts to danger.
The
symbol alerts the user to items that must never
be carried out (are forbidden). The specific thing that
must not be done is indicated by the design contained
within the circle. In the case of the symbol at left, it
means that the unit must never be disassembled.
The ● symbol alerts the user to things that must be
carried out. The specific thing that must be done is
indicated by the design contained within the circle. In
the case of the symbol at left, it means that the powercord plug must be unplugged from the outlet.
• Do not excessively twist or bend the power cord,
nor place heavy objects on it. Doing so can damage the cord, producing severed elements and
short circuits. Damaged cords are fire and shock
hazards!
...........................................................................................................
• This unit, either alone or in combination with an
amplifier and headphones or speakers, may be
capable of producing sound levels that could
cause permanent hearing loss. Do not operate for
a long period of time at a high volume level, or at
a level that is uncomfortable. If you experience
any hearing loss or ringing in the ears, you should
immediately stop using the unit, and consult an
audiologist.
...........................................................................................................
• Do not allow any objects (e.g., flammable material,
coins, pins); or liquids of any kind (water, soft
drinks, etc.) to penetrate the unit.
...........................................................................................................
• Immediately turn the power off, remove the
power cord from the outlet, and request servicing
by your retailer, the nearest Roland Service Center, or an authorized Roland distributor, as listed
on the “Information” page when:
• The power-supply cord, or the plug has been damaged; or
• If smoke or unusual odor occurs
• Objects have fallen into, or liquid has been spilled
onto the unit; or
• The unit has been exposed to rain (or otherwise
has become wet); or
• The unit does not appear to operate normally or
exhibits a marked change in performance.
...........................................................................................................
HP107_e.book Page 3 Tuesday, October 19, 2004 10:41 PM
014
• Protect the unit from strong impact.
• (Do not drop it!)
...........................................................................................................
015
• Do not force the unit’s power-supply cord to share
an outlet with an unreasonable number of other
devices. Be especially careful when using extension cords—the total power used by all devices
you have connected to the extension cord’s outlet
must never exceed the power rating (watts/
amperes) for the extension cord. Excessive loads
can cause the insulation on the cord to heat up and
eventually melt through.
...........................................................................................................
...........................................................................................................
• Never handle the power cord or its plugs with wet
hands when plugging into, or unplugging from,
an outlet or this unit.
...........................................................................................................
• If you need to move the instrument, take note of
the precautions listed below. At least two persons
are required to safely lift and move the unit. It
should be handled carefully, all the while keeping
it level. Make sure to have a firm grip, to protect
yourself from injury and the instrument from
damage.
ENGLISH
• In households with small children, an adult
should provide supervision until the child is capable of following all the rules essential for the safe
operation of the unit.
...........................................................................................................
ENGLISH
106
• Never climb on top of, nor place heavy objects on
the unit.
016
• Before using the unit in a foreign country, consult
with your retailer, the nearest Roland Service Center, or an authorized Roland distributor, as listed
on the “Information” page.
...........................................................................................................
026
• DO NOT play a CD-ROM disc on a conventional
audio CD player. The resulting sound may be of a
level that could cause permanent hearing loss.
Damage to speakers or other system components
may result.
...........................................................................................................
026
• Before cleaning the unit, turn off the power and
unplug the power cord from the outlet (p. 9).
...........................................................................................................
110a
• Whenever you suspect the possibility of lightning
in your area, pull the plug on the power cord out
of the outlet.
...........................................................................................................
116
• Be careful when opening/closing the lid so you do
not get your fingers pinched (p. 10). Adult supervision is recommended whenever small children
use the unit.
...........................................................................................................
ENGLISH
• Do not put anything that contains water (e.g.,
flower vases) on this unit. Also, avoid the use of
insecticides, perfumes, alcohol, nail polish, spray
cans, etc., near the unit. Swiftly wipe away any liquid that spills on the unit using a dry, soft cloth.
...........................................................................................................
...........................................................................................................
109a
ENGLISH
• Check to make sure the screws securing the unit to
the stand have not become loose. Fasten them
again securely whenever you notice any loosening.
• Disconnect the power cord.
• Disconnect all cords coming from external devices.
• Raise the adjusters on the stand (p. 11).
• Close the lid.
• Fold down the music rest.
118b
• Should you remove the music rest’s attachment
screws, screws of stand, and wing nut, make sure
to put them in a safe place out of children’s reach,
so there is no chance of them being swallowed
accidentally.
...........................................................................................................
ENGLISH
ENGLISH
• The unit should be located so that its location or
position does not interfere with its proper ventilation.
...........................................................................................................
• Always grasp only the plug on the power-supply
cord when plugging into, or unplugging from, an
outlet or this unit.
...........................................................................................................
• At regular intervals, you should unplug the power
plug and clean it by using a dry cloth to wipe all
dust and other accumulations away from its
prongs. Also, disconnect the power plug from the
power outlet whenever the unit is to remain
unused for an extended period of time. Any accumulation of dust between the power plug and the
power outlet can result in poor insulation and lead
to fire.
...........................................................................................................
• Try to prevent cords and cables from becoming
entangled. Also, all cords and cables should be
placed so they are out of the reach of children.
...........................................................................................................
HP107_e.book Page 4 Tuesday, October 19, 2004 10:41 PM
HP107e – Important notes
Important notes
In addition to the items listed under “IMPORTANT SAFETY INSTRUCTIONS” and “Using the unit safely” (p. 2), please
read and observe the following:
Power Supply
• Do not connect this unit to same electrical outlet that is
being used by an electrical appliance that is controlled by
an inverter (such as a refrigerator, washing machine,
microwave oven, or air conditioner), or that contains a
motor. Depending on the way in which the electrical
appliance is used, power supply noise may cause this
unit to malfunction or may produce audible noise. If it is
not practical to use a separate electrical outlet, connect a
power supply noise filter between this unit and the electrical outlet.
307
• Before connecting this unit to other devices, turn off the
power to all units. This will help prevent malfunctions
and/or damage to speakers or other devices.
308
• Although the LCD and LEDs are switched off when the
POWER switch is switched off, this does not mean that
the unit has been completely disconnected from the
source of power. If you need to turn off the power completely, first turn off the POWER switch, then unplug the
power cord from the power outlet. For this reason, the
outlet into which you choose to connect the power cord’s
plug should be one that is within easy reach and readily
accessible.
Placement
• Using the unit near power amplifiers (or other equipment
containing large power transformers) may induce hum.
To alleviate the problem, change the orientation of this
unit; or move it farther away from the source of interference.
352a
• This device may interfere with radio and television reception. Do not use this device in the vicinity of such receivers.
352b
• Noise may be produced if wireless communications
devices, such as cell phones, are operated in the vicinity
of this unit. Such noise could occur when receiving or initiating a call, or while conversing. Should you experience
such problems, you should relocate such wireless devices
so they are at a greater distance from this unit, or switch
them off.
354b
• Do not expose the unit to direct sunlight, place it near
devices that radiate heat, leave it inside an enclosed vehicle, or otherwise subject it to temperature extremes. Also,
do not allow lighting devices that normally are used
while their light source is very close to the unit (such as a
piano light), or powerful spotlights to shine upon the
same area of the unit for extended periods of time. Excessive heat can deform or discolor the unit.
355b
• When moved from one location to another where the
temperature and/or humidity is very different, water
droplets (condensation) may form inside the unit. Damage or malfunction may result if you attempt to use the
unit in this condition. Therefore, before using the unit,
you must allow it to stand for several hours, until the
condensation has completely evaporated.
4
• Do not allow rubber, vinyl, or similar materials to remain
on the unit for long periods of time. Such objects can discolor or otherwise harmfully affect the finish.
358
• Do not allow objects to remain on top of the keyboard.
This can be the cause of malfunction, such as keys ceasing
to produce sound.
359
• Do not paste stickers, decals, or the like to this instrument. Peeling such matter off the instrument may damage the exterior finish.
Maintenance
• To clean the unit, use a dry, soft cloth; or one that is
slightly dampened. Try to wipe the entire surface using
an equal amount of strength, moving the cloth along with
the grain of the wood. Rubbing too hard in the same area
can damage the finish.
402
• Never use benzine, thinners, alcohol or solvents of any
kind, to avoid the possibility of discoloration and/or
deformation.
• The pedals of this unit are made of brass.
Brass eventually darkens as the result of the natural oxidization process. If the brass becomes tarnished, polish it
using commercially available metal polisher.
Repairs and Data
• Please be aware that all data contained in the unit’s memory may be lost when the unit is sent for repairs. Important data should always be backed up in another MIDI
device (e.g., a sequencer), or written down on paper
(when possible). During repairs, due care is taken to
avoid the loss of data. However, in certain cases (such as
when circuitry related to memory itself is out of order),
we regret that it may not be possible to restore the data,
and Roland assumes no liability concerning such loss of
data.
Additional Precautions
• Please be aware that the contents of memory can be irretrievably lost as a result of a malfunction, or the improper
operation of the unit. To protect yourself against the risk
of loosing important data, we recommend that you periodically save a backup copy of important data you have
stored in the unit’s memory in another MIDI device (e.g.,
a sequencer).
552
• Unfortunately, it may be impossible to restore the contents of data that was stored in the unit’s memory and
another MIDI device (e.g., a sequencer) once it has been
lost. Roland Corporation assumes no liability concerning
such loss of data.
553
• Use a reasonable amount of care when using the unit’s
buttons, sliders, or other controls; and when using its
jacks and connectors. Rough handling can lead to malfunctions.
HP107_e.book Page 5 Tuesday, October 19, 2004 10:41 PM
Important notes
ENGLISH
• When connecting / disconnecting all cables, grasp the
connector itself—never pull on the cable. This way you
will avoid causing shorts, or damage to the cable’s internal elements.
557
• A small amount of heat will radiate from the unit during
normal operation.
558a
• To avoid disturbing your neighbors, try to keep the unit’s
volume at reasonable levels. You may prefer to use headphones, so you do not need to be concerned about those
around you (especially when it is late at night).
559b
ENGLISH
• When you need to transport the unit, pack it in shockabsorbent material. Transporting the unit without doing
so can cause it to become scratched or damaged, and
could lead to malfunction.
560
• Do not apply undue force to the music rest while it is in
use.
562
• Use a cable from Roland to make the connection. If using
some other make of connection cable, please note the following precautions.
ENGLISH
• Some connection cables contain resistors. Do not use
cables that incorporate resistors for connecting to this unit.
The use of such cables can cause the sound level to be
extremely low, or impossible to hear. For information on
cable specifications, contact the manufacturer of the cable.
565
ENGLISH
• Before opening or closing the keyboard lid, always make
sure that no pets or other small animals are located on top
of the instrument (in particular, they should be kept away
from the keyboard and its lid). Otherwise, due to the
structural design of this instrument, small pets or other
animals could end up getting trapped inside it. If such a
situation is encountered, you must immediately switch
off the power and disconnect the power cord from the
outlet. You should then consult with the retailer from
whom the instrument was purchased, or contact the nearest Roland Service Center.
Handling CD-ROMs
• Avoid touching or scratching the shiny underside
(encoded surface) of the disc. Damaged or dirty CD-ROM
discs may not be read properly. Keep your discs clean
using a commercially available CD cleaner.
ENGLISH
ENGLISH
5
HP107_e.book Page 6 Tuesday, October 19, 2004 10:41 PM
HP107e – Contents
Contents
Using the unit safely ..........................................................2
Splitting the Keyboard Into Two Sections for Four-Hand Performances
(Twin Piano Mode)..........................................................................................22
Important notes ..................................................................4
Chapter 3. Playing Along with the Built-in Songs ........ 23
Panel Descriptions .............................................................7
Changing the Tempo.......................................................................................23
Adding a count-in to match the timing (Count-In) ......................23
Playing Each Hand Separately ......................................................................24
Front Panel ......................................................................................................... 7
Rear Panel........................................................................................................... 8
Bottom Panel ...................................................................................................... 8
Before You Start Playing ...................................................9
Connecting the Pedal Cable............................................................................. 9
Connecting the Speaker Cable......................................................................... 9
Connect the Power Cord .................................................................................. 9
Setting Up the Music Rest ................................................................................ 9
Opening/Closing the Lid............................................................................... 10
Connecting Headphones ................................................................................ 10
Using the headphones hook ............................................................10
Turning the Power On and Off ..................................................................... 11
Adjusting the Sound’s Volume and Brilliance ............................................ 11
About the Pedals ............................................................................................. 11
Chapter 1. Enjoying the Built-in Songs ..........................12
Listening to Built-in Songs ............................................................................. 12
Playing back all songs continuously (All Song Play) ...................12
Selecting a song and playing it ........................................................12
Listening to the Demo Songs ......................................................................... 13
Playing Back the Tone Demo Songs ...............................................13
Listening to a Demo of the Functions.............................................13
Chapter 2. Performance ...................................................14
Performing with a Variety of Sounds........................................................... 14
Making Fine Adjustments to the Piano Sound (Piano Resonance).......... 14
Playing Sounds When the Keys Are Released (Key Off).............14
Producing the Resonance of the Strings When the Keys Are
Played (String Resonance)................................................................14
Having Resonance Played When You Press the Damper Pedal
(Damper Resonance) .........................................................................15
Adjusting the Keyboard Touch (Key Touch) .............................................. 15
Changing the Timing of Sounds According to the Force Used to
Press the Keys (Hammer Response) ...............................................15
Adding a Sense of Depth to the Sound (Grand Space) .............................. 16
Adding the Right Sense of Depth for Headphones (Grand Space) ......... 16
Adding Liveliness to the Sound (Dynamic Emphasis) .............................. 17
Applying Effects to the Sound ...................................................................... 17
Adding reverberation to the sound (Reverb) ................................17
Adding richness to the sound (Chorus) .........................................17
Changing the amount of effect applied..........................................17
Transposing the Key of the Keyboard (Transpose).................................... 18
Layering Complementary Sounds with the Piano Tones (Acoustic
Layering)........................................................................................................... 18
Changing the Volume Balance for Acoustic Layering .................19
Playing Two Sounds Together (Dual Performance) .................................. 19
Adjusting the volume balance in Dual performance (Dual
Balance) ...............................................................................................19
Playing Different Tones with the Left and Right Hands (Split) ............... 20
Changing the keyboard’s split point ..............................................20
Changing How the Center Pedals Work ..................................................... 21
Using Metronome............................................................................................ 21
Sounding the metronome.................................................................21
Changing the metronome volume ..................................................21
6
Chapter 4. Recording Your Performance ...................... 25
Recording a New Song ...................................................................................25
Recording Along with a Song ........................................................................26
Selecting and Recording the Track for Each Hand Separately .................27
Erasing Recorded Performances....................................................................27
Erasing a performance from the specified track ...........................27
Erasing a song ....................................................................................27
Chapter 5. Changing Various Settings .......................... 28
Making Detailed Settings (Function) ............................................................28
Tuning to other instruments’ pitches (Master Tuning) ...............29
Changing the temperament .............................................................29
Setting the tuning curve (Stretch Tuning) .....................................29
Changing the Pitch by Octaves (Octave Shift) ..............................30
Applying the damper pedal to the left-hand keyboard area ......30
Changing How Grand Space is Applied (Grand Space Mode) ..30
Disabling Everything Except Piano Play (Panel Lock) ..............................30
Restoring the Settings to the Factory Condition (Factory Reset) ..............31
Remembering the Settings Even When the Power is Turned Off
(Memory Backup) ............................................................................................31
Saving Recorded Songs (Song Backup) ........................................................31
Deleting backed up songs ................................................................31
Using the V-LINK function ............................................................................32
Making the Settings for the USB Driver .......................................................32
Chapter 6. Connecting External Devices....................... 33
Connecting to Audio Equipment ..................................................................33
Connecting to the USB Connector.................................................................33
Connecting MIDI Devices ..............................................................................34
Making MIDI-related Settings .......................................................................34
MIDI send channel settings .............................................................35
Switching Local Control on and off ................................................35
Transmitting a performance you recorded....................................35
Appendix........................................................................... 36
Troubleshooting...............................................................................................36
Error Messages/Other Messages ..................................................................37
Parameters Stored in Memory Backup.........................................................37
Easy Operation List .........................................................................................38
Main Specifications..........................................................................................39
Tone List ......................................................................... 240
Built-in Song List ........................................................... 241
MIDI Implementation Chart.................................. 243
HP107_e.book Page 7 Tuesday, October 19, 2004 10:41 PM
Panel Descriptions
ENGLISH
Panel Descriptions
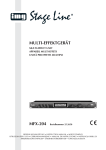
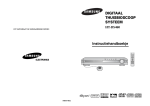
Front Panel
6 7 8
3
15
17
18
21 22
19
20
23 24
4 5
9 10 11
16
25 26
27
ENGLISH
2
12 13 14
Power On
1
1. [Power On] switch
Turns the power on/off (p. 11).
2. [Volume] knob
Adjusts the overall volume level (p. 11).
Adjusts the tone brightness (p. 11).
4. [Demo] button
You can listen to a demo of the instrument’s tones as well
as a demo of the various functions (p. 13).
5. [
(Headphones)] indicator
This indicator lights up when headphones are connected
to the headphone jack (p. 10).
6. [Transpose] button
Transposes the pitch of the keyboard (p. 18).
Divides the keyboard into right-hand and left-hand areas,
allowing you to play a different sound in each area (p.
20). You can also set a number of different functions
when this button and the [Chorus] button are held down
(p. 28–p. 32, p. 34–p. 35).
8. [Chorus] button
Adds richness to the sound (p. 17).
9. [Grand Space] button
Adds a sense of depth to the sound (p. 16, p. 16).
Creates brilliance and liveliness in the sound (p. 17).
11. [Reverb] button
Adds reverberation to the sound (p. 17).
Piano Resonance
12. [Key Off] button
Plays the sound produced when the keys are released (p.
14).
13. [String] button
14. [Damper] button
Changes the resonance produced when the damper pedal
is pressed (p. 15).
17. Display
The display indicates values for various settings, including the tone variation, song number, and tempo. Usually
these will appear as in the figure above.
18. [Song/Tempo] Button
Used to select from the built-in songs (p. 12, p. 23).
Furthermore, you can press this button to alternately display the tempo and the currently selected song number
(indicated by an “S.” before it). The indicator is green
when the tempo is indicated and red when the song number is displayed.
19. [-] [+] buttons
Allow you to select the value of various settings.
Pressing both the [-] and [+] buttons simultaneously
returns the setting of a particular item or function to its
original value.
20. [Metronome/Count In] Button
Turns the metronome on/off (p. 21). Also featured is the
count-in sound, which can be played before the song
starts, allowing you to begin playing with the song with
perfect timing (p. 23).
TRACK
21. [Left] button
Plays back or records a performance separately for each
hand (p. 24, p. 26–p. 27).
The left-hand performances of the built-in songs are
assigned to this button. This button and the following
[Right] button are collectively referred to as the “track
buttons.”
22. [Right] button
Plays back or records a performance separately for each
hand (p. 24, p. 26–p. 27). The right-hand performances of
the built-in songs are assigned to this button.
7
ENGLISH
Produces the resonance of the strings created when you
play the keyboard (p. 14).
They are used to choose the kinds of tones (tone groups)
played by the keyboard (p. 14).
ENGLISH
10. [Dynamic Emphasis] button
16. Tone buttons
ENGLISH
7. [Split] button
You can layer and play recommended tones that complement the piano’s own sound (p. 18).
ENGLISH
3. [Brilliance] knob
15. [Acoustic Layering] button
HP107_e.book Page 8 Tuesday, October 19, 2004 10:41 PM
HP107e – Panel Descriptions
23. [Play] button
26. [Hammer] button
Starts and stops playback of built-in songs and recorded
performances (p. 12, p. 23).
Also starts/stops recording of a performance (p. 25–p.
27).
Adjusts how variations in your keyboard playing
strength will modify the timing at which notes are
sounded (p. 15).
27.[Center Pedal] button
Switches the center pedal function (p. 21).
24. [Rec] button
Puts the HP107e in recording-standby mode (p. 25–p. 27).
KEY TOUCH
25. [Touch] button
Modifies the playing feel of the keyboard (p. 15).
Front Panel
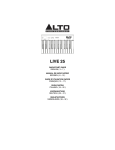
Rear Panel
Bottom Panel
Rear Panel
28.Pedal connector
Connect the pedal cable of the special stand to this connector (p. 9).
28
29
30
29.Input jacks
These jacks can be connected to another sound generating
device or an audio device, so that the sound of that device
will be output from the HP107e’s speakers (p. 33).
30.Output jacks
Allows you to output the piano’s sound to sound reinforcement equipment to obtain a more powerful sound.
These can also be connected to a tape recorder or other
recording device to record a performance (p. 33).
Bottom Panel
31.Phones jacks
A set of headphones can be connected here (p. 10).
32.MIDI Out/In connectors
Connect to external MIDI devices to exchange performance data (p. 34).
31
32
33
33.USB connector
You can connect a computer and exchange performance
data between the instrument and the computer (p. 33).
8
HP107_e.book Page 9 Tuesday, October 19, 2004 10:41 PM
Before You Start Playing
ENGLISH
Before You Start Playing
Connecting the Pedal Cable
Insert the pedal cable into the Pedal connector on
the rear panel of the HP107e.
Connect the Power Cord
1. Insert the included power cord into the AC inlet
on the bottom panel of the HP107e.
NOTE
ENGLISH
2. Plug the power cord into a power outlet.
Use only the attached power-supply cord.
Connecting the Speaker
Cable
Push the speaker cable in until it clicks into position.
Setting Up the Music Rest
ENGLISH
As shown in the diagram, connect the speaker
cable leading from the speaker box of the stand to
the speaker connector located on the rear bottom
of the HP107e.
1. Grasping the music rest with both hands, lift it
toward you until its in the upright position.
2. Use the support on the back of the music rest to
keep the stand in place.
The angle of the music rest can be set to any of three positions.
1
Speaker connector
2
ENGLISH
Clip portion
Speaker cable
NOTE
Do not put anything that contains water (e.g., flower
vases) on this unit. Also, avoid the use of insecticides,
perfumes, alcohol, nail polish, spray cans, etc., near the
unit.
The speakers of this piano are mounted beneath the upper
surface, and face upwards. Malfunctions or accidents
may occur if liquids contact any part of the speakers.
Speakers
■ Folding down the music rest
Raise the support located on the back of the music
rest, then gently fold down the music rest.
You can use the holders to hold pages in place. When not
using the holders, leave them folded down.
ENGLISH
■ Using the music holders
ENGLISH
9
HP107_e.book Page 10 Tuesday, October 19, 2004 10:41 PM
HP107e – Before You Start Playing
■ Removing the music rest
You can remove the music rest from the piano. This
allows you to place a notebook computer on the piano.
Position the music rest so it’s upright, then remove
the three screws, as shown.
The headphone volume is adjusted by the [Volume] knob
(p. 11) of the HP107e.
NOTE Use Stereo headphones.
Make sure to use only Roland headphones. Headphones
from other manufacturers may be unable to provide sufficient volume.
You can remove the screws using a coin.
Some notes on using headphones
NOTE
Be careful not to lose the screws that you removed from
the music rest, or put them where they might be swallowed by small children.
Opening/Closing the Lid
To open the lid, use both hands to lift it lightly,
and slide it away from yourself.
To close the lid, pull it gently toward yourself, and
lower it softly after it has been fully extended.
NOTE
NOTE
When opening and closing the lid, be careful not to let
your fingers get caught. If small children will be using
the HP107e, adult supervision should be provided.
If you need to move the piano, make sure the lid is closed
first to prevent accidents.
• To prevent damage to the cord, handle the headphones only
by the headset or the plug.
• Connecting the headphones when the volume of connected
equipment is turned up may result in damage to the headphones. Lower the volume on the HP107e before plugging
in the headphones.
• Listening at excessively high volume levels will not only
damage the headphones, but may also cause hearing loss.
Use the headphones at a moderate volume level.
■ Using the headphones hook
Whenever you are not using the headphones, you can
hang them on the headphone hook at the lower left of the
HP107e.
Attaching the Headphone Hook
Press and twist the headphone hook included with the
HP107e into the hole in the bottom of the HP107e (refer to
the figure below). Turn the wing nut of headphone hook
to secure the headphone hook.
Wing Nut
Headphone Hook
Connecting Headphones
The HP107e has two jacks for plugging in headphones. This
allows two people to listen through headphones simultaneously, making it very useful for lessons and when performing piano pieces for four hands. Additionally, this
allows you to play without having to worry about bothering
others around you, even at night.
Plug the headphones into the Phones jacks located
at the bottom left of the piano.
Phones jack x 2
When headphones are connected, the [
(Headphones)]
indicator (p. 7) lights up, and sounds stop playing from
the speakers of the HP107e.
10
HP107_e.book Page 11 Tuesday, October 19, 2004 10:41 PM
Before You Start Playing
Turn on power to your various devices in the order specified.
By turning on devices in the wrong order, you risk causing
malfunction and/or damage to speakers and other devices.
To turn the power on, turn the [Volume] knob all
the way down, and then press the [Power On]
switch.
ENGLISH
Turning the Power On and
Off
About the Pedals
The pedals have the following functions, and are used
mainly for piano performance.
Soft Pedal
Damper Pedal
Sostenuto Pedal
Damper pedal (right pedal)
While this pedal is pressed, notes will be sustained even
after you take your fingers off the keys.
ENGLISH
Power On
The length of sustain will change subtly depending on
how deeply you press the pedal.
Power Indicator
The power will turn on, and the Power indicator at the
left front of the HP107e will light.
To turn the power off, turn the [Volume] knob all
the way to the left, and press the [Power On]
switch.
Adjusting the Sound’s
Volume and Brilliance
Turn the [Volume] knob to adjust the overall volume.
Min
Max
Mellow
Soft pedal (left pedal)
When you hold down this pedal and play the keyboard,
the sound will have a softer tone.
The softness of the tone can be varied subtly by the depth
to which you press the pedal.
About the adjuster
Be sure to use the adjusters underneath the pedals whenever the instrument is moved or when the pedals appear
to be unstable.
❍ Rotate the adjuster to lower it so that it is in firm contact
with the floor. If there is a gap between the pedals and
the floor, the pedals may be damaged. In particular when
placing the instrument on carpet, adjust this so that the
pedals firmly contact the floor.
ENGLISH
Turn the [Brilliance] knob to adjust the brightness
of the sound.
This pedal sustains only the sounds of the keys that were
already played when you pressed the pedal.
You can switch the function of the sostenuto pedal ( p.
21).
ENGLISH
The Power indicator at the left front of the HP107e will go
dark, and the power will be turned off.
NOTE If you need to turn off the power completely, first turn off
the POWER switch, then unplug the power cord from
the power outlet. Refer to “Power Supply” (p. 4).
Sostenuto pedal (center pedal)
ENGLISH
After a few seconds, you will be able to play the keyboard
to produce sound. Use the [Volume] knob to adjust the
volume.
NOTE This unit is equipped with a protection circuit. A brief
interval (a few seconds) after power up is required before
the unit will operate normally.
On an acoustic piano, holding down the damper pedal
will allow the remaining strings to resonate in sympathy
with the sounds that you played from the keyboard, adding a rich resonance. The HP107e simulates this sympathetic resonance.
You can change the amount of resonance applied with
the damper pedal (p. 15).
Bright
Adjuster
ENGLISH
11
HP107_e.book Page 12 Tuesday, October 19, 2004 10:41 PM
HP107e – Chapter 1. Enjoying the Built-in Songs
Chapter 1. Enjoying the Built-in Songs
Listening to Built-in Songs
■ Selecting a song and playing it
The HP107e comes with 68 piano songs onboard.
“Chapter 3. Playing Along with the Built-in Songs” on
page 23, “Tone List” (p. 240)
■ Playing back all songs continuously (All Song
Play)
The built-in songs can be played back consecutively.
1 3, 4
2
About the display for the built-in songs
USr (user) … The location where you can record your
performance. (For details on recording → p. 25)
S.1–S.68 … Built-in songs
S. U … Song saved with Song Backup (p. 31)
12
1. Simultaneously press the [Song/Tempo] and
[Play] button.
The [Song/Tempo] button’s indicator will light, the [Play]
button’s indicator will blink, and the songs will play back
successively, starting with the currently selected song.
Choosing the song to play back
1. Press the [Song/Tempo] button, getting its indicator to light in red.
The song number appears in the display for several seconds.
The song number appears in the display for several seconds.
2. Press the [-] or [+] button to select a song.
You can press the [-] or [+] button to select the song that
you want to play back.
Holding down the button causes the numbers to change
continuously.
Select backed up songs with the following procedure:
1
Simultaneously press the [-] and [+] buttons
so that “USr” appears in the display.
2
Press the [-] button so that “S. U” is displayed.
When all songs have been played, playback will return to
the first song and resume.
Stopping the playback
2. Press the [Play] button.
Playback will stop.
Playing back
3. Press the [Play] button.
The button’s indicator will light, and the selected song will
play.
Stopping the playback
4. Press the [Play] button.
The button’s indicator goes out, and playback stops. The
next time you press the [Play] button, the song that was
stopped is played from the beginning.
12
HP107_e.book Page 13 Tuesday, October 19, 2004 10:41 PM
Chapter 1. Enjoying the Built-in Songs
You can listen to various demo songs, including those demonstrating the piano and other tones, as well as the function
applied to the piano tones.
When a button is pressed, the demo assigned to the button
is played. Two versions of the demo will be played—one
includes the function provided by the button you’ve
pressed, the other doesn’t.
ENGLISH
Listening to the Demo Songs
■ Playing Back the Tone Demo Songs
1. Press the [Demo] button.
The button’s indicator flashes, and playback of the tone
demo songs starts.
When you press the button pressed in Step 2, you can
switch between demos both with the function switched
on and off.
When playback of the last song is finished, playback then
returns to the first song.
When you press any of the tone buttons while the [Demo]
button is flashing, the demo song corresponding to that
tone button is played.
Demo content
[Piano]
Piano tone demo songs
[E. Piano]
E. Piano tone demo songs
[Harpsichord]
Harpsichord tone demo songs
[Organ]
Organ tone demo songs
[Strings]
Strings tone demo songs
[Acoustic Layering]
Demo songs using the Acoustic Layering
function (p. 18)
[Split]
Demo songs using the Split function (p. 20)
Try playing the keyboard and see how the Hammer
Response function feels.
When Hammer Response is switched on, the sounds are
expressed more slowly as you play the keys with
greater force.
The Hammer Response function demo makes it easy to
hear how the sound will be with the function both on and
off.
ENGLISH
Button assigned
tone demo
The performance stops when the Hammer Response
function demo is selected. Hammer Response is alternately switched on and off each time you press the Key
Touch [Hammer] button.
ENGLISH
About the Hammer Response Function
Demo
Stopping the Demo of the Functions
3. Press the [Demo] button.
The [Demo] button’s indicator goes off, and the demo
quits.
ENGLISH
Stopping the Tone Demo Songs
2. Press the [Demo] button.
The [Demo] button’s indicator goes off, and the demo
quits.
■ Listening to a Demo of the Functions
You can listen to the demo of the functions that can be
applied to the piano tones.
1. Press the [Demo] button.
ENGLISH
The button’s indicator flashes, and playback of the tone
demo songs starts.
2. Press any of the following buttons.
Button assigned function
demo
Demo content
[Grand Space]
Grand Space demo
p. 16
[Dynamic Emphasis]
Dynamic Emphasis demo
p. 17
Piano Resonance [Key Off]
Key off demo
p. 14
Piano Resonance [String]
String Resonance demo
p. 14
Piano Resonance [Damper]
Damper Resonance demo
p. 15
Key Touch [Hammer]
Hammer Response demo
p. 15
ENGLISH
13
HP107_e.book Page 14 Tuesday, October 19, 2004 10:41 PM
HP107e – Chapter 2. Performance
Chapter 2. Performance
Performing with a Variety of Sounds
The HP107e contains 36 different built-in tones. The tones are
organized into five tone groups, which are assigned to the
Tone buttons.
Selecting a tone group
1. Press any Tone button.
The indicator of the button you pressed will light.
When you play the keyboard, you will hear a sound in the
selected tone group.
Selecting variation tones
2. Press the [-] or [+] button.
1
The Tone variation number appears in the display for several seconds.
2
For more details, refer to Tone List (p. 240).
The tone you’ve selected is heard when you finger the keyboard.
Making Fine Adjustments to the Piano Sound
(Piano Resonance)
You can make fine adjustments to the sound of the piano as desired.
■ Playing Sounds When the Keys Are Released
(Key Off)
You can play the “key off” sound (the subtle sound produced when the keys are released) obtained when playing
an acoustic piano.
You can save this setting in the HP107e’s memory using
the Memory Backup function (p. 31).
1. Press the Piano Resonance [Key Off] button, getting its indicator to light.
A distinctive sound results when you release the keys.
Press the Piano Resonance [Key Off] button once more,
causing the button’s indicator to go off, and the effect is
cancelled.
For more about the tones with which this setting is
enabled, refer to the Tone List (p. 240).
Adjusting the Volume of the Key Off Sound
2. Hold down the Piano Resonance [Key Off] button
and press the [-] or [+] button.
You can set the volume of the sound heard when the keys
are released to any of ten different levels.
The volume increases as the value is raised.
■ Producing the Resonance of the Strings When
the Keys Are Played (String Resonance)
When you play the keys on an acoustic piano, the strings
that are already playing resonate as well. The function that
reproduces this effect is called “String Resonance.”
NOTE This setting is enabled only with the piano tones. You
cannot set this for other tones.
1. Press the Piano Resonance [Sting] button, getting
its indicator to light.
The String Resonance function is switched on. Press the
Piano Resonance [String] button once more, causing the
button’s indicator to go off, and the effect is cancelled.
You can save this setting in the HP107e’s memory using
the Memory Backup function (p. 31).
14
HP107_e.book Page 15 Tuesday, October 19, 2004 10:41 PM
Chapter 2. Performance
2. Hold down the Piano Resonance [String] button
and press the [-] or [+] button.
You can adjust the resonance depth (the volume of the resonance) to any of ten levels.
More resonance effect is applied as the value is increased.
■ Having Resonance Played When You Press
the Damper Pedal (Damper Resonance)
On an acoustic piano, depressing the damper pedal makes
the notes you play resonate with other strings, adding rich
reverberations and fatness to the sound. The damper
pedal on the HP107e recreates this resonance (sympathetic
resonance) when depressed.
NOTE This setting is enabled only with the piano tones. You
cannot set this for other tones.
1. Hold down the Piano Resonance [Damper] button,
getting its indicator to light.
Press the Piano Resonance [Damper] button once more,
causing the button’s indicator to go off, and the effect is
cancelled.
You can save this setting in the HP107e’s memory using
the Memory Backup function (p. 31).
Adjusting the Depth of the Resonance
2. Hold down the Piano Resonance [Damper] button,
and press the [-] or [+] button.
“Heavy” Lit. Fortissimo (ff) cannot be produced unless
you play more strongly than usual, making the keyboard
feel heavier. Dynamic fingering adds even more feeling to
what you play.
All Indicators Off. Fixed. Sounds at a fixed volume,
regardless of your keyboard playing strength.
■ Changing the Timing of Sounds According to
the Force Used to Press the Keys
(Hammer Response)
This adjusts how your playing strength will affect the timing at which the note sounds. This is called the “Hammer
Response” function.
You can save this setting in the HP107e’s memory using
the Memory Backup function (p. 31).
On an acoustic piano, pressing a key moves a hammer,
which strikes a string to produce sound. If you press the
key softly, the hammer will move slowly, meaning that it
will take slightly longer (in comparison to a stronglyplayed note) from the moment you press the key until the
sound is produced.
If the Hammer Response function is turned on, the time
between the moment you press a key until the sound is
heard will change depending on the strength with which
you play. As you play more softly, this time will become
longer.
ENGLISH
You can select from ten levels of depth for the resonant
sound (resonance level).
Larger values will produce a deeper effect.
Adjusting the Keyboard
Touch (Key Touch)
You can adjust the touch (playing feel) of the keyboard.
1
1. Press the Key Touch [Hammer] button to get the
appropriate indicator to light.
“Medium” Lit. The regular timing is used when the keys
are pressed gently.
You can save this setting in the HP107e’s memory using
the Memory Backup function (p. 31).
ENGLISH
“Light” Lit. The response is faster when the keys are
pressed gently.
1
ENGLISH
The Damper Resonance function is switched on.
“Medium” Lit. This allows you to play using the most natural touch. This is the closest to the touch of an acoustic
piano.
ENGLISH
You can change the volume of the damper pedal resonance.
“Light” Lit. Fortissimo (ff) can be produced by playing
less strongly than usual, making the keyboard feel lighter.
This setting makes it easy to play, even for children.
ENGLISH
Adjusting the Depth of the Resonance
“Heavy” Lit. The timing of the sounds is delayed when the
keys are pressed gently.
All Indicators Off. The Hammer Response function is cancelled. The sound is played immediately, regardless of the
force with which the keys are played (velocity).
1. Press the Key Touch [Touch] button.
ENGLISH
Each time you press the Key Touch [Touch] button, the
indicator that is lit switches, and the touch changes.
15
HP107_e.book Page 16 Tuesday, October 19, 2004 10:41 PM
HP107e – Chapter 2. Performance
Adding a Sense of Depth to
the Sound (Grand Space)
The HP107e includes a “Grand Space” function that allows
you to get sounds that have a sense of depth like you get by
playing an acoustic piano. Using this function gives you the
natural-sounding reverberation and breadth of sound that an
acoustic piano provides.
1
2
You can save this setting in the HP107e’s memory using
the Memory Backup function (p. 31).
1. Press the [Grand Space] button, getting its indicator to light.
The Grand Space function is switched on, giving the
sound a greater sense of depth.
When Grand Space Mode (p. 30) is set to “1” and a pair
of headphones is connected, the sense of depth is optimized for headphones, and when no headphones are connected, the optimal depth for speakers is selected.
2. Hold down the [Grand Space] button, and press
the [-] or [+] button.
You can adjust the sense of depth to any of four levels.
A greater sense of depth is produced as the value is
increased.
Adding the Right Sense of
Depth for Headphones
(Grand Space)
You can achieve the kind of sonic depth produced with a
grand piano through headphones as well. Using this function
provides you with the natural reverberation and breadth in
the sound provided by an acoustic piano.
1
2
You can save this setting in the HP107e’s memory using
the Memory Backup function (p. 31).
1. Press the [Grand Space] button, getting its indicator to light.
The Grand Space function is switched on, giving the
sound a greater sense of depth.
When Grand Space Mode (p. 30) is set to “1” and a pair
of headphones is connected, the sense of depth is optimized for headphones, and when no headphones are connected, the optimal depth for speakers is selected.
2. Hold down the [Grand Space] button, and press
the [-] or [+] button.
You can adjust the sense of depth to any of four levels.
A greater sense of depth is produced as the value is
increased.
3. To cancel the Grand Space function, press the
[Grand Space] button once more so its illumination is turned off.
3. To cancel the Grand Space function, press the
[Grand Space] button once more so its illumination is turned off.
The [ (Headphones)] indicator lights up when headphones are connected.
16
HP107_e.book Page 17 Tuesday, October 19, 2004 10:41 PM
Chapter 2. Performance
ENGLISH
Adding Liveliness to the
Sound (Dynamic Emphasis)
Applying Effects to the
Sound
You can add liveliness to the sound to give it superb clarity
and distinctness.
1
By applying the reverb effect you can produce a pleasant
reverberation, making it sound as though you were performing in a concert hall.
3
You can save this setting in the HP107e’s memory using
the Memory Backup function (p. 31).
1. Press the [Dynamic Emphasis] button, getting its
indicator to light.
2. To cancel the Dynamic Emphasis function, press
the [Dynamic Emphasis] button once more so its
illumination is turned off.
Changing the Dynamic Emphasis Settings
3. Hold down the [Dynamic Emphasis] button, and
press the [-] or [+] button.
Description
1
Creates a sound with boosted bass and treble.
2
Produces a sound with chords in the low registers that are clear and distinct.
3
Creates a sound with boosted bass.
The button’s indicator will light, and a reverb effect will be
applied to the sound.
To cancel the reverb effect, press the [Reverb] button, getting its indicator to go dark.
You can save the reverb on/off setting as well as the setting for the amount of reverb applied in the HP107e’s
memory using the Memory Backup function (p. 31).
■ Adding richness to the sound (Chorus)
By adding the chorus effect, you can give the sound
greater dimension, with more fatness and breadth.
1. Press the [Chorus] button.
The button’s indicator will light, and a chorus effect will be
applied to the sound.
To cancel the chorus effect, press the [Chorus] button, getting its indicator to go dark.
You can save separate chorus effect on/off settings to
each tone individually. The original settings are restored
when the power is turned off.
ENGLISH
Indicator
1. Press the [Reverb] button.
ENGLISH
The Dynamic Emphasis function is switched on, enlivening the sound.
ENGLISH
■ Adding reverberation to the sound (Reverb)
■ Changing the amount of effect applied
The amount (depth) of the reverb and chorus effects can be
set to any of ten levels.
With the factory settings, the reverb and chorus are set to
“5.”
ENGLISH
Changing the depth of the reverb effect
1. Hold down the [Reverb] button and press the [-] or
[+] button.
The currently specified value will be displayed.Higher
values will produce a deeper effect.
NOTE You cannot save separate reverb settings to each tone
individually.
The currently specified value will be displayed. Higher
values will produce a deeper effect.
17
ENGLISH
Changing the depth of the chorus effect
1. Hold down the [Chorus] button and press the [-] or
[+] button.
HP107_e.book Page 18 Tuesday, October 19, 2004 10:41 PM
HP107e – Chapter 2. Performance
Transposing the Key of the
Keyboard (Transpose)
By using the “Transpose function,” you can transpose your
performance without changing the notes you play. For example, even if the song is in a difficult key with numerous
sharps (#) or flats (b), you can transpose it to a key that is easier for you to play.
Layering Complementary
Sounds with the Piano Tones
(Acoustic Layering)
With the HP107e, you can easily select the perfect tones to
complement the piano tone and play together with the piano
tone. This feature is called the “Acoustic Layering function.”
When accompanying a vocalist, you can easily transpose the
pitch to a range that is comfortable for the singer, while still
playing the notes as written (i.e., with the same fingering
positions).
1
2
You can change the pitch of the Layer tone in octave
steps (p. 30).
1
First have a piano tone selected (p. 14).
1. Continue to hold down the [Transpose] button,
and press a note to indicate the tonic of the key to
which you want to transpose.
The button’s indicator will light, and the keyboard will be
transposed.
When you hold down the [Transpose] button, the currently specified value will be displayed.
You can also transpose by holding down the [Transpose]
button and pressing the [-] or [+] button.
If you hold down the [Transpose] button and press the [-]
and [+] buttons simultaneously, the setting will return to
the original value (0).
This can be set in a range of -6–0–5 (semitone steps).
For example, if you want the E pitch to sound when you
play the C key, hold down the [Transpose] button and
press the E key.
1. Press the [Acoustic Layering] button, getting its
indicator to light.
When you play the keyboard, the piano tone and the tone
complementing it are layered and played together.
When you want to layer sounds to tones other than the
piano tone, press the tone button, then select the tone to
be used as the basis.
Selecting the Tone to Be Layered with the
Piano Tone
2. Use the [-] and [+] buttons to select the layered
tone.
The song number appears in the display for several seconds.
The number for the tone layered with the piano tone (the
layer tone) has “L.” appended to it.
Counting from C as a reference point, one moves up four
keys, including the black keys, to reach E, thus “4” appears
in the display.
If you play C E G
It will sound E G# B
When the transpose value is set to “0,” the button’s indicator will remain dark even if you press the [Transpose] button.
To cancel the transpose function, press the [Transpose]
button, extinguishing its indicator.
When you press the [Transpose] button once again, getting its indicator to light, the keyboard will be transposed
to the note you specified here.
This setting returns to the original value (0) when you
turn off the power.
18
When “Layer” is selected as the center pedal setting, the
Acoustic Layering function is switched on automatically (p. 18). In this case, you can adjust the volume of
the tone layered with the piano tone with the pedal.
When you play the keyboard, the piano tone and the tone
you have selected are layered and played together.
HP107_e.book Page 19 Tuesday, October 19, 2004 10:41 PM
Chapter 2. Performance
You can adjust the balance in volume between the two
selected tones when performing with Acoustic Layering.
When the volume balance is changed with Acoustic Layering in effect, the Dual Balance also changes to the same
volume balance settings (p. 19).
■ Adjusting the volume balance in Dual performance (Dual Balance)
You can change the volume balance between the two layered sounds in Dual performance.
ENGLISH
■ Changing the Volume Balance for Acoustic
Layering
1. Hold down the [Acoustic Layering] button and
press the [-] or [+] button.
The volume balance changes.
1
2
You can save this setting in the HP107e’s memory using
the Memory Backup function (p. 31).
Volume of the Piano tone
Volume of Layer Tone
ENGLISH
To return to the original volume balance, press the [-] and
[+] buttons simultaneously.
1. Hold down the [Transpose] button, and press the
[Split] button.
The indicators of the buttons you pressed will blink.
The current volume balance appears in the display.
Simultaneously playing two tones when one key is pressed is
called “Dual performance.” You can select the tone you want
to have layered by pressing the corresponding tone button.
2. Press the [-] or [+] button to change the value.
The volume balance changes.
You can also change the volume balance by holding
down the [Acoustic Layering] button and pressing the
[+] or [-] button.
To return to the original volume balance, press the [-] and
[+] buttons simultaneously.
ENGLISH
Playing Two Sounds
Together (Dual Performance)
1. Simultaneously press the two Tone buttons that
you want to play together.
The indicator of the button you pressed will light.
When you play the keyboard, the tones of the two Tone
buttons you selected will sound simultaneously.
To change the tone of the right button of
the two selected tones
Volume of the right button tone
Press any button other than the [-] [+] buttons, and the button’s indicator will return to the previous state.
ENGLISH
To cancel Dual performance, press any Tone button.
Volume of the left button tone
2. Press the [-] or [+] button.
Dual performance now features the tone of the left side’s
tone button along with the newly selected tone.
You can change the pitch of the tone of the right button
in octave steps (p. 30).
ENGLISH
To change the tone of the left button of the
two selected tones
Cancel the Dual performance, and then re-select the tone.
Press the two Tone buttons that you want to play together.
ENGLISH
19
HP107_e.book Page 20 Tuesday, October 19, 2004 10:41 PM
HP107e – Chapter 2. Performance
Playing Different Tones with
the Left and Right Hands
(Split)
Dividing the keyboard into right-hand and left-hand areas,
then playing different sounds in each is called “Split performance.” The boundary key is called the “split point.”
Changing tone played by the right hand
Cancel Split performance, and then re-select the tone.
In Split performance, the damper pedal will be applied
only to the right-hand area of the keyboard. If you want
the damper pedal to be applied to the left-hand area, refer
to Applying the damper pedal to the left-hand
keyboard area (p. 30).
■ Changing the keyboard’s split point
Split Point (Factory setting: F#3)
You can change the location where the keyboard is
divided (the split point) within the range of B1 through B6.
This is set at the factory to “F#3.”
A0 B0 C1 D1 E1 F1 G1 A1 B1 C2 …
C3
Left-hand Tone
C4
C5
Right-hand Tone
1. While continuing to hold the [Split] button, press
the key that you want to specify as the split point.
The key you pressed becomes the split point, and belongs
to the left-hand section of the keyboard.
You can also change the setting by pressing the [-] or [+]
button while continuing to hold down the [Split] button.
1
If you hold down the [Split] button and simultaneously
press the [-] and [+] buttons, the setting will return to its
original value (F#3).
1. Press the [Split] button.
The button’s indicator will light. The keyboard is divided
into right-hand and left-hand areas.
The split point key is included in the left-hand keyboard
area.
The tone played on the right side is the tone in use before
the [Split] button is pressed, while the bass tone is played
on the left side when the power is turned on, with a different tone selected when the left-hand tone is changed.
To cancel Split performance, press the [Split] button, getting its indicator to go dark.
When using Dual performance, press the [Split]
button
The right hand will play the tone of the left button of
Dual performance, and the left hand will play a suitable
match for the right-hand tone.
You can change the pitch of the tones on the left side of
the keyboard in octave steps (p. 30).
Changing tone played by the left hand
1. Press any Tone button.
2. Press the [-] or [+] button.
Each time you press the [-] or [+] button, the left-hand tone
will change.
For more about the tones, refer to the Tone List (p.
240).
20
The split point key is displayed as follows.
Display
C
C
d
E_
Letter
name
C
C
D
E
Display
E
F
F
G
Letter
name
E
F
F
G
Display
A_
A b_
b
Letter
name
A
A
B
B
When you continue holding the [Split] button, the currently specified split point value will be displayed.
HP107_e.book Page 21 Tuesday, October 19, 2004 10:41 PM
Chapter 2. Performance
With the factory setting, the center pedal functions as a sostenuto pedal (p. 11).
However, the center pedal setting can be changed to any of a
variety of different functions.
Changing the tempo
2. Press the [Song/Tempo] button; the button’s indicator lights in green.
ENGLISH
Changing How the Center
Pedals Work
3. Press the [-] or [+] button to adjust the tempo.
Changing the beat of metronome
4. Hold down the [Song/Tempo] button, and press
the [-] or [+] button.
The currently selected beat will be displayed.
1
If you hold down the [Song/Tempo] button and press the
[-] and [+] buttons simultaneously, the beat will go back to
what it was before you changed it.
Correspondence between
beat and tempo display
1. Press the [Center Pedal] button to get the appropriate indicator to light.
Beat
If Acoustic Layering (p. 26) and Dual function are
switched off, the Acoustic Layering function is then
switched on.
Octave. When you play a key while pressing on the center pedal, the note for the key being pressed and the note
one octave above it are layered and played together. You
can adjust the volume of the sound one octave above the
layer tone by changing the pressure used on the pedal.
2/2
=5–250
x/4
=10–500
3/8
=20–999
6/8
9/8
12/8
= 7–333
It is not possible to change the beat during song playback
or recording.
Display
beat
Display
beat
2.2
2/2
6.4
6/4
0.4
Only weak beats
7.4
7/4
2.4
2/4
3.8
3/8
3.4
3/4
6.8
6/8
4.4
4/4
9.8
9/8
5.4
5/4
12.8
12/8
ENGLISH
Using Metronome
NOTE
Tempo Value
ENGLISH
Sostenuto. Sets function to sostenuto pedal (p. 11).
Layer. When you play a key while pressing on the center
pedal, a suitable tone to match the piano tone is selected,
and the two tones are layered and played together.
The volume of the layer tone is adjusted according to
how much you press the pedal.
ENGLISH
If you hold down the [Song/Tempo] button and press the
[-] or [+] button, the beat will change.
Stopping the metronome
■ Sounding the metronome
The HP107e features a built-in metronome.
While a song plays back, the metronome will sound at the
tempo and time signature (Beat) of that song.
5. Once again press the [Metronome/Count In] button, getting its indicator to go dark.
The metronome will stop.
■ Changing the metronome volume
3 4 1,5 2
Sounding the metronome
1. Press the [Metronome/Count In] button.
The currently specified volume will be displayed.
Continue to hold down the [Metronome/Count In] button, and press the [-] or [+] button to sound the metronome, and change the volume.
When the metronome volume is set to “0,” the metronome sound does not play.
21
ENGLISH
The metronome will sound. The button’s indicator flashes
in red and green in time with the beat selected at that time.
The indicator lights in red on the downbeats, and in green
on weak beats.
1. While holding down the [Metronome/Count In]
button, press the [-] or [+] button.
ENGLISH
The volume of the metronome can be adjusted, with ten
volume levels available.
This is set to “4” when the instrument is turned on.
HP107_e.book Page 22 Tuesday, October 19, 2004 10:41 PM
HP107e – Chapter 2. Performance
Splitting the Keyboard Into Two Sections for Four-Hand
Performances (Twin Piano Mode)
You can divide the keyboard into two separate sections, allowing two people to perform in the same registers.
C1
C3
C2
C4
C3
C4
C5
C6
1. While holding down the [Split] button and press
the [Piano] button.
The [Split] button’s indicator will light, and Twin Piano
Mode is switched on.
C5
C3
C6
C4
C7
C5
C8
C6
● The following occur when Twin Piano Mode is switched
on:
• The keyboard is divided into two separate sections, and
the pitch changes.
• The right pedal now functions as the damper pedal for
the right keyboard section, and the left pedal functions
as the damper pedal for the left keyboard section.
• The center pedal now functions as the Sostenuto pedal
for the right keyboard section.
2. To exit the function, while holding down the
[Split] button and press the [Piano] button once
more.
• If recording is in progress or the instrument is in
recording standby, recording is stopped or recording
standby is cancelled. The [Rec] button is disabled while
Twin Piano Mode is active.
• If the Split function happens to be on, it is switched off.
• The same tone and effects are used on both the left and
right sides. If the piano is in Split Play before switching
Twin Piano Mode on, then the tone selected for the
right hand in Split Play is used.
NOTE The damper resonance function is not operational in
Twin Piano Mode.
22
HP107_e.book Page 23 Tuesday, October 19, 2004 10:41 PM
Chapter 3. Playing Along with the Built-in Songs
Here’s how you can play along with the built-in songs.
For details on operation, refer to “Selecting a song and
playing it” (p. 12).
Correspondence between beat and tempo
display
Beat
Tempo Value
2/2
=5–250
x/4
=10–500
3/8
=20–999
6/8
9/8
12/8
= 7–333
ENGLISH
You can slow down the playback tempo of the song, or play
back each hand separately. Before you try playing the song,
listen to it several times to get a general feel for the song.
If you turn on the metronome while the song plays back,
the metronome will sound at the beat and tempo of the
song.
About the display for the built-in songs
Changing the Tempo
If the song has a rapid tempo, you can slow down the
tempo so that you can practice it more easily. It is effective
to gradually raise the tempo as you practice.
USr (user) … The location where you can record your
performance. (For details on recording → p. 25)
S.1~S.68 … Built-in songs
S. U … Song saved with Song Backup (p. 31)
When you’re playing along with a song, you can make
sure that your playing is in time with the song by sounding a count before the song starts playing.
1
Some of the built-in songs have tempos that change during the song.
Sounding a “count sound” leading up to playback of a
song is called “Count-In.”
On the HP107e, if you playback a song while the metronome is sounding, two measures of lead-in count will be
heard at the beginning of the song.
During the count-in, the count measure is indicated in
the display as “-2” then “-1.”
“Sounding the metronome” on page 21
1. Press the [Song/Tempo] button, getting its indicator to light in green.
ENGLISH
First select the song that you want to play back (p. 12).
ENGLISH
■ Adding a count-in to match the timing (CountIn)
2
ENGLISH
Chapter 3. Playing Along with the Built-in Songs
The tempo appears in the display.
Each time you press the [Song/Tempo] button, the tempo
and the currently selected song number (prefixed by “S.”)
will be displayed alternately.
While the tempo is displayed, the [Song/Tempo] button
indicator will light in green. While the song number is displayed, it will light in red.
ENGLISH
2. Press the [-] or [+] button to adjust the tempo.
The tempo can be adjusted in a range of q= 10–500. You
can also change the tempo during playback.
Pressing the [+] button once increases the tempo by one
unit. Holding down the button increases the tempo continuously.
Pressing the [-] button once decreases the tempo by one
unit. Holding down the button makes the tempo change
(slow down) continuously.
ENGLISH
If you press the [-] and [+] buttons simultaneously, you
will return to the basic tempo of the song (the tempo
before you modified it).
23
HP107_e.book Page 24 Tuesday, October 19, 2004 10:41 PM
HP107e – Chapter 3. Playing Along with the Built-in Songs
Playing Each Hand
Separately
Playing back a song
2. Press the [Play] button, getting its indicator to
light.
The built-in songs allow you to select the performance part
that will be played back.
The song will begin playing back. The part you selected in
step 1 will not sound.
The left-hand performance of the built-in songs is assigned to
the [Left] button, while the right-hand performance is
assigned to the [Right] button. The place where each part of
the performance is held is called a “track,” and the [Left] and
[Right] buttons are called “track buttons.”
Practice your right-hand performance along with the lefthand playback.
Track buttons
Left-hand
Part
Right-hand
Part
Left
Right
Here’s how to practice each hand separately along with the
song.
2, 3 1
First select the song that you want to play back (p. 12).
Selecting the part that you yourself will
play
1. Press the [Left] or [Right] button.
The indicator of the button you’ve pressed goes out, and
the sound of the selected part will no longer be heard.
For example, if you want to practice the right hand, press
button [Right] and get its indicator to go dark. When you
play back the song, the right-hand performance will not
sound.
24
Once again press the button you selected in step 1. The
button’s indicator will light, and the sound will be heard
once again.
Even while the song is playing, you can press the track
buttons to mute or un-mute the sound.
Stopping the song
3. Press the [Play] button, getting its indicator to go
dark.
The song will stop.
HP107_e.book Page 25 Tuesday, October 19, 2004 10:41 PM
Chapter 4. Recording Your Performance
ENGLISH
Chapter 4. Recording Your Performance
You can easily record your performances.
A recorded performance can be played back to hear your
own playing, or to add additional parts.
The following types of recording can be done using the
HP107e.
• Recording along with a built-in song (→ “Recording
Along with a Song” p. 26)
Function
Left Track
Right Track
Layer
Layer tone
Original tone (piano tone)
Octave
Layer tone (one octave
higher)
Original tone
* When using method B or C above to layer a recording to a
song, press both the [Left] and [Right] buttons before recording so that the buttons flash.
ENGLISH
• Recording just your own keyboard performance (→
“Recording a New Song” p. 25)
C. Recording while the “Layer” or “Octave” function is
assigned to the center pedal
• Recording each hand separately (→ “Selecting and
Recording the Track for Each Hand Separately” p. 27)
Recording a New Song
Notes regarding recording
• Only one song can be recorded.
If you see the following...
3
2 1 4 6,8 5,7
The HP107e includes a “Song Backup function” (p. 31),
which allows you to store the song recorded with the
HP107e in the instrument itself.
Recording settings (select “USr”)
1. Press the [Song/Tempo] button, getting its indicator to light in red.
The song number appears in the display.
If it is OK to erase the performance, press the [Rec] button.
If you do not want to erase the performance, press the
[Play] button.
About the Recorded Tracks
A. Recording without specifying the track to be recorded
B. Recording while using the Dual, Acoustic Layering, or Split
functions
Function
Left Track
Right Track
Dual
Tone from right tone button
Tone from left tone button
Acoustic Layering
Layer tone
Original tone (piano tone)
Split
Left (keyboard) tone
Right (keyboard) tone
2. Press [-] and [+] buttons simultaneously, and
“USr” appears in the display.
Specifying the tone and tempo for recording
3. Select the tone that you want to play (p. 14).
4. If necessary, turn on the metronome.
Sound the metronome while you set the tempo and beat of
the song (p. 21).
NOTE If you layer a newly recorded performance without erasing the recorded song, the song tempo and beat will be
stored with the settings that were recorded first.
ENGLISH
If there is no data recorded on the left and right track, the
data is then recorded to the right track. If there is any data
recorded to either the left or right track, the data is then
recorded to the empty track.
ENGLISH
If you attempt to select a song when another performance
has already been recorded, the following appears in the
display and the [Record] button’s indicator flashes.
Record only the keyboard performance without playing
along with a built-in song.
ENGLISH
• The HP107e includes a “Song Backup function” (p. 31),
which allows you to store the song recorded with the
HP107e in the instrument itself. Recorded performance
that have not been backed up with Song Backup is
erased with the power is turned off. Be sure to use Song
Backup for any performance you want to keep. You can
either record it on an external audio device, or use an
external MIDI device to save the performance data on a
floppy disk. For details, refer to Chapter 6. Connecting External Devices (p. 33).
5. Press the [Rec] button.
The [Rec] button’s indicator will light, the [Play] button’s
indicator will blink, and you will be in recording-standby
mode.
ENGLISH
25
HP107_e.book Page 26 Tuesday, October 19, 2004 10:41 PM
HP107e – Chapter 4. Recording Your Performance
Start recording
6. Recording will start when you either press the
[Play] button or play the keyboard.
Two measures of the count sound are played, and the
recording begins.
Note that recording will also begin as soon as you play
anything on the keyboard, even if you do not press the
[Play] button. There is no count sound played when you
start in this manner.
When recording begins, the [Play] button and [Rec] button
indicators will light.
Recording Along with a Song
You can record a performance that you play along with an
built-in song.
The HP107e includes a “Song Backup function” (p. 31),
which allows you to store the song recorded with the
HP107e in the instrument itself.
Using the [Left] or [Right] buttons, you can (for example)
perform and record just the right-hand part of a song
while listening to the left-hand playback of a built-in song.
Go ahead and perform on the keyboard.
Stop recording
7. Press the [Play] or [Rec] button.
Recording will stop, and the indicators for the [Play] and
[Rec] buttons will go dark.
2 1 3 6,8 4,7 5
About the “USr” display
When you stop recording, the “
” display will
change to “
.”
The “.” in the lower right of the display indicates that
there is already a recorded performance.
Play back the recorded performance
8. Press the [Play] button.
You will hear the recorded performance.
Once again press the [Play] button, and playback will stop.
If you record without specifying the recording track, the
performance will be recorded to the [Right] button.
If you want to record the right and left hands separately
on separate recording tracks, refer to “Selecting and
Recording the Track for Each Hand Separately” (p. 27).
Selecting the song to record
1. Press the [Song/Tempo] button, getting its indicator to light in red.
The display will indicate the song number.
2. Use the [-] or [+] button to select the song that you
want to play.
3. As necessary, set the metronome and tempo (p.
21).
4. Press the [Rec] button.
The [Rec] button’s indicator will light.
Selecting the track to record
5. Press the [Left] or [Right] button.
When you want to record the left-hand performance, press
the [Left] button; to record that of the right hand, press the
[Right] button.
The indicators of the button you pressed and of the [Play]
button will blink, and the HP107e enters recordingstandby mode.
If “dEL” appears in the display, refer to p. 25.
Starting to record
6. Press the [Play] button.
Recording begins after two measures of count sound.
Play along with the song.
Stop recording
7. Press the [Play] or [Rec] button.
Recording will stop, and the indicators for the [Play] and
[Rec] buttons will go dark.
The recorded performance is stored in “USr (User).”
Play back the recorded performance
8. Press the [Play] button.
You will hear the recorded performance.
Once again press the [Play] button, and playback will stop.
26
HP107_e.book Page 27 Tuesday, October 19, 2004 10:41 PM
Chapter 4. Recording Your Performance
If you want to re-do the recording, you can re-record just
a specific track.
5. Press the [Play] or [Rec] button.
Recording will stop, and the indicators for the [Play] and
[Rec] buttons will go dark.
Your performance has been recorded to the specified track
button.
If you want to record on the other track, return to step 2 to
record your performance again. You can record while you
listen to the previously recorded performance.
Play back the recorded performance
6. Press the [Play] button.
You will hear the recorded performance.
Press the [Play] button once again, and playback will stop.
ENGLISH
The recorder of the HP107e has two recording tracks,
allowing you to record the right and left hands separately.
Use the [Left] button or [Right] button to specify the
recording track.
The HP107e includes a “Song Backup function” (p. 31),
which allows you to store the song recorded with the
HP107e in the instrument itself.
Stop recording
ENGLISH
Selecting and Recording the
Track for Each Hand
Separately
Erasing Recorded Performances
You can erase a recorded performance.
NOTE
If you go on to record additional material without erasing the recorded song, the song tempo, beat, and metronome settings of the original recording will be used for
the new material as well.
1. As necessary, turn on the metronome (p. 21).
2. Press the [Rec] button.
The [Rec] button’s indicator will light, the [Play] button’s
indicator will blink, and you will be in recording-standby
mode.
You can select a recorded track and erase it.
Hold down either the [Left] or [Right] button, and
press the [Rec] button.
The indicator of the button you pressed will go dark, and
the performance of the selected track will be erased.
■ Erasing a song
You can erase a song you’ve recorded.
Hold down the [Song/Tempo] button and press
the [Rec] button.
The following display will appear, and the [Rec] button’s
indicator will blink.
ENGLISH
When recording a new song, first follow the instructions in
Steps 1 and 2 of Recording a New Song (p. 25) to select
“USr.” When layering recordings with built-in songs or
songs that have been backed up, select the built-in or
backed up song as described in Steps 1 and 2 of Selecting
a song and playing it (p. 12).
■ Erasing a performance from the specified
track
ENGLISH
1 4,6 2,5 3
The button indicators of tracks that are already recorded
will light.
The track button for which you will next be recording will
be blinking.
The track buttons allow you to record to either the [Left]
or the [Right] button, one at a time.
7. Once again press the [Rec] button.
ENGLISH
3. Press the [Left] or [Right] button to turn off the
button for the track not to be recorded.
If you decide not to erase the performance, press the [Play]
or [Song/Tempo] button.
The recorded performance is erased.
Start recording
4. Press the [Play] button.
Two measures of the count sound are played, and the
recording begins. Go ahead and perform on the keyboard.
ENGLISH
Note that recording will also begin as soon as you play
anything on the keyboard, even if you do not press the
[Play] button. There is no count sound played when you
start in this manner.
27
HP107_e.book Page 28 Tuesday, October 19, 2004 10:41 PM
HP107e – Chapter 5. Changing Various Settings
Chapter 5. Changing Various Settings
Making Detailed Settings
(Function)
Button
Function
Page
Local Control
You can make performance-related settings such as tuning
and temperament.
How to enter function mode
1. Simultaneously press the [Split] and [Chorus] button.
Piano Resonance
[Key Off]
p. 35
MIDI send channel
Piano Resonance
[Strings]
p. 35
The HP107e switches to the set mode.
The indicators for the [Split] and [Chorus] buttons and
the button to which the function is assigned start flashing.
USB Driver Setting
Piano Resonance
[Damper]
p. 32
Memory Backup
[Metronome/
Count In]
p. 31
Setting the various functions
2. Press the button to which the desired function is
assigned.
The indicators for pressed button, [Split] button, and
[Chorus] button flash.
Song Backup
p. 31
[Song/Tempo]
The name of the function assigned to the button appears
in the display for as long as the button is held down.
V-LINK
p. 32
[Right]
Button
Function
Page
Master Tuning
Transmitting a recorded
performance
p. 29
[Piano]
[Left]
p. 35
Temperament
Grand Space Mode
p. 29
[E. Piano]
p. 30
[Grand Space]
Stretch Tuning
Factory Reset
p. 29
[Harpsichord]
Key Touch
[Touch]
p. 31
Octave Shift
p. 30
[Organ]
3. Press the [-] or [+] button to change the value.
Applying the damper pedal to the
left-hand keyboard area
[Strings]
For details on each function, refer to the explanations
below.
p. 30
Pressing the [-] and [+] buttons simultaneously restores
the factory values.
How to exit function mode
4. Press the [Split] or [Chorus] button.
The button’s indicator will return to the previous state.
28
HP107_e.book Page 29 Tuesday, October 19, 2004 10:41 PM
Chapter 5. Changing Various Settings
In situations such as when playing ensemble with other
instruments, you can tune the HP107e’s standard pitch to
the pitch of another instrument. The standard pitch generally refers to the pitch of the note that’s played when
you finger the middle A key. This tuning of all the instruments to a standard pitch is called “tuning.”
If you press the [Piano] button in step 2 of Making
Detailed Settings (Function) (p. 28), a display like the
following will appear.
Temperament
Display
Qualities
This scale makes some compromises in just
intonation, enabling transposition to other
keys.
Mean Tone
7
This tuning, devised by the philosopher
Pythagoras, eliminates dissonance in
Pythagorean fourths and fifths. Dissonance is produced
by third-interval chords, but melodies are
euphonious.
8
Werckmeister
This temperament combines the Mean Tone
and Pythagorean tunings. Performances are
possible in all keys (first technique, III).
Factory setting 1 C
Tonic
The last three digits are indicated in the display. “440.0
Hz” is indicated in the figure above.
415.3 Hz–440.0 Hz–466.2 Hz
Value
Factory setting 440.0 Hz
This setting remains in effect until you turn off the power.
* You can save this setting in the HP107e’s memory using the
Memory Backup function (p. 31).
When playing with tuning other than equal temperament, you need to specify the tonic note for tuning the
song to be performed (that is, the note that corresponds to
C for a major key or to A for a minor key).
While hold down the [E. Piano] button, and press a
note to specify the desired tonic key.
The tonic note you specify will be displayed as follows.
You can play classical styles such as Baroque using historic temperaments (tuning methods).
Today, compositions are generally created with equal
temperament in mind and are played using equal temperament. However in past ages of classical music, a variety of temperaments were used. Playing a composition
with its original tuning lets you enjoy the sonorities of the
chords that the composer originally intended.
C
C
d
E_
E
F
F
G
A_ A
b_
b
Letter
name
C
C
D
E
E
F
F
G
A
B
B
A
If you choose an equal temperament, there’s no need to
select a tonic note.
* If you record with a temperament other than equal temperament selected, and then want to play back that performance,
use this setting to select the same temperament for playback as
the temperament you used when recording.
* When performing in ensemble with other instruments, be
aware that depending on the key, there may be some shifting of
the pitch. Tune the HP107e to the fundamental pitch of the
other instruments.
* You can save this setting in the HP107e’s memory using the
Memory Backup function (p. 31).
ENGLISH
If you press the [E.Piano] button in step 2 of Making
Detailed Settings (Function) (p. 28), a display like the
following will appear.
Display
ENGLISH
fig.Chart_note2.j
■ Changing the temperament
ENGLISH
6
ENGLISH
■ Tuning to other instruments’ pitches (Master
Tuning)
■ Setting the tuning curve (Stretch Tuning)
Temperament
Tonic
You can choose from among the eight temperaments
described below.
Display
Qualities
Equal
In this tuning, each octave is divided into
twelve equal steps. Every interval produces
about the same amount of slight dissonance.
2
Just
Major
This tuning eliminates ambiguities in the
fifths and thirds. It is unsuited to playing
melodies and cannot be transposed, but is
capable of beautiful sonorities.
3
Just
Minor
The Just tunings differ from major and
minor keys. You can get the same effect with
the minor scale as with the major scale.
4
Arabic
This tuning is suitable for the music of Arabia.
5
Kirnberger
This is an improvement of the Mean Tone
and Just tunings that provides a high degree
of freedom of modulation. Performances are
possible in all keys (III).
OFF
On
This is the standard tuning curve. This is the right
choice when using Dual performance (p. 19), or
when playing in ensemble with other instruments.
This tuning curve expands the bass and treble
ends somewhat. It is suitable for performances
such as piano solos.
Factory setting On
* This effect works only with the piano tones.
29
ENGLISH
1
If you press the [Harpsichord] button in step 2 of Making Detailed Settings (Function) (p. 28), a display like
the following will appear.
ENGLISH
Temperament
A piano is generally tuned to a pitch with a lower bass
range and a higher treble range than equal temperament.
This special tuning method for pianos is called “Stretch
Tuning.”
HP107_e.book Page 30 Tuesday, October 19, 2004 10:41 PM
HP107e – Chapter 5. Changing Various Settings
* You can save this setting in the HP107e’s memory using the
Memory Backup function (p. 31).
■ Changing the Pitch by Octaves (Octave Shift)
You can change the pitch of the left tone in Split Play (p.
20), the right tone in Dual Play (p. 19), and the Layer tone
in Acoustic Layering Play (p. 18) in octave increments.
This function is called “Octave Shift.”
If you press the [Organ] button in step 2 of Making
Detailed Settings (Function) (p. 28), a display like the
following will appear.
■ Changing How Grand Space is Applied
(Grand Space Mode)
If you press the [Grand Space] button in step 2 of Making Detailed Settings (Function) (p. 28), a display like
the following will appear.
Setting
1
When the headphones are connected, the depth
effect is optimized for headphones, and when no
headphones are connected, the optimal depth for
speakers is applied.
2
The optimal depth for speakers is used, regardless
of whether or not headphones are connected.
Grand Space is also applied to the sound output
from the Output connectors, making this convenient when you want to play through speakers connected to the Output connectors.
3
The optimal depth for headphones is used, regardless of whether or not headphones are connected.
You can alter the pitch in a range from two octaves below
(-2) to two octaves above (+2) the original pitch.
* Certain Octave Shift settings may result in tones that exceed
the recommended range, are difficult to hear well, or that have
unnatural tonal qualities or pitches.
■ Applying the damper pedal to the left-hand
keyboard area
When you are using Split performance (p. 20), you can
apply the damper pedal effect to the sound played by the
left-hand keyboard range.
If you press the [String] button in step 2 of Making
Detailed Settings (Function) (p. 28), a display like the
following will appear.
On
OFF
The damper pedal effect will be applied to the
sound of the left and right hand keyboard area.
The damper pedal effect will not be applied to the
sound of the left-hand keyboard area.
Factory setting OFF
* You can save this setting in the HP107e’s memory using the
Memory Backup function (p. 31).
Descriptions
* You can save this setting in the HP107e’s memory using the
Memory Backup function (p. 31).
Disabling Everything Except
Piano Play (Panel Lock)
The “Panel Lock” function locks the HP107e in a state where
only piano performance can be used, and all buttons will be
disabled. This prevents the settings from being inadvertently
modified even if children press the buttons accidentally.
In the Panel Lock state, only the grand piano sound can be
played.
1. Turn the volume to the minimum, and press the
[Power On] switch to turn off the power.
2. Hold down the [Piano] button, and press the
[Power On] switch to turn on the power.
Then, continue to hold down these two buttons for a few
seconds.
The following display will appear.
All buttons are disabled.
Adjust the volume.
When you play the keyboard, the grand piano sound will
be heard.
To defeat the Panel Lock function, turn the volume down
to the minimum, and turn on the power once again.
30
HP107_e.book Page 31 Tuesday, October 19, 2004 10:41 PM
Chapter 5. Changing Various Settings
The settings stored in the HP107e can be returned to their
factory settings.
* Songs secured with the Song Backup procedure (p. 31) are not
deleted when Factory Reset is executed.
The HP107e switches to the set mode.
2. Press the Key Touch [Touch] button.
The following appears in the display.
Saving Recorded Songs
(Song Backup)
Normally, any songs you have recorded are deleted when
you turn off the power to the HP107e. However, if you wish,
you can have such recorded songs be saved even while the
power is turned off. This function is called “Song Backup.”
* You cannot use the Song Backup function unless you have
recorded song.
1. Hold down the [Split] button, and press the [Chorus] button.
The HP107e switches to the set mode.
2. Press the [Song/Tempo] button.
ENGLISH
1. Hold down the [Split] button, and press the [Chorus] button.
ENGLISH
Restoring the Settings to the
Factory Condition (Factory
Reset)
The button’s indicator flashes.
The following appears in the display.
3. Press the [Rec] button.
Factory Reset is executed.
* Do not turn off the power until “End” is displayed in the
screen. Turning off the power before this is displayed may
damage the HP107e’s internal memory, rendering the instrument unusable.
Normally, the various settings revert to their default values
when the power is turned off. However, you can specify that
the settings will be remembered even when the power is
turned off. This function is called “Memory Backup.”
* For more on the settings stored using Memory Backup, refer to
“Parameters Stored in Memory Backup” (p. 37).
The HP107e switches to the set mode.
2. Press the [Metronome/Count In] button.
When Song Backup is finished, the display and buttons
return to their normal appearance.
* You can select and play songs that have been backed up in the
same way as you do with the built-in songs (p. 12). Songs that
have been backed up are indicated in the display as shown
below.
■ Deleting backed up songs
1. Hold down the [Split] button, and press the
[Chorus] button.
2. Press the [Song/Tempo] button.
The following appears in the display.
To cancel the procedure, press the [Play] button.
3. Press the [Rec] button.
The backed up song is deleted.
The display and buttons return to their normal appearance.
The button’s indicator flashes.
ENGLISH
1. Hold down the [Split] button, and press the [Chorus] button.
Song backup is executed.
ENGLISH
Remembering the Settings
Even When the Power is
Turned Off (Memory Backup)
3. Press the [Rec] button.
ENGLISH
When Factory Reset is finished, the following appears in
the display. Turn off the power at this time.
The following appears in the display.
3. Press the [Rec] button.
ENGLISH
Memory backup is executed.
When Memory Backup is finished, the display and buttons return to their normal appearance.
31
HP107_e.book Page 32 Tuesday, October 19, 2004 10:41 PM
HP107e – Chapter 5. Changing Various Settings
Using the V-LINK function
Connecting the HP107e to a V-LINK compatible image
device allows you to control the images with the HP107e.
V-LINK
V-LINK (
) is functionality promoted by Roland
that allows linked performance of music and visual material. By using V-LINK-compatible video equipment,
visual effects can be easily liked to, and made part of the
expressive elements of a performance.
How to Use the V-LINK
1. Hold down the [Split] button, and press the [Chorus] button.
Making the Settings for the
USB Driver
If you intend to connect to a computer using the USB connector, you need to make the following setting before you make
the connection.
1. Hold down the [Split] button, and press the [Chorus] button.
The HP107e switches to the set mode.
2. Press the Piano Resonance [Damper] button.
The button’s indicator flashes.
The following appears in the display.
The HP107e switches to the set mode.
2. Press the [Right] button.
The button’s indicator flashes.
3. Press the [-] and [+] buttons to set the driver.
The following appears in the display.
Indication
OFF
On
The V-LINK function is switched off.
The V-LINK function is switched on. You can
control images using the twelve keys at the left
end of the keyboard.
Factory setting OFF
3. Press the [-] and [+] buttons to switch the V-LINK
function on and off.
You can control images using the twelve keys at the left
end of the keyboard.
* While V-LINK is switched on, no sound is produced when you
press any of the twelve keys at the left end of the keyboard.
How to exit function mode
4. Press the [Split] or [Chorus] button.
The button’s indicator returns to its original state.
32
Description
vdr (Vendor)
Select this when using the supplied driver with
a USB connection.
GEn (Generic)
Select this when using a generic USB driver
included with the OS with a USB connection.
How to exit function mode
4. Press the [Split] or [Chorus] button.
The button’s indicator returns to its original state.
HP107_e.book Page 33 Tuesday, October 19, 2004 10:41 PM
Chapter 6. Connecting External Devices
ENGLISH
Chapter 6. Connecting External Devices
Connecting to Audio
Equipment
Output R/L (Line Out,
Aux Out)
HP107e
ENGLISH
You can connect audio devices to play the sound of the
HP107e through the speakers of your audio system, or to
record your performance on a tape recorder or other recording device.
Playing the sound of an audio device
through the speakers of the HP107e
When connecting, please use an audio cable with a standard
phone plug (sold separately).
Connection examples
* To prevent malfunction and/or damage to speakers or other
devices, always turn down the volume, and turn off the power
on all devices before making any connections.
Input R/L (Line In,
Aux In)
HP107e
1. Turn on the power of the connected device.
2. Turn on the power of the HP107e.
3. Adjust the volume of each device.
* You cannot use the HP107e to adjust the volume of the connected sound generating device.
Turning off the power
1. Set the volume of the HP107e and of the connected
devices to the minimum position.
ENGLISH
Playing the sound of the HP107e through
the speakers of an audio system/Recording
the performance of the HP107e on a
recording device
❍ Use the following procedure when turning on the power.
2. Turn off the power to the HP107e.
3. Turn off the connected equipment.
1. Turn on the power of the HP107e.
2. Turn on the power of the connected device.
3. Adjust the volume of each device.
* You can adjust the volume of a connected sound module with
the HP107e.
When Recording HP107e Performances on a Recording
Device
5. Perform on the HP107e.
6. When the performance ends, stop recording on the
connected equipment.
33
ENGLISH
* Connecting your computer to the HP107e for the first time
requires installation of the “USB Driver” (on the included
CD-ROM) to the computer. For more details, refer to the separate “USB Installation Guide.”
* Only MIDI data can be transmitted using USB.
* To prevent malfunction and/or damage to speakers or other
devices, always turn down the volume, and turn off the power
on all devices before making any connections.
* USB cables are not included. Consult your Roland dealer if
you need to purchase.
* Use a USB cable no longer than 3 meters.
* Turn on the power to the HP107e before starting up MIDI
applications on the computer. Do not turn the HP107e on or
off while any MIDI application is running.
* Do not connect or disconnect the USB cable while the
HP107e’s power is on.
* If not using USB, disconnect the USB cable from the HP107e.
* If during the transmission/reception of data, the computer
switches to energy-saving mode or suspended mode, or if
power is switched on or off, the computer may freeze, or the
HP107e’s operation may become unstable.
ENGLISH
4. Start recording with the connected device.
You can use a USB connector to connect the HP107e to
your computer. For more details, refer to the separate
“USB Installation Guide.”
ENGLISH
❍ Use the following procedure when turning on the power.
Connecting to the USB
Connector
HP107_e.book Page 34 Tuesday, October 19, 2004 10:41 PM
HP107e – Chapter 6. Connecting External Devices
Connecting MIDI Devices
Perform on the HP107e to play a MIDI
sound generator
By connecting an external MIDI device and exchanging
performance data, you can control the performances on
one device from the other. For instance, you can output
sound from the other instrument or switch tones on the
other instrument.
Sound Module
THRU
MIDI
OUT
IN
HP107e
■ What’s MIDI?
MIDI stands for Musical Instrument Digital Interface, an
international standard which allows performance information to be communicated among electronic musical
instruments and computers.
The HP107e provides MIDI connectors, which allow performance data to be exchanged with external devices.
When these connectors are used to connect the HP107e to
external devices, an even wider range of possibilities
becomes available.
* A separate publication titled “MIDI Implementation” is also
available. It provides complete details concerning the way
MIDI has been implemented on this unit. If you should require
this publication (such as when you intend to carry out bytelevel programming), please contact the nearest Roland Service
Center or authorized Roland distributor.
Connection examples
* To prevent malfunction and/or damage to speakers or other
devices, always turn down the volume, and turn off the power
on all devices before making any connections.
Playing the HP107e from a MIDI
sequencer/Recording an HP107e performance on a MIDI sequencer
MT Series
* MT-90s has no MIDI Out
connector.
Out
MIDI
In
HP107e
Making MIDI-related Settings
Here’s how you can set the transmit channel and other
MIDI-related settings.
How to enter function mode
1. Hold down the [Split] button, and press the
[Chorus] button.
The HP107e switches to the set mode.
The indicators for the [Split] and [Chorus] buttons and
the button to which the function is assigned start flashing.
Setting various functions
2. Press the button to which the desired function is
assigned.
The indicators for pressed button, [Split] button, and
[Chorus] button flash.
For details on the contents of each function, refer to the
explanations that follow.
3. Press the [-] or [+] button to change the value.
If you press the [-] and [+] buttons simultaneously, the
setting will return to the original value.
How to exit function mode
4. Press the [Split] or [Chorus] button.
The button’s indicator will return to the previous state.
Set Local Off if you have connected the HP107e to a
MIDI sequencer. Refer to “Switching Local Control on
and off” (p. 35). Also set your MIDI sequencer to
MIDI Thru mode (so that messages received at MIDI
IN will be re-transmitted without change from MIDI
OUT). For details, refer to the owner’s manual of
your MIDI sequencer.
34
HP107_e.book Page 35 Tuesday, October 19, 2004 10:41 PM
Chapter 6. Connecting External Devices
MIDI features sixteen MIDI channels, numbered 1–16.
Simply connecting a cable is not enough for communication to take place. The connected devices must be set to
use the same MIDI channels. Otherwise, no sound will be
produced, and no sounds can be selected.
1~16
Value
fig.disp-on
Value
ENGLISH
* The HP107e receives all channels 1–16.
* When using the HP107e in Dual mode (p. 19) or Split mode
(p. 20), the left hand of the performance is transmitted on
Channel 5 in Dual mode and in on Channel 3 in Split mode.
These MIDI Transmit channel settings are fixed and cannot be
changed. When connecting an external MIDI device while
using Dual or Split modes, use channels other than 3 and 5 for
the MIDI device.
If you press the Piano Resonance [String] button in
step 2 of “Making MIDI-related Settings”, a display like
the following will appear.
* When a Roland MT series instrument is connected, it is not
necessary to make the Local Off setting. MT units transmit
Local Off messages when their power is switched on. If you
turn on the power in the order of the HP107e → MT series,
Local Off will be set automatically.
If you press the Piano Resonance [Key Off] button in
step 2 of “Making MIDI-related Settings”, a display like
the following will appear.
On, OFF
Factory setting On
■ Transmitting a performance you recorded
If you want to transmit a performance recorded on the
HP107e to an external MIDI device or computer, turn this
setting “On.” If this is “OFF,” the data will not be transmitted.
If you press the [Left] button in step 2 of “Making MIDIrelated Settings”, a display like the following will appear.
Factory setting 1
ENGLISH
fig.disp-Off
■ Switching Local Control on and off
When connecting a MIDI sequencer, set Local Control to
“OFF.”
As illustrated, information describing what has been
played on the keyboard is passed to the internal sound
generator over two different routes, (1) and (2). As a
result, you hear overlapping or intermittent sounds. To
prevent this from happening, route (1) must be severed,
by setting the unit to what is known as “Local Off.”
(1) Local On
Sound Generator
MIDI
OUT
On, OFF
Factory setting OFF
If you wish to save the performance recorded on the
HP107e, use the following procedure. In this situation,
your external sequencer is set its MIDI Thru feature to be
OFF. For details, refer to the owner’s manual of your
MIDI sequencer.
Connect a MIDI sequencer such as the MT series (p. 34).
Record the performance on the HP107e (p. 25).
Memory
MIDI
OUT
Value
Set this setting to “On.”
ENGLISH
Sequencer
MIDI
IN
ENGLISH
■ MIDI send channel settings
Start recording with the connected MIDI sequencer.
MIDI
IN
Start playback of the recorded song on the HP107e.
(2) Thru function On
Each note is sounded
twice played
Local Control ON: The keyboard and the internal sound
generator are in a linked state.
When playback ends, stop recording with the connected
MIDI sequencer.
Use a connected MIDI sequencer to save the data on a
floppy disk or other media.
Sound is emitted
ENGLISH
Sound Generator
Local On
Local Control OFF: The keyboard and the internal sound
generator are in an unlinked state. No sound will be produced by the keyboard when it is played.
No sound produced
ENGLISH
Sound Generator
Local Off
35
HP107_e.book Page 36 Tuesday, October 19, 2004 10:41 PM
HP107e – Troubleshooting
Troubleshooting
If you think there’s a problem, read this first.
The power doesn’t come on
Is the power cord connected and plugged in correctly? (p. 9)
The button doesn’t work
Is the panel locked? (p. 30)
Turn the power off, then back on.
No sound is heard
Is the volume level of the HP107e turned all the way down? (p. 11)
Are headphones plugged in? (p. 10)
Has a plug remained connected to the Phones jack?
When headphones are connected, the keyboard’s speaker stops
playing.
Is Local Off selected?
When Local Control is set to OFF, no sound is produced by playing the keyboard. Set Local Control to “ON” (p. 35).
Is V-LINK switched on?
While V-LINK is switched on, no sound is produced when you
press any of the twelve keys at the left end of the keyboard.
No sound is heard (when a MIDI instrument is connected)
Have all devices been switched on?
Are the MIDI cables connected correctly?
Does the MIDI channel match the connected instrument? (p. 35)
Sounds are heard twice (doubled) when the keyboard is played
Is the HP107e in Dual performance? (p. 19)
When the HP107e is connected to an external sequencer, set it to
the Local OFF mode (p. 35).
Alternatively, the sequencer could be set so its MIDI Thru feature
is OFF.
Tone doesn’t change
Is the panel locked? (p. 30)
Turn the power off, then back on.
Are the indicators for the [Split] and [Chorus] buttons flashing?
Setting of functions is in progress. Press the [Split] or [Chorus]
button to exit function mode (p. 28, p. 34).
Not all played notes are sounded
The maximum number of notes that the HP107e can play simultaneously is 128.
Frequent use of the damper pedal when playing along with a
song may result in performance data with too many notes, causing some notes to drop out.
The tuning or pitch of the keyboard or song is off
Have you set Transpose? (p. 18)
Are the settings for the “Temperament” and “Stretch Tuning”
correct? (p. 29)
Is the setting for the “Master Tuning” correct? (p. 29)
Song doesn’t play back/ Only the sound of a particular instrument in a
song does not play
Are the indicator for the Track buttons ([Left] and [Right] buttons)
extinguished? (p. 24)
If the button indicator is out, the music on that track is not heard.
Press the track button so the indicator is illuminated.
Can’t record
Has the track buttons for recording been selected? (p. 25–p. 27)
Tempo of recorded song or metronome is off
If you select an built-in song in which the tempo changes during
the song, and then record, the tempo will change in the same way
for the performances. The tempo of the metronome will also
change in the same way.
If you record additional material without erasing the previously
recorded song, the song will be recorded at the first-recorded
tempo. Please erase the previously recorded song before you rerecord (p. 27).
36
The recorded performance has disappeared
Recorded performance that have not been backed up with Song
Backup is erased with the power is turned off. A performance
cannot be restored once it’s been deleted.
The HP107e includes a “Song Backup function” (p. 31), which
allows you to store song recorded with the HP107e in the instrument itself. Use the Song Backup function to save any performance you do not want deleted to the HP107e.
Depressing a pedal has no effect, or the pedal effect doesn’t stop
Is the pedal connected correctly?
Make sure the pedal cable extending from the stand is securely
connected to the pedal jack on the rear of the unit (p. 9).
The pedal rattles
Adjust the adjuster underneath the pedal so that the adjuster
presses firmly against the floor surface (p. 11).
Reverberation still audible even with Reverb turned off
Since the HP107e’s piano sounds accurately reproduce the depth
and reverberation of the original acoustic piano, you may find
that reverberation is audible when the Key Off function and
Grand Space are enabled.
If you want to eliminate the reverberation, turn off the Key Off
function (p. 14) and Grand Space (p. 16–16).
In the upper range, the sound changes abruptly beyond a certain key
On an acoustic piano, notes in the upper one and a half octaves of
the keyboard continue to sound until they decay naturally,
regardless of the damper pedal. There is a difference in the timbre
as well. Roland pianos faithfully simulate such characteristics of
the acoustic piano. On the HP107e, the range that is unaffected by
the damper pedal will change depending on the Key Transpose
setting.
A High-pitched whine is produced
When listening through headphones:
Some of the more flamboyant and effervescent piano tones feature an ample high-end component, which may make the sound
appear to have metallic reverberation added. Since this reverberation becomes particularly audible when supplemented by heavy
reverb, you may be able to diminish the problem by reducing the
amount of reverb applied to the sound.
When listening through speakers:
Here, a different cause (such as resonance produced by the
HP107e) would be suspect. Consult your Roland dealer or nearest
Roland Service Center.
The bass range sounds odd, or there is a vibrating resonance
When listening through speakers:
Playing at loud volumes may cause instruments near the HP107e
to resonate. Resonation can also occur with fluorescent light
tubes, glass doors, and other objects. In particular, this problem
occurs more easily when the bass component is increased, and
when the sound is played at higher volumes. Use the following
measures to suppress such resonance.
• Place speakers so they are 10–15 cm from walls and other surfaces.
• Reduce the volume.
• Move the speakers away from any resonating objects.
When listening through headphones:
Here, a different cause would be suspect. Consult your Roland
dealer or nearest Roland Service Center.
The volume level of the instrument connected to Input jacks is too low
Could you be using a connection cable that contains a resistor?
Use a connection cable that does not contain a resistor.
HP107_e.book Page 37 Tuesday, October 19, 2004 10:41 PM
Error Messages/Other Messages
ENGLISH
Error Messages/Other Messages
Display
Meaning
User Song. Stores recorded performances (p. 25).
Usr.
The “.” in the display indicates that there is performance material already recorded (p. 25).
S.1~68
Built-in song number (p. 12).
S. U
This is a song backed up with the Song Backup function (p. 31).
PU
This appears when a song with a pickup (a song that does not start on the first beat) is played back.
dEL
This appears when you attempt to delete a recorded song (p. 25, p. 27, p. 31).
E.32
The amount of performance information is too large, and further recording is not possible.
E.41
A problem such as a loose MIDI cable occurred. Make sure the MIDI cables are correctly hooked up.
_._._.
V-LINK function is On (p. 32).
ENGLISH
USr
* Error messages are indicated by an “E.” before the number. Press any button, and you can cancel the error message.
ENGLISH
Parameters Stored in Memory Backup
String Resonance (On/Off, Depth)
p. 14
Damper Resonance (On/Off, Depth)
p. 15
Key Touch
p. 15
Hammer Response
p. 15
Temperament (Temperament, Tonic)
p. 29
Stretch Tuning
p. 29
Grand Space (On/Off, Depth)
p. 16, p. 16
Dynamic Emphasis (On/Off, Depth)
p. 17
Master Tuning
p. 29
Reverb (On/Off, Depth)
p. 17
USB Driver Setting
p. 32
Applying the damper pedal to the left-hand keyboard area
p. 30
Grand Space Mode
p. 30
Split Point
p. 20
Dual Balance, Layer Balance
p. 19, p. 19
ENGLISH
Other Settings
p. 14
ENGLISH
Piano Tone-Related Settings in Effect
When the Power is Turn On
Key Off Resonance (On/Off, Volume)
ENGLISH
37
HP107_e.book Page 38 Tuesday, October 19, 2004 10:41 PM
HP107e – Easy Operation List
Easy Operation List
11
7
10 9
8
4
No.
1
2
3
6
5
4
5
6
You want to
1
7
8
3
10
9
11
12 13
14
2
Buttons
Page
Press the [Split] and [Chorus] buttons simultaneously, and press the [●] button.
1
Local Control
[Split] + [Chorus] → Piano Resonance [Key Off]
p. 35
2
MIDI send channel settings
[Split] + [Chorus] → Piano Resonance [String]
p. 35
3
USB Driver Setting
[Split] + [Chorus] → Piano Resonance [Damper]
p. 32
4
Grand Space Mode
[Split] + [Chorus] → [Grand Space]
p. 30
5
Master Tuning
[Split] + [Chorus] → [Piano]
p. 29
6
Selecting a temperament
Specifying the keynote
[Split] + [Chorus] → [E. Piano]→
[E. Piano] + key
p. 29
7
Stretch tuning
[Split] + [Chorus] → [Harpsichord]
p. 29
8
Octave Shift
[Split] + [Chorus] → [Organ]
p. 30
9
Applying the damper pedal to the left-hand keyboard area
[Split] + [Chorus] → [Strings]
p. 30
10
Song Backup
[Split] + [Chorus] → [Song/Tempo]
p. 31
11
Memory Backup
[Split] + [Chorus] → [Metronome/Count In]
p. 31
12
Transmitting a recorded performance
[Split] + [Chorus] → [Left]
p. 35
13
V-LINK
[Split] + [Chorus] → [Right]
p. 32
14
Factory Reset
[Split] + [Chorus] → Key Touch [Touch]
p. 31
Hold down the [
] button and press the [-] or [+] button.
1
Beat of metronome
[Song/Tempo] + [-] [+]
p. 21
2
Metronome volume
[Metronome/Count In] + [-] [+]
p. 21
3
Layer Balance (Dual Balance)
[Acoustic Layering] + [-] [+]
p. 19
4
Damper pedal’s resonance level
Piano Resonance [Damper] + [-] [+]
p. 15
5
String’s resonance level
Piano Resonance [String] + [-] [+]
p. 14
6
Key Off volume
Piano Resonance [Key Off] + [-] [+]
p. 14
7
Depth of the Chorus effect
[Chorus] + [-] [+]
p. 17
8
Depth of the Reverb effect
[Reverb] + [-] [+]
p. 17
9
Dynamic Emphasis setting
[Dynamic Emphasis] + [-] [+]
p. 17
Grand Space setting
[Grand Space] + [-] [+]
p. 16, p. 16
[Transpose] + [Split] → [-] [+]
p. 19
10
Press the [
11
] button, and press the [-] or [+] button.
Dual Balance (Layer Balance)
Hold down the [Split] or [Transpose] button and press the key.
38
Split Point
[Split] + key
p. 20
Key Transpose
[Transpose] + key
p. 18
HP107_e.book Page 39 Tuesday, October 19, 2004 10:41 PM
Main Specifications
ENGLISH
Main Specifications
Keyboard
Keyboard
Touch Sensitivity
Keyboard Mode
88 keys (Progressive Hammer Action Keyboard with Escapement)
Touch: Light, Medium, Heavy, Fixed
Hammer: Light, Medium, Heavy, Off
Whole, Layer/Dual (volume balance adjustable), Split (split point adjustable)
ENGLISH
Sound Generator
Max. Polyphony
128 voices
Tones
5 groups 36 variations+ 4 tones for Layer
Temperament
8 types, selectable tonic
Stretched Tuning
2 types
Master Tuning
415.3 Hz–466.2 Hz (0.1 Hz Step)
Transpose
-6–+5 (in semitones)
Effects
Grand Space, Dynamic Emphasis, Piano Resonance (Key Off Resonance, String Resonance,
Damper Resonance), Reverb (10 levels), Chorus (10 levels)
Metronome
2/2, 0/4, 2/4, 3/4, 4/4, 5/4, 6/4, 7/4, 3/8, 6/8, 9/8, 12/8
Volume
10 levels
ENGLISH
Beat
Recorder
Tracks
2 tracks
Song
1 song (Rememberable)
Note Storage
Approx. 10,000 notes
Tempo
Quarter note = 10–500
Resolution
120 ticks per quarter note
Control
Play/Stop, Rec, Tempo, All Song Play, Track Select
Built-in Songs
68 songs + 14 Tone Demo songs
ENGLISH
Others
50 W x 2
Speakers
20 cm x 2 (Speaker Box), 10cm x 2
Display
Beat LED
7 segments, 3 characters (LED)
Headphones indicator
Control
Volume, Brilliance
Pedals
Damper (half-pedal recognition), Soft (half-pedal recognition), Sostenuto (function assignable)
Other Functions
Panel Lock, Song backup, Memory backup, Factory Reset
Connectors
USB connector (MIDI), Output jacks (L/Mono, R), Input jacks (L/Mono, R), Headphone jack x 2 (Stereo),
MIDI connectors (In, Out)
Power supply
AC 230V
Power Consumption
110 W
Dimensions
(including piano stand)
1,425 (W) x 536 (D) x 931 (H) mm (music rest down)
ENGLISH
Rated Power Output
1,425 (W) x 536 (D) x 1,083.5(H) mm (music rest up)
Weights
(including Piano Stand)
82kg
Accessories
Owner’s manual, Roland 60 Classical Piano Masterpieces, USB Installation Guide,
CD-ROM (Roland Digital Piano USB Driver), Power Cord, Headphone Hook
* In the interest of product improvement, the specifications and/or appearance of this unit are subject to change without prior notice.
ENGLISH
39
HP107_e.book Page 40 Tuesday, October 19, 2004 10:41 PM
HP107e – Main Specifications
40
HP107_e.book Page 41 Tuesday, October 19, 2004 10:41 PM
Bedienungsanleitung
Vielen Dank, dass Sie sich für ein Digital-Piano HP107e von Roland entschieden haben.
Die wichtigsten Funktionen
Klavierklänge mit einer breit gefächerten Resonanz und einer großen Expressivität
Die Stereo-Samples liefern einen besonders realistischen Klangeindruck, weil selbst die beim Auftreffen der Hämmer auf die Saiten entstehenden Geräusche berücksichtigt werden. Somit ist ein
realistischer Klavierklang gewährleistet, der kaum noch von einem akustischen Flügel zu unterscheiden ist. Das Instrument ist 128-stimmig polyphon. Sie können das Dämpferpedal also bedenkenlos verwenden, ohne befürchten zu müssen, dass Noten wegfallen.
Dieses Instrument erkennt selbst die feinsten Nuancen Ihres Spiels und gibt sie naturgetreu wieder: Anschlagvariationen, Simulation der Saitenresonanzen bei der Tastenfreigabe und bei Verwendung des Pedals (“Piano Resonance”) usw. Darüber hinaus enthält das Instrument ein “Grand
Sound”-Lautsprechersystem, das im Zusammenspiel mit der “Grand Space”- und “Dynamic
Emphasis”-Funktion den druckvollen, brillanten und dreidimensionalen Klangeindruck eines
Konzertflügels überzeugend simuliert.
Ansprache und Anschlagverhalten eines Flügels
Dieses Instrument enthält eine “Progressive Hammer Action”-Tastatur, die das gleiche Spielgefühl
vermittelt wie die Klaviatur eines Flügels: Im Bass ist der Widerstand der Tasten nämlich etwas
größer als im Diskant. Die Klaviatur des HP107e erzeugt zudem das für einen Flügel typische “Klicken” der Tasten (Druckpunktsimulation bzw. “Escapement”).
Die Anschlagdynamik kann auf zwei Arten ausgewertet werden: Über die “Hammeransprache”
(die das Verhalten der Hämmer simuliert) und über die Tastenansprache. Auch die Pedale sprechen besonders akkurat an, so dass wirklich alle Facetten Ihres Spiels zum Tragen kommen.
Lesen Sie sich vor dem Einsatz folgende Punkte durch:
“Hinweise für eine sichere
Handhabung” (S. 42) und
“Wichtige Hinweise” (S. 44).
Dort finden Sie wichtige Bedien- und Sicherheitshinweise. Außerdem müssen Sie
sich natürlich die gesamte Bedienungsanleitung durchlesen, um alle Funktionen kennen zu lernen und bei der Bedienung alles richtig zu machen. Bewahren Sie die Bedienungsanleitung für die spätere Bezugnahme an einem sicheren Ort auf.
Expressivität, die es nur auf Digital-Instrumenten gibt
Das HP107e bietet ausnahmslos authentische Klänge, deren Verhalten jenem der akustischen Vorlagen sehr nahe kommt. Bei Bedarf können dem Klavierklang andere Klangfarben hinzugefügt
(und auf Wunsch sogar in Oktavschritten transponiert) werden. Die Balance der beiden Klänge
lässt sich über ein Pedal einstellen.
Auch im Kopfhörer überlegen
Bei Verwendung eines Kopfhörers kommen spezielle Effekte zum Einsatz, die einen angenehmen
und niemals ermüdenden Klangeindruck bewirken. Wenn Sie einen Kopfhörer anschließen, leuchtet eine Diode im Bedienfeld. Ferner ist das HP107e mit einem Haken ausgestattet, an dem Sie den
Kopfhörer bequem aufhängen können.
Eine Vielzahl praktischer Übungsfunktionen und interne Klavierstücke
Eine Metronomfunktion und ein 2-Spur-Recorder sowie die 60 internen Klavierstücke mit dazugehörigem Notenheft sowie weitere praktische Funktionen, die man nur auf einem Digital-Piano findet, machen dieses Instrument auch für Unterrichtszwecke geeignet.
Copyright ©2004 ROLAND CORPORATION.
Alle Rechte vorbehalten. Diese Bedienungsanleitung darf ohne die schriftliche Genehmigung der ROLAND CORPORATION weder auszugsweise, noch vollständig kopiert werden.
HP107_e.book Page 42 Tuesday, October 19, 2004 10:41 PM
Hinweise für eine sichere Handhabung
HINWEISE FÜR EINE SICHERE HANDHABUNG
MASSNAHMEN FÜR DIE VERMEIDUNG VON BRÄNDEN, STROMSCHLÄGEN UND VERLETZUNGEN
Über die
WARNUNG und
WARNUNG
VORSICHT Hinweise
Dieses Symbol signalisiert Dinge, welche
den Anwender bei unsachgemäßer Behandlung auf die Gefahr schwerer Verletzungen
(eventuell mit Todesfolge) hinweisen.
Weist auf Verletzungsgefahr oder mögliche
Sachschäden hin, die sich aus einer unsachgemäßen Bedienung ergeben können.
VORSICHT
* Mit "Sachschäden" sind hier Schäden an
den Möbeln oder Verletzungen von
Haustieren gemeint.
Über die Symbole
Das
Symbol weist auf wichtige Instruktionen oder Warnungen hin. Die genaue Bedeutung des Symbols richtet sich
nach dem Zeichen in dem Dreieck. Das hier gezeigte Symbol
bedeutet beispielsweise, daß es sich um einen allgemeinen
Hinweis auf mögliche Gefahren handelt.
Das
Symbol verweist auf Handlungen hin, die Sie niemals
ausführen dürfen (welche verboten sind). Was genau verboten ist, können Sie an dem Symbol in dem Kreis ablesen.
Das hier gezeigte Symbol bedeutet beispielsweise, daß das
Gehäuse nicht geöffnet werden darf.
Das ● Symbol bezeichnet Dinge, die Sie unbedingt
ausführen müssen. Auch hier richtet sich die genaue Bedeutung nach dem Symbol in dem schwarzen Kreis. Das hier gezeigte Symbol bedeutet beispielsweise, daß der Netzanschluß
gelöst werden muß.
BITTE FOLGENDE PUNKTE BEACHTEN
WARNUNG
• Lesen Sie sich vor dem Einsatz dieses Produkts
alle Hinweise dieser Seite sowie den Rest dieser
Bedienungsanleitung durch.
...........................................................................................................
• Öffnen Sie das Instrument niemals und nehmen
Sie keine Modifikationen vor.
...........................................................................................................
• Versuchen Sie niemals, das Gerät zu öffnen oder
selbst defekte Teile zu erneuern (es sei denn, die
Bedienungsanleitung enthält ausdrückliche
Anweisungen). Überlassen Sie alle Wartungs- und
Reparaturarbeiten Ihrem Roland-Händler, einer
qualifizierten Kundendienststelle oder dem offiziellen
Roland-Vertrieb (siehe die Adressen auf der “Information”-Seite).
...........................................................................................................
• Verwenden bzw. lagern Sie dieses Gerät niemals
an folgenden Orten:
• Orte, die extremen Temperaturen ausgesetzt sind
(z.B. in der prallen Sonne, in einem geschlossenen
Fahrzeug, in der Nähe eines Heizkörpers, Herdes
usw.);
• Feuchte Orte (Bad, Waschküche, nasser Fußboden
usw.);
• Nasse Orte;
• Draußen im Regen;
• Staubige Orte;
• Orte, die starken Vibrationen ausgesetzt sind.
...........................................................................................................
• Dieses Instrument darf nur auf einen Ständer
gestellt werden, der von Roland ausdrücklich
empfohlen wird.
...........................................................................................................
• Stellen Sie das Gerät immer auf eine ebene und
stabile Oberfläche. Verwenden Sie niemals ein
wackliges Stativ bzw. ein Stativ, auf dem das
Gerät geneigt aufgestellt würde.
...........................................................................................................
• Schließen Sie dieses Produkt nur an eine Steckdose an, die den Angaben in dieser Bedienungsanleitung bzw. auf dem Typenschild entspricht.
...........................................................................................................
• Verwenden Sie ausschließlich das beiliegende
Netzkabel. Umgekehrt eignet sich das beiliegende
Netzkabel nicht für andere Geräte.
...........................................................................................................
WARNUNG
• Beschädigen Sie niemals das Netzkabel und stellen Sie keine schweren Gegenstände darauf. Verlegen Sie es so, dass es weder gequetscht, noch
anderweitig abgeklemmt wird. Bei Verwendung
eines beschädigten Kabels besteht Stromschlagbzw. Brandgefahr.
...........................................................................................................
• Dieses Gerät kann entweder von sich aus oder im
Zusammenspiel mit einem Verstärker oder Kopfhörer einen Schallpegel erzeugen, der zu einem
permanenten Hörschaden führen kann. Verwenden Sie es niemals über einen längeren Zeitraum
bei hohem Schallpegel. Wenden Sie sich bei Verdacht auf Gehörverlust oder anderen Beschwerden sofort an einen Ohrenarzt.
...........................................................................................................
• Achten Sie darauf, dass niemals Fremdkörper
(brennbare Stoffe, Münzen, Büroklammern usw.)
oder Flüssigkeiten (Wasser, Getränke usw.) in das
Geräteinnere gelangen.
...........................................................................................................
• Schalten Sie das Gerät sofort aus, lösen Sie den
Netzanschluss und wenden Sie sich an Ihren
Roland-Händler oder den Vertrieb (siehe die
“Information”-Seite), wenn:
• Das Netzkabel oder der Stecker sichtbare Schäden
aufweist;
• Wenn Rauch aus dem Gerät kommt bzw. wenn es
verbrannt riecht.
• Wenn Fremdkörper oder Flüssigkeiten ins
Geräteinnere gelangt sind.
• Das Gerät im Regen gestanden hat (oder nass
geworden ist);
• Sich das Gerät nicht erwartungsgemäß verhält
oder in seiner Leistung merklich nachgelassen hat.
...........................................................................................................
HP107_e.book Page 43 Tuesday, October 19, 2004 10:41 PM
• In Familien mit kleinen Kindern müssen die Eltern
darauf achten, dass die Kinder das Gerät erst dann
alleine bedienen, wenn sie mit allen wichtigen
Bedienungsverfahren vertraut sind.
...........................................................................................................
014
• Netz- und Signalkabel sollten niemals miteinander verdreht werden. Verlegen Sie alle Kabel
außerdem immer außerhalb der Reichweite von
Kindern.
...........................................................................................................
106
• Setzen Sie sich niemals auf das Gerät und stellen
Sie keine schweren Gegenstände darauf.
• Setzen Sie das Gerät niemals schweren
Erschütterungen aus.
• (Lassen Sie es niemals fallen!)
...........................................................................................................
...........................................................................................................
• Fassen Sie das Netz- und die übrigen Kabel niemals mit feuchten oder nassen Händen an.
015
VORSICHT
• Beachten Sie beim Transport des Gerätes folgende
Hinweise. Am besten bitten Sie jemanden, Ihnen
beim Tragen des Instrumentes zu helfen. Halten
Sie das Instrument waagerecht und transportieren Sie es mit äußerster Vorsicht, um Verletzungen und Schäden zu vermeiden.
016
• Vor dem Einsatz dieses Produkts im Ausland
wenden Sie sich mit eventuellen Fragen bezüglich
der Stromversorgung bitte an Ihren Händler oder
den Vertrieb (siehe die “Information”-Seite).
...........................................................................................................
026
• Spielen Sie eine CD-ROM UNTER KEINEN
UMSTÄNDEN mit einem herkömmlichen CDPlayer ab. Das könnte nämlich zu Hörschäden
und einer Beschädigung der Lautsprecher bzw.
anderer Komponenten Ihrer Anlage führen.
...........................................................................................................
026
VORSICHT
• Schalten Sie das Instrument vor dem Reinigen aus
und lösen Sie den Netzanschluss (S. 49).
...........................................................................................................
110a
• Im Falle eines Gewitters lösen Sie am besten den
Netzanschluss.
116
• Seien Sie beim Öffnen und Schließen des Tastaturdeckels vorsichtig, um Sie sich nicht die Finger zu
klemmen (S. 50). Am besten überlassen Sie das
niemals einem Kind.
...........................................................................................................
118b
• Wenn Sie Schrauben oder Muttern des Notenoder Pianoständers bzw. die Flügelmutter lösen,
müssen Sie sie an einem sicheren Ort –auf jeden
Fall aber außerhalb der Reichweite von Kindern–
aufbewahren, damit niemand sie verlegt bzw. verschluckt.
...........................................................................................................
DEUTSCH
• Das Gerät und Netzkabel müssen immer so aufgestellt bzw. verlegt werden, dass eine ausreichende
Lüftung gewährleistet ist.
...........................................................................................................
• Ziehen Sie beim Lösen des Netzanschlusses nur
am Stecker des Netzkabels und niemals am Kabel,
um das Reißen der Adern zu vermeiden.
...........................................................................................................
• Lösen Sie den Netzstecker in regelmäßigen
Abständen und reinigen Sie ihn mit einem trockenen Tuch, um die Steckerstifte von Staub und
anderem Schmutz zu befreien. Außerdem sollten
Sie den Netzanschluss lösen, wenn Sie das Gerät
längere Zeit nicht verwenden möchten. Bedenken
Sie, dass Staub zwischen dem Netzstecker und der
Anschlussbuchse zu einer ungenügenden Isolierung führen und einen Brand verursachen kann.
...........................................................................................................
...........................................................................................................
109a
DEUTSCH
• Stellen Sie niemals Flüssigkeitsbehälter (Vasen
usw.) auf das Instrument. Vermeiden Sie außerdem die Verwendung von Insektensprays, Parfüm, Alkohol, Nagellack, Spraydosen usw. in
unmittelbarer Nähe des Geräts. Falls das Gehäuse
trotzdem Spritzer abbekommt, müssen Sie diese sofort
wegwischen.
...........................................................................................................
DEUTSCH
• Kontrollieren Sie, ob die Schrauben, mit denen das
Instrument am Ständer befestigt wurde, noch fest
sitzen. Wenn sie sich gelöst haben, müssen Sie sie
sofort wieder fest andrehen.
• Lösen Sie den Netzanschluss.
• Lösen Sie die Kabel aller externen Geräte.
• Drehen Sie die Einstellschraube weiter heraus
(S. 51).
• Schließen Sie die Tastenklappe.
• Klappen Sie den Notenständer hinunter.
DEUTSCH
• Schließen Sie das Netzkabel niemals an einen
Stromkreis an, der bereits mehrere andere Geräte
speist. Seien Sie besonders vorsichtig mit Verlängerungskabeln: die Gesamtleistungsaufnahme
aller daran angeschlossenen Geräte darf niemals
größer sein als die Angaben auf dem Kabel, weil
sonst die Adern schmelzen, was zu Kurzschlüssen
führt.
...........................................................................................................
DEUTSCH
WARNUNG
DEUTSCH
HP107_e.book Page 44 Tuesday, October 19, 2004 10:41 PM
HP107e – Wichtige Hinweise
Wichtige Hinweise
Bitte lesen Sie sich außer “IMPORTANT SAFETY INSTRUCTIONS” und “Hinweise für eine sichere Handhabung” (S. 42)
auch folgende Punkte durch:
Stromversorgung
• Schließen Sie das Instrument niemals an eine Steckdose
an, die auch Geräte speist, welche mit einem Wechselrichter arbeiten (z.B. Kühlschrank, Waschmaschine,
Mikrowellenherd oder Klimaanlage) oder einen Motor
enthalten. Solchen Geräte können nämlich Funktionsstörungen und hörbare Störgeräusche verursachen. Wenn
Sie keine andere Möglichkeit haben, sollten Sie einen
Netzfilter zwischen dem Instrument und jener Steckdose
verwenden.
307
• Schalten Sie das Instrument sowie die übrigen Geräte
Ihrer Anlage aus, bevor Sie sie miteinander verbinden.
Nur so ist nämlich sichergestellt, dass es weder zu Fehlfunktionen noch zu Schäden an den Lautsprechern
kommt.
308
• Obwohl das Display und die Dioden bei Drücken des
POWER-Schalters ausgehen, ist das Gerät nach wie vor
mit dem Netz verbunden. Um auch die Stromzufuhr zu
unterbinden, müssen Sie nach Drücken des POWERSchalters den Netzanschluss lösen. Daher sollten Sie das
Gerät nach Möglichkeit an eine Steckdose anschließen,
die man bequem erreicht bzw. ein beschaltetes Verlängerungskabel verwenden.
Aufstellung
• Wenn das Gerät zu nahe an Verstärkern oder größeren
Transformatoren platziert wird, können Brummgeräusche entstehen. Stellen Sie das Gerät bzw. die andere
Störquelle dann etwas weiter entfernt auf.
352a
• Dieses Gerät könnte den Empfang von Radios oder Fernsehgeräten beeinträchtigen. Betreiben Sie es niemals in
der Nähe solcher Empfänger.
352b
• Wenn Sie in der Nähe dieses Gerätes ein drahtloses Telefon bzw. Handy verwenden, können Brummgeräusche
entstehen. Das ist vor allem bei Erhalt oder Beginn eines
Anrufs der Fall. Daher raten wir, niemals in unmittelbarer Nähe des Gerätes zu telefonieren und das Handy
sogar auszuschalten.
354b
• Setzen Sie das Gerät keinen extremen Temperaturen (z.B.
direkter Sonneneinstrahlung) aus und lassen Sie es nicht
in einem geschlossenen Auto liegen, das in der Sonne
steht. Vermeiden Sie außerdem, dass Leuchten mit einem
starken Lichtstrahl lange Zeit auf dieselbe Stelle des
Gehäuses strahlen. Nur so ist sichergestellt, dass sich das
Gehäuse weder verfärbt, noch verformt.
355b
• Wenn das Gerät von einem kälteren/feuchteren Ort an
einen wärmeren/trockeneren Ort (oder umgekehrt)
gebracht wird, könnte es zu Kondensbildung kommen.
Im Extremfall führt dies beim Einschalten zu einem Kurzschluss oder Brand. Warten Sie nach dem Transport also
mehrere Stunden, bevor Sie das Gerät einschalten, damit
das Kondenswasser verdampfen kann.
• Gegenstände aus Gummi, Vinyl o.ä. sollten niemals längere Zeit auf das Gerät gestellt werden, weil das zu einer
Verfärbung bzw. schwer entfernbaren Rändern führt.
44
358
• Legen Sie niemals (schwere) Gegenstände auf die Tastatur. Das könnte nämlich dazu führen, dass die Tasten
nicht mehr erwartungsgemäß reagieren.
359
• Bringen Sie niemals Aufkleber oder andere Ziergegenstände auf dem Instrument an. Wenn Sie diese nämlich
später wieder entfernen, bleiben eventuell Reste kleben
bzw. entstehen Ränder, die sich kaum noch entfernen lassen.
Wartung und Pflege
• Verwenden Sie für die Reinigung ein weiches, trockenes
Tuch, das bei Bedarf auch leicht angefeuchtet werden
darf. Bei stärkerer Verschmutzung kann auch ein mildes,
neutrales Reinigungsmittel verwendet werden. Wenden
Sie dabei niemals Gewalt an, um das Gehäuse nicht zu
beschädigen.
402
• Verwenden Sie kein Benzin, Verdünner, Alkohol o.ä., um
eine Beschädigung oder Verfärbung der Geräteoberfläche
zu vermeiden.
• Die Pedale sind aus Messing.
Messing wird nach und nach dunkler, was auf eine Oxidierung zurückzuführen ist. Daher sollten Sie die Pedale
in regelmäßigen Zeitabständen mit einem Metallreiniger
säubern.
Reparaturen und Datenspeicher
• Bitte beachten Sie, dass der Speicherinhalt verloren gehen
kann, wenn das Instrument zur Reparatur eingereicht
wird. Archivieren Sie alle wichtigen Daten via MIDI oder
notieren Sie sie, bevor Sie das Instrument zur Reparatur
einreichen. Zwar geben wir uns große Mühe, den Speicherinhalt zu erhalten, jedoch können wir das nicht
garantieren. Bei bestimmten Reparaturen (z.B. wenn eine
Schaltung oder der Speicherbereich selbst beschädigt ist)
können die intern gespeicherten Daten nicht wiederhergestellt werden. Roland haftet nicht für den Verlust solcher Daten.
Weitere Vorsichtsmaßnahmen
• Beachten Sie, dass der Speicherinhalt im Falle einer Störung bzw. bei unsachgemäßer Behandlung gelöscht werden kann. Roland kann nicht garantieren, dass diese
Daten auch wieder in den internen Speicher geladen werden können. Daher raten wir, Ihre Einstellungen in regelmäßigen Zeitabständen via MIDI (z.B. mit einem Sequenzer) extern zu archivieren.
552
• In bestimmten Fällen können via MIDI (z.B. mit einem
Sequenzer) archivierte Daten nicht mehr geladen werden.
Roland haftet nicht für Schäden, die sich aus solchen
Datenverlusten ergeben könnten.
553
• Behandeln Sie die Bedienelemente und Anschlussbuchsen des Gerätes mit der gebührenden Umsicht. Eine
etwas zu forsche Handhabung kann nämlich zu Schäden
führen.
HP107_e.book Page 45 Tuesday, October 19, 2004 10:41 PM
Wichtige Hinweise
DEUTSCH
• Ziehen Sie beim Herstellen bzw. Lösen der Anschlüsse
nur an den Steckern – niemals an den Kabeln. Nur so vermeiden Sie das Reißen der Adern bzw. Schäden an den
internen Komponenten.
557
• Während des Betriebs wird das Gerät warm. Das ist völlig normal.
558a
• Um die Nachbarn oder die übrigen Familienmitglieder
nicht zu stören, sollten Sie die Lautstärke immer in vertretbaren Grenzen halten. Am besten verwenden Sie spät
Abends oder früh Morgens einen Kopfhörer.
559b
DEUTSCH
• Transportieren Sie das Instrument immer im OriginalLieferkarton bzw. in einem geeigneten Koffer o.ä., um
das Gehäuse nicht unnötig zu beschädigen.
560
• Belasten Sie den Notenständer niemals übermäßig.
562
• Verwenden Sie zum Herstellen von Audioverbindungen
ausschließlich Roland-Kabel. Wenn Sie sich trotzdem für
eine andere Marke entscheiden, beachten Sie bitte folgende Punkte:
DEUTSCH
• Bestimmte Verbindungskabel enthalten Widerstände.
Diese sind für die Verwendung mit diesem Gerät nicht
geeignet, weil die Lautstärke sonst u.U. viel zu gering ist.
Im Extremfall hören Sie überhaupt nichts mehr. Wenden
Sie sich im Zweifelsfall an den Hersteller oder Vertrieb
der verwendeten Audiokabel.
565
• Sorgen Sie vor Öffnen oder Schließen der Tastenklappe
dafür, dass sich kein Haus- oder Kleintier auf dem Instrument befindet (insbesondere nicht in der Nähe der Tastatur oder der Klappe). Andernfalls könnte es zwischen
Klappe und Tastatur geraten und dort eingeschlossen
werden. Dann müssen Sie das Gerät sofort ausschalten
und den Netzanschluss lösen. Wenden Sie sich anschließend an Ihren Roland-Händler oder an die nächste Kundendienststelle.
DEUTSCH
Handhabung von CD-ROMs
• Vermeiden Sie Kratzer und Flecke auf der glänzenden
(Daten)Seite der CD. Beschädigte und/oder schmutzige
CD-ROMs sind u.U. unleserlich. Bei Bedarf können Sie
sie mit einem CD-Reinigungsmittel säubern.
DEUTSCH
DEUTSCH
45
HP107_e.book Page 46 Tuesday, October 19, 2004 10:41 PM
HP107e – Inhaltsverzeichnis
Inhaltsverzeichnis
Hinweise für eine sichere Handhabung .........................42
Wichtige Hinweise ............................................................44
Beschreibung der Bedienelemente ................................47
Bedienfeld .......................................................................................................... 47
Rückseite ............................................................................................................ 48
Unterseite ........................................................................................................... 48
Vorbereitung .....................................................................49
Anschließen des Pedalkabels .......................................................................... 49
Anschließen des Lautsprecherkabels............................................................. 49
Anschließen des Netzkabels............................................................................ 49
Verwendung des Notenständers .................................................................... 49
Öffnen/Schließen des Tastaturdeckels.......................................................... 50
Anschließen eines Kopfhörers ........................................................................ 50
Verwendung des Kopfhörerhakens................................................50
Ein- und Ausschalten ....................................................................................... 51
Lautstärke und Klangfarbe.............................................................................. 51
Über die Pedale ................................................................................................. 51
Kapitel 3. Spielen zu den internen Stücken................... 63
Ändern des Tempos..........................................................................................63
Starten der Wiedergabe nach einem Einzähler.............................63
Separate Wiedergabe der beiden Hände .......................................................64
Kapitel 4. Aufnehmen Ihres Spiels ................................. 65
Aufnahme eines neuen Stücks ........................................................................65
Aufnahme mit einem internen Stück .............................................................66
Aufnahme auf zwei Spuren .............................................................................67
Löschen einer Aufnahme .................................................................................67
Löschen einer Spur............................................................................67
Löschen eines Stückes.......................................................................67
Kapitel 5. Weitere Funktionen......................................... 68
Anhören der internen Stücke .......................................................................... 52
Abspielen aller Klavierstücke ..........................................................52
Anwahl des Stückes, das Sie sich anhören möchten ....................52
Anhören der Demosongs................................................................................. 53
Abspielen einer Klangdemo.............................................................53
Anhören einer Funktionsdemo .......................................................53
Weiter führende Einstellungen (Funktionsmodus) .....................................68
Angleichen der Stimmung an ein anderes Instrument
(Gesamtstimmung)............................................................................68
Auswahl des Stimmungssystems ...................................................69
Andere Stimmungskurven (Stretch Tuning).................................69
Transponieren in Oktavschritten ....................................................70
Aktivieren des Dämpferpedals für die linke Hälfte.....................70
Einstellungen des “Grand Space”-Modus’ ....................................70
Verriegeln der Bedienelemente .......................................................................70
Laden der Werksvorgaben (Factory Reset) ...................................................71
Speichern der Einstellungen (Memory Backup)...........................................71
Speichern des aufgenommenen Stücks (Song Backup) ...............................71
Löschen eines gespeicherten Stücks ...............................................71
Verwendung der V-LINK-Funktion...............................................................72
Einstellen des USB-Treibers.............................................................................72
Kapitel 2. Und nun dürfen Sie spielen ............................54
Kapitel 6. Anbindung externer Geräte ........................... 73
Klanganwahl...................................................................................................... 54
Feine Korrekturen des Klavierklangs (Piano Resonance)........................... 54
Aktivieren des Klickens bei der Tastenfreigabe (Key Off) ..........54
Simulieren der Saitenresonanz (String Resonance)......................54
Resonanzsimulation für das Pedalspiel (Damper Resonance) ...55
Einstellen der Anschlagdynamik (Key Touch)............................................. 55
Notenverzögerung bei variierendem Anschlag
(Hammer Response)..........................................................................55
Den Klang mit ‘Tiefe’ versehen (Grand Space) ............................................ 56
Den Klang im Kopfhörer mit ‘Tiefe’ versehen (Grand Space) ................... 56
Den Klang ‘lebendiger’ machen (Dynamic Emphasis) ............................... 57
Verwendung der Digital-Effekte .................................................................... 57
Verwendung des Halleffekts (Reverb) ...........................................57
Verwendung des Chorus-Effekts (Chorus) ...................................57
Einstellen des Effektanteils ..............................................................57
Transponieren der Tastatur (“Transpose”-Funktion) ................................. 58
Hinzufügen eines komplementären Klangs zum Klavierklang
(Acoustic Layer) ................................................................................................ 58
Ändern der Balance im ‘Acoustic Layer’-Modus .........................59
Stapeln zweier Klänge (Dual-Modus)............................................................ 59
Lautstärkebalance im Dual-Modus (Dual Balance)......................59
Unterschiedliche Klänge für die linke/rechte Hand (Split-Modus) ......... 60
Ändern des Splitpunkts....................................................................60
Funktion des mittleren Pedals ........................................................................ 61
Verwendung des Metronoms ......................................................................... 61
Arbeiten mit dem Metronom...........................................................61
Ändern der Metronomlautstärke ....................................................61
Aufteilen der Klaviatur für vierhändiges Spiel (Twin-Modus) ................. 62
Verwendung externer Audiogeräte................................................................73
Verwendung des USB-Anschlusses................................................................73
Arbeiten mit MIDI-Geräten .............................................................................74
Einstellen der MIDI-Funktionen .....................................................................74
Einstellen des MIDI-Kanals .............................................................75
Ein-/Ausschalten der Local-Funktion............................................75
Ausgabe der Recorder-Daten über MIDI OUT .............................75
Kapitel 1. Abspielen der internen Stücke.......................52
46
Anhang .................................................................... 76
Fehlersuche ........................................................................................................76
Fehler- und andere Meldungen ......................................................................77
Speicherbare Einstellungen .............................................................................77
Übersicht der internen Funktionen ................................................................78
Technische Daten ..............................................................................................79
Tone List ......................................................................... 240
Built-in Song List ........................................................... 241
MIDI Implementation Chart.................................. 243
HP107_e.book Page 47 Tuesday, October 19, 2004 10:41 PM
Beschreibung der Bedienelemente
DEUTSCH
Beschreibung der Bedienelemente
Bedienfeld
6 7 8
3
15
17
18
21 22
19
20
23 24
4 5
9 10 11
16
25 26
27
DEUTSCH
2
12 13 14
Power On
1
1. [Power On]-Schalter
Hiermit schalten Sie das Instrument ein und aus (S. 51).
2. [Volume]-Regler
Hiermit wird die Lautstärke eingestellt (S. 51).
Hiermit regeln Sie die Klangfarbe (S. 51).
4. [Demo]-Taster
Dient zur Anwahl der Klang- und Funktions-Demosongs
des Instruments (S. 53).
5. [
(Kopfhörer)]-Diode
Diese Diode leuchtet, wenn Sie einen Kopfhörer an eine
der beiden Buchsen anschließen (S. 50).
6. [Transpose]-Taster
Hiermit transponieren Sie die Klaviatur (S. 58).
Hiermit kann die Klaviatur in zwei Hälften geteilt werden. Dann lassen sich zwei unterschiedliche Klänge spielen (S. 60). Wenn Sie diesen Taster gemeinsam mit [Chorus] gedrückt halten, haben Sie Zugriff auf weitere Funktionen (S. 68~S. 72, S. 74~S. 75).
8. [Chorus]-Taster
Hiermit schalten Sie den Chorus-Effekt ein/aus (S. 57).
9. [Grand Space]-Taster
Versieht den Klang mit einer gewissen “Tiefe” (S. 56,
S. 56).
Macht den Klang brillanter und lebendiger (S. 57).
11.[Reverb]-Taster
Hiermit schalten Sie den Halleffekt ein/aus (S. 57).
Piano Resonance
12.[Key Off]-Taster
Erzeugt das typische Geräusch, das bei der Tastenfreigabe auftritt (S. 54).
13.[String]-Taster
16.Tone-Taster
Mit diesen Tastern wählen Sie die Familie des Klangs,
den Sie spielen möchten (S. 54).
17.Anzeige
Das Display informiert Sie über die Einstellungen, darunter der aktuell gewählte Variationsklang, die Song-Nummer und das Tempo. Siehe obige Abbildung.
18.[Song/Tempo]-Taster
Hiermit wählten Sie die intern gespeicherten Stücke
(S. 52, S. 63).
Außerdem können Sie mit diesem Taster abwechselnd
die Tempoangabe und die Nummer des gewählten
Stücks (“S.” vor der Nummer) aufrufen. Wenn das
Tempo angezeigt wird, leuchtet die Diode grün. Andernfalls leuchtet sie rot.
19.[–] [+]-Taster
Hiermit stellen Sie Werte ein.
Drücken Sie [–] und [+] gemeinsam, um wieder den Vorgabewert der betreffenden Funktion zu wählen.
20.[Metronome/Count In]-Taster
Hiermit schalten Sie das Metronom ein/aus (S. 61).
Außerdem können Sie eine Einzählfunktion aktivieren,
um zeitgleich mit den internen Stücken beginnen zu können (S. 63).
TRACK
21.[Left]-Taster
Dient zur Anwahl des Parts, den Sie sich anhören oder
aufnehmen möchten (S. 64, S. 66~S. 67).
Diesem Taster ist die linke Hand der internen Stücke
zugeordnet. Diesen und den [Right]-Taster unten wollen
wir die “Spurtaster” nennen.
47
DEUTSCH
Hiermit aktivieren Sie eine Resonanzsimulation für die
gespielten Noten (S. 54).
Hiermit können Sie dem gewählten Klavierklang einen
passenden Zweitklang hinzufügen (S. 58).
DEUTSCH
10.[Dynamic Emphasis]-Taster
15.[Acoustic Layering]-Taster
DEUTSCH
7. [Split]-Taster
Hiermit kann die Resonanz des Pedalspiels simuliert
werden (S. 55).
DEUTSCH
3. [Brilliance]-Regler
14.[Damper]-Taster
HP107_e.book Page 48 Tuesday, October 19, 2004 10:41 PM
HP107e – Beschreibung der Bedienelemente
22.[Right]-Taster
KEY TOUCH
Dient zur Anwahl des Parts, den Sie sich anhören oder
aufnehmen möchten (S. 64, S. 66~S. 67). Diesem Taster ist
die rechte Hand der internen Stücke zugeordnet.
23.[Play]-Taster
Hiermit starten und stoppen Sie die Wiedergabe der
internen und selbst aufgenommenen Stücke (S. 52, S. 63).
Außerdem starten/stoppen Sie hiermit die Aufnahme
(S. 65~S. 67).
24.[Rec]-Taster
Hiermit aktivieren Sie die Aufnahmebereitschaft des
HP107e (S. 65~S. 67).
25.[Touch]-Taster
Hiermit ändern Sie die Anschlagdynamik (S. 55).
26.[Hammer]-Taster
Hiermit stellen Sie ein, wie stark sich die Verzögerung
zwischen dem Anschlagen einer Taste und der Ausgabe
der entsprechenden Note nach dem Anschlag richtet
(S. 55).
27.[Center Pedal]-Taster
Hiermit können Sie die Funktion des mittleren Pedals
wählen (S. 61).
Bedienfeld
Rückseite
Unterseite
Rückseite
28.Pedal-Buchse
Schließen Sie hier das Kabel der Pedaleinheit an (S. 49).
28
29
30
29.Input-Buchsen
Hier können die Audio-Ausgänge eines anderen Gerätes
angeschlossen werden. Dessen Signal wird dann ebenfalls über die Lautsprecher des HP107e ausgegeben
(S. 73).
30.Output-Buchsen
Bei Bedarf können Sie diese Buchsen mit den Eingängen
eines Leistungsverstärkers, Mischpultes, Kassettendecks
usw. verbinden. Einen externen Verstärker brauchen Sie
nur, wenn Sie das Instrument in einem Saal o.ä. verwenden möchten (S. 73).
Unterseite
31.Kopfhörerbuchsen
Hier können Sie einen oder zwei Kopfhörer anschließen
(S. 50).
32.MIDI Out/In-Buchsen
31
32
33
Schließen Sie hier andere MIDI-kompatible Instrumente
an (S. 74).
33.USB-Buchse
Diese kann mit einem Computer verbunden werden und
erlaubt also den Datenaustausch (S. 73).
48
HP107_e.book Page 49 Tuesday, October 19, 2004 10:41 PM
Vorbereitung
DEUTSCH
Vorbereitung
Anschließen des Pedalkabels
Schließen Sie das Pedalkabel an die Pedal-Buchse
auf der Rückseite des HP107e an.
Anschließen des Netzkabels
1. Verbinden Sie den kleineren Stecker des beiliegenden Netzkabels mit dem Netzanschluss an der
Unterseite des HP107e.
Anm.
Verwenden Sie ausschließlich das beiliegende Netzkabel.
DEUTSCH
2. Verbinden Sie den größeren Stecker des Netzkabels mit einer Steckdose.
Anschließen des
Lautsprecherkabels
DEUTSCH
Verbinden Sie das Kabel des Lautsprecherkastens
(am Ständer) wie gezeigt mit der Lautsprecherbuchse des HP107e.
Verwendung des
Notenständers
Schieben Sie den Stecker so weit, bis er festklickt.
1. Halten Sie den Notenständer mit beiden Händen
fest, während Sie ihn zu sich hinziehen, um ihn
hochzuklappen.
Lautsprecheranschluss
Klemmstecker
Anm.
Stellen Sie niemals Flüssigkeitsbehälter (Vasen usw.) auf
das Instrument. Vermeiden Sie außerdem die Verwendung von Insektensprays, Parfüm, Alkohol, Nagellack,
Spraydosen usw. in unmittelbarer Nähe des Geräts.
Die Lautsprecher dieses Pianos befinden sich unter der
Deckplatte und sind nach oben gedreht. Vermeiden Sie
daher, dass Flüssigkeiten auf die Lautsprecher tropfen.
Lautsprecher
Für die Neigung des Notenständers stehen drei Positionen zur Verfügung.
1
2
DEUTSCH
Lautsprecherkabel
2. Arretieren Sie den Notenständer mit der Stützklemme.
■ Hinunterklappen des Notenständers
■ Verwendung der Klemmen
DEUTSCH
Heben Sie die Stützklemme an der Rückseite des
Notenständers hoch und senken Sie den Notenständer ab.
Bei Bedarf können Sie die Klemmen zum Halten der
Notenblätter verwenden. Wenn Sie die Klemmen nicht
brauchen, klappen Sie sie am besten wieder hinunter.
DEUTSCH
49
HP107_e.book Page 50 Tuesday, October 19, 2004 10:41 PM
HP107e – Vorbereitung
■ Entfernen des Notenständers
Der Notenständer kann auch abgenommen werden.
Dann können Sie einen Laptop o.ä. auf das Instrument
stellen.
Schließen Sie einen Kopfhörer an eine der beiden
Buchsen links unter dem Instrument an.
Kopfhörerbuchse x2
Klappen Sie den Notenständer zuerst hoch und
lösen Sie dann die drei Schrauben.
Die Schrauben können mit einer Geldmünze gelöst werden.
Wenn mindestens ein Kopfhörer angeschlossen ist, leuchtet die [ ]-Diode (S. 47) und die Lautsprecher des
HP107e werden stummgeschaltet.
Anm.
Bewahren Sie die Schrauben an einem sicheren Ort auf,
um sie nicht zu verlieren und zu verhindern, dass Kleinkinder sie verschlucken.
Öffnen/Schließen des
Tastaturdeckels
Um den Tastaturdeckel zu öffnen, müssen Sie ihn
mit beiden Händen leicht anheben und zur Rückseite des Instruments schieben.
Um ihn zu schließen, heben Sie sie leicht an und
ziehen sie zu sich hin.
Anm.
Anm.
Seien Sie beim Öffnen/Schließen des Deckels vorsichtig,
damit Sie sich nicht die Finger klemmen. Kinder sollten
den Tastaturdeckel des HP107e nur unter Aufsicht eines
Erwachsenen öffnen und schließen.
Schließen Sie den Tastaturdeckel vor dem Transport des
Instruments, um Verletzungen zu vermeiden.
Anschließen eines
Kopfhörers
Die Lautstärke im Kopfhörer kann mit dem [Volume]Regler des HP107e eingestellt werden (S. 51).
Anm. Verwenden Sie nach Möglichkeit einen Stereokopfhörer.
Am besten entscheiden Sie sich für einen Kopfhörer von
Roland. Kopfhörer anderer Hersteller sind u.U. viel zu
leise.
Anmerkungen zur Verwendung von
Kopfhörern
• Um das Anschlusskabel des Kopfhörers weder zu dehnen
noch zu beschädigen, dürfen Sie nur den Kopfhörer anfassen.
• Wenn Sie den Kopfhörer anschließen, während die Lautstärke sehr hoch eingestellt ist, könnte der Kopfhörer
beschädigt werden. Am besten stellen Sie die Lautstärke des
HP107e vorher auf den Mindestwert.
• Überhaupt sollten Sie die Lautstärke immer in erträglichen
Grenzen halten, weil Sie sonst nicht nur den Kopfhörer
beschädigen, sondern sich auch einen Hörschaden zuziehen
können.
■ Verwendung des Kopfhörerhakens
Bei Nichtbenutzung können Sie Ihren Kopfhörer an den
dafür vorgesehenen Haken links unter der HP107e-Tastatur hängen.
Anbringen des Kopfhörerhakens
Schieben Sie den beiliegenden Kopfhörerhaken mit einer
Drehbewegung in die Bohrung an der Unterseite des
HP107e (siehe die Abbildung). Arretieren Sie ihn
anschließend mit der Flügelmutter.
Ihr HP107e ist mit zwei Kopfhörerbuchsen versehen. Es können also zwei Kopfhörer angeschlossen werden, was z.B. für
den Unterricht oder zum Spielen vierhändiger Stücke notwendig ist. Außerdem stören Sie bei Verwendung eines
Kopfhörers niemanden.
Flügelmutter
Kopfhörerhaken
50
HP107_e.book Page 51 Tuesday, October 19, 2004 10:41 PM
Vorbereitung
Über die Pedale
Nach Herstellen aller notwendigen Verbindungen müssen
Sie die Geräte in der richtigen Reihenfolge einschalten. Wenn
Sie eine andere als die hier erwähnte Reihenfolge wählen,
werden u.U. die Lautsprecher und/oder der Verstärker
beschädigt.
Die Pedale haben –zumal beim Spielen von Klavierklängen–
folgende Funktionen:
Vor dem Einschalten müssen Sie den [Volume]Regler auf den Mindestwert stellen. Drücken Sie
anschließend den [Power On]-Schalter.
Leisepedal
Dämpferpedal
Sostenutopedal
Verwenden Sie dieses Pedal, um die gespielten Noten
länger zu halten.
Dieses Pedal arbeitet stufenlos, d.h. über die Pedalposition kann die Haltedauer der Noten exakt dosiert werden.
Netzanzeige
Das HP107e wird eingeschaltet und die Diode vorne links
leuchtet.
Vor dem Ausschalten müssen Sie den [Volume]Regler auf den Mindestwert stellen. Drücken Sie
anschließend den [Power On]-Schalter.
Lautstärke und Klangfarbe
Stellen Sie mit dem [Volume]-Regler die allgemeine Lautstärke ein.
Mit dem [Brilliance]-Regler können Sie die Klangfarbe (brillant/rund) einstellen.
Max
Mellow
Leisepedal (links)
Mit diesem Pedal können Sie die Lautstärke der gespielten Noten verringern.
Da auch dieses Pedal stufenlos arbeitet, können Sie die
Lautstärkeverringerung ebenfalls exakt dosieren.
Über die Einstellschraube
Nach dem Transport des Instruments muss die Einstellschraube in der Regel nachjustiert werden.
❍ Drehen Sie die Einstellschraube so weit heraus, bis sie
den Boden berührt. Berührt sie den Boden nämlich nicht,
so werden u.U. nicht alle Pedalbewegungen ausgewertet.
Vor allem bei einem dicken Teppich ist darauf zu achten,
dass die Einstellschraube fest gegen den Untergrund
drückt.
DEUTSCH
Min
Wenn Sie das Sostenutopedal betätigen, werden nur die
zu dem Zeitpunkt gespielten Noten gehalten.
Diesem Pedal kann man auch eine andere Funktion
zuordnen (S. 61).
DEUTSCH
Das HP107e wird ausgeschaltet und die Diode vorne
links erlischt.
Anm. Um auch die Stromzufuhr zu unterbinden, müssen Sie
nach Drücken des POWER-Schalters den Netzanschluss
lösen. Siehe “Stromversorgung” (S. 44).
Sostenutopedal (Mitte)
DEUTSCH
Nach ein paar Sekunden hören Sie die auf der Klaviatur
gespielten Noten. Stellen Sie mit dem [Volume]-Regler
die gewünschte Lautstärke ein.
Anm. Das Gerät ist mit einer Schutzschaltung versehen.
Daher dauert es nach dem Einschalten ein paar Sekunden, bevor Sie etwas hören.
Bei einem akustischen Klavier schwingen bei Betätigen
dieses Pedals auch andere Saiten mit jenen der gespielten
Noten mit. Dadurch wird der Klang voller. Das
Dämpferpedal des HP107e simuliert dieses Phänomen,
das man “Saitenresonanz-Simulation” nennt.
Der Resonanzanteil ist einstellbar (S. 55).
DEUTSCH
Dämpferpedal (rechts)
Power On
DEUTSCH
Ein- und Ausschalten
Bright
Einstellschraube
DEUTSCH
51
HP107_e.book Page 52 Tuesday, October 19, 2004 10:41 PM
HP107e – Kapitel 1. Abspielen der internen Stücke
Kapitel 1. Abspielen der internen Stücke
Anhören der internen Stücke
■ Anwahl des Stückes, das Sie sich anhören
möchten
Das HP107e enthält 68 Klavierstücke.
“Kapitel 3. Spielen zu den internen Stücken” auf S. 63,
“Tone List” (S. 240)
■ Abspielen aller Klavierstücke
Bei Bedarf können alle internen Stücke der Reihe nach
abgespielt werden.
1 3, 4
2
Display-Anzeige bei Anwahl der internen Stücke
12
USr (“User”) … Dieser Speicher enthält Ihre eigene
Aufnahme (Hinweise zur Aufnahme → S. 65).
S.1~S.68 … Interne Stücke
S. U … Das selbst gespeicherte Stück (S. 71)
Anwahl des Stückes
1. Drücken Sie den [Song/Tempo]- und [Play]-Taster
gleichzeitig.
Die Diode des [Song/Tempo]-Tasters leuchtet und die
Diode des [Play]-Tasters blinkt. Die Wiedergabe beginnt
ab dem zuletzt gewählten Stück.
1. Drücken Sie den [Song/Tempo]-Taster (Diode
muss rot leuchten).
Im Display wird kurz die Nummer des aktuell gewählten
Stücks angezeigt.
Im Display wird kurz die Nummer des aktuell gewählten
Stücks angezeigt.
2. Wählen Sie mit [–] oder [+] ein Stück.
Mit dem [–]- oder [+]-Taster können Sie ein anderes Stück
wählen.
Am Ende des letzten Stücks kehrt das Instrument zurück
zum ersten und setzt die Wiedergabe fort.
Bei Bedarf können Sie diese Taster gedrückt halten, um
schneller ein weiter entferntes Stück zu wählen.
Selbst gespeicherte Stücke können folgendermaßen gewählt werden:
1
Drücken Sie den [–]- und [+]-Taster gemeinsam, um “USr” zu wählen.
2
Wählen Sie mit dem [–]-Taster “S. U”.
Anhalten der Wiedergabe
2. Drücken Sie den [Play]-Taster.
Die Wiedergabe hält an.
Starten der Wiedergabe
3. Drücken Sie den [Play]-Taster.
Dessen Diode leuchtet und die Wiedergabe des gewählten
Stücks beginnt.
Anhalten der Wiedergabe
4. Drücken Sie den [Play]-Taster.
Die Diode dieses Tasters erlischt und die Wiedergabe hält
an. Wenn Sie den [Play]-Taster danach erneut drücken,
wird die Wiedergabe ab Beginn des zuletzt erreichten Stückes fortgesetzt.
52
HP107_e.book Page 53 Tuesday, October 19, 2004 10:41 PM
Kapitel 1. Abspielen der internen Stücke
Es stehen mehrere Demosongs zur Verfügung, darunter Stücke, welche die verfügbaren Klänge (“Tones”) vorführen
sowie Demos der Klavierfunktionen.
Bei Drücken eines dieser Taster beginnt der entsprechende
Demosong. Die Wirkung wird anhand eines A/B-Vergleichs (Wiedergabe mit und ohne Effekt) veranschaulicht.
DEUTSCH
Anhören der Demosongs
■ Abspielen einer Klangdemo
1. Drücken Sie den [Demo]-Taster.
Die Diode des Tasters blinkt und die Wiedergabe der
Funktionsdemos beginnt.
Durch erneutes Betätigen des Tasters, den Sie in Schritt
2 gedrückt haben, können Sie den Effekt abwechselnd
ein- und ausschalten.
Am Ende des letzten Stücks kehrt das Instrument zurück
zum ersten und setzt die Wiedergabe fort.
Wenn Sie bei blinkendem [Demo]-Taster einen Tone-Taster betätigen, wird sofort die dazugehörige Demo abgespielt.
Klangdemotaster
Demo
Vorführung der Klavierklänge
[E. Piano]
Vorführung der E. Piano-Klänge
[Harpsichord]
Cembalodemo
[Organ]
Orgeldemo
[Strings]
Streicherdemo
[Acoustic Layering]
Demosongs, welche die “Acoustic Layer”Funktion veranschaulichen (S. 58)
[Split]
Demosongs, welche die “Split”-Funktion
veranschaulichen (S. 60)
Spielen Sie jeweils ein paar Noten, um sich mit der
Hammersimulation vertraut zu machen.
Wenn die Hammeransprache aktiv ist, werden die
Noten bei zunehmend leichterem Anschlag immer träger wiedergegeben.
Anhand der Hammer-Demo können Sie sehr leicht
ermitteln, wie sich die Funktion auf die Ansprache auswirkt.
DEUTSCH
[Piano]
Bei Anwahl der Hammer-Demo hält die Wiedergabe
an. Die Hammeransprache kann dann durch wiederholtes Drücken des Key Touch [Hammer]-Tasters abwechselnd ein- und ausgeschaltet werden.
DEUTSCH
Über die Vorführung der Hammeransprache
Anhalten der Funktionsdemos
3. Drücken Sie den [Demo]-Taster.
Die Diode des [Demo]-Tasters erlischt und die Wiedergabe hält an.
DEUTSCH
Anhalten der Klangdemos
2. Drücken Sie den [Demo]-Taster.
Die Diode des [Demo]-Tasters erlischt und die Wiedergabe hält an.
■ Anhören einer Funktionsdemo
Diese Stücke veranschaulichen die Spezialfunktionen für
Klavierklänge.
1. Drücken Sie den [Demo]-Taster.
DEUTSCH
Die Diode des Tasters blinkt und die Wiedergabe der
Funktionsdemos beginnt.
2. Drücken Sie einen der folgenden Taster.
Taster mit Funktionsdemo
Demo
Vorführung des “Grand
Space”-Effekts
S. 56
[Dynamic Emphasis]
Vorführung des “Dynamic Emphasis”-Effekts
S. 57
Piano Resonance [Key Off]
Vorführung der “Key
Off”-Funktion
S. 54
Piano Resonance [String]
Saitenresonanz-Demo
S. 54
Piano Resonance [Damper]
Dämpferresonanz-Demo
S. 55
Key Touch [Hammer]
Vorführung der Hammeransprache
S. 55
DEUTSCH
[Grand Space]
53
HP107_e.book Page 54 Tuesday, October 19, 2004 10:41 PM
HP107e – Kapitel 2. Und nun dürfen Sie spielen
Kapitel 2. Und nun dürfen Sie spielen
Klanganwahl
Das HP107e enthält 36 Klänge (“Tones”). Diese sind in fünf
Gruppen unterteilt, die man mit den Tone-Tastern wählt.
Anwahl der Klanggruppe
1. Drücken Sie einen Tone-Taster
Die Diode des gedrückten Tasters leuchtet.
Spielen Sie auf der Klaviatur, um den so gewählten Klang
zu beurteilen.
Anwahl eines Variationsklangs
2. Drücken Sie den [–]- oder [+]-Taster.
1
2
Im Display wird kurz die aktuell gewählte Klangvariation
angezeigt.
Siehe auch “Tone List” (S. 240).
Spielen Sie auf der Tastatur, um die gewählte Variation zu
beurteilen.
Feine Korrekturen des Klavierklangs (Piano Resonance)
Bei Bedarf können Sie die Klangfarbe der Klavierklänge noch weiter Ihren Bedürfnissen anpassen.
■ Aktivieren des Klickens bei der Tastenfreigabe (Key Off)
Wenn Sie möchten, erklingt bei Freigabe jeweils jenes Klicken, das auch auf einem akustischen Klavier auftritt.
Diese Funktion nennen wir “Key Off”.
Die Einstellung kann mit der “Backup”-Funktion des
HP107e gespeichert werden (S. 71).
1. Drücken Sie den Piano Resonance [Key Off]-Taster (Diode muss leuchten).
Nun hören Sie beim Loslassen der Tasten jenes typische
Geräusch.
Drücken Sie den Piano Resonance [Key Off]-Taster noch
einmal, um den Effekt wieder auszuschalten (die Diode
erlischt).
In der “Tone List” (S. 240) erfahren Sie, für welche
Klänge diese Funktion belegt ist.
Lautstärke des ‘Key Off’-Geräuschs
2. Halten Sie den Piano Resonance [Key Off]-Taster
gedrückt, während Sie den [–]- oder [+]-Taster
betätigen.
Die Lautstärke des “Key Off”-Klickens kann in zehn Stufen eingestellt werden.
Je größer der Wert, desto lauter ist der Effekt.
■ Simulieren der Saitenresonanz
(String Resonance)
Beim Spielen einer Note, während andere Tasten noch
gedrückt sind, entstehen auf einem akustischen Instrument spezifische Schwingungen, die von der Saitenresonanz-Simulation perfekt wiedergegeben werden.
Anm. Diese Funktion ist nur für Klavierklänge belegt. Für
andere Klänge ist sie nicht belegt.
1. Drücken Sie den Piano Resonance [Sting]-Taster
(Diode muss leuchten).
Die Saitenresonanz-Simulation ist nun aktiv. Drücken Sie
den Piano Resonance [String]-Taster noch einmal, um den
Effekt wieder auszuschalten (die Diode erlischt).
Die Einstellung kann mit der “Backup”-Funktion des
HP107e gespeichert werden (S. 71).
54
HP107_e.book Page 55 Tuesday, October 19, 2004 10:41 PM
Kapitel 2. Und nun dürfen Sie spielen
2. Halten Sie den Piano Resonance [String]-Taster
gedrückt, während Sie den [–]- oder [+]-Taster
betätigen.
Die Resonanzintensität (Lautstärke) kann in zehn Stufen
eingestellt werden.
Je größer der Wert, desto lauter wird der Resonanzeffekt.
■ Resonanzsimulation für das Pedalspiel (Damper Resonance)
Bei einem akustischen Klavier schwingen bei Betätigen
des Dämpferpedals auch andere Saiten mit jenen der
gespielten Noten mit. Dadurch wird der Klang voller. Das
Dämpferpedal des HP107e simuliert dieses Phänomen,
das man “Saitenresonanz-Simulation” nennt.
Anm. Diese Funktion ist nur für Klavierklänge belegt. Für
andere Klänge ist sie nicht belegt.
Die Dämpferresonanz-Simulation ist nun aktiv.
Drücken Sie den Piano Resonance [Damper]-Taster noch
einmal, um den Effekt wieder auszuschalten (die Diode
erlischt).
Die Einstellung kann mit der “Backup”-Funktion des
HP107e gespeichert werden (S. 71).
Ändern der Resonanzintensität
Alle Dioden aus. Fest. Ihre Anschlagtechnik ist unerheblich, weil alle Noten gleich laut wiedergegeben werden
und auch dieselbe Klangfarbe aufweisen.
■ Notenverzögerung bei variierendem
Anschlag (Hammer Response)
Mit dieser Funktion können Sie einstellen, inwiefern man
über den Anschlag bestimmen kann, wann die gespielten
Noten ausgegeben werden. Diese Funktion heißt “Hammer Response”.
Die Einstellung kann mit der “Backup”-Funktion des
HP107e gespeichert werden (S. 71).
Auf einem akustischen Klavier bewegt sich beim Spielen
einer Note ein Hammer und schlägt die entsprechenden
Saiten an. Je leichter man eine Taste anschlägt, desto langsamer trifft der Hammer auf die Saiten – es entsteht also
eine Verzögerung zwischen dem Drücken der Taste und
dem Erklingen der Note.
Mit der Hammeransprache kann dieser Effekt simuliert
werden. Bedenken Sie aber, dass dieser Effekt nur bei
leicht angeschlagenen Tasten zum Tragen kommt.
Es stehen zehn Resonanzpegel zur Wahl.
Je größer der Wert, desto auffälliger wird der Effekt.
Einstellen der Anschlagdynamik (Key Touch)
Bei Bedarf kann die Anschlagdynamik -eigentlich: die
Ansprache der Klaviatur- geändert werden.
1
“Medium” leuchtet. Normale Verzögerung bei leicht
angeschlagenen Noten.
Die Einstellung kann mit der “Backup”-Funktion des
HP107e gespeichert werden (S. 71).
DEUTSCH
1. Aktivieren Sie mit dem Key Touch [Hammer]-Taster die gewünschte Diode.
“Light” leuchtet. Geringe Verzögerung bei leicht angeschlagenen Noten.
1
DEUTSCH
2. Halten Sie den Piano Resonance [Damper]-Taster
gedrückt, während Sie den [–]- oder [+]-Taster
betätigen.
“Heavy” leuchtet. Um besonders laute Noten (“Fortissimo” oder “ff”) zu spielen, muss man viel härter anschlagen als sonst. Das erweckt den Eindruck einer “schwer
gängigen” Klaviatur. Allerdings verfügen Sie dann über
den größten Dynamikumfang, so dass sich jede Note viel
genauer dosieren lässt.
DEUTSCH
1. Halten Sie den Piano Resonance [Damper]-Taster
gedrückt (Diode muss leuchten).
“Medium” leuchtet. Diese Einstellung vertritt das
Anschlagverhalten, das jenem eines akustischen Klaviers
am ähnlichsten ist.
DEUTSCH
Der bei Betätigen des Dämpferpedals hinzugefügte Resonanzanteil ist einstellbar.
“Light” leuchtet. Bereits mit einem relativ leichten
Anschlag können Fortissimo-Noten erzielt werden. Das
erweckt den Eindruck eines geringeren Tastenwiderstandes. Diese Einstellung ist vor allem für Kinder gedacht.
DEUTSCH
Ändern der Resonanzintensität
“Heavy” leuchtet. Starke Verzögerung bei leicht angeschlagenen Noten.
Alle Dioden aus. Die Hammeransprache wird nicht simuliert. Alle Noten werden ohne Verzögerung ausgegeben
(die Anschlagstärke hat darauf also keinen Einfluss).
DEUTSCH
1. Drücken Sie den Key Touch [Touch]-Taster.
Bei wiederholtem Drücken des Key Touch [Touch]-Tasters leuchtet jeweils eine andere Diode. So wissen Sie, welche Anschlagdynamik gewählt ist.
55
HP107_e.book Page 56 Tuesday, October 19, 2004 10:41 PM
HP107e – Kapitel 2. Und nun dürfen Sie spielen
Den Klang mit ‘Tiefe’
versehen (Grand Space)
Das HP107e verfügt über eine so genannte “Grand Space”Funktion. Damit erzielen Sie eine “Tiefe”, die jener eines Flügels entspricht. Diese Funktion simuliert den natürlichen
Hall und die Klangfülle eines akustischen Flügels.
1
2
Die Einstellung kann mit der “Backup”-Funktion des
HP107e gespeichert werden (S. 71).
1. Drücken Sie den [Grand Space]-Taster (Diode
muss leuchten).
Die “Grand Space”-Funktion wird aktiviert und reichert
den Klavierklang an.
Wählen Sie für den Kopfhörerbetrieb die “Grand Space”Einstellung “1” (S. 70). Dann erfolgt nämlich eine automatische Optimierung der Effektintensität für den Kopfhörer, sobald Sie einen anschließen. Solange kein Kopfhörer angeschlossen ist, wird hingegen die Lautsprecherausgabe optimiert.
2. Halten Sie den [Grand Space]-Taster gedrückt,
während Sie den [–]- oder [+]-Taster betätigen.
Die “Klangtiefe” kann in vier Stufen geändert werden.
Je höher der Wert, desto räumlicher wird der Klang.
Den Klang im Kopfhörer mit
‘Tiefe’ versehen
(Grand Space)
Die “Grand Space”-Funktion kann auch das Kopfhörersignal aufwerten. Diese Funktion simuliert den natürlichen Hall
und die Klangfülle eines Flügels.
1
2
Die Einstellung kann mit der “Backup”-Funktion des
HP107e gespeichert werden (S. 71).
1. Drücken Sie den [Grand Space]-Taster (Diode
muss leuchten).
Die “Grand Space”-Funktion wird aktiviert und reichert
den Klavierklang an.
Wählen Sie für den Kopfhörerbetrieb die “Grand Space”Einstellung “1” (S. 70). Dann erfolgt nämlich eine automatische Optimierung der Effektintensität für den Kopfhörer, sobald Sie einen anschließen. Solange kein Kopfhörer angeschlossen ist, wird hingegen die Lautsprecherausgabe optimiert.
2. Halten Sie den [Grand Space]-Taster gedrückt,
während Sie den [–]- oder [+]-Taster betätigen.
Die “Klangtiefe” kann in vier Stufen geändert werden.
Je höher der Wert, desto räumlicher wird der Klang.
3. Drücken den [Grand Space]-Taster erneut (die
Diode erlischt), um die gleichnamige Funktion
wieder auszuschalten.
3. Drücken den [Grand Space]-Taster erneut (die
Diode erlischt), um die gleichnamige Funktion
wieder auszuschalten.
Die [ ]-Diode leuchtet, wenn Sie einen Kopfhörer
anschließen.
56
HP107_e.book Page 57 Tuesday, October 19, 2004 10:41 PM
Kapitel 2. Und nun dürfen Sie spielen
DEUTSCH
Den Klang ‘lebendiger’
machen (Dynamic Emphasis)
Verwendung der DigitalEffekte
Hiermit sorgen Sie dafür, dass der Klangeindruck noch
transparenter und lebendiger wirkt.
1
3
Die Einstellung kann mit der “Backup”-Funktion des
HP107e gespeichert werden (S. 71).
1. Drücken Sie den [Dynamic Emphasis]-Taster
(Diode muss leuchten).
2. Drücken Sie den [Dynamic Emphasis]-Taster
erneut (die Diode erlischt), um diese Funktion
wieder auszuschalten.
Ändern der “Dynamic Emphasis”-Einstellung
3. Halten Sie den [Dynamic Emphasis]-Taster
gedrückt, während Sie den [–]- oder [+]-Taster
betätigen.
Beschreibung
1
Der Bass und die Höhen werden angehoben.
2
Akkorde in tieferen Lagen klingen klar und
transparent.
3
Der Bassbereich wird angehoben.
Dessen Diode leuchtet und der Klang wird mit Hall versehen.
Drücken Sie den [Reverb]-Taster noch einmal, um den
Hall wieder auszuschalten (Diode erlischt).
Der Status (an/aus) des Halleffekts und der Effektanteil
können mit der “Backup”-Funktion des HP107e gespeichert werden (S. 71).
■ Verwendung des Chorus-Effekts (Chorus)
Der Chorus-Effekt erzeugt einen volleren Klang mit einem
ausgesprochenen “Stereo-Charakter”, der sich besonders
für Popmusik eignet.
1. Drücken Sie den [Chorus]-Taster.
Dessen Diode leuchtet und der Klang wird mit Chorus
versehen.
Drücken Sie den [Chorus]-Taster noch einmal, um den
Effekt wieder auszuschalten (Diode erlischt).
Der Status und Pegel des Chorus-Effekts werden für
jeden Klangwahltaster separat gepuffert. Bei Ausschalten des Instruments werden allerdings wieder die Vorgaben geladen.
DEUTSCH
Diode
1. Drücken Sie den [Reverb]-Taster.
DEUTSCH
Die “Dynamic Emphasis”-Funktion wird aktiviert und
der Klang erscheint lebendiger.
Der Reverb-Effekt versieht den Klang mit Rauminformationen und erweckt so den Eindruck, dass man in einem
Konzertsaal spielt.
DEUTSCH
■ Verwendung des Halleffekts (Reverb)
■ Einstellen des Effektanteils
Der Hall- und Chorus-Anteil (Lautstärke des Halls bzw.
Chorus-Effekts) sind in zehn Stufen einstellbar.
Ab Werk verwenden der Hall- und Chorus-Effekt die
Einstellung “5”.
DEUTSCH
Ändern des Hallanteils
1. Halten Sie den [Reverb]-Taster gedrückt, während
Sie den [–]- oder [+]-Taster betätigen.
Im Display erscheint der aktuelle Wert. Je größer der Wert,
desto lauter ist der Effekt.
Anm. Die Einstellungen des Reverb-Effekts gelten jeweils für
alle Klänge.
Im Display erscheint der aktuelle Wert. Je größer der Wert,
desto lauter ist der Effekt.
57
DEUTSCH
Ändern des Chorus-Anteils
1. Halten Sie den [Chorus]-Taster gedrückt, während
Sie den [–]- oder [+]-Taster betätigen.
HP107_e.book Page 58 Tuesday, October 19, 2004 10:41 PM
HP107e – Kapitel 2. Und nun dürfen Sie spielen
Transponieren der Tastatur
(“Transpose”-Funktion)
Ihre Musik kann in einer anderen Tonart wiedergegeben
werden als jener, in der Sie spielen. Beispiel: Stücke in einer
schwierigen Tonart, d.h. mit vielen Kreuzen (#) oder Bs (b)
können mit dem Fingersatz einer einfacheren Tonart gespielt
werden.
Hinzufügen eines komplementären Klangs zum
Klavierklang (Acoustic Layer)
Das HP107e bietet eine Funktion, mit der man blitzschnell
Klangfarben wählen kann, die besonders gut zum aktiven
Klavierklang passen. Diese Funktion heißt “Acoustic Layer”.
Das ist z.B. praktisch, wenn Sie ein Stück in einer bestimmten
Tonart einstudiert haben und es nun in einer anderen spielen
müssen: stellen die entsprechende Transposition ein – und
schon kann’s losgehen.
1
2
Der hinzugefügte Klang kann in Oktavschritten transponiert werden (S. 70).
1
Wählen Sie zunächst einen Klavierklang (S. 54).
1. Halten Sie den [Transpose]-Taster gedrückt, während Sie die Taste betätigen, die dem Grundton
der gewünschten Tonart entspricht.
Dessen Diode leuchtet und die Tastatur wird transponiert.
Solange Sie den [Transpose]-Taster gedrückt halten,
wird der aktuelle Wert angezeigt.
Bei Bedarf können Sie die Tastatur auch transponieren,
indem Sie den [Transpose]-Taster gedrückt halten, während Sie den [–]- oder [+]-Taster betätigen.
Halten Sie den [Transpose]-Taster gedrückt, während Sie
[–] und [+] gleichzeitig betätigen, um wieder die Vorgabe
(“0”= keine Transposition) zu wählen.
Der Einstellbereich für die Transposition lautet –6~0~5
Halbtöne.
Beispiel: Wenn Sie bei Drücken einer “C”-Taste jeweils
eine “E”-Note hören möchten, müssen Sie den [Transpose]-Taster gedrückt halten und eine “E”-Taste betätigen.
Da sich das “E” vier (weiße und schwarze) Tasten weiter
rechts befindet, erscheint im Display dann der Wert “4”.
Wenn Sie C, E, G
spielen…
…hören Sie
E, G#, B.
Wenn der Transpose-Wert “0” lautet, leuchtet die Diode
des [Transpose]-Tasters selbst dann nicht, wenn Sie ihn
einzuschalten versuchen.
Um die Transposition wieder auszuschalten, müssen Sie
den [Transpose]-Taster noch einmal drücken (seine Diode
erlischt dann wieder).
Drücken Sie den [Transpose]-Taster erneut, um wieder
das zuletzt gewählte Transpositionsintervall aufzurufen.
Beim Ausschalten wird wieder “0” eingestellt.
58
1. Drücken Sie den [Acoustic Layering]-Taster
(Diode muss leuchten).
Alle gespielten Noten werden nun von zwei Klängen wiedergegeben.
Es gibt auch eine Kombinationsfunktion für andere
Klänge als Klavier: Drücken Sie zuerst einen Klangwahltaster und wählen Sie anschließend den “Grundklang”.
Wahl des Zusatzklangs
2. Wählen Sie mit dem [–]- oder [+]-Taster den
Zusatzklang.
Im Display wird kurz die Klangnummer angezeigt.
Die Nummer des Zusatzklangs ist mit der Kennzeichnung
“L.” versehen.
Wenn Sie dem mittleren Pedal die “Layer”-Funktion
zuordnen, wird die “Acoustic Layer”-Funktion automatisch aktiviert (S. 58). Dann können Sie die Lautstärke
des Zusatzklangs mit dem mittleren Pedal einstellen.
Alle gespielten Noten werden nun von zwei Klängen
(dem Klavier- und dem gewählten Zusatzklang) wiedergegeben.
HP107_e.book Page 59 Tuesday, October 19, 2004 10:41 PM
Kapitel 2. Und nun dürfen Sie spielen
Der “Acoustic Layer”-Modus bietet eine Funktion, mit der
man die Balance zwischen dem Haupt- und Zusatzklang
einstellen kann.
Wenn Sie die “Acoustic Layer”-Balance ändern, wird
auch der Dual-Balancewert (S. 59) anders eingestellt.
■ Lautstärkebalance im Dual-Modus
(Dual Balance)
Bei Bedarf können Sie das Lautstärkeverhältnis der beiden
im Dual-Modus gespielten Klänge ändern.
DEUTSCH
■ Ändern der Balance im ‘Acoustic Layer’Modus
1. Halten Sie den [Acoustic Layering]-Taster
gedrückt, während Sie den [–]- oder [+]-Taster
betätigen.
Um wieder die zuvor verwendete Balance zu wählen,
müssen Sie den [–]- und [+]-Taster gleichzeitig drücken.
1
2
Die Einstellung kann mit der “Backup”-Funktion des
HP107e gespeichert werden (S. 71).
DEUTSCH
Das Lautstärkeverhältnis ändert sich.
1. Halten Sie den [Transpose]-Taster gedrückt, während Sie den [Split]-Taster betätigen.
Lautstärke des Klavierklangs
Lautstärke des Zusatzklangs
Bei Bedarf können Sie zwei Klänge gleichzeitig spielen. Der
betreffende Modus heißt “Dual”. Den hinzugefügten Klang
kann man mit den Tone-Tastern wählen.
2. Zum Ändern eines Wertes verwenden Sie die [–]-/
[+]-Taster.
Das Lautstärkeverhältnis ändert sich.
Sie können die Balance auch ändern, indem Sie den
[Acoustic Layering]-Taster gedrückt halten, während Sie
den [+]- oder [–]-Taster betätigen.
DEUTSCH
Stapeln zweier Klänge
(Dual-Modus)
Die Dioden dieser beiden Taster fangen an zu blinken.
Im Display wird die aktuelle Balance angezeigt:
Um wieder die zuvor verwendete Balance zu wählen,
müssen Sie den [–]- und [+]-Taster gleichzeitig drücken.
1. Drücken Sie die Taster der beiden benötigten
Klänge gleichzeitig.
Die Diode des gedrückten Tasters leuchtet.
Um den Dual-Modus wieder auszuschalten, müssen Sie
einen beliebigen Klangwahltaster drücken.
Pegel des linken Tone-Tasters
Pegel des rechten Tone-Tasters
Drücken Sie einen anderen Taster als [–] [+], damit die
Diode aufhört zu blinken.
Anwahl eines anderen Klangs für den rechten Tone-Taster
DEUTSCH
Spielen Sie ein paar Noten auf der Klaviatur, um sich die
gewählte Klangkombination anzuhören.
2. Drücken Sie den [–]- oder [+]-Taster.
DEUTSCH
Beim Spielen auf der Klaviatur hören Sie weiterhin den
vorhin gewählten Klang des linken Tone-Tasters. Dem
rechten Tone-Taster ist jedoch eine andere Klangvariation
zugeordnet.
Die Tonhöhe des Klangs, der dem “rechten” Tone-Taster zugeordnet ist, kann in Oktavschritten transponiert
werden (S. 70).
Anwahl eines anderen Klangs für den linken Tone-Taster
Verlassen Sie den Dual-Modus kurz und wählen Sie dann
einen anderen Klang. Drücken Sie die Taster der beiden
benötigten Klänge gleichzeitig.
DEUTSCH
59
HP107_e.book Page 60 Tuesday, October 19, 2004 10:41 PM
HP107e – Kapitel 2. Und nun dürfen Sie spielen
Unterschiedliche Klänge für
die linke/rechte Hand
(Split-Modus)
Das Instrument erlaubt das Aufteilen der Klaviatur, so dass
mit der linken und rechten Hand unterschiedliche Klänge
gespielt werden können. Auf Englisch nennt man dies
“Split”. Die Note, wo die Klaviatur geteilt wird, heißt folgerichtig “Splitpunkt”.
Splitpunkt (Vorgabe: F#3)
A0 B0 C1 D1 E1 F1 G1 A1 B1 C2 …
C3
Klang der linken Hand
C4
C5
Klang der rechten Hand
Anwahl eines anderen Klangs für die rechte
Hälfte
Verlassen Sie den Split-Modus und wählen Sie dann einen
anderen Klang.
Im Split-Modus bezieht sich das Dämpferpedal anfangs
nur auf den rechts gespielten Klang. Es kann jedoch auch
der linken Hälfte zugeordnet werden. Siehe “Aktivieren
des Dämpferpedals für die linke Hälfte” (S. 70).
■ Ändern des Splitpunkts
Bei Bedarf können Sie den Splitpunkt (die Note, bei der die
Klaviatur geteilt wird) ändern. Der Splitpunkt kann einer
beliebigen Taste im Bereich B1~B6 (deutsch: H1~H6)
zugeordnet werden.
Die Vorgabe lautet “F#3”.
1. Halten Sie den [Split]-Taster gedrückt, während
Sie die Taste betätigen, die als neuer Splitpunkt
fungieren soll.
Jene Taste vertritt die höchste Note der linken Hälfte.
Sie können den Splitpunkt auch einstellen, indem Sie den
[Split]-Taster gedrückt halten und [–] oder [+] betätigen.
1
1. Drücken Sie den [Split]-Taster.
Die Diode dieses Tasters leuchtet. Die Klaviatur wird in
zwei Hälften geteilt: eine für die linke und eine weitere für
die rechte Hand.
Der Splitpunkt vertritt die höchste Note der linken
Tastaturhälfte.
Der rechten Hälfte wird der Klang zugeordnet, der vor
Drücken des [Split]-Tasters gewählt war, während der linken Hälfte ein Bassklang zugeordnet wird. Das kann man
aber ändern.
Drücken Sie den [Split]-Taster noch einmal, damit seine
Diode wieder erlischt.
Wenn Sie den [Split]-Taster im Dual-Modus
drücken:
Dann wird der Klang des linken leuchtenden Tone-Tasters der rechten Klaviaturhälfte zugeordnet. Für die linke
Hälfte wird hingegen ein passender Zusatzklang
gewählt.
Die Tonhöhe des linken Klangs kann in Oktavschritten
transponiert werden (S. 70).
Anwahl eines anderen Klangs für die linke
Hälfte
1. Drücken Sie einen Tone-Taster
2. Drücken Sie den [–]- oder [+]-Taster.
Bei wiederholtem Drücken des [–]- oder [+]-Tasters wird
jeweils ein anderer Klang für die linke Hälfte gewählt.
Siehe auch “Tone List” (S. 240).
60
Halten Sie den [Split]-Taster gedrückt, während Sie
sowohl [–] als auch [+] betätigen, um wieder den vorprogrammierten Splitpunkt (F#3) zu wählen.
Die Notennamen werden folgendermaßen im Display
dargestellt:
Anzeige
C
C
d
E_
Notenname
C
C
D
E
Anzeige
E
F
F
G
Notenname
E
F
F
G
Anzeige
A_
A b_
b
Notenname
A
A
B
B
Solange Sie den [Split]-Taster gedrückt halten, wird der
aktuelle Splitpunkt angezeigt.
HP107_e.book Page 61 Tuesday, October 19, 2004 10:41 PM
Kapitel 2. Und nun dürfen Sie spielen
DEUTSCH
Funktion des mittleren
Pedals
3. Drücken Sie den [–]- oder [+]-Taster, um das
Tempo zu ändern.
Anwahl einer anderen Taktart
Laut Vorgabe ist dem mittleren Pedal die Sostenuto-Funktion zugeordnet (S. 51).
Man kann ihm jedoch auch eine andere Funktion zuordnen.
4. Halten Sie den [Song/Tempo]-Taster gedrückt,
während Sie den [–]- oder [+]-Taster betätigen.
Das Display zeigt die neue Taktart an.
Halten Sie den [Song/Tempo]-Taster gedrückt und betätigen Sie [–] oder [+], um die Taktart zu ändern.
Taktart und Tempoanzeige
1
Taktart
1. Aktivieren Sie mit dem [Center Pedal]-Taster die
gewünschte Diode.
Wenn die “Acoustic Layer”- und “Dual”-Funktion ausgeschaltet sind, wird die “Acoustic Layer”-Funktion
aktiviert.
Layer. Solange Sie das mittlere Pedal drücken, werden
alle gespielten Noten von zwei Klängen wiedergegeben.
Mit dem Pedal kann die Lautstärke des Zusatzklangs
geändert werden.
Octave. Solange Sie das mittlere Pedal drücken, werden
alle gespielten Noten oktaviert und also doppelt ausgegeben. Die Oktavlage des Zusatzklangs kann über das
Pedal geändert werden (eine Oktave höher oder tiefer).
■ Arbeiten mit dem Metronom
Das HP107e bietet eine Metronomfunktion.
Während der Wiedergabe eines Stücks zählt das Metronom im Takt (und Tempo) jenes Stücks.
2/2
=5–250
x/4
=10–500
3/8
=20–999
6/8
9/8
12/8
= 7–333
Während der Recorder-Wiedergabe bzw. -Aufnahme
kann die Taktart nicht geändert werden.
Anzeige
Taktart
Anzeige
Taktart
2.2
2/2
6.4
6/4
0.4
Nur weiche
Schläge
7.4
7/4
2.4
2/4
3.8
3/8
3.4
3/4
6.8
6/8
4.4
4/4
9.8
9/8
5.4
5/4
12.8
12/8
Anhalten des Metronoms
DEUTSCH
Verwendung des Metronoms
Anm.
Tempowert
DEUTSCH
Sostenuto. Das Pedal fungiert als Sostenutopedal (S. 51).
DEUTSCH
Halten Sie [Song/Tempo] weiterhin gedrückt, während
Sie den [–]- und [+]-Taster gleichzeitig betätigen, um wieder die vorige Taktart zu wählen.
5. Drücken Sie den [Metronome/Count In]-Taster
noch einmal, damit seine Diode wieder erlischt.
Das Metronom hält an.
■ Ändern der Metronomlautstärke
Die Lautstärke des Metronoms kann in zehn Schritten eingestellt werden.
Beim Einschalten wird die Einstellung “4” gewählt.
Arbeiten mit dem Metronom
1. Drücken Sie den [Metronome/Count In]-Taster.
Das Metronom beginnt zu zählen. Die Diode dieses Tasters blinkt im aktuellen Tempo (rot auf dem ersten Taktschlag und grün auf den übrigen Taktschlägen).
DEUTSCH
3 4 1,5 2
1. Halten Sie den [Metronome/Count In]-Taster
gedrückt, während Sie den [–]- oder [+]-Taster
betätigen.
Im Display erscheint nun der aktuell gewählte Lautstärkewert.
Halten Sie [Metronome/Count In] gedrückt und ändern
Sie den Lautstärkewert mit dem [–]- oder [+]-Taster.
2. Drücken Sie den [Song/Tempo]-Taster (dessen
Diode leuchtet grün).
Wenn Sie die Lautstärke auf “0” stellen, ist das Metronom unhörbar.
61
DEUTSCH
Ändern des Tempos
HP107_e.book Page 62 Tuesday, October 19, 2004 10:41 PM
HP107e – Kapitel 2. Und nun dürfen Sie spielen
Aufteilen der Klaviatur für vierhändiges Spiel (Twin-Modus)
Die Klaviatur kann in zwei separate Bereiche aufgeteilt werden, so dass zwei Personen gleichzeitig in derselben Tonlage spielen
können.
C1
C3
C2
C4
C3
C4
C5
C6
1. Halten Sie den [Split]-Taster gedrückt, während
Sie den [Piano]-Taster betätigen.
Die Diode des [Split]-Tasters leuchtet und der TwinModus wird aktiviert.
C5
C3
C6
C4
C7
C5
C8
C6
● Im Twin-Modus werden folgende Dinge eingestellt:
• Die Klaviatur wird in zwei Bereiche aufgeteilt; der Tonumfang der beiden Hälften ändert sich entsprechend.
• Das rechte Pedal fungiert als Dämpferpedal für die
rechte Klaviaturhälfte, das linke als Dämpferpedal für
die linke Hälfte.
• Das mittlere Pedal fungiert als Sostenutopedal für die
rechte Klaviaturhälfte.
2. Um diese Funktion zu verlassen, halten Sie den
[Split]-Taster gedrückt, während Sie erneut den
[Piano]-Taster betätigen.
• Wenn momentan die Aufnahme läuft bzw. wenn das
Instrument aufnahmebereit ist, wird die Aufnahme/
Aufnahmebereitschaft deaktiviert. Im Twin PianoModus ist der [Rec]-Taster nicht belegt.
• Wenn die Split-Funktion aktiv ist, wird sie ausgeschaltet.
• Der linken und rechten Hälfte sind derselbe Klang und
dieselben Effekteinstellungen zugeordnet. Wenn sich
das Instrument vor Anwahl des Twin Piano-Modus’ im
Split-Modus befand, wird der Klang der rechten Klaviaturhälfte gewählt.
Anm. Die Saitenresonanz-Funktion ist im Twin-Modus nicht
belegt.
62
HP107_e.book Page 63 Tuesday, October 19, 2004 10:41 PM
Kapitel 3. Spielen zu den internen Stücken
DEUTSCH
Kapitel 3. Spielen zu den internen Stücken
Sehen wir uns nun an, wie man die internen Klavierstücke
als Begleitung verwenden kann.
Wie man ein Stück anwählt und abspielt, erfahren Sie
unter “Anwahl des Stückes, das Sie sich anhören
möchten” (S. 52).
Die Taktart und Tempoanzeige
Taktart
Tempowert
2/2
=5–250
x/4
=10–500
3/8
=20–999
6/8
9/8
12/8
= 7–333
DEUTSCH
Das Tempo kann bei Bedarf geändert werden. Ferner besteht
die Möglichkeit, den Part der linken oder rechten Hand auszuschalten, damit Sie nicht beide gleichzeitig spielen müssen.
Ganz gleich, welchen Ansatz Sie bevorzugen: Am besten
hören Sie sich ein Stück zuerst ein paar Mal an.
Bei Bedarf können Sie auch das Metronom aktivieren.
Dieses folgt dem Takt und Tempo des gewählten Stücks.
Drücken Sie den [–]- und [+]-Taster gleichzeitig, um wieder den vorprogrammierten Tempowert zu wählen.
Display-Anzeige bei Anwahl der internen Stücke
Ändern des Tempos
■ Starten der Wiedergabe nach einem Einzähler
Wenn Sie gleich ab Beginn des Stückes mitspielen
möchten/müssen, sollten Sie die Einzählfunktion aktivieren.
DEUTSCH
Wenn Ihnen das gewählte Stück anfangs etwas zu schnell
erscheint, können Sie das Tempo verringern. Das ist
besonders beim Einstudieren neuer Stücke wichtig.
USr (“User”) … Dieser Speicher enthält Ihre eigene
Aufnahme (Hinweise zur Aufnahme → S. 65).
S.1~S.68 … Interne Stücke
S. U … Das selbst gespeicherte Stück (S. 71)
Diese ist zwar nicht separat verfügbar, kann aber folgendermaßen aktiviert werden.
2
1
Wählen Sie zuerst das Stück, das Sie spielen möchten
(S. 52).
DEUTSCH
Manche interne Stücke enthalten Tempowechsel.
Aktivieren Sie vor Starten der Wiedergabe das Metronom.
Dann zählt das HP107e nämlich zwei Takte ein. Danach
beginnt die Wiedergabe.
Das Display informiert Sie beim Einzählen folgendermaßen über die Taktanzahl vor Beginn des Stückes: “–2”
(noch zwei Takte), “–1” (noch ein Takt und die Musik
spielt auf).
“Arbeiten mit dem Metronom” auf S. 61
1. Drücken Sie den [Song/Tempo]-Taster (Diode
muss grün leuchten).
Im Display erscheint nun der aktuelle Tempowert.
DEUTSCH
Bei mehrmaligem Drücken des [Song/Tempo]-Tasters
werden abwechselnd der Tempowert und die Nummer
des aktuellen Stückes (mit vorangestelltem “S.”) angezeigt.
Wenn der Tempowert angezeigt wird, leuchtet die [Song/
Tempo]-Diode grün. Haben Sie die Song-Nummer
gewählt, so leuchtet die Diode rot.
2. Drücken Sie den [–]- oder [+]-Taster, um das
Tempo zu ändern.
Der Einstellbereich für den Tempowert lautet q= 10~500.
Das Tempo kann auch bei laufender Wiedergabe geändert
werden.
DEUTSCH
Mit dem [+]-Taster erhöhen Sie das Tempo. Halten Sie ihn
gedrückt, um schnell einen weitaus größeren Wert zu
wählen.
Mit dem [–]-Taster verringern Sie das Tempo. Auch diesen
Taster können Sie gedrückt halten, um schnell einen weitaus niedrigeren Tempowert einzustellen.
63
HP107_e.book Page 64 Tuesday, October 19, 2004 10:41 PM
HP107e – Kapitel 3. Spielen zu den internen Stücken
Separate Wiedergabe der
beiden Hände
Starten der Wiedergabe
2. Drücken Sie den [Play]-Taster (Diode muss leuchten).
Bei Bedarf können Sie selbst bestimmen, welcher Part des
gewählten Stückes abgespielt wird.
Die Wiedergabe beginnt. Den unter Schritt 1 gewählten
Part hören Sie jetzt nicht mehr.
Der Part der linken Hand ist dem [Left]-Taster zugeordnet.
Der Part der rechten Hand kann hingegen mit dem [Right]Taster ein-/ausgeschaltet werden. Die Parts befinden sich
auf so genannten “Spuren”. Einfachheitshalber wollen wir
die Taster [Left] und [Right] im folgenden die “Spurtaster”
nennen.
Sie können ihn also selbst spielen, während Sie sich vom
aufgezeichneten Part der linken Hand begleiten lassen.
Spurtaster
Linke Hand
Rechte
Hand
Drücken Sie den unter Schritt 1 betätigten Taster noch einmal. Dessen Diode leuchtet und der Part ist wieder hörbar.
Sie können einen Part auch bei laufender Wiedergabe aktivieren/ausschalten.
Anhalten der Wiedergabe
3. Drücken Sie den [Play]-Taster noch einmal, damit
seine Diode wieder erlischt.
Die Wiedergabe hält an.
Left
Right
Sie können den Part der linken oder rechten Hand ausschalten, um nicht beide gleichzeitig spielen zu müssen.
2, 3 1
Wählen Sie zuerst das Stück, das Sie spielen möchten
(S. 52).
Ausschalten des Parts, den Sie selbst spielen möchten
1. Drücken Sie den [Left]- oder [Right]-Taster.
Die Diode des gedrückten Tasters erlischt. Der betreffende
Part wird nicht mehr abgespielt.
Wenn Sie z.B. den Part der rechten Hand selbst spielen
möchten, müssen Sie den [Right]-Taster drücken (dessen
Diode erlischt). Jener Part wird nun nicht mehr ausgegeben.
64
HP107_e.book Page 65 Tuesday, October 19, 2004 10:41 PM
Kapitel 4. Aufnehmen Ihres Spiels
DEUTSCH
Kapitel 4. Aufnehmen Ihres Spiels
Das Instrument bietet eine Funktion (Recorder), mit der man
sein Spiel aufnehmen kann.
Selbstverständlich kann man es danach auch wieder abspielen – und bei Bedarf sogar einen zweiten Part hinzufügen.
Die Aufnahmefunktion des HP107e kann auf verschiedene
Arten verwendet werden:
• Aufnahme Ihres Spiels zu einem internen Stück (→
“Aufnahme mit einem internen Stück”, S. 66)
• Separate Aufnahme zweier Parts (z.B. der linken und
rechten Hand (→ “Aufnahme auf zwei Spuren”, S. 67)
Anmerkungen zur Recorder-Funktion
• Es gibt nur einen Song-Speicher.
Wenn im Display folgende Meldung
erscheint…
‘Right’-Spur
Zusatzklang
Originalklang (Klavier)
‘Octave’
Layer-Klang (eine Oktave
höher)
Originalklang
* Wenn Sie sich für Verfahren “B” oder “C” entschieden haben,
müssen Sie vor Starten der Aufnahme [Left] UND [Right]
aktivieren (beide müssen blinken).
Aufnahme eines neuen Stücks
Hier wird nur Ihr eigenes Spiel –ohne Begleitung eines
internen Stücks– aufgenommen.
3
2 1 4 6,8 5,7
Das HP107e bietet eine “Song Backup”-Funktion
(S. 71), mit der man das zuletzt eingespielte Stück speichern kann.
Anwahl des Speichers (wählen Sie “USr”)
1. Drücken Sie den [Song/Tempo]-Taster (Diode
muss rot leuchten).
Im Display erscheint nun die Nummer des gewählten
Stücks.
DEUTSCH
Wenn Sie versuchen ein neues Stück aufzunehmen, während der Speicher noch ein zuvor eingespieltes Stück enthält, erscheint folgende Meldung. Außerdem blinkt die
Diode des [Record]-Tasters.
‘Left’-Spur
‘Layer’
DEUTSCH
• Das HP107e bietet eine “Song Backup”-Funktion
(S. 71), mit der man das zuletzt eingespielte Stück speichern kann. Wenn Sie das nicht tun, wird die Aufnahme bei Ausschalten des Instruments gelöscht.
Daher sollten Sie sich mit der “Backup”-Funktion vertraut machen. Wenn Sie sie nicht verwenden, aber Ihr
Stück trotzdem nicht verlieren möchten, können Sie die
Daten vor dem Ausschalten zu einem externen Sequenzer oder Computer übertragen und dort speichern.
Siehe “Kapitel 6. Anbindung externer Geräte” (S. 73).
Funktion
DEUTSCH
• Aufnahme nur des eigenen Spiels (→ “Aufnahme eines
neuen Stücks”, S. 65)
C. Aufnahme, wenn dem mittleren Pedal die “Layer”- oder
“Octave”-Funktion zugeordnet ist
2. Drücken Sie den [–]- und [+]-Taster gemeinsam,
um “USr” zu wählen.
Wenn die vorigen Daten gelöscht werden dürfen, drücken
Sie [Rec]. Möchten Sie die erste Einspielung jedoch behalten, so müssen Sie den [Play]-Taster drücken.
A. Aufnahme ohne Anwahl einer Spur
Wenn keine der beiden Spuren Daten enthält, wird Ihr
Spiel auf die “Right”-Spur aufgenommen. Wenn eine der
beiden Spuren bereits Daten enthält, wird Ihr Spiel auf die
noch freie Spur aufgenommen.
B. Aufnahme im “Dual”-, “Acoustic Layer”- oder “Split”Modus
‘Left’-Spur
‘Right’-Spur
Dual-Modus
Klang des rechten ToneTasters
Klang des linken ToneTasters
‘Acoustic
Layer’
Zusatzklang
Originalklang (Klavier)
Split
Linker Klang
Rechter Klang
4. Schalten Sie bei Bedarf das Metronom ein.
Starten Sie das Metronom, um die Taktart einstellen zu
können (S. 61).
Anm. Wenn Sie eine zuvor eingespielte Aufnahme mit einem
weiteren Part versehen, werden das Tempo und die Taktart der ersten Aufnahme verwendet.
5. Drücken Sie den [Rec]-Taster.
Die [Rec]-Diode leuchtet und die [Play]-Diode blinkt. Das
Instrument ist nun aufnahmebereit.
65
DEUTSCH
Funktion
3. Wählen Sie den Klang, den Sie für die Aufnahme
verwenden möchten (S. 54).
DEUTSCH
Ein Wort zu Ihren Aufnahmen
Anwahl des Klangs und Einstellen des Tempos
HP107_e.book Page 66 Tuesday, October 19, 2004 10:41 PM
HP107e – Kapitel 4. Aufnehmen Ihres Spiels
Starten der Aufnahme
6. Die Aufnahme beginnt, sobald Sie eine Taste
anschlagen oder den [Play]-Taster betätigen.
Aufnahme mit einem
internen Stück
Das Instrument zählt zwei Takte ein und startet dann die
Aufnahme.
Die Aufnahme kann auch durch Betätigen einer Klaviaturtaste (statt [Play]) gestartet werden. Dann beginnt die Aufnahme sofort.
Auch Ihr Spiel zu einem internen Stück kann aufgenommen werden.
Das HP107e bietet eine “Song Backup”-Funktion
(S. 71), mit der man das zuletzt eingespielte Stück speichern kann.
Bei Starten der Aufnahme leuchten die [Play]- und [Rec]Diode.
Sie könnten z.B. nur einen der beiden vorprogrammierten
Parts wiedergeben (und aufnehmen), indem Sie den
[Left]- oder [Right]-Taster aktivieren und jenen Part dann
selbst spielen.
Fangen Sie an zu spielen.
Anhalten der Aufnahme
7. Drücken Sie den [Play]- oder [Rec]-Taster.
Die Aufnahme hält an und die [Play]- und [Rec]-Diode
erlöschen wieder.
Über die “USr”-Meldung
Nach der Aufnahme ändert sich die “
”-Meldung zu “
”.
Ein “.” im Display bedeutet, dass der User-Speicher
Daten enthält.
Anhören der Aufnahme
8. Drücken Sie den [Play]-Taster.
Ihre Aufnahme wird nun abgespielt.
Drücken Sie den [Play]-Taster erneut, um die Wiedergabe
anzuhalten.
Wenn Sie vor Starten der Aufnahme keine Spur wählen,
wird Ihr Spiel automatisch auf die [Right]-Spur aufgenommen.
Unter “Aufnahme auf zwei Spuren” (S. 67) erfahren
Sie, wie man einen zweiten Part hinzufügt.
2 1 3 6,8 4,7 5
Anwählen des Stücks
1. Drücken Sie den [Song/Tempo]-Taster (Diode
muss rot leuchten).
Im Display wird nun die Nummer des aktuellen Stücks
angezeigt.
2. Wählen Sie mit dem [–]- oder [+]-Taster das Stück,
das Sie als Grundlage verwenden möchten.
3. Aktivieren Sie eventuell auch das Metronom und
stellen Sie das Tempo ein (S. 61).
4. Drücken Sie den [Rec]-Taster.
Die Diode des [Rec]-Tasters leuchtet.
Anwahl der Aufnahmespur
5. Drücken Sie den [Left]- oder [Right]-Taster.
Wenn Sie den Part der linken Hand selbst spielen
möchten, müssen Sie den [Left]-Taster drücken. Um den
Part der rechten Hand einzuspielen, müssen Sie den
[Right]-Taster drücken.
Die Dioden des gedrückten Spur- und [Play]-Tasters blinken. Das HP107e ist nun aufnahmebereit.
Wenn im Display die “dEL”-Meldung erscheint, siehe
S. 65.
Starten der Aufnahme
6. Drücken Sie den [Play]-Taster.
Das Instrument zählt zwei Takte ein und startet dann die
Aufnahme.
Spielen Sie zu der internen Begleitung.
Anhalten der Aufnahme
7. Drücken Sie den [Play]- oder [Rec]-Taster.
Die Aufnahme hält an und die [Play]- und [Rec]-Diode
erlöschen wieder.
Ihre Aufnahme befindet sich im “USr (User)”-Speicher.
66
HP107_e.book Page 67 Tuesday, October 19, 2004 10:41 PM
Kapitel 4. Aufnehmen Ihres Spiels
8. Drücken Sie den [Play]-Taster.
Ihre Aufnahme wird nun abgespielt.
Drücken Sie den [Play]-Taster erneut, um die Wiedergabe
anzuhalten.
Aufnahme auf zwei Spuren
Vorteil dieser Arbeitsweise ist, dass man nur einen Part
erneut aufzunehmen brauchen, wenn er beim ersten Mal
nicht gelingt.
4. Drücken Sie den [Play]-Taster.
Das Instrument zählt zwei Takte ein und startet dann die
Aufnahme. Fangen Sie an zu spielen.
Die Aufnahme kann auch durch Betätigen einer Klaviaturtaste (statt [Play]) gestartet werden. Dann beginnt die Aufnahme sofort.
Anhalten der Aufnahme
5. Drücken Sie den [Play]- oder [Rec]-Taster.
Die Aufnahme hält an und die [Play]- und [Rec]-Diode
erlöschen wieder.
Ihr neuer Part befindet sich auf der oben gewählten Spur.
Wenn Sie nun noch einen zweiten Part aufnehmen
möchten, müssen Sie mit Schritt 2 fortfahren und die
andere Spur wählen. Während der erneuten Aufnahme
hören Sie dann den soeben aufgenommenen Part.
DEUTSCH
An anderer Stelle wurde bereits erwähnt, dass der Recorder des HP107e zwei Spuren bietet. Die könnten Sie z.B.
dazu nutzen, den Part der linken und rechten Hand separat aufzunehmen. Wählen Sie mit dem [Left]- und [Right]Taster jeweils die Spur, die Sie bespielen möchten.
Das HP107e bietet eine “Song Backup”-Funktion
(S. 71), mit der man das zuletzt eingespielte Stück speichern kann.
Starten der Aufnahme
DEUTSCH
Anhören der Aufnahme
Anhören der Aufnahme
6. Drücken Sie den [Play]-Taster.
Ihre Aufnahme wird nun abgespielt.
Löschen einer Aufnahme
1 4,6 2,5 3
Anm.
Wenn Sie eine zuvor eingespielte Aufnahme mit einem
weiteren Part versehen, werden das Tempo, die Taktart
und die Metronomeinstellung der ersten Aufnahme verwendet.
1. Aktivieren Sie bei Bedarf das Metronom (S. 61).
2. Drücken Sie den [Rec]-Taster.
Wenn mindestens eine der beiden Spuren bereits Daten
enthält, leuchtet die Diode ihres Tasters.
■ Löschen einer Spur
Mit dem hier beschriebenen Verfahren können Sie eine
Spur löschen.
Halten Sie den [Left]- oder [Right]-Taster
gedrückt, während Sie den [Rec]-Taster betätigen.
Die Diode des gedrückten Spurtasters erlischt, um Sie darauf hinzuweisen, dass der betreffende Part gelöscht ist.
■ Löschen eines Stückes
Um den gesamten “Usr”-Speicher zu löschen, müssen Sie
folgendermaßen verfahren:
Halten Sie den [Song/Tempo]-Taster gedrückt,
während Sie den [Rec]-Taster betätigen.
Folgende Meldung erscheint und die Diode des [Rec]-Tasters beginnt zu blinken.
DEUTSCH
Die [Rec]-Diode leuchtet und die [Play]-Diode blinkt. Das
Instrument ist nun aufnahmebereit.
Um eine oder beide Spuren des “USr”-Speichers zu
löschen, müssen Sie folgendermaßen verfahren:
DEUTSCH
Siehe die Schritte 1 und 2 unter “Aufnahme eines neuen
Stücks” (S. 65) und wählen Sie den “USr”-Speicher, um ein
neues Stück aufzunehmen. Wenn Sie Ihr Spiel gemeinsam
mit einem internen oder dem zuvor gespeicherten Stück
aufzeichnen möchten, müssen Sie jenes Stück zuerst wählen. Siehe die Schritte 1 und 2 unter “Anwahl des Stückes,
das Sie sich anhören möchten” (S. 52).
DEUTSCH
Drücken Sie den [Play]-Taster erneut, um die Wiedergabe
anzuhalten.
Die Diode des für die Aufnahme gewählten Spurtasters
blinkt.
3. Schalten Sie den Taster der Spur, die Sie NICHT
bespielen möchten ([Left] bzw. [Right]) AUS.
Man kann nicht auf beide Spuren gleichzeitig aufnehmen (drücken Sie also entweder [Left] oder [Right]).
Wenn Sie es sich anders überlegt haben und das Stück
doch nicht löschen möchten, müssen Sie den [Play]- oder
[Song/Tempo]-Taster drücken.
7. Drücken Sie den [Rec]-Taster noch einmal.
DEUTSCH
Ihr eigenes Stück wird nun gelöscht.
67
HP107_e.book Page 68 Tuesday, October 19, 2004 10:41 PM
HP107e – Kapitel 5. Weitere Funktionen
Kapitel 5. Weitere Funktionen
Weiter führende Einstellungen
(Funktionsmodus)
Ihr Instrument bietet noch folgende Funktionen, die man wie
unten beschrieben einstellt:
Anwahl des Funktionsmodus’
1. Drücken Sie den [Split]- und [Chorus]-Taster
gleichzeitig.
Taster
Funktion
Siehe
MIDI-Übertragungskanal
Piano Resonance
[Strings]
S. 75
USB-Treibereinstellung
Piano Resonance
[Damper]
S. 72
Das HP107e wechselt in den Funktionsmodus.
Die Dioden des [Split]-, [Chorus]- und des gedrückten
Tasters fangen an zu blinken.
Speicherfunktion
[Metronome/
Count In]
S. 71
Song-Speicherung
Anwahl der änderungsbedürftigen Funktion
2. Drücken Sie den Taster, dem die benötigte Funktion zugeordnet ist.
Die Dioden des [Split]-, [Chorus]- und des gedrückten
Funktionstasters blinken.
V-LINK
Funktion
Siehe
S. 72
[Right]
Solange Sie den Taster gedrückt halten, wird der Name
der gewählten Funktion im Display angezeigt.
Taster
S. 71
[Song/Tempo]
Ausgabe der Recorder-Daten
S. 75
[Left]
Gesamtstimmung
S. 68
[Piano]
“Grand Space”-Effekt
S. 70
[Grand Space]
Stimmungssystem
S. 69
[E. Piano]
Werksvorgaben
Key Touch
[Touch]
Gedehnte Stimmung
S. 71
S. 69
[Harpsichord]
Alles Weitere zu diesen Funktionen finden Sie weiter
unten.
Oktavierung
S. 70
[Organ]
Zuordnen des Dämpferpedals
Drücken Sie [–] und [+] gleichzeitig, um wieder den Vorgabewert aufzurufen.
Verlassen des Funktionsmodus’
S. 70
[Strings]
3. Zum Ändern eines Wertes verwenden Sie die [–]-/
[+]-Taster.
4. Drücken Sie den [Split]- oder [Chorus]-Taster.
Die Diode dieses Tasters verhält sich nun wieder “normal”.
Local-Funktion
Piano Resonance
[Key Off]
S. 75
■ Angleichen der Stimmung an ein anderes
Instrument (Gesamtstimmung)
Wenn Sie das HP107e zum Begleiten schwer oder überhaupt nicht stimmbarer Instrumente verwenden, können
Sie seine Kammertonfrequenz an jene des akustischen
68
HP107_e.book Page 69 Tuesday, October 19, 2004 10:41 PM
Kapitel 5. Weitere Funktionen
Drücken Sie in Schritt 2 unter “Weiter führende Einstellungen (Funktionsmodus)” (S. 68) den [Piano]-Taster. Im
Display erscheint nun z.B. folgende Meldung:
Einstellung
415.3Hz~440.0Hz~466.2Hz
Vorgabe
440.0Hz
Diese Einstellung wird so lange beibehalten, bis Sie das
Instrument ausschalten.
* Die Einstellung kann mit der “Backup”-Funktion des HP107e
gespeichert werden (S. 71).
Das Instrument bietet mehrere Stimmungen der klassischen Musik (darunter des Barock), so dass Sie jene
Musik mit der damals gebräuchlichen Stimmung spielen
können.
Bei den meisten neueren Stücken wird die wohltemperierte Stimmung vorausgesetzt (weil sie fast überall verwendet wird). In der Klassik wurden jedoch andere Stimmungen verwendet. Um zu entdecken, wie ein Stück zu
Lebzeiten des Komponisten geklungen hat, können Sie
eine der folgenden Stimmungen wählen.
Stimmungssystem
Grundton
Es stehen acht Stimmungstypen zur Wahl:
StimmungsAnzeige
system
Erklärung
2
Rein (Dur)
Diese Stimmung löst die Ambiguität von
Quinten und Terzen. Sie eignet sich nicht
für Melodien, bewirkt allerdings sehr
warme Akkorde.
3
Rein (Moll)
Diese Stimmung liefert das gleiche Ergebnis
wie die vorige, allerdings ist sie für Stücke
in Moll gedacht.
4
Arabisch
Diese Stimmung eignet sich für orientalische Vierteltonmusik.
1
6
Mittelton
Ein Kompromiss, der auf der reinen DurStimmung beruht und das Transponieren
von Stücken erlaubt.
7
Pythagoras
Diese Stimmung wird dem griechischen
Philosophen Pythagoras zugeschrieben. Sie
löst die Zweideutigkeit von Quarten und
Quinten und sorgt so für reinere Melodien.
8
Werckmeister
Kombination der Mittelton- und pythagoreischen Stimmung, die sich für alle Tonarten
eignet (erste Technik, III).
1C
Vorgabe
Grundton
Für alle Stimmungen außer der gleichschwebenden müssen Sie auch den Grundton (Tonika für Dur und Sexte für
Moll) für die Tonart des Stückes einstellen.
Halten Sie den [E. Piano]-Taster gedrückt, während Sie
die Taste jener Note betätigen, die als Grundton fungieren soll.
Der Grundton wird folgendermaßen angezeigt.
Anzeige
C
C
d
E_
E
F
F
G
A_ A
b_
b
Notenname
C
C
D
E
E
F
F
G
A
B
B
A
Für die gleichschwebende Stimmung brauchen Sie keinen Grundton einzustellen.
* Wenn Sie vor Starten der Aufnahme eine andere Stimmung
wählen als die gleichschwebende, müssen Sie diese während
der Wiedergabe ebenfalls aktivieren, weil sie nur dann verwendet wird.
* Denken Sie daran, alle Instrumente, mit denen Sie zusammenspielen, gleich zu stimmen, weil es sonst zu argen Dissonanzen kommt. Sorgen Sie dafür, dass die Gesamtstimmung des
HP107e jener der anderen Instrumente entspricht.
* Die Einstellung kann mit der “Backup”-Funktion des HP107e
gespeichert werden (S. 71).
■ Andere Stimmungskurven (Stretch Tuning)
Flügel werden meist so gestimmt, dass die Noten im Bass
etwas unter und im Diskant etwas über der gleichschwebenden Temperierung liegen. Auf Englisch nennt man
dies “Stretch Tuning” (gedehnte Stimmung).
Drücken Sie in Schritt 2 unter “Weiter führende Einstellungen (Funktionsmodus)” (S. 68) den [Harpsichord]Taster. Im Display erscheint nun z.B. folgende Meldung:
OFF
On
Normale Stimmungskurve. Wählen Sie diese Einstellung, wenn Sie zwei Klänge stapeln (S. 59)
oder andere Instrumente begleiten möchten.
Eine Stimmungskurve, bei der die Bassnoten
etwas tiefer und die Diskantnoten etwas höher
als die “Norm” gestimmt werden (“gedehnt”).
Eignet sich nur für Solo-Klavierspiel.
69
DEUTSCH
Jede Oktave ist in zwölf gleich große Intervalle eingeteilt. Alle Intervalle weisen also
die gleichen (wenn auch minimalen) Unsauberkeiten auf.
Dies ist eine Weiterentwicklung der Mittelton- und reinen Stimmung, mit der man ein
Stück leidlich transponieren und in fast
jeder Tonart spielen kann (III).
DEUTSCH
Gleichschwebend
5
Kirnberger
DEUTSCH
Drücken Sie in Schritt 2 unter “Weiter führende Einstellungen (Funktionsmodus)” (S. 68) den [E.Piano]-Taster.
Im Display erscheint nun z.B. folgende Meldung:
Erklärung
DEUTSCH
■ Auswahl des Stimmungssystems
Stimmungssystem
DEUTSCH
Das Display kann nur jeweils drei Ziffern anzeigen.
Darum erscheinen auch nur die letzten drei Stellen. Das
Beispiel oben verweist demnach auf “440.0Hz”.
Anzeige
DEUTSCH
Instruments angleichen. Diese Kammertonfrequenz verweist auf die Stimmung des mittleren “A”. Da sich beim
Ändern dieses Wertes auch die Stimmung der übrigen
Noten ändert, nennt man diese Funktion die “Gesamtstimmung”.
HP107_e.book Page 70 Tuesday, October 19, 2004 10:41 PM
HP107e – Kapitel 5. Weitere Funktionen
Vorgabe
On
* Diese Einstellung gilt nur für Klavierklänge.
* Die Einstellung kann mit der “Backup”-Funktion des HP107e
gespeichert werden (S. 71).
■ Einstellungen des “Grand Space”-Modus’
Drücken Sie in Schritt 2 unter “Weiter führende Einstellungen (Funktionsmodus)” (S. 68) den [Grand Space]Taster. Im Display erscheint nun z.B. folgende Meldung:
■ Transponieren in Oktavschritten
Folgende Klänge können in Oktavschritten höher/tiefer
transponiert werden: Im “Split”-Modus (S. 60) der linke,
im “Dual”-Modus (S. 59) der rechte und im “Acoustic
Layer”-Modus (S. 58) der Zusatzklang. Diese Funktion
heißt “Octave Shift”.
Drücken Sie in Schritt 2 unter “Weiter führende Einstellungen (Funktionsmodus)” (S. 68) den [Organ]-Taster. Im
Display erscheint nun z.B. folgende Meldung:
Die Tonhöhe kann bis zu zwei Oktaven abgesenkt (–2)
und erhöht (+2) werden.
Einstellung
Beschreibung
1
Bei Anschließen eines Kopfhörers erfolgt eine automatische Optimierung der Effektintensität. Sobald
Sie ihn herausziehen, passt sich der Effekt wieder
dem Lautsprecherbetrieb an.
2
Es wird die für den Lautsprecherbetrieb optimale
Effektintensität gewählt. Diese ändert sich selbst
dann nicht, wenn ein Kopfhörer angeschlossen
wird.
Auch die an den Output-Buchsen anliegenden Signale werden mit dem “Grand Space”-Effekt bearbeitet. Diese Einstellung empfiehlt sich also, wenn
Sie das Instrument an eine Beschallungsanlage usw.
anschließen.
3
Es wird die für den Kopfhörerbetrieb optimale
Effektintensität gewählt – unabhängig davon, ob
Sie einen Kopfhörer verwenden oder nicht.
* Bestimmte Einstellungen führen in bestimmten Lagen zu
einem unnatürlichen Klang, weil die Tonhöhe außerhalb des
“natürlichen” Bereichs liegt.
■ Aktivieren des Dämpferpedals für die linke
Hälfte
Wenn Sie im Split-Modus (S. 60) auch die links gespielten
Noten mit dem Dämpferpedal halten möchten, müssen
Sie folgendermaßen vorgehen:
* Die Einstellung kann mit der “Backup”-Funktion des HP107e
gespeichert werden (S. 71).
Drücken Sie in Schritt 2 unter “Weiter führende Einstellungen (Funktionsmodus)” (S. 68) den [String]-Taster. Im
Display erscheint nun z.B. folgende Meldung:
Verriegeln der
Bedienelemente
On
Fast alle Taster und Funktionen des HP107e können verriegelt werden. Dann steht nur noch der Klavierklang zur Verfügung. Das ist z.B. praktisch für den Musikunterricht, wenn
die Schüler weder die anderen Klänge ausprobieren, noch
mit dem Recorder spielen sollen.
OFF
Das Dämpferpedal bezieht sich sowohl auf die
rechts als auch auf die links gespielten Noten.
Das Dämpferpedal gilt nur für die in der rechten
Tastaturhälfte gespielten Noten.
Vorgabe
OFF
* Die Einstellung kann mit der “Backup”-Funktion des HP107e
gespeichert werden (S. 71).
Nach Verriegeln der Bedienfunktionen kann nur noch der
Flügelklang gespielt werden.
1. Stellen Sie die Lautstärke auf den Mindestwert
und drücken Sie den [Power On]-Schalter, um das
Instrument auszuschalten.
2. Halten Sie den [Piano]-Taster gedrückt, während
Sie den [Power On]-Taster betätigen.
Halten Sie den Taster ein paar Sekunden gedrückt.
Im Display erscheint folgende Anzeige:
Jetzt sind alle Taster verriegelt.
Stellen Sie die Lautstärke wunschgemäß ein.
Sie können jetzt “nur noch” Klavier spielen.
Um diese Riegelfunktion wieder zu deaktivieren, müssen Sie die Lautstärke auf den Mindestwert stellen und
das Instrument aus- und wieder einschalten.
70
HP107_e.book Page 71 Tuesday, October 19, 2004 10:41 PM
Kapitel 5. Weitere Funktionen
Bei Bedarf können Sie für alle Funktionen des HP107e wieder
die Werksvorgaben laden.
DEUTSCH
Laden der Werksvorgaben
(Factory Reset)
Speichern des
aufgenommenen Stücks
(Song Backup)
* Bei Verwendung dieser Funktion werden die intern gespeicherten Stücke nicht gelöscht (S. 71).
Das selbst aufgenommene Stück wird bei Ausschalten des
HP107e wieder gelöscht. Vor dem Ausschalten können Sie es
jedoch speichern. Diese Funktion heißt “Song Backup”.
1. Halten Sie den [Split]-Taster gedrückt, während
Sie den [Chorus]-Taster betätigen.
* Diese Speicherfunktion ist nur belegt, wenn Sie bereits etwas
aufgenommen haben.
Das HP107e wechselt in den Funktionsmodus.
Im Display erscheint folgende Anzeige:
1. Halten Sie den [Split]-Taster gedrückt, während
Sie den [Chorus]-Taster betätigen.
Das HP107e wechselt in den Funktionsmodus.
2. Drücken Sie den [Song/Tempo]-Taster.
DEUTSCH
2. Drücken Sie den Key Touch [Touch]-Taster.
Die Diode dieses Tasters blinkt.
Im Display erscheint folgende Anzeige:
3. Drücken Sie den [Rec]-Taster.
Nun werden wieder die Werksvorgaben geladen.
Sobald die Einstellungen geladen sind, erscheint folgende
Anzeige. Schalten Sie das Instrument dann aus.
3. Drücken Sie den [Rec]-Taster.
Sobald der Speichervorgang beendet ist, verhalten sich
das Display und die Tasterdioden wieder “normal”.
* Warten Sie mit dem Ausschalten, bis die Meldung “End” im
Display erscheint. Wenn Sie das HP107e bereits vorher ausschalten, wird u.U. sein interner Speicherbereich beschädigt.
Das kann zu Funktionsstörungen führen.
Speichern der Einstellungen
(Memory Backup)
* Eine Übersicht der speicherbaren Einstellungen finden Sie
unter “Speicherbare Einstellungen” (S. 77).
■ Löschen eines gespeicherten Stücks
1. Halten Sie den [Split]-Taster gedrückt, während
Sie den [Chorus]-Taster betätigen.
2. Drücken Sie den [Song/Tempo]-Taster.
DEUTSCH
Die meisten Einstellungen gelten nur so lange, bis Sie das
Instrument wieder ausschalten – es sei denn, Sie speichern
sie vorher. Die dafür benötigte Funktion heißt “Memory
Backup”.
* Ein gespeichertes Stück kann man genau wie die internen Stücke für die Wiedergabe anwählen (S. 52). Das gespeicherte
Stück erkennt man an folgender Bezeichnung:
DEUTSCH
Das Stück wird gespeichert.
Im Display erscheint folgende Anzeige:
1. Halten Sie den [Split]-Taster gedrückt, während
Sie den [Chorus]-Taster betätigen.
Das HP107e wechselt in den Funktionsmodus.
2. Drücken Sie den [Metronome/Count In]-Taster.
Im Display erscheint folgende Anzeige:
3. Drücken Sie den [Rec]-Taster.
Das gespeicherte Stück wird gelöscht.
Nun verhalten sich das Display und die Tasterdioden
wieder “normal”.
DEUTSCH
Die Diode dieses Tasters blinkt.
Drücken Sie den [Play]-Taster, um den Vorgang abzubrechen.
3. Drücken Sie den [Rec]-Taster.
Die Einstellungen werden gespeichert.
Sobald der Speichervorgang beendet ist, verhalten sich
das Display und die Tasterdioden wieder “normal”.
DEUTSCH
71
HP107_e.book Page 72 Tuesday, October 19, 2004 10:41 PM
HP107e – Kapitel 5. Weitere Funktionen
Verwendung der V-LINKFunktion
Wenn Sie das HP107e mit einem V-LINK-kompatiblen Videogerät verbinden, können Sie die Ausgabe von Bilddaten mit
dem HP107e beeinflussen.
Einstellen des USB-Treibers
Vor Anschließen des USB-Ports an Ihren Computer müssen
Sie folgenden Parameter einstellen.
1. Halten Sie den [Split]-Taster gedrückt, während
Sie den [Chorus]-Taster betätigen.
Das HP107e wechselt in den Funktionsmodus.
V-LINK
Die von Roland entwickelte V-LINK-Technologie
(
) erlaubt nämlich das Einbinden von Videomaterial in Ihre Musik. Bei Verwendung von V-LINKkompatiblen Videogeräten können visuelle Effekte auf
einfache Weise in die Musik einbezogen werden.
2. Drücken Sie den Piano Resonance [Damper]-Taster.
Die Diode dieses Tasters blinkt.
Im Display erscheint folgende Anzeige:
V-LINK-Einstellungen
1. Halten Sie den [Split]-Taster gedrückt, während
Sie den [Chorus]-Taster betätigen.
Das HP107e wechselt in den Funktionsmodus.
2. Drücken Sie den [Right]-Taster.
Die Diode dieses Tasters blinkt.
Im Display erscheint folgende Anzeige:
OFF
On
V-LINK ist deaktiviert.
Die V-LINK-Funktion ist aktiv. Nun dienen die
zwölf tiefsten Klaviaturtasten zum Steuern von
Videomaterial.
Vorgabe
OFF
3. Mit dem [–]- und [+]-Taster können Sie die VLINK-Funktion ein- und ausschalten.
Nun dienen die zwölf tiefsten Klaviaturtasten zum Steuern von Videomaterial.
* Solange V-LINK aktiv ist, können Sie mit den zwölf tiefsten
Tasten keine Noten spielen.
Verlassen des Funktionsmodus’
4. Drücken Sie den [Split]- oder [Chorus]-Taster.
Die Diode dieses Tasters verhält sich nun wieder “normal”.
72
3. Wählen Sie mit [–] und [+] die geeignete Treibereinstellung.
Anzeige
Beschreibung
vdr (Vendor)
Wählen Sie diese Einstellung, wenn Sie mit
dem beiliegenden USB-Treiber arbeiten.
GEn (Generic)
Wählen Sie diese Einstellung, wenn Sie den
USB-Treiber Ihres Betriebssystems verwenden.
Verlassen des Funktionsmodus’
4. Drücken Sie den [Split]- oder [Chorus]-Taster.
Die Diode dieses Tasters verhält sich nun wieder “normal”.
HP107_e.book Page 73 Tuesday, October 19, 2004 10:41 PM
Kapitel 6. Anbindung externer Geräte
DEUTSCH
Kapitel 6. Anbindung externer Geräte
Verwendung externer
Audiogeräte
Output R/L (Line Out,
Aux Out)
HP107e
DEUTSCH
Wenn Sie das HP107e an externe Audiogeräte anschließen,
können Sie es z.B. über die Lautsprecher Ihrer Stereo- oder
einer Beschallungsanlage verstärken bzw. Ihr Spiel auf Kassette usw. aufnehmen.
Anschließen externer Audio-Geräte/Instrumente an das HP107e
Für diese Verbindungen brauchen Sie Kabel mit einem herkömmlichen Klinkenstecker.
Anschlussbeispiele
* Um Schäden und/oder Funktionsstörungen der Lautsprecher
zu vermeiden, müssen Sie vor Herstellen/Lösen von Verbindungen die Lautstärke aller Geräte auf den Mindestwert stellen.
Input R/L (Line In,
Aux In)
HP107e
1. Schalten Sie die externen Geräte ein.
2. Schalten Sie das HP107e ein.
3. Stellen Sie die gewünschte Lautstärke ein.
* Die Lautstärke des angeschlossen Klangerzeugers kann nicht
vom HP107e aus geregelt werden.
DEUTSCH
Extern Verstärken des HP107e/Aufnehmen Ihres Spiels
❍ Bei Verwendung eines externen Audiogeräts/Instruments
usw. müssen Sie die Geräte in folgender Reihenfolge einschalten:
Ausschalten
1. Stellen Sie die Lautstärke des HP107e und externen Geräts auf den Mindestwert.
2. Schalten Sie das HP107e aus.
3. Schalten Sie die externen Geräte aus.
1. Schalten Sie das HP107e ein.
2. Schalten Sie die externen Geräte ein.
3. Stellen Sie die gewünschte Lautstärke ein.
* Die Lautstärke eines angeschlossenen Klangerzeugers kann
vom HP107e aus geregelt werden.
Wenn Sie Ihr Spiel auf dem HP107e mit einem externen
Gerät aufnehmen möchten:
5. Spielen Sie auf dem HP107e.
6. Halten Sie am Ende des Stücks die Aufnahme des
externen Geräts an.
Den USB-Port des HP107e können Sie mit einem Computer verbinden. Siehe auch den “USB Installation Guide”.
73
DEUTSCH
* Vor Anschließen des HP107e an den Computer müssen Sie
auf letzterem einen USB-Treiber (siehe die beiliegende CDROM) installieren. Siehe auch den “USB Installation Guide”.
* Der USB-Port überträgt nur MIDI-Daten.
* Um Schäden und/oder Funktionsstörungen der Lautsprecher
zu vermeiden, müssen Sie vor Herstellen/Lösen von Verbindungen die Lautstärke aller Geräte auf den Mindestwert stellen.
* Ein USB-Kabel gehört nicht zum Lieferumfang. Das finden
Sie jedoch bei Ihrem Roland-Händler.
* Das USB-Kabel darf maximal 3 Meter lang sein.
* Schalten Sie das HP107e ein, bevor Sie auf dem Computer ein
MIDI-Programm starten. Schalten Sie das HP107e niemals
ein bzw. aus, wenn bereits ein MIDI-Programm läuft.
* Lösen Sie die USB-Verbindung des HP107e, solange es eingeschaltet ist.
* Wenn Sie die USB-Verbindung nicht brauchen, müssen Sie
das Kabel aus dem USB-Port des HP107e ziehen.
* Wenn der Computer während des Empfangs/der Übertragung
von Daten einschlummert, könnte er beim “Wecken” abstürzen. Außerdem ist es denkbar, dass sich das HP107e dann
nicht mehr erwartungsgemäß verhält.
DEUTSCH
4. Starten Sie die Aufnahme des externen Geräts.
Verwendung des USBAnschlusses
DEUTSCH
❍ Bei Verwendung eines externen Audiogeräts/Instruments
usw. müssen Sie die Geräte in folgender Reihenfolge einschalten:
HP107_e.book Page 74 Tuesday, October 19, 2004 10:41 PM
HP107e – Kapitel 6. Anbindung externer Geräte
Arbeiten mit MIDI-Geräten
Wenn Sie das Instrument an einen Sequenzer der MTSerie anschließen, kann das intern aufgenommene Stück
extern aufgezeichnet und auf Diskette gesichert werden.
Sie können Ihr Spiel aber auch direkt (ohne den Umweg
über den Recorder) aufnehmen und dann auf Diskette
o.ä. sichern.
Spielen auf dem HP107e und Ansteuern
eines externen Klangerzeugers
Klangerzeuger
THRU
MIDI
OUT
IN
HP107e
■ Was ist MIDI?
MIDI ist die Abkürzung von “Musical Instrument Digital
Interface”. Hierbei handelt es sich um eine Norm für den
Austausch von Musikdaten zwischen elektronischen
Instrumenten und Computern.
Das HP107e ist mit zwei MIDI-Buchsen ausgestattet und
kann diese Daten also einerseits senden und andererseits
empfangen. Somit bieten sich zahlreiche spannende Möglichkeiten für einen noch größeren Musikspaß mit dem
HP107e.
* Für dieses Instrument gibt es ein separat verfügbares Heft
namens “MIDI Implementation”. Diese Aufstellung enthält
Details zu allen gesendeten und empfangenen MIDI-Befehlen.
Wenn Sie diese Informationen für Programmierzwecke benötigen, wenden Sie sich bitte an Ihren Roland-Händler oder eine
Kundendienststelle.
Anschlussbeispiele
* Um Schäden und/oder Funktionsstörungen der Lautsprecher
zu vermeiden, müssen Sie vor Herstellen/Lösen von Verbindungen die Lautstärke aller Geräte auf den Mindestwert stellen.
Ansteuern des HP107e mit einem Sequenzer/Aufnahme mit dem Sequenzer
MT-Serie
* Der MT-90s besitzt keine
MIDI OUT-Buchse.
Out
MIDI
In
Einstellen der MIDIFunktionen
Sehen wir uns zunächst an, wie man die belegten MIDIFunktionen erreicht und einstellt.
Anwahl des Funktionsmodus’
1. Halten Sie den [Split]-Taster gedrückt, während
Sie den [Chorus]-Taster betätigen.
Das HP107e wechselt in den Funktionsmodus.
Die Dioden des [Split]-, [Chorus]- und des gedrückten
Tasters fangen an zu blinken.
Einstellen der MIDI-Funktionen
2. Drücken Sie den Taster, dem die benötigte Funktion zugeordnet ist.
Die Dioden des [Split]-, [Chorus]- und des gedrückten
Funktionstasters blinken.
Die einzelnen Funktionen werden weiter unten vorgestellt.
3. Zum Ändern eines Wertes verwenden Sie die [–]-/
[+]-Taster.
Drücken Sie den [–]- und [+]-Taster gleichzeitig, um wieder die Vorgabe zu wählen.
HP107e
Verlassen des Funktionsmodus’
4. Drücken Sie den [Split]- oder [Chorus]-Taster.
Die Diode dieses Tasters verhält sich nun wieder “normal”.
* Schalten Sie die Local-Funktion des HP107e aus, wenn Sie es
mit einem Sequenzer verbinden. Siehe “Ein-/Ausschalten der
Local-Funktion” (S. 75). Außerdem müssen Sie die MIDI
THRU-Funktion des Sequenzers aktivieren (damit die über
MIDI IN empfangenen Befehle zur MIDI OUT-Buchse des
Sequenzers durchgeschleift werden). Siehe auch die Bedienungsanleitung des Sequenzers.
74
HP107_e.book Page 75 Tuesday, October 19, 2004 10:41 PM
Kapitel 6. Anbindung externer Geräte
MIDI erlaubt die Datenübertragung auf 16 Kanälen
gleichzeitig (1~16). Daher ist es mit dem bloßen Herstellen einer Verbindung nicht getan. Die angeschlossenen
Geräte müssen nämlich denselben MIDI-Kanal verwenden. Andernfalls werden die gespielten Noten nicht wiedergegeben, keine Klänge gewählt usw.
1~16
Vorgabe
1
■ Ein-/Ausschalten der Local-Funktion
Wenn Sie mit einem MIDI-Sequenzer arbeiten, müssen
Sie die Local-Funktion wohl ausschalten (“OFF”).
Wie Sie nachstehend sehen, erreichen die beim Spielen
auf der Tastatur erzeugten MIDI-Befehle die interne
Klangerzeugung sonst auf zwei Wegen: (1) und (2).
Dadurch würde jede Note doppelt gespielt. Wenn Sie
Local ausschalten (“Local Off”), wird Signalweg (1)
unterbrochen.
Klangerzeugung
Local aus
* Wenn Sie ein Gerät der MT-Serie anschließen, brauchen Sie
die Local-Funktion nicht von Hand einzustellen. Beim Einschalten sendet das MT-Gerät nämlich einen Local Off-Befehl
via MIDI. Das geschieht automatisch, wenn Sie die Geräte in
folgender Reihenfolge einschalten: HP107e → MT-Gerät.
Drücken Sie in Schritt 2 unter “Einstellen der MIDI-Funktionen” den Piano Resonance [Key Off]-Taster. Im Display erscheint nun z.B. folgende Meldung:
Einstellung
On, OFF
Vorgabe
On
■ Ausgabe der Recorder-Daten über MIDI OUT
Wenn Sie diese Einstellung aktivieren (“On”), werden die
mit dem Recorder aufgenommenen Daten zu einem
externen Instrument oder Computer übertragen. Wenn
Sie “OFF” wählen, werden die Daten nicht gesendet.
Drücken Sie in Schritt 2 unter “Einstellen der MIDI-Funktionen” den [Left]-Taster. Im Display erscheint nun z.B.
folgende Meldung:
DEUTSCH
(1) Local aktiv
Sequenzer
MIDI
IN
Klangerzeugung
MIDI
OUT
Speicher
MIDI
OUT
MIDI
IN
(2) THRU-Funktion aktiv
Jede Note wird doppelt wiedergegeben
Local ON: Die Tastatur ist mit der internen Klangerzeugung verbunden.
Einstellung
On, OFF
Vorgabe
OFF
Für die Übertragung des mit dem HP107e aufgenommenen Stücks müssen Sie folgendermaßen verfahren. Vor
der Übertragung müssen Sie die MIDI THRU-Funktion
des Sequenzers ausschalten. Siehe auch die Bedienungsanleitung des Sequenzers.
Schließen Sie einen MIDI-Sequenzer, beispielsweise der
MT-Serie, an (S. 74).
Nehmen Sie mit dem HP107e ein Stück auf (S. 65).
Klangerzeugung
Local aktiv
Stellen Sie diesen Parameter auf “On”.
DEUTSCH
Sie hören, was Sie spielen
DEUTSCH
Einstellung
Sie hören nicht mehr, was Sie spielen
DEUTSCH
* Das HP107e empfängt auf allen MIDI-Kanälen (1~16).
* Im Dual- (S. 59) bzw. Split-Modus (S. 60) sendet das HP107e
die Daten des linken Klangwahltasters auf Kanal 5 (Dual)
bzw. der linken Hand auf Kanal 3 (Split). Diese Einstellungen
können nicht geändert werden. Vergessen Sie nach Anwahl
des Dual- bzw. Split-Modus’ also nicht, auf dem externen
Instrument (Sender) andere MIDI-Kanäle als “3” bzw. “5” zu
wählen.
Drücken Sie in Schritt 2 unter “Einstellen der MIDI-Funktionen” den Piano Resonance [String]-Taster. Im Display erscheint nun z.B. folgende Meldung:
Local OFF: Die Tastatur ist nicht mehr mit der internen
Klangerzeugung verbunden. Das Instrument gibt die
gespielten Noten also nicht wieder.
DEUTSCH
■ Einstellen des MIDI-Kanals
Starten Sie die Aufnahme des externen MIDI-Sequenzers.
Starten Sie die Wiedergabe des Songs auf dem HP107e.
Halten Sie die Aufnahme an, sobald die Wiedergabe
beendet ist.
Sichern Sie die Daten des externen Sequenzers auf einer
Diskette oder einem anderen Datenträger.
DEUTSCH
75
HP107_e.book Page 76 Tuesday, October 19, 2004 10:41 PM
HP107e – Fehlersuche
Fehlersuche
Wenn sich das Instrument nicht erwartungsgemäß verhält, versuchen Sie das Problem am besten zuerst anhand der hier gegebenen Hinweise zu lösen, bevor Sie auf eine Störung schließen.
Das Instrument kann nicht eingeschaltet werden
Haben Sie das Netzkabel richtig angeschlossen (S. 49)?
Die Bedientaster funktionieren nicht
Haben Sie das Bedienfeld “verriegelt” (S. 70)?
Schalten Sie das Instrument aus und wieder ein.
Sie hören nichts
Haben Sie die Lautstärke des HP107e auf den Mindestwert
gestellt (S. 51)?
Haben Sie einen Kopfhörer angeschlossen (S. 50)?
Haben Sie eine Klinke an eine Kopfhörer-Buchse angeschlossen?
Dann werden die Lautsprecher nämlich deaktiviert.
Haben Sie die Local-Funktion ausgeschaltet?
Dann hören Sie die auf der Tastatur gespielten Noten nicht mehr.
Aktivieren Sie die Local-Funktion (“ON”, S. 75).
Ist die V-LINK-Funktion aktiv?
Solange V-LINK aktiv ist, können Sie mit den zwölf tiefsten Tasten keine Noten spielen.
Sie hören nichts (nach Anschließen eines MIDI-Instruments)
Haben Sie alle benötigten Geräte eingeschaltet?
Stimmen die MIDI-Verbindungen zwischen dem Instrument und
dem externen Gerät?
Haben Sie den richtigen MIDI-Kanal gewählt (S. 75)?
Der Klang wirkt eigenartig.
Haben Sie den Dual-Modus des HP107e aktiviert (S. 59)?
Wenn die SOFT THRU-Funktion des Sequenzers aktiv ist, werden alle Noten eventuell doppelt abgespielt und klingen dementsprechend eigenartig. Stellen Sie die Local-Funktion des HP107e
auf “OFF” (S. 75).
Alternative: Schalten Sie die SOFT THRU-Funktion des Sequenzers aus (OFF).
Es kann kein anderer Klang gewählt werden
Haben Sie das Bedienfeld “verriegelt” (S. 70)?
Schalten Sie das Instrument aus und wieder ein.
Blinken die Dioden des [Split]- und [Chorus]-Tasters?
Das Instrument befindet sich im Funktionsmodus. Drücken Sie
den [Split]- oder [Chorus]-Taster (S. 68, S. 74).
Ab und zu fallen Noten weg
Das HP107e kann bis zu 128 Noten gleichzeitig wiedergeben.
Bei ausgiebiger Verwendung des Dämpferpedals und gleichzeitiger Wiedergabe eines internen Stücks reicht die “Polyphonie”
eventuell nicht aus.
Die selbst gespielten Noten klingen falsch.
Haben Sie die Transposition aktiviert (S. 58)?
Haben Sie das richtige Stimmungssystem gewählt (S. 69)?
Wie ist die Gesamtstimmung eingestellt (S. 68)?
Ein aufgezeichnetes Stück wird nicht/nur teilweise abgespielt
Schauen Sie nach, ob beide Spurtaster ([Left] und [Right]) leuchten (S. 64).
Wenn die Diode eines dieser Taster nicht leuchtet, wird der
betreffende Part nicht abgespielt. Aktivieren Sie jenen Taster also.
Es wird nichts aufgenommen
Haben Sie einen Spurtaster aktiviert (S. 65~S. 67)?
Leuchten der Fall sein. Dies macht sich vor allem beim Spielen tiefer Noten bemerkbar, wenn eine relativ hohe Lautstärke gewählt
wurde. Das kann folgendermaßen behoben werden:
• Stellen Sie das Instrument mindestens 10~15cm von der Wand
entfernt auf.
• Reduzieren Sie die Lautstärke.
76
Das Tempo eines Stücks ändert sich hin und wieder
Die internen Stücke enthalten Tempowechsel, die während der
Wiedergabe ausgeführt werden. An jenen Stellen ändert sich das
Tempo folglich. Das Metronom berücksichtigt derlei Variationen
ebenfalls.
Wenn Sie eine zuvor eingespielte Aufnahme mit einem weiteren
Part versehen, werden das Tempo und die Taktart der esten Aufnahme verwendet. Wenn Sie ein gleichmäßiges Tempo bevorzugen, müssen Sie Ihre Aufnahme zuerst löschen (S. 67).
Die Aufnahme wurde gelöscht
Wenn Sie das nicht tun, wird die Aufnahme bei Ausschalten des
Instruments gelöscht. Gelöschte Daten können nicht wiederhergestellt werden.
Das HP107e bietet eine “Song Backup”-Funktion (S. 71), mit der
man das zuletzt eingespielte Stück speichern kann. Wichtige Aufnahmen sollten Sie mit dieser Funktion intern speichern.
Die Pedale funktionieren nicht oder gehen nicht mehr aus
Haben Sie die Pedaleinheit richtig angeschlossen?
Überprüfen Sie, ob das Pedalkabel vollständig mit der PedalBuchse an der Rückseite verbunden ist (S. 49).
Eigenartige Geräusche bei Betätigen eines Pedals
Drehen Sie die Einstellschraube der Pedaleinheit so weit heraus,
bis sie den Boden berührt (S. 51).
Der Halleffekt (Reverb) wurde ausgeschaltet, ist aber nicht ganz verschwunden
Die “Grand Space”- und “Key Off”-Funktion des HP107e simulieren den natürlichen Nachhall und die Resonanz eines Flügels.
Deshalb kann der Eindruck entstehen, dass ein Halleffekt aktiv
ist.
Wenn Sie das nicht möchten, können Sie die “Key Off”- (S. 54)
und “Grand Space”-Funktion ausschalten (S. 56~56).
Im Diskant ändert sich der Klang ab einer bestimmten Note
Auf einem akustischen Instrument werden die Saiten der letzten
1,5 Oktaven nicht gedämpft und klingen also natürlich aus. Die
Einstellung des Dämpferpedals hat keinen Einfluss auf diese
Noten. Auch die Klangfarbe ist etwas anders. Die Digital-Pianos
von Roland simulieren dieses Phänomen naturgetreu. Außerdem
richtet sich der “ungedämpfte” Bereich des HP107e nach der eingestellten Transposition.
Es tritt ein Pfeif- oder Heulton auf
Wenn Sie mit einem Kopfhörer arbeiten:
Bestimmte Klavierklänge sind besonders brillant und könnten
daher einen “metallischen” Eindruck erzeugen, wenn Sie den
Halleffekt aktivieren. Wählen Sie eventuell einen geringeren
Hallanteil oder schalten Sie den Effekt aus.
Bei Verwendung der Lautsprecher:
In diesem Fall weist das Problem auf eine Funktionsstörung hin
(was z.B. darauf zurückzuführen ist, dass bestimmte Komponenten resonanzbedingt anfangen zu schwingen). Bitte wenden Sie
sich an Ihren Roland-Händler.
Die Bassnoten sind falsch oder erzeugen einen Brummton
Bei Verwendung der Lautsprecher:
Bei einer hohen Lautstärke ist es durchaus denkbar, dass das
Gehäuse des HP107e oder ein Gegenstand in seiner Nähe zu
schwingen beginnt. Das könnte auch bei Gläsern oder sogar
• Stellen Sie das mitschwingende Objekt woanders hin.
Wenn Sie mit einem Kopfhörer arbeiten:
Hier deutet das Problem auf eine Funktionsstörung hin. Bitte
wenden Sie sich an Ihren Roland-Händler.
HP107_e.book Page 77 Tuesday, October 19, 2004 10:41 PM
Fehlersuche
DEUTSCH
Die Lautstärke des an die Input-Buchsen angeschlossenen Instrumentes/Gerätes ist viel zu gering
Vielleicht verwenden Sie ein Audiokabel mit einem Widerstand.
Versuchen Sie es einmal mit einem anderen Kabel.
Fehler- und andere Meldungen
DEUTSCH
Anzeige
Bedeutung
Der Speicher für Ihre Aufnahme. Hier befindet sich das Stück, das Sie selbst aufgenommen haben (S. 65).
Usr.
Ein “.” im Display bedeutet, dass der “User”-Speicher bereits Daten enthält (S. 65).
S.1~68
Verweist auf ein internes Stück (S. 52).
S. U
Dieses Stück wurde intern gespeichert (S. 71).
PU
Diese Meldung bedeutet, dass das Stück mit einem (unvollständigen) Auftakt beginnt.
dEL
Diese Meldung wird angezeigt, wenn Sie ein Stück zu löschen versuchen (S. 65, S. 67, S. 71).
E.32
Die Kapazität des Recorder-Speichers ist erschöpft. Es kann nichts mehr aufgenommen werden.
E.41
Es wurde ein MIDI-Problem festgestellt (wahrscheinlich wurde eine Verbindung gelöst). Kontrollieren Sie
die Anschlüsse.
_._._.
Die V-LINK-Funktion ist aktiv (S. 72).
* Fehlermeldungen sind an dem “E.” und einer Nummer erkenntlich. Um eine solche Meldung zu löschen, müssen Sie einen beliebigen
Taster drücken.
DEUTSCH
USr
Speicherbare Einstellungen
S. 54
Dämpferresonanz-Simulation (an/aus, Lautstärke)
S. 55
Anschlagdynamik
S. 55
Hammeransprache
S. 55
Stimmungssystem (+ Grundton)
S. 69
Gedehnte Stimmung
S. 69
‘Grand Space’ (an/aus, Lautstärke)
S. 56, S. 56
Dynamic Emphasis (an/aus, Intensität)
S. 57
Gesamtstimmung
S. 68
Reverb-Effekt (an/aus, Lautstärke)
S. 57
USB-Treibereinstellung
S. 72
Zuordnen des Dämpferpedals
S. 70
“Grand Space”-Effekt
S. 70
Splitpunkt
S. 60
Dual- und Layer-Balance
S. 59, S. 59
DEUTSCH
Saitenresonanz-Simulation (an/aus, Lautstärke)
DEUTSCH
Andere Einstellungen
S. 54
DEUTSCH
Klavierbezogene Einstellungen beim
Einschalten des Instruments
“Key Off”-Resonanz (an/aus, Lautstärke)
77
HP107_e.book Page 78 Tuesday, October 19, 2004 10:41 PM
HP107e – Übersicht der internen Funktionen
Übersicht der internen Funktionen
11
7
10 9
8
4
Nr.
1
2
3
6
5
4
5
6
1
7
Sie möchten…
8
3
10
9
11
12 13
14
2
Taster
Siehe
Den [Split]- und [Chorus]-Taster gedrückt halten, während Sie den [●]-Taster betätigen.
1
Local-Funktion
[Split] + [Chorus] → Piano Resonance [Key Off]
S. 75
2
Einstellen des MIDI-Kanals
[Split] + [Chorus] → Piano Resonance [String]
S. 75
3
USB-Treibereinstellung
[Split] + [Chorus] → Piano Resonance [Damper]
S. 72
4
“Grand Space”-Effekt
[Split] + [Chorus] → [Grand Space]
S. 70
5
Gesamtstimmung
[Split] + [Chorus] → [Piano]
S. 68
6
Anwahl eines Stimmungssystems
Angabe des Grundtons
[Split] + [Chorus] → [E. Piano]→
[E. Piano] + Klaviaturtaste
S. 69
7
Gedehnte Stimmung
[Split] + [Chorus] → [Harpsichord]
S. 69
8
Oktavierung
[Split] + [Chorus] → [Organ]
S. 70
9
Zuordnen des Dämpferpedals
[Split] + [Chorus] → [Strings]
S. 70
10
Song-Speicherung
[Split] + [Chorus] → [Song/Tempo]
S. 71
11
Speicherfunktion
[Split] + [Chorus] → [Metronome/Count In]
S. 71
12
Ausgabe der Recorder-Daten
[Split] + [Chorus] → [Left]
S. 75
13
V-LINK
[Split] + [Chorus] → [Right]
S. 72
14
Werksvorgaben
[Split] + [Chorus] → Key Touch [Touch]
S. 71
Halten Sie den [
]-Taster gedrückt, während Sie den [–]- oder [+]-Taster betätigen.
1
Taktart des Metronoms
[Song/Tempo] + [-] [+]
S. 61
2
Metronomlautstärke
[Metronome/Count In] + [-] [+]
S. 61
3
Layer-Balance (Dual-Balance)
[Acoustic Layering] + [-] [+]
S. 59
4
Lautstärke der Dämpferresonanz
Piano Resonance [Damper] + [-] [+]
S. 55
5
Lautstärke der Saitenresonanz
Piano Resonance [String] + [-] [+]
S. 54
6
“Key Off”-Lautstärke
Piano Resonance [Key Off] + [-] [+]
S. 54
7
Chorus-Anteil
[Chorus] + [-] [+]
S. 57
8
Hallanteil
[Reverb] + [-] [+]
S. 57
9
“Dynamic Emphasis”-Effekt
[Dynamic Emphasis] + [-] [+]
S. 57
“Grand Space”-Effekt
[Grand Space] + [-] [+]
S. 56, S. 56
[Transpose] + [Split] → [-] [+]
S. 59
10
[
] gedrückt halten, während Sie den [–]- oder [+]-Taster betätigen.
11
Dual-Balance (Layer-Balance)
Den [Split]- oder [Transpose]-Taster gedrückt halten, während Sie die gewünschte Note auf der Klaviatur spielen.
78
Splitpunkt
[Split] + Klaviaturtaste
S. 60
Transposition
[Transpose] + Klaviaturtaste
S. 58
HP107_e.book Page 79 Tuesday, October 19, 2004 10:41 PM
Technische Daten
DEUTSCH
Technische Daten
Tastatur
Tastatur
Anschlagdynamik
Tastaturmodi
88 Tasten, “Progressive Hammer Action” (Hammermechanik) mit Druckpunktsimulation
Stufen: Leicht, mittel, schwer, fest
Hammer: Leicht, mittel, schwer, aus
Whole, Layer/Dual (Balance einstellbar), Split (Splitpunkt einstellbar)
DEUTSCH
Klangerzeugung
Polyphonie
128 Stimmen
Klänge
5 Gruppen, 36 Variationen + 4 Layer-Klänge
Stimmungssystem
8 Typen, einstellbarer Grundton
Gedehnte Stimmung
2 Typen
Gesamtstimmung
415.3Hz~466.2Hz (0.1Hz-Schritte)
Transposition
–6~+5 Halbtöne
Effekte
‘Grand Space’, ‘Dynamic Emphasis’, Klavierresonanz (‘Key Off’, Saitenresonanz, Dämpferresonanz), Reverb/
Hall (10 Stufen), Chorus (10 Stufen)
Metronom
2/2, 0/4, 2/4, 3/4, 4/4, 5/4, 6/4, 7/4, 3/8, 6/8, 9/8, 12/8
Lautstärke
10 Stufen
DEUTSCH
Taktart
Recorder
Spuren
2 Spuren
Song
1 Stück (kann gespeichert werden)
Speicherkapazität
±10.000 Noten
Tempo
Viertelnote= 10~500
Auflösung
120 Schritte je Viertelnote
Bedienfunktionen
Play/Stop, Rec, Tempo, All Song Play, Track
Interne Stücke
68 Stücke + 14 Klangdemos
DEUTSCH
Andere
50W x2
Lautsprecher
20cm x2 (in separatem Gehäuse), 10cm x2
Anzeige
Taktanzeige
7 Segmente, 3 Zeichen (LED)
Kopfhörerdiode
Bedienfunktionen
Lautstärke, Brillanz
Pedale
Dämpfer (stufenlos), Leise (stufenlos), Sostenuto (zuweisbare Funktion)
Andere Funktionen
Riegelfunktion, Speicher für eine Aufnahme, Einstellungsspeicher, Werksvorgaben
Anschlüsse
USB-Anschluss (MIDI), Audio-Ausgänge (L/Mono, R), Eingänge (L/Mono, R), Kopfhörerbuchsen x2 (Stereo),
MIDI IN & OUT
Stromversorgung
AC230V
Leistungsaufnahme
110W
Abmessungen
(inklusive Ständer)
1425 (B) x 536 (T) x 931 (H) mm (Notenpult hinuntergeklappt)
DEUTSCH
Ausgangsleistung
1425 (B) x 536 (T) x 1.083,5 (H) mm (Notenpult hochgeklappt)
Gewicht
(inklusive Ständer)
82kg
Lieferumfang
Bedienungsanleitung, “60 Classical Piano Masterpieces”, USB-Installationshandbuch,
CD-ROM (“Roland Digital Piano USB Driver”), Netzkabel, Kopfhörerhaken
* Änderungen der technischen Daten und des Designs ohne vorherige Ankündigung vorbehalten. Für Druckfehler wird keine Haftung
übernommen.
DEUTSCH
79
HP107_e.book Page 80 Tuesday, October 19, 2004 10:41 PM
HP107e – Technische Daten
80
HP107_e.book Page 81 Tuesday, October 19, 2004 10:41 PM
Mode d’emploi
Félicitations et merci d’avoir opté pour le piano numérique Roland HP107e.
Caractéristiques principales
Sons de piano d’une résonance extrêmement riche et d’une expressivité
infinie
Le générateur de son de piano échantillonné en stéréo reproduit fidèlement jusqu’au son des marteaux frappant les cordes afin de générer les superbes sonorités d’un piano à queue. La polyphonie
maximale de 128 notes vous permet d’utiliser les pédales sans craindre de perdre des notes.
Cet instrument restitue fidèlement les nuances les plus fines de votre jeu, qu’il s’agisse d’infimes
variations de toucher, de la résonance des cordes lorsque vous relâchez les touches ou de la résonance du piano lorsque vous relâchez les pédales. En outre, cet instrument dispose d’un système
de haut-parleurs “Grand Sound” simulant le son d’un piano à queue dans toute son ampleur
(Grand Space) et produisant une sonorité d’une clarté et d’une puissance extraordinaires (Dynamic
Emphasis).
Simulation de la dynamique d’un piano à queue
Cet instrument dispose d’un clavier avec marteaux à action progressive émulant le toucher d’un
piano à queue: plus lourd dans le grave et plus léger dans l’aigu. Le HP107e simule même le
“déclic” que vous ressentez lorsque vous enfoncez une touche sur un piano à queue (mécanisme
d’échappement).
L’instrument propose deux types de contrôle de la dynamique: la réponse des touches qui change
leur dynamique et la fonction de “réponse des marteaux” qui reproduit les mouvements subtils des
marteaux d’un piano. La pédale est conçue pour offrir une réponse optimale et permet d’exprimer
les nuances les plus subtiles.
Avant d’utiliser ce produit,
veuillez lire attentivement
les sections intitulées: “Consignes de sécurité” (p. 82) et
“Remarques importantes”
(p. 84). Ces sections donnent
des informations importantes concernant l’utilisation
appropriée du produit. En
outre, pour maîtriser correctement chaque fonction de
votre nouvelle acquisition,
veuillez lire entièrement le
mode d’emploi. Conservez
ensuite le manuel à portée
de main pour toute référence
ultérieure.
Expressivité que seul un instrument numérique peut offrir
Le HP107e vous permet d’ajouter des sons taillés pour le piano afin d’obtenir un résultat particulièrement riche.
Vous pouvez ajouter le son de divers instruments au son de piano ou lui ajouter un son d’une
octave plus haut et vous servir d’une pédale pour contrôler le volume.
Confort de jeu avec casque
Des effets spéciaux sont ajoutés au son afin de rendre l’écoute au casque particulièrement confortable. Outre le témoin en face avant s’allumant lorsque vous branchez un casque, le HP107e propose également un crochet pratique auquel vous pouvez attacher le casque lorsque vous ne l’utilisez pas.
Aides diverses à l’apprentissage et morceaux de piano internes
Le métronome interne, “l’enregistreur” à deux pistes, les morceaux internes (60) et d’autres fonctions vous permettent d’aborder les leçons de piano sous un angle que seul un piano numérique
peut offrir.
Copyright © 2004 ROLAND CORPORATION
Tous droits réservés. Toute reproduction intégrale ou partielle de cette publication est
interdite sous quelque forme que ce soit sans l’autorisation écrite de
ROLAND CORPORATION.
HP107_e.book Page 82 Tuesday, October 19, 2004 10:41 PM
Consignes de sécurité
CONSIGNES DE SECURITÉ
INSTRUCTIONS POUR LA PREVENTION D'INCENDIE, CHOC ÉLECTRIQUE OU BLESSURE
A propos des symboles
Avertissement et
Précaution
Sert aux instructions destinées à alerter
l'utilisateur d'un risque mortel ou de
AVERTISSEMENT blessure grave en cas d'utilisation
incorrecte de l'unité.
Sert aux instructions destinées à alerter
l'utilisateur d'un risque de blessure ou
de dommage matériel en cas d'emploi
incorrect de l'unité.
PRUDENCE
* Les dommages matériels se réfèrent
aux dommages ou autres effets
négatifs causés au lieu d'utilisation et
à tous ses éléments, ainsi qu'aux
animaux domestiques.
A propos des symboles
Le symbole
alerte l'utilisateur d'instructions importantes
ou de mise en garde. La signification du symbole est
déterminée par ce que contient le triangle. Dans le cas du
symbole de gauche, il sert pour des précautions générales,
des mises en garde ou alertes vis-à-vis d'un danger.
Le symbole
prévient l'utilisateur des interdits. Ce
qui ne doit spécifiquement pas être fait est indiqué
dans le cercle. Dans le cas du symbole de gauche, cela
signifie que l'unité ne doit jamais être démontée.
Le symbole ● alerte l'utilisateur de ce qui doit être
fait. Ce qui doit être fait est indiqué par l'icône
contenue dans le cercle. Dans le cas du symbole de
gauche, cela signifie que le cordon d'alimentation doit
être débranché de la prise murale.
OBSERVEZ TOUJOURS CE QUI SUIT
AVERTISSEMENT
• Avant d’utiliser ce produit, lisez les instructions
données ci-dessous et dans le mode d’emploi.
...........................................................................................................
• N’ouvrez (et ne modifiez) pas le produit.
...........................................................................................................
• N’essayez pas de réparer ce produit ou d’en remplacer des éléments (sauf si ce manuel vous donne
des instructions spécifiques pour le faire). Confiez
tout entretien ou réparation à votre revendeur, au
service de maintenance Roland le plus proche ou à
un distributeur Roland agréé (vous en trouverez la liste à
la page “Information”).
...........................................................................................................
• Ne placez jamais ce produit dans des endroits:
• soumis à des températures extrêmes (en plein
soleil dans un véhicule fermé, à proximité d’une
conduite de chauffage, au-dessus de matériel
générateur de chaleur),
• humides (salles de bain, toilettes, sur des sols ou
supports mouillés),
• à l’humidité ambiante élevée,
• exposés aux précipitations,
• poussiéreux,
• soumis à de fortes vibrations.
...........................................................................................................
• Utilisez ce produit uniquement avec un support
ou un stand recommandé par Roland.
...........................................................................................................
• Veillez à placer ce produit sur une surface plane
afin de lui assurer une stabilité optimale. Évitez
les supports qui vacillent ou les surfaces inclinées.
...........................................................................................................
• Ne branchez l’appareil qu’à une prise de courant
répondant aux spécifications énoncées dans le
mode d’emploi ou imprimées à l’arrière de l’appareil.
...........................................................................................................
• Servez-vous exclusivement du cordon d’alimentation fourni. N’utilisez pas le cordon d’alimentation fourni avec un autre appareil.
...........................................................................................................
AVERTISSEMENT
• Évitez de tordre ou de plier excessivement le cordon d’alimentation ainsi que de placer des objets
lourds dessus. Vous risquez de l’endommager, ce
qui provoquerait des courts-circuits et couperait
l’alimentation de certains éléments. Un cordon
endommagé peut provoquer une électrocution ou un
incendie!
...........................................................................................................
• Ce produit, utilisé seul ou avec un amplificateur et
des enceintes ou un casque d’écoute, est en
mesure de produire des signaux à des niveaux qui
pourraient endommager l’ouïe de façon irréversible. Ne l’utilisez donc pas trop longtemps à
volume élevé ou inconfortable. Si vous pensez
avoir endommagé votre ouïe ou si vos oreilles
bourdonnent, arrêtez immédiatement l’écoute et
consultez un spécialiste.
...........................................................................................................
• Évitez que des objets (du matériel inflammable, de
la monnaie, des trombones) ou des liquides (eau,
limonades, etc.) ne pénètrent à l’intérieur de ce
produit.
...........................................................................................................
• Coupez immédiatement l’alimentation de l’appareil, débranchez le cordon d’alimentation de la
prise et ramenez l’appareil chez votre revendeur,
au service après-vente Roland le plus proche ou
chez un distributeur Roland agréé (vous en trouverez la liste à la page “Information”) quand:
• le cordon d’alimentation ou la fiche est endommagé(e),
• il y a de la fumée ou une odeur inhabituelle
• des objets ou du liquide ont pénétré dans le produit
• le produit a été exposé à la pluie (ou a été mouillé
d’une autre façon),
• le produit semble ne pas fonctionner normalement ou affiche un changement de performance marqué.
...........................................................................................................
HP107_e.book Page 83 Tuesday, October 19, 2004 10:41 PM
• Avec de jeunes enfants, la présence d’un adulte est
indispensable jusqu’à ce que l’enfant puisse respecter les précautions nécessaires au maniement
de ce produit.
...........................................................................................................
014
• Protégez ce produit contre tout coup ou impact
important.
• (Ne le laissez pas tomber!)
...........................................................................................................
• Ne faites pas partager au cordon d’alimentation
de ce produit une prise murale avec un nombre
excessif d’autres appareils. Soyez particulièrement
vigilant avec des multiprises. La puissance totale
utilisée par tous les appareils connectés ne doit
jamais excéder la puissance (watts/ampères) de la
rallonge. Une charge excessive peut augmenter la
température du câble et, éventuellement, entraîner
une fusion.
...........................................................................................................
016
106
• Ne montez jamais sur ce produit et évitez d’y
déposer des objets lourds.
...........................................................................................................
PRUDENCE
• Ne saisissez jamais le cordon secteur ni ses fiches
avec des mains humides lorsque vous le branchez
ou débranchez d’une prise murale ou de l’instrument.
...........................................................................................................
• Lorsque vous déplacez l’instrument, veuillez
observer les précautions suivantes. Il faut au
moins deux personnes pour soulever et déplacer
l’instrument. Il doit être manié avec soin et maintenu horizontal. Veillez à saisir fermement l’instrument afin d’éviter tout risque de blessures et
d’endommagement de l’instrument en cas de
chute.
026
• N’insérez JAMAIS un CD-ROM dans un lecteur
de CD audio conventionnel. Le son produit pourrait atteindre un niveau entraînant une perte
d’audition irréversible. Les enceintes et/ou tout
autre élément du système d’écoute risque(nt)
d’être endommagé(es).
...........................................................................................................
026
PRUDENCE
• Placez ce produit de sorte à lui assurer une ventilation appropriée.
• Avant de nettoyer cet appareil, éteignez-le et
débranchez le cordon d’alimentation de la prise
murale (p. 89).
...........................................................................................................
110a
• S’il y a risque d’orage, débranchez le cordon d’alimentation de la prise murale.
...........................................................................................................
116
• Veillez à ne pas vous coincer les doigts lorsque
vous ouvrez ou fermez le couvercle (p. 90). La présence d’un adulte est conseillée chaque fois qu’un
enfant utilise l’instrument.
...........................................................................................................
118b
• Si vous retirez les vis de fixation du pupitre, celles
du pied et le papillon, rangez-les immédiatement
hors de portée des enfants pour qu’ils ne risquent
pas de les avaler accidentellement.
...........................................................................................................
FRANÇAIS
FRANÇAIS
...........................................................................................................
• Saisissez toujours la fiche du cordon d’alimentation lors du branchement (débranchement) au secteur ou à ce produit.
...........................................................................................................
• A intervalles réguliers, débranchez la prise secteur
et frottez-la avec un chiffon sec pour enlever toute
la poussière et autres saletés accumulées sur ses
broches. Si ce produit ne va pas être utilisé durant
une période prolongée, débranchez le cordon
d’alimentation. Toute accumulation de poussière
entre la prise murale et la fiche d’alimentation
peut nuire à l’isolation et causer un incendie.
...........................................................................................................
...........................................................................................................
109a
FRANÇAIS
• Ne placez aucun récipient contenant de l’eau (un
vase, par exemple) sur ce produit. Évitez en outre
l’usage d’insecticides, de parfum, d’alcool, de vernis à ongles, d’atomiseurs ou sprays à proximité
de ce produit. Essuyez rapidement tout liquide
renversé sur ce produit avec un chiffon sec et doux.
...........................................................................................................
FRANÇAIS
• Assurez-vous que les vis maintenant ce produit au
support ne sont pas desserrées. Resserrez-le si
nécessaire.
• Débranchez le cordon d’alimentation.
• Débranchez tous les câbles reliant l’instrument à
des appareils périphériques.
• Relevez le dispositif de réglage du pied (p. 91).
• Fermez le couvercle.
• Enlevez le pupitre.
• Avant d’utiliser ce produit dans un pays étranger,
contactez votre revendeur, le service de maintenance Roland le plus proche ou un distributeur
Roland agréé (vous en trouverez la liste à la page
“Information”).
...........................................................................................................
FRANÇAIS
015
• Évitez que les cordons d’alimentation et les câbles
ne s’emmêlent. De plus, tous les cordons et câbles
doivent être placés hors de portée des enfants.
...........................................................................................................
FRANÇAIS
AVERTISSEMENT
HP107_e.book Page 84 Tuesday, October 19, 2004 10:41 PM
HP107e – Remarques importantes
Remarques importantes
Outre les informations des sections “IMPORTANT SAFETY INSTRUCTIONS” et “Consignes de sécurité” (p. 82), veuillez
lire et suivre les conseils suivants:
Alimentation
• Ne connectez jamais ce produit à une prise murale d’un
circuit auquel vous avez branché un appareil contenant
un inverseur (frigo, machine à lessiver, four à microondes ou climatisation), voire un moteur. Selon la façon
dont l’appareil en question est utilisé, il peut en effet
générer des parasites qui pourraient être enregistrés.
Dans certains cas, les parasites pourraient même entraîner des dysfonctionnements. S’il vous est impossible
d’utiliser une prise murale faisant partie d’un autre circuit, nous vous conseillons d’insérer un filtre antiparasites entre ce produit et la prise murale.
307
• Avant de brancher ce produit à d’autres appareils, mettez-les tous hors tension. Le non-respect de cette précaution pourrait entraîner des dysfonctionnements et/ou
l’endommagement de vos enceintes ou d’autres appareils.
308
• Bien que l’écran et les diodes s’éteignent quand vous mettez l’appareil hors tension avec son interrupteur POWER,
cela ne signifie pas que ce produit soit complètement
coupé de la source d’alimentation. Pour couper entièrement l’alimentation de l’appareil, mettez-le hors tension
avec l’interrupteur POWER puis débranchez le cordon
secteur de la prise de courant. Branchez donc ce produit à
une prise de courant facile à atteindre et immédiatement
accessible.
Emplacement
• L’usage de ce produit à proximité d’amplificateurs (ou de
tout autre matériel contenant de grands transformateurs
électriques) peut être source de bruit. Pour résoudre le
problème, changez l’orientation de ce produit ou éloignez-le de la source d’interférence.
• Ce produit peut causer des interférences lors de la
réception radio ou télévisée. Ne vous en servez pas à
proximité de tels récepteurs.
• Il peut y avoir du bruit si vous utilisez des moyens de
communication sans fil (tel qu’un téléphone mobile) à
proximité de ce produit. Ce bruit peut survenir au début
d’un appel (donné ou reçu) ou durant la conversation. Si
vous avez des problèmes, éloignez le téléphone portable
de ce produit ou coupez-le.
• N’exposez pas ce produit directement au soleil, ne le laissez pas près d’appareils irradiant de la chaleur, dans un
véhicule fermé ou dans un endroit le soumettant à des
températures extrêmes. Évitez également de laisser des
sources d’éclairage (telles qu’une lampe de piano) trop
longtemps trop près de ce produit. Évitez l’exposition
prolongée à la lumière de projecteurs puissants. Une chaleur excessive peut déformer ou décolorer ce produit.
• Lorsque vous déplacez ce produit en le soumettant à une
forte différence de température et/ou d’humidité, il peut
y avoir formation de condensation à l’intérieur. Une utilisation de ce produit dans cet état peut entraîner des pannes ou des dommages. Avant d’utiliser ce produit, laissez-le reposer quelques heures jusqu’à ce que la condensation se soit évaporée.
84
• Ne laissez pas traîner longtemps du caoutchouc, du
vinyle ou des matières similaires sur ce produit. Cela risque de décolorer ou d’abîmer la finition.
358
• Ne posez jamais d’objet sur le clavier. Cela pourrait provoquer des dysfonctionnements (certaines touches ne
produisant plus de son, par exemple).
359
• Ne collez pas d’autocollants, de décalcomanies ou autres
sur ce produit. Vous risqueriez d’endommager la finition
lors du retrait de ces autocollants, etc.
Entretien
• Pour nettoyer ce produit, utilisez un chiffon sec et doux
ou, éventuellement, un chiffon légèrement humide.
Essuyez toute la surface en exerçant une force égale et en
suivant les lignes du bois. Si vous frottez trop fort un
endroit particulier, vous risquez d’endommager la finition.
402
• N’utilisez jamais d’essence, de diluant, de solvant ou
d’alcool d’aucune sorte pour éviter le risque de décoloration et/ou de déformation.
• Les pédales de cet instrument sont en cuivre.
Le cuivre finit par foncer en s’oxydant. Il suffit alors de
polir le cuivre avec un produit pour cuivre disponible
dans le commerce.
Réparations et données
• N’oubliez pas que toutes les données contenues dans ce
produit sont perdues s’il doit subir une réparation. Sauvegardez donc toujours vos données importantes sur un
autre appareil MIDI (un séquenceur, par exemple) ou
notez-les sur papier (si possible). Durant les réparations,
les techniciens tentent, dans la mesure du possible, d’éviter toute perte de données. Cependant, il peut se révéler
impossible de récupérer des données dans certains cas
(notamment lorsque les circuits touchant à la mémoire
elle-même sont endommagés). Roland rejette toute responsabilité concernant la perte de ces données.
Précautions supplémentaires
• N’oubliez jamais que le contenu de la mémoire peut être
irrémédiablement perdu suite à un mauvais fonctionnement ou un mauvais maniement de ce produit. Pour vous
prémunir contre un tel risque, nous vous conseillons de
faire régulièrement des copies de secours des données
importantes se trouvant dans la mémoire de l’appareil
sur un autre appareil MIDI (un séquenceur, par exemple).
552
• Il peut malheureusement se révéler impossible de récupérer les données de la mémoire ou stockées sur un autre
appareil MIDI (tel qu’un séquenceur) une fois qu’elles ont
été perdues. Roland rejette toute responsabilité concernant la perte de ces données.
HP107_e.book Page 85 Tuesday, October 19, 2004 10:41 PM
Remarques importantes
FRANÇAIS
553
• Maniez les curseurs, boutons et autres commandes avec
un minimum d’attention; faites aussi preuve de délicatesse avec les prises et connecteurs de ce produit. Un
maniement trop brutal peut entraîner des dysfonctionnements.
• Lorsque vous branchez/débranchez des câbles, prenez la
fiche en main – jamais le câble. Vous éviterez ainsi
d’endommager le câble ou de provoquer des court-circuits.
557
• Ce produit dégage une faible quantité de chaleur durant
son fonctionnement.
FRANÇAIS
558a
• Pour ne pas déranger vos voisins, maintenez le volume à
un niveau raisonnable. Il peut parfois être préférable
d’utiliser le casque (surtout quand vous jouez la nuit).
559b
• Si vous devez transporter l’instrument, emballez-le dans
du matériel le protégeant des chocs. Si vous transportez
l’instrument sans précautions, vous risquez de le griffer
ou de l’endommager, ce qui l’empêcherait de fonctionner
convenablement.
560
• Ne soumettez pas le pupitre à une pression excessive
lorsque vous l’utilisez.
562
FRANÇAIS
• Utilisez un câble Roland pour effectuer la connexion. Si
vous utilisez un autre câble de connexion, notez les précautions suivantes.
• Certains câbles de connexion contiennent des résistances.
Ne vous servez pas de câbles contenant des résistances
pour connecter ce produit. De tels câbles engendrent un
volume extrêmement bas voire inaudible. Pour en savoir
plus sur les caractéristiques d’un câble, veuillez contacter
son fabricant.
565
FRANÇAIS
• Avant d’ouvrir et de fermer le couvercle du clavier, assurez-vous toujours qu’aucun petit animal familier ou autre
ne se trouve sur l’instrument (gardez-les à distance du
clavier et du couvercle). Faute de quoi, l’animal risque
d’être coincé à l’intérieur. Dans un tel cas, coupez immédiatement l’alimentation et débranchez le cordon d’alimentation de la prise. Consultez ensuite le revendeur qui
vous a vendu l’instrument ou le SAV Roland le plus proche.
Maniement des CD-ROM
FRANÇAIS
• Évitez de toucher ou de griffer la surface inférieure
brillante (surface encodée) du disque. Les CD-ROM
endommagés ou sales peuvent ne pas être lus correctement. Nettoyez vos disques avec un produit de nettoyage
pour CD disponible dans le commerce.
FRANÇAIS
85
HP107_e.book Page 86 Tuesday, October 19, 2004 10:41 PM
HP107e – Sommaire
Sommaire
Consignes de sécurité .....................................................82
Remarques importantes ..................................................84
Description........................................................................87
Face avant ..............................................................................................87
Face arrière ............................................................................................88
Face inférieure.......................................................................................88
Avant de commencer à jouer ..........................................89
Connexion du câble de pédalier.........................................................89
Connexion du câble de haut-parleur.................................................89
Connexion du cordon d’alimentation ...............................................89
Installation du pupitre.........................................................................89
Ouvrir/fermer le couvercle ................................................................90
Brancher un casque ..............................................................................90
Utiliser le crochet pour casque ........................................................90
Mise sous/hors tension .......................................................................91
Réglage du volume et de la brillance ................................................91
Les pédales ............................................................................................91
Chapitre 1. Exploiter les morceaux internes..................92
Écouter les morceaux internes............................................................92
Écouter tous les morceaux consécutivement.................................92
Choisir un morceau pour l’écouter .................................................92
Écouter les morceaux de démonstration...........................................93
Écouter les morceaux de démonstration des sons ........................93
Démonstration des fonctions ...........................................................93
Chapitre 3. Accompagner les morceaux internes ...... 103
Changer le tempo ...............................................................................103
Ajouter un décompte (Count-In)...................................................103
Écouter séparément la partie d’une main.......................................104
Chapitre 4. Enregistrer votre jeu .................................. 105
Enregistrer un nouveau morceau ....................................................105
Enregistrer avec un morceau interne ..............................................106
Enregistrer séparément la partie de chaque main.........................107
Effacer une exécution enregistrée ....................................................107
Effacer un enregistrement de la piste choisie..............................107
Effacer un morceau .........................................................................107
Chapitre 5. Changer divers réglages ........................... 108
Réglages détaillés ...............................................................................108
Changer l’accord global (diapason)..............................................108
Changer la gamme ..........................................................................109
Réglage de la courbe d’accord (accord étiré)...............................109
Transposition par octave ................................................................110
Appliquer la pédale forte à la section gauche du clavier ..........110
Changer le mode d’application de “Grand Space” ....................110
Mode Piano uniquement...................................................................110
Rappel des réglages usine (Factory Reset) .....................................111
Mémorisation des réglages (Backup) ..............................................111
Mémorisation de morceaux (Song Backup) ...................................111
Effacer un morceau mémorisé.......................................................111
Utiliser la fonction V-LINK...............................................................112
Réglages pour le pilote USB .............................................................112
Chapitre 6. Connexion d’appareils externes ............... 113
Chapitre 2. Jeu..................................................................94
Jouer avec différents sons....................................................................94
Réglages fins du son de piano (Piano Resonance) ..........................94
Son des touches relâchées (Key Off) ...............................................94
Résonance des cordes........................................................................94
Résonance sympathique (Damper).................................................95
Réglage de la dynamique du clavier (Key Touch) ..........................95
Changer le timing en fonction de la force exercée sur les touches
(Hammer Response)..........................................................................95
Rendre le son plus profond (Grand Space) ......................................96
Sélectionner la bonne profondeur pour le casque (Grand Space).96
Ajouter de la dynamique au son (Dynamic Emphasis) ..................97
Ajouter des effets au son .....................................................................97
Ajouter de la réverbération au son (Reverb) .................................97
Enrichir le son (Chorus)....................................................................97
Changer l’intensité de l’effet ............................................................97
Transposer le clavier (Transpose) ......................................................98
Ajouter un son complémentaire au piano (Acoustic Layer) ..........98
Changer la balance en mode “Acoustic Layer” ...............................99
Superposer deux sons (Superposition) .............................................99
Régler la balance en mode de superposition.................................99
Produire des sons différents des mains gauche & droite (Split) .100
Changer le point de partage du clavier........................................100
Changer la fonction de la pédale centrale.......................................101
Utilisation du métronome .................................................................101
Faire sonner le métronome.............................................................101
Changer le volume du métronome ...............................................101
Partager le clavier en deux sections pour jeu à 4 mains ...............102
86
Connexion à du matériel audio........................................................113
Connexion au port USB.....................................................................113
Connexion d’appareils MIDI ............................................................114
Réglages MIDI ....................................................................................114
Choisir le canal de transmission MIDI .........................................115
Activer/couper la fonction Local (On/Off) ................................115
Transmission d’un enregistrement ...............................................115
Appendice ............................................................. 116
Dépannage...........................................................................................116
Messages d’erreur et autres messages ............................................117
Paramètres dont le réglage peut être mémorisé ............................117
Liste des opérations ...........................................................................118
Fiche technique ...................................................................................119
Tone List ......................................................................... 240
Built-in Song List ........................................................... 241
MIDI Implementation Chart.................................. 243
HP107_e.book Page 87 Tuesday, October 19, 2004 10:41 PM
Description
FRANÇAIS
Description
Face avant
6 7 8
3
15
17
18
21 22
19
20
23 24
4 5
9 10 11
16
25 26
27
FRANÇAIS
2
12 13 14
Power On
1
1. Commutateur [Power On]
Mise sous/hors tension (p. 91).
2. Commande [Volume]
Détermine le volume global (p. 91).
Détermine le timbre (p. 91).
4. Bouton [Demo]
Vous pouvez écouter une démonstration exploitant les
sons de l’instrument ainsi qu’une démonstration des
diverses fonctions (p. 93).
5. Témoin [
(casque)]
Ce témoin s’allume quand vous branchez un casque à la
prise pour casque (p. 90).
6. Bouton [Transpose]
7. Bouton [Split]
Divise le clavier en deux parties, une pour la main gauche
et l’autre pour la main droite; vous pouvez ainsi jouer
avec un son différent dans chaque partie (p. 100). Vous
pouvez aussi régler divers paramètres en maintenant ce
bouton et le bouton [Chorus] enfoncés (p. 108~p. 112,
p. 114~p. 115).
8. Bouton [Chorus]
Enrichit le son (p. 97).
Confère une impression de profondeur au son (p. 96,
p. 96).
10.Bouton [Dynamic Emphasis]
Avive le son et le rend plus brillant (p. 97).
11.Bouton [Reverb]
Ajoute de la réverbération au son (p. 97).
Piano Resonance
12.Bouton [Key Off]
13.Bouton [String]
Produit la résonance des cordes induite lorsque vous
jouez sur le clavier (p. 94).
16.Boutons Tone
Ces boutons permettent de sélectionner des sons (ou
groupes de sons) pour jouer sur le clavier (p. 94).
17.Écran
L’écran indique les valeurs de divers paramètres comme
la variation de son, le numéro de morceau et le tempo.
Elles sont affichées de la façon illustrée plus haut.
18.Bouton [Song/Tempo]
Permet de choisir un morceau interne (p. 92, p. 103).
De plus, chaque pression sur ce bouton affiche alternativement le tempo et le numéro du morceau sélectionné
(précédé d’un “S.”). Le témoin s’allume en vert quand le
tempo est affiché et en rouge pour le numéro de morceau.
19.Boutons [–] [+]
Permettent de régler la valeur de divers paramètres.
Une pression simultanée sur les boutons [–] et [+] ramène
le paramètre en question à sa valeur originale.
20.Bouton [Metronome/Count In]
Active/coupe le métronome (p. 101). Vous disposez aussi
d’un décompte joué avant le début du morceau pour
vous permettre d’accompagner parfaitement le morceau
(p. 103).
TRACK
21.Bouton [Left]
Reproduit ou enregistre séparément une partie pour chaque main (p. 104, p. 106~p. 107).
La partie de la main gauche des morceaux internes est
assignée à ce bouton. Ce bouton et le bouton [Right] sont
appelés “boutons de piste”.
22.Bouton [Right]
Reproduit ou enregistre séparément une partie pour chaque main (p. 104, p. 106~p. 107). La partie de la main
droite des morceaux internes est assignée à ce bouton.
87
FRANÇAIS
Produit le son généré quand les touches sont relâchées
(p. 94).
Vous pouvez ajouter des sons complémentaires au son
du piano (p. 98).
FRANÇAIS
9. Bouton [Grand Space]
15.Bouton [Acoustic Layering]
FRANÇAIS
Transpose le clavier (p. 98).
Change la résonance produite lorsque la pédale forte est
actionnée (p. 95).
FRANÇAIS
3. Commande [Brilliance]
14.Bouton [Damper]
HP107_e.book Page 88 Tuesday, October 19, 2004 10:41 PM
HP107e – Description
23.Bouton [Play]
KEY TOUCH
Lance et arrête la reproduction de morceaux internes et
des enregistrements (p. 92, p. 103).
Lance et arrête aussi l’enregistrement (p. 105~p. 107).
24.Bouton [Rec]
25.Bouton [Touch]
Modifie la dynamique du clavier (p. 95).
26.Bouton [Hammer]
Règle la façon dont la force exercée sur le clavier détermine le timing des notes (p. 95).
Fait passer le HP107e en attente d’enregistrement
(p. 105~p. 107).
27.Bouton [Center Pedal]
Change la fonction de la pédale centrale (p. 101).
Face avant
Face arrière
Face inférieure
Face arrière
28.USB
Branchez le câble du pédalier du pied à cette prise (p. 89).
28
29
30
29.Prises Input
Ces entrées permettent de brancher un autre générateur
de sons ou un appareil audio pour que le son de cet appareil soit produit par les haut-parleurs du HP107e (p. 113).
30.Prises Output
Ces sorties permettent d’envoyer le son du piano à une
sono afin d’obtenir un son plus puissant. Vous pouvez
aussi les brancher à un enregistreur pour enregistrer ce
que vous jouez (p. 113).
Face inférieure
31.Prises Phones
Permettent de brancher un casque (p. 90).
32.Prises MIDI Out/In
31
32
33
Ces prises permettent de brancher l’instrument à des
appareils MIDI afin d’échanger des données de jeu
(p. 114).
33.USB
Vous pouvez brancher un ordinateur et échanger des
données de jeu entre l’instrument et l’ordinateur (p. 113).
88
HP107_e.book Page 89 Tuesday, October 19, 2004 10:41 PM
Avant de commencer à jouer
FRANÇAIS
Avant de commencer à jouer
Connexion du câble de
pédalier
1. Insérez le cordon d’alimentation dans la prise AC
située sous le HP107e, à l’arrière.
2. Branchez le cordon d’alimentation à une prise secteur.
NOTE
Servez-vous exclusivement du cordon d’alimentation
fourni.
FRANÇAIS
Connexion du câble de hautparleur
FRANÇAIS
Branchez le câble du pédalier à la prise Pedal en
face arrière du HP107e.
Connexion du cordon
d’alimentation
Branchez le câble des haut-parleurs sortant du boîtier des haut-parleurs à la prise prévue à cet effet
sous le HP107e.
Installation du pupitre
Enfoncez la fiche du câble des haut-parleurs jusqu’au
déclic.
1. Prenez le pupitre des deux mains et soulevez-le
vers vous jusqu’à ce qu’il soit redressé.
2. Utilisez le support à l’arrière du pupitre pour le
maintenir en place.
Vous pouvez incliner le pupitre selon trois angles.
FRANÇAIS
1
Prise pour haut-parleurs
2
Clip
Câble de haut-parleur
NOTE
Haut-parleurs
■ Abaisser le pupitre
Relevez le support situé derrière le pupitre puis
abaissez doucement le pupitre.
■ Languettes de maintien de partition
Vous pouvez vous servir des languettes de maintien pour
maintenir la partition. Si vous ne les utilisez pas, repliezles.
FRANÇAIS
Ne placez aucun récipient contenant de l’eau (un vase,
par exemple) sur ce produit. Évitez en outre l’usage
d’insecticides, de parfum, d’alcool, de vernis à ongles,
d’atomiseurs ou sprays à proximité de ce produit.
Les haut-parleurs de ce piano sont montés sous le panneau supérieur de l’instrument et sont orientés vers le
haut. Il peut y avoir des problèmes ou des accidents si du
liquide entre en contact avec des éléments des hautparleurs.
FRANÇAIS
89
HP107_e.book Page 90 Tuesday, October 19, 2004 10:41 PM
HP107e – Avant de commencer à jouer
■ Enlever le pupitre
Vous pouvez enlever le pupitre du piano. Cela vous permet de placer un ordinateur portable sur le piano.
Redressez le pupitre verticalement puis dévissez
les trois vis.
Vous pouvez le faire à l’aide d’une pièce de monnaie.
Lorsque vous branchez un casque, le témoin [ (casque)]
(p. 87) s’allume et les haut-parleurs du HP107e ne produisent plus de son.
Réglez le volume du casque avec la commande [Volume]
(p. 91) du HP107e.
NOTE Utilisez un casque stéréo.
Optez pour un casque Roland car un autre casque risque
de ne pas pouvoir fournir le volume nécessaire.
Remarques concernant l’usage du casque
NOTE
Veillez à ne pas perdre les vis que vous ôtez; évitez de les
laisser à un endroit où elles pourraient être avalées par
de jeunes enfants.
Ouvrir/fermer le couvercle
• Pour éviter d’endommager le câble, prenez toujours le casque en main lorsque vous le maniez; ne tirez pas sur le câble
mais sur la fiche pour le débrancher.
• Si vous branchez le casque alors que le volume est très
élevé, vous risquez de l’endommager. Réglez donc le
volume au minimum sur le HP107e avant de brancher le
casque.
• Une écoute à volume excessivement élevé endommage non
seulement le casque mais surtout votre ouïe. Réglez le
volume à un niveau adéquat.
■ Utiliser le crochet pour casque
Pour ouvrir le couvercle, soulevez-le légèrement
avec les deux mains et éloignez-le de vous.
Lorsque vous n’utilisez pas le casque, vous pouvez le suspendre au crochet prévu à cet effet sur le côté inférieur
gauche du HP107e.
Pour refermer le couvercle, tirez-le doucement
vers vous et abaissez-le lorsqu’il est entièrement
tiré.
Fixer le crochet pour casque
NOTE
NOTE
Veillez à ne pas vous coincer les doigts lorsque vous
ouvrez ou fermez le couvercle. Quand de jeunes enfants
jouent sur le HP107e, la présence d’un adulte est souhaitable.
Si vous devez déplacer le piano, fermez le couvercle pour
éviter tout accident.
Brancher un casque
Le HP107e a deux prises pour casque. Cela permet à deux
personnes d’écouter simultanément au casque, ce qui vient à
point pour les leçons de piano ou le jeu à quatre mains. Cela
vous permet en outre de jouer sans déranger votre entourage, notamment le soir.
Branchez le(s) casque(s) à la (aux) prise(s) Phones
située(s) à gauche, sous le piano.
Prises pour casque x2
90
Enfoncez et faites tourner le crochet pour casque fourni
avec le HP107e dans l’orifice situé sous le HP107e (voyez
l’illustration ci-dessous). Serrez le papillon du crochet
pour casque.
Papillon
Crochet pour casque
HP107_e.book Page 91 Tuesday, October 19, 2004 10:41 PM
Avant de commencer à jouer
Les pédales
Mettez vos différents appareils sous tension selon l’ordre
spécifié. Si vous modifiez cet ordre, vous risquez de provoquer des dysfonctionnements ou d’endommager certains éléments comme les haut-parleurs.
Les pédales ont les fonctions suivantes et servent surtout
pour le jeu de piano.
Pour mettre l’instrument sous tension, tournez la
commande [Volume] au minimum puis appuyez
sur [Power On].
Pédale douce
Pédale forte
Pédale sostenuto
Pédale forte (droite)
Tant que cette pédale est enfoncée, les notes sont maintenues même lorsque vous relâchez les touches.
La durée du maintien des notes varie subtilement en
fonction de la force exercée sur la pédale.
Témoin de mise sous tension
L’instrument est sous tension et le témoin d’alimentation
à l’avant gauche du HP107e s’allume.
Pour mettre l’instrument hors tension, tournez la
commande [Volume] au minimum puis appuyez
sur [Power On].
Réglage du volume et de la
brillance
Servez-vous de la commande [Volume] pour
régler le volume global.
Min
Max
Mellow
Pédale douce (gauche)
Lorsque vous maintenez cette pédale enfoncée en jouant
sur le clavier, le son est adouci.
L’adoucissement du son varie subtilement en fonction de
la force exercée sur la pédale.
Dispositif de réglage
Si vous avez l’impression que les pédales sont instables
ou si vous déplacez l’instrument, ajustez le dispositif de
réglage situé sous les pédales.
❍ Abaissez le dispositif en le tournant pour qu’il soit fermement en contact avec le sol. Si le pédalier ne repose pas
convenablement sur le sol, cela risque d’endommager les
pédales. Soyez particulièrement attentif lorsque vous placez l’instrument sur de la moquette ou un tapis: le pédalier doit être fermement en contact avec le sol.
FRANÇAIS
Actionnez la commande [Brilliance] pour ajuster
le timbre du son.
Cette pédale maintient la note des touches actionnées
avant que vous n’appuyiez sur la pédale.
Vous pouvez changer la fonction de la pédale sostenuto
(p. 101).
FRANÇAIS
L’instrument est hors tension et le témoin de mise sous
tension à l’avant gauche du HP107e s’éteint.
NOTE Pour couper entièrement l’alimentation de l’appareil,
mettez-le hors tension avec l’interrupteur POWER puis
débranchez le cordon secteur de la prise de courant.
Voyez “Alimentation” (p. 84).
Pédale sostenuto (centre)
FRANÇAIS
Attendez quelques secondes avant de jouer. Utilisez la
commande [Volume] pour régler le volume.
NOTE Ce produit est doté d’un circuit de protection. Il faut
attendre un bref laps de temps (quelques secondes) après
la mise sous tension pour que le produit fonctionne normalement.
Lorsque vous actionnez la pédale forte d’un piano acoustique, les cordes des touches adjacentes sont libérées et
vibrent sous l’effet des touches actionnées sur le clavier,
rendant ainsi le son plus riche et plus vaste. Le HP107e
simule cette “résonance sympathique” produite par la
pédale forte.
Vous pouvez déterminer l’ampleur de la résonance générée par la pédale forte (p. 95).
FRANÇAIS
Power On
FRANÇAIS
Mise sous/hors tension
Bright
Dispositif de réglage
FRANÇAIS
91
HP107_e.book Page 92 Tuesday, October 19, 2004 10:41 PM
HP107e – Chapitre 1. Exploiter les morceaux internes
Chapitre 1. Exploiter les morceaux internes
Écouter les morceaux
internes
■ Choisir un morceau pour l’écouter
Le HP107e propose 68 morceaux de piano.
“Chapitre 3. Accompagner les morceaux internes” à la
page 103, “Tone List” (p. 240)
■ Écouter tous les morceaux consécutivement
Les morceaux internes peuvent être écoutés successivement.
1 3, 4
2
Affichage pour les morceaux internes
USr (utilisateur) … La mémoire où vous pouvez enregistrer votre jeu. (Pour en savoir plus sur l’enregistrement → p. 105)
S.1~S.68 … Morceaux internes
S. U … Morceau sauvegardé avec la fonction “Song
Backup” (p. 111)
12
1. Appuyez simultanément sur les boutons [Song/
Tempo] et [Play].
Le témoin du bouton [Song/Tempo] s’allume, le témoin
du bouton [Play] clignote et les morceaux sont joués successivement en commençant par le morceau actuellement
sélectionné.
Le numéro du morceau apparaît à l’écran durant quelques
secondes.
Vous pouvez appuyer sur le bouton [–] ou [+] pour sélectionner le morceau que vous voulez écouter.
Lorsque tous les morceaux ont été joués, la reproduction
recommence à partir du premier morceau.
Choix d’un morceau à reproduire
1. Appuyez sur le bouton [Song/Tempo] pour allumer son témoin en rouge.
Le numéro du morceau apparaît à l’écran durant quelques
secondes.
2. Appuyez sur le bouton [–] ou [+] pour sélectionner
un morceau.
Maintenez le bouton enfoncé pour faire changer les numéros de façon continue.
Pour sélectionner un morceau mémorisé, procédez comme suit.
1
Appuyez simultanément sur les boutons [–] et
[+] pour afficher “USr” à l’écran.
2
Appuyez sur le bouton [–] pour afficher “S.
U”.
Arrêter la reproduction
2. Appuyez sur le bouton [Play].
La reproduction s’arrête.
Reproduction
3. Appuyez sur le bouton [Play].
Le témoin s’allume et le morceau choisi est reproduit.
Arrêter la reproduction
4. Appuyez sur le bouton [Play].
Le témoin du bouton s’éteint et la reproduction s’arrête. Si
vous appuyez une fois de plus sur [Play], le morceau interrompu est rejoué à partir du début.
92
HP107_e.book Page 93 Tuesday, October 19, 2004 10:41 PM
Chapitre 1. Exploiter les morceaux internes
Démo des fonctions des
différents boutons
Vous pouvez écouter divers morceaux de démonstration
dont ceux exploitant les sons de piano et d’autres sons ainsi
que diverses fonctions.
■ Écouter les morceaux de démonstration des
sons
Le témoin du bouton clignote et la reproduction des morceaux de démonstration des sons commence.
Lorsque tous les morceaux ont été reproduits, la reproduction recommence à partir du premier morceau.
Si vous appuyez sur un des boutons de son (Tone) lorsque
le bouton [Demo] clignote, vous entendez le morceau de
démonstration correspondant au son choisi.
Contenu
Morceaux de démonstration de son Piano
[E. Piano]
Morceaux de démonstration de son
E.Piano
[Harpsichord]
Morceaux de démonstration de clavecin
(Harpsichord)
[Organ]
Morceaux de démonstration de son
d’orgue (Organ)
[Strings]
Morceaux de démonstration de son de cordes (Strings)
[Acoustic Layering]
Morceaux de démonstration avec fonction
Split (p. 98)
[Split]
Morceaux de démonstration avec fonction
Split (p. 100)
p. 94
Piano Resonance [Damper]
Démonstration de la résonance sympathique
p. 95
Key Touch [Hammer]
Démonstration de la
réponse des marteaux
p. 95
Lorsque vous appuyez sur un bouton, vous entendez la
démonstration assignée à ce bouton. Vous entendez en fait
deux versions: une avec la fonction du bouton actionné et
l’autre sans.
Lorsque vous appuyez une fois de plus sur le bouton
actionné à l’étape 2, vous changez de démonstration et
alternez ainsi entre celle avec et celle sans effet.
Démonstration de la réponse des marteaux
Le jeu s’arrête lorsque vous sélectionnez la démonstration de réponse des marteaux. Chaque pression sur le
bouton Key Touch [Hammer] active et coupe alternativement la fonction.
Jouez sur le clavier et testez la fonction de réponse des
marteaux.
Lorsque la fonction “Hammer Response” est activée, les
notes sont produites avec d’autant plus de retard que la
pression sur les touches est importante.
La démonstration de la réponse des marteaux montre
clairement la différence entre le son obtenu avec et sans
la fonction Hammer Response.
Arrêter la démonstration des fonctions
FRANÇAIS
[Piano]
Démonstration de la résonance des cordes
FRANÇAIS
Démo des différents
boutons de sons
Piano Resonance [String]
FRANÇAIS
1. Appuyez sur le bouton [Demo].
Contenu
FRANÇAIS
Écouter les morceaux de
démonstration
3. Appuyez sur le bouton [Demo].
Arrêter la démonstration des sons
Le témoin [Demo] s’éteint et la démonstration s’arrête.
2. Appuyez sur le bouton [Demo].
Le témoin [Demo] s’éteint et la démonstration s’arrête.
■ Démonstration des fonctions
FRANÇAIS
Vous pouvez écouter la démonstration des fonctions disponibles pour les sons de piano.
1. Appuyez sur le bouton [Demo].
Le témoin du bouton clignote et la reproduction des morceaux de démonstration des sons commence.
2. Appuyez sur un des boutons suivants.
Démo des fonctions des
différents boutons
Contenu
Démonstration de la fonction Grand Space
p. 96
[Dynamic Emphasis]
Démonstration de la fonction Dynamic Emphasis
p. 97
Piano Resonance [Key Off]
Démonstration du son
après le relâchement des
touches
p. 94
FRANÇAIS
[Grand Space]
93
HP107_e.book Page 94 Tuesday, October 19, 2004 10:41 PM
HP107e – Chapitre 2. Jeu
Chapitre 2. Jeu
Jouer avec différents sons
Le HP107e est doté de 36 sons internes. Ils sont divisés en
cinq groupes assignés chacun à un bouton Tone.
Sélectionner un groupe de sons
1. Appuyez sur n’importe quel bouton de son
(Tone).
Le témoin du bouton actionné s’allume.
Lorsque vous jouez sur le clavier, vous entendez un son
appartenant au groupe choisi.
Sélectionner des variations
1
2
2. Appuyez sur le bouton [–] ou [+].
Le numéro de la variation apparaît à l’écran durant quelques secondes.
Pour en savoir plus, voyez “Tone List” (p. 240).
Le son sélectionné est audible lorsque vous jouez sur le
clavier.
Réglages fins du son de piano (Piano Resonance)
Vous pouvez affiner les réglages du son de piano.
■ Son des touches relâchées (Key Off)
Vous pouvez produire le son de “touche relâchée” (le son
subtil produit lorsque les touches sont relâchées) d’un
piano acoustique.
Vous pouvez sauvegarder ce réglage dans la mémoire du
HP107e avec la fonction de mémorisation (“Backup”)
(p. 111).
1. Appuyez sur le bouton Piano Resonance [Key Off]
(son témoin s’allume).
Vous obtenez le son distinctif produit lorsque vous relâchez les touches.
Appuyez une fois de plus sur le bouton Piano Resonance
[Key Off] pour éteindre son témoin et couper la fonction.
Vous trouverez les sons pour lesquels cette fonction est
activée dans la “Tone List” (p. 240).
Réglage du volume du son de touche relâchée
2. Maintenez le bouton Piano Resonance [Key Off]
enfoncé et appuyez sur le bouton [+] ou [–].
Vous pouvez régler le volume du son de touche relâchée
selon dix niveaux.
Plus la valeur est élevée, plus le volume augmente.
■ Résonance des cordes
Lorsque vous jouez sur le clavier d’un piano acoustique,
les cordes déjà actionnées résonnent également. La fonction qui produit cet effet est appelée “String Resonance”.
NOTE Cet effet ne fonctionne qu’avec les sons de piano. Il est
impossible de l’appliquer à d’autres sons.
1. Appuyez sur le bouton Piano Resonance [Sting]
(son témoin s’allume).
La résonance des cordes est activée. Appuyez une fois de
plus sur le bouton Piano Resonance [String] pour éteindre
son témoin et couper la fonction.
Vous pouvez sauvegarder ce réglage dans la mémoire du
HP107e avec la fonction de mémorisation (“Backup”)
(p. 111).
94
HP107_e.book Page 95 Tuesday, October 19, 2004 10:41 PM
Chapitre 2. Jeu
2. Maintenez le bouton Piano Resonance [String]
enfoncé et appuyez sur le bouton [+] ou [–].
Vous pouvez régler l’intensité de la résonance (le volume
de la résonance) sur dix niveaux.
Plus la valeur est élevée, plus la résonance est importante.
■ Résonance sympathique (Damper)
Vous pouvez déterminer le volume de la résonance générée par la pédale forte.
1. Maintenez le bouton Piano Resonance [Damper]
enfoncé (son témoin s’allume).
Appuyez une fois de plus sur le bouton Piano Resonance
[Damper] pour éteindre son témoin et couper la fonction.
Vous pouvez sauvegarder ce réglage dans la mémoire du
HP107e avec la fonction de mémorisation (“Backup”)
(p. 111).
Régler l’intensité de la résonance
“Heavy” allumé. Pour jouer fortissimo (ff), il faut avoir la
main plus lourde: le clavier donne l’impression d’être plus
dur. Un toucher dynamique rend votre jeu plus expressif.
Tous les témoins éteints. Fixe. La force exercée sur les
touches n’est pas prise en considération: le volume des
notes reste identique.
■ Changer le timing en fonction de la force
exercée sur les touches (Hammer Response)
Cette fonction détermine la façon dont votre toucher détermine le timing des notes. Cette fonction s’appelle “Hammer Response”.
Vous pouvez sauvegarder ce réglage dans la mémoire du
HP107e avec la fonction de mémorisation (“Backup”)
(p. 111).
Sur un piano acoustique, la pression d’une touche
actionne un marteau qui frappe une corde pour produire
du son. Si vous appuyez doucement sur la touche, le marteau se déplace lentement et prend donc plus de temps
pour produire la note.
FRANÇAIS
La résonance sympathique est activée.
“Medium” allumé. Permet de jouer avec le toucher le plus
naturel. Cette réponse est la plus proche de la dynamique
d’un piano acoustique.
FRANÇAIS
Sur un piano acoustique, vous pouvez enfoncer la pédale
forte pour permettre aux cordes adjacentes de résonner
avec les notes que vous jouez afin d’enrichir le son et de lui
conférer plus de réverbération. La pédale forte du HP107e
simule cette résonance (sympathique) lorsqu’elle est
enfoncée.
NOTE Cet effet ne fonctionne qu’avec les sons de piano. Il est
impossible de l’appliquer à d’autres sons.
“Light” allumé. Pour jouer fortissimo (ff), la main peut
rester assez légère: le clavier réagit plus vite. Ce réglage
facilite le jeu, notamment pour les enfants.
FRANÇAIS
Régler l’intensité de la résonance
Si vous activez la fonction “Hammer Response”, l’intervalle séparant la frappe sur la touche et la production du
son varie en fonction de la force avec laquelle vous jouez.
Plus vous jouez doucement, plus cet intervalle est long.
2. Maintenez le bouton Piano Resonance [Damper]
enfoncé et appuyez sur le bouton [+] ou [–].
FRANÇAIS
Vous disposez de dix niveaux d’intensité pour la résonance.
Des valeurs plus élevées augmentent l’intensité de l’effet.
Réglage de la dynamique du
clavier (Key Touch)
Vous pouvez régler la dynamique (la sensibilité au toucher)
du clavier.
1
1. Appuyez sur le bouton Key Touch [Hammer] pour
allumer le témoin voulu.
“Light” allumé. La réponse est plus rapide lorsque vous
appuyez doucement sur les touches.
“Heavy” allumé. Les notes sont légèrement retardées lorsque vous appuyez doucement sur les touches.
1
Tous les témoins éteints. La fonction de réponse des
marteaux est coupée. Le son est produit immédiatement,
quelle que soit la force exercée sur les touches.
FRANÇAIS
“Medium” allumé. Le timing est normal lorsque vous
appuyez doucement sur les touches.
Vous pouvez sauvegarder ce réglage dans la mémoire du
HP107e avec la fonction de mémorisation (“Backup”)
(p. 111).
FRANÇAIS
1. Appuyez sur le bouton Key Touch [Touch].
Chaque pression sur le bouton Key Touch [Touch] allume
un autre témoin et sélectionne une dynamique différente.
95
HP107_e.book Page 96 Tuesday, October 19, 2004 10:41 PM
HP107e – Chapitre 2. Jeu
Rendre le son plus profond
(Grand Space)
Le HP107e dispose d’une fonction “Grand Space” qui vous
permet d’obtenir un son dont la profondeur évoque celle
d’un piano à queue. Cette fonction vous permet donc de
retrouver la réverbération et la profondeur naturelles du son
produit par un piano à queue acoustique.
1
2
Vous pouvez sauvegarder ce réglage dans la mémoire du
HP107e avec la fonction de mémorisation (“Backup”)
(p. 111).
1. Appuyez sur le bouton [Grand Space] (son témoin
s’allume).
La fonction “Grand Space” est activée et confère plus
d’ampleur au son.
Quand le mode “Grand Space” (p. 110) est réglé sur “1”
alors qu’un casque est branché, la profondeur est optimisée pour casque; si aucun casque n’est branché, la profondeur est optimisée pour haut-parleurs.
2. Maintenez le bouton [Grand Space] enfoncé et
appuyez sur le bouton [+] ou [–].
Vous avez le choix entre quatre niveaux de profondeur.
Plus la valeur augmente, plus le son est profond.
Sélectionner la bonne
profondeur pour le casque
(Grand Space)
Vous pouvez également recréer la sensation de profondeur
d’un piano de concert à travers le casque. Cette fonction vous
permet de retrouver la réverbération et la profondeur naturelles du son produit par un piano à queue acoustique.
1
2
Vous pouvez sauvegarder ce réglage dans la mémoire du
HP107e avec la fonction de mémorisation (“Backup”)
(p. 111).
1. Appuyez sur le bouton [Grand Space] (son témoin
s’allume).
La fonction “Grand Space” est activée et confère plus
d’ampleur au son.
Quand le mode “Grand Space” (p. 110) est réglé sur “1”
alors qu’un casque est branché, la profondeur est optimisée pour casque; si aucun casque n’est branché, la profondeur est optimisée pour haut-parleurs.
2. Maintenez le bouton [Grand Space] enfoncé et
appuyez sur le bouton [+] ou [–].
Vous avez le choix entre quatre niveaux de profondeur.
Plus la valeur augmente, plus le son est profond.
3. Pour couper la fonction “Grand Space”, appuyez
une fois de plus sur [Grand Space] afin d’éteindre
le bouton.
3. Pour couper la fonction “Grand Space”, appuyez
une fois de plus sur [Grand Space] afin d’éteindre
le bouton.
Le témoin [
branché.
96
(casque)] s’allume quand un casque est
HP107_e.book Page 97 Tuesday, October 19, 2004 10:41 PM
Chapitre 2. Jeu
FRANÇAIS
Ajouter de la dynamique au
son (Dynamic Emphasis)
Ajouter des effets au son
Vous pouvez conférer une clarté et une définition extraordinaires au son.
■ Ajouter de la réverbération au son (Reverb)
3
1. Appuyez sur le bouton [Reverb].
Vous pouvez sauvegarder ce réglage dans la mémoire du
HP107e avec la fonction de mémorisation (“Backup”)
(p. 111).
1. Appuyez sur le bouton [Dynamic Emphasis] (son
témoin s’allume).
2. Pour couper la fonction “Dynamic Emphasis”,
appuyez sur [Dynamic Emphasis] afin d’éteindre
le bouton.
Changer les réglages “Dynamic Emphasis”
3. Maintenez le bouton [Dynamic Emphasis]
enfoncé et appuyez sur le bouton [+] ou [–].
Témoin
Description
2
Produit un son avec des accords dans le grave
qui sont clairs et distincts.
3
Produit un son dont le grave est accentué.
Pour couper la réverbération, appuyez sur le bouton
[Reverb] (son témoin s’éteint).
Vous pouvez sauvegarder le réglage de réverbération
activée/coupée ainsi que l’intensité de la réverbération
dans la mémoire du HP107e avec la fonction de
mémorisation (“Backup”) (p. 111).
■ Enrichir le son (Chorus)
En ajoutant du chorus, vous conférez une dimension supplémentaire au son en l’enrichissant.
1. Appuyez sur le bouton [Chorus].
Le témoin du bouton s’allume et le son est pourvu de chorus.
Pour couper l’effet Chorus, appuyez sur le bouton [Chorus] de sorte à éteindre son témoin.
Vous pouvez sauvegarder le réglage de chorus activé/
coupé pour chaque son individuel. Les réglages d’origine
sont rétablis à la mise hors tension.
FRANÇAIS
1
Produit un son dont le grave et l’aigu sont
accentués.
Le témoin du bouton s’allume et de la réverbération est
ajoutée au son.
FRANÇAIS
La fonction “Dynamic Emphasis” est activée et anime le
son.
FRANÇAIS
1
L’effet Reverb ajoute une belle réverbération au son et
vous donne l’impression de jouer dans une salle de concert.
■ Changer l’intensité de l’effet
Vous avez le choix entre dix niveaux d’intensité pour le
chorus.
Ce paramètre a été réglé sur “5” à la sortie d’usine pour
les effets Reverb et Chorus.
La valeur en vigueur est affichée. Des valeurs plus élevées
augmentent l’intensité de l’effet.
NOTE Vous ne pouvez pas sauvegarder les réglages de
réverbération pour chaque son individuel.
La valeur en vigueur est affichée. Des valeu-rs plus élevées
augmentent l’intensité de l’effet.
97
FRANÇAIS
Changer l’intensité du chorus
1. Maintenez le bouton [Chorus] enfoncé et appuyez
sur le bouton [+] ou [–].
FRANÇAIS
Changer l’intensité de la réverbération
1. Maintenez le bouton [Reverb] enfoncé et appuyez
sur le bouton [+] ou [–].
HP107_e.book Page 98 Tuesday, October 19, 2004 10:41 PM
HP107e – Chapitre 2. Jeu
Transposer le clavier
(Transpose)
La fonction de transposition vous permet de transposer votre
jeu pour éviter certaines difficultés techniques. Si, par exemple, le morceau est dans une tonalité difficile comprenant de
nombreux dièses (#) ou bémols (b), vous pouvez transposer le
clavier pour le jouer dans une tonalité plus facile.
Lorsque vous accompagnez un chanteur, vous pouvez transposer le clavier pour produire une hauteur plus confortable
pour le chanteur tout en jouant comme vous en avez l’habitude (vous actionnez toujours les mêmes touches).
Ajouter un son complémentaire au piano
(Acoustic Layer)
Avec le HP107e, vous pouvez facilement sélectionner des
sons complétant parfaitement le son de piano et les ajouter
au son de piano. Cette fonction est appelée “Acoustic Layering”.
1
2
Vous pouvez changer la hauteur du son ajouté par octaves (p. 110).
1
Commencez par sélectionner un son de piano (p. 94).
1. Maintenez le bouton [Transpose] enfoncé puis
appuyez sur la touche correspondant à la tonique
de la gamme voulue.
Le témoin s’allume et le clavier est transposé.
Si vous maintenez le bouton [Transpose] enfoncé, la
valeur en vigueur est affichée.
Vous pouvez aussi effectuer la transposition en maintenant le bouton [Transpose] enfoncé et en appuyant sur le
bouton [–] ou [+].
Une pression simultanée sur les boutons [+] et [–] en maintenant [Transpose] enfoncé rétablit le réglage original (0).
Vous pouvez transposer le clavier sur une plage de –6~0~
5 (demi-tons).
Imaginons que vous vouliez entendre un Mi lorsque vous
enfoncez la touche Do. Maintenez le bouton [Transpose]
enfoncé et actionnez la touche Mi.
1. Appuyez sur le bouton [Acoustic Layering] (son
témoin s’allume).
Lorsque vous jouez sur le clavier, le son de piano et le son
complémentaire sont superposés.
Si vous voulez faire des superpositions avec d’autres
sons que le son de piano, choisissez un autre son comme
base.
Sélection du son à ajouter au son de piano
2. Servez-vous des boutons [–] et [+] pour choisir le
son à ajouter.
Le numéro du morceau apparaît à l’écran durant quelques
secondes.
Le numéro du son ajouté au son de piano est doté d’un
“L.” (Layer= ajout).
En comptant à partir de Do comme point de référence, il
faut compter quatre touches (noires comprises) pour
atteindre le Mi; “4” s’affiche donc.
Si vous jouez
Do Mi Sol
vous entendrez
Mi Sol# Si
Avec une valeur de transposition “0”, le témoin du bouton
reste éteint même si appuyez sur le bouton [Transpose].
Pour annuler la transposition, appuyez sur le bouton
[Transpose] (le témoin s’éteint).
Une nouvelle pression sur le bouton [Transpose] (son
témoin s’allume) transpose le clavier en fonction de la note
spécifiée ici.
Ce paramètre retrouve sa valeur originale (0) à la mise
hors tension.
98
Quand “Layer” est sélectionné comme réglage de la
pédale centrale, la fonction “Acoustic Layer” est automatiquement activée (p. 98). Dans ce cas, vous pouvez
régler le volume du son ajouté au son de piano avec la
pédale.
Lorsque vous jouez sur le clavier, le son de piano et le son
complémentaire sont superposés et produits simultanément.
HP107_e.book Page 99 Tuesday, October 19, 2004 10:41 PM
Chapitre 2. Jeu
■ Régler la balance en mode de superposition
Vous pouvez régler la balance des deux sons superposés.
Vous pouvez régler la balance de volume entre sons
superposés lorsque vous jouez en mode “Acoustic Layer”.
Quand vous changez la balance en mode “Acoustic
Layer”, la balance du mode de superposition change de la
même façon (p. 99).
1. Maintenez le bouton [Acoustic Layering] enfoncé
et appuyez sur le bouton [+] ou [–].
La balance change.
2
Vous pouvez sauvegarder ce réglage dans la mémoire du
HP107e avec la fonction de mémorisation (“Backup”)
(p. 111).
1. Maintenez le bouton [Transpose] enfoncé et
appuyez sur le bouton [Split].
Volume du son de piano
Volume du son ajouté
Lorsque vous êtes en mode de “superposition”, vous produisez deux sons simultanément en appuyant sur une seule touche. Vous pouvez sélectionner le son à superposer en
appuyant sur le bouton Tone correspondant.
Les témoins des boutons actionnés s’allument.
La balance actuelle s’affiche.
2. Appuyez sur le bouton [–] ou [+] pour changer la
valeur.
La balance change.
Vous pouvez aussi changer la balance en maintenant le
bouton [Acoustic Layering] enfoncé et en appuyant sur
le bouton [+] ou [–].
Pour revenir à la balance originale, appuyez simultanément sur les boutons [–] et [+].
FRANÇAIS
Superposer deux sons
(Superposition)
FRANÇAIS
Pour revenir à la balance originale, appuyez simultanément sur les boutons [–] et [+].
1
FRANÇAIS
■ Changer la balance en mode “Acoustic
Layer”
1. Appuyez simultanément sur les deux boutons
Tone correspondant aux sons que vous voulez
superposer.
Le témoin du bouton actionné s’allume.
Volume du bouton droit
Appuyez sur n’importe quel bouton autre que [–] [+] pour
ramener le témoin du bouton à son état précédent.
Pour quitter le mode de superposition, appuyez sur un
bouton Tone.
FRANÇAIS
Lorsque vous jouez sur le clavier, vous entendez simultanément les sons des deux boutons Tone choisis.
Volume du bouton gauche
Changer le son du bouton droit
2. Appuyez sur le bouton [–] ou [+].
La superposition comprend maintenant le son du bouton
Tone gauche et le nouveau son.
Vous pouvez changer la hauteur du son du bouton droit
par octaves (p. 110).
FRANÇAIS
Changer le son du bouton gauche
Annulez le mode superposition puis sélectionnez le son
voulu. Appuyez sur les deux boutons Tone correspondant
aux sons que vous voulez jouer ensemble.
FRANÇAIS
99
HP107_e.book Page 100 Tuesday, October 19, 2004 10:41 PM
HP107e – Chapitre 2. Jeu
Produire des sons différents
des mains gauche & droite
(Split)
Le mode “Split” partage le clavier en deux parties, une pour
la main gauche et l’autre pour la main droite; vous pouvez
ainsi jouer avec un son différent dans chaque partie. La touche où la séparation a lieu est appelée “point de partage”.
C3
Son main gauche
C4
Annulez le mode “Split” puis sélectionnez le son voulu.
En mode Split, la pédale forte (damper) n’a d’effet que
sur la partie droite du clavier. Si vous voulez que la
pédale forte s’applique aussi à la partie gauche du clavier,
voyez “Appliquer la pédale forte à la section gauche du
clavier” (p. 110).
■ Changer le point de partage du clavier
Vous pouvez déplacer le point de partage du clavier sur
une plage allant de Si1 à Si6 (B1~B6).
A l’usine, il est réglé sur “F#3”.
Point de partage (réglage usine: F#3)
A0 B0 C1 D1 E1 F1 G1 A1 B1 C2 …
Changer le son produit par la main droite
C5
Son de la main droite
1. Maintenez le bouton [Split] enfoncé et appuyez
sur la touche voulue pour le point de partage.
La touche actionnée devient le point de partage et appartient à la partie gauche du clavier.
Vous pouvez aussi changer ce réglage en appuyant sur le
bouton [–] ou [+] et en maintenant le bouton [Split]
enfoncé.
1
Une pression simultanée sur les boutons [+] et [–] en maintenant [Split] enfoncé rétablit le réglage original (F#3).
1. Appuyez sur le bouton [Split].
Le témoin du bouton s’allume. Le clavier est partagé entre
une section gauche et une section droite.
Ce point de partage fait partie de la section gauche du
clavier.
Ce point de partage est affiché de la façon suivante.
Écran
Note
Le son de la partie droite est le son utilisé avant que vous
n’actionniez le bouton [Split] tandis que le son de basse est
assigné à la partie gauche à la mise sous tension; vous pouvez cependant choisir un autre son pour la main gauche.
Pour quitter le mode “Split”, appuyez une fois de plus sur
le bouton [Split] (son témoin s’éteint).
En mode de superposition, appuyez sur le bouton [Split].
La main droite produit le son du bouton gauche du mode
de superposition et la main gauche produit un son
assorti au son de la main droite.
Vous pouvez changer la hauteur du son de la partie gauche du clavier par octaves (p. 110).
Changer le son produit par la main gauche
1. Appuyez sur n’importe quel bouton de son
(Tone).
2. Appuyez sur le bouton [–] ou [+].
Chaque pression sur le bouton [–] ou [+] change le son de
la main gauche.
Pour en savoir plus sur les sons, voyez “Tone List”
(p. 240).
100
Écran
Note
Écran
Note
C
C
d
E_
C
C
D
E
E
F
F
G
E
F
F
G
A_
A b_
b
A
A
B
B
Si vous continuez à maintenir le bouton [Split] enfoncé,
le point de partage sélectionné est affiché.
HP107_e.book Page 101 Tuesday, October 19, 2004 10:41 PM
Chapitre 2. Jeu
Avec le réglage usine, la pédale centrale fait office de pédale
sostenuto (p. 91).
Vous pouvez toutefois utiliser cette pédale à d’autres fins.
Changer le tempo
2. Appuyez sur le bouton [Song/Tempo]; le témoin
s’allume en vert.
FRANÇAIS
Changer la fonction de la
pédale centrale
3. Appuyez sur le bouton [–] ou [+] pour régler le
tempo.
Changer la mesure du métronome
4. Maintenez le bouton [Song/Tempo] enfoncé et
appuyez sur le bouton [+] ou [–].
Le type de mesure actuellement sélectionné apparaît.
1
Si vous maintenez [Song/Tempo] enfoncé en appuyant
simultanément sur les boutons [–] et [+], la mesure revient
à son réglage précédent.
1. Appuyez sur le bouton [Center Pedal] pour allumer le témoin voulu.
Correspondance entre l’affichage de tempo et la mesure
Si les fonctions “Acoustic Layer” et “Superposition”
sont coupées, la fonction “Acoustic Layer” est automatiquement activée.
Mesure
2/2
Tempo
=5–250
x/4
=10–500
3/8
=20–999
Layer. Lorsque vous appuyez sur la pédale centrale en
jouant une note sur le clavier, un son complémentaire est
ajouté au son de piano.
Vous pouvez régler le volume du son ajouté en enfonçant
la pédale plus ou moins fort.
6/8
9/8
12/8
= 7–333
■ Faire sonner le métronome
Le HP107e a un métronome interne.
Durant la reproduction d’un morceau, le métronome a le
tempo et la métrique de ce morceau.
Il est impossible de changer la mesure durant la reproduction d’un morceau ou l’enregistrement.
Écran
Mesure
Écran
Mesure
2.2
2/2
6.4
6/4
0.4
Temps faibles uniquement
7.4
7/4
2.4
2/4
3.8
3/8
3.4
3/4
6.8
6/8
4.4
4/4
9.8
9/8
5.4
5/4
12.8
12/8
FRANÇAIS
Utilisation du métronome
NOTE
FRANÇAIS
Sostenuto. La pédale fait office de pédale sostenuto
(p. 91).
Octave. Lorsque vous appuyez sur la pédale centrale en
jouant une note sur le clavier, vous entendez la note jouée
doublée de la même note produite une octave plus haut.
Vous pouvez régler le volume de la note à l’octave supérieure en variant la pression exercée sur la pédale.
FRANÇAIS
Si vous maintenez [Song/Tempo] enfoncé en appuyant
simultanément sur les boutons [–] et [+], la mesure change.
Arrêter le métronome
5. Appuyez une fois de plus sur le bouton [Metronome/Count In] (son témoin s’éteint).
Le métronome s’arrête.
■ Changer le volume du métronome
3 4 1,5 2
FRANÇAIS
Vous pouvez régler le volume du métronome selon dix
niveaux.
A la mise sous tension, ce paramètre est réglé sur “4”.
1. Tout en maintenant le bouton [Metronome/Count
In] enfoncé, actionnez le bouton [+] ou [–].
Le volume en vigueur apparaît à l’écran.
Faire sonner le métronome
1. Appuyez sur le bouton [Metronome/Count In].
Lorsque le volume du métronome est réglé sur “0”, le
métronome est inaudible.
101
FRANÇAIS
Le métronome est activé. Le témoin du bouton clignote en
rouge et vert selon le type de mesure sélectionné. Le
témoin clignote en rouge sur les temps forts et en vert sur
les temps faibles.
Maintenez le bouton [Metronome/Count In] enfoncé et
appuyez sur le bouton [+] ou [–] pour faire sonner le
métronome et changer le volume.
HP107_e.book Page 102 Tuesday, October 19, 2004 10:41 PM
HP107e – Chapitre 2. Jeu
Partager le clavier en deux sections pour jeu à 4 mains
Vous pouvez diviser le clavier en deux sections distinctes afin de permettre à deux personnes de jouer dans les mêmes registres.
C1
C3
C2
C4
C3
C4
C5
C6
1. Maintenez le bouton [Split] enfoncé et appuyez
sur le bouton [Piano].
Le témoin du bouton [Split] s’allume et vous passez en
mode de jeu à quatre mains.
C5
C3
C6
C4
C7
C5
C8
C6
● Voici ce qui se passe en mode de jeu à quatre mains:
• Le clavier est divisé en deux sections distinctes et la
hauteur change.
• La pédale de droite sert de pédale forte pour la section
droite du clavier et la pédale de gauche sert de pédale
forte pour la section gauche du clavier.
• La pédale centrale sert de pédale sostenuto pour la section droite du clavier.
2. Pour annuler la fonction, maintenez le bouton
[Split] enfoncé et appuyez une fois de plus sur le
bouton [Piano].
102
• Si l’enregistrement était en cours, il est arrêté; si l’instrument était en attente d’enregistrement, ce mode est
annulé. Le bouton [Rec] est inactif en mode de jeu à
quatre mains.
• Si la fonction “Split” était activée, elle est coupée.
• Le même son et les mêmes effets sont utilisés pour les
deux parties du clavier. Si le piano était en mode
“Split” avant le passage au mode de jeu à quatre mains,
le son sélectionné pour la main droite du mode “Split”
est utilisé.
NOTE La fonction de résonance sympathique (Damper) n’est
pas disponible en mode de jeu à quatre mains.
HP107_e.book Page 103 Tuesday, October 19, 2004 10:41 PM
Chapitre 3. Accompagner les morceaux internes
Voici comment accompagner des morceaux internes.
Pour en savoir plus sur la marche à suivre, voyez “Choisir
un morceau pour l’écouter” (p. 92).
Correspondance entre l’affichage de tempo
et la mesure
Mesure
Tempo
2/2
=5–250
x/4
=10–500
3/8
=20–999
6/8
9/8
12/8
= 7–333
FRANÇAIS
Vous pouvez ralentir la reproduction du morceau ou ne
reproduire que la partie d’une des deux mains. Avant
d’essayer de jouer le morceau, écoutez-le plusieurs fois afin
de vous en imprégner.
Si vous activez le métronome durant la reproduction du
morceau, le métronome en adopte le tempo et la métrique.
FRANÇAIS
Chapitre 3. Accompagner les morceaux internes
Affichage pour les morceaux internes
Changer le tempo
■ Ajouter un décompte (Count-In)
Lorsque vous accompagnez un morceau, vous pouvez
ajouter un décompte avant le début du morceau pour vous
préparer.
2
1
Certains morceaux internes ont un tempo qui change au
cours du morceau.
L’instrument produit deux mesures de préparation appelées “décompte”.
Sur le HP107e, si vous reproduisez un morceau tandis que
le métronome est activé, vous entendez un décompte de
deux mesures au début du morceau.
Durant le décompte, les deux mesures préludant au morceau sont affichées comme suit: “–2” puis “–1”.
“Faire sonner le métronome” à la page 101
1. Appuyez sur le bouton [Song/Tempo] de sorte à
allumer son témoin en vert.
FRANÇAIS
Choisissez le morceau à reproduire (p. 92).
FRANÇAIS
Si le morceau a un tempo rapide, vous pouvez le ralentir
pour faciliter vos exercices. Augmentez ensuite progressivement le tempo quand vous vous sentez plus sûr de
vous.
USr (utilisateur) … La mémoire où vous pouvez enregistrer votre jeu. (Pour en savoir plus sur l’enregistrement → p. 105)
S.1~S.68 … Morceaux internes
S. U … Morceau sauvegardé avec la fonction “Song
Backup” (p. 111)
La valeur de tempo actuelle s’affiche.
Chaque pression sur le bouton [Song/Tempo] affiche à
tour de rôle le tempo et le numéro de morceau (précédé de
“S.”).
FRANÇAIS
Quand le tempo est affiché, le témoin du bouton [Song/
Tempo] s’allume en vert. Quand le numéro de morceau est
affiché, ce témoin s’allume en rouge.
2. Appuyez sur le bouton [–] ou [+] pour régler le
tempo.
Vous pouvez régler le tempo selon la plage suivante: q=
10~500. Vous pouvez aussi changer le tempo pendant la
reproduction.
Une pression sur le bouton [+] augmente le tempo d’une
unité. Si vous maintenez le bouton enfoncé, le tempo augmente de façon continue.
FRANÇAIS
Une pression sur le bouton [–] diminue le tempo d’une
unité. Maintenez le bouton enfoncé pour ralentir le tempo
de façon continue.
Si vous appuyez simultanément sur les boutons [–] et [+],
vous retrouvez le tempo de base du morceau (le tempo en
vigueur avant vos changements).
103
HP107_e.book Page 104 Tuesday, October 19, 2004 10:41 PM
HP107e – Chapitre 3. Accompagner les morceaux internes
Écouter séparément la partie
d’une main
Reproduire un morceau
2. Appuyez sur le bouton [Play] (son témoin
s’allume).
Les morceaux internes vous permettent de sélectionner la
partie à reproduire.
La reproduction du morceau commence. La partie sélectionnée à l’étape 1 est inaudible.
La partie de la main gauche des morceaux internes est assignée au bouton [Left] et la partie de la main droite au bouton
[Right]. Chaque partie du morceau est sur une “piste” et les
boutons [Left] et [Right] sont appelés “boutons de piste”.
Entraînez-vous de la main droite en écoutant la partie de
la main gauche.
Boutons de piste
Main
gauche
Partie de la
main droite
Left
Right
Appuyez à nouveau sur le bouton choisi à l’étape 1. Le
témoin du bouton s’allume et la partie coupée est de nouveau audible.
Vous pouvez appuyer sur les boutons de piste durant la
reproduction du morceau pour couper/activer la partie
correspondante.
Arrêter le morceau
Voici comment vous exercer à jouer de chaque main séparément tout en accompagnant le morceau.
2, 3 1
Choisissez le morceau à reproduire (p. 92).
Sélectionner la partie à jouer
1. Appuyez sur le bouton [Left] ou [Right].
Le témoin du bouton s’éteint et la partie correspondante
n’est plus audible.
Si, par exemple, vous voulez vous entraîner à jouer la partie de la main droite, appuyez sur le bouton [Right] pour
éteindre son témoin. Lorsque vous écoutez le morceau,
vous n’entendez plus la partie de la main droite.
104
3. Appuyez une fois de plus sur le bouton [Play] (son
témoin s’éteint).
La reproduction s’arrête.
HP107_e.book Page 105 Tuesday, October 19, 2004 10:41 PM
Chapitre 4. Enregistrer votre jeu
FRANÇAIS
Chapitre 4. Enregistrer votre jeu
Vous pouvez facilement enregistrer votre jeu.
Vous pouvez ensuite écouter l’enregistrement pour vérifier
votre jeu ou ajouter des parties supplémentaires.
Vous pouvez effectuer les types d’enregistrement suivants
avec le HP107e.
• Enregistrer avec un morceau interne (→ “Enregistrer
avec un morceau interne” p. 106)
Fonction
Piste gauche
Piste droite
Layer
Son ajouté
Son de piano
Octave
Son ajouté (une octave plus
haut)
Son original
* Si vous utilisez la méthode B ou C pour enregistrer plusieurs
sons, appuyez simultanément sur les boutons [Left] et [Right]
avant l’enregistrement (les boutons clignotent).
FRANÇAIS
• Enregistrer votre jeu sur le clavier (→ “Enregistrer un
nouveau morceau” p. 105 )
C. Enregistrer avec la fonction “Layer” ou “Octave” assignée à
la pédale centrale
• Enregistrer chaque partie séparément (→ “Enregistrer
séparément la partie de chaque main” p. 107)
Remarques concernant l’enregistrement
• Vous ne pouvez enregistrer qu’un seul morceau.
Si le “message” suivant apparaît…
3
2 1 4 6,8 5,7
Le HP107e a une fonction de sauvegarde de morceau
(“Backup”) (p. 111) qui vous permet de sauvegarder le
morceau enregistré avec le HP107e dans la mémoire de
l’instrument.
Enregistrer les réglages (sélectionner “USr”)
1. Appuyez sur le bouton [Song/Tempo] pour allumer son témoin en rouge.
FRANÇAIS
Si vous essayez d’effectuer un enregistrement alors qu’une
exécution a déjà été enregistrée, l’affichage suivant apparaît (“Delete”: effacer?) et le témoin du bouton [Record]
clignote.
Vous n’enregistrez que votre jeu sur le clavier sans accompagner un morceau interne.
FRANÇAIS
• Le HP107e a une fonction de sauvegarde de morceau
(“Backup”) (p. 111) qui vous permet de sauvegarder le
morceau enregistré avec le HP107e dans la mémoire de
l’instrument. L’enregistrement qui n’a pas été sauvegardé avec la fonction “Song Backup” est supprimé à la
mise hors tension. N’oubliez pas de sauvegarder l’enregistrement que vous voulez conserver. Vous pouvez
l’enregistrer sur un appareil audio externe ou vous servir d’un appareil MIDI pour consigner les données sur
disquette. Pour en savoir plus, voyez “Chapitre 6. Connexion d’appareils externes” (p. 113).
Enregistrer un nouveau
morceau
Le numéro du morceau apparaît à l’écran.
Si vous souhaitez effacer le morceau, appuyez sur le bouton [Rec].
Si vous ne voulez pas effacer l’enregistrement, appuyez
sur le bouton [Play].
A. Enregistrer sans choisir de piste
Si les pistes gauche et droite ne contiennent pas de données, les données sont enregistrées sur la piste droite. Si
une des pistes (gauche ou droite) contient des données, les
données sont enregistrées sur la piste vide.
B. Enregistrer en mode de superposition, “Acoustic Layer” ou
“Split”
Piste gauche
Piste droite
Superposition
Son du bouton Tone de
droite
Son du bouton Tone de gauche
Acoustic Layer
Son ajouté
Son de piano
Split
Son de la partie gauche
Son de la partie droite
3. Sélectionnez un son (p. 94).
4. Si vous le souhaitez, activez le métronome.
Faites fonctionner le métronome pour choisir le tempo et
la métrique du morceau (p. 101).
NOTE Si vous ajoutez de nouvelles données sans effacer le morceau déjà enregistré, le tempo et la métrique du premier
enregistrement sont en vigueur.
5. Appuyez sur le bouton [Rec].
Le témoin du bouton [Rec] s’allume et le témoin du bouton
[Play] clignote: vous êtes en mode d’attente d’enregistrement.
105
FRANÇAIS
Fonction
Choisir un son et un tempo pour l’enregistrement
FRANÇAIS
A propos des pistes enregistrées
2. Appuyez simultanément sur les boutons [–] et [+];
“USr” apparaît à l’écran.
HP107_e.book Page 106 Tuesday, October 19, 2004 10:41 PM
HP107e – Chapitre 4. Enregistrer votre jeu
Lancer l’enregistrement.
6. L’enregistrement commence dès que vous
appuyez sur [Play] ou jouez sur le clavier.
Un décompte de deux mesures précède l’enregistrement.
Notez que l’enregistrement commence dès que vous jouez
quelque chose sur le clavier même si vous n’avez pas
appuyé sur le bouton [Play]. Lorsque vous lancez l’enregistrement de cette manière, il n’y a pas de décompte.
Lorsque l’enregistrement commence, le témoin des boutons [Play] et [Rec] s’allument.
Jouez sur le clavier.
Arrêter l’enregistrement
Enregistrer avec un morceau
interne
Voici comment enregistrer votre accompagnement des
morceaux internes.
Le HP107e a une fonction de sauvegarde de morceau
(“Backup”) (p. 111) qui vous permet de sauvegarder le
morceau enregistré avec le HP107e dans la mémoire de
l’instrument.
Vous pouvez utiliser le bouton [Left] ou [Right] pour
n’enregistrer, par exemple, que la partie de la main droite
d’un morceau tout en écoutant la partie de la main gauche
du morceau interne.
7. Appuyez sur le bouton [Play] ou [Rec].
L’enregistrement s’arrête et les témoins des boutons [Play]
et [Rec] s’éteignent.
Affichage “USr”
Lorsque vous arrêtez l’enregistrement, l’affichage
“
” se mue en “
”.
Le point “.” dans le coin inférieur droit de l’écran indique la présence de données enregistrées.
Écouter l’enregistrement
8. Appuyez sur le bouton [Play].
Vous entendez l’enregistrement.
Appuyez une fois de plus sur le bouton [Play] pour arrêter
la reproduction.
Si vous enregistrez une exécution sans choisir de piste,
elle est enregistrée sur la piste [Right].
Pour enregistrer les mains gauche et droite sur une piste
différente, voyez “Enregistrer séparément la partie de
chaque main” (p. 107).
2 1 3 6,8 4,7 5
Sélectionner le morceau à enregistrer
1. Appuyez sur le bouton [Song/Tempo] pour allumer son témoin en rouge.
L’écran affiche le numéro du morceau.
2. Utilisez les boutons [–] ou [+] pour choisir le
numéro du morceau voulu.
3. Si nécessaire, réglez le métronome et le tempo
(p. 101).
4. Appuyez sur le bouton [Rec].
Le témoin du bouton [Rec] s’allume.
Sélectionner la piste à enregistrer
5. Appuyez sur le bouton [Left] ou [Right].
Pour enregistrer la partie de la main gauche, appuyez sur
le bouton [Left] et pour enregistrer celle de la main droite,
appuyez sur le bouton [Right].
Les témoins du bouton que vous avez actionné et du bouton [Play] clignotent et le HP107e passe en mode d’attente
d’enregistrement.
Si “dEL” apparaît à l’écran, voyez p. 105.
Lancer l’enregistrement
6. Appuyez sur le bouton [Play].
L’enregistrement commence après un décompte de deux
mesures.
Jouez en accompagnant le morceau.
Arrêter l’enregistrement
7. Appuyez sur le bouton [Play] ou [Rec].
L’enregistrement s’arrête et les témoins des boutons [Play]
et [Rec] s’éteignent.
L’enregistrement est sauvegardé dans la mémoire “USr
(User)” (utilisateur).
106
HP107_e.book Page 107 Tuesday, October 19, 2004 10:41 PM
Chapitre 4. Enregistrer votre jeu
Lancer l’enregistrement.
8. Appuyez sur le bouton [Play].
4. Appuyez sur le bouton [Play].
Vous entendez l’enregistrement.
Appuyez une fois de plus sur le bouton [Play] pour arrêter
la reproduction.
Enregistrer séparément la
partie de chaque main
Si vous voulez recommencer un enregistrement, vous
pouvez ne réenregistrer qu’une seule piste.
Notez que l’enregistrement commence dès que vous jouez
quelque chose sur le clavier même si vous n’avez pas
appuyé sur le bouton [Play]. Lorsque vous lancez l’enregistrement de cette manière, il n’y a pas de décompte.
Arrêter l’enregistrement
5. Appuyez sur le bouton [Play] ou [Rec].
L’enregistrement s’arrête et les témoins des boutons [Play]
et [Rec] s’éteignent.
Votre exécution est enregistrée sur la piste correspondant
au bouton choisi.
Pour enregistrer sur l’autre piste, retournez à l’étape 2
pour enregistrer votre jeu. Vous pouvez enregistrer tout
en écoutant l’enregistrement précédent.
Écouter l’enregistrement
6. Appuyez sur le bouton [Play].
Appuyez une fois de plus sur le bouton [Play] pour arrêter
la reproduction.
NOTE
Pour enregistrer un nouveau morceau, suivez les instructions données aux étapes 1 et 2 de la section “Enregistrer
un nouveau morceau” (p. 105) pour sélectionner “USr”. Si
vous voulez enregistrer en accompagnant un morceau
interne ou un morceau enregistré, sélectionnez le morceau
comme indiqué aux étapes 1 et 2 de la section “Choisir un
morceau pour l’écouter” (p. 92).
1. Si vous le souhaitez, activez le métronome (p. 101).
2. Appuyez sur le bouton [Rec].
Vous pouvez effacer un enregistrement.
■ Effacer un enregistrement de la piste choisie
Vous pouvez choisir une piste enregistrée et l’effacer.
Maintenez le bouton [Left] ou [Right] enfoncé et
appuyez sur le bouton [Rec].
Le témoin du bouton actionné s’éteint et les données enregistrées sur cette piste sont effacées.
■ Effacer un morceau
Vous pouvez effacer un morceau que vous avez enregistré.
Maintenez le bouton [Song/Tempo] enfoncé et
appuyez sur le bouton [Rec].
L’affichage suivant apparaît et le témoin du bouton [Rec]
clignote.
Les témoins des boutons de pistes contenant déjà des données s’allument.
FRANÇAIS
Le témoin du bouton [Rec] s’allume et le témoin du bouton
[Play] clignote: vous êtes en mode d’attente d’enregistrement.
Effacer une exécution
enregistrée
FRANÇAIS
Si vous ajoutez de nouvelles données sans effacer le morceau déjà enregistré, le tempo, la métrique et les réglages
de métronome du premier enregistrement sont en
vigueur.
FRANÇAIS
Vous entendez l’enregistrement.
1 4,6 2,5 3
FRANÇAIS
L’enregistreur du HP107e a deux pistes, ce qui vous permet d’enregistrer séparément les parties des mains droite
et gauche. Utilisez le bouton [Left] ou [Right] pour sélectionner la piste d’enregistrement.
Le HP107e a une fonction de sauvegarde de morceau
(“Backup”) (p. 111) qui vous permet de sauvegarder le
morceau enregistré avec le HP107e dans la mémoire de
l’instrument.
Un décompte de deux mesures précède l’enregistrement.
Jouez sur le clavier.
FRANÇAIS
Écouter l’enregistrement
Le bouton de la piste sur laquelle vous allez enregistrer clignote.
3. Appuyez sur le bouton [Left] ou [Right] pour
éteindre le bouton de la piste ne devant pas être
enregistrée.
7. Appuyez à nouveau sur le bouton [Rec].
L’enregistrement est effacé.
FRANÇAIS
Les boutons de piste vous permettent d’enregistrer sur
une piste à la fois, la piste [Left] ou [Right].
Si vous renoncez à effacer l’enregistrement, appuyez sur le
bouton [Play] ou [Song/Tempo].
107
HP107_e.book Page 108 Tuesday, October 19, 2004 10:41 PM
HP107e – Chapitre 5. Changer divers réglages
Chapitre 5. Changer divers réglages
Réglages détaillés
Bouton
Fonction
Page
Canal de transmission MIDI
Vous pouvez effectuer des réglages concernant notamment
l’accord global et la gamme du piano.
Passer en mode de réglage
1. Appuyez simultanément sur les boutons [Split] et
[Chorus].
Le HP107e passe en mode de réglage.
Piano Resonance
[Strings]
p. 115
Réglages du pilote USB
Piano Resonance
[Damper]
Les témoins des boutons [Split] et [Chorus] ainsi que
celui du bouton auquel le paramètre est assigné clignotent.
p. 112
Mémorisation des réglages
[Metronome/
Count In]
p. 111
Mémorisation de morceau
Effectuer différents réglages
p. 111
[Song/Tempo]
2. Appuyez sur le bouton assigné au paramètre
voulu.
Les témoins du bouton actionné, du bouton [Split] et du
bouton [Chorus] clignotent.
V-LINK
p. 112
[Right]
Le nom de la fonction assignée au bouton apparaît à
l’écran tant que vous maintenez le bouton enfoncé.
Transmission d’un enregistrement
Bouton
Fonction
Page
p. 108
[Piano]
Mode “Grand Space”
p. 110
[Grand Space]
Gamme
p. 109
[E. Piano]
p. 115
[Left]
Diapason
Réglages d’usine
Key Touch
[Touch]
Accord étiré
p. 111
p. 109
[Harpsichord]
Pour en savoir plus, voyez les explications données plus
loin.
Transposition par octave
p. 110
[Organ]
3. Appuyez sur le bouton [–] ou [+] pour changer la
valeur.
Une pression simultanée sur les boutons [–] et [+] rétablit
les réglages d’usine.
Appliquer la pédale forte à la section gauche du clavier.
Quitter le mode de réglage
p. 110
[Strings]
4. Appuyez sur le bouton [Split] ou [Chorus].
Le témoin du bouton retrouve son état antérieur.
■ Changer l’accord global (diapason)
Local On/Off
Piano Resonance
[Key Off]
108
p. 115
Lorsque vous jouez avec d’autres instruments, vous pouvez accorder la hauteur de référence (diapason) du
HP107e en fonction d’un autre instrument. La hauteur de
référence est généralement déterminée par le La central.
HP107_e.book Page 109 Tuesday, October 19, 2004 10:41 PM
Chapitre 5. Changer divers réglages
Si vous appuyez sur le bouton [Piano] à l’étape 2 de la
section “Réglages détaillés” (p. 108), un affichage ressemblant au suivant apparaît.
415.3Hz~440.0Hz~466.2Hz
Valeur
Réglage d’usine 440.0Hz
Ce réglage reste en vigueur jusqu’à la mise hors tension.
* Vous pouvez sauvegarder ce réglage dans la mémoire du
HP107e avec la fonction de mémorisation (“Backup”) (p. 111).
Gamme
Description
7
Pythagoricienne
Gamme conçue par Pythagore afin d’éliminer la dissonance des quartes et des quintes.
La dissonance est produite par des accords
basés sur des tierces mais les mélodies sont
euphoniques.
8
Werckmeister
Combinaison des gammes moyenne et
pythagoricienne. Elle peut être utilisée avec
toutes les tonalités (première technique, III).
Réglage d’usine 1 C
Tonique
Lorsque vous jouez avec une autre gamme que le tempérament égal, il faut spécifier la tonique en fonction du
morceau (c.-à-d. la note correspondant à Do pour une
tonalité majeure ou à La pour une tonalité mineure).
Maintenez le bouton [E. Piano] enfoncé et appuyez sur
une touche pour spécifier la tonique.
La tonique choisie est affichée comme suit.
■ Changer la gamme
Vous pouvez jouer des morceaux classiques (baroques,
par exemple) avec des gammes anciennes.
Si vous appuyez sur le bouton [E.Piano] à l’étape 2 de la
section “Réglages détaillés” (p. 108), un affichage ressemblant au suivant apparaît.
Écran
C
C
d
E_
E
F
F
G
A_ A
b_
b
Note
C
C
D
E
E
F
F
G
A
B
B
A
Si vous optez pour le tempérament égal, il n’est pas
nécessaire de choisir une tonique.
* Si vous enregistrez avec une gamme autre que le tempérament
égal, effectuez ce réglage avant la reproduction du morceau
pour sélectionner la gamme utilisée lors de l’enregistrement.
* Lorsque vous jouez avec d’autres instruments, sachez que,
selon la tonalité, il peut y avoir un certain décalage de hauteur.
Mettez donc le HP107e au diapason des autres instruments.
* Vous pouvez sauvegarder ce réglage dans la mémoire du
HP107e avec la fonction de mémorisation (“Backup”) (p. 111).
Tonique
Vous avez le choix parmi les huit gammes décrites ci-dessous.
Écran
1
Description
Tempérament égal
Cette gamme divise l’octave en 12 unités
égales. Chaque intervalle produit une légère
dissonance de même ampleur.
Juste
majeure
Cette gamme élimine les ambiguïtés dans
les quintes et les tierces. Elle n’est pas indiquée pour jouer des mélodies et ne peut pas
être transposée mais elle peut générer de
superbes sonorités.
Les gammes justes se distinguent par la
tonalité majeure et mineure. Cette gamme
produit le même effet que la gamme juste
majeure mais permet de jouer en mineur.
4
Arabe
Gamme idéale pour la musique orientale.
5
Kirnberger
Résulte des améliorations apportées à la
gamme moyenne et aux gammes justes; elle
tolère la transposition. Elle peut être utilisée
avec toutes les tonalités (III).
Moyenne
Cette gamme fait quelques compromis au
niveau de l’intonation juste, ce qui permet la
transposition vers d’autres tonalités.
3
6
OFF
On
Il s’agit de la courbe d’accord standard. Cette
courbe est idéale pour le jeu avec superposition
de sons (p. 99) ou pour accompagner d’autres instruments.
Cette courbe étire légèrement le grave et l’aigu.
Elle est recommandée pour des solos de piano,
par exemple.
Réglage d’usine On
* Cet effet ne fonctionne qu’avec les sons de piano.
* Vous pouvez sauvegarder ce réglage dans la mémoire du
HP107e avec la fonction de mémorisation (“Backup”) (p. 111).
109
FRANÇAIS
Juste
mineure
Si vous appuyez sur le bouton [Harpsichord] à l’étape 2
de la section “Réglages détaillés” (p. 108), un affichage
ressemblant au suivant apparaît.
FRANÇAIS
2
Gamme
Un piano est généralement accordé avec des graves plus
bas et des aigus plus hauts que le tempérament égal.
Cette méthode d’accord pour piano est appelée “accord
étiré”.
FRANÇAIS
■ Réglage de la courbe d’accord (accord étiré)
FRANÇAIS
Actuellement, les compositions sont généralement écrites
et jouées selon le tempérament égal. L’histoire de la musique a toutefois connu de nombreuses gammes différentes. Ces réglages de gamme vous permettent donc de
retrouver des sonorités d’accords telles que le compositeur les avait imaginées.
Gamme
FRANÇAIS
Les trois derniers chiffres de la hauteur de référence
apparaissent à l’écran. L’illustration ci-dessus affiche
“440.0Hz”.
Écran
FRANÇAIS
Cet accord de tous les instruments en fonction d’une hauteur de référence est appelé “accord global”.
HP107_e.book Page 110 Tuesday, October 19, 2004 10:41 PM
HP107e – Chapitre 5. Changer divers réglages
■ Transposition par octave
Vous pouvez transposer par octaves le son de la partie
gauche du clavier en mode “Split” (p. 100), le son de
droite en mode de superposition (p. 99) et le son ajouté en
mode “Acoustic Layer” (p. 98). Cette fonction s’appelle
“Octave Shift”.
■ Changer le mode d’application de “Grand
Space”
Si vous appuyez sur le bouton [Grand Space] à l’étape 2
de la section “Réglages détaillés” (p. 108), un affichage
ressemblant au suivant apparaît.
Si vous appuyez sur le bouton [Organ] à l’étape 2 de la
section “Réglages détaillés” (p. 108), un affichage ressemblant au suivant apparaît.
Vous pouvez transposer sur une plage allant de deux
octaves plus bas (–2) à deux octaves plus haut (+2) que la
hauteur originale.
* Certaines transpositions à l’octave peuvent produire des sons
excédant la plage recommandée, des sons difficiles à écouter
voire des sons d’un timbre ou d’une hauteur peu naturelle.
■ Appliquer la pédale forte à la section gauche
du clavier
Si vous êtes en mode Split (p. 100), vous pouvez appliquer l’effet de la pédale forte au son joué dans la partie
gauche du clavier.
Si vous appuyez sur le bouton [String] à l’étape 2 de la
section “Réglages détaillés” (p. 108), un affichage ressemblant au suivant apparaît.
On
OFF
La pédale forte s’applique aux parties gauche et
droite du clavier.
La pédale forte ne s’applique pas à la partie gauche du clavier.
Réglage d’usine OFF
* Vous pouvez sauvegarder ce réglage dans la mémoire du
HP107e avec la fonction de mémorisation (“Backup”) (p. 111).
Réglage
Description
1
Quand un casque est branché, la profondeur est
optimisée pour casque; si aucun casque n’est branché, la profondeur est optimisée pour hautparleurs.
2
La profondeur optimisée pour haut-parleurs est utilisée, qu’un casque soit branché ou non.
L’effet “Grand Space” est également appliqué au
signal de sortie, ce qui vous permet d’en bénéficier
lorsque vous branchez des enceintes aux sorties.
3
La profondeur est optimisée pour casque, qu’un
casque soit branché ou non.
* Vous pouvez sauvegarder ce réglage dans la mémoire du
HP107e avec la fonction de mémorisation (“Backup”) (p. 111).
Mode Piano uniquement
Le mode Piano uniquement bloque le HP107e dans un état
qui n’autorise que le jeu de piano; tous les boutons sont
désactivés. Cette fonction est souvent utile, notamment lorsque des enfants utilisent le piano: ils risquent d’actionner certains boutons par inadvertance et de changer ainsi de précieux réglages.
Avec ce mode, vous n’avez accès qu’au son de piano.
1. Diminuez le volume au minimum et actionnez le
commutateur [Power On] pour couper l’alimentation.
2. Maintenez le bouton [Piano] enfoncé et appuyez
sur le commutateur [Power On] pour remettre
l’instrument sous tension.
Maintenez ces deux boutons enfoncés durant quelques
secondes.
L’écran affiche ce qui suit.
Tous les boutons sont désactivés.
Réglez le volume.
Lorsque vous jouez sur le clavier, vous n’entendez que le
son du piano à queue.
Pour couper le mode Piano uniquement, réglez le volume
au minimum et remettez l’instrument sous tension.
110
HP107_e.book Page 111 Tuesday, October 19, 2004 10:41 PM
Chapitre 5. Changer divers réglages
Mémorisation de morceaux
(Song Backup)
Les paramètres du HP107e peuvent retrouver leur réglage
d’usine.
Normalement les morceaux enregistrés sont effacés à la mise
hors tension HP107e. Cependant, vous pouvez conserver vos
enregistrements même après la mise hors tension. Il suffit de
les mémoriser (Song Backup).
* Les morceaux sauvegardés avec la fonction de mémorisation de
morceau (p. 111) ne sont pas effacés lors de ce rappel des réglages d’usine.
Le HP107e passe en mode de réglage.
2. Appuyez sur le bouton Key Touch [Touch].
L’indication suivante apparaît.
* Pour mémoriser un morceau, il faut évidemment l’enregistrer
au préalable.
1. Maintenez le bouton [Split] enfoncé et appuyez
sur le bouton [Chorus].
Le HP107e passe en mode de réglage.
2. Appuyez sur le bouton [Song/Tempo].
Le témoin clignote.
FRANÇAIS
1. Maintenez le bouton [Split] enfoncé et appuyez
sur le bouton [Chorus].
FRANÇAIS
Rappel des réglages usine
(Factory Reset)
L’indication suivante apparaît.
3. Appuyez sur le bouton [Rec].
Le rappel des réglages d’usine est terminé.
3. Appuyez sur le bouton [Rec].
L’enregistrement est mémorisé.
Une fois la mémorisation du morceau terminée, l’écran et
les témoins des boutons retrouvent leur apparence normale.
* Ne coupez pas l’alimentation tant que l’écran n’affiche pas le
message “End” (fin). Si vous coupez l’alimentation avant que
ce message n’apparaisse, vous risquez d’endommager la
mémoire interne du HP107e et de rendre l’instrument inutilisable.
* Vous pouvez sélectionner et écouter un morceau enregistré
comme vous le faites pour un morceau interne (p. 92). Le morceau mémorisé est indiqué de la façon suivante à l’écran.
■ Effacer un morceau mémorisé
Normalement, les divers paramètres retrouvent leur réglage
par défaut à la mise hors tension. Cependant, vous pouvez
conserver les réglages même après la mise hors tension. Il
suffit de les mémoriser.
2. Appuyez sur le bouton [Song/Tempo].
1. Maintenez le bouton [Split] enfoncé et appuyez
sur le bouton [Chorus].
FRANÇAIS
Mémorisation des réglages
(Backup)
FRANÇAIS
Pour signaler la fin de l’opération, l’affichage suivant
apparaît. Mettez alors l’appareil hors tension.
L’indication suivante apparaît.
* Pour en savoir plus sur les réglages mémorisables, voyez
“Paramètres dont le réglage peut être mémorisé” (p. 117).
1. Maintenez le bouton [Split] enfoncé et appuyez
sur le bouton [Chorus].
2. Appuyez sur le bouton [Metronome/Count In].
Le témoin clignote.
L’indication suivante apparaît.
3. Appuyez sur le bouton [Rec].
Le morceau mémorisé est effacé.
L’écran et les témoins des boutons retrouvent leur apparence normale.
FRANÇAIS
Le HP107e passe en mode de réglage.
Pour annuler l’opération, appuyez sur [Play].
3. Appuyez sur le bouton [Rec].
FRANÇAIS
Les réglages sont mémorisés.
Une fois la mémorisation des réglages terminée, l’écran et
les témoins des boutons retrouvent leur apparence normale.
111
HP107_e.book Page 112 Tuesday, October 19, 2004 10:41 PM
HP107e – Chapitre 5. Changer divers réglages
Utiliser la fonction V-LINK
Réglages pour le pilote USB
Vous pouvez brancher le HP107e à un appareil de traitement d’image compatible V-LINK afin de piloter les images à
partir du HP107e.
Si vous avez l’intention de brancher un ordinateur au connecteur USB, effectuez les réglages suivants au préalable.
V-LINK
V-LINK (
) est un système soutenu par Roland
permettant de lier les données musicales aux données
d’image. Si vous utilisez du matériel vidéo compatible VLINK, vous pouvez facilement lier des effets visuels aux
effets sonores et conférer plus d’expression encore à votre
jeu.
1. Maintenez le bouton [Split] enfoncé et appuyez
sur le bouton [Chorus].
Le HP107e passe en mode de réglage.
2. Appuyez sur le bouton Piano Resonance [Damper].
Le témoin clignote.
L’indication suivante apparaît.
V-LINK: mode d’emploi
1. Maintenez le bouton [Split] enfoncé et appuyez
sur le bouton [Chorus].
Le HP107e passe en mode de réglage.
2. Appuyez sur le bouton [Right].
Le témoin clignote.
L’indication suivante apparaît.
OFF
On
La fonction V-LINK est coupée.
La fonction V-LINK est activée. Vous pouvez
contrôler les images en vous servant des douze
touches situées à l’extrémité gauche du clavier.
Réglage d’usine OFF
3. Appuyez simultanément sur les boutons [–] et [+]
pour activer/couper la fonction V-LINK.
Vous pouvez contrôler les images en vous servant des
douze touches situées à l’extrémité gauche du clavier.
* Quand la fonction V-LINK est active, les douze touches de
l’extrémité gauche du clavier ne produisent aucun son lorsque
vous les actionnez.
Quitter le mode de réglage
4. Appuyez sur le bouton [Split] ou [Chorus].
Le témoin du bouton retrouve son état original.
112
3. Appuyez sur le bouton [–] ou [+] pour sélectionner
le pilote.
Affichage
Description
vdr (Vendor)
Sélectionnez ce réglage lorsque vous utilisez le
pilote fourni pour établir une connexion USB.
GEn (Generic)
Sélectionnez ce réglage lorsque vous utilisez
un pilote USB générique du système d’exploitation pour établir une connexion USB.
Quitter le mode de réglage
4. Appuyez sur le bouton [Split] ou [Chorus].
Le témoin du bouton retrouve son état original.
HP107_e.book Page 113 Tuesday, October 19, 2004 10:41 PM
Chapitre 6. Connexion d’appareils externes
Connexion à du matériel
audio
Écouter le signal d’un appareil audio avec
les haut-parleurs du HP107e
Output R/L (Line Out,
Aux Out)
FRANÇAIS
En branchant le HP107e à du matériel audio, vous pouvez
écouter le son du piano avec une installation audio ou enregistrer votre jeu sur cassette ou tout autre support.
HP107e
Pour effectuer ces connexions, utilisez un câble audio doté
d’une fiche standard (vendu séparément).
Exemples de connexion
* Pour éviter tout dysfonctionnement et pour ne pas endommager les enceintes ou les autres périphériques, diminuez le
volume et coupez l’alimentation de tous les appareils avant
d’effectuer les connexions.
Input R/L (Line In,
Aux In)
HP107e
❍ Procédez comme suit pour la mise sous tension.
1. Mettez l’appareil branché sous tension.
2. Mettez le HP107e sous tension.
3. Réglez le volume de chaque appareil.
* Il est impossible de régler le niveau du signal d’entrée sur le
HP107e; réglez donc le niveau sur l’appareil source.
Mise hors tension
1. Réglez le volume du HP107e et des appareils branchés au minimum.
FRANÇAIS
Amplification du signal du HP107e par des
enceintes externes ou enregistrement de
votre jeu sur un enregistreur
FRANÇAIS
Chapitre 6. Connexion d’appareils externes
2. Mettez le HP107e hors tension.
3. Mettez le matériel externe hors tension.
❍ Procédez comme suit pour la mise sous tension.
1. Mettez le HP107e sous tension.
2. Mettez l’appareil branché sous tension.
3. Réglez le volume de chaque appareil.
* Vous pouvez régler le volume d’un module branché avec le
HP107e.
Lors de l’enregistrement de votre jeu sur le HP107e avec
un enregistreur
5. Jouez sur le HP107e.
6. Quand vous avez terminé, arrêtez l’enregistrement
sur l’appareil externe.
113
FRANÇAIS
* Avant de brancher votre ordinateur pour la première fois au
HP107e, installez le pilote “USB Driver” se trouvant sur le
CD-ROM fourni. Pour en savoir plus, voyez le fascicule
“USB Installation Guide”.
* Vous ne pouvez transmettre que des données MIDI via USB.
* Pour éviter tout dysfonctionnement et pour ne pas endommager les enceintes ou les autres périphériques, diminuez le
volume et coupez l’alimentation de tous les appareils avant
d’effectuer les connexions.
* Le câble USB n’est pas fourni. Si vous souhaitez en acquérir
un, veuillez consulter votre revendeur Roland.
* Servez-vous d’un câble USB d’une longueur maximale de 3m.
* Mettez le HP107e sous tension avant de lancer une application MIDI sur l’ordinateur. Ne mettez pas le HP107e sous/
hors tension tant qu’une application MIDI tourne.
* Évitez de brancher ou de débrancher le câble USB tant que le
HP107e est sous tension.
* Si vous n’utilisez pas la connexion USB, débranchez le câble
USB du HP107e.
* Si, au cours de la transmission/réception de données, l’ordinateur passe en mode de veille ou de suspension, ou si l’alimentation est établie ou coupée, l’ordinateur peut planter et le
HP107e peut devenir instable.
FRANÇAIS
4. Lancez l’enregistrement sur l’appareil externe.
Vous pouvez vous servir du port USB pour brancher le
HP107e à votre ordinateur. Pour en savoir plus, voyez le
fascicule “USB Installation Guide”.
FRANÇAIS
Connexion au port USB
HP107_e.book Page 114 Tuesday, October 19, 2004 10:41 PM
HP107e – Chapitre 6. Connexion d’appareils externes
Connexion d’appareils MIDI
En branchant un appareil MIDI, vous pouvez échanger
des données de jeu et piloter un appareil avec l’autre.
Vous pouvez, par exemple, produire des sons ou changer de son sur l’autre instrument.
■ Qu’est-ce que MIDI?
MIDI (Musical Instruments Digital Interface= interface
numérique pour instruments de musique) est une norme
mondiale destinée à l’échange de données musicales
entre instruments électroniques et ordinateurs.
Le HP107e est pourvu de prises MIDI qui permettent
d’échanger des données de jeu avec des appareils ou instruments externes. Grâce à ces prises, les possibilités de
votre HP107e sont considérablement élargies.
* Une publication distincte, “MIDI Implementation”, est également disponible. Elle détaille de façon très complète l’équipement MIDI disponible sur cet appareil. Si vous souhaitez vous
procurer cette publication (pour effectuer de la programmation
au niveau de l’octet, par exemple), veuillez contacter le SAV
Roland le plus proche ou un revendeur Roland agréé.
Exemples de connexion
* Pour éviter tout dysfonctionnement et pour ne pas endommager les enceintes ou les autres périphériques, diminuez le
volume et coupez l’alimentation de tous les appareils avant
d’effectuer les connexions.
Piloter le HP107e à partir d’un séquenceur
MIDI/Enregistrer des données de jeu du
HP107e sur un séquenceur MIDI
Série MT
* Le MT-90s n’a pas de
prise MIDI Out.
Out
MIDI
In
HP107e
* Optez pour le réglage “Local Off” si vous avez branché le
HP107e à un séquenceur MIDI. Voyez “Activer/couper la
fonction Local (On/Off)” (p. 115). Réglez aussi le séquenceur
MIDI en mode MIDI Thru (les messages reçus via la prise
MIDI IN sont retransmis tels quels via MIDI OUT). Pour en
savoir plus, voyez le mode d’emploi du séquenceur MIDI.
Jouer sur le HP107e avec les sons d’un
générateur de sons MIDI
Générateur de sons (module)
THRU
HP107e
114
MIDI
OUT
IN
Réglages MIDI
Voici comment régler le canal de transmission et d’autres
paramètres concernant le MIDI.
Passer en mode de réglage
1. Maintenez le bouton [Split] enfoncé et appuyez
sur le bouton [Chorus].
Le HP107e passe en mode de réglage.
Les témoins des boutons [Split] et [Chorus] ainsi que
celui du bouton auquel le paramètre est assigné clignotent.
Effectuer différents réglages
2. Appuyez sur le bouton assigné au paramètre
voulu.
Les témoins du bouton actionné, du bouton [Split] et du
bouton [Chorus] clignotent.
Pour en savoir plus sur chaque fonction, voyez les explications suivantes.
3. Appuyez sur le bouton [–] ou [+] pour changer la
valeur.
Une pression simultanée sur les boutons [–] et [+] rétablit
le réglage original.
Quitter le mode de réglage
4. Appuyez sur le bouton [Split] ou [Chorus].
Le témoin du bouton retrouve son état antérieur.
HP107_e.book Page 115 Tuesday, October 19, 2004 10:41 PM
Chapitre 6. Connexion d’appareils externes
La norme MIDI utilise 16 canaux, numérotés de 1~16. La
connexion d’un câble ne suffit pas pour établir la communication. Les appareils connectés doivent en effet utiliser
les mêmes canaux MIDI. Faute de quoi, aucun son n’est
produit ni sélectionné.
Pas de son
Générateur de sons
Local Off
* Si le piano est branché à un séquenceur de la série Roland MT,
il n’est pas nécessaire de choisir Local Off. A la mise sous tension, le MT transmet en effet un message Local Off
(désactivant cette fonction). Si vous mettez votre système sous
tension dans l’ordre HP107e → MT, le réglage “Local Off” est
automatiquement sélectionné.
Si vous appuyez sur le bouton Piano Resonance [Key
Off] à l’étape 2 de la section “Réglages MIDI”, un affichage ressemblant au suivant apparaît.
FRANÇAIS
* Le HP107e reçoit tous les canaux 1~16.
* Lorsque vous utilisez le HP107e en mode de superposition
(p. 99) ou “Split” (p. 100), la partie de la main gauche est
transmise sur le canal 5 en mode de superposition et sur le
canal 3 en mode “Split”. Le réglage de ces canaux de transmission MIDI ne peut pas être changé. Si vous branchez un appareil MIDI externe alors que vous utilisez le mode de superposition ou “Split”, utilisez d’autres canaux que les canaux 3 et 5
pour l’appareil MIDI.
Si vous appuyez sur le bouton Piano Resonance
[String] à l’étape 2 de la section “Réglages MIDI”, un affichage ressemblant au suivant apparaît.
Local OFF: Le clavier et le générateur de sons interne sont
désolidarisés. Le piano ne produit aucun son lorsque
vous jouez sur le clavier.
FRANÇAIS
■ Choisir le canal de transmission MIDI
1~16
Valeur
Valeur
■ Activer/couper la fonction Local (On/Off)
Quand vous branchez un séquenceur MIDI, désactivez
(“OFF”) son paramètre Local Control.
On, OFF
Réglage d’usine On
■ Transmission d’un enregistrement
Pour transmettre l’enregistrement d’une exécution sur le
HP107e à un appareil MIDI externe ou un ordinateur,
activez la transmission (“On”). Avec un réglage “OFF”,
les données ne sont pas transmises.
Si vous appuyez sur le bouton [Left] à l’étape 2 de la section “Réglages MIDI”, un affichage ressemblant au suivant apparaît.
FRANÇAIS
Comme vous pouvez le voir sur l’illustration, les données
générées par votre jeu sur le clavier sont envoyées au
générateur de sons interne par deux voies: (1) et (2). Vous
entendez donc des sons intermittents ou qui se chevauchent. Vous pouvez éviter ce problème en choisissant le
réglage “Local Off” pour couper le chemin (1) entre le clavier et le générateur de sons de l’instrument.
FRANÇAIS
Réglage d’usine 1
(1) Local On
Séquenceur
MIDI
IN
Générateur de
sons
MIDI
OUT
Mémoire
MIDI
OUT
Chaque note est produite deux fois
MIDI
IN
(2) Fonction THRU active
Il y a production de son
On, OFF
Réglage d’usine OFF
Pour sauvegarder les données de jeu enregistrées sur le
HP107e, procédez comme suit. Réglez la fonction MIDI
Thru du séquenceur externe sur OFF. Pour en savoir plus,
voyez le mode d’emploi du séquenceur MIDI.
Branchez un séquenceur MIDI de la série MT, par exemple (p. 114).
Enregistrez votre jeu sur le HP107e (p. 105).
Générateur de sons
Local On
Réglez ce paramètre sur “On”.
FRANÇAIS
Local ON: Le clavier et le générateur de sons interne sont
reliés.
Valeur
Lancez l’enregistrement sur le séquenceur MIDI externe.
Lancez la reproduction du morceau enregistré sur le
HP107e.
A la fin du morceau, arrêtez l’enregistrement sur le
séquenceur MIDI.
Sauvegardez les données enregistrées sur disquette ou
autre support avec un séquenceur MIDI.
FRANÇAIS
115
HP107_e.book Page 116 Tuesday, October 19, 2004 10:41 PM
HP107e – Dépannage
Dépannage
Si vous rencontrez un problème, commencez par lire ce qui suit.
Impossible de mettre le piano sous tension
Le cordon d’alimentation est-il correctement branché (p. 89)?
Les boutons ne fonctionnent pas.
Etes-vous en mode Piano uniquement (p. 110)?
Éteignez le piano puis rallumez-le.
Pas de son
Le volume du HP107e est-il au minimum (p. 91)?
Avez-vous branché un casque (p. 90)?
Avez-vous laissé une fiche dans la prise Phones?
Lorsqu’un casque est branché, les haut-parleurs du piano sont
coupés.
La fonction Local est-elle sur “OFF”?
Avec Local OFF, vous n’entendez aucun son lorsque vous jouez
sur le clavier. Choisissez Local “ON” (p. 115).
La fonction V-LINK est-elle activée?
Quand la fonction V-LINK est active, les douze touches de l’extrémité gauche du clavier ne produisent aucun son lorsque vous les
actionnez.
Pas de son (quand un instrument MIDI est branché)
Tous les appareils sont-ils sous tension?
Les connexions MIDI sont-elles correctes?
Le canal MIDI correspond-il à celui de l’appareil externe (p. 115)?
Les sons résonnent deux fois lorsque vous jouez sur le clavier
Le HP107e est-il en mode de superposition (p. 99)?
Si le HP107e est branché à un séquenceur externe, réglez-le sur
Local OFF (p. 115).
Alternativement, réglez la fonction MIDI Thru du séquenceur
externe sur OFF.
Le son ne change pas
Etes-vous en mode Piano uniquement (p. 110)?
Éteignez le piano puis rallumez-le.
Les témoins des boutons [Split] et [Chorus] clignotent?
Vous êtes en mode de réglage. Appuyez sur le bouton [Split] ou
[Chorus] pour quitter le mode de réglage (p. 108, p. 114, ).
Certaines notes sont inaudibles
Vous avez dépassé le nombre limite de notes que le HP107e peut
jouer simultanément (128).
Un usage fréquent de la pédale forte lorsque vous accompagnez
un morceau peut entraîner la production de trop de notes et certaines sont alors inaudibles.
Le clavier ou le morceau sonne faux
Avez-vous transposé le clavier (p. 98)?
Les réglages de gamme et d’accord étiré sont-ils corrects (p. 109)?
L’accord global est-il correct (p. 108)?
Le morceau est inaudible/ Une partie du morceau est inaudible
Le témoin des boutons de piste ([Left] et [Right]) est-il éteint
(p. 104)?
Si le témoin est éteint, cette piste est inaudible. Appuyez sur le
bouton de piste pour allumer le témoin.
Impossible d’enregistrer
Avez-vous choisi une piste pour l’enregistrement (p. 105~p. 107)?
Le tempo du morceau enregistré ou du métronome n’est pas bon
Si vous avez sélectionné un morceau interne dont le tempo
change avant d’enregistrer, le tempo changera de la même façon
pour votre jeu. Le tempo du métronome change de la même
façon.
Si vous ajoutez de nouvelles données sans effacer le morceau déjà
enregistré, le tempo du premier enregistrement est conservé. Effacez donc le premier morceau avant d’en enregistrer un autre
(p. 107).
116
L’enregistrement a disparu
L’enregistrement qui n’a pas été sauvegardé avec la fonction
“Song Backup” est supprimé à la mise hors tension. Il est impossible de récupérer un enregistrement une fois qu’il a été supprimé.
Le HP107e a une fonction de mémorisation de morceau (“Song
Backup”) (p. 111) qui vous permet de sauvegarder le morceau
enregistré avec le HP107e dans la mémoire de l’instrument.
Mémorisez les enregistrements que vous voulez conserver dans
le HP107e.
La pédale n’a aucun effet ou ne cesse plus de faire de l’effet
La pédale est-elle correctement branchée?
Assurez-vous que le câble du pédalier est bien branché à la prise
pour pédale en face arrière (p. 89).
Le pédalier vibre
Réglez le dispositif sous le pédalier pour qu’il repose solidement
contre le sol (p. 91).
La réverbération reste audible après la coupure de l’effet
Comme les sons de piano du HP107e simulent fidèlement
l’ampleur et la réverbération d’un piano acoustique, il peut y
avoir de la réverbération lorsque la fonction “Grand Space” ou
“Key Off” est activée.
Pour éliminer la réverbération, coupez la fonction “Key Off”
(p. 94) et “Grand Space” (p. 96~96).
Dans l’aigu, le son change brutalement après une certaine note.
Sur un piano acoustique, les notes de l’octave et demi supérieure
résonnent jusqu’à leur chute naturelle, indépendamment de la
pédale forte. Il y a aussi une différence de timbre. Les pianos
Roland reproduisent fidèlement ces caractéristiques d’un piano
acoustique. Sur le HP107e, la plage de notes qui n’est pas affectée
par la pédale forte change en fonction du réglage de transposition.
Un bruit aigu est produit
Lors de l’écoute avec le casque:
Certains sons de piano particulièrement flamboyants et effervescents peuvent avoir des aigus impressionnants et allant jusqu’à
émuler une réverbération métallique. Ce phénomène est encore
exacerbé si vous y ajoutez une forte réverb; pour adoucir le son,
réduisez la réverbération appliqué au son.
Lors de l’écoute avec les haut-parleurs:
Il faut chercher la cause ailleurs (une résonance engendrée par le
HP107e, par exemple). Veuillez consulter votre revendeur Roland
ou le SAV Roland le plus proche.
Le grave est étrange ou produit une résonance avec vibration
Lors de l’écoute avec les haut-parleurs:
Quand vous jouez à volume élevé, cela peut faire résonner des
instruments à proximité du HP107e. Cette résonance peut aussi se
produire quand des lampes fluorescentes, des portes vitrées, etc.
se mettent à vibrer. Ce phénomène est particulièrement perceptible avec des basses fréquences produites à volume élevé. Pour
éviter une telle résonance, procédez comme suit.
• Placez les haut-parleurs à une distance minimum de 10~15cm
des murs et d’autres surfaces.
• Réduisez le volume.
• Augmentez la distance entre les haut-parleurs et les objets qui
entrent en résonance.
Lors de l’écoute avec le casque:
Il faut chercher la cause ailleurs. Veuillez consulter votre revendeur Roland ou le SAV Roland le plus proche.
Le niveau du signal arrivant à l’entrée est trop faible
Utilisez-vous un câble contenant une résistance?
Servez-vous d’un câble qui ne contient pas de résistance.
HP107_e.book Page 117 Tuesday, October 19, 2004 10:41 PM
Messages d’erreur et autres messages
FRANÇAIS
Messages d’erreur et autres messages
Écran
Signification
Morceau utilisateur Mémoire pour les enregistrements (p. 105).
Usr.
Le point “..” affiché à l’écran indique la présence de données enregistrées (p. 105).
S.1~68
Numéro de morceau interne (p. 92).
S. U
Morceau mémorisé avec la fonction “Song Backup” (p. 111).
PU
Apparaît lorsque le morceau commence par une anacrouse (quand il ne commence pas sur le premier
temps).
dEL
Indique que vous essayez d’effacer un morceau enregistré (p. 105, p. 107, p. 111, ).
E.32
La capacité de la mémoire est atteinte et il est impossible d’enregistrer d’autres données.
E.41
Un problème tel qu’un câble MIDI déconnecté s’est produit. Assurez-vous que les connexions MIDI sont correctes.
_._._.
La fonction V-LINK est activée (p. 112).
FRANÇAIS
USr
* Les messages d’erreur sont indiqués par un “E.” devant le numéro. Appuyez n’importe quel bouton pour annuler le message d’erreur.
Résonance de cordes (String) (activée/coupée, intensité)
p. 94
Résonance sympathique (Damper) (activée/coupée, intensité)
p. 95
Key Touch
p. 95
Réponse des marteaux (Hammer Response)
p. 95
Gamme (gamme, tonique)
p. 109
Accord étiré
p. 109
Grand Space (activé/coupé, intensité)
p. 96, p. 96
Dynamic Emphasis (activé/coupé, intensité)
p. 97
Diapason
p. 108
Réverbération (activée/coupée, intensité)
p. 97
Réglages du pilote USB
p. 112
Appliquer la pédale forte à la section gauche du clavier.
p. 110
Mode “Grand Space”
p. 110
Point de partage
p. 100
Balance de superposition, d’ajout
p. 99, p. 99
FRANÇAIS
Autres réglages
p. 94
FRANÇAIS
Réglages des sons de piano en vigueur à
la mise sous tension
Son de touche relâchée (Key Off) (activé/coupé, volume)
FRANÇAIS
Paramètres dont le réglage peut être mémorisé
FRANÇAIS
117
HP107_e.book Page 118 Tuesday, October 19, 2004 10:41 PM
HP107e – Liste des opérations
Liste des opérations
11
7
10 9
8
4
No.
1
2
3
6
5
4
5
6
1
7
8
3
10
9
11
Opération/paramètre
12 13
14
2
Boutons
Page
Appuyez simultanément sur les boutons [Split] et [Chorus] et appuyez sur le bouton [●].
1
Local On/Off
[Split] + [Chorus] → Piano Resonance [Key Off]
p. 115
2
Choisir le canal de transmission MIDI
[Split] + [Chorus] → Piano Resonance [String]
p. 115
3
Réglages du pilote USB
[Split] + [Chorus] → Piano Resonance [Damper]
p. 112
4
Mode “Grand Space”
[Split] + [Chorus] → [Grand Space]
p. 110
5
Diapason
[Split] + [Chorus] → [Piano]
p. 108
6
Sélectionner une gamme
Sélectionner la tonique
[Split] + [Chorus] → [E. Piano]→
[E. Piano] + touche
p. 109
7
Accord étiré
[Split] + [Chorus] → [Harpsichord]
p. 109
8
Transposition par octave
[Split] + [Chorus] → [Organ]
p. 110
9
Appliquer la pédale forte à la section gauche du clavier.
[Split] + [Chorus] → [Strings]
p. 110
10
Mémorisation de morceau
[Split] + [Chorus] → [Song/Tempo]
p. 111
11
Mémorisation des réglages
[Split] + [Chorus] → [Metronome/Count In]
p. 111
12
Transmission d’un enregistrement
[Split] + [Chorus] → [Left]
p. 115
13
V-LINK
[Split] + [Chorus] → [Right]
p. 112
14
Réglages d’usine
[Split] + [Chorus] → Key Touch [Touch]
p. 111
Maintenez le bouton [
] enfoncé et appuyez sur le bouton [+] ou [–].
1
Rythme du métronome
[Song/Tempo] + [-] [+]
p. 101
2
Volume du métronome
[Metronome/Count In] + [-] [+]
p. 101
3
Balance de superposition (d’ajout)
[Acoustic Layering] + [-] [+]
p. 99
4
Niveau de résonance de la pédale forte
Piano Resonance [Damper] + [-] [+]
p. 95
5
Niveau de résonance des cordes
Piano Resonance [String] + [-] [+]
p. 94
6
Volume du son de touche relâchée (Key Off)
Piano Resonance [Key Off] + [-] [+]
p. 94
7
Intensité du chorus
[Chorus] + [-] [+]
p. 97
8
Intensité de la réverbération
[Reverb] + [-] [+]
p. 97
9
Réglage “Dynamic Emphasis”
[Dynamic Emphasis] + [-] [+]
p. 97
Réglage “Grand Space”
[Grand Space] + [-] [+]
p. 96, p. 96
[Transpose] + [Split] → [-] [+]
p. 99
10
Maintenez le bouton [
11
] enfoncé et appuyez sur le bouton [+] ou [–].
Balance de superposition (d’ajout)
Maintenez le bouton [Split] ou [Transpose] enfoncé et appuyez sur la touche.
118
Point de partage
[Split] + touche
p. 100
Transposition
[Transpose] + touche
p. 98
HP107_e.book Page 119 Tuesday, October 19, 2004 10:41 PM
Fiche technique
FRANÇAIS
Fiche technique
Clavier
Clavier
Sensibilité au toucher
Dynamique: Pour toucher léger, moyen, lourd; dynamique fixe
Réponse des marteaux: Pour toucher léger, moyen, lourd; réponse neutre
Clavier entier, superposition/ajout (avec balance de volume réglable), Split (avec point de partage réglable)
Générateur de sons
Max. Polyphonie
128 voix
Sons
5 groupes 36 variations + 4 sons “Layer”
Gamme
8 types, tonique au choix
Accord étiré
2 types
Diapason
415.3Hz~466.2Hz (par pas de 0.1Hz)
Transposition
–6~+5 demi-tons
Effets
Grand Space, Dynamic Emphasis, Piano Resonance (Key Off Resonance, String Resonance, Damper Resonance), Reverb (10 niveaux), Chorus (10 niveaux)
FRANÇAIS
Modes d’utilisation du clavier
88 touches (mécanisme à marteaux progressif avec échappement)
Métronome
2/2, 0/4, 2/4, 3/4, 4/4, 5/4, 6/4, 7/4, 3/8, 6/8, 9/8, 12/8
Volume
10 niveaux
FRANÇAIS
Mesure
Enregistreur
2 pistes
Morceau
1 morceau (mémorisable)
Capacité
Environ 10.000 notes
Tempo
Noire= 10~500
Résolution
120 pas par noire
Commandes
Play/Stop, Rec, Tempo, All Song Play, Track
Morceaux internes
68 morceaux + 14 morceaux de démonstration des sons
FRANÇAIS
Pistes
Divers
50W x 2
Haut-parleurs
20cm x 2 (boîtier), 10cm x 2
Écran
Diode de métronome
7 segments, 3 caractères (LED)
Témoin de connexion d’un casque
Commandes
Volume, Brillance
Pédales
forte (détection de mi-course), douce (détection de mi-course), sostenuto (fonction assignable)
Autres fonctions
Mode Piano uniquement, mémorisation de morceau, mémorisation de réglages, rappel des réglages d’usine
Prises
Connecteur USB (MIDI), Sorties (L/Mono, R), entrées (L/Mono, R), prises pour casque x 2 (stéréo), prises MIDI
(IN, OUT)
Alimentation
AC 230V
Consommation
110W
Dimensions
(pied compris)
1425 (L) x 536 (P) x 931 (H) mm (pupitre abaissé)
FRANÇAIS
Puissance de sortie nominale
1425 (L) x 536 (P) x 1.083,5 (H) mm (pupitre abaissé)
Poids
(pied compris)
82kg
Accessoires
Mode d’emploi, Roland 60 Classical Piano Masterpieces, Guide d’installation USB,
CD-ROM (pilote USB pour piano numérique Roland), câble d’alimentation, crochet pour casque
* En vue d’améliorer le produit, les caractéristiques techniques et/ou l’aspect de ce produit peuvent être modifiés sans avis préalable.
FRANÇAIS
119
HP107_e.book Page 120 Tuesday, October 19, 2004 10:41 PM
HP107e – Fiche technique
120
HP107_e.book Page 121 Tuesday, October 19, 2004 10:41 PM
Manuale dell’utente
Grazie e congratulazioni per avere scelto il pianoforte digitale HP107e della Roland.
Caratteristiche principali
Timbri di pianoforte caratterizzati da una ricca risonanza e da un’ampia
gamma di espressività
Il timbro di pianoforte campionato stereofonicamente riproduce fedelmente anche il rumore dei
martelletti che colpiscono le corde, simulando il timbro di un pianoforte a coda da concerto di alta
qualità. Grazie alla polifonia massima di 128 note potete utilizzare liberamente il pedale senza preoccuparvi di esaurire il numero di note disponibili.
Questo strumento può riprodurre tutte le più piccole sfumature di esecuzione, sia che si tratti di
leggere variazioni di tocco che di risonanza delle corde al rilascio dei tasti o dei pedali (Piano Resonance). Inoltre, lo strumento è dotato di un sistema di altoparlanti “Grand Sound” che riproduce
la pienezza e la tridimensionalità del timbro di un pianoforte a coda da concerto (Grand Space),
producendo al contempo un suono pulito e potente (Dynamic Emphasis).
La sensazione è quella di suonare un pianoforte a coda
Questo strumento è dotato di una tastiera di tipo progressive hammer action che riproduce il tocco
di un pianoforte a coda: più pensate nel registro dei bassi e più leggero nel registro degli acuti. Inoltre l’HP107e simula fedelmente anche il rumore che si sente quando si premono i tasti di un pianoforte a coda (meccanismo di scappamento).
Lo strumento è dotato di due tipi di controlli di tocco: la Key Response che modifica il peso apparente dei tasti, e la funzione Hammer Response che riproduce i sottili movimenti dei martelletti del
pianoforte. Il pedale offre una buona risposta al tocco e permette di eseguire anche le più sottili sfumature.
Espressività che può essere prodotta solo da uno strumento digitale
Prima di utilizzare l’apparecchio, leggete con attenzione i paragrafi intitolati:
“Usare l’apparecchio in
modo sicuro” (p. 122) e “Note importanti” (p. 124). Questi paragrafi contengono importanti informazioni sul
corretto funzionamento
dell’apparecchio. Inoltre,
per conoscere al meglio tutte
le caratteristiche dell’apparecchio, leggete interamente
questo manuale, che vi consigliamo di conservare per
future consultazioni.
L’HP107e vi permette di aggiungere al pianoforte i timbri che volete per ottenere un suono pieno
e ricco.
Potete sovrapporre al timbro di pianoforte altri timbri strumentali, sovrapporre suoni un’ottava
più acuti e utilizzare un pedale per controllare il volume.
Comodo da utilizzare con le cuffie
Quando utilizzate le cuffie vengono applicati effetti speciali in modo che l’ascolto non vi affatichi.
Oltre a un indicatore sul pannello anteriore che si accende quando collegate un paio di cuffie,
l’HP107e è dotato di un gancio dove potete riporre le cuffie quando non le utilizzate.
Numerose funzioni di supporto alle esercitazioni e song di pianoforte incorporate
Grazie al metronomo, al registratore a due tracce, alle song incorporate (60 song in tutto) e ad altre
funzioni, questo pianoforte digitale è ideale per lezioni di pianoforte.
Copyright © 2004 ROLAND CORPORATION
Tutti i diritti riservati. Nessuna parte di questa pubblicazione può essere riprodotta in
alcuna forma senza il permesso scritto della ROLAND CORPORATION.
HP107_e.book Page 122 Tuesday, October 19, 2004 10:41 PM
Usare l’apparecchio in modo sicuro
ISTRUZIONI PER LA PREVENZIONE DI INCENDI, SCOSSE ELETTRICHE E DANNI ALLE PERSONE
Riguardo a
WARNING
ea
Usato per le istruzioni che avvisano
l'utente del pericolo di morte o di gravi
danni alla persona se l'unità è usata in
modo scorretto.
Usato per le istruzioni che avvisano
l'utente del pericolo di ferimento o di
danni materiali se l'unità è usata in
modo scorretto.
CAUTION
* Per danni materiali si intendono
circostanze nocive per la casa,
l'arredamento o gli animali domestici.
• Prima di utilizzare l’apparecchio, leggete le
seguenti istruzioni e il manuale dell’utente.
...........................................................................................................
• Non aprite e non eseguite alcuna modifica interna
all’apparecchio.
...........................................................................................................
• Non cercate di riparare l’apparecchio o di sostituire parti al suo interno (eccetto nei casi descritti in
questo manuale). Per l’assistenza tecnica contattate il vostro rivenditore o uno dei Centri Assistenza Tecnica Autorizzati Roland elencati nella
pagina “Information”.
...........................................................................................................
• Non utilizzate e non lasciate mai l’apparecchio in
luoghi che sono:
• soggetti a temperature elevate (per es. esposti a
luce solare diretta in un veicolo chiuso, vicino a un
condotto di riscaldamento, su apparecchiature che
generano calore);
• bagnati (per es. bagni, lavanderie, pavimenti
bagnati);
• umidi;
• esposti alla pioggia;
• polverosi;
• soggetti a elevati livelli di vibrazioni.
...........................................................................................................
• L’apparecchio deve essere utilizzato solo con un
rack o con un supporto consigliato da Roland.
...........................................................................................................
• Posizionate sempre l’apparecchio orizzontalmente e in posizione stabile. Non ponetelo mai su
sostegni ondeggianti o su superfici inclinate.
...........................................................................................................
• L’apparecchio deve essere collegato solo al tipo di
alimentazione descritto nelle istruzioni di funzionamento o riportato sulla parte posteriore
dell’apparecchio.
...........................................................................................................
Riguardo ai Simboli
Il simbolo avverte l'utente di importanti istruzioni o
avvisi. Il significato specifico del
simbolo è
determinato da quanto è contenuto all'interno del
triangolo. Il simbolo sulla sinistra è presente in tutte le
situazioni in cui si deve prestare particolare attenzione.
Il simbolo
avverte l'utente che l'azione non
dev'essere eseguita (è vietata). L'azione specifica da
evitare è determinata dal contenuto del cerchio. Il
simbolo a sinistra significa che l'unità non dev'essere
mai smontata.
Il simbolo ● avverte che l'azione dev'essere eseguita.
L'azione da eseguire è indicata dal contenuto del
cerchio. Il simbolo a sinistra significa che il cavo di
alimentazione dev'essere scollegato dalla presa.
• Utilizzate solo il cavo dell’alimentazione fornito in
dotazione. Tale cavo dell’alimentazione non deve
essere utilizzato con altri dispositivi.
...........................................................................................................
• Non tirate o torcete eccessivamente il cavo dell’alimentazione e non ponete oggetti pesanti su di
esso. Così facendo potreste danneggiare il cavo,
interrompere i conduttori interni e creare cortocircuiti. Un cavo danneggiato può provocare scosse
elettriche o incendi!
...........................................................................................................
• Questo apparecchio, da solo o con un amplificatore e delle cuffie o con degli altoparlanti, può produrre un livello sonoro tale da provocare la perdita permanente dell’udito. Non utilizzatelo per
un lungo periodo di tempo ad alto volume o,
comunque, a un volume eccessivo. Se notate una
perdita d’udito o un ronzio nelle orecchie, interrompete subito l’uso dell’apparecchio e consultate
un otorino.
...........................................................................................................
• Evitate che nell’apparecchio penetrino oggetti (per
es. materiali infiammabili, monete, spille) o liquidi
di qualsiasi tipo (acqua, bibite, ecc.).
...........................................................................................................
• Spegnete immediatamente l’apparecchio, staccate
il cavo dell’alimentazione dalla presa e richiedete
l’intervento del vostro rivenditore o di uno dei
Centri Assistenza Tecnica Autorizzati Roland
elencati nella pagina “Information” nel caso in cui:
• il cavo dell’alimentazione o le prese sono danneggiate;
• notate del fumo o avvertite strani odori;
• nell’apparecchio sono penetrati oggetti o liquidi;
• l’apparecchio è stato esposto alla pioggia o si è
bagnato in altro modo;
• l’apparecchio sembra non funzionare correttamente o notate cambiamenti nelle prestazioni.
...........................................................................................................
HP107_e.book Page 123 Tuesday, October 19, 2004 10:41 PM
• I bambini dovrebbero essere assistiti da un adulto
fino a quando non siano in grado di seguire le procedure essenziali per utilizzare l’apparecchio in
tutta sicurezza.
...........................................................................................................
014
• Proteggete l’apparecchio da urti violenti.
• Non fatelo cadere!
...........................................................................................................
015
...........................................................................................................
• Non maneggiate mai il cavo dell’alimentazione o
le sue spine con le mani bagnate quando lo collegate o lo scollegate dalla presa di corrente o
dall’apparecchio.
...........................................................................................................
• Se dovete spostare lo strumento, osservate le
seguenti precauzioni. Per sollevare e spostare
l’apparecchio in modo sicuro sono necessarie
almeno due persone. Maneggiatelo con cautela e
mantenetelo sempre in piano. Accertatevi di avere
una buona presa per evitare di ferirvi e di causare
danni allo strumento.
016
• Prima di utilizzare l’apparecchio in un’altra
nazione, contattate il vostro rivenditore o uno dei
Centri Assistenza Tecnica Autorizzati Roland
elencati nella pagina “Information”.
...........................................................................................................
026
• NON riproducete un disco CD-ROM su un lettore
audio CD convenzionale. Il volume del suono
risultante potrebbe essere talmente alto da causare
la perdita permanente dell’udito. Inoltre potreste
danneggiare gli altoparlanti o altri componenti del
sistema.
...........................................................................................................
026
• Prima di pulire l’apparecchio, spegnetelo e scollegate il cavo dell’alimentazione dalla presa di corrente (p. 129).
...........................................................................................................
110a
• In caso di temporale staccate il cavo dell’alimentazione dalla presa di corrente.
116
• Fate attenzione quando aprite/chiudete il coperchio in modo da non farvi male alle dita (p. 130).
Per l’uso dell’apparecchio da parte di bambini è
consigliata la supervisione di adulti.
...........................................................................................................
ITALIANO
• Non posizionate sull’apparecchio oggetti contenenti acqua (per es. vasi di fiori). Evitate inoltre di
utilizzare vicino all’apparecchio insetticidi, profumi, alcol, smalto per unghie, spray, ecc. Asciugate rapidamente il liquido versato sull’apparecchio utilizzando un panno morbido e asciutto.
...........................................................................................................
...........................................................................................................
109a
ITALIANO
• Controllate che le viti che fissano l’apparecchio al
supporto siano ben serrate. Serratele nuovamente
se notate che si sono allentate.
• Staccate il cavo dell’alimentazione.
• Staccate tutti i cavi provenienti da dispositivi
esterni.
• Alzate i regolatori del supporto (p. 131).
• Chiudete il coperchio.
• Abbassate il leggio.
ITALIANO
• Non collegate un numero eccessivo di apparecchi
alla stessa presa di corrente. Prestate particolare
attenzione quando utilizzate le prolunghe: la
potenza complessiva utilizzata da tutti i dispositivi collegati a una prolunga non deve mai superare il limite massimo (watt/ampere) di tale prolunga. Carichi eccessivi possono provocare un surriscaldamento del cavo e scioglierne l’isolante.
• Non salite e non ponete oggetti pesanti sull’apparecchio.
ITALIANO
106
118b
• L’apparecchio deve essere posizionato in modo
tale da non interferire con la sua ventilazione.
ITALIANO
ITALIANO
...........................................................................................................
• Afferrate sempre la spina del cavo dell’alimentazione quando lo collegate o lo scollegate
dall’apparecchio o dalla presa di corrente.
...........................................................................................................
• A intervalli regolari scollegate la spina dell’alimentazione e rimuovete la polvere o altri accumuli di sporco utilizzando un panno asciutto.
Scollegate inoltre la spina dalla presa di corrente
se l’apparecchio rimane inutilizzato per un lungo
periodo di tempo. L’accumulo di polvere tra la
spina e la presa di corrente può ridurre l’azione
isolante e provocare incendi.
...........................................................................................................
• Cercate di evitare che i cavi si aggroviglino. I cavi
dovrebbero inoltre essere tenuti fuori dalla portata
dei bambini.
...........................................................................................................
• Se rimuovete le viti di fissaggio del leggio, le viti
del supporto e il dado a farfalla, assicuratevi di
porli in un luogo sicuro fuori dalla portata dei
bambini in modo che non possano ingerirli accidentalmente.
...........................................................................................................
HP107_e.book Page 124 Tuesday, October 19, 2004 10:41 PM
HP107e – Note importanti
Note importanti
Oltre a quanto specificato in “IMPORTANT SAFETY INSTRUCTIONS” e “Usare l’apparecchio in modo sicuro” (p. 122), vi
preghiamo di leggere e di osservare le seguenti precauzioni.
Alimentazione
• Non collegate l’apparecchio alla stessa presa di corrente
utilizzata da un dispositivo elettrico controllato da un
invertitore (per es. un frigorifero, una lavatrice, un forno
a microonde o un condizionatore) o che contiene un
motore. A seconda di come viene utilizzato tale dispositivo, il rumore di alimentazione può causare malfunzionamenti all’apparecchio o produrre un fastidioso rumore.
Se non riuscite a utilizzare una presa di corrente separata,
collegate un filtro per il rumore di alimentazione tra
l’apparecchio e la presa elettrica.
307
• Prima di collegare l’apparecchio ad altri dispositivi, spegnete tutti i dispositivi. In tal modo evitate malfunzionamenti e/o danni agli altoparlanti o ai dispositivi stessi.
308
• Nonostante l’LCD e i LED siano spenti quando l’interruttore POWER è spento, ciò non significa che l’apparecchio
sia scollegato completamente dalla sorgente dell’alimentazione. Se dovete spegnere completamente l’apparecchio, spegnete prima l’interruttore POWER e poi scollegate il cavo dell’alimentazione dalla presa di corrente. A
tal fine la presa di corrente alla quale avete collegato il
cavo dell’alimentazione dovrebbe essere facile da raggiungere e velocemente accessibile.
Posizionamento
• Se utilizzate l’apparecchio vicino ad amplificatori di
potenza (o ad altri dispositivi dotati di grossi trasformatori) si può generare un ronzio. Per evitare che ciò
avvenga, cambiate l’orientamento dell’apparecchio o
allontanatelo il più possibile dalla sorgente dell’interferenza.
352a
• Questo apparecchio può interferire con la ricezione di
radio e televisori. Non utilizzatelo nelle vicinanze di tali
ricevitori.
352b
• Se nelle vicinanze dell’apparecchio utilizzate dispositivi
di comunicazione senza fili, come cellulari, si può produrre un rumore. Tale rumore viene avvertito durante la
ricezione o l’inoltro di una chiamata, o durante la conversazione. Se ciò dovesse accadere, allontanate tali dispositivi dall’apparecchio oppure spegneteli.
354b
• Non esponete l’apparecchio alla luce diretta del sole, non
ponetelo vicino a dispositivi che emettono calore, non
lasciatelo all’interno di un veicolo chiuso o soggetto a
temperature elevate. Inoltre, evitate che dispositivi di
illuminazione che vengono utilizzati normalmente con la
sorgente luminosa posta molto vicino all’apparecchio
(come luci per pianoforte) o riflettori potenti illuminino la
stessa area dell'apparecchio per lunghi periodi di tempo.
L’eccessivo calore può deformare o scolorire l’apparecchio.
124
355b
• Quando l’apparecchio viene spostato da un luogo a un
altro con temperatura e/o grado di umidità diverso, al
suo interno si può creare della condensa. Se l’apparecchio
viene utilizzato in tali condizioni, potrebbero verificarsi
danni o malfunzionamenti. Non utilizzate l’apparecchio
per alcune ore per far sì che la condensa evapori completamente.
• Non lasciate sull’apparecchio per lunghi periodi di tempo
oggetti di gomma, plastica o altri materiali simili. Tali
oggetti possono scolorire o danneggiare la finitura.
358
• Non lasciate oggetti sulla tastiera. Facendolo potreste
causare malfunzionamenti, per esempio i tasti potrebbero
non produrre più suoni.
359
• Non incollate adesivi, decalcomanie o altro sullo strumento. Cercando di rimuoverli potreste danneggiare la
finitura esterna.
Manutenzione
• Per pulire l’apparecchio utilizzate un panno morbido e
asciutto o leggermente inumidito. Cercate di pulire
l’intera superficie applicando una pressione costante e
muovendo il panno lungo la venatura del legno. Strofinando con troppo forza la stessa superficie, potreste danneggiare la finitura.
402
• Non utilizzate benzene, diluenti, alcol o solventi di alcun
tipo per evitare di scolorire o deformare l’apparecchio.
• I pedali dell’apparecchio sono di ottone.
L’ottone tende a scurirsi a causa del naturale processo di
ossidazione. Se l’ottone si opacizza, pulitelo utilizzando
dei prodotti disponibili in commercio.
Riparazioni e dati
• Sappiate che tutti i dati contenuti nella memoria del
dispositivo possono andare persi quando il dispositivo
viene inviato in riparazione. I dati importanti dovrebbero
essere salvati in un altro dispositivo MIDI (per es. un
sequencer) o annotati su un foglio di carta (se possibile).
Durante la riparazione viene prestata la massima attenzione affinché i dati non vengano persi. Tuttavia, in certi
casi (come quando i circuiti di memoria sono danneggiati) è impossibile ripristinare i dati e Roland non si
assume alcuna responsabilità circa la perdita di tali dati.
Ulteriori precauzioni
• Sappiate che il contenuto della memoria può andare irrimediabilmente perso a causa di malfunzionamenti o di
un uso scorretto dell’apparecchio. Per evitare di perdere
dati importanti vi consigliamo di fare periodicamente un
backup dei dati più importanti presenti nella memoria
dell’apparecchio in un altro dispositivo MIDI (per es. un
sequencer).
HP107_e.book Page 125 Tuesday, October 19, 2004 10:41 PM
Note importanti
ITALIANO
552
• Sfortunatamente potrebbe essere impossibile recuperare i
dati immagazzinati nella memoria dell’apparecchio o in
un altro dispositivo MIDI (per es. un sequencer) una
volta che sono andati persi. Roland Corporation non si
assume alcuna responsabilità circa la perdita di tali dati.
553
• Utilizzate con attenzione i pulsanti, gli slider e gli altri
controlli dell’apparecchio nonché i connettori. Un
impiego troppo rude può causare malfunzionamenti.
• Quando collegate/scollegate i cavi, afferrate il connettore
e non tirate mai i cavi stessi. In tal modo evitate cortocircuiti o danni agli elementi interni del cavo.
ITALIANO
557
• Durante il normale funzionamento l’apparecchio produce
una piccola quantità di calore.
558a
• Per evitare di disturbare i vicini, cercate di tenere il
volume dell’apparecchio a livelli ragionevoli. Utilizzate le
cuffie per non dovervi preoccupare di chi vi sta intorno
(soprattutto di notte).
559b
• Quando dovete trasportare l’apparecchio, avvolgetelo
con materiale che assorbe gli urti. Trasportandolo senza
questa precauzione potreste graffiarlo o danneggiarlo, o
causare malfunzionamenti.
560
ITALIANO
• Non forzate eccessivamente il leggio mentre lo utilizzate.
562
• Utilizzate un cavo Roland per effettuare i collegamenti.
Se utilizzate un cavo di collegamento di altre marche,
osservate la seguente precauzione.
• Alcuni cavi di collegamento contengono delle resistenze.
Per collegare l’apparecchio non utilizzate cavi che contengono delle resistenze. L’uso di tali cavi può far sì che il
livello del suono risulti estremamente basso o impossibile
da sentire. Per informazioni sulle caratteristiche tecniche
dei cavi contattate il loro produttore.
565
ITALIANO
• Prima di aprire o chiudere il coperchio della tastiera,
accertatevi che sullo strumento non ci siano animali
domestici (dovrebbero essere tenuti lontano dalla tastiera
e dal coperchio). A causa del design dello strumento, animali di piccole dimensioni potrebbero rimanere intrappolati all’interno. Se ciò dovesse accadere, spegnete immediatamente l’apparecchio e scollegate il cavo dell’alimentazione dalla presa di corrente. Successivamente contattate il rivenditore che vi ha venduto lo strumento o uno
dei Centri Assistenza Tecnica Autorizzati Roland.
Come utilizzare i CD-ROM
ITALIANO
• Evitate di toccare o di rigare la parte lucida sottostante (la
superficie che contiene i dati) del disco. I dischi CD-ROM
danneggiati o sporchi potrebbero non essere letti correttamente. Mantenete puliti i dischi utilizzando prodotti di
pulizia per CD disponibili in commercio.
ITALIANO
125
HP107_e.book Page 126 Tuesday, October 19, 2004 10:41 PM
HP107e – Sommario
Sommario
Usare l’apparecchio in modo sicuro.............................122
Note importanti ...............................................................124
Descrizione dei pannelli.................................................127
Pannello anteriore ........................................................................................... 127
Pannello posteriore ......................................................................................... 128
Pannello inferiore............................................................................................ 128
Prima di iniziare a suonare ............................................129
Collegare il cavo dei pedali ........................................................................... 129
Collegare il cavo degli altoparlanti .............................................................. 129
Collegare il cavo dell’alimentazione ............................................................ 129
Alzare il leggio ................................................................................................ 129
Aprire/chiudere il coperchio ........................................................................ 130
Collegare le cuffie ........................................................................................... 130
Utilizzare il gancio delle cuffie ......................................................130
Accendere e spegnere lo strumento ............................................................. 131
Regolare il Volume e la Brillantezza del Suono ......................................... 131
Informazioni sui pedali .................................................................................. 131
Capitolo 1. Ascoltare le song incorporate ...................132
Ascoltare le song incorporate........................................................................ 132
Riprodurre tutte le song in modo consecutivo (All Song Play) 132
Selezionare una song e riprodurla ................................................132
Ascoltare le demo song .................................................................................. 133
Riprodurre le demo song dei timbri .............................................133
Ascoltare una demo delle funzioni ...............................................133
Capitolo 2. Esecuzione ..................................................134
Suonare utilizzando vari timbri.................................................................... 134
Regolare in dettaglio il timbro di pianoforte (Piano Resonance)............. 134
Produrre il suono di rilasciamento dei tasti (Key Off)...............134
Produrre la risonanza delle corde a tasti premuti
(String Resonance)...........................................................................134
Produrre risonanza quando viene premuto il pedale damper (
Damper Resonance) ........................................................................135
Regolare la sensibilità della tastiera (Key Touch) ...................................... 135
Cambiare la temporizzazione dei suoni a seconda della forza
utilizzata per premere i tasti (Hammer Response).....................135
Aggiungere profondità al suono (Grand Space) ........................................ 136
Aggiungere una sensazione di profondità per l’ascolto con cuffie (Grand
Space)................................................................................................................ 136
Aggiungere vivacità al suono (Dynamic Emphasis) ................................. 137
Applicare effetti al suono............................................................................... 137
Aggiungere riverberazione al suono (Reverb) ............................137
Aggiungere ricchezza al suono (Chorus).....................................137
Cambiare la quantità di effetto applicato.....................................137
Trasporre la tonalità della tastiera (Transpose) .......................................... 138
Sovrapporre timbri complementari a quelli di pianoforte
(Acoustic Layering) ........................................................................................ 138
Cambiare il bilanciamento di volume quando utilizzate
l’Acoustic Layering .........................................................................139
Utilizzare due timbri simultaneamente (Dual Performance)................... 139
Regolare il bilanciamento di volume in Dual Performnace (Dual
Balance) .............................................................................................139
Suonare timbri diversi con la mano destra e sinistra (Split)..................... 140
Cambiare il punto di divisione della tastiera ..............................140
Cambiare il funzionamento del pedale centrale ........................................ 141
126
Utilizzare il metronomo .................................................................................141
Far suonare il metronomo ..............................................................141
Cambiare il volume del metronomo.............................................141
Dividere la tastiera in due parti per esecuzioni a quattro mani
(modo Twin Piano) .........................................................................................142
Capitolo 3. Suonare sulle song incorporate................ 143
Cambiare il tempo...........................................................................................143
Aggiungere un preconteggio per facilitare la temporizzazione
(Count-In) .........................................................................................143
Suonare le due mani separatamente ............................................................144
Capitolo 4. Registrare la vostra esecuzione................ 145
Registrare una nuova song ............................................................................145
Registrare su una song ...................................................................................146
Selezionare e registrare separatamente la traccia di ogni mano ..............147
Cancellare le esecuzioni registrate................................................................147
Cancellare un’esecuzione da una specifica traccia .....................147
Cancellare una song ........................................................................147
Capitolo 5. Cambiare varie impostazioni..................... 148
Effettuare impostazioni dettagliate (Function) ...........................................148
Accordare secondo le intonazioni di altri strumenti (Master
Tuning)..............................................................................................149
Cambiare il temperamento ............................................................149
Impostare la curva di accordatura (Stretch Tuning) ..................149
Cambiare l’intonazione in intervalli di ottava (Octave Shift) ...150
Applicare il pedale damper alla parte della mano sinistra .......150
Modificare il Grand Space (modo Grand Space) ........................150
Disabilitare tutto tranne l’esecuzione del pianoforte (Panel Lock)..........150
Ripristinare le impostazioni originali del costruttore ................................151
Fare rimanere in memoria le impostazioni anche a strumento spento
(Memory Backup)............................................................................................151
Salvare song registrate anche a strumento spento (Song Backup) ..........151
Cancellare song di cui avete fatto un backup..............................151
Utilizzare la funzione V-LINK ......................................................................152
Effettuare le impostazioni del Driver USB ..................................................152
Capitolo 6. Collegare dispositivi esterni...................... 153
Collegare apparecchiature audio ..................................................................153
Collegare il connettore USB ...........................................................................153
Collegare dispositivi MIDI.............................................................................154
Effettuare impostazioni relative al MIDI .....................................................154
Impostazioni del canale MIDI send ..............................................155
Attivare e disattivare Local Control .............................................155
Trasmettere un’esecuzione registrata...........................................155
Appendice ............................................................. 156
Risoluzione dei problemi ...............................................................................156
Messaggi di Errore/Altri Messaggi..............................................................157
Parametri memorizzati in Memory Backup ................................................157
Elenco delle operazioni ..................................................................................158
Principali caratteristiche tecniche .................................................................159
Tone List ......................................................................... 240
Built-in Song List ........................................................... 241
MIDI Implementation Chart.................................. 243
HP107_e.book Page 127 Tuesday, October 19, 2004 10:41 PM
Descrizione dei pannelli
ITALIANO
Descrizione dei pannelli
Pannello anteriore
6 7 8
3
15
17
18
21 22
19
20
23 24
4 5
9 10 11
16
25 26
27
ITALIANO
2
12 13 14
Power On
1
1. Interruttore [Power On]
Accende e spegne l’apparecchio (p. 131).
2. Manopola [Volume]
Regola il livello di volume generale (p. 131).
Regola la brillantezza dei timbri (p. 131).
4. Pulsante [Demo]
Potete ascoltare una demo dei timbri dello strumento o
una demo delle varie funzioni (p. 133).
5. Indicatore [
(cuffie)]
Questo indicatore si accende quando al connettore delle
cuffie viene collegato un paio di cuffie (p. 130).
6. Pulsante [Transpose]
Traspone l’intonazione della tastiera (p. 138).
Divide la tastiera in una parte per la mano destra e una
per la mano sinistra permettendovi di utilizzare timbri
diversi nelle due parti (p. 140). Tenendo premuto questo
pulsante e il pulsante [Chorus] potete inoltre impostare
varie altre funzioni (p. 148~p. 152, p. 154~p. 155).
8. Pulsante [Chorus]
Aggiunge ricchezza al suono (p. 137).
9. Pulsante [Grand Space]
Aggiunge profondità al suono (p. 136, p. 136).
Dona al suono vivacità e brillantezza (p. 137).
11.Pulsante [Reverb]
Aggiunge riverberazione al suono (p. 137).
Piano Resonance
12.Pulsante [Key Off]
Simula il suono prodotto al rilascio dei tasti (p. 134).
13.Pulsante [String]
Produce la risonanza delle corde che si crea quando suonate la tastiera (p. 134).
17.Display
Il display indica i valori delle varie impostazioni tra cui la
variazione timbrica, il numero della song e il tempo. Di
solito tali valori vengono visualizzati come nella figura
riportata sopra.
18.Pulsante [Song/Tempo]
Serve per selezionare le song incorporate (p. 132, p. 143).
Inoltre potete premere questo pulsante per visualizzare il
tempo e il numero di song correntemente selezionata
(preceduto da una “S.”). Quando viene visualizzato il
tempo l’indicatore è verde, quando viene visualizzato il
numero della song l’indicatore è rosso.
19.Pulsanti [–] [+]
Vi permettono di selezionare il valore delle varie impostazioni.
Premendo simultaneamente i pulsanti [–] e [+] riportate
l’impostazione di un particolare elemento o funzione al
suo valore originale.
20.Pulsante [Metronome/Count In]
Attiva e disattiva il metronomo (p. 141). Lo strumento è
inoltre dotato di una funzione di conteggio, eseguito
prima dell’inizio della song, che vi permette di iniziare a
suonare sulla song rispettando esattamente la temporizzazione (p. 143).
TRACK
21.Pulsante [Left]
Riproduce o registra un’esecuzione separata per ogni
mano (p. 144, p. 146~p. 147).
A questo pulsante vengono assegnate le esecuzioni della
mano sinistra delle song interne. Questo pulsante e il pulsante [Right] sono chiamati “pulsanti delle tracce”.
Cambia la risonanza prodotta quando il pedale damper
viene premuto (p. 135).
127
ITALIANO
14.Pulsante [Damper]
Servono per scegliere i tipi di timbri (gruppi di timbri)
suonati dalla tastiera (p. 134).
ITALIANO
10.Pulsante [Dynamic Emphasis]
16.Pulsanti Tone
ITALIANO
7. Pulsante [Split]
Potete sovrapporre e suonare timbri particolarmente
adatti a essere utilizzati con il pianoforte (p. 138).
ITALIANO
3. Manopola [Brilliance]
15.Pulsante [Acoustic Layering]
HP107_e.book Page 128 Tuesday, October 19, 2004 10:41 PM
HP107e – Descrizione dei pannelli
22.Pulsante [Right]
KEY TOUCH
Riproduce o registra un’esecuzione separata per ogni
mano (p. 144, p. 146~p. 147). A questo pulsante vengono
assegnate le esecuzioni della mano destra delle song
incorporate.
23.Pulsante [Play]
Avvia e arresta la riproduzione delle song incorporate e
delle esecuzioni registrate (p. 132, p. 143).
Inoltre avvia/arresta la registrazione di un’esecuzione
(p. 145~p. 147).
25.Pulsante [Touch]
Modifica la sensibilità della tastiera (p. 135).
26.Pulsante [Hammer]
Definisce quanto la differente forza con cui suonate la
tastiera modifica la temporizzazione secondo la quale
vengono suonate le note (p. 135).
27.Pulsante [Center Pedal]
Cambia la funzione del pedale centrale (p. 141).
24.Pulsante [Rec]
Mette l’HP107e nel modo standby di registrazione
(p. 145~p. 147).
Pannello anteriore
Pannello posteriore
Pannello inferiore
Pannello posteriore
28.Connettore Pedal
Collegate a questo connettore il cavo dei pedali
dell’apposito supporto (p. 129).
28
29
30
29.Connettori Input
Questi connettori possono essere collegati a un altro
dispositivo di generazione sonora o a un dispositivo
audio in modo che il suono di quel dispositivo venga
emesso dagli altoparlanti dell’HP107e (p. 153).
30.Connettori Output
Vi permettono di inviare il suono a dispositivi che lo rendono ancora più potente. Possono inoltre essere collegati
a un registratore a cassette o a un dispositivo simile per
registrare un’esecuzione (p. 153).
Pannello inferiore
31.Connettori Phones
Qui potete collegare un paio di cuffie (p. 130).
32.Connettori MIDI Out/In
Collegateli ai dispositivi MIDI esterni per scambiare dati
di esecuzione (p. 154).
31
32
33
33.Connettore USB
Potete collegare un computer e scambiare dati di esecuzione tra lo strumento e il computer (p. 153).
128
HP107_e.book Page 129 Tuesday, October 19, 2004 10:41 PM
Prima di iniziare a suonare
ITALIANO
Prima di iniziare a suonare
Collegare il cavo dei pedali
Inserite il cavo dei pedali nel connettore Pedal che
si trova nel pannello posteriore dell'HP107e.
Collegare il cavo
dell’alimentazione
2. Collegate il cavo dell’alimentazione a una presa di
corrente.
Nota
ITALIANO
1. Inserite il cavo dell’alimentazione fornito in dotazione nella presa CA che si trova sul pannello
inferiore sul retro dell’HP107e.
Utilizzate solo il cavo dell’alimentazione fornito in dotazione.
Collegare il cavo degli
altoparlanti
Infilate il cavo degli altoparlanti finché non sentite un
clic.
ITALIANO
Come mostra la figura, collegate il cavo degli altoparlanti proveniente dalla cassa degli altoparlanti
del supporto al connettore degli altoparlanti che si
trova sul pannello inferiore dell’HP107e.
Alzare il leggio
1. Afferrate il leggio con entrambe le mani, alzatelo
verso di voi finché non sia dritto.
2. Utilizzate il supporto sul retro del leggio per mantenerlo in posizione.
Fermo
1
Cavo degli altoparlanti
Nota
Non posizionate sull’apparecchio oggetti contenenti
acqua (per es. vasi di fiori). Evitate inoltre di utilizzare
vicino all’apparecchio insetticidi, profumi, alcol, smalto
per unghie, spray, ecc.
Gli altoparlanti di questo pianoforte sono montati al di
sotto della superficie superiore e sono direzionati verso
l’alto. Se gli altoparlanti vengono in contatto con liquidi
possono crearsi malfunzionamenti o incidenti.
2
■ Abbassare il leggio
Alzate il supporto sul retro del leggio e poi abbassate gentilmente il leggio.
■ Utilizzare i reggispartito
ITALIANO
Altoparlanti
ITALIANO
Connettore degli altoparlanti
L’angolazione del leggio può essere impostata su una
delle tre seguenti posizioni.
Potete utilizzare i reggispartito per tenere aperte le
pagine. Quando non utilizzate i reggispartito, chiudeteli.
ITALIANO
129
HP107_e.book Page 130 Tuesday, October 19, 2004 10:41 PM
HP107e – Prima di iniziare a suonare
■ Rimuovere il leggio
È possibile rimuovere il leggio dal pianoforte. In questo
modo potete appoggiare sul pianoforte un computer portatile.
Posizionate verticalmente il leggio e rimuovete le
tre viti come mostra la figura.
Per rimuovere le viti potete utilizzare una moneta.
Quando le cuffie sono collegate, l’indicatore [
(cuffie)]
(p. 127) si accende e il suono smette di essere emesso
dagli altoparlanti dell’HP107e.
Il volume delle cuffie viene regolato con la manopola
[Volume] (p. 131) dell’HP107e.
Nota Utilizzate cuffie stereo.
Accertatevi di utilizzare solo cuffie Roland. Le cuffie di
altri produttori potrebbero produrre un volume non sufficiente.
Alcune note riguardo all’utilizzo delle cuffie
Nota
Non perdere le viti che rimuovete dal leggio e fate in
modo che non vengano ingerite accidentalmente da bambini.
Aprire/chiudere il coperchio
Per aprire il coperchio utilizzate entrambe le mani
in modo da sollevarlo e farlo scivolare all’indietro.
Per chiudere il coperchio tiratelo leggermente
verso di voi e, una volta estratto completamente,
abbassatelo.
Nota
Nota
Fate attenzione a non farvi male alle dita quando aprite e
chiudete il coperchio. Se l’HP107e viene utilizzato da
bambini, è consigliata la supervisione di adulti.
Se dovete spostare il pianoforte, accertatevi prima che il
coperchio sia chiuso per evitare incidenti.
Collegare le cuffie
L’HP107e è dotato di due connettori per cuffie. Ciò permette
a due persone di utilizzare simultaneamente le cuffie, per
esempio durante lezioni di pianoforte o quando si suona a
quattro mani. Inoltre, grazie alle cuffie, non dovete preoccuparvi di disturbare chi vi sta attorno, soprattutto di notte.
Collegate le cuffie al connettore Phones che si
trova sul fondo a sinistra del pianoforte.
Connettore Phones x 2
130
• Per evitare di causare danni al cavo, afferrate solo il corpo
delle cuffie o la spina.
• Se collegate le cuffie quando il volume dell’apparecchiatura
collegata è alzato, potreste danneggiarle. Abbassate il
volume dell’HP107e prima di collegare le cuffie.
• Ascoltando a un volume eccessivo, non solo potreste danneggiare le cuffie ma potreste anche perdere l’udito. Utilizzate le cuffie con un livello di volume moderato.
■ Utilizzare il gancio delle cuffie
Quando non utilizzate le cuffie, potete appenderle al loro
gancio che si trova nella parte inferiore sinistra
dell’HP107e.
Fissare il gancio delle cuffie
Inserite e avvitate il gancio delle cuffie fornito in dotazione con l’HP107e nel foro che si trova nella parte inferiore dell’HP107e (si veda la seguente figura). Ruotate il
dado a farfalla del gancio delle cuffie per fissarlo.
Dado a farfalla
Gancio delle cuffie
HP107_e.book Page 131 Tuesday, October 19, 2004 10:41 PM
Prima di iniziare a suonare
Accendete i vari dispositivi nell’ordine specificato. Accendendo i dispositivi nell’ordine sbagliato rischiate di causare
malfunzionamenti e/o danni agli altoparlanti o ad altri
dispositivi.
Per accendere lo strumento ruotate completamente
verso il basso la manopola [Volume] e poi premete
l’interruttore [Power On].
Informazioni sui pedali
I pedali hanno le seguenti funzioni e servono principalmente
per le esecuzioni di pianoforte.
Pedale soft
Pedale damper
Pedale sostenuto
La lunghezza della risonanza cambia leggermente a
seconda di quanto premete il pedale.
Indicatore Power
Lo strumento si accende e così pure l’indicatore Power
nella parte anteriore sinistra dell’HP107e.
Per spegnere lo strumento ruotate completamente
verso sinistra la manopola [Volume] e poi premete
l’interruttore [Power On].
Regolare il Volume e la
Brillantezza del Suono
Pedale soft (pedale sinistro)
Quando tenete premuto questo pedale e suonate la
tastiera, il suono viene messo in sordina.
La morbidezza del timbro può variare leggermente a
seconda della pressione a cui sottoponete il pedale.
Informazioni sul regolatore dei pedali
Utilizzate i regolatori che si trovano al di sotto dei pedali
dopo avere spostato il pianoforte o quando i pedali non
risultano stabili.
❍ Ruotate il regolatore per abbassarlo in modo che venga in
contatto con il pavimento. Se lasciate uno spazio, i pedali
potrebbero danneggiarsi. In particolare, se collocate lo
strumento su un tappeto dovete abbassare il regolatore in
modo che prema con forza contro il pavimento.
Ruotate la manopola [Brilliance] per regolare la
brillantezza del suono.
ITALIANO
Ruotate la manopola [Volume] per regolare il
volume generale.
Questo pedale sostiene solo le note dei tasti che avevate
già suonato quando avete premuto il pedale.
Potete cambiare la funzione del pedale sostenuto (p. 141).
ITALIANO
L’indicatore Power nella parte anteriore sinistra
dell’HP107e si spegne e con lui anche lo strumento.
Nota Se dovete spegnere completamente l’apparecchio, spegnete prima l’interruttore POWER e poi scollegate il
cavo dell’alimentazione dalla presa di corrente. Si veda
“Alimentazione” (p. 124).
Pedale sostenuto (pedale centrale)
ITALIANO
Dopo pochi secondi potete suonare la tastiera per produrre suoni. Utilizzate la manopola [Volume] per regolare il volume.
Nota L’apparecchio è dotato di un circuito di protezione.
Prima che l’apparecchio funzioni normalmente è necessario un breve intervallo (pochi secondi) dopo l’accensione.
In un pianoforte acustico, tenendo premuto il pedale
damper, le altre corde vengono lasciate risuonare in “simpatia” con le note suonate sulla tastiera aggiungendo ricchezza al suono. L’HP107e simula questo tipo di risonanza simpatetica.
Potete cambiare la quantità di risonanza applicata con il
pedale damper (p. 135).
ITALIANO
Pedale damper (pedale destro)
Quando premete il pedale le note vengono tenute in risonanza anche se rilasciate i tasti.
Power On
ITALIANO
Accendere e spegnere lo
strumento
Regolatore dei pedali
Min
Max
Mellow
Bright
ITALIANO
131
HP107_e.book Page 132 Tuesday, October 19, 2004 10:41 PM
HP107e – Capitolo 1. Ascoltare le song incorporate
Capitolo 1. Ascoltare le song incorporate
Ascoltare le song
incorporate
■ Selezionare una song e riprodurla
L’HP107e contiene 68 pezzi di pianoforte incorporate.
“Capitolo 3. Suonare sulle song incorporate” a pagina
143, “Tone List” (p. 240)
■ Riprodurre tutte le song in modo consecutivo
(All Song Play)
Le song incorporate possono essere riprodotte in modo
consecutivo.
1 3, 4
2
Informazioni sulla visualizzazione delle song
incorporate
USr (user) … Luogo dove potete registrare la vostra
esecuzione. (Per maggiori dettagli sulla registrazione si
veda → p. 145.)
S.1~S.68 … Song incorporate
S. U … Song salvate con Song Backup (p. 151)
12
1. Premete simultaneamente i pulsanti [Song/
Tempo] e [Play].
L’indicatore del pulsante [Song/Tempo] si accende, l’indicatore del pulsante [Play] lampeggia e tutti i pezzi vengono riprodotti uno dopo l’altro iniziando dal brano selezionato.
Sul display appare per qualche secondo il numero della
song.
Potete premere il pulsante [–] o [+] per selezionare la song
che volete riprodurre.
Scegliere una song da riprodurre
1. Premete il pulsante [Song/Tempo] in modo che
l’indicatore si illumini di rosso.
Sul display appare per qualche secondo il numero della
song.
2. Premete [–] o [+] per selezionare una song.
Se tenete premuto il pulsante, i numeri cambiano continuamente.
Selezionate un brano di cui avete fatto un backup
con la seguente procedura:
1
Premete simultaneamente i pulsanti [–] e [+]
in modo che sul display appaia “USr”.
2
Premete il pulsante [–] in modo che venga
visualizzato “S. U”.
Quando sono state riprodotte tutte le song, la riproduzione riparte dalla prima song.
Arrestare la riproduzione
2. Premete il pulsante [Play].
La riproduzione si arresta.
Come riprodurre
3. Premete il pulsante [Play].
L’indicatore del pulsante si accende e la song selezionata
viene riprodotta.
Arrestare la riproduzione
4. Premete il pulsante [Play].
L’indicatore del pulsante si spegne e la riproduzione viene
arrestata. Se premete di nuovo il pulsante [Play], viene
avviata nuovamente la riproduzione della song che avete
arrestato.
132
HP107_e.book Page 133 Tuesday, October 19, 2004 10:41 PM
Capitolo 1. Ascoltare le song incorporate
Potete ascoltare varie demo song tra cui quelle che presentano i timbri di pianoforte e altri timbri e quelle che presentano le funzioni applicate ai timbri di pianoforte.
Quando premete un pulsante, viene riprodotta la demo
assegnata a quel pulsante. Vengono riprodotte due versioni della demo: una in cui è utilizzata la funzione del
pulsante che avete premuto e una in cui non è utilizzata.
ITALIANO
Ascoltare le demo song
■ Riprodurre le demo song dei timbri
1. Premete il pulsante [Demo].
L’indicatore del pulsante lampeggia e viene avviata la
riproduzione delle demo song dei timbri.
Quando premete il pulsante premuto al punto 2, potete
passare dalla versione in cui è utilizzata la funzione a
quella in cui non è utilizzata e viceversa.
Quando termina la riproduzione dell’ultima song, la
riproduzione riprende dalla prima song.
Se premete uno qualsiasi dei pulsanti Tone mentre il pulsante [Demo] lampeggia, viene riprodotta la demo song
corrispondente a quel pulsante.
Contenuto della demo
[Piano]
del timbro E. Piano
[E. Piano]
Demo song del timbro E. Piano
[Harpsichord]
Demo song del timbro di arpicordo
[Organ]
Demo song del timbro di organo
[Strings]
Demo song dei timbri di strumenti a corde
[Acoustic Layering]
Demo song che utilizzano la funzione
Acoustic Layering (p. 138)
[Split]
Demo song che utilizzano la funzione Split
(p. 140)
Suonate la tastiera e provate la funzione Hammer
Response.
Se la funzione Hammer Response è attivata, i suoni vengono emessi più lentamente quando la tastiera viene
suonata con più forza.
La demo della funzione Hammer Response vi aiuta a
capire quali sono gli effetti sul suono a funzione attivata
e disattivata.
ITALIANO
Pulsante assegnato
alla demo di un timbro
Quando viene selezionata la demo della funzione Hammer Response l'esecuzione si arresta. Ogni volta che
premete il pulsante Key Touch [Hammer], la funzione
Hammer Response viene attivata e disattivata.
ITALIANO
Informazioni sulla demo della funzione
Hammer Response
Arrestare la demo delle funzioni
3. Premete il pulsante [Demo].
Arrestare le demo song dei timbri
2. Premete il pulsante [Demo].
ITALIANO
L’indicatore del pulsante [Demo] si spegne e la demo
viene arrestata.
L’indicatore del pulsante [Demo] si spegne e la demo
viene arrestata.
■ Ascoltare una demo delle funzioni
Potete ascoltare la demo delle funzioni applicate ai timbri
di pianoforte.
1. Premete il pulsante [Demo].
ITALIANO
L’indicatore del pulsante lampeggia e viene avviata la
riproduzione delle demo song dei timbri.
2. Premete uno dei seguenti pulsanti.
Pulsante assegnato alla
demo delle funzioni
Contenuto della demo
Demo Grand Space
p. 136
[Dynamic Emphasis]
Demo Dynamic Emphasis
p. 137
Piano Resonance [Key Off]
Demo Key Off
p. 134
Piano Resonance [String]
Demo String Resonance
p. 134
Piano Resonance [Damper]
Demo Damper Resonance
p. 135
Key Touch [Hammer]
Demo Hammer Response
p. 135
ITALIANO
[Grand Space]
133
HP107_e.book Page 134 Tuesday, October 19, 2004 10:41 PM
HP107e – Capitolo 2. Esecuzione
Capitolo 2. Esecuzione
Suonare utilizzando vari timbri
L’HP107e contiene 36 diversi timbri incorporati. I timbri sono
organizzati in gruppi assegnati ai pulsanti Tone.
Selezionare un gruppo di timbri
1. Premete uno qualsiasi dei pulsanti Tone.
Si accende l’indicatore del pulsante che avete premuto.
Quando suonate la tastiera, sentite uno dei timbri contenuto nel gruppo selezionato.
Selezionare i timbri di variazione
2. Premete il pulsante [–] o [+].
1
2
Sul display appare per qualche secondo il numero del
suono.
Per maggiori dettagli si veda “Tone List” (p. 240).
Quando suonate la tastiera udite il timbro selezionato.
Regolare in dettaglio il timbro di pianoforte
(Piano Resonance)
Potete effettuare regolazioni dettagliate del timbro di pianoforte.
■ Produrre il suono di rilasciamento dei tasti
(Key Off)
Potete produrre il suono lieve che si sente al rilascio dei
tasti su un pianoforte acustico.
Potete salvare questa impostazione nella memoria
dell’HP107e utilizzando la funzione Memory Backup
(p. 151).
1. Premete il pulsante Piano Resonance [Key Off] in
modo che l’indicatore si accenda.
Quando rilasciate i tasti si sente un suono.
Premete di nuovo il pulsante Piano Resonance [Key Off] in
modo che l’indicatore si spenga e l’effetto venga annullato.
Per maggiori dettagli sui timbri in cui è abilitata questa
impostazione si veda “Tone List” (p. 240).
Regolare il volume del suono Key Off
2. Tenete premuto il pulsante Piano Resonance [Key
Off] e premete il pulsante [–] o [+].
Potete impostare il volume del suono che si sente al rilascio dei tasti su uno dei dieci livelli.
Aumentando il valore aumenta il volume.
■ Produrre la risonanza delle corde a tasti
premuti (String Resonance)
Quando premete i tasti di un pianoforte acustico, risuonano anche le corde che sono già in vibrazione. Questa
funzione riproduce l’effetto chiamato “risonanza delle
corde”.
Nota Questa impostazione è disponibile solo con i timbri di
pianoforte. Non potete impostarla con altri tipi di timbri.
1. Premete il pulsante Piano Resonance [Sting] in
modo che l’indicatore si accenda.
La funzione String Resonance è attivata. Premete di nuovo
il pulsante Piano Resonance [String] in modo che l’indicatore si spenga e l’effetto venga annullato.
Potete salvare questa impostazione nella memoria
dell’HP107e utilizzando la funzione Memory Backup
(p. 151).
134
HP107_e.book Page 135 Tuesday, October 19, 2004 10:41 PM
Capitolo 2. Esecuzione
2. Tenete premuto il pulsante Piano Resonance
[String] e premete il pulsante [–] o [+].
Potete regolare la profondità della risonanza (il volume
della risonanza) su uno dei dieci livelli.
Aumentando il valore aumenta l’effetto di risonanza
applicato.
■ Produrre risonanza quando viene premuto il
pedale damper ( Damper Resonance)
Quando in un pianoforte acustico premete il pedale damper, le note risuonano con altre corde aggiungendo riverberazione e ricchezza al suono. Quando viene premuto, il
pedale damper dell’HP107e ricrea lo stesso tipo di risonanza (risonanza simpatetica).
Nota Questa impostazione è disponibile solo con i timbri di
pianoforte. Non potete impostarla con altri tipi di timbri.
La funzione Damper Resonance viene attivata.
Premete di nuovo il pulsante Piano Resonance [Damper]
in modo che l’indicatore si spenga e l’effetto venga annullato.
Potete salvare questa impostazione nella memoria
dell’HP107e utilizzando la funzione Memory Backup
(p. 151).
Regolare la profondità della risonanza
Potete scegliere uno dei dieci livelli di profondità del
suono risonante (livello di risonanza).
Tutti gli indicatori spenti. Fisso. I suoni hanno un volume
fisso indipendentemente dalla forza con cui viene suonata
la tastiera.
■ Cambiare la temporizzazione dei suoni a
seconda della forza utilizzata per premere i
tasti (Hammer Response)
Questa impostazione definisce quanto la forza con cui premete i tasti influisce la temporizzazione con cui le note
vengono suonate. Questa funzione è chiamata “Hammer
Response”.
Potete salvare questa impostazione nella memoria
dell’HP107e utilizzando la funzione Memory Backup
(p. 151).
Quando in un pianoforte acustico premete un tasto, il martelletto colpisce la corda producendo un suono. Se premete il tasto con poca forza, il martelletto si muove lentamente. In questo modo il suono viene prodotto con un
certo ritardo rispetto a quando suonate con più forza.
Se avete attivato la funzione Hammer Response, il tempo
compreso tra la pressione del tasto e il momento in cui si
sente il suono dipende dalla forza con cui suonate la
tastiera. Se suonate con meno forza, il tempo sarà più
lungo.
ITALIANO
2. Tenete premuto il pulsante Piano Resonance
[Damper] e premete il pulsante [–] o [+].
“Heavy” acceso. Il fortissimo (ff) non può essere prodotto
a meno che non suoniate con più forza del solito. La
tastiera risulta più pesante. Una diteggiatura dinamica
aggiunge ancora più sentimento all’esecuzione.
ITALIANO
1. Tenete premuto il pulsante Piano Resonance
[Damper] in modo che l’indicatore si accenda.
“Medium” acceso. Vi permette di suonare utilizzando la
sensibilità più naturale. Questa impostazione è quella che
si avvicina maggiormente a quella di un pianoforte acustico.
ITALIANO
Potete cambiare il volume della risonanza del pedale damper.
“Light” acceso. Il fortissimo (ff) può essere prodotto suonando con meno forza del solito. La tastiera risulta più leggera. Questa impostazione facilita l’esecuzione ed è adatta
ai bambini.
ITALIANO
Regolare la profondità della risonanza
Valori alti producono un effetto più profondo.
Regolare la sensibilità della
tastiera (Key Touch)
La sensibilità (il tocco) della tastiera può essere regolata.
1
“Light” acceso. Quando i tasti vengono premuti con poca
forza, la risposta è più veloce.
1
Potete salvare questa impostazione nella memoria
dell’HP107e utilizzando la funzione Memory Backup
(p. 151).
Ogni volta che premete il pulsante Key Touch [Touch],
l’indicatore del pulsante cambia così come cambia la sensibilità della tastiera.
“Medium” acceso. Quando i tasti vengono premuti con
poca forza, viene utilizzata la temporizzazione normale.
“Heavy” acceso. Quando i tasti vengono premuti con poca
forza, la temporizzazione dei suoni viene ritardata.
Tutti gli indicatori spenti. La funzione Hammer
Response viene annullata. Il suono viene eseguito immediatamente, indipendentemente dalla forza con cui premete i tasti (velocity).
135
ITALIANO
1. Premete il pulsante Key Touch [Touch].
ITALIANO
1. Premete il pulsante Key Touch [Hammer] in modo
che si accenda l’indicatore appropriato.
HP107_e.book Page 136 Tuesday, October 19, 2004 10:41 PM
HP107e – Capitolo 2. Esecuzione
Aggiungere profondità al
suono (Grand Space)
L’HP107e è dotato di una funzione “Grand Space” che vi permette di ottenere suoni caratterizzati da un senso di profondità come quelli di un pianoforte acustico. Utilizzando questa funzione potete ottenere la naturale riverberazione e profondità di un pianoforte acustico.
1
2
Potete salvare questa impostazione nella memoria
dell’HP107e utilizzando la funzione Memory Backup
(p. 151).
1. Premete il pulsante [Grand Space] in modo che
l’indicatore si accenda.
La funzione Grand Space viene attivata e al suono viene
aggiunto un grande senso di profondità.
Se impostate il modo Grand Space (p. 150) su “1” e collegate un paio di cuffie, il senso di profondità viene adattato all’ascolto con cuffie. Se invece non collegate un paio
di cuffie, viene selezionata la profondità che più si addice
agli altoparlanti.
2. Tenete premuto il pulsante [Grand Space] e premete il pulsante [–] o [+].
Potete regolare il senso di profondità su uno dei quattro
livelli.
A valori più alti corrisponde una maggiore profondità.
Aggiungere una sensazione
di profondità per l’ascolto
con cuffie (Grand Space)
Anche nell’ascolto con cuffie potete ottenere la profondità
sonora tipica di un pianoforte a coda. Utilizzando questa funzione potete ottenere la naturale riverberazione e profondità
di un pianoforte acustico.
1
2
Potete salvare questa impostazione nella memoria
dell’HP107e utilizzando la funzione “Memory Backup”
(p. 151).
1. Premete il pulsante [Grand Space] in modo che
l’indicatore si accenda.
La funzione Grand Space viene attivata e al suono viene
aggiunto un grande senso di profondità.
Se impostate il modo Grand Space (p. 150) su “1” e collegate un paio di cuffie, il senso di profondità viene adattato all’ascolto con cuffie. Se invece non collegate un paio
di cuffie, viene selezionata la profondità che più si addice
agli altoparlanti.
2. Tenete premuto il pulsante [Grand Space] e premete il pulsante [–] o [+].
Potete regolare il senso di profondità su uno dei quattro
livelli.
A valori più alti corrisponde una maggiore profondità.
3. Per annullare la funzione Grand Space premete di
nuovo il pulsante [Grand Space] in modo che
l’indicatore si spenga.
3. Per annullare la funzione Grand Space premete di
nuovo il pulsante [Grand Space] in modo che
l’indicatore si spenga.
Quando collegate le cuffie, l’indicatore [
accende.
136
(cuffie)] si
HP107_e.book Page 137 Tuesday, October 19, 2004 10:41 PM
Capitolo 2. Esecuzione
ITALIANO
Aggiungere vivacità al
suono (Dynamic Emphasis)
Applicare effetti al suono
Potete aggiungere vivacità al suono per conferirgli chiarezza
e nitidezza.
■ Aggiungere riverberazione al suono (Reverb)
3
1. Premete il pulsante [Reverb].
Potete salvare questa impostazione nella memoria
dell’HP107e utilizzando la funzione Memory Backup
(p. 151).
1. Premete il pulsante [Dynamic Emphasis] in modo
che l’indicatore si accenda.
2. Per annullare la funzione Dynamic Emphasis premete di nuovo il pulsante [Dynamic Emphasis] in
modo che l’indicatore si spenga.
Cambiare le impostazioni Dynamic Emphasis
3. Tenete premuto il pulsante [Dynamic Emphasis] e
premete il pulsante [–] o [+].
Descrizione
1
Crea un suono con bassi e acuti enfatizzati.
2
Produce un suono caratterizzato da accordi
chiari e distinti nel registro dei bassi.
3
Crea un suono con bassi enfatizzati.
Per annullare l’effetto di riverbero, premete il pulsante
[Reverb] in modo che l’indicatore si spenga.
Potete salvare nella memoria dell’HP107e l’impostazione
on/off del riverbero così come la quantità di riverbero
applicata utilizzando la funzione Memory Backup
(p. 151).
■ Aggiungere ricchezza al suono (Chorus)
Aggiungendo l’effetto chorus potete dare al suono maggiore spaziosità e respiro.
1. Premete il pulsante [Chorus].
L’indicatore del pulsante si accende e al suono viene applicato l’effetto chorus.
Per annullare l’effetto chorus, premete il pulsante [Chorus] in modo che l’indicatore si spenga.
Potete salvare le impostazioni on/off dell’effetto chorus
indipendentemente per ogni timbro. Quando lo strumento viene spento vengono ripristinate le impostazioni
originali.
ITALIANO
Indicatore
L’indicatore del pulsante si accende e al suono viene applicato l’effetto di riverbero.
ITALIANO
Viene attivata la funzione Dynamic Emphasis e al suono
viene aggiunta vivacità.
ITALIANO
1
Applicando l’effetto di riverbero potete produrre una piacevole riverberazione come se suonaste in una sala da concerti.
■ Cambiare la quantità di effetto applicato
La quantità (ossia la profondità) dell’effetto riverbero e
chorus può essere impostata su uno dei dieci livelli.
Con le impostazioni del costruttore, il riverbero e il chorus sono impostati su “5”.
ITALIANO
Cambiare la profondità dell’effetto riverbero
1. Tenete premuto il pulsante [Reverb] e premete il
pulsante [–] o [+].
Viene visualizzato il valore correntemente specificato.
Valori alti producono un effetto più profondo.
Nota Non potete salvare impostazioni di riverbero separate per
ogni timbro.
Viene visualizzato il valore correntemente specificato.
Valori alti producono un effetto più profondo.
137
ITALIANO
Cambiare la profondità dell’effetto chorus
1. Tenete premuto il pulsante [Chorus] e premete il
pulsante [–] o [+].
HP107_e.book Page 138 Tuesday, October 19, 2004 10:41 PM
HP107e – Capitolo 2. Esecuzione
Trasporre la tonalità della
tastiera (Transpose)
Utilizzando la funzione “Transpose” potete trasporre l’esecuzione senza cambiare le note che eseguite. Per esempio, se
una song è in una tonalità complicata con molti diesis (#) o
bemolli (b), potete utilizzare questa funzione per eseguirla in
una tonalità più semplice.
Sovrapporre timbri complementari a quelli di pianoforte (Acoustic Layering)
Con l’HP107e potete facilmente selezionare i timbri più
adatti per essere utilizzati con quello di pianoforte. Questa
funzione è chiamata “Acoustic Layering”.
Quando accompagnate un cantante, potete facilmente trasporre la tonalità in modo da adattarla alle esigenze del cantante ed eseguire al contempo la song così come si presenta
sullo spartito (ossia con la stessa diteggiatura).
1
2
Potete cambiare l’intonazione del timbro Layer in intervalli di ottava (p. 150).
1
Prima di tutto selezionate un timbro di pianoforte (p. 134).
1. Continuate a tenere premuto il pulsante [Transpose] e premete una nota per indicare la tonica
della tonalità su cui volete trasporre.
L’indicatore del pulsante si accende, e la tastiera viene trasposta.
Se tenete premuto il pulsante [Transpose], viene visualizzato il valore correntemente specificato.
Potete inoltre trasporre tenendo premuto il pulsante
[Transpose] e premendo il pulsante [–] o [+].
Se tenete premuto il pulsante [Transpose] e premete
simultaneamente i pulsanti [–] e [+], l’impostazione torna
al suo valore originale (0).
La gamma di valori possibili è –6~0~5 (in intervalli di
semitono).
Per esempio, se volete che si senta la tonalità E quando
suonate la tonalità C, tenete premuto il pulsante [Transpose] e premete il tasto E.
1. Premete il pulsante [Acoustic Layering] in modo
che l’indicatore si accenda.
Quando suonate la tastiera il timbro di pianoforte e il timbro complementare vengono sovrapposti e suonati
assieme.
Se volete sovrapporre timbri diversi da quello di pianoforte, premete il pulsante del timbro e poi selezionate il
timbro da utilizzare come base.
Selezionare il timbro da sovrapporre a
quello di pianoforte
2. Utilizzate i pulsanti [–] e [+] per selezionare il timbro sovrapposto.
Sul display appare per qualche secondo il numero della
song.
Il numero del timbro sovrapposto a quello di pianoforte
(timbro Layer) ha una “L.”.
Prendendo C come punto di riferimento, se vi spostate di
quattro tasti, compresi i tasti neri, sino a raggiungere E, sul
display appare “4”.
Se suonate C E G
Udite E G# B
Se impostate il valore di trasposizione su “0”, l’indicatore
del pulsante rimane spento anche se premete il pulsante
[Transpose].
Per annullare la funzione Transpose, premete il pulsante
[Transpose] in modo che l’indicatore si spenga.
Se premete di nuovo il pulsante [Transpose] in modo che
l’indicatore si accenda, la tastiera viene trasposta sulla
nota che avete specificato qui.
Quando spegnete lo strumento, questa impostazione
torna al suo valore originale (0).
138
Se selezionate “Layer” come impostazione del pedale centrale, la funzione Acoustic Layering viene attivata automaticamente (p. 138). In questo caso potete regolare il
volume del timbro sovrapposto a quello di pianoforte con
il pedale.
Quando suonate la tastiera il timbro di pianoforte e l'altro
timbro che avete selezionato vengono sovrapposti e suonati assieme.
HP107_e.book Page 139 Tuesday, October 19, 2004 10:41 PM
Capitolo 2. Esecuzione
Quando utilizzate l’Acoustic Layering potete regolare il
bilanciamento del volume dei due timbri selezionati.
Quando viene cambiato il bilanciamento del volume
durante l’Acoustic Layering, la Dual Balance viene
impostata sulle stesse impostazioni di bilanciamento di
volume (p. 139).
■ Regolare il bilanciamento di volume in Dual
Performnace (Dual Balance)
In Dual Performance potete modificare il bilanciamento
del volume dei due timbri sovrapposti.
ITALIANO
■ Cambiare il bilanciamento di volume quando
utilizzate l’Acoustic Layering
1. Tenete premuto il pulsante [Acoustic Layering] e
premete il pulsante [–] o [+].
Per tornare al bilanciamento di volume originale premete
simultaneamente i pulsanti [–] e [+].
Volume del timbro di pianoforte
Volume del timbro Layer
La “Dual Performance” consiste nel suonare simultaneamente due timbri premendo un tasto. Potete selezionare un
timbro da sovrapporre premendo il corrispondente pulsante
del timbro.
2
Potete salvare questa impostazione nella memoria
dell’HP107e utilizzando la funzione Memory Backup
(p. 151).
1. Tenete premuto il pulsante [Transpose] e premete
il pulsante [Split].
Gli indicatori dei pulsanti che avete premuto lampeggiano.
Sul display appare il bilanciamento di volume corrente.
2. Premete il pulsante [–] o [+] per cambiare il valore.
Il bilanciamento del volume cambia.
Potete inoltre cambiare il bilanciamento di volume
tenendo premuto il pulsante [Acoustic Layering] e premendo il pulsante [+] o [–].
ITALIANO
Utilizzare due timbri simultaneamente
(Dual Performance)
1
ITALIANO
Il bilanciamento del volume cambia.
Per tornare al bilanciamento di volume originale premete
simultaneamente i pulsanti [–] e [+].
1. Premete simultaneamente i due pulsanti Tone che
volete che suonino contemporaneamente.
Quando suonate la tastiera, vengono eseguiti simultaneamente i timbri dei due pulsanti Tone che avere selezionato.
Per annullare l’esecuzione Dual premete uno qualsiasi dei
pulsanti Tone.
Volume del timbro del pulsante sinistro
Volume del timbro del pulsante destro
Premete un pulsante qualsiasi diverso dai pulsanti [–] [+]
e l’indicatore del pulsante torna allo stato precedente.
ITALIANO
Si accende l’indicatore del pulsante che avete premuto.
Per cambiare il timbro del pulsante destro
dei due timbri selezionati
2. Premete il pulsante [–] o [+].
ITALIANO
La Dual Performance ora utilizza il timbro del pulsante
sinistro insieme con il nuovo timbro selezionato.
Potete cambiare l’intonazione del timbro del pulsante
destro in intervalli di ottava (p. 150).
Per cambiare il timbro del pulsante sinistro
dei due timbri selezionati
Annullate la Dual Performance e poi riselezionate il timbro. Premete i due pulsanti Tone che volete che suonino
contemporaneamente.
ITALIANO
139
HP107_e.book Page 140 Tuesday, October 19, 2004 10:41 PM
HP107e – Capitolo 2. Esecuzione
Suonare timbri diversi con la
mano destra e sinistra (Split)
La “Split Performance” consiste nel dividere la tastiera in
una parte per la mano destra e in una per la mano sinistra e
poi suonare timbri diversi nelle due parti. Il tasto che divide
le due parti si chiama “punto di divisione”.
Punto di divisione (impostazione del costruttore: F#3)
Cambiare il timbro utilizzato dalla mano
destra
Annullate la Split Performance e poi riselezionate il timbro.
In Split Performance il pedale damper viene applicato
solo alla parte della mano destra della tastiera. Se volete
che il pedale damper venga applicato alla parte della
mano sinistra, fate riferimento a “Applicare il pedale
damper alla parte della mano sinistra” (p. 150).
■ Cambiare il punto di divisione della tastiera
A0 B0 C1 D1 E1 F1 G1 A1 B1 C2 …
C3
Timbro della mano sinistra
C4
C5
Timbro della mano destra
Potete cambiare il punto di divisione della tastiera
all’interno dell’intervallo che va da B1 a B6.
L’impostazione del costruttore è “F#3”.
1. Continuando a tenere premuto il pulsante [Split],
premete il tasto che volete specificare come punto
di divisione.
1
1. Premete il pulsante [Split].
L’indicatore del pulsante si accende. La tastiera viene
divisa in una parte per la mano destra e in una per la mano
sinistra.
Il tasto del punto di divisione fa parte dell’area della
mano sinistra della tastiera.
Il timbro utilizzato per la parte destra è quello che veniva
utilizzato prima di premere il pulsante [Split], mentre il
timbro di basso è quello eseguito sulla parte sinistra
all’accensione dello strumento e quando il timbro della
mano sinistra viene cambiato viene selezionato un timbri
diverso.
Per annullare la Split Performance premete il pulsante
[Split] in modo che l’indicatore si spenga.
Quando utilizzate la Dual Performance premete il pulsante [Split].
La mano destra utilizza il timbro del pulsante sinistro
della Dual Performance mentre la mano sinistra utilizza
un timbro adatto a quello della mano destra.
Potete cambiare l’intonazione dei timbri della parte sinistra della tastiera in intervalli di ottava (p. 150).
Cambiare il timbro utilizzato dalla mano
sinistra
1. Premete uno qualsiasi dei pulsanti Tone.
2. Premete il pulsante [–] o [+].
Ogni volta che premete il pulsante [–] o [+] il timbro della
mano sinistra cambia.
Per maggiori dettagli sui timbri si veda “Tone List”
(p. 240).
140
Il tasto che avete premuto diventa il punto di divisione.
Tale tasto fa parte dell’area della mano sinistra della
tastiera.
Potete inoltre cambiare l’impostazione premendo il pulsante [–] o [+] mentre continuate a tenere premuto il pulsante [Split].
Se tenete premuto il pulsante [Split] e premete simultaneamente i pulsanti [–] e [+], l’impostazione torna al suo
valore originale (F#3).
Il tasto del punto di divisione viene visualizzato nel
seguente modo.
Display
C
C
d
E_
Nota
C
C
D
E
Display
E
F
F
G
Nota
E
F
F
G
Display
A_
A b_
b
Nota
A
A
B
B
Se continuate a tenere premuto il pulsante [Split], viene
visualizzato il punto di divisione correntemente specificato.
HP107_e.book Page 141 Tuesday, October 19, 2004 10:41 PM
Capitolo 2. Esecuzione
Con l’impostazione del costruttore il pedale centrale funziona come un pedale sostenuto (p. 131). Tuttavia potete
assegnare al pedale centrale varie altre funzioni.
Cambiare il tempo
2. Premete il pulsante [Song/Tempo] in modo che
l’indicatore si illumini di verde.
ITALIANO
Cambiare il funzionamento
del pedale centrale
3. Premete il pulsante [–] o [+] per regolare il tempo.
Cambiare la suddivisione ritmica
4. Tenete premuto il pulsante [Song/Tempo] e premete il pulsante [–] o [+].
1. Premete il pulsante [Center Pedal] in modo che si
accenda l’indicatore appropriato.
Se avete disattivato la funzione Acoustic Layering e
Dual, la funzione Acoustic Layering viene attivata.
Suddivisione
Layer. Quando suonate un tasto premendo il pedale centrale, viene selezionato un timbro appropriato a quello di
pianoforte e i due timbri vengono sovrapposti e suonati
assieme.
Il volume del timbro Layer viene regolato a seconda di
quanto avete premuto il pedale.
Octave. Quando suonate un tasto premendo il pedale
centrale, la nota del tasto che avete premuto e la nota
un’ottava più acuta vengono sovrapposte e suonate
assieme. Potete regolare il volume del suono un’ottava
più acuto premendo in maniera diversa sul pedale.
■ Far suonare il metronomo
L’HP107e è dotato di un metronomo incorporato.
Quando viene riprodotta una song, il metronomo suona
secondo il tempo e la suddivisione ritmica (il beat) della
song.
2/2
=5–250
x/4
=10–500
3/8
=20–999
6/8
9/8
12/8
= 7–333
Non è possibile cambiare la suddivisione ritmica durante
la riproduzione o la registrazione di una song.
Display
Suddivisione
ritmica
Display
Suddivisione
2.2
2/2
6.4
6/4
0.4
Solo levare
7.4
7/4
2.4
2/4
3.8
3/8
3.4
3/4
6.8
6/8
4.4
4/4
9.8
9/8
5.4
5/4
12.8
12/8
Arrestare il metronomo
5. Premete di nuovo il pulsante [Metronome/Count
In] in modo che l’indicatore si spenga.
Il metronomo si arresta.
■ Cambiare il volume del metronomo
Far suonare il metronomo
1. Premete il pulsante [Metronome/Count In].
1. Tenete premuto il pulsante [Metronome/Count In]
e premete il pulsante [–] o [+].
Viene visualizzato il volume correntemente specificato.
Continuate a tenere premuto il pulsante [Metronome/
Count In] e premete il pulsante [–] o [+] per far suonare il
metronomo e cambiare il volume.
Quando il volume del metronomo è impostato su “0”, il
metronomo non suona.
141
ITALIANO
Il metronomo inizia a suonare. Il pulsante lampeggia di
rosso e di verde a tempo con la suddivisione ritmica selezionata. Il pulsante lampeggia di rosso nei battere e di
verde nei levare.
ITALIANO
Il volume del metronomo può essere regolato su dieci
livelli.
All’accensione viene selezionato il livello “4”.
3 4 1,5 2
ITALIANO
Utilizzare il metronomo
Nota
Valore del tempo
ITALIANO
Sostenuto. Imposta la funzione sul pedale sostenuto
(p. 131).
ITALIANO
1
Viene visualizzata la suddivisione ritmica correntemente
selezionata. Tenendo premuto il pulsante [Song/Tempo] e
premendo il pulsante [–] o [+], la suddivisione ritmica
cambia. Se tenete premuto il pulsante [Song/Tempo] e
premete simultaneamente i pulsanti [–] e [+], la suddivisione ritmica torna a essere quella impostata prima della
modifica.
Corrispondenza tra la visualizzazione
della suddivisione ritmica e del tempo
HP107_e.book Page 142 Tuesday, October 19, 2004 10:41 PM
HP107e – Capitolo 2. Esecuzione
Dividere la tastiera in due parti per esecuzioni a quattro
mani (modo Twin Piano)
Potete dividere la tastiera in due parti separate in modo che due persone possano suonare negli stessi registri.
C1
C3
C2
C4
C3
C4
C5
C6
1. Tenendo premuto il pulsante [Split] premete il
pulsante [Piano].
L’indicatore del pulsante [Split] si accende e viene attivato il modo Twin Piano.
C5
C3
C6
C4
C7
C5
C8
C6
● Quando è attivato il modo Twin Piano accade ciò che
segue.
• La tastiera viene divisa in due parti separate e l’intonazione cambia.
• Ora il pedale destro funziona come pedale damper per
la parte destra della tastiera e il pedale sinistro funziona come pedale damper per la parte sinistra della
tastiera.
• Ora il pedale centrale funziona come pedale sostenuto
per la parte destra della tastiera.
2. Per uscire dalla funzione tenete premuto il pulsante [Split] e premete di nuovo il pulsante
[Piano].
• Durante la registrazione o quando lo strumento è in
modo standby di registrazione, la registrazione viene
arrestata oppure il modo standby viene annullato. Il
pulsante [Rec] non funziona quando è attivato il modo
Twin Piano.
• Se la funzione Split è attivata, viene disattivata.
• Sulla parte destra e sinistra viene utilizzato lo stesso
timbro e gli stessi effetti. Se il pianoforte si trova in Split
Play prima che venga attivato il modo Twin Piano,
viene utilizzato il timbro selezionato per la mano destra
nel modo Split.
Nota La funzione di risonanza del pedale damper non funziona
nel modo Twin Piano.
142
HP107_e.book Page 143 Tuesday, October 19, 2004 10:41 PM
Capitolo 3. Suonare sulle song incorporate
ITALIANO
Capitolo 3. Suonare sulle song incorporate
Di seguito viene spiegato come suonare sulle song incorporate.
Per maggiori dettagli sul funzionamento si veda “Selezionare una song e riprodurla” (p. 132).
Suddivisione
Valore del tempo
2/2
=5–250
x/4
=10–500
3/8
=20–999
6/8
9/8
12/8
= 7–333
ITALIANO
Potete rallentare il tempo di riproduzione della song o riprodurre le due mani separatamente. Prima di provare a suonare una song, ascoltatela più volte per farvene un’idea.
Se accendete il metronomo durante la riproduzione di
una song, il metronomo suona secondo il tempo e la suddivisione ritmica della song.
Corrispondenza tra la visualizzazione della
misura e del tempo
Informazioni sulla visualizzazione delle song
incorporate
Cambiare il tempo
■ Aggiungere un preconteggio per facilitare la
temporizzazione (Count-In)
Quando suonate su una song potete fare in modo che la
vostra esecuzione risulti a tempo con la song aggiungendo
un conteggio prima che la song venga riprodotta.
2
1
In alcune song incorporate il tempo cambia all’interno
della song.
L’inserimento di un conteggio che precede la riproduzione
della song viene chiamato “Count-In”.
Se sull’HP107e riproducete una song utilizzando il metronomo, sentite un conteggio di due battute prima dell’inizio della song.
Durante il preconteggio il numero delle battute viene
indicato sul display con “–2” e poi con “–1”.
“Far suonare il metronomo” a pagina 141
1. Premete il pulsante [Song/Tempo] in modo che
l’indicatore si illumini di verde.
ITALIANO
Per prima cosa selezionate la song che volete riprodurre
(p. 132).
ITALIANO
Se la song ha un tempo veloce, potete rallentarlo in modo
che l’esercitazione risulti più semplice. Vi consigliamo di
velocizzare il tempo man mano che vi esercitate.
USr (user) … Luogo dove potete registrare la vostra
esecuzione. (Per maggiori dettagli sulla registrazione si
veda → p. 145.)
S.1~S.68 … Song incorporate
S. U … Song salvate con Song Backup (p. 151)
Sul display appare il tempo.
Ogni volta che premete il pulsante [Song/Tempo] viene
visualizzato a turno il tempo e il numero della song correntemente selezionata (preceduto da “S.”).
ITALIANO
Quando viene visualizzato il tempo, il pulsante [Song/
Tempo] si illumina di verde. Quando viene visualizzato il
numero della song, si illumina di rosso.
2. Premete il pulsante [–] o [+] per regolare il tempo.
La gamma di valori possibili per il tempo è q= 10~500.
Potete cambiare il tempo anche durante la riproduzione.
Se premete di nuovo il pulsante [+], il tempo aumenta di
un’unità. Se tenete premuto il pulsante, il tempo aumenta
continuamente.
Se premete una volta il pulsante [–], il tempo diminuisce di
un’unità. Se tenete premuto il pulsante, il tempo diminuisce continuamente.
ITALIANO
Se premete simultaneamente i pulsanti [–] e [+], viene
ripristinato il tempo base della song (il tempo precedente
alle modifiche).
143
HP107_e.book Page 144 Tuesday, October 19, 2004 10:41 PM
HP107e – Capitolo 3. Suonare sulle song incorporate
Suonare le due mani
separatamente
Riprodurre una song
2. Premete il pulsante [Play] in modo che l’indicatore
si accenda.
Le song incorporate vi permettono di selezionare la parte di
esecuzione che deve essere riprodotta.
La song inizia a essere riprodotta. La parte che avete selezionato al punto 1 non viene riprodotta.
L’esecuzione della mano sinistra delle song incorporate è
assegnata al pulsante [Left] mentre l’esecuzione della mano
destra è assegnata al pulsante [Right]. Il luogo in cui sono
memorizzate le due parti dell’esecuzione viene chiamata
“traccia” e i pulsanti [Left] e [Right] sono chiamati “pulsanti
delle tracce”.
Esercitatevi sull’esecuzione della mano destra mentre
viene riprodotta la parte della mano sinistra.
Pulsanti delle tracce
Mano
sinistra
Mano destra
Left
Anche durante la riproduzione potete premere i pulsanti
delle tracce per silenziare o attivare la riproduzione delle
parti.
Arrestare la song
Right
Di seguito viene spiegato come esercitare separatamente le
due mani su una song.
2, 3 1
Per prima cosa selezionate la song che volete riprodurre
(p. 132).
Selezionare la parte che volete eseguire voi
1. Premete il pulsante [Left] o [Right].
L’indicatore del pulsante che avete premuto si spegne e la
parte selezionata non viene più riprodotta.
Per esempio, se volete esercitare la mano destra, premete
il pulsante [Right] in modo che l’indicatore si spenga.
Quando riproducete la song, l’esecuzione della mano
destra non viene riprodotta.
144
Premete di nuovo il pulsante che avete selezionato al
punto 1. L’indicatore del pulsante si accende e la parte
viene di nuovo riprodotta.
3. Premete il pulsante [Play] in modo che l’indicatore
si spenga.
La song si arresta.
HP107_e.book Page 145 Tuesday, October 19, 2004 10:41 PM
Capitolo 4. Registrare la vostra esecuzione
Potete facilmente registrare le vostre esecuzioni.
Potete riprodurre un'esecuzione che avete registrato per sentire come l’avete suonata o per aggiungere delle parti.
Con l’HP107e potete registrare in uno dei seguenti modi.
• Registrare su una song incorporata (→ “Registrare su
una song” p. 146)
• Registrare ogni mano separatamente (→ “Selezionare e
registrare separatamente la traccia di ogni mano”
p. 147)
Note sulla registrazione
C. Registrare mentre la funzione “Layer” od “Octave” è assegnata al pedale centrale
Funzione
Traccia sinistra
Traccia destra
Layer
Timbro Layer
Timbro originale (timbro di
pianoforte)
Octave
Timbro Layer (un’ottava più
acuto)
Timbro originale
* Se utilizzate il metodo B o C per sovrapporre una registrazione
a una song, premete sia il pulsante [Left] che il pulsante
[Right] prima di registrare in modo che i pulsanti lampeggino.
ITALIANO
• Registrare solo la vostra esecuzione sulla tastiera (→
“Registrare una nuova song” p. 145)
ITALIANO
Capitolo 4. Registrare la vostra esecuzione
Registrare una nuova song
• Potete registrare solo una song.
Se vedete...
3
2 1 4 6,8 5,7
L’HP107e contiene la funzione Song Backup (p. 151) che
vi permette di memorizzare nello strumento la song registrata con l’HP107e.
Impostazioni di registrazione (selezionate “USr”)
1. Premete il pulsante [Song/Tempo] in modo che
l’indicatore si illumini di rosso.
Sul display appare il numero della song.
Se volete cancellare l’esecuzione, premete il pulsante
[Rec].
Se non volete cancellare l’esecuzione, premete il pulsante
[Play].
A. Registrare senza specificare la traccia in cui registrare
Se non ci sono dati registrati nella traccia sinistra e destra,
i dati vengono registrati sulla traccia destra. Se ci sono dati
registrati nella traccia sinistra o destra, i dati vengono registrati sulla traccia vuota.
B. Registrare quando si utilizzano le funzioni Dual, Acoustic
Layering o Split
Traccia sinistra
Traccia destra
Dual
Timbro del pulsante destro
Timbro del pulsante sinistro
Acoustic
Layering
Timbro Layer
Timbro originale (timbro di
pianoforte)
Split
Timbro sinistro (tastiera)
Timbro destro (tastiera)
Specificare il timbro e il tempo per la
registrazione
3. Selezionate il timbro che volete utilizzare (p. 134).
4. Se necessario, attivate il metronomo.
Utilizzate il metronomo mentre impostate il tempo e la
suddivisione ritmica della song (p. 141).
Nota Se sovrapponete una nuova registrazione di esecuzione
senza cancellare la song registrata, il tempo e la suddivisione ritmica della song vengono memorizzati con le
impostazioni registrate per prime.
5. Premete il pulsante [Rec].
L’indicatore del pulsante [Rec] si accende, l’indicatore del
pulsante [Play] lampeggia e viene attivato il modo standby di registrazione.
145
ITALIANO
Funzione
2. Premete simultaneamente i pulsanti [–] e [+] in
modo che sul display appaia “USr”.
ITALIANO
Informazioni sulle tracce registrate
ITALIANO
Se cercate di selezionare una song quando è già stata registrata un’altra esecuzione, sul display appare ciò che segue
e l’indicatore del pulsante [Record] lampeggia.
Registrate solo l’esecuzione della tastiera senza suonare su
una song incorporata.
ITALIANO
• L’HP107e contiene la funzione Song Backup (p. 151)
che vi permette di memorizzare nello strumento la
song registrata con l’HP107e. Le esecuzioni registrate di
cui non viene fatto un backup con Song Backup vengono cancellate quando lo strumento viene spento. Utilizzate Song Backup per tutte le esecuzioni che volete
conservare. Registratele su un dispositivo audio
esterno oppure utilizzate un dispositivo MIDI esterno
per salvare i dati di esecuzione su un floppy disk. Per
maggiori dettagli si veda “Capitolo 6. Collegare dispositivi esterni” (p. 153).
HP107_e.book Page 146 Tuesday, October 19, 2004 10:41 PM
HP107e – Capitolo 4. Registrare la vostra esecuzione
Avviate la registrazione
6. La registrazione inizia quando premete il pulsante
[Play] o suonate la tastiera.
Vengono eseguite due battute di conteggio e poi la registrazione inizia.
Sappiate che la registrazione viene inoltre avviata se suonate qualcosa sulla tastiera anche senza avere premuto il
pulsante [Play]. Quando avviate la registrazione in questo
modo non avviene alcun conteggio.
Quando la registrazione inizia, gli indicatori del pulsante
[Play] e del pulsante [Rec] si accendono.
Registrare su una song
Potete registrare un’esecuzione suonata su una song incorporata.
L’HP107e contiene la funzione Song Backup (p. 151) che
vi permette di memorizzare nello strumento la song registrata con l’HP107e.
Utilizzando il pulsante [Left] o [Right] potete per esempio
eseguire e registrate solo la parte della mano destra di una
song mentre ascoltate la riproduzione della mano sinistra
di una song incorporata.
Suonate la tastiera.
Arrestate la registrazione
7. Premete il pulsante [Play] o [Rec].
La registrazione si arresta e gli indicatori del pulsante
[Play] e del pulsante [Rec] si spengono.
Informazioni sull’indicazione “USr”
Quando arrestate la registrazione, l’indicazione
“
” diventa “
”.
“.” nella parte inferiore destra del display indica che esiste già un’esecuzione registrata.
Riproducete l’esecuzione registrata
8. Premete il pulsante [Play].
Viene riprodotta l’esecuzione registrata.
Premete di nuovo il pulsante [Play] per arrestare la riproduzione.
Se registrate senza specificare la traccia di registrazione,
l’esecuzione viene registrata nel pulsante [Right].
Se volete registrare separatamente la mano destra e la
mano sinistra su tracce di registrazione separate, fate
riferimento a “Selezionare e registrare separatamente la
traccia di ogni mano” (p. 147).
2 1 3 6,8 4,7 5
Selezionare la song da registrare
1. Premete il pulsante [Song/Tempo] in modo che
l’indicatore si illumini di rosso.
Il display indica il numero della song.
2. Utilizzate il pulsante [–] o [+] per selezionare la
song che volete suonare.
3. Se necessario, impostate il metronomo e il tempo
(p. 141).
4. Premete il pulsante [Rec].
L’indicatore del pulsante [Rec] si accende.
Selezionare la traccia da registrare
5. Premete il pulsante [Left] o [Right].
Se volete registrare l’esecuzione della mano sinistra premete il pulsante [Left], se volete registrare quella della
mano destra premete il pulsante [Right].
L’indicatore del pulsante che avete premuto e quello del
pulsante [Play] lampeggiano e l’HP107e entra nel modo
standby di registrazione.
Se sul display appare “dEL”, fate riferimento a p. 145.
Avviate la registrazione
6. Premete il pulsante [Play].
La registrazione inizia dopo due battute di conteggio.
Suonate sulla song.
Arrestate la registrazione
7. Premete il pulsante [Play] o [Rec].
La registrazione si arresta e gli indicatori del pulsante
[Play] e del pulsante [Rec] si spengono.
L’esecuzione registrata viene memorizzata in “USr
(User)”.
Riproducete l’esecuzione registrata
8. Premete il pulsante [Play].
Viene riprodotta l’esecuzione registrata.
146
HP107_e.book Page 147 Tuesday, October 19, 2004 10:41 PM
Capitolo 4. Registrare la vostra esecuzione
Selezionare e registrare
separatamente la traccia di
ogni mano
Se volete rifare la registrazione, potete riregistrare solo
una traccia specifica.
Arrestate la registrazione
5. Premete il pulsante [Play] o [Rec].
La registrazione si arresta e gli indicatori del pulsante
[Play] e del pulsante [Rec] si spengono.
L’esecuzione è stata registrata nel pulsante della traccia
specificato.
Se volete registrare su un’altra traccia, tornate al punto 2
per registrare di nuovo l’esecuzione. Potete registrare
mentre ascoltate l’esecuzione precedentemente registrata.
Riproducete l’esecuzione registrata
ITALIANO
Il registratore dell’HP107e ha due tracce di registrazione
che vi permettono di registrare separatamente la mano
sinistra e la mano destra. Utilizzate il pulsante [Left] o il
pulsante [Right] per specificare la traccia di registrazione.
L’HP107e contiene la funzione Song Backup (p. 151) che
vi permette di memorizzare nello strumento la song registrata con l’HP107e.
Sappiate che la registrazione viene inoltre avviata se suonate qualcosa sulla tastiera anche senza avere premuto il
pulsante [Play]. Quando avviate la registrazione in questo
modo non avviene alcun conteggio.
ITALIANO
Premete di nuovo il pulsante [Play] per arrestare la riproduzione.
6. Premete il pulsante [Play].
Viene riprodotta l’esecuzione registrata.
Premete di nuovo il pulsante [Play] per arrestare la riproduzione.
1 4,6 2,5 3
Nota
Se continuate a registrare altro materiale senza cancellare la song registrata, le impostazioni del tempo, della
suddivisione ritmica e del metronomo della song originariamente registrata vengono utilizzate anche per il nuovo
materiale.
1. Se necessario attivate il metronomo (p. 141).
2. Premete il pulsante [Rec].
■ Cancellare un’esecuzione da una specifica
traccia
Potete selezionare una traccia di registrazione e cancellarla.
Tenete premuto il pulsante [Left] o [Right] e premete il pulsante [Rec].
L’indicatore del pulsante che avete premuto si spegne, e la
traccia selezionata viene cancellata.
■ Cancellare una song
Potete cancellare una song che avete registrato.
Tenete premuto il pulsante [Song/Tempo] e premete il pulsante [Rec].
Sul display appare ciò che segue e l’indicatore del pulsante
[Rec] lampeggia.
ITALIANO
L’indicatore del pulsante [Rec] si accende, l’indicatore del
pulsante [Play] lampeggia e viene attivato il modo standby di registrazione.
Potete cancellare un’esecuzione registrata.
Gli indicatori dei pulsanti delle tracce che sono già registrate si accendono.
Il pulsante della traccia che dovete registrare lampeggia.
3. Premete il pulsante [Left] o [Right] per disattivare
il pulsante della traccia che non volete registrare.
I pulsanti delle tracce vi permettono di registrare nel pulsante [Left] o nel pulsante [Right] uno alla volta.
ITALIANO
Quando registrate una nuova song, seguite prima le istruzioni al punto 1 e 2 di “Registrare una nuova song” (p. 145)
per selezionare “USr”. Quando sovrapponete registrazioni e song incorporate o song di cui avete fatto un
backup, selezionate la song incorporata o quella di cui
avete fatto un backup come descritto nei punti 1 e 2 di
“Selezionare una song e riprodurla” (p. 132).
ITALIANO
Cancellare le esecuzioni registrate
Se non volete cancellare l’esecuzione premete il pulsante
[Play] o [Song/Tempo].
7. Premete di nuovo il pulsante [Rec].
L’esecuzione registrata viene cancellata.
Avviate la registrazione
ITALIANO
4. Premete il pulsante [Play].
Vengono eseguite due battute di conteggio e poi la registrazione inizia. Suonate la tastiera.
147
HP107_e.book Page 148 Tuesday, October 19, 2004 10:41 PM
HP107e – Capitolo 5. Cambiare varie impostazioni
Capitolo 5. Cambiare varie impostazioni
Effettuare impostazioni
dettagliate (Function)
Pulsante
Funzione
Pagina
Local Control
Potete definire impostazioni relative alle esecuzioni come
l’accordatura e il temperamento.
Entrare nel modo Function
1. Premete simultaneamente i pulsanti [Split] e
[Chorus].
Piano Resonance
[Key Off]
p. 155
Canale MIDI send
Piano Resonance
[Strings]
p. 155
L’HP107e entra nel modo di impostazione.
Gli indicatori dei pulsanti [Split] e [Chorus] e il pulsante a
cui è assegnata la funzione iniziano a lampeggiare.
Impostazioni driver USB
Piano Resonance
[Damper]
p. 152
Memory Backup
[Metronome/
Count In]
Impostare varie funzioni
2. Premete il pulsante a cui è assegnata la funzione
che desiderate.
Gli indicatori del pulsante premuto, del pulsante [Split] e
del pulsante [Chorus] lampeggiano.
Song Backup
Funzione
Pagina
p. 151
[Song/Tempo]
Il nome della funzione assegnata al pulsante appare sul
display fino a quando il pulsante viene tenuto premuto.
Pulsante
p. 151
V-LINK
p. 152
[Right]
Master Tuning
p. 149
[Piano]
Trasmettere un’esecuzione
registrata
[Left]
Temperamento
p. 155
p. 149
[E. Piano]
Modo Grand Space
p. 150
[Grand Space]
Stretch Tuning
p. 149
[Harpsichord]
Factory Reset
Key Touch
[Touch]
Octave Shift
p. 150
[Organ]
Per maggiori informazioni sulle singole funzioni, fate
riferimento alle seguenti spiegazioni.
Applicare il pedale damper alla
parte della mano sinistra della
tastiera
[Strings]
p. 151
3. Premete il pulsante [–] o [+] per cambiare il valore.
p. 150
Se premete simultaneamente i pulsanti [–] e [+] vengono
reimpostati i valori originali.
Uscire dal modo Function
4. Premete il pulsante [Split] o [Chorus].
L’indicatore del pulsante torna allo stato precedente.
148
HP107_e.book Page 149 Tuesday, October 19, 2004 10:41 PM
Capitolo 5. Cambiare varie impostazioni
In situazioni in cui suonate con altri strumenti potete
regolare l’intonazione di riferimento dell’HP107e su
quella di un altro strumento. L’intonazione standard di
solito si riferisce all’intonazione della nota che viene suonata quando premete il tasto A centrale. Il riferimento di
tutti gli strumenti a questa nota è detto “accordatura”.
Se premete il pulsante [Piano] al punto 2 di “Effettuare
impostazioni dettagliate (Function)” (p. 148), sul display
appare ciò che segue.
Display
5
Kirnberger
6
Toni interi
Questo temperamento attua un compromesso tra le scale perfette permettendo la
trasposizione ad altre tonalità.
7
Pitagorico
Questo temperamento, ideato dal filosofo
Pitagora, elimina la dissonanza nelle quarte
e nelle quinte. La dissonanza è prodotta
dalle terze, ma le melodie sono eufoniche.
8
Werckmeister
Questo temperamento è una combinazione
della scala a toni interi e della scala pitagorica. È possibile eseguire in qualsiasi tonalità (prima tecnica, III).
Impostazione del costruttore440.0Hz
Questa impostazione rimane valida fino a quando non
spegnete lo strumento.
■ Cambiare il temperamento
Potete eseguire musica classica, come quella barocca, utilizzando vari temperamenti (metodi di accordatura).
Se premete il pulsante [E.Piano] al punto 2 di “Effettuare
impostazioni dettagliate (Function)” (p. 148), sul display
appare ciò che segue.
Temperamento
Tonica
Display
Temperamento
Qualità
Equabile
2
Perfetta
maggiore
Questo temperamento elimina le ambiguità
nelle quinte e nelle terze. Non è adatto alle
melodie e non può essere trasposto, ma produce bellissime sonorità.
3
Perfetta
minore
La scala perfetta può essere maggiore o
minore. Potete ottenere lo stesso effetto sia
con la scala minore che con la scala maggiore.
4
Arabo
È un temperamento adatto alla musica
araba.
Tenete premuto il pulsante [E. Piano] e premete una
nota per specificare il tasto della tonica desiderata.
La tonica che specificate viene visualizzata nel seguente
modo.
Display
C
C
d
E_
E
F
F
G
A_ A
b_
b
Nome
della
C
C
D
E
E
F
F
G
A
B
B
A
Se scegliete un temperamento equabile non c’è bisogno di
selezionare una tonica.
* Se registrate in un temperamento diverso da quello equabile e
poi volete riprodurre l’esecuzione, utilizzate questa impostazione per selezionare per la riproduzione lo stesso temperamento utilizzato nella registrazione.
* Quando suonate insieme ad altri strumenti, fate attenzione
perché a seconda della tonalità ci potrebbe essere uno spostamento dell’intonazione. Accordate l’HP107e all’intonazione
fondamentale degli altri strumenti.
* Potete salvare questa impostazione nella memoria dell’HP107e
utilizzando la funzione Memory Backup (p. 151).
■ Impostare la curva di accordatura
(Stretch Tuning)
Di solito l’intonazione del pianoforte viene accordata più
bassa per le note basse e più alta per le note alte rispetto
al temperamento equabile. Questo metodo di accordatura
è specifico del pianoforte ed è conosciuto col nome di
“accordatura stretch”.
Se premete il pulsante [Harpsichord] al punto 2 di “Effettuare impostazioni dettagliate (Function)” (p. 148), sul
display appare ciò che segue.
ITALIANO
1
In questo temperamento ogni ottava è
divisa in dodici intervalli uguali. Ogni intervallo produce quasi la stessa quantità di leggera dissonanza.
Quando suonate utilizzando un temperamento diverso
da quello equabile, dovete indicare la fondamentale ("C"
per il maggiore e "A" per il minore) a seconda della tonalità in cui volete suonare.
ITALIANO
Potete scegliere uno degli otto temperamenti descritti di
seguito.
Tonica
ITALIANO
La maggior parte della musica dei giorni nostri viene
composta ed eseguita secondo il temperamento equabile.
Nel corso degli anni in cui è stata composta la musica
classica sono stati però utilizzati anche altri temperamenti. Suonare una composizione con il temperamento
originale vi permette di ascoltare le sonorità degli accordi
originariamente ideati dal compositore.
Impostazione del costruttore1 C
ITALIANO
* Potete salvare questa impostazione nella memoria dell’HP107e
utilizzando la funzione Memory Backup (p. 151).
ITALIANO
415.3Hz~440.0Hz~466.2Hz
Qualità
Questo temperamento è una variante del
temperamento toni interi e perfetto e permette una maggiore libertà di modulazione.
È possibile eseguire in qualsiasi tonalità
(III).
Sul display vengono indicate le ultime tre cifre. Nella precedente figura è indicato “440.0Hz”.
Valore
Temperamento
ITALIANO
■ Accordare secondo le intonazioni di altri
strumenti (Master Tuning)
149
HP107_e.book Page 150 Tuesday, October 19, 2004 10:41 PM
HP107e – Capitolo 5. Cambiare varie impostazioni
OFF
On
È la curva di accordatura standard. Scegliete questa opzione quando utilizzate la Dual Performance (p. 139) o quando suonate con altri strumenti.
Questa accordatura modifica l’intonazione delle
note alte e di quelle basse. È adatta per assolo di
pianoforte.
■ Modificare il Grand Space (modo Grand
Space)
Se premete il pulsante [Grand Space] al punto 2 di
“Effettuare impostazioni dettagliate (Function)” (p. 148),
sul display appare ciò che segue.
Impostazione del costruttoreOn
* Questo effetto funziona solo con i timbri di pianoforte.
* Potete salvare questa impostazione nella memoria dell’HP107e
utilizzando la funzione Memory Backup (p. 151).
■ Cambiare l’intonazione in intervalli di ottava
(Octave Shift)
Potete cambiare l’intonazione del timbro sinistro in Split
Play (p. 140), del timbro destro in Dual Play (p. 139) e del
timbro Layer in Acoustic Layering Play (p. 138) secondo
intervalli di ottava. Questa reazione è chiamata “Octave
Shift”.
Impostazione
Descrizioni
1
Se avete collegato delle cuffie, la profondità
dell’effetto viene adattata all’ascolto con cuffie. Se
invece non avete collegato delle cuffie viene selezionata la profondità che più si addice agli altoparlanti.
2
Indipendentemente dal fatto che vi siano collegate o
meno delle cuffie, viene utilizzata la profondità che
più si addice agli altoparlanti.
Grand Space viene inoltre applicato al suono
emesso dai connettori Output nelle situazioni in cui
utilizzate degli amplificatori collegati ai connettori
Output.
3
Indipendentemente dal fatto che vi siano collegate o
meno delle cuffie, viene utilizzata la profondità che
più si addice alle cuffie.
Se premete il pulsante [Organ] al punto 2 di “Effettuare
impostazioni dettagliate (Function)” (p. 148), sul display
appare ciò che segue.
Potete cambiare l’intonazione in un intervallo compreso
tra due ottave verso il basso (–2) e due ottave verso l’alto
(+2) rispetto all’intonazione originale.
* Alcune impostazioni Octave Shift potrebbero far sì che i timbri
eccedano l’intervallo raccomandato, non siano molto udibili o
abbiano qualità timbriche o intonazioni non naturali.
■ Applicare il pedale damper alla parte della
mano sinistra
Quando utilizzate l’esecuzione Split (p. 140), potete applicare l’effetto del pedale damper alla parte della mano
sinistra della tastiera.
Se premete il pulsante [String] al punto 2 di “Effettuare
impostazioni dettagliate (Function)” (p. 148), sul display
appare ciò che segue.
* Potete salvare questa impostazione nella memoria dell’HP107e
utilizzando la funzione Memory Backup (p. 151).
Disabilitare tutto tranne
l’esecuzione del pianoforte
(Panel Lock)
La funzione “Panel Lock” blocca l'HP107e in modo che si
possa utilizzare solo l'esecuzione del pianoforte disabilitando
tutti i pulsanti. Ciò evita che le impostazioni vengano inavvertitamente modificate qualora dei bambini premano accidentalmente i pulsanti.
Nello stato Panel Lock può essere utilizzato solo il timbro di
pianoforte a coda.
1. Abbassate il volume al minimo e premete l’interruttore [Power On] per spegnere lo strumento.
On
OFF
L’effetto del pedale damper viene applicato al
suono della parte della mano destra e sinistra
della tastiera.
L’effetto del pedale damper non viene applicato
al suono della parte della mano sinistra della
tastiera.
2. Tenete premuto il pulsante [Piano] e premete
l’interruttore [Power On] per accendere lo strumento.
Continuate a tenere premuti questi due pulsanti per
alcuni secondi.
Appare la seguente schermata.
Impostazione del costruttoreOFF
* Potete salvare questa impostazione nella memoria dell’HP107e
utilizzando la funzione Memory Backup (p. 151).
150
Tutti i pulsanti sono disabilitati.
Regolate il volume.
Quando suonate la tastiera si sente solo il timbro del pianoforte a coda.
Per disattivare la funzione Panel Lock, abbassate il
volume al minimo e accendete nuovamente lo strumento.
HP107_e.book Page 151 Tuesday, October 19, 2004 10:41 PM
Capitolo 5. Cambiare varie impostazioni
Le impostazioni memorizzate nell’HP107e possono essere
riportate ai loro valori originali.
* Le song che sono state sottoposte alla procedura Song Backup
(p. 151) non vengono cancellate quando viene eseguito il
Factory Reset.
1. Tenete premuto il pulsante [Split] e premete il
pulsante [Chorus].
2. Premete il pulsante Key Touch [Touch].
Sul display appare ciò che segue.
Salvare song registrate
anche a strumento spento
(Song Backup)
Normalmente le song che avete registrate vengono cancellate
quando l’HP107e viene spento. Tuttavia, se volete, potete far
sì che queste song registrate rimangano salvate anche a strumento spento. Questa funzione si chiama “Song Backup”.
* Non potete utilizzare la funzione Song Backup se non avete
registrato delle song.
1. Tenete premuto il pulsante [Split] e premete il
pulsante [Chorus].
L’HP107e entra nel modo di impostazione.
ITALIANO
L’HP107e entra nel modo di impostazione.
ITALIANO
Ripristinare le impostazioni
originali del costruttore
2. Premete il pulsante [Song/Tempo].
L’indicatore del pulsante lampeggia.
Sul display appare ciò che segue.
3. Premete il pulsante [Rec].
Viene eseguito il Factory Reset.
3. Premete il pulsante [Rec].
Viene eseguito il Song Backup.
Quando il Song Backup è terminato, il display e i pulsanti
tornano al loro stato normale.
* Non spegnete lo strumento finché sul display non appare
“End”. Se lo spegnete prima che venga visualizzato, potreste
causare danni alla memoria interna dell’HP107e rendendola
inutilizzabile.
Normalmente le varie impostazioni tornano a essere quelle
di default quando lo strumento viene spento. Tuttavia potete
specificare che le impostazioni vengano mantenute in memoria anche a strumento spento. Questa funzione si chiama
“Memory Backup”.
1. Tenete premuto il pulsante [Split] e premete il
pulsante [Chorus].
L’HP107e entra nel modo di impostazione.
■ Cancellare song di cui avete fatto un backup
1. Tenete premuto il pulsante [Split] e premete il
pulsante [Chorus].
2. Premete il pulsante [Song/Tempo].
Sul display appare ciò che segue.
Per annullare la procedura premete il pulsante [Play].
3. Premete il pulsante [Rec].
La song di cui avevate fatto un backup viene cancellata.
Il display e i pulsanti tornano al loro stato normale.
ITALIANO
* Per maggiori informazioni sulle impostazioni memorizzate
utilizzando il Memory Backup si veda “Parametri memorizzati in Memory Backup” (p. 157).
* Potete selezionare e riprodurre song di cui avete fatto un
backup come fate con le song incorporate (p. 132). Le song di
cui avete fatto un backup vengono indicate sul display nel
seguente modo.
ITALIANO
Fare rimanere in memoria le
impostazioni anche a
strumento spento (Memory
Backup)
ITALIANO
Quando il Factory Reset è terminato, sul display appare
ciò che segue. Spegnete lo strumento.
2. Premete il pulsante [Metronome/Count In].
L’indicatore del pulsante lampeggia.
Sul display appare ciò che segue.
ITALIANO
3. Premete il pulsante [Rec].
Viene eseguito il Memory Backup.
Quando il Memory Backup è terminato, il display e i pulsanti tornano al loro stato normale.
151
HP107_e.book Page 152 Tuesday, October 19, 2004 10:41 PM
HP107e – Capitolo 5. Cambiare varie impostazioni
Utilizzare la funzione V-LINK
Se collegate l’HP107e a un dispositivo video compatibile con
V-LINK potete controllare le immagini con l’HP107e.
V-LINK
V-LINK (
) è una funzionalità promossa da
Roland che permette di collegare le esecuzioni musicali a
materiale visivo. Utilizzando un’apparecchiatura video
compatibile con V-LINK, potete facilmente inserire effetti
visivi e renderli parte dell’espressività dell'esecuzione.
Utilizzare il V-LINK
1. Tenete premuto il pulsante [Split] e premete il
pulsante [Chorus].
Effettuare le impostazioni del
Driver USB
Se volete collegare un computer utilizzando il connettore
USB, prima di eseguire il collegamento dovete effettuare la
seguente impostazione.
1. Tenete premuto il pulsante [Split] e premete il
pulsante [Chorus].
L’HP107e entra nel modo di impostazione.
2. Premete il pulsante Piano Resonance [Damper].
L’indicatore del pulsante lampeggia.
Sul display appare ciò che segue.
L’HP107e entra nel modo di impostazione.
2. Premete il pulsante [Right].
L’indicatore del pulsante lampeggia.
Sul display appare ciò che segue.
3. Premete il pulsante [–] e [+] per impostare il driver.
Indicazione
OFF
On
La funzione V-LINK è disattivata.
La funzione V-LINK è attivata. Potete controllare
le immagini utilizzando gli ultimi dodici tasti a
sinistra della tastiera.
Impostazione del costruttoreOFF
3. Premete i pulsanti [–] e [+] per attivare e disattivare la funzione V-LINK.
Potete controllare le immagini utilizzando gli ultimi
dodici tasti a sinistra della tastiera.
* Se la funzione V-LINK è attivata, non viene prodotto alcun
suono quando premete uno degli ultimi dodici tasti a sinistra
della tastiera.
Uscire dal modo Function
4. Premete il pulsante [Split] o [Chorus].
L’indicatore del pulsante torna allo stato originale.
152
Descrizione
vdr (Vendor)
Selezionatela quando utilizzate il driver in
dotazione con un collegamento USB.
GEn (Generic)
Selezionatela quando utilizzate un driver USB
qualsiasi con l’OS con un collegamento USB.
Uscire dal modo Function
4. Premete il pulsante [Split] o [Chorus].
L’indicatore del pulsante torna allo stato originale.
HP107_e.book Page 153 Tuesday, October 19, 2004 10:41 PM
Capitolo 6. Collegare dispositivi esterni
ITALIANO
Capitolo 6. Collegare dispositivi esterni
Collegare apparecchiature audio
Far emettere il suono di un dispositivo
audio dagli altoparlanti dell’HP107e
Potete collegare dispositivi audio per emettere il suono
dell’HP107e dagli altoparlanti di un sistema audio o per registrare la vostra esecuzione su un registratore a cassette o su
un altro dispositivo di registrazione.
Output R/L (Line Out,
Aux Out)
ITALIANO
HP107e
Per il collegamento utilizzate un cavo audio con una spina
phone standard (venduto separatamente).
Esempi di collegamento
* Per evitare malfunzionamenti e/ o danni agli altoparlanti o ad
altri dispositivi, abbassate il volume e spegnete tutti i dispositivi prima di effettuare qualsiasi collegamento.
Input R/L (Line In,
Aux In)
HP107e
❍ Quando accendete lo strumento eseguite la seguente procedura.
1. Accendete il dispositivo collegato.
2. Accendete l’HP107e.
3. Regolate il volume dei dispositivi.
* Non potete utilizzare l’HP107e per regolare il volume del
dispositivo di generazione sonora collegato.
ITALIANO
Far emettere il suono dell’HP107e dagli
altoparlanti del sistema audio/come registrare l’esecuzione dell’HP107e su un
dispositivo di registrazione
Spegnimento
1. Abbassate al minimo il volume dell’HP107e e dei
dispositivi collegati.
2. Spegnete l’HP107e.
3. Spegnete l’apparecchiatura collegata.
1. Accendete l’HP107e.
2. Accendete il dispositivo collegato.
3. Regolate il volume dei dispositivi.
* Potete regolate il volume del modulo sonoro collegato mediante
l’HP107e.
Registrare le esecuzioni dell’HP107e su un dispositivo di
registrazione
4. Avviate la registrazione sul dispositivo collegato.
6. Alla fine dell’esecuzione arrestate la registrazione
sull’apparecchiatura collegata.
Potete utilizzare un connettore USB per collegare
l’HP107e al vostro computer. Per maggiori dettagli, vedi
il manuale “USB Installation Guide”.
153
ITALIANO
* Quando collegate per la prima volta il computer all’HP107e
dovete installare sul computer il “driver USB” (contenuto nel
CD-ROM in dotazione). Per maggiori dettagli, vedi il
manuale “USB Installation Guide”.
* Utilizzando l’USB potete trasmettere solo dati MIDI.
* Per evitare malfunzionamenti e/ o danni agli altoparlanti o ad
altri dispositivi, abbassate il volume e spegnete tutti i dispositivi prima di effettuare qualsiasi collegamento.
* I cavi USB non sono forniti in dotazione. Per l’acquisto contattate un rivenditore Roland.
* Utilizzate un cavo USB non più lungo di 3 metri.
* Accendete l’HP107e prima di avviare le applicazioni MIDI sul
computer. Non spegnete e non accendete l’HP107e durante
l’esecuzione delle applicazioni MIDI.
* Non collegate e non scollegate il cavo USB quando l’HP107e è
acceso.
* Se non utilizzate l’USB, scollegate il cavo USB dall’HP107e.
* Se durante la trasmissione/ricezione di dati il computer entra
nel modo risparmio energetico, o se viene acceso o spento, il
computer potrebbe bloccarsi o l’HP107e potrebbe non funzionare correttamente.
ITALIANO
5. Suonate sull’HP107e.
Collegare il connettore USB
ITALIANO
❍ Quando accendete lo strumento eseguite la seguente procedura.
HP107_e.book Page 154 Tuesday, October 19, 2004 10:41 PM
HP107e – Capitolo 6. Collegare dispositivi esterni
Collegare dispositivi MIDI
Suonate sull’HP107e per far emettere i
suoni da un generatore sonoro MIDI
Collegando dei dispositivi MIDI esterni e scambiando i
dati di esecuzione, un dispositivo può controllare l’esecuzione di un altro dispositivo. Per esempio, potete emettere il suono da un altro strumento o cambiare i timbri su
un altro strumento.
■ Che cos’è il MIDI?
Modulo sonoro
THRU
MIDI
OUT
IN
HP107e
Il MIDI (Musical Instrument Digital Interface – interfaccia
digitale per strumenti musicali) è uno standard internazionale che permette la comunicazione tra strumenti
musicali elettronici e computer.
L’HP107e è dotato di connettori MIDI che permettono di
scambiare dati di esecuzione tra lo strumento e dispositivi esterni. Quando questi connettori vengono utilizzati
per collegare l’HP107e a dei dispositivi esterni, le possibilità aumentano.
* È disponibile una pubblicazione separata dal titolo “MIDI
Implementation”. Tale pubblicazione fornisce informazioni
dettagliate circa il modo in cui il MIDI è stato implementato
su questo apparecchio. Per richiedere questa pubblicazione (per
effettuare, per esempio, programmazioni a livello di byte), contattate Roland Italy.
Esempi di collegamento
* Per evitare malfunzionamenti e/ o danni agli altoparlanti o ad
altri dispositivi, abbassate il volume e spegnete tutti i dispositivi prima di effettuare qualsiasi collegamento.
Suonare l’HP107e da un sequencer MIDI /
come registrare un’esecuzione dell’HP107e
su un sequencer MIDI
Serie MT
* L’MT-90s non ha connettori MIDI Out.
Out
MIDI
In
Effettuare impostazioni
relative al MIDI
Di seguito viene spiegato come impostare il canale di trasmissione e altre impostazioni relative al MIDI.
Entrare nel modo Function
1. Tenete premuto il pulsante [Split] e premete il
pulsante [Chorus].
L’HP107e entra nel modo di impostazione.
Gli indicatori dei pulsanti [Split] e [Chorus] e il pulsante a
cui è assegnata la funzione iniziano a lampeggiare.
Impostare varie funzioni
2. Premete il pulsante a cui è assegnata la funzione
che desiderate.
Gli indicatori del pulsante premuto, del pulsante [Split] e
del pulsante [Chorus] lampeggiano.
Per maggiori informazioni sulle singole funzioni, fate
riferimento alle spiegazioni che seguono.
3. Premete il pulsante [–] o [+] per cambiare il valore.
Se premete simultaneamente i pulsanti [–] e [+], l’impostazione torna al valore originale.
HP107e
Uscire dal modo Function
4. Premete il pulsante [Split] o [Chorus].
L’indicatore del pulsante torna allo stato precedente.
* Impostate Local Off se avete collegato l’HP107e a un sequencer MIDI. Si veda “Attivare e disattivare Local Control”
(p. 155). Impostate inoltre il sequencer MIDI sul modo MIDI
Thru (in modo che i messaggi ricevuti in MIDI IN vengano
ritrasmessi da MIDI OUT senza essere modificati). Per maggiori dettagli consultate il manuale dell’utente del sequencer
MIDI.
154
HP107_e.book Page 155 Tuesday, October 19, 2004 10:41 PM
Capitolo 6. Collegare dispositivi esterni
Il MIDI è dotato di sedici canali MIDI numerati 1~16.
Non basta collegare un cavo per avviare la comunicazione. I dispositivi collegati devono essere impostati in
modo da utilizzare gli stessi canali MIDI, altrimenti non
viene prodotto alcun suono e non si possono selezionare i
timbri.
Non viene prodotto alcun suono
Generatore sonoro
Local Off
* Se collegate uno strumento Roland della serie MT, non è
necessario effettuare l’impostazione Local Off. Gli apparecchi
MT trasmettono messaggi Local Off quando vengono accesi.
Se accendete i dispositivi nel seguente ordine, HP107e → serie
MT, Local Off viene impostato automaticamente.
Se premete il pulsante Piano Resonance [Key Off] al
punto 2 di “Effettuare impostazioni relative al MIDI”, sul
display appare ciò che segue.
ITALIANO
* L’HP107e riceve tutti i canali 1~16.
* Quando utilizzate l’HP107e nel modo Dual (p. 139) o nel
modo Split (p. 140), la mano sinistra dell’esecuzione viene trasmessa sul Canale Channel 5 nel modo Dual e sul Canale 3 nel
modo Split. Queste impostazioni di canali di trasmissione
MIDI sono fisse e non possono essere modificate. Se collegate
un dispositivo MIDI esterno mentre utilizzate il modo Dual o
Split, usate canali diversi da 3 e 5 per il dispositivo MIDI.
Se premete il pulsante Piano Resonance [String] al
punto 2 di “Effettuare impostazioni relative al MIDI”, sul
display appare ciò che segue.
Local Control OFF: la tastiera e il generatore sonoro non
sono collegati. Quando suonate la tastiera non viene prodotto alcun suono.
ITALIANO
■ Impostazioni del canale MIDI send
1~16
Valore
On, OFF
Impostazione del costruttoreOn
■ Attivare e disattivare Local Control
Quando collegate un sequencer MIDI, impostate Local
Control su “OFF”.
Se volete trasmettere un’esecuzione registrata
sull’HP107e a un dispositivo MIDI esterno o a un computer, impostate questa impostazione su “On”. Se l’impostazione è su “OFF”, i dati non vengono trasmessi.
Se premete il pulsante [Left] al punto 2 di “Effettuare
impostazioni relative al MIDI”, sul display appare ciò che
segue.
ITALIANO
Come indicato nell’illustrazione, le informazioni che
descrivono ciò che viene eseguito sulla tastiera vengono
inviate al generatore sonoro interno attraverso due percorsi: (1) e (2). Per questa ragione si sentono dei suoni
sovrapposti o intermittenti. Per evitare che ciò avvenga, il
percorso (1) deve essere disattivato impostando l’apparecchio su “Local Off”.
■ Trasmettere un’esecuzione registrata
(1) Local On
Sequencer
MIDI
IN
Generatore
sonoro
MIDI
OUT
Valore
Memoria
MIDI
OUT
MIDI
IN
(2) Funzione Thru On
Ogni nota viene suonata due volte
Viene emesso il suono
On, OFF
Impostazione del costruttoreOFF
Se volete salvare l’esecuzione registrata sull’HP107e, utilizzate la seguente procedura. In questa situazione la funzione MIDI Thru del sequencer esterno è su OFF. Per
maggiori dettagli consultate il manuale dell’utente del
sequencer MIDI.
Collegate un sequencer MIDI come un apparecchio della
serie MT (p. 154).
Registrate l’esecuzione sull’HP107e (p. 145).
Generatore sonoro
Local On
Impostate questa impostazione su “On”.
ITALIANO
Local Control ON: la tastiera e il generatore sonoro sono
collegati.
ITALIANO
Valore
Impostazione del costruttore1
Avviate la registrazione con il sequencer MIDI collegato.
Avviate la riproduzione della song registrata
sull’HP107e.
Alla fine della riproduzione arrestate la registrazione sul
sequencer MIDI collegato.
Utilizzate un sequencer MIDI collegato per salvare i dati
su un floppy disk o su un altro supporto.
ITALIANO
155
HP107_e.book Page 156 Tuesday, October 19, 2004 10:41 PM
HP107e – Risoluzione dei problemi
Risoluzione dei problemi
Se pensate che vi sia qualche problema, leggete la seguente sezione.
L’apparecchio non si accende
Il cavo dell’alimentazione è collegato correttamente (p. 129)?
Il pulsante non funziona
Il pannello è bloccato (p. 150)?
Spegnete l’apparecchio e poi riaccendetelo.
Non viene prodotto alcun suono
Avete abbassato completamente il volume dell’HP107e (p. 131)?
Avete collegato le cuffie (p. 130)?
Una spina è rimasta collegata al connettore Phones?
Quando sono collegate le cuffie, l’altoparlante della tastiera non emette
suoni.
Avete selezionato Local Off?
Se Local Control è impostato su OFF, non viene prodotto alcun suono
quando viene suonata la tastiera. Impostate Local Control su “ON”
(p. 155).
Avete attivato la funzione V-LINK?
Se la funzione V-LINK è attivata, non viene prodotto alcun suono
quando premete uno degli ultimi dodici tasti a sinistra della tastiera.
Non viene prodotto alcun suono (quando è collegato uno strumento
MIDI)
Avete acceso tutti i dispositivi?
I cavi MIDI sono collegati correttamente?
Il canale MIDI corrisponde allo strumento collegato (p. 155)?
Quando si suona la tastiera i suoni vengono prodotti due volte
L’HP107e si trova in Dual Performance (p. 139)?
Quando l’HP107e è collegato a un sequencer esterno, impostatelo sul
modo Local OFF (p. 155).
In alternativa impostate MIDI Thru del sequencer su OFF.
Il timbro non cambia
Il pannello è bloccato (p. 150)?
Spegnete l’apparecchio e poi riaccendetelo.
Gli indicatori dei pulsanti [Split] e [Chorus] lampeggiano?
È in corso l’impostazione di qualche funzione. Premete il pulsante [Split]
o [Chorus] per uscire dal modo Function (p. 148, p. 154).
Non vengono prodotte tutte le note eseguite
Il numero massimo di note che l’HP107e può eseguire simultaneamente
è 128.
L’uso frequente del pedale damper durante l’esecuzione su una song
può produrre dati di esecuzione con troppe note e quindi alcune di queste non vengono eseguite.
L’accordatura o l’intonazione della tastiera o di una song non è corretta
Avete impostato Transpose (p. 138)?
Avete impostato correttamente “Temperament” e “Stretch Tuning”
(p. 149)?
Avete impostato correttamente “Master Tuning” (p. 149)?
La song non viene riprodotta/in una song non viene riprodotto solo il
timbro di un particolare strumento
Gli indicatori dei pulsanti delle tracce (pulsanti [Left] e [Right]) sono
spenti (p. 144)?
Se l’indicatore del pulsante è spento, quella traccia non viene riprodotta.
Premete il pulsante delle traccia in modo che l’indicatore si accenda.
Non riuscite a registrare
Avete selezionato i pulsanti delle tracce per la registrazione (p. 145~
p. 147)?
156
Il tempo della song registrata o del metronomo non è corretto
Se selezionate una song interna in cui il tempo cambia durante la song e
poi la registrate, il tempo cambia nello stesso modo nelle esecuzioni.
Anche il tempo del metronomo cambia nello stesso modo.
Se registrate altro materiale senza cancellare la song precedentemente
registrata, la song viene registrata con il tempo registrato la prima volta.
Cancellate la song precedentemente registrata prima di riregistrare
(p. 147).
L’esecuzione registrata è stata cancellata
Le esecuzioni registrate di cui non viene fatto un backup con Song
Backup vengono cancellate quando lo strumento viene spento. Un’esecuzione non può essere ripristinata una volta che è stata cancellata.
L’HP107e contiene la funzione Song Backup (p. 151) che vi permette di
memorizzare nello strumento la song registrata con l’HP107e. Utilizzate
la funzione Song backup per salvare nell’HP107e le esecuzione che non
volete che vengano cancellate.
Premendo un pedale non avviene alcun effetto oppure l’effetto del
pedale non si arresta
Il pedale è collegato correttamente?
Accertatevi che il cavo dei pedali che proviene dal supporto sia collegato
correttamente al connettore dei pedali sul retro dell’apparecchio (p. 129).
Il pedale fa rumore
Regolate il regolatore al di sotto del pedale in modo che quest’ultimo
prema contro il pavimento (p. 131).
Si sente della riverberazione anche quando l'effetto di riverbero è
disattivato
Siccome l’HP107e riproduce fedelmente la profondità e la riverberazione
di un pianoforte acustico, quando le funzioni Key Off e Grand Space
sono attivate si potrebbe udire una riverberazione.
Se volete eliminare la riverberazione, disattivate le funzioni Key Off
(p. 134) e Grand Space (p. 136~136).
Nella gamma degli acuti il suono cambia considerevolmente oltre un
certo tasto
In un pianoforte acustico le note dell’ottava e mezza più acuta continuano a suonare fino a decadere naturalmente indipendentemente dal
pedale damper. Inoltre c’è una differenza di timbro. I pianoforti Roland
simulano fedelmente le caratteristiche dei pianoforti acustici.
Nell’HP107e la gamma che non viene interessata dal pedale damper
cambia secondo l’impostazione Key Transpose.
Viene prodotto un sibilo acuto
Se ascoltate con le cuffie: Alcuni dei timbri di pianoforte più vivaci hanno
un’ampia componente di acuti che può fare sembrare che al suono sia
stata aggiunta una riverberazione metallica. Visto che tale riverberazione
diventa particolarmente udibile quando viene aggiunto molto riverbero,
potete ridurre il problema riducendo la quantità di riverbero applicata al
suono.
Se ascoltate con gli altoparlanti: Qui probabilmente la causa è di natura
diversa (come una risonanza prodotta dall’HP107e). Contattate il vostro
rivenditore o uno dei Centri Assistenza Tecnica Autorizzati Roland.
La gamma dei bassi risulta strana o si sente una risonanza vibrante
Se ascoltate con gli altoparlanti: Se suonate ad alto volume, gli strumenti
vicino all’HP107e possono risuonare. La risonanza può inoltre essere
dovuta a luci fluorescenti, a porte di vetro e ad altri oggetti. In particolare
questo problema sorge quando viene aumentata la componente dei bassi
e quando il volume è molto alto. Per eliminare la risonanza fate ciò che
segue.
• Posizionate gli altoparlanti in modo che vi siano 10~15cm dal muro o
da altre superfici.
HP107_e.book Page 157 Tuesday, October 19, 2004 10:41 PM
Risoluzione dei problemi
Il livello del volume dello strumento collegato ai connettori Input è
troppo basso
State utilizzando un cavo di collegamento che contiene una resistenza?
Utilizzate un cavo di collegamento che non contiene una resistenza.
ITALIANO
• Abbassate il volume.
• Allontanate gli altoparlanti dagli oggetti che risuonano.
Se ascoltate con le cuffie:
In questo caso la causa potrebbe essere diversa. Contattate il vostro
rivenditore o uno dei Centri Assistenza Tecnica Autorizzati Roland.
Messaggi di Errore/Altri Messaggi
ITALIANO
Display
Significato
Brano dell’utente Memorizza le esecuzioni registrate (p. 145).
Usr.
“.” nella parte inferiore destra del display indica che esiste già un’esecuzione registrata (p. 145).
S.1~68
Numero della song incorporata (p. 132).
S. U
Su questa song è stato eseguito il Song Backup (p. 151).
PU
Appare quando viene riprodotta una song che non inizia sul primo movimento della battuta.
dEL
Appare quando cercate di eliminare una song registrata (p. 145, p. 147, p. 151).
E.32
La quantità di informazioni riguardanti l’esecuzione è troppo grossa e non è possibile registrare altro materiale.
E.41
C’è un problema, per esempio un cavo MIDI si è allentato. Accertatevi che i cavi MIDI siano ben collegati.
_._._.
La funzione V-LINK è attiva(p. 152).
* I messaggi di errore sono preceduti da una “E.” prima del numero. Premete un pulsante qualsiasi per cancellare il messaggio di errore.
ITALIANO
USr
Parametri memorizzati in Memory Backup
p. 134
Damper Resonance (On/Off, Depth)
p. 135
Key Touch
p. 135
Hammer Response
p. 135
Temperament (Temperament, Tonic)
p. 149
Stretch Tuning
p. 149
Grand Space (On/Off, Depth)
p. 136, p. 136
Dynamic Emphasis (On/Off, Depth)
p. 137
Master Tuning
p. 149
Reverb (On/Off, Depth)
p. 137
Impostazioni driver USB
p. 152
Applicare il pedale damper alla parte della mano sinistra della
tastiera
p. 150
Modo Grand Space
p. 150
Punto di divisione
p. 140
Dual Balance, Layer Balance
p. 139, p. 139
ITALIANO
String Resonance (On/Off, Depth)
ITALIANO
Altre impostazioni
p. 134
ITALIANO
Impostazioni relative al timbro di pianoforte attivate quando lo strumento viene
acceso
Key Off Resonance (On/Off, Volume)
157
HP107_e.book Page 158 Tuesday, October 19, 2004 10:41 PM
HP107e – Elenco delle operazioni
Elenco delle operazioni
11
7
10 9
8
4
N.
1
2
3
6
5
4
5
6
1
7
Operazione
8
3
10
9
11
12 13
14
2
Pulsanti
Pagina
Premete simultaneamente i pulsanti [Split] e [Chorus] e poi premete il pulsante [●].
1
Local Control
[Split] + [Chorus] → Piano Resonance [Key Off]
p. 155
2
Impostazioni del canale MIDI send
[Split] + [Chorus] → Piano Resonance [String]
p. 155
3
Impostazioni driver USB
[Split] + [Chorus] → Piano Resonance [Damper]
p. 152
4
Modo Grand Space
[Split] + [Chorus] → [Grand Space]
p. 150
5
Master Tuning
[Split] + [Chorus] → [Piano]
p. 149
6
Selezionare un temperamento
Specificare la tonica
[Split] + [Chorus] → [E. Piano]→
[E. Piano] + tasto
p. 149
7
Stretch Tuning
[Split] + [Chorus] → [Harpsichord]
p. 149
8
Octave Shift
[Split] + [Chorus] → [Organ]
p. 150
9
Applicare il pedale damper alla parte della mano sinistra della
tastiera
[Split] + [Chorus] → [Strings]
p. 150
10
Song Backup
[Split] + [Chorus] → [Song/Tempo]
p. 151
11
Memory Backup
[Split] + [Chorus] → [Metronome/Count In]
p. 151
12
Trasmettere un’esecuzione registrata
[Split] + [Chorus] → [Left]
p. 155
13
V-LINK
[Split] + [Chorus] → [Right]
p. 152
14
Factory Reset
[Split] + [Chorus] → Key Touch [Touch]
p. 151
Tenete premuto il pulsante [
] e premete il pulsante [–] o [+].
1
Suddivisione ritmica del metronomo
[Song/Tempo] + [-] [+]
p. 141
2
Volume del metronomo
[Metronome/Count In] + [-] [+]
p. 141
3
Layer Balance (Dual Balance)
[Acoustic Layering] + [-] [+]
p. 139
4
Livello di risonanza del pedale damper
Piano Resonance [Damper] + [-] [+]
p. 135
5
Livello di risonanza della corda
Piano Resonance [String] + [-] [+]
p. 134
6
Volume Key Off
Piano Resonance [Key Off] + [-] [+]
p. 134
7
Profondità dell’effetto chorus
[Chorus] + [-] [+]
p. 137
8
Profondità dell’effetto riverbero
[Reverb] + [-] [+]
p. 137
9
Impostazione Dynamic Emphasis
[Dynamic Emphasis] + [-] [+]
p. 137
Impostazione Grand Space
[Grand Space] + [-] [+]
p. 136, p. 136
[Transpose] + [Split] → [-] [+]
p. 139
10
Premete il pulsante [
11
] e poi premete il pulsante [–] o [+].
Dual Balance (Layer Balance)
Tenete premuto il pulsante [Split] o [Transpose] e premete il tasto.
158
Punto di divisione
[Split] + tasto
p. 140
Key Transpose
[Transpose] + tasto
p. 138
HP107_e.book Page 159 Tuesday, October 19, 2004 10:41 PM
Principali caratteristiche tecniche
ITALIANO
Principali caratteristiche tecniche
Tastiera
Tastiera
Sensibilità al tocco
Tocco: Light, Medium, Heavy, Fixed
Hammer: Light, Medium, Heavy, spento
Whole, Layer/Dual (bilanciamento del volume regolabile), Split (punto di divisione regolabile)
ITALIANO
Modi di tastiera
88 tasti (tastiera progressive hammer action con scappamento)
Generatore sonoro
Polifonia massima
128 voci
Timbri
5 gruppi 36 variazioni + 4 timbri per Layer
Temperamento
8 tipi, tonica selezionabile
Stretched Tuning
2 tipi
Master Tuning
415.3Hz~466.2Hz (intervallo 0.1Hz)
Transpose
–6~+5 (in semitoni)
Effetti
Grand Space, Dynamic Emphasis, Piano Resonance (Key Off Resonance, String Resonance, Damper
Resonance), Reverb (10 livelli), Chorus (10 livelli)
Metronomo
2/2, 0/4, 2/4, 3/4, 4/4, 5/4, 6/4, 7/4, 3/8, 6/8, 9/8, 12/8
Volume
10 livelli
ITALIANO
Suddivisione ritmica
Registratore
2 tracce
Song
1 song (memorizzabili)
Capacità di memorizzazione
delle note
±10.000 note
Tempo
Nota da un quarto= 10~500
Risoluzione
120 tick per nota da un quarto
Controllo
Play/Stop, Rec, Tempo, All Song Play, Track
Song incorporate
68 song + 14 demo song di timbri
ITALIANO
Tracce
Altro
50W x 2
Altoparlanti
20cm x2 (cassa di altoparlante), 10cm x2
Display
LED della suddivisione ritmica
7 segmenti, 3 caratteri (LED)
Indicatore delle cuffie
Controllo
Volume, Brilliance
Pedali
Damper (riconoscimento mezzo pedale), Soft (riconoscimento mezzo pedale), Sostenuto (funzione assegnabile)
Altre funzioni
Panel Lock, Song backup, Memory backup, Factory Reset
Connettori
Connettore USB (MIDI), Connettori Output (L/Mono, R), connettori Input (L/Mono, R), connettore delle cuffie
x 2 (Stereo), connettori MIDI (IN, OUT)
Alimentazione
AC230V
Consumo elettrico
110W
Dimensioni
(incluso il supporto del pianoforte)
1425 (L) x 536 (P) x 931 (A) mm (leggio abbassato)
ITALIANO
Potenza di uscita nominale
1425 (L) x 536 (P) x 1.083,5 (A) mm (leggio alzato)
Peso
(incluso il supporto del pianoforte)
82kg
Accessori in dotazione
Manuale dell’utente, “60 Classical Piano Masterpieces”, Guida all’installazione USB
CD-ROM (driver USB per pianoforte digitale Roland), cavo dell’alimentazione, gancio per cuffie
159
ITALIANO
* Al fine di migliorare il prodotto, le caratteristiche tecniche e/o l’aspetto dell’apparecchio sono soggetti a modifiche senza preavviso.
HP107_e.book Page 160 Tuesday, October 19, 2004 10:41 PM
HP107e – Principali caratteristiche tecniche
160
HP107_e.book Page 161 Tuesday, October 19, 2004 10:41 PM
Manual del Usuario
Gracias y enhorabuena por adquirir el Piano Digital Roland HP107e.
Características principales
Sonidos de piano con una resonancia rica y una expresividad de gama amplísima
El generador de sonido de piano con muestreo estéreo reproduce de manera realista incluso el
sonido de los martillos golpeando las cuerdas, generando los tonos de un piano de cola para conciertos de alta calidad. La polifonía máxima de 128 notas garantiza que podrá utilizar el pedal libremente sin que se agoten las notas.
Este instrumento responde a todos los delicados matices que el intérprete puede utilizar y los
reproduce hábilmente, tanto si son ligeras variaciones en el tacto o la resonancia de las cuerdas al
soltar las teclas o el tipo de resonancia que se oye cuando se sueltan los pedales (Piano Resonance).
Además, el instrumento incorpora un sistema de altavoces “Grand Sound” y simula la plena naturaleza tridimensional de un piano de cola para conciertos (Grand Space), lo que ayuda a conseguir
un sonido con una claridad y potencia incluso mayores (Dynamic Emphasis).
Buscando las sensaciones de un piano de cola
Este instrumento presenta un teclado de acción martillo progresiva, que duplica el tacto de un
piano de cola, con un tacto más duro en el registro más bajo, y un tacto más suave en el registro
superior. Además, en el HP107e, se simula fielmente incluso el “clic” característico que se nota al
pulsar una tecla en un piano de cola (“mecanismo de escape”).
El instrumento incorpora dos tipos de control de pulsación de tecla; respuesta de tecla, que cambia
el peso aparente de las teclas y la “función de respuesta del martillo”, que reproduce los sutiles
movimientos de los martillos del piano. El pedal está diseñado para una respuesta agradable al
tacto y permite expresar sutiles matices en la interpretación.
Antes de utilizar este equipo, lea con atención las secciones tituladas: “Utilizar el
equipo de forma segura”
(p. 162) y “Notas importantes” (p. 164). Estas secciones
le proporcionan información
importante acerca del correcto uso y funcionamiento
del equipo. Además, para familiarizarse con todas las
funciones que ofrece este
nuevo equipo, lea con atención y por completo el Manual del Usuario. Guarde
este manual y téngalo a
mano para futuras consultas.
Expresividad que sólo un instrumento digital puede proporcionar
El HP107e le permite añadir los sonidos perfectos al piano para un efecto pleno y rico.
Puede superponer los sonidos de varios instrumentos sobre el sonido de piano, superponer sonidos una octava por encima y utilizar un pedal para controlar el volumen.
Cómodo para usarlo con auriculares
Los efectos especiales aplicados al sonido cuando se usan auriculares consiguen que la audición a
través de los auriculares sea cómoda y sin fatiga. Además de un indicador en el panel frontal que
se ilumina al conectar los auriculares, el HP107e también cuenta con un cómodo gancho donde colgar los auriculares cuando no los utilice.
Una gran variedad de prácticas y útiles características así como canciones
integradas para piano
Una función de metrónomo y un “grabador de dos pistas”, las canciones integradas de una gran
colección (incluye 60 canciones) entre otras características, le permiten disfrutar de sus lecciones de
piano de formas que son sólo posibles a través de un piano digital.
Copyright © 2004 ROLAND CORPORATION
Todos los derechos reservados. Ninguna parte de esta publicación podrá reproducirse de
ninguna forma sin el permiso escrito de ROLAND CORPORATION.
HP107_e.book Page 162 Tuesday, October 19, 2004 10:41 PM
Utilizar el equipo de forma segura
UTILIZAR LA UNIDAD DE MANERA SEGURA
INSTRUCCIONES PARA EVITAR EL RIESGO DE FUEGO, DESCARGAS ELÉCTRICAS Y LESIONES EN LAS PERSONAS
Los avisos de
ATENCIÓN y
ATENCIÓN
PRECAUCIÓN
Se utiliza para instrucciones que alertan al
usuario del peligro de muerte o de lesiones
personales graves en caso de no utilizar la
unidad de manera correcta.
Se utiliza para instrucciones que alertan al
usuario del peligro de lesiones o daños
materiales en caso de no utilizar la unidad
de manera correcta.
PRECAUCIÓN * Los daños materiales se refieren a los
daños u otros efectos adversos provocados
con relación a la casa y a todo su
mobiliario, así como a los animales
domésticos.
Los símbolos
El símbolo alerta al usuario de instrucciones o advertencias
importantes. El significado específico del símbolo está
determinado por el dibujo contenido dentro del triángulo. En
el caso del símbolo de la izquierda, éste se utiliza para avisos,
advertencias y alertas de peligro general.
El símbolo alerta al usuario de acciones que no deben
realizarse (están prohibidas). El significado específico del
símbolo está determinado por el dibujo contenido dentro del
círculo. En el caso del símbolo de la izquierda, éste significa
que la unidad no debe desmontarse.
El símbolo ● alerta al usuario de acciones que deben
realizarse. El significado específico del símbolo está
determinado por el dibujo contenido dentro del círculo. En el
caso del símbolo de la izquierda, éste significa que el cable
de alimentación debe desconectarse de la toma de corriente.
TENGA SIEMPRE EN CUENTA LO SIGUIENTE
ATENCIÓN
• Antes de utilizar este equipo, lea las siguientes
instrucciones y el Manual del usuario.
...........................................................................................................
• No abra ni realice modificaciones internas en el
equipo.
...........................................................................................................
• No intente reparar el equipo ni reemplazar sus
elementos internos (excepto donde el manual lo
indique específicamente). Para cualquier reparación, contacte con el establecimiento donde adquirió el equipo, el Centro de Servicio Roland más
cercano, o un distribuidor Roland autorizado, que aparecen listados en la página “Information”.
...........................................................................................................
• Nunca utilice ni guarde el equipo en lugares:
• Sujetos a temperaturas extremas (por ejemplo, a la
luz directa del sol dentro de un vehículo cerrado,
cerca de calefactores o encima de aparatos generadores de calor); o
• Mojados (por ejemplo, baños, servicios, suelos
mojados); o
• Húmedos; o
• Expuestos a la lluvia; o
• Con polvo; o
• Sujetos a altos niveles de vibración.
...........................................................................................................
• Este equipo sólo se debe utilizar con el estante o
soporte recomendado por Roland.
...........................................................................................................
• Coloque siempre el equipo en posición horizontal
y sobre una superficie estable. No lo coloque
nunca sobre soportes que puedan tambalearse ni
sobre superficies inclinadas.
...........................................................................................................
• El equipo se debería conectar a una fuente de alimentación del tipo descrito en las instrucciones de
funcionamiento o tal como se indica en la parte
posterior del equipo.
...........................................................................................................
• Utilice sólo el cable de alimentación incluido. Además, el cable de alimentación incluido no debería
utilizarse en otros dispositivos.
...........................................................................................................
ATENCIÓN
• No doble ni retuerza excesivamente el cable de alimentación, ni coloque objetos pesados encima de
él. Podría dañar el cable y causar desperfectos y
corto circuitos. ¡Un cable dañado puede provocar
incendios y descargas eléctricas!
...........................................................................................................
• Este equipo, solo o combinado con un amplificador y auriculares o altavoces, puede producir
niveles de sonido capaces de provocar una pérdida de audición permanente. No utilice el equipo
durante períodos de tiempo prolongados a altos
niveles de volumen, ni tampoco a niveles que
resulten incómodos. Si experimenta cualquier pérdida de audición u oye zumbidos en los oídos,
deje de utilizar el equipo inmediatamente y consulte con
un médico especialista.
...........................................................................................................
• No permita que penetren objetos (por ejemplo,
material inflamable, monedas, alfileres), ni líquidos de ningún tipo (agua, refrescos, etc.) en el interior del equipo.
...........................................................................................................
• Desactive el equipo inmediatamente, extraiga el
cable de la toma de corriente, y solicite asistencia
al establecimiento donde adquirió el equipo, al
Centro de Servicio Roland más cercano, o a un distribuidor Roland autorizado, que aparecen listados en la página “Information” cuando:
• El cable de alimentación, o el conector hayan sido
dañados; o
• Aparezcan humos u olores inusuales; o
• Haya penetrado algún objeto o algún líquido dentro del equipo; o
• El equipo haya sido expuesto a la lluvia (o se haya
mojado de otra forma); o
• El equipo no funcione con normalidad o perciba cambios
en su funcionamiento.
...........................................................................................................
HP107_e.book Page 163 Tuesday, October 19, 2004 10:41 PM
• En hogares con niños pequeños, un adulto deberá
supervisar siempre la utilización del equipo hasta
que el niño sea capaz de seguir todas las normas
básicas para un uso seguro.
...........................................................................................................
014
• No deje que los cables se enreden. Además, todos
los cables deben colocarse fuera del alcance de los
niños.
...........................................................................................................
106
• No se encarame nunca sobre el equipo, ni deposite
objetos pesados sobre el mismo.
• Evite que el equipo sufra golpes fuertes.
• (¡No lo deje caer!)
...........................................................................................................
...........................................................................................................
• No manipule nunca el cable de alimentación ni los
conectores con las manos mojadas al conectarlos o
desconectarlos de la toma de corriente o del
equipo.
...........................................................................................................
• Si necesita mover el instrumento, tenga en cuenta
las siguientes precauciones. Son necesarias al
menos dos personas para levantar y mover el
equipo de una forma segura. Debe manejarse cuidadosamente, manteniéndolo siempre horizontal.
Asegúrese de sujetarlo firmemente, para evitar
lesiones o dañar el instrumento.
015
ATENCIÓN
• Antes de utilizar el equipo en un país extranjero,
consulte con la tienda donde adquirió el equipo,
con el Centro de Servicios Roland más cercano, o
con un distribuidor Roland autorizado, que aparecen listados en la página “Information”.
...........................................................................................................
026
• NO reproduzca un disco CD-ROM en un reproductor de CDs de audio convencional. El nivel del
sonido resultante puede causar pérdidas auditivas
permanentes. Pueden producirse daños en los
altavoces u otros componentes del sistema.
...........................................................................................................
026
ATENCIÓN
• El equipo debe situarse de forma que su posición
no impida su correcta ventilación.
• Antes de limpiar el equipo, desactívelo y desconecte el cable de alimentación de la toma de
corriente (p. 169).
...........................................................................................................
110a
• Si hay posibilidad de que caigan rayos en su zona,
desconecte el cable de alimentación de la toma de
corriente.
...........................................................................................................
116
• Tenga cuidado de no pellizcarse los dedos al
abrir/cerrar la tapa (p. 170). Se recomienda la
supervisión de un adulto cuando utilicen el
equipo niños pequeños.
...........................................................................................................
118b
• Si necesita extraer los tornillos de montaje del atril,
los tornillos del soporte y la palomilla, asegúrese
de colocarlos en un lugar seguro fuera del alcance
de los niños, para que no puedan tragárselos por
accidente.
...........................................................................................................
ESPAÑOL
ESPAÑOL
...........................................................................................................
• Cuando conecte o desconecte el cable de alimentación de la toma de corriente o del equipo, tire
siempre del conector.
...........................................................................................................
• De vez en cuando, debería desconectar el conector
de alimentación y limpiarlo utilizando un paño
seco para eliminar el polvo y otras acumulaciones
de las clavijas. Si no va a utilizar el equipo durante
un largo periodo de tiempo, desconecte el cable de
alimentación de la toma de corriente. Si se acumula suciedad entre el conector y la toma de
corriente se puede debilitar el aislamiento y provocar un incendio.
...........................................................................................................
...........................................................................................................
109a
ESPAÑOL
• No coloque sobre el equipo ningún objeto que
contenga agua (por ejemplo, un jarro con flores).
Evite también el uso de insecticidas, perfumes,
alcohol, laca de uñas, spray, etc., cerca del equipo.
Limpie rápidamente cualquier líquido que se
vierta sobre el equipo utilizando un paño seco y suave.
...........................................................................................................
ESPAÑOL
• Compruebe que los enganches que fijan el equipo
al soporte no se hayan aflojado. Si percibe que se
han aflojado, fíjelos de nuevo.
• Desconecte el cable de alimentación.
• Desconecte todos los cables de equipos externos.
• Levante los ajustes del soporte (p. 171).
• Cierre la tapa.
• Pliegue el atril.
016
ESPAÑOL
• No conecte el equipo a una toma de corriente
donde haya conectados un número excesivo de
dispositivos. Tenga un cuidado especial cuando
utilice cables de extensión; el consumo total de
todos los dispositivos conectados a la toma de
corriente de la extensión no debe sobrepasar la
capacidad (vatios/amperios) de la misma. Una
carga excesiva puede provocar un sobrecalentamiento del aislamiento del cable, el cual incluso
puede llegar a fundirse.
...........................................................................................................
ESPAÑOL
ATENCIÓN
HP107_e.book Page 164 Tuesday, October 19, 2004 10:41 PM
HP107e – Notas importantes
Notas importantes
Además de los puntos que aparecen en las secciones IMPORTANT SAFETY INSTRUCTIONS y “Utilizar el equipo de
forma segura” (p. 162), lea y tenga en cuenta lo siguiente:
Alimentación
• No conecte este equipo a la misma toma de corriente que
esté utilizando un dispositivo eléctrico controlado por un
inversor (como por ejemplo, una nevera, una lavadora,
un microondas o un aparato de aire acondicionado), o
que contenga un motor. Según la forma en que se utiliza
el dispositivo eléctrico, las interferencias de la fuente de
alimentación pueden dañar el equipo o producir interferencias audibles. Si no resulta práctico utilizar una toma
de corriente distinta, conecte un filtro para las interferencias de la fuente de alimentación entre este equipo y la
toma de corriente.
• Antes de conectar este equipo a otros dispositivos, desactive la alimentación de todas las unidades. De esta forma
evitará funcionamientos incorrectos y/o daños en los
altavoces u otros dispositivos.
• Aunque la LCD y los LEDs estén apagados cuando el
conmutador de alimentación POWER esté en la posición
de apagado, no significa que la unidad esté completamente desconectada de la fuente de alimentación. Si tiene
que desactivar por completo la alimentación, desconecte
primero el conmutador de alimentación POWER y, a continuación, desconecte el cable de alimentación de la toma
de corriente. Por esta razón, la toma de corriente en la que
desee conectar el conector del cable de alimentación debe
ser fácil y rápidamente accesible.
Ubicación
• Si utiliza el equipo cerca de amplificadores de potencia (u
otros equipos con transformadores de potencia de gran
tamaño) se pueden producir zumbidos. Para solucionar
este problema, cambie la orientación del equipo; o aléjelo
de la fuente de interferencias.
352a
• Este dispositivo puede producir interferencias en la
recepción de televisión y radio. No utilice este dispositivo
cerca de este tipo de receptores.
352b
• Es posible que se produzcan interferencias si se utilizan
dispositivos de comunicación inalámbricos, como teléfonos móviles, cerca de este equipo. Estas interferencias
podrían producirse al recibir o iniciar una llamada, o
durante la conversación. Si percibe este tipo de problemas, coloque los dispositivos inalámbricos a mayor distancia del equipo o desactívelos.
354b
• No exponga el equipo a la luz solar directa, ni lo coloque
cerca de dispositivos que desprendan calor, ni lo deje
dentro de un vehículo cerrado, ni lo someta a temperaturas extremas. Tampoco lo sitúe durante mucho tiempo
cerca de dispositivos de iluminación que a menudo se
utilizan a su alrededor, como luces de pianos o focos
potentes. El calor excesivo puede deformar o decolorar el
equipo.
164
355b
• Si traslada el equipo de una ubicación a otra donde la
temperatura y/o la humedad sean muy diferentes,
podrían formarse gotas de agua (condensación) dentro
del equipo. Si intenta utilizar el equipo bajo estas circunstancias, podría causar daños o un funcionamiento anómalo. Por lo tanto, antes de utilizar el equipo, déjelo reposar durante varias horas, hasta que la condensación se
haya evaporado por completo.
• No deje goma, vinilo o materiales similares sobre la unidad durante largos períodos de tiempo. Estos objetos
pueden decolorar o dañar el acabado.
358
• No deje objetos encima del teclado. Esto podría causar un
funcionamiento anómalo, como por ejemplo que las
teclas dejen de sonar.
359
• No pegue adhesivos, calcomanías, ni similares en este
instrumento. Al despegarlos se podría dañar el acabado
exterior.
Mantenimiento
• Para la limpieza del equipo, utilice un paño suave y seco
o ligeramente humedecido con agua. Pruebe de frotar
toda la superficie utilizando una fuerza homogénea, y
mueva el paño siguiendo las aguas de la madera. Si frota
demasiado fuerte en la misma área puede dañar el acabado.
• No utilice nunca bencina, diluyentes, alcohol o disolventes de ningún tipo, para evitar así el posible riesgo de
deformación y/o decoloración.
• Los pedales de este equipo están hechos de metal.
El metal se puede oscurecer como resultado del proceso
natural de oxidación. Si el metal pierde el brillo, púlalo
utilizando un pulidor de metal disponible en el mercado.
Reparaciones e información
• Tenga en cuenta que todos los datos contenidos en la
memoria del instrumento pueden perderse al enviarlo
para una reparación. La información importante debe
guardarse siempre en otro dispositivo MIDI (por ejemplo,
un secuenciador) o escribirse en un papel (cuando sea
posible). Durante las reparaciones, se toman las precauciones necesarias para evitar la pérdida de información.
No obstante, en ciertos casos (como cuando los circuitos
relacionados con la propia memoria no funcionan), no
será posible recuperar la información, y Roland no asumirá ninguna responsabilidad concerniente a la pérdida
de memoria.
Precauciones adicionales
• Tenga en cuenta que el contenido de la memoria se puede
perder irreparablemente como resultado de un funcionamiento incorrecto o de la utilización inadecuada del
equipo. Para evitar el riesgo de perder información
importante, recomendamos que realice periódicamente
una copia de seguridad de la información importante
guardada en la memoria de la unidad en otro dispositivo
MIDI (por ejemplo, un secuenciador).
HP107_e.book Page 165 Tuesday, October 19, 2004 10:41 PM
Notas importantes
ESPAÑOL
• Lamentablemente, puede que no sea posible recuperar
los contenidos de la información guardada en la memoria
de la unidad u otro dispositivo MIDI (por ejemplo, un
secuenciador) cuando se haya perdido. Roland Corporation no asume ninguna responsabilidad por la pérdida de
información.
553
ESPAÑOL
• Tenga cuidado al utilizar los botones, deslizadores y
demás controles del equipo así como los jacks y conectores. Un uso poco cuidadoso puede provocar funcionamientos incorrectos.
• Cuando conecte y desconecte todos los cables, sujételos
por el conector, no tire nunca del cable. De este modo evitará cortocircuitos o daños en los elementos internos del
cable.
557
• Durante el funcionamiento normal del equipo, éste
genera una pequeña cantidad de calor.
558a
• Para no molestar a los vecinos, trate de mantener el volumen de su unidad a unos niveles razonables. Puede optar
por utilizar auriculares y así no tendrá que preocuparse
por los que tenga a su alrededor (especialmente a altas
horas de la madrugada).
559b
ESPAÑOL
• Cuando deba transportar el equipo, empaquételo en
material de protección contra golpes. Si transportara la
unidad sin tener en cuenta estas precauciones, podría arañarla o estropearla lo que podría provocar un funcionamiento anómalo.
560
• No aplique fuerza excesiva sobre el atril cuando lo use.
562
• Utilice un cable de Roland para realizar la conexión. Si
utiliza cualquier otro cable de conexión, tenga en cuenta
las siguientes precauciones.
ESPAÑOL
• Algunos cables de conexión contienen resistencias. No utilice cables que incorporen resistencias para conectar este
equipo. El uso de este tipo de cables puede provocar que
el nivel de sonido sea extremadamente bajo, o imposible
de oír. Para más información acerca de las especificaciones
de cable, consulte con su fabricante.
565
ESPAÑOL
• Antes de abrir o cerrar el teclado, asegúrese siempre de
que no haya mascotas u otros animales de pequeño
tamaño en la parte superior del instrumento (en particular, es aconsejable mantenerlos alejados del teclado y de
la tapa). En caso contrario, debido al diseño estructural
del instrumento, los animales de pequeño tamaño
podrían quedar atrapados en su interior. Si llegara el caso
de producirse una de estas situaciones, desactive inmediatamente el equipo y desconecte el cable de alimentación de la toma de pared. Consulte entonces con el distribuidor del instrumento o contacte con el Centro de Servicio Roland más cercano.
Manejar CD-ROMs
• No toque ni raye la cara inferior brillante (superficie codificada) del disco. Es posible que los discos CD-ROM
sucios o dañados no permitan una lectura correcta. Mantenga los discos limpios mediante el uso de un limpiador
de CDs disponible en el mercado.
ESPAÑOL
165
HP107_e.book Page 166 Tuesday, October 19, 2004 10:41 PM
HP107e – Contenido
Contenido
Utilizar el equipo de forma segura................................162
Notas importantes ..........................................................164
Descripciones del panel ................................................167
Panel frontal ........................................................................................167
Panel posterior ....................................................................................168
Panel inferior.......................................................................................168
Antes de empezar a tocar ..............................................169
Conectar el cable del pedal ...............................................................169
Conectar el cable del altavoz ............................................................169
Conectar el cable de alimentación....................................................169
Colocar el atril.....................................................................................169
Abrir/Cerrar la tapa ..........................................................................170
Conectar los Auriculares ...................................................................170
Uso del gancho para los auriculares ......................................................... 170
Activar y desactivar el equipo ..........................................................171
Ajuste del volumen y brillo del sonido ...........................................171
Acerca de los pedales.........................................................................171
Capítulo 1. Disfrutar de las canciones internas ..........172
Escuchar las canciones internas........................................................172
Reproducir todas las canciones de manera continua (All Song Play).. 172
Seleccionar una canción y reproducirla.................................................... 172
Escuchar las canciones de demostración ........................................173
Reproducir las canciones de demostración de sonidos.......................... 173
Escuchar una demostración de las funciones .......................................... 173
Capítulo 2. Interpretación ..............................................174
Interpretar con distintos sonidos .....................................................174
Realizar ajustes precisos al sonido del piano (Piano Resonance)174
Reproducir sonidos cuando se liberan las teclas (Key Off) ................... 174
Producir la resonancia de las cuerdas cuando las teclas se tocan (String
Resonance) .................................................................................................... 174
Resonancia al pulsar el pedal Damper (Damper Resonance) ............... 175
Ajustar el tacto del teclado (Key Touch) .........................................175
Cambiar la temporización de los sonidos según la fuerza aplicada al
pulsar las teclas (Hammer Response) ....................................................... 175
Añadir sensación de profundidad al sonido (Grand Space)........176
Añadir la sensación de profundidad ideal para los auriculares
(Grand Space)......................................................................................176
Añadir vigor al sonido (Dynamic Emphasis).................................177
Aplicar efectos al sonido ...................................................................177
Añadir reverberación al sonido (Reverb) ................................................. 177
Añadir riqueza al sonido (Chorus) ........................................................... 177
Cambiar la cantidad de efecto aplicado ................................................... 177
Transponer el tono del teclado (Transpose) ...................................178
Superponer sonidos complementarios con los sonidos de piano
(Acoustic Layering)............................................................................178
Cambiar el balance de volumen al interpretar con Acoustic Layering 179
Reproducir dos sonidos conjuntamente (Dual Play) ....................179
Balance de volumen en la interpretación Dual (Balance Dual) ............ 179
Tocar diferentes sonidos con las manos izquierda y derecha
(Interpretación Split) ..........................................................................180
Cambiar el punto de división del teclado ................................................ 180
Cambiar el funcionamiento de los pedales centrales....................181
Utilizar el metrónomo........................................................................181
Hacer sonar el metrónomo ......................................................................... 181
Cambiar el volumen del metrónomo........................................................ 181
166
Dividir el teclado en dos secciones para interpretaciones con
cuatro manos (modo Twin Piano) ...................................................182
Capítulo 3. Tocar junto con las canciones internas ... 183
Cambiar el tempo ...............................................................................183
Añadir una claqueta para coincidir con la temporización (Count-In) .183
Tocar cada mano por separado ........................................................184
Capítulo 4. Grabar su interpretación............................ 185
Grabar una canción nueva ................................................................185
Grabar junto con una canción...........................................................186
Seleccionar y grabar la pista para cada mano por separado........187
Eliminar interpretaciones grabadas.................................................187
Eliminar una interpretación desde la pista especificada ........................187
Eliminar una canción ...................................................................................187
Capítulo 5. Cambiar distintos ajustes.......................... 188
Realizar ajustes detallados (Función) ..............................................188
Sintonizar con la afinación de otros instrumentos (Master Tuning) ....188
Cambiar el temperamento ..........................................................................189
Ajustar la Curva de afinación (Stretch Tuning) .......................................189
Cambiar la afinación por octavas (Octave Shift) .....................................190
Aplicar el pedal damper a la zona del teclado de la mano izquierda ..190
Cambiar cómo se aplica Grand Space (Modo Grand Space) .................190
Desactivarlo todo excepto el piano (Panel Lock)...........................190
Recuperar los ajustes originales .......................................................191
Recordar los ajustes incluso cuando el equipo esté desactivado
(Memory Backup)...............................................................................191
Guardar canciones guardadas incluso con la alimentación
desactivada (Song Backup) ...............................................................191
Borrar canciones con copia de seguridad .................................................191
Utilizar la función V-LINK ...............................................................192
Realizar los ajustes para el controlador USB..................................192
Capítulo 6. Conectar dispositivos externos ................ 193
Conectar a un Equipo de audio........................................................193
Conectar al conector USB ..................................................................193
Conectar dispositivos MIDI ..............................................................194
Definir ajustes relacionados con MIDI ............................................194
Ajustes del canal de envío MIDI ................................................................195
Activar y desactivar Local Control ............................................................195
Transmitir una interpretación grabada.....................................................195
Apéndices ............................................................. 196
Solucionar Problemas ........................................................................196
Mensajes de error/Otros mensajes ..................................................197
Parámetros guardados en Memory Backup...................................197
Lista de funcionamiento fácil ...........................................................198
Especificaciones principales .............................................................199
Tone List ......................................................................... 240
Built-in Song List ........................................................... 241
MIDI Implementation Chart.................................. 243
HP107_e.book Page 167 Tuesday, October 19, 2004 10:41 PM
Descripciones del panel
ESPAÑOL
Descripciones del panel
Panel frontal
6 7 8
3
15
17
18
21 22
19
20
23 24
4 5
9 10 11
16
25 26
27
ESPAÑOL
2
12 13 14
Power On
1
1. Conmutador [Power On]
Activa y desactiva el equipo (p. 171).
2. Mando [Volume]
Ajusta el nivel de volumen general (p. 171).
Ajusta el brillo del sonido (p. 171).
4. Botón [Demo]
Puede escuchar una demostración de los sonidos del instrumento así como de las diversas funciones (p. 173).
5. Indicador [
(Auriculares]
Este indicador se ilumina cuando los auriculares se
conectan al jack de auriculares (p. 170).
6. Botón [Transpose]
Transpone la afinación del teclado (p. 178).
Divide el teclado en zonas para la mano derecha y zonas
para la mano izquierda, permitiendo tocar un sonido
diferente en cada zona (p. 180). También puede ajustar un
número de funciones diferentes cuando este botón y el
botón [Chorus] se mantienen pulsados (p. 188~p. 192,
p. 194~p. 195).
8. Botón [Chorus]
Añade riqueza al sonido (p. 177).
9. Botón [Grand Space]
10.Botón [Dynamic Emphasis]
Da brillo y vigor al sonido (p. 177).
Puede superponer y reproducir los sonidos recomendados que complementan el sonido propio del piano
(p. 178).
16.Botones Tone
Se utilizan para elegir los tipos de sonidos (grupos de
sonidos) que reproduce el teclado (p. 174).
17.Pantalla
La pantalla indica los valores de varios de los ajustes,
incluyendo la variación de tono, número de canción y
tempo. En general, se visualizan tal como se indica en la
figura anterior.
18.Botón [Song/Tempo]
Se utiliza para seleccionar las canciones internas (p. 172,
p. 183).
Además, puede pulsar este botón para visualizar alternativamente el tempo y el número de la canción seleccionada actualmente (indicada con una “S.” delante). El
indicador es verde cuando se indica el tempo y rojo
cuando se visualiza el número de la canción.
19.Botones [–] [+]
Permite seleccionar el valor de distintos ajustes.
Al pulsar los botones [–] y [+] simultáneamente el ajuste
de un elemento o función particular vuelve a su valor original.
20.Botón [Metronome/Count In]
Piano Resonance
Activa y desactiva el metrónomo (p. 181). También
incluye el sonido de claqueta, que puede tocarse antes de
iniciar la canción, lo que permite empezar a tocar la canción de forma perfectamente sincronizada (p. 183).
12.Botón [Key Off]
TRACK
11.Botón [Reverb]
Añade reverberación al sonido (p. 177).
Reproduce el sonido producido cuando se liberan las
teclas (p. 174).
21.Botón [Left]
Reproduce o graba una interpretación por separado para
cada mano (p. 184, p. 186~p. 187).
Produce la resonancia de las cuerdas creada al tocar el
teclado (p. 174).
167
ESPAÑOL
13.Botón [String]
ESPAÑOL
Añade una sensación de profundidad al sonido (p. 176,
p. 176).
15.Botón [Acoustic Layering]
ESPAÑOL
7. Botón [Split]
Cambia la resonancia producida cuando se pulsa el pedal
damper (p. 175).
ESPAÑOL
3. Mando [Brilliance]
14.Botón [Damper]
HP107_e.book Page 168 Tuesday, October 19, 2004 10:41 PM
HP107e – Descripciones del panel
Las interpretaciones de la mano izquierda de las canciones internas se asignan a este botón. Este botón y el
siguiente [Right] se conocen en conjunto como los “botones de pista”.
22.Botón [Right]
Reproduce o graba una interpretación por separado para
cada mano (p. 184, p. 186~p. 187). Las interpretaciones de
la mano derecha de las canciones internas se asignan a
este botón.
23.Botón [Play]
Inicia y detiene la reproducción de canciones internas e
interpretaciones grabadas (p. 172, p. 183).
También inicia/detiene la grabación de una interpretación (p. 185~p. 187).
24.Botón [Rec]
Alterna entre los modos de grabación-espera del HP107e
(p. 185~p. 187).
KEY TOUCH
25.Botón [Touch]
Modifica el tacto del teclado al interpretar (p. 175).
26.Botón [Hammer]
Ajusta cómo las variaciones en la fuerza con que toca las
teclas modificarán la temporización con la que suenan las
notas (p. 175).
27.Botón [Center Pedal]
Cambia la función del centro del pedal (p. 181).
Panel frontal
Panel posterior
Panel inferior
Panel posterior
28.Conector Pedal
Conecte el cable del pedal del soporte especial a este
conector (p. 169).
28
29
30
29.Jacks Input
Estos jacks pueden conectarse a otro dispositivo generador de sonido o a un dispositivo de audio, de modo que
el sonido de dicho dispositivo saldrá de los altavoces del
HP107e (p. 193).
30.Jacks Output
Permite enviar el sonido del piano a un equipo de
refuerzo del sonido para obtener un sonido más potente.
También pueden conectarse a una grabadora de cinta u
otro dispositivo de grabación para grabar una interpretación (p. 193).
Panel inferior
31.Jacks Phones
Aquí puede conectar unos auriculares (p. 170).
32.Conectores MIDI Out/In
Se conectan a dispositivos MIDI externos para intercambiar información de interpretación (p. 194).
31
32
33
33.Conector USB
Puede conectar un ordenador e intercambiar información
de interpretación entre el instrumento y el ordenador
(p. 193).
168
HP107_e.book Page 169 Tuesday, October 19, 2004 10:41 PM
Antes de empezar a tocar
ESPAÑOL
Antes de empezar a tocar
Conectar el cable del pedal
Inserte el cable del pedal al conector Pedal del
panel posterior del HP107e.
Conectar el cable de
alimentación
2. Conecte el cable de alimentación en una toma de
corriente de pared.
Nota
Utilice sólo el cable de alimentación incluido.
ESPAÑOL
1. Inserte el cable de alimentación incluido a la toma
de CA en el panel inferior del HP107e.
Conectar el cable del altavoz
Presione el cable del altavoz hasta que encaje en su posición con un clic.
ESPAÑOL
Tal como muestra el diagrama, conecte el cable del
altavoz que sale de la caja del altavoz del soporte
al conector de altavoz situado en el panel inferior
del HP107e.
Colocar el atril
1. Sujetando el atril con ambas manos, levántelo
hacia usted hasta colocarlo en posición vertical.
2. Utilice el soporte de la parte posterior del atril
para mantener el soporte en posición.
El ángulo del atril puede ajustarse en tres posiciones.
Conector de altavoz
2
Cable del altavoz
Nota
No coloque sobre el equipo ningún objeto que contenga
agua (por ejemplo, un jarro con flores). Evite también el
uso de insecticidas, perfumes, alcohol, laca de uñas,
spray, etc., cerca del equipo.
Los altavoces de este piano se montan debajo de la superficie superior, y quedan encarados hacia arriba. Si alguna
parte de los altavoces entra en contacto con líquidos, pueden producirse funcionamientos incorrectos o accidentes.
■ Plegar el atril
Levante el soporte situado en la parte posterior del
atril, y luego pliéguelo con cuidado.
■ Utilizar los soportes musicales
Puede utilizar los soportes para mantener las páginas en
su posición. Cuando no utilice los soportes, déjelos plegados.
ESPAÑOL
Altavoces
ESPAÑOL
1
Parte del clip
ESPAÑOL
169
HP107_e.book Page 170 Tuesday, October 19, 2004 10:41 PM
HP107e – Antes de empezar a tocar
■ Retirar el atril
Puede retirar el atril del piano. Esto le permite colocar un
ordenador notebook en el piano.
Coloque el atril en posición vertical y extraiga los
tornillos, como se muestra.
El volumen de los auriculares se ajusta con el mando
[Volume] (p. 171) del HP107e.
Nota Utilice auriculares estéreo.
Sólo se deben utilizar auriculares Roland. Es posible que
los auriculares de otros fabricantes no le proporcionen el
volumen suficiente.
Puede extraer los tornillos utilizando una moneda.
Observaciones acerca de la utilización de
los auriculares
Nota
Tenga cuidado de no perder los tornillos extraídos del
atril y colóquelos fuera del alcance de los niños para evitar que se atraganten.
• Para evitar dañar el cable, sujete los auriculares sólo por su
parte superior o por el conector.
• Si conecta los auriculares cuando el volumen del equipo
conectado es elevado se pueden dañar los auriculares. Baje
el volumen del HP107e antes de conectar los auriculares.
• Si escucha a un nivel de volumen excesivamente alto no
sólo puede dañar los auriculares, sino que también puede
experimentar pérdidas de oído. Utilice los auriculares a un
volumen moderado.
■ Uso del gancho para los auriculares
Abrir/Cerrar la tapa
Para abrir la tapa, levántela ligeramente con
ambas manos y deslícela alejándola de usted.
Para cerrar la tapa, tire de ella hacia usted y bájela
con cuidado después de extenderla por completo.
Nota
Nota
Cuando abra y cierre la tapa, tenga cuidado de no pillarse
los dedos. Si los niños pequeños utilizan el HP107e, es
necesaria la supervisión de un adulto.
Si necesita mover el piano, compruebe primero que la
tapa esté cerrada para evitar accidentes.
Conectar los Auriculares
El HP107e dispone de dos jacks para conectar auriculares.
Esto permite que dos personas puedan escuchar con auriculares simultáneamente, lo cual resulta muy útil para lecciones
y al interpretar piezas de piano a cuatro manos. Además,
esto permite tocar sin tener que preocuparse por si molesta a
los que le rodean, incluso por la noche.
Conecte los auriculares a los jacks Phones, situados en la parte inferior izquierda del piano.
Jack Phones x 2
Al conectar los auriculares, el indicador [
(Auriculares)] (p. 167) se ilumina y el sonido deja de salir por los
altavoces del HP107e.
170
Cuando no use los auriculares, puede colgarlos del gancho para auriculares que se encuentra en la parte inferior
izquierda del HP107e.
Colocar el gancho para los auriculares
Presione y gire el gancho para los auriculares que se
entrega con el HP107e en el orificio de la parte inferior
del HP107e (consulte la figura inferior). Gire la palomilla
del gancho para los auriculares para asegurarlo.
Palomilla
Gancho para los
auriculares
HP107_e.book Page 171 Tuesday, October 19, 2004 10:41 PM
Antes de empezar a tocar
Active los distintos dispositivos en el orden especificado. Si
activa los dispositivos en un orden erróneo, existe el riesgo
de provocar un funcionamiento anómalo y/o daños en los
altavoces y en los demás dispositivos.
Para activar el equipo, baje al mínimo el mando
[Volume] y luego pulse el conmutador [Power
On].
Los pedales tienen las siguientes funciones y se utilizan principalmente para interpretaciones de piano.
Pedal celeste
Pedal Damper
Pedal Sostenuto
Pedal Damper (derecho)
Si pulsa este pedal, las notas seguirán oyéndose aunque
aparte los dedos de las teclas.
ESPAÑOL
Power On
Acerca de los pedales
ESPAÑOL
Activar y desactivar el
equipo
La longitud del sustain cambiará sutilmente según si
pulsa más o menos el pedal.
Indicador Power
El equipo se activará, y se iluminará el indicador Power
que se encuentra en la parte frontal izquierda del HP107e.
Para desactivar el equipo, gire completamente el
mando [Volume] el máximo a la izquierda y luego
pulse el conmutador [Power On].
Ajuste del volumen y brillo
del sonido
Pedal celeste ( pedal izquierdo)
Si mantiene pulsado este pedal y toca el teclado, el sonido
tendrá un tono más suave.
La suavidad del tono puede variarse sutilmente según la
fuerza con que pulse el pedal.
Acerca del ajustador
Asegúrese de utilizar los ajustadores debajo de los pedales cuando se mueva el instrumento o si los pedales no
son estables.
❍ Gire el ajustador para bajarlo hasta que quede totalmente
en contacto con el suelo. Si deja un espacio entre los pedales y el suelo, puede dañar los pedales. En particular, si
coloca el instrumento encima de alfombras, ajústelo de
modo que los pedales estén totalmente en contacto con el
suelo.
Gire el mando[Brilliance] para ajustar el brillo del
sonido.
ESPAÑOL
Gire el mando [Volume] para ajustar el volumen
general.
Este pedal sostiene sólo los sonidos de las teclas que ya se
tocaron al pulsar el pedal.
Puede cambiar la función del pedal sostenuto (p. 181).
ESPAÑOL
Se apagará el indicador Power de la parte frontal
izquierda del HP107e y el equipo se desactivará.
Nota Si tiene que desactivar por completo la alimentación, desconecte primero el conmutador de alimentación POWER
y, a continuación, desconecte el cable de alimentación de
la toma de corriente. Consulte la sección “Alimentación”
(p. 164).
Pedal Sostenuto (pedal central)
ESPAÑOL
Pasados unos segundos, podrá tocar el teclado para generar sonidos. Utilice el mando [Volume] para ajustar el
volumen.
Nota Este equipo incorpora un circuito de protección. Se
requiere un breve espacio de tiempo (unos segundos) después de activar el equipo para que funcione con total normalidad.
En un piano acústico, al pulsar el pedal damper las cuerdas restantes resonarán por simpatía con los sonidos
tocados en el teclado, con lo cual se añade una resonancia
rica. El HP107e simula esta resonancia por simpatía.
Puede cambiar la cantidad de resonancia aplicada con el
pedal damper(p. 175).
Ajustador
Min
Max
Mellow
Bright
ESPAÑOL
171
HP107_e.book Page 172 Tuesday, October 19, 2004 10:41 PM
HP107e – Capítulo 1. Disfrutar de las canciones internas
Capítulo 1. Disfrutar de las canciones internas
Escuchar las canciones
internas
■ Seleccionar una canción y reproducirla
El HP107e se entrega con 68 canciones de piano internas.
“Capítulo 3. Tocar junto con las canciones internas” en
la p. 183, “Tone List” (p. 240)
■ Reproducir todas las canciones de manera
continua (All Song Play)
Las canciones internas pueden reproducirse de manera
consecutiva.
1 3, 4
2
Acerca de la visualización de las canciones
internas
USr (usuario) … La ubicación donde puede grabar su
interpretación. (Para más información acerca de la grabación, consulte → p. 185)
S.1~S.68 … Canciones internas
S. U … Canción guardada con Song Backup (p. 191)
12
1. Pulse los botones [Song/Tempo] y [Play] simultáneamente.
Se iluminará el indicador del botón [Song/Tempo], parpadeará el indicador del botón [Play] y las canciones se
reproducirán de forma sucesiva, empezando por la canción seleccionada.
Aparece el número de la canción en la pantalla durante
unos segundos.
Puede pulsar el botón [–] o [+] para seleccionar la canción
que desea reproducir.
Seleccionar la canción a reproducir
1. Pulse el botón [Song/Tempo], y su indicador se
iluminará en rojo.
Aparece el número de la canción en la pantalla durante
unos segundos.
2. Pulse los botones [–] o [+] para seleccionar una
canción.
Si mantiene pulsado el botón, los números cambiarán de
manera continua.
Seleccione canciones memorizados con el
siguiente procedimiento.
1
Pulse simultáneamente los botones [–] y [+]
para que “USr” aparezca en la pantalla.
2
Pulse el botón [–] para que se visualice “S. U”.
Una vez reproducidas todas las canciones, la reproducción
volverá a la primera canción y volverá a empezar.
Detener la reproducción
2. Pulse el botón [Play].
La reproducción se detendrá.
Reproducir
3. Pulse el botón [Play].
Se iluminará el indicador del botón y se reproducirá la
canción seleccionada.
Detener la reproducción
4. Pulse el botón [Play].
Se apaga el indicador del botón y se detiene la reproducción. La próxima vez que pulse el botón [Play], la canción
que detuvo se volverá a reproducir desde el principio.
172
HP107_e.book Page 173 Tuesday, October 19, 2004 10:41 PM
Capítulo 1. Disfrutar de las canciones internas
Botón con demostración
de función
Puede escuchar varias canciones de demostración, incluyendo las que muestran sonidos como el de piano, así como
la función aplicada a los sonidos de piano.
■ Reproducir las canciones de demostración de
sonidos
1. Pulse el botón [Demo].
Cuando finaliza la última canción, la reproducción vuelve
a la primera canción.
Botón con demostración de sonido
Contenido de la demostración
Canciones de demostración del sonido de
piano
[E. Piano]
Canciones de demostración del sonido de
E. Piano
[Harpsichord]
Canciones de demostración del sonido de
clavicémbalo
[Organ]
Canciones de demostración del sonido de
órgano
[Strings]
Canciones de demostración del sonido de
cuerdas
[Acoustic Layering]
Canciones de demostración utilizando la
función Acoustic Layering (p. 178)
[Split]
Canciones de demostración utilizando la
función Split (p. 180)
Detener las canciones de demostración de
sonidos
p. 174
Piano Resonance [String]
Demostración String
Resonance
p. 174
Piano Resonance [Damper]
Demostración Damper
Resonance
p. 175
Key Touch [Hammer]
Demostración Hammer
Response
p. 175
Al pulsar un botón, se reproduce la demostración asignada al botón. Se reproducirán dos versiones de la demostración; una incluye la función del botón pulsado y la otra
no.
Si pulsa el botón pulsado en el paso 2, podrá cambiar de
demostración con la función activada y desactivada.
Acerca de la demostración de la función
Hammer Response
La interpretación se detiene cuando se selecciona la
demostración de la función Hammer Response. Hammer Response se activa y desactiva alternativamente
cada vez que se pulsa la tecla Key Touch [Hammer].
Intente de tocar el teclado y compruebe el funcionamiento de Hammer Response.
Cuando Hammer Response se activa, los sonidos se
expresan más lentamente a medida que toque las teclas
con más fuerza.
La demostración de la función Hammer Response facilita la audición del sonido conla función activada y desactivada.
ESPAÑOL
[Piano]
Demostración Key off
ESPAÑOL
Si pulsa alguno de los botones Tone mientras el botón
[Demo] está parpadeando, se reproducirá la canción de
demostración correspondiente al botón de dicho sonido.
Piano Resonance [Key Off]
ESPAÑOL
El indicador del botón parpadea y se inicia la reproducción de la canción de demostración del sonido.
Contenido de la demostración
ESPAÑOL
Escuchar las canciones de
demostración
Detener la demostración de las funciones
3. Pulse el botón [Demo].
El indicador del botón [Demo] se apaga y la demostración
se cierra.
2. Pulse el botón [Demo].
ESPAÑOL
El indicador del botón [Demo] se apaga y la demostración
se cierra.
■ Escuchar una demostración de las funciones
Puede escuchar la demostración de las funciones que se
pueden aplicar a los sonidos de piano.
1. Pulse el botón [Demo].
El indicador del botón parpadea y se inicia la reproducción de la canción de demostración del sonido.
2. Pulse uno de los siguientes botones.
Contenido de la demostración
[Grand Space]
Demostración Grand
Space
p. 176
[Dynamic Emphasis]
Demostración Dynamic
Emphasis
p. 177
ESPAÑOL
Botón con demostración
de función
173
HP107_e.book Page 174 Tuesday, October 19, 2004 10:41 PM
HP107e – Capítulo 2. Interpretación
Capítulo 2. Interpretación
Interpretar con distintos sonidos
El HP107e contiene 36 sonidos internos diferentes. Los sonidos se organizan en cinco grupos de sonido, que se asignan a
los botones Tone.
Seleccionar un grupo de sonidos
1. Pulse cualquier botón Tone.
Se iluminará el indicador del botón pulsado.
Cuando toque el teclado, oirá un sonido del grupo de sonidos seleccionado.
Seleccionar sonidos de variación
2. Pulse el botón [–] o [+].
1
Aparece el número de la variación del sonido la pantalla
durante unos segundos.
2
Para más información, consulte la sección “Tone List”
(p. 240).
El sonido seleccionado suena cuando toca el teclado.
Realizar ajustes precisos al sonido del piano
(Piano Resonance)
Puede realizar ajustes precisos del sonido del piano como usted desee.
■ Reproducir sonidos cuando se liberan las
teclas (Key Off)
Puede reproducir el sonido “key off” (el sonido sutil producido cuando las teclas se liberan) que se obtiene cuando
se reproduce un piano acústico.
Puede guardar este ajuste en la memoria del HP107e con
la función Memory Backup (p. 191).
1. Pulse el botón [Key Off] Piano Resonance, de
forma que su indicador se ilumine.
Se produce un sonido distintivo al liberar las teclas.
Pulse el botón Piano Resonance [Key Off] una vez más,
haciendo que el indicador del botón se apague cuando el
efecto se cancele.
Para más información acerca de los sonidos en los que
esté ajuste se activa, consulte “Tone List” (p. 240).
Ajustar el volumen del sonido Key Off
2. Mantenga pulsado el botón Piano Resonance [Key
Off] y pulse el botón [–] o [+].
Puede ajustar el volumen del sonido que se escucha
cuando se liberan las teclas en uno de los diez niveles diferentes.
El volumen se incrementa a medida que el valor sube.
■ Producir la resonancia de las cuerdas cuando
las teclas se tocan (String Resonance)
Cuando pulse una tecla en un piano acústico, varias cuerdas empiezan a vibrar. La función que reproduce este
efecto se denomina “String Resonance”.
Nota Este ajuste sólo funciona con los sonidos de piano. No
puede ajustarlo para otros sonidos.
1. Pulse el botón [Sting] Piano Resonance, de forma
que su indicador se ilumine.
La función String Resonance está activada. Pulse el botón
Piano Resonance [String] una vez más, haciendo que el
indicador del botón se apague cuando el efecto se cancele.
Puede guardar este ajuste en la memoria del HP107e con
la función Memory Backup (p. 191).
174
HP107_e.book Page 175 Tuesday, October 19, 2004 10:41 PM
Capítulo 2. Interpretación
2. Mantenga pulsado el botón Piano Resonance
[String] y pulse el botón [–] o [+].
Puede ajustar la profundidad de la resonancia (el volumen
de la resonancia) a diez niveles.
Cuanto más se incrementa el valor, más efectos de resonancia se aplican.
■ Resonancia al pulsar el pedal Damper (Damper Resonance)
En un piano acústico, pisar el pedal damper hace que las
notas que toca resuenen junto con otras cuerdas, añadiendo reverberaciones y grosor al sonido. Al pulsar el
pedal damper del HP107e se produce esta resonancia
(resonancia por simpatía).
Nota Este ajuste sólo funciona con los sonidos de piano. No
puede ajustarlo para otros sonidos.
La función Damper Resonance está activada.
Pulse el botón Piano Resonance [Damper] una vez más,
haciendo que el indicador del botón se apague cuando el
efecto se cancele.
Puede guardar este ajuste en la memoria del HP107e con
la función Memory Backup (p. 191).
Ajusta la profundidad de la resonancia.
Todos los indicadores apagados. Fixed. Suena con un
volumen fijo, independientemente de la fuerza con la que
toque.
■ Cambiar la temporización de los sonidos
según la fuerza aplicada al pulsar las teclas
(Hammer Response)
Ajusta cómo afectará la fuerza de la interpretación la temporización del sonido de la nota. Se denomina función
“Hammer Response”.
Puede guardar este ajuste en la memoria del HP107e con
la función Memory Backup (p. 191).
En un piano acústico, al pulsar la tecla se mueve el martillo, que golpea una cuerda para producir un sonido. Si
pulsa la tecla con suavidad, el martillo se moverá lentamente, lo que significa que tardará ligeramente más (en
comparación con una nota tocada con fuerza) desde el
momento que pulse la tecla hasta que se produzca el
sonido.
Si la función Hammer Response está activada, el tiempo
desde el momento que pulsa una tecla hasta que se escuche un sonido cambiará según la fuerza con la que la pulse.
Si toca con más suavidad, el tiempo será más rápido.
Puede seleccionar entre diez niveles de profundidad para
el sonido de resonancia (nivel de resonancia).
Los valores mayores producirán un efecto más profundo.
Ajustar el tacto del teclado
(Key Touch)
ESPAÑOL
2. Mantenga pulsado el botón Piano Resonance
[Damper] y pulse el botón [–] o [+].
“Heavy” iluminado. Fortissimo (ff) no se puede producir
a no ser que interprete con más fuerza de lo normal,
haciendo que el teclado tenga un tacto más fuerte.
Tocando de un modo dinámico se añade más sentimiento
a su interpretación.
ESPAÑOL
1. Mantenga pulsado el botón Piano Resonance
[Damper], de forma que su indicador se ilumine.
“Medium” iluminado. Permite tocar con el tacto más natural. Es el tacto más parecido al de un piano acústico.
ESPAÑOL
Puede cambiar la volumen de la resonancia aplicada con el
pedal damper.
“Light” iluminado. Fortissimo (ff) se puede producir
tocando con menos fuerza de la normal, haciendo que el
teclado tenga un tacto más suave. Con este ajuste interpretar es más fácil, incluso para los niños.
ESPAÑOL
Ajusta la profundidad de la resonancia.
1
Puede ajustar el tacto (la sensación al tocar) del teclado.
“Light” iluminado. La respuesta es más rápida cuando las
teclas se pulsan ligeramente.
ESPAÑOL
1. Pulse el botón Key Touch [Hammer] para que el
indicador adecuado se ilumine.
“Medium” iluminado. La temporización regular se utiliza
cuando las teclas se pulsan ligeramente.
1
Puede guardar este ajuste en la memoria del HP107e con
la función Memory Backup (p. 191).
Todos los indicadores apagados. La función Hammer
Response se cancela. El sonido se reproduce inmediatamente, independientemente de la fuerza con la que se
tocan las teclas (velocidad).
Cada vez que pulse el botón Key Touch [Touch], el indicador que se ilumine cambiará y el tacto cambiará.
175
ESPAÑOL
1. Pulse el botón Key Touch [Touch].
“Heavy” iluminado. La temporización de los sonidos se
retarda cuando las teclas se pulsan ligeramente.
HP107_e.book Page 176 Tuesday, October 19, 2004 10:41 PM
HP107e – Capítulo 2. Interpretación
Añadir sensación de
profundidad al sonido
(Grand Space)
Añadir la sensación de
profundidad ideal para los
auriculares (Grand Space)
El HP107e incluye una función “Grand Space” que le permite
conseguir sonidos con una sensación de profundidad como
en un piano acústico. Con esta función conseguirá la amplitud y reverberación de sonido natural que proporciona un
piano acústico.
También puede conseguir el tipo de profundidad sónica producida con un piano de cola a través de los auriculares. Utilizando esta función se obtiene una reverberación y una amplitud natural en el sonido producido por un piano acústico.
1
2
Puede guardar este ajuste en la memoria del HP107e con
la función Memory Backup (p. 191).
1. Pulse el botón [Grand Space], de forma que su
indicador se ilumine.
La función Grand Space se activa, y añade una sensación
de profundidad mayor al sonido.
Cuando el modo Grand Space (p. 190) se ajusta a “1” y
se conectan unos auriculares, la sensación de profundidad se optimiza para los auriculares y si no se conectan
auriculares, se selecciona la profundidad óptima para los
altavoces.
2. Mantenga pulsado el botón [Grand Space] y pulse
el botón [–] o [+].
2. Mantenga pulsado el botón [Grand Space] y pulse
el botón [–] o [+].
Puede ajustar la sensación de profundidad a cuatro niveles.
Puede ajustar la sensación de profundidad a cuatro niveles.
Se produce una mayor sensación de profundidad al incrementar el valor.
Se produce una mayor sensación de profundidad al incrementar el valor.
3. Para cancelar la función Grand Space, pulse el
botón [Grand Space] una vez, de forma que se apague su iluminación.
3. Para cancelar la función Grand Space, pulse el
botón [Grand Space] una vez, de forma que se apague su iluminación.
El indicador [ (Auriculares)] se ilumina al conectar
los auriculares.
176
HP107_e.book Page 177 Tuesday, October 19, 2004 10:41 PM
Capítulo 2. Interpretación
ESPAÑOL
Añadir vigor al sonido
(Dynamic Emphasis)
Aplicar efectos al sonido
Puede añadir vigor al sonido para hacer que sea totalmente
claro y distintivo.
■ Añadir reverberación al sonido (Reverb)
3
1. Pulse el botón [Reverb].
Puede guardar este ajuste en la memoria del HP107e con
la función Memory Backup (p. 191).
1. Pulse el botón [Dynamic Emphasis], de forma que
su indicador se ilumine.
2. Para cancelar la función Dynamic Emphasis, pulse
el botón [Dynamic Emphasis] una vez, de forma
que se apague su iluminación.
Cambiar los ajustes Dynamic Emphasis
3. Mantenga pulsado el botón [Dynamic Emphasis] y
pulse el botón [–] o [+].
Descripción
1
Crea un sonido con los graves y agudos realzados.
2
Produce un sonido con acordes en los registros
bajos que son claros y distintivos.
3
Crea un sonido con los graves realzados.
Para cancelar el efecto de reverberación, pulse el botón
[Reverb], con lo que se apagará su indicador.
Puede guardar el ajuste de activar/desactivar la reverberación además de ajustar la reverberación que se aplique
en la memoria del HP107e con la función Memory
Backup(p. 191).
■ Añadir riqueza al sonido (Chorus)
Al añadir el efecto chorus, puede dar una mayor dimensión al sonido, con más cuerpo y amplitud.
1. Pulse el botón [Chorus].
Se iluminará el indicador del botón y se aplicará un efecto
de chorus al sonido.
Para cancelar el efecto chorus, pulse el botón [Chorus], con
lo que se apagará su indicador.
Puede guardar los ajustes de activación/desactivación de
chorus para cada sonido individualmente. Los ajustes
originales se recuperan cuando se desactiva la alimentación.
ESPAÑOL
Indicador
Se iluminará el indicador del botón y se aplicará un efecto
de reverberación al sonido.
ESPAÑOL
Se activa la función Dynamic Emphasis, y se proporciona
vigor al sonido.
ESPAÑOL
1
Aplicando el efecto de reverberación podrá conseguir una
reverberación agradable, haciendo que el sonido sea el
mismo que si estuviera tocando en un auditorio.
■ Cambiar la cantidad de efecto aplicado
La cantidad (profundidad) del efecto de reverberación y
de chorus se puede ajustar a diez niveles.
Con los ajustes originales, la reverberación y el chorus se
ajustan a “5”.
ESPAÑOL
Cambiar la profundidad del efecto de
reverberación
1. Mantenga pulsado el botón [Reverb] y pulse el
botón [–] o [+].
Se visualizará el valor especificado. Los valores más altos
producirán un efecto más profundo.
Nota No puede guardar ajustes de reverberación para cada
sonido individualmente.
Se visualizará el valor especificado. Los valores más altos
producirán un efecto más profundo.
177
ESPAÑOL
Cambiar la profundidad del efecto Chorus
1. Mantenga pulsado el botón [Chorus] y pulse el
botón [–] o [+].
HP107_e.book Page 178 Tuesday, October 19, 2004 10:41 PM
HP107e – Capítulo 2. Interpretación
Transponer el tono del
teclado (Transpose)
Utilizando la “función Transpose”, puede transponer la
interpretación sin cambiar las notas que toca. Por ejemplo,
incluso si la canción tiene un tono difícil, con muchas notas
sostenidas (#) o bemoles (b), puede transponerla a un tono
más sencillo de tocar.
Superponer sonidos complementarios con los sonidos de
piano (Acoustic Layering)
Con el HP107e, puede seleccionar los sonidos perfectos para
complementar los sonidos de piano y tocarlos con los sonidos de piano. Esta función se denomina “Acoustic Layering”.
Si acompaña a un vocalista, puede transponer fácilmente la
afinación a una gama cómoda para el cantante, y seguir
tocando las notas tal y como están escritas (es decir, con los
dedos en la misma posición).
1
2
Puede cambiar la afinación del sonido Layer en intervalos de octavas (p. 190).
1
Primero seleccione un sonido de piano (p. 174).
1. Mantenga pulsado el botón [Transpose], y pulse
una nota para indicar la tónica del tono al que
desea transponer.
Se iluminará el indicador del botón y el teclado se transpondrá.
Si mantiene pulsado el botón [Transpose], se visualizará
el valor especificado.
También puede transponer manteniendo pulsado el botón
[Transpose] y pulsando el botón [–] o [+].
Si mantiene pulsado el botón [Transpose] y pulsa simultáneamente los botones [–] y [+], el ajuste volverá al valor
original (0).
Puede ajustarlo en un intervalo de 6~0~5 (intervalos de
semitonos).
Por ejemplo, si desea que suene la afinación de E cuando
toque la tecla C, mantenga pulsado el botón [Transpose] y
pulse la tecla E.
1. Pulse el botón [Acoustic Layering], de forma que
su indicador se ilumine.
Cuando toca el teclado, el sonido de piano y el sonido
complementario se superponen y se reproducen simultáneamente.
Si desea superponer sonidos a los tonos que no sean tonos
de piano, pulse el botón del tono, y seleccione el tono que
se debe utilizar como base.
Seleccionar el sonido que se debe superponer con el sonido de piano
2. Utilice los botones [–] y [+] para seleccionar el
sonido superpuesto.
Aparece el número de la canción en la pantalla durante
unos segundos.
El número del tono superpuesto con el sonido del piano (el
sonido superpuesto) tiene “L.” adjunto.
Si partimos de C como punto de referencia, se sube cuatro
tonos, incluyendo las teclas negras, hasta llegar a E, y por
lo tanto aparece “4” en la pantalla.
Si toca C E G
Sonará E G# B
Cuando el valor de transposición se ajusta a “0”, el indicador del botón seguirá apagado aunque pulse el botón
[Transpose].
Para cancelar la función de transposición, pulse el botón
[Transpose], con lo que se apagará su indicador.
Si pulsa de nuevo el botón [Transpose], con lo que se iluminará su indicador, el teclado se transpondrá a la nota
especificada aquí.
Este ajuste vuelve al valor original (0) cuando desactiva
el equipo.
178
Cuando se selecciona “Layer” como el ajuste de pedal
central, la función Acoustic Layering se activa automáticamente (p. 178). En este caso, con el pedal puede ajustar
el volumen del sonido superpuesto con el tono de piano.
Cuando toca el teclado, el sonido de piano y el sonido que
ha seleccionado se superponen y se reproducen simultáneamente.
HP107_e.book Page 179 Tuesday, October 19, 2004 10:41 PM
Capítulo 2. Interpretación
Puede ajustar el balance de volumen entre los dos sonidos
seleccionados al interpretar con Acoustic Layering.
Cuando el balance de volumen se cambia con Acoustic
Layering, el balance dual también cambia a los mismos
ajustes de balance del volumen (p. 179).
■ Balance de volumen en la interpretación
Dual (Balance Dual)
Puede cambiar el balance de volumen entre los dos sonidos superpuestos en la interpretación Dual.
ESPAÑOL
■ Cambiar el balance de volumen al interpretar con Acoustic Layering
1. Mantenga pulsado el botón [Acoustic Layering] y
pulse el botón [–] o [+].
El balance de volumen cambia.
1
2
Puede guardar este ajuste en la memoria del HP107e con
la función Memory Backup (p. 191).
Volumen del sonido de piano
Volumen del sonido Layer
ESPAÑOL
Para volver al balance de volumen original, pulse los botones [–] y [+] simultáneamente.
1. Mantenga pulsado el botón [Transpose] y pulse el
botón [Split].
Parpadearán los indicadores de los botones pulsados.
El balance actual del volumen aparece en pantalla.
La reproducción simultánea de dos sonidos al pulsar una
tecla se llama “interpretación Dual”. Puede seleccionar el
sonido que desea superponer pulsando el botón del tono
correspondiente.
2. Pulse los botones [–] o [+] para cambiar el valor.
El balance de volumen cambia.
También puede cambiar el balance de volumen manteniendo pulsado el botón [Acoustic Layering] y pulsando
el botón [+] o [–].
Para volver al balance de volumen original, pulse los botones [–] y [+] simultáneamente.
ESPAÑOL
Reproducir dos sonidos conjuntamente (Dual Play)
1. Pulse simultáneamente los dos botones Tone que
desea reproducir conjuntamente.
Se iluminará el indicador del botón pulsado.
Para cancelar la interpretación dual, pulse cualquiera de
los botones Tone.
Volumen del sonido del botón izquierdo
Volumen del sonido del botón derecho
Pulse cualquier botón distinto a los botones [–] [+] y el
indicador del botón volverá al estado anterior.
Para cambiar el sonido del botón derecho
de los dos sonidos seleccionados
ESPAÑOL
Cuando toca el teclado, los sonidos de los dos botones
Tone seleccionados sonarán simultáneamente.
2. Pulse el botón [–] o [+].
La interpretación dual toca ahora el sonido del botón Tone
izquierdo junto con el sonido recién seleccionado.
Puede cambiar la afinación del sonido del botón derecho
en intervalos de octavas (p. 190).
ESPAÑOL
Para cambiar el sonido del botón izquierdo
de los dos sonidos seleccionados
Cancele la interpretación Dual y vuelva a seleccionar el
sonido. Pulse los dos botones Tone que desea reproducir
conjuntamente.
ESPAÑOL
179
HP107_e.book Page 180 Tuesday, October 19, 2004 10:41 PM
HP107e – Capítulo 2. Interpretación
Tocar diferentes sonidos con
las manos izquierda y
derecha (Interpretación Split)
Dividir el teclado en zonas para las manos derecha e
izquierda, y tocar sonidos diferentes en cada una de ellas, se
denomina “interpretación Split”. La tecla de límite se denomina “punto de división”.
Cambiar el sonido que tocará con la mano
derecha
Cancele la interpretación Split y vuelva a seleccionar el
sonido.
En la interpretación Split, el pedal damper se aplicará
solamente a la zona de la mano derecha del teclado. Si
desea aplicar el pedal damper a la zona de la mano
izquierda, consulte la sección “Aplicar el pedal damper a
la zona del teclado de la mano izquierda” (p. 190).
Punto de división (Ajuste original: F#3)
■ Cambiar el punto de división del teclado
A0 B0 C1 D1 E1 F1 G1 A1 B1 C2 …
Sonido de la mano izquierda
C3
C4
C5
Sonido de la mano derecha
Puede cambiar el punto donde se divide el teclado (el
punto de división) dentro del intervalo de B1 a B6.
Está ajustado a “F#3” en los ajustes originales.
1. Manteniendo pulsado el botón [Split], pulse la
tecla que desea especificar como punto de división.
La tecla pulsada se convierte en punto de división, y pertenece a la sección de la mano izquierda del teclado.
1
1. Pulse el botón [Split].
También puede cambiar el ajuste pulsando el botón [–] o
[+] mientras mantiene pulsado el botón [Split].
Si mantiene pulsado el botón [Split] y pulsa simultáneamente los botones [–] y [+], el ajuste volverá al valor original (F#3).
Se iluminará el indicador del botón. El teclado se divide en
zonas para la mano derecha y la mano izquierda.
La tecla del punto de división forma parte de la zona del
teclado correspondiente a la mano izquierda.
El sonido que se toca en el lado derecho es el sonido que se
utiliza antes de pulsar el botón [Split], mientras que el
sonido de bajo se toca en el lado izquierdo cuando se
activa el equipo, y se selecciona un sonido diferente
cuando cambia el tono de la mano izquierda.
Para cancelar la interpretación Split, pulse el botón [Split],
con lo que se apagará su indicador.
Al utilizar la interpretación Dual, pulse el botón
[Split].
La mano derecha tocará el sonido del botón izquierdo de
la interpretación Dual y la mano izquierda tocará una
nota adecuada al sonido de la mano derecha.
Puede cambiar la afinación de los sonidos de la parte
izquierda del teclado en intervalos de octavas (p. 190).
Cambiar el sonido que tocará con la mano
izquierda
1. Pulse cualquier botón Tone.
2. Pulse el botón [–] o [+].
Cada vez que pulse el botón [–] o [+], cambiará el sonido
de la mano izquierda.
Para obtener más información acerca de los sonidos, consulte la “Tone List” (p. 240).
180
La tecla del punto de división se visualiza de esta forma.
Pantalla
C
C
d
E_
Nombre
de letra
C
C
D
E
Pantalla
E
F
F
G
Nombre
de letra
E
F
F
G
Pantalla
A_
A b_
b
Nombre
de letra
A
A
B
B
Si continúa pulsando el botón [Split], se visualizará el
valor del punto de división actualmente especificado.
HP107_e.book Page 181 Tuesday, October 19, 2004 10:41 PM
Capítulo 2. Interpretación
Con los ajustes originales, el pedal central funciona como un
pedal Sostenuto (p. 171).
Sin embargo, se puede cambiar el ajuste del pedal central por
una gran variedad de funciones diferentes.
Cambiar el tempo
2. Pulse el botón [Song/Tempo]; el indicador del
botón se ilumina en verde.
ESPAÑOL
Cambiar el funcionamiento
de los pedales centrales
3. Pulse el botón [–] o [+] para ajustar el tempo.
Cambiar el tiempo del metrónomo
4. Mantenga pulsado el botón [Song/Tempo] y pulse
el botón [–] o [+].
Se visualizará el tiempo actualmente seleccionado.
1
Si mantiene pulsado el botón [Song/Tempo] y pulsa los
botones [–] y [+] simultáneamente, el tiempo volverá a ser
el de antes de cambiarlo.
Correspondencia entre el tiempo
y la visualización de tempo
1. Pulse el botón [Center Pedal] para que el indicador adecuado se ilumine.
Tiempo
Valor de tempo
=5–250
x/4
=10–500
Sostenuto. Ajusta la función a pedal Sostenuto (p. 171).
3/8
=20–999
Layer. Cuando toca una tecla pulsando el pedal central,
se selecciona un sonido adecuado para que coincida con
el sonido de piano. Entonces, los dos sonidos se superponen y se reproducen simultáneamente.
El volumen del sonido Layer se ajusta en función de la
fuerza con la que pulse el pedal.
6/8
9/8
12/8
= 7–333
■ Hacer sonar el metrónomo
El HP107e dispone de un metrónomo integrado.
Durante la reproducción de una canción, el metrónomo
sonará según el tempo y el tipo de compás (Tiempo) de
dicha canción.
No es posible cambiar el tiempo durante la reproducción
o la grabación de una canción.
Pantalla
Tiempo
Pantalla
Tiempo
2.2
2/2
6.4
6/4
0.4
Sólo tiempos débiles
7.4
7/4
2.4
2/4
3.8
3/8
3.4
3/4
6.8
6/8
4.4
4/4
9.8
9/8
5.4
5/4
12.8
12/8
ESPAÑOL
Utilizar el metrónomo
Nota
ESPAÑOL
2/2
Si desactiva Acoustic Layering y la función Dual, la función Acoustic Layering se activará.
Octave. Cuando toca una tecla pulsando el pedal central,
la nota de la tecla que se pulsa y la nota que se encuentra
una octava por encima se superponen y se reproducen
simultáneamente. Puede ajustar el volumen del sonido
una octava por encima del tono Layer cambiando la presión con la que pulsa el pedal.
ESPAÑOL
Si mantiene pulsado el botón [Song/Tempo] y pulsa el
botón [–] o [+], el tiempo cambiará.
Detener el metrónomo
5. Vuelva a pulsar el botón [Metronome/Count In],
con lo cual se apagará su indicador.
Se detendrá el metrónomo.
■ Cambiar el volumen del metrónomo
ESPAÑOL
Se puede ajustar el volumen del metrónomo con diez niveles de volumen disponibles.
Al activar el instrumento, se ajusta a “4”.
1. Mientras mantiene pulsado el botón [Metronome/
Count In], pulse el botón [–] o [+].
3 4 1,5 2
Hacer sonar el metrónomo
1. Pulse el botón [Metronome/Count In].
Cuando el volumen del metrónomo se ajusta a “0”, el
sonido del metrónomo no se reproduce.
181
ESPAÑOL
El metrónomo sonará. El indicador del botón parpadea en
rojo y verde de acuerdo con el tiempo seleccionado en ese
momento. El indicador se ilumina en rojo en los tiempos
fuertes y en verde en los tiempos débiles.
Se visualizará el volumen actualmente especificado.
Siga pulsando el botón [Metronome/Count In] y pulse el
botón [–] o [+] para hacer sonar el metrónomo y cambiar el
volumen.
HP107_e.book Page 182 Tuesday, October 19, 2004 10:41 PM
HP107e – Capítulo 2. Interpretación
Dividir el teclado en dos secciones para interpretaciones con
cuatro manos (modo Twin Piano)
Puede dividir el teclado en dos secciones por separado, permitiendo interpretar a dos personas en los mismos registros.
C1
C3
C2
C4
C3
C4
C5
C6
1. Mientras mantiene pulsado el botón [Split] y
pulsa el botón [Piano].
El indicador del botón [Split] se ilumina y se activa el
modo Twin Piano.
C5
C3
C6
C4
C7
C5
C8
C6
● Con el modo Twin Piano activado, sucede lo siguiente:
• El teclado se divide en dos secciones separadas y la afinación cambia.
• Entonces, el pedal derecho funciona como pedal damper para la sección derecha del teclado y el pedal
izquierdo como pedal damper para la sección izquierda
del teclado.
• Entonces, el pedal central funciona como pedal Sostenuto para la sección derecha del teclado.
2. Para salir de la función, mantenga pulsado el
botón [Split] y pulse el botón [Piano] una vez más.
• Si la grabación está en progreso o si el instrumento está
en el modo de grabación en espera, se detendrá la grabación o se cancelará la grabación en espera. El botón
[Rec] se desactivará mientras el modo Twin Piano esté
activado.
• Si la función Split está activada, se desactivará.
• Se utilizarán los mismos sonidos y efectos tanto en la
parte derecha como en la izquierda. Si el piano utilizaba la interpretación Split antes de activar el modo
Twin Piano, se utilizará el sonido seleccionado para la
mano derecha en la interpretación Split.
Nota La función de resonancia damper no puede utilizarse en
el modo Twin Piano.
182
HP107_e.book Page 183 Tuesday, October 19, 2004 10:41 PM
Capítulo 3. Tocar junto con las canciones internas
Aquí se explica cómo tocar con las canciones internas.
Para más información acerca de la operación, consulte
“Seleccionar una canción y reproducirla” (p. 172).
Cambiar el tempo
Correspondencia entre el tiempo y la visualización de tempo
Tiempo
Valor de tempo
2/2
=5–250
x/4
=10–500
3/8
=20–999
6/8
9/8
12/8
= 7–333
Acerca de la visualización de las canciones
internas
USr (usuario) … La ubicación donde puede grabar su
interpretación. (Para más información acerca de la grabación, consulte → p. 185)
S.1~S.68 … Canciones internas
S. U … Canción guardada con Song Backup (p. 191)
ESPAÑOL
Si una canción tiene un tempo rápido, puede hacer que el
tempo sea más lento de forma que pueda ensayar más
fácilmente. Es efectivo aumentar gradualmente el tempo a
medida que vaya ensayando.
Si pulsa los botones [–] y [+] simultáneamente, volverá al
tempo básico de la canción (el tempo antes de ser modificado).
ESPAÑOL
Puede hacer que el tempo de reproducción de la canción sea
más lento, o tocar cada mano por separado. Antes de intentar
tocar la canción, escúchela varias veces para tener una idea
general de ella.
Si activa el metrónomo mientras la canción se reproduce,
el metrónomo sonará con el tiempo y el tempo de la canción.
ESPAÑOL
Capítulo 3. Tocar junto con las canciones internas
■ Añadir una claqueta para coincidir con la
temporización (Count-In)
2
1
Primero seleccione la canción que desea reproducir
(p. 172).
1. Pulse el botón [Song/Tempo], y su indicador se
iluminará en verde.
El tempo aparece en la pantalla.
Escuchar un sonido de claqueta antes de empezar a reproducir la canción se denomina “Count-In”.
En el HP107e, si reproduce una canción mientras el metrónomo suena, se escucharán dos compases de claqueta al
principio de la canción.
Mientras suene la claqueta, el compás aparece en la pantalla como “–2” seguido de “–1”.
“Hacer sonar el metrónomo” en la p. 181
ESPAÑOL
Algunas canciones internas tienen tempos que cambian
durante la canción.
Cuando toque con una canción, puede asegurarse de que
el tiempo sea el mismo que el de la canción escuchando la
claqueta antes de que la canción empiece a sonar.
Cada vez que pulse el botón [Song/Tempo], el tempo y el
número de la canción seleccionada (con el prefijo “S.”) se
visualizarán alternativamente.
ESPAÑOL
Mientras se visualice el tempo, el indicador del botón
[Song/Tempo] se iluminará en verde. Mientras se visualice el número de la canción, se iluminará en rojo.
2. Pulse el botón [–] o [+] para ajustar el tempo.
El tempo se puede ajustar en un intervalo de q= 10~500.
También puede cambiar el tempo durante la reproducción.
Si pulsa una vez el botón [+] el tempo incrementará en una
unidad. Si mantiene pulsado el botón el tempo incrementará de forma continua.
ESPAÑOL
Si pulsa una vez el botón [–] el tempo disminuirá en una
unidad. Si mantiene pulsado el botón, el tempo cambiará
continuamente (más lento).
183
HP107_e.book Page 184 Tuesday, October 19, 2004 10:41 PM
HP107e – Capítulo 3. Tocar junto con las canciones internas
Tocar cada mano por
separado
Reproducir una canción
2. Pulse el botón [Play], de forma que su indicador se
ilumine.
Las canciones internas le permiten seleccionar la parte de la
interpretación que se reproducirá.
La canción empezará a reproducirse. La parte seleccionada en el paso 1 no sonará.
La interpretación de las canciones internas con la mano
izquierda se asigna al botón [Left], mientras que la interpretación con la mano derecha se asigna al botón [Right]. El
lugar donde se almacena cada parte de la interpretación se
denomina “pista”, y los botones [Left] y [Right] se denominan “botones de pista”.
Ensaye la interpretación de la mano derecha junto con la
interpretación de la mano izquierda.
Botones de pista
Mano
izquierda
Mano derecha
Left
Right
A continuación se muestra cómo interpretar con cada mano
por separado en la canción.
2, 3 1
Primero seleccione la canción que desea reproducir
(p. 172).
Seleccione la parte que desee reproducir
1. Pulse el botón [Left] o [Right].
El indicador del botón que ha pulsado se apagará, y el
sonido de la parte seleccionada no se oirá más.
Por ejemplo, si desea ensayar con la mano derecha, pulse
el botón [Right] y el indicador se apagará. Cuando toque
la canción, la interpretación de la mano derecha no sonará.
184
Vuelva a pulsar el botón seleccionado en el paso 1. Se iluminará el indicador del botón, y se oirá de nuevo el sonido.
Incluso durante la reproducción de la canción, puede pulsar los botones de pista para enmudecer o desenmudecer
el sonido.
Detener la canción
3. Pulse el botón [Play], de forma que su indicador se
apague.
Se detendrá la canción.
HP107_e.book Page 185 Tuesday, October 19, 2004 10:41 PM
Capítulo 4. Grabar su interpretación
ESPAÑOL
Capítulo 4. Grabar su interpretación
Puede grabar fácilmente sus interpretaciones.
Puede reproducir una interpretación grabada para escuchar
su propia forma de tocar, o para añadir partes adicionales.
• Grabar sólo su propia interpretación de teclado (→
“Grabar una canción nueva”, p. 185)
• Grabar junto con una canción interna (→ “Grabar junto
con una canción”, p. 186)
• Grabar cada mano por separado (→ “Seleccionar y grabar la pista para cada mano por separado”, p. 187)
Notas acerca de la grabación
Función
Pista izquierda
Pista derecha
Layer
Sonido superpuesto
Sonido original (sonido de
piano)
Octave
Sonido Layer (una octava
superior)
Sonido original
* Al utilizar el método B o C anterior para superponer una grabación a una canción, pulse los botones [Left] y [Right] antes
de grabar, de forma que los botones parpadeen.
ESPAÑOL
Puede realizar los siguientes tipos de grabación utilizando el
HP107e.
C. Grabar mientras las funciones “Layer” o “Octave” están
asignadas al pedal central
Grabar una canción nueva
• Sólo se puede grabar una canción.
Si observa lo siguiente…
3
2 1 4 6,8 5,7
El HP107e incluye la “función Song Backup” (p. 191),
que le permite guardar la canción grabada con el HP107e
en el mismo instrumento.
Ajustes de grabación (seleccione “USr”)
1. Pulse el botón [Song/Tempo], y su indicador se
iluminará en rojo.
ESPAÑOL
Si intenta seleccionar una canción cuando ya se ha grabado otra interpretación, aparecerá lo siguiente en la pantalla y el indicador del botón [Record] parpadeará.
Aquí se graba sólo la interpretación del teclado sin interpretar junto a una canción interna.
ESPAÑOL
• El HP107e incluye la “función Song Backup” (p. 191),
que le permite guardar la canción grabada con el
HP107e en el mismo instrumento. La interpretación
grabada de la cual no se haya realizado ninguna copia
de seguridad en Song Backup se perderá al desactivar
la potencia. Asegúrese de utilizar Song Backup para
cualquier interpretación que desee conservar. Puede
grabarla en un dispositivo de audio externo o utilizar
un dispositivo MIDI externo para guardar la información de interpretación en un disquete. Para más información, consulte el “Capítulo 6. Conectar dispositivos
externos” (p. 193).
Aparecerá el número de canción en la pantalla.
Si desea eliminar la interpretación, pulse el botón [Rec].
Si no desea eliminar la interpretación, pulse el botón
[Play].
Acerca de las pistas grabadas
2. Pulse los botones [–] y [+] simultáneamente, y aparecerá “USr” en la pantalla.
Especificar el sonido y el tempo para la
grabación
3. Seleccione el sonido que desea reproducir (p. 174).
Si no hay información grabada en las pistas derecha e
izquierda, entonces la información se graba en la pista
derecha. Si hay información grabada en alguna de las pistas derecha o izquierda, entonces la información se grabará en la pista vacía.
4. Si fuera necesario, active el metrónomo.
B. Grabar utilizando las funciones Dual, Acoustic Layering o
Split
Pista izquierda
Pista derecha
Dual
Sonido del botón de sonido
derecho
Sonido del botón de sonido
izquierdo
Acoustic Layering
Sonido superpuesto
Sonido original (sonido de
piano)
Split
Sonido (del teclado)
izquierdo
Sonido (del teclado) derecho
5. Pulse el botón [Rec].
Se iluminará el indicador del botón [Rec], parpadeará el
indicador del botón [Play], y pasará al modo recordingstandby.
185
ESPAÑOL
Función
Haga sonar el metrónomo mientras ajusta el tempo y el
tiempo de la canción (p. 181).
Nota Si superpone una interpretación nueva sin eliminar la
canción grabada, el tempo y el tiempo de la canción se
almacenarán con los ajustes que se grabaron primero.
ESPAÑOL
A. Grabar sin especificar la pista a grabar
HP107_e.book Page 186 Tuesday, October 19, 2004 10:41 PM
HP107e – Capítulo 4. Grabar su interpretación
Iniciar la grabación
6. La grabación se iniciará cuando pulse el botón
[Play] o cuando toque el teclado.
Se reproducen dos compases del sonido de claqueta y
empieza la grabación.
Tenga en cuenta que la grabación también se iniciará
cuando toque algo en el teclado, incluso si no pulsa el
botón [Play]. Al empezar así, no se reproduce sonido de
claqueta.
Cuando se inicie la grabación, se iluminarán los indicadores del botón [Play] y del botón [Rec].
Adelante e interprete en el teclado.
Grabar junto con una
canción
Puede grabar una interpretación que toque con una canción interna.
El HP107e incluye la “función Song Backup” (p. 191),
que le permite guardar la canción grabada con el HP107e
en el mismo instrumento.
Con los botones [Left] o [Right], puede (por ejemplo) interpretar y grabar sólo la parte de la mano derecha de una
canción mientras escucha la reproducción de la mano
izquierda de una canción interna.
Detener la grabación
7. Pulse el botón [Play] o [Rec].
La grabación se detendrá, y los indicadores de los botones
[Play] y [Rec] se apagarán.
Acerca de la pantalla “USr”
Cuando detenga la grabación, la pantalla “
”
cambiará a “
”.
El “.” en la parte inferior derecha de la pantalla indica
que ya existe una interpretación grabada.
Reproducir la interpretación grabada
8. Pulse el botón [Play].
Oirá la interpretación grabada.
Vuelva a pulsar el botón [Play] y la reproducción se detendrá.
Si graba sin especificar la pista de grabación, la interpretación se grabará en el botón [Right].
Si desea grabar las manos izquierda y derecha en pistas
de grabación separadas, consulte la sección “Seleccionar
y grabar la pista para cada mano por separado” (p. 187).
2 1 3 6,8 4,7 5
Seleccionar la canción para grabar
1. Pulse el botón [Song/Tempo], y su indicador se
iluminará en rojo.
La pantalla indicará el número de canción.
2. Utilice el botón [–] o [+] para seleccionar la canción
que desee reproducir.
3. Si fuera necesario, ajuste el metrónomo y el tempo
(p. 181).
4. Pulse el botón [Rec].
Se iluminará el indicador del botón [Rec].
Seleccionar la pista para grabar
5. Pulse el botón [Left] o [Right].
Cuando desee grabar la interpretación de la mano
izquierda, pulse el botón [Left]; para grabar la de la mano
derecha, pulse el botón [Right].
Los indicadores del botón que pulsó y del botón [Play]
parpadearán, y el HP107e entra en el modo recordingstandby.
Si aparece “dEL” en la pantalla, consulte la p. 185.
Empezar a grabar
6. Pulse el botón [Play].
La grabación se inicia después de dos compases de sonido
de claqueta.
Toque junto con la canción.
Detener la grabación
7. Pulse el botón [Play] o [Rec].
La grabación se detendrá, y los indicadores de los botones
[Play] y [Rec] se apagarán.
La interpretación grabada se almacena en “USr (User)”.
Reproducir la interpretación grabada
8. Pulse el botón [Play].
186
HP107_e.book Page 187 Tuesday, October 19, 2004 10:41 PM
Capítulo 4. Grabar su interpretación
Vuelva a pulsar el botón [Play] y la reproducción se detendrá.
Seleccionar y grabar la pista
para cada mano por separado
Si desea rehacer la grabación, puede volver a grabar una
pista específica.
Detener la grabación
5. Pulse el botón [Play] o [Rec].
La grabación se detendrá, y los indicadores de los botones
[Play] y [Rec] se apagarán.
Su interpretación se ha grabado en el botón de la pista
especificada.
Si desea grabar en la otra pista, vuelva al paso 2 para volver a grabar su interpretación. Puede grabar mientras
escucha la interpretación grabada anteriormente.
Reproducir la interpretación grabada
ESPAÑOL
El grabador del HP107e tiene dos pistas de grabación, y le
permite grabar las manos derecha e izquierda por separado. Utilice el botón [Left] o [Right] para especificar la
pista de grabación.
El HP107e incluye la “función Song Backup” (p. 191),
que le permite guardar la canción grabada con el HP107e
en el mismo instrumento.
Tenga en cuenta que la grabación también se iniciará
cuando toque algo en el teclado, incluso si no pulsa el
botón [Play]. Al empezar así, no se reproduce sonido de
claqueta.
ESPAÑOL
Oirá la interpretación grabada.
6. Pulse el botón [Play].
Oirá la interpretación grabada.
Pulse de nuevo el botón [Play] y la reproducción se detendrá.
Nota
Si graba material adicional sin eliminar la canción grabada, el tempo de la canción, el tiempo, y los ajustes de
metrónomo de la grabación original también se utilizarán para el material nuevo.
1. Si fuera necesario, active el metrónomo (p. 181).
2. Pulse el botón [Rec].
■ Eliminar una interpretación desde la pista
especificada
Puede seleccionar una pista grabada y eliminarla.
Mantenga pulsado el botón [Left] o [Right] y pulse
el botón [Rec].
El indicador del botón que pulsó se apagará, y la interpretación de la pista seleccionada se eliminará.
■ Eliminar una canción
Puede eliminar una canción que haya grabado.
Mantenga pulsado el botón [Song/Tempo] y pulse
el botón [Rec].
Aparecerá la siguiente pantalla y el indicador del botón
[Rec] parpadeará.
Los indicadores de los botones de pistas que ya se hayan
grabado se iluminarán.
El botón de la pista para la que grabará a continuación parpadeará.
3. Pulse el botón [Left] o [Right] para desactivar el
botón de la pista que no desea grabar.
Los botones de la pista le permiten grabar en el botón
[Left] o [Right], uno cada vez.
Si finalmente no desea eliminar la interpretación, pulse el
botón [Play] o [Song/Tempo].
ESPAÑOL
Se iluminará el indicador del botón [Rec], parpadeará el
indicador del botón [Play], y pasará al modo recordingstandby.
Puede eliminar una interpretación grabada.
ESPAÑOL
Al grabar una nueva canción, primero siga las instrucciones de los pasos 1 y 2 de la sección “Grabar una canción
nueva” (p. 185) para seleccionar “USr”. Al superponer
grabaciones con canciones internas o con canciones de las
cuales se ha realizado una copia de seguridad, seleccione
la canción interna o guardada tal como se describe en los
pasos 1 y 2 de la sección “Seleccionar una canción y reproducirla” (p. 172).
ESPAÑOL
1 4,6 2,5 3
Eliminar interpretaciones
grabadas
7. Vuelva a pulsar el botón [Rec].
Se eliminará la interpretación grabada.
ESPAÑOL
Iniciar la grabación
4. Pulse el botón [Play].
Se reproducen dos compases del sonido de claqueta y
empieza la grabación. Adelante e interprete en el teclado.
187
HP107_e.book Page 188 Tuesday, October 19, 2004 10:41 PM
HP107e – Capítulo 5. Cambiar distintos ajustes
Capítulo 5. Cambiar distintos ajustes
Realizar ajustes detallados
(Función)
Puede definir ajustes relacionados con la interpretación,
como la afinación y el temperamento.
Cómo entrar en el modo de funciones
1. Pulse los botones [Split] y [Chorus] simultáneamente.
El HP107e pasa al modo de ajustes. Los indicadores de
los botones [Split] y [Chorus] y el botón en el que se
asigna la función empiezan a parpadear.
Botón
Función
Página
Canal de envío MIDI
Piano Resonance
[Strings]
p. 195
Ajuste del controlador USB
Piano Resonance
[Damper]
p. 192
Memory Backup
[Metronome/
Count In]
p. 191
Song Backup
Ajustar las distintas funciones
p. 191
[Song/Tempo]
2. Pulse el botón al que se asigna la función deseada.
Los indicadores del botón pulsado, el botón [Split] y el
botón [Chorus] parpadearán.
El nombre de la función asignada al botón aparece en la
pantalla mientras se mantenga pulsado el botón.
Botón
Función
V-LINK
Transmitir una interpretación grabada
Página
Master Tuning
p. 192
[Right]
[Left]
p. 195
p. 188
[Piano]
Modo Grand Space
Temperamento
p. 190
[Grand Space]
p. 189
[E. Piano]
Restablecer los ajustes originales
Estiramiento de la afinación
p. 189
[Harpsichord]
p. 190
3. Pulse los botones [–] o [+] para cambiar el valor.
Si pulsa los botones [–] y [+] simultáneamente se restablecerán los valores por defecto.
Aplicar el pedal damper a la zona
del teclado de la mano izquierda
Cómo salir del modo de funciones
p. 190
[Strings]
p. 191
Para detalles sobre cada función, consulte las explicaciones siguientes.
Octave Shift
[Organ]
Key Touch
[Touch]
4. Pulse el botón [Split] o [Chorus].
El indicador del botón volverá a su estado anterior.
Local Control
Piano Resonance
[Key Off]
188
p. 195
■ Sintonizar con la afinación de otros instrumentos (Master Tuning)
En situaciones como cuando toque junto con otros instrumentos, puede sintonizar la afinación estándar del
HP107e con la afinación de otro instrumento. La afinación
estándar normalmente se refiere a la afinación de la nota
HP107_e.book Page 189 Tuesday, October 19, 2004 10:41 PM
Capítulo 5. Cambiar distintos ajustes
Si pulsa el botón [Piano] en el paso 2 of “Realizar ajustes
detallados (Función)” (p. 188), aparecerá una pantalla
como la siguiente.
Ajustes originales440.0Hz
* Puede guardar este ajuste en la memoria del HP107e con la
función Memory Backup (p. 191).
■ Cambiar el temperamento
Hoy en día, las composiciones se crean generalmente
teniendo en mente un temperamento equal y se reproducen utilizando un temperamento equal. Sin embargo, en
las épocas pasadas de la música clásica, se utilizaban distintos temperamentos. Tocar una composición con su afinación original le permite disfrutar de la sonoridad de los
acordes que pretendía el compositor originalmente.
Si pulsa el botón [E.Piano] en el paso 2 of “Realizar ajustes detallados (Función)” (p. 188), aparecerá una pantalla
como la siguiente.
Características
3
Just Minor
Las afinaciones Just difieren de los tonos
mayor y menor. Puede obtener el mismo
efecto con la escala menor que con la escala
mayor.
4
Arabic
Esta afinación es recomendable para la
música de Arabia.
Kirnberger
Se trata de una mejora de las afinaciones
Mean Tone y Just que proporciona un alto
grado de libertad de modulación. Las interpretaciones son posibles en todos los tonos
(III).
Tonic
Si interpreta con una afinación distinta a un temperamento equal, deberá especificar la nota tónica para afinar
la canción que se debe interpretar (es decir, la nota que
corresponde a C para un tono mayor, o a A para un tono
menor).
Manteniendo pulsado el botón [E. Piano] pulse una nota
para especificar la tecla tónica deseada.
La nota tónica que especifique se visualizará de la forma
siguiente.
Pantalla
C
C
d
E_
E
F
F
G
A_ A
b_
b
Nombre
de letra
C
C
D
E
E
F
F
G
A
B
B
A
Si selecciona un temperamento equal, no es necesario
seleccionar una nota tónica.
* Si graba con un temperamento distinto al temperamento equal
seleccionado, y luego desea reproducir esta interpretación, utilice este ajuste para seleccionar el mismo temperamento para la
reproducción como el temperamento que utilizó cuando grabó.
* Si interpreta junto con otros instrumentos, tenga en cuenta
que según la tecla, puede haber algún cambio en la afinación.
Sintonice el HP107e a la afinación fundamental de los otros
instrumentos.
* Puede guardar este ajuste en la memoria del HP107e con la
función Memory Backup (p. 191).
■ Ajustar la Curva de afinación (Stretch Tuning)
Un piano generalmente se sintoniza a una afinación con
una gama de graves inferior y una gama de agudos
mayor que el temperamento equal. Este método de sintonización especial para pianos se denomina “Stretch
Tuning”.
Si pulsa el botón [Harpsichord] en el paso 2 of “Realizar
ajustes detallados (Función)” (p. 188), aparecerá una pantalla como la siguiente.
OFF
Ésta es la curva de afinación estándar. Es la
opción correcta cuando utilice una interpretación
Dual (p. 179) o cuando toque junto con otros instrumentos.
189
ESPAÑOL
Just Major
Esta afinación elimina las ambigüedades
entre las quintas y las terceras. No es adecuado para interpretar melodías y no se
puede transponer, pero es capaz de realizar
bellas sonoridades.
5
Este temperamento combina las afinaciones
Mean Tone y Pythagorean. Las interpretaciones son posibles en todos los tonos (primera técnica, III).
ESPAÑOL
Equal
En esta afinación, cada octava se divide en
doce pasos iguales. Cada intervalo produce
la misma cantidad de ligera disonancia.
2
8
Werckmeister
ESPAÑOL
Tonic
Puede elegir entre los ocho temperamentos que se describen a continuación.
1
7
Esta afinación, creada por el filósofo Pitágoras, elimina la disonancia en las cuartas y las
Pythagorean quintas. La disonancia se produce con acordes de intervalos de tercios, pero las
melodías son eufónicas.
ESPAÑOL
Puede reproducir estilos clásicos como el barroco utilizando los temperamentos históricos (métodos de afinación).
Temperamento
Esta escala se compromete con la entonación just, permitiendo la transposición con
otros tonos.
Mean Tone
Ajustes originales1 C
Este ajuste sigue siendo efectivo hasta que desactiva la
unidad.
Temperamento
Características
6
415.3Hz~440.0Hz~466.2Hz
Valor
Pantalla
Temperamento
ESPAÑOL
Los últimos tres dígitos se indican en la pantalla.
“440.0Hz” se indica en la figura anterior.
Pantalla
ESPAÑOL
que suena al tocar la tecla A central. Esta sincronización
de todos los instrumentos a la afinación estándar se denomina “tuning”.
HP107_e.book Page 190 Tuesday, October 19, 2004 10:41 PM
HP107e – Capítulo 5. Cambiar distintos ajustes
On
Esta curva de afinación expande en cierta medida
los finales de graves y agudos. Es adecuada para
interpretaciones como solos de piano.
Ajustes originalesOn
* Este efecto sólo funciona con los sonidos de piano.
* Puede guardar este ajuste en la memoria del HP107e con la
función Memory Backup (p. 191).
■ Cambiar cómo se aplica Grand Space (Modo
Grand Space)
Si pulsa el botón [Grand Space] en el paso 2 of “Realizar
ajustes detallados (Función)” (p. 188), aparecerá una pantalla como la siguiente.
■ Cambiar la afinación por octavas (Octave
Shift)
Puede cambiar la afinación del sonido de la izquierda en
Split Play (p. 180), la afinación del sonido derecho en
Dual Play (p. 179) y el sonido de Layer en Acoustic Layering Play (p. 178) en incrementos de octavas. Esta función
se denomina “Octave Shift”.
Si pulsa el botón [Organ] en el paso 2 of “Realizar ajustes
detallados (Función)” (p. 188), aparecerá una pantalla
como la siguiente.
Puede cambiar la afinaciones en un intervalo de menos
dos octavas (–2) a más dos octavas (+2) de la afinación
original.
* Algunos ajustes de Octave Shift pueden producir sonidos que
superen el intervalo recomendado, difíciles de escuchar correctamente o con calidades tonales o afinaciones poco naturales.
■ Aplicar el pedal damper a la zona del
teclado de la mano izquierda
Cuando utilice interpretación Split (p. 180), puede aplicar el efecto de pedal damper al sonido tocado por el
intervalo de teclado de la mano izquierda.
Si pulsa el botón [String] en el paso 2 of “Realizar ajustes
detallados (Función)” (p. 188), aparecerá una pantalla
como la siguiente.
Ajuste
Descripciones
1
Cuando se conectan los auriculares, el efecto de profundidad se optimiza para los auriculares y cunado
no están conectados, se aplica la optimización para
los altavoces.
2
Se utiliza la profundidad óptima para los altavoces,
independientemente de que los auriculares estén o
no estén conectados.
Grand Space también se aplica a la salida del sonido
desde los conectores Output, lo que es muy práctico
si desea interpretar a través de los altavoces conectados a los conectores Output.
3
Se utiliza la profundidad óptima para los auriculares, independientemente de que los auriculares
estén o no estén conectados.
* Puede guardar este ajuste en la memoria del HP107e con la
función Memory Backup (p. 191).
Desactivarlo todo excepto el
piano (Panel Lock)
La función “Panel Lock” bloquea el HP107e en un estado en
el cual sólo se puede utilizar la interpretación de piano, y
todos los botones se desactivarán. Esto evita que se modifiquen los ajustes sin querer, incluso si hay niños que toquen
los botones por accidente.
En el estado Panel Lock, sólo se puede interpretar el sonido
de piano de cola.
1. Baje el volumen al mínimo, y pulse el conmutador
[Power On] para desactivar el equipo.
On
OFF
El efecto del pedal damper se aplicará al sonido
del área de la mano izquierda y derecha del
teclado.
El efecto del pedal damper no se aplicará al
sonido del área de la mano izquierda del teclado.
2. Mantenga pulsado el botón [Piano] y pulse el conmutador [Power On] para activar el equipo.
Después, mantenga pulsados estos dos botones durante
unos segundos.
Aparecerá la siguiente pantalla.
Ajustes originalesOFF
* Puede guardar este ajuste en la memoria del HP107e con la
función Memory Backup (p. 191).
Todos los botones se desactivan.
Ajuste el volumen.
Cuando toque el teclado, se oirá el sonido del piano de
cola.
Para desactivar la función Panel Lock, baje el volumen al
mínimo y vuelva a activar el equipo.
190
HP107_e.book Page 191 Tuesday, October 19, 2004 10:41 PM
Capítulo 5. Cambiar distintos ajustes
Los ajustes guardados en el HP107e pueden recuperar sus
valores originales.
* Las canciones protegidas con el procedimiento Song Backup
(p. 191) no se borran cuando se ejecuta Factory Reset.
1. Mantenga pulsado el botón [Split] y pulse el
botón [Chorus].
El HP107e pasa al modo de ajustes.
Aparece en pantalla lo siguiente.
Guardar canciones
guardadas incluso con la
alimentación desactivada
(Song Backup)
Normalmente, las canciones que haya grabado se borran
cuando desactiva la alimentación del HP107e. Sin embargo,
si lo desea, puede hacer que estas canciones grabadas se
guarden aunque la alimentación esté desactivada. La función
se denomina “Song Backup”.
* No puede utilizar la función Song Backup a no ser que haya
grabado una canción.
1. Mantenga pulsado el botón [Split] y pulse el
botón [Chorus].
ESPAÑOL
2. Pulse el botón Key Touch [Touch].
ESPAÑOL
Recuperar los ajustes
originales
El HP107e pasa al modo de ajustes.
3. Pulse el botón [Rec].
2. Pulse el botón [Song/Tempo].
El indicador del botón parpadea.
Cuando Factory Reset haya terminado, aparecerá lo
siguiente en la pantalla. En este momento, desactive la
alimentación.
Aparece en pantalla lo siguiente.
ESPAÑOL
Se ejecuta Factory Reset.
3. Pulse el botón [Rec].
Se ejecuta Song backup.
* No desactive la alimentación hasta que “End” se visualice en
la pantalla. Si desactiva la alimentación antes de que se visualice podría dañar la memoria interna del HP107e, haciendo que
el instrumento quede inutilizable.
Normalmente, los varios ajustes recuperan sus valores originales cuando se desactiva la fuente de alimentación. No obstante, puede especificar que estos ajustes se conserven
incluso cuando está desactivado. La función se denomina
“Memory Backup”.
* Para más información acerca de los ajustes guardados con
Memory Backup, consulte “Parámetros guardados en Memory
Backup” (p. 197).
* Puede seleccionar y reproducir canciones de las que se hayan
realizado copias de seguridad de la misma forma que con las
canciones integradas (p. 172). Las canciones de las que se haya
realizado una copia de seguridad se indican en la pantalla
como se puede ver a continuación.
ESPAÑOL
Recordar los ajustes incluso
cuando el equipo esté
desactivado (Memory Backup)
Cuando Song Backup termine, la pantalla y los botones
recuperan su aspecto normal.
■ Borrar canciones con copia de seguridad
1. Mantenga pulsado el botón [Split] y pulse el
botón [Chorus].
2. Pulse el botón [Song/Tempo].
Aparece en pantalla lo siguiente.
El HP107e pasa al modo de ajustes.
2. Pulse el botón [Metronome/Count In].
El indicador del botón parpadea.
Aparece en pantalla lo siguiente.
Para cancelar el procedimiento, pulse el botón [Play].
ESPAÑOL
1. Mantenga pulsado el botón [Split] y pulse el
botón [Chorus].
3. Pulse el botón [Rec].
La canción con copia de seguridad se borra.
La pantalla y los botones recuperan su aspecto normal.
3. Pulse el botón [Rec].
ESPAÑOL
Se ejecuta Memory backup.
Cuando Memory Backup termine, la pantalla y los botones recuperan su aspecto normal.
191
HP107_e.book Page 192 Tuesday, October 19, 2004 10:41 PM
HP107e – Capítulo 5. Cambiar distintos ajustes
Utilizar la función V-LINK
Si conecta el HP107e a un dispositivo de imagen compatible
con V-LINK podrá controlar las imágenes con el HP107e.
V-LINK
V-LINK (
) es una prestación creada por Roland
que permite una interpretación enlazada de música y
material visual. Utilizando equipos de vídeo compatibles
con V-LINK, los efectos visuales pueden enlazarse fácilmente, e integrarse en los elementos expresivos de una
interpretación.
Cómo utilizar el V-LINK
Realizar los ajustes para el
controlador USB
Si desea conectarse a un ordenador con el conector USB, debe
realizar el siguiente ajuste antes de realizar la conexión.
1. Mantenga pulsado el botón [Split] y pulse el
botón [Chorus].
El HP107e pasa al modo de ajustes.
2. Pulse el botón Piano Resonance [Damper].
El indicador del botón parpadea.
Aparece en pantalla lo siguiente.
1. Mantenga pulsado el botón [Split] y pulse el
botón [Chorus].
El HP107e pasa al modo de ajustes.
2. Pulse el botón [Right].
El indicador del botón parpadea.
Aparece en pantalla lo siguiente.
OFF
On
Se ha desactivado la función V-LINK.
Se ha activado la función V-LINK. Puede controlar imágenes utilizando las doce teclas del
extremo izquierdo del teclado.
Ajustes originalesOFF
3. Pulse los botones [–] y [+] para activar y desactivar
la función V-LINK.
Puede controlar imágenes utilizando las doce teclas del
extremo izquierdo del teclado.
* Mientras V-LINK esté activado, no se producirá ningún
sonido cuando pulse las doce teclas en el extremo izquierdo del
teclado.
Cómo salir del modo de funciones
4. Pulse el botón [Split] o [Chorus].
El indicador del botón vuelve a su estado original.
192
3. Pulse los botones [–] y [+] para ajustar el controlador.
Indicación
Descripción
vdr (Vendor)
Selecciónelo cuando utilice el controlador
adjunto con una conexión USB.
GEn (Generic)
Selecciónelo cuando utilice un controlador
USB genérico incluido con un SO con una
conexión USB.
Cómo salir del modo de funciones
4. Pulse el botón [Split] o [Chorus].
El indicador del botón vuelve a su estado original.
HP107_e.book Page 193 Tuesday, October 19, 2004 10:41 PM
Capítulo 6. Conectar dispositivos externos
Conectar a un Equipo de
audio
ESPAÑOL
Capítulo 6. Conectar dispositivos externos
Reproducir el sonido de un dispositivo de
audio a través de los altavoces del HP107e
Output R/L (Line Out,
Aux Out)
ESPAÑOL
Puede conectar dispositivos de audio para reproducir el
sonido del HP107e a través de los altavoces de su sistema de
audio, o para grabar su interpretación en un grabador de cintas u otro dispositivo de grabación.
HP107e
Al conectar, utilice un cable de audio con un conector phone
estándar (vendido por separado).
Ejemplos de conexión
* Para evitar un funcionamiento anómalo y/o causar daños en
los altavoces u otros dispositivos, baje el volumen, y desactive
todos los dispositivos antes de realizar ninguna conexión.
Input R/L (Line In,
Aux In)
HP107e
1. Active el dispositivo conectado.
2. Active el HP107e.
3. Ajuste el volumen de cada dispositivo.
* No puede utilizar el HP107e para ajustar el volumen del dispositivo generador de sonido.
Desactivar el equipo.
1. Ajustar el volumen del HP107e y de las unidades
conectadas a la posición mínima.
ESPAÑOL
Reproducir el sonido del HP107e a través
de los altavoces de un sistema de audio/
Grabar la interpretación del HP107e en un
dispositivo de grabación
❍ Utilice el procedimiento siguiente cuando active el equipo.
2. Desactive el HP107e.
3. Desactive los equipos conectados.
❍ Utilice el procedimiento siguiente cuando active el equipo.
1. Active el HP107e.
2. Active el dispositivo conectado.
3. Ajuste el volumen de cada dispositivo.
* Puede ajustar el volumen de un módulo de sonido conectado
con el HP107e.
Cuando grabe interpretaciones del HP107e en un dispositivo de grabación
5. Interpretar en el HP107e.
6. Cuando termina la interpretación, detenga la grabación en el dispositivo conectado.
193
ESPAÑOL
* La conexión del ordenador al HP107e por primera vez requiere
de la instalación del “Controlador USB” (en el CD-ROM
incluido) en el ordenador. Para más información, consulte la
“USB Installation Guide”.
* Sólo la información MIDI se puede transmitir con USB.
* Para evitar un funcionamiento anómalo y/o causar daños en
los altavoces u otros dispositivos, baje el volumen, y desactive
todos los dispositivos antes de realizar ninguna conexión.
* Los cables USB no están incluidos. Si necesita comprarlos,
consulte a su distribuidor Roland.
* Utilice un USB que no sea más largo de 3 metros.
* Active el HP107e antes de iniciar las aplicaciones MIDI en el
ordenador. No active ni desactive el HP107e mientras una
aplicación MIDI se esté ejecutando.
* No conecte ni desconecte el cable USB con el HP107e activado.
* Si no utiliza USB, desconecte el cable USB del HP107e.
* Si durante la transmisión/recepción de información, el ordenador pasa al modo de ahorro de energía o al modo suspender o la
fuente de alimentación se activa o desactiva, el ordenador se
puede colgar o puede que el funcionamiento del HP107e sea
inestable.
ESPAÑOL
4. Empiece a grabar con el dispositivo conectado.
Puede utilizar un conector USB para conectar el HP107e
al ordenador. Para más información, consulte la “USB
Installation Guide”.
ESPAÑOL
Conectar al conector USB
HP107_e.book Page 194 Tuesday, October 19, 2004 10:41 PM
HP107e – Capítulo 6. Conectar dispositivos externos
Conectar dispositivos MIDI
Operar en el HP107e para reproducir un
generador de sonido MIDI
Conectando un dispositivo MIDI externo e intercambiando información de interpretación, puede controlar las
interpretaciones en un dispositivo desde el otro. Por
ejemplo, puede dar salida al sonido desde el otro instrumento o cambiar tonos en el otro instrumento.
THRU
MIDI
OUT
IN
HP107e
■ ¿Qué es MIDI?
MIDI significa Musical Instrument Digital Interface
(Interface Digital para Instrumentos Musicales) y es un
estándar internacional que permite el intercambio de
información de interpretación entre instrumentos musicales electrónicos y ordenadores.
El HP107e proporciona conectores MIDI, que permiten el
intercambio de información de interpretación con dispositivos externos. Cuando se utilizan estos conectores para
conectar el HP107e a dispositivos externos, puede acceder a una gama de posibilidades aún más amplía.
* También está disponible una publicación separada titulada
“MIDI Implementation”. Proporciona detalles completos
acerca de la forma en que se ha aplicado MIDI en este equipo.
En caso de necesitar esta publicación (por ejemplo, si desea realizar programación a nivel de bytes), póngase en contacto con
el Centro Roland más cercano o con un distribuidor Roland
autorizado.
Ejemplos de conexión
* Para evitar un funcionamiento anómalo y/o causar daños en
los altavoces u otros dispositivos, baje el volumen, y desactive
todos los dispositivos antes de realizar ninguna conexión.
Tocar el HP107e desde un secuenciador
MIDI/Grabar una interpretación de HP107e
en un secuenciador MIDI
Series MT
Definir ajustes relacionados
con MIDI
Aquí tiene cómo ajustar el canal de transmisión y otros
ajustes relacionados con MIDI.
Cómo entrar en el modo de funciones
1. Mantenga pulsado el botón [Split] y pulse el
botón [Chorus].
El HP107e pasa al modo de ajustes.
Los indicadores de los botones [Split] y [Chorus] y el
botón en el que se asigna la función empiezan a parpadear.
Ajustar distintas funciones
2. Pulse el botón al que se asigna la función deseada.
Los indicadores del botón pulsado, el botón [Split] y el
botón [Chorus] parpadearán.
Para información acerca de los contenidos de cada función, consulte las siguientes explicaciones.
3. Pulse los botones [–] o [+] para cambiar el valor.
* El MT-90s no dispone de
conector MIDI Out.
Out
Módulo de sonido
MIDI
In
Si pulsa los botones [–] y [+] simultáneamente, el ajuste
volverá a su valor original.
Cómo salir del modo de funciones
HP107e
4. Pulse el botón [Split] o [Chorus].
El indicador del botón volverá a su estado anterior.
* Seleccione Local Off si ha conectado el HP107e a un secuenciador MIDI. Consulte la sección “Activar y desactivar Local
Control” (p. 195). Además ajuste su secuenciador MIDI a
modo MIDI Thru (de forma que los mensajes recibidos en
MIDI IN serán retransmitidos sin cambios desde MIDI OUT).
Para más detalles, consulte el Manual del Usuario de su
secuenciador MIDI.
194
HP107_e.book Page 195 Tuesday, October 19, 2004 10:41 PM
Capítulo 6. Conectar dispositivos externos
MIDI dispone de dieciséis canales MIDI, numerados
como 1~16. Para que se realice la comunicación no basta
con conectar un cable. Los dispositivos conectados se
deben definir para que utilicen los mismos canales MIDI.
De lo contrario, no se producirá ni se podrán seleccionar
sonidos.
No se produce sonido
Generador de sonido
Local Off
* Al conectar un instrumento Roland MT series, no es necesario
cambiar el ajuste Local Off. Las unidades MT transmiten mensajes Local Off al ser activadas. Si activa el equipo en el orden
HP107e → serie MT, se seleccionará automáticamente Local
Off.
Si pulsa el botón Piano Resonance [Key Off] en el paso
2 of “Definir ajustes relacionados con MIDI”, aparecerá
una pantalla como la siguiente.
ESPAÑOL
* El HP107e recibe todos los canales 1~16.
* Si lo utiliza el HP107e en modo Dual (p. 179) o en modo Split
(p. 180), la mano izquierda de la interpretación se transmite en
el canal 5 en modo Dual y en el canal 3 en modo Split. Estos
ajustes de canal de transmisión MIDI son fijos y no se pueden
cambiar. Cuando conecte un dispositivo externo MIDI mientras utilice los modos Dual o Split, utilice canales diferentes a
3 y 5 para el dispositivo MIDI.
Si pulsa el botón Piano Resonance [String] en el paso 2
of “Definir ajustes relacionados con MIDI”, aparecerá una
pantalla como la siguiente.
Local Control OFF El teclado y el generador de sonido
interno no están enlazados. Al tocar el teclado no se
reproducirá ningún sonido.
ESPAÑOL
■ Ajustes del canal de envío MIDI
1~16
Valor
On, OFF
Ajustes originalesOn
■ Activar y desactivar Local Control
Al conectar un secuenciador MIDI, ajuste el Control local
en “OFF”.
Si desea transmitir una interpretación grabada en el
HP107e a un dispositivo MIDI externo o a un ordenador,
seleccione “On” para este ajuste. Si está en “OFF”, la
información no se transmitirá.
Si pulsa el botón [Left] en el paso 2 of “Definir ajustes
relacionados con MIDI”, aparecerá una pantalla como la
siguiente.
ESPAÑOL
Tal como aparece en la ilustración, la información que
describe lo que se ha tocado en el teclado pasa al generador de sonido interno por dos rutas distintas, (1) y (2).
Como resultado, escuchará sonidos superpuestos o intermitentes. Para evitar que esto ocurra, se debe separar la
ruta (1), ajustando la unidad a lo que se conoce como
“Local Off”.
■ Transmitir una interpretación grabada
(1) Local On
Secuenciador
MIDI
IN
Generador de
sonido
MIDI
OUT
Valor
Memoria
MIDI
OUT
MIDI
IN
(2) Función Thru activada
Cada nota se reproduce dos veces
Produce sonido
On, OFF
Ajustes originalesOFF
Si desea guardar la interpretación que haya grabado en el
HP107e, siga este procedimiento. En esta situación, su
secuenciador externo está ajustado para que su función
MIDI Thru esté en OFF. Para más detalles, consulte el
Manual del Usuario de su secuenciador MIDI.
Conecte un secuenciador MIDI como uno de la serie MT
(p. 194).
Grabe la interpretación en el HP107e (p. 185).
Generador de sonido
Local On
Seleccione “On” para este ajuste.
ESPAÑOL
Local Control ON El teclado y el generador de sonido
interno están enlazados.
ESPAÑOL
Valor
Ajustes originales1
Empiece grabando con el secuenciador MIDI conectado.
Inicie la reproducción de la canción grabada en el
HP107e.
Cuando termine la reproducción, detenga la grabación
con el secuenciador MIDI conectado.
Utilice un secuenciador MIDI conectado para guardar la
información en un disquete u otro soporte.
ESPAÑOL
195
HP107_e.book Page 196 Tuesday, October 19, 2004 10:41 PM
HP107e – Solucionar Problemas
Solucionar Problemas
Si percibe algún tipo de problema, primero lea esta sección.
El equipo no se activa
¿El cable de alimentación está correctamente conectado (p. 169)?
El botón no funciona
¿El panel está bloqueado (p. 190)?
Desactive el equipo, luego vuélvalo a activar.
No se oye ningún sonido.
¿El nivel de volumen del HP107e está completamente bajado (p. 171)?
¿Están conectados los auriculares (p. 170)?
¿Hay algún conector en el jack Phones?
Cuando los auriculares están conectados, el altavoz del teclado detiene la
reproducción.
¿Está Local Off seleccionado?
Cuando Local Control está ajustado a OFF, no se produce ningún sonido
tocando el teclado. Ajuste Local Control a “ON” (p. 195).
¿Está V-LINK activado?
Mientras V-LINK esté activado, no se producirá ningún sonido cuando
pulse las doce teclas en el extremo izquierdo del teclado.
No se oye ningún sonido (cuando un instrumento MIDI está conectado)
¿Se han activado todos los dispositivos?
¿Los cables MIDI están correctamente conectados?
¿El canal MIDI coincide con el instrumento (p. 195)?
Los sonidos se oyen dos veces (doblados) cuando se toca el teclado
¿El HP107e está en interpretación Dual (p. 179)?
Cuando el HP107e está conectado a un secuenciador externo, ajústelo al
modo Local OFF (p. 195).
Como alternativa, el secuenciador se podría ajustar de forma que su función MIDI Thru esté en OFF.
El sonido no cambia
¿El panel está bloqueado (p. 190)?
Desactive el equipo, luego vuélvalo a activar.
¿Los indicadores de los botones [Split] y [Chorus] parpadean?
El ajuste de las funciones está en progreso. Pulse el botón [Split] o [Chorus] para salir del modo de función (p. 188, p. 194).
No suenan todas las notas tocadas
El número máximo de notas que el HP107e puede tocar simultáneamente
es de 128.
La utilización frecuente del pedal damper al interpretar junto con una
canción puede provocar una información de interpretación con demasiadas notas, provocando que caigan algunas notas.
La sintonización o afinación del teclado o de la canción está desactivada
¿Ha ajustado Transpose (p. 178)?
¿Los ajustes para “Temperament” y “Stretch Tuning” son correctos
(p. 189)?
¿El ajuste para “Afinación Master” es correcto (p. 188)?
La canción no se reproduce/Sólo el sonido de un instrumento particular en una canción no suena
¿El indicador de los botones de pista (botones [Left] y [Right]) se ha apagado (p. 184)?
Si el indicador del botón está apagado, la música de esa pista no se oirá.
Pulse el botón de pista para que el indicador esté iluminado.
No puede grabar
¿Ha seleccionado los botones de pista para grabación (p. 185~p. 187)?
El tempo de la canción grabada o el metrónomo está desactivado
Si selecciona una canción interna en la que el tempo cambie durante la
canción, y luego graba, el tempo cambiará de la misma forma para las
interpretaciones. El tempo del metrónomo también cambiará de la
misma forma.
Si graba material adicional sin eliminar los sonidos grabados previamente, la canción se grabará con el tempo grabado inicialmente. Elimine
la canción grabada previamente antes de volver a grabar (p. 187).
196
La interpretación grabada ha desaparecido
La interpretación grabada de la cual no se haya realizado ninguna copia
de seguridad en Song Backup se perderá al desactivar la potencia. No se
puede restaurar una interpretación una vez que se ha eliminado.
El HP107e incluye la “función Song Backup” (p. 191), que le permite
guardar una canción grabada con el HP107e en el mismo instrumento.
Utilice la función Song Backup para guardar cualquier interpretación
que no desee eliminar en el HP107e.
Pulsar un pedal no tiene efecto, o el efecto del pedal no se detiene
¿El pedal está conectado correctamente?
Asegúrese de que el cable del pedal que se extiende desde el soporte está
conectado con seguridad al jack del pedal de la parte posterior del equipo
(p. 169).
El pedal vibra
Coloque el ajustador de debajo del pedal de forma que éste presione firmemente la superficie del suelo (p. 171).
La reverberación se puede oír incluso con Reverb desactivado
Puesto que los sonidos de piano del HP107e reproducen de forma precisa
la profundidad y reverberación del piano acústico original, es posible
que la reverberación se oiga aunque las funciones Key Off y Grand Space
estén desactivadas.
Si desea eliminar la reverberación, desactive la función Key Off (p. 174)
y Grand Space (p. 176~176).
En la gama superior, el sonido cambia de forma abrupta a partir de
ciertas teclas
En un piano acústico, las notas de la octava y media superior del teclado
continúan sonando hasta que caen de forma natural, independientemente del pedal damper. También existe una diferencia en el timbre. Los
pianos Roland simulan fielmente las características del piano acústico.
En el HP107e, el intervalo no afectado por el pedal damper cambiará
dependiendo del ajuste de Key Transpose.
Se produce un pitido muy agudo
Al escuchar con auriculares:
Algunos de los sonidos de piano más llamativos y efervescentes disponen de muchos componentes de gama alta, que pueden provocar que
parezca que el sonido tenga una reverberación metálica añadida. Puesto
que esta reverberación pasa a ser particularmente notable si se complementa con una reverberación fuerte, quizás pueda atenuar el problema
reduciendo la cantidad de reverberación aplicada al sonido.
Al escuchar con altavoces: Aquí, la causa puede ser distinta (como por
ejemplo, una resonancia generada por el HP107e). Consulte con su distribuidor Roland o con el Centro de Servicio Roland más cercano.
La gama de bajos sueña extraña, o hay una resonancia de vibración
Al escuchar con altavoces: Si interpreta a volúmenes altos puede causar
que los instrumentos situados cerca del HP107e resuenen. La resonancia
también puede producirse con fluorescentes, puertas de cristal, y otros
objetos. En particular, este problema se produce con más frecuencia
cuando aumenta el componente de bajo, y al tocar el sonido a volúmenes
más altos. Utilice las siguientes medidas para suprimir dicha resonancia.
• Coloque los altavoces de forma que queden a 10~15cm de las paredes
y otras superficies.
• Reduzca el volumen.
• Separe los altavoces de cualquier objeto que pueda causar resonancias.
Al escuchar con auriculares:
Aquí, la causa puede ser distinta. Consulte con su distribuidor Roland o
con el Centro de Servicio Roland más cercano.
El nivel de volumen del instrumento conectado a los jacks Input es
demasiado bajo
¿Es posible que utilice un cable de conexión que contiene una resistencia?
Utilice un cable de conexión que no contenga resistencias.
HP107_e.book Page 197 Tuesday, October 19, 2004 10:41 PM
Solucionar Problemas
ESPAÑOL
Mensajes de error/Otros mensajes
Pantalla
Significado
Canción de usuario. Almacena interpretaciones grabadas (p. 185).
Usr.
El “.” en la pantalla indica que ya existe material de interpretación grabado (p. 185).
S.1~68
Número de canción interna (p. 172).
S. U
Se trata de una canción guardada con la función Song Backup (p. 191).
PU
Esto aparece cuando se reproduce una canción con una pastilla (una canción que no se inicia en el primer
tiempo).
dEL
Esto aparece si intenta borrar una canción grabada (p. 185, p. 187, p. 191).
E.32
La cantidad de información de interpretación es demasiado grande, por lo que ya no puede grabarse más.
E.41
Se ha producido un problema, como un cable MIDI flojo. Compruebe que los cables MIDI estén conectados
correctamente.
_._._.
La función V-LINK está activada (p. 192).
ESPAÑOL
USr
* Los mensajes de error se indican mediante una “E.” antes del número. Pulse cualquier botón, y podrá cancelar el mensaje de error.
Resonancia de las cuerdas (Activada/Desactivada, Profundidad)
p. 174
Resonancia damper (Activada/Desactivada, Profundidad)
p. 175
Tacto del teclado
p. 175
Respuesta de martillo
p. 175
Temperamento (Temperamento, Tónica)
p. 189
Estiramiento de la afinación
p. 189
Grand Space (Activada/Desactivada, Profundidad)
p. 176,
p. 176
Dynamic Emphasis (Activada/Desactivada, Profundidad)
p. 177
Master Tuning
p. 188
Reverberación (Activada/Desactivada, Profundidad)
p. 177
Ajuste del controlador USB
p. 192
Aplicar el pedal damper a la zona del teclado de la mano
izquierda
p. 190
Modo Grand Space
p. 190
Punto de división
p. 180
Balance dual, balance superpuesto
p. 179,
p. 179
ESPAÑOL
Otros ajustes
p. 174
ESPAÑOL
Ajustes relacionados con el sonido de
piano en efecto al activar la potencia
Resonancia Key Off (Activada/Desactivada, Volumen)
ESPAÑOL
Parámetros guardados en Memory Backup
ESPAÑOL
197
HP107_e.book Page 198 Tuesday, October 19, 2004 10:41 PM
HP107e – Lista de funcionamiento fácil
Lista de funcionamiento fácil
11
7
10 9
8
4
Nº
1
2
3
6
5
4
5
6
1
7
8
Si quiere
3
10
9
11
12 13
14
2
Botones
Página
Pulse los botones [Split] y [Chorus] simultáneamente y pulse el botón [●].
1
Local Control
[Split] + [Chorus] → Piano Resonance [Key Off]
p. 195
2
Ajustes del canal de envío MIDI
[Split] + [Chorus] → Piano Resonance [String]
p. 195
3
Ajuste del controlador USB
[Split] + [Chorus] → Piano Resonance [Damper]
p. 192
4
Modo Grand Space
[Split] + [Chorus] → [Grand Space]
p. 190
5
Master Tuning
[Split] + [Chorus] → [Piano]
p. 188
6
Seleccionar un temperamento
Especificar el tono de tecla
[Split] + [Chorus] → [E. Piano]→
[E. Piano] + tecla
p. 189
7
Estiramiento de la afinación
[Split] + [Chorus] → [Harpsichord]
p. 189
8
Octave Shift
[Split] + [Chorus] → [Organ]
p. 190
9
Aplicar el pedal damper a la zona del teclado de la mano izquierda
[Split] + [Chorus] → [Strings]
p. 190
10
Song Backup
[Split] + [Chorus] → [Song/Tempo]
p. 191
11
Memory Backup
[Split] + [Chorus] → [Metronome/Count In]
p. 191
12
Transmitir una interpretación grabada
[Split] + [Chorus] → [Left]
p. 195
13
V-LINK
[Split] + [Chorus] → [Right]
p. 192
14
Restablecer los ajustes originales
[Split] + [Chorus] → Key Touch [Touch]
p. 191
Mantenga pulsado el botón [
] y pulse el botón [–] o [+].
1
Tiempo del metrónomo
[Song/Tempo] + [-] [+]
p. 181
2
Volumen del metrónomo
[Metronome/Count In] + [-] [+]
p. 181
3
Balance superpuesto (Dual Balance)
[Acoustic Layering] + [-] [+]
p. 179
4
Nivel de resonancia del pedal damper
Piano Resonance [Damper] + [-] [+]
p. 175
5
Nivel de resonancia de las cuerdas
Piano Resonance [String] + [-] [+]
p. 174
6
Volumen de Key Off
Piano Resonance [Key Off] + [-] [+]
p. 174
7
Profundidad del efecto Chorus
[Chorus] + [-] [+]
p. 177
8
Profundidad del efecto Reverb
[Reverb] + [-] [+]
p. 177
9
Ajuste Dynamic Emphasis
[Dynamic Emphasis] + [-] [+]
p. 177
Ajuste Grand Space
[Grand Space] + [-] [+]
p. 176, p. 176
[Transpose] + [Split] → [-] [+]
p. 179
10
Pulse el botón [
11
] y pulse el botón [–] o [+].
Balance dual (balance superpuesto)
Mantenga pulsado el botón [Split] o [Transpose] y pulse la tecla.
198
Punto de división
[Split] + tecla
p. 180
Transposición de tono
[Transpose] + tecla
p. 178
HP107_e.book Page 199 Tuesday, October 19, 2004 10:41 PM
Especificaciones principales
ESPAÑOL
Especificaciones principales
Teclado
Teclado
Sensibilidad táctil
Modo del teclado
88 teclas (Teclado de acción martillo progresiva con Escape)
Tacto: Ligero, Medio, Pesado, Fijo
Martillo: Ligero, Medio, Pesado, Desactivado
Whole, Layer/Dual (balance de volumen ajustable), Split (punto de división ajustable)
ESPAÑOL
Generador de sonido
Polifonía máxima
128 voces
Sonidos
5 grupos 36 variaciones + 4 sonidos por capa
Temperamento
8 tipos, tónica seleccionable
Estiramiento de la afinación
2 tipos
Master Tuning
415.3Hz~466.2Hz (pasos de 0.1Hz)
Transposición
–6~+5 (en semitonos)
Efectos
Grand Space, Dynamic Emphasis, Piano Resonance (Key Off Resonance, String Resonance, Damper Resonance), Reverb (10 niveles), Chorus (10 niveles)
Metrónomo
2/2, 0/4, 2/4, 3/4, 4/4, 5/4, 6/4, 7/4, 3/8, 6/8, 9/8, 12/8
Volumen
10 niveles
ESPAÑOL
Tiempo
Grabador
Pistas
2 pistas
Canción
1 canción (Recordable)
Almacenamiento de notas
±10.000 notas
Tempo
Negra= 10~500
Resolución
120 pulsaciones por negra
Control
Play/Stop, Rec, Tempo, All Song Play, Track
Canciones internas
68 canciones + 14 canciones de demostración de sonidos
ESPAÑOL
Otros
50W x2
Altavoces
20cm x2 (mueble del altavoz), 10cm x2
Pantalla
LED Beat
7 segmentos, 3 caracteres (LED)
Indicador de auriculares
Control
Volumen, Brillo
Pedales
Damper (reconocimiento de medio pedal), Soft (reconocimiento de medio pedal), Sostenuto (función asignable)
Otras funciones
Panel Lock, Song backup, Memory backup, Factory Reset
Conectores
Conector USB (MIDI), Jacks de salida (L/Mono, R), Jacks de entrada (L/Mono, R), Jack de auriculares x2 (Estéreo), conectores MIDI (In, Out)
Alimentación
CA230V
Consumo
110W
Dimensiones
(incluyendo el soporte del
piano)
1425 (Ancho) x 536 (Profundo) x 931 (Alto) mm (con el atril bajado)
ESPAÑOL
Potencia nominal de salida
1425 (Ancho) x 536 (Profundo) x 1.083,5 (Alto) mm (con el atril subido)
Pesos
(incluyendo el soporte del
piano)
82kg
Accesorios
Manual del Usuario, “60 Classical Piano Masterpieces” de Roland, guía de instalación USB,
CD-ROM (Controlador USB del piano digital de Roland), cable de alimentación, gancho para los auriculares
* Con el objetivo de mejorar el producto, las especificaciones y/o el aspecto del equipo están sujetos a cambios sin previo aviso.
ESPAÑOL
199
HP107_e.book Page 200 Tuesday, October 19, 2004 10:41 PM
HP107e – Especificaciones principales
200
HP107_e.book Page 201 Tuesday, October 19, 2004 10:41 PM
Handleiding
Bedankt voor en gefeliciteerd met uw aankoop van de digitale Roland-piano HP107e.
Belangrijkste kenmerken
Pianoklanken met een superieure resonantie en een sublieme expressiviteit
De gehanteerde stereosamples zorgen voor een bijzonder realistisch geluid en houden zelfs rekening met de geluiden van de hamers die de snaren raken. Dit levert een authentiek geluid op dat
erg dicht in de buurt komt bij een vleugel. Dankzij de 128-stemmige polyfonie kunt u het demperpedaal zo vaak gebruiken als u maar wilt – zonder te vrezen dat er noten wegvallen.
Dit instrument respecteert alle nuances van de pianist en geeft ze natuurgetrouw weer. Dat houdt
niet alleen de toucher in, maar ook de resonanties van de denkbeeldige snaren, het geluid bij het
loslaten van een toets en de resonanties die bij het loslaten van het demperpedaal optreden. Bovendien biedt dit instrument een “Grand Sound”-luidsprekersysteem en een overtuigende 3D-simulatie van een vleugel (“Grand Space”). De combinatie van die twee zorgt enerzijds voor meer transparantie en anderzijds voor meer vermogen (“Dynamic Emphasis”).
De toucher van een vleugel
Dit instrument is voorzien van een “Progressive Hammer Action”-klavier dat aanvoelt zoals het
klavier van een vleugel: de weerstand van de toetsen is in de bas net iets groter dan in de diskant.
De HP107e voegt daar zelfs de typische “klik” aan toe die bij het indrukken van een toets op een
akoestische vleugel optreedt (drukpuntsimulatie).
De respons van het klavier kan op twee manieren worden ingesteld: enerzijds is er de aanslaggevoeligheid, die de subjectieve weerstand van de toetsen bepaalt, en anderzijds de “hamerrespons”
die de variërende bewegingen van de hamers simuleert. Ook de pedalen spreken bijzonder nauwkeurig aan, wat een brede waaier aan nuances toelaat.
Lees, alvorens dit product te
gebruiken, de volgende dingen door: “Veilig gebruik
van dit product” (blz. 202)
en “Belangrijke opmerkingen” (blz. 204). Daar vindt u
namelijk belangrijke tips en
een opsomming van wat u
wel en niet mag doen. Bovendien verdient het natuurlijk aanbeveling om ook
de rest van de handleiding
door te nemen om kennis te
maken met alles functies van
dit product. Bewaar de
handleiding op een veilige
plaats, omdat u ze later beslist nog eens nodig zal hebben.
Expressiemogelijkheden die je alleen op een digitaal instrument vindt
De HP107e biedt een aantal geluiden die perfect bij de pianoklank passen en deze op bijzonder
muzikale manier aanvullen.
Op die manier kunt u een tweede klank bij de piano voegen, de bijkomende klank (indien nodig)
een octaaf hoger bespelen en/of het volume ervan met een pedaal bepalen.
Klinkt net zo overtuigend in een hoofdtelefoon
Dankzij speciale effecten blijft het geluid zelfs bij gebruik van een hoofdtelefoon overeind. Zo bent
u er zeker van dat u nooit te kampen hebt met vermoeiingsverschijnselen. Verder is de HP107e
voorzien van een indicator, die bij gebruik van een hoofdtelefoon oplicht evenals een haak voor het
opbergen van de hoofdtelefoon, als u hem niet gebruikt.
Tal van handige functies en interne pianostukken
Een metronoom en een “tweesporen-recorder”, 60 pianostukken in het interne geheugen en nog
talrijke andere functies maken dit instrument tevens bijzonder geschikt voor educatieve toepassingen.
Copyright ©2004 ROLAND CORPORATION.
Alle rechten voorbehouden. Het kopiëren, verveelvoudigen of openbaar maken van deze
handleiding, hetzij gedeeltelijk, hetzij in z’n geheel, is zonder de schriftelijke toestemming
van ROLAND CORPORATION verboden.
HP107_e.book Page 202 Tuesday, October 19, 2004 10:41 PM
Veilig gebruik van dit product
VEILIG GEBRUIK VAN DIT APPARAAT
INSTRUCTIES VOOR HET VOORKOMEN VAN BRAND, ELEKTRISCHE SCHOKKEN EN VERWONDINGEN
Over de
WAARSCHUWING en
LET OP
labels
Over de symbolen
Wijst de gebruiker op het risico op
dodelijke ongevallen of zware verWAARSCHUWING wondingen als gevolg van een fout
gebruik van dit apparaat.
Het foute gebruik van dit apparaat kan
leiden tot verwondingen en of materi le
schade.
LET OP!
* "Materi le" schade heeft betrekking op
het beschadigen van het meubilair of
andere huishoudelijke voorwerpen
evenals huisdieren enz.
Een driehoek maakt de gebruiker attent op belangrijke
instructies of waarschuwingen. De juiste betekenis van het
symbool wordt bepaald door de tekening in de driehoek. Het
links getoonde symbool wordt gebruikt voor algemene
waarschuwingen of om de aandacht te vestigen op gevaar.
Dit symbool maakt de gebruiker attent op dingen die nooit
mogen worden uitgevoerd. Wat nooit mag worden gedaan
wordt aangegeven door de tekening in de cirkel. Het links
getoonde symbool wordt gebruikt om aan te geven dat het
toestel nooit uit elkaar mag worden gehaald.
Dit symbool maakt de gebruiker attent op dingen die moeten
worden uitgevoerd. Wat er moet worden gedaan wordt
aangegeven door de tekening in de cirkel. Het links getoonde
symbool betekent dat de stekker van het stroomsnoer van de
uitgang moet worden losgekoppeld.
HOUD ALTIJD HET VOLGENDE IN DE GATEN
WAARSCHUWING
• Lees, alvorens dit product te gebruiken, de volgende punten en de rest van deze handleiding
door.
...........................................................................................................
• Open nooit de behuizing van dit product en breng
vooral geen wijzigingen aan.
...........................................................................................................
• Probeer nooit het product te herstellen of defecte
onderdelen te vervangen (tenzij dit in de handleiding uitdrukkelijk staat vermeld). Laat alle herstellingen en onderhoudswerken over aan uw
Roland-dealer, een erkende herstellingsdienst of
de distributeur (zie de adressen op de “Information”pagina).
...........................................................................................................
• Zet dit product nooit op één van de volgende
plaatsen:
• Plaatsen die onderworpen zijn aan extreme temperaturen (bv. in de zon, in een gesloten auto, in de
buurt van een radiator of fornuis enz.);
• Vochtige plaatsen (badkamer, natte vloer, in de
buurt van een wasmachine enz.);
• Natte plaatsen;
• Buiten in de regen;
• Stoffige plaatsen;
• Plaatsen die aan sterke trillingen onderworpen zijn.
...........................................................................................................
• Gebruik voor dit instrument enkel een rack of
stand dat/die uitdrukkelijk door Roland wordt
aanbevolen.
...........................................................................................................
• Zet het product altijd op een stevig en effen oppervlak. Zet het product nooit op een sterk trillende
of hellende plaats.
...........................................................................................................
• Sluit dit product alleen aan op een stopcontact dat
beantwoordt aan de vereisten op het naamplaatje
en in de specificaties in deze handleiding.
...........................................................................................................
• Gebruik uitsluitend het bijgeleverde netsnoer. Het
netsnoer is echter niet geschikt voor gebruik met
andere apparaten.
...........................................................................................................
WAARSCHUWING
• Beschadig nooit het netsnoer en zet er geen zware
voorwerpen op. Zorg dat de kabel altijd zo wordt
gelegd dat hij niet afgeklemd of op een andere
manier gekneusd wordt. Het gebruik van een
beschadigde kabel kan leiden tot brand of elektrocutie.
...........................................................................................................
• Dit apparaat kan, hetzij op zich, hetzij bij gebruik
van een hoofdtelefoon, voor een geluidsniveau
zorgen dat tot gehoorverlies kan leiden. Gebruik
het dus nooit lange tijd op hoog volume. Als u ook
maar vermoedt dat u gehoorproblemen begint te
krijgen of last hebt van gepiep in uw oren, neemt
u het best meteen contact op met een oorarts.
...........................................................................................................
• Zorg dat er nooit kleine metalen of brandbare
voorwerpen c.q. vloeistoffen (water, dranken e.d.)
in het inwendige terechtkomen.
...........................................................................................................
• In de volgende gevallen moet u dit product meteen uitschakelen, de aansluiting op het lichtnet
verbreken en contact opnemen met een door
Roland erkende herstellingsdienst, uw Rolanddealer of de verdeler (zie de “Information”pagina):
• Wanneer de stekker of het netsnoer zichtbaar
beschadigd is.
• Als er rook of een vreemde geur uit het apparaat
komt.
• Wanneer een voorwerp of vloeistof in het inwendige terecht is gekomen.
• Wanneer het product in de regen heeft gestaan of
op een andere manier nat is geworden;
• Wanneer het product niet naar behoren lijkt te werken.
...........................................................................................................
HP107_e.book Page 203 Tuesday, October 19, 2004 10:41 PM
• In gezinnen met kleine kinderen moeten de
ouders de kroost zo lang helpen bij het bedienen
van dit product tot de kinderen weten wat ze wel
en niet mogen doen.
...........................................................................................................
014
• Behandel het product altijd met de nodige zorg.
• (Laat het nooit vallen!)
...........................................................................................................
015
• Ga nooit op het apparaat staan en plaats er geen
zware voorwerpen op.
...........................................................................................................
LET OP!
• Raak het netsnoer en de overige kabels nooit met
natte handen aan.
...........................................................................................................
• Let, bij het transport van het instrument, op de
volgende dingen. Voor het transport zijn minstens
twee personen nodig. Houd het instrument recht
en wees tijdens het transport voorzichtig. Houd
het instrument stevig vast om verwondingen c.q.
schade aan andere voorwerpen te voorkomen.
016
• Vóór het gebruik van dit product in het buitenland neemt u het best contact op met uw dealer of
de verdeler om te zorgen dat u de juiste voeding
gebruikt (zie ook de adressen onder “Information”).
...........................................................................................................
026
• Speel een CD-ROM NOOIT met een gewone CDspeler af. Het daarbij optredende stoorgeluid zou
namelijk ernstige hoorstoornissen kunnen veroorzaken. Bovendien zou u de versterker of de luidsprekers van uw HiFi-keten kunnen beschadigen.
...........................................................................................................
026
LET OP!
• Zet dit product altijd op een goed verluchte plaats.
...........................................................................................................
110a
• Verbreek, tijdens een onweer, de aansluiting op
het lichtnet.
116
• Wees tijdens het openen en sluiten van de klep
voorzichtig dat u zich niet de vingers kneust
(blz. 210). Kinderen sluiten de klep het best uitsluitend onder toezicht van volwassenen.
...........................................................................................................
118b
• Als u ooit schroeven (o.m. van de stand of lessenaar) of de vleugelmoer moet verwijderen, legt u
ze het best op een veilige plaats – buiten het bereik
van kinderen. Zo hoeft u ze later niet te zoeken en
is het vrijwel uitgesloten dat kleine kinderen ze
inslikken.
...........................................................................................................
NEDERLANDS
NEDERLANDS
...........................................................................................................
• Trek, bij het verbreken van de aansluiting op het
lichtnet, altijd aan de stekker van het netsnoer
–nooit aan de kabel zelf. Anders gaan eventueel
de aders stuk.
...........................................................................................................
• Trek de stekker op regelmatige tijdstippen uit het
stopcontact en maak de pennen schoon (als er stof
op zit). Als u dit product langere tijd niet wilt
gebruiken, verbreekt u het best de aansluiting op
het lichtnet. Stof tussen de stekker van het netsnoer en de netaansluiting kan de isolatie nadelig
beïnvloeden en leiden tot brand.
...........................................................................................................
• Stroom- en signaalkabels draait u het best nooit
samen om storingen te voorkomen. Bovendien
moet u zorgen dat de kabels zich buiten het bereik
van kinderen bevinden.
...........................................................................................................
• Alvorens het instrument schoon te maken moet u
de aansluiting op het lichtnet verbreken (blz. 209).
NEDERLANDS
• Zet nooit een vaas, glas e.d. op dit product. Vermijd bovendien het gebruik van verstuivers en
sprays, parfum, alcohol, nagellak e.d. in de buurt
van het product. Indien de bewuste stof toch plekken op het behuizing achterlaat, dient u deze
onmiddellijk te verwijderen.
...........................................................................................................
...........................................................................................................
109a
NEDERLANDS
• Ga na of de moeren, waarmee het instrument aan
de stand bevestigd is, nog goed vastzitten. Als u
merkt dat ze wat losjes zitten, moet u ze meteen
weer aandraaien.
• Verbreek de aansluiting op het lichtnet.
• Verbreek de aansluiting op alle andere instrumenten.
• Zorg voor een degelijke instelling van de instelschroeven (blz. 211).
• Sluit de klep.
• Klap de muziekstandaard neer.
NEDERLANDS
• Sluit het netsnoer van dit product nooit aan op een
stroomcircuit waarop al talrijke andere apparaten
zijn aangesloten. Wees bijzonder voorzichtig met
verlengkabels: het opgenomen vermogen van alle
apparaten mag niet hoger liggen dan de capaciteit
(Watt/Ampère) van de verlengkabel. Anders
smelten de aders namelijk. Let altijd op de gegevens die op de gehanteerde kabel staan vermeld.
...........................................................................................................
106
NEDERLANDS
WAARSCHUWING
HP107_e.book Page 204 Tuesday, October 19, 2004 10:41 PM
HP107e – Belangrijke opmerkingen
Belangrijke opmerkingen
Lees naast “IMPORTANT SAFETY INSTRUCTIONS” en “Veilig gebruik van dit product” (blz. 202) ook de volgende punten even door:
Voeding
• Sluit dit product nooit aan op een stopcontact waarmee u
al een apparaat met invertor (koelkast, wasmachine, magnetron of air conditioning) of motor hebt aangesloten. Dat
andere apparaat zou namelijk storingen of op z’n minst
een hoorbare brom kunnen veroorzaken. Als u, om de
één of andere reden, geen ander stopcontact kunt gebruiken, maakt u het best gebruik van een bromfilter dat zich
tussen het stopcontact en dit product moet bevinden.
307
• Schakel dit product en alle andere apparaten van uw
installatie uit alvorens ze op elkaar aan te sluiten. Op die
manier voorkomt u schade aan de luidsprekers.
308
• Hoewel het LC-display en de LEDs doven, wanneer u het
product met zijn POWER-schakelaar uitzet, betekent dit
niet dat de verbinding met het lichtnet helemaal is verbroken. Om de verbinding helemaal te verbreken moet u,
na op POWER gedrukt te hebben, ook de stekker uit het
stopcontact trekken. Het verdient dan ook aanbeveling
om een stopcontact waar u gemakkelijk bij kunt c.q. een
voorziening met een schakelaar te kiezen.
Opstelling
• Als u dit product te dicht bij een versterker of grote transformator plaatst, zou er brom kunnen optreden. Om het
probleem te verhelpen of op z’n minst te verzachten,
moet u één van beide in voorkomend geval op een andere
plaats zetten.
352a
• Dit product kan de radio- of TV-ontvangst storen. Zet het
daarom nooit in de buurt van dergelijke apparaten.
352b
• Als u in de buurt van dit product een draadloze telefoon,
afstandsbediening e.d. gebruikt, zou er een bromgeluid
kunnen optreden. Dat is met name het geval, wanneer u
wordt opgebeld of zelf iemand belt. Het verdient dan ook
aanbeveling om tijdens het bellen e.d. iets verder van het
instrument vandaan te gaan staan.
354b
• Zorg dat dit product nooit wordt blootgesteld aan
extreme temperaturen (bv. in het directe zonlicht of in
een gesloten auto). Verder moet u voorkomen dat dit product in het directe zonlicht of in de buurt van een krachtige spot staat, omdat de ombouw anders zou kunnen
verkleuren. Overdreven warmte kan er namelijk voor
zorgen dat de ombouw vervormt of verkleurt.
355b
• Wanneer u dit product van een koude/vochtige plaats
naar een warme/drogere plaats (en vice versa) brengt,
zou er condensatie (kleine waterdruppeltjes) kunnen
optreden. Schakelt u het product dan in, zou er een kortsluiting of ernstige schade kunnen optreden/ontstaan.
Het verdient aanbeveling om, na het transport van dit
product, enkele uren te wachten alvorens het in te schakelen.
• Laat nooit voorwerpen uit rubber, vinyl e.d. lange tijd op
dit product liggen. Dat kan er namelijk toe leiden dat de
ombouw verkleurt of dat er randen/plekken ontstaan,
die nauwelijks kunnen worden verwijderd.
204
358
• Leg nooit zware voorwerpen op de toetsen. Dat kan er
namelijk toe leiden dat de betreffende toetsen na verloop
van tijd niet meer werken.
359
• Kleef geen stickers e.d. op het instrument. Als u die
namelijk later weer verwijdert, blijven er lelijke randen
achter, die nauwelijks kunnen worden verwijderd.
Onderhoud
• Gebruik, voor de schoonmaak van dit product, enkel een
zachte, droge of lichtjes bevochtigde doek. Wrijf altijd in
de vezelrichting van het hout om een mooi resultaat te
verkrijgen. Wrijf nooit te lang op dezelfde plaats om de
finish niet te beschadigen.
402
• Gebruik nooit oplosmiddelen zoals bv. verfverdunners,
omdat die de behuizing kunnen beschadigen.
• De pedalen van dit product zijn van messing.
Messing wordt na verloop van tijd steeds donkerder, wat
te wijten is aan oxidatie. Als de pedalen er minder mooi
beginnen uit te zien, moet u ze met een speciaal product
schoonmaken.
Herstellingen en uw data
• Houd er rekening mee dat alle data in het interne geheugen van dit product tijdens een herstelling gewist kunnen
worden. Noteer uw instellingen dus op regelmatige tijdstippen of sein ze door naar een MIDI-sequencer waar u
ze dan kunt opslaan. Tijdens herstellingswerken wordt er
getracht de geheugeninhoud te bewaren, maar een garantie hiervoor is er niet. Roland wijst elke aansprakelijkheid
m.b.t. dataverlies tijdens herstellingswerken af.
Bijkomende voorzorgsmaatregelen
• Als gevolg van een defect aan de geheugenchips of een
foute bediening kan het gebeuren dat de inhoud van de
geheugens verloren gaat. Om uzelf te beschermen tegen
het verlies van data seint u belangrijke instellingen het
best door naar een MIDI-sequencer en slaat u ze vervolgens op diskette of harde schijf op.
552
• Eens de geheugeninhoud van dit product gewist is,
bestaat er geen mogelijkheid meer om die instellingen te
herstellen. Sein uw instellingen daarom op regelmatige
tijdstippen door naar een MIDI-sequencer e.d. Roland
Corporation kan niet aansprakelijk worden gesteld voor
een dergelijk dataverlies.
553
• Behandel de bedieningsorganen zachtjes om defecten en
schade te voorkomen. Dit geldt met name voor de regelaars en knoppen en tevens voor kabels die u eventueel
aansluit. Een al te brutale behandeling kan leiden tot storingen of beschadiging van bepaalde onderdelen.
HP107_e.book Page 205 Tuesday, October 19, 2004 10:41 PM
Belangrijke opmerkingen
NEDERLANDS
• Trek, voor het verbreken van eender welk soort aansluitingen, enkel aan de stekker en nooit aan de daaraan vastzittende kabel. Anders zou u de aders of interne componenten namelijk kunnen beschadigen, wat een kortsluiting kan veroorzaken.
557
• Tijdens het gebruik wordt dit product warm. Dat is normaal.
558a
NEDERLANDS
• Zet het volume laat op de avond of ’s ochtends niet te
hard om geluidsoverlast bij de buren te voorkomen.
Gebruik op zo’n momenten (met name in de late uurtjes)
een hoofdtelefoon.
559b
• Alvorens dit product te vervoeren moet u het weer degelijk inpakken – liefst in de originele leveringsdoos. Zo
voorkomt u krassen en andere schade aan de ombouw en
het product zelf.
560
• Behandel de muziekstandaard altijd met de nodige zorg.
562
• Gebruik uitsluitend kabels van Roland voor de audioverbindingen. Als u audiokabels van een ander merk
gebruikt, moet u even het volgende in de gaten houden:
NEDERLANDS
• Sommige aansluitkabels bevatten weerstanden. Die
maken ze ongeschikt voor gebruik met dit product, omdat
het volume/niveau dan te laag is. In sommige gevallen
hoort u eventueel helemaal niets. Als u niet zeker weet
wat voor kabels u hebt, neemt u het best contact op met
uw dealer of de importeur van de kabels.
565
NEDERLANDS
• Ga, alvorens de klep van dit instrument te openen, na of
er geen huisdieren op zitten (het verdient trouwens aanbeveling om te zorgen dat uw huisdier nooit op het klavier c.q. de klep gaat liggen). In zeldzame gevallen zou
het kunnen gebeuren dat uw huisdier binnenin het
instrument verzeild geraakt. Dan moet u het instrument
meteen uitschakelen en de aansluiting op het lichtnet verbreken. Neem vervolgens contact op met uw Rolanddealer of een erkende herstellingsdienst.
Hanteren van CD-ROMs
• Raak nooit de kant met de datalaag aan en doe het nodige
om krassen op die laag te vermijden. Beschadigde of
vuile CD-ROMs kunnen niet naar behoren worden gelezen. Als dat bij u het geval is, moet u de vuile disc met
een CD-reiniger schoonmaken.
NEDERLANDS
NEDERLANDS
205
HP107_e.book Page 206 Tuesday, October 19, 2004 10:41 PM
HP107e – Inhoud
Inhoud
Veilig gebruik van dit product .......................................202
Splitsen van het klavier in twee helften voor quatre-mainsstukken
(Twin-mode) ....................................................................................................222
Belangrijke opmerkingen...............................................204
Hoofdstuk 3. Meespelen met de interne stukken........ 223
Voorzieningen op de panelen........................................207
Frontpaneel ...................................................................................................... 207
Achterpaneel.................................................................................................... 208
Onderkant ........................................................................................................ 208
Voorbereiding .................................................................209
Pedaalkabel aansluiten................................................................................... 209
Luidsprekerkabel aansluiten......................................................................... 209
Netsnoer aansluiten........................................................................................ 209
Gebruik van de lessenaar............................................................................... 209
Openen en sluiten van de klep ..................................................................... 210
Hoofdtelefoon aansluiten .............................................................................. 210
Gebruik van de hoofdtelefoonhaak ..............................................210
In- en uitschakelen .......................................................................................... 211
Volume en helderheid van het geluid instellen ......................................... 211
Over de pedalen .............................................................................................. 211
Hoofdstuk 1. Beluisteren van de interne stukken .......212
Luisteren naar de interne stukken................................................................ 212
Weergave van alle pianostukken ..................................................212
Kiezen van het stuk dat u wilt beluisteren ..................................212
Luisteren naar de demosongs ....................................................................... 213
Afspelen van een klankdemo ........................................................213
Functiedemo beluisteren ................................................................213
Hoofdstuk 2. Zelf spelen ................................................214
Andere klanken kiezen .................................................................................. 214
Gedetailleerde aanpassingen van het pianogeluid (Piano Resonance) .. 214
Geluid bij het loslaten van de toetsen (Key Off) .........................214
Simulatie van de snaarresonanties tijdens het spelen (String
Resonance)........................................................................................214
Respons van de demperresonantie ...............................................215
Aanslaggevoeligheid instellen (Key Touch) ............................................... 215
Timing van de noten via de dynamiek bepalen
(Hammer Response)........................................................................215
Meer diepte voor het geluid (Grand Space)................................................ 216
Diepte voor de hoofdtelefoon optimeren (Grand Space).......................... 216
Geluid levendiger maken (Dynamic Emphasis) ........................................ 217
Digitale effecten gebruiken............................................................................ 217
Geluid van galm voorzien (Reverb)..............................................217
Geluid ‘breder’ maken (Chorus) ...................................................217
Wijzigen van de effectintensiteit ...................................................217
Transponeren van het klavier (Transpose) ................................................. 218
Passende klanken met het pianogeluid combineren (Acoustic Layer) ... 218
Volumebalans voor de ‘Acoustic Layer’-functie instellen.........219
Twee klanken tegelijk bespelen (Dual) ........................................................ 219
Volumebalans in de Dual-mode (Dual Balance).........................219
Verschillende klanken voor de linker-/rechterhand (Split) ..................... 220
Splitpunt instellen ...........................................................................220
Functie van het middelste pedaal kiezen .................................................... 221
Metronoom gebruiken ................................................................................... 221
Werken met de metronoom ...........................................................221
Metronoomvolume wijzigen .........................................................221
206
Tempo instellen ...............................................................................................223
Weergave beginnen met een aftel .................................................223
Aparte weergave van de twee partijen ........................................................224
Hoofdstuk 4. Zelf iets opnemen.................................... 225
Nieuw stuk opnemen .....................................................................................225
Opnemen tijdens de weergave van een intern stuk ...................................226
Aparte opname van de linker- en rechterhand...........................................227
Wissen van uw eigen opname.......................................................................227
Wissen van één spoor .....................................................................227
Stuk wissen.......................................................................................227
Hoofdstuk 5. Andere handige functies ........................ 228
Geavanceerde instellingen (functies) ...........................................................228
Algemene stemming (Master Tune) .............................................229
Ander stemmingssysteem kiezen .................................................229
Stretch Tuning (andere stemmingscurve)....................................229
Toonhoogte in octaven transponeren (Octave Shift)..................230
Toewijzen van het demperpedaal aan de linker klavierhelft ...230
Werking van het ‘Grand Space’-effect..........................................230
‘Vergrendelen’ van de bedieningsfuncties ..................................................230
Laden van de fabrieksinstellingen (Factory Reset) ....................................231
Opslaan van de gemaakte instellingen (Memory Backup) .......................231
Opslaan van uw laatste opname (Song Backup) ........................................231
Wissen van een intern opgeslagen stuk .......................................231
V-LINK-functie gebruiken .............................................................................232
Instellingen voor de USB-driver ...................................................................232
Hoofdstuk 6. Werken met externe apparaten.............. 233
Aansluiten van audio-apparaten ..................................................................233
Aansluiten van de USB-poort........................................................................233
MIDI-apparaten aansluiten............................................................................234
Instellen van de MIDI-functies......................................................................234
MIDI-zendkanaal instellen.............................................................235
Local-functie: verbinding tussen het klavier en de klankbron .235
Verzenden van de opname ............................................................235
Appendix ............................................................... 236
Verhelpen van storingen ................................................................................236
Fout- en andere boodschappen .....................................................................237
Intern opgeslagen parameterinstellingen ....................................................237
Overzicht van de beschikbare functies ........................................................238
Specificaties ......................................................................................................239
Tone List ......................................................................... 240
Built-in Song List ........................................................... 241
MIDI Implementation Chart.................................. 243
HP107_e.book Page 207 Tuesday, October 19, 2004 10:41 PM
Voorzieningen op de panelen
NEDERLANDS
Voorzieningen op de panelen
Frontpaneel
6 7 8
3
15
17
18
21 22
19
20
23 24
4 5
9 10 11
16
25 26
27
NEDERLANDS
2
12 13 14
Power On
1
1. [Power On]-schakelaar
Hiermee schakelt u het instrument in en uit (blz. 211).
2. [Volume]-regelaar
3. [Brilliance]-regelaar
Hiermee bepaalt u de helderheid van het geluid
(blz. 211).
4. [Demo]-knop
Hiermee start u een demonstratie van de beschikbare
klanken en bepaalde functies (blz. 213).
5. [
(hoofdtelefoon)]-indicator
Deze indicator licht op, wanneer u een hoofdtelefoon
aansluit (blz. 210).
Hiermee transponeert u het klavier (blz. 218).
7. [Split]-knop
Hiermee verdeelt u het klavier in een linker en rechter
helft. Dat betekent dat u twee verschillende klanken kunt
gebruiken (blz. 220). Door deze knop samen met de [Chorus]-knop in te drukken hebt u bovendien toegang tot bijkomende functies (blz. 228~blz. 232, blz. 234~blz. 235).
8. [Chorus]-knop
Zorgt voor een voller geluid (blz. 217).
9. [Grand Space]-knop
10.[Dynamic Emphasis]-knop
Maakt het geluid levendiger en sprankelender (blz. 217).
11.[Reverb]-knop
Voorziet het geluid van galm (blz. 217).
Piano Resonance
12.[Key Off]-knop
13.[String]-knop
Hiermee simuleert u de resonanties van de snaren die tijdens het spelen op een akoestisch instrument optreden
(blz. 214).
16.Tone-knoppen
Hiermee kiest u de klank(en) die u via het klavier kunt
bespelen (blz. 214).
17.Display
Het display houdt u op de hoogte van verschillende
instellingen, bv. de klankvariatie, het songnummer en het
tempo. In de regel ziet het er zoals hierboven getoond uit.
18.[Song/Tempo]-knop
Hiermee selecteert u een intern stuk (blz. 212, blz. 223).
Door deze knop herhaaldelijk in te drukken zorgt u dat
afwisselend het tempo en het nummer van het gekozen
stuk (met een “S.” ervóór) worden afgebeeld. Als de indicator groen oplicht, wordt het tempo afgebeeld. Is hij
rood, dan toont het display het stuknummer.
19.[–] [+]-knoppen
Hiermee kunt u de waarde van bepaalde functies wijzigen.
Druk [+] en [–] samen in om weer de oorspronkelijke
waarde voor de geselecteerde functie te kiezen.
20.[Metronome/Count In]-knop
Hiermee schakelt u de metronoom in/uit (blz. 221). Er is
tevens een aftelfunctie, die enkele tellen vóór het begin
van een stuk te horen is. Zo weet u perfect wanneer u
moet beginnen spelen (blz. 223).
TRACK
21.[Left]-knop
Laat toe om een andere Recorder-partij te kiezen
(blz. 224, blz. 226~blz. 227).
Bij de interne stukken kunt u met deze knop de partij van
de linkerhand uitschakelen. Deze knop en de [Right]knop gaan we verderop de “spoorknoppen” noemen.
207
NEDERLANDS
Hiermee activeert u het (bij)geluid dat bij het loslaten van
een toets optreedt (blz. 214).
Hiermee voegt u een tweede geluid toe aan de pianoklank. De betreffende geluiden passen bijzonder goed bij
piano (blz. 218).
NEDERLANDS
Hiermee voorziet u het geluid van meer diepte (blz. 216,
blz. 216).
15.[Acoustic Layering]-knop
NEDERLANDS
6. [Transpose]-knop
Hiermee voorziet u het geluid van de typische resonanties die bij gebruik van het demperpedaal optreden
(blz. 215).
NEDERLANDS
Hiermee stelt u het algemene volume in (blz. 211).
14.[Damper]-knop
HP107_e.book Page 208 Tuesday, October 19, 2004 10:41 PM
HP107e – Voorzieningen op de panelen
22.[Right]-knop
KEY TOUCH
Laat toe om een andere Recorder-partij te kiezen
(blz. 224, blz. 226~blz. 227). Bij de interne stukken kunt u
met deze knop de partij van de rechterhand uitschakelen.
23.[Play]-knop
Hiermee start/stopt u de weergave van de demo’s of uw
eigen stuk (blz. 212, blz. 223).
Bovendien start/stopt u hiermee de opname (blz. 225~
blz. 227).
24.[Rec]-knop
25.[Touch]-knop
Hiermee wijzigt u de respons van het klavier (blz. 215).
26.[Hammer]-knop
Hiermee bepaalt u in hoeverre er –naar gelang uw aanslag– sprake is van een lichte vertraging van de noten
(blz. 215).
27.[Center Pedal]-knop
Hiermee kunt u een andere functie aan het middelste
pedaal toewijzen (blz. 221).
Hiermee maakt u de HP107e klaar voor de opname
(blz. 225~blz. 227).
Frontpaneel
Achterpaneel
Onderkant
Achterpaneel
28.Pedal-connector
Sluit hier de pedaalkabel van de stand aan (blz. 209).
28
29
30
29.Input-connectors
Sluit hier de audio-uitgangen van een ander instrument
of apparaat aan. Het geluid daarvan wordt eveneens via
de luidsprekers van de HP107e weergegeven (blz. 233).
30.Output-connectors
Deze connectors zou u op de ingangen van een eindtrap,
mengpaneel of cassettedeck e.d. kunnen aansluiten. Een
externe versterker hebt u echter alleen nodig, wanneer u
in een grote zaal speelt (blz. 233).
Onderkant
31.Hoofdtelefoonconnectors
Hier kunt u hoofdtelefoons aansluiten (blz. 210).
32.MIDI Out/In-connectors
Hier kunt u andere MIDI-compatibele instrumenten aansluiten en samen met dit instrument gebruiken (blz. 234).
31
32
33
33.USB-connector
Deze poort kunt u met uw computer verbinden en op die
manier muziekdata naar de computer doorseinen of van
daar ontvangen (blz. 233).
208
HP107_e.book Page 209 Tuesday, October 19, 2004 10:41 PM
Voorbereiding
NEDERLANDS
Voorbereiding
Pedaalkabel aansluiten
Sluit de kabel van de pedalen aan op de Pedalconnector achterop de HP107e.
Netsnoer aansluiten
1. Sluit het netsnoer aan op de AC-connector aan de
onderkant van de HP107e.
Opm.
NEDERLANDS
2. Sluit het netsnoer aan op een stopcontact.
Gebruik uitsluitend het bijgeleverde netsnoer.
Luidsprekerkabel aansluiten
Gebruik van de lessenaar
Druk de stekker zo ver in de connector tot hij vastklikt.
1. Houd de lessenaar met beide handen vast, terwijl
u hem zo ver optilt tot hij rechtstaat.
NEDERLANDS
Sluit de luidsprekerkabel van de luidsprekerkast
aan de stand zoals getoond op de connector aan de
onderkant van de HP107e (achteraan) aan.
2. Stut de lessenaar met de steunpootjes aan zijn achterkant af.
Voor het bepalen van de opstellingshoek kunt u kiezen
uit drie standen.
Luidsprekerconnector
Clip
1
Opm.
Zet nooit een vaas, glas e.d. op dit product. Vermijd
bovendien het gebruik van verstuivers en sprays, parfum, alcohol, nagellak e.d. in de buurt van het product.
De luidsprekers binnenin de piano bevinden zich onder
diens bovenpaneel en zijn naar boven gekeerd. Voorkom
daarom dat er vloeistoffen of kleine voorwerpen in de
openingen belanden.
Luidsprekers
NEDERLANDS
Luidsprekerkabel
2
■ Neerklappen van lessenaar
Til de steunpoten aan de achterkant van de lessenaar op en laat deze laatste voorzichtig zakken.
Indien nodig kunt u de klemmen gebruiken om te voorkomen dat uw partituren weer dichtklappen. Als u deze
klemmen niet nodig hebt, moet u ze neerklappen.
NEDERLANDS
■ Partituurklemmen gebruiken
NEDERLANDS
209
HP107_e.book Page 210 Tuesday, October 19, 2004 10:41 PM
HP107e – Voorbereiding
■ Lessenaar verwijderen
Indien nodig, kunt u de lessenaar ook helemaal verwijderen. Dat laat bv. toe om een laptop op de piano te zetten.
Zet de lessenaar eerst volledig recht en verwijder
vervolgens de drie schroeven.
De schroeven kunnen met een muntstuk worden verwijderd.
Wanneer u een hoofdtelefoon aansluit, licht de [ ]-indicator (blz. 207) op en worden de luidsprekers van de
HP107e uitgeschakeld.
Het volume in de hoofdtelefoon stelt u in met de
[Volume]-regelaar (blz. 211) van de HP107e.
Opm. Gebruik een stereo-hoofdtelefoon.
Werk, indien mogelijk, met hoofdtelefoons van Roland.
Bij gebruik van andere hoofdtelefoons is het volume
namelijk eventueel te laag.
Opmerkingen i.v.m. het gebruik van een
hoofdtelefoon
Opm.
Leg de schroeven op een veilige plaats om ze later snel
terug te vinden en te voorkomen dat kleine kinderen ze
inslikken.
Openen en sluiten van de klep
• Om de kabel van de hoofdtelefoon niet te beschadigen mag
u enkel de hoofdtelefoon zelf of de stekker vastpakken.
• Als u de hoofdtelefoon op het instrument aansluit, terwijl er
een hoog volume staat ingesteld, gaat de hoofdtelefoon
eventueel stuk. Zet het volume van de HP107e dus op de
minimumwaarde alvorens een hoofdtelefoon aan te sluiten.
• Zet het volume nooit te hard, omdat u daardoor niet alleen
de hoofdtelefoon beschadigt, maar ook uw oren. Werk altijd
op een verantwoord volume.
■ Gebruik van de hoofdtelefoonhaak
Om de klep te openen moet u ze met beide handen vastpakken, een beetje optillen en naar de
achterkant van het instrument schuiven.
Als u de hoofdtelefoon niet nodig hebt, kunt u hem aan
de haak links onder het klavier van de HP107e hangen.
Om de klep te sluiten moet u ze voorzichtig naar u
toe trekken en vervolgens laten zakken.
Draai de hoofdtelefoonhaak heen en weer, terwijl u hem
in de boring aan de onderkant van de HP107e schuift (zie
de afbeelding verderop). Draai de vleugelmoer van de
hoofdtelefoonhaak stevig vast om de haak klem te zetten.
Opm.
Opm.
Let er tijdens het openen en sluiten van de klep op dat u
niet uw vingers klemt. Het is dan ook verstandiger dat
kleine kinderen de klep van de HP107e nooit alleen openen of sluiten.
Alvorens de piano te verplaatsen sluit u de klep het best
om verwondingen tijdens het transport te voorkomen.
Hoofdtelefoon aansluiten
De HP107e is voorzien van twee hoofdtelefoonaansluitingen. Zo kunnen telkens twee personen naar uw spel luisteren, wat bv. voor educatieve toepassingen of tijdens het spelen van quatre-mains stukken handig is. Bovendien heeft een
hoofdtelefoon natuurlijk het voordeel dat u ook ‘s ochtends
vroeg en ‘s avonds laat kunt spelen zonder wie dan ook te
storen.
Sluit de hoofdtelefoon(s) aan op de connectors
links onder het klavier.
Hoofdtelefoonaansluiting x2
210
Installeren van de hoofdtelefoonhaak
Vleugelmoer
Hoofdtelefoonhaak
HP107_e.book Page 211 Tuesday, October 19, 2004 10:41 PM
Voorbereiding
Over de pedalen
Schakel de instrumenten in de opgegeven volgorde in. Door
de apparaten in de verkeerde volgorde in te schakelen zou u
de luidsprekers enz. kunnen beschadigen.
Er zijn drie pedalen, die –met name bij het gebruik van pianoklanken– de volgende functies hebben:
NEDERLANDS
In- en uitschakelen
Alvorens het instrument in te schakelen moet u de
[Volume]-regelaar in de laagste stand zetten en
vervolgens op [Power On] drukken.
Demperpedaal (rechts)
Gebruik dit pedaal, wanneer u de gespeelde noten langer
wilt aanhouden.
Via de stand van het pedaal bepaalt u bovendien hoe lang
de noten blijven doorklinken (het pedaal werkt traploos).
Stroomindicator
Het instrument wordt ingeschakeld en de stroomindicator links aan de voorkant van de HP107e licht op.
Sostenutopedaal (midden)
Om het instrument uit te schakelen moet u de
[Volume]-regelaar in de laagste stand zetten en
vervolgens op [Power On] drukken.
Volume en helderheid van
het geluid instellen
Stel met de [Volume]-regelaar het gewenste
volume in.
Min
Max
Mellow
Met dit pedaal kunt u het volume tijdelijk verminderen.
Zodra u het pedaal intrapt, worden de gespeelde noten
stiller dan normaal weergegeven.
Hoe zacht de noten precies worden weergegeven kunt u
via de stand van het pedaal nauwkeurig doseren.
Over de instelschroef
Met de instelschroef onder de pedalenbak voorkomt u
dat de pedalen tijdens het gebruik beginnen te wiebelen.
❍ Draai de instelschroef zo ver uit tot ze de vloer raakt. Als
er namelijk een speling blijft tussen de instelschroef en de
vloer, kan het gebeuren dat het instrument niet op het
intrappen van de pedalen reageert. Wanneer u het instrument op een dik vast tapijt e.d. zet, moet u de instelschroef zo ver uitdraaien tot ze tegen de vloer drukt.
Bright
NEDERLANDS
Met de [Brilliance]-regelaar kunt u de helderheid
van het geluid veranderen.
Zacht pedaal (links)
NEDERLANDS
De HP107e wordt uitgeschakeld en de stroomindicator
links vooraan dooft.
Opm. Om de verbinding helemaal te verbreken moet u, na op
POWER gedrukt te hebben, ook de stekker uit het stopcontact trekken. Zie ook “Voeding” (blz. 204).
Met het sostenutopedaal kunt u enkel de noten laten
doorklinken, die u speelt op het moment dat u het pedaal
intrapt.
Aan het sostenutopedaal kunt u ook een andere functie
toewijzen (blz. 221).
NEDERLANDS
Enkele seconden later is het instrument beschikbaar en
hoort u wat u op het klavier speelt. Stel met de [Volume]regelaar het gewenste volume in.
Opm. Dit product is voorzien van een veiligheidscircuit.
Daarom duurt het na het inschakelen even voordat het
naar behoren werkt.
Op akoestische piano’s zorgt het demperpedaal dat ook
andere snaren met de gespeelde noten beginnen mee te
trillen. Zo wordt het geluid voller. Het demperpedaal van
de HP107e simuleert dit fenomeen. Dit heet ook wel
“Sympathetic Resonance”.
U kunt zelf bepalen hoe duidelijk de resonanties van het
demperpedaal te horen zijn (blz. 215).
NEDERLANDS
Zacht pedaal
Demperpedaal
Sostenutopedaal
Power On
Instelschroef
NEDERLANDS
211
HP107_e.book Page 212 Tuesday, October 19, 2004 10:41 PM
HP107e – Hoofdstuk 1. Beluisteren van de interne stukken
Hoofdstuk 1. Beluisteren van de interne stukken
Luisteren naar de interne
stukken
■ Kiezen van het stuk dat u wilt beluisteren
De HP107e bevat 68 pianostukken.
“Hoofdstuk 3. Meespelen met de interne stukken” op
blz. 223, “Tone List” (blz. 240)
■ Weergave van alle pianostukken
Als u wilt, worden alle beschikbare stukken na elkaar
afgespeeld.
1 3, 4
2
Identificatie van de interne stukken
USr (User) … Het geheugen dat het door u opgenomen
stuk bevat. (→ blz. 225 voor details i.v.m. de opname.)
S.1~S.68 … Interne stukken
S. U … Stuk dat u intern opgeslagen hebt (blz. 231)
Stuk kiezen
12
1. Druk de [Song/Tempo]- en [Play]-knop samen in.
De indicator van de [Song/Tempo]-knop licht op, terwijl
de indicator van de [Play]-knop knippert. De weergave
begint vanaf het momenteel geselecteerde stuk.
Het nummer van het geselecteerde stuk wordt in het display afgebeeld.
Met de knoppen [–] en [+] kunt u het gewenste stuk kiezen.
1. Druk op de [Song/Tempo]-knop (indicator moet
rood oplichten).
Het nummer van het geselecteerde stuk wordt in het display afgebeeld.
2. Kies met de [+]- of [–]-knop een stuk.
U kunt deze knoppen ook ingedrukt houden om sneller
een ander nummer te kiezen.
Het zelf opgeslagen stuk kunt u op de volgende
manier kiezen:
1
Druk de [+]- en [–]-knop samen in om “USr”
te selecteren.
2
Zorg er met de [–]-knop voor dat het display
“S. U” afbeeldt.
Aan het einde van het laatste stuk keert de weergave terug
naar het eerste en loopt ze gewoon door.
Weergave stoppen
2. Druk op de [Play]-knop.
De weergave stopt.
Weergave starten
3. Druk op de [Play]-knop.
De indicator van deze knop licht op en de weergave van
het gekozen stuk begint.
Weergave stoppen
4. Druk op de [Play]-knop.
De indicator van deze knop dooft en de weergave stopt.
Als u daarna opnieuw op de [Play]-knop drukt, begint de
weergave weer vanaf het begin van het stuk waar u ze
gestopt had.
212
HP107_e.book Page 213 Tuesday, October 19, 2004 10:41 PM
Hoofdstuk 1. Beluisteren van de interne stukken
Door een knop in te drukken selecteert u de bijbehorende
demosong. U hoort dan telkens twee versies van de betreffende demo: één mét de betreffende functie en één zónder.
Uw instrument bevat verschillende stukken die de piano- en
andere klanken evenals andere handige functies demonstreren.
Door herhaaldelijk op de in stap 2 gedrukte knop te drukken kiest u afwisselend de versie mét en zónder de betreffende functie.
■ Afspelen van een klankdemo
1. Druk op de [Demo]-knop.
Over de demo van de hamerrespons
Wanneer u de hamerresponsfunctie selecteert, stopt de
weergave. Door de Key Touch [Hammer]-knop herhaaldelijk in te drukken schakelt u de hamerrespons-simulatie afwisselend in en uit.
Aan het einde van de laatste klankdemo keert de weergave terug naar het eerste stuk en loopt ze gewoon door.
Als u op een Tone-knop drukt, terwijl de [Demo]-knop
knippert, wordt de demosong van de betreffende klankgroep afgespeeld.
Speel een paar noten op het klavier om de werking van
deze functie te achterhalen.
Als deze functie actief is, duurt het bij zacht gespeelde
noten net iets langer eer u iets hoort.
Demo van de pianogeluiden
[E. Piano]
Demo van de elektrische pianogeluiden
[Harpsichord]
Demo van de klavecimbelklanken
[Organ]
Demo van de orgelgeluiden
[Strings]
Demo van de strijkersklanken
[Acoustic Layering]
Demo van de “Acoustic Layer”-functie
(blz. 218)
[Split]
Demo van de splitfunctie (blz. 220)
De hamerresponsdemo laat toe om het effect mét en zonder simulatie te achterhalen.
NEDERLANDS
Verklaring
[Piano]
NEDERLANDS
De indicator knippert en de weergave van de klankdemo’s
begint.
Tone-knop
NEDERLANDS
Luisteren naar de demosongs
Weergave van de functiedemo stoppen
3. Druk op de [Demo]-knop.
De indicator van de [Demo]-knop dooft en de demoweergave stopt.
NEDERLANDS
Weergave van de klankdemo’s stoppen
2. Druk op de [Demo]-knop.
De indicator van de [Demo]-knop dooft en de demoweergave stopt.
■ Functiedemo beluisteren
Er is tevens een demo die talrijke functies voor de pianoklanken ten tonele voert.
1. Druk op de [Demo]-knop.
NEDERLANDS
De indicator knippert en de weergave van de klankdemo’s
begint.
2. Druk op één van de volgende knoppen.
Functieknop
Verklaring
“Grand Space”-demo
blz. 216
[Dynamic Emphasis]
“Dynamic Emphasis”demo
blz. 217
Piano Resonance [Key Off]
“Key Off”-demo
blz. 214
Piano Resonance [String]
Demo van de snaarresonantie
blz. 214
Piano Resonance [Damper]
Demo van de demperresoblz. 215
nantie
Key Touch [Hammer]
Demo van de hamerrespons
NEDERLANDS
[Grand Space]
blz. 215
213
HP107_e.book Page 214 Tuesday, October 19, 2004 10:41 PM
HP107e – Hoofdstuk 2. Zelf spelen
Hoofdstuk 2. Zelf spelen
Andere klanken kiezen
De HP107e bevat 36 verschillende klanken (zgn. “Tones”) die
in vijf groepen zijn onderverdeeld. De groepen selecteert u
met de Tone-knoppen.
Klankgroep kiezen
1. Druk op een klankkeuzeknop.
De indicator van de ingedrukte knop licht op.
Als u nu op het klavier speelt, worden de noten met de
zopas gekozen klank weergegeven.
Klankvariatie kiezen
2. Druk op de [–]- of [+]-knop.
1
2
Het nummer van de geselecteerde klank wordt even in het
display afgebeeld.
Meer details vindt u onder “Tone List” (blz. 240).
Speel op het klavier om de gekozen klank te beluisteren.
Gedetailleerde aanpassingen van het pianogeluid (Piano
Resonance)
U kunt het pianogeluid nog verder aan uw behoefte aanpassen.
■ Geluid bij het loslaten van de toetsen (Key
Off)
Wanneer u op een akoestische piano een toets loslaat hoort
u een lichte klik, die door de “Key Off”-functie gesimuleerd wordt.
Deze instelling kunt u in een intern geheugen van de
HP107e opslaan (blz. 231).
1. Druk op de Piano Resonance [Key Off]-knop
(indicator moet oplichten).
Nu hoort u bij het loslaten van de toetsen telkens dat typische bijgeluid.
Druk nog een keer op de Piano Resonance [Key Off]-knop
(indicator dooft) om deze functie weer uit te schakelen.
Meer details over de klanken waarvoor deze functie
beschikbaar is vindt u in de “Tone List” (blz. 240).
Volume van het ‘Key Off’-geluid instellen
2. Houd de Piano Resonance [Key Off]-knop ingedrukt, terwijl u op de [–]- of [+]-knop drukt.
Het volume van dit klikgeluid kan in tien stappen worden
ingesteld.
Hoe groter de waarde, hoe luider het effect wordt.
■ Simulatie van de snaarresonanties tijdens het
spelen (String Resonance)
Wanneer u op een akoestische piano een toets indrukt,
beïnvloedt dit ook de trillingen van de reeds weerklinkende noten. De functie waarmee u dit effect kunt simuleren heet “String Resonance”.
Opm. Deze instelling is alleen beschikbaar voor pianoklanken.
Bij andere klanken doet ze helemaal niets.
1. Druk op de Piano Resonance [Sting]-knop (indicator moet oplichten).
De simulatie van de snaarresonanties is nu actief. Druk
nog een keer op de Piano Resonance [String]-knop (indicator dooft) om deze functie weer uit te schakelen.
Deze instelling kunt u in een intern geheugen van de
HP107e opslaan (blz. 231).
214
HP107_e.book Page 215 Tuesday, October 19, 2004 10:41 PM
Hoofdstuk 2. Zelf spelen
2. Houd de Piano Resonance [String]-knop ingedrukt, terwijl u op de [–]- of [+]-knop drukt.
Het volume van dit resonantie-effect kunt u in tien stappen instellen.
Hoe groter de waarde, hoe sterker de resonanties opvallen.
■ Respons van de demperresonantie
Op akoestische piano’s zorgt het intrappen van het demperpedaal ervoor dat ook andere snaren met de gespeelde
noten beginnen te trillen. Hierdoor wordt het geluid voller. Het demperpedaal van de HP107e simuleert dit fenomeen. Dit heet ook wel “Sympathetic Resonance”.
Opm. Deze instelling is alleen beschikbaar voor pianoklanken.
Bij andere klanken doet ze helemaal niets.
De simulatie van de demperresonantie is nu actief.
Druk nog een keer op de Piano Resonance [Damper]-knop
(indicator dooft) om deze functie weer uit te schakelen.
Deze instelling kunt u in een intern geheugen van de
HP107e opslaan (blz. 231).
Intensiteit van de resonantie wijzigen
2. Houd de Piano Resonance [Damper]-knop ingedrukt, terwijl u op de [–]- of [+]-knop drukt.
Hoe groter de waarde, hoe opvallender de resonantie
wordt.
Alle indicators uit. Vaste aanslagwaarde. Uw manier van
spelen (dynamiek) heeft geen enkele invloed op het
volume of de klankkleur: alle noten klinken even hard/
helder.
■ Timing van de noten via de dynamiek
bepalen (Hammer Response)
Met deze functie kunt u instellen in hoeverre uw aanslag
leidt tot een lichte vertraging tussen het spelen en het
weerklinken van de noten. De functie heet “Hammer Response”.
Deze instelling kunt u in een intern geheugen van de
HP107e opslaan (blz. 231).
Op akoestische piano’s wordt bij het indrukken van een
toets een hamer bewogen, die op de betreffende snaren
slaat. Als u een toets maar heel lichtjes indrukt, beweegt de
hamer trager – en dat zorgt voor een lichte vertraging (vergeleken bij normaal/hard aangeslagen noten) tussen het
indrukken van de toets en het weerklinken van de betreffende noot.
De vertraging, die na het inschakelen van de hamerrespons optreedt, verschilt naar gelang de kracht waarmee u
de toetsen aanslaat. Hoe zachter u aanslaat, hoe trager de
noten worden weergegeven.
NEDERLANDS
De resonantie-intensiteit kan in tien stappen worden ingesteld.
“Heavy” licht op. Om bijzonder luid (fortissimo, alias “ff”)
te spelen moet u de toetsen veel harder aanslaan dan normaal. Dat wekt de indruk van een ietwat “logge” klavierrespons. Daar staat echter een veel ruimere dynamiek
tegenover.
NEDERLANDS
1. Houd de Piano Resonance [Damper]-knop ingedrukt (indicator moet oplichten).
“Medium” licht op. Hiermee kiest u de meest natuurlijke
respons. Deze instelling vertegenwoordigt de respons van
een akoestische piano.
NEDERLANDS
Het volume van de gesimuleerde demperresonanties kunt
u naar wens instellen.
“Light” licht op. Zelfs met een betrekkelijk lichte aanslag
kunt u al fortissimo spelen. Het klavier voelt dan ook lichter aan dan normaal. Kies deze instelling bv. voor kleine
kinderen.
NEDERLANDS
Intensiteit van de resonantie wijzigen
Aanslaggevoeligheid instellen (Key Touch)
Als u wilt, kunt u de aanslaggevoeligheid –of beter: de respons van het klavier– wijzigen.
1. Kies met de Key Touch [Hammer]-knop de
gewenste instelling (zie de indicators).
“Light” licht op. Minimale vertraging bij zacht gespeelde
noten.
1
Deze instelling kunt u in een intern geheugen van de
HP107e opslaan (blz. 231).
Door verschillende keren op de Key Touch [Touch]-knop
te drukken kiest u telkens een andere instelling (let op de
oplichtende indicator).
“Medium” licht op. Normale vertraging bij zacht
gespeelde noten.
“Heavy” licht op. Sterkere vertraging bij zacht gespeelde
noten.
Alle indicators uit. De hamerrespons-simulatie is uit. Alle
gespeelde noten weerklinken meteen (de aanslag heeft
geen invloed op de timing).
215
NEDERLANDS
1. Druk op de Key Touch [Touch]-knop.
NEDERLANDS
1
HP107_e.book Page 216 Tuesday, October 19, 2004 10:41 PM
HP107e – Hoofdstuk 2. Zelf spelen
Meer diepte voor het geluid
(Grand Space)
De HP107e bevat een “Grand Space”-functie die voor een
geluid zorgt dat qua diepte nauw aanleunt bij het geluid van
een akoestische vleugel. Eén en ander wordt mogelijk dankzij de toevoeging van een natuurlijke galm en een voller
geluid, die je op een vleugel altijd aantreft.
1
2
Deze instelling kunt u in een intern geheugen van de
HP107e opslaan (blz. 231).
1. Druk op de [Grand Space]-knop (indicator moet
oplichten).
De Grand Space-functie is nu actief en voorziet het geluid
van meer diepte.
Na keuze van de Grand Space-mode “1” (blz. 230) kunt
u ook met een hoofdtelefoon werken, omdat het diepteeffect voor dit soort toepassingen wordt geoptimeerd.
Gebruikt u geen hoofdtelefoon, dan wordt de diepte op de
luidsprekers afgestemd.
2. Houd de [Grand Space]-knop ingedrukt, terwijl u
op de [–]- of [+]-knop drukt.
De diepte kan in vier stappen worden ingesteld.
Hoe groter de waarde, hoe meer diepte het geluid krijgt.
Diepte voor de
hoofdtelefoon optimeren
(Grand Space)
Het diepte-effect kan tevens worden aangepast om zelfs bij
gebruik van een hoofdtelefoon nog optimaal over te komen.
Ook in dat geval hoort u dus een simulatie van de natuurlijke
galm en het vollere geluid van een vleugel.
1
2
Deze instelling kunt u in een intern geheugen van de
HP107e opslaan (blz. 231).
1. Druk op de [Grand Space]-knop (indicator moet
oplichten).
De Grand Space-functie is nu actief en voorziet het geluid
van meer diepte.
Na keuze van de Grand Space-mode “1” (blz. 230) kunt
u ook met een hoofdtelefoon werken, omdat het diepteeffect voor dit soort toepassingen wordt geoptimeerd.
Gebruikt u geen hoofdtelefoon, dan wordt de diepte op de
luidsprekers afgestemd.
2. Houd de [Grand Space]-knop ingedrukt, terwijl u
op de [–]- of [+]-knop drukt.
De diepte kan in vier stappen worden ingesteld.
Hoe groter de waarde, hoe meer diepte het geluid krijgt.
3. Druk nog een keer op de [Grand Space]-knop (hij
dooft) om de gelijknamige functie weer uit te
schakelen.
3. Druk nog een keer op de [Grand Space]-knop (hij
dooft) om de gelijknamige functie weer uit te
schakelen.
Als u een hoofdtelefoon aansluit, licht de [
op.
216
]-indicator
HP107_e.book Page 217 Tuesday, October 19, 2004 10:41 PM
Hoofdstuk 2. Zelf spelen
Digitale effecten gebruiken
Indien nodig kunt u het geluid levendiger maken en voor
een nóg betere definitie zorgen.
Het Reverb-effect voorziet de gespeelde noten van galm,
die de indruk wekt dat u in een concertzaal zit te spelen.
1
3
Deze instelling kunt u in een intern geheugen van de
HP107e opslaan (blz. 231).
1. Druk op de [Dynamic Emphasis]-knop (indicator
moet oplichten).
2. Om deze functie weer uit te schakelen moet u
opnieuw op de [Dynamic Emphasis]-knop drukken (diens indicator moet doven).
De indicator van deze knop licht op en het geluid wordt
van galm voorzien.
Om de galm weer uit te schakelen moet u nog een keer op
de [Reverb]-knop drukken (indicator dooft weer).
De status en de intensiteit van het galmeffect kunt u in
een intern geheugen van de HP107e opslaan (blz. 231).
■ Geluid ‘breder’ maken (Chorus)
Met het choruseffect simuleert u een natuurlijke zweving
die het geluid “breder” maakt en een stereo-effect simuleert.
1. Druk op de [Chorus]-knop.
‘Dynamic Emphasis’-instellingen wijzigen
3. Houd de [Dynamic Emphasis]-knop ingedrukt,
terwijl u op de [–]- of [+]-knop drukt.
Indicator
Omschrijving
De bas en de hoge tonen worden benadrukt.
2
Zorgt voor een geluid waarbij zelfs in de bas
gespeelde akkoorden nog duidelijk overeind
blijven.
3
De bas wordt benadrukt.
De indicator van deze knop licht op en het geluid wordt
van chorus voorzien.
Om de chorus weer uit te schakelen moet u nog een keer
op de [Chorus]-knop drukken (indicator dooft weer).
De chorusinstelling wordt voor elke gebruikte klank
apart onthouden tot u het instrument weer uitschakelt.
■ Wijzigen van de effectintensiteit
De diepte (hoeveelheid) van het galm- of choruseffect kan
in tien stappen worden ingesteld.
Na het inschakelen wordt zowel voor de galm als de chorus de waarde “5” gehanteerd.
Het display beeldt de nieuwe waarde af. Hoe groter de
waarde, hoe luider de galm.
Opm. De geldinstelling kan niet voor elke klank apart worden
onthouden.
NEDERLANDS
Galmvolume veranderen
1. Houd de [Reverb]-knop ingedrukt, terwijl u op de
[–]- of [+]-knop drukt.
NEDERLANDS
1
NEDERLANDS
De “Dynamic Emphasis”-functie is nu actief en het geluid
lijkt veel levendiger.
1. Druk op de [Reverb]-knop.
NEDERLANDS
■ Geluid van galm voorzien (Reverb)
NEDERLANDS
Geluid levendiger maken
(Dynamic Emphasis)
Galm- en/of chorusvolume veranderen
1. Houd de [Chorus]-knop ingedrukt, terwijl u op de
[–]- of [+]-knop drukt.
217
NEDERLANDS
Het display beeldt de nieuwe waarde af. Hoe groter de
waarde, hoe luider het effect.
HP107_e.book Page 218 Tuesday, October 19, 2004 10:41 PM
HP107e – Hoofdstuk 2. Zelf spelen
Transponeren van het
klavier (Transpose)
Met de Transpose-functie zorgt u dat een stuk in een andere
toonaard wordt weergegeven dan degene waarin u het
speelt. Dat laat bv. toe om een stuk in een moeilijke toonaard
(met veel kruisen (#) en mollen (b) te laten klinken, terwijl u
eigenlijk in een gemakkelijke toonaard zit te spelen.
Passende klanken met het
pianogeluid combineren
(Acoustic Layer)
De HP107e is voorzien van een functie waarmee u heel eenvoudig een klank bij de piano kunt voegen die er perfect bijpast. Die functie noemen we “Acoustic Layering”.
Een andere toepassing is het hanteren van een andere toonaard, terwijl u nog steeds dezelfde toetsen indrukt, wanneer
de zanger(es) moeite heeft met de originele toonaard van het
stuk.
1
2
De toonhoogte van de tweede klank kan in octaafstappen
worden getransponeerd (blz. 230).
1
Kies eerst de pianoklank (blz. 214).
1. Houd de [Transpose]-knop ingedrukt, terwijl u op
de toets drukt die overeenkomt met de grondtoon
van de gewenste toonaard.
De indicator van deze knop licht op en het klavier wordt
getransponeerd.
Als u de [Transpose]-knop ingedrukt houdt, wordt de
momenteel gehanteerde waarde in het display afgebeeld.
U kunt het transpositie-interval tevens wijzigen door de
[Transpose]-knop ingedrukt te houden, terwijl u op [–] of
[+] drukt.
Als u de [Transpose]-knop ingedrukt houdt en tegelijk op
[–] en [+] drukt, wordt weer de oorspronkelijke instelling
(“0”= geen transpositie) gekozen.
Het instelbereik voor de transpositie luidt –6~0~5 (halve
tonen).
Voorbeeld: Als u bij het drukken op een C-toets telkens
een E wilt horen, moet u de [Transpose]-knop ingedrukt
houden en een E-toets indrukken.
Aangezien de E zich vier (witte en zwarte) toetsen rechts
van de C bevindt, beeldt het display dan de waarde “4” af.
Als u
C E G speelt…
…hoort u E G# B
1. Druk op de [Acoustic Layering]-knop (indicator
moet oplichten).
Als u nu op het klavier speelt, hoort u zowel de piano- als
een tweede klank.
Er is ook een stapelfunctie waarmee u andere klanken
dan piano met een bijkomend geluid kunt combineren.
Keuze van de klank die bij de piano moet
worden gevoegd
2. Kies de gewenste klank met de [–]- of [+]-knop.
Het nummer van de geselecteerde klank wordt in het display afgebeeld.
Het nummer van de klank, die bij de piano wordt
gevoegd, herkent u aan de “L.”.
Als u de “Layer”-functie aan het middelste pedaal toewijst, wordt de “Acoustic Layer”-functie automatisch
geactiveerd (blz. 218). Dan dient het pedaal namelijk
voor het bepalen van het volume van de toegevoegde
klank.
Als u nu op het klavier speelt, hoort u zowel de piano- als
de tweede (zonet geselecteerde) klank.
Als de Transpose-waarde “0” luidt, licht de indicator van
de [Transpose]-knop zelfs dan niet op, wanneer u hem
indrukt.
Om de transpositie weer uit te schakelen moet u nog een
keer op de [Transpose]-knop drukken (de indicator dooft
weer).
Druk opnieuw op de [Transpose]-knop (indicator licht op)
om weer het laatst ingestelde transpositie-interval te
gebruiken.
Tijdens het uitschakelen wordt deze waarde weer op “0”
gezet.
218
HP107_e.book Page 219 Tuesday, October 19, 2004 10:41 PM
Hoofdstuk 2. Zelf spelen
De balans tussen de twee klanken, die u in de “Acoustic
Layer”-mode gebruikt, kunt u naar wens veranderen.
Door de “Acoustic Layer”-balans te wijzigen verandert
u ook de Dual Balance-instelling (blz. 219): die wordt op
dezelfde waarde gezet.
■ Volumebalans in de Dual-mode
(Dual Balance)
Indien nodig, kunt u de volumebalans van de Dual-mode
wijzigen.
NEDERLANDS
■ Volumebalans voor de ‘Acoustic Layer’functie instellen
1. Houd de [Acoustic Layering]-knop ingedrukt, terwijl u op de [–]- of [+]-knop drukt.
Om weer de oorspronkelijke balans te kiezen moet u de
[–]- en [+]-knop samen indrukken.
1
2
Deze instelling kunt u in een intern geheugen van de
HP107e opslaan (blz. 231).
Volume van de pianoklank
Volume van de Layer-klank
U kunt met elke toets telkens twee klanken tegelijk bespelen.
Hier en daar noemen we dit “Dual”. Via de Tone-knoppen
kunt u de gewenste klankcombinaties kiezen.
1. Druk de knoppen van de twee klanken, die u
samen wilt gebruiken, tegelijkertijd in.
1. Houd de [Transpose]-knop ingedrukt, terwijl u op
de [Split]-knop drukt.
De indicators van deze twee knoppen knipperen.
In het display verschijnt de momenteel gekozen balanswaarde.
2. Druk op de [–]- of [+]-knop om de waarde te wijzigen.
De balans verandert.
U kunt de volumebalans tevens wijzigen door de [Acoustic Layering]-knop ingedrukt te houden, terwijl u op [+]
of [–] drukt.
NEDERLANDS
Twee klanken tegelijk
bespelen (Dual)
NEDERLANDS
De balans verandert.
Om weer de oorspronkelijke balans te kiezen moet u de
[–]- en [+]-knop samen indrukken.
De indicator van de ingedrukte knop licht op.
Als u nu op het klavier speelt, worden de noten door deze
klanken weergegeven.
Andere klank voor de rechter Tone-knop
kiezen
Volume van de linker Tone-knop
Volume van de rechter Tone-knop
Druk op een andere knop dan [–] [+] om te zorgen dat de
indicators weer “normaal” werken.
NEDERLANDS
Om de Dual-mode weer te verlaten moet u op één enkele
klankkeuzeknop drukken.
2. Druk op de [–]- of [+]-knop.
NEDERLANDS
Nu hoort u tijdens het spelen nog steeds de klank van de
linker Tone-knop. Daar wordt echter de zonet gekozen
klank aan toegevoegd.
De toonhoogte van de klank, die aan de rechter knop toegewezen is, kan in octaafstappen worden getransponeerd
(blz. 230).
Andere klank voor de linker Tone-knop
kiezen
Schakel de Dual-mode even uit en kies vervolgens de
benodigde klanken. Druk de knoppen van de twee klanken, die u samen wilt gebruiken, samen in.
NEDERLANDS
219
HP107_e.book Page 220 Tuesday, October 19, 2004 10:41 PM
HP107e – Hoofdstuk 2. Zelf spelen
Verschillende klanken voor
de linker-/rechterhand (Split)
U kunt via de linker klavierhelft een andere klank bespelen
dan via de rechter. Zoiets noemen we een “Split”. De noot
waar het klavier in twee helften wordt verdeeld is het “splitpunt”.
Splitpunt (fabrieksinstelling: F#3)
A0 B0 C1 D1 E1 F1 G1 A1 B1 C2 …
C3
Klank voor de linkerhand
C4
Andere klank voor de rechter helft kiezen
Schakel de Split-mode even uit en kies vervolgens de
benodigde klank.
In de Split-mode heeft het demperpedaal aanvankelijk
alleen betrekking op de rechter klavierhelft. Dat kunt u
echter veranderen. Zie hiervoor “Toewijzen van het demperpedaal aan de linker klavierhelft” (blz. 230).
■ Splitpunt instellen
C5
Klank voor de rechterhand
Indien nodig, kunt u het splitpunt (waar de linker helft
stopt en de rechter helft begint) wijzigen. Die noot kan
eender waar tussen de “B1” en de “B6” liggen.
De fabrieksinstelling luidt “F#3”.
1. Houd de [Split]-knop ingedrukt, terwijl u op de
toets drukt die u als nieuw splitpunt wilt hanteren.
Die toets vertegenwoordigt de hoogste noot van de linker
helft.
1
1. Druk op de [Split]-knop.
De indicator van deze knop licht op. Het klavier is nu in
twee helften verdeeld: één voor de linker- en een tweede
voor de rechterhand.
Het splitpunt vertegenwoordigt de hoogste noot van de
linker helft.
De klank van de rechter helft is nog steeds degene die u
vóór het indrukken van de [Split]-knop had gekozen. Aan
de linker helft is echter een basklank toegewezen. De
keuze van de basklank hangt af van de rechts gehanteerde
klank.
Om de Split-mode weer te verlaten moet u nog een keer op
de [Split]-knop drukken (de indicator dooft weer).
Als u in de Dual-mode op de [Split]-knop
drukt…
De klank van de linker Tone-knop (wiens indicator
oplicht) wordt aan de rechter helft toegewezen, terwijl u
via de linker helft een daarbij passend geluid aanstuurt.
De toonhoogte van de klanken in de linker helft kan in
octaafstappen worden getransponeerd (blz. 230).
Andere klank voor de linker helft kiezen
1. Druk op een klankkeuzeknop.
2. Druk op de [–]- of [+]-knop.
Met de [–]- en [+]-knop kunt u –indien nodig– een andere
klank voor de linker helft kiezen.
Zie “Tone List” (blz. 240) voor meer details over de klanken.
220
Indien nodig, kunt u het splitpunt ook met de [–]- of [+]knop kiezen, terwijl u de [Split]-knop indrukt.
Door de [Split]-knop ingedrukt te houden, terwijl u tegelijk op [+] en [–] drukt, kiest u weer het voorgeprogrammeerde splitpunt (F#3).
De nootnamen verschijnen als volgt in het display:
Display
C
C
d
E_
Benaming
C
C
D
E
Display
E
F
F
G
Benaming
E
F
F
G
Display
A_
A b_
b
Benaming
A
A
B
B
Als u de [Split]-knop ingedrukt houdt, beeldt het display
de nootnaam van het momenteel gekozen splitpunt af.
HP107_e.book Page 221 Tuesday, October 19, 2004 10:41 PM
Hoofdstuk 2. Zelf spelen
Onmiddellijk na het inschakelen fungeert het middelste
pedaal als sostenutopedaal (blz. 211).
U kunt het middelste pedaal echter ook voor andere dingen
gebruiken.
Tempo instellen
2. Druk op de [Song/Tempo]-knop (de indicator
moet groen oplichten).
3. Druk op de [–]- of [+]-knop om een ander tempo te
kiezen.
NEDERLANDS
Functie van het middelste
pedaal kiezen
Andere maatsoort kiezen
4. Houd de [Song/Tempo]-knop ingedrukt, terwijl u
op de [–]- of [+]-knop drukt.
Overeenkomst tussen de maatsoort en de tempoweergave
1. Kies met de [Center Pedal]-knop de gewenste
instelling (zie de indicators).
Sostenuto. Het pedaal doet dienst als sostenutopedaal
(blz. 211).
Metronoom gebruiken
■ Werken met de metronoom
De HP107e bevat een metronoom.
Indien nodig, tikt de metronoom tijdens de weergave van
een stuk in de maat (Beat) en het tempo van dat stuk.
Tempowaarde
2/2
=5–250
x/4
=10–500
3/8
=20–999
6/8
9/8
12/8
= 7–333
Tijdens de songweergave of -opname kunt u geen andere
maatsoort kiezen.
Display
Maatsoort
Display
Maatsoort
2.2
2/2
6.4
6/4
0.4
Enkel zachte tellen
7.4
7/4
2.4
2/4
3.8
3/8
3.4
3/4
6.8
6/8
4.4
4/4
9.8
9/8
5.4
5/4
12.8
12/8
Metronoom stoppen
5. Druk nog een keer op de [Metronome/Count In]knop om te zorgen dat zijn indicator weer dooft.
De metronoom stopt.
De metronoom begint te tellen. De indicator van de knop
knippert in de gekozen maat (en uiteraard het tempo). Op
de eerste tel van elke maat licht hij rood op, voor de overige tellen wordt groen gehanteerd.
Het display beeldt het momenteel gehanteerde volume af.
Houd [Metronome/Count In] nog steeds ingedrukt, terwijl u met de [+]- of [–]-knop een andere volumewaarde
instelt.
Als u deze waarde op “0” zet, hoort u de metronoom niet
meer.
221
NEDERLANDS
Werken met de metronoom
1. Druk op de [Metronome/Count In]-knop.
1. Houd de [Metronome/Count In]-knop ingedrukt,
terwijl u op de [–]- of [+]-knop drukt.
NEDERLANDS
■ Metronoomvolume wijzigen
Het volume van de metronoom kunt u in tien stappen
instellen.
Na het inschakelen wordt automatisch de waarde “4”
gekozen.
3 4 1,5 2
NEDERLANDS
Octave. Als u een toets indrukt, terwijl u het middelste
pedaal intrapt, hoort u naast de gespeelde noot ook een
noot, die één octaaf erboven wordt weergegeven. Het
volume van de geoctaveerde noten bepaalt u via de stand
van het pedaal.
Opm.
Maatsoort
NEDERLANDS
Wanneer zowel de “Acoustic Layer”- als de Dual-functie
uitgeschakeld zijn, wordt de “Acoustic Layer”-functie
automatisch geactiveerd.
Layer. Als u een toets indrukt, terwijl u het middelste
pedaal intrapt, wordt een passende klank bij het
gebruikte pianogeluid gevoegd. U bespeelt dan twee
klanken.
Het volume van de toegevoegde klank bepaalt u via de
stand van het pedaal.
NEDERLANDS
1
Het display beeldt nu de momenteel gekozen maatsoort
af. Houd de [Song/Tempo]-knop ingedrukt en kies met
[+] of [–] een andere maatsoort. Houd de [Song/Tempo]knop ingedrukt, terwijl u de [–]- en [+]-knop samen
indrukt om weer de eerder gekozen maatsoort te hanteren.
HP107_e.book Page 222 Tuesday, October 19, 2004 10:41 PM
HP107e – Hoofdstuk 2. Zelf spelen
Splitsen van het klavier in twee helften voor quatremainsstukken (Twin-mode)
Het klavier kan in twee aparte secties worden verdeeld, zodat twee pianisten tegelijk in hetzelfde register kunnen spelen.
C1
C3
C2
C4
C3
C4
C5
C6
1. Houd de [Split]-knop ingedrukt, terwijl u op de
[Piano]-knop drukt.
De indicator van de [Split]-knop licht op en de Twin
Piano-mode is actief.
C5
C3
C6
C4
C7
C5
C8
C6
● In de Twin-mode worden de volgende dingen ingesteld:
• Het klavier wordt in twee secties verdeeld en de toonhoogte verandert.
• Het rechter pedaal fungeert als demperpedaal voor de
rechter helft, terwijl het linker pedaal als demper voor
de linker helft dienst doet.
• Het middelste pedaal fungeert als sostenutopedaal
voor de rechter helft.
2. Om deze functie weer te verlaten, moet u de
[Split]-knop ingedrukt houden, terwijl u op de
[Piano]-knop drukt.
• Als de opname al loopt c.q. als het instrument klaarstaat voor de opname, wordt de opname/de standbymode uitgeschakeld. In de Twin-mode is de [Rec]-knop
niet beschikbaar.
• Als de Split-functie momenteel actief is, wordt ze uitgeschakeld.
• Via de linker en rechter helft wordt dezelfde klank (met
dezelfde effectinstellingen) bespeeld. Als de piano zich
vóór het activeren van de Twin-functie al in de Splitmode bevond, wordt automatisch de klank van de
rechter (Split-)helft gehanteerd.
Opm. In de Twin-mode is de demperresonantie niet beschikbaar.
222
HP107_e.book Page 223 Tuesday, October 19, 2004 10:41 PM
Hoofdstuk 3. Meespelen met de interne stukken
Laten we nu kijken wat je moet doen om met de interne stukken mee te spelen.
Onder “Kiezen van het stuk dat u wilt beluisteren”
(blz. 212) komt u te weten hoe u te werk moet gaan.
Druk de [+]- en [–]-knop samen in om weer het voorgeprogrammeerde tempo van het gekozen stuk op te roepen.
Overeenkomst tussen de maatsoort en de
tempoweergave
Maatsoort
Tempowaarde
2/2
=5–250
x/4
=10–500
3/8
=20–999
6/8
9/8
12/8
= 7–333
NEDERLANDS
Indien nodig, kunt u aanvankelijk een lager tempo kiezen tot
u de muziek helemaal onder de knie hebt. Verder zou u met
één hand kunnen beginnen en daarna de andere hand kunnen instuderen. Wat u ook doet: het verdient altijd aanbeveling om het betreffende stuk eerst een paar keer aandachtig
te beluisteren.
Indien nodig, kunt u de metronoom inschakelen. Die telt
dan in de maat en het tempo van het gekozen stuk.
NEDERLANDS
Hoofdstuk 3. Meespelen met de interne stukken
Identificatie van de interne stukken
Tempo instellen
■ Weergave beginnen met een aftel
Als u meteen vanaf het begin van het stuk moet/wilt meespelen, activeert u het best de aftelfunctie. Dan bent u er
namelijk zeker van dat u op het juiste moment begint.
NEDERLANDS
Als u het gekozen stuk aanvankelijk wat aan de snelle kant
vindt, kunt u het tempo verminderen. Dat is met name
voor het instuderen van nieuw repertoire van belang.
Voer het tempo dan geleidelijk aan op.
USr (User) … Het geheugen dat het door u opgenomen
stuk bevat. (→ blz. 225 voor details i.v.m. de opname.)
S.1~S.68 … Interne stukken
S. U … Stuk dat u intern opgeslagen hebt (blz. 231)
Deze aftel is beschikbaar, wanneer u vóór het starten van
de weergave de metronoom activeert.
1
Bepaalde interne stukken bevatten tempowijzigingen.
Kies eerst het stuk dat u wilt spelen (blz. 212).
NEDERLANDS
2
In dat geval telt de HP107e twee maten af en start hij vervolgens de weergave.
Weergave tijdens de aftel: “–2” (nog twee maten), “–1”
(nog één maat en u bent aan de beurt).
“Werken met de metronoom” op blz. 221
1. Druk op de [Song/Tempo]-knop (indicator moet
groen oplichten).
Het display beeldt nu de gehanteerde tempowaarde af.
NEDERLANDS
Door herhaaldelijk op de [Song/Tempo]-knop te drukken
roept u afwisselend de tempowaarde en het nummer van
het gekozen stuk (voorafgegaan door “S.”) op.
Als de tempowaarde wordt afgebeeld, licht de indicator
van de [Song/Tempo]-knop in het groen op. Hebt u het
songnummer gekozen, dan licht de indicator in het rood
op.
2. Stel met de [–]- en [+]-knop het gewenste tempo
in.
Het instelbereik voor het tempo luidt q= 10~500. U kunt
het tempo ook tijdens de weergave wijzigen.
NEDERLANDS
Met de [+]-knop voert u het tempo in kleine stappen op.
Houd hem ingedrukt om snel een beduidend hoger tempo
te kiezen.
Met de [–]-knop vermindert u het tempo. Ook deze knop
kunt u ingedrukt houden om het tempo drastisch te verminderen.
223
HP107_e.book Page 224 Tuesday, October 19, 2004 10:41 PM
HP107e – Hoofdstuk 3. Meespelen met de interne stukken
Aparte weergave van de
twee partijen
Weergave starten
2. Druk op de [Play]-knop (indicator moet oplichten).
U kunt zelf bepalen welke partij(en) van de interne stukken
moet(en) worden afgespeeld.
De weergave van het stuk begint. De partij, die u in stap 1
gekozen hebt, wordt niet afgespeeld.
De partij van de linkerhand kan met de [Left]-knop in-/uitgeschakeld worden. De partij van de rechterhand is aan de
[Right]-knop toegewezen. Laten we de [Left]- en [Right]knop in het volgende gewoon de “spoorknoppen” noemen.
U moet ze dus zelf spelen, terwijl u door de partij van de
linkerhand wordt begeleid.
Spoorknoppen
Partij van de Partij van de
linkerhand rechter hand
Druk nog een keer op de knop, die u in stap 1 had uitgeschakeld. Nu hoort u de ontbrekende partij weer (en de
indicator van de knop licht op).
U kunt de spoorknoppen ook tijdens de weergave in- en
uitschakelen.
Stop de weergave
Left
Right
3. Druk op de [Play]-knop om te zorgen dat zijn
indicator weer dooft.
De weergave van het stuk stopt.
En dan nu muziek…
2, 3 1
Kies eerst het stuk dat u wilt spelen (blz. 212).
Keuze van de partij die u zelf wilt spelen
1. Druk op de [Left]- of [Right]-knop.
De indicator van de ingedrukte knop dooft. Dat betekent
dat de betreffende partij niet meer afgespeeld wordt.
Als u bv. de partij van de rechterhand zelf wilt spelen,
moet u op de [Right]-knop drukken (indicator moet
doven). Die partij wordt nu niet meer weergeven.
224
HP107_e.book Page 225 Tuesday, October 19, 2004 10:41 PM
Hoofdstuk 4. Zelf iets opnemen
NEDERLANDS
Hoofdstuk 4. Zelf iets opnemen
U kunt ook eigen muziek (of versies van bestaande stukken)
opnemen.
En natuurlijk kunt u uw spel beluisteren – en er zelfs een
tweede partij aan toevoegen.
De opnamefunctie van de HP107e werkt als volgt:
• Opname tijdens de weergave van een intern stuk (→
“Opnemen tijdens de weergave van een intern stuk”,
blz. 226)
• Apart opnemen van de linker- en rechterhand (→
“Aparte opname van de linker- en rechterhand”,
blz. 227)
Opmerkingen i.v.m. de opname
• Intern is er plaats voor één opname.
Als de volgende boodschap verschijnt…
‘Right’-spoor
Layer
Layer-klank
Oorspronkelijke klank
(piano)
Octavering
Layer-klank (één octaaf
hoger)
Oorspronkelijke klank
* Als u methode B of C wilt gebruiken, moet u vóór het starten
van de opname de [Left]- en [Right]-knop indrukken (beide
indicators moeten knipperen).
Nieuw stuk opnemen
Ziehier hoe u kunt opnemen zonder begeleiding van een
intern stuk.
3
2 1 4 6,8 5,7
De HP107e bevat een songgeheugen (blz. 231) waarmee
u het laatst opgenomen stuk intern kunt opslaan.
Instellingen voor de opname (kies “USr”)
1. Druk op de [Song/Tempo]-knop (indicator moet
rood oplichten).
Het display beeldt het nummer van het gekozen stuk af.
Als de vorige opname mag worden gewist, moet u op de
[Rec]-knop drukken.
Over de sporen van de Recorder
A. Opname starten zonder een spoor te kiezen
Als noch het linker, noch het rechter spoor data bevat,
wordt uw spel automatisch op het “Right”-spoor opgenomen. Als hetzij het linker, hetzij het rechter spoor al data
bevat, wordt uw spel automatisch op het nog vrije spoor
opgenomen.
B. Opname in de Dual-, Acoustic Layer- of Split-mode
‘Left’-spoor
‘Right’-spoor
Dual
Klank van de rechter keuzeknop
Klank van de linker keuzeknop
“Acoustic
Layer”
Layer-klank
Oorspronkelijke klank
(piano)
Split
Klank van de linker helft
Klank van de rechter helft
Klank kiezen en tempo instellen
3. Kies de klank die u voor de opname wilt gebruiken (blz. 214).
4. Schakel eventueel de metronoom in.
Start de metronoom even om het tempo en de maatsoort te
kunnen instellen (blz. 221).
Opm. Als u een partij aan een bestaande opname toevoegt, hanteert die het tempo en de maatsoort van het eerder opgenomen materiaal.
5. Druk op de [Rec]-knop.
De [Rec]-indicator licht op, terwijl de [Play]-indicator
knippert. Dat betekent dat het instrument klaar is voor de
opname.
225
NEDERLANDS
Functie
2. Druk de [+]- en [–]-knop samen in om “USr” te
kiezen.
NEDERLANDS
Wilt u de eerder gemaakte opname niet verliezen, dan
moet u op de [Play]-knop drukken. Maar dan kunt u niet
opnemen.
NEDERLANDS
Als u een stuk kiest, terwijl u net een ander nummer hebt
opgenomen, verschijnt de volgende boodschap in het display. Bovendien knippert de indicator van de [Record]knop.
‘Left’-spoor
NEDERLANDS
• De HP107e bevat een songgeheugen (blz. 231) waarin u
het laatst opgenomen stuk intern kunt opslaan. Opnamen, die u niet opslaat, worden gewist, zodra u het
instrument uitschakelt. Vergeet dus niet uw favoriete
stuk weg te schrijven. U kunt uw stukken echter ook
met een cassettespeler e.d. opnemen of de data naar
een MIDI-apparaat doorseinen om ze daar op te slaan.
Zie hiervoor “Hoofdstuk 6. Werken met externe apparaten” (blz. 233).
Functie
NEDERLANDS
• Opname van uw eigen spel (→ “Nieuw stuk opnemen”, blz. 225)
C. Opname, wanneer de “Layer”- of “Octave”-functie aan het
middelste pedaal toegewezen is
HP107_e.book Page 226 Tuesday, October 19, 2004 10:41 PM
HP107e – Hoofdstuk 4. Zelf iets opnemen
Start de opname
6. De opname begint zodra u op het klavier speelt of
op de [Play]-knop drukt.
Nu wordt er eerst twee maten afgeteld. Daarna begint de
opname.
U kunt de opname ook starten door minstens één noot op
het klavier te spelen (dan hoeft u namelijk niet op de
[Play]-knop te drukken). In dat geval hoort u uiteraard
geen aftel.
Zodra de opname begint, lichten de [Play]- en [Rec]-indicator op.
Speel het stuk dat u wilt opnemen.
Opnemen tijdens de
weergave van een intern
stuk
U kunt ook opnemen wat u bij één van de interne stukken
speelt.
De HP107e bevat een songgeheugen (blz. 231) waarmee
u het laatst opgenomen stuk intern kunt opslaan.
U zou ook enkel de partij van de [Left]- of [Right]-knop
kunnen weergeven, terwijl u de partij van de andere hand
zelf speelt en opneemt.
Stop de opname
7. Druk op de [Play]- of [Rec]-knop.
De [Play]- en [Rec]-indicator doven en de opname stopt.
Over de “USr”-boodschap
Na de opname verandert de “
”-boodschap in
“
”.
Een “.” rechtsonder in het display betekent dat het Usergeheugen al data bevat.
Beluister uw opname
8. Druk op de [Play]-knop.
Nu hoort u wat u zonet hebt opgenomen.
Druk nog een keer op de [Play]-knop om de weergave
weer te stoppen.
Als u vóór de opname geen spoor kiest, wordt uw spel
automatisch op het [Right]-spoor opgenomen.
Zie “Aparte opname van de linker- en rechterhand”
(blz. 227) om de linker- en rechterhand apart op te
nemen.
2 1 3 6,8 4,7 5
Stuk kiezen
1. Druk op de [Song/Tempo]-knop (indicator moet
rood oplichten).
Het display beeldt nu het nummer van het gekozen stuk
af.
2. Kies met de [+]- of [–]-knop het stuk dat u als basis
wilt gebruiken.
3. Activeer eventueel de metronoom en stel het
gewenste tempo in (blz. 221).
4. Druk op de [Rec]-knop.
De indicator van de [Rec]-knop licht op.
Kies het op te nemen spoor
5. Druk op de [Left]- of [Right]-knop.
Om de partij van de linkerhand zelf op te nemen moet u
op de [Left]-knop drukken; wilt u de partij van de rechterhand zelf spelen, dan moet u op de [Right]-knop drukken.
De indicators van de ingedrukte knop en de [Play]-knop
knipperen. De HP107e is nu klaar voor de opname.
Als de “dEL”-boodschap in het display verschijnt, zie
dan blz. 225.
Start de opname
6. Druk op de [Play]-knop.
Het instrument telt nu eerst twee maten af en start vervolgens de opname.
Speel mee met de interne partij.
Stop de opname
7. Druk op de [Play]- of [Rec]-knop.
De [Play]- en [Rec]-indicator doven en de opname stopt.
Uw opname bevindt zich in het “USr (User)”-geheugen.
Beluister uw opname
8. Druk op de [Play]-knop.
Nu hoort u wat u zonet hebt opgenomen.
226
HP107_e.book Page 227 Tuesday, October 19, 2004 10:41 PM
Hoofdstuk 4. Zelf iets opnemen
Stop de opname
5. Druk op de [Play]- of [Rec]-knop.
De [Play]- en [Rec]-indicator doven en de opname stopt.
Aparte opname van de linker- en rechterhand
Het voordeel van deze aanpak is dat u maar één partij
hoeft over te doen, als u zich tijdens de opname vergist.
Beluister uw opname
6. Druk op de [Play]-knop.
Nu hoort u wat u zonet hebt opgenomen.
Druk nog een keer op de [Play]-knop om de weergave
weer te stoppen.
NEDERLANDS
We hadden het er al over dat de Recorder van de HP107e
twee sporen biedt. Daar zou u gebruik van kunnen maken
om de partij van de linker- en rechterhand apart op te
nemen. Kies met de [Left]- en [Right]-knop het spoor
waarop u wilt opnemen.
De HP107e bevat een songgeheugen (blz. 231) waarmee
u het laatst opgenomen stuk intern kunt opslaan.
Wat u zonet hebt gespeeld bevindt zich nu op het eerder
gekozen spoor.
Om een bijkomende partij op het resterende spoor op te
nemen moet u met stap 2 vervolgen en die partij eveneens
inspelen. Tijdens de tweede opname hoort u dan de daarnet opgenomen partij.
NEDERLANDS
Druk nog een keer op de [Play]-knop om de weergave
weer te stoppen.
Wissen van uw eigen
opname
1 4,6 2,5 3
Opm.
Als u een tweede partij opneemt zonder de eerste partij te
wissen, hanteert de Recorder het tempo van de eerste partij.
1. Schakel eventueel de metronoom in (blz. 221).
2. Druk op de [Rec]-knop.
De [Rec]-indicator licht op, terwijl de [Play]-indicator
knippert. Dat betekent dat het instrument klaar is voor de
opname.
Met het volgende wist u enkel de partij van het gekozen
spoor.
Houd de [Left] of [Right]-knop ingedrukt, terwijl
u op de [Rec]-knop drukt.
De indicator van de ingedrukte spoorknop dooft nu – en
dat betekent dat de betreffende partij verdwenen is.
■ Stuk wissen
Om de volledige “Usr”-Song te wissen moet u als volgt te
werk gaan:
Houd de [Song/Tempo]-knop ingedrukt, terwijl u
op de [Rec]-knop drukt.
NEDERLANDS
Zie stap 1 en 2 onder “Nieuw stuk opnemen” (blz. 225)
voor het kiezen van “USr”. Dat is alleen nodig om met een
schone lei te beginnen. Als u zich tijdens de opname door
een intern of uw zelf opgeslagen stuk wilt laten begeleiden, moet u dat selecteren (zie de stappen 1 en 2 onder
“Kiezen van het stuk dat u wilt beluisteren” (blz. 212)).
■ Wissen van één spoor
NEDERLANDS
Ziehier wat u moet doen om één of beide sporen van het
“Usr”-geheugen te wissen:
Het display beeldt nu de volgende boodschap af en de
indicator van de [Rec]-knop knippert.
Als één of beide sporen al data bevatten, licht(en) de bijbehorende spoorknop(pen) eveneens op.
3. Schakel de [Left]- of [Right]-knop uit, als u niets
op het betreffende spoor wilt opnemen.
U kunt niet op beide sporen tegelijk opnemen (kies dus
hetzij [Left], hetzij [Right]).
Als u de opname toch niet wilt wissen, moet u op de
[Play]- of [Song/Tempo]-knop drukken.
7. Druk nog een keer op de [Rec]-knop.
Het opgenomen stuk wordt nu gewist.
NEDERLANDS
De knop van het spoor, dat u voor de opname kiest, begint
zo meteen te knipperen.
Start de opname
4. Druk op de [Play]-knop.
NEDERLANDS
Nu wordt er eerst twee maten afgeteld. Daarna begint de
opname. Speel het stuk dat u wilt opnemen.
U kunt de opname ook starten door minstens één noot op
het klavier te spelen (dan hoeft u namelijk niet op de
[Play]-knop te drukken). In dat geval hoort u uiteraard
geen aftel.
227
HP107_e.book Page 228 Tuesday, October 19, 2004 10:41 PM
HP107e – Hoofdstuk 5. Andere handige functies
Hoofdstuk 5. Andere handige functies
Geavanceerde instellingen
(functies)
Er zijn nog een aantal verborgen functies die u als volgt
instelt:
Oproepen van de functiemode
1. Druk de [Split]- en [Chorus]-knop samen in.
De HP107e activeert de gekozen mode.
De indicators van de [Split]- en [Chorus]-knop evenals
van de knop, die aan de gekozen functie is toegewezen,
knipperen.
Knop
Functie
blz.
Local-functie
Piano Resonance
[Key Off]
blz. 235
MIDI-zendkanaal
Piano Resonance
[Strings]
blz. 235
USB-driverinstelling
Piano Resonance
[Damper]
blz. 232
Opslag van de instellingen
[Metronome/
Count In]
Kiezen van de benodigde functie
2. Druk op de knop die aan de benodigde functie is
toegewezen.
De indicators van de knop, die aan de gekozen functie is
toegewezen, evenals van de [Split]- en [Chorus]-knop
knipperen.
blz. 231
Opslag van de opname
blz. 231
[Song/Tempo]
Als u de knop van de gekozen functie ingedrukt houdt,
wordt de functienaam in het display afgebeeld.
V-LINK
blz. 232
[Right]
Knop
Functie
blz.
Algemene stemming
Verzenden van de opname via
MIDI
blz. 229
[Piano]
[Left]
blz. 235
Stemmingssysteem
blz. 229
[E. Piano]
“Grand Space”-mode
blz. 230
[Grand Space]
Stretch Tuning
blz. 229
[Harpsichord]
Laden van de fabrieksinstellingen
Key Touch
[Touch]
blz. 231
Octave Shift
blz. 230
[Organ]
3. Stel met de [–]- of [+]-knop de gewenste waarde
in.
Toewijzen van het demperpedaal
aan de linker klavierhelft
[Strings]
Meer details over deze functies vindt u verderop.
blz. 230
Druk de [–]- en [+]-knop samen in om weer de voorgeprogrammeerde waarde te kiezen.
Functiemode verlaten
4. Druk op de [Split]- of [Chorus]-knop.
De indicator van die knop werkt nu weer “normaal”.
228
HP107_e.book Page 229 Tuesday, October 19, 2004 10:41 PM
Hoofdstuk 5. Andere handige functies
Als u nauwelijks of helemaal niet te stemmen akoestische
instrumenten moet begeleiden, kunt u de algemene stemming van de HP107e wijzigen. Voor het stemmen maakt
men in de regel gebruik van een referentienoot – de “A4”.
Meer bepaald worden alle instrumenten dan op een
bepaalde toonhoogte afgestemd.
Druk in stap 2 onder “Geavanceerde instellingen (functies)” (blz. 228) op de [Piano]-knop. Het display toont nu
bv. de volgende waarde.
Waarde
415.3Hz~440.0Hz~466.2Hz
* Deze instelling kunt u in een intern geheugen van de HP107e
opslaan (blz. 231).
■ Ander stemmingssysteem kiezen
U kunt stemmingen kiezen die in de klassieke periode
(barokmuziek e.d.) werden gehanteerd.
Druk in stap 2 onder “Geavanceerde instellingen (functies)” (blz. 228) op de [E.Piano]-knop. Het display toont
nu bv. de volgende waarde.
Tonica
U kunt kiezen uit acht verschillende stemmingen.
6
Een gedeeltelijk compromis van de reine
Middentoon stemming, die transposities/modulaties
toelaat.
7
Deze stemming wordt aan de filosoof Pythagoras toegeschreven. Hij zou de ambiguïteit tussen kwarten en kwinten opgelost
Pythagorisch
hebben. Ze is vooral geschikt voor melodieën, terwijl drieklanken ietwat vals klinken.
8
Werckmeister
Deze stemming combineert de middentoonmet de Pythagorische stemming. Ze is voor
alle toonaarden geschikt (eerste techniek,
III).
Fabrieksinstelling1 C
2
Rein
(majeur)
Deze stemming lost de ambiguïteit van
kwinten en tertsen op. Ze is niet geschikt
voor melodieën, en transposities zijn helemaal uit den boze. Akkoorden klinken echter “mooier” dan normaal.
3
Rein
(mineur)
Zelfde principe als de reine majeurstemming. Deze is echter bedoeld voor het spelen in mineur.
4
Arabisch
Deze stemming laat toe om oosterse muziek
te spelen.
Houd de [E. Piano]-knop ingedrukt, terwijl u op de
toets van de noot drukt, die als tonica moet fungeren.
De tonica wordt als volgt in het display afgebeeld:
Display
C
C
d
E_
E
F
F
G
A_ A
b_
b
Benaming
C
C
D
E
E
F
F
G
A
B
B
A
Voor de gelijkzwevende stemming hoeft u de tonica niet
in te stellen.
* Als u tijdens de opname een andere stemming gebruikt dan de
gelijkzwevende en wilt dat die tijdens de weergave eveneens
wordt gehanteerd, moet u ze opnieuw kiezen.
* Wanneer u met andere instrumenten samenspeelt, kan het
gebeuren dat bepaalde noten vals klinken. Probeer dan de
andere instrumenten op de HP107e af te stemmen.
* Deze instelling kunt u in een intern geheugen van de HP107e
opslaan (blz. 231).
■ Stretch Tuning (andere stemmingscurve)
Vleugels worden vaak zo gestemd dat de lage noten iets
onder en de diskantnoten iets boven de toon staan
gestemd – in verhouding tot de gelijkzwevende temperatuur. In het Engels noem je dit “Stretch Tuning” (uitgerokken stemming).
Druk in stap 2 onder “Geavanceerde instellingen (functies)” (blz. 228) op de [Harpsichord]-knop. Het display
toont nu bv. de volgende waarde.
OFF
Normale stemming. Een goede keuze, wanneer u
twee klanken stapelt (Dual, blz. 219) of met
andere instrumenten samenspeelt.
229
NEDERLANDS
Deze stemming verdeelt een octaaf in twaalf
gelijk grote intervallen. Dit zorgt voor een
minimum aan ambiguïteit.
Voor andere stemmingen dan de gelijkzwevende temperatuur moet u ook de grondtoon (tonica voor majeur en
sixt voor mineur) instellen om de juiste toonaard te kiezen.
NEDERLANDS
Verklaring
Gelijkzwevend
1
5
NEDERLANDS
Vandaag de dag gaan we er eigenlijk van uit dat alle
instrumenten volgens de gelijkzwevende temperatuur
worden gestemd. In de klassieke periode werden echter
verschillende stemmingen gehanteerd. Door die te kiezen
beseft u pas goed hoe de betreffende stukken eigenlijk
bedoeld waren.
Stemmingssysteem
Deze stemming vormt een verbetering van
de middentoon- en reine stemming en kan
voor het spelen in nagenoeg elke toonaard
worden gebruikt (III).
Kirnberger
NEDERLANDS
Deze stemming wordt gehanteerd tot u het instrument
weer uitschakelt.
Display
Verklaring
Tonica
Fabrieksinstelling440.0Hz
Stemmingssysteem
Stemmingssysteem
NEDERLANDS
Het display kan maar drie cijfers weergeven. Daarom
worden enkel de laatste drie cijfers van de gekozen stemming getoond. De afbeelding hierboven slaat dus op
“440.0Hz”.
Display
NEDERLANDS
■ Algemene stemming (Master Tune)
HP107_e.book Page 230 Tuesday, October 19, 2004 10:41 PM
HP107e – Hoofdstuk 5. Andere handige functies
On
Een stemmingscurve waarbij de bas lager en de
diskant hoger staan gestemd dan bij de gelijkzwevende temperatuur. Vooral geschikt voor pianosolo’s.
■ Werking van het ‘Grand Space’-effect
Druk in stap 2 onder “Geavanceerde instellingen (functies)” (blz. 228) op de [Grand Space]-knop. Het display
toont nu bv. de volgende waarde.
FabrieksinstellingOn
* Deze instelling is enkel beschikbaar voor pianoklanken.
* Deze instelling kunt u in een intern geheugen van de HP107e
opslaan (blz. 231).
■ Toonhoogte in octaven transponeren (Octave
Shift)
De toonhoogte van de linker klank in de Split-mode
(blz. 220), de rechter klank in de Dual-mode (blz. 219) of
de toegevoegde klank in de “Acoustic Layer”-mode
(blz. 218) kan in octaven worden getransponeerd. Dat
noemen we de “Octave Shift”-functie.
Druk in stap 2 onder “Geavanceerde instellingen (functies)” (blz. 228) op de [Organ]-knop. Het display toont nu
bv. de volgende waarde.
De betreffende klank kan maximaal twee octaven lager
(–2) of hoger (+2) worden getransponeerd.
* In bepaalde gevallen leidt de octaaftranspositie ertoe dat de
gespeelde noten zich buiten het aanbevolen bereik van de
gehanteerde klank bevinden en dus ietwat onnatuurlijk overkomen.
■ Toewijzen van het demperpedaal aan de linker klavierhelft
In de Split-mode (blz. 220) kunt u er op de volgende
manier voor zorgen dat het demperpedaal de links
gespeelde noten beïnvloedt.
Druk in stap 2 onder “Geavanceerde instellingen (functies)” (blz. 228) op de [String]-knop. Het display toont nu
bv. de volgende waarde.
On
OFF
Het demperpedaal heeft betrekking op de rechts
en links gespeelde noten.
Het demperpedaal heeft enkel betrekking op de
rechts gespeelde noten (in de Split-mode).
Instelling
Omschrijving
1
Na keuze van deze “Grand Space”-mode kunt u
ook met een hoofdtelefoon werken, omdat het
diepte-effect voor dit soort toepassingen wordt
geoptimeerd. Gebruikt u geen hoofdtelefoon, dan
wordt de diepte voor de luidsprekers aangepast.
2
Het instrument hanteert altijd de optimale instellingen voor de luidsprekers (zelfs wanneer u een
hoofdtelefoon gebruikt).
Het “Grand Space”-effect wordt zelfs aan de signalen toegevoegd, die via de Output-connectors naar
de buitenwereld worden gestuurd.
3
Het instrument hanteert altijd de optimale instellingen voor de hoofdtelefoon (zelfs wanneer u geen
hoofdtelefoon gebruikt).
* Deze instelling kunt u in een intern geheugen van de HP107e
opslaan (blz. 231).
‘Vergrendelen’ van de
bedieningsfuncties
U kunt bijna alle knoppen en functies van de HP107e vergrendelen en zorgen dat alleen de pianoklank beschikbaar is.
Dat is bv. handig voor de muziekles, als u niet wilt dat de
leerlingen tijdens de les andere klanken uitproberen of met
de Recorder beginnen te spelen.
Eens de bedieningsfuncties vergrendeld zijn, kunt u enkel
nog de vleugelklank gebruiken.
1. Zet het volume op de minimumwaarde en druk op
de [Power On]-schakelaar om het instrument uit te
schakelen.
2. Houd de [Piano]-knop ingedrukt, terwijl u op de
[Power On]-knop drukt.
Houd deze knop nog enkele seconden ingedrukt.
Het display beeldt nu de volgende boodschap af:
FabrieksinstellingOFF
* Deze instelling kunt u in een intern geheugen van de HP107e
opslaan (blz. 231).
Nu zijn alle knoppen vergrendeld.
Stel het gewenste volume in.
U kunt enkel nog piano spelen en het volume instellen.
Om deze grendelfunctie weer uit te schakelen moet u het
volume op de minimumwaarde zetten en het instrument
opnieuw inschakelen.
230
HP107_e.book Page 231 Tuesday, October 19, 2004 10:41 PM
Hoofdstuk 5. Andere handige functies
Opslaan van uw laatste
opname (Song Backup)
Indien nodig, kunt u voor alle parameters van de HP107e
opnieuw de fabriekswaarden kiezen.
Bij het uitschakelen van de HP107e wordt uw opname weer
gewist, tenzij u ze eerst in een speciaal daarvoor bedoeld
geheugen opslaat. De functie waarmee u dat doet heet “Song
Backup”.
* Het intern opgeslagen stuk (blz. 231) wordt daarbij niet
gewist.
1. Houd de [Split]-knop ingedrukt, terwijl u op de
[Chorus]-knop drukt.
2. Druk op de Key Touch [Touch]-knop.
Het display beeldt de volgende boodschap af.
* Deze functie is alleen beschikbaar, nadat u iets hebt opgenomen.
1. Houd de [Split]-knop ingedrukt, terwijl u op de
[Chorus]-knop drukt.
De HP107e kiest de instellingsmode.
2. Druk op de [Song/Tempo]-knop.
De indicator van die knop begint te knipperen.
NEDERLANDS
De HP107e activeert de gekozen mode.
NEDERLANDS
Laden van de fabrieksinstellingen
(Factory Reset)
Het display beeldt de volgende boodschap af.
3. Druk op de [Rec]-knop.
De fabrieksinstellingen worden geladen.
3. Druk op de [Rec]-knop.
Het stuk wordt opgeslagen.
Zodra de data van uw opname opgeslagen zijn, werken
de knoppen en functies weer normaal.
* Wacht met het uitschakelen tot de boodschap “End” in het display verschijnt. Door de HP107e te vroeg uit te schakelen
beschadigt u namelijk het interne geheugen, wat ertoe kan leiden dat het instrument niet meer naar behoren werkt.
Heel wat parameters krijgen bij het uitschakelen van het
instrument weer hun fabriekswaarde. Om uw instellingen op
een later tijdstip opnieuw te kunnen gebruiken moet u ze
opslaan. De functie waarmee u dat doet heet “Memory
Backup”.
■ Wissen van een intern opgeslagen stuk
1. Houd de [Split]-knop ingedrukt, terwijl u op de
[Chorus]-knop drukt.
2. Druk op de [Song/Tempo]-knop.
Het display beeldt de volgende boodschap af.
NEDERLANDS
Opslaan van de gemaakte
instellingen (Memory Backup)
* Stukken, die u intern opslaat, kunt u op dezelfde manier kiezen
als de interne stukken (blz. 212). Een intern opgeslagen stuk
herkent u aan de volgende boodschap:
NEDERLANDS
Zodra de fabriekswaarden geladen zijn, beeldt het display de volgende boodschap af. Schakel het instrument
uit.
* Meer details over wat er precies wordt opgeslagen vindt u
onder “Intern opgeslagen parameterinstellingen” (blz. 237).
De HP107e kiest de instellingsmode.
2. Druk op de [Metronome/Count In]-knop.
Druk op de [Play]-knop om deze functie weer te verlaten.
3. Druk op de [Rec]-knop.
Het opgeslagen stuk wordt gewist.
Het display en de knoppen werken nu weer “normaal”.
De indicator van die knop begint te knipperen.
Het display beeldt de volgende boodschap af.
NEDERLANDS
1. Houd de [Split]-knop ingedrukt, terwijl u op de
[Chorus]-knop drukt.
3. Druk op de [Rec]-knop.
NEDERLANDS
De instellingen worden opgeslagen.
Zodra de instellingen opgeslagen zijn werken de knoppen en functies weer normaal.
231
HP107_e.book Page 232 Tuesday, October 19, 2004 10:41 PM
HP107e – Hoofdstuk 5. Andere handige functies
V-LINK-functie gebruiken
Door de HP107e op een V-LINK-compatibel videoapparaat
aan te sluiten kunt u de beeldweergave vanop de HP107e
beïnvloeden.
V-LINK
V-LINK (
) is een door Roland ontwikkelde
functie voor de integratie van muziek met videobeelden.
Met V-LINK-compatibele videoapparaten kunt u beeldmateriaal bij uw spel betrekken en op die manier ook de
visuele kant van uw optredens bepalen.
V-LINK gebruiken
Instellingen voor de USBdriver
Alvorens de USB-poort op een computer aan te sluiten moet
u eerst het volgende instellen.
1. Houd de [Split]-knop ingedrukt, terwijl u op de
[Chorus]-knop drukt.
De HP107e kiest de instellingsmode.
2. Druk op de Piano Resonance [Damper]-knop.
De indicator van die knop begint te knipperen.
Het display beeldt de volgende boodschap af.
1. Houd de [Split]-knop ingedrukt, terwijl u op de
[Chorus]-knop drukt.
De HP107e kiest de instellingsmode.
2. Druk op de [Right]-knop.
De indicator van die knop begint te knipperen.
Het display beeldt de volgende boodschap af.
OFF
On
De V-LINK-functie is uit.
De V-LINK-functie is actief. Nu kunt u met de
twaalf onderste toetsen (helemaal links) de beeldweergave beïnvloeden.
FabrieksinstellingOFF
3. Schakel de V-LINK-functie met de [–]- of [+]-knop
in.
Nu kunt u met de twaalf onderste toetsen (helemaal
links) de beeldweergave beïnvloeden.
* Zolang de V-LINK-functie actief is, hoort u niets, wanneer u
de twaalf onderste toetsen indrukt.
Functiemode verlaten
4. Druk op de [Split]- of [Chorus]-knop.
De indicator van die knop keert terug naar zijn vorige
stand.
232
3. Kies met de [–]- of [+]-knop de geschikte driverinstelling.
Boodschap
Omschrijving
vdr (Vendor)
Kies deze instelling, wanneer u de bijgeleverde
driver voor de USB-verbinding wilt gebruiken.
GEn (Generic)
Kies deze instelling, wanneer u de driver van
het besturingssysteem (op uw computer) voor
de USB-verbinding wilt gebruiken.
Functiemode verlaten
4. Druk op de [Split]- of [Chorus]-knop.
De indicator van die knop keert terug naar zijn vorige
stand.
HP107_e.book Page 233 Tuesday, October 19, 2004 10:41 PM
Hoofdstuk 6. Werken met externe apparaten
NEDERLANDS
Hoofdstuk 6. Werken met externe apparaten
Aansluiten van audioapparaten
Output R/L (Line Out,
Aux Out)
NEDERLANDS
Door de HP107e op andere audio-apparaten aan te sluiten
kunt u zijn geluid bv. via uw HiFi-keten of een PA versterken, of uw spel op cassette e.d. opnemen.
Externe audio-apparaten/instrumenten
aansluiten op de HP107e
HP107e
Voor deze verbindingen hebt u kabels met zgn. “jack”-stekkers nodig (optie).
Aansluitvoorbeelden
* Om schade aan de luidsprekers en andere apparaten te voorkomen moet u het volume van alle apparaten op de minimumwaarde zetten en de betrokken apparaten uitschakelen alvorens
ze op elkaar aan te sluiten.
Input R/L (Line In,
Aux In)
HP107e
1. Schakel het externe apparaat in.
2. Schakel de HP107e in.
3. Regel het volume op het externe apparaat.
* Op de HP107e zelf kunt u het volume van het externe apparaat niet bijregelen.
Uitschakelen
1. Zet het volume van de HP107e en de externe apparaten op de minimumwaarde.
NEDERLANDS
Uitversterken van de HP107e met een
extern apparaat of opnemen van uw spel
❍ Ziehier de volgorde waarin u de apparaten moet inschakelen, wanneer u met externe apparaten werkt:
2. Schakel de HP107e uit.
3. Schakel de externe apparaten uit.
1. Schakel de HP107e in.
2. Schakel het externe apparaat in.
3. Regel het volume op het externe apparaat.
* Stel het volume van de HP107e in.
Opname van de HP107e-signalen
4. Start de opname van het externe apparaat.
5. Speel op het klavier van de HP107e.
Via de USB-poort kunt u de HP107e op een computer
aansluiten. Details daaromtrent vindt u in de “USB Installation Guide”.
233
NEDERLANDS
* Wanneer u de HP107e voor het eerst op uw computer aansluit,
moet u de “USB-driver” (zie de bijgeleverde CD-ROM) op de
computer installeren. Details daaromtrent vindt u in de “USB
Installation Guide”.
* De USB-poort zendt alleen MIDI-data.
* Om schade aan de luidsprekers en andere apparaten te voorkomen moet u het volume van alle apparaten op de minimumwaarde zetten en de betrokken apparaten uitschakelen alvorens
ze op elkaar aan te sluiten.
* De benodigde USB-kabel wordt niet bijgeleverd. Die kabel
vindt u bij uw Roland-dealer.
* Gebruik een USB-kabel met een maximale lengte van 3 meter.
* Schakel de HP107e uit alvorens het MIDI-programma op uw
computer te starten. Schakel de HP107e nooit in of uit, terwijl
een MIDI-programma op uw computer draait.
* Maak c.q. verbreek nooit de USB-aansluiting, terwijl de
HP107e ingeschakeld is.
* Als u geen gebruik maakt van de USB-verbinding moet u de
aansluiting van de betreffende kabel op de HP107e verbreken.
* Als de computer de sluimerstand kiest c.q. als u de HP107e
uit- en weer inschakelt, verloopt de communicatie niet meer
naar behoren en reageert het instrument niet meer zoals verwacht.
NEDERLANDS
6. Als u gedaan hebt met spelen, moet u de opname
van het externe apparaat weer stoppen.
Aansluiten van de USB-poort
NEDERLANDS
❍ Ziehier de volgorde waarin u de apparaten moet inschakelen, wanneer u met externe apparaten werkt:
HP107_e.book Page 234 Tuesday, October 19, 2004 10:41 PM
HP107e – Hoofdstuk 6. Werken met externe apparaten
MIDI-apparaten aansluiten
Spelen op de HP107e en aansturen van een
externe MIDI-klankbron
Door dit instrument op een extern MIDI-apparaat aan te
sluiten kunt u de klanken van dat apparaat aansturen (en
dus op dezelfde manier bespelen als uw piano). U kunt
uw spel bovendien direct (zonder de omweg via de
Recorder) opnemen en dan op diskette e.d. opslaan.
Geluidsmodule
THRU
MIDI
OUT
IN
HP107e
■ Wat is MIDI?
MIDI is de afkorting van “Musical Instrument Digital
Interface”. Meer bepaald gaat het om een standaard voor
het uitwisselen van muziekdata tussen elektronische
muziekinstrumenten en computers.
De HP107e is uitgerust met MIDI-aansluitingen en kan
MIDI-data dus enerzijds zenden en anderzijds ontvangen. Op die manier beschikt u over tal van mogelijkheden
voor nog meer muziekplezier met uw HP107e.
* Meer details over de mogelijkheden vind u in het apart verkrijgbare “MIDI Implementation”-boekje. Het bevat een
opsomming van alle MIDI-functies, die dit instrument ondersteunt. Als u dit boekje nodig hebt, neemt u het best contact op
met uw Roland-dealer of de distributeur in uw streek.
Aansluitvoorbeelden
* Om schade aan de luidsprekers en andere apparaten te voorkomen moet u het volume van alle apparaten op de minimumwaarde zetten en de betrokken apparaten uitschakelen alvorens
ze op elkaar aan te sluiten.
Aansturen van de HP107e via een sequencer/opname van uw spel met een externe
sequencer
MT-serie
* De MT-90s heeft geen
MIDI OUT-connector
Out
MIDI
Instellen van de MIDIfuncties
Laten we nu kijken hoe je het zendkanaal en andere
MIDI-parameters instelt.
Oproepen van de functiemode
1. Houd de [Split]-knop ingedrukt, terwijl u op de
[Chorus]-knop drukt.
De HP107e kiest de instellingsmode.
De indicators van de [Split]- en [Chorus]-knop evenals
van de knop, die aan de gekozen functie is toegewezen,
knipperen.
Instellen van de MIDI-functies
2. Druk op de knop die aan de benodigde functie is
toegewezen.
De indicators van de knop, die aan de gekozen functie is
toegewezen, evenals van de [Split]- en [Chorus]-knop
knipperen.
In
Meer details over deze functies vindt u verderop.
HP107e
3. Stel met de [–]- of [+]-knop de gewenste waarde
in.
Als u de [–]-knop ingedrukt houdt en tegelijk op [+]
drukt, wordt weer de oorspronkelijke waarde gekozen.
Functiemode verlaten
* Schakel de Local-functie uit, wanneer u de HP107e op een
MIDI-sequencer aansluit. Zie ook “Local-functie: verbinding
tussen het klavier en de klankbron” (blz. 235). Bovendien moet
u de MIDI THRU-functie van de MIDI-sequencer inschakelen
(om te zorgen dat de via MIDI IN ontvangen commando’s
meteen weer naar de MIDI OUT-aansluiting van de sequencer
worden uitgestuurd). Meer details hierover vindt u in de
handleiding van de MIDI-sequencer.
234
4. Druk op de [Split]- of [Chorus]-knop.
De indicator van die knop werkt nu weer “normaal”.
HP107_e.book Page 235 Tuesday, October 19, 2004 10:41 PM
Hoofdstuk 6. Werken met externe apparaten
MIDI laat de overdracht en ontvangst op 16 MIDI-kanalen (1~16) tegelijk toe. Het volstaat echter niet om
gewoon een kabel aan te sluiten. De zender en ontvanger
moeten namelijk op hetzelfde kanaal worden ingesteld.
Anders worden de noten niet door het ontvangende
instrument gespeeld c.q. kiest dit laatste geen klanken
enz.
Klankbron
Local uit
* Als u een MT-sequencer van Roland aansluit, hoeft u de
Local-functie niet handmatig uit te schakelen. Bij het inschakelen van een MT wordt de Local-functie immers automatisch
geactiveerd. Dit gebeurt automatisch, als u de apparaten in de
volgorde HP107e → MT inschakelt.
Druk in stap 2 onder “Instellen van de MIDI-functies” op
de Piano Resonance [Key Off]-knop. Het display toont
nu bv. de volgende waarde.
On, OFF
FabrieksinstellingOn
Fabrieksinstelling1
■ Local-functie: verbinding tussen het klavier
en de klankbron
Als u het instrument op een MIDI-sequencer aansluit,
moet u de Local-functie uitschakelen (“OFF”).
Als u deze functie activeert, worden de met de Recorder
opgenomen data naar de MIDI OUT-connector van de
HP107e gestuurd en kunnen dus met een externe sequencer of computer worden opgenomen. Kiest u “OFF”, dan
worden de data niet verzonden.
Druk in stap 2 onder “Instellen van de MIDI-functies” op
de [Left]-knop. Het display toont nu bv. de volgende
waarde.
(1) Local aan
Sequencer
MIDI
IN
Klankbron
MIDI
OUT
MIDI
IN
Local-functie “ON”: Het klavier is met de interne klankbron verbonden.
U hoort wat u speelt
Ziehier wat u moet doen om de songdata van de HP107e
naar de externe sequencer door te seinen. In dit geval
moet u de MIDI Thru-functie van de sequencer uitschakelen. Meer details hierover vindt u in de handleiding
van de MIDI-sequencer.
Sluit een MIDI-sequencer (bv. van de MT-serie) aan
(blz. 234).
Neem een stuk op met de HP107e (blz. 225).
Zet deze parameter op “On”.
Klankbron
Local aan
NEDERLANDS
(2) Thru-functie aan
Elke gespeelde noot
weerklinkt dubbel
On, OFF
FabrieksinstellingOFF
Geheugen
MIDI
OUT
Waarde
NEDERLANDS
Zoals u hierna ziet, bereiken de bij het spelen op het klavier gegenereerde commando’s de interne klankbron
anders via twee routes: (1) en (2). Daarom klinken de
gespeelde noten dan vreemd of vallen ze gedeeltelijk
weg. Om dat te voorkomen, moet u verbinding (1) verbreken door de Local-functie uit te schakelen (“Local
Off”).
■ Verzenden van de opname
NEDERLANDS
Waarde
1~16
Waarde
Noten worden niet weergegeven
NEDERLANDS
* De HP107e ontvangt op alle MIDI-kanalen (1~16).
* Als u de HP107e in de Dual- (blz. 219) of Split-mode
(blz. 220) gebruikt, worden de data van de linker klankkeuzeknop op MIDI-kanaal 5 (Dual-mode) of 3 (Split-mode) verzonden. De instelling van die zendkanalen kunt u niet wijzigen.
Als u dus in de Dual- of Split-mode werkt en tegelijk een
externe module wilt aansturen, moet u op het externe instrument eventueel andere MIDI-kanalen dan 3 en 5 kiezen.
Druk in stap 2 onder “Instellen van de MIDI-functies” op
de Piano Resonance [String]-knop. Het display toont
nu bv. de volgende waarde.
Local-functie “OFF”: Het klavier is niet meer met de
interne klankbron verbonden. Daarom worden de
gespeelde noten niet meer weergegeven.
NEDERLANDS
■ MIDI-zendkanaal instellen
Start de opname van de externe sequencer.
Start de weergave van uw stuk op de HP107e.
Als uw stuk afgelopen is, mag u de opname van de
externe sequencer weer stoppen.
235
NEDERLANDS
Sla de overgehevelde songdata op de harde schijf van de
sequencer/computer of op een diskette op.
HP107_e.book Page 236 Tuesday, October 19, 2004 10:41 PM
HP107e – Verhelpen van storingen
Verhelpen van storingen
Als u de indruk hebt dat het instrument niet naar behoren werkt, moet u eerst het volgende even doornemen.
U kunt het instrument niet inschakelen
Hebt u het netsnoer goed aangesloten (blz. 209)?
De knoppen werken niet
Hebt u de bedieningsfuncties vergrendeld (blz. 230)?
Schakel het instrument even uit en weer in.
U hoort niets
Hebt u het volume van de HP107e op de minimumwaarde gezet
(blz. 211)?
Hebt u een hoofdtelefoon aangesloten (blz. 210)?
Is er misschien nog een stekker op een Phones-connector aangesloten?
In dat geval worden de luidsprekers uitgeschakeld.
Hebt u de Local-functie uitgeschakeld?
Als dat het geval is, hoort u de op het klavier gespeelde noten
namelijk niet meer. Zet Local op “ON” (blz. 235).
Is de V-LINK-functie actief?
Zolang de V-LINK-functie actief is, hoort u niets, wanneer u de
twaalf onderste toetsen indrukt.
U hoort niets (na een MIDI-instrument aangesloten te hebben)
Hebt u alle benodigde apparaten ingeschakeld?
Kloppen de MIDI- en audioverbindingen met de externe apparaten?
Hebt u het juiste MIDI-kanaal gekozen (blz. 235)?
Tijdens het spelen is het geluid betrekkelijk vreemd (dubbele noten)
Hebt u de Dual-mode van de HP107e geselecteerd (blz. 219)?
Wanneer de HP107e op een externe sequencer aangesloten is,
moet u de Local-functie op “OFF” zetten (blz. 235).
Schakel anders de MIDI THRU-functie van de sequencer uit.
U kunt geen andere klanken kiezen
Hebt u de bedieningsfuncties vergrendeld (blz. 230)?
Schakel het instrument even uit en weer in.
Knipperen de indicators van de [Split]- en [Chorus]-knop?
Dan bevindt u zich in de functiemode. Druk op de [Split]- of
[Chorus]-knop (blz. 228, blz. 234).
Soms vallen er noten weg
De HP107e kan maximaal 128 noten tegelijk weergeven.
Als u het demperpedaal de hele tijd indrukt en een intern stuk als
begeleiding gebruikt, kan het gebeuren dat bepaalde noten wegvallen. Het pedaal doet namelijk eveneens een beroep op de
beschikbare stemmen.
De stemming van de zelf gespeelde of opgenomen noten klopt niet
Hebt u de transpositie geactiveerd (blz. 218)?
Weet u zeker dat u het juiste stemmingssysteem gekozen hebt
(blz. 229)?
Klopt de algemene stemming (blz. 229)?
Een opgenomen stuk wordt niet/maar gedeeltelijk weergegeven
Kijk even of de indicators van beide spoorknoppen ([Left] en
[Right]) oplichten (blz. 224).
Als de indicator van één van deze knoppen niet oplicht, wordt de
betreffende partij niet afgespeeld. Schakel die knop dus weer in.
Opname onmogelijk
Weet u zeker dat u een spoorknop geactiveerd hebt (blz. 225~
blz. 227)?
Het tempo van een opgenomen stuk/de metronoom varieert
Als u een intern stuk afspeelt, verandert het tempo soms tijdens
de weergave. De metronoom volgt dergelijke tempowijzigingen.
Als u een tweede partij opneemt zonder de eerste partij te wissen,
hanteert de Recorder het tempo van de eerst opgenomen partij.
Om een gelijkmatig tempo te kunnen hanteren moet u de eerste
partij eerst wissen (blz. 227).
236
De opname is verdwenen
Opnamen, die u niet opslaat, worden gewist, zodra u het instrument uitschakelt. Een gewiste opname kunt u niet meer herstellen.
De HP107e bevat een songgeheugen (blz. 231) waarmee u het
laatst opgenomen stuk intern kunt opslaan. Belangrijke stukken
slaat u het best op alvorens de HP107e uit te schakelen.
De pedalen werken niet of gaan niet meer uit
Hebt u de pedaalkabel goed aangesloten?
Ga even na of u de pedaalkabel volledig op de connector van het
instrument hebt aangesloten (blz. 209).
Vreemde geluiden bij het intrappen van een pedaal
Draai de instelschroef van de pedalenbak zo ver uit tot ze de vloer
raakt (blz. 211).
De galm (Reverb) is uitgeschakeld, maar u hoort nog steeds galm
De pianoklanken van de HP107e bevatten tevens de resonanties
van een akoestische piano. Na inschakelen van de “Grand
Space”- en “Key Off”-functie zorgt dit af en toe voor een galmend
effect.
Als u dat effect niet op prijs stelt, moet u de “Key Off”- ((blz. 214))
en “Grand Space”-functie uitschakelen (blz. 216~216).
In het hoge register verandert het geluid vanaf een bepaalde noot
Op akoestische instrumenten worden de snaren van de hoogste
1,5 octaven niet gedempt en sterven ze dus zelfs natuurlijk uit,
wanneer u het demperpedaal niet gebruikt. Ook de klankkleur
verschilt van die van de overige noten. Roland-piano’s simuleren
dit fenomeen. Onthoud bovendien dat het “ongedempte” bereik
van de HP107e varieert naar gelang de ingestelde transpositie.
U hoort een fluittoon of piepen
Als u met een hoofdtelefoon werkt:
Sommige pianoklanken zijn bijzonder helder en vol. Dat betekent
dat ze heel wat hoge frequenties bevatten, die iets “blikkerig”
beginnen te klinken, wanneer u het Reverb-effect activeert. Probeer het eventueel eens met een lager Reverb-volume.
Bij gebruik van de luidsprekers:
In dit geval ligt het probleem bij de HP107e zelf (met name bij de
resonanties die eventueel door het meetrillen van bepaalde
onderdelen optreden). Neem contact op met uw Roland-dealer.
De basnoten klinken vals of zorgen voor brom
Bij gebruik van de luidsprekers:
Bij een pittig volume kan het gebeuren dat de behuizing van de
HP107e of een voorwerp in de buurt begint mee te trillen. Dat kan
bv. bij TL-buizen of glazen het geval zijn. Dit fenomeen doet zich
vooral voor, wanneer u betrekkelijk lage noten speelt en bovendien een pittig volume instelt. Dat kunt u op de volgende manieren verhelpen:
• Plaats het instrument minstens 10~15cm van de muur e.d. vandaan.
• Verminder het volume.
• Zet het meetrillende voorwerp ergens anders.
Als u met een hoofdtelefoon werkt:
In dat geval ligt het probleem ergens anders. Neem contact op
met uw Roland-dealer.
Het volume van het op de ingangen aangesloten apparaat is veel te
laag
Misschien gebruikt u audiokabels met een weerstand.
Probeer het eens met een andere kabel.
HP107_e.book Page 237 Tuesday, October 19, 2004 10:41 PM
Fout- en andere boodschappen
NEDERLANDS
Fout- en andere boodschappen
Display
Betekenis
Stuk in het “Usr”-geheugen. Dit geheugen bevat het stuk dat u zelf opneemt (blz. 225).
Usr.
Een “.” in het display betekent dat het User-geheugen al data bevat (blz. 225).
S.1~68
Slaat op een intern stuk (blz. 212).
S. U
Het stuk dat u met de “Song Backup”-functie opgeslagen hebt (blz. 231).
PU
Deze boodschap betekent dat het stuk met een opmaat (onvolledige eerste maat) begint.
dEL
Deze boodschap verschijnt, wanneer u uw opname probeert te wissen (blz. 225, blz. 227, blz. 231).
E.32
De capaciteit van het songgeheugen is uitgeput. U kunt niets meer opnemen.
E.41
Er is een MIDI-probleem opgetreden (bv. het verbreken van een verbinding). Ga de aansluitingen even na.
_._._.
De V-LINK-functie is ingeschakeld (blz. 232).
NEDERLANDS
USr
* Foutmeldingen zijn genummerd en worden voorafgegaan door een “E.”. Om een dergelijke boodschap weer te doen verdwijnen drukt u
gewoon op een knop naar keuze.
NEDERLANDS
Intern opgeslagen parameterinstellingen
Snaarresonantie (aan/uit, volume)
blz. 214
Demperresonantie (aan/uit, volume)
blz. 215
Aanslaggevoeligheid
blz. 215
Hamerrespons
blz. 215
Stemming (systeem, tonica)
blz. 229
Stretch Tuning
blz. 229
‘Grand Space’ (aan/uit, diepte)
blz. 216,
blz. 216
Dynamic Emphasis (aan/uit, diepte)
blz. 217
Algemene stemming
blz. 229
Galm (aan/uit, diepte)
blz. 217
USB-driverinstelling
blz. 232
Toewijzen van het demperpedaal aan de linker klavierhelft
blz. 230
“Grand Space”-mode
blz. 230
Splitpunt
blz. 220
Dual-/Layer-balans
blz. 219,
blz. 219
NEDERLANDS
Andere instellingen
blz. 214
NEDERLANDS
Pianofuncties die bij het inschakelen
geactiveerd worden
‘Key Off’-resonantie (aan/uit, volume)
NEDERLANDS
237
HP107_e.book Page 238 Tuesday, October 19, 2004 10:41 PM
HP107e – Overzicht van de beschikbare functies
Overzicht van de beschikbare functies
11
7
10 9
8
4
Nr.
1
2
3
6
5
4
5
6
1
7
8
3
10
9
11
U wilt…
12 13
14
2
Knoppen
blz.
Druk de [Split]- en [Chorus]-knop samen in en druk vervolgens op [●].
1
Local-functie
[Split] + [Chorus] → Piano Resonance [Key Off]
blz. 235
2
MIDI-zendkanaal instellen
[Split] + [Chorus] → Piano Resonance [String]
blz. 235
3
USB-driverinstelling
[Split] + [Chorus] → Piano Resonance [Damper]
blz. 232
4
“Grand Space”-mode
[Split] + [Chorus] → [Grand Space]
blz. 230
5
Algemene stemming
[Split] + [Chorus] → [Piano]
blz. 229
6
Stemmingssysteem kiezen
Tonica instellen
[Split] + [Chorus] → [E. Piano]→
[E. Piano] + toets
blz. 229
7
Stretch Tuning
[Split] + [Chorus] → [Harpsichord]
blz. 229
8
Octave Shift
[Split] + [Chorus] → [Organ]
blz. 230
9
Toewijzen van het demperpedaal aan de linker klavierhelft
[Split] + [Chorus] → [Strings]
blz. 230
10
Opslag van de opname
[Split] + [Chorus] → [Song/Tempo]
blz. 231
11
Opslag van de instellingen
[Split] + [Chorus] → [Metronome/Count In]
blz. 231
12
Verzenden van de opname via MIDI
[Split] + [Chorus] → [Left]
blz. 235
13
V-LINK
[Split] + [Chorus] → [Right]
blz. 232
14
Laden van de fabrieksinstellingen
[Split] + [Chorus] → Key Touch [Touch]
blz. 231
Houd de [
]-knop ingedrukt, terwijl u op de [–]- of [+]-knop drukt.
1
Maatsoort van de metronoom
[Song/Tempo] + [-] [+]
blz. 221
2
Metronoomvolume
[Metronome/Count In] + [-] [+]
blz. 221
3
Layer-balans (Dual-balans)
[Acoustic Layering] + [-] [+]
blz. 219
4
Resonantie van het demperpedaal
Piano Resonance [Damper] + [-] [+]
blz. 215
5
Volume van de snaarresonanties
Piano Resonance [String] + [-] [+]
blz. 214
6
“Key Off”-volume
Piano Resonance [Key Off] + [-] [+]
blz. 214
7
Intensiteit van het choruseffect
[Chorus] + [-] [+]
blz. 217
8
Galmaandeel (intensiteit)
[Reverb] + [-] [+]
blz. 217
9
“Dynamic Emphasis”-instelling
[Dynamic Emphasis] + [-] [+]
blz. 217
“Grand Space”-instelling
[Grand Space] + [-] [+]
blz. 216,
blz. 216
[Transpose] + [Split] → [-] [+]
blz. 219
10
Houd de [
11
]-knop ingedrukt, terwijl u op de [–]- of [+]-knop drukt.
Dual-balans (Layer-balans)
Houd de [Split]- of [Transpose]-knop ingedrukt, terwijl u op een toets drukt.
238
Splitpunt
[Split] + toets
blz. 220
Transpositie
[Transpose] + toets
blz. 218
HP107_e.book Page 239 Tuesday, October 19, 2004 10:41 PM
Specificaties
NEDERLANDS
Specificaties
Klavier
Klavier
Aanslaggevoeligheid
Standen: Licht, medium, zwaar, vast
Hamerrespons: Licht, medium, zwaar, uit
NEDERLANDS
Klaviermodes
88 toetsen, “Progressive Hammer Action” met drukpunt (“Escapement”)
Whole, Layer/Dual (balans instelbaar), Split (splitpunt instelbaar)
Klankbron
Polyfonie
128 stemmen
Klanken
5 groepen, 36 variaties + 4 ‘Layer’-klanken
Stemmingssysteem
8 typen, instelbare tonica
Stretched Tuning
2 typen
Algemene stemming
415.3Hz~466.2Hz (in 0.1Hz-stappen)
Transpositie
–6~+5 halve tonen
Effecten
‘Grand Space’, ‘Dynamic Emphasis’, ‘Piano Resonance’ (Key Off Resonance, String Resonance, Damper Resonance), reverb (10 niveaus), chorus (10 standen)
Maatsoort
2/2, 0/4, 2/4, 3/4, 4/4, 5/4, 6/4, 7/4, 3/8, 6/8, 9/8, 12/8
Volume
10 standen
NEDERLANDS
Metronoom
Recorder
2 sporen
Songgeheugen
1 song (wordt onthouden)
Geheugencapaciteit
±10.000 noten
Tempo
Kwartnoot= 10~500
Resolutie
120 stappen per kwartnoot
Bedieningsorganen
Play/Stop, Rec, Tempo, All Song Play, Track
Interne stukken
68 stukken + 14 klankdemo’s
NEDERLANDS
Sporen
Varia
50W x2
Luidsprekers
20cm x2 (speakerkast), 10cm x2
Display
Maatindicator
7 segmenten, 3 tekens (LED)
Hoofdtelefoonindicator
Bedieningsorganen
Volume, Brilliance
Pedalen
Demper (traploos), soft (traploos), sostenuto (toewijsbare functie)
Andere functies
Vergrendeling van de bedieningsorganen, opslag van de opname, opslag van de instellingen, laden van de
fabrieksinstellingen
Aansluitingen
USB-poort (MIDI), Audio-uitgangen (L/Mono, R), audio-ingangen (L/Mono, R), hoofdtelefoon x2 (stereo),
MIDI (IN, OUT)
Voeding
AC230V
Opgenomen vermogen
110W
Afmetingen
(met pianostand)
1425 (B) x 536 (D) x 931 (H) mm (lessenaar neergeklapt)
NEDERLANDS
Uitgangsvermogen
1425 (B) x 536 (D) x 1.083,5 (H) mm (lessenaar opgeklapt)
Gewicht
(met pianostand)
82kg
Accessoires
Handleiding, “60 Classical Piano Masterpieces”, USB-installatiehandboek,
CD-ROM (USB-driver voor digitale Roland-piano’s), netsnoer, hoofdtelefoonhaak
NEDERLANDS
* Wijzigingen van de specificaties en de afwerking zonder voorafgaande kennisgeving voorbehouden.
239
HP107_e.book Page 240 Tuesday, October 19, 2004 10:41 PM
Tone List
Tone List
A
Piano
Strings
1
Grand Piano 1
*1
*2
1
Strings 1
2
Mellow Piano 1
*1
*2
2
Jazz Scat
3
Honky-tonk
*2
3
Orchestra
4
Mellow Piano 2
*1
*2
4
Choir
5
Grand Piano 2
*1
*2
5
Strings 2
6
Detuned Piano
*2
6
Voice Oohs
7
Rock Piano
*2
7
Glittery Pad
8
Acoustic Bass
9
Acoustic Bass + Cymbal
*1
10 Fingered Bass
E.Piano
11 Vox Bass
1
Electric Piano 1
2
Electric Piano 2
3
Vibraphone
4
Morning Lite
Acoustic Layering Tones
5
Celesta
1
Strings
6
Electric Grand
2
Choir
3
Pad
4
Bell Pad
Harpsichord
1
Harpsichord 1
2
Nylon Guitar
3
Harp
4
Coupled Harpsichord
5
Harpsichord 2
*1
*1
Organ
1
Church Organ 1
2
Rotary Organ
3
Theater Organ
4
Accordion
5
Church Organ 2
6
Nason Flute 8'
7
Lower Organ
240
*1 Tones that can be used with the Key Off Resonance
function
*2 Tones that can be used with the String Resonance and
Damper Resonance functions
HP107_e.book Page 241 Tuesday, October 19, 2004 10:41 PM
Built-in Song List
Built-in Song List
A
Song
No.
Song Name
Composer
Copyright
S. 1
Scherzo No.2 (Except)
F. Chopin
© 2004 Roland Corporation
S. 2
La Fille aux Cheveux de Lin
C. Debussy
© 2004 Roland Corporation
S. 3
La Campanella
F. Liszt
© 2004 Roland Corporation
S. 4
Late Night Chopin
F. Chopin/
Arranged by John Maul
© 2002 Roland Corporation
S. 5
Fly Free
John Maul
© 1998 Roland Corporation
S. 6
L'éveil del l'amour
Masashi & Kazuko
Hirashita
© 2000 Roland Corporation
S. 7
Sonate für Klavier No. 15
W. A. Mozart
© 1996 Roland Corporation
S. 8
Liebesträume III
F. Liszt
© 2001 Roland Corporation
S. 9
Étude, op.10-3
F. Chopin
© 2001 Roland Corporation
S. 10
Je te veux
E. Satie
© 1997 Roland Corporation
S. 11
Valse, op.64-1
F. Chopin
© 2001 Roland Corporation
S. 12
Golliwog’s Cake walk
C. Debussy
© 1995 Roland Corporation
S. 13
Fantaisie-Impromptu
F. Chopin
© 2001 Roland Corporation
S. 14
1ére Arabesque
C. Debussy
© 1995 Roland Corporation
S. 15
An der schönen, blauen Donau
J. Strauss (II)
© 1996 Roland Corporation
S. 16
Auf Flügeln des Gesanges
F. Mendelsshon
© 1996 Roland Corporation
S. 17
Mazurka No.5
F. Chopin
© 1995 Roland Corporation
S. 18
1ère Gymnopédie
E. Satie
© 1997 Roland Corporation
S. 19
Étude, op.25-1
F. Chopin
© 1995 Roland Corporation
S. 20
Clair de Lune
C. Debussy
© 1998 Roland Corporation
S. 21
Étude, op.10-5
F. Chopin
© 2001 Roland Corporation
S. 22
Doctor Gradus ad Parnassum
C. Debussy
© 1995 Roland Corporation
S. 23
Grande Valse Brillante
F. Chopin
© 1995 Roland Corporation
S. 24
La prière d'une Vierge
T. Badarzewska
© 1996 Roland Corporation
S. 25
Course en Troïka
P. Tchaikovsky
© 1996 Roland Corporation
S. 26
To The Spring
E. Grieg
© 1996 Roland Corporation
S. 27
Valse, op.64-2
F. Chopin
© 1996 Roland Corporation
S. 28
Radetzky Marsch
J. Strauss (I)
© 1996 Roland Corporation
S. 29
Träumerei
R. Schumann
© 1996 Roland Corporation
S. 30
Moments Musicaux III
F. Schubert
© 1996 Roland Corporation
S. 31
Prélude, op.28-15
F. Chopin
© 1996 Roland Corporation
S. 32
The harmonious blacksmith
G. Handel
© 1996 Roland Corporation
S. 33
Ungarische Tänze V
J. Brähms
© 1996 Roland Corporation
S. 34
Türkischer Marsch (Beethoven)
L. v. Beethoven
© 1996 Roland Corporation
S. 35
Nocturne No.2
F. Chopin
© 1996 Roland Corporation
S. 36
Frühlingslied
F. Mendelsshon
© 1996 Roland Corporation
S. 37
Präludium
J. S. Bach
© 1996 Roland Corporation
S. 38
Jägerlied
F. Mendelsshon
© 1996 Roland Corporation
S. 39
Menuet Antique
M. Ravel
© 1996 Roland Corporation
S. 40
Für Elise
L. v. Beethoven
© 1996 Roland Corporation
S. 41
Türkischer Marsch (Mozart)
W. A. Mozart
© 1996 Roland Corporation
S. 42
Ständchen
F. Schubert
© 1996 Roland Corporation
241
HP107_e.book Page 242 Tuesday, October 19, 2004 10:41 PM
Built-in Song List
Song
No.
*
Song Name
Composer
Copyright
S. 43
Humoreske
A. Dvorák
© 1996 Roland Corporation
S. 44
Blumenlied
G. Lange
© 1996 Roland Corporation
S. 45
Alpenglöckchen
T. Oesten
© 1996 Roland Corporation
S. 46
Menuett G dur (Beethoven)
L. v. Beethoven
© 1996 Roland Corporation
S. 47
Venezianisches Gondellied
F. Mendelsshon
© 1996 Roland Corporation
S. 48
Alpenabendröte
T. Oesten
© 1996 Roland Corporation
S. 49
Farewell to the Piano
L. v. Beethoven
© 1996 Roland Corporation
S. 50
Brautchor
R. Wagner
© 1996 Roland Corporation
S. 51
Battle of Waterloo
W. Anderson
© 1996 Roland Corporation
S. 52
Wiener Marsch
C. Czerny
© 1996 Roland Corporation
S. 53
Le Coucou
L. C. Daquin
© 1996 Roland Corporation
S. 54
Menuett G dur (Bach)
J. S. Bach
© 1992 Roland Corporation
S. 55
Spinnerlied
A. Ellmenreich
© 1996 Roland Corporation
S. 56
Gavotte
F. Gossec
© 1996 Roland Corporation
S. 57
Heidenröslein
G. Lange
© 1996 Roland Corporation
S. 58
Zigeuner Tanz
H. Lichner
© 1996 Roland Corporation
S. 59
La Cinquantaine
G. Marie
© 1996 Roland Corporation
S. 60
Csikos Post
H. Necke
© 1996 Roland Corporation
S. 61
Dolly’s Dreaming Awakening
T. Oesten
© 1996 Roland Corporation
S. 62
La Violette
L. Streabbog
© 1996 Roland Corporation
S. 63
Fröhlicher Landmann
R. Schumann
© 1996 Roland Corporation
S. 64
Sonatine op.36-1 (Clementi)
M. Clementi
© 1996 Roland Corporation
S. 65
Sonatine op.20-1 (Kuhlau)
F. Kuhlau
© 1996 Roland Corporation
S. 66
Sonatine No.5 (Beethoven)
L. v. Beethoven
© 1996 Roland Corporation
S. 67
Hungarian Rag: Hungarian Dance No. 5 Ragtime Arrangement For
Solo Piano
J. Brahms/
Arranged by John Maul
© 1996 Roland Corporation
S. 68
Paganini Boogie: Jazz Variation Based on “Caprice No. 24 in A
Minor”
N. Paganini/
Arranged by John Maul
© 1998 Roland Corporation
All rights reserved. Unauthorized use of this material for purposes other than private, personal enjoyment is a violation of applicable laws.
Profile
John Maul
John Maul is a musician, composer and arranger having graduated from the Royal Academy of Music in London.
John’s work encompasses studio recordings and live performances including work with top UK Jazz artists.
His writing credits include commercial music for BBC radio and television, as well as scoring jazz and classical works.
Having been a product specialist for Roland U.K., John is now actively involved in music software composing/
programming for both Roland Japan and various music publishers. Quite recently his “Musical Picture Book,” a
volume of original piano music encompassing all standards of musical ability, which included the piano and orchestral
accompaniment data in SMF format, was published and printed.
242
HP107_e.book Page 243 Tuesday, October 19, 2004 10:41 PM
Built-in Song List
MIDI Implementation Chart
DIGITAL PIANO
Date : Mar. 1, 2004
MIDI Implementation Chart
Model HP107e
Transmitted
Function...
Recognized
Basic
Channel
Default
Changed
1
1—16
1—16
1—16
Mode
Default
Messages
Altered
Mode 3
x
Mode 3
x
Note
Number :
True Voice
**************
0—127
0—127
Velocity
Note ON
Note OFF
O
O
O
O
After
Touch
Key s
Ch s
x
x
x
x
x
O
O
x
x
O
O
x
O
O
x
O
O
x
O
O
O
O
O
O
O
O
O
O
O
O
O
O
O
O
O
O
0...100
**************
O (0—127)
0...100
O
O
Pitch Bend
0, 32
1
5
6, 38
7
10
11
64
65
66
67
84
91
93
100, 101
Control
Change
Prog
Change
: True Number
System Exclusive
Version : 1.00
Remarks
**************
0—127
System
Common
: Song Pos
: Song Sel
: Tune
x
x
x
x
x
x
System
Real Time
: Clock
: Commands
x
x
x
x
Aux
Message
: All sound off
: Reset all controllers
: Local Control
: All Notes OFF
: Active Sense
: Reset
x
x
x
x
O
x
O (120, 126, 127)
O
O
O (123—127)
O
x
Bank Select
Modulation
Portamento time
Data entry
Volume
Panpot
Expression
Hold 1
Portamento
Sostenuto
Soft
Portamento control
Effect 1 (Reverb)
Effect 3 (Chorus)
RPN LSB, MSB
Notes
Mode 1 : OMNI ON, POLY
Mode 2 : OMNI ON, MONO
O : Yes
Mode 3 : OMNI OFF, POLY
Mode 4 : OMNI OFF, MONO
X : No
243
HP107_e.book Page 244 Tuesday, October 19, 2004 10:41 PM
Built-in Song List
244
HP107_e.book Page 245 Tuesday, October 19, 2004 10:41 PM
For EU Countries
This product complies with the requirements of European Directives EMC 89/336/EEC and LVD 73/23/EEC.
For the USA
FEDERAL COMMUNICATIONS COMMISSION
RADIO FREQUENCY INTERFERENCE STATEMENT
This equipment has been tested and found to comply with the limits for a Class B digital device, pursuant to Part 15 of the
FCC Rules. These limits are designed to provide reasonable protection against harmful interference in a residential
installation. This equipment generates, uses, and can radiate radio frequency energy and, if not installed and used in
accordance with the instructions, may cause harmful interference to radio communications. However, there is no guarantee
that interference will not occur in a particular installation. If this equipment does cause harmful interference to radio or
television reception, which can be determined by turning the equipment off and on, the user is encouraged to try to correct the
interference by one or more of the following measures:
– Reorient or relocate the receiving antenna.
– Increase the separation between the equipment and receiver.
– Connect the equipment into an outlet on a circuit different from that to which the receiver is connected.
– Consult the dealer or an experienced radio/TV technician for help.
This device complies with Part 15 of the FCC Rules. Operation is subject to the following two conditions:
(1) This device may not cause harmful interference, and
(2) This device must accept any interference received, including interference that may cause undesired operation.
Unauthorized changes or modification to this system can void the users authority to operate this equipment.
This equipment requires shielded interface cables in order to meet FCC class B Limit.
For Canada
NOTICE
This Class B digital apparatus meets all requirements of the Canadian Interference-Causing Equipment Regulations.
AVIS
Cet appareil numérique de la classe B respecte toutes les exigences du Règlement sur le matériel brouilleur du Canada.
HP107_e.book Page 246 Tuesday, October 19, 2004 10:41 PM
RES 408-04 602.00.0058 E/D/F/It/Sp/Ol
Traducido por www.caballeria.com