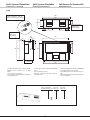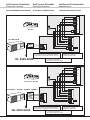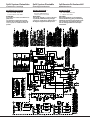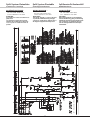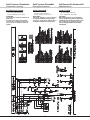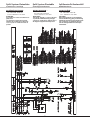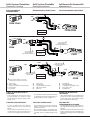
1
Installation and maintenance manual
Notice d’installation et de maintenance
Installations und Wartungshandbuch
Manuale di installazione e di manutanzione
Manual de instalacion y de mantenimiento
Korte uiteenzetting van installatie en onderhoud
CD 35
CD 43
CD 50
CD 60
CH 35 / 35RC
CH 43 / 43RC
CH 50 / 50RC
CH 60 / 60RC
Split-System Gainables Condenseur Centrifuge
Split System Ductable Centrifugal Condenseur
Split-Bauweise Für Kanalanschluß RadialKondensor
Split-System Rivestibili Condensatore Centrifugo
Split System con conexión a conductos Condensador Centrífugo
Split System voor leidingaansluiting Radiale condensor
TH3038 H - Part number / Code / code / Codice / Código : 399467
Supersedes / Annule et remplace / annulliert und ersezt /
Annulla e sostituisce / anula y sustituye : TH3038 G
NOTICE D’INSTALLATION
INSTALLATION INSTRUCTION
INSTALLATIONSHANDBUCH
ISTRUZIONI INSTALLAZIONE
INSTRUCCIONES DE INSTALACIÓN
INSTALLATIE INSTRUCTIES
Split-System Gainables
Condenseur Centrifuge
MISE HORS TENSION
OBLIGATOIRE AVANT
TOUTES INTERVENTIONS
DANS LES BOITIERS
ELECTRIQUES
Split System Ductable
Centrifugal Condenseur
IT IS MANDATYORY TO
CUTOFF POWER SUPPLY
BEFORE STARTING TO
WORK IN THE ELECTRIC
CASING BOXES.
Split-Bauweise Für Kanalanschluß
RadialKondensor
VOR JEDEM EINGRIFF IN
DEN SCHALTSCHRÄNKEN
UNBEDINGT NETZSTECKER ZIEHEN
R
G
A
- Avant tout, merci d'avoir porté votre choix
sur un matériel Airwell.
- Congratulations for having selected an
Airwell air conditioner.
- Zunächst danken wir Ihnen, daß Sie sich für
ein Airwell Klimagerät entschieden haben.
CONSEILS DE SECURITE
SAFETY DIRECTIONS
SICHERHEITSANWEISUNGEN
ECOMMANDATIONS
GENERALES
- Lorsque vous intervenez sur votre matériel
: suivez les règles de sécurité en vigueur.
- L’installation et l’entretien du matériel devront être effectués exclusivement par du
personnel qualifié selon les règles de l'art,
les normes et instructions en vigueur.
- Assurez-vous que l'alimentation électrique
disponible et la fréquence du réseau sont
adaptées au courant de fonctionnement
nécessaire compte tenu des conditions
spécifiques de l’emplacement, et du courant
nécessaire à tout autre appareil branché sur
le même circuit.
AVERTISSEMENT
- Couper l'alimentation électrique générale
avant toute intervention ou opération d’entretien.
- Le fabricant décline toute responsabilité et la
garantie ne sera plus valable si ces instructions d’installation ne sont pas respectées.
- Si vous avez des difficultés, faites appel au
Service Technique de votre zone.
- Avant la mise en place, procédez si possible
au montage des accessoires obligatoires ou
non. (Voir notice livrée avec chaque accessoire) .
- Pour une meilleure connaissance du produit,
nous vous conseillons de consulter également notre notice technique .
- Les informations contenues dans cette notice sont
sujettes à modifications sans préavis.
ENERAL
RECOMMENDATIONS
LLGEMEINE
EMPFEHLUNGEN
- Follow the safety rules in force when you are
working on your appliance.
- Installation and maintenance of the equipment must only be performed by qualified
specialists in accordance with the rules of
good workmanship and prevailing standards
and instructions.
- Make sure that the power supply and its
frequency are adapted to the required electric current of operation, taking into account
specific conditions of the location and the
current required for any other appliance
connected with the same circuit.
- Bei Eingriffen an Ihrem Gerät sind die geltenden Sicherheitsvorschriften zu befolgen.
- Installation und Wartung der Ausrüstung
dürfen nur von qualifiziertem Personal fachgemäß und entsprechend den geltenden
Normen und Vorschriften vorgenommen
werden.
- Vergewissern Sie sich, daß Stromversorgung und Netzfrequenz dem erforderlichen
Betriebsstrom entsprechen, wobei die spezifischen Bedingungen des Aufstellungsorts
und der erforderliche Strom für die anderen,
an den gleichen Stromkreis angeschlossenen
Geräte zu berücksichtigen sind.
WARNING
WARNUNG
- Cutoff power supply before starting to work
on the appliance.
- The manufacturer declines any responsibility and the warranty becomes void if these
instructions are not respected.
- If you meet a problem, please call the Technical Department of your area.
- If possible, assemble the mandatory or
optional accessories before placing the appliance on its final location.(see instructions
provided with each accessory)
- In order to become fully familiar with the
appliance, we suggest to read also our
Technical Instructions .
- The information contained in these Instructions are
subject to modification without advance notice.
2
- Vor jedem Eingriff oder vor Wartungsarbeiten
an dem Gerät muß der Strom abgeschaltet
werden.
- Bei Nichtbefolgen dieser Anweisungen lehnt
der Hersteller jede Verantwortung ab, und
die Garantie wird ungültig.
- Bei Schwierigkeiten wenden Sie sich bitte
an den für Ihren Bezirk zuständigen Technischen Kundendienst.
- Vor dem Aufstellen falls möglich die vorgeschriebenen oder wahlfreien Zubehörteile
montieren. (Siehe die mit den jeweiligen
Zubehörteilen gelieferte Anleitung).
- Um mit dem Gerät besser vertraut zu werden, empfehlen wir, auch unsere Technische
Beschreibung durchzulesen.
- Die in der vorliegenden Beschreibung enthaltenen Informationen können ohne vorherige Mitteilung geändert werden.
Split-System Gainables
Split System Ductable
Split-Bauweise Für Kanalanschluß
Centrifugal Condenseur
RadialKondensor
S
DESCRIPTION
S
I
Caractéristiques générales .......................4-6
General Specifications..............................4-6
Technische Daten .....................................4-6
INSTALLATION
INSTALLATION
INSTALLATION
Emplacement des unités ........................7-11
Départs de gaine ....................................... 12
Dimensions ................................................ 13
Configurations ........................................... 17
Connexions électriques ............................. 18
Condensats ............................................... 30
Liaisons frigorifiques .................................. 31
Raccordements "display" ........................... 35
Mode d'emploi ........................................... 37
Location of the Units ...............................7-11
Duct outlet ................................................. 12
Dimensions ............................................... 13
Configuration ............................................. 17
Electrical Connections ............................... 18
Condensate ............................................... 30
Cooling pipe............................................... 31
Display Connections .................................. 35
Directions for use ....................................... 37
Aufstellungsort Außenteil........................7-11
Kanalabgänge ........................................... 12
Abmessungen............................................ 13
Konfiguration ............................................. 17
Stromanschlüsse ....................................... 18
Kondensats ................................................ 30
Kälteleitungen ............................................ 31
«Display» Anschlüsse ............................... 35
Gebrauchsanleitung .................................. 37
Maintenance .............................................. 38
Maintenance .............................................. 38
Wartung ..................................................... 38
Condenseur Centrifuge
OMMAIRE
UMMARY
DESCRIPTION
NHALT
BESCHREIBUNG
3
Split-System Gainables
Split System Ductable
Split-Bauweise Für Kanalanschluß
Centrifugal Condenseur
RadialKondensor
COMPOSITION DU COLIS
CONTENTS OF PARCEL
LIEFERUMFANG
1
1
1
1
1
1
2
1
1
1
1
1
1
1
2
CD
Configuration plug
Infrared remote control
Remote infrared received + 1 cable 7m
7/8" coupling (CH50/50RC and CH60/60RC)
5/8" coupling (CH50/50RC)
7/8" - 1"1/8 coupling sleeves (CD/CH60/
60RC)
1 7/8" - 3/4" reducing pipe fitting (CD/CH5050RC)
1 bag with reference material
1
1
1
1
1
S P É C I F I C A T I O N S
FRIGORIFIQUES
COOLING SPECIFICATIONS
KÄLTETECHNISCHE DATEN
Modèle -Model - Modell
Charge frigorifique -Refrigerant
charge -Kältemittelladung (7.5m)
CH35 / 35RC
CH43 / 43RC
CH50 / 50RC
CH60 / 60RC
3160 g
3200 g
5630 g
5430 g
+27 g/m
+48g /m
+40g /m
+52g / m
Condenseur Centrifuge
CD
Prise de configuration
Télécommande infra-rouge
Récepteur à distance + câble de 7m
Raccord 7/8"(CH50-50RC et CH60-60RC)
Raccord 5/8"(CH50-50RC)
Manchons 7/8"-1"1/8(CD/CH60-60RC)
Réducteur 7/8" - 3/4" (CD/CH50-50RC)
1 Sachet documentation
Additional charge / Charge
additionnelle
Modèle - Model -Modell
1
2
1
1
CD
Konfigurationsstecker
Infrarot-Fernbedienung
Versetzter Infrarot-Empfänger + Kabel 7m
Anschlußstutzen 7/8"(CH50/50RC und
CH60/60RC)
Anschlußstutzen 5/8"(CH50/50RC)
Muffen 7/8"-1"1/8(CD/CH60/60RC)
Reduzierstück 7/8" - 3/4" (CD/CH5050RC)
Beutel mit technischen Unterlagen
CH35 / 35RC CH43 / 43RC CH50 / 50RC CH60 / 60RC
Ø vanne Gaz - Gas valve Ø - Kupplung Gas Ø
3/4"
3/4"
7/8"
7/8"
Ø vanne Liquide - Liquid valve Ø - Kupplung Flüssigkeit Ø
3/8"
3/8"
5/8"
5/8"
Ø tube Gaz -Gas pipe Ø Gasrohr Ø
3/4"
3/4"
7/8"
1" 1/8
Ø tube -Liquid pipe Ø Flüssigkeitsrohr Ø
3/8"
3/8"
1/2"
5/8"
*Longueur maxi de la liaison frigorifique :
30 m.
*Maximum refrigerant line length: 30m.
4
*Maximale Länge der Kältemittel-Verbindungsleitung:
30m.
Split-System Gainables
Condenseur Centrifuge
SPÉCIFICATIONS ÉLECTRIQUES
Type d'appareil
Alimentation
1N ~ 230V - 50Hz
Split System Ductable
Split-Bauweise Für Kanalanschluß
Centrifugal Condenseur
RadialKondensor
ELECTRIC SPECIFICATIONS
ELEKTRISCHE SPEZIFKATIONEN
35 MONO
Type of appliance
Power supply
1N ~ 230V - 50Hz
Modell
Betriebsspannung
1N ~ 230V - 50Hz
Froid + Ventil (ou chauffage
Cooling + fan (or heatpump
Kühlung + Lüftung (oder
thermodynamique)
heating)
thermodynamische Heizung)
.
Intensité maximale
A
35
Maximum current
Max. Strom
Calibre fusible aM
A
40
Fuse rating aM
Sicherung (träge)
Calibre fusible ASE/VDE*
A
50
Fuse rating ASE/VDE*
Sicherung SEV/VDE*
Intensité totale démarrage
A
122
Total starting current
Gesamtanlaufstrom
mm²
3G6
Cable section*
Kabelquerschnitt*
CD/CH CONNECTIONS**
Verbindungen CD/CH**
- CONTROL
- STEUERUNG
Maximum current
Max.Strom
Section de câble*
LIAISONS CD/CH **
-COMMANDE
Intensité maximale
A
3.1
Section de câble Froid seul
mm²
5 G 1.5
Cooling only cable section
Kabelquerschnitt Nur Kühlung
Section de câble Réversible
mm²
6 G 1.5
Heatpump cable section
Kabelquerschnitt Wärmepumpe
Type of appliance
Power supply
3N ~ 400V - 50Hz
Modell
Betriebsspannung
3N ~ 400V - 50Hz
Cooling + fan (or heatpump
Kühlung + Lüftung (oder
heating)
thermodynamische Heizung)
Maximum current
Max. Strom
Type d'appareil
Alimentation
3N ~ 400V - 50Hz
35
.
Froid + Ventil (ou chauffage
thermodynamique)
Intensité maximale
A
17.5
Calibre fusible aM
A
20
Fuse rating aM
Sicherung (träge)
Calibre fusible ASE/VDE*
A
20
Fuse rating ASE/VDE*
Sicherung SEV/VDE*
Intensité totale démarrage
A
57.5
Total starting current
Gesamtanlaufstrom
mm²
5 G 2.5
Cable section*
Kabelquerschnitt*
Section de câble*
LIAISONS CD/CH **
CD/CH CONNECTIONS**
Verbindungen CD/CH**
-COMMANDE
- CONTROL
- STEUERUNG
Intensité maximale
A
3.1
Maximum current
Max.Strom
Section de câble Froid seul
mm²
5 G 1.5
Cooling only cable section
Kabelquerschnitt Nur Kühlung
Section de câble Réversible
mm²
6 G 1.5
Heatpump cable section
Kabelquerschnitt Wärmepumpe
Type d'appareil
Alimentation
3N ~ 400V - 50Hz
43
50
60
Type of appliance
Power supply
3N ~ 400V - 50Hz
Modell
Betriebsspannung
3N ~ 400V - 50Hz
.
.
.
Froid + Ventil (ou chauffage
Cooling + fan (or heatpump
Kühlung + Lüftung (oder
thermodynamique)
heating)
thermodynamische Heizung)
Intensité maximale
A
17.5
19
22
Maximum current
Max. Strom
Calibre fusible aM
A
25
25
25
Fuse rating aM
Sicherung (träge)
Calibre fusible ASE/VDE*
A
25
25
25
Fuse rating ASE/VDE*
Sicherung SEV/VDE*
Intensité totale démarrage
A
66.1
74.6
104.3
Total starting current
Gesamtanlaufstrom
mm²
5 G 2.5
5 G 2.5
5G4
Cable section*
Kabelquerschnitt*
LIAISONS CD/CH **
CD/CH CONNECTIONS**
Verbindungen CD/CH**
-COMMANDE
- CONTROL
- STEUERUNG
Section de câble*
A
3.5
3.5
6
Maximum current
Max.Strom
Section de câble Froid seul
Intensité maximale
mm²
5 G 1.5
5 G 1.5
4 G 1.5
Cooling only cable section
Kabelquerschnitt Nur Kühlung
Section de câble Réversible
mm²
6 G 1.5
6 G 1.5
5 G 1.5
Heatpump cable section
Kabelquerschnitt Wärmepumpe
IMPORTANT
* Ces valeurs sont données à titre indicatif,
elles doivent être vérifiées et ajustées
en fonction des normes en vigueur: elles
dépendent de l'installation et du choix des
conducteurs.
Protection par fusible en amont de l'installation obligatoire:
Fusibles non fournis
Câbles non fournis
** VALEURS CALCULÉES POUR 30 m
MAXI.
IMPORTANT
* These values are given for guidance. They
must be checked and adjusted according to
prevailing standards. They depend on the
system installed and the cables used.
Afuse must mandatorily be provided on the
system input.
Fuses not supplied
Cables not supplied
** VALUES CALCULATED FOR 30m MAX.
5
WICHTIG
* Diese Werte dienen als Hinweis; sie müssen in Übereinstimmung mit den geltenden
Normen überprüft und angepaßt werden: sie
hängen jeweils von der Anlage und der Wahl
der Drahtarden ab.
Vor der Anlage ist ein Schutz durch Sicherung unbedingt erforderlich:
Sicherungennicht geliefert
Kabel nicht geliefert
** WERTE FÜR MAX. 30m BERECHNET.
Split-System Gainables
Condenseur Centrifuge
MODE DE MANUTENTION
Split System Ductable
Split-Bauweise Für Kanalanschluß
Centrifugal Condenseur
RadialKondensor
HANDLING
HANDHABUNG DES GERÂTS
- Sens des fourches pour chariot élévateur
Fork direction on fork lift truck
Richtung der Gabeln bei Gabelstapler
- Centre de gravité
Center of gravity
Schwerpunkt
POIDS NET
NET WEIGHT
NETTOGEWICHT
Modèle -Model -Modell
CD 35
CH 35
CD 43
CH 43
CD 50
CH 50
CD 60
CH 60
Froid seul -Cooling only -Nur Kühlung
50 Kg
110 Kg
58 Kg
110 Kg
65 Kg
196 Kg
68 Kg
196 Kg
Réversible -Heatpump -Wärmepumpe
50 Kg
110 Kg
58 Kg
110 Kg
65 Kg
196 Kg
68 Kg
196 Kg
FIXATION AU PLAFOND
ATTACHMENT TO THE CEILING
DECKENBEFESTIGUNG
- Dans le cas d'une installation au plafond,
ce dernier doit supporter le poids total des
appareils fixés (voir tableau ci-dessus).
- In the event of a ceiling installation, the
latter must support the total weight of the
appliances attached (see table above)
- Bei einer Installation an der Decke muß diese
das Gesamtgewicht der befestigten Geräte
tragen (siehe nachstehende Tabelle)
POSE ET DÉPOSE DU FILTRE A AIR
INSTALLING / REMOVING THE
FILTER
MONTAGE, DEMONTAGE DES
FILTERS
CD17->50
CD60
2
3
Filtre
Filter
Filter
1
Filtre
Filter
Filter
6
Split-System Gainables
Split System Ductable
Split-Bauweise Für Kanalanschluß
Centrifugal Condenseur
RadialKondensor
INSTALLATION DE L'UNITÉ
INTERIEURE
INSTALLATION OF THE INDOOR
UNIT
INSTALLATION DES INNENTEILS
- La faible hauteur des unités intérieures CD
(240 mm à 400 mm selon la puissance)
permet de les insérer facilement dans un
faux-plafond.
- The low height of the CD indoor units, from
240 mm to 400 mm depending on power,
facilitates installation in a double ceiling.
- Wegen der geringen Höhe der Innenteile CD
(240 mm bis 400 mm je nach Leistung) können sie problemlos in eine Zwischendecke
eingefügt werden.
- Le couvercle de service situé dans la partie
inférieure permet d’accéder facilement à
l’unité.
- The trap door at the bottom facilitates internal
access.
- Über den Servicedeckel am Boden ist das
Gerät bequem zugänglich.
- Le tableau électrique situé sur le côté droit
est facilement accessible.
- The terminal box on the left side is readily
accessible from the bottom.
- Die seitlich angebrachte Schalttafel ist leicht
zugänglich.
- Dans le cas du CD60, le coffret électrique
peut être placé à droite ou à gauche de l'appareil (intervention interne sur les fils moteur
et sur le fil de sonde). Il peut egalement être
déporté, en rallongant les fils moteur et les
fils de sonde.
- In the case of the CD60, the electrical control
box can be located to the left or right of the
unit (internal modification of the motor wiring
and probe wire). The control box can also be
completely separated from the unit, if the
motor and probe wires are extended.
- Bei dem CD60 kann der Schaltkasten rechts
oder links von dem Gerät angebracht werden
(interner Eingriff an den Motordrähten und
dem Temperaturfühlerdraht). Er kann auch
weiter versetzt werden, indem man die
Motordrähte und den Temperaturfühlerdraht
verlängert.
- Les moteurs des ventilateurs des climatiseurs CD ont 3 vitesses, ce qui permet un
réglage du débit, selon les pertes de charge
des gaines.
- The fan motors of the CD systems have three
speeds to allow accurate output adjustment
according to pressure losses in the ducts.
- Die Ventilatormotoren der Klimageräte CD
haben 3 verschiedene Drehzahlen, mit
denen die Luftmenge entsprechend den
Druckverlusten in den Leitungen präzise
eingestellt werden kann.
Condenseur Centrifuge
Couvercle de service
Trap door
Servicedeckel
7
Split-System Gainables
Condenseur Centrifuge
Emplacement de l’unité intérieure :
Split System Ductable
Split-Bauweise Für Kanalanschluß
Centrifugal Condenseur
RadialKondensor
Location of the Indoor Unit
Aufstellungsort des Innenteils:
ATTENTION :
Les unités intérieures sont fournies avec
une charge d’azote sec à 8 bars.
CAUTION:
The indoor units are supplied with a dry
nitrogen charge at a pressure of 8 bars.
ACHTUNG:
Die Innenteile werden mit einer Trockenstickstoffladung bei einem Druck von 8
Bar geliefert.
- L’unité intérieure est conçue pour être installée dans un faux-plafond, soutenue par 4
points d’ancrage qui permettent de la fixer
et de la mettre à niveau.
- L’unité ne doit pas être placée dans des
zones contenant des fumées, odeurs ou
poussières, qui encrasseraient le filtre d’aspiration, diminueraient les performances de
l’équipement et affecteraient la qualité de
l’air climatisé.
- The indoor unit is designed for installation
in a double ceiling supported by four anchor
points used to attachment and leveling.
- Das Innenteil ist für die Installation in eine
Zwischendecke ausgelegt; es sind 4 Ankerpunkte für die Befestigung und die Waagerecht-Einstellung vorgesehen.
- Das Gerät darf nicht in Zonen mit Rauchgasen, unangenehmen Gerüchen oder Staub
aufgestellt werden, die den Ansaugfilter
verschmutzen, die Geräteleistungen mindern und die Qualität der behandelten Luft
beeinträchtigen könnten.
- Les 5 mm indiqués évitent la transmission
du bruit à travers le faux-plafond.
- The 5 mm clearance shown in the sketch
prevents noise transmission through the
double ceiling.
- Install away from smoke, odors and dust
that could foul the suction filter, decrease
the equipment performance and affect the
quality of the conditioned air.
- Durch den angegebenen Freiraum von 5
mm wird eine Geräuschübertragung durch
die Zwischendecke vermieden.
Trappe d’accès à l’unité
Unit access panel
Zugangsklappe zu dem Gerät
Filtre à air dans l’aspiration de l’unité
Unit suction air filter
Luftfilter im Geräteansaug.
Il est conseillé de placer une manchette souple
sur les gaines afin d’éviter toute transmission
de bruit côté air traité.
It is recommended to provide a flexible coupling
between the supply duct and the indoor unit
to prevent noise from being transmitted in the
air processed.
NOTA
Dans le cas ou l'unité intérieure est installée
dans une zone ou l'humidité relative est élevée, prévoir une isolation supplémentaire de
l'appareil afin de prévenir des risques de point
de condensation sur cette dernière.
NOTE:
If the indoor unit is installed in a region where
the relative humidity is high, provide additional insulation on the appliance to prevent
risks of condensation spots.
8
Es wird empfohlen, eine flexible Muffe in
die Luftkanäle zu installieren, um Geräuschübertragungen auf der Zuluftseite zu
vermeiden.
HINWEIS :
Falls das Innenteil in einer Zone mit hoher
Leuchtfeuchtigkeit aufgestellt wird, muß eine
zusätzliche Geräteisolierung vorgesehen
werden, um Taupunktrisiken an dem Gerät
zu vermeiden.
Split-System Gainables
Condenseur Centrifuge
CONFIGURATION POUR
L'INSTALLATION DE L'APPAREIL
CD60
configuration usine en plafond
- Pour modifier la configuration, afin d'installer
l'appareil au sol, il faut inverser la position
du bac d'évacuation des condensats comme
suit:
1 et 2 : retirer les panneaux d'accès.
3 : retirer les vis tenant l'évaporateur et le
bac d'évacuation des condensats.
Split System Ductable
Split-Bauweise Für Kanalanschluß
- To change the configuration, in order to
install the unit on the floor, it is necessary
to reverse the position of the condensate
evacuation tray as follows:
- Zum Ändern der Konfiguration, um das Gerät
auf dem Boden aufzustellen, muß die Position der Kondensatwanne folgendermaßen
geändert werden:
1 and 2: remove the access panels
3: remove the screws securing the evaporator and the condensate evacuation tray.
1 und 2: die Zugangsplaten entfernen.
3: die Schrauben entfernen, mit denen
Verdampfer und Kondensatwanne gehalten
werden.
Centrifugal Condenseur
CONFIGURATION FOR
INSTALLING THE CD60 UNIT
original factory configuration:
ceiling
1
2
1
RadialKondensor
K O N F I G U R AT I O N F Ü R D I E
INSTALLIERUNG VON GERÄT CD60
Werksseitige Deckenkonfiguration
3
4 : oter le bac d'évacuation des condensats
de l'appareil.
5 : oter l'évaporateur en prenant soin de ne
pas abimer la partie ailetée.
6 : tour ner le bac d'évacuation des
condensats de 180°.
4: remove the condensate evacuation tray
from the unit.
5: remove the evaporator, taking care to
avoid damaging the finned part.
6: rotate the condensate evacuation tray
through 180°.
4
5
7 : placer ce bac dans le fond de l'appareil.
8 : Remettre en place l'évaporateur dans le
même sens qu'au démontage.
9 : remettre les vis du bac et de l'échangeur
ainsi que les panneaux d'accès.
4: die Kondensatwanne aus dem Gerät
entfernen.
5: den Verdampfer entnehmen und darauf
achten, daß die Rippen nicht beschädigt
werden.
6: die Kondensatwanne um 180° drehen.
6
7: locate this tray in the bottom of the unit.
8: reinstall the evaporator, oriented in the
same way as prior to removal.
9: reinstall the screws of the tray and evaporator, and refir the access poanels.
8
7
9
9
7: die Wanne auf den Geräteboden stellen.
8: den Verdampfer in der gleichen Richtung
wie bei der Demontage wieder anbringen.
9: die Schrauben von Kondensatwanne
und Verdampfer, sowie die Zugangsplatten
wieder anbringen.
Split-System Gainables
Split System Ductable
Split-Bauweise Für Kanalanschluß
Centrifugal Condenseur
RadialKondensor
I N S TA L L AT I O N D E L ' U N I T É
EXTÉRIEURE
INSTALLATION OF THE OUTDOOR
UNIT
INSTALLATION DES AUSSENTEIL
- Dégagement minimum à prévoir pour accès
à la maintenance.
- Les côtes A, B et C sont à respecter suivant
la configuration usine.
- Minimum clearance to be provided for maintenance access
- Dimensions A, B and C depend on the facory
configuration.
- Mindestfreiraum zum Zugang zwecks Wartungsarbeiten vorsehen.
- Die maß A, B und C müssen entsprechend
der Werkskonfiguration berücksichtigt werden.
Condenseur Centrifuge
CH
B
C
A
A
Aire de service minimale (mm) - Minimum clearance (mm) -min. Wartungsfreiraum (mm)
CH
A
B
C
750
750
500
- Diamètre des tiges filetées pour fixation au
plafond : Ø10 MINI / Ø18 MAXI.
- Diameter of threaded rods : MIN. 10 MM,
MAX. 18 MM.
10
- Durchmesser der Schraubenspindeln : Ø
MIN. 10, ØMAX. 18.
Split-System Gainables
Split System Ductable
Split-Bauweise Für Kanalanschluß
Centrifugal Condenseur
RadialKondensor
VENTILATION
VENTILATION
LÜFTUNG
AVERTISSEMENT
WARNING
- If necessary, interchange the ventilation
panels before attaching the appliance to the
ceiling.
- If the unit is hung from the ceiling, replacement of the heat exchanger requires removing the unit and setting it on the floor.
HINWEIS
- Im Bedarfsfall die Lüftungsblenden vor dem
Befestigen des Gerätes an der Decke umsetzen.
- Falls das Innenteil unter einer Decke aufgehängt wird, muß zum eventuellen Auswechseln eines Wärmetauschers die Maschine
auf den Boden gestellt werden.
CONFIGURATION DE SOUFFLAGE
ET DE REPRISE
STANDARD DISCHARGE AND
SUCTION CONFIGURATION
STANDARD-KONFIGURATION FÜR
AUSBLAS UND ANSAUG
- Tous les modèles offrent des configurations
différentes pour l'aspiration et le soufflage
de l'air extérieur (page 12)
- All the models have different configurations
for the suction and discharge of external air,
as well as for the return and discharge of
treated air. (page 12)
- Alle Modelle bieten verschiedene Konfigurationen zum Ansaug und Ausblas der
Außenluft, sowie für die Rückströmung und
den Ausblas der Zuluft.Siehe 12.
PERMUTATION DE LA VENTIL
VENTILATION SWITCHING
VERTAUSCHEN DER LÜFTUNG
- Ces opérations sont à effectuer HORS
TENSION et avant la mise en place définitive de la machine.
- These operations are to be carried out
with POWER OFF and before final installation of the appliance.
- Vor diesen Eingriffen muß unbedingt der
NETZSTECKER GEZOGEN werden, und
sie sind vor dem endgültigen Anbringen
des Gerätes vorzunehmen.
- L'opération se fait simplement sur le ventilateur A, en démontant l'ensemble (ventil
A + son panneau de soufflage) et en le
permutant avec le panneau B.
- Le moteur à poulie variable C doit être
inversé de sa position initiale afin d'avoir
toujours accès au réglage du débit d'air par
le panneau de visite B.
- This is carried out very easily for fan A by
removing the fan assembly (fan A + its discharge grille) and interchanging it with panel
B.
- Variable pulley motor C must be reversed
with respect to its initial position in order to
ensure that the air flow adjustment control
remains accessible through inspection panel
B.
- Dieser Eingriff wird nur an dem Lüfter A
vorgenommen, indem das Aggregat (Lüfter
A + Ausblasblende) ausgebaut und mit der
Blende B ausgetauscht wird.
- Der Motor mit verstellbarer Riemenscheibe
C muß aus seiner Ausgangsposition umgekehrt werden, um über die Wartungsplatte
B stets Zugang zu der Regelung der Luftmenge zu haben.
Condenseur Centrifuge
- Au besoin, permuter les panneaux de
ventilation avant la fixation de l'appareil au
plafond.
- Dans le cas où l'unité est suspendue sous
un plafond, le remplacement éventuel d'un
échangeur thermique implique la dépose de
la machine au sol.
B
C
A
11
Split-System Gainables
Split System Ductable
Condenseur Centrifuge
Split-Bauweise Für Kanalanschluß
Centrifugal Condenseur
Configuration usine
Factory configuration
Werkseitige Konfiguration
CONDENSEUR
CONDENSER
VERFLÜSSIGER
RadialKondensor
VENTILATION
VENTILATION
LÜFTUNG
CH
exemple de configuration chantier
Example of on-site configuration
Beispiel für Baustellenkonfiguration
DIMENSIONS DÉPARTS DE GAINES
DUCT OUTLET DIMENSIONS
CH 35 / 43
454
317
155
270
317
454
155
88
213
454
349
175
MASSE KANALABGÄNGE
213
CH 50 / 60
454
403
454
91
454
112
183
324
403
454
91
223
454
187
88
349
349
349
223
ATTENTION
LORS DU REMONTAGE DE LA POULIE FIXE,VÉRIFIER TOUJOURS QUE
LA DISTANCE ENTRE LA POULIE ET LA BAGUE BRONZE DU GROUPE
VENTILATEUR SOIT COMPRISE ENTRE 10 ET 12 MM.
WARNING
WHEN REFITTING THE FIXED PULLEY, ALWAYS CHECK THAT THERE IS
THE GAP BETWEEN THE PULLEY AND THE FAN UNIT BRONZE RING IS
BETWEEN 10 AND 12 MM.
ACHTUNG
BEIM WIEDEREINBAU DER FESTSCHEIBE MUSS IMMER SICHERGESTELLT
WERDEN, DAS DER ABSTAND ZWISCHEN DER SHEIBE UND DEM
BRONZERING DES VENTILATORAGGREGATS ZWISCHEN 10 UND 12 MM
BETRÄGT
12
Split-System Gainables
Condenseur Centrifuge
DIMENSIONS CD
Split System Ductable
Split-Bauweise Für Kanalanschluß
Centrifugal Condenseur
RadialKondensor
DIMENSIONS CD
ABMESSUNGEN CD
CD35
1010
960
Raccord Flare 3/4" et 3/8"
Flare coupling 3/4" and 3/8"
Börelanschlüsse 3/4" und 3/8"
180
340 210
25
Sortie des tubes
Exit pipes
Rohraustritt
140
90
25
50
225
225
50
25
Coffret électrique
Terminal box
Schaltschrank
930
20
60
110
327
350
745
20
720
586
290
850
900
CD43
Raccord Flare 3/4" et 3/8"
Flare coupling 3/4" and 3/8"
Börelanschlüsse 3/4" und 3/8"
1260
1210
180
340 210
25
Sortie des tubes
Exit pipes
Rohraustritt
140
90
25
190
225
225
190
25
Coffret électrique
Terminal box
Schaltschrank
1180
20
60
110
327
350
745
20
720
586
290
1100
1150
13
Split-System Gainables
Split System Ductable
Condenseur Centrifuge
Split-Bauweise Für Kanalanschluß
Centrifugal Condenseur
RadialKondensor
CD50
Raccord Flare 3/4" et 1/2"
Flare coupling 3/4" and 1/2"
Börelanschlüsse 3/4" und 1/2"
1460
1410
180
340 210
Coffret électrique
Terminal box
Schaltschrank
25
Sortie des tubes
Exit pipes
Rohraustritt
140
90
25
290
225
225
290
25
1380
20
60
110
327
350
745
20
720
586
290
1300
290
- La ligne d'aspiration des systèmes GC50/
CD50 doit être réalisée avec un tube
Ø7/8".
- Les raccords ont un Ø 3/4".
- Une fois le raccordement réalisé, le Ø devra
être agrandi à 7/8".
1350
- Use 7/8" pipe for the suction line GC50/CD50
units.
- The connections are 3/4" .
- After the connections, the line should be
enlarged to 7/8".
tube 3/4"
Raccord Flare 3/4"
pipe 3/4"
Flare coopling 3/4"
Börelanschlüsse 3/4" Rohr 3/4"
14
- Für die Saugleitung der Systeme GC50/CD50
ist ein Rohr Ø 7/8" zu verwenden.
- .Anschlußstutzen einen Durchmesser von
3/4".
- Nach dem Anschluß ist der Durchmesser auf
7/8" zu vergrößern.
tube 7/8"
pipe 7/8"
Rohr 7/8"
Split-System Gainables
Condenseur Centrifuge
Split System Ductable
Centrifugal Condenseur
Split-Bauweise Für Kanalanschluß
RadialKondensor
CD60
Coffret électrique
Terminal box
Schaltschrank
Raccord Flare 7/8" et 5/8"
Flare coupling 7/8" and 5/8"
Börelanschlüsse 7/8" und 5/8"
256
400
1425
25
25
302
302
242
25
1400
25
25
25
120
75
28
28
400
640
30
700
45
250
151
30
Sortie des tubes
Exit pipes
Rohraustritt
242
350
22,5
1300
23,5
1350
83
- Possibilité de sortir les tubes (frigorifiques
et condensats) à droite ou à gauche.
Dans ce cas frigorifique, il faut débraser les
tubes Gaz et Liquide au niveau du rep. A et
ressouder les tubes dans la configuration
désirée.
- The tubes (coolant and condensate) can be
brought out on the left-hand or right-hand
sides.
In the case of the coolant tubes, it is necessary to drain the Gas and Liquid from the
tubes at point A and to re-weld the tubes in
the required configuration.
A
15
- Möglichkeiten für den Rohraustrirr (Kältemittel und Kondensat) rechts oder links.
Im Falle des Kältemittels müssen die Gasund Flüssigkeitsrohre bei Pos. A losgelötet
und in der gewünschten Konfiguration erneut
gelötet werden.
Split-System Gainables
Condenseur Centrifuge
DIMENSIONS CH
Split System Ductable
Split-Bauweise Für Kanalanschluß
Centrifugal Condenseur
RadialKondensor
DIMENSIONS CH
ABMESSUNGEN CH
CH 35 / 43
806
504
406
582
145
149
0
144
0
6
71
CH 50 / 60
904
580
477
653
64
170
2
165
2
16
3
80
Split-System Gainables
Condenseur Centrifuge
REGLAGE DÉBIT / PRESSION
Split System Ductable
Split-Bauweise Für Kanalanschluß
Centrifugal Condenseur
RadialKondensor
F L OW R AT E / P R E S S U R E
CONTROL
EINSTELLEN VON LUFTMENGE /
DRUCK
35
43
50
60
NON
NON
NON
Poulie variable
NO
NO
NO
Variable pulley
NICHT
NICHT
NICHT
Veränderbare Riemenscheibe
Vitesses disponibles Air Traité
3 vitesses
3 vitesses
3 vitesses
3 vitesses
Treated air speeds
3 speeds
3 speeds
3 speeds
3 speeds
Mögliche Drehzahlen Zuluft
3 Drehzahl
3 Drehzahl
3 Drehzahl
3 Drehzahl
CONFIGURATION
ÉLECTRONIQUE POUR LA
VERSION RÉVERSIBLE
ELECTRONIC CONFIGURATION
FOR THE HEATPUMP MODEL
Réglage débit pression Condenseur
Condenser flow rate/pressure control
Einstellen Luftmenge Druck Verflüssiger
KONFIGURATION BEI
WARMEPUMPENAUSFUHRUNG
! A EFFECTUER HORS TENSIONS !TO
BE CARRIED OUT WITH ! VOR EINGRIFF NETZSTECKER
POWER OFF
ZIEHEN !
- Le ST est configuré en version STANDARD
- Pour configurer l'appareil en version REVERSIBLE : Oter la prise de configuration
rep. ELD ST et la remplacer par la prise de
configuration rep. ELD RC (fournie avec
l'appareil).
- The ST is configured for COOLING ONLY.
- To configure it for HEATPUMP, remove configuration plug P/N ELD ST and replace it with
configuration plug P/N ELD RC (supplied
with the appliance).
- Der ST ist in der STANDARDVERSION
konfiguriet.
- Für eine Konfiguration mit WÄRMEPUMPE
folgendermaßen vorgehen: den Konfigurationsstecker, Pos. ELD ST entfernen und
durch den Konfigurationsstecker, Pos. ELD
RC (mit dem Gerät geliefert) erstzen.
ATTENTION au sens d'embrochage
(Flèches de repère IMPERATIVEMENT
en vis à vis).
CAUTION be careful to install the plug
in right direction (MANDATORILY line up
the arrows)
DIE EINSCHUBRICHTUNG BEACHTEN
(Markierungspfeile UNBEDINGT
einander gegenüber)
pour changer de configuration
- Effectuer impérativement un RESET.
(voir document MURC4)
To change the configuration
- Mandatorily carry out a reset (see document
MURC4)
17
Zur Änderung der Konfiguration
- unbedingt RESET ausführen (Siehe Dokument MURC4)
Split-System Gainables
Condenseur Centrifuge
R A C C O R D E M E N T S
ÉLECTRIQUES
- Ces machines sont équipées de base d'un
interrupteur de proximité, faisant office de
bornier d'alimentation générale.
- Possibilité de cadenasser l'interrupteur en
tirant la partie (C)
Split System Ductable
Split-Bauweise Für Kanalanschluß
Centrifugal Condenseur
RadialKondensor
ELECTRICAL CONNECTIONS
ELEKTRISCHE ANSCHLÜSSE
- These units are equipped with a local switch
used as general terminal board.
- Diese Geräte sind in ihrer Grundausführung
mit einem Näherungsschalter ausgerüstet,
der als Anschlußklemmenleiste dient.
- Indem man das Teil (C) herauszieht kann ein
Vorhängeschloß an den Schalter angelegt
werden.
- The switch can be padlocked by pulling out
part C.
�
��
�
���
- Un disjoncteur ou un porte fusible (non
fourni) doit être installé en amont de
l'unité, conformément au schéma électrique; pour les calibres, se reporter aux
spécifications électriques page 5.
C
- A circuit breaker or fuse holder (not
supplied) must be installed upstream of
the unit in accordance with the circuit
diagram. For the ratings, refer to the
electrical specifications on page 5.
- Vor dem Gerät muß ein Sicherungsautomat oder ein Sicherungshalter (nicht geliefert) angebracht werden, entsprechend
dem Stromlaufplan ; die Größen sind den
elektrischen Spezifikationen, Seite 5, zu
entnehmen.
- Appuyer pour le déclipsage et la désolidarisation du bloc "interrupteur de proximité" sur le
panneau électrique.
- Press to unclip and withdraw the « local switch »
unit on the terminal board.
- Drücken, um den Näherungsschalterblock zu
lösen und von der Schalttafel zu trennen.
- Couple de serrage maxi: 0,8 Nm
- Max. tightening torque: 0,8 Nm
- Max. Anziehmoment: 0,8 Nm
1 Ôter l'écran de protection des bornes.
1 Remove the terminal protector.
1 Den Schutzschirm der Klemmen entfernen.
2 Pour raccorder, utiliser un tournevis POZIDRIV M3,5 Form Z.
2 Use a Pozidrive M3.5 screwdriver, Form Z,
to make the connections.
2 Für den Anschluß einen Schraubendreher
POZIDRIV M3,5 Form Z, benutzen.
���������������������������������
���������������������������������������������
����������������������
���
3N~400V-50HZ
1N~230V-50HZ
18
Split-System Gainables
Condenseur Centrifuge
RACCORDEMENTS ÉLECTRIQUES
Split System Ductable
Split-Bauweise Für Kanalanschluß
Centrifugal Condenseur
RadialKondensor
ELECTRICAL CONNECTIONS
ELEKTRISCHE ANSCHLÜSSE
1/L
2/N
3
4
5
6
*
CD 35
8
9
1
2
4
5
6
CH 35M / RC M
**
L
N
8
9
***
** Protection électrique à prévoir lors de l'installation.
** Electrical protection to be provided during installation.
** Bei der Montage vorzunehmende elektrische Sicherung.
1N~230V-50HZ
*
*
*
Câblage à effectuer dans le cas réversible.
Wiring in case of heatpump.
Bei Wärmepumpenmodellen.
*** Raccordement sur l'interrupteur de proximité.
*** Connections on local switch.
*** Anschluß an den Näherungsschalter.
1/L
2/N
3
4
5
6
*
8
9
CD 35 / 43 / 50 / 60
1
2
4
5
6
CH 35T/RCT - 43/43RC - 50/50RC - 60/60RC
**
L1
L2
L3
N
8
9
***
3N~400V-50HZ
** Protection électrique à prévoir lors de l'installation.
** Electrical protection to be provided during installation.
** Bei der Montage vorzunehmende elektrische Sicherung.
*
*
*
Câblage à effectuer dans le cas réversible.
Wiring in case of heatpump.
Bei Wärmepumpenmodellen.
*** Raccordement sur l'interrupteur de proximité.
*** Connections on local switch.
*** Anschluß an den Näherungsschalter.
19
Split-System Gainables
Condenseur Centrifuge
IMPORTANT
Respecter le raccordement des liaisons
électriques y compris l'alimentation secteur
(phase, neutre, terre, etc...) par rapport au
repérage du bornier.
Split System Ductable
Split-Bauweise Für Kanalanschluß
Centrifugal Condenseur
RadialKondensor
IMPORTANT
Die Reihenfolge der Stromanschlüsse,
einschließlich des Netzanschlusses (Phase,
Mittelleiter, Erdleitung, usw.) gemäß der
Kennzeichnung der Klemmenleiste berücksichtigen.
Observe the correct order for the electrical
connections, including the mains supply
(phase, neutral, earth, etc...), in accordance
with the markings on the terminal strip.
WICHTIG
TRÈS IMPORTANT :
3N~400V-50Hz
Le groupe extérieur est équipé de base d’un
contrôleur d’ordre et de coupure de phases
implanté dans le boîtier électrique.
LA VISUALISATION DES DIODES DOIT
ÊTRE INTERPRÉTÉE COMME SUIT :
Diode verte =1 : système sous-tension
Sehr wichtig:
Very important:
3N~400V-50Hz
The outdoor unit is equipped as standard with a
phase sequence and cut-out controller located
in the electrical box.
THIS PRODUCT IS EQUIPPED WITH
A PHASE SEQUENCE CONTROLLER.
THE LED’s INDICATE THE FOLLOWING
CONDITIONS:
3N~400V-50Hz
Das Außenaggregat ist in der Grundversion
mit einer Phasenfolge- und Phasenabschaltübe
rwachung ausgestattet, die in dem Elektrofach
untergebracht ist.
DIESES PRODUKT IST MIT EINEM
PHASENFOLGENPRÜFSYSTEM
AUSGESTATTET. DIE ANZEIGE DER
DIODEN MUSS FOLGENDERMAßEN
AUSGELEGT WERDEN:
le sens de rotation du compresseur est correct
Green LED =1: low voltage supply
Diode verte =clignotante : inversion de phase
the compressor rotation direction is correct
Grüne Diode =1: System unter Spannung
Diode verte =0 : coupure de phase
Green LED =flickering: phase inversion
der Drehsinn des Kompressors ist richtig.
Le compresseur et les ventilateurs ne démarrent
pas.
Green LED =0: phase absent
Grüne Diode =blinzelnd: Phasenumkehrung
the compressor and the fans do not start.
Grüne Diode =0: Phasenunterbrechung
Kompressor und Ventilatoren starten nicht.
20
WIRING DIAGRAM :
SCHALTPLÄNE :
SE : 2971+3006 CD/CH 35
1-Phase 230 V+/-10% 50Hz
TAKE CARE!
This wiring diagram is correct at the time
of publication. Manufacturing changes
can lead to modifications. Always refer to
the diagram supplied with the product.
SE : 2971+3006 CD/CH 35
1~ 230 V+/-10% 50Hz
ACHTUNG!
Dieser Stromlaufplan ist zum Zeitpunkt
der Veröffentlichung gültig. In Herstellung
befindliche Varianten können Änderungen
mit sich bringen. In jedem Fall den mit
dem Produkt gelieferten Stromlaufplan
hinzuziehen.
>
ATTENTION
Ce schéma est correct au moment de la
publication.
Les variantes en fabrication peuvent
entraîner des modifications. Reportezvous toujours au schéma livré avec le
produit.
RadialKondensor
>
SE : 2971+3006 CD/CH 35
1-Phase 230 V+/-10% 50Hz
Split-Bauweise Für Kanalanschluß
Centrifugal Condenseur
230/12V
SCHÉMA ÉLECTRIQUE :
Split System Ductable
3,15A T
230V
Condenseur Centrifuge
T2
Split-System Gainables
21
SE : 2971+3006 CD/CH 35
1-Phase 230 V+/-10% 50Hz
ATTENTION
Ce schéma est correct au moment de la
publication.
Les variantes en fabrication peuvent
entraîner des modifications. Reportezvous toujours au schéma livré avec le
produit.
Centrifugal Condenseur
RadialKondensor
WIRING DIAGRAM :
SCHALTPLÄNE :
SE : 2971+3006 CD/CH 35
1-Phase 230 V+/-10% 50Hz
TAKE CARE!
This wiring diagram is correct at the time
of publication. Manufacturing changes
can lead to modifications. Always refer to
the diagram supplied with the product.
SE : 2971+3006 CD/CH 35
1~ 230 V+/-10% 50Hz
ACHTUNG!
Dieser Stromlaufplan ist zum Zeitpunkt
der Veröffentlichung gültig. In Herstellung
befindliche Varianten können Änderungen
mit sich bringen. In jedem Fall den mit
dem Produkt gelieferten Stromlaufplan
hinzuziehen.
N° DE CODE:399455
SCHÉMA ÉLECTRIQUE :
Split-Bauweise Für Kanalanschluß
P>
Condenseur Centrifuge
Split System Ductable
MO4
Split-System Gainables
22
WIRING DIAGRAM :
SCHALTPLÄNE :
SE : 2971+3005 CD/CH 35/43
3-N ~ 400/230 V+/-10% 50Hz
SE : 2971+3005 CD/CH 35/43
3-Phase 400/230 V+/-10% 50Hz
TAKE CARE!
This wiring diagram is correct at the time
of publication. Manufacturing changes
can lead to modifications. Always refer to
the diagram supplied with the product.
ACHTUNG!
Dieser Stromlaufplan ist zum Zeitpunkt
der Veröffentlichung gültig. In Herstellung
befindliche Varianten können Änderungen
mit sich bringen. In jedem Fall den mit
dem Produkt gelieferten Stromlaufplan
hinzuziehen.
23
�� �� �����������
�
�
ATTENTION
Ce schéma est correct au moment de la
publication.
Les variantes en fabrication peuvent
entraîner des modifications. Reportezvous toujours au schéma livré avec le
produit.
RadialKondensor
��
SE : 2971+3005 CD/CH 35/43
3-Phase 400/230 V+/-10% 50Hz
Split-Bauweise Für Kanalanschluß
Centrifugal Condenseur
��
SCHÉMA ÉLECTRIQUE :
Split System Ductable
��
Condenseur Centrifuge
��
Split-System Gainables
ATTENTION
Ce schéma est correct au moment de la
publication.
Les variantes en fabrication peuvent
entraîner des modifications. Reportezvous toujours au schéma livré avec le
produit.
RadialKondensor
WIRING DIAGRAM :
SCHALTPLÄNE :
SE : 2971+3004 CD/CH 50
3-Phase 400/230 V+/-10% 50Hz
TAKE CARE!
This wiring diagram is correct at the time
of publication. Manufacturing changes
can lead to modifications. Always refer to
the diagram supplied with the product.
SE : 2971+3004 CD/CH 50
3-N ~ 400/230 V+/-10% 50Hz
ACHTUNG!
Dieser Stromlaufplan ist zum Zeitpunkt
der Veröffentlichung gültig. In Herstellung
befindliche Varianten können Änderungen
mit sich bringen. In jedem Fall den mit
dem Produkt gelieferten Stromlaufplan
hinzuziehen.
�� �� �����������
SE : 2971+3004 CD/CH 50
3-Phase 400/230 V+/-10% 50Hz
Centrifugal Condenseur
��
SCHÉMA ÉLECTRIQUE :
Split-Bauweise Für Kanalanschluß
���
Condenseur Centrifuge
Split System Ductable
���
Split-System Gainables
24
Split-System Gainables
Condenseur Centrifuge
SCHÉMA ÉLECTRIQUE :
SE : 2984+3003 CD/CH 60
3-Phase 400/230 V+/-10% 50Hz
Split System Ductable
Split-Bauweise Für Kanalanschluß
Centrifugal Condenseur
RadialKondensor
WIRING DIAGRAM :
SCHALTPLÄNE :
SE : 2984+3003 CD/CH 60
3-Phase 400/230 V+/-10% 50Hz
TAKE CARE!
This wiring diagram is correct at the time
of publication. Manufacturing changes
can lead to modifications. Always refer to
the diagram supplied with the product.
ATTENTION
Ce schéma est correct au moment de la
publication.
Les variantes en fabrication peuvent
entraîner des modifications. Reportezvous toujours au schéma livré avec le
produit.
SE : 2984+3003 CD/CH 60
3-N ~ 400/230 V+/-10% 50Hz
ACHTUNG!
Dieser Stromlaufplan ist zum Zeitpunkt
der Veröffentlichung gültig. In Herstellung
befindliche Varianten können Änderungen
mit sich bringen. In jedem Fall den mit
dem Produkt gelieferten Stromlaufplan
>
>
230/12V
3,15A T230V
T2
FUSE 5A t !
hinzuziehen.
25
ATTENTION
Ce schéma est correct au moment de la
publication.
Les variantes en fabrication peuvent
entraîner des modifications. Reportezvous toujours au schéma livré avec le
produit.
RadialKondensor
WIRING DIAGRAM :
SCHALTPLÄNE :
SE : 2984+3003 CD/CH 60
3-Phase 400/230 V+/-10% 50Hz
TAKE CARE!
This wiring diagram is correct at the time
of publication. Manufacturing changes
can lead to modifications. Always refer to
the diagram supplied with the product.
SE : 2984+3003 CD/CH 60
3-N ~ 400/230 V+/-10% 50Hz
ACHTUNG!
Dieser Stromlaufplan ist zum Zeitpunkt
der Veröffentlichung gültig. In Herstellung
befindliche Varianten können Änderungen
mit sich bringen. In jedem Fall den mit
dem Produkt gelieferten Stromlaufplan
hinzuziehen.
�� �� �����������
SE : 2984+3003 CD/CH 60
3-Phase 400/230 V+/-10% 50Hz
Centrifugal Condenseur
��
SCHÉMA ÉLECTRIQUE :
Split-Bauweise Für Kanalanschluß
���
Condenseur Centrifuge
Split System Ductable
���
Split-System Gainables
26
Split-System Gainables
Condenseur Centrifuge
Split System Ductable
Split-Bauweise Für Kanalanschluß
Centrifugal Condenseur
RadialKondensor
N701
LÉGENDE DES SCHÉMAS
ÉLECTRIQUES :
SE 2984 + 3003: CD/CH 60
3-Phases 400/230 V+/-10% 50Hz
SE 2971 + 3004: CD/CH 50
3-Phases 400/230 V+/-10% 50Hz
SE 2971 + 3005: CD/CH 35 / 43
3-Phases 400/230 V+/-10% 50Hz
SE 2971 + 3006: CD/CH 35
1-Phase 230 V+/-10% 50Hz
1) ALIMENTATION
Modèles triphasés :
Tension : 400 V~ + Neutre + Terre
Raccordement sur les bornes L1(1) – L2(3)–
L3(5)- N(7) - PE – de l’interrupteur sectionneur Q1 (Unité extérieure).
Modèles monophasés :
Tension : 230 V ~ + Terre
Raccordement sur les bornes de l’interrupteur sectionneur Q1 (Unité extérieure):
-L(3) pour la phase
-N(1) pour le neutre
-PE pour le conducteur de protection
Cette alimentation vient d’un DISJONCTEUR ou d’un PORTE FUSIBLES FFG
équipé de fusibles type aM. Ce porte fusible
doit être monté adjacent à l’unité extérieure.
Le tableau 1 donne le calibre du disjoncteur
ou des fusibles suivant le modèle.
L’installation électrique et le câblage de
l’unité doivent être conformes aux normes
en vigueur dans le pays d’installation .
WIRING DIAGRAM LEGEND :
LEGENDE DER SCHALTPLÄNE :
SE 2984 + 3003: CD/CH 60
3-Phase 400/230 V+/-10% 50Hz
SE 2971 + 3004: CD/CH 50
3-Phase 400/230 V+/-10% 50Hz
SE 2971 + 3005: CD/CH 35 / 43
3-Phase 400/230 V+/-10% 50Hz
SE 2971 + 3006: CD/CH 35
1-Phase 230 V+/-10% 50Hz
SE 2984 + 3003: CD/CH 60
3-N ~ 400V+/-10% 50Hz
SE 2971 + 3004: CD/CH 50
3-N ~ 400V+/-10% 50Hz
SE 2971 + 3005: CD/CH 35 / 43
3-N ~ 400V+/-10% 50Hz
SE 2971 + 3006: CD/CH 35
1 ~ 230 V+/-10% 50Hz
1) POWER CIRCUIT
Threephase model :
Voltage : 400 V~ + Neutral + Earth
Connect to main isolator Q1 L1(1) – L2(3)–
L3(5)- N(7) - PE – (Outdoor Unit).
1) NETZANSCHLUSS
Drehstromausfürung :
Netzspannung : 3N~400 V-50Hz ,PE
Der anschlub erfolgt an den klemmen L1(1)
– L2(3)– L3(5)- N(7) - PE des hauptschalters
Q1 (Ausseneinheit).
Einphasig modellen :
Netzspannung : 1~230 V-50Hz ,PE
Der anschlub erfolgt am hauptschalter Q1
(Ausseneinheit):
-L(3) Phase
-N(1) N
-PE Erde
Singlephase model :
Voltage : 230 V~ + Earth
Connect to main isolator Q1 (Outdoor
Unit):
– L (3) : phase
– N (1): neutral
– PE – : earth
Der Nennstrom der bauseitigen, trägen
VORSICHERUNG FFG ist aus der Taballa
1 ersichlich.
Es gelten die örtlichen Vorschriften.
The power supply must be protected by a
CIRCUIT BREAKER (FFG) fitted with motor
start fuses supplied by installer. This circuit
breaker must be mounted adjacent to the
unit.Table 1 give circuit-breaker size.
The Electrical Installation and Wiring of this
unit must be in accordance with Local Wiring
Regulations
TABLEAU 1
TABELLE 1
TABLE 1
MODELE
FFG Fusibles(aM) / Disjoncteur moteur
Intensité en charge
Intensité de démarrage
MODEL
FFG (aM) Fuse/Circuit breaker size
Full Load Current
Starting current
MODELLE
FFG Vorsicherung,träge (Bauseits)
Nennstrom
Anlaufstrom
(FLC)
(LRA)
EH/CH
35 monophasé
40 A
35 A
122 A
35 triphasé
43
50
60
20 A
25 A
25 A
25 A
17.5 A
17.5 A
19 A
22 A
57.5 A
66.1 A
74.6 A
104.3 A
27
Split-System Gainables
Split System Ductable
Split-Bauweise Für Kanalanschluß
Centrifugal Condenseur
RadialKondensor
2) DESIGNATION DES REPERES
DU SCHEMA ELECTRIQUE
2)ELECTRIC WIRING DIAGRAM
LEGEND:
2)ZEICHENERKLÄRUNG
2.1
FROID / PROTECTION
2.1
COMPRESSOR/SAFETY CIRCUIT
2.1
KÜHLUNG/ NETZANSCHLUSS
FFG
: disjoncteur ou fusibles (fourni par
l’installateur)
: interrupteur sectionneur
: contacteur du compresseur MC1
: relais thermique du compresseur
MC1 (modèles triphasés)
: fusibles du compresseur MC1
(modèles monophasés)
: pressostat haute pression
(réarmement manuel)
: résistance de carter (modèles
réversibles)
: compresseur
: vanne d’inversion de cycle
(modèles réversibles)
: condensateur du compresseur
MC1 (modèles monophasés)
: Module de contrôle d’absence
ou coupure d’ordre de phase
(modèles triphasés)
FFG
Q1
K1
FT1
: circuit breaker
: Isolator
: compressor contactor MC1
: compressor thermal relay MC1
(threephase model)
: compressor fuses MC1
(singlephase model)
: high pressure switch (MANUALRESET CONTROL)
: crankcase heater (Heat pump
model)
: compressor
: reversing valve solenoid (Heat
pump model)
: compressor capacitor MC1
(singlephase model)
: phase sequence controller (order
and missing phase) (threephase
model)
FFG
Q1
K1
FT1
: träge Vorsicherung (bauseits)
: hauptschalter
: Schütz Kompressor MC1
: Überstromauslöser Kompresssor
MC1 (400V-Ausfürung)
: träge Kompressor MC1 (230VAusfürung)
: HD-Sicherheitsbegrenzer
: Kurbelwannenheizung
(Wärmpumpenausführung)
: Kompressor
: Umkehrventil
(Wärmpumpenausführung)
: Betriebskondensatorv Kompressor
MC1 (230V-Ausfürung)
: Phasenfolgeanzeiger (400VAusfürung)
2.2
VENTILATION
2.2
FAN MOTORS & RELATED
EQUIPEMENT
MO4
: moteur de ventilation du
condenseur
: condensateur du moteur MO4
(cas monophasé)
: contacteur du moteur MO4
: relais thermique du moteur MO4
(modèles 50/60)
: disjoncteur magnétothermique
(modèles 35/43)
: disjoncteur magnétothermique
10A
: moteur de ventilation air traité
: condensateur du moteur M4
: relais moteur M4 pour Grande
Vitesse (Mod 60)
MO4
C4
2.3
PCB
ST1
Condenseur Centrifuge
Q1
K1
FT1
FH1
R1
MC1
Y1
C1
KA1
C4
K4
FT4
FF7
M4
C4
KGV
ST2
ST3
X1
X2
FH1
R1
MC1
Y1
C1
KA1
FH1
R1
MC1
Y1
C1
KA1
2.2
LÜFTUNG
MO4
C4
M4
C4
KGV
: outdoor fan motor unit
: MO4 capacitor
(singlephase model)
: outdoor unit fan motor contactor
: fan motor thermal relay MO4
(models 50/60)
: thermo-magnetic circuit breaker
(models 35/43)
: 10A circuit breaker to protect
control
: indoor unit fan motor
: M4 capacitor
: M4 high fan relay (Mod 60)
: Verflüssiger-Ventilatormotor
: Kondensator Ventilatormotor MO4
(230V-Ausfürung)
: Schütz Ventilatormotor MO4
: Überstromauslöser
Ventilatormotor MO4 (50/60)
: Sicherungsautomat Steuerteil
(35/43)
: Sicherungsautomat Steuerteil
10A
: Zuluft-Ventilatormotor
: Kondensator Ventilatormotor M4
: Schütz Ventilatormotor M4
(Mod. 60)
COMMANDE
2.3
CONTROL
2.3
STEUERTEIL
: carte électronique
: sonde de température ambiance
– ROOM : sonde de température anti-givre –
IN : sonde de température
condenseur – OUT: bornier de contrôle de l’unité
extérieure
: bornier de contrôle de l’unité
intérieure
PCB
ST1
ST2
ST3
X1
X2
: Electronic general controller
: ROOM temperature sensor
: INdoor coil temperature sensor
: OUTdoor coil temperature
: Outdoor Unit control terminal strip
: Indoor Unit control terminal strip
PCB
ST1
ST2
ST3
X1
X2
: Steuerplatine
: Raumfühler – ROOM : Abtaufühler – IN : Verflüssigerfühler – OUT: Ausseneinheit Klemmleiste
: Inneneinheit Klemmleiste
K4
FT4
FF7
28
K4
FT4
FF7
M4
C4
KGV
Split-System Gainables
Condenseur Centrifuge
3 ) VA L E U R S , R E G L AG E D E S
RELAIS THERMIQUES, CALIBRES
DES CONTACTEURS (CLASSE
AC3)
Split System Ductable
Split-Bauweise Für Kanalanschluß
Centrifugal Condenseur
RadialKondensor
3) RANGE AND SETTING OF
INDOOR FAN THERMAL RELAYS
AND CONTACTOR (CLASS AC3)
CURRENT RATING
3) SCHÜTZE (KLASSE AC3) :
NENNSTRÖME UND EINSTELLUNG
DER ÜBERSTROMAUSLÖSER
MODELE / MODEL / MODELL
Fusible FT1 (type aM)
Adjust. of thermal relays
UBERSTROMAUSLÖSER
FT1
FT1
FT1
réglage
Range
43
50
60
32A
/
/
/
/
/
10 – 14 A
10 – 14 A
10 – 14 A
12 – 18 A
Adjustment
10A
11,5A
13,5A
2,6 – 3,7A
2,6 – 3,7A
Bereich
Einstellungen
10 A
Relais thermique
Adjust. of thermal relays
UBERSTROMAUSLÖSER
FT4
FT4
FT4
plage
35
FT1 Träge aM Type
Relais thermique
plage
35 mono.
réglage
Range
Adjustment
Bereich
/
Einstellungen
10 A
/
10 A
/
10 A
2,8 A
3,5 A
Contacteur AC3
Contactor AC3
Schütz AC3
K1
K1
K1
18A
12A
12A
12A
18A
K4
K4
K4
0,8 kW
0,8 kW
0,8 kW
9A
9A
4) REGLAGE DU PRESSOSTAT
(RÉARMEMENT MANUEL)
4)PRESSURE SWITCH (AUTORESET)
4) HD-SICHERHEITSBEGRENZER
(HANDENTRIEGELUNG)
FH1: réglage fixe haute pression 2920 kPa
29,2 bar (423,7 PSI)
FH1: fixed high pressure 2920 kPa
29,2 bar (423,7 PSI)
FH1: Abschaltung bei 2920 kPa / 29,2 bar
/ (423,7 PSI)
5) CODE DES COULEURS
5) CODE OF COLOURS
5) KABELFARBEN
BK
RD
VT
WH
BU
GNYE
OG
GY
BN
:
:
:
:
:
:
:
:
:
noir
rouge
violet
blanc
bleu
vert/jaune
orange
gris
brun
BK
RD
OG
BU
GNYE
VT
GY
BN
WH
:
:
:
:
:
:
:
:
:
black
red
orange
blue
green/yellow
violet
grey
brown
white
29
BK
RD
WH
GY
BU
GNYE
VT
OG
BN
:
:
:
:
:
:
:
:
:
schwarz
rot
weib
grau
blau
gelbgrün
violett
orange
braun
Split-System Gainables
Split System Ductable
Split-Bauweise Für Kanalanschluß
Centrifugal Condenseur
RadialKondensor
RACCORDEMENT HYDRAULIQUE
DES CONDENSATS
CONDENSATE DRAIN LINE
HYDRAULIKANSCHLUSS DES
KONDENSATS
CH:
CH:
CH:
CD:
CD:
CD:
Condenseur Centrifuge
- Surélever l'appareil pour la réalisation
des syphons du tuyau d'évacuation des
condensats.
- Orifice d'évacuation : Ø 1"
- Cas réversible, prévoir un syphon côté
condenseur.
- Comme l’indique le schéma, le siphon a effectuer sur le chantier (30mm minimum) est
situé sur l’évacuation des condensats pour
garantir le drainage durant le fonctionnement
du ventilateur intérieur.
Si, faute de hauteur, il est impossible de
l’installer, il est nécessaire de placer une
pompe spécifique. (non fournie)
- Raise the appliance to provide traps on the
condensate drain lines
- Drain port: dia. 1"
- Heat pump models: provide a trap on the
condenser side
- As shown in the drawing, a siphon is to
be made on site (minimum 30 mm) on the
condensate drain line to ensure condensate drainage during operation of the indoor
fan.
If there is not sufficient height for the siphon,
provide a special pump (not supplied).
- Muß das Gerät erhöht werden, um den
Siphon des Kondenswasserabflußrohrs
herstellen zu können.
- Abflußöffnung : Ø 1"
- Ausführung mit Wärmepumpe : einen Siphon
auf der Seite des Verflüssigers vorsehen.
- Wie auf dem Schema dargestellt, befindet
sich der vor Ort herzustellende Siphon (min.
30 mm) an der Kondensatabflußleitung, um
die Entwässerung während dem Betrieb des
Innenventilators zu gewährleisten.
Falls er wegen unzureichender Höhe nicht
installiert werden kann, muß eine spezielle
Pumpe angebracht werden (nicht geliefert).
100mm
100mm
- ATTENTION : Ne jamais braser le tuyau
d'évacuation des condensats sur les
raccords sortant de l'appareil.
- CAUTION: Never braze the condensate
drain pipe to the appliance outlet fittings.
- ACHTUNG : Das Kondenswasserabflußrohr niemals an die austretenden
Anschlußstutzen des Gerätes löten.
ATTENTION
CAUTION
ACHTUNG
- Pour les modèles Réversibles, dans le cas où
la température extérieure peut être inférieure
à 1°C, prévoir un système prévenant des
risques de prise en glace des condensats
(cordon chauffant par exemple).
- For Heatpump models, if the outdoor temperature is likely to fall below +1°C, provide
a system to prevent the condensates from
freezing (e.g. heating cord).
- Bei Ausführungen mit Wärmepumpe muß,
falls die Außentemperatur niedriger als 1°C
sein kann, ein System vorgesehen werden,
um ein Gefrieren des Kondenswassers zu
vermeiden (beispielsweise eine Heizschnur).
30
Split-System Gainables
Split System Ductable
Split-Bauweise Für Kanalanschluß
Centrifugal Condenseur
RadialKondensor
LIAISON FRIGORIFIQUE
COOLING PIPE
KÄLTELEITUNGEN
- Unité extérieure à un niveau supérieur.
- Outdoor unit on an upper level.
- Höher angeordnetes Außenteil.
Condenseur Centrifuge
Les unités CH sont équipées d’un système
de séparateur d’huile qui permet de les
installer sans siphons.
The CH units are equipped with an oil recovery system enabling them to be installed
without siphons.
�
Die Einheiten CH sind mit einem Ölabscheidesystem ausgestattet und können
daher ohne Siphons installiert werden.
��
LIAISON FRIGORIFIQUE
COOLING PIPE
KÄLTELEITUNGEN
- Unité extérieure à un niveau inférieur.
- Outdoor unit on a lower level.
- Tiefer angeordnetes Außenteil.
�
��
Tous Modèles - All models - Alle Modelle
H+ maxi
30m
H- maxi
30m
Longueur maxi - Max. length - Max. Länge
30m
31
Split-System Gainables
Condenseur Centrifuge
RACCORDEMENTS
FRIGORIFIQUES
Split System Ductable
Split-Bauweise Für Kanalanschluß
Centrifugal Condenseur
RadialKondensor
REFRIGERANT CONNECTIONS
KÄLTETECHNISCHE ANSCHLÜSSE
A
3/4"
E
3/8"
B
CH35-CH43
C
3/4"
E
3/8"
CD35-CD43
L. MAX
30 m
5/8"
A
7/8"
7/8"
E
*
D
Raccord fourni
Coupling supplied
Gelieferter Anschlußstutzen
1/2"
CH50
C 7/8"
B
*
Raccord fourni
Coupling supplied
Gelieferter Anschlußstutzen
1/2"
30 m
1"1/8
5/8"
*
Manchon fourni
Coupling sleeve supplied
Geliefert Muffe
Manchon fourni
Coupling sleeve supplied
Geliefert Muffe
1"1/8
B
A
B
C
D
E
C
7/8"
D
L. MAX
E
5/8"
30 m
*
CD60
A braser avant couplage sur les unités
Brazing before connections on the units
Tube « Gaz »
Tube « Liquide »
Isolation des tubes (6 mm minimum)
Côté à braser
Écrou Flare
A
B
C
D
E
CD50
*
A
7/8"
CH60
3/4"
L. MAX
«Gaz» pipe
«Liquid» pipe
Pipe insulation (6 mm min.)
Side to the brazed
Flare nut
TUBES A REALISER SUR LE
CHANTIER
PIPES TO BE MADE ON SITE
- Cette opération doit être effectuée par un
personnel qualifié et en suivant les règles
de l'art du frigoriste (brasure, tirage au vide,
charge, etc...).
- This operation should be performed expertly
by qualified professionals (refrigeration engineer) (brazing, vacuum, charge, etc ...).
LIAISONS FRIGORIFIQUES
COOLING LINKING PIPES
- Le rayon de cintrage des tubes doit être
égal ou supérieur à 3,5 fois le Ø extérieur
du tube.
- Ne pas cintrer les tubes plus de 3 fois consécutivement et ne pas effectuer plus de 12
coudes sur la longueur totale de la liaison.
- The bending radius of the pipes should be
equal to or more than 3,5 times de outside
diameter of the pipe.
- Do not bend the pipes consecutively more
than three times and do not make more than
12 bends over the complete length of the
link.
32
A
B
C
D
E
Saugleitung
Flüssigkeisleitung
Leitungsisolierung (6 mm min)
Diese Seite löten
Bördelmutter
BAUSEITIG GEFERTIGTE
LEITUNGEN
- Diese Arbeiten dürfen nur von qualifiziertem
Fachpersonal unter Beachtung der kältetechnischen Regeln durchgeführt werden
(Löten, Evakuieren, Füllen usw.).
KÄLTEMITTELVERBINDUNGSLEITUNGEN
- Der Biegeradius der Rohre muß mindestens
das 3,5fache des Rohraußendurchmessers
betragen.
- Die Rohre nicht mehr als 3 mal nacheinander
biegen, und nicht mehr als 12 Krümmungen
über die Gesamtlänge der Rohrverbindung
herstellen.
Split-System Gainables
Condenseur Centrifuge
TIRAGE AU VIDE DES TUBES
FRIGORIFIQUES ET DE L'UNITE
INTERIEURE
- Toutes interventions sur les circuits frigorifiques necessitent le respect des recommandations CECOMAF GT1-001 (recommandation sur le rejet de R22 dans l'atmosphère).
- La charge en R22 est contenue uniquement
dans le caisson extérieur. L'unité intérieure
contient une petite quantité de gaz neutre.
C'est pourquoi après avoir installé les
liaisons il faut impérativement tirer au vide
les liaisons et l'unité intérieure.
Split System Ductable
Split-Bauweise Für Kanalanschluß
Centrifugal Condenseur
RadialKondensor
VACUUM OF COOLING PIPES
AND INDOOR UNIT
ENTLEEREN DER
KÄLTEMITTELLEITUNGEN UND
DES INNENTEILS
- Any working on the cooling circuits require
respect of the CECOMAF GT1-001 recommendations (which refer to discharging R22
into the air).
- Only the outdoor unit is charged with R22
cooling fluid. The indoor unit contains a small
quantity of a neutral gas. This the reason it is
imperative to vacuum the linking pipes and
the indoor unit.
- Arbeiten an Kältekreisläufen dürfen nur
entsprechend den «Empfehlungen bezüglich
R22-Emissionen» (CECOMAF GTI-001)
durchgeführt werden.
- Nur das Außenteil ist mit R22 geladen. Das
Innenteil enthält eine kleine Menge Neutralgas. Daher müssen nach Installieren der
Verbindungen diese, sowie das Innenteil,
unbedingt entleert werden.
PROCEDURE DE MONTAGE
ASSEMBLY
MONTAGE
- Le groupe extérieur possède une vanne
permettant le tirage au vide de l'installation
(grosse vanne)
- The outdoor unit is equipped with a valve
allowing to vacuum the installation (large
valve)
- Das Außenteil verfügt über ein Ventil zum
Entleeren der Anlage (großes Ventil)
1 Connecter les tubes de liaison au caisson
extérieur et à l'unité intérieure.
1 Connect the connecting pipes to the outdoor
unit and to the indoor unit.
1 Die Verbindungsleitungen an die Außenteile
und an die Innenteile anschließen.
- Pour obtenir un bon serrage, recouvrir la
surface avec de l'huile de réfrigération
- To obtain the right tightening, cover the
surface with cooling oil.
- Um einen festen Sitz zu gewährleisten, die
Oberfläche mit Kühlöl behandeln.
- L'utilisation d'une contre clef est indispensable pour le serrage des vannes.
- The use of a counter wrench is required to
tighten the valves.
- Zum Anziehen der Ventile ist ein Gegenschlüssel unerläßlich.
- Les valeurs du couple de serrage se trouvent
dans le tableau ci-dessous.
- The values of the tightening torque are
shown in the table below.
- Die Anziehdrehmomente sind in nachstehender Tabelle angegeben:
Ø ROHRDURCHMESSES ANZUGSDREHMOMENT
Ø DES TUBES
COUPLE DE SERRAGE
PIPE Ø
TIGHTENING TORQUE
1/4"
15-20 Nm
1/4"
15-20 Nm
1/4"
15-20 Nm
3/8"
30-35 Nm
3/8"
30-35 Nm
3/8"
30-35 Nm
1/2"
50-54 Nm
1/2"
50-54 Nm
1/2"
50-54 Nm
5/8"
70-75 Nm
5/8"
70-75 Nm
5/8"
70-75 Nm
7/8"
90-95 Nm
7/8"
90-95 Nm
7/8"
90-95 Nm
2 Connecter la pompe à vide au raccord flare
du caisson extérieur muni de la vanne de
service (gros raccord).
3 Mettre la pompe à vide en marche et vérifier
que l'aiguille de l'indicateur descend à - 0,1
Mpa (- 76 cm Hg).
La pompe doit fonctionner pendant 15 minutes au minimum.
4 Avant de retirer la pompe à vide, il faut
vérifier que l'indicateur de vide reste stable
pendant cinq minutes.
5 Déconnecter la pompe à vide.
6 Enlever le bouchon de la vanne "GAZ" et
"LIQUIDE" et les ouvrir à l'aide d'une clé
hexagonale afin de libérer le R22 contenu
dans le groupe extérieur.
7 Vérifier l'étanchéité des liaisons. Utiliser
un détecteur de fuite électronique ou une
éponge savonneuse.
2 Connect the vacuum pump with the flare
coupling of the outdoor unit equipped with
a process valve (large coupling).
3 Start the vacuum pump and check that the
needle of the indicator goes down to - 0,1
Mpa (-76 cm Hg).
The pump should run during at least 15
minutes.
4 Before disconnecting the vacuum pump,
check that the vacuum indicator remains in
the same position during five minutes.
5 Disconnect the vacuum pump.
6 Remove the cap of the "GAS" and "LIQUID"
valves and open them with a hexagonal
wrench to free the R22 contained in the
outdoor unit.
7 Check that the linking pipes are sealed.
Use an electronic leak detector or a soapy
sponge.
33
2 Die Vakuumpumpe mit der Kupplung des
Außenteils verbinden, das mit dem Betriebsventil (große Kupplung) versehen ist.
3 Die Vakuumpumpe in Betrieb setzen und
prüfen, daß die Anzeigernadel auf -0,1
Mpa absinkt (-76 cm Hg).Die Pumpe muß
mindestens 15 Minuten arbeiten.
4 Bevor die Vakuumpumpe wieder entfernt
wird, prüfen, daß der Unterdruckmesser 5
Minuten lang unverändert bleibt.
5 Die Vakuumpumpe abschalten.
6 Den Stopfen des «GAS» und «FLÜSSIGKEITS»-Ventils entfernen und die Ventile mit
einem Sechskantschlüssel öffnen, um das
in dem Außenteil befindliche R22 freizusetzen.
7 Die Verbindungen auf Dichtigkeit prüfen.
Dazu einen elektronischen Lecksucher oder
einen Seifenschwamm verwenden.
Split-System Gainables
Split System Ductable
Split-Bauweise Für Kanalanschluß
Centrifugal Condenseur
RadialKondensor
TACHES FINALES
FINAL TASKS
ABSCHLIESSENDE ARBEITEN
- Remettre les bouchons des vannes et vérifier
qu'ils sont convenablement serrés.
- Fixer si necessaire les câbles et les liaisons
au mur avec des colliers.
- Faire fonctionner le climatiseur en présence
de l'utilisateur et lui expliquer toutes les
fonctions.
- Montrer le démontage des filtres, leur nettoyage et leur remise en place.
- Place the plugs back on the valves and check
that they are properly tightened.
- If needed, fix the cables and the pipes on
the wall with clamping collars.
- Operate the air conditioner in the presence
of the user and explain all functions.
- Ventilstopfen wieder anbringen und prüfen,
ob sie richtig angezogen sind.
- Kabel und Verbindungsleitungen ggf. mit
Schellen an der Wand befestigen.
- Klimagerät in Anwesenheit des Benutzers
in Betrieb nehmen und alle Funktionen
erläutern.
- Abnehmen, Reinigen und Wiedereinsetzen
des Filters vorführen.
Condenseur Centrifuge
- Show him how to remove, clean and place
back the filters.
34
Split-System Gainables
Split System Ductable
Split-Bauweise Für Kanalanschluß
Centrifugal Condenseur
RadialKondensor
INTERCONNEXION :
PANNEAU DE COMMANDE
RÉCEPTEUR INFRAROUGE
CONTROL PANEL
INFRARED RECEIVER
INTERCONNECTION
VERBINDUNG:
BEDIENFELD
INFRAROT-EMPFÄNGER
- L’équipement est fourni avec un câble blindé
de 7 m, muni de connecteurs à ses deux
extrémités, qui permet l’interconnexion entre
le panneau de commande et le récepteur.
- A 7m shielded cable with connectors at both
ends is provided with the equipment for interconnecting the control panel and infrared
receiver.
- Das Gerät wird mit einem 7 m langen,
geschirmten Kabel geliefert, das an beiden
Enden mit Anschlußsteckern zur Verbindung
von Bedienfeld und Empfänger versehen
ist.
Condenseur Centrifuge
- Possibilité de rallonger ce câble jusqu'à
50m maxi; ce câble doit-être impérativement
blindé, et ne doit pas cheminer avec le circuit
de puissance.
- Possibility of extending this cable to a maximum of 50m. This cable shall mandatorily
be shielded and shall not be routed with the
power circuit cables
- Verlängerungsmöglichkeit dieses Kabels bis
zu 50m max. Dieses Kabel muß unbedingt
geschirmt sein und darf nicht zusammen mit
dem Leistungskreis verlaufen.
Carte électronique
Electronic circuit board
Schelde elettronica
COOL
MODE
HEAT
TIMER
COOL
MODE
STBY.
HEAT
Appuyer doucement sur les clips pour soulever le couvercle.
Press gently on the clips to remove the cover
Leicht auf die Klammern drücken und den Deckel anheben.
TIMER
OPER.
STBY.
OPER.
- Au cas où l’utilisation du connecteur présenterait des difficultés, il est possible de
couper le câble et de réaliser la connexion
sur le récepteur au moyen de la barrette.
- Dans ce cas, il convient d’appliquer le code
de couleurs figurant sur la barrette. Il correspond aux couleurs des 7 conducteurs plus la
masse qui doit être connectée sur la dernière
borne portant l’indication Gd.
- Pour garantir une bonne connexion, il est
nécessaire de placer des embouts pour
des sections de 0,25 mm² aux extrémités
du câble.
8
7
6
5
4
3
2
1
ROUGE
ORANGE
JAUNE
VIOLET
MARRON
NOIR
VERT
MASSE DOREE
8
7
6
5
4
3
2
1
RED
ORANGE
YELLOW
VIOLET
BROWN
BLACK
GREEN
GOLD BRAID
8
7
6
5
4
3
2
1
- In case of difficulties with the connector, cut
it off the cable and wire the cable directly on
the infrared receiver terminal board.
- In this case, follow the color codes shown
on the terminal board, corresponding to the
7 cable conductors plus the bonding braid,
to be connected to the last terminal, marked
Gd.
- To guarantee satisfactory connection, fit the
cable ends with terminals for a 0.25 mm²
size.
ROT
ORANGE
GELB
VIOLETT
BRAUN
SCHWARZ
GRÜN
MASSE VERGOLDET
35
COOL
COOL
MODE
MODE
STBY.
STBY.
- Sollte der Anschlußstecker Schwierigkeiten
bereiten, kann das Kabel abgeschnitten werden und die Verbindung an dem Empfänger
mit der Klemmenleiste hergestellt werden.
- In diesem Fall muß der Farbencode auf
der Klemmenleiste angewandt werden. Er
entspricht den Farben der 7 Drahtadern plus
Erde, die an die letzte Klemme mit der Markierung Gd angeschlossen werden muß.
- Um eine gute Verbindung herzustellen, sind
Kabelschuhe für einen Kabelquerschnitt von
0,25 mm² zu benutzen.
HEAT
HEAT
TIMER
TIMER
OPER.
OPER.
8
7
6
5
4
3
2
1
Split-System Gainables
Split System Ductable
Split-Bauweise Für Kanalanschluß
Centrifugal Condenseur
RadialKondensor
RÉCEPTEUR À INFRAROUGE
INFRARED REMOTE CONTROL
RECEIVER
INFRAROT-EMPFÄNGER
COOL
Voyant mode froid.
COOL
Cooling LED
COOL
Anzeigeleuchte Kühlung
HEAT
Voyant mode chaud.
HEAT
Heating LED
HEAT
Anzeigeleuchte Heizung
TIMER
Voyant programmation horaire activée.
TIMER
Timer active
TIMER
Zeitanzeige
STBY
Voyant d’attente. S’allume quand l’appareil
est connecté et prêt à recevoir les ordres de
la télécommande.
STBY
Standby LED. Lit when the system is connected and . ready to receive commands
from the remote control unit.
STBY
Betriebsanzeige
OPER
Voyant de fonctionnement. S’allume quand
l’appareil fonctionne. Un clignotement annonce que le signal infrarouge a été reçu.
OPER
Operation LED. Comes on when the system
is operating. Flashes to indicate reception of
an infrared signal.
OPER
Betriebsleuchte. Leuchtet bei Betrieb
durchgehend. Sie blinkt, um den Empfang
und die Verarbeitung von Infrarotsignalen
anzuzeigen.
MODE
Commande d’urgence. Une pression sur
cette touche permet de sélectionner les
fonctions froid ou chaud au cas où l’on ne
dispose pas de la télécommande.
MODE
Emergency switch. In case of unavailability
of the remote unit, this switch is used to
select heating or cooling.
MODE
Wahlschalter. Umschalten des Klimageräten
auf Kühlung oder Heizen ohne Fernbedienung.
Condenseur Centrifuge
COOL
MODE
STBY.
HEAT
TIMER
OPER.
Récepteur du signal à infrarouge
Infrared signal receiver
Infrarot-Empfänger
NOTA :
- Les voyants COOL et HEAT ne sont activés
qu'en actionnant le commutateur MODE du
recepteur.
NOTE:
- The COOL and HEAT LEDs only come on
when the receiver MODE switch is used.
36
ACHTUNG:
- Die Anzeigeleuchten Kühlung und Heizen
werden erst durch Betätigen des Wahlschalters am Empfänger aktiviert.
Split-System Gainables
Split System Ductable
Split-Bauweise Für Kanalanschluß
Centrifugal Condenseur
RadialKondensor
MODE D'EMPLOI
DIRECTIONS FOR USE
GEBRAUCHSANLEITUNG
MARCHE - ARRÊT
ON - OFF
EIN - AUS
- Presser la touche O de la télécommande
pour mettre en marche le climatiseur, le
voyant OPER du récepteur infrarouge
s'allume pour indiquer que l'appareil est en
marche. L'afficheur LCD indique toujours le
dernier mode de fonctionnement utilisé.
- Press the key
on the remote control
to start the air conditioner, and the OPER
indicator on the infrared receiver will light up
to show that the appliance is working. The
LCD always displays the last operating mode
used.
- Die Taste der Fernbedienung drücken, um
das Klimagerät einzuschalten, die Kontrollampe OPER des IR-Empfängers leuchtet,
um anzuzeigen, daß das Gerät eingeschaltet
ist. Die Flüssigkristallanzeige zeigt immer die
zuletzt benutzte Betriebsart an.
RÉGLAGE DE LA TEMPÉRATURE
AMBIANTE
ROOM TEMPERATURE CONTROL
R E G E L U N G
RAUMTEMPERATUR
- Les touches + et - servent à régler la température désirée.
- The keys + and - are used to obtain the
desired temperature.
SÉLECTION DE LA VITESSE DE
VENTILATION
FAN SPEED SELECTION
- Passer à la vitesse de ventilation désirée en
pressant la touche
.
- he desired fan speed is achieved by pressing
the key
.
- Pour les autres fonctions, voir le manuel d'utilisation fourni avec l'appareil
(MURC4)
- For the other functions, refer to the user
manual supplied with the appliance
(MURC4).
Condenseur Centrifuge
- Mit den Tasten + und – wird die gewünschte
Temperatur eingestellt.
DREHZAHLREGELUNG DER
LÜFTUNG
- Durch Drücken der Taste
die gewünschte Lüftungsdrehzahl einstellen.
- Für die anderen Funktionen verweisen
wir auf das mit dem Gerät gelieferte
Benutzerhandbuch (MURC4).
MARCHE - ARRÊT
ON - OFF
EIN - AUS
R É G L A G E D E L A T E M P É R AT U R E
AMBIANTE
ROOM TEMPERATURE CONTROL
RAUMTEMPERATURWAHL
SÉLECTION DE LA VITESSE DE VENTILATION
FAN SPEED SELECTION
DREHZAHLREGELUNG
37
D E R
Split-System Gainables
Split System Ductable
Split-Bauweise Für Kanalanschluß
Centrifugal Condenseur
RadialKondensor
MAINTENANCE
MAINTENANCE
WARTUNG
Installation générale
- Effectuer une inspection visuelle de l’ensemble de l’installation en service.
- Vérifier la propreté de l’installation en général
et vérifier que les évacuations de condensats
ne sont pas obstruées, particulièrement celle
de la batterie d'évaporation, avant la saison
d’été.
- Vérifié l'état du bac.
- Vér ifié l'état et la tension de(s) la
courroie(s).
General System
- Perform a visual inspection of the entire
system in operation.
- Before the summer, check that the system
is clean and make sure that the system condensate drains are not clogged, especially
the one in the indoor unit.
- Check the condition of the tray
- Check the condition of the tray.
- Check the condition and the tension of the
belt(s).
Allgemeine Anlage
- Eine Sichtkontrolle der in Betrieb befindlichen Gesamtanlage vornehmen.
- Die Anlage generell auf Sauberkeit prüfen
und sich vor der Sommersaison vergewissern, daß die Kondensatabflußleitungen
nicht verstopft sind, besonders an dem
Innenteil.
- Den Zustand der Kondensatwanne prüfen.
- Den Zustand der Kondensatwanne kontrollieren.
- Zustand und Spannung des Riemens (der
Riemen) prüfen.
Cooling System
- Periodically clean the refrigerant/air exchanger using a special product for cleaning
aluminum/copper batteries and rinse with
water. Never use hot water or steam which
would cause an increase in the refrigerant
pressure.
- Check that the surface of the exchanger
aluminum fins is not damaged by dents or
scratches. If necessary, polish with a suitable tool.
Kältekreislauf
- Den Kältemittel - Luft Wärmetauscher
mit einem Spezialprodukt für AluminiumKupfer-Batterien reinigen und mit Wasser
nachspülen. Kein heißes Wasser und keinen
Dampf verwenden, weil dadurch der Druck
des Kältemittels erhöht werden könnte.
- Prüfen, daß die Oberfläche der Aluflügel
des Wärmetauschers nicht beschädigt oder
zerkratzt ist und falls notwendig mit einem
geeigneten Werkzeug polieren.
Electrical Part
- Check the general power supply line for
damage that could affect the insulation.
- Check the interconnecting cables between
the two units for damage and security of
attachment.
- Tighten if necessary
- Check the grounding
Make the same checks on the connecting
cables between CH and CD.
- To ensure correct operation of the system,
it is necessary to periodically clean the air
filter located on the indoor unit suction line.
It can be cleaned with sudsy water.
The cleaning frequency varies considerably
according to the amount of impurities in the
air to be conditioned. It is recommended to
replace it periodically (optional filter box).
- A clogged filter decreases the air flow
through the indoor unit battery, decreasing
the system efficiency and making it more
difficult to cool the fan motor.
- Check the cleanliness of the indoor unit
- This list is not exhaustive; other checks can
be made depending on the environment and
the appliance’s operating conditions.
Elektrische Anlage
- Das Speisekabel auf eventuelle Beschädigungen prüfen, die die Isolation beeinträchtigen können.
- Prüfen, daß die Verbindungskabel zwischen
den beiden Geräteteilen nicht beschädigt
und gut befestigt sind.
- Den Zustand der Kondensatwanne prüfen.
- Falls erforderlich nachziehen.
- Diese Prüfungen ebenfalls an der(n)
Verbindungsleitung(en) zwischen CH und
CD vornehmen.
- Um einen einwandfreien Betrieb der Anlage
zu gewährleisten, muß der Luftfilter am
Ansaug des Innenteils regelmäßig gereinigt
werden. Dazu kann Seifenwasser verwendet
werden.
Die Häufigkeit der Reinigung ist je nach
Verschmutzung der Raumluft sehr unterschiedlich. Es wird empfohlen, den Filter
regelmäßig auszuwechseln (Filterkasten als
Option).
- Durch einen verschmutzten Filter nimmt die
Luftmenge in der Batterie des Innenteils ab,
dadurch wird die Leistung der Anlage reduziert und die Kühlung des Ventilatormotors
beeinträchtigt.
- Die Batterie des Innenteils auf Sauberkeit
prüfen.
- Diese Aufzählung ist nicht vollständig ; je
nach Umgebung und Betriebsbedingungen
des Gerätes können weitere Prüfungen
durchgeführt werden.
ACHTUNG
VOR JEDEM EINGRIFF AN DER ANLAGE UNBEDINGT PRÜFEN, DAß DER
NETZSTECKER GEZOGEN IST UND
DAS GERÄT NICHT UNBEABSICHTIGT
EINGESCHALTET WERDEN KANN.
EIN NICHTBEFOLGEN DIESER VORSCHRIFT KANN ZU VERLETZUNGEN
ODER TÖDLICHEM ELEKTROSCHOCK
FÜHREN.
Condenseur Centrifuge
Circuit frigorifique
- Nettoyer l’échangeur à air en utilisant un
produit spécial pour les batteries aluminium-cuivre et rincer à l’eau. Ne pas utiliser
d’eau chaude ni de vapeur, car cela pourrait
entraîner une augmentation de la pression
du réfrigérant.
- Vérifier que la surface des ailettes en
aluminium de l’échangeur n’ont pas été
détériorées par des coups ou érafflures, et si
nécessaire les peigner avec l’outil adéquat.
Partie électrique
- Vérifier que le câble d’alimentation générale
ne présente pas d’altérations pouvant nuire
à l’isolation.
- Vérifier que le câble d’interconnexion entre
l'unité et le récepteur infra-rouge ne présente pas d’altérations et est correctement
raccordé.
- Resserrage si besoin.
- Vérifier le raccordement à la terre.
- Procéder à ces mêmes vérifications sur le
ou les câbles de liaison entre CH et CD.
- Pour un fonctionnement correct de l’installation, il est indispensable de nettoyer
régulièrement le filtre à air situé au niveau
de l’aspiration de la batterie air traité, et du
condenseur (boite à filtre en option).
La fréquence du nettoyage varie sensiblement selon le degré d’impuretés de l’air à
climatiser. Il est conseillé de remplacer le
filtre régulièrement.
- Un filtre sale provoque une diminution de
débit de l’air à travers les échangeurs thermiques, ce qui diminue le rendement de
l’installation et entrave le refroidissement
des moteurs d e ventilation.
- Vérifier l'état de propreté de la batterie intérieure.
- Cette liste n'est pas exhaustive, d'autres
contrôles peuvent-être effectués en fonction
de l'environnement et des conditions de
fonctionnement de l'appareil.
ATTENTION
AVANT DE PROCEDER A UNE
QUELCONQUE MANIPULATION DU
MATERIEL, IL CONVIENT DE S’ASSURER
QUE L’ALIMENTATION ELECTRIQUE EST
COUPEE ET QU’IL N’EXISTE AUCUNE
POSSIBILITE DE MISE EN MARCHE
INOPINEE.
LE NON RESPECT DE CETTE MESURE
PEUT PROVOQUER DES BLESSURES OU
LA MORT PAR ELECTROCUTION.
IL EST CONSEILLÉ DE CADENASSER
L'INTERRUPTEUR DE PROXIMITÉ
CAUTION
ALWAYS MAKE SURE THE POWER
SUPPLY IS CUT OFF AND CANNOT
BE APPLIED ACCIDENTALLY BEFORE
PROCEEDING TO ANY WORK ON THE
SYSTEM.
FAILURE TO COMPLY WITH THIS INSTRUCTION COULD LEAD TO INJURY
OR DEATH BY ELECTROCUTION.
IT IS RECOMMENDED THAT THE LOCAL
SWITCH BE PADLOCKED
38
ES WIRD EMPFOHLEN, DEN NÄHERUNGSSCHALTER MIT EINEM VORHÄNGESCHLOß ABZUSCHlEßEN
Split-System Gainables
Condenseur Centrifuge
Le logo ci-dessus représentant une
«poubelle barrée» signifie qu’il
ne faut pas se débarrasser de ce
climatiseur comme d’un déchet
classique mais que celui-ci doit être
collecté séparément en tant que DEEE
(Déchet d’Equipement Electrique et
Electronique).
La présence de substances
dangereuses dans les équipements
électriques et électroniques,
l’utilisation inappropriée de tels
équipements ou partie de tels
équipements ainsi que le danger
représentant la collecte non
centralisée de matériels DEEE peuvent
être préjudiciables à l’environnement
et à la santé publique.
En tant qu’utilisateur final, il vous
est demandé de collecter les DEEE
séparément des déchets ordinaires.
Vous êtes priés de prendre contact
avec votre revendeur ou votre
installateur pour qu’il vous indique le
mode de collecte de votre commune.
Lors du renouvellement de votre
climatiseur, vous avez la possibilité
de rendre votre ancien climatiseur
gratuitement à votre installateur ou
votre revendeur qui se chargera d’en
assurer la collecte.
Split System Ductable
Split-Bauweise Für Kanalanschluß
Centrifugal Condenseur
RadialKondensor
The meaning of the above logo
representing a crossed-out wheeled
bin is that this air conditioning unit
must not be disposed of as unsorted
municipal waste but should be
collected separately as WEEE (Waste
Electrical and Electronic Equipment).
Die Bedeutung des Logos mit der
durchgestrichenen Mülltonne besteht
darin, dass es sich bei diesem
Klimagerät nicht um Hausmüll
(Wertstoffmüll oder Restmüll) handelt.
The presence of hazardous substances
in electrical and electronic equipment
or an improper use of such
equipments or of parts thereof as well
as the hazards of not separating WEEE
from unsorted domestic waste, may
affect the environment and human
health.
As an End User, you are required to
place WEEE in a collection separate
from that for unsorted domestic
waste. Please contact a point of sale
or installer to find out the collection
system available at your local
community. You may return your old
air conditioning unit for free to the
point of sale or the installer when
purchasing a new one.
As an End User, it is your role to
contribute to the reuse, recycling
and other forms of recovery of such
wastes so as to reduce the disposal
of waste. This will help preserve your
environment.
En tant qu’utilisateur final, il est
de votre devoir de participer à la
réutilisation, au recyclage, et à toute
autre forme de récupération de tels
déchets afin d’en diminuer la quantité.
Cela contribuera à la préservation de
l’environnement.
39
Dieses Klimagerät ist nach der Elektround Elektronikgerätegesetz ElektroG
(WEEE) zu sammeln und zu entsorgen.
Durch das Vorhandensein von
gefährlichen Substanzen in
elektrischen oder elektronischen
Bauteilen kann die missbräuchliche
Verwendung solcher Teile oder
das Entsorgen solcher Geräte
über den Hausmüll zu nicht
unerhebliche Umwelt- und/ oder
Gesundheitsschäden führen.
Sie als Endkunde sind angehalten,
Geräte, welche unter die ElektroG
(WEEE) fallen, separat vom Hausmüll
zu entsorgen. Bitte informieren Sie den
Händler, Installateur oder Ihre Stadtoder Gemeindeverwaltung, um einen
Entsorgungsbetrieb in Ihrer Nähe
ausfindig zu machen. Eine Möglichkeit
besteht darin, das Klimagerät
kostenlos bei Ihrem Händler oder
Installateur abzugeben, wenn Sie sich
ein neues Klimagerät kaufen.
Als Endkunde beteiligen Sie sich
so an der Wiederverwendung,
Rückgewinnung oder
Wiederverwertung von derartigen
Rohstoffen. Sie helfen, Müll zu
vermeiden und leisten so Ihren Beitrag
zu einer sauberen Umwelt.
Split-System Gainables
Condenseur Centrifuge
Split System Ductable
Centrifugal Condenseur
40
Split-Bauweise Für Kanalanschluß
RadialKondensor
EC Compliance declaration
Under our own responsibility, we declare that the product designated in this manual comply with the provisions of the EEC directives listed hereafter and
with the national legislation into which these directives have been transposed.
Déclaration CE de conformité
Nous déclarons sous notre responsabilité que les produits désignés dans la présente notice sont conformes aux dispositions des directives CEE
énoncées ci- après et aux législations nationales les transposant.
EG-Konformitätserklärung
Wir erklarën in eigener Verantwortung, das die in der vorliegenden Beschreibung angegebenen Produkte den Bestimungen der nachstehend erwähnten
EG-Richtlinien und den nationalen Gesetzesvorschriffen entsprechen, in denen diese Richtinien umgesetz sind.
Dichiarazione CE di conformità
Dichiariamo, assurmendone la responsasabilità, che i prodotti descritti nel presente manuale sono conformi alle disposizioni delle direttive CEE di cui
sott e alle lagislazionni nazionali che li recepiscono
Declaración CE de conformidad
Declaramos, bajo nuestra responsabilidad, que los productos designados en este manual son conformes a las disposiciones de las directivas CEE
enunuciadas a continuacion, asi como a las legislaciones nacionales que las contemplan.
CD 43/43RC -50/50RC - 60/60RC
CH 35/35RC - 43/43RC -50/50RC - 60/60RC
MACHINERY DIRECTIVE 98 / 37 / EEC
LOW VOLTAGE DIRECTIVE (DBT) 73 / 23 / CEE AMENDED BY DIRECTIVE 93 / 68 EEC
ELECTROMAGNETIC COMPATIBILITY DIRECTIVE 89 / 336 / EEC
PRESSURISE EQUIPMENT DIRECTIVE (DESP) 97 / 23 / EEC
MODULE A CATEGORY I: CD 43/43RC -50/50RC - 60/60RC - CH35/35RC
SUB-MODULE A1 CATEGORY II: CH 43/43RC -50/50RC - 60/60RC
NOTIFIED BODY: TÜV RHEINLAND – 6, RUE HALÉVY – 75 009 PARIS - FRANCE.
THE PRODUCTS ARE PROVIDED WITH CE 0035 MARKING OF CONFORMITY
DIRECTIVE MACHINES 98 / 37 C.E.E.
DIRECTIVE BASSE TENSION (DBT) 73 /23 C.E.E. , AMENDEE PAR DIRECTIVE 93 / 68 C.E.E.
DIRECTIVE COMPATIBILITE ELECTROMAGNETIQUE 89 / 336 / C.E.E.
DIRECTIVE DES EQUIPEMENTS SOUS PRESSION (DESP) 97 / 23 C.E.E.
MODULE A CATEGORIE I CD 43/43RC -50/50RC - 60/60RC - CH35/35RC
SOUS-MODULE A1 CATEGORIE II : CH 43/43RC -50/50RC - 60/60RC
AVEC SURVEILLANCE PAR LE TUV RHEINLAND 6, RUE HALÉVY – 75 009 PARIS - FRANCE.
LES PRODUITS SONT FOURNIS AVEC LE MARQUAGE DE CONFORMITE CE 0035
RICHTLINIE MASCHINEN 98 / 37 / EG
RICHTLINIE NIERDERSPANNUNG (DBT) 73 / 23 / EG ABGEÄNDERT DURCH DIE RICHTLINIE 93 / 68 EG
RICHTLINIE ELEKTROMAGNETISHE VERTRÄGLICHKEIT 89 / 336 / EG
RICHTLINIE FÜR AUSRÜSTUNGEN UNTER DRUCK (DESP) 97 / 23 / EG
MODUL A, KATEGORIE I : CD 43/43RC -50/50RC - 60/60RC - CH35/35RC
UNTER MODUL A1, KATEGORIE II : CH 43/43RC -50/50RC - 60/60RC
MIT KONTROLLE DURCH DEN TUV RHEINLAND 6, RUE HALÉVY – 75 009 PARIS - FRANCE.
DIE PRODUKTE WERDEN MIT DER MARKIERUNG CONFORMITE CE 0035 GELIEFERT.
DIRETTIVA MACHINE 98 / 37 / CEE
DIRETTIVA BASSA TENSIONE (DBT) 73 / 23 / CEE EMENDATA DALLA DIRETTIVA 93 / 68 CEE
DIRETTIVA COMPATIBILITA ELETTROMAGNATICA 89 / 336 / CEE
DIRETTIVA DEGLI IMPIANTI SOTTO PRESSIONE (DESP) 97 / 23 / CEE
MODULO A, CATEGORIA I : CD 43/43RC -50/50RC - 60/60RC - CH35/35RC
SOTTOMODULO A1, CATEGORIA II : CH 43/43RC -50/50RC - 60/60RC
CON SUPERVISION POR EL TUV RHEINLAND 6, RUE HALÉVY – 75 009 PARIS - FRANCE.
I PRODOTTI SONO FORNITI CON LA MARCATURA DI CONFORMITE CE 0035.
DIRECTIVA MAQUIAS 98 / 37 / CEE
DIRECTIVA BAJA TENSION (DBT) 73 / 23 / CEE ENMENDATA POR LA DIRECTIVA 93/ 68 CEE
DIRECTIVA COMPATIBILIDAD ELECTROMAGNETICA 89 / 336 / CEE
DIRECTIVA DE LOS EQUIPOS A PRESION (DESP) 97 / 23 / CEE
MODULO A, CATEGORIA I : CD 43/43RC -50/50RC - 60/60RC - CH35/35RC
BAJA MODULO A1, CATEGORIA II : CH 43/43RC -50/50RC - 60/60RC
CON SORVEGLIANZA DAL TUV RHEINLAND 6, RUE HALÉVY – 75 009 PARIS - FRANCE.
LOS PRODUCTOS SE PROPORCIONAN CON EL MARCADO DE CONFOR CE 0035.
Et que les paragraphes suivants les normes harmonisées ont été appliqués.
And that the following paragraphs of the harmonised standards have been applied.
Und dass die folgenden Paragraphen der vereinheitlichten Normen Angewandt wurden.
E che sono stati applicati i seguenti paragraphi delle norme armonnizzate.
Y que se han aplicado los siguientes apartados de las normas armonizadas.
EN 60 204-1
EN 55 022
EN 814
EN 60 335-1
EN 50 082-1
EN 378
A Tillières Sur Avre
27570 - FRANCE
Le: 29/07/2004
Franck Bailly
Quality Manager
ACE Industrie
EN 60 335-2-40
EN 61 000-3-2
EN 255
A.C.E Marketing
France
1 bis, Avenue du 8 mai 1945
Saint-Quentin-en-Yvelines
78284 Guyancourt Cedex
Tél. 33 (0)1 39 44 78 00
Fax 33 (0)1 39 44 11 55
www.airwell.com
ACE Kmimatechnik GmbH
DEUTSCHLAND
Berner straße 43
60437 FRANKFURT/MAIN
Tél. 0 69/507 02-0
Fax 0 69/507 02-250
www.airwell.de
Itelco-Clima Srl
ITALY
Via XXV April, 29
20030 BARLASSINA
Tél. 00 39 03.62.6801
Fax 00 39 03.626.80238
www.itelco-clima.com
Iber elco s.a.
SPAIN
Ciències 71-81
Mòdul 5
POLIGONO PEDROSA
08908 L’HOSPITALET DE LLOBREGAT
Tél. 34-93-264 66 00
Fax 34-93-335 95 38
www.iberelco.es
With a concern for a constant improvement, our products can be modified without notice. Photos non contractual.
Dans un souci d’amélioration constante, nos produits peuvent être modifiés sans préavis. Photos non contractuelles.
In dem Bemühen um ständige Verbesserung können unsere Erzeugnisse ohne vorherige Ankündigung werden. Fotos nicht vertraglich binden.
A causa della politica di continua miglioria posta in atto dal costruttore, questi prodotti sono soggetti a modifiche senza alcun obbligo di
preavviso. Le foto publicate non danno luogo ad alcun vincolo contrattuale.
Con objeto de mejorar constantemente, nuestros productos pueden ser modificados sin previo aviso. Fotos no contractuales.