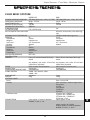
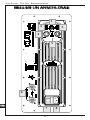
1
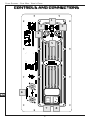
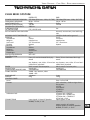
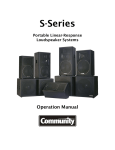
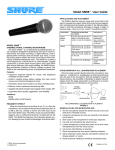
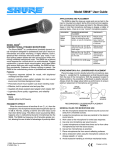
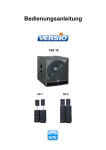
CLUB MINI
system
USER’S GUIDE
EN
BENUTZERHANDBUCH
DE
MANUALE UTENTE
IT
VOICE SYSTEMS - CLUB MINI - USER’S GUIDE
IND EX
IMPORTANT NOTES ..........................................................................2
INTRODUCTION ................................................................................3
CONTROLS AND CONNECTIONS .....................................................4
SATELLITES: Controls and Connections ......................................................5
SUB: Controls and Connections ....................................................................5
SYSTEM CONFIGURATION ...............................................................6
SPEAKERS INSTALLATION: SAFETY RECOMMENDATIONS .....................7
USAGE SUGGESTIONS......................................................................8
TECHNICAL SPECIFICATION............................................................9
THANK YOU FOR CHOOSING A VOICE SYSTEMS
PRODUCT.
THIS GUIDE WILL GIVE YOU INFORMATION
AND USEFUL TIPS FOR A CORRECT USE OF
YOUR CLUB MINI SYSTEM.
WE ADVISE YOU TO READ
CAREFULLY THIS MANUAL
BEFORE USING YOUR
SPEAKERS.
THE VOICE SYSTEMS TEAM
WISHES YOU GOOD WORK
AND... HAVE FUN!
1
EN
VOICE SYSTEMS - CLUB MINI - USER’S GUIDE
I M P O RTA N T N OT E S
LOOKING AFTER THE PRODUCT
• Never apply excessive force to the structures or controls (knobs, switches).
• Do not stress the speaker in transit or during use.
• Do not place the device close to heat sources, in damp or dusty places
or close to strong magnetic fields.
• When possible, do not place the speaker close to units which generate strong interference, such as radio and TV sets, monitors, etc.
• Never insert objects or liquids of any kind inside the device, for any reason.
• Clean using a soft brush or an air jet only; never use detergents, solvents or alcohol.
• When disconnecting cables from sockets, always take hold of them by the
connector and not by the cable itself, and when winding take care to
avoid knots or twisting.
• Do not expose the speaker to direct sunlight or rain.
CONNECTING TO THE MAINS
• To avoid the risk of electric shock, do not make connections with wet hands.
• Make sure that the mains voltage is the same as that indicated on the control
panel.
• Connect the speaker to a mains socket with earth contact.
CONNECTING TO A MIXER
• Always use good quality screened cables.
• Before making the connections, check that all the speakers you are about to connect are switched off. You will avoid noisy, if not hazardous, signal peaks.
IN CASE OF MALFUNCTION
• In case of malfunction, contact only an authorised service centre.
EN
2
I N T RO D U C T I O N
VOICE SYSTEMS - CLUB MINI - USER’S GUIDE
The CLUB series speakers were created by VOICE SYSTEMS in collaboration with the
VERSE team to deliver a portable amplification system, ideal for monitoring and for
use in fixed installations.
Thanks to a completely new digital amplifier combined with a digital processor, and
the use of resistant, lightweight materials for the cabinet construction, the CLUB
speakers allows unlimited versatility in use.
The CLUB series are easy to use and to carry. These setups are ideal for various installation: both for piano-bar music or for a concert gig on the fly. CLUB systems are
Plug&Play: connect four cords, choose your preset and you’re ready to go!
AMPLIFIER
The new digital technology totally changed the way a professional audio amplifier is
developed. No other way makes possible to give great power and long term reliability.
Remarkable heat reduction and outstanding weight decrease, make digital amplifier,
like the ones that equip CLUB speakers, efficient, powerful and less heating. The output stages of the amplifiers typically run at 95% efficiency, dissipating only 5% of the
input energy as heat.
Moreover the efficiency doesn't depend on the output level, and since standard music
signals have an average power density of 40% of the maximum level, conventional
amplifiers can easily generate 10 times more heat than the ones that equip CLUB
speakers, given the same sound volume.
ENERGY SAVE
The amplifier is also equipped with a “Energy Save” functionality which completely
switches off the amplifier power stages in absence of incoming signal. This functionality, together with the intrinsic efficiency of the digital amplifier, contributes to a
drastical reduction of the power consumption.
THE CABINET
The cabinet is built in plywood, clad throughout with scratch-proof paint and protected on the front by a solid metal grille. This tough, compact structure guarantees
the reliability of the CLUB speakers even in the most critical situations.
FLYING SYSTEM
The cabinet can also stand flown in a number of ways, providing the maximum flexibility of use. To stand it flown, the cabinet can be hung up making use of the 9 anchor
points it is fitted, by screwing eyebolts inside them.
AUDIO QUALITY
The CLUB series spreads the signal by means of speakers built to VOICE SYSTEMS
specifications with carefully selected, quality-controlled materials.
All the speakers have been studied in order to provide a linear response throughout
the whole power range granting at the same time high sound pressure and an extremely clean sound.
PRESETS
The CLUB systems are equipped with different audio presets, useful in many situation, from speechs and conferences to live music of any kind! The only thing to
do after powering up your speakers is choose the preset that suits you best. To
find out more about presets jump to the Controls And Connections section.
3
EN
VOICE SYSTEMS - CLUB MINI - USER’S GUIDE
C O N T RO L S A N D C O N N E C T I O N S
1
2
3
4
5
EN
6
7
4
8
SUB: CONTROLS
AND
CONNECTIONS
VOICE SYSTEMS - CLUB MINI - USER’S GUIDE
1. Level: adjusts INPUT signal level.
2. Status LEDs:
- LIMIT: LED indicating limiter intervention, due to signal over the safety
threshold. If the LED is constantly ON, please reduce incoming signal level.
- TEMP: indicates that the internal amplifier switched to protection mode
due to excessive heating. In this condition, the amplifier supply half the
normal power. Please reduce the input signal to allow the restore of normal load conditions.
- SIGNAL: flashes when signal is incoming.
- READY: indicates that the speaker is ON and ready.
3. Preset LEDs: indicate which one of the preset is currently in use. To choose a
preset scroll through using the PRESET SELECT switch.
- FLAT: default preset. Provides the maximally flat frequency response.
- VOICE: improves the voice signal for singing, making it brighter and vivid.
- SPEECH: improves the voice signal for speeches, making it clearer and intelligible, by using De-Popping and De-Essing techniques.
- D.BASS: adds a Dynamic Bass Boost. Useful to reinforce Low Frequencies
when playing at low levels.
4. Input (Left & Right): XLR inputs for line signal.
5. Preset Select: switch to select one of the built-in presets. The active preset is indicated by the Preset LEDs.
6. Speaker Out (Left & Right): Speakon outputs to feed the satellites with signal
7. Power on: switch to power ON/OFF.
8. AC Power in: connects to the mains.
SATELLITES: CONTROLS
AND
CONNECTIONS
9. Input: Speakon signal input from Sub
9
5
EN
VOICE SYSTEMS - CLUB MINI - USER’S GUIDE
S Y S T E M C O N F I G U R AT I O N
Installation and configuration of the system is very easy and can be carried on in
3 steps:
1. connect the Satellites to the Sub with the provided Speakon cables
2. connect the Sub INPUT XLRs to the mixer output (usually called MAIN OUT)
3. select the preset that suits best the occasion
EN
MIXER MAIN OUT
6
VOICE SYSTEMS - CLUB MINI - USER’S GUIDE
SPEAKERS INSTALLATION: SAFETY RECOMMENDATIONS
This manual assumes that the owners and/or users of a VOICE SYSTEMS system
are knowledgeable and experienced in the areas of Pole and Tripod use with loudspeaker systems, as well as flying suspension of loudspeakers.
The flying suspension of large, heavy objects and the suspension on Pole or Tripod
in public places is subject to numerous laws and regulations at the national/federal, state/provincial, and local levels, that are not addressed in this manual.
However, the user must assume responsibility for making sure that use of any
VOICE SYSTEMS system, its components and all the stands and poles and associated hardware in any particular circumstance or venue conforms to all applicable
laws and regulations in force at the time.
WHEN USING STANDS OR POLES, BE SURE TO OBSERVE THE FOLLOWING
PRECAUTIONS.
CHECK THE STAND OR POLE SPECIFICATION TO BE CERTAIN THE DEVICE IS
DESIGNED TO SUPPORT THE WEIGHT OF THE SPEAKER. OBSERVE ALL
SAFETY PRECAUTIONS SPECIFIED BY THE MANUFACTURER.
MAKE SURE THAT THE SURFACE ON WHICH THE SYSTEM IS TO BE STACKED
IS FLAT, STABLE AND SOLID.
ROUTE CABLES SO THAT PERFORMERS, PRODUCTION CREW, AND AUDIENCE
WILL NOT TRIP AND TOPPLE THE SPEAKERS.
INSPECT THE STAND (OR POLE AND ASSOCIATED HARDWARE) BEFORE EACH
USE AND DO NOT USE EQUIPMENT WITH WORN, DAMAGED, OR MISSING
PARTS.
DO NOT ATTEMPT TO PLACE MORE THAN ONE SATELLITE LOUDSPEAKERS
ON A STAND OR POLE.
ALWAYS BE CAUTIOUS WHEN DEPLOYING THE SYSTEM OUTDOORS. UNEXPECTED WINDS MAY TOPPLE A SYSTEM.
IT MAY BE NECESSARY TO PLACE ADDITIONAL WEIGHT (I.E.SANDBAGS) ON
THE BASE OF THE STAND TO IMPROVE STABILITY. AVOID ATTACHING BANNERS OR SIMILAR ITEMS TO ANY PART OF A SPEAKER SYSTEM. SUCH ATTACHMENTS COULD ACT AS A SAIL AND TOPPLE THE SYSTEM.
UNLESS YOU ARE CONFIDENT THAT YOU CAN HANDLE THE WEIGHT OF THE
SPEAKER, ASK ANOTHER PERSON TO HELP YOU GET IT ONTO THE TRIPOD
STAND OR POLE.
FOR WHAT CONCERNS THE FLYING SUSPENSION OF LOUDSPEAKERS, THE
USER MUST ASSUME ALL RESPONSIBILITY FOR THE APPROPRIATE USE OF
VOICE SYSTEMS EQUIPMENT IN ANY PARTICULAR LOCATION OR CIRCUMSTANCE. IT IS RESPONSIBILITY OF THE USER TO MAKE CERTAIN THAT ANY
VOICE SYSTEMS LOUDSPEAKER SYSTEM IS SUSPENDED IN ACCORDANCE
WITH ALL APPLICABLE NATIONAL/FEDERAL, STATE/PROVINCIAL, AND LOCAL
REGULATIONS.
As an extra precaution, careful inspection of the attachment points is advised before flying, particularly in older venues or those hosting frequent events using
large sound and lighting systems. In any case, VOICE SYSTEMS systems are intended only for suspension from approved rigging points, each known to have
ample safe working loads margins for the system components suspended below
them.
7
EN
VOICE SYSTEMS - CLUB MINI - USER’S GUIDE
U S AG E S U G G E S T I O N S
The acoustic characteristics of the room/environment in which a sound system is
used have sometimes very significant effects on the overall sound produced.
Thanks to its special technical features, VOICE SYSTEMS speakers help reduce or
prevent some of the most common problems.
However, some factors should be borne in mind as they may help to optimise its
performance.
• Do not place speakers in the corners of a room or in recesses (e.g. niches), since
this causes an increase in the low frequencies, producing sounds which are redundant or blurred.
• Do not place speakers against a wall, as this also causes an increase in the low
frequencies, although less pronounced than that produced in a corner or niche.
N.B.: on the other hand, this phenomenon may sometimes be used to advantage
to reinforce the low range, but it must be employed carefully and in a controlled
way.
• Do not place speakers straight on a stage, a floating floor or any other support
with cavities, as this tends to trigger resonances that alter and interfere with the
overall sound.
N.B.: solid supports should always be used when possible, or a speaker stand.
• Remember that high frequencies have a high level of directivity and a much
higher absorption coefficient than low frequencies. Therefore, to guarantee that
the signal reaches the listener in an intelligible form, position speakers so that
they are in a direct line with the audience (clearly visible) about ½ meter /
1meter above the audience’s heads.
• In buildings with a lot of reverberation (places of worship, gymnasiums, etc.)
first of all keep the sound reflections down using materials which absorb sound
(carpets, curtains, special panels, etc.). If this is not possible or is not sufficient,
do not simply turn up the volume, because this will also increase the volume of
the reflected sound, and may make the situation even worse. The best solution
is to use more speakers, placed around the room and closer to the audience (e.g.
front+back; front+sides; front+sides+back).
EN
8
VOICE SYSTEMS - CLUB MINI - USER’S GUIDE
T E C H N I C A L S P E C I F I C AT I O N
CLUB MINI SYSTEM
POWER HANDLING NOMINAL
FREQUENCY RESPONSE
INPUT SENSITIVITY
MAX SPL <CALCULATED=
CROSSOVER FREQUENCY
SUBSONIC FILTER
HF PROTECTIONS
ACTIVE PROTECTIVE CIRCUITRY
NOMINAL INPUT IMPEDANCE
WOOFER
Impedance
Magnet
Voice coil
Former
TWEETER
Impedance
Magnet
Voice coil
Diaphragm
ANGULAR DISPERSION
CONSTRUCTION
CABINET
FINISH
PROTECTION
DIMENSIONS <HXWXD= MM
FLYING SYSTEM
POLE MOUNT
WEIGHT
CONTROL PANEL
Level
Presets
SATELLITE
350 Wa- (EIAJ test - 1kHz, 1% THD)
80 Hz - 20 kHz
0 dBu
120 dB
2800 Hz
PTC, HPCCR bulb
Yes
thermal, overcurrent, non audio signals
10 kOhm balanced to ground
2 x 8"
2x4 Ohm
neodymium
2.5" aluminium
kapton
8"
4 Ohm
neodymium
2.5" aluminium
kapton
1"
8 Ohm
ceramic
aluminium
mylar
90° x 60°
front: 15 mm laminated birch ply- front: 30 mm laminated birch plywood
wood
top, bo-om, rear, sides: 12 mm lam- top, bo-om, rear, sides: 15 mm lamiinated birch plywood
nated birch plywood
black scratch resistant paint
black scratch resistant paint
metal grid
metal grid
410x268x285
550x280x400
2xM8 - top, bo-om, sides
1xM8 - rear
1 bo-om
1 top
8 Kg
16 Kg
Indica,on leds
CONNECTIONS
SUB
700 Wa- (EIAJ test - 1kHz, 1% THD)
50 Hz - 90 Hz
0 dBu
124 dB
input signal: 1 Neutrik Speakon
NL4MP, 1+ IN+, 1- IN-
9
from -Inf to 0 dB
push selec,on, 4 leds to sign the ac,ve preset:
1) FLAT
2) D.BOOST
3) SPEECH
4) VOICE
1) green led = ON/OFF
2) green led = SIGNAL ON
3) yellow led = TEMPOUT
4) red led = CLIP
input signals: 2 XLR
power supply: AC socket
output signals: 2 Neutrik Speakon
NL4MP, 1+ OUT+, 1- OUT-
EN
VOICE SYSTEMS - CLUB MINI - MANUALE UTENTE
IND ICE
NOTE IMPORTANTI ...........................................................................12
INTRODUZIONE.................................................................................13
CONTROLLI E CONNESSIONI ..........................................................14
SATELLITI: Controlli e Connessioni..............................................................15
SUB: Controlli e Connessioni ........................................................................15
INSTALLAZIONE DEL SISTEMA........................................................16
PRECAUZIONI DI MONTAGGIO ...................................................................17
SUGGERIMENTI D’USO.....................................................................18
SPECIFICHE TECNICHE ...................................................................19
GRAZIE PER AVER SCELTO UN PRODOTTO DELLA
SERIE VOICE SYSTEMS.
QUESTO MANUALE VI DARÀ INFORMAZIONI E
SUGGERIMENTI UTILI PER UN CORRETTO UTILIZZO DEL VOSTRO SISTEMA
VOICE SYSTEMS.
BUON LAVORO E BUON DIVERTIMENTO DALLO STAFF
VOICE SYSTEMS!
IT
11
VOICE SYSTEMS - CLUB MINI - MANUALE UTENTE
N OT E I M P O RTA N T I
CURA DEL PRODOTTO
• Non applicate eccessiva forza alle strutture ed ai comandi (manopole, interruttori).
• Evitate forti sollecitazioni della cassa sia nel corso del trasporto che durante il
suo utilizzo.
• Evitate di posizionare l’apparecchio in prossimità di fonti di calore, in luoghi
umidi o polverosi o nelle vicinanze di forti campi magnetici.
• Non collocare, quando possibile, la cassa in prossimità di unità che producano
forti interferenze come apparecchi radio – TV, monitor, ecc...
• Non introdurre per nessuna ragione oggetti estranei o liquidi di qualsiasi genere
all’interno dell’apparecchio.
• Per la pulizia usate solo un pennello morbido od aria compressa, non usate mai
detergenti, solventi od alcool.
• Quando scollegate i cavi dalle prese abbiate cura di afferrarli per il connettore
e non per il cavo stesso; avvolgendoli, inoltre, evitate nodi e torsioni.
• Evitate di esporre la cassa all’irradiazione solare diretta ed alla pioggia.
COLLEGAMENTO ALLA RETE
• Per evitare il rischio di shock elettrico non effettuare i collegamenti con le mani
bagnate.
• Accertatevi che la tensione di rete corrisponda a quella indicata sul pannello dei
comandi.
• Collegate la cassa ad una presa di rete provvista di contatto a terra.
COLLEGAMENTO AD UN MIXER
• Utilizzate sempre cavi schermati di buona qualità.
• Prima di effettuare i collegamenti accertatevi che tutte le casse che state per
collegare siano spente. Eviterete rumorosi se non pericolosi picchi di segnale.
IN CASO DI AVARIA
• In caso di avaria rivolgetevi esclusivamente ad un centro di assistenza autorizzato.
IT
12
I N T RO D U Z I O N E
VOICE SYSTEMS - CLUB MINI - MANUALE UTENTE
La serie di diffusori CLUB è stata creata da VOICE SYSTEMS in collaborazione con il
team VERSE con l’obiettivo di realizzare un sistema di amplificazione facile da trasportare, comodo per monitoraggio e installazioni fisse. Grazie ad un moderno amplificatore digitale integrato a un processore digitale e l’impiego di materiali robusti e
leggeri per la costruzione del cabinet, i diffusori CLUB Mini consentono una flessibilità
di impiego illimitata. La serie CLUB si caratterizza per facilità di utilizzo e facilità di
trasporto. Questi sistemi sono ideali in un’ampia gamma di utilizzi, dal piano-bar all’installazione fissa in ambienti di tutte le dimensioni. I sistemi CLUB sono
“Plug&Play”:basta collegare quattro cavi e scegliere il preset adatto!
AMPLIFICATORE
La nuova tecnologia digitale ha cambiato il modo in cui si progetta l’amplificazione audio
professionale. In nessun altro modo si può rispondere alla richiesta di grande potenza
e affidabilità di lungo termine.
Grazie alla notevole riduzione del calore prodotto ed alla altrettanto considerevole riduzione del peso, gli amplificatori digitali di cui sono equipaggiati i diffusori CLUB offrono grande efficienza, grande potenza e ridotta dissipazione di calore. Gli stadi di
uscita di questi amplificatori lavorano tipicamente al 95% di efficienza, dissipando appena il 5% di energia sotto forma di calore. Inoltre l’efficienza non è legata al livello di
uscita, e considerando che i segnali musicali hanno mediamente una densità di potenza
pari al 40% del massimo livello, gli amplificatori convenzionali generano dieci volte più
calore, a parità di volume di suono.
RISPARMIO ENERGETICO
L’amplificatore è inoltre dotato della funzionalità di “Energy Save”, che spegne completamente tutti gli stadi di potenza in assenza di segnale. Questa modalità di
funzionamento, unita alla efficienza intrinseca dell’amplificatore digitale, contribuisce
a ridurre drasticamente il consumo energetico.
IL CABINET
Il cabinet è costruito in multistrato di betulla, verniciato anti-graffio e protetto anteriormente da una solida griglia metallica.
Questa struttura robusta e compatta garantisce l’affidabilità dei diffusori CLUB anche
nelle situazioni più critiche.
INSTALLAZIONE SOSPESA “FLYING SYSTEM”
I diffusori Satellite possono anche essere sospesi in vario modo, per la massima flessibilità di utilizzo. Per sospendere un diffusore, sono disponibili ben 9 punti di ancoraggio ai quali vanno fissati gli appositi golfari.
QUALITA’ AUDIO
Tutta la serie CLUB utilizza, per la diffusione del segnale, altoparlanti costruiti su specifiche VOICE SYSTEMS con materiali accuratamente selezionati e controllati. Questi
altoparlanti sono stati realizzati in modo da fornire sempre una risposta lineare anche
alle massime potenze, garantendo un’elevata pressione sonora ed un suono estremamente pulito.
PRESETS
I sistemi CLUB mettono a disposizione diversi preset audio, utili in tante situazioni: da
conferenze e assemblee alla musica dal vivo di ogni genere! L’unica cosa da fare dopo
aver acceso le vostre casse è scegliere il preset più adatto alla situazione. Per scoprire
di più sui preset, andate alla sezione Controlli e Connessioni.
13
IT
VOICE SYSTEMS - CLUB MINI - MANUALE UTENTE
C O N T RO L L I E C O N N E S S I O N I
1
2
3
4
5
6
IT
7
14
8
SUB: CONTROLLI
E
CONNESSIONI
VOICE SYSTEMS - CLUB MINI - MANUALE UTENTE
1. Level: modifica il guadagno del segnale INPUT in ingresso
2. LED di status:
- LIMIT: indica che il limiter è in funzione, per via di un segnale in ingresso che
supera la soglia di sicurezza. Se il LED rimane costantemente acceso si consiglia di abbassare il livello del segnale in ingresso.
- TEMP: indica che l’amplificatore interno è passato in modalità protezione per
via di uno sviluppo eccessivo di calore. In tale condizione l’amplificatore fornisce metà della potenza normale. Si consiglia di ridurre la potenza del segnale in
ingresso per riportare l’amplificatore alle normali condizioni di carico.
- SIGNAL: lampeggia quando c’è segnale in ingresso.
- READY: indica che la cassa è accesa.
3. Preset LED: indicano quale dei preset è attualmente in uso. Per scegliere un
preset scorrere tra i preset disponibili tramite lo switch PRESET SELECT.
- FLAT: preset di base. Produce la risposta in frequenza massimamente lineare.
- VOICE: migliora il segnale vocale per il cantato, rendendolo più chiaro e presente.
- SPEECH: migliora il segnale vocale per il parlato, aumenta la chiarezza e l’intellegibilità delle parole mediante tecniche di De-Popping e De-Essing.
- D.BASS: aggiunge un Dynamic Bass Boost. Da utilizzare per rinforzare le basse
frequenze quando si tengono gli altoparlanti a bassi livelli di volume.
4. Input (L&R): ingresso XLR per segnale di linea.
5. Preset Select: switch per la selezione di uno dei preset disponibili. Il preset attualmente in funzione è indicato da uno dei LED Preset.
6. Speaker Out (L&R): connettori di tipo Speakon per inviare il segnale alle casse
Satellite.
7. Power on: pulsante di accensione e spegnimento.
8. AC Power in: connette alla presa di corrente.
SATELLITI: CONTROLLI
E
CONNESSIONI
9. Input: connettore Speakon per il segnale in arrivo
dal Sub.
9
15
IT
VOICE SYSTEMS - CLUB MINI - MANUALE UTENTE
I N S TA L L A Z I O N E D E L S I S T E M A
Installare e configurare il sistema è molto semplice e si può fare in 3 passaggi;
1. connettere i Satelliti al Sub tramite i cavi Speakon forniti insieme al sistema.
2. connettere l’ingresso (XLR) INPUT del Sub all’uscita del mixer (in genere chiamata MAIN OUT)
3. selezionare il preset che più sia adatta all’occasione.
IT
MIXER MAIN OUT
16
VOICE SYSTEMS - CLUB MINI - MANUALE UTENTE
PRECAUZIONI DI MONTAGGIO
In questo manuale si assume che l’utente od il proprietario del sistema VOICE SYSTEMS abbia conoscenza ed esperienza nell’installazione di sistemi di casse acustiche con l'utilizzo di stativi e treppiedi da terra, con pali per la sospensione sulle casse
subwoofer, così come per l’installazione sospesa.
L’installazione sospesa, e quella su pali o stativi, di oggetti di grandi dimensioni e di
peso notevole in spazi pubblici deve sottostare a numerose leggi e regolamentazioni
ai differenti livelli locali e nazionali che non sono oggetto di questo manuale.
In ogni caso l’utente deve assumersi ogni responsabilità relativamente all’uso in sicurezza dei sistemi VOICE SYSTEMS ed all'utilizzo di apparecchiature idonee alla loro
sospensione in ogni particolare circostanza e luogo, in conformità alle leggi e regolamenti vigenti.
PER QUANTO RIGUARDA L’INSTALLAZIONE SU PALI O STATIVI, ASSICURATEVI DI
OSSERVARE LE PRECAUZIONI DESCRITTE NEL SEGUITO.
VERIFICARE ATTENTAMENTE CHE LE SPECIFICHE DELLO STATIVO O DEL PALO
PER ESSERE SICURI CHE L'APPARECCHIATURA È PROGETTATA PER SOSTENERE
IL PESO DELLA CASSA CHE SI VUOLE SOSPENDERE. OSSERVARE TUTTE LE PRECAUZIONI DI SICUREZZA SPECIFICATE DAL FABBRICANTE DELLO STATIVO O
DEL PALO. ACCERTARSI CHE LA SUPERFICIE SULLA QUALE SARÀ DISPOSTO IL
SISTEMA SIA PIANA, STABILE E NON SDRUCCIOLEVOLE. DISPORRE I CAVI DI
RETE E DI SEGNALE IN MODO TALE CHE ESECUTORI, PERSONALE DI SERVIZIO
E PUBBLICO NON INCIAMPINO E FACCIANO TRABALLARE LA CASSA SOSPESA
SULLO STATIVO O PALO.
ISPEZIONARE LO STATIVO OD IL PALO PRIMA DI OGNI UTILIZZO E NON UTILIZZARE MAI ATTREZZATURE CON PARTI USURATE, DANNEGGIATE, O MANCANTI.
NON MONTARE MAI PIÙ DI UNA CASSA SATELLITE SU UNO STATIVO O PALO.
QUANDO SI UTILIZZANO SISTEMI DI CASSE IN INSTALLAZIONI ALL'APERTO È
MOLTO IMPORTANTE FARE ATTENZIONE A VENTI INASPETTATI CHE POSSONO
FARE TRABALLARE E ROVESCIARE IL SISTEMA.
PUÒ ESSERE NECESSARIO PREDISPORRE DEI PESI SUPPLEMENTARI (AD ESEMPIO SACCHETTI DI SABBIA) SULLA BASE DELLO STAND PER MIGLIORARNE LA
STABILITÀ. EVITARE DI LEGARE BANDIERE O ARTICOLI SIMILI A QUALSIASI
PARTE DI UN SISTEMA DI CASSE, COSÌ DA EVITARE CHE SI COMPORTI A MO’ DI
“VELA” E FACCIA ROVESCIARE IL SISTEMA.
SE NON SI È SICURI DI POTER REGGERE DA SOLI IL PESO DEL DIFFUSORE, È OPPORTUNO CHIEDERE AD UN'ALTRA PERSONA UN AIUTO PER SOLLEVARE LA
CASSA FIN SULLA CIMA DEL PALO O DELLO STATIVO.
PER QUANTO RIGUARDA L’INSTALLAZIONE DI CASSE SOSPESE, L’UTENTE DEVE
ASSUMERSI TUTTA LA RESPONSABILITÀ PER L’USO APPROPRIATO DEI SISTEMI
VOICE SYSTEMS IN CIASCUNA PARTICOLARE UBICAZIONE E CIRCOSTANZA.
INOLTRE È RESPONSABILITÀ DELL’UTENTE CHE GLI ALTOPARLANTI SIANO SOSPESI IN IN CONCORDANZA CON TUTTE LE LEGGI E REGOLAMENTI NAZIONALI
E LOCALI VALIDI NEL LUOGO DELL’INSTALLAZIONE.
Come precauzione addizionale, è opportuna una ispezione accurata dei punti di aggancio prima di sospendere le casse dei sistemi VOICE SYSTEMS, particolarmente
qualora l’installazione avvenga in locali o sedi di non recente costruzione o in quelli
dove vi sono eventi frequenti e dove vengono usati grandi sistemi per il suono e per
le luci. In ogni caso, i sistemi VOICE SYSTEMS vanno utilizzati in installazioni sospese solamente su attrezzature approvate, delle quali siano note le caratteristiche relative ai carichi sospesi sopportati e che consentano ampi margini per il peso dei
componenti dei sistemi VOICE SYSTEMS sospesi sotto tali attrezzature.
17
IT
VOICE SYSTEMS - CLUB MINI - MANUALE UTENTE
SUGGERIME NTI D’USO
Le caratteristiche acustiche dell’ambiente nel quale si effettua una diffusione incidono sul risultato sonoro complessivo, talvolta in modo molto significativo.
Gli speaker VOICE SYSTEMS, grazie alle loro peculiarità tecniche (ad esempio:
l’ampio angolo di dispersione), consentono di contenere o prevenire alcuni degli
inconvenienti tipici.
Qualche accorgimento d’installazione, tuttavia, può contribuire a ottimizzarne le
prestazioni.
• Evitate di collocare i diffusori negli angoli di una stanza o in cavità (es. nicchie),
poiché ciò determina un incremento delle basse frequenze, causando suoni ridondanti e poco distinti.
• Evitate di collocare i diffusori contro un muro, poiché ciò determina un incremento delle basse frequenze, anche se in modo più contenuto rispetto alla collocazione in un angolo o in una nicchia.
NOTA: per contro, questo fenomeno può talora essere vantaggiosamente sfruttato proprio per rinforzare la gamma bassa, ma è opportuno che ciò sia praticato
con consapevolezza e in modo controllato.
• Evitate di far poggiare i diffusori direttamente su un palco, su un pavimento galleggiante o su un altro supporto con cavità, poiché ciò tende ad indurre risonanze che alterano e disturbano il risultato sonoro complessivo.
NOTA: usate di preferenza un appoggio solido (pieno) oppure uno stativo per
casse acustiche.
• Ricordate che le frequenze alte sono caratterizzate da un elevato indice di direttività e sono soggette ad un coefficiente di assorbimento molto più elevato rispetto alle frequenze basse.
Per garantire intelligibilità e presenza del segnale, pertanto, posizionate i diffusori in modo che siano collocati in linea di diffusione diretta (a vista) verso il
pubblico d’ascolto, a ½ metro / 1 metro al di sopra di esso.
• In ambienti altamente riverberanti (luoghi di culto, palestre, etc.) provvedete innanzitutto a contenere le riflessioni usando materiali fono-assorbenti (tappeti,
tendaggi, pannelli specifici, etc.). Se ciò non fosse praticabile o non fosse sufficiente, evitate di ricorrere al semplice incremento di volume, poiché ciò incrementerebbe anche il volume delle riflessioni, possibilmente peggiorando la
situazione. Ricorrete di preferenza all’uso di un maggior numero di diffusori distribuiti, più vicini al pubblico d’ascolto (es. fronte+retro; fronte+lati,
fronte+lati+retro).
IT
18
VOICE SYSTEMS - CLUB MINI - MANUALE UTENTE
SPECIFIC HE TEC NIC HE
CLUB MINI SYSTEM
SATELLITE
POWER HANDLING NOMINAL 350 Wa- (EIAJ test - 1kHz, 1% THD)
FREQUENCY RESPONSE
80 Hz - 20 kHz
INPUT SENSITIVITY
0 dBu
MAX SPL <CALCULATED=
120 dB
CROSSOVER FREQUENCY
2800 Hz
SUBSONIC FILTER
HF PROTECTIONS
PTC, HPCCR bulb
ACTIVE PROTECTIVE CIRCUITRY
NOMINAL INPUT IMPEDANCE
WOOFER
Impedance
Magnet
Voice coil
Former
TWEETER
Impedance
Magnet
Voice coil
Diaphragm
ANGULAR DISPERSION
CONSTRUCTION
CABINET
FINISH
PROTECTION
DIMENSIONS <HXWXD= MM
FLYING SYSTEM
POLE MOUNT
WEIGHT
CONTROL PANEL
Level
Presets
8"
4 Ohm
neodymium
2.5" aluminium
kapton
1"
8 Ohm
ceramic
aluminium
mylar
90° x 60°
Yes
thermal, overcurrent, non audio signals
10 kOhm balanced to ground
2 x 8"
2x4 Ohm
neodymium
2.5" aluminium
kapton
front: 15 mm laminated birch ply- front: 30 mm laminated birch plywood
wood
top, bo-om, rear, sides: 12 mm lam- top, bo-om, rear, sides: 15 mm lamiinated birch plywood
nated birch plywood
black scratch resistant paint
black scratch resistant paint
metal grid
metal grid
410x268x285
550x280x400
2xM8 - top, bo-om, sides
1xM8 - rear
1 bo-om
1 top
8 Kg
16 Kg
Indica,on leds
CONNECTIONS
SUB
700 Wa- (EIAJ test - 1kHz, 1% THD)
50 Hz - 90 Hz
0 dBu
124 dB
input signal: 1 Neutrik Speakon
NL4MP, 1+ IN+, 1- IN-
19
from -Inf to 0 dB
push selec,on, 4 leds to sign the ac,ve preset:
1) FLAT
2) D.BOOST
3) SPEECH
4) VOICE
1) green led = ON/OFF
2) green led = SIGNAL ON
3) yellow led = TEMPOUT
4) red led = CLIP
input signals: 2 XLR
power supply: AC socket
output signals: 2 Neutrik Speakon
NL4MP, 1+ OUT+, 1- OUT-
IT
VOICE SYSTEMS - CLUB MINI - BENUTZERHANDBUCH
I N H A LT
HINWEISE ..........................................................................................22
ÜBERSICHT........................................................................................23
REGLER UN ANSCHLÜSSE ...............................................................24
TOPTEILEN: REGLER UN ANSCHLÜSSE ....................................................25
SUB: REGLER UN ANSCHLÜSSE ................................................................25
LAUTSPRECHER-INSTALLATION......................................................26
SICHERHEITSHINWEISE FÜR DISTANZSTANGEN UND STATIVE............27
SICHERHEITSHINWEISE FÜR HÄNGENDER/GEFLOGENER MONTAGE .27
ANWENDUNGS-VORSCHLÄGE .........................................................28
TECHNISCHE DATEN ........................................................................29
DANKE, DASS SIE SICH FÜR EIN PRODUKT AUS
DER VOICE SYSTEMS SERIE ENTSCHIEDEN
HABEN.
DIESE BEDIENUNGSANLEITUNG LIEFERT IHNEN
WICHTIGE INFORMATIONEN
UND TIPPS ZU IHREM VOICE
SYSTEM GERÄT. DAS VOICE
SYSTEM-TEAM WÜNSCHT
IHNEN VIEL FREUDE MIT
IHREM NEUE VOICE SYSTEMS PRODUKT!
DE
21
VOICE SYSTEMS - CLUB MINI - BENUTZERHANDBUCH
HINWEISE
GEHEN SIE SCHONEND MIT IHREM GERÄT UM
• Bedienen Sie Regler und Schalter mit Sorgfalt, wenden Sie bei der Bedienung
niemals Gewalt an.
• Belasten Sie die Lautsprecher nie übermäßig – nicht während des Transports
und auch nicht während des Betriebs.
• Platzieren Sie die Lautsprecher niemals in der Nähe von Heizungen/Wärmequellen, in feuchten oder staubigen Räumen oder im Umfeld starker Magnetfelder.
• Platzieren sie die Lautsprecher, falls möglich, nicht in unmittelbaren Umgebung von Geräten die starke Interferenzen aussenden, so wie Radios, Fernsehgeräte, Monitore etc.
• Vermeiden Sie Kontakt der Lautsprecher mit Fremdkörper oder Flüssigkeiten.
• Reinigen Sie die Komponenten gegebenenfalls mit einer weichen Bürste oder
Druckluft.
• Verwenden Sie niemals Alkohol- oder lösungsmittelhaltige Putzmittel.
• Wenn Sie ein Kabel entfernen, sollten Sie dieses immer direkt am Stecker und
nicht am Kabel abziehen. Achten Sie beim Zusammenlegen der Kabel darauf,
dass sich keine Knoten, Verdrehungen oder Schlingen bilden.
• Setzen Sie die Lautsprecher niemals direkter Sonnenbestrahlung oder Regen
aus.
ANSCHLUSS ANS STROMNETZ
• Um das Risiko eines Stromschlags zu vermeiden, sollten Sie die Verbindung
mit dem Netz auf keinen Fall mit nassen oder feuchten Händen herstellen.
• Stellen Sie sicher, dass das von Ihnen verwendete Stromnetz den Vorgaben
auf dem Typenschild entspricht.
• Schließen Sie das Gerät ausschließlich an geerdete Steckdosen an.
VERBINDUNG MIT EINEM MISCHER
• Um Klangeinbußen zu vermeiden, empfehlen wir die Verwendung hochwertiger, abgeschirmter Kabel.
• Stellen Sie vor dem Anschluss sicher, dass das Gerät auf jeden Fall ausgeschaltet sind. Auf diese Weise vermeiden Sie gefährliche Signal-Spitzen.
IM FALLE EINER FEHLFUNKTION
• Setzen Sie sich im Falle einer Fehlfunktion umgehend mit einem autorisierten
Service-Center oder Voice Systems Fachhändler in Verbindung.
DE
22
ÜBERSICHT
VOICE SYSTEMS - CLUB MINI - BENUTZERHANDBUCH
Lautstärke liegt, können konventionell aufgebaute Verstärker leicht 10x mehr Hitze
erzeugen, als ein in den CLUB Serie Systemen verbauter PVM Endstufen-Block mit
identischem Lautstärke-Niveau.
BESCHREIBUNG
Die CLUB Serie Systeme von VOICE SYSTEMS wurden entwickelt, um alle
denkbaren Anwendungssituationen wie
Club-Beschallung, Bühnen-Monitoring und
Festinstallationen abzudecken, bei denen
ein kompaktes und leichtes Verstärkersystem benötigt wird, welches schnell und unkompliziert zu installieren ist.
ENERGIEEINSPARUNG
Die "Energy Save" Funktion des Gerätes
regelt die Endstufe bei der Unterschreitung
eines bestimmten Grenzwertes automatisch in den Standby Betrieb. Dieser Betriebsmodus sorgt für eine drastischen
Senkung des Energieverbrauchs.
Die CLUB Serie Systeme sind mit PVMEndstufen neuster Generation ausgestattet.
Die Prozessor-gesteuerte Digital-Endstufe
in Verbindung mit den verbauten hochwertigen Komponenten und der neu konzipierten Gehäuseform garantieren ein optimales
Klangbild. Ob als Kompakt-PA für kleinere
Bands oder Alleinunterhalter, als Festinstallation in Cafes/Bars, im Einsatz für Keyboard oder zum Bühnenmonitoring, die
Club Serie Systeme sind universell einsetzbar.
Die CLUB Serie Systeme sind als
"Plug&Play" Lösung konzipiert: Sie brauchen nur vier Kabeln anzuschließen, ein
Preset auszuwählen, das System mit Ihrem
Mischpult zu verbinden - das System dann
ist einsatzbereit.
DAS GEHÄUSE
Das Gehäuse ist aus hochwertigem BirkenSperrholz, welches mit kratzerunempfindlichem Strukturlack überzogen ist. Die
Lautsprecher werden auf der Vorderseite
durch ein stabiles Metallgitter geschützt.
Dies garantiert bedingungslose „Roadtauglichkeit“ der Club Serie Systeme in allen
Anwendungs-Szenarien.
"FLYING
SYSTEM",
DIE
HÄNGENDE/GEFLOGENE INSTALLATION
Die Satelliten der Club Serie Systeme
haben verschieden Flugpunkte. So können
die Boxen äußerst flexibel mittels optional
erhältlichem Flug-Geschirr aufgehängt
werden. Bitte beachten Sie den Punkt SICHERHEITSHINWEISE FÜR HÄNGENDER/GEFLOGENER MONTAGE.
VERSTÄRKER
Die Digital-Technik hat die Entwicklung
professioneller Audio-Verstärker revolutioniert.
Keine andere Technik ist in der Lage mehr
Leistung bereit zu stellen.
Die auf ein Minimum reduzierte Wärmeentwicklung, sowie überragendes Leistungs-/Gewichtsverhältnis der in den CLUB
Serie Systemen verwendeten Digitalverstärker, sorgen für bestechende Dynamik
und enorme
Leistungsreserven. Die Endstufen erreichen eine Effizienz von unglaublichen
95%. Das heißt in der Praxis, dass nur ca.
5% der verwendeten Energie in Wärme umgewandelt wird, unglaubliche 95% stehen
zur Verstärkung des Audiosignals zur Verfügung. Grundsätzlich hängt die Effizienz
eines Systems nicht
zwingend von der Ausgangslautstärke ab.
Da die durchschnittliche Leistungsdichte
von musikalischem Programm-Material nur
bei ca. 40% der maximal zu erreichenden
KLANGQUALITÄT
Die CLUB Serie verfügen über hochwertige
Lautsprecher, die nach den exakten Vorgaben von VOICE SYSTEMS unter Verwendung geprüfter Komponenten, sowie
modernsten Fertigungstechnologien hergestellt wurden. Das Resultat sind Lautsprecher mit exzellentem Frequenzgang und
hohem Schalldruck.
DIE PRESETS
Die CLUB Serie Systemen bieten verschiedenen Audio Presets die es dem Anwender
äußerst einfach machen, die Anlage für bestimmte Anwendungen klanglich zu optimieren. Nach Einschalten des Systems
kann mittels des Preset-Schalter einfach
das gewünschte Preset ausgewählt werden.
Im folgenden Abschnitt werden die Funktionalitäten näher erläutert.
23
DE
VOICE SYSTEMS - CLUB MINI - BENUTZERHANDBUCH
REGLER UN ANSCHLÜSSE
1
2
3
4
5
6
DE
7
24
8
VOICE SYSTEMS - CLUB MINI - BENUTZERHANDBUCH
SUB: REGLER UN ANSCHLÜSSE
1.Level: Regelt den Eingangspegel des Club Serie System
2. Status LED:
- LIMIT: Diese LED leuchtet wenn der interne Limiter anspricht. Bitte vermeiden Sie dauerhaftes Leuchten dieser LED.
- Temp: Diese LED leuchtet wenn dass der integrierte Verstärker wegen Überhitzung in den Schutzmodus schaltet. Die Verstärkerleistung wird zur Sicherheit auf 50% reduziert. Wir empfehlen in diesem Fall den Lautstärkepegel am
Level Regler oder am angeschlossenen Mischpult zu reduzieren, so dass das
Endstufenmodul wieder in den normalen Betriebsmodus wechselt.
- SIGNAL: zeigt ein anliegendes Signal an.
- READY: leuchtet bei Betriebsbereitschaft
3. Preset LED: zeigt das gewählte Preset an. Um ein Preset auszuwählen, drücken sie den PRESET SELECT Schalter.
- FLAT: Standard-Preset. Dieses Preset liefert einen ausgewogenen Frequenzgang.
- VOICE: Vocal-Preset. Dieses Preset ist für Gesang optimiert.
- SPEECH: Sprach-Preset. Diese Preset sorgt für Klarheit bessere Sprachverständlichkeit der Stimme und hat zusätzlich De-Esser und Poppfilter zur optimalen Übertragung von Ansprachen.
- D.Bass: Dynamik Bass Preset. In Abhängigkeit der Lautstärke werden die
Bass-Frequenzen bei diesem Preset angehoben. Durch die dynamische Regelung nimmt die Bass-Anhebung bei zunehmender Lautstärke ab. Diese Preset
ist für DJ-Anwendung konzipiert.
4. Input (L&R): XLR Buchse zur Einspeisung des zu verstärkenden Signals.
5. Preset Select: Mit diesem Schalter wechselt man zwischen den Presets. Das
ausgewählte Preset wird über die Preset-LED angezeigt.
6. Speaker Out (L&R): Diese Speakon Buchsen sind die Verbindung zu den Satelitten Lautsprechern der Club Serie Systeme.
7. Power on: Netzschalter, schaltet das Gerät ein/aus
8. AC Power in: Netzbuchse, verbindet das mitgelieferte Netzkabel mit dem
Stromnetz.
TOPTEILEN: REGLER UN ANSCHLÜSSE
9. Input: Diese Speakon Buchse ist die Verbindung
zum Subwoofer.
DE
9
25
VOICE SYSTEMS - CLUB MINI - BENUTZERHANDBUCH
L AU T S P R E C H E R - I N S TA L L AT I O N
Die Installation des Systeme ist einfach und äußerst benutzerfreundlich:
1. Verbinden Sie die Satelliten mittels der mitgelieferten Speakon Kabel mit dem
Subwoofer.
2. Verbinden Sie die (XLR) INPUT Buchse des Subwoofers mit dem Ausgang
Ihres Mischpultes.
3. Schalten Sie das Gerät ein.
DE
MIXER MAIN OUT
26
VOICE SYSTEMS - CLUB MINI - BENUTZERHANDBUCH
SICHERHEITSHINWEISE FÜR DISTANZSTANGEN UND STATIVE
Dieses Handbuch setzt voraus, dass die Besitzer und/oder Benutzer eines CLUB Serie
Systems Kenntnisse und Erfahrungen auf dem Gebiet Stativbenutzung mit Lautsprechersystemen besitzen.
Die Installation großer schwerer Gegenstände an Distanz-Stangen oder Stative an öffentlichen Orten unterliegt zahlreichen Regelungen und Bestimmungen des jeweiligen
Landes. Wir werden in diesem Handbuch nicht weiter darauf eingehen, möchten Sie
aber an dieser Stelle eindringlich darauf aufmerksam machen, dass Sie als Benutzer
eines solchen Systems für die ordnungsgemäße Aufstellung/Installation und den Betrieb
verantwortlich sind.
BEI DER BENUTZUNG VON STÄNDERN UND DISTANZSTANGEN BITTE DIE FOLGENDEN VORSICHTSMASSNAHMEN BEACHTEN: DIE SPEZIFIKATIONEN DES STÄNDERS ODER DER DISTANZSTANGE ÜBERPRÜFEN, UM SICHERZUSTELLEN, DASS
DAS GERÄT FÜR DIE ZU TRAGENDE LAST DES LAUTSPRECHERS KONZIPIERT IST.
BITTE BEFOLGEN SIE ALLE VORSICHTSMASSNAHMEN DES HERSTELLERS ZUR
GEWÄHRLEISTUNG DER SICHERHEIT. STELLEN SIE SICHER, DASS DIE OBERFLÄCHE, AUF DER DAS SYSTEM GESTAPELT WERDEN SOLL, EBEN, STABIL UND OHNE
GEFÄLLE IST. VERLEGEN SIE DIE KABEL SO, DASS WEDER KÜNSTLER, PRODUKTIONSTEAM NOCH PUBLIKUM DARÜBER STOLPERN KÖNNEN UND DEN LAUTSPRECHER UMKIPPEN. PRÜFEN SIE DEN STÄNDER (ODER DIE DISTANZSTANGE
UND DIE ZUGEHÖRIGE HARDWARE) VOR JEDEM GEBRAUCH UND VERWENDEN
SIE KEINE GERÄTE MIT ABGENUTZTEN, BESCHÄDIGTEN ODER FEHLENDEN TEILEN. ACHTEN SIE AUF PRÜFSIEGEL! VERSUCHEN SIE NICHT MEHR ALS EINEN
VOICE SYSTEM CLUB SERIE LAUTSPRECHER AUF EINEN STÄNDER ODER EINE DISTANZSTANGE ZU STELLEN/MONTIEREN. BEI DER VERWENDUNG IM FREIEN
KÖNNEN UNERWARTETE WINDBÖEN DAS SYSTEM UMKIPPEN. ES KANN NOTWENDIG WERDEN, ZUSÄTZLICHE GEWICHTE (Z. B. SANDSÄCKE) AM FUß DES
STÄNDERS ZU PLATZIEREN, UM DESSEN STABILITÄT ZU VERBESSERN. BEFESTIGEN SIE KEINE FAHNEN ODER ÄHNLICHES AN IRGENDEINEM TEIL EINES DER
LAUTSPRECHERSYSTEME. SOLCHE ZUSÄTZE KÖNNTEN ALS SEGEL FUNGIEREN
UND STABILITÄT STARK GEFÄHRDEN. FALLS SIE NICHT SICHER SIND, DASS SIE
DAS GEWICHT DES LAUTSPRECHERS ALLEIN BEWÄLTIGEN KÖNNEN, BITTEN SIE
JEMAND, IHNEN DABEI ZU HELFEN, DIESEN AUF DEN STÄNDER ODER DIE DISTANZSTANGE ZU HEBEN.
SICHERHEITSHINWEISE FÜR HÄNGENDER/GEFLOGENER MONTAGE
VIELE DER FÜR EINEN SICHEREN BETRIEB ENTSCHEIDENDEN ASPEKTE KÖNNEN
IN DIESER BEDIENUNGSANLEITUNG NICHT BERÜCKSICHTIGT WERDEN. DER BENUTZER ÜBERNIMMT DIE VOLLE VERANTWORTUNG FÜR DEN EINSATZ EINES
CLUB SERIE SYSTEMS AN ALLEN ERDENKLICHEN ORTEN UND IN ALLEN ERDENKLICHEN UMSTÄNDEN. DER BENUTZER EINES CLUB-SYSTEMS IST VERANTWORTLICH DAFÜR, DASS BEIM AUFBAU ALLE VOM JEWEILIGEN GESETZGEBER
FESTGELEGTEN VORSCHRIFTEN UND BESTIMMUNGEN BERÜCKSICHTIGT WERDEN.
Um eine sichere Montage des Systems zu gewährleisten, sollte man im Vorfeld alle Haltepunkte an den Boxen einer gründlichen Prüfung unterziehen. Das Gleiche gilt auch für
die Montage an vor Ort angebotenen Montagehilfen wie Installations-Punkten an Decken etc. - gerade dann, wenn sie im Rahmen von Konzerten regelmäßig verwendet werden. Auch Stative sollten vor der Montage gründlich in Augenschein genommen werden.
VOICE SYSTEM Systeme sollten nur aufgehängt werden, wenn sicherheitsgeprüfte, zertifizierte Installations-Punkte angeboten werden, die in der Lage sind die Last der Komponenten sicher zu halten.
27
DE
VOICE SYSTEMS - CLUB MINI - BENUTZERHANDBUCH
A N W E N D U N G S - VO R S C H L Ä G E
Die akustischen Eigenschaften eines Raums haben einen maßgeblichen Einfluss
aufden vom Soundsystem produzierten Gesamtklang.
• Platzieren Sie die Boxen nie in den Ecken eines Raums oder in Nischen. Dies
kann zu einer unangenehmen Verstärkung tiefer Frequenzen führen. Das Resultat
ist ein „verwaschener“, undifferenzierter Klang.
• Stellen Sie die Boxen nicht in Richtung Wand auf. Auch dies führt zu einer Verstärkung tiefer Frequenzen. In Maßen eingesetzt lässt sich diesem Effekt aber
auch etwas Positives abgewinnen. So hat man die Option dünn klingenden Sounds
durch vorsichtiges Drehen der Boxen in Richtung Wand, mehr Fülle und Druck zu
verleihen.
• Vermeiden Sie das direkte Aufstellen der Boxen auf Untergründen die einen Resonanzraum bieten. Dies kann zu Interferenzen und Feedbacks führen. Die besten
Ergebnisse erzielen Sie wenn Sie von vornherein Boxen-Ständer verwenden.
• Denken Sie daran, dass sich hohe Frequenzen im Vergleich zu Bässen, wesentlich zielgerichteter ausbreiten und dabei einen höheren Absorbtionsgrad besitzen.
Für eine ausgewogene, flächige Beschallung des Publikums, stellen Sie sicher,
dass die Satelliten Lautsprecher die Köpfe der Zuschauer etwa um einen halben
bis einen Meter überragen.
• In Gebäuden mit intensivem Hall (Kirche, Aula, Halle etc.) ist es empfehlenswert
mit Dämmmaterialien wie Teppichen, Gardinen etc. zu arbeiten. Sollte das nicht
möglich sein, erhöhen Sie zur Erzielung eines besseres
Ergebnisses auf keinen Fall einfach nur die Lautstärke. Dies würde zu einer Verstärkung der Reflektionen und damit einer weiteren Verschlechterung des Klangs
führen. Die beste Lösung liegt im Einsatz mehrerer Boxen, die im gesamten
DE
28
VOICE SYSTEMS - CLUB MINI - BENUTZERHANDBUCH
T E C H N I S C H E DAT E N
CLUB MINI SYSTEM
SATELLITE
POWER HANDLING NOMINAL 350 Wa- (EIAJ test - 1kHz, 1% THD)
FREQUENCY RESPONSE
80 Hz - 20 kHz
INPUT SENSITIVITY
0 dBu
MAX SPL <CALCULATED=
120 dB
CROSSOVER FREQUENCY
2800 Hz
SUBSONIC FILTER
HF PROTECTIONS
PTC, HPCCR bulb
ACTIVE PROTECTIVE CIRCUITRY
NOMINAL INPUT IMPEDANCE
WOOFER
Impedance
Magnet
Voice coil
Former
TWEETER
Impedance
Magnet
Voice coil
Diaphragm
ANGULAR DISPERSION
CONSTRUCTION
CABINET
FINISH
PROTECTION
DIMENSIONS <HXWXD= MM
FLYING SYSTEM
POLE MOUNT
WEIGHT
CONTROL PANEL
Level
Presets
8"
4 Ohm
neodymium
2.5" aluminium
kapton
1"
8 Ohm
ceramic
aluminium
mylar
90° x 60°
Yes
thermal, overcurrent, non audio signals
10 kOhm balanced to ground
2 x 8"
2x4 Ohm
neodymium
2.5" aluminium
kapton
front: 15 mm laminated birch ply- front: 30 mm laminated birch plywood
wood
top, bo-om, rear, sides: 12 mm lam- top, bo-om, rear, sides: 15 mm lamiinated birch plywood
nated birch plywood
black scratch resistant paint
black scratch resistant paint
metal grid
metal grid
410x268x285
550x280x400
2xM8 - top, bo-om, sides
1xM8 - rear
1 bo-om
1 top
8 Kg
16 Kg
Indica,on leds
CONNECTIONS
SUB
700 Wa- (EIAJ test - 1kHz, 1% THD)
50 Hz - 90 Hz
0 dBu
124 dB
input signal: 1 Neutrik Speakon
NL4MP, 1+ IN+, 1- IN-
29
from -Inf to 0 dB
push selec,on, 4 leds to sign the ac,ve preset:
1) FLAT
2) D.BOOST
3) SPEECH
4) VOICE
1) green led = ON/OFF
2) green led = SIGNAL ON
3) yellow led = TEMPOUT
4) red led = CLIP
input signals: 2 XLR
power supply: AC socket
output signals: 2 Neutrik Speakon
NL4MP, 1+ OUT+, 1- OUT-
DE
VOICE
SYSTEMS
SY
STEMS
VOICE SYSTEMS is a trademark of
VISCOUNT INTERNATIONAL S.p.a.
Via Belvedere Fogliense 154
I-47836 Mondaino (RN) Italy
Tel. +39 0541-981700
Fax +39 0541-981052
Website: www.viscount.it
Distribuito in Italia da
TITAN MUSIC S.A.
Strada Genghe di Atto, 80
47892 Acquaviva
Repubblica di San Marino
Tel. 0549-999164
Fax 0549-999490
Le informazioni contenute nel presente documento sono state redatte e controllate con attenzione. Tuttavia VISCOUNT declina ogni responsabilità in
merito ad eventuali inesattezze. Tanto le informazioni contenute in questo documento, quanto le specifiche dei prodotti ai quali fa riferimento sono
soggette a modifiche senza preavviso. VISCOUNT non assume alcuna responsabilità sull’uso o sull’applicazione dei prodotti descritti in questo
documento. Ogni eventuale citazione di nomi, prodotti e società ha il solo scopo di illustrare l’uso dei prodotti qui descritti. Nomi, logo e marchi
eventualmente riportati appartengono ai rispettivi proprietari. Tutti i diritti sono riservati e nessuna parte di questo documento può essere riprodotta
in alcuna forma, in alcun modo e per alcuno scopo senza il permesso scritto di VISCOUNT
The information in this document has been drafted and checked with care. However VISCOUNT declines all responsibility for any inaccuracies. Both
the information in this document and the product specifications to which it refers are subject to amendment without notice. VISCOUNT does not
accept any responsibility with regard to the use or application of the products described in this document. Any references to names, products and
companies is for the sole purpose of illustrating the use of the products described herein. Any names, logos and brands referred to belong to their
respective owners. All rights reserved; the reproduction of any part of this document, in any form and for any purpose without VISCOUNT’s specific
written permission is forbidden.