1
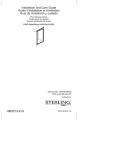
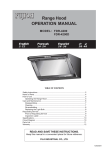
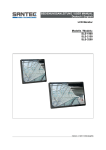
SLS-1505D, SLS-1705D, SLS-1905D SLS-2150D, SLS-3200D, SLS-4200D KURZANLEITUNG / QUICK INSTALLATION GUIDE. LCD Monitor Modelle / Models: SLS-1505D SLS-1705D SLS-1905D SLS-2150D SLS-3200D SLS-4200D Lieferumfang: 1x LCD Monitor 1x Netzteil mit Netzkabel (100-240V AC) 1x VGA-Kabel 1x HDMI-Kabel 1x IR-Fernbedienung inkl. Batterien 1x Kurzanleitung und Sicherheitshinweise Items included in the delivery: 1x LCD monitor 1x Power supply incl. power cord (100-240V AC) 1x VGA cable 1x HDMI cable 1x IR remote control incl. batteries 1x Quick installation guide and security notes Anschlüsse auf der Monitorrückseite / Connections on monitor backside: SLS-1505D, SLS-1705D, SLS-1905D, SLS-2150D, SLS-3200D, SLS-4200D: 1 2 3 4 5 6 7 8 9 10 Beschreibung 12 V DC Betriebsspannungseingang (nicht bei SLS-3200D und SLS-4200D) PC-Stereoeingang Kopfhörerausgang HDMI Anschluss DVI Anschluss VGA Anschluss CAM2 Eingang/Ausgang CAM1 Eingang/Ausgang S-Video Eingang Anschluss Netzteil und Ein/Aus Schalter (nur bei SLS-3200D und SLS-4200D) Description 12 V DC power input (not available for SLS-3200D and SLS-4200D) PC stereo input Headphone output HDMI port DVI port VGA port CAM2 input/output CAM1 input/output S-video input AC input and power on/off button (only available for SLS-3200D and SLS-4200D) 1 Version 1.0sfi/0315/dt-engl/A5 SLS-1505D, SLS-1705D, SLS-1905D SLS-2150D, SLS-3200D, SLS-4200D Bedientasten am Monitor / Control keys on monitor: SLS-1505D, SLS-1705D, SLS-1905D: Die folgenden Bedienelemente finden Sie an der Monitorvorderseite: The following control keys can be found on the monitor front: SLS-2150D, SLS-3200D, SLS-4200D: Die folgenden Bedienelemente finden Sie an der Monitorseite: 1 2 3 4 5 6 7 8 The following control keys can be found on the monitor side: Beschreibung Source: Auswahl der verschiedenen Eingangsquellen. Drücken Sie den PFEIL NACH OBEN oder PFEIL NACH UNTEN, um durch die verfügbaren Quellen zu blättern, und den PFEIL NACH LINKS oder RECHTS, um eine Auswahl zu bestätigen. Pfeil nach unten: Ermöglicht das vertikale Blättern im OSDMenü (On-Screen-Display). Pfeil nach oben: Hauptfunktion: Automatische Anpassung der Anzeige für bestmögliche Einstellungen (nur im VGA-Modus). Außerdem: Vertikales Blättern im OSD-Menü Empfänger für IR-Fernbedienung (bitte nicht verdecken) Ein/Aus Schalter Schaltet den Monitor ein bzw. aus. Menu: Anzeige des OSD-Menüs. Pfeil nach links: Hauptfunktion: Dient zur Verringerung der Lautstärke. Außerdem: Bewegt den Cursor in den linken Bereich des OSD-Fensters und reduziert den Wert eines ausgewählten Menüs. Pfeil nach rechts: Hauptfunktion: Dient zur Erhöhung der Lautstärke. Außerdem: Bewegt den Cursor in den rechten Bereich des OSD-Fensters und erhöht den Wert eines ausgewählten Menüs. 2 Description Source: Used to select from different input sources. Press the UP or DOWN arrow to scroll through the available sources, and press LEFT or RIGHT arrow to confirm selection. Down arrow: Allows for vertical scrolling in the OSD (on screen display). Up arrow: Primary function: Automatically adjusts the display to the most optimal setting possible. (VGA mode only) Secondary Function: Allows for vertical scrolling in the OSD menu Receiver for IR remote control (please do not cover) Power on/off: Switches the monitor on and off. Menu: Turns the OSD menu on. Left arrow: Primary function: Used to decrease the volume. Secondary function: Moves the cursor to the left in the OSD window and decreases the value of any selected menu. Right arrow: Primary function: Used to increase the volume. Secondary function: Moves the cursor to the right in the OSD window and increases the value of any selected menu. SLS-1505D, SLS-1705D, SLS-1905D SLS-2150D, SLS-3200D, SLS-4200D Bedienung des Monitors über das OSD-Menü: Nachdem Sie den Monitor angeschlossen haben, schalten Sie ihn über die Ein/Aus Taste ein. Wenn sich der Monitor zuvor im Standby-Modus befand, können Sie ihn auch über die Ein/Aus Taste der Fernbedienung einschalten. Drücken Sie auf die MENU Taste am Monitor oder auf der Fernbedienung, um das OSD-Menü aufzurufen. Mit den LINKS/RECHTS Tasten blättern Sie durch das Menü. Mit den HOCH/RUNTER Tasten wählen Sie Untermenüpunkte an. Drücken Sie erneut auf die MENU Taste, um das OSD-Menü wieder zu verlassen. Adjusting the monitor settings via the OSD menu: Once you have connected the monitor, switch it on using the on/off power button. If the monitor has previously been in standby mode, you can also switch it on using the on/off power button on the remote control. Press the MENU button either on the monitor or on the remote control to call-up the OSD menu. Use the LEFT/RIGHT buttons to scroll through the menu. Use the UP/DOWN buttons to go to a sub-menu. Press the MENU button again to exit the OSD menu. Bedienung des Monitors über„Hot Keys“: Einige Einstellungen können Sie auch vornehmen, ohne das OSD-Menü aufzurufen, und zwar über die „Hot Key“ Tasten: SOURCE Taste: Auswahl des Eingangssignals Hoch Taste: Bestmögliche Einstellung Links/rechts Taste: Regulierung der Lautstärke Runter Taste: Monitor stumm schalten (Ein/Aus) SOURCE + : Über diese Tastenkombination können Sie den Zugriff auf das OSD sperren bzw. entsperren. MENU Taste: Wenn Sie die MENU Taste für 5 Sekunden gedrückt halten, werden die Bedientasten am Monitor gesperrt bzw. entsperrt. Adjusting the monitor settings via the „hot keys“: Some settings can be made without calling-up the OSD menu but by using the „hot key“ buttons. SOURCE button: Select an input source signal. Up arrow: Set the best possible setting. Left/right buttons: Adjust the volume. Down button: Set the monitor to mute (on/off) SOURCE + : Use this key combination to lock resp. unlock access to the OSD menu. MENU button: If you press and hold the MENU button for 5 seconds, the control keys on the monitor will be locked resp. unlocked. Bitte beachten: Bitte beachten Sie auch das Beiblatt mit Sicherheitshinweisen und Vorsichtsmaßnahmen. Please note: Please also read the supplemental sheet on safety precautions and safety instructions. 3 SLS-1505D, SLS-1705D, SLS-1905D SLS-2150D, SLS-3200D, SLS-4200D Ausführliches Benutzerhandbuch Diese Kurzanleitung dient dazu, das Gerät einfach und unkompliziert in Betrieb zu nehmen. Weitere ausführlichere Erklärungen und Beschreibungen der einzelnen Funktionen finden Sie im Benutzerhandbuch, das Sie auf unserer Webseite als pdf-Datei herunterladen können: www.santec-video.com Detailed user manual The purpose of this quick installation guide is to start the device in an easy and convenient way. Further detailed explanations and descriptions of the various functions are available in the user manual which you can download as pdf file from our website: www.santec-video.com Alternativ können Sie für einen schnellen Zugriff auf das Handbuch diesen QR-Code einlesen, um das Handbuch direkt auf Ihr Smartphone oder Tablet zu erhalten. Alternatively, for quick access to the user manual, you can scan the below QR-code to view the user manual on your smartphone or tablet. Hinweise zur Geräteentsorgung Notes on waste disposal Bitte beachten Sie im Fall der Entsorgung unbrauchbarer Geräte die geltenden gesetzlichen Vorschriften. Dieses Symbol bedeutet, dass elektrische und elektronische Geräte am Ende ihrer Nutzungsdauer vom Hausmüll getrennt entsorgt werden müssen. Bitte entsorgen Sie das Gerät bei Ihrer örtlichen kommunalen Sammelstelle. Please respect the local legal regulations on waste if you need to dispose of discarded appliances. This symbol means that electrical appliances need to be disposed of properly and not simply with unsorted household refuse. Please respect local regulations on waste disposal. Impressum Das Copyright dieser Bedienungsanleitung liegt ausschließlich bei SANTEC BW AG. Jegliche Vervielfältigung auch auf elektronischen Datenträgern bedarf der schriftlichen Genehmigung der SANTEC BW AG. Der Nachdruck – auch auszugsweise – ist verboten. Irrtum und technische Änderungen vorbehalten. Errors excepted. Specifications are subject to change without notice for quality improvement. SANTEC ist ein eingetragenes Warenzeichen der SANTEC BW AG. Übrige evtl. genannte Firmen- und Produktnamen sind Warenzeichen oder eingetragene Warenzeichen bzw. Marken der jeweiligen Inhaber. © Copyright: Copyright All rights reserved. This publication may not be reproduced, stored in a retrieval system or transmitted, in any form or by any means (electronic, mechanical, photocopying, recording or otherwise), without the written prior permission of SANTEC BW AG. No reproduction of any part or excerpts thereof are permitted. SANTEC BW AG An der Strusbek 31 22926 Ahrensburg Germany www.santec-video.com SANTEC is a registered trademark of SANTEC BW AG. All other companies or products mentioned in this publication are trademarks, registered trademarks or brands of the respective company. © Copyright: 4 SANTEC BW AG An der Strusbek 31 22926 Ahrensburg Germany www.santec-video.com