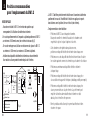
1
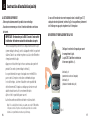
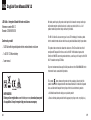
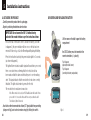
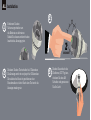
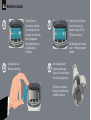
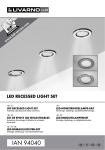
MANUEL D’UTILISATION BW 1.2
USER MANUAL BW 1.2
BENUTZERHANDBUCH BW 1.2
www.Bellandwyson.com
1
FR Procédure pour installer l’ampoule
1
Tirez sur la languette positionnée
sur l’ampoule afin d’activer la pile.
2
Une fois la languette retirée
le voyant vert s’allume.
12
9
2
secondes
2
Appuyez sur le bouton test qui se trouve au niveau
du voyant vert pendant 2 secondes.
Le voyant devient alors rouge et un signal
sonore retentit 2 fois par seconde à 3 reprises
consécutives confirmant ainsi que le circuit
électrique, la sirène et la batterie sont en parfait
état de fonctionnement.
3
3
6
Il vous suffit ensuite
de visser votre ampoule
dans la douille
(type E 27) et vous
profiterez pleinement
de l’éclairage en
appuyant simplement
sur l’interrupteur.
Après ce test le voyant doit passer au vert.
2
3
FR Procédure pour changer la pile
Pour changer la pile,
appuyez délicatement
avec votre doigt
à l’endroit de la marque
(triangle), puis utilisez
un petit tournevis
plat par exemple pour
faire levier et soulevez
ensuite le cache.
1
-
Enlevez
délicatement
la pile.
4
-
+
Remplacez la pile
par une pile neuve
exactement dans le
bon sens (polarité +/-).
Pour vous repérer,
le culot de l’ampoule
doit être positionné
vers le bas.
4
+
2
+
3
Replacez le cache en
appuyant délicatement
dessus jusqu’à ce que
le cache reprenne
sa position initiale.
Vous devrez entendre
un léger « clic ».
Le cache fermé devra
être parfaitement ajusté.
5
FR Manuel d’utilisation en français
Ampoule LED + Détecteur avertisseur de fumée intégré
Référence BW 1.2
Barcode : 3700789292470
Nous tenons à vous remercier pour l’achat de ce produit qui de par sa conception
innovante et son design vous satisferont pleinement. Vous bénéficierez, d’outre
sa facilité d’installation, d’un produit 2 en 1 alliant le design et la sécurité.
Contenu du produit
La BW 1.2 est également une ampoule qui vous fera réaliser des économies
d’énergie grâce à sa technologie LED mais aussi un détecteur avertisseur de fumée
photoélectrique, élément important pour la sécurité de votre habitation.
•
1 ampoule LED avec détecteur avertisseur
de fumée photoélectrique intégré
•
1 pile Lithium 3 V CR 123
•
1 manuel d’utilisation
Ce produit ne contient pas de substances radioactives. Le marquage CE atteste
de sa conformité aux directives européennes ainsi qu’aux spécificités de la norme
EN 14 604 au regard de la directive 89/106/CEE pour la fonction détecteur de fumée
et aux spécificités de la norme EN 62471 pour la fonction Ampoule LED.
Dans son souci de la préservation de la planète, Bell & Wyson est adhérente
à l’ECO ORGANISME pour le traitement des déchets de nos produits.
INFORMATION
Lors de l’enregistrement en ligne www.bellandwyson.com,
téléchargez votre certificat d’acquisition qui pourrait vous être
demandé par votre assureur.
6
Ce symbole
apposé sur le produit ou son emballage indique que ce produit ne doit
pas être traité avec les autres déchets ménagers. Il doit être remis à un point de collecte
approprié pour le recyclage des produits électriques et électroniques :
• Dans les points de distribution en cas d’achat d’un équipement équivalent
• Dans les points de collecte mis à votre disposition localement
(déchèterie, collecte sélective …)
7
FR
1
Présentation BW 1.2
7
Descriptif produit
Ampoule LED 9 w (75 watts 800 Lm) avec détecteur-alarme de fumée intégré
• Détection photoélectrique (rapide pour les combustions lentes)
• Type de montage : plafonnier recommandé, applique possible (voir schéma ci-dessous)
• Sources alimentations : interne au dispositif (pile fournie) et/ou secteur 110-220 V
• Ne fonctionne pas dans un camping-car
• Angle d’éclairage à 180 degrés
• Fonctionne avec un interrupteur standard
• Chaleur t Kelvin (2700K-), IRC >80+
• Durée de vie ampoule : environ 40 000 heures
• Douille E27 (possibilité d’acquérir un adaptateur pour les autres formats de douille)
• Alarme sonore >85DB+ à 3 m
• Pile Lithium (pour détecteur de fumée) 3 V CR 123
• Autonomie de la pile : environ 5 ans
• Indicateur d’alarme autonome
• Avertisseur sonore (pour détecteur de fumée en cas de pile déchargée ou en cas
d’incendie)
• Voyant lumineux (pour détecteur de fumée clignotant en cas de pile déchargée
ou continu pour le bon fonctionnement)
• Bouton test (pour détecteur de fumée)
• Dimensions : 150 mm (h), 80 mm(l)
• Poids : 210 g (approx.)
• Garantie : 2 ans
•
8
8
5
4
6
2
3
1
Fig. 1
1
Avertisseur sonore > 85 dB à 3 m
2
Bouton de test pour détecteur de fumée
3
Voyant lumineux pour détecteur de fumée
4
E 27
5
LED 800 lm
6
180°
7
Cache à soulever pour accéder
au logement de la pile
8
Emplacement où soulever le cache
pour accéder au logement de la pile
AVERTISSEMENT ! Il faut éviter de fixer
l’ampoule tant que la pile lithium n’est pas
installée pour la mise en fonctionnement
du détecteur de fumée. Le retrait de la pile rend
le détecteur de fumée non opérationnel.
IMPORTANT ! Lisez attentivement l’ensemble
de cette notice avant de procéder
à l’installation. Conservez cette notice pendant
toute la durée de vie de ce produit afin
de la consulter ultérieurement.
ATTENTION ! La pile peut exploser ou entrainer
des blessures si elle est désassemblée,
rechargée ou exposée à de l’eau, du feu
ou à une température élevée. Gardez-la hors
de portée des enfants. Si avalée consultez
de toute urgence un médecin.
9
2
Positions recommandées
pour l’emplacement du BW 1.2
MISE EN PLACE
• V
ous devez installer la BW 1.2 en fonction des positions qui
correspondent à l’utilisation d’un détecteur de fumée.
• En cas de positionnement de l’ampoule au plafond positionnez la BW 1.2
au minimum à 100 mm du mur (voir schéma ci-dessous fig 2).
• E
n cas de montage mural, utilisez une cloison murale, placez la BW 1.2
au minimum à 100 mm et au maximum à 305 mm du plafond.
• I nstaller deux dispositifs de détection de fumée aux deux extrémités
d’un couloir ou d’une grande chambre de plus de 9 mètres.
plafond
1
2
cuisine
couloir
2
Plusieurs étages
Emplacements pour les détecteurs de fumée
Installation minimale
Installation optimale
10
sous-sol
jamais
cuisine
meilleur
emplacement
30,5 cm
maximum
chambre
Un seul niveau
10 cm
minimum
espace sans
circulation d’air
chambre chambre
salon
1
chambre
10 cm
minimum
chambre
chambre
acceptable
Fig. 2
La BW 1.2 doit être prioritairement installée avec l’ouverture du détecteur
positionnée face au sol. Possibilité de l’installer en applique si respect
des distances avec le plafond, le mur et le sol (voir schéma).
• Emplacement
dans votre habitation
- Positionnez la BW 1.2 au voisinage des chambres.
Essayez de surveiller le chemin d’évacuation; les chambres sont
en général les pièces les plus éloignées de la sortie.
- Si les chambres sont réparties dans plusieurs zones,
positionnez un dispositif de détection de fumée dans chaque zone
- Positionnez un ou des dispositifs de détection de fumée dans l’escalier;
les escaliers agissent comme des cheminées pour la fumée et la chaleur.
- Positionnez au minimum un dispositif de détection de fumée
à chaque étage.
- Positionnez un dispositif de détection de fumée dans chaque pièce
où vous utilisez des appareils électriques (chauffage portatif par exemple).
- Positonnez un dispositif de détection de fumée dans chaque pièce
où une personne dort avec la porte fermée. La porte fermée peut
empêcher la fonction alarme du détecteur de fumée non situé
dans la pièce de réveiller cette personne.
- Fixer le produit au milieu d’une pièce permet au détecteur de bien
sécuriser cet espace.
• mur
latéral
11
3
Consignes de sécurité
ATTENTION !
• N
e positionnez pas la BW 1.2 dans des endroits humides par exemple près
d’un point d’eau, d’une source chaleur tel un radiateur, cuisinière, four ...
• N
e mouillez en aucun cas la BW 1.2 et ne projetez pas de liquide
dans sa direction.
• N
e positionnez la BW 1.2 qu’en plafonnier et/ou applique
(voir schéma paragraphe 2).
• N
e pas installer en extérieur.
• N
e pas utiliser la BW 1.2 pour des sorties de secours.
• N
e pas boucher les ouvertures.
N’insérez pas d’objets dans les ouvertures ou fentes du produit.
• N
e pas installer avec des prises électriques ou des raccordements
électriques non prévus pour ce type d’ampoule.
• N
e pas installer dans des dispositifs fermés qui limitent le flux d’air
et/ou empêchent une dissipation correcte de la chaleur.
• N
’ouvrez pas la BW 1.2, sauf le logement de la pile, sous peine d’annuler
la garantie et d’endommager le produit.
• N
e pas installer dans des endroits infectés d’insectes et poussiéreux
(les particules de poussière peuvent déclencher de fausses alarmes).
12
Ne pas installer dans une zone avec des variations de température
trop importantes.
• N
e pas installer dans un garage; le démarrage des véhicules libère
des produits de combustion.
• E
vitez tout contact oculaire direct avec le faisceau lumineux et éviter
de regarder directement l’ampoule de façon prolongée.
Ce produit appartient au groupe 1 selon norme IEC/EN62471.
• L
a pile peut exploser ou entrainer des blessures si elle est désassemblée,
rechargée ou exposée à de l’eau, du feu ou une température élevée.
• N
e laissez pas le produit à portée des enfants.
Si la pile est avalée, consultez de toute urgence un médecin.
• N
’installez pas ce produit dans la cuisine ou à moins de 900 mm
des points suivants :
- porte d’entrée d’une cuisine,
- d’une salle de bains équipée d’une baignoire ou d’une douche,
- de gaines de ventilation mécanique utilisées pour le chauffage
ou refroidissement,
- de ventilateurs d’aération au plafond ou centralisés.
• L
’ampoule BW 1.2 s’avère être plus lourde que des ampoules
« conventionnelles »; cette différence de poids peut engendrer une
certaine instabilité au niveau du luminaire. Il est important de vérifier
l’installation du luminaire au plafond.
• 13
4
Entretien
Pour l’entretien débranchez le produit puis nettoyez-le à l’aide
d’un chiffon sec sans utiliser de produits détergents pour éviter tout risque
d’électrocution. Nettoyez le produit au moins 2 fois par an.
5
Instruction d’installation
Fig. 3
Fig. 5
Fig. 4
12
9
2
secondes
s
14
6
15
Instruction d’installation (suite)
16
2 fois par seconde à 3 reprises consécutives puis toutes les secondes
et demie. Le voyant lumineux restera en position rouge.
Il vous suffit ensuite de visser votre ampoule dans la douille (type E 27)
adéquate de votre plafonnier (schéma fig. 5) et vous profiterez pleinement
de l’éclairage en appuyant simplement sur l’interrupteur.
•
B/ INSERTION ET REMPLACEMENT DE LA PILE
Déclipsez le cache de l’ampoule pour ouvrir
le compartiment à pile.
La pile CR123 doit être insérée dans
le bon sens (polarité +/-).
Schéma fig. 6
(ouverture du cache sur l’ampoule)
Schéma fig. 6
(situation et insertion de la pile)
+
A/ ACTIVATION DU PRODUIT
• E
nlevez précautionneusement le produit de son emballage.
• V
ous devez commencer par activer la fonction détecteur-avertisseur
de fumée.
- IMPORTANT : Ne branchez pas la BW 1.2 avant d’avoir activé
le détecteur de fumée en suivant les instructions ci-après
- Tirez sur la languette positionnée sur l’ampoule afin d’activer la pile
(comme indiqué schéma 3); une fois la languette retirée le voyant vert
s’allume. Dans le cas contraire reportez-vous à la section B insertion
et remplacement de la pile.
- Appuyez sur le bouton test qui se trouve au niveau du voyant vert
pendant 2 secondes (comme indiqué schéma 4).
- Le voyant devient alors rouge et un signal sonore retentit 2 fois
par seconde à 3 reprises consécutives confirmant ainsi que
le circuit électrique, la sirène et la batterie sont en parfait état
de fonctionnement. Ce signal vous indique que la mise en route
du détecteur de fumée a été correctement effectuée.
Après ce test le voyant doit passer au vert.
- La fonction avertisseur détecteur de fumée est alors activée.
Nota : En cas de détection de fumée, une alarme sonore de 85 dB retentira
-
5
-
+
Fig. 6
17
5
Instruction d’installation (suite)
Si le voyant se met à clignoter en rouge et vert alternativement
et que le signal sonore se déclenche brièvement, ceci vous avertit
que la pile doit être remplacée sans tarder.
• D
éclipsez le cache à l’aide d’un tournevis plat adapté comme indiqué
ci-dessus (fig. 6).
• E
nlevez délicatement la pile usagée.
• R
emplacez-la par une pile neuve exactement du même type
(pile lithium 3V CR 123).
• L
a pile doit être mise dans le bon sens (polarité +/-).
• R
eplacez et clipsez le cache de l’ampoule (fig. 6).
• A
ppuyez sur le bouton test qui se trouve au niveau du voyant vert pendant
2 secondes (comme indiqué fig. 4).
• L
e voyant devient alors rouge et le signal sonore retentit 2 fois par seconde
à 3 reprises consécutives confirmant ainsi que le circuit électrique, la sirène
et la batterie sont en parfait état de fonctionnement. Ce signal vous indique
que la mise en route du détecteur de fumée a été correctement effectuée.
Après ce test le voyant doit passer au vert.
• L
a fonction avertisseur détecteur de fumée est alors activée.
• 18
Quand vous changez la pile n’utilisez qu’une pile neuve.
Les bornes d’une pile ne doivent pas être mises en court- circuit.
Cette manipulation doit être effectuée par un adulte.
C/ TESTEZ LE DÉTECTEUR UNE FOIS PAR SEMAINE
• Appuyez
sur le bouton test qui se trouve au niveau du voyant vert pendant
2 secondes (comme indiqué fig. 4).
• Le
voyant devient alors rouge et le signal sonore retentit 2 fois par
seconde à 3 reprises consécutives confirmant ainsi que le circuit
électrique, la sirène et la batterie sont en parfait état de fonctionnement.
Ce signal vous indique que la mise en route du détecteur de fumée a été
correctement effectuée. Après ce test le voyant doit passer au vert.
• La
fonction avertisseur détecteur de fumée est alors activée.
• Si
le voyant se met à clignoter en rouge et vert alternativement
et que le signal sonore se déclenche brièvement (une fois par seconde),
ceci vous avertit que la pile doit être remplacée sans tarder tel qu’indiqué
à la section B) insertion et remplacement de la pile.
• Si
le voyant se met à clignoter en rouge et vert alternativement
et que le signal sonore se déclenche brièvement (deux fois par seconde),
ceci vous avertit que le détecteur de fumée est défectueux.
Vous devez alors vous rapprocher du service après-vente Bell & Wyson
et remplacer le cas échéant le détecteur défectueux le temps de son
éventuelle remise en état de marche. Merci dans ce cas vous reporter
à la section 9 service après-vente.
• 19
6
Limitation de la fonction détecteur de fumée
A LIRE ATTENTIVEMENT
• La protection contre l’incendie dans les locaux à usage d’habitation
repose principalement sur le signalement précoce aux occupants
de la nécessité de s’échapper ainsi que du suivi par ces derniers des
procédures d’évacuation. Bien qu’un détecteur de fumée en état
de marche augmente les chances de survie à un incendie potentiellement
fatal, les victimes sont souvent trop proches de l’incendie, trop âgées ou
trop jeunes, ou encore handicapées physiquement ou mentalement,
de telle sorte qu’elles sont incapables de s’échapper même lorsqu’elles
sont averties assez tôt pour qu’une évacuation soit possible.
Pour ces personnes, d’autres stratégies comme la protection sur place
ou encore l’évacuation ou les secours assistés sont nécessaires.
• L
es incendies domestiques se développent de différentes manières
et sont souvent imprévisibles et un détecteur mal positionné peut
ne pas toujours signaler un incendie. Pour cette raison, nous vous
recommandons de placer les produits BW 1.2 ou d’autres détecteurs
de fumée conformes dans des emplacements tel qu’indiqué dans le chapitre 2
POSITIONS RECOMMANDEES POUR L’EMPLACEMENT DE LA BW 1.2
• Un produit fonctionnant à pile doit être équipé d’une pile du type
préconisé, en état de marche et correctement installée (chapitre 5)
20
INSTRUCTIONS D’INSTALLATION
• U
n produit sur secteur électrique sans pile de secours ne fonctionnera pas
en cas de coupure de courant.
• T
estez une fois par semaine la fonction détection de fumée pour vérifier
que la pile et le circuit d’alarme fonctionnent correctement.
• La fonction détection de fumée ne peut être opérationnelle
si le détecteur est obstrué et plus généralement si la fumée ne peut être
détectée à cause d’un mauvais emplacement qui en empêche le bon
fonctionnement. A noter que le BW 1.2, ne pourra signaler un incendie qui
se déclare dans la cheminée, à l’intérieur d’un mur, sur un toit, de l’autre
côté d’une porte fermée ou à un étage différent.
• Si le produit BW 1.2 est placé hors d’une chambre à coucher
ou à un étage différent, il peut ne pas réveiller une personne qui dort
profondément, ayant une insuffisance auditive et/ou doté d’appareillages
tendant à atténuer les bruits extérieurs.
• La consommation d’alcool ou de drogues peut également diminuer la
capacité à entendre une alarme. Pour une protection maximale installez
un détecteur de fumée dans chaque pièce à dormir et à chaque étage de
l’habitation.
21
6
Bien que les détecteurs de fumée contribuent à sauver des vies
en signalant tôt la présence d’un incendie, ils ne remplacent pas
une police d’assurance. Les propriétaires et locataires doivent être
correctement assurés afin d’être protégés.
• 22
7
Limitation de la fonction détecteur de fumée
(suite)
Plan de sécurité
Installez et entretenez des extincteurs à chaque étage de la maison,
dans la cuisine, le sous-sol et le garage .Sachez comment utiliser
un extincteur avant qu’une urgence ne survienne.
• D
essinez un plan à l’étage en indiquant toutes les portes et fenêtres
et au moins deux issues de secours à partir de chaque pièce.
Pour les fenêtres du premier étage, vous devriez prévoir une corde
ou une échelle escamotable.
• R
éunissez toute la famille et expliquez votre plan d’évacuation
en montrant à chacun ce qu’il doit faire en cas d’incendie.
• C
hoisissez un endroit à l’extérieur où vous pourrez tous vous retrouver
en cas d’incendie.
• F
amiliarisez chaque membre de la famille avec la sirène du détecteur
et entrainez-les à quitter la maison lorsque l’alarme retentit.
• Faites un exercice d’incendie tous les six mois, y compris la nuit.
L’entrainement permet à tous les occupants de tester votre plan avant
qu’une urgence ne se déclenche.
• 23
7
Les études récentes ont montré que les détecteurs de fumée pouvaient
ne pas réveiller tous les individus endormis et il est de la responsabilité
de chaque membre de la famille capable d’aider les autres de porter
assistance à ceux qui peuvent ne pas être réveillés par la sirène d’alarme
ou ceux qui peuvent être incapables d’évacuer la zone en toute sécurité
sans aide .
• 24
8
Plan de sécurité (suite)
Que faire lorsque l’alarme retentit ?
Alertez tous les membres de la famille en particulier enfants en bas âge
et les personnes âgées de la maison
• Q
uittez immédiatement les lieux en respectant votre plan d’évacuation.
Chaque seconde compte. Ne perdez pas votre temps à vous habiller
ou à rassembler des objets de valeur.
• En partant n’ouvrez aucune porte intérieure sans toucher d’abord
sa surface. Si elle est chaude ou si vous voyez de la fumée qui s’infiltre
par des fissures, n’ouvrez pas cette porte. Utilisez alors l’autre sortie
prévue dans votre plan. Si la porte n’est pas chaude, placez votre épaule
contre la porte, ouvrez-la légèrement et soyez prêt à la fermer rapidement
si la fumée et/ou de la chaleur s’engouffrent dans la pièce où vous vous trouvez.
• Restez proche du sol si l’air est chargé de fumée. Ne respirez pas à fond
et couvrez-vous la bouche et votre nez avec un chiffon mouillé si possible.
• U
ne fois à l’extérieur, allez au point de rassemblement choisi et vérifiez
que tout le monde est présent.
• A
ppelez les pompiers de chez votre voisin ou de votre portable une fois
à l’extérieur. Evitez d’appeler de chez vous.
• Ne rentrez pas chez vous tant que les pompiers ne vous y ont pas autorisé.
• 25
8
•
Que faire lorsque l’alarme retentit ? (suite)
Il existe des situations où un détecteur de fumée peut être inefficace pour
vous protéger contre l’incendie. Par exemple :
1. Fumer au lit
2. Laisser les enfants seuls à la maison
3. Utiliser des liquides de nettoyage inflammables comme l’essence
26
9
Service après vente et garantie
SERVICE APRÈS-VENTE
Pour toutes informations relatives aux produits certifiés, aux conditions
d’installation ainsi que de la maintenance merci de vous connecter sur
le site www.bellandwyson.com
GARANTIE LIMITÉE
Bell & Wyson garantit l’ampoule BW 1.2 uniquement contre tout défaut
de matériel et de fabrication dans le cadre d’une utilisation normale
pendant une période de deux ans (dans les pays de l’union européenne).
Cette garantie prend effet à partir de la date d’achat au détail par
le premier acheteur du dispositif. Dans le cadre de cette garantie limitée,
si un défaut survient et dans le cas ou Bell & Wyson recevait une demande
pendant la durée de garantie, Bell & Wyson pourrait à sa discrétion
et dans la limite autorisée par la loi réparer le produit à l’aide de pièces
de rechange neuves ou réusinées, ou échanger le produit contre un produit
neuf ou réusiné. En cas de défaut dans la limite autorisée par la loi, cela
constitue votre seul et unique recours. Un produit ou une pièce de rechange
est garanti pour la durée de garantie restante du produit d’origine
ou pendant 30 jours si la durée restante est inférieure à ce délai.
27
9
Service après vente et garantie (suite)
L orsqu’un produit ou une pièce du produit est échangé tout élément
de rechange devient votre propriété et l’élément remplacé devient
la propriété de Bell & Wyson. Les pièces fournies par Bell & Wyson dans
le cadre de son obligation de garantie doivent être utilisées dans
des produits ayant fait l’objet d’une réclamation au titre du service de garantie
INSTRUCTIONS
Pour obtenir un service de garantie vous devez faire parvenir le produit en
port payé dans son emballage d’origine ou dans un emballage lui assurant
le même degré de protection à l’adresse indiqué par Bell & Wyson pendant
la période de garantie accompagné d’une description écrite
et suffisamment détaillée du défaut ainsi que de la preuve d’achat.
Conformément à la législation en vigueur Bell & Wyson peut vous demander
une preuve d’achat et/ou de satisfaire à des obligations d’inscription avant
que vous ne puissiez bénéficier d’un service de garantie. Il est de votre
responsabilité de sauvegarder les données, les logiciels ou autres documents
que vous aurez éventuellement enregistrés ou conservés sur le produit
ou en relation avec celui-ci. Ces données logiciels ou autres documents
28
seront vraisemblablement perdues ou reformatées lors de la réparation.
Bell & Wyson ne pourra être tenu responsable d’aucun dommage ou
d’aucune perte les concernant. Pour obtenir des instructions spécifiques
sur la procédure d’obtention d’un service de garantie pour le produit,
connectez-vous sur le site web www.bellandwyson.com/support.
EXCLUSIONS ET LIMITATIONS
Cette garantie limitée ne s’applique que sur un produit fabriqué par ou pour
Bell & Wyson et pouvant être identifié par la marque ou le nom commercial
Bell & Wyson ou par le logo y figurant.
La garantie limitée ne s’applique pas aux consommables (par exemple
les piles) ou logiciels même si ils sont livrés ou vendus avec le produit
ou contenus dans celui-ci. Reportez-vous aux licences accompagnant
les logiciels pour en savoir plus sur vos droits de les utiliser.
Bell & Wyson décline toute responsabilité en cas de dommages résultant
du non-respect des instructions relatives à l’utilisation du produit
ou résultant d’une alimentation électrique inadéquate. Cette garantie
ne s’applique pas à un produit qui aura été modifié (par exemple afin
29
9
Service après vente et garantie (suite)
d’en modifier les fonctionnalités ou les capacités) par un intervenant
qui ne soit pas agréé par Bell & Wyson.
En outre, cette garantie limitée ne s’applique pas aux défauts
ou dommages provoqués par l’utilisation de produits non Bell & Wyson,
un accident, un abus, une mauvaise utilisation, une inondation, un incendie,
un tremblement de terre ou toute autre cause externe ou situation
anormale, l’utilisation du produit en dehors des utilisations ou conditions
autorisés ou prévues décrites par Bell & Wyson ou sous une tension
ou avec une alimentation électrique inadéquate ou par l’intervention
technique sur le produit (y compris mise à niveau et extension) exécutée
par un intervenant non agréé Bell & Wyson.
La récupération et la réinitialisation des programmes logiciels
et des données utilisateurs ne sont pas couvertes par cette garantie limitée.
Cette garantie ne couvre pas les frais de renvoi du produit par Bell & Wyson;
ces frais restant à votre charge.
Aucun revendeur, agent ou employé de Bell & Wyson n’est autorisé
à modifier, à étendre ou compléter cette garantie limitée. Si l’un des articles
de ce document est jugé illégal ou inapplicable, la légalité ou l’applicabilité
30
des autres articles ne sera ni affectée ni amoindrie.
GARANTIES EXCLUSIVES
Les garanties figurant dans la présente sont les garanties exclusives
fournies par Bell & Wyson et sauf si les lois en vigueur du pays de vente
l’interdisent, toute autre garantie qu’elle soit express ou implicite est exclue
par la présente.
LIMITATION DE DOMMAGES
Sauf si les lois en vigueur l’interdisent Bell & Wyson ne saurait être tenue
responsable de dommages incidents, indirects, spécifiques ou consécutifs
résultant de l’utilisation du produit ou d’une violation des garanties
ou des conditions expresses ou implicites quelle que soit la base juridique
invoquée sauf si les lois en vigueur l’interdisent.
31
9
Service après vente et garantie (suite)
TABLEAU RÉCAPITULATIF DES SIGNAUX LUMINEUX ET SONORES
Signal Lumineux
Signal sonore
Diagnostic
Action
Voyant vert fixe
Aucun
Votre appareil
fonctionne correctement
Aucune
Voyant rouge fixe
Alarme sonore de 85 dB
2 fois par seconde à 3
reprises consécutives
puis toutes les secondes
et demie
Détection de fumée
Suivre les instructions
en cas de
déclenchement
d’incendie
Voyant rouge fixe
6 secondes
Signal sonore 2 fois
par secondes à 3
reprises consécutives
Test de fonctionnement
en cours
Aucune si test OK
Voyant clignotant
rouge et vert
Signal sonore 1 fois
par seconde
Pile défectueuse
La pile doit
être remplacée
Voyant clignotant
rouge et vert
Signal sonore 2 fois
par seconde
Détecteur de fumée
endommagé
ou défectueux
Le produit doit
être réparé
32
33
ENG Device installation
1
Pull on the strip to activate
the battery.
Once the strip is removed,
the indicator lights green.
2
12
9
2
SEconds
2
34
Press the test button during 2 seconds.
The indicator turns red and the signal tone sounds
6 times. This confirms that the electrical circuit, the
buzzer and the battery are in perfect working order.
After this test, the indicator turns green.
3
3
6
Simply screw your bulb
(E27 type), press
the switch on and enjoy
your lighting.
35
ENG Battery replacement process
To change the battery,
gently press with your
finger where you see
a triangle, then use
for instance a suitable
screwdriver to pry off
and to lift the cover.
1
-
Gently remove
the used battery
36
-
+
Replace it with a new
battery of exactly the
same type (3V CR 123
lithium battery).
The battery must be
inserted in the correct
orientation(+/- polarity)
4
+
2
+
3
To replace the cover,
gently press it till
it returns to its
initial position.
You should hear a soft
click. Once closed
the cover should
match perfectly.
37
ENG English User Manual BW 1.2
LED Bulb + Integrated Smoke Detector and Alarm
Reference number BW 1.2
Barcode: 3700789292470
We thank you for buying this product and hope that its innovative concept and design
will provide complete satisfaction. As well as being easy to install, this is a 2-in-1
product combining excellent design with safety functions.
Contenu du produit
The BW 1.2 bulb will also save energy as it uses LED technology. It includes a photoelectric smoke detector and alarm which can also provide additional safety for your home.
•
1 LED Bulb with integrated photo-electric smoke detector and alarm
•
1 x 3V CR 123 lithium battery
•
1 user manual
This product does not contain radioactive substances. The CE mark indicates that it
complies with European Directives as well as the EN 14 604 standard pursuant to
Directive 89/106/EEC concerning smoke detectors, as well as specific aspects of the EN
62471 standard covering LED Bulbs.
To prevent environmental damage, Bell & Wyson adheres to the ECO ORGNISME for the
treatment of waste associated with products.
INFORMATION
During on line registration www.bellandwyson.com, download your proof
of acquisition. It may be required by your insurance company
38
This symbol
, when shown on the product or the packaging, indicates that this
product should not be disposed of with normal household waste. It should be disposed
of at a suitable collection point for recycling of electrical and electronic products:
• At distribution outlets when buying an equivalent product
• At local collection points provided for this purpose (recycling centre, recycling bins...)
39
ENG
1
BW 1.2 Introduction
Product description
9 Watt LED bulb (75 watts 800 Lm) with integrated smoke detector/alarm
• Photo-electric detection system (rapid detection of slow-burning fires)
• Type of fitting: ceiling recommended, may be wall-mounted (see diagram below)
• Power source: internal (battery supplied) and/or 110-220 V mains
• Will not work in a camper vehicle
• 180 degree lighting angle
• Functions using a normal switch
• Kelvin warmth temp (2700K-), IRC >80+
• Life span of the bulb: around 40,000 hours
• E27 socket (an adapter can be purchased for other socket types)
• Audible alarm >85DB+ at 3 m
• 3V CR 123 lithium battery (for smoke detector)
• Battery life: around 5 years
• Autonomous alarm indicator
• Audible warning (for smoke detector when battery discharged or in the event of a fire)
• Indicator light (for smoke detector, flashes when battery discharged and continuously
on when operating correctly)
• Test button (for smoke detector)
• Dimensions: 150 mm (h), 80 mm (w)
• Weight: 210 g (approx.)
• Guarantee: 2 years
7
•
40
8
5
4
6
2
3
1
Fig. 1
1
Alarm > 85 dB 3 meters
2
Test button for smoke detectors
3
Light indicator for smoke detectors
4
E 27
5
LED 800 lm
6
180°
7
Cover to lift to access the battery
compartment
8
Location where one can lift the cover
to access the battery compartment
WARNING! Do not insert the bulb without first
installing the smoke detector battery.
Removing the battery will render the smoke
detector inoperable.
IMPORTANT! Read these instructions carefully
before installation. Keep these instructions for
the life of the bulb for later reference.
CAUTION! The battery may explode or cause
injury if disassembled, recharged or exposed
to water, flames or elevated temperatures.
Keep out of the reach of children.
If swallowed seek medical attention urgently.
41
2
Recommended positions for the BW 1.2
The BW 1.2 must be installed with the detector opening facing the floor.
May be wall-mounted as long as the distances from the ceiling, wall
and floor are respected (see diagram)
• P
osition in your room
- Position the BW 1.2 in the vicinity of bedrooms. Pay attention to
the evacuation route; bedrooms are often the rooms farthest from the exit
- If bedrooms are spread over several zones, a smoke detector should
be fitted in each zone
- Install one or more smoke detectors in stairwells, these act as chimneys
for smoke and heat
- Install at least one smoke detector on each floor
- Smoke detectors should be fitted in all rooms in which electric equipment
is used (portable heaters for example)
- Smoke detectors should be fitted in all rooms in which people sleep with
the door closed. A closed door may prevent the alarm waking a person
sleeping in a room with the door closed.
- Installing the product in the centre of the room will give the detector
the best coverage of the space
• INSTALLATION
• T
he BW 1.2 should be installed in a position which is suitable for
a smoke detector.
• W
hen installed in a ceiling fixture make sure the BW 1.2 is at least
100 mm from walls (see diagram below)
• W
hen wall-mounted, mount the BW 1.2 on a partition wall at least
100 mm and at most 305 mm from the ceiling.
• I nstall two smoke detectors at either end of corridors and in large rooms
which are over 9m long.
ceiling
1
cuisine
kitchen
Küche
chambre
chambre
bedroom
bedroom
Schlafzimmer Schlafzimmer
couloir
corridor
salon
Korridor
living room
Wohnzimmer
chambre
bedroom
Schlafzimmer
cuisine
kitchen
Küche
10 cm
minimum
space without
air circulation
never
best place
30,5 cm
maximum
chambre
bedroom
Schlafzimmer
chambre
bedroom
Schlafzimmer
10 cm
minimum
chambre
bedroom
Schlafzimmer
2
sous-sol
underground
Keller
1 Un seul niveau - only for one floor - nur eine Etage
2 Plusieurs étages - for many floors - fur mehere Etagen
Emplacements pour les
détecteurs de fumée
Minimal Installation / Installation minimale
Minimale Installation
Smoke detectors locations
Optional Installation / Installation optimale
Optimale Installation
Stellen für die Rauchdetektoren
42
acceptable
Fig. 2
side
wall
43
3
Safety instructions
CAUTION !
• D
o not position the BW 1.2 in damp places, e.g. close to a water outlet,
or a heat source such as a radiator, cooking top or oven...
• N
ever allow the BW 1.2 to get wet and never spray liquids towards it
• O
nly mount the BW 1.2 on the ceiling and/or wall (see diagram in section 2)
• D
o not use outdoors
• D
o not use the BW 1.2 for emergency exits
• D
o not cover the openings. Do not insert objects in the product’s openings
or slots
• D
o not use with electrical sockets or connectors which are not designed
for this type of bulb
• D
o not install in closed fixtures which restrict the flow of air and/or prevent
the correct dissipation of heat
• Do not open the BW 1.2 except to install the battery, doing so will void
the guarantee and may damage the product
• D
o not install in places infested with insects or in dusty places (dust
particles may trigger false alarms)
• D
o not install in zones in which there are significant temperature variations
44
Do not install in garages; vehicles release combustion products when they
are started
• A
void direct eye contact with the light beam and avoid looking directly at
the lamp for long periods. This is a Group 1 product pursuant to the IEC/
EN62471 standard
• T
he battery may explode or cause injury if disassembled, recharged or
exposed to water, flames or elevated temperatures
• K
eep the product out of the reach of children. If swallowed seek medical
attention urgently.
• D
o not install this product in kitchens, or at least 900 mm from
the following:
- the kitchen entrance door
- a bathroom fitted with a bath or shower
- mechanical ventilation ducts used for heating or cooling
- central ventilation grills in ceilings
• T
he BW 1.2 is heavier than “conventional” bulbs; this may cause light fittings
to become slightly unstable. Make sure light fittings are firmly fastened
to ceilings.
• 45
4
Maintenance
The product should be maintained by removing it and cleaning it with a dry
cloth, do not use detergent products to prevent the risk of electrocution.
Clean the product at least twice a year.
5
Installation instructions
Fig. 3
Fig. 5
Fig. 4
12
9
2
SEcondss
46
6
47
Installation instructions
per second for 3 consecutive times and then every second and a half.
The indicator light will show red.
Your bulb can then be screwed into a fixture (E27 type) suitable for your ceiling
(diagram in fig.5) and can be turned on simply by flicking the switch.
B/ INSERTING AND REPLACING THE BATTERY
Lift the cover on the bulb to open the battery
compartment
the CR123 battery must be inserted in the
correct orientation (+/- polarity)
Fig. 6 diagram
(opening the bulb’s cover)
Fig. 6 diagram
(inserting the battery and position)
+
A/ ACTIVATING THE PRODUCT
• C
arefully remove the product from its packaging.
• B
egin by activating the detector-alarm function.
- IMPORTANT: Do not connect the BW 1.2 without having
activated the smoke detector as per the instructions below
- Pull out the tab on the bulb in order to activate the battery (as shown
in diagram 3); the green indicator will turn on once the tab has been
removed. If it does not, go to Section B Inserting and Replacing the Battery.
- Press the test button located by the green indicator light for 2 seconds
(as shown in diagram 4).
- The light will turn red and an audible signal will sound twice per second
three consecutive times confirming that the electrical circuit has
been made and that the alarm and the battery are in correct working
order. This signal indicates that the smoke detector has been correctly
initialised. The light should return to green after the test.
- The smoke detector and alarm is now active.
Note: When smoke is detected, an 85 dB audible alarm will sound 2 times
-
5
-
+
• 48
Fig. 6
49
5
Installation instructions
If the indicator light flashes red and green and the alarm sounds briefly, the
battery must be replaced immediately.
• L
ift the cover using a suitable screwdriver as shown above (Fig. 6).
• G
ently remove the used battery.
• R
eplace it with a new battery of exactly the same type
(3V CR 123 lithium battery)
• T
he battery must be inserted in the correct orientation (+/- polarity)
• R
eplace the cover on the bulb .
• P
ress the test button located by the green indicator light for 2 seconds
(as shown in Fig. 4).
• T
he light will turn red and an audible signal will sound twice per second
three consecutive times confirming that the electrical circuit has been made
and that the alarm and the battery are in correct working order.
This signal indicates that the smoke detector has been correctly initialised.
The light should return to green after the test.
• T
he smoke detector and alarm is now active.
• C/ TEST THE DETECTOR ONCE A WEEK
• Press
the test button located by the green indicator light for 2 seconds (as
shown in Fig. 4).
• The
light will turn red and an audible signal will sound twice per second
three consecutive times confirming that the electrical circuit has been made
and that the alarm and the battery are in correct working order. This signal
indicates that the smoke detector has been correctly initialised. The light
should return to green after the test.
• The
smoke detector and alarm is now active.
• If the indicator light starts flashing red and green and an audible signal
sounds briefly (once per second), this is warning you that the battery must
be immediately replaced as shown in Section B) Inserting and Replacing
the Battery
• If the indicator light flashes red and green and the alarm sounds briefly
(twice per second), this is warning you that the smoke detector is defective.
You should then contact the Bell & Wyson customer care department
and replace the defective detector while it is being repaired, if necessary.
In this event please see Section 9, Customer Care.
Only replace the battery with a brand new one. The battery terminals
must never be short-circuited. This should only be done by an adult.
• 50
51
6
Limitations of smoke detectors
PLEASE READ CAREFULLY
• P
rotection against fire in residential premises mainly relies on the
occupants being provided with an early warning of the need to evacuate,
as well as the occupants following pre-planned evacuation procedures.
While a correctly functioning smoke detector increases the chances of
surviving a potentially fatal fire, the victims may be too close to the fire,
too old or too young, or physically or mentally handicapped, making it
impossible for them to evacuate even though they have received the
early warning. Other strategies, such as in-situ protection or assisted
evacuation will be required.
• D
omestic fires develop in different ways and are often unpredictable, an
incorrectly positioned smoke detector may not always detect a fire.
It is for this reason that we recommend you position BW 1.2 products
and other compliant smoke detectors in the locations shown in Chapter 2,
RECOMMENDED POSITIONS FOR THE BW 1.2
• B
attery-operated products must be fitted with a battery of the correct
type, they must be in working order and have been installed correctly
(Chapter 5 INSTALLATION INSTRUCTIONS)
• A
mains-powered product which does not have a backup battery will not
work if the mains power is cut.
52
Smoke detectors must be tested at least once a week to check that the
alarm circuit is functioning correctly and that the battery is charged.
• T
he smoke detector may not work if it is obstructed or, in general,
if it cannot detect smoke due to poor positioning affecting its operation.
It should be noted that the BW 1.2 is not able to detect fires developing
within chimneys, within wall spaces, on roofs, on the other side of a
closed door, or on a different floor.
• I f the BW 1.2 product is installed outside of a bedroom or on a different
floor, it may not wake a person in a deep sleep, a person who is hearing
impaired, or a person sleeping with ear plugs.
• C
onsumption of alcohol or drugs may also affect the ability to hear
an alarm. For maximum protection, always install smoke detectors in
every bedroom and on every floor of the house.
• W
hile smoke detectors help to save lives and provide an early warning of
a fire, they do not replace a good insurance policy. Owners and tenants
must be properly insured in order to be fully protected.
• 53
7
Install and maintain extinguishers on every floor of the house, in the
kitchen, the basement and in the garage. Learn how to use extinguishers
before an emergency arises.
• D
raw plans of each floor showing all doors and windows with at least
two emergency exits from each room. Ropes or chain ladders should be
provided for first floor windows.
• B
ring together the whole family and explain the evacuation plan and what
each should do in the event of a fire.
• C
hoose a meeting point outside the house where everyone should go in
the event of a fire.
• F
amiliarise each member of the family with the detector siren and tell
them to leave the house when the alarm sounds.
• C
onduct a fire drill every six months, especially at night. These drills will
allow all occupants to test the plan before an emergency arises.
• R
ecent studies have shown that smoke detectors may not wake all individuals
sleeping in the house, it is therefore the responsibility of each capable member
of the family to help others and to wake anyone who has not been woken by
the alarm, as well as those incapable of evacuating the house without help.
• 54
8
Safety plan
What to do when the alarm sounds ?
Alert all members of the family, especially any young children and seniors
in the house.
• I mmediately leave the house as per your evacuation plan. Every second
counts. Do not waste time getting dressed or collecting valuable items.
• D
o not open any internal door without first touching its surface. Do not
open the door if it is hot or if smoke is escaping around the edges. Use
another exit as specified in your plan. If the door is not hot, place your
shoulder against the door, open it slowly but be ready to close it again
quickly if smoke and/or heat enter the room you are in.
• K
eep your face close to the floor if the air is filled with smoke. Do not breathe
deeply and cover your mouth and nose with a damp cloth if possible.
• O
nce outside, go to the pre-selected assembly point and make sure
everyone is present.
• C
all the fire brigade from your neighbour’s house or your mobile phone
once outside. Do not call them from your own home.
• Do not re-enter the house until authorised to do so by the fire brigade.
• 55
8
What to do when the alarm sounds ?
Smoke detectors may be unable to protect you from fire under certain
situations. For example :
1. Smoking in bed
2. Leaving children alone in the house
3. Using flammable cleaning fluids such as petrol
• 56
9
Customer care and guarantee
CUSTOMER CARE
• F
or all information relating to certified products, installation conditions
and maintenance please go to the website www.bellandwyson.com
GUARANTEE
• B
ell & Wyson guarantee the BW 1.2 bulb against physical and
manufacturing defects, under normal use, for a period of 2 years (in
EU countries). This guarantee takes effect on the date the product is
purchased by the first buyer. Under the terms of the limited guarantee, if a
fault arises and Bell & Wyson receive a claim during the guarantee period,
Bell & Wyson may, at their discretion and within the limits authorised
by law, repair the product using new or refurbished spare parts, or
exchange the product for a new or refurbished product. In the event a
fault arises within the limits authorised by law, this procedure will be your
sole recourse. Products and spare parts are guaranteed for the original
product’s remaining guarantee period, or for 30 days if the remaining
guarantee period is shorter.
• W
hen a product or a part of a product is exchanged, all exchanged items
will become your property and the replaced items will become the
57
9
Customer care and guarantee
property of Bell & Wyson. Parts provided by Bell & Wyson within the scope
of their guarantee obligations must be used in the products associated with
the guarantee claim.
INSTRUCTIONS
To obtain the guarantee service you must send the product postage-paid
in its original packaging, or in packaging which provides the same level of
protection, to the address provided by Bell & Wyson, during the guarantee
period, accompanied by a detailed written description of the defect and
proof of purchase.
Pursuant to current legislation, Bell & Wyson may ask you for proof of
purchase and/or to register the product in order to benefit from the
guarantee. It is your responsibility to keep all information, software and
other documents needing to be registered or kept concerning the product
or relating to it. Software data and other documents are likely to be lost or
reformatted during repair procedures. Bell & Wyson may not be held liable
for any damage or loss in this regard. To obtain special instructions for the
procedure for obtaining a guarantee service for the product, go to the web
page www.bellandwyson.com/support.
58
EXEMPTIONS AND LIMITATIONS
The limited guarantee only applies to products manufactured by or for Bell
& Wyson and identified by the Bell & Wyson mark or trademark or by the
logo appearing on it.
The limited guarantee does not apply to consumables (batteries for
example) or software, even if delivered or sold with the product or
contained within it. Please refer to the licenses accompanying software for
further information on the rights of users.
Bell & Wyson waives all responsibility in the event of damages caused
by failure to comply with instructions relating to the use of the product or
arising from the use of incorrect electrical power sources. The guarantee
will not apply to products which have been modified (for example,
modifications to functionality or capabilities) by a person not approved by
Bell & Wyson.
59
9
Customer care and guarantee
Furthermore, the limited guarantee does not apply to defects or damage
caused by the use of products not made by Bell & Wyson, by accidents,
by abuse, by incorrect use, by flooding, by fire, by earthquakes or any
other external cause or abnormal situation, by use of the product beyond
the authorised uses and conditions for use described by Bell & Wyson, or
by use of an incorrect voltage or electrical power supply, or by technical
intervention on the product (including upgrade and extension) executed
by a person not approved by Bell & Wyson. Recovery and re-booting of
software programs and user data are not covered by this limited guarantee.
This guarantee does not cover postage costs incurred by Bell & Wyson;
these must be paid by you. No retailer, agent or employee of Bell & Wyson
is authorised to modify, extend or add to this limited guarantee. If one of the
clauses in this document is deemed to be illegal or inapplicable, the legality
or applicability of the other clauses will not be affected in any way.
EXCLUSIVE GUARANTEES
The guarantees stipulated in this document are exclusive guarantees
provided by Bell & Wyson and, unless prohibited by applicable legislation in the
country of sale, all other express and implied guarantees are hereby excluded.
60
LIMITATION OF DAMAGES
Unless prohibited by applicable legislation, Bell & Wyson may not be held
liable for incidental, indirect, specific or consequential damages resulting
from the use of the product or a breach of the guarantees or the express
and implied terms, regardless of the legal basis cited, unless prohibited
by applicable legislation.
61
9
Customer care and guarantee
SUMMARY TABLE OF VISIBLE AND AUDIBLE INDICATORS
Indicator Light
Audible Signal
Diagnostics
Action
Continuous
green light
None
Your device is
working correctly
None
Continuous
red light
85 dB audible alarm
sounds 2 times
persecond for 3
consecutive times
and then every
second and a half
Smoke detection
Follow the instructions
in the event of fire
Continuous red
light for
6 seconds
Audible alarm sounds 2
times per second for 3
consecutive times
Operation test in
progress
None if test is OK
Light flashing
green and red
Audible alarm sounds
once per second
Defective battery
The battery must
be replaced
Light flashing
green and red
Audible alarm sounds
twice per second
Smoke detector is
damaged or defective
The product must
be repaired
©2014 Bell & Wyson SAS. All rights reserved. The Bell & Wyson logo and all associated logos, designs and
trademarks are the property of Bell & Wyson. All other trademarks and registered marks are the property
of their respective owners.
62
63
ALL Installation
1
Entfernen Sie den
Sicherungsstreifen um
die Batterie zu aktivieren.
Sobald Sie diesen entfernt haben
leuchtet die Anzeige grün.
2
12
9
2
SEkunDEN
2
64
Drücken Sie den Testschalter für 2 Sekunden.
Die Anzeige wird rot und piept für 6 Sekunden.
Der elekrische Kreis ist geschlossen, der
Rauchmelder ist aktiv. Nach dem Test wird die
Anzeige wieder grün
3
3
6
Drehen Sie einfach die
Glühbirne (E27 Typ) ein,
drücken Sie den AN
Schalter und geniessen
Sie Ihr Licht
65
ALL Batterie ersetzen
Um die Batterie
zu ersetzen, drücken
Sie vorsichtig auf die
Triangel und benutzen
einen geeigneten
Schraubenzieher um
die Abdeckung
zu öffnen.
1
-
Ersetzen Sie die
Batterie vorsichtig
-
+
Ersetzen Sie die Batterie
durch eine neue des
gleichen Types (3V CR
123 lithium battery)
Die Batterie muss korrekt
nach + - Polen eingesetzt
werden
4
Um die Abdeckung
wieder anzubringen,
drücken Sie vorsichtig in
Ihre Ursprungsposition.
Sie hören ein leichtes
klicken. Die Abdeckung
schließt bündig ab.
-
+
2
+
3
66
67
ALL Deutsch Benutzerhandbuch BW 1.2
LED-Lampe + eingebaute Rauchdetektor-Warnanlage
Art. BW 1.2
Strichcode: 3700789292470
Inhalt der Verpackung
•
1 LED-Lampe mit eingebauter Rauchdetektor-Warnanlage
•
1 Lithium-Akku 3 V CR 123
•
1 Benutzerhandbuch
Vielen Dank für den Kauf dieses Produkts, das Sie mit seiner innovativen Konzeption
und seinem Design voll zufrieden stellen wird. Neben der Leichtigkeit seiner Installation,
werden Sie ein 2-in-1-Produkt zu schätzen wissen, das Design mit Sicherheit
kombiniert.
Die BW 1.2 ist außerdem eine Lampe, mit der Sie dank ihrer LED-Technologie Energie
sparen können, und bietet dazu noch eine fotoelektrische Rauchdetektor-Warnanlage,
die für Sicherheit in Ihrem Wohnbereich sorgt.
Unser Produkt enthält keine radioaktiven Substanzen. Seine CE-Kennzeichnung
bescheinigt seine Übereinstimmung mit den europäischen Richtlinien sowie mit den
Besonderheiten der Norm EN 14 604 in Zusammenhang mit der Richtlinie 89/106/
EWG für die Rauchdetektor-Warnanlagenfunktion und den Besonderheiten der Norm EN
62471 für ihre LED-Lampenfunktion.
Wir sind ständig um die Wahrung unserer Umwelt bemüht, und Bell & Wyson ist Mitglied
einer Umweltorganisation für die Aufbereitung des Abfalls ihrer Produkte.
INFORMATION
Speichern Sie das Beschaffungszertifikat bei der Online-Registrierung
www.bellandwyson.com , welches Sie später Ihrer Versicherung vorlegen
können, sofern gefordert.
68
Dieses Symbol
, das Sie auf dem Produkt oder seiner Verpackung finden werden,
zeigt an, dass es nicht mit dem Hausmüll entsorgt werden soll. Sie müssen es bei einer
Sammelstelle für das Recycling von Elektro- und Elektronikgeräten abgeben:
• bei den Verkaufsstellen, wenn Sie ein gleichwertiges Produkt erwerben
• bei den Sammelstellen, die Ihnen an Ihrem Wohnort zur Verfügung stehen
(Sammelstelle, selektive Sammelsysteme usw.)
69
ALL
1
Präsentation der BW1.2
Produktbeschreibung
LED-Lampe 9 W (75 Watt 800 Lm) mit eingebauter Rauchdetektor-Alarmanlage
• Fotoelektrische Detektion (bei langsamer Verbrennung schnelles Verfahren)
• Typ der Montage: an der Decke oder an der Wand (siehe unten stehende Skizze)
• Stromversorgung: innerhalb der Vorrichtung (Batterie wird mitgeliefert) und/oder
Netzstrom 110 -220 V
• nicht für Wohnmobile geeignet
• Beleuchtungswinkel 180 Grad
• Funktioniert mit einem Standard-Ein-/Ausschalter
• Wärme t Kelvin (2700 K-), IRC >80+
• Lebensdauer der Lampe: etwa 40.000 Stunden
• Fassung E27 (ein Adapter für andere Fassungsformate ist im Handel erhältlich)
• Akustischer Alarm > 85 dB+ in 3 m Entfernung
• Lithiumbatterie (für den Rauchdetektor) 3 V CR 123
• Autonomie der Batterie: ca. 5 Jahre
• Autonome Alarmanzeige
• Akustischer Alarm (für den Rauchdetektor im Fall einer leeren Batterie oder bei Brand)
• Leuchtanzeige (für den Rauchdetektor blinkend bei leerer Batterie oder ständig
leuchtend für ordnungsgemäßen Betrieb)
• Testknopf (für den Rauchdetektor)
• Abmessungen: 150 mm (h), 80 mm (b)
• Gewicht: (ca.) 210 g
• Garantie: 2 Jahre
7
•
70
8
5
4
6
2
3
1
Abb. 1
1
Alarm > 85 dB 3 meter
2
Prüfttaste für Rauchmelder
3
Prüftlicht für Rauchmelder
4
E 27
5
LED 800 lm
6
180°
7
Abdeckung öffnen, um Zugang zu den
Batterien zu haben
8
Ort um die Batterien installieren
WARNUNG! Es muss vermieden werden, die Lampe
anzubringen, solange die Lithiumbatterie für den
Rauchdetektor nicht installiert wurde. Das Entfernen
der Batterie deaktiviert den Rauchdetektor.
WICHTIG! Bitte lesen Sie diese Anweisungen
aufmerksam, bevor Sie mit der Installation
beginnen. Verwahren Sie diese Anweisungen
während der gesamten Lebensdauer des Produkts,
um sie später noch einsehen zu können.
ACHTUNG! Die Batterie kann explodieren
oder Verletzungen verursachen, wenn sie
auseinandergenommen, aufgeladen oder Wasser,
Feuer oder hoher Temperatur ausgesetzt wird.
Verwahren Sie sie für Kinder unerreichbar. Bei
Verschlucken unverzüglich einen Arzt aufsuchen.71
2
Empfohlene positionen für die BW 1.2
Installieren Sie zwei Rauchdetektoren an den zwei Enden eines Gangs oder
eines großen Zimmers (mehr als 9 m).
• D
ie BW 1.2 wird vorrangig mit der Öffnung des Detektors zum Boden
zeigend installiert. Es besteht die Möglichkeit der Installation an einer
Wand, solange die Entfernungen von der Decke, der Mauer und dem Boden
eingehalten werden (siehe Skizze).
• I nstallationsstelle in Ihrem Wohnraum
- Positionieren Sie die BW 1.2 in der Nähe der Zimmer. Versuchen Sie, den
Fluchtweg zu überwachen, die Zimmer sind im Allgemeinen Räume, die
vom Ausgang am weitesten entfernt sind.
- Falls die Zimmer in mehreren Zonen verteilt sind, positionieren Sie einen
Rauchdetektor in jeder Zone.
- Positionieren Sie einen oder mehrere Rauchdetektoren im Treppenhaus,
denn Treppen wirken für Rauch und Hitze wie Kamine.
- Positionieren Sie mindestens einen Rauchdetektor auf jeder Etage.
- Positionieren Sie einen Rauchdetektor in jedem Raum, in dem Sie
Elektrogeräte (zum Beispiel tragbare Heizung) verwenden.
• INSTALLATION
• S
ie müssen die BW 1.2 in Abhängigkeit von den Positionen, die dem
Gebrauch eines Rauchdetektors entsprechen, installieren.
• W
enn Sie die Lampe an der Decke installieren, positionieren Sie sie
mindestens 100 mm von der Wand beabstandet (siehe unten stehende Skizze).
• B
ei der Installation an einer Wand, wählen Sie eine Innenwand aus und
installieren die BW 1.2 mindestens 100 mm und maximal 305 mm von
der Decke entfernt.
Decke
1
cuisine
kitchen
Küche
chambre
chambre
bedroom
bedroom
Schlafzimmer Schlafzimmer
couloir
corridor
salon
Korridor
living room
Wohnzimmer
chambre
bedroom
Schlafzimmer
cuisine
kitchen
Küche
sous-sol
underground
Keller
10 cm
minimum
Platz ohne
Luftzirkulation
Niemals
Betzer Platz
en zu haben
30,5 cm
maximum
chambre
bedroom
Schlafzimmer
chambre
bedroom
Schlafzimmer
10 cm
minimum
chambre
bedroom
Schlafzimmer
2
1 Un seul niveau - only for one floor - nur eine Etage
2 Plusieurs étages - for many floors - fur mehere Etagen
Emplacements pour les
détecteurs de fumée
Minimal Installation / Installation minimale
Minimale Installation
Smoke detectors locations
Optional Installation / Installation optimale
Optimale Installation
Stellen für die Rauchdetektoren
72
Abb. 2
akzeptabel
Seitenwand
73
2
74
Empfohlene positionen für die BW 1.2
- Positionieren Sie einen Rauchdetektor in jedem Raum, in dem eine
Person bei geschlossener Tür schläft. Die geschlossene Tür kann die
Alarmfunktion des Rauchdetektors, der sich nicht in dem Raum befindet,
zum Wecken dieser Person verhindern.
- Wenn Sie das Produkt in der Mitte eines Raums befestigen, kann der
Rauchdetektor das Volumen gut absichern.
3
Sicherheitshinweise
ACHTUNG !
• P
ositionieren Sie die BW 1.2 nicht an feuchten Stellen, zum Beispiel in der
Nähe eines Wasserhahns, oder in der Nähe einer Wärmequelle, wie zum
Beispiel ein Heizkörper, ein Kochherd, ein Backofen usw.
• D
ie BW 1.2 darf auf keinen Fall nass werden, Spritzen Sie keine
Flüssigkeit in ihre Richtung.
• P
ositionieren Sie die BW 1.2 nur an der Decke und/oder an der Wand
(siehe Skizze in Abs. 2).
• N
icht im Freien installieren.
• V
erwenden Sie die BW 1.2 nicht für Notausgänge.
• V
erschließen Sie ihre Öffnungen nicht. Stecken Sie keine Gegenstände in
die Öffnungen oder Schlitze des Produkts.
• I nstallieren Sie das Produkt nicht mit Steckdosen oder elektrischen
Anschlüssen, die nicht für diese Art von Lampe vorgesehen sind.
• I nstallieren Sie dieses Produkt nicht in geschlossenen Vorrichtungen,
die den Luftstrom einschränken und/oder eine korrekte Wärmeableitung
verhindern.
• Ö
ffnen Sie die BW 1.2 mit Ausnahme des Batteriefachs nicht, das Öffnen
kann das Produkt beschädigen und die Garantie annullieren.
75
3
Sicherheitshinweise
Nicht an Orten installieren, an welchen sich Insekten aufhalten, nicht in
staubiger Umgebung installieren (Staubpartikel können zu Fehlalarmen führen).
• N
icht in einer Zone installieren, in der die Temperaturen stark schwanken.
• N
icht in einer Garage installieren, beim Anlassen von Fahrzeugen werden
Verbrennungsprodukte freigesetzt.
• V
ermeiden Sie jeden direkten Augenkontakt mit dem Lichtstrahl und
blicken Sie nicht während längerer Zeit direkt auf die Lampe. Dieses
Produkt gehört gemäß der Norm IEC/EN62471 zur Gruppe 1.
• D
ie Batterie kann explodieren oder Verletzungen verursachen, wenn
sie auseinandergenommen, aufgeladen oder Wasser, Feuer oder hoher
Temperatur ausgesetzt wird.
• F
ür Kinder unerreichbar verwahren. Bei Verschlucken der Batterie
unverzüglich einen Arzt aufsuchen.
• I nstallieren Sie dieses Produkt nicht in der Küche oder in einer Entfernung
von weniger als 900 mm von den folgenden Stellen:
- E ingangstür zu einer Küche,
-B
adezimmer mit Badewanne oder Dusche,
- K anäle mit mechanischer Belüftung für Heizung oder Kühlung,
-B
elüftungsgebläse an der Decke oder in zentraler Lage.
• 76
Die Lampe BW 1.2 ist schwerer als „herkömmliche“ Lampen. Dieser
Gewichtsunterschied kann an dem Beleuchtungskörper zu einer gewissen
Instabilität führen. Die gute Befestigung des Beleuchtungskörpers an der
Decke muss unbedingt geprüft werden.
• 77
4
Instandhaltung
Zur Instandhaltung wird das Produkt abgesteckt und dann mit einem
trockenen Tuch ohne Waschmittel gereinigt, um jede Gefahr eines
elektrischen Schlages zu vermeiden. Das Produkt muss mindestens zweimal
jährlich gereinigt werden.
5
Anweisungen für die installation
Abb. 3
Abb. 5
Abb. 4
12
9
2
s
SEkunDEN
78
6
79
Anweisungen für die installation
80
hintereinander ein akustischer Alarm mit einem Schallpegel von 85 dB,
danach alle eineinhalb Sekunden. Die Anzeigelampe leuchtet weiterhin rot.
Danach schrauben Sie die Lampe in die Fassung (Typ E27) Ihrer Deckenleuchte
(Skizze Abb. 5) und können dann die Beleuchtung uneingeschränkt durch
einfaches Drücken auf den Schalter verwenden.
B/ EINFÜGEN UND ERSETZEN DER BATTERIE
• Öffnen Sie die Abdeckung der Glühbirne
um an die Batterie zu kommen
Die Batterie CR123 muss in die richtige um
richtung eingesetzt werden (Polung +/-)
Skizze Abb. 6
(Öffnen Sie die Abdeckung der Glühbirne)
Skizze Abb. 6
(Lage und Einfügen der Batterie)
+
A/ AKTIVIERUNG DES PRODUKTS
• N
ehmen Sie das Produkt vorsichtig aus seiner Verpackung.
• S
ie müssen mit dem Aktivieren der Rauchdetektor-Warnanlagenfunktion beginnen.
- WICHTIG: Schließen Sie die BW 1.2 nicht an, bevor Sie den
Rauchdetektor unter Einhaltung der folgenden Anweisungen
aktiviert haben.
- Ziehen Sie an der Lasche, die sich auf der Lampe befindet, um die
Batterie zu aktivieren (wie auf Skizze 6 angezeigt), sobald die Lasche
herausgezogen wurde, schaltet sich die grüne Anzeigelampe ein.
Anderenfalls sehen Sie bitte in Abschnitt B Einfügen und Ersetzen der
Batterie nach.
- Drücken Sie 2 Sekunden lang auf den Testknopf, der sich im Bereich der
grünen Anzeigelampe befindet (wie auf Skizze 4 gezeigt).
- Die Anzeigelampe wird dabei rot und ein akustisches Signal ertönt
zweimal pro Sekunde dreimal nacheinander und bestätigt, dass der
Stromkreis, die Sirene und die Batterie in perfektem Betriebszustand
sind. Dieses Signal zeigt an, dass die Inbetriebnahme des
Rauchdetektors richtig vorgenommen wurde. Nach diesem Test schaltet
die Anzeigelampe auf Grün.
- Die Rauchdetektorfunktion ist jetzt aktiv.
Hinweis: Beim Erfassen von Rauch ertönt zweimal pro Sekunde dreimal
-
5
-
+
Abb. 6
81
5
Anweisungen für die installation
Falls die Anzeigelampe abwechselnd rot und grün zu blinken beginnt und
der akustische Alarm vorübergehend kurz eingeschaltet wird, müssen Sie
die Batterie so schnell wie möglich ersetzen.
• Ö
ffnen Sie die Abdeckung mit einem geeigneten Schraubenzieher, siehe
Abbildung) (Abb. 6) ab.
• N
ehmen Sie die leere Batterie vorsichtig heraus.
• E
rsetzen Sie sie mit einer neuen Batterie des gleichen Typs (Lithiumbatterie
3 V CR 123).
• D
ie Batterie muss in die richtige Richtung (Polung +/-) eingelegt werden.
• S
etzen Sie die Abdeckung wieder ein.
• D
rücken Sie 2 Sekunden lang auf den Testknopf, der sich im Bereich der
grünen Anzeigelampe befindet (wie auf Skizze 4 gezeigt).
• D
ie Anzeigelampe wird dabei rot und ein akustisches Signal ertönt zweimal
pro Sekunde dreimal nacheinander und bestätigt, dass der Stromkreis, die
Sirene und die Batterie in perfektem Betriebszustand sind. Dieses Signal
zeigt an, dass die Inbetriebnahme des Rauchdetektors richtig vorgenommen
wurde. Nach diesem Test schaltet die Anzeigelampe auf Grün.
• D
ie Rauchdetektorfunktion ist jetzt aktiv.
• B
eim Ersetzen der Batterie muss eine neue Batterie verwendet werden.
Die Klemmen einer Batterie dürfen nicht kurz geschlossen werden.
Dieser Vorgang muss von einem Erwachsenen ausgeführt werden.
• 82
C/ TESTEN SIE DEN RAUCHDETEKTOR EINMAL WÖCHENTLICH
• Drücken Sie 2 Sekunden lang auf den Testknopf, der sich im Bereich der
grünen Anzeigelampe befindet (wie auf Skizze 4 gezeigt).
• D
ie Anzeigelampe wird dabei rot und ein akustisches Signal ertönt zweimal
pro Sekunde dreimal nacheinander und bestätigt, dass der Stromkreis, die
Sirene und die Batterie in perfektem Betriebszustand sind. Dieses Signal
zeigt an, dass die Inbetriebnahme des Rauchdetektors richtig vorgenommen
wurde. Nach diesem Test schaltet die Anzeigelampe auf Grün.
• D
ie Rauchdetektorfunktion ist jetzt aktiv.
• Falls die Anzeigelampe abwechselnd rot und grün zu blinken beginnt und
das akustische Signal kurz (einmal pro Sekunde) ertönt, weist das darauf
hin, dass die Batterie so schnell wie möglich, wie in Abschnitt B) „Einsetzen
und Ersetzen der Batterie“ angegeben ersetzt werden muss.
• F
alls die Anzeigelampe abwechselnd rot und grün zu blinken beginnt und
der akustische Alarm vorübergehend kurz eingeschaltet (zweimal pro
Sekunde) wird, ist der Rauchdetektor defekt. In diesem Fall müssen Sie sich
an den Kundendienst von Bell & Wyson wenden und gegebenenfalls den
schadhaften Detektor während der Zeit, in der er eventuell repariert wird,
ersetzen. Bitte sehen Sie in diesem Fall im Abschnitt 9 „Kundendienst“ nach.
83
6
Einschränkung der rauchdetektorfunktion
BITTE AUFMERKSAM LESEN
• Der Brandschutz in Wohnräumen beruht in der Hauptsache auf
dem frühzeitigen Verständigen der Bewohner, dass sie die Räume
verlassen müssen, sowie auf der Überwachung dieser Letzteren bei
der Evakuierung. Obwohl ein funktionierender Rauchdetektor die
Überlebenschancen bei einem potentiellen fatalen Brand erhöht, sind
die Opfer oft dem Brand zu nahe, zu alt oder zu jung oder auch physisch
oder geistig behindert, so dass sie nicht in der Lage sind, zu fliehen, auch
wenn sie für eine Evakuierung früh genug gewarnt wurden. Für diese
Personen sind andere Strategien erforderlich, wie zum Beispiel Schutz an
Ort und Stelle oder Evakuierung mit Unterstützung.
• H
aushaltsbrände entwickeln sich auf unterschiedliche Arten und sind oft
unvorhersehbar. Ein schlecht positionierter Detektor ist nicht immer in
der Lage, einen Brand zu melden. Wir empfehlen daher, die Produkte BW
1.2 oder andere konforme Branddetektoren an Stellen wie in Kapitel 2
„EMPFOHLENE POSITIONEN FÜR DIE BW 1.2“ angegeben, zu platzieren.
• E
in Produkt, das mit einer Batterie funktioniert, muss mit einer Batterie
des empfohlenen Typs ausgestattet werden, die in Betriebszustand und
richtig installiert ist (Kapitel 5) ANWEISUNGEN FÜR DIE INSTALLATION
• E
in mit Netzstrom versorgtes Produkt ohne Notbatterie funktioniert beim
Ausfallen des Stroms nicht mehr.
84
Testen Sie das Funktionieren der Rauchdetektion einmal pro Woche,
um sicherzugehen, dass die Batterie und die Alarmschaltung richtig
funktionieren.
• D
ie Rauchdetektorfunktion funktioniert nicht, wenn der Detektor verstopft
ist und allgemeiner, wenn der Rauch aufgrund einer unsachgemäßen
Lage, die das gute Funktionieren verhindert, nicht erkannt werden kann.
Zu bemerken ist, dass die BW 1.2 einen Brand, der im Kamin, im Inneren
einer Mauer, auf einem Dach, auf der anderen Seite einer geschlossenen
Tür oder auf einer unterschiedlichen Etage nicht melden kann.
• F
alls das Produkt BW 1.2 außerhalb eines Schlafzimmers oder auf einer
anderen Etage platziert wurde, kann es eine Person, die tief schläft,
gehörbehindert ist und/oder ein Hörgerät trägt, das externe Geräusche
dämpfen kann, nicht wecken.
• A
lkohol- und Drogenkonsum können die Fähigkeit, einen Alarm zu hören,
ebenfalls verringern. Um für maximalen Schutz zu sorgen, muss ein
Rauchdetektor im Schlafzimmer und auf jeder Etage des Wohnraums
installiert werden.
• Obwohl Rauchdetektoren dazu beitragen, Leben zu retten, indem
sie einen Brand frühzeitig melden, können sie auf keinen Fall einen
Versicherungsvertrag ersetzen. Eigentümer und Mieter müssen zu ihrem
Schutz richtig versichert sein.
• 85
7
Installieren Sie Löschgeräte auf jeder Etage des Hauses, in der Küche,
im Untergeschoss und in der Garage. Sorgen Sie für eine regelmäßige
Instandhaltung. Machen Sie sich mit dem Gebrauch des Löschgeräts vor
dem Auftreten eines Notfalls bekannt.
• Z
eichnen Sie einen Plan der Etage und geben Sie darauf alle Türen und
Fenster und mindestens zwei Notausgänge ab jedem Raum an. Für die
Fenster auf der ersten Etage sollten Sie ein Seil oder eine ausziehbare
Leiter vorsehen.
• V
ereinen Sie die ganze Familie und erklären Sie Ihren Evakuierungsplan,
erklären Sie jeder einzelnen Person, was sie im Brandfall zu tun hat.
Wählen Sie eine Stelle im Freien aus, an der sie sich im Brandfall treffen.
• M
achen Sie jedes Familienmitglied mit der Sirene des Detektors vertraut
und trainieren Sie das Evakuieren des Hauses beim Ertönen des Alarms.
• W
iederholen Sie diese Brandübung alle sechs Monate, darunter auch
in der Nacht. Das Üben erlaubt es allen Bewohnern, Ihren Plan vor dem
Auftreten eines Notfalls zu testen.
• J
üngste Untersuchungen haben gezeigt, dass Rauchdetektoren nicht alle
schlafenden Personen wecken können, und dass jedes Familienmitglied,
das zum Helfen fähig ist, anderen, die eventuell von der Sirene nicht
geweckt wurden oder nicht fähig sind, die Zone in aller Sicherheit
selbstständig zu verlassen, zu Hilfe zu kommen sollten.
• 86
8
Sicherheitsplan
Was tut man, wenn der alarm ertönt ?
Verständigen Sie alle Familienmitglieder, insbesondere Kleinkinder und
Senioren im Haus
• V
erlassen Sie die Räume unverzüglich unter Einhaltung Ihres
Evakuierungsplans. Jede Sekunde zählt. Vergeuden Sie keine Zeit
mit Ankleiden oder Zusammentragen von Wertgegenständen.
• B
evor Sie eine Tür beim Verlassen öffnen, berühren Sie zuerst ihre
Oberfläche. Bei heißer Oberfläche oder wenn Sie Rauch, der durch Risse
durchdringt, sehen, öffnen Sie diese Tür nicht. Verwenden Sie in diesem
Fall den anderen auf ihrem Plan vorgesehenen Ausgang. Falls die Tür
nicht heiß ist, legen Sie Ihre Schulter gegen die Tür, öffnen sie leicht,
während Sie bereit bleiben, sie schnell zu schließen, falls Rauch und/oder
Hitze in den Raum, in dem Sie sich befinden, eindringt.
• W
enn die Luft bereits mit Rauch gefüllt ist, sollten Sie in Bodennähe
bleiben.
• A
tmen Sie nicht tief und, wenn möglich, bedecken Sie Mund und Nase
mit einem nassen Tuch.
• S
obald Sie im Freien sind, begeben Sie sich zum vereinbarten Treffpunkt
und prüfen Sie, ob alle anderen Personen anwesend sind.
• R
ufen Sie die Feuerwehr bei Ihren Nachbarn oder auf Ihrem Handy an, sobald
Sie sich im Freien befinden. Vermeiden Sie es, noch im Haus anzurufen.
• 87
8
Was tut man, wenn der alarm ertönt ?
Gehen Sie nicht in das Haus zurück, solange die Feuerwehr es Ihnen nicht
gestattet hat.
• E
s gibt Situationen, in welchen ein Rauchdetektor für Ihren Schutz vor
Brand nicht effizient ist. Zum Beispiel:
1. Rauchen im Bett
2. Kinder allein zuhause lassen
3. Verwenden entflammbarer Reinigungsprodukte, wie zum Beispiel Benzin
• 88
9
Kundendienst und garantie
KUNDENDIENST
Informationen in Zusammenhang mit zertifizierten Produkten, den
Installationsbedingungen sowie der Wartung, finden Sie auf der Website
www.bellandwyson.com
BESCHRÄNKTE GARANTIE
Bell & Wyson gewährt für die Lampe BW 1.2 nur eine Garantie bei Materialund Herstellungsmängeln im Rahmen eines normalen Gebrauchs während
einer Zeitspanne von zwei Jahren (in einem Land der Europäischen Union).
Diese Garantie tritt am Datum des Einzelhandelskaufs durch den ersten
Käufer der Vorrichtung in Kraft. Falls im Rahmen dieser beschränkten
Garantie eine Fehler auftreten sollte und falls Bell & Wyson während der
Laufzeit der Garantie eine Anfrage erhalten sollte, kann Bell & Wyson nach
ihrem Gutdünken und innerhalb des gesetzlichen Rahmens das Produkt
mit Hilfe neuer oder erneuerter Ersatzteile reparieren oder das Produkt
durch ein neues oder erneuertes Produkt ersetzen. Im Fall eines Mangels
innerhalb der vom Gesetz zugelassenen Limits, ist das der einzige Rekurs
des Käufers. Für ein Produkt oder ein Ersatzteil beträgt die Laufzeit der
Garantie die restliche Laufzeit des Originalprodukts oder 30 Tage, falls die
89
9
Kundendienst und garantie
restliche Laufzeit kürzer ist als diese Frist.
Beim Ersetzen eines Produkts oder eines Teils des Produkts, geht jedes
Ersatzteil in Ihren Eigentum über, und das ersetzte Element geht in das
Eigentum von Bell & Wyson über. Die von Bell & Wyson im Rahmen ihrer
Garantieverpflichtung gelieferten Teile müssen in Produkten verwendet
werden, die Gegenstand einer Reklamation im Rahmen der Garantie waren.
ANWEISUNGEN
Um Ihren Anspruch geltend zu machen, müssen Sie das Produkt mit
vorgelegter Fracht in seiner Originalverpackung oder in einer Verpackung,
die denselben Schutzgrad wie die Originalverpackung bietet, an die von Bell
& Wyson angegebene Adresse während der Laufzeit der Garantie begleitet
von einer schriftlichen, ausführlichen Beschreibung des Mangels sowie des
Kaufnachweises einsenden.
Gemäß der geltenden Gesetzgebung, kann Bell & Wyson Sie zur Vorlage
eines Kaufnachweises und/oder zur Anmeldung auffordern, bevor Sie
in den Genuss einer Garantie kommen. Es obliegt Ihnen, die Daten,
Softwareprogramme oder andere Dokumente, die Sie eventuell in
90
Zusammenhang mit dem Produkt registriert oder aufbewahrt haben, zu
speichern. Diese Softwaredaten und anderen Unterlagen gehen bei der
Reparatur höchstwahrscheinlich verloren oder werden neu formatiert. Bell
& Wyson haftet nicht für Schäden oder Verlust dieser Daten. Spezifische
Anweisungen zur Vorgehensweise der Garantieleistung für das Produkt
finden Sie auf der Website www.bellandwyson.com/support.
AUSSCHLUSS UND BESCHRÄNKUNG
Diese beschränkte Garantie gilt nur für ein von oder für Bell & Wyson
hergestelltes Produkt, das durch die Markierung oder die Handelsbezeichnung
Bell & Wyson oder durch ihr Logo identifiziert werden kann.
Die beschränkte Garantie gilt nicht für Verbrauchsgüter (zum Beispiel für
die Batterien) oder Softwareprogramme, auch wenn diese mit dem Produkt
geliefert oder verkauft werden oder in ihm enthalten sind. Informationen
entnehmen Sie bitte den Lizenzen, die die Softwareprodukte begleiten, um
mehr über Ihre Gebrauchsrechte für die Softwareprogramme zu erfahren.
Bell & Wyson lehnt jede Haftung bei Schäden ab, die sich aus der
Nichteinhaltung der Anweisungen für den Gebrauch des Produkts oder aus
91
9
Kundendienst und garantie
einer ungeeigneten Stromversorgung ergeben. Diese Garantie gilt nicht
für ein Produkt, das (zum Beispiel bei Änderungen der Funktionalitäten
oder Kapazitäten) von einem nicht von Bell & Wyson zugelassenen
Dritten geändert wurde. Außerdem gilt diese beschränkte Garantie nicht
für Mängel oder Schäden, die durch den Gebrauch von Produkten, die
nicht von Bell & Wyson stammen, einen Unfall, einen Missbrauch, einen
unsachgemäßen Gebrauch, eine Überschwemmung, einen Brand, ein
Erdbeben oder jede andere externe Ursache oder anormale Situation
hervorgerufen werden, durch den Gebrauch des Produkts außerhalb der
von Bell & Wyson zugelassenen oder vorgesehenen und beschriebenen
Zwecke und Bedingungen, den Gebrauch mit einer anderen Spannung
oder einer ungeeigneten Stromversorgung oder bei einem technischen
Eingriff an dem Produkt (inklusive Aufrüstung oder Erweiterung), der
von einem nicht von Bell & Wyson zugelassenen Dritten vorgenommen
wird. Die Rückgewinnung und Initialisierung der Softwareprogramme
und Benutzerdaten werden von dieser Garantie nicht gedeckt. Diese
Garantie deckt die Versandkosten des Produkts durch Bell & Wyson
nicht; diese Kosten trägt der Benutzer. Kein Weiterverkäufer, Vertreter
92
oder Arbeitnehmer von Bell & Wyson ist zur Änderung, Erweiterung, oder
Vervollständigung dieser beschränkten Garantie befugt. Sollte einer der
Artikel dieses Dokuments für ungesetzmäßig oder ungültig erklärt werden,
wird dadurch die Gesetzmäßigkeit oder Gültigkeit der anderen Artikel weder
beeinflusst noch verringert.
AUSSCHLIESSLICHE GARANTIEN
Die im vorliegenden Dokument stehenden Garantien sind die
ausschließlichen Garantien, die Bell & Wyson bietet, und außer falls die
im Verkaufsland geltenden Gesetze es verbieten, schließt die vorliegende
Garantie jede andere Garantie, sei sie ausdrücklich oder implizit, aus.
BESCHRÄNKUNG DER SCHÄDEN
Außer wenn die geltenden Gesetze es verbieten, haftet Bell & Wyson nicht
für Begleitschäden, indirekte, spezifische oder Folgeschäden, die sich aus
dem Gebrauch des Produkts oder durch einen Verstoß der Garantien oder
ausdrücklichen oder impliziten Bedingungen ergeben, ungeachtet der
geltend gemachten gesetzlichen Grundlage, außer wenn die geltenden
Gesetze dies verbieten.
93
9
Customer care and guarantee
ZUSAMMENFASSENDE TABELLE DER LICHT- UND AKUSTISCHEN SIGNALE
Anzeigelampe
Akustisches Signal
Diagnose
Aktion
Anzeigelampe
grün stationär
Keine
Ihr Gerät
funktioniert normal
Keine
Anzeigelampe rot
stationär
Akustischer Alarm 85
85 dB 2 pro Sekunde,
3 Mal hinter- einander,
dann alle 1,5 Sekunden
Sekunden
Rauch erfasst
Bei Auslösen bei Brand
die Anweisungen
befolgen
TEXTE MANQUANT
Akustisches Signal 2
Mal pro Sekunde 3 Mal
hintereinander
Funktionstest läuft
Wenn Test OK, keine
Anzeigelampe
rot und grün
blinkend
Akustisches Signal
einmal pro Sekunde
Batterie defekt
Batterie ersetzen
Anzeigelampe
rot und grün
blinkend
Akustisches Signal
zweimal pro Sekunde
Rauchdetektor
beschädigt oder defekt
Das Produkt
reparieren lassen
©2014 Bell & Wyson SAS. Alle Rechte vorbehalten. Das Logo sowie alle dazugehörenden Logos, Zeichnungen und Handelsbezeichnungen sind das Eigentum von Bell & Wyson. Alle anderen Handelsmarken oder
eingetragenen Warenzeichen sind Eigentum ihrer jeweiligen Eigentümer.
94
95
Design your connected life®
7 RUE DU FOSSÉ BLANC
92230 GENNEVILLIERS FRANCE
10 BLD DU PARC
92200 NEUILLY SUR SEINE FRANCE
©2014 Bell & Wyson SAS. All rights reserved. Bell & Wyson logo, and all associated logos and designs are
trademarks or registered trademarks of Bell & Wyson SAS. All others trademarks or registered trademarks are
property of their respective owners
©2014 Bell & Wyson SAS. Tous droits réservés. Le logo Bell & Wyson et tous les logos, dessins et noms
commerciaux associés sont la propriété de Bell & Wyson. Toutes les autres marques commerciales ou marques
déposées sont la propriété de leurs propriétaires respectifs.
©2014 Bell & Wyson SAS. Alle Rechte vorbehalten. Das Logo sowie alle dazugehörenden Logos, Zeichnungen und
Handelsbezeichnungen sind das Eigentum von Bell & Wyson. Alle anderen Handelsmarken oder eingetragenen
Warenzeichen sind Eigentum ihrer jeweiligen Eigentümer.
96