1
WF9854AW(A/E/F/G/H/N/V/W)
WF9852AW(A/E/F/G/H/N/V/W)
WF9850AW(A/E/F/G/H/N/V/W)
WF9854FW(A/E/F/G/H/N/V/W)
WF9852FW(A/E/F/G/H/N/V/W)
WF9850FW(A/E/F/G/H/N/V/W)
WF9854LW(A/E/F/G/H/N/V/W)
WF9852LW(A/E/F/G/H/N/V/W)
WF9850LW(A/E/F/G/H/N/V/W)
Washing Machine
user manual
imagine the possibilities
Thank you for purchasing this Samsung product.
To receive a more complete service, please
register your product at
www.samsung.com/register
WF9854LWN-02713K_EN.indd 1
2011-02-11
6:08:35
features of your new samsung
washing machine
Your new washing machine will change the way you feel about doing laundry. From
its super-size capacity to its energy efficiency, your new Samsung washing machine
has all the benefits to make washing laundry as easy and as pleasant as possible.
• Quiet Drive
Samsung’s unique Quiet Drive Motor offers a quiet wash unheard of among other washers.
The motor works without belts or gears, reducing vibration and making the washer quieter
and more durable.
• Air Refresh (selected models)
Refresh your favourite clothes simply with hot air; ideal for instance if you’ve been out on
the town in your best suit or dress and have been exposed to cigarette smoke. Rather than
having to deal with a full wash cycle or perhaps even a visit to the dry cleaner, non-stained
clothing does not need to be washed - simply refresh it. 3 different cycles are available for
various kinds of fabrics.
• Super EZ Iron (selected models)
Ironing is a major chore and takes too much time. The new super easy iron function is a
specialized laundry setting that helps eliminate wrinkles, so that you can spend less of your
valuable time ironing and your outfit looks fresh.
• Eco Drum Clean (selected models)
Using Eco Drum Clean helps to keep your washing machine clean even without any chemical
detergent or bleach. Keep your drum cleansed and odourless with this specialized cleaning
program.
• Ceramic Heater for Durability & Energy Saving (selected models)
Our truly innovative Ceramic Heater is twice as durable as regular heaters. That saves you
money on repairs, plus it eliminates the scale of hard water and saves energy.
• Silver Wash - Silver Wash Health System (Selected models)
The winning combination! Samsung’s silver technology combines the sanitizing effect of silver
with state-of-the-art science for the ultimate in clean. During a wash cycle, tiny particles of
silver from the Silver metal plates are gradually converted into silver ions through electrolysis.
Even in cold and bleach less water, the silver particles in the water remove odour causing
bacteria for a “super clean” wash. So washing in cold water is energy efficient and better for
your clothes. The Silver plates carry a warranty of ten years for 2 cycles run per week, and
these plates can easily be replaced by a Service Technician if needed.
2_ features
WF9854LWN-02713K_EN.indd Sec1:2
2011-02-11
6:08:50
• Child Lock
The Child Lock function ensures that curious little hands are kept out of your washing
machine.
This safety feature stops your children from playing with the operation of the washing
machine, and alerts you when it is activated.
• Wool Certified
The machine has been tested and passed the required Woolmark Company specification for
machine washable wool products.
Fabrics should be washed according to the instructions on the garment label as specified by
Woolmark and Samsung.
• Delay End
Delay a cycle for up to 19 hours in one-hour increments and increase the convenience of
using your washing machine especially when you have to go out.
• Quick Wash
No time to lose! Less than 30 minutes wash will give you time to run out before it’s too late.
Our 29 minute Quick Wash program can be the solution to your busy life. Now you can wash
your favourite clothes in only 29 minutes!
• Delicates & Hand Wash Program
Special care can be determined by the appropriate temperature, the gentle wash action and
the appropriate amount of water.
• Digital Graphic Display
The Digital Graphic Display control panel is clear and easy to use for minimum fuss and
hassle. And while it is easy to operate, the Digital Graphic Display enables you to make quick
and accurate adjustments to your wash for excellent washing results.
• Wide door
Extra wide door aperture for convenient viewing! Easily add and remove laundry, especially for
large sized laundry items such as bedding, towels etc.
This manual contains important information on the installation, use, and care of your new
Samsung washing machine. Refer to it for descriptions of the control panel, instructions on how
to use the washing machine, and tips for making the most of its state-of-the-art features and
functions. The “Troubleshooting and information codes” section on page 34 tells you what to
do if something goes wrong with your new washing machine.
features _3
WF9854LWN-02713K_EN.indd Sec1:3
2011-02-11
6:08:51
safety information
Congratulations on your new Samsung ActivFresh™ washer. This manual contains
important information on the installation, use and care of your appliance. Please
take time to read this manual to take full advantage of your washer’s many benefits
and features.
WHAT YOU NEED TO KNOW ABOUT SAFETY INSTRUCTIONS
Please read this manual thoroughly to ensure that you know how to safely and efficiently operate the
extensive features and functions of your new appliance and retain it at a safe place near the appliance
for your future reference. Use this appliance only for its intended purpose as described in this instruction
manual.
Warnings and Important Safety Instructions in this manual do not cover all possible conditions and
situations that may occur. It is your responsibility to use common sense, caution, and care when installing,
maintaining, and operating your washer.
Because these following operating instructions cover various models, the characteristics of your washer
may differ slightly from those described in this manual and not all warning signs may be applicable. If you
have any questions or concerns, contact your nearest service center or find help and information online at
www.samsung.com.
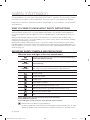
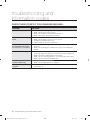
IMPORTANT SAFETY SYMBOLS AND PRECAUTIONS
What the icons and signs in this user manual mean:
WARNING
Hazards or unsafe practices that may result in severe personal injury,
death and/or property damage.
CAUTION
Hazards or unsafe practices that may result in personal injury and/or
property damage.
CAUTION
To reduce the risk of fire, explosion, electric shock, or personal injury
when using your washer, follow these basic safety precautions:
Do NOT attempt.
Do NOT disassemble.
Do NOT touch.
Follow directions explicitly.
Unplug the power plug from the wall socket.
Make sure the machine is grounded to prevent electric shock.
Call the service centre for help.
Note
These warning signs are here to prevent injury to you and others.
Please follow them explicitly.
After reading this section, keep it in a safe place for future reference.
Read all instructions before using the appliance.
As with any equipment using electricity and moving parts, potential hazards exist. To safely
operate this appliance, become familiar with its operation and exercise care when using it.
4_ features
WF9854LWN-02713K_EN.indd Sec1:4
2011-02-11
6:08:51
Do not let children (or pets) play on or in your washing machine. The washing machine door does not
open easily from the inside, and children may be seriously injured if trapped inside.
WARNING
This appliance is not intended for use by persons (including children) with reduced physical, sensory or
mental capabilities, or lack of experience and knowledge, unless they have been given supervision or
instruction concerning use of the appliance by a person responsible for their safety.
Children should be supervised to ensure that they do not play with the appliance.
If the plug (power supply cord) is damaged, it must be replaced by the manufacturer or its service
agent or a similarly qualified person in order to avoid a hazard.
This appliance should be positioned to be accessible to the power plug, the water supply tabs and the
drain pipes.
For washing machines with ventilation openings in the base, ensure that the opening is not obstructed
by carpet or any other obstacles.
Use the new hose-sets and old hose-sets should not be reused.
features _5
WF9854LWN-02713K_EN.indd Sec1:5
2011-02-11
6:08:53
safety information
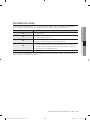
WARNING
SEVERE WARNING SIGNS FOR INSTALLATION
The installation of this appliance must be performed by a qualified technician or service
company.
- Failure to do so may result in electric shock, fire, an explosion, problems with the
product, or injury.
The appliance is heavy, take care upon lifting it
Plug the power cord into an AC 220-240V / 60Hz wall socket or higher and use the socket
for this appliance only. In addition, do not use an extension cord.
- Sharing a wall socket with other appliances using a power strip or extending the power
cord may result in electric shock or fire.
- Ensure that the power voltage, frequency and current are the same as those of the
product specifications. Failure to do so may result in electric shock or fire. Failure Plug
the power plug into the wall socket firmly.
Remove all foreign substances such as dust or water from the power plug terminals and
contact points using a dry cloth on a regular basis.
- Unplug the power plug and clean it with a dry cloth.
- Failure to do so may result in electric shock or fire.
Plug the power plug into the wall socket in the right direction so that the cord runs towards
the floor.
- If you plug the power plug into the socket in the opposite direction, the electric wires
within the cable may be damaged and this may result in electric shock or fire.
Keep all packaging materials well out of the reach of children, as packaging materials can
be dangerous to children.
- If a child places a bag over its head, it may result in suffocation.
When the appliance or power plug or power cord is damaged, contact your nearest service
centre.
This appliance must be properly grounded.
Do not ground the appliance to a gas pipe, plastic water pipe, or telephone line.
- This may result in electric shock, fire, an explosion, or problems with the product
- Never plug the power cord into a socket that is not grounded correctly and make sure
that it is in accordance with local and national codes.
Do not install this appliance near a heater, inflammable material.
Do not install this appliance in a humid, oily or dusty location, in a location exposed to direct
sunlight and water (rain drops).
Do not install this appliance in a location of low temperature
- Frost may cause tubes to burst
Do not install this appliance in a location where gas may leak.
- This may result in electric shock or fire.
Do not use an electric transformer.
- It may result in electric shock or fire.
Do not use a damaged power plug, damaged power cord or loose wall socket.
- This may result in electric shock or fire.
Do not pull or excessively bend the power cord.
Do not twist or tie the power cord.
6_ safety information
WF9854LWN-02713K_EN.indd Sec2:6
2011-02-11
6:08:53
Do not hook the power cord over a metal object, place a heavy object on the power cord,
insert the power cord between objects, or push the power cord into the space behind the
appliance.
- This may result in electric shock or fire.
Do not pull the power cord, when unplugging the power plug.
- Unplug the power plug by holding the plug.
- Failure to do so may result in electric shock or fire.
Do not lay the power cord and tubes where you may fall over them.
CAUTION
CAUTION SIGNS FOR INSTALLATION
This appliance should be positioned in such a way that it is accessible to the power plug.
- Failure to do so may result in electric shock or fire due to electric leakage.
Install your appliance on a level and hard floor that can support its weight.
- Failure to do so may result in abnormal vibrations, moves, noise, or problems with the
product.
WARNING
SEVERE WARNING SIGNS FOR USING
If the appliance is flooded, cut the water supply and power immediately and contact your
nearest service centre.
- Do not tough the power plug with wet hands
- Failure to do so may cause electric shock
If the appliance generates a strange noise, a burning smell or smoke, unplug the power
plug immediately and contact your nearest service centre.
- Failure to do so may result in electric shock or fire.
In the event of a gas leak (such as propane gas, LP gas, etc.), ventilate immediately without
touching the power plug. Do not touch the appliance or power cord.
- Do not use a ventilating fan.
- A spark may result in an explosion or fire.
Do not let children play in or on the washer. In addition, when disposing of the appliance,
remove the washer door lever.
- If trapped inside, the child may become trapped and suffocate to death.
Make sure to remove the packaging (sponge, styrofoam) attached to the bottom of the
washer before using it.
safety information _7
WF9854LWN-02713K_EN.indd Sec2:7
2011-02-11
6:08:54
safety information
Do not wash items contaminated with gasoline, kerosene, benzene, paint thinner, alcohol or
other flammable or explosive substances.
- This may result in electric shock, fire or an explosion.
Do not open the washer door by force while it is operating (high-temperature washing/
drying/spinning).
- Water flowing out of the washer may result in burns or cause the floor to be slippery.
This may result in injury.
- Opening the door by force may result in damage to the product or injury.
Do not insert your hand under the washer.
- This may result in injury.
Do not touch the power plug with wet hands.
- This may result in electric shock.
Do not turn the appliance off by unplugging the power plug while an operation is in
progress.
- Plugging the power plug into the wall socket again may cause a spark and result in
electric shock or fire.
Do not let children or infirm persons use this washer unsupervised. Do not let children climb
in the appliance
- Failure to do so may result in electric shock, burns or injury.
Do not insert your hand or a metal object under the washer while it is operating.
- This may result in injury.
Do not unplug the appliance by pulling at the power cord, always grip plug firmly and pull
straight out from the outlet.
- Damage to the cord may cause short-circuit, fire and/or electric shock
Do not attempt to repair, disassemble, or modify the appliance yourself.
- Do not use any fuse(such as cooper, steel wire, etc.) other than the standard fuse.
- When repairing or reinstalling the appliance is required, contact your nearest service
centre.
- Failure to do so may result in electric shock, fire, problems with the product, or injury.
If any foreign substance such as water has entered the appliance, unplug the power plug
and contact your nearest service centre.
- Failure to do so may result in electric shock or fire.
When the water supply hose comes loose from the faucet and floods the appliance, unplug
the power plug.
- Failure to do so may result in electric shock or fire.
Unplug the power plug when the appliance is not being used for long periods of time or
during a thunder/lightning storm.
- Failure to do so may result in electric shock or fire.
8_ safety information
WF9854LWN-02713K_EN.indd Sec2:8
2011-02-11
6:08:55
CAUTION
CAUTION SIGNS FOR USING
When the washer is contaminated by a foreign substance such as detergent, dirt, food
waste, etc., unplug the power plug and clean the washer using a damp and soft cloth.
- Failure to do so may result in discoloration, deformation, damage or rust.
The front glass may be broken by a strong impact. Take care when using the washer.
- When the glass is broken, it may result in injury.
After a water supply failure or when reconnecting the water supply hose, open the faucet
slowly.
Open the faucet slowly after a long period of non-use.
- The air pressure in the water supply hose or the water pipe may result in damage to a
part or in water leakage.
If a drain error occurs during an operation, check if there is a draining problem.
- If the washer is used when it is flooded because of a draining problem, it may result in
electric shock or fire due to electric leakage.
Insert the laundry into the washer completely so that laundry does not get caught in the
door.
- If laundry gets caught in the door, it may result in damage to the laundry or the washer,
or result in water leakage.
Ensure that the faucet is turned off when the washer is not being used.
- Ensure that the screw on the water supply hose connector is properly tightened.
- Failure to do so may result in property damage or injury.
Check if the rubber seal is not contaminated by foreign substances (waste, thread, etc).
- If the door is not closed completely, it may result in water leakage.
Open the faucet and check if the water supply hose connector is firmly tightened and that
there is no water leaking before using the product.
- If the screws or the water supply hose connector are loose, it may result in water
leakage.
To reduce the risk of fire or explosion:
- Under certain conditions, hydrogen gas may be produced in a hot water system such
as your hot water heater that has not been used for two weeks or more. HYDROGEN
GAS IS EXPLOSIVE. If your hot water system has not been used for two weeks or
more, turn on all hot water taps in your home, and let the water flow for several minutes
before using your washing machine. This will release any hydrogen gas build–up. Since
hydrogen gas is flammable, do not smoke or light an open flame during this time.
Ventilate immediately without touching the power plug if there is a gas leak.
safety information _9
WF9854LWN-02713K_EN.indd Sec2:9
2011-02-11
6:08:55
safety information
Do not stand on top of the appliance or place objects (such as laundry, lighted candles,
lighted cigarettes, dishes, chemicals, metal objects, etc.) on the appliance.
- This may result in electric shock, fire, problems with the product, or injury.
Do not spray volatile material such as insecticide onto the surface of the appliance.
- As well as being harmful to humans, it may also result in electric shock, fire or problems
with the product.
Do not place an object that generates a electromagnetic field near the washer.
- This may result in injury due to a malfunction.
Since the water drained during a high-temperature wash or drying cycle is hot, do not
touch the water.
- This may result in burns or injury.
Do not wash, spin or dry water-proof seats, mats or clothing (*) unless your appliance has a
special program for washing these items.
- Do not wash thick, hard mats even if the washer mark is on the care label.
- This may result in injury or damage to the washer, walls, floor or clothing due to
abnormal vibrations.
* Woollen bedding, rain covers, fishing vests, ski pants, sleeping bags, diaper covers,
sweat suits, and bicycle, motor cycle, car covers, etc.
Do not operate the washer when the detergent box is removed.
- This may result in electric shock or injury due to water leakage.
Do not touch the inside of the tub during or just after drying as it is hot.
- This may result in burns.
Do not insert your hand into the detergent box after opening it.
- This may result in injury as your hand may be caught by the detergent input device.Do
not place any objects (such as shoes, food waste, animals) other than laundry into the
washer.
- This may result in damage to the washer, or injury and death in the case of pets due to
the abnormal vibrations.
Do not press the buttons using sharp objects such as pins, knifes, fingernails, etc.
- This may result in electric shock or injury.
Do not wash laundry contaminated by oils, creams or lotions usually found in skincare
shops or massage clinics.
- This may result in the rubber seal becoming deformed and water leakage.
Do not leave metal objects such as a safety pin or hair pin, or bleach in the tub for long
periods of time.
- This may cause the tub to rust.
- If rust starts appearing on the surface of the tub, apply a cleansing agent (neutral) to the
surface and use a sponge to clean it. Never use a metal brush.
Do not use dry cleaning detergent directly and do not wash, rinse, or spin laundry
contaminated by dry cleaning detergent.
- This may result in spontaneous combustion or ignition due to the heat of the oxidation of
the oil.
Do not use hot water from water cooling/heating devices.
- This may result in problems with the washer.
10_ safety information
WF9854LWN-02713K_EN.indd Sec2:10
2011-02-11
6:08:55
Do not use natural hand-washing soap for the washer.
- If it hardens and accumulates inside the washer, it may result in problems with the
product, discoloration, rust or bad odors.
Do not wash large laundry items such as bedding in the washing net.
- Place socks and brassieres into the washing net and wash them with the other laundry.
- Failure to do so may result in injury due to abnormal vibrations.
Do not use hardened detergent.
- If it accumulates inside the washer, it may result in water leakage.
For washing machines with ventilation openings in the base, ensure that the opening is not
obstructed by carpet or any other obstacles.
Make sure that the pockets of all clothing to be washed are empty.
- Hard, sharp objects, such as coins, safety pins, nails, screws, or stones can cause
extensive damage to the appliance.
Do not wash clothing with large buckles, buttons, or other heavy metal.
WARNING
SEVERE WARNING SIGNS FOR CLEANING
Do not clean the appliance by spraying water directly onto it.
Do not use benzene, thinner or alcohol to clean the appliance.
- This may result in discoloration, deformation, damage, electric shock or fire.
Before cleaning or performing maintenance, unplug the appliance from the wall socket.
- Failure to do so may result in electric shock or fire.
safety information _11
WF9854LWN-02713K_EN.indd Sec2:11
2011-02-11
6:08:56
contents
SETTING UP YOUR WASHING
MACHINE
13
14
14
14
15
15
15
15
15
Checking the parts
Meeting installation requirements
Electrical supply and grounding
Water Supply
Drain
Flooring
Surrounding temperature
Alcove or closet installation
Installing your washing machine
21
21
22
24
24
24
25
26
27
29
29
29
Washing for the first time
Basic instructions
Using the control panel
Child lock
Sound off
Delay end
Washing clothes using the cycle selector
Washing clothes manually
Laundry guidelines
Detergent and additives information
Which detergent to use
Detergent drawer
CLEANING AND MAINTAINING YOUR
WASHING MACHINE
30
31
30
31
32
33
33
33
33
Eco Drum Clean
Draining the washing machine in an
emergency
Cleaning the exterior
Cleaning the detergent drawer and drawer
recess
Cleaning the debris filter
Cleaning the water hose mesh filter
Repairing a frozen washing machine
Storing your washing machine
TROUBLESHOOTING AND
INFORMATION CODES
34
35
Check these points if your washing machine...
Information codes
34
36
CYCLE CHART
36
Cycle chart
APPENDIX
37
37
37
38
Fabric care chart
Protecting the environment
Declaration of conformity
Specifications
13
WASHING A LOAD OF LAUNDRY
21
37
12_ contents
WF9854LWN-02713K_EN.indd Sec3:12
2011-02-11
6:08:56
setting up your washing
machine
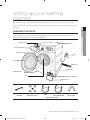
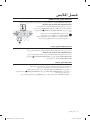
CHECKING THE PARTS
Carefully unpack your washing machine, and make sure you’ve received all of the parts shown below.
If your washing machine was damaged during shipping, or if you do not have all of the parts, contact
Samsung Customer Service or your Samsung dealer.
Release lever
01 SETTING UP
Be sure to have your installer follow these instructions closely so that your new
washing machine works properly and so that you’re not at risk of injury when doing
laundry.
Work top
Detergent drawer
Control panel
Plug
Door
Drain hose
Debris filter
Adjustable feet
Tub
Emergency drain tube
Filter Cover
Spanner
Bolt hole covers
Cold
Hot
(Selected Model)
Hose guide
Water supply hose
setting up your new washing machine _13
WF9854LWN-02713K_EN.indd Sec4:13
2011-02-11
6:08:56
setting up your washing
machine
MEETING INSTALLATION REQUIREMENTS
Electrical supply and grounding
To prevent unnecessary risk of fire, electrical shock, or personal injury, all wiring and grounding
must be done in accordance with the National Electrical Code ANSI/FNPA, No. 70 Latest
Revision and local codes and ordinances. It is the personal responsibility of the appliance owner
to provide adequate electrical service for this appliance.
WARNING
Never use an extension cord.
Use only the power cord that comes with your washing machine.
When preparing for installation, ensure that your power supply offers:
• AC 220-240V / 60Hz fuse or circuit breaker
• Individual branch circuit serving only your washing machine
Your washing machine must be grounded. If your washing machine malfunctions or breaks
down, grounding will reduce the risk of electric shock by providing a path of least resistance for
the electric current.
Your washing machine comes with a power cord having a three-prong grounding plug for use in
a properly installed and grounded outlet.
Never connect the ground wire to plastic plumbing lines, gas lines, or hot water pipes.
Improperly connecting the equipment-grounding conductor can result electrical shock.
Check with a qualified electrician or serviceman if you are unsure if the washing machine is
properly grounded. Do not modify the plug provided with the washing machine. If it does not fit
the outlet, have a proper outlet installed by a qualified electrician.
Water Supply
Your washing machine will fill properly when your water pressure is 50 kPa ~ 800 kPa. Water
pressure less than 50 kPa may cause water valve failure, not allowing the water valve to shut
off completely. Or, it may take the washing machine longer to fill than what the controls allow,
resulting in your washing machine turning off. (A fill-time limit, designed to prevent overflows/
flooding if an internal hose becomes loose, is built into the controls.)
The water taps must be within 4 feet (122cm) of the back of your washing machine for the
provided inlet hoses provided to reach your washing machine.
Most plumbing supply stores sell inlet hoses of various lengths up to 10 feet (305cm) long.
You can reduce the risk of leaks and water damage by:
• Making water taps easily accessible.
• Turning off taps when the washing machine is not in use.
• Periodically checking for leaks at water inlet hose fittings.
WARNING
Before using your washing machine for the first time, check all connections at the water
valve and taps for leaks.
14_ setting up your new washing machine
WF9854LWN-02713K_EN.indd Sec4:14
2011-02-11
6:08:58
Drain
Samsung recommends a standpipe height of 18 in (46 cm). The drain hose must be routed
through the drain hose clip to the standpipe. The standpipe must be large enough to accept the
outside diameter of the drain hose. The drain hose is attached at the factory.
For best performance, your washing machine must be installed on a solidly constructed floor.
Wood floors may need to be reinforced to minimize vibration and/or unbalanced loads. Carpeting
and soft tile surfaces are contributing factors to vibrations and the tendency for your washing
machine to move slightly during the spin cycle.
01 SETTING UP
Flooring
Never install your washing machine on a platform or poorly supported structure.
Surrounding temperature
Do not install your washing machine in areas where water may freeze, since your washing
machine always retains some water in its water valve, pump, and hose areas. Frozen water in
the lines can cause damage to belts, the pump, and other components.
Alcove or closet installation
To operate safely and properly, your new washing machine requires minimum clearances of:
Sides – 25 mm
Rear – 51 mm
Top – 25 mm
Front – 465 mm
If both the washing machine and a dryer are installed together, the front of the alcove or closet
must have at least 465 mm unobstructed air opening. Your washing machine alone does not
require a specific air opening.
INSTALLING YOUR WASHING MACHINE
STEP 1
Selecting a location
Before you install the washing machine, make sure the location:
•
•
•
•
•
•
Has a hard, level surface without carpeting or flooring that may obstruct ventilation
Is away from direct sunlight
Has adequate ventilation
Will not be freezing (below 32 ˚F or 0 ˚C)
Is away from heat sources such as oil or gas
Has enough space so that the washing machine doesn’t stand on its power cord
setting up your new washing machine _15
WF9854LWN-02713K_EN.indd Sec4:15
2011-02-11
6:08:59
setting up your washing
machine
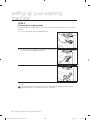
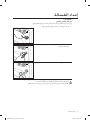
STEP 2
Removing the shipping bolts
Before installing the washing machine, you must remove the five shipping bolts from the back of
the unit.
1. Loosen all the bolts with the supplied wrench.
Option
2. Hold the bolt with the spanner and pull it through the wide
section of the hole. Repeat for each bolt.
Option
3. Fill the holes with the supplied plastic covers.
Option
4. Store the shipping bolts away safely in case you have to move the washing machine in the
future.
WARNING
Packaging materials can be dangerous to children; keep all packaging material (plastic
bags, polystyrene, etc.) well out of the reach of children.
16_ setting up your new washing machine
WF9854LWN-02713K_EN.indd Sec4:16
2011-02-11
6:08:59
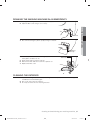
STEP 3
Adjusting the levelling feet
When installing your washing machine, ensure that the power plug, the water supply and
the drain are easily accessible.
01 SETTING UP
1. Slide the washing machine into position.
2. Level your washing
machine by turning the
leveling feet in and out as
necessary by hand.
3. When your washing machine is level, tighten the nuts using
the wrench supplied with your washing machine.
STEP 4
Connecting the water and drain
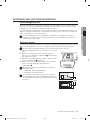
Connecting the water supply hose
1. Take the L-shaped arm fitting for the cold water
supply hose and connect it to the cold water
supply intake on the back of the machine.
Tighten by hand.
Option
The water supply hose must be connected to
the washing machine at one end and to the
water tap at the other. Do not stretch the water
supply hose. If the hose is too short, replace
the hose with a longer, high pressure hose.
2. Connect the other end of the cold water supply
hose to your sink’s cold water tap and tighten
it by hand. If necessary, you can reposition the
water supply hose at the washing machine end
by loosening the fitting, rotating the hose, and
retightening the fitting.
For selected models with an additional hot water
intake:
1. Take the red L-shaped arm fitting for the hot water supply hose and connect it to the hot
water supply intake on the back of the machine. Tighten by hand.
2. Connect the other end of the hot water supply hose to your sink’s hot water tap and tighten
it by hand.
3. Use a Y-piece if you only want to use cold water.
setting up your new washing machine _17
WF9854LWN-02713K_EN.indd Sec4:17
2011-02-11
6:09:00
setting up your washing
machine
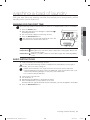
Connecting the water supply hose (selected models)
1. Remove the adaptor from the water supply hose.
Adaptor
Water supply
hose
2. First, using a ‘+’ type screwdriver, loosen the four screws
on the adaptor. Next, take the adaptor and turn part (2)
following the arrow until there is a 5 mm gap.
1
5 mm
2
3. Connect the adaptor to the water tap by tightening the
screws firmly while lifting the adaptor upwards.
Turn part (2) following the arrow and connect (1) and (2).
Water tap
1
2
4. Connect the water supply hose to the adaptor.
When you release part (3), the hose automatically
connects to the adaptor making a ‘click’ sound.
After you have connected the water supply
hose to the adaptor, ensure that it is connected
correctly by pulling the water supply hose
downwards.
3
5. Connect the other end of the water supply hose to the inlet
water valve at the rear of the washing machine. Screw the
hose clockwise all the way in.
Option
18_ setting up your new washing machine
WF9854LWN-02713K_EN.indd Sec4:18
2011-02-11
6:09:02
6. Turn on the water supply and ensure that no water leaks
from the water valve, tap or adaptor. If there is a water
leaks, repeat the previous steps.
•
Do not use your washing machine if there is a water leak.
This may cause electric shock or injury.
✗
✗
If the water tap has a screw type tap, connect the water
supply hose to the tap as shown.
01 SETTING UP
WARNING
Use the most conventional type of tap for the water supply. In case the tap is square or too
big, remove the spacing ring before inserting the tap into the adaptor.
setting up your new washing machine _19
WF9854LWN-02713K_EN.indd Sec4:19
2011-02-11
6:09:03
setting up your washing
machine
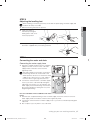
Connecting the drain hose
The end of the drain hose can be positioned in three ways:
1. Over the edge of a wash basin: The drain hose must be placed at a height of between 60
and 90 cm. To keep the drain hose spout bent, use the supplied plastic hose guide. Secure
the guide to the wall with a hook or to the tap with a piece of string to prevent the drain hose
from moving.
60 ~ 90 cm
Drain hose
Hose guide
2. ln a sink drain pipe branch: The drain pipe branch must be above the sink siphon so that
the end of the hose is at least 60 cm above the ground.
3. ln a drain pipe: We recommend using a 65 cm high vertical pipe; it must be no shorter than
60 cm and no longer than 90 cm.
STEP 5
Powering your washing machine
Plug the power cord into a wall sockets, an AC 220-240V / 60Hz approved electrical outlet
protected by a fuse or circuit breaker. (For more information on electrical and grounding
requirements, see page 14.)
20_ setting up your new washing machine
WF9854LWN-02713K_EN.indd Sec4:20
2011-02-11
6:09:04
washing a load of laundry
With your new Samsung washing machine, the hardest part of doing laundry will be
deciding which load to wash first.
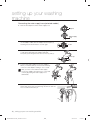
WASHING FOR THE FIRST TIME
1. Press the Power button.
2. Add a little detergent to the detergent compartment
the detergent drawer.
3. Turn on the water supply to the washing machine.
4. Press the Start/Pause button.
in
This will remove any water that might be left over in the
machine from the manufacturer’s test run.
Compartment
Compartment
Compartment
: Detergent for prewash, or starch.
: Detergent for the main wash, water softener, pre-soaking agent, bleach and
stain removal product.
: Additives, e.g. fabric softener or former (fill no higher than lower edge (MAX)
of “A”)
02 WASHING A LOAD OF LAUNDRY
Before washing laundry for the first time, you must run a complete empty cycle (i.e. no laundry).
BASIC INSTRUCTIONS
1. Load your laundry into the washing machine.
WARNING
Do not overload the washing machine. To determine the load capacity for each type of
laundry, refer to the chart on page 28.
• Make sure that laundry is not caught in the door, as this may cause a water leak.
• Washing detergent may remain in the front rubber part of the washer after a wash cycle.
Remove any remaining detergent, as they may cause a water leak.
• Do not wash water-proofed items.
2.
3.
4.
5.
Close the door until it latches.
Turn the power on.
Add detergent and additives to the dispenser drawer.
Select the appropriate cycle and options for the load.
The Wash Indicator light will illuminate and the estimated cycle time will appear in the display.
6. Press the Start/Pause button.
washing a load of laundry _21
WF9854LWN-02713K_EN.indd Sec5:21
2011-02-11
6:09:06
washing a load of laundry
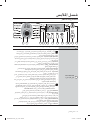
USING THE CONTROL PANEL
1
1
2
DIGITAL GRAPHIC
DISPLAY
3
4
1
5
6
7
8
9
10
11
12
Displays the remaining wash cycle time, all cycle information, and error
messages.
Select the tumble pattern and spin speed for the cycle.
For detailed information, refer to “Washing clothes using the cycle
selector”. (see page 25)
2
CYCLE SELECTOR
Cotton - For averagely or lightly soiled cottons, bed linen, table linen,
underwear, towels, shirts, etc.
Synthetics - For averagely or lightly soiled blouses, shirts, etc., made of
polyester (diolen, trevira), polyamide (perlon, nylon) or other similar blends.
Denim - A higher water level in the main wash and extra rinse ensure
that no washing powder remains that may mark your clothing.
Sports Wear - Use for water-proofed or proofed garments to keep their
good looks and fresh feel.
Delicates - For sheer fabrics, brassieres, lingerie, dresses, shirts and
blouses. For best results, use liquid detergent.
Wool - Only for machine-washable wool. A load should be less than 2.0 kg.
• The wool course washes the laundry using gentle cradling actions.
During the wash, the gentle cradling and soaking actions are
continued to protect the wool fibers from shrinkage / distortion and
for a super gentle clean. This stop operation is not a problem.
• Neutral detergent is recommended for wool course, for improved
washing results and for improved care of the wool fibers.
The wool wash cycle of this machine has been approved by Woolmark
for the washing of machine-washable Woolmark products provided that
the products are washed according to the instructions on the garment
label and those issued by the manufacturer of this washing machine,
M0509 (Certificate Number issued by IWS NOM INEE Co., Ltd.)
Handwash - A very light wash cycle as gentle as a hand wash.
Water Saving - This is a specially designed course that enables you to
wash laundry effectively with the minimum amount of water.
The energy label specifications have been determined by using the
following program.
The program is Water Saving 40, 3 Rinses, Intensive,and 1400rpm.
Dark Garment - Additional rinses and reduced spinning ensure that your
favourite dark clothes are washed gently and rinsed thoroughly.
Daily Wash - Use for everyday items such as underwear and shirts.
Quick 29’ - For lightly soiled garments that you require quickly.
22_ washing a load of laundry
WF9854LWN-02713K_EN.indd Sec5:22
2011-02-11
6:09:07
Spin - Performs an additional spin cycle to remove more water.
Rinse + Spin - Use for a load that needs rinsing only or to add rinseadded fabric softener to a load.
Eco Drum Clean - Use for drum cleaning. It cleanses drum of dirt and
bacteria. Regular use (after every 40 washes) is recommended. No
detergent or bleach needed.
PREWASH
SELECTION BUTTON
Press this button to select pre-wash. Pre-wash is only available with:
Cotton, Synthetics, Denim, Sports Wear, Dark Garment, Daily Wash.
4
DELAY END
SELECTION BUTTON
Press this button repeatedly to cycle through the available Delay End
options (from 3 hours to 19 hours in one hour increments).
The hour displayed indicates the time when the wash cycle will be
finished.
5
TEMPERATURE
SELECTION BUTTON
Press this button repeatedly to cycle through the available water
temperature options: (Cold Water , 30 ˚C, 40 ˚C , 60 ˚C and 95 ˚C).
6
RINSE SELECTION
BUTTON
Press this button to add additional rinse cycles. The maximum number
of rinse cycles is five.
Press the button repeatedly to cycle through the available speeds for the
spin cycle.
7
SPIN SELECTION
BUTTON
WF9854
,
, 400, 800, 1200, 1400 rpm
WF9852
,
, 400, 800, 1000, 1200 rpm
WF9850
,
, 400, 600, 800, 1000 rpm
02 WASHING A LOAD OF LAUNDRY
3
“No spin ” - The laundry remains in the drum and no spin cycle is
performed after the final drain.
” -The laundry remains soaking in the final rinse water.
“Rinse Hold
Before the laundry can be unloaded, either a Drain or Spin cycle must be
performed.
8
WASH OPTION
SELECTION BUTTON
Press this button repeatedly to cycle through the wash options: Easy
Iron Soak Easy Iron + Soak off
“Easy Iron”: Use this option to prepare your laundry so that it can be
easily ironed.
“Soak”: Use this option to effectively remove stains from your laundry by
soaking your laundry.
• The Soak function is performed 13 minutes into the wash cycle.
• The Soak function continues for 30 minutes with six cycles, where one
cycle is a soak cycle that spins for 1 minute and stands still for 4 minutes.
• The Soak function is only available for the following wash programs:
Cotton, Synthetics, Denim, Sports wear, Dark garment, Daily wash.
9
INTENSIVE WASH
SELECTION BUTTON
Press this button when the laundry is heavily soiled and needs to be
washed intensively. The cycle time is increased for each cycle.
10
SOUND OFF BUTTON
The sound can be turned off for all courses. When this function is
selected, the sound is turned off for all cycles.
• When the Sound off function is activated, the lamp on the Sound Off
button and the control panel are illuminated.
• When the Sound off function is deactivated, a buzzer will go off, and
the lamp on the button and the control panel is turned off.
11
START/PAUSE
SELECTION BUTTON
Press to pause and restart a cycle.
12
POWER BUTTON
Press it once to turn your washing machine on, press it again to turn
your washing machine off.
If the washing machine is left on for more than 10 minutes without any
buttons being touched, the power automatically turns off.
washing a load of laundry _23
WF9854LWN-02713K_EN.indd Sec5:23
2011-02-11
6:09:08
washing a load of laundry
Child lock
The Child Lock function allows you to lock the buttons so that the wash cycle you’ve chosen
can’t be changed.
Activating/Deactivating
If you want to activate or deactivate the Child Lock function,
press the Temp. and Rinse buttons at the same time for
3 seconds. “Child Lock ” will be lit when this feature is
activated.
When the Child Lock function is activated, only the
Power button works. The Child Lock function remains
on even after the power is turned on and off or after the
disconnecting and reconnecting the power cord.
3 SEC.
Sound off
The Sound Off function can be selected during all courses. When this function is selected, sound
is turned off for all courses. Even if the power is turned on and off repeatedly, the setting is
retained.
Activating/Deactivating
If you want to activate or deactivate the Sound Off function, press the Sound Off button. The
“Sound Off ” and the lamp on the Sound Off button will be lit when this feature is activated.
Delay end
You can set the washing machine to finish your wash automatically at a later time, choosing a
delay of between 3 to 19 hours (in 1 hour increments). The hour displayed indicates the time at
which the wash will be finished.
1. Manually or automatically set your washing machine according to the type of laundry you are
washing.
2. Press the Delay End button repeatedly until the delay time is set.
3. Press the Start/Pause button. The “Delay End ” indicator will be lit, and the clock will
begin counting down until it reaches the set time.
4. To cancel a Delay End function, press the Power button and then turn the washing machine
on again.
24_ washing a load of laundry
WF9854LWN-02713K_EN.indd Sec5:24
2011-02-11
6:09:10
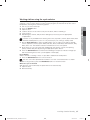
Washing clothes using the cycle selector
Pre-wash is only available when selecting the Cotton, Synthetics, Denim, Sports Wear, Dark
Garment and Daily Wash cycles. It is only necessary if your clothing is heavily soiled.
7. Use the Cycle Selector to select the appropriate cycle according to the type of material:
Cotton, Synthetics, Denim, Sports Wear, Delicates, Wool, Hand Wash, Dark Garment, Daily
Wash, Quick 29’. The relevant indicators will illuminate on the control panel.
8. At this time, you can control the wash temperature, the amount of rinses, the spinning
speed, and the delay time by pressing the appropriate option button.
9. Press the Start/Pause button and the wash will begin. The process indicator will light up
and the remaining time for the cycle will appear in the display.
02 WASHING A LOAD OF LAUNDRY
Your new washing machine makes washing clothes easy, using Samsung’s “Fuzzy Control”
automatic control system. When you select a wash program, the machine will set the correct
temperature, washing time, and washing speed.
1. Turn on your sink’s water tap.
2. Press the Power button.
3. Open the door.
4. Load the articles one at a time loosely into the drum, without overfilling it.
5. Close the door.
6. Add detergent, softener, and pre-wash detergent (if necessary) into the appropriate
compartments.
Pause Option
Within 5 minutes of starting a wash, it is possible to add/remove laundry items.
1. Press the Start/Pause button to unlock the door.
The door cannot be opened when the water is too HOT or the water level is too HIGH.
2. After closing the door, press the Start/Pause button to restart the wash.
When the cycle is finished:
After the total cycle has finished, the power will turn off automatically.
1. Open the door.
2. Remove laundry.
washing a load of laundry _25
WF9854LWN-02713K_EN.indd Sec5:25
2011-02-11
6:09:13
washing a load of laundry
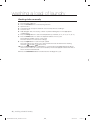
Washing clothes manually
You can wash clothes manually without using the Cycle Selector.
1. Turn the water supply on.
2. Press the Power button on the washing machine.
3. Open the door.
4. Load the articles loosely into the drum one at a time, without overfilling it.
5. Close the door.
6. Add detergent and, if necessary, softener or prewash detergent, into the appropriate
compartments.
7. Press the Temp. button to select the temperature. (Cold water, 30 ˚C, 40 ˚C, 60 ˚C, 95 ˚C)
8. Press the Rinse button to select the required number of rinse cycles.
The maximum number of rinse cycles is five.
The wash duration is increased accordingly.
9. Press the Spin button to select the spin speed.
The rinse hold function allows you to remove items that are still wet from the washing
machine. (
: Rinse Hold)
: No Spin,
10. Press the Delay End button repeatedly to cycle through the available Delay End options
(from 3 hour to 19 hours in one hour increments). The hour displayed indicates the time at
which the wash will be finished.
11. Press the Start/Pause button and the machine will begin the cycle.
26_ washing a load of laundry
WF9854LWN-02713K_EN.indd Sec5:26
2011-02-11
6:09:13
LAUNDRY GUIDELINES
Follow these simple guidelines for the cleanest laundry and the most efficient wash.
Always check the Care label on clothing before washing.
Emptying pockets
Before each wash, empty all the pockets of your laundry. Small, irregularly shaped hard objects,
such as coins, knives, pins, and paperclips could damage your washing machine. Do not wash
clothing with large buckles, buttons, or other heavy metal objects.
Metal on clothing may damage your clothing as well as the tub. Turn clothing with buttons and
embroidered clothes inside out before washing them. If zips of pants and jackets are open while
washing, the spin basket may be damaged. Zips should be closed and fixed with a string before
washing.
Clothing with long strings may become entangled with other clothes damaging them. Be sure to
fix the strings before starting the wash.
02 WASHING A LOAD OF LAUNDRY
Sort and wash your laundry according to the following criteria:
• Care Label: Sort laundry into cottons, mixed fibres, synthetics, silks, wools and rayons.
• Colour: Divide whites and colours. Wash new colour items separately.
• Size: Placing items of different sizes in the same load will improve the wash action.
• Sensitivity: Wash delicate items separately, using the Delicate wash cycle for pure, new
woollen items, curtains and silk articles. Check the labels on the items you are washing or
refer to the fabric care chart in the appendix.
Prewashing cotton
Your new washing machine, combined with modern detergents, will give perfect washing results,
thus saving energy, time, water and detergent. However, if your cotton is particularly dirty,
prewash with a protein-based detergent.
washing a load of laundry _27
WF9854LWN-02713K_EN.indd Sec5:27
2011-02-11
6:09:14
washing a load of laundry
Determining the load capacity
Do not overload the washing machine or your laundry may not wash properly. Use the chart
below to determine the load capacity for the type of laundry you are washing.
Fabric Type
Load Capacity
Model
WF9854/
WF9852/
WF9850
Cotton
- average/lightly soiled
- heavily soiled
8.5kg
Synthetics
3.0 kg
Denim
3.0 kg
Sports Wear
2.5 kg
Delicates
2.5 kg
Wool
2.0 kg
• When the laundry is unbalanced (“UE” lights up on the display), redistribute the load.
If the laundry is unbalanced, the spin efficiency may be degraded.
• When washing Bedding or Duvets, the wash time may be lengthened or the spin
efficiency may be degraded.
• For Bedding or Duvets, the recommended load capacity is 1,8(kg) or less.
Make sure to insert brassieres (water washable) into a laundry net (to be
purchased additionally).
• The metal parts of the brassieres may break through the material
and damage the laundry. Therefore make sure to place them inside
a fine laundry net.
• Small, light clothing such as socks, gloves, stockings and
handkerchiefs may become caught around the door. Place them
inside a fine laundry net.
CAUTION
Do not wash the laundry net by itself without other laundry. This may cause abnormal
vibrations that could move the washing machine and cause an accident resulting in
injury.
28_ washing a load of laundry
WF9854LWN-02713K_EN.indd Sec5:28
2011-02-11
6:09:14
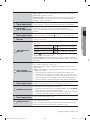
DETERGENT AND ADDITIVES INFORMATION
Which detergent to use
Do not use detergent that has hardended or solidified as the detergent may remain in
the rinse cycle. It may cause your washing machine to not rinse properly or result in the
overflow becoming blocked.
Detergent drawer
Your washing machine has separate compartments for dispensing detergent and fabric softener.
Add all laundry additives to the correct compartment before starting your washing machine.
Do NOT open the detergent drawer when your washing machine is running.
02 WASHING A LOAD OF LAUNDRY
The type of detergent you should use is based on the type of fabric (cotton, synthetic, delicate
items, wool), colour, wash temperature, and degree of soiling. Always use “low suds” laundry
detergent, which is designed for automatic washing machines.
Follow the detergent manufacturer’s recommendations based on the weight of the laundry, the
degree of soiling, and the hardness of the water in your area. If you do not know how hard your
water is, enquire at your local water authority.
1. Pull out the detergent drawer on the left side of the control
panel.
2. Add the recommended amount of laundry detergent
before starting
directly into the detergent compartment
your washing machine.
3. Add the recommended amount of fabric softener into the
softener compartment
if required.
4. When using the Prewash option, add the recommended
amount of laundry detergent into the prewash
compartment .
When washing large items do NOT use the following
detergetnt types.
• Tablet and capsule type detergents
• Detergents using a ball and net
Concentrated or thick fabric softener and conditioner
must be diluted with a little water before being poured
into the dispenser (prevents the overflow from becoming
blocked.)
MAX
washing a load of laundry _29
WF9854LWN-02713K_EN.indd Sec5:29
2011-02-11
6:09:15
cleaning and maintaining your
washing machine
Keeping your washing machine clean improves its performance, wards off
unnecessary repairs, and lengthens its life.
ECO DRUM CLEAN
This course is a self-cleaning course that removes mold that may occur inside the washing machine.
1. Press the Power button.
2. Turn the Cycle Selector to the ECO Drum Clean course.
• You can only use the Delay End function.
• The water temperature during the ECO Drum Clean is
set to 70 ˚C.
You cannot change the temperature.
3. Place the appropriate amount of cleansing agent into the
detergent compartment and close the detergent drawer
(when cleaning the drum using a cleansing agent).
• Be sure to use the recommended cleansing agent for
cleaning the drum.
• There are powder-type and liquid-type drum cleansing
agents.
4. Press the Start/Pause button.
• If you press the Start/Pause button, the ECO Drum Clean course begins.
CAUTION
•
•
•
•
•
•
Using the ECO Drum Clean course, you can clean the drum without using a cleansing agent.
Never use the ECO Drum Clean course when laundry is in the washing machine. This may
result in damage to the texture or a problem with the washing machine.
Use only 1/10 of the amount of the drum cleansing agent recommended by the
cleansing agent manufacturer.
Since using a chlorine bleaching agent may discolor the product, be sure to use only oxygen
bleaching agents.
Powder-type cleansing agent: Use a [powder-type bleaching agent] or a [cleansing agent for
drum cleaning only].
Liquid-type cleansing agent: Use a [liquid-type oxygen bleaching agent] or a [cleansing agent
for drum cleaning only].
The ECO Drum Clean Auto Alarm Function
• If the “ECO Drum Clean” indicator on the display and the
lamp on the Cycle Selector are lit after a wash, it indicates
that tub (drum) cleaning is required. In this case, remove the
laundry from the washing machine, turn the power on, and
clean the drum by performing the ECO Drum Clean course.
• If you do not perform the ECO Drum Clean course, the
“ECO Drum Clean” indicator on the display and the lamp
on the Cycle Selector are turned off. However, the “ECO
Drum Clean” indicator on the display and the lamp on the
Cycle Selector are turned on again after two washes are
performed. However, this will not result in a problem with the
washing machine.
• Although generally, the ECO Drum Clean Auto Alarm
appears once a month or so, the frequency may differ
depending on the number of times the washing machine is used.
30_ cleaning and maintaining your washing machine
WF9854LWN-02713K_EN.indd Sec6:30
2011-02-11
6:09:16
DRAINING THE WASHING MACHINE IN AN EMERGENCY
1. Unplug the washing machine from the power supply.
2. Open the filter cover using a coin or a key.
3. Unscrew the emergency drain cap by turning it to the left.
03 CLEANING AND MAINTAINING
Filter cover
Emergency
drain cap
4. Hold the cap on the end of the emergency drain tube and
slowly pull it out about 15 cm.
5. Allow all the water to flow into a bowl.
6. Reinsert the drain tube and screw the cap back on.
7. Replace the filter-cover.
Emergency
drain tube
CLEANING THE EXTERIOR
1. Wipe the washing machine surfaces, including the control panel, with a soft cloth using a
nonabrasive household detergent.
2. Use a soft cloth to dry the surfaces.
3. Do not pour water onto the washing machine.
cleaning and maintaining your washing machine _31
WF9854LWN-02713K_EN.indd Sec6:31
2011-02-11
6:09:19
cleaning and maintaining your
washing machine
CLEANING THE DETERGENT DRAWER AND DRAWER RECESS
1. Press the release lever on the inside of the
detergent drawer and pull the drawer out.
2. Remove the rinse cap from the detergent
drawer.
Release lever
3. Wash all parts under running water.
4. Clean the drawer recess with an old toothbrush.
5. Replace the liquid detergent divider by pushing it firmly into
the drawer.
6. Push the drawer back into place.
7. To remove any remaining detergent, perform a rinse cycle
without any laundry in the drum.
32_ cleaning and maintaining your washing machine
WF9854LWN-02713K_EN.indd Sec6:32
2011-02-11
6:09:20
CLEANING THE DEBRIS FILTER
We recommend cleaning the debris filter 5 or 6 times a year, or when the error message of “5E” is
displayed. (Refer to “Draining the washing machine in an emergency” in the previous page.)
1. Open the filter cover by using a key or coin.
2. Unscrew the emergency drain cap by turning it to the left
and drain off all the water.
3. Unscrew the debris filter cap.
4. Wash any dirt or other material from the debris filter. Make
sure the drain pump propeller behind the debris filter is not
blocked.
5. Replace the debris filter cap.
6. Replace the filter cover.
CLEANING THE WATER HOSE MESH FILTER
03 CLEANING AND MAINTAINING
Debris filter cap
You should clean the water hose mesh filter at least once a year, or when the error message of “4E” is
displayed:
1. Turn off the water supply to the washing machine.
2. Unscrew the hose from the back of the washing machine. To prevent water from gushing out
due to the air pressure in the hose, cover the hose with a cloth.
3. Gently pull out the mesh filter from the end of the hose using a pair of pliers and rinse it under
water until clean. Also clean inside and outside the threaded connector.
4. Push the filter back into place.
5. Screw the hose back onto the washing machine.
6. Make sure the connections are watertight and turn on the tap.
REPAIRING A FROZEN WASHING MACHINE
If the temperature drops below freezing and your washing machine is frozen:
1.
2.
3.
4.
5.
Unplug the washing machine.
Pour warm water over the tap to loosen the water supply hose.
Remove the water supply hose and soak it in warm water.
Pour warm water into the washing machine drum and let it sit for 10 minutes.
Reconnect the water supply hose to the water tap and check if the water supply and drain
are operating normal.
STORING YOUR WASHING MACHINE
If you need to store your washing machine for an extended time, it’s better to drain and disconnect it.
Washing machines can be damaged if water is left in the hoses and internal components before storage.
1. Select the Quick 29’ cycle and add bleach to the bleach compartment. Run your washing
machine through the cycle without a load.
2. Turn the water taps off and disconnect the inlet hoses.
3. Unplug your washing machine from the electrical outlet, and leave your washing machine
door open to allow air to circulate inside the tumbler.
If your washing machine has been stored in below-freezing temperatures, allow time for any
leftover water in your washing machine to thaw out before using it.
cleaning and maintaining your washing machine _33
WF9854LWN-02713K_EN.indd Sec6:33
2011-02-11
6:09:21
troubleshooting and
information codes
CHECK THESE POINTS IF YOUR WASHING MACHINE...
PROBLEM
SOLUTION
Will not start
•
•
•
•
Make sure your washing machine is plugged in.
Make sure the door is firmly closed.
Make sure the water source tap(s) are turned on.
Make sure to press the Start/Pause button.
Has no water or not enough
water
•
•
•
•
Turn the water tap on fully.
Make sure the water source hose is not frozen.
Straighten the water intake hoses.
Clean the filter on the water intake hose.
Has detergent remaining in
the detergent drawer after
the wash cycle is complete
•
Make sure your washing machine is running with sufficient water
pressure.
Make sure the detergent is added to the center of the detergent
drawer.
Vibrates or is too noisy
•
•
•
•
•
Make sure your washing machine is on a level surface. If the surface
is not level, adjust the washing machine feet to level the appliance.
Make sure that the shipping bolts are removed.
Make sure your washing machine is not touching any other object.
Make sure the laundry load is balanced.
The washing machine does
not drain and/or spin
•
•
Straighten the drain hose. Eliminate kinked hoses.
Make sure the debris filter is not clogged.
Door is locked shut or will
not open.
•
The door will not open until 3 minutes after the machine stops or the
power turns off.
If the problem persists, contact your local Samsung Customer Service.
34_ troubleshooting and information codes
WF9854LWN-02713K_EN.indd Sec10:34
2011-02-11
6:09:22
INFORMATION CODES
CODE SYMBOL
SOLUTION
dE
•
Close the door.
4E
•
•
Make sure the source water tap is turned on.
Check the water pressure.
5E
•
•
Clean the debris filter.
Make sure the drainage hose is installed correctly.
•
The laundry load is unbalanced. Redistribute the load. If only one item
of clothing needs washing, such as a bathrobe or pair of jeans, the
final spin result might be unsatisfactory and an “UE” error message
will be shown in the display window.
•
Call the after-sales service.
UE
cE/3E
04 TROUBLESHOOTING
If your washing machine malfunctions, you may see an information code on the display. If this happens,
please check the table below and try the suggested solution before calling Customer Service.
For any codes not listed above, or if the suggested solution doesn’t fix the problem, call your Samsung
Service Centre or local Samsung dealer.
troubleshooting and information codes _35
WF9854LWN-02713K_EN.indd Sec10:35
2011-02-11
6:09:22
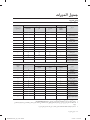
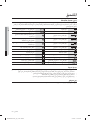
cycle chart
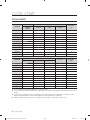
CYCLE CHART
(z user option)
Max load(kg)
PROGRAM
DETERGENT
WF9854/
WF9852/
WF9850
Pre-wash
wash
Softener
Max Temp
(˚C)
95
Cotton
8.5
z
yes
z
Synthetics
3.0
z
yes
z
60
Denim
3.0
z
yes
z
60
Sports Wear
2.5
z
yes
z
60
Delicates
2.5
-
yes
-
40
Wool
2.0
-
yes
-
40
Handwash
2.0
-
yes
z
40
Water Saving
8.5
z
yes
z
40
Dark Garment
4.0
z
yes
z
40
Daily Wash
4.0
z
yes
z
60
Quick 29’
3.0
-
yes
z
60
Eco Drum Clean
-
-
-
-
-
Delay end
Cycle time
(min)
Spin Speed(MAX) rpm
PROGRAM
WF9854
WF9852
WF9850
Cotton
1400
1200
1000
z
120
Synthetics
1200
1200
1200
z
90
Denim
800
800
800
z
78
Sports Wear
1200
1200
1200
z
73
Delicates
800
800
800
z
50
Wool
800
800
800
z
38
Handwash
400
400
400
z
31
Water Saving
1400
1200
1000
z
134
Dark Garment
1200
1200
1200
z
78
Daily Wash
1200
1200
1200
z
70
Quick 29’
1400
1200
1000
z
29
Eco Drum Clean
-
-
-
z
86
1. A cycle with a prewash takes approx. 15 minutes longer.
2. The cycle duration data has been measured under the conditions specified in Standard IEC 60456 / EN
60456.
3. Course time in individual homes may differ from the values given in the table due to variations in the
pressure and temperature of the water supply, the load and the type of laundry.
4. When the Intensive Wash function is selected, the cycle time is increased for each cycle.
36_ cycle chart
WF9854LWN-02713K_EN.indd Sec9:36
2011-02-11
6:09:22
appendix
FABRIC CARE CHART
Resistant material
Can be ironed at 100 ˚C max
Delicate fabric
Do not iron
Item may be washed at 95 ˚C
Can be dry cleaned using any
solvent
Item may be washed at 60 ˚C
Dry clean with perchloride, lighter
fuel, pure alcohol or R113 only
Item may be washed at 40 ˚C
Dry clean with aviation fuel, pure
alcohol or R113 only
Item may be washed at 30 ˚C
Do not dry clean
Item may be hand washed
Dry flat
Dry clean only
Can be hung to dry
Can be bleached in cold water
Dry on clothes hanger
Do not bleach
Tumble dry, normal heat
Can be ironed at 200 ˚C max
Tumble dry, reduced heat
Can be ironed at 150 ˚C max
Do not tumble dry
06 APPENDIX
The following symbols provide garment care directions. The care labels include four symbols in this order:
washing, bleaching, drying and ironing (and dry cleaning when necessary). The use of symbols ensures
consistency among garment manufacturers of domestic and imported items. Follow the care label
directions to maximize garment life and reduce laundery problems.
PROTECTING THE ENVIRONMENT
•
•
•
•
This appliance is manufactured from recyclable materials. If you decide to dispose of this appliance,
please observe local waste disposal regulations. Cut off the power cord so that the appliance cannot be
connected to a power source. Remove the door so that animals and small children cannot get trapped
inside the appliance.
Do not exceed the detergent quantities recommended in the detergent manu-facturers’ instructions.
Use stain removal products and bleaches before the wash cycle only when strictly necessary.
Save water and electricity by only washing full loads (the exact amount depends upon the program
used).
DECLARATION OF CONFORMITY
This appliance complies with European safety standards, EC directive 93/68 and EN Standard 60335.
appendix _37
WF9854LWN-02713K_EN.indd Sec8:37
2011-02-11
6:09:22
appendix
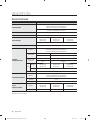
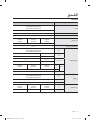
SPECIFICATIONS
TYPE
FRONT LOADING WASHING MACHINE
WF9854AW/WF9852AW/WF9850AW
WF9854FW/WF9852FW/WF9850FW
WF9854LW/WF9852LW/WF9850LW
DIMENSIONS
W598mm X D600mm X H844mm
WATER PRESSURE
50 kPa ~ 800 kPa
WATER VOLUME
63 ℓ
WF9854AW/
WF9854FW/
WF9854LW
NET WEIGHT
WF9852AW/
WF9852FW/
WF9852LW
WF9850AW/
WF9850FW/
WF9850LW
70 kg
WASH AND SPIN CAPACITY
8.5kg
WF9854AW/WF9852AW/WF9850AW
WF9854FW/WF9852FW/WF9850FW
WF9854LW/WF9852LW/WF9850LW
MODEL
220 V
150 W
WASHING
POWER
CONSUMPTION
WASH AND
HEATING
MODEL
SPIN
240 V
150 W
220 V
2000 W
240 V
2400 W
WF9854AW/
WF9854FW/
WF9854LW
230V
WF9850AW/
WF9850FW/
WF9850LW
350 W
PUMPING
34 W
MODEL
WF9854AW/WF9852AW/WF9850AW
WF9854FW/WF9852FW/WF9850FW
WF9854LW/WF9852LW/WF9850LW
PAPER
2.5 kg
PACKAGE WEIGHT
PLASTIC
SPIN
REVOLUTIONS
WF9852AW/
WF9852FW/
WF9852LW
2.5 kg
MODEL
WF9854AW/
WF9854FW/
WF9854LW
WF9852AW/
WF9852FW/
WF9852LW
WF9850AW/
WF9850FW/
WF9850LW
rpm
1400
1200
1000
The appearance and specifications of the product are subject to change without prior notice for purposes
of product enhancement.
38_ appendix
WF9854LWN-02713K_EN.indd Sec8:38
2011-02-11
6:09:32
memo
WF9854LWN-02713K_EN.indd Sec8:39
2011-02-11
6:09:32
QUESTIONS OR COMMENTS?
Country
CALL
OR VISIT US ONLINE AT
Saudi Arabia
9200-21230
www.samsung.com
Code No. DC68-02713K_EN
WF9854LWN-02713K_EN.indd Sec8:40
2011-02-11
6:09:32
WF9854AW(A/E/F/G/H/N/V/W)
WF9852AW(A/E/F/G/H/N/V/W)
WF9850AW(A/E/F/G/H/N/V/W)
WF9854FW(A/E/F/G/H/N/V/W)
WF9852FW(A/E/F/G/H/N/V/W)
WF9850FW(A/E/F/G/H/N/V/W)
WF9854LW(A/E/F/G/H/N/V/W)
WF9852LW(A/E/F/G/H/N/V/W)
WF9850LW(A/E/F/G/H/N/V/W)
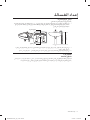
ﻏﺴﺎﻟﺔ ﻣﻼﺑﺲ
ﺩﻟﻴﻞ ﺍﳌﺴﺘﺨﺪﻡ
ﺇﻣﻜﺎﻧﺎﺕ ﻫﺎﺋﻠﺔ
.Samsung ﻧﺸﻜﺮﻙ ﻋﻠﻰ ﺷﺮﺍﺀ ﻫﺬﺍ ﺍﳌﻨﺘﺞ ﻣﻦ
ﺍﻟﺮﺟﺎﺀ ﺗﺴﺠﻴﻞ ﺍﳌﻨﺘﺞ ﻋﻠﻰ ﻣﻮﻗﻊ،ﻟﻠﺤﺼﻮﻝ ﻋﻠﻰ ﺧﺪﻣﺔ ﺃﻛﺜﺮ ﺗﻜﺎﻣﻼﹰ
www.samsung.com/register
WF9854LWN-02713K_AR_v1.indd 1
2/14/2011 11:02:45 AM
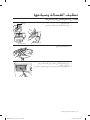
ﻣﻴﺰﺍﺕ ﺍﻟﻐﺴﺎﻟﺔ ﺍﳉﺪﻳﺪﺓ ﻣﻦ Samsung
ﺳﺘﻐﻴﺮ ﻫﺬﻩ ﺍﻟﻐﺴﺎﻟﺔ ﺍﳉﺪﻳﺪﺓ ﺭﺅﻳﺘﻚ ﻟﻌﻤﻠﻴﺔ ﺍﻟﻐﺴﻴﻞ ،ﺣﻴﺚ ﺗﺘﻮﻓﺮ ﻓﻲ ﻏﺴﺎﻟﺔ Samsungﻛﺎﻓﺔ ﺍﳌﻴﺰﺍﺕ ﺍﻟﺘﻲ
ﲡﻌﻞ ﻋﻤﻠﻴﺔ ﺍﻟﻐﺴﻴﻞ ﻋﻤﻠﻴﺔ ﺳﻬﻠﺔ ﻭﳑﺘﻌﺔ ﻗﺪﺭ ﺍﻹﻣﻜﺎﻥ ،ﺑﺪ ﹰﺀ ﻣﻦ ﺳﻌﺘﻬﺎ ﺫﺍﺕ ﺍﳊﺠﻢ ﺍﻟﻔﺎﺋﻖ ﻭﺣﺘﻰ ﺍﺳﺘﻬﻼﻛﻬﺎ
ﺍﻻﻗﺘﺼﺎﺩﻱ ﻟﻠﻄﺎﻗﺔ.
• ﺍﻟﺘﺸﻐﻴﻞ ﺍﻟﻬﺎﺩﺉ
ﻳﻮﻓﺮ "ﻣﺤﺮﻙ ﺍﻟﺘﺸﻐﻴﻞ ﺍﻟﻬﺎﺩﺉ" ﺍﻟﻔﺮﻳﺪ ﻣﻦ Samsungﻋﻤﻠﻴﺔ ﻏﺴﻞ ﻫﺎﺩﺋﺔ ﻏﻴﺮ ﻣﺴﻤﻮﻋﺔ ﻣﻘﺎﺭﻧﺔ ﺑﺎﻟﻐﺴﺎﻻﺕ ﺍﻷﺧﺮﻯ .ﻳﻌﻤﻞ ﺍﶈﺮﻙ
ﺑﺪﻭﻥ ﺳﻴﻮﺭ ﺃﻭ ﺗﺮﻭﺱ ،ﳑﺎ ﻳﻘﻠﻞ ﻣﻦ ﺍﻻﻫﺘﺰﺍﺯ ﻭﻳﺠﻌﻞ ﺍﻟﻐﺴﺎﻟﺔ ﺃﻛﺜﺮ ﻫﺪﻭ ﹰﺀﺍ ﻭﲢﻤﻼ ﹰ.
• ﺍﻟﺘﻨﻈﻴﻒ ﺑﺎﻟﺒﺨﺎﺭ )ﻃﺮﺍﺯﺍﺕ ﻣﺤﺪﺩﺓ(
ﻣﺜﺎﻟﻴﺎ ﻋﻨﺪﻣﺎ ﺗﺘﻌﺮﺽ ﻟﺪﺧﺎﻥ ﺍﻟﺴﺠﺎﺋﺮ ﺃﺛﻨﺎﺀ ﺗﻮﺍﺟﺪﻙ
ﺍﺟﻌﻞ ﻣﻼﺑﺴﻚ ﺍﳌﻔﻀﻠﺔ ﺗﺒﺪﻭ ﻛﺎﳉﺪﻳﺪﺓ ﻓﻘﻂ ﺑﻮﺍﺳﻄﺔ ﺍﻟﻬﻮﺍﺀ ﺍﻟﺴﺎﺧﻦ؛ ﺍﻟﺬﻱ ﻳﻌﺪ
ﹰ
ﺧﺎﺭﺝ ﺍﳌﻨﺰﻝ ﻭﺍﺭﺗﺪﺍﺋﻚ ﻷﻓﻀﻞ ﺑﺬﻟﺔ ﺃﻭ ﻓﺴﺘﺎﻥ ﻟﺪﻳﻚ ،ﻓﺒﺪﻻ ﹰ ﻣﻦ ﺃﻥ ﺗﻀﻄﺮ ﻟﺘﺸﻐﻴﻞ ﺩﻭﺭﺓ ﻏﺴﻴﻞ ﻛﺎﻣﻠﺔ ﺃﻭ ﺍﻟﺬﻫﺎﺏ ﺇﻟﻰ ﻣﻜﺎﻥ ﻟﻠﺘﻨﻈﻴﻒ
ﺑﺎﻟﺒﺨﺎﺭ ،ﻓﺎﳌﻼﺑﺲ ﻏﻴﺮ ﺍﳌﺘﺴﺨﺔ ﺍﻟﺘﻲ ﻻ ﲢﺘﺎﺝ ﺇﻟﻰ ﻏﺴﻴﻞ ،ﻳﻜﻔﻲ ﻓﻘﻂ ﺇﻧﻌﺎﺷﻬﺎ .ﺗﺘﻮﻓﺮ ٣ﺩﻭﺭﺍﺕ ﻣﺨﺘﻠﻔﺔ ﻷﻧﻮﺍﻉ ﻣﺘﻨﻮﻋﺔ ﻣﻦ ﺍﻷﻗﻤﺸﺔ.
• ﺍﻟﻜﻲ ﺍﻟﺴﻬﻞ ﺍﳌﺘﻤﻴﺰ )ﻃﺮﺍﺯﺍﺕ ﻣﺤﺪﺩﺓ(
ﻧﻈﺮﹰﺍ ﻷﻥ ﺍﻟﻜﻲ ﻳﹸﻌﺪ ﻋﻤﻠﻴﺔ ﻳﻮﻣﻴﺔ ﺃﺳﺎﺳﻴﺔ ﺗﺴﺘﻐﺮﻕ ﺍﻟﻜﺜﻴﺮ ﻣﻦ ﺍﻟﻮﻗﺖ ،ﻭﺑﻔﻀﻞ ﻭﻇﻴﻔﺔ ﺍﻟﻜﻲ ﺍﳉﺪﻳﺪﺓ ﺍﻟﺮﺍﺋﻌﺔ ﺍﻟﺘﻲ ﺗﻌﺪ ﺃﺣﺪ ﺇﻋﺪﺍﺩﺍﺕ
ﻋﻤﻠﻴﺔ ﺍﻟﻐﺴﻴﻞ ﺍﳌﺘﺨﺼﺼﺔ ﺍﻟﺘﻲ ﺗﺴﺎﻋﺪﻙ ﻓﻲ ﺇﺧﻔﺎﺀ ﺍﻻﻧﺜﻨﺎﺀﺍﺕ ،ﳝﻜﻨﻚ ﺗﻘﻠﻴﻞ ﺍﻟﻮﻗﺖ ﺍﻟﺬﻱ ﺗﻘﻀﻴﻪ ﻓﻲ ﺍﻟﻜﻲ ﻟﺘﺤﺴﻦ ﻣﻦ ﻣﻈﻬﺮﻙ
ﺍﳋﺎﺭﺟﻲ.
• ﺗﻨﻈﻴﻒ ﺍﳊﺎﻭﻳﺔ ﺻﺪﻳﻖ ﺍﻟﺒﻴﺌﺔ )ﻃﺮﺍﺯﺍﺕ ﻣﺤﺪﺩﺓ(
ﺗﺴﺎﻋﺪﻙ ﻣﻴﺰﺓ "ﺗﻨﻈﻴﻒ ﺍﳊﺎﻭﻳﺔ ﺻﺪﻳﻖ ﺍﻟﺒﻴﺌﺔ" ﻓﻲ ﺍﳊﻔﺎﻅ ﻋﻠﻰ ﻧﻈﺎﻓﺔ ﺍﻟﻐﺴﺎﻟﺔ ﺩﻭﻥ ﺍﺳﺘﺨﺪﺍﻡ ﺃﻱ ﻣﻨﻈﻔﺎﺕ ﺃﻭ ﻣﻮﺍﺩ ﻣﺒﻴﻀﺔ .ﺣﺎﻓﻆ
ﻋﻠﻰ ﻧﻈﺎﻓﺔ ﺍﳊﺎﻭﻳﺔ ﻭﺭﺍﺋﺤﺘﻬﺎ ﺍﳉﻴﺪﺓ ﺑﻔﻀﻞ ﺑﺮﻧﺎﻣﺞ ﺍﻟﺘﻨﻈﻴﻒ ﺍﳌﺘﺨﺼﺺ ﻫﺬﺍ.
• ﺳﺨﺎﻥ ﺧﺰﻓﻲ ﻟﻠﻤﺘﺎﻧﺔ ﻭﺗﻮﻓﻴﺮ ﺍﻟﻄﺎﻗﺔ )ﻃﺮﺍﺯﺍﺕ ﻣﺤﺪﺩﺓ(
ﻳﺘﻤﻴﺰ "ﺍﻟﺴﺨﺎﻥ ﺍﳋﺰﻓﻲ" ﺍﳌﺒﺘﻜﺮ ﺑﻘﻮﺓ ﻣﻀﺎﻋﻔﺔ ﺗﻔﻮﻕ ﺍﻟﺴﺨﺎﻧﺎﺕ ﺍﻟﻌﺎﺩﻳﺔ .ﻭﻫﺬﺍ ﻳﻮﻓﺮ ﺃﻣﻮﺍﻟﻚ ﺍﻟﺘﻲ ﺗﺘﻜﺒﺪﻫﺎ ﻋﻠﻰ ﺍﻹﺻﻼﺣﺎﺕ ،ﻓﻀﻼ ﹰ ﻋﻦ
ﺃﻧﻪ ﻳﺨﻔﻒ ﻣﻦ ﺣﺪﺓ ﺍﳌﺎﺀ ﺍﻟﺴﺎﺧﻦ ﻋﻠﻰ ﺍﳌﻼﺑﺲ ﻭﻳﻮﻓﺮ ﺍﻟﻄﺎﻗﺔ.
• ﺍﻟﻐﺴﻞ ﺍﻟﻔﻀﻲ -ﻧﻈﺎﻡ ﺍﻟﻐﺴﻞ ﺍﻟﻔﻀﻲ ﺍﻟﺼﺤﻲ )ﻃﺮﺍﺯﺍﺕ ﻣﺤﺪﺩﺓ(
ﺗﺮﻛﻴﺒﺔ ﺭﺍﺋﺪﺓ! ﲡﻤﻊ ﺗﻘﻨﻴﺔ ﺍﻟﻐﺴﻞ ﺍﻟﻔﻀﻲ ﻣﻦ Samsungﺑﲔ ﺃﺛﺮ ﺍﻟﺘﻌﻘﻴﻢ ﺍﻟﻨﺎﰋ ﻋﻦ ﺍﻟﻐﺴﻞ ﺍﻟﻔﻀﻲ ﻭﺍﻟﻌﻠﻮﻡ ﺍﳌﺘﻘﺪﻣﺔ ﻟﻠﺤﺼﻮﻝ ﻋﻠﻰ
ﺗﺪﺭﻳﺠﻴﺎ ﺇﻟﻰ ﺃﻳﻮﻧﺎﺕ
ﺃﻗﺼﻰ ﺩﺭﺟﺎﺕ ﺍﻟﻐﺴﻞ ﺍﻟﻨﻈﻴﻒ ،ﺣﻴﺚ ﻳﺘﻢ ﲢﻮﻳﻞ ﺍﳉﺰﺋﻴﺎﺕ ﺍﻟﺪﻗﻴﻘﺔ ﻣﻦ ﺍﻟﻔﻀﺔ ﻣﻦ ﺍﻷﻃﺒﺎﻕ ﺍﳌﻌﺪﻧﻴﺔ ﻣﻦ ﺍﻟﻔﻀﺔ
ﹰ
ﺍﻟﻔﻀﺔ ﻣﻦ ﺧﻼﻝ ﺍﻟﺘﺤﻠﻴﻞ ﺍﻟﻜﻬﺮﺑﻲ ،ﺃﺛﻨﺎﺀ ﺩﻭﺭﺓ ﺍﻟﻐﺴﻴﻞ .ﻭﺗﻘﻮﻡ ﺟﺰﻳﺌﺎﺕ ﺍﻟﻔﻀﺔ ﺑﺈﺯﺍﻟﺔ ﺍﻟﺮﺍﺋﺤﺔ ﺍﻟﺘﻲ ﺗﺴﺒﺐ ﺍﻟﺒﻜﺘﺮﻳﺎ ﺍﻟﺘﻲ ﲢﺪﺙ ﺃﺛﻨﺎﺀ
ﻋﻤﻠﻴﺔ ﺍﻟﻐﺴﻴﻞ "ﻓﺎﺋﻖ ﺍﻟﻨﻈﺎﻓﺔ" ،ﺣﺘﻰ ﻭﺇﻥ ﻛﺎﻧﺖ ﻓﻲ ﻣﺎﺀ ﺑﺎﺭﺩ ﺃﻭ ﻣﺎﺀ ﺑﻼ ﻣﺎﺩﺓ ﻟﺘﺒﻴﻴﺾ ﺍﻟﻠﻮﻥ ،ﻟﺬﺍ ﺗﻌﻤﻞ ﻋﻤﻠﻴﺔ ﺍﻟﻐﺴﻴﻞ ﻓﻲ ﻣﺎﺀ ﺑﺎﺭﺩ
ﺃﺳﺒﻮﻋﻴﺎ ،ﻛﻤﺎ ﳝﻜﻦ
ﻋﻠﻰ ﺗﻮﻓﻴﺮ ﻃﺎﻗﺔ ﻛﺎﻓﻴﺔ ﻭﻣﻔﻴﺪﺓ ﻟﻠﻐﺴﻴﻞ .ﺗﺘﻤﺘﻊ ﻃﺒﻘﺎﺕ ﺍﻟﻔﻀﺔ ﺑﻀﻤﺎﻥ ﳌﺪﺓ ﻋﺸﺮ ﺳﻨﻮﺍﺕ ﻟﻠﺘﺸﻐﻴﻞ ﻣﺮﺗﲔ
ﹰ
ﺍﺳﺘﺒﺪﺍﻟﻬﻤﺎ ﺑﺴﻬﻮﻟﺔ ﺑﻮﺍﺳﻄﺔ "ﻓﻨﻲ ﺍﻟﺼﻴﺎﻧﺔ" ﺇﺫﺍ ﻟﺰﻡ ﺍﻷﻣﺮ.
_٢ﻣﻴﺰﺍﺕ
2/14/2011 11:02:59 AM
WF9854LWN-02713K_AR_v1.indd Sec1:2
• ﺍﻟﺘﺄﻣﲔ ﺿﺪ ﻋﺒﺚ ﺍﻷﻃﻔﺎﻝ
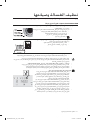
ﺗﻀﻤﻦ ﻭﻇﻴﻔﺔ ) Child Lockﺍﻟﺘﺄﻣﲔ ﺿﺪ ﻋﺒﺚ ﺍﻷﻃﻔﺎﻝ( ﺍﳊﻔﺎﻅ ﻋﻠﻰ ﺍﻟﻐﺴﺎﻟﺔ ﺿﺪ ﻋﺒﺚ ﺍﻷﻃﻔﺎﻝ.
ﻭﺗﻌﻤﻞ ﻣﻴﺰﺓ ﺍﻷﻣﺎﻥ ﻫﺬﻩ ﻋﻠﻰ ﻣﻨﻊ ﺍﻷﻃﻔﺎﻝ ﻣﻦ ﺍﻟﻌﺒﺚ ﺑﺘﺸﻐﻴﻞ ﺍﻟﻐﺴﺎﻟﺔ ،ﻛﻤﺎ ﺗﻘﻮﻡ ﺑﺘﻨﺒﻴﻬﻚ ﻋﻨﺪ ﺗﺸﻐﻴﻠﻬﺎ.
• ﻏﺴﻞ ﺍﻟﺼﻮﻑ
ﰎ ﺍﺧﺘﺒﺎﺭ ﻫﺬﻩ ﺍﻟﻐﺴﺎﻟﺔ ﺣﻴﺚ ﺍﺟﺘﺎﺯﺕ ﺍﳌﻮﺍﺻﻔﺎﺕ ﺍﻟﺘﻲ ﺣﺪﺩﺗﻬﺎ ﺷﺮﻛﺔ Woolmarkﻟﻐﺴﻞ ﺍﳌﻨﺘﺠﺎﺕ ﺍﻟﺼﻮﻓﻴﺔ ﻓﻲ ﺍﻟﻐﺴﺎﻟﺔ.
ﻳﺠﺐ ﻏﺴﻞ ﺍﳌﻼﺑﺲ ﻭﻓﻘﺎ ﹰ ﻟﻺﺭﺷﺎﺩﺍﺕ ﺍﳌﺪﻭﻧﺔ ﻋﻠﻰ ﺍﳌﻠﺼﻖ ﺍﳌﻮﺟﻮﺩ ﻋﻠﻰ ﺍﳌﻼﺑﺲ ﻛﻤﺎ ﺣﺪﺩﺗﻬﺎ ﺷﺮﻛﺘﻲ Woolmarkﻭ .Samsung
• ﺗﺄﺟﻴﻞ ﺍﻟﺘﻮﻗﻒ
ﺗﻌﻤﻞ ﻫﺬﻩ ﺍﳌﻴﺰﺓ ﻋﻠﻰ ﺗﺄﺟﻴﻞ ﺍﻟﺪﻭﺭﺓ ﺣﺘﻰ ١٩ﺳﺎﻋﺔ ﺗﻀﺎﻑ ﺳﺎﻋﺔ ﺑﻌﺪ ﺳﺎﻋﺔ ﻭﺯﻳﺎﺩﺓ ﺳﻬﻮﻟﺔ ﺍﺳﺘﺨﺪﺍﻡ ﺍﻟﻐﺴﺎﻟﺔ ﻻﺳﻴﻤﺎ ﻋﻨﺪﻣﺎ ﺗﺮﻏﺐ
ﻓﻲ ﺍﻟﺬﻫﺎﺏ ﻟﻠﺨﺎﺭﺝ.
• ﺍﻟﻐﺴﻞ ﺳﺮﻳﻊ
ﻣﺘﺴﻌﺎ ﻣﻦ ﺍﻟﻮﻗﺖ ﻟﻠﺨﺮﻭﺝ ﻗﺒﻞ ﻓﻮﺍﺕ ﺍﻷﻭﺍﻥ.
ﻻ ﻣﺠﺎﻝ ﻹﻫﺪﺍﺭ ﺍﻟﻮﻗﺖ! ﲤﻨﺤﻚ ﻋﻤﻠﻴﺔ ﺍﻟﻐﺴﻴﻞ ﺍﻟﺘﻲ ﺗﺴﺘﻐﺮﻕ ﺃﻗﻞ ﻣﻦ ٣٠ﺩﻗﻴﻘﺔ
ﹰ
ﻟﺬﺍ ﹸﳝﺜﻞ ﺑﺮﻧﺎﻣﺞ ) Quick Washﺍﻟﻐﺴﻞ ﺍﻟﺴﺮﻳﻊ( ﻓﻲ ٢٩ﺩﻗﻴﻘﺔ ﺣﻼ ﹰ ﳊﻴﺎﺗﻚ ﺍﳌﻜﺘﻈﺔ ﺑﺎﻷﻋﻤﺎﻝ .ﺍﻵﻥ ﳝﻜﻨﻚ ﻏﺴﻞ ﻣﻼﺑﺴﻚ ﺍﳌﻔﻀﻠﺔ ﻓﻲ
٢٩ﺩﻗﻴﻘﺔ ﻓﻘﻂ!
• ﺑﺮﻧﺎﻣﺞ ) Delicatesﺃﻧﺴﺠﺔ ﺭﻗﻴﻘﺔ( ﻭ ) Hand Washﻏﺴﻞ ﻳﺪﻭﻱ(
ﳝﻜﻨﻚ ﺃﻥ ﲢﻈﻰ ﺑﻌﻨﺎﻳﺔ ﺧﺎﺻﺔ ﺑﻐﺴﻞ ﻣﻼﺑﺴﻚ ﻋﻦ ﻃﺮﻳﻖ ﲢﺪﻳﺪ ﺩﺭﺟﺔ ﺣﺮﺍﺭﺓ ﻣﻼﺋﻤﺔ ﻭﺩﻭﺭﺓ ﻏﺴﻴﻞ ﻫﺎﺩﺋﺔ ﻭﻛﻤﻴﺔ ﻣﺎﺀ ﻣﻨﺎﺳﺒﺔ.
• ﻟﻮﺣﺔ ﻋﺮﺽ ﺭﺳﻮﻣﻴﺔ ﺭﻗﻤﻴﺔ
ﺗﺘﻤﻴﺰ "ﻟﻮﺣﺔ ﺍﻟﻌﺮﺽ ﺍﻟﺮﺳﻮﻣﻴﺔ ﺍﻟﺮﻗﻤﻴﺔ" ﺑﻮﺿﻮﺣﻬﺎ ﻭﺳﻬﻮﻟﺔ ﺍﺳﺘﺨﺪﺍﻣﻬﺎ ﳑﺎ ﻳﻌﻤﻞ ﻋﻠﻰ ﺗﻘﻠﻴﻞ ﺍﻟﻀﻮﺿﺎﺀ ﻭﺍﳌﻘﺎﻃﻌﺔ ﺇﻟﻰ ﺃﺩﻧﻰ ﺣﺪ.
ﺑﺎﻹﺿﺎﻓﺔ ﺇﻟﻰ ﺳﻬﻮﻟﺔ ﺍﻟﺘﺸﻐﻴﻞ ﺍﻟﺘﻲ ﺗﺘﻴﺢ ﻟﻚ "ﻟﻮﺣﺔ ﺍﻟﻌﺮﺽ ﺍﻟﺮﺳﻮﻣﻴﺔ ﺍﻟﺮﻗﻤﻴﺔ" ﺇﺟﺮﺍﺀ ﻋﻤﻠﻴﺎﺕ ﺍﻟﻀﺒﻂ ﺑﺴﺮﻋﺔ ﻭﺑﺪﻗﺔ ﻟﻠﺤﺼﻮﻝ
ﻋﻠﻰ ﻧﺘﺎﺋﺞ ﻏﺴﻞ ﻓﺎﺋﻘﺔ.
• ﺑﺎﺏ ﻭﺍﺳﻊ
ﻭﺧﺼﻮﺻﺎ
ﻓﺘﺤﺔ ﻋﺮﻳﻀﺔ ﺟ ﹰﺪﺍ ﻟﻠﺒﺎﺏ ﳌﺸﺎﻫﺪﺓ ﻋﻤﻠﻴﺔ ﺍﻟﻐﺴﻞ ﺑﺸﻜﻞ ﻣﺮﻳﺢ! ﻛﻤﺎ ﺃﻧﻪ ﻳﺴﻤﺢ ﺑﺈﺿﺎﻓﺔ ﻗﻄﻊ ﺍﳌﻼﺑﺲ ﻭﺇﺧﺮﺍﺟﻬﺎ ﺑﺴﻬﻮﻟﺔ،
ﹰ
ﺍﻟﻘﻄﻊ ﻛﺒﻴﺮﺓ ﺍﳊﺠﻢ ،ﻣﺜﻞ ﺍﳌﻔﺮﻭﺷﺎﺕ ﻭﺍﳌﻨﺎﺷﻒ ﺇﻟﻰ ﺁﺧﺮﻩ.
ﻳﺤﺘﻮﻯ ﻫﺬﺍ ﺍﻟﺪﻟﻴﻞ ﻋﻠﻰ ﻣﻌﻠﻮﻣﺎﺕ ﻫﺎﻣﺔ ﺣﻮﻝ ﻋﻤﻠﻴﺔ ﺍﻟﺘﺮﻛﻴﺐ ﻭﺍﻻﺳﺘﺨﺪﺍﻡ ﻭﺍﻟﻌﻨﺎﻳﺔ ﺑﻐﺴﺎﻟﺔ Samsungﺍﳉﺪﻳﺪﺓ .ﳝﻜﻨﻚ ﺍﻟﺮﺟﻮﻉ ﺇﻟﻴﻪ
ﻟﻠﺘﻌﺮﻑ ﻋﻠﻰ ﺷﻜﻞ ﻟﻮﺣﺔ ﺍﻟﺘﺤﻜﻢ ،ﻭﺍﻟﺘﻌﻠﻴﻤﺎﺕ ﺍﳋﺎﺻﺔ ﺑﻜﻴﻔﻴﺔ ﺍﺳﺘﺨﺪﺍﻡ ﺍﻟﻐﺴﺎﻟﺔ ،ﺑﺎﻹﺿﺎﻓﺔ ﺇﻟﻰ ﺍﻟﺘﻠﻤﻴﺤﺎﺕ ﺍﳌﺘﻌﻠﻘﺔ ﺑﺎﻟﻮﺻﻮﻝ ﺇﻟﻰ
ﺃﻗﺼﻰ ﺍﺳﺘﻔﺎﺩﺓ ﻣﻦ ﺃﺣﺪﺙ ﺍﳌﻴﺰﺍﺕ ﻭﺍﻹﻣﻜﺎﻧﺎﺕ ﺍﳌﺘﻮﻓﺮﺓ ﺑﻬﺎ .ﻳﺮﺷﺪﻙ ﺍﻟﻘﺴﻢ "ﺍﺳﺘﻜﺸﺎﻑ ﺍﳌﺸﺎﻛﻞ ﻭﺣﻠﻬﺎ ﻭﺭﻣﻮﺯ ﺍﳌﻌﻠﻮﻣﺎﺕ" ﻓﻲ ﺻﻔﺤﺔ
٣٤ﺇﻟﻰ ﻣﺎ ﻳﺠﺐ ﻋﻠﻴﻚ ﻓﻌﻠﻪ ﻓﻲ ﺣﺎﻟﺔ ﺣﺪﻭﺙ ﻋﻄﻞ ﺑﻐﺴﺎﻟﺘﻚ ﺍﳉﺪﻳﺪﺓ.
ﻣﻴﺰﺍﺕ _٣
2/14/2011 11:02:59 AM
WF9854LWN-02713K_AR_v1.indd Sec1:3
ﻣﻌﻠﻮﻣﺎﺕ ﺍﻟﺴﻼﻣﺔ
ﺗﻬﺎﻧﻴﻨﺎ ﻋﻠﻰ ﺷﺮﺍﺋﻚ ﻏﺴﺎﻟﺔ™ ActivFreshﺍﳉﺪﻳﺪﺓ ﻣﻦ .Samsungﻳﺤﺘﻮﻯ ﻫﺬﺍ ﺍﻟﺪﻟﻴﻞ ﻋﻠﻰ ﻣﻌﻠﻮﻣﺎﺕ ﻫﺎﻣﺔ ﺣﻮﻝ
ﻋﻤﻠﻴﺔ ﺗﺮﻛﻴﺐ ﺍﳉﻬﺎﺯ ﻭﺍﺳﺘﺨﺪﺍﻣﻪ ﻭﺍﻟﻌﻨﺎﻳﺔ ﺑﻪ .ﻳﺮﺟﻰ ﻗﺮﺍﺀﺓ ﻫﺬﺍ ﺍﻟﺪﻟﻴﻞ ﺑﻌﻨﺎﻳﺔ ﻟﺘﺘﻤﻜﻦ ﻣﻦ ﺍﻻﺳﺘﻔﺎﺩﺓ ﺍﻟﻜﺎﻣﻠﺔ ﻣﻦ
ﺍﳌﻴﺰﺍﺕ ﻭﺍﻟﻔﻮﺍﺋﺪ ﺍﻟﻌﺪﻳﺪﺓ ﻟﻐﺴﺎﻟﺘﻚ.
ﻣﺎ ﻳﺠﺐ ﺃﻥ ﺗﻌﺮﻓﻪ ﺣﻮﻝ ﺇﺭﺷﺎﺩﺍﺕ ﺍﻟﺴﻼﻣﺔ
ﻳﺮﺟﻰ ﻗﺮﺍﺀﺓ ﻫﺬﺍ ﺍﻟﺪﻟﻴﻞ ﺑﻌﻨﺎﻳﺔ ﻟﻠﺘﺄﻛﺪ ﻣﻦ ﻣﻌﺮﻓﺔ ﻛﻴﻔﻴﺔ ﺗﺸﻐﻴﻞ ﺍﳌﻴﺰﺍﺕ ﻭﺍﻟﻮﻇﺎﺋﻒ ﺍﳌﺘﻌﺪﺩﺓ ﳉﻬﺎﺯﻙ ﺍﳉﺪﻳﺪ ﺑﺴﻼﻣﺔ ﻭﻓﺎﻋﻠﻴﺔ ،ﻛﻤﺎ ﻳﺠﺐ ﺍﻻﺣﺘﻔﺎﻅ ﺑﻪ ﻓﻲ
ﻣﻜﺎﻥ ﺁﻣﻦ ﺑﺎﻟﻘﺮﺏ ﻣﻦ ﺍﳉﻬﺎﺯ ﻟﻠﺮﺟﻮﻉ ﺇﻟﻴﻪ ﻓﻲ ﺍﳌﺴﺘﻘﺒﻞ .ﺍﺳﺘﺨﺪﻡ ﻫﺬﺍ ﺍﳉﻬﺎﺯ ﻟﻠﻐﺮﺽ ﺍﺼﺺ ﻟﻬﺎ ﻓﻘﻂ ﻋﻠﻰ ﺍﻟﻨﺤﻮ ﺍﳌﻮﺿﺢ ﻓﻲ ﺩﻟﻴﻞ ﺍﻹﺭﺷﺎﺩﺍﺕ ﺍﻟﺬﻱ ﺑﲔ
ﻳﺪﻳﻚ.
ﻻ ﺗﻐﻄﻲ ﺍﻟﺘﺤﺬﻳﺮﺍﺕ ﻭﺇﺭﺷﺎﺩﺍﺕ ﺍﻟﺴﻼﻣﺔ ﺍﻟﻬﺎﻣﺔ ﺍﻟﻮﺍﺭﺩﺓ ﻓﻲ ﻫﺬﺍ ﺍﻟﺪﻟﻴﻞ ﻛﺎﻓﺔ ﺍﻟﻈﺮﻭﻑ ﻭﺍﳌﻮﺍﻗﻒ ﺍﶈﺘﻤﻞ ﺣﺪﻭﺛﻬﺎ .ﻟﺬﺍ ﻳﻘﻊ ﻋﻠﻰ ﻋﺎﺗﻘﻚ ﻣﺴﺆﻭﻟﻴﺔ ﺍﺗﺒﺎﻉ
ﺍﳌﻨﻄﻖ ﺍﻟﺴﻠﻴﻢ ﻭﺍﻟﺘﻌﺎﻣﻞ ﺑﺤﺬﺭ ﻭﻣﺮﺍﻋﺎﺓ ﺍﻻﻧﺘﺒﺎﻩ ﻋﻨﺪ ﺗﺮﻛﻴﺐ ﺍﻟﻐﺴﺎﻟﺔ ﻭﺻﻴﺎﻧﺘﻬﺎ ﻭﺗﺸﻐﻴﻠﻬﺎ.
ﻧﻈﺮﹰﺍ ﻷﻥ ﺇﺭﺷﺎﺩﺍﺕ ﺍﻟﺘﺸﻐﻴﻞ ﺍﻟﺘﺎﻟﻴﺔ ﺗﻨﻄﺒﻖ ﻋﻠﻰ ﹸﻃﺮﺯ ﻣﺘﻌﺪﺩﺓ ،ﻓﺈﻥ ﺧﺼﺎﺋﺺ ﺍﻟﻐﺴﺎﻟﺔ ﺍﻟﺘﻲ ﺗﺴﺘﻌﻤﻠﻬﺎ ﻗﺪ ﺗﺨﺘﻠﻒ ﻗﻠﻴﻼ ﹰ ﻋﻦ ﺗﻠﻚ ﺍﳌﻮﺻﻮﻓﺔ ﻓﻲ ﻫﺬﺍ
ﺍﻟﺪﻟﻴﻞ ،ﻛﻤﺎ ﺃﻥ ﺑﻌﺾ ﻋﻼﻣﺎﺕ ﺍﻟﺘﺤﺬﻳﺮ ﺍﳌﺬﻛﻮﺭﺓ ﻗﺪ ﺗﻜﻮﻥ ﻏﻴﺮ ﻗﺎﺑﻠﺔ ﻟﻠﺘﻄﺒﻴﻖ .ﺇﺫﺍ ﻛﺎﻧﺖ ﻟﺪﻳﻚ ﺃﻱ ﺃﺳﺌﻠﺔ ﺃﻭ ﻣﺨﺎﻭﻑ ،ﺍﺗﺼﻞ ﺑﺄﻗﺮﺏ ﻣﺮﻛﺰ ﺧﺪﻣﺔ ﺃﻭ ﺍﺑﺤﺚ ﻋﻦ
ﺍﻟﺘﻌﻠﻴﻤﺎﺕ ﻭﺍﳌﻌﻠﻮﻣﺎﺕ ﻋﺒﺮ ﺍﻹﻧﺘﺮﻧﺖ ﻋﻠﻰ ﻣﻮﻗﻊ .www.samsung.com
ﺍﻟﺮﻣﻮﺯ ﻭﺍﻻﺣﺘﻴﺎﻃﺎﺕ ﺍﻟﻬﺎﻣﺔ ﻟﻠﺴﻼﻣﺔ
ﺗﺸﻴﺮ ﺍﻟﺮﻣﻮﺯ ﻭﺍﻟﻌﻼﻣﺎﺕ ﺍﳌﻮﺟﻮﺩﺓ ﻓﻲ ﺩﻟﻴﻞ ﺍﳌﺴﺘﺨﺪﻡ ﺍﻟﺬﻱ ﺑﲔ ﻳﺪﻳﻚ ﺇﻟﻰ ﻣﺎ ﻳﻠﻲ:
ﲢﺬﻳﺮ
ﺗﻨﺒﻴﻪ
ﺗﻨﺒﻴﻪ
ﺍﳌﻤﺎﺭﺳﺎﺕ ﺍﳋﻄﻴﺮﺓ ﺃﻭ ﻏﻴﺮ ﺍﻵﻣﻨﺔ ﺍﻟﺘﻲ ﻗﺪ ﺗﺆﺩﻱ ﺇﻟﻰ ﻲﻓ ﻒﻠﺗ ﻭﺃ/ﻭ ﺕﻮﳌﺍ ﻭﺃ/ﻭ ﺹﺎﺨﺷﻸﻟ ﺓﺮﻴﻄﺧ ﺕﺎﺑﺎﺻﺇ
.ﺕﺎﻜﻠﺘﻤﳌﺍ
ﺍﳌﻤﺎﺭﺳﺎﺕ ﺍﳋﻄﻴﺮﺓ ﺃﻭ ﻏﻴﺮ ﺍﻵﻣﻨﺔ ﺍﻟﺘﻲ ﻗﺪ ﺗﺆﺩﻱ ﺕﺎﻜﻠﺘﻤﳌﺍ ﻲﻓ ﻒﻠﺗ ﻭﺃ/ﻭ ﺹﺎﺨﺷﻸﻟ ﺕﺎﺑﺎﺻﺇ ﻰﻟﺇ.
ﻟﺘﻘﻠﻴﻞ ﺍﺣﺘﻤﺎﻝ ﺣﺪﻭﺙ ﺧﻄﺮ ﺍﳊﺮﻳﻖ ﺃﻭ ﺍﻻﻧﻔﺠﺎﺭ ﺃﻭ ﺍﻟﺼﺪﻣﺎﺕ ﺍﻟﻜﻬﺮﺑﻴﺔ ﺃﻭ ﺍﻹﺻﺎﺑﺔ ﺍﳉﺴﺪﻳﺔ ﺃﺛﻨﺎﺀ
ﺍﺳﺘﺨﺪﺍﻡ ﺍﻟﻐﺴﺎﻟﺔ ،ﺍﺗﺒﻊ ﺍﺣﺘﻴﺎﻃﺎﺕ ﺍﻟﺴﻼﻣﺔ ﺍﻷﺳﺎﺳﻴﺔ ﺍﻟﺘﺎﻟﻴﺔ:
ﳑﻨﻮﻉ ﺍﶈﺎﻭﻟﺔ.
ﳑﻨﻮﻉ ﺍﻟﻔﻚ.
ﳑﻨﻮﻉ ﺍﻟﻠﻤﺲ.
ﺍﺗﺒﻊ ﺍﻹﺭﺷﺎﺩﺍﺕ ﺑﻌﻨﺎﻳﺔ.
ﻗﻢ ﺑﻔﺼﻞ ﻗﺎﺑﺲ ﺍﻟﺘﻴﺎﺭ ﺍﻟﻜﻬﺮﺑﻲ ﻣﻦ ﻣﻘﺒﺲ ﺍﳊﺎﺋﻂ.
ﺗﺄﻛﺪ ﻣﻦ ﺗﻮﺻﻴﻞ ﺍﻟﻐﺴﺎﻟﺔ ﺑﺄﺭﺿﻲ ﳌﻨﻊ ﺣﺪﻭﺙ ﺻﺪﻣﺔ ﻛﻬﺮﺑﻴﺔ.
ﺍﺗﺼﻞ ﲟﺮﻛﺰ ﺍﳋﺪﻣﺔ ﻟﻠﺤﺼﻮﻝ ﻋﻠﻰ ﺗﻌﻠﻴﻤﺎﺕ.
ﻣﻼﺣﻈﺔ
.ﻦﻳﺮﺧﻶﻟﻭ ﻚﻟ ﺕﺎﺑﺎﺻﺇ ﺙﻭﺪﺣ ﻊﻨﻣ ﻰﻟﺇ ﻩﺬﻫ ﺮﻳﺬﺤﺘﻟﺍ ﺕﺎﻣﻼﻋ ﻑﺪﻬﺗ
.ﺔﻳﺎﻨﻌﺑ ﺎﻬﻋﺎﺒﺗﺍ ﻰﺟﺮﻳ ﺍﺬﻟ
.ﻞﺒﻘﺘﺴﳌﺍ ﻲﻓ ﻊﺟﺮﻤﻛ ﻪﻴﻟﺇ ﺩﺎﻨﺘﺳﻼﻟ ﻦﻣﺁ ﻥﺎﻜﻣ ﻲﻓ ﻪﻈﻔﺤﺑ ﻢﻗ ،ﻞﻴﻟﺪﻟﺍ ﺍﺬﻫ ﺓﺀﺍﺮﻗ ﺪﻌﺑ
ﺍﻗﺮﺃ ﻛﺎﻓﺔ ﺍﻹﺭﺷﺎﺩﺍﺕ ﺃﻭﻻ ﹰ ﻗﺒﻞ ﺍﺳﺘﺨﺪﺍﻡ ﺍﳉﻬﺎﺯ.
ﻳﻮﺟﺪ ﺍﺣﺘﻤﺎﻝ ﺍﻟﺘﻌﺮﺽ ﻟﻠﻤﺨﺎﻃﺮ ،ﻛﻤﺎ ﻫﻮ ﺍﳊﺎﻝ ﺃﺛﻨﺎﺀ ﺍﺳﺘﺨﺪﺍﻡ ﺍﻟﻄﺎﻗﺔ ﺍﻟﻜﻬﺮﺑﻴﺔ ﻭﺍﻷﺟﺰﺍﺀ ﺍﳌﺘﺤﺮﻛﺔ .ﻭﻟﺘﺸﻐﻴﻞ ﻫﺬﺍ ﺍﳉﻬﺎﺯ ﺑﺄﻣﺎﻥ،
ﻳﺠﺐ ﻋﻠﻴﻚ ﺍﻟﺘﻌﺮﹼﻑ ﻋﻠﻰ ﻃﺮﻳﻘﺔ ﺗﺸﻐﻴﻠﻪ ﻭﺗﻮﺧﻲ ﺍﳊﺬﺭ ﺃﺛﻨﺎﺀ ﺍﺳﺘﺨﺪﺍﻣﻪ.
_٤ﻣﻴﺰﺍﺕ
2/14/2011 11:02:59 AM
WF9854LWN-02713K_AR_v1.indd Sec1:4
ﻻ ﺗﺪﻉ ﺍﻷﻃﻔﺎﻝ )ﺃﻭ ﺍﳊﻴﻮﺍﻧﺎﺕ ﺍﻷﻟﻴﻔﺔ( ﻳﻠﻌﺒﻮﻥ ﻓﻮﻕ ﺍﻟﻐﺴﺎﻟﺔ ﺃﻭ ﺑﺪﺍﺧﻠﻬﺎ ،ﺣﻴﺚ ﻻ ﳝﻜﻦ ﻓﺘﺢ ﺑﺎﺏ ﺍﻟﻐﺴﺎﻟﺔ ﺑﺴﻬﻮﻟﺔ ﻣﻦ ﺍﻟﺪﺍﺧﻞ ،ﻭﻗﺪ
ﻳﺼﺎﺏ ﺍﻷﻃﻔﺎﻝ ﺑﺈﺻﺎﺑﺎﺕ ﺑﺎﻟﻐﺔ ﻓﻲ ﺣﺎﻟﺔ ﺍﺣﺘﺒﺎﺳﻬﻢ ﺑﺪﺍﺧﻠﻬﺎ.
ﲢﺬﻳﺮ
ﻟﻢ ﻳﺘﻢ ﺗﺼﻤﻴﻢ ﻫﺬﺍ ﺍﳉﻬﺎﺯ ﻟﻼﺳﺘﺨﺪﺍﻡ ﻣﻦ ﹺﻗﺒﻞ ﺃﺷﺨﺎﺹ ﻟﺪﻳﻬﻢ ﻧﻘﺺ ﻓﻲ ﻗﺪﺭﺍﺕ ﺟﺴﺪﻳﺔ ﺃﻭ ﻋﻘﻠﻴﺔ ﺃﻭ ﺣﺴﻴﺔ )ﲟﺎ ﻓﻴﻬﻢ ﺍﻷﻃﻔﺎﻝ(
ﺃﻭ ﻧﻘﺺ ﻓﻲ ﺍﳌﻌﺮﻓﺔ ﺃﻭ ﺍﳋﺒﺮﺓ ،ﺇﻻ ﲢﺖ ﺇﺷﺮﺍﻑ ﺃﻭ ﺗﻮﺟﻴﻪ ﻓﻴﻤﺎ ﻳﺨﺺ ﺍﺳﺘﺨﺪﺍﻡ ﻫﺬﺍ ﺍﳉﻬﺎﺯ ﻣﻦ ﹺﻗﺒﻞ ﺍﻟﺸﺨﺺ ﺍﳌﺴﺌﻮﻝ ﻋﻦ ﺳﻼﻣﺘﻬﻢ.
ﻳﺠﺐ ﻣﺮﺍﻗﺒﺔ ﺍﻷﻃﻔﺎﻝ ﻟﻀﻤﺎﻥ ﻋﺪﻡ ﻋﺒﺜﻬﻢ ﺑﺎﳉﻬﺎﺯ.
ﻓﻲ ﺣﺎﻟﺔ ﺗﻠﻒ ﺍﻟﻘﺎﺑﺲ )ﺳﻠﻚ ﺍﻟﺘﻴﺎﺭ ﺍﻟﻜﻬﺮﺑﻲ( ،ﻳﺠﺐ ﺗﻐﻴﻴﺮﻩ ﻣﻦ ﹺﻗﺒﻞ ﺍﻟﺸﺮﻛﺔ ﺍﳌﺼﻨﹼﻌﺔ ﺃﻭ ﻭﻛﻴﻞ ﺍﻟﺼﻴﺎﻧﺔ ﺍﳋﺎﺹ ﺑﻬﺎ ﺃﻭ ﺃﻱ ﻓﻨﻲ
ﻣﺆﻫﻞ ﻟﺘﻔﺎﺩﻱ ﺍﻟﺘﻌﺮﺽ ﻷﻱ ﺧﻄﺮ.
ﻳﺠﺐ ﻭﺿﻊ ﺍﳉﻬﺎﺯ ﺑﺎﻟﻘﺮﺏ ﻣﻦ ﻗﺎﺑﺲ ﺍﻟﺘﻴﺎﺭ ﺍﻟﻜﻬﺮﺑﻲ ،ﻭﺻﻨﺎﺑﻴﺮ ﺗﻮﺭﻳﺪ ﺍﳌﺎﺀ ﻭﺧﺮﺍﻃﻴﻢ ﺗﺼﺮﻳﻒ ﺍﳌﺎﺀ ،ﺑﺤﻴﺚ ﻳﺴﻬﻞ ﺍﻟﻮﺻﻮﻝ ﺇﻟﻴﻬﺎ.
ﺑﺎﻟﻨﺴﺒﺔ ﻟﻠﻐﺴﺎﻻﺕ ﺍﻟﺘﻲ ﲢﺘﻮﻱ ﻋﻠﻰ ﻓﺘﺤﺎﺕ ﺗﻬﻮﻳﺔ ﺑﻘﺎﻋﺪﺗﻬﺎ ،ﺗﺄﻛﺪ ﻣﻦ ﻋﺪﻡ ﺳﺪ ﺍﻟﺴﺠﺎﺩ ﺃﻭ ﺃﻳﺔ ﻋﻮﺍﺋﻖ ﺃﺧﺮﻯ ﻟﻬﺬﻩ ﺍﻟﻔﺘﺤﺎﺕ.
ﻳﹸﻨﺼﺢ ﺑﺎﺳﺘﺨﺪﺍﻡ ﻣﺠﻤﻮﻋﺔ ﺧﺮﺍﻃﻴﻢ ﺟﺪﻳﺪﺓ ﻭﻋﺪﻡ ﺍﺳﺘﺨﺪﺍﻡ ﺍﳋﺮﺍﻃﻴﻢ ﺍﻟﻘﺪﳝﺔ ﻣﺮﺓ ﺃﺧﺮﻯ.
ﻣﻴﺰﺍﺕ _٥
2/14/2011 11:02:59 AM
WF9854LWN-02713K_AR_v1.indd Sec1:5
ﻣﻌﻠﻮﻣﺎﺕ ﺍﻟﺴﻼﻣﺔ
ﲢﺬﻳﺮ
ﻋﻼﻣﺎﺕ ﺍﻟﺘﺤﺬﻳﺮ ﺍﻟﺼﺎﺭﻣﺔ ﺍﳋﺎﺻﺔ ﺑﺎﻟﺘﺮﻛﻴﺐ
ﻳﺠﺐ ﺗﺮﻛﻴﺐ ﻫﺬﺍ ﺍﳉﻬﺎﺯ ﺑﻮﺍﺳﻄﺔ ﻓﻨﻲ ﻣﺆﻫﻞ ﺃﻭ ﺷﺮﻛﺔ ﺻﻴﺎﻧﺔ ﻣﺘﺨﺼﺼﺔ.
ﻗﺪ ﻳﻨﺘﺞ ﻋﻦ ﺍﻟﻔﺸﻞ ﻓﻲ ﺍﺗﺒﺎﻉ ﻫﺬﻩ ﺍﻟﺘﻌﻠﻴﻤﺎﺕ ﺣﺪﻭﺙ ﺻﺪﻣﺔ ﻛﻬﺮﺑﻴﺔ ﺃﻭ ﺣﺮﻳﻖ ﺃﻭ ﺍﻧﻔﺠﺎﺭ ﺃﻭ ﻣﺸﺎﻛﻞ ﺗﺘﻌﻠﻖ ﺑﺎﳌﻨﺘﺞ ﺃﻭ ﺍﻟﺘﻌﺮﺽﻟﻺﺻﺎﺑﺔ.
ﻳﺠﺐ ﺗﻮﺧﻲ ﺍﳊﺬﺭ ﻋﻨﺪ ﺭﻓﻊ ﺍﳉﻬﺎﺯ ﻷﻥ ﻭﺯﻧﻪ ﺛﻘﻴﻞ
ﻗﻢ ﺑﺘﻮﺻﻴﻞ ﺳﻠﻚ ﺍﻟﻄﺎﻗﺔ ﲟﻘﺒﺲ ﺣﺎﺋﻂ ﺑﺠﻬﺪ ﻣﻦ ٢٢٠ﺇﻟﻰ ٢٤٠ﻓﻮﻟﺖ ٦٠ /ﻫﺮﺗﺰ ﺃﻭ ﺃﻋﻠﻰ ﻣﻦ ﺫﻟﻚ ،ﻭﻻ ﺗﺴﺘﺨﺪﻡ
ﺍﳌﻘﺒﺲ ﺇﻻ ﻟﺘﺸﻐﻴﻞ ﻫﺬﺍ ﺍﳉﻬﺎﺯ ﻓﻘﻂ .ﺑﺎﻹﺿﺎﻓﺔ ﺇﻟﻰ ﺫﻟﻚ ﻳﺠﺐ ﻋﺪﻡ ﺍﺳﺘﺨﺪﺍﻡ ﺳﻠﻚ ﲤﺪﻳﺪ.
ﻗﺪ ﺗﺆﺩﻱ ﻣﺸﺎﺭﻛﺔ ﻣﻘﺒﺲ ﺍﳊﺎﺋﻂ ﻣﻊ ﺃﺟﻬﺰﺓ ﺃﺧﺮﻯ ﺑﺎﺳﺘﺨﺪﺍﻡ ﻣﺸﺘﺮﻙ ﻛﻬﺮﺑﺎﺀ ﺃﻭ ﻣﺪ ﺳﻠﻚ ﺍﻟﺘﻴﺎﺭ ﺍﻟﻜﻬﺮﺑﻲ ﺇﻟﻰ ﺣﺪﻭﺙ ﺻﺪﻣﺔﻛﻬﺮﺑﻴﺔ ﺃﻭ ﻧﺸﻮﺏ ﺣﺮﻳﻖ.
ﺗﺄﻛﺪ ﻣﻦ ﺗﺘﻄﺎﺑﻖ ﻛﻞ ﻣﻦ ﺍﳉﻬﺪ ﺍﻟﻜﻬﺮﺑﻲ ﻭﺍﻟﺘﺮﺩﺩ ﻭﺍﻟﺘﻴﺎﺭ ﻣﻊ ﺍﻟﻘﻴﺎﺳﺎﺕ ﺍﳋﺎﺻﺔ ﲟﻮﺍﺻﻔﺎﺕ ﺍﳌﻨﺘﺞ .ﻳﺆﺩﻱ ﺍﻟﻔﺸﻞ ﻓﻲ ﺍﻻﻟﺘﺰﺍﻡ ﺑﻬﺬﺍﺍﻷﻣﺮ ﺇﻟﻰ ﺣﺪﻭﺙ ﺻﺪﻣﺔ ﻛﻬﺮﺑﻴﺔ ﺃﻭ ﻧﺸﻮﺏ ﺣﺮﻳﻖ .ﻭﻛﺬﻟﻚ ﺍﻟﻔﺸﻞ ﻓﻲ ﺇﺩﺧﺎﻝ ﻗﺎﺑﺲ ﺍﻟﺘﻴﺎﺭ ﺍﻟﻜﻬﺮﺑﻲ ﻓﻲ ﻣﻘﺒﺲ ﺍﳊﺎﺋﻂ ﺑﺈﺣﻜﺎﻡ.
ﻗﻢ ﺑﺈﺯﺍﻟﺔ ﺃﻱ ﻣﻮﺍﺩ ﻏﺮﻳﺒﺔ ،ﻣﺜﻞ ﺍﻷﺗﺮﺑﺔ ﺃﻭ ﺍﳌﺎﺀ ﻣﻦ ﺍﻟﻨﻬﺎﻳﺎﺕ ﺍﻟﻄﺮﻓﻴﺔ ﻟﻘﺎﺑﺲ ﺍﻟﺘﻴﺎﺭ ﺍﻟﻜﻬﺮﺑﻲ ﻭﻧﻘﺎﻁ ﺍﻻﺗﺼﺎﻝ ﺑﺎﺳﺘﺨﺪﺍﻡ
ﻗﻄﻌﺔ ﻗﻤﺎﺵ ﺟﺎﻓﺔ ﺑﺎﻧﺘﻈﺎﻡ.
ﺍﻓﺼﻞ ﻗﺎﺑﺲ ﺍﻟﺘﻴﺎﺭ ﺍﻟﻜﻬﺮﺑﻲ ﻭﻧﻈﻔﻪ ﺑﺎﺳﺘﺨﺪﺍﻡ ﻗﻄﻌﺔ ﻗﻤﺎﺵ ﺟﺎﻓﺔ. ﻳﺆﺩﻱ ﺍﻟﻔﺸﻞ ﻓﻲ ﺍﻻﻟﺘﺰﺍﻡ ﺑﻬﺬﺍ ﺍﻷﻣﺮ ﺇﻟﻰ ﺣﺪﻭﺙ ﺻﺪﻣﺔ ﻛﻬﺮﺑﻴﺔ ﺃﻭ ﻧﺸﻮﺏ ﺣﺮﻳﻖ.ﻗﻢ ﺑﺈﺩﺧﺎﻝ ﻗﺎﺑﺲ ﺍﻟﺘﻴﺎﺭ ﺍﻟﻜﻬﺮﺑﻲ ﻓﻲ ﻣﻘﺒﺲ ﺍﳊﺎﺋﻂ ﻓﻲ ﺍﻻﲡﺎﻩ ﺍﻟﺼﺤﻴﺢ ﺑﺤﻴﺚ ﻳﻜﻮﻥ ﺍﲡﺎﻩ ﺍﻟﺴﻠﻚ ﻧﺤﻮ ﺍﻷﺭﺿﻴﺔ.
ﺇﺫﺍ ﻗﻤﺖ ﺑﺈﺩﺧﺎﻝ ﻗﺎﺑﺲ ﺍﻟﻄﺎﻗﺔ ﻓﻲ ﺍﳌﻘﺒﺲ ﻓﻲ ﺍﻻﲡﺎﻩ ﺍﳌﻌﺎﻛﺲ ،ﻓﻘﺪ ﺗﺘﻠﻒ ﺍﻷﺳﻼﻙ ﺍﻟﻜﻬﺮﺑﺎﺋﻴﺔ ﺍﳌﻮﺟﻮﺩﺓ ﺩﺍﺧﻞ ﺍﻟﻜﺒﻞ ﻭﻗﺪ ﻳﺆﺩﻱﻫﺬﺍ ﺍﻷﻣﺮ ﺇﻟﻰ ﺣﺪﻭﺙ ﺻﺪﻣﺔ ﻛﻬﺮﺑﻴﺔ ﺃﻭ ﻧﺸﻮﺏ ﺣﺮﻳﻖ.
ﲤﺎﻣﺎ ﻋﻦ ﻣﺘﻨﺎﻭﻝ ﺍﻷﻃﻔﺎﻝ ،ﻧﻈﺮﹰﺍ ﻷﻧﻬﺎ ﻗﺪ ﲤﺜﻞ ﺧﻄﻮﺭﺓ ﻋﻠﻰ ﺍﻷﻃﻔﺎﻝ.
ﺍﺣﺘﻔﻆ ﺑﺠﻤﻴﻊ ﻣﻮﺍﺩ ﺍﻟﺘﻌﺒﺌﺔ ﻭﺍﻟﺘﻐﻠﻴﻒ ﺑﻌﻴﺪﺓ ﹰ
ﻗﺪ ﻳﺆﺩﻱ ﻭﺿﻊ ﺍﻟﻄﻔﻞ ﻟﻜﻴﺲ ﻣﻦ ﺃﻛﻴﺎﺱ ﺍﻟﺘﻐﻠﻴﻒ ﻓﻮﻕ ﺭﺃﺳﻪ ﺇﻟﻰ ﺇﺻﺎﺑﺘﻪ ﺑﺎﻻﺧﺘﻨﺎﻕ.ﻓﻲ ﺣﺎﻟﺔ ﺗﻠﻒ ﺍﳉﻬﺎﺯ ﺃﻭ ﻗﺎﺑﺲ ﺍﻟﺘﻴﺎﺭ ﺍﻟﻜﻬﺮﺑﻲ ﺃﻭ ﻣﻮﺻﻞ ﺍﻟﻄﺎﻗﺔ ،ﺍﺗﺼﻞ ﺑﺄﻗﺮﺏ ﻣﺮﻛﺰ ﺻﻴﺎﻧﺔ.
ﻳﺠﺐ ﺗﻮﺻﻴﻞ ﺍﳉﻬﺎﺯ ﺑﺎﻷﺭﺿﻲ ﺑﺸﻜﻞ ﺳﻠﻴﻢ.
ﻭﻻ ﺗﻘﻢ ﺑﺘﻮﺻﻴﻞ ﺍﳉﻬﺎﺯ ﺑﺎﻷﺭﺿﻲ ﺑﺎﻟﻘﺮﺏ ﻣﻦ ﺃﻧﺒﻮﺏ ﻏﺎﺯ ﺃﻭ ﺃﻧﺒﻮﺏ ﻣﺎﺀ ﺑﻼﺳﺘﻴﻜﻲ ﺃﻭ ﺳﻠﻚ ﺗﻠﻴﻔﻮﻥ.
ﻗﺪ ﻳﻨﺘﺞ ﻋﻦ ﻫﺬﺍ ﺍﻷﻣﺮ ﺣﺪﻭﺙ ﺻﺪﻣﺔ ﻛﻬﺮﺑﻴﺔ ﺃﻭ ﻧﺸﻮﺏ ﺣﺮﻳﻖ ﺃﻭ ﺍﻧﻔﺠﺎﺭ ﺃﻭ ﻣﺸﺎﻛﻞ ﺑﺎﳌﻨﺘﺞ ﻳﺠﺐ ﻋﺪﻡ ﺗﻮﺻﻴﻞ ﺳﻠﻚ ﺍﻟﺘﻴﺎﺭ ﺍﻟﻜﻬﺮﺑﻲ ﲟﺄﺧﺬ ﻟﻢ ﻳﺘﻢ ﺗﻮﺻﻴﻠﻪ ﺑﺄﺭﺿﻲ ﺑﺸﻜﻞ ﺻﺤﻴﺢ ،ﻭﺗﺄﻛﺪ ﻣﻦ ﺃﻥ ﺫﻟﻚ ﻳﺘﻢ ﻭﻓﻘﹰ ﺎ ﻟﻠﻘﻮﺍﻋﺪﺍﶈﻠﻴﺔ ﻭﺍﻟﻘﻮﻣﻴﺔ.
ﻳﺠﺐ ﻋﺪﻡ ﺗﺮﻛﻴﺐ ﻫﺬﺍ ﺍﳉﻬﺎﺯ ﺑﺎﻟﻘﺮﺏ ﻣﻦ ﺳﺨﺎﻥ ﺃﻭ ﻣﻮﺍﺩ ﻗﺎﺑﻠﺔ ﻟﻼﺷﺘﻌﺎﻝ،
ﻛﻤﺎ ﻳﺠﺐ ﻋﺪﻡ ﺗﺮﻛﻴﺐ ﻫﺬﺍ ﺍﳉﻬﺎﺯ ﻓﻲ ﺑﻴﺌﺔ ﺭﻃﺒﺔ ﺃﻭ ﻣﻮﻗﻊ ﺑﻪ ﺯﻳﺖ ﺃﻭ ﺃﺗﺮﺑﺔ ﺃﻭ ﻓﻲ ﻣﻜﺎﻥ ﻳﺘﻌﺮﺽ ﻟﻀﻮﺀ ﺍﻟﺸﻤﺲ
ﺍﳌﺒﺎﺷﺮ ﻭﺍﳌﺎﺀ )ﻗﻄﺮﺍﺕ ﺍﳌﻄﺮ(.
ﻳﺠﺐ ﻋﺪﻡ ﺗﺮﻛﻴﺐ ﻫﺬﺍ ﺍﳉﻬﺎﺯ ﻓﻲ ﻣﻜﺎﻥ ﺩﺭﺟﺔ ﺣﺮﺍﺭﺗﻪ ﻣﻨﺨﻔﻀﺔ
ﻗﺪ ﻳﺆﺩﻱ ﺍﳉﻠﻴﺪ ﺇﻟﻰ ﺍﻧﻔﺠﺎﺭ ﺍﻷﻧﺎﺑﻴﺐﻳﺠﺐ ﻋﺪﻡ ﺗﺮﻛﻴﺐ ﻫﺬﺍ ﺍﳉﻬﺎﺯ ﻓﻲ ﻣﻮﻗﻊ ﻳﻜﻮﻥ ﺑﻪ ﺗﺴﺮﺏ ﻟﻠﻐﺎﺯ.
ﻗﺪ ﻳﻨﺘﺞ ﻋﻦ ﻫﺬﺍ ﺍﻷﻣﺮ ﺣﺪﻭﺙ ﺻﺪﻣﺔ ﻛﻬﺮﺑﻴﺔ ﺃﻭ ﻧﺸﻮﺏ ﺣﺮﻳﻖ.ﻻ ﺗﺴﺘﺨﺪﻡ ﻣﺤﻮﻝ ﻛﻬﺮﺑﻲ.
ﻗﺪ ﻳﻨﺘﺞ ﻋﻦ ﻫﺬﺍ ﺍﻷﻣﺮ ﺣﺪﻭﺙ ﺻﺪﻣﺔ ﻛﻬﺮﺑﻴﺔ ﺃﻭ ﻧﺸﻮﺏ ﺣﺮﻳﻖ.ﻻ ﺗﺴﺘﺨﺪﻡ ﻗﺎﺑﺲ ﺗﻴﺎﺭ ﻛﻬﺮﺑﻲ ﺃﻭ ﺳﻠﻚ ﺗﻴﺎﺭ ﻛﻬﺮﺑﻲ ﺗﺎﻟﻒ ﺃﻭ ﻣﻘﺒﺲ ﺣﺎﺋﻂ ﻏﻴﺮ ﹸﻣﺤﻜﻢ.
ﻗﺪ ﻳﻨﺘﺞ ﻋﻦ ﻫﺬﺍ ﺍﻷﻣﺮ ﺣﺪﻭﺙ ﺻﺪﻣﺔ ﻛﻬﺮﺑﻴﺔ ﺃﻭ ﻧﺸﻮﺏ ﺣﺮﻳﻖ.ﻳﺠﺐ ﻋﺪﻡ ﺟﺬﺏ ﺳﻠﻚ ﺍﻟﺘﻴﺎﺭ ﺍﻟﻜﻬﺮﺑﻲ ﺃﻭ ﺛﻨﻴﻪ ﺑﻘﻮﺓ.
ﻳﺠﺐ ﻋﺪﻡ ﻟﻒ ﺳﻠﻚ ﺍﻟﻄﺎﻗﺔ ﺃﻭ ﻃﻴﻪ.
ﻳﺠﺐ ﻋﺪﻡ ﺗﻌﻠﻴﻖ ﺳﻠﻚ ﺍﻟﻄﺎﻗﺔ ﻓﻮﻕ ﺷﻲﺀ ﻣﻌﺪﻧﻲ ﺃﻭ ﻭﺿﻊ ﺷﻲﺀ ﺛﻘﻴﻞ ﻓﻮﻕ ﺳﻠﻚ ﺍﻟﺘﻴﺎﺭ ﺍﻟﻜﻬﺮﺑﻲ ﺃﻭ ﲤﺮﻳﺮ ﺳﻠﻚ
ﺍﻟﺘﻴﺎﺭ ﺍﻟﻜﻬﺮﺑﻲ ﺑﲔ ﺃﺷﻴﺎﺀ ﺃﻭ ﺩﻓﻊ ﺳﻠﻚ ﺍﻟﺘﻴﺎﺭ ﺍﻟﻜﻬﺮﺑﻲ ﻓﻲ ﺍﳌﺴﺎﺣﺔ ﺍﳌﻮﺟﻮﺩﺓ ﺧﻠﻒ ﺍﳉﻬﺎﺯ.
-ﻗﺪ ﻳﻨﺘﺞ ﻋﻦ ﻫﺬﺍ ﺍﻷﻣﺮ ﺣﺪﻭﺙ ﺻﺪﻣﺔ ﻛﻬﺮﺑﻴﺔ ﺃﻭ ﻧﺸﻮﺏ ﺣﺮﻳﻖ.
_٦ﻣﻌﻠﻮﻣﺎﺕ ﺍﻟﺴﻼﻣﺔ
2/14/2011 11:02:59 AM
WF9854LWN-02713K_AR_v1.indd Sec2:6
ﻳﺠﺐ ﻋﺪﻡ ﺟﺬﺏ ﺳﻠﻚ ﺍﻟﻄﺎﻗﺔ ﻋﻨﺪ ﻓﺼﻞ ﻗﺎﺑﺲ ﺍﻟﺘﻴﺎﺭ ﺍﻟﻜﻬﺮﺑﻲ.
ﻳﺠﺐ ﻓﺼﻞ ﻗﺎﺑﺲ ﺍﻟﺘﻴﺎﺭ ﺍﻟﻜﻬﺮﺑﻲ ﻋﻦ ﻃﺮﻳﻖ ﺍﻹﻣﺴﺎﻙ ﺑﺎﻟﻘﺎﺑﺲ. ﻳﺆﺩﻱ ﺍﻟﻔﺸﻞ ﻓﻲ ﺍﻻﻟﺘﺰﺍﻡ ﺑﻬﺬﺍ ﺍﻷﻣﺮ ﺇﻟﻰ ﺣﺪﻭﺙ ﺻﺪﻣﺔ ﻛﻬﺮﺑﻴﺔ ﺃﻭ ﻧﺸﻮﺏ ﺣﺮﻳﻖ.ﻻ ﺗﻀﻊ ﺳﻠﻚ ﺍﻟﻄﺎﻗﺔ ﻭﺍﻷﻧﺎﺑﻴﺐ ﻓﻲ ﻣﻜﺎﻥ ﻗﺪ ﻳﻌﺮﺿﻚ ﻟﻠﺴﻘﻮﻁ ﻓﻮﻗﻬﺎ.
ﺗﻨﺒﻴﻪ
ﻋﻼﻣﺎﺕ ﺍﻟﺘﻨﺒﻴﻪ ﺍﳋﺎﺻﺔ ﺑﺎﻟﺘﺮﻛﻴﺐ
ﻳﺠﺐ ﻭﺿﻊ ﻫﺬﺍ ﺍﳉﻬﺎﺯ ﺑﻄﺮﻳﻘﺔ ﳝﻜﻦ ﻣﻦ ﺧﻼﻟﻬﺎ ﺍﻟﻮﺻﻮﻝ ﺇﻟﻰ ﻗﺎﺑﺲ ﺍﻟﺘﻴﺎﺭ ﺍﻟﻜﻬﺮﺑﻲ.
ﻳﺆﺩﻱ ﺍﻟﻔﺸﻞ ﻓﻲ ﺍﻻﻟﺘﺰﺍﻡ ﺑﻬﺬﺍ ﺍﻷﻣﺮ ﺇﻟﻰ ﺣﺪﻭﺙ ﺻﺪﻣﺔ ﻛﻬﺮﺑﻴﺔ ﺃﻭ ﻧﺸﻮﺏ ﺣﺮﻳﻖ ﻧﺘﻴﺠﺔ ﻟﺘﺴﺮﻳﺐ ﺍﻟﻜﻬﺮﺑﺎﺀ.ﻳﺠﺐ ﺗﺮﻛﻴﺐ ﺍﳉﻬﺎﺯ ﻋﻠﻰ ﺃﺭﺿﻴﺔ ﻣﺴﺘﻮﻳﺔ ﻭﺻﻠﺒﺔ ﺗﺘﺤﻤﻞ ﻭﺯﻥ ﺍﳉﻬﺎﺯ.
-ﻗﺪ ﻳﻨﺘﺞ ﻋﻦ ﺍﻟﻔﺸﻞ ﻓﻲ ﺍﺗﺒﺎﻉ ﻫﺬﻩ ﺍﻟﺘﻌﻠﻴﻤﺎﺕ ﻭﺟﻮﺩ ﺍﻫﺘﺰﺍﺯﺍﺕ ﺃﻭ ﲢﺮﻛﺎﺕ ﺃﻭ ﺿﻮﺿﺎﺀ ﺃﻭ ﻣﺸﺎﻛﻞ ﻏﻴﺮ ﻃﺒﻴﻌﻴﺔ ﻣﻊ ﺍﳌﻨﺘﺞ.
ﲢﺬﻳﺮ
ﻋﻼﻣﺎﺕ ﺍﻟﺘﺤﺬﻳﺮ ﺍﻟﺼﺎﺭﻣﺔ ﺍﳋﺎﺻﺔ ﺑﺎﻻﺳﺘﺨﺪﺍﻡ
ﻓﻲ ﺣﺎﻟﺔ ﺗﻌﺮﺽ ﺍﳉﻬﺎﺯ ﻟﻜﻤﻴﺔ ﺯﺍﺋﺪﺓ ﻣﻦ ﺍﳌﺎﺀ ،ﻗﻢ ﺑﻘﻄﻊ ﺗﻮﺭﻳﺪ ﺍﳌﺎﺀ ﻭﻗﻄﻊ ﺍﺗﺼﺎﻝ ﺍﻟﻜﻬﺮﺑﺎﺀ ﺑﺸﻜﻞ ﻓﻮﺭﻱ ﻭﺍﺗﺼﻞ
ﺑﺄﻗﺮﺏ ﻣﺮﻛﺰ ﺻﻴﺎﻧﺔ.
ﻻ ﺗﻠﻤﺲ ﺳﻠﻚ ﺍﻟﺘﻴﺎﺭ ﺍﻟﻜﻬﺮﺑﻲ ﻭﻳﺪﻳﻚ ﹸﻣﺒﺘﻠﺔ ﻗﺪ ﻳﺆﺩﻱ ﻋﺪﻡ ﺍﻻﻟﺘﺰﺍﻡ ﺑﺬﻟﻚ ﺇﻟﻰ ﺣﺪﻭﺙ ﺻﺪﻣﺔ ﻛﻬﺮﺑﺎﺋﻴﺔﻓﻲ ﺣﺎﻟﺔ ﺇﺻﺪﺍﺭ ﺍﳉﻬﺎﺯ ﻟﻀﻮﺿﺎﺀ ﻏﻴﺮ ﻃﺒﻴﻌﻴﺔ ﺃﻭ ﺭﺍﺋﺤﺔ ﺍﺷﺘﻌﺎﻝ ﺃﻭ ﺩﺧﺎﻥ ،ﻗﻢ ﺑﻔﺼﻞ ﻗﺎﺑﺲ ﺍﻟﺘﻴﺎﺭ ﺍﻟﻜﻬﺮﺑﻲ ﻓﻮﺭﹰﺍ
ﻭﺍﺗﺼﻞ ﺑﺄﻗﺮﺏ ﻣﺮﻛﺰ ﺻﻴﺎﻧﺔ.
ﻳﺆﺩﻱ ﺍﻟﻔﺸﻞ ﻓﻲ ﺍﻻﻟﺘﺰﺍﻡ ﺑﻬﺬﺍ ﺍﻷﻣﺮ ﺇﻟﻰ ﺣﺪﻭﺙ ﺻﺪﻣﺔ ﻛﻬﺮﺑﻴﺔ ﺃﻭ ﻧﺸﻮﺏ ﺣﺮﻳﻖ.ﻓﻲ ﺣﺎﻟﺔ ﻭﺟﻮﺩ ﺗﺴﺮﻳﺐ ﻟﻠﻐﺎﺯ )ﻣﺜﻞ ﻏﺎﺯ ﺍﻟﺒﺮﻭﺑﺎﻥ ﺃﻭ ﺍﻟﻐﺎﺯ ﺍﻟﻨﻔﻄﻲ ﺍﳌﹸﺴﺎﻝ ﻭﻣﺎ ﺇﻟﻰ ﺫﻟﻚ( ،ﻳﺠﺐ ﺗﻬﻮﻳﺔ ﺍﳌﻜﺎﻥ ﻓﻮﺭﹰﺍ ﺑﺪﻭﻥ
ﳌﺲ ﻗﺎﺑﺲ ﺍﻟﺘﻴﺎﺭ ﺍﻟﻜﻬﺮﺑﻲ .ﻻ ﺗﻘﻢ ﺑﻠﻤﺲ ﺍﳉﻬﺎﺯ ﺃﻭ ﺳﻠﻚ ﺍﻟﻄﺎﻗﺔ.
ﻻ ﺗﺴﺘﺨﺪﻡ ﻣﺮﻭﺣﺔ ﺗﻬﻮﻳﺔ. ﻗﺪ ﻳﻨﺘﺞ ﻋﻦ ﺍﻟﺸﺮﺍﺭﺓ ﺣﺪﻭﺙ ﺻﺪﻣﺔ ﻛﻬﺮﺑﻴﺔ ﺃﻭ ﻧﺸﻮﺏ ﺣﺮﻳﻖ.ﻻ ﺗﺪﻉ ﺍﻷﻃﻔﺎﻝ ﻳﻠﻌﺒﻮﻥ ﻓﻮﻕ ﺍﻟﻐﺴﺎﻟﺔ ﺃﻭ ﺑﺪﺍﺧﻠﻬﺎ .ﻛﺬﻟﻚ ،ﻳﺠﺐ ﻓﺼﻞ ﺣﺎﻣﻞ ﺑﺎﺏ ﺍﻟﻐﺴﺎﻟﺔ ﻋﻨﺪ ﺍﻟﺘﺨﻠﺺ ﻣﻦ ﺍﳉﻬﺎﺯ.
ﻓﻲ ﺣﺎﻟﺔ ﺍﻻﻧﺤﺸﺎﺭ ﺩﺍﺧﻞ ﺍﻟﻐﺴﺎﻟﺔ ،ﻗﺪ ﻳﺘﻌﺮﺽ ﺍﻟﻄﻔﻞ ﻟﻼﺣﺘﺠﺎﺯ ﻭﺍﻻﺧﺘﻨﺎﻕ ﺣﺘﻰ ﺍﳌﻮﺕ.ﺗﺄﻛﺪ ﻣﻦ ﺇﺯﺍﻟﺔ ﺍﻟﻐﻼﻑ )ﺍﻹﺳﻔﻨﺞ ،ﺍﻟﻔﻮﻡ( ﺍﳌﻮﺟﻮﺩ ﺃﺳﻔﻞ ﺍﻟﻐﺴﺎﻟﺔ ﻗﺒﻞ ﺍﻻﺳﺘﺨﺪﺍﻡ.
ﻣﻌﻠﻮﻣﺎﺕ ﺍﻟﺴﻼﻣﺔ _٧
2/14/2011 11:03:00 AM
WF9854LWN-02713K_AR_v1.indd Sec2:7
ﻣﻌﻠﻮﻣﺎﺕ ﺍﻟﺴﻼﻣﺔ
ﻳﺠﺐ ﻋﺪﻡ ﻏﺴﻞ ﺍﻟﻌﻨﺎﺻﺮ ﺍﻟﻌﺎﻟﻖ ﺑﻬﺎ ﺍﳉﺎﺯ ﺃﻭ ﺍﻟﻜﻴﺮﻭﺳﲔ ﺃﻭ ﺍﻟﺒﻨﺰﻳﻦ ﺃﻭ ﻣﺮﻗﻖ ﺍﻟﻄﻼﺀ ﺃﻭ ﺍﻟﻜﺤﻮﻝ ﺃﻭ ﺃﻱ ﻣﻮﺍﺩ ﺃﺧﺮﻯ ﻗﺎﺑﻠﺔ
ﻟﻼﺷﺘﻌﺎﻝ ﺃﻭ ﺍﻻﻧﻔﺠﺎﺭ.
ﻗﺪ ﻳﻨﺘﺞ ﻋﻦ ﻫﺬﺍ ﺍﻷﻣﺮ ﺣﺪﻭﺙ ﺻﺪﻣﺔ ﻛﻬﺮﺑﻴﺔ ﺃﻭ ﻧﺸﻮﺏ ﺣﺮﻳﻖ ﺃﻭ ﺍﻧﻔﺠﺎﺭ.ﻳﺠﺐ ﻋﺪﻡ ﻓﺘﺢ ﺑﺎﺏ ﺍﻟﻐﺴﺎﻟﺔ ﺑﺎﻟﻘﻮﺓ ﺃﺛﻨﺎﺀ ﺍﻟﺘﺸﻐﻴﻞ )ﺍﻟﻐﺴﻴﻞ/ﺍﻟﺘﺠﻔﻴﻒ/ﺍﻟﺘﻨﺸﻴﻒ ﻋﻨﺪ ﺩﺭﺟﺔ ﺣﺮﺍﺭﺓ ﻋﺎﻟﻴﺔ(.
ﻗﺪ ﻳﻨﺘﺞ ﻋﻦ ﺍﻧﺪﻓﺎﻉ ﺍﳌﺎﺀ ﺧﺎﺭﺝ ﺍﻟﻐﺴﺎﻟﺔ ﺍﻹﺻﺎﺑﺔ ﺑﺎﳊﺮﻭﻕ ﺃﻭ ﺍﻟﺘﺴﺒﺐ ﻓﻲ ﺃﻥ ﺗﺼﺒﺢ ﺍﻷﺭﺽ ﻣﻨﺰﻟﻘﺔ.ﻗﺪ ﻳﻨﺘﺞ ﻋﻦ ﻫﺬﺍ ﺍﻷﻣﺮ ﺣﺪﻭﺙ ﺇﺻﺎﺑﺎﺕ.
ﻗﺪ ﻳﺆﺩﻱ ﻓﺘﺢ ﺍﻟﺒﺎﺏ ﺑﺎﻟﻘﻮﺓ ﺇﻟﻰ ﺗﻠﻒ ﺍﳌﻨﺘﺞ ﺃﻭ ﺣﺪﻭﺙ ﺇﺻﺎﺑﺔ.ﻳﺠﺐ ﻋﺪﻡ ﻭﺿﻊ ﻳﺪﻳﻚ ﲢﺖ ﺍﻟﻐﺴﺎﻟﺔ.
ﻗﺪ ﻳﻨﺘﺞ ﻋﻦ ﻫﺬﺍ ﺍﻷﻣﺮ ﺣﺪﻭﺙ ﺇﺻﺎﺑﺎﺕ.ﻻ ﺗﻠﻤﺲ ﻗﺎﺑﺲ ﺍﻟﺘﻴﺎﺭ ﺍﻟﻜﻬﺮﺑﻲ ﻭﻳﺪﻳﻚ ﹸﻣﺒﺘﻠﺔ.
ﻗﺪ ﻳﻨﺘﺞ ﻋﻦ ﻫﺬﺍ ﺍﻷﻣﺮ ﺍﻹﺻﺎﺑﺔ ﺑﺼﺪﻣﺔ ﻛﻬﺮﺑﻴﺔ.ﻳﺠﺐ ﻋﺪﻡ ﺇﻳﻘﺎﻑ ﺗﺸﻐﻴﻞ ﺍﻟﻐﺴﺎﻟﺔ ﻭﻓﺼﻞ ﻗﺎﺑﺲ ﺍﻟﺘﻴﺎﺭ ﺍﻟﻜﻬﺮﺑﻲ ﺃﺛﻨﺎﺀ ﺗﺸﻐﻴﻠﻬﺎ.
ﻗﺪ ﻳﺆﺩﻱ ﺇﺩﺧﺎﻝ ﻗﺎﺑﺲ ﺍﻟﺘﻴﺎﺭ ﺍﻟﻜﻬﺮﺑﻲ ﻣﺮﺓ ﺃﺧﺮﻯ ﻓﻲ ﻣﺄﺧﺬ ﺍﳊﺎﺋﻂ ﺇﻟﻰ ﺣﺪﻭﺙ ﺷﺮﺍﺭﺓ ﻳﻨﺘﺞ ﻋﻨﻬﺎ ﺻﺪﻣﺔ ﻛﻬﺮﺑﻴﺔ ﺃﻭ ﻧﺸﻮﺏ ﺣﺮﻳﻖ.ﻳﺠﺐ ﻋﺪﻡ ﺍﻟﺴﻤﺎﺡ ﻟﻸﻃﻔﺎﻝ ﺃﻭ ﺍﻷﻓﺮﺍﺩ ﻏﻴﺮ ﺍﳌﺆﻫﻠﲔ ﺑﺎﺳﺘﺨﺪﺍﻡ ﻫﺬﻩ ﺍﻟﻐﺴﺎﻟﺔ ﺑﺪﻭﻥ ﺇﺷﺮﺍﻑ .ﻳﺠﺐ ﻋﺪﻡ ﺍﻟﺴﻤﺎﺡ
ﻟﻸﻃﻔﺎﻝ ﺑﺎﻟﺘﺴﻠﻖ ﻓﻮﻕ ﺍﻟﻐﺴﺎﻟﺔ
ﻳﺆﺩﻱ ﺍﻟﻔﺸﻞ ﻓﻲ ﺍﻻﻟﺘﺰﺍﻡ ﺑﻬﺬﺍ ﺍﻷﻣﺮ ﺇﻟﻰ ﺣﺪﻭﺙ ﺻﺪﻣﺔ ﻛﻬﺮﺑﻴﺔ ﺃﻭ ﺣﺮﻭﻕ ﺃﻭ ﺇﺻﺎﺑﺔ.ﻻ ﺗﻀﻊ ﻳﺪﻳﻚ ﺃﻭ ﺃﻱ ﻛﺎﺋﻦ ﻣﻌﺪﻧﻲ ﺃﺳﻔﻞ ﺍﻟﻐﺴﺎﻟﺔ ﺃﺛﻨﺎﺀ ﺗﺸﻐﻴﻠﻬﺎ.
ﻗﺪ ﻳﻨﺘﺞ ﻋﻦ ﻫﺬﺍ ﺍﻷﻣﺮ ﺣﺪﻭﺙ ﺇﺻﺎﺑﺎﺕ.ﻳﺠﺐ ﻋﺪﻡ ﻓﺼﻞ ﺍﳉﻬﺎﺯ ﻋﻦ ﻃﺮﻳﻖ ﺟﺬﺏ ﺳﻠﻚ ﺍﻟﻄﺎﻗﺔ ،ﻳﺠﺐ ﺇﻣﺴﺎﻙ ﺳﻠﻚ ﺍﻟﻄﺎﻗﺔ ﺑﺈﺣﻜﺎﻡ ﻭﺳﺤﺒﻪ ﺑﺸﻜﻞ
ﻣﺴﺘﻘﻴﻢ ﻣﻦ ﺍﳌﻨﻔﺬ ﺇﻟﻰ ﺍﳋﺎﺭﺝ.
ﻗﺪ ﻳﺆﺩﻱ ﺗﻠﻒ ﺍﻟﺴﻠﻚ ﺇﻟﻰ ﺣﺪﻭﺙ ﻋﻄﻞ ﲤﺎﺱ ﻭ/ﺃﻭ ﺣﺮﻳﻖ ﻭ/ﺃﻭ ﺻﺪﻣﺔ ﻛﻬﺮﺑﻴﺔﻻ ﲢﺎﻭﻝ ﺇﺻﻼﺡ ﺍﳉﻬﺎﺯ ﺃﻭ ﻓﻜﻪ ﺃﻭ ﺗﻌﺪﻳﻠﻪ ﺑﻨﻔﺴﻚ.
ﻳﺠﺐ ﻋﺪﻡ ﺍﺳﺘﺨﺪﺍﻡ ﺃﻱ ﻣﻨﺼﻬﺮ )ﻣﺜﻞ ﺍﻟﻨﺤﺎﺱ ﺃﻭ ﺳﻠﻚ ﻣﻌﺪﻧﻲ ،ﻭﻣﺎ ﺇﻟﻰ ﺫﻟﻚ( ﺧﻼﻑ ﺍﳌﻨﺼﻬﺮ ﺍﻟﻘﻴﺎﺳﻲ. ﻓﻲ ﺣﺎﻟﺔ ﻭﺟﻮﺩ ﺣﺎﺟﺔ ﻹﺻﻼﺡ ﺍﳉﻬﺎﺯ ﺃﻭ ﺇﻋﺎﺩﺓ ﺗﺮﻛﻴﺒﻪ ،ﺍﺗﺼﻞ ﺑﺄﻗﺮﺏ ﻣﺮﻛﺰ ﺻﻴﺎﻧﺔ ﺇﻟﻴﻚ. ﻗﺪ ﻳﻨﺘﺞ ﻋﻦ ﺍﻟﻔﺸﻞ ﻓﻲ ﺍﺗﺒﺎﻉ ﻫﺬﻩ ﺍﻟﺘﻌﻠﻴﻤﺎﺕ ﺣﺪﻭﺙ ﺻﺪﻣﺔ ﻛﻬﺮﺑﻴﺔ ﺃﻭ ﻧﺸﻮﺏ ﺣﺮﻳﻖ ﺃﻭ ﻣﺸﺎﻛﻞ ﺗﺘﻌﻠﻖ ﺑﺎﳌﻨﺘﺞ ﺃﻭ ﺍﻟﺘﻌﺮﺽﻟﻺﺻﺎﺑﺔ.
ﻓﻲ ﺣﺎﻟﺔ ﺩﺧﻮﻝ ﺃﻱ ﻣﺎﺩﺓ ﻏﺮﻳﺒﺔ ،ﻣﺜﻞ ﺍﳌﺎﺀ ﺇﻟﻰ ﺍﳉﻬﺎﺯ ،ﻗﻢ ﺑﻔﺼﻞ ﻗﺎﺑﺲ ﺍﻟﺘﻴﺎﺭ ﺍﻟﻜﻬﺮﺑﻲ ﻭﺍﺗﺼﻞ ﺑﺄﻗﺮﺏ ﻣﺮﻛﺰ ﺻﻴﺎﻧﺔ.
ﻳﺆﺩﻱ ﺍﻟﻔﺸﻞ ﻓﻲ ﺍﻻﻟﺘﺰﺍﻡ ﺑﻬﺬﺍ ﺍﻷﻣﺮ ﺇﻟﻰ ﺣﺪﻭﺙ ﺻﺪﻣﺔ ﻛﻬﺮﺑﻴﺔ ﺃﻭ ﻧﺸﻮﺏ ﺣﺮﻳﻖ.ﻋﻨﺪﻣﺎ ﻳﺼﺒﺢ ﺧﺮﻃﻮﻡ ﺗﻮﺭﻳﺪ ﺍﳌﺎﺀ ﻏﻴﺮ ﻣﺤﻜﻢ ﺍﻟﺮﺑﻂ ﻣﻦ ﻧﺎﺣﻴﺔ ﺍﻟﺼﻨﺒﻮﺭ ﻭﻳﻨﺘﺞ ﻋﻨﻪ ﺗﺴﺮﺏ ﻣﺎﺀ ﺇﻟﻰ ﺩﺍﺧﻞ ﺍﳉﻬﺎﺯ ،ﻗﻢ
ﺑﻔﺼﻞ ﻗﺎﺑﺲ ﺍﻟﺘﻴﺎﺭ ﺍﻟﻜﻬﺮﺑﻲ.
ﻳﺆﺩﻱ ﺍﻟﻔﺸﻞ ﻓﻲ ﺍﻻﻟﺘﺰﺍﻡ ﺑﻬﺬﺍ ﺍﻷﻣﺮ ﺇﻟﻰ ﺣﺪﻭﺙ ﺻﺪﻣﺔ ﻛﻬﺮﺑﻴﺔ ﺃﻭ ﻧﺸﻮﺏ ﺣﺮﻳﻖ.ﻳﺠﺐ ﻓﺼﻞ ﻗﺎﺑﺲ ﺍﻟﺘﻴﺎﺭ ﺍﻟﻜﻬﺮﺑﻲ ﻋﻨﺪﻣﺎ ﻳﻜﻮﻥ ﺍﳉﻬﺎﺯ ﻗﻴﺪ ﺍﻻﺳﺘﺨﺪﺍﻡ ﻟﻔﺘﺮﺍﺕ ﻃﻮﻳﻠﺔ ﺃﻭ ﺃﺛﻨﺎﺀ ﺍﻟﻌﻮﺍﺻﻒ ﺍﻟﺮﻋﺪﻳﺔ ﺃﻭ
ﺍﻟﺒﺮﻕ.
-ﻳﺆﺩﻱ ﺍﻟﻔﺸﻞ ﻓﻲ ﺍﻻﻟﺘﺰﺍﻡ ﺑﻬﺬﺍ ﺍﻷﻣﺮ ﺇﻟﻰ ﺣﺪﻭﺙ ﺻﺪﻣﺔ ﻛﻬﺮﺑﻴﺔ ﺃﻭ ﻧﺸﻮﺏ ﺣﺮﻳﻖ.
_٨ﻣﻌﻠﻮﻣﺎﺕ ﺍﻟﺴﻼﻣﺔ
2/14/2011 11:03:00 AM
WF9854LWN-02713K_AR_v1.indd Sec2:8
ﺗﻨﺒﻴﻪ
ﻋﻼﻣﺎﺕ ﺍﻟﺘﻨﺒﻴﻪ ﺍﳋﺎﺻﺔ ﺑﺎﻻﺳﺘﺨﺪﺍﻡ
ﻋﻨﺪﻣﺎ ﻳﻌﻠﻖ ﺑﺎﻟﻐﺴﺎﻟﺔ ﻣﺎﺩﺓ ﻏﺮﻳﺒﺔ ﻣﺜﻞ ﺍﳌﻨﻈﻔﺎﺕ ﺃﻭ ﺍﻷﺗﺮﺑﺔ ﺃﻭ ﻣﺨﻠﻔﺎﺕ ﺍﻟﻄﻌﺎﻡ ﻭﻣﺎ ﺇﻟﻰ ﺫﻟﻚ ،ﻗﻢ ﺑﻔﺼﻞ ﻗﺎﺑﺲ
ﺍﻟﺘﻴﺎﺭ ﺍﻟﻜﻬﺮﺑﻲ ﻭﺗﻨﻈﻴﻒ ﺍﻟﻐﺴﺎﻟﺔ ﺑﺎﺳﺘﺨﺪﺍﻡ ﻗﻄﻌﺔ ﻗﻤﺎﺵ ﻣﺒﻠﻠﺔ ﻭﻧﺎﻋﻤﺔ.
ﻳﺆﺩﻱ ﺍﻟﻔﺸﻞ ﻓﻲ ﺍﻻﻟﺘﺰﺍﻡ ﺑﻬﺬﺍ ﺍﻷﻣﺮ ﺇﻟﻰ ﺣﺪﻭﺙ ﺗﻐﻴﻴﺮ ﻓﻲ ﺃﻟﻮﺍﻥ ﺍﻟﻐﺴﺎﻟﺔ ﺃﻭ ﺗﺸﻮﻳﻪ ﺃﻭ ﺗﻠﻒ ﺃﻭ ﺻﺪﺃ ﺑﻬﺎ.ﻗﺪ ﻳﻨﻜﺴﺮ ﺍﻟﺰﺟﺎﺝ ﺍﻷﻣﺎﻣﻲ ﻧﺘﻴﺠﺔ ﺣﺪﻭﺙ ﺍﺻﻄﺪﺍﻡ ﻗﻮﻱ .ﻳﺠﺐ ﺍﳊﺮﺹ ﻋﻨﺪ ﺍﺳﺘﺨﺪﺍﻡ ﺍﻟﻐﺴﺎﻟﺔ.
ﻗﺪ ﲢﺪﺙ ﺇﺻﺎﺑﺔ ﻋﻨﺪﻣﺎ ﻳﻨﻜﺴﺮ ﺍﻟﺰﺟﺎﺝ.ﻋﻨﺪ ﺣﺪﻭﺙ ﻓﺸﻞ ﻓﻲ ﺗﻮﺭﻳﺪ ﺍﳌﺎﺀ ﺃﻭ ﻋﻨﺪ ﺇﻋﺎﺩﺓ ﺗﻮﺻﻴﻞ ﺧﺮﻃﻮﻡ ﺗﻮﺭﻳﺪ ﺍﳌﺎﺀ ،ﻳﺠﺐ ﻓﺘﺢ ﺍﻟﺼﻨﺒﻮﺭ ﺑﺒﻂﺀ.
ﻳﺠﺐ ﻓﺘﺢ ﺍﻟﺼﻨﺒﻮﺭ ﺑﺒﻂﺀ ﻓﻲ ﺣﺎﻟﺔ ﻋﺪﻡ ﺍﻻﺳﺘﺨﺪﺍﻡ ﻟﻔﺘﺮﺓ ﻃﻮﻳﻠﺔ.
ﻗﺪ ﻳﺆﺩﻱ ﻭﺟﻮﺩ ﺿﻐﻂ ﺍﻟﻬﻮﺍﺀ ﻓﻲ ﺧﺮﻃﻮﻡ ﺗﻮﺭﻳﺪ ﺍﳌﺎﺀ ﺃﻭ ﺃﻧﺒﻮﺏ ﺍﳌﺎﺀ ﺇﻟﻰ ﺗﻠﻒ ﺟﺰﺀ ﻣﻦ ﺍﻟﻐﺴﺎﻟﺔ ﺃﻭ ﻭﺟﻮﺩ ﺗﺴﺮﺏ ﻟﻠﻤﺎﺀ.ﻓﻲ ﺣﺎﻟﺔ ﺣﺪﻭﺙ ﺧﻄﺄ ﻳﺘﻌﻠﻖ ﺑﺎﻟﺘﺼﺮﻳﻒ ﺃﺛﻨﺎﺀ ﺍﻟﺘﺸﻐﻴﻞ ،ﲢﻘﻖ ﻣﻦ ﻭﺟﻮﺩ ﻣﺸﻜﻠﺔ ﺗﺘﻌﻠﻖ ﺑﺎﻟﺘﺼﺮﻳﻒ.
ﻗﺪ ﻳﺆﺩﻱ ﺍﺳﺘﺨﺪﺍﻡ ﺍﻟﻐﺴﺎﻟﺔ ﺃﺛﻨﺎﺀ ﺗﺴﺮﺏ ﺍﳌﻴﺎﻩ ﻣﻨﻬﺎ ﻧﺘﻴﺠﺔ ﻭﺟﻮﺩ ﻣﺸﻜﻠﺔ ﺑﺎﻟﺘﺼﺮﻳﻒ ﺇﻟﻰ ﺍﻹﺻﺎﺑﺔ ﺑﺼﺪﻣﺔ ﻛﻬﺮﺑﻴﺔ ﺃﻭ ﻧﺸﻮﺏﺣﺮﻳﻖ ﻧﺘﻴﺠﺔ ﺗﺴﺮﺏ ﻛﻬﺮﺑﻲ.
ﻳﺠﺐ ﺇﺩﺧﺎﻝ ﺍﳌﻼﺑﺲ ﺑﺎﻟﻜﺎﻣﻞ ﻓﻲ ﺍﻟﻐﺴﺎﻟﺔ ﺑﺤﻴﺚ ﻻ ﺗﺘﻌﻠﻖ ﺑﺎﻟﺒﺎﺏ.
ﻗﺪ ﻳﺆﺩﻱ ﺗﻌﻠﻖ ﺍﳌﻼﺑﺲ ﺑﺎﻟﺒﺎﺏ ﺇﻟﻰ ﺗﻠﻒ ﺍﳌﻼﺑﺲ ﺃﻭ ﺍﻟﻐﺴﺎﻟﺔ ،ﻛﻤﺎ ﻗﺪ ﻳﻨﺘﺞ ﻋﻨﻪ ﺣﺪﻭﺙ ﺗﺴﺮﺏ ﻟﻠﻤﺎﺀ.ﺗﺄﻛﺪ ﻣﻦ ﺇﻏﻼﻕ ﺍﻟﺼﻨﺒﻮﺭ ﻓﻲ ﺣﺎﻟﺔ ﻋﺪﻡ ﺍﺳﺘﺨﺪﺍﻡ ﺍﻟﻐﺴﺎﻟﺔ.
ﺗﺄﻛﺪ ﻣﻦ ﺭﺑﻂ ﻣﺴﻤﺎﺭ ﻭﺻﻠﺔ ﺧﺮﻃﻮﻡ ﺗﻮﺭﻳﺪ ﺍﳌﺎﺀ ﺍﻟﻘﻼﻭﻭﻅ ﺑﺈﺣﻜﺎﻡ. ﻳﺆﺩﻱ ﺍﻟﻔﺸﻞ ﻓﻲ ﺍﻻﻟﺘﺰﺍﻡ ﺑﻬﺬﺍ ﺍﻷﻣﺮ ﺇﻟﻰ ﺗﻠﻒ ﺍﳉﻬﺎﺯ ﺃﻭ ﺣﺪﻭﺙ ﺇﺻﺎﺑﺎﺕ.ﲢﻘﻖ ﻣﻦ ﻋﺪﻡ ﺗﻌﻠﻖ ﺃﻱ ﻣﻮﺍﺩ ﻏﺮﻳﺒﺔ )ﻣﺨﻠﻔﺎﺕ ﺃﻭ ﺧﻴﻮﻁ ،ﻭﻣﺎ ﺇﻟﻰ ﺫﻟﻚ( ﺑﺎﳊﺎﺟﺰ ﺍﳌﻄﺎﻃﻲ.
ﲤﺎﻣﺎ.
ﻗﺪ ﻳﺤﺪﺙ ﺗﺴﺮﻳﺐ ﻟﻠﻤﺎﺀ ﺇﺫﺍ ﻟﻢ ﻳﺘﻢ ﺇﻏﻼﻕ ﺍﻟﺒﺎﺏ ﹰﻳﺠﺐ ﻓﺘﺢ ﺍﻟﺼﻨﺒﻮﺭ ﻭﺍﻟﺘﺤﻘﻖ ﻣﻦ ﺇﺣﻜﺎﻡ ﻣﻮﺻﻞ ﺧﺮﻃﻮﻡ ﺍﳌﺎﺀ ﻭﻋﺪﻡ ﻭﺟﻮﺩ ﺗﺴﺮﻳﺐ ﻟﻠﻤﺎﺀ ﻗﺒﻞ ﺍﺳﺘﺨﺪﺍﻡ ﺍﳌﻨﺘﺞ.
ﻓﻲ ﺣﺎﻟﺔ ﻋﺪﻡ ﺇﺣﻜﺎﻡ ﺍﳌﺴﺎﻣﻴﺮ ﺃﻭ ﻣﻮﺻﻞ ﺧﺮﻃﻮﻡ ﺗﻮﺭﻳﺪ ﺍﳌﺎﺀ ،ﻗﺪ ﻳﺤﺪﺙ ﺗﺴﺮﻳﺐ ﻟﻠﻤﺎﺀ.ﻟﺘﻘﻠﻴﻞ ﻣﺨﺎﻃﺮ ﺣﺪﻭﺙ ﺣﺮﻳﻖ ﺃﻭ ﺍﻧﻔﺠﺎﺭ:
ﻓﻲ ﺑﻌﺾ ﺍﳊﺎﻻﺕ ،ﻗﺪ ﻳﺘﻜﻮﻥ ﻏﺎﺯ ﺍﻟﻬﻴﺪﺭﻭﺟﲔ ﻋﻨﺪ ﺍﺳﺘﺨﺪﺍﻡ ﻧﻈﺎﻡ ﺍﳌﺎﺀ ﺍﻟﺴﺎﺧﻦ ،ﻛﻤﺎ ﻫﻮ ﺍﳊﺎﻝ ﺑﺎﻟﻨﺴﺒﺔ ﻟﺴﺨﺎﻥ ﺍﳌﺎﺀ ﺍﻟﺬﻱ ﻟﻢﻳﹸﺴﺘﺨﺪﻡ ﳌﺪﺓ ﺃﺳﺒﻮﻋﲔ ﺃﻭ ﺃﻛﺜﺮ .ﻏﺎﺯ ﺍﻟﻬﻴﺪﺭﻭﺟﲔ ﻗﺎﺑﻞ ﻟﻼﻧﻔﺠﺎﺭ .ﻭﻓﻲ ﺣﺎﻟﺔ ﻋﺪﻡ ﺍﺳﺘﺨﺪﺍﻡ ﻧﻈﺎﻡ ﺍﳌﺎﺀ ﺍﻟﺴﺎﺧﻦ ﳌﺪﺓ ﺃﺳﺒﻮﻋﲔ
ﺃﻭ ﺃﻛﺜﺮ ،ﻗﻢ ﺑﻔﺘﺢ ﻛﺎﻓﺔ ﺻﻨﺎﺑﻴﺮ ﺍﳌﺎﺀ ﺍﻟﺴﺎﺧﻦ ﺍﳌﻮﺟﻮﺩﺓ ﻓﻲ ﺍﳌﻨﺰﻝ ،ﻭﺩﻉ ﺍﳌﺎﺀ ﻳﺘﺪﻓﻖ ﻟﺒﻀﻌﺔ ﺩﻗﺎﺋﻖ ﻗﺒﻞ ﺍﺳﺘﺨﺪﺍﻡ ﺍﻟﻐﺴﺎﻟﺔ ،ﺣﻴﺚ
ﻳﻌﻤﻞ ﺫﻟﻚ ﻋﻠﻰ ﺍﻟﺘﺨﻠﺺ ﻣﻦ ﻏﺎﺯ ﺍﻟﻬﻴﺪﺭﻭﺟﲔ ﺍﻟﺬﻱ ﰎ ﺗﻜﻮﻳﻨﻪ ﺩﺍﺧﻞ ﺍﻟﺼﻨﺎﺑﻴﺮ .ﻭﻧﻈﺮﹰﺍ ﻷﻥ ﻏﺎﺯ ﺍﻟﻬﻴﺪﺭﻭﺟﲔ ﻗﺎﺑﻞ ﻟﻼﺷﺘﻌﺎﻝ ،ﻳﺠﺐ
ﻋﺪﻡ ﺍﻟﺘﺪﺧﲔ ﺃﻭ ﺇﺷﻌﺎﻝ ﺃﻱ ﻟﻬﺐ ﻓﻲ ﻫﺬﺍ ﺍﻟﻮﻗﺖ ،ﻛﻤﺎ ﻳﺠﺐ ﺇﺟﺮﺍﺀ ﺗﻬﻮﻳﺔ ﻓﻮﺭﻳﺔ ﻗﺒﻞ ﳌﺲ ﻗﺎﺑﺲ ﺍﻟﺘﻴﺎﺭ ﺍﻟﻜﻬﺮﺑﻲ ﻓﻲ ﺣﺎﻟﺔ ﻭﺟﻮﺩ
ﺗﺴﺮﻳﺐ ﻟﻠﻐﺎﺯ.
ﻣﻌﻠﻮﻣﺎﺕ ﺍﻟﺴﻼﻣﺔ _٩
2/14/2011 11:03:00 AM
WF9854LWN-02713K_AR_v1.indd Sec2:9
ﻣﻌﻠﻮﻣﺎﺕ ﺍﻟﺴﻼﻣﺔ
ﻳﺠﺐ ﻋﺪﻡ ﺍﻟﻮﻗﻮﻑ ﻓﻮﻕ ﺍﳉﻬﺎﺯ ﺃﻭ ﻭﺿﻊ ﺃﺷﻴﺎﺀ ﻓﻮﻗﻪ )ﻣﺜﻞ ﻣﻼﺑﺲ ﺍﻟﻐﺴﻴﻞ ﺃﻭ ﺍﻟﺸﻤﻌﺪﺍﻥ ﺍﳌﹸﻀﺎﺀ ﺃﻭ ﺍﻟﺴﺠﺎﺋﺮ ﺍﳌﺸﺘﻌﻠﺔ
ﺃﻭ ﺍﻷﻃﺒﺎﻕ ﺃﻭ ﺍﳌﻮﺍﺩ ﺍﻟﻜﻴﻤﺎﻭﻳﺔ ﺃﻭ ﺍﻷﺷﻴﺎﺀ ﺍﳌﻌﺪﻧﻴﺔ ،ﻭﻣﺎ ﺇﻟﻰ ﺫﻟﻚ(.
ﻗﺪ ﻳﻨﺘﺞ ﻋﻦ ﻫﺬﺍ ﺍﻷﻣﺮ ﺍﻹﺻﺎﺑﺔ ﺑﺼﺪﻣﺔ ﻛﻬﺮﺑﻴﺔ ﺃﻭ ﺣﺪﻭﺙ ﺣﺮﻳﻖ ﺃﻭ ﻣﺸﺎﻛﻞ ﺑﺎﳌﻨﺘﺞ ﺃﻭ ﻭﻗﻮﻉ ﺇﺻﺎﺑﺎﺕ.ﻳﺠﺐ ﻋﺪﻡ ﺭﺵ ﻣﻮﺍﺩ ﻣﺘﻄﺎﻳﺮﺓ ،ﻣﺜﻞ ﺍﳌﺒﻴﺪﺍﺕ ﺍﳊﺸﺮﻳﺔ ،ﻓﻮﻕ ﺳﻄﺢ ﺍﳉﻬﺎﺯ.
ﺃﻳﻀﺎ ﺍﻹﺻﺎﺑﺔ ﺑﺼﺪﻣﺔ ﻛﻬﺮﺑﻴﺔ ﺃﻭ ﻧﺸﻮﺏ ﺣﺮﻳﻖ ﺃﻭ ﺣﺪﻭﺙ ﻣﺸﺎﻛﻞ
ﺑﺎﻹﺿﺎﻓﺔ ﺇﻟﻰ ﺃﻥ ﻫﺬﺍ ﺍﻷﻣﺮ ﻳﻀﺮ ﺑﺎﻹﻧﺴﺎﻥ ،ﻓﻘﺪ ﻳﻨﺘﺞ ﻋﻨﻪ ﹰﺑﺎﳌﻨﺘﺞ.
ﻻ ﺗﻀﻊ ﺷﻴ ﹰﺌﺎ ﻳﻨﺘﺞ ﻋﻨﻪ ﻭﺟﻮﺩ ﻣﺠﺎﻝ ﻛﻬﺮﻭﻣﻐﻨﺎﻃﻴﺴﻲ ﺑﺎﻟﻘﺮﺏ ﻣﻦ ﺍﻟﻐﺴﺎﻟﺔ.
ﻗﺪ ﻳﻨﺘﺞ ﻋﻦ ﻫﺬﺍ ﺣﺪﻭﺙ ﺇﺻﺎﺑﺎﺕ ﺷﺨﺼﻴﺔ ﻧﺘﻴﺠﺔ ﻭﺟﻮﺩ ﺧﻠﻞ ﻓﻲ ﻭﻇﺎﺋﻒ ﺍﻟﺘﺸﻐﻴﻞ.ﻳﺠﺐ ﻋﺪﻡ ﳌﺲ ﺍﳌﺎﺀ ﺣﻴﺚ ﻳﻜﻮﻥ ﺍﳌﺎﺀ ﺍﻟﺬﻱ ﻳﺘﻢ ﺗﺼﺮﻳﻔﻪ ﺃﺛﻨﺎﺀ ﺍﻟﻐﺴﻴﻞ ﻓﻲ ﺩﺭﺟﺎﺕ ﺣﺮﺍﺭﺓ ﻋﺎﻟﻴﺔ ﺃﻭ ﺃﺛﻨﺎﺀ ﺩﻭﺭﺓ ﺍﻟﺘﻨﺸﻴﻒ
ﺳﺎﺧﻨﹰﺎ.
ﻗﺪ ﻳﻨﺘﺞ ﻋﻦ ﻫﺬﺍ ﺍﻷﻣﺮ ﺣﺪﻭﺙ ﺣﺮﻭﻕ ﺃﻭ ﺇﺻﺎﺑﺎﺕ ﺷﺨﺼﻴﺔ.ﻳﺠﺐ ﻋﺪﻡ ﻏﺴﻞ ﻣﻔﺮﻭﺷﺎﺕ ﺍﳌﻘﺎﻋﺪ ﺃﻭ ﺍﻟﺴﺠﺎﺩ ﺃﻭ ﺍﻟﻘﻤﺎﺵ )*( ﺍﳌﻀﺎﺩﺓ ﻟﻠﻤﺎﺀ ﺃﻭ ﺗﻨﺸﻴﻔﻬﺎ ﺃﻭ ﲡﻔﻴﻔﻬﺎ ﻣﺎ ﻟﻢ ﻳﻜﻦ
ﺑﺮﻧﺎﻣﺠﺎ
ﺟﻬﺎﺯﻙ ﻳﺘﻀﻤﻦ
ﺧﺎﺻﺎ ﻟﻐﺴﻞ ﻫﺬﻩ ﺍﻟﻌﻨﺎﺻﺮ.
ﹰ
ﹰ
ﻳﺠﺐ ﻋﺪﻡ ﻏﺴﻞ ﺍﻟﺴﺠﺎﺩ ﺍﻟﺴﻤﻴﻚ ﺃﻭ ﺍﻟﺜﻘﻴﻞ ﺣﺘﻰ ﻓﻲ ﺣﺎﻟﺔ ﻭﺟﻮﺩ ﻋﻼﻣﺔ ﺍﻟﻐﺴﺎﻟﺔ ﻋﻠﻰ ﺑﻄﺎﻗﺔ ﺍﻟﻌﻨﺎﻳﺔ ﺑﺎﳌﻨﺘﺞ. ﻗﺪ ﻳﺆﺩﻱ ﻫﺬﺍ ﺍﻷﻣﺮ ﺇﻟﻰ ﺣﺪﻭﺙ ﺇﺻﺎﺑﺔ ﺃﻭ ﺗﻠﻒ ﺑﺎﻟﻐﺴﺎﻟﺔ ﺃﻭ ﺑﺎﳊﻮﺍﺋﻂ ﺃﻭ ﺑﺎﻷﺭﺿﻴﺔ ﺃﻭ ﺑﺎﳌﻼﺑﺲ ﻧﺘﻴﺠﺔ ﻟﻼﻫﺘﺰﺍﺯﺍﺕ ﻏﻴﺮ ﺍﻟﻄﺒﻴﻌﻴﺔ.* ﺍﳌﻔﺮﻭﺷﺎﺕ ﺍﻟﺼﻮﻓﻴﺔ ﺃﻭ ﺍﻷﻏﻄﻴﺔ ﺍﳌﻘﺎﻭﻣﺔ ﻟﻸﻣﻄﺎﺭ ﺃﻭ ﺳﺘﺮﺍﺕ ﺍﻟﺼﻴﺪ ﺃﻭ ﺑﻨﻄﻠﻮﻧﺎﺕ ﺍﻟﺘﺰﻟﺞ ﺃﻭ ﺣﻘﺎﺋﺐ ﺍﻟﻨﻮﻡ ﺃﻭ ﺃﻏﻄﻴﺔ ﺍﳊﻔﺎﻇﺎﺕ ﺃﻭ
ﺍﳌﻼﺑﺲ ﺍﻟﺮﻳﺎﺿﻴﺔ ﺃﻭ ﺃﻏﻄﻴﺔ ﺍﻟﺪﺭﺍﺟﺎﺕ ﻭﺍﻟﺪﺭﺍﺟﺎﺕ ﺍﻟﺒﺨﺎﺭﻳﺔ ﻭﺍﻟﺴﻴﺎﺭﺍﺕ ،ﻭﻣﺎ ﺇﻟﻰ ﺫﻟﻚ.
ﻳﺠﺐ ﻋﺪﻡ ﺗﺸﻐﻴﻞ ﺍﻟﻐﺴﺎﻟﺔ ﻓﻲ ﺣﺎﻟﺔ ﻋﺪﻡ ﻭﺟﻮﺩ ﺩﺭﺝ ﺍﳌﺴﺤﻮﻕ.
ﻗﺪ ﻳﻨﺘﺞ ﻋﻦ ﻫﺬﺍ ﺍﻷﻣﺮ ﻭﺟﻮﺩ ﺻﺪﻣﺔ ﻛﻬﺮﺑﻴﺔ ﺃﻭ ﺇﺻﺎﺑﺔ ﻧﺘﻴﺠﺔ ﻟﺘﺴﺮﺏ ﺍﳌﺎﺀ.ﻳﺠﺐ ﻋﺪﻡ ﳌﺲ ﺍﳊﻮﺽ ﻣﻦ ﺍﻟﺪﺍﺧﻞ ﺃﺛﻨﺎﺀ ﻋﻤﻠﻴﺔ ﺍﻟﺘﻨﺸﻴﻒ ﺃﻭ ﺑﻌﺪﻫﺎ ﻣﺒﺎﺷﺮﺓﹰ ﻧﻈﺮﹰﺍ ﻷﻧﻪ ﻳﻜﻮﻥ ﺳﺎﺧﻨﹰﺎ.
ﻗﺪ ﻳﻨﺘﺞ ﻋﻦ ﻫﺬﺍ ﺍﻷﻣﺮ ﺍﻹﺻﺎﺑﺔ ﺑﺤﺮﻭﻕ.ﻳﺠﺐ ﻋﺪﻡ ﻭﺿﻊ ﺍﻟﻴﺪﻳﻦ ﻓﻲ ﺩﺭﺝ ﺍﳌﺴﺤﻮﻕ ﺑﻌﺪ ﻓﺘﺤﻪ.
ﻗﺪ ﻳﻨﺘﺞ ﻋﻦ ﻫﺬﺍ ﺍﻷﻣﺮ ﺣﺪﻭﺙ ﺇﺻﺎﺑﺔ ،ﻗﺪ ﻳﻌﻠﻖ ﺟﻬﺎﺯ ﺇﺩﺧﺎﻝ ﺍﳌﺴﺤﻮﻕ ﺑﻴﺪﻙ ،ﻛﻤﺎ ﻳﺠﺐ ﻋﺪﻡ ﻭﺿﻊ ﺃﻱ ﺃﺷﻴﺎﺀ )ﻣﺜﻞ ﺍﻷﺣﺬﻳﺔ ﺃﻭ ﺑﻘﺎﻳﺎﺍﻟﻄﻌﺎﻡ ﺃﻭ ﺍﳊﻴﻮﺍﻧﺎﺕ( ﺧﻼﻑ ﺍﻟﻐﺴﻴﻞ ﻓﻲ ﺍﻟﻐﺴﺎﻟﺔ.
ﻗﺪ ﻳﺆﺩﻱ ﻫﺬﺍ ﺍﻷﻣﺮ ﺇﻟﻰ ﺗﻠﻒ ﺍﻟﻐﺴﺎﻟﺔ ﺃﻭ ﺣﺪﻭﺙ ﺇﺻﺎﺑﺔ ﻭﻭﻓﺎﺓ ﻓﻲ ﺣﺎﻟﺔ ﻭﺟﻮﺩ ﺣﻴﻮﺍﻧﺎﺕ ﺃﻟﻴﻔﺔ ﻧﺘﻴﺠﺔ ﻟﻼﻫﺘﺰﺍﺯﺍﺕ ﻏﻴﺮ ﺍﻟﻄﺒﻴﻌﻴﺔ.ﻳﺠﺐ ﻋﺪﻡ ﺍﻟﻀﻐﻂ ﻋﻠﻰ ﺍﻷﺯﺭﺍﺭ ﺑﺎﺳﺘﺨﺪﺍﻡ ﺃﺩﻭﺍﺕ ﺣﺎﺩﺓ ﻣﺜﻞ ﺍﳌﺴﺎﻣﻴﺮ ﺃﻭ ﺍﻟﺴﻜﺎﻛﲔ ﺃﻭ ﺍﻷﻇﺎﻓﺮ ،ﻭﻣﺎ ﺇﻟﻰ ﺫﻟﻚ.
ﻗﺪ ﻳﻨﺘﺞ ﻋﻦ ﻫﺬﺍ ﺍﻷﻣﺮ ﺣﺪﻭﺙ ﺻﺪﻣﺔ ﻛﻬﺮﺑﻴﺔ ﺃﻭ ﺣﺪﻭﺙ ﺇﺻﺎﺑﺔ.ﻳﹸﺤﻈﺮ ﻏﺴﻞ ﺍﳌﻼﺑﺲ ﺍﻟﺘﻲ ﲢﺘﻮﻱ ﻋﻠﻰ ﺯﻳﻮﺕ ﺃﻭ ﻛﺮﳝﺎﺕ ﺃﻭ ﻏﺴﻮﻻﺕ ،ﻭﺍﻟﺘﻲ ﺗﻜﻮﻥ ﻓﻲ ﺍﻟﻐﺎﻟﺐ ﻣﻮﺟﻮﺩﺓ ﻓﻲ ﻣﺘﺎﺟﺮ
ﺍﳌﺴﺘﺤﻀﺮﺍﺕ ﺍﳉﻠﺪﻳﺔ ﺃﻭ ﻋﻴﺎﺩﺍﺕ ﺍﻟﺘﺪﻟﻴﻚ.
ﻗﺪ ﻳﻨﺘﺞ ﻋﻦ ﻫﺬﺍ ﺍﻷﻣﺮ ﺗﺸﻮﻩ ﺍﳊﺎﺟﺰ ﺍﳌﻄﺎﻃﻲ ﻭﺗﺴﺮﺏ ﺍﳌﺎﺀ.ﻳﺠﺐ ﻋﺪﻡ ﺗﺮﻙ ﺃﻱ ﺃﺷﻴﺎﺀ ﻣﻌﺪﻧﻴﺔ ،ﻣﺜﻞ ﺍﻟﺪﺑﺎﺑﻴﺲ ﺃﻭ ﺑﻨﺲ ﺍﻟﺸﻌﺮ ﺃﻭ ﻣﻮﺍﺩ ﺍﻟﺘﺒﻴﻴﺾ ،ﻓﻲ ﺍﳊﻮﺽ ﻟﻔﺘﺮﺍﺕ ﻃﻮﻳﻠﺔ ﻣﻦ
ﺍﻟﻮﻗﺖ.
ﻗﺪ ﻳﺆﺩﻱ ﻫﺬﺍ ﺍﻷﻣﺮ ﺇﻟﻰ ﺻﺪﺃ ﺍﳊﻮﺽ. ﻭﻓﻲ ﺣﺎﻟﺔ ﺑﺪﺀ ﻇﻬﻮﺭ ﺍﻟﺼﺪﺃ ﻋﻠﻰ ﺳﻄﺢ ﺍﳊﻮﺽ ،ﻗﻢ ﺑﺘﻨﻈﻴﻒ ﺳﻄﺤﻪ ﺑﺎﺳﺘﺨﺪﺍﻡ ﺳﺎﺋﻞ ﺗﻨﻈﻴﻒ )ﻣﺘﻌﺎﺩﻝ( ﻭﺇﺳﻔﻨﺞ ﻓﻲﻧﻬﺎﺋﻴﺎ.
ﺗﻨﻈﻴﻔﻪ .ﻳﺠﺐ ﻋﺪﻡ ﺍﺳﺘﺨﺪﺍﻡ ﻓﺮﺷﺎﺓ ﻣﻌﺪﻧﻴﺔ
ﹰ
ﻳﺠﺐ ﻋﺪﻡ ﺍﺳﺘﺨﺪﺍﻡ ﺳﺎﺋﻞ ﺍﻟﺘﻨﻈﻴﻒ ﺑﺸﻜﻞ ﻣﺒﺎﺷﺮ ،ﻛﻤﺎ ﻳﺠﺐ ﻋﺪﻡ ﻏﺴﻞ ﻣﻼﺑﺲ ﺍﻟﻐﺴﻴﻞ ﺃﻭ ﺷﻄﻔﻬﺎ ﺃﻭ
ﺗﻨﺸﻴﻔﻬﺎ ﻓﻲ ﺣﺎﻟﺔ ﺗﻌﻠﻖ ﻣﺴﺤﻮﻕ ﺟﺎﻑ ﻟﻠﺘﻨﻈﻴﻒ ﺑﻬﺎ.
ﻗﺪ ﻳﺆﺩﻱ ﻫﺬﺍ ﺍﻷﻣﺮ ﺇﻟﻰ ﺣﺪﻭﺙ ﺍﺷﺘﻌﺎﻝ ﻓﻮﺭﻱ ﻧﺘﻴﺠﺔ ﻟﻠﺤﺮﺍﺭﺓ ﺍﻟﻨﺎﲡﺔ ﻋﻦ ﺗﺄﻛﺴﺪ ﺍﻟﺰﻳﺖ.ﻳﺠﺐ ﻋﺪﻡ ﺍﺳﺘﺨﺪﺍﻡ ﺍﳌﺎﺀ ﺍﻟﻘﺎﺩﻡ ﻣﻦ ﺃﺟﻬﺰﺓ ﺗﺒﺮﻳﺪ/ﺗﺴﺨﲔ ﺍﳌﺎﺀ.
-ﻗﺪ ﻳﻨﺘﺞ ﻋﻦ ﻫﺬﺍ ﺍﻷﻣﺮ ﺣﺪﻭﺙ ﻣﺸﺎﻛﻞ ﻓﻲ ﺍﻟﻐﺴﺎﻟﺔ.
_١٠ﻣﻌﻠﻮﻣﺎﺕ ﺍﻟﺴﻼﻣﺔ
2/14/2011 11:03:00 AM
WF9854LWN-02713K_AR_v1.indd Sec2:10
ﻳﺠﺐ ﻋﺪﻡ ﺍﺳﺘﺨﺪﺍﻡ ﺻﺎﺑﻮﻥ ﻏﺴﻞ ﺍﻟﻴﺪﻳﻦ ﺍﳌﺘﻌﺎﺩﻝ ﻣﻊ ﺍﻟﻐﺴﺎﻟﺔ.
ﻓﻲ ﺣﺎﻟﺔ ﺗﺮﺍﻛﻤﻪ ﻭﺗﺼﻠﺒﻪ ﺩﺍﺧﻞ ﺍﻟﻐﺴﺎﻟﺔ ،ﻗﺪ ﲢﺪﺙ ﻣﺸﺎﻛﻞ ﺗﺘﻌﻠﻖ ﺑﺎﳌﻨﺘﺞ ﻣﺜﻞ ﺗﻐﻴﺮ ﺍﻷﻟﻮﺍﻥ ﺃﻭ ﺍﻟﺼﺪﺃ ﺃﻭ ﺍﻧﺒﻌﺎﺙ ﺭﻭﺍﺋﺢ ﻛﺮﻳﻬﺔ.ﻳﺠﺐ ﻋﺪﻡ ﻏﺴﻞ ﺃﻧﻮﺍﻉ ﺍﻟﻐﺴﻴﻞ ﻛﺒﻴﺮﺓ ﺍﳊﺠﻢ ﻣﺜﻞ ﺍﳌﻔﺮﻭﺷﺎﺕ ﻓﻲ ﺷﺒﻜﺔ ﺍﻟﻐﺴﻴﻞ.
ﳝﻜﻨﻚ ﻭﺿﻊ ﺍﳉﻮﺍﺭﺏ ﻭﺣﻤﺎﻻﺕ ﺍﻟﺼﺪﺭ ﻓﻲ ﺷﺒﻜﺔ ﺍﻟﻐﺴﻴﻞ ﻭﻏﺴﻠﻬﺎ ﻣﻊ ﺑﻘﻴﺔ ﻣﻼﺑﺲ ﺍﻟﻐﺴﻴﻞ. ﻳﺆﺩﻱ ﺍﻟﺘﻘﺼﻴﺮ ﻓﻲ ﺍﻻﻟﺘﺰﺍﻡ ﺑﻬﺬﺍ ﺍﻷﻣﺮ ﺇﻟﻰ ﺣﺪﻭﺙ ﺇﺻﺎﺑﺔ ﻧﺘﻴﺠﺔ ﻟﻼﻫﺘﺰﺍﺯﺍﺕ ﻏﻴﺮ ﺍﻟﻄﺒﻴﻌﻴﺔ.ﻻ ﺗﺴﺘﺨﺪﻡ ﻣﺴﺤﻮﻕ ﻏﺴﻴﻞ ﻣﺘﻴﺒﺲ.
ﻓﻘﺪ ﻳﺤﺪﺙ ﺗﺴﺮﺏ ﻟﻠﻤﺎﺀ ﻓﻲ ﺣﺎﻟﺔ ﺗﺮﺍﻛﻢ ﻫﺬﺍ ﺍﳌﺴﺤﻮﻕ ﺍﳌﺘﻴﺒﺲ ﺩﺍﺧﻞ ﺍﻟﻐﺴﺎﻟﺔ.ﺑﺎﻟﻨﺴﺒﺔ ﻟﻠﻐﺴﺎﻻﺕ ﺍﻟﺘﻲ ﲢﺘﻮﻱ ﻋﻠﻰ ﻓﺘﺤﺎﺕ ﺗﻬﻮﻳﺔ ﺑﻘﺎﻋﺪﺗﻬﺎ ،ﺗﺄﻛﺪ ﻣﻦ ﻋﺪﻡ ﺳﺪ ﺍﻟﺴﺠﺎﺩ ﺃﻭ ﺃﻳﺔ ﻋﻮﺍﺋﻖ ﺃﺧﺮﻯ ﻟﻬﺬﻩ
ﺍﻟﻔﺘﺤﺎﺕ.
ﺗﺄﻛﺪ ﻣﻦ ﺇﻓﺮﺍﻍ ﻛﺎﻓﺔ ﺟﻴﻮﺏ ﺍﳌﻼﺑﺲ ﺍﻟﺘﻲ ﺳﻴﺘﻢ ﻏﺴﻠﻬﺎ.
ﻗﺪ ﺗﺘﺴﺒﺐ ﺍﻷﺷﻴﺎﺀ ﺍﻟﺼﻠﺒﺔ ﻭﺍﳊﺎﺩﺓ ﻣﺜﻞ ﺍﻟﻌﻤﻼﺕ ﺍﳌﻌﺪﻧﻴﺔ ﺃﻭ ﺍﻟﺪﺑﺎﺑﻴﺲ ﺃﻭ ﺍﳌﺴﺎﻣﻴﺮ ﺃﻭ ﺍﳌﺴﺎﻣﻴﺮ ﺍﻟﻘﻼﻭﻭﻅ ﺃﻭ ﺍﻷﺣﺠﺎﺭ ﻓﻲ ﺇﺣﺪﺍﺙﺃﺿﺮﺍﺭ ﺑﺎﻟﻐﺔ ﺑﺎﳉﻬﺎﺯ.
ﻳﺠﺐ ﻋﺪﻡ ﻏﺴﻞ ﺍﳌﻼﺑﺲ ﺍﳌﺰﻭﹼﺩﺓ ﺑﺈﺑﺰﳝﺎﺕ ﺃﻭ ﺃﺯﺭﺍﺭ ﻛﺒﻴﺮﺓ ﺍﳊﺠﻢ ﺃﻭ ﺍﻷﺷﻴﺎﺀ ﺍﳌﻌﺪﻧﻴﺔ ﺍﻷﺧﺮﻯ ﺛﻘﻴﻠﺔ ﺍﻟﻮﺯﻥ.
ﲢﺬﻳﺮ
ﻋﻼﻣﺎﺕ ﺍﻟﺘﺤﺬﻳﺮ ﺍﻟﺼﺎﺭﻣﺔ ﺍﳋﺎﺻﺔ ﺑﺎﻟﺘﻨﻈﻴﻒ
ﻳﺠﺐ ﻋﺪﻡ ﺗﻨﻈﻴﻒ ﺍﳉﻬﺎﺯ ﻋﻦ ﻃﺮﻳﻖ ﺭﺵ ﺍﳌﺎﺀ ﻓﻮﻗﻪ ﻣﺒﺎﺷﺮﺓﹰ.
ﻳﺠﺐ ﻋﺪﻡ ﺍﺳﺘﺨﺪﺍﻡ ﺍﻟﺒﻨﺰﻳﻦ ﺃﻭ ﺍﻟﺜﻨﺮ ﺃﻭ ﺍﻟﻜﺤﻮﻝ ﻟﺘﻨﻈﻴﻒ ﺍﳉﻬﺎﺯ.
ﻗﺪ ﻳﻨﺘﺞ ﻋﻦ ﻫﺬﺍ ﺍﻷﻣﺮ ﺣﺪﻭﺙ ﺗﻐﻴﺮ ﻓﻲ ﺍﻷﻟﻮﺍﻥ ﺃﻭ ﺗﺸﻮﻳﻪ ﺃﻭ ﺣﺪﻭﺙ ﺻﺪﻣﺔ ﻛﻬﺮﺑﻴﺔ ﺃﻭ ﻧﺸﻮﺏ ﺣﺮﻳﻖ.ﺍﻓﺼﻞ ﻗﺎﺑﺲ ﺍﳉﻬﺎﺯ ﻣﻦ ﻣﻘﺒﺲ ﺍﳊﺎﺋﻂ ﻗﺒﻞ ﺗﻨﻈﻴﻔﻪ ﺃﻭ ﺻﻴﺎﻧﺘﻪ.
-ﻳﺆﺩﻱ ﺍﻟﻔﺸﻞ ﻓﻲ ﺍﻻﻟﺘﺰﺍﻡ ﺑﻬﺬﺍ ﺍﻷﻣﺮ ﺇﻟﻰ ﺣﺪﻭﺙ ﺻﺪﻣﺔ ﻛﻬﺮﺑﻴﺔ ﺃﻭ ﻧﺸﻮﺏ ﺣﺮﻳﻖ.
ﻣﻌﻠﻮﻣﺎﺕ ﺍﻟﺴﻼﻣﺔ _١١
2/14/2011 11:03:00 AM
WF9854LWN-02713K_AR_v1.indd Sec2:11
ﺍﶈﺘﻮﻳﺎﺕ
ﺇﻋﺪﺍﺩ ﺍﻟﻐﺴﺎﻟﺔ
١٣
١٤
٤١
٤١
٥١
٥١
٥١
٥١
١٥
ﻓﺤﺺ ﺍﻷﺟﺰﺍﺀ
ﺍﺳﺘﻴﻔﺎﺀ ﻣﺘﻄﻠﺒﺎﺕ ﺍﻟﺘﺮﻛﻴﺐ
ﻣﺼﺪﺭ ﺍﻟﻄﺎﻗﺔ ﺍﻟﻜﻬﺮﺑﻴﺔ ﻭﺍﻟﺘﻮﺻﻴﻞ ﺍﻷﺭﺿﻲ
ﺗﻮﺭﻳﺪ ﺍﳌﺎﺀ
ﺍﻟﺘﺼﺮﻳﻒ
ﺍﻟﺘﺜﺒﻴﺖ ﺍﻷﺭﺿﻲ
ﺩﺭﺟﺔ ﺍﳊﺮﺍﺭﺓ ﺍﶈﻴﻄﺔ
ﺗﺮﻛﻴﺐ ﺍﻟﻘﻨﻄﺮﺓ ﺃﻭ ﺍﳋﺰﺍﻧﺔ
ﺗﺮﻛﻴﺐ ﺍﻟﻐﺴﺎﻟﺔ
ﻏﺴﻞ ﺍﳌﻼﺑﺲ
٢١
٢١
٢٢
٤٢
٤٢
٤٢
٥٢
٦٢
٢٧
٢٩
٩٢
٩٢
ﺍﻟﻐﺴﻞ ﻟﻠﻤﺮﺓ ﺍﻷﻭﻟﻰ
ﺇﺭﺷﺎﺩﺍﺕ ﺃﺳﺎﺳﻴﺔ
ﺍﺳﺘﺨﺪﺍﻡ ﻟﻮﺣﺔ ﺍﻟﺘﺤﻜﻢ
) Child Lockﺍﻟﺘﺄﻣﲔ ﺿﺪ ﻋﺒﺚ ﺍﻷﻃﻔﺎﻝ(
) Sound offﺇﻳﻘﺎﻑ ﺗﺸﻐﻴﻞ ﺍﻟﺼﻮﺕ(
) Delay Endﺗﺄﺟﻴﻞ ﺍﻟﺘﻮﻗﻒ(
ﻏﺴﻞ ﺍﳌﻼﺑﺲ ﺑﺎﺳﺘﺨﺪﺍﻡ ﻗﺮﺹ ﲢﺪﻳﺪ ﺍﻟﺪﻭﺭﺓ
ﻏﺴﻞ ﺍﳌﻼﺑﺲ ﻳﺪﻭﻳﹰﺎ
ﺇﺭﺷﺎﺩﺍﺕ ﺣﻮﻝ ﺍﻟﻐﺴﻴﻞ
ﻣﻌﻠﻮﻣﺎﺕ ﺣﻮﻝ ﻣﺴﺤﻮﻕ ﺍﻟﻐﺴﻴﻞ ﻭﺍﳌﻮﺍﺩ ﺍﻹﺿﺎﻓﻴﺔ
ﻣﺴﺤﻮﻕ ﺍﻟﻐﺴﻴﻞ ﺍﻟﺬﻱ ﳝﻜﻦ ﺍﺳﺘﺨﺪﺍﻣﻪ
ﺩﺭﺝ ﻣﺴﺤﻮﻕ ﺍﻟﻐﺴﻴﻞ
ﺗﻨﻈﻴﻒ ﺍﻟﻐﺴﺎﻟﺔ ﻭﺻﻴﺎﻧﺘﻬﺎ
٣٠
٣١
٣١
٣٢
٣٣
٣٣
٣٣
٣٣
) Eco Drum Cleanﺗﻨﻈﻴﻒ ﺍﳊﺎﻭﻳﺔ ﺻﺪﻳﻖ ﺍﻟﺒﻴﺌﺔ(
ﺗﺼﺮﻳﻒ ﺍﳌﺎﺀ ﻣﻦ ﺍﻟﻐﺴﺎﻟﺔ ﻋﻨﺪ ﺍﻟﻄﻮﺍﺭﺉ
ﺗﻨﻈﻴﻒ ﺍﻷﺳﻄﺢ ﺍﳋﺎﺭﺟﻴﺔ
ﺗﻨﻈﻴﻒ ﺩﺭﺝ ﻣﺴﺤﻮﻕ ﺍﻟﻐﺴﻴﻞ ﻭﺍﳉﺰﺀ ﺍﻟﺪﺍﺧﻠﻲ ﻣﻨﻪ
ﺗﻨﻈﻴﻒ ﻣﺼﻔﺎﺓ ﺍﻠﻔﺎﺕ
ﺗﻨﻈﻴﻒ ﺍﳌﺼﻔﺎﺓ ﺍﻟﺸﺒﻜﻴﺔ ﺍﳌﺘﺼﻠﺔ ﺑﺨﺮﻃﻮﻡ ﺍﳌﺎﺀ
ﺇﺻﻼﺡ ﻏﺴﺎﻟﺔ ﻣﺘﺠﻤﺪﺓ
ﺗﺨﺰﻳﻦ ﺍﻟﻐﺴﺎﻟﺔ
ﺍﺳﺘﻜﺸﺎﻑ ﺍﳌﺸﺎﻛﻞ ﻭﺣﻠﻬﺎ ﻭﺭﻣﻮﺯ ﺍﳌﻌﻠﻮﻣﺎﺕ
٣٤
٣٥
ﲢﻘﻖ ﳑﺎ ﻳﻠﻲ ﺇﺫﺍ ﻛﺎﻧﺖ ﺍﻟﻐﺴﺎﻟﺔ...
ﺭﻣﻮﺯ ﺍﳌﻌﻠﻮﻣﺎﺕ
ﺟﺪﻭﻝ ﺍﻟﺪﻭﺭﺍﺕ
٣٦
ﺟﺪﻭﻝ ﺍﻟﺪﻭﺭﺍﺕ
١٣
٢١
٣٠
٣٤
٣٦
ﺍﳌﻠﺤﻖ
٣٧
٣٧
٣٧
٣٧
٣٨
ﺟﺪﻭﻝ ﺍﻟﻌﻨﺎﻳﺔ ﺑﺎﻷﻗﻤﺸﺔ
ﺣﻤﺎﻳﺔ ﺍﻟﺒﻴﺌﺔ
ﺑﻴﺎﻥ ﺍﻟﺘﻮﺍﻓﻖ
ﺍﳌﻮﺍﺻﻔﺎﺕ
_١٢ﺍﶈﺘﻮﻳﺎﺕ
2/14/2011 11:03:01 AM
WF9854LWN-02713K_AR_v1.indd Sec3:12
ﺇﻋﺪﺍﺩ ﺍﻟﻐﺴﺎﻟﺔ
ﺗﺄﻛﺪ ﻣﻦ ﺍﺗﺒﺎﻉ ﺍﻟﻘﺎﺋﻢ ﺑﺎﻟﺘﺮﻛﻴﺐ ﻟﻬﺬﻩ ﺍﻹﺭﺷﺎﺩﺍﺕ ﺑﺪﻗﺔ ﺣﺘﻰ ﺗﻌﻤﻞ ﺍﻟﻐﺴﺎﻟﺔ ﺑﺸﻜﻞ ﺻﺤﻴﺢ ﻭﻟﺘﺠﻨﺐ ﺣﺪﻭﺙ ﺇﺻﺎﺑﺎﺕ
ﻋﻨﺪ ﺍﻟﻘﻴﺎﻡ ﺑﺎﻟﻐﺴﻴﻞ.
ﻓﺤﺺ ﺍﻷﺟﺰﺍﺀ
٠١ﺍﻹﻋﺪﺍﺩ
ﺃﺧﺮﺝ ﺍﻟﻐﺴﺎﻟﺔ ﺑﺤﺮﺹ ﻣﻦ ﺍﻟﺼﻨﺪﻭﻕ ﻭﺗﺄﻛﺪ ﻣﻦ ﻭﺟﻮﺩ ﻛﺎﻓﺔ ﺍﻷﺟﺰﺍﺀ ﺍﳌﻮﺿﺤﺔ ﺃﺩﻧﺎﻩ .ﻓﻲ ﺣﺎﻟﺔ ﺗﻠﻒ ﺍﻟﻐﺴﺎﻟﺔ ﺃﺛﻨﺎﺀ ﻋﻤﻠﻴﺔ ﺍﻟﺸﺤﻦ ﺃﻭ ﻋﺪﻡ ﺍﺳﺘﻼﻣﻚ ﻟﻜﺎﻓﺔ
ﺍﻷﺟﺰﺍﺀ ،ﺍﺗﺼﻞ ﺑﺨﺪﻣﺔ ﻋﻤﻼﺀ Samsungﺃﻭ ﺍﳌﻮﺯﹼﻉ ﺍﳌﻌﺘﻤﺪ ﻟﺪﻯ .Samsung
ﺫﺭﺍﻉ ﺍﻹﻃﻼﻕ
ﺳﻄﺢ ﺍﻟﻐﺴﺎﻟﺔ
ﺩﺭﺝ ﻣﺴﺤﻮﻕ ﺍﻟﻐﺴﻴﻞ
ﻟﻮﺣﺔ ﺍﻟﺘﺤﻜﻢ
ﺍﻟﻘﺎﺑﺲ
ﺑﺎﺏ
ﺍﻟﻐﺴﺎﻟﺔ
ﺧﺮﻃﻮﻡ
ﺍﻟﺘﺼﺮﻳﻒ
ﻣﺼﻔﺎﺓ ﺍﻠﻔﺎﺕ
ﺃﻗﺪﺍﻡ ﻗﺎﺑﻠﺔ ﻟﻠﻀﺒﻂ
ﺣﻮﺽ ﺍﻟﻐﺴﻴﻞ
ﺃﻧﺒﻮﺏ ﺗﺼﺮﻳﻒ ﺍﻟﻄﻮﺍﺭﺉ
ﻏﻄﺎﺀ ﺍﳌﺼﻔﺎﺓ
ﻞﻴﻣﺍﻮﺼﻟﺍ
ﺮﻴﻣﺎﺴﳌﺍ ﺕﺎﺤﺘﻓ ﺔﻴﻄﻏﺃ
ﺩﺭﺎﺑ
ﻦﺧﺎﺳ
)ﺓﺩﺪﺤﻣ ﺕﺍﺯﺍﺮﻃ(
ﻡﻮﻃﺮﳋﺍ ﻞﻣﺎﺣ
ﺀﺎﳌﺍ ﺪﻳﺭﻮﺗ ﻡﻮﻃﺮﺧ
ﺇﻋﺪﺍﺩ ﺍﻟﻐﺴﺎﻟﺔ _١٣
2/14/2011 11:03:01 AM
WF9854LWN-02713K_AR_v1.indd Sec4:13
ﺇﻋﺪﺍﺩ ﺍﻟﻐﺴﺎﻟﺔ
ﺍﺳﺘﻴﻔﺎﺀ ﻣﺘﻄﻠﺒﺎﺕ ﺍﻟﺘﺮﻛﻴﺐ
ﻣﺼﺪﺭ ﺍﻟﻄﺎﻗﺔ ﺍﻟﻜﻬﺮﺑﻴﺔ ﻭﺍﻟﺘﻮﺻﻴﻞ ﺍﻷﺭﺿﻲ
ﻟﺘﻔﺎﺩﻱ ﺧﻄﺮ ﺣﺪﻭﺙ ﺣﺮﻳﻖ ﺃﻭ ﺍﻟﺘﻌﺮﺽ ﻟﺼﺪﻣﺔ ﻛﻬﺮﺑﻴﺔ ﺃﻭ ﺇﺻﺎﺑﺔ ﺟﺴﺪﻳﺔ ،ﻳﺠﺐ ﺃﻥ ﺗﺘﻢ ﻋﻤﻠﻴﺔ ﺗﻮﺻﻴﻞ ﺍﻷﺳﻼﻙ ﻭﺍﻟﺘﻮﺻﻴﻞ ﺍﻷﺭﺿﻲ ﻭﻓﻘﹰ ﺎ
ﻷﺣﺪﺙ ﻧﺴﺨﺔ ﻣﻦ ﺍﻟﻼﺋﺤﺔ ﺍﻟﻮﻃﻨﻴﺔ ﻟﻠﻜﻬﺮﺑﺎﺀ ،ANSI/FNPAﺭﻗﻢ ٧٠ﻭﺍﻟﻘﻮﺍﻧﲔ ﻭﺍﻟﻀﻮﺍﺑﻂ ﺍﶈﻠﻴﺔ .ﻳﺘﺤﻤﻞ ﻣﺎﻟﻚ ﻫﺬﺍ ﺍﳉﻬﺎﺯ ﻣﺴﺆﻭﻟﻴﺔ ﺗﻮﻓﻴﺮ
ﺍﻟﺼﻴﺎﻧﺔ ﺍﻟﻜﻬﺮﺑﺎﺋﻴﺔ ﺍﻟﻜﺎﻓﻴﺔ ﻟﻠﺠﻬﺎﺯ.
ﲢﺬﻳﺮ
ﳑﻨﻮﻉ ﺍﺳﺘﺨﺪﺍﻡ ﻛﺒﻼﺕ ﺇﺿﺎﻓﻴﺔ.
ﺍﺳﺘﺨﺪﻡ ﺳﻠﻚ ﺍﻟﺘﻴﺎﺭ ﺍﻟﻜﻬﺮﺑﻲ ﺍﳌﺮﻓﻖ ﻣﻊ ﺍﻟﻐﺴﺎﻟﺔ ﻓﻘﻂ.
ﻋﻨﺪ ﺍﻹﻋﺪﺍﺩ ﻟﻌﻤﻠﻴﺔ ﺍﻟﺘﺮﻛﻴﺐ ،ﺗﺄﻛﺪ ﺃﻥ ﺳﻠﻚ ﺍﻟﺘﻴﺎﺭ ﺍﻟﻜﻬﺮﺑﻲ ﻳﻮﻓﺮ:
• ﻗﺎﻃﻊ ﺩﺍﺋﺮﺓ ﻛﻬﺮﺑﻴﺔ ﺃﻭ ﻣﻨﺼﻬﺮ ﺑﺠﻬﺪ ٢٢٠ﺇﻟﻰ ٢٤٠ﻓﻮﻟﺖ ﺗﻴﺎﺭ ﻣﺘﺮﺩﺩ ٦٠ /ﻫﺮﺗﺰ
• ﺩﺍﺋﺮﺓ ﻛﻬﺮﺑﻴﺔ ﻓﺮﻋﻴﺔ ﻣﻨﻔﺼﻠﺔ ﻟﺘﺸﻐﻴﻞ ﺍﻟﻐﺴﺎﻟﺔ ﻓﻘﻂ
ﻳﺠﺐ ﺗﻮﺻﻴﻞ ﺍﻟﻐﺴﺎﻟﺔ ﲟﺄﺧﺬ ﺃﺭﺿﻲ .ﻭﻓﻲ ﺣﺎﻟﺔ ﺣﺪﻭﺙ ﺧﻠﻞ ﺃﻭ ﺗﻌﻄﻞ ﻓﻲ ﺍﻷﺩﺍﺀ ،ﻳﻌﻤﻞ ﺍﻟﺘﻮﺻﻴﻞ ﺍﻷﺭﺿﻲ ﻋﻠﻰ ﺗﻘﻠﻴﻞ ﺧﻄﻮﺭﺓ ﺍﻟﺘﻌﺮﺽ
ﻟﺼﺪﻣﺔ ﻛﻬﺮﺑﻴﺔ ،ﻭﺫﻟﻚ ﺑﺘﻮﻓﻴﺮ ﻣﺴﺎﺭ ﺃﻗﻞ ﻣﻘﺎﻭﻣﺔ ﻟﻠﺘﻴﺎﺭ ﺍﻟﻜﻬﺮﺑﻲ.
ﻳﺘﻢ ﺗﺰﻭﻳﺪ ﺍﻟﻐﺴﺎﻟﺔ ﺑﻘﺎﺑﺲ ﺗﻴﺎﺭ ﻛﻬﺮﺑﻲ ﺃﺭﺿﻲ ﺑﺜﻼﺛﺔ ﺳﻨﻮﻥ ﻻﺳﺘﺨﺪﺍﻣﻪ ﺑﺸﻜﻞ ﺻﺤﻴﺢ ﻓﻲ ﺍﳌﺄﺧﺬ ﺍﻷﺭﺿﻲ ﺍﳌﹸﺮﻛﺐ ﺑﺸﻜﻞ ﺻﺤﻴﺢ.
ﻻ ﺗﻘﻢ ﻣﻄﻠﻘﹰ ﺎ ﺑﺘﻮﺻﻴﻞ ﺍﻟﺴﻠﻚ ﺍﻷﺭﺿﻲ ﺑﺨﻄﻮﻁ ﻣﻮﺍﺳﻴﺮ ﺍﻟﺴﺒﺎﻛﺔ ﺍﻟﺒﻼﺳﺘﻴﻜﻴﺔ ﺃﻭ ﺧﻄﻮﻁ ﺍﻟﻐﺎﺯ ﺃﻭ ﻣﻮﺍﺳﻴﺮ ﺍﳌﺎﺀ ﺍﻟﺴﺎﺧﻦ.
ﻓﻘﺪ ﻳﺆﺩﻱ ﺍﻟﺘﻮﺻﻴﻞ ﻏﻴﺮ ﺍﻟﺼﺤﻴﺢ ﻟﻠﻤﻮﺻﻞ ﺍﻷﺭﺿﻲ ﺍﳋﺎﺹ ﺑﺎﻟﻐﺴﺎﻟﺔ ﺇﻟﻰ ﺣﺪﻭﺙ ﺻﺪﻣﺔ ﻛﻬﺮﺑﻴﺔ.
ﺍﺳﺘﺸﺮ ﻓﻨﻲ ﻛﻬﺮﺑﺎﺀ ﻣﺆﻫﻼ ﹰ ﺃﻭ ﻓﻨﻲ ﺻﻴﺎﻧﺔ ﺇﺫﺍ ﻟﻢ ﺗﻜﻦ ﻣﺘﺄﻛ ﹰﺪﺍ ﻣﻦ ﺻﺤﺔ ﺍﻟﺘﻮﺻﻴﻞ ﺍﻷﺭﺿﻲ ﻟﻠﻐﺴﺎﻟﺔ .ﻳﹸﺤﻈﺮ ﺗﻌﺪﻳﻞ ﺍﻟﻘﺎﺑﺲ ﺍﳌﺮﻓﻖ ﻣﻊ
ﺍﻟﻐﺴﺎﻟﺔ .ﻭﻓﻲ ﺣﺎﻟﺔ ﻋﺪﻡ ﺗﻮﺍﻓﻘﻪ ﻣﻊ ﻣﺨﺮﹶﺝ ﺍﻟﺘﻴﺎﺭ ،ﺍﺳﺘﻌﻦ ﺑﻔﻨﻲ ﻛﻬﺮﺑﺎﺀ ﻣﺆﻫﻞ ﻟﺘﺮﻛﻴﺐ ﻣﺨﺮﹶﺝ ﻣﻨﺎﺳﺐ.
ﺗﻮﺭﻳﺪ ﺍﳌﺎﺀ
ﻳﺘﻢ ﻣﻞﺀ ﺍﻟﻐﺴﺎﻟﺔ ﺑﺸﻜﻞ ﺳﻠﻴﻢ ﻋﻨﺪﻣﺎ ﻳﻜﻮﻥ ﺿﻐﻂ ﺍﳌﺎﺀ ﻣﻦ ٥٠ﺇﻟﻰ ٨٠٠ﻛﻴﻠﻮﺑﺎﺳﻜﺎﻝ .ﻗﺪ ﻳﺘﺴﺒﺐ ﺿﻐﻂ ﺍﳌﺎﺀ ﺍﻷﻗﻞ ﻣﻦ ٥٠ﻛﻴﻠﻮﺑﺎﺳﻜﺎﻝ
ﻓﻲ ﺗﻠﻒ ﺻﻤﺎﻡ ﺍﳌﺎﺀ ﳑﺎ ﻻ ﻳﺴﻤﺢ ﺑﺈﻏﻼﻗﻪ ﻛﻠﻴﺔﹰ .ﺃﻭ ﻗﺪ ﺗﺴﺘﻐﺮﻕ ﺍﻟﻐﺴﺎﻟﺔ ﻭﻗ ﹰﺘﺎ ﺃﻃﻮﻝ ﳑﺎ ﺗﺴﻤﺢ ﺑﻪ ﻋﻨﺎﺻﺮ ﺍﻟﺘﺤﻜﻢ ﳌﻠﺌﻬﺎ ﺑﺎﳌﺎﺀ ،ﳑﺎ ﻳﻨﺘﺞ ﻋﻨﻪ
ﺇﻳﻘﺎﻑ ﺗﺸﻐﻴﻞ ﺍﻟﻐﺴﺎﻟﺔ) .ﻳﺘﻢ ﺗﻀﻤﲔ ﻧﻈﺎﻡ ﲢﺪﻳﺪ ﻭﻗﺖ ﻣﻞﺀ ﺍﻟﻐﺴﺎﻟﺔ ﻓﻲ ﻋﻨﺎﺻﺮ ﺍﻟﺘﺤﻜﻢ ﻭﺍﻟﺬﻱ ﰎ ﺗﺼﻤﻴﻤﻪ ﻟﻠﺤﺪ ﻣﻦ ﻋﻤﻠﻴﺎﺕ ﺗﺪﻓﻖ/
ﻓﻴﻀﺎﻥ ﺍﳌﺎﺀ ﻓﻲ ﺣﺎﻟﺔ ﺍﺭﺗﺨﺎﺀ ﺍﳋﺮﻃﻮﻡ ﺍﻟﺪﺍﺧﻠﻲ(.
ﻳﺠﺐ ﺃﻥ ﺗﻜﻮﻥ ﺻﻨﺎﺑﻴﺮ ﺍﳌﺎﺀ ﻋﻠﻰ ﺑﹸﻌﺪ 4ﺃﻗﺪﺍﻡ ) ١٢٢ﺳﻢ( ﻣﻦ ﺍﳉﺎﻧﺐ ﺍﳋﻠﻔﻲ ﻟﻠﻐﺴﺎﻟﺔ ﻟﺘﺴﻬﻴﻞ ﻭﺻﻮﻝ ﺧﺮﺍﻃﻴﻢ ﺗﻮﺭﻳﺪ ﺍﳌﺎﺀ ﺍﳌﺮﻓﻘﺔ ﺇﻟﻰ
ﺍﻟﻐﺴﺎﻟﺔ.
ﺗﻘﻮﻡ ﻣﻌﻈﻢ ﻣﺘﺎﺟﺮ ﺗﻮﺭﻳﺪ ﺍﳌﻮﺍﺳﻴﺮ ﺑﺒﻴﻊ ﺧﺮﺍﻃﻴﻢ ﺗﻮﺭﻳﺪ ﺍﳌﺎﺀ ﲟﺨﺘﻠﻒ ﺃﻃﻮﺍﻟﻬﺎ ﺍﻟﺘﻲ ﺗﺼﻞ ﺇﻟﻰ ١٠ﺃﻗﺪﺍﻡ
) ٣٠٥ﺳﻢ(.
ﳝﻜﻨﻚ ﺗﻘﻠﻴﻞ ﻣﺨﺎﻃﺮ ﺗﺴﺮﺏ ﺍﳌﺎﺀ ﺃﻭ ﺗﻠﻮﺛﻪ ﻋﻦ ﻃﺮﻳﻖ:
•
•
•
ﲢﺬﻳﺮ
ﺗﻴﺴﻴﺮ ﻭﺻﻮﻝ ﺍﳋﺮﺍﻃﻴﻢ ﺇﻟﻰ ﺻﻨﺎﺑﻴﺮ ﺍﳌﺎﺀ.
ﺇﻏﻼﻕ ﺍﻟﺼﻨﺎﺑﻴﺮ ﻓﻲ ﺣﺎﻟﺔ ﻋﺪﻡ ﺗﺸﻐﻴﻞ ﺍﻟﻐﺴﺎﻟﺔ.
ﺍﻟﻔﺤﺺ ﺩﻭﺭﻱ ﻟﻠﺘﺄﻛﺪ ﻣﻦ ﻋﺪﻡ ﺗﺴﺮﺏ ﺍﳌﺎﺀ ﻣﻦ ﲡﻬﻴﺰﺍﺕ ﺧﺮﺍﻃﻴﻢ ﺗﻮﺭﻳﺪ ﺍﳌﺎﺀ.
ﻗﻢ ﺑﻔﺤﺺ ﻛﺎﻓﺔ ﺍﻟﺘﻮﺻﻴﻼﺕ ﺍﳌﻮﺟﻮﺩﺓ ﻓﻲ ﺻﻤﺎﻡ ﻭﺻﻨﺎﺑﻴﺮ ﺍﳌﺎﺀ ﻟﻠﺘﺤﻘﻖ ﳑﺎ ﺇﺫﺍ ﻛﺎﻥ ﻫﻨﺎﻙ ﺃﻱ ﺗﺴﺮﻳﺐ ﻗﺒﻞ ﺍﺳﺘﺨﺪﺍﻡ ﺍﻟﻐﺴﺎﻟﺔ ﺃﻭﻝ
ﻣﺮﺓ.
_١٤ﺇﻋﺪﺍﺩ ﺍﻟﻐﺴﺎﻟﺔ
2/14/2011 11:03:01 AM
WF9854LWN-02713K_AR_v1.indd Sec4:14
ﺍﻟﺘﺼﺮﻳﻒ
ﺗﻮﺻﻲ ﺷﺮﻛﺔ Samsungﺑﺎﺳﺘﺨﺪﺍﻡ ﻣﺎﺳﻮﺭﺓ ﺭﺃﺳﻴﺔ ﻳﺼﻞ ﺍﺭﺗﻔﺎﻋﻬﺎ ﺇﻟﻰ ١٨ﺑﻮﺻﺔ ) ٤٦ﺳﻢ( .ﻳﺠﺐ ﺗﻮﺟﻴﻪ ﺧﺮﻃﻮﻡ ﺍﻟﺘﺼﺮﻳﻒ ﺑﺎﺳﺘﺨﺪﺍﻡ
ﻣﺸﺒﻚ ﺧﺮﻃﻮﻡ ﺍﻟﺘﺼﺮﻳﻒ ﺇﻟﻰ ﺍﲡﺎﻩ ﺍﳌﺎﺳﻮﺭﺓ ﺍﻟﺮﺃﺳﻴﺔ .ﻭﻳﺠﺐ ﺃﻥ ﺗﻜﻮﻥ ﺍﳌﺎﺳﻮﺭﺓ ﺍﻟﺮﺃﺳﻴﺔ ﻛﺒﻴﺮﺓ ﺑﺪﺭﺟﺔ ﻛﺎﻓﻴﺔ ﺗﺴﻤﺢ ﺑﺈﺩﺧﺎﻝ ﺍﻟﻘﻄﺮ ﺍﳋﺎﺭﺟﻲ
ﳋﺮﻃﻮﻡ ﺍﻟﺘﺼﺮﻳﻒ ،ﺍﻟﺬﻱ ﻳﻘﻮﻡ ﺍﳌﺼﻨﹼﻊ ﺑﺈﺭﻓﺎﻗﻪ.
٠١ﺍﻹﻋﺪﺍﺩ
ﺍﻟﺘﺜﺒﻴﺖ ﺍﻷﺭﺿﻲ
ﻳﺠﺐ ﺗﺜﺒﻴﺖ ﺍﻟﻐﺴﺎﻟﺔ ﻋﻠﻰ ﺳﻄﺢ ﺛﺎﺑﺖ ﻭﺻﻠﺐ ﻟﻠﺤﺼﻮﻝ ﻋﻠﻰ ﺃﻓﻀﻞ ﺃﺩﺍﺀ .ﻗﺪ ﲢﺘﺎﺝ ﺍﻷﺳﻄﺢ ﺍﳋﺸﺒﻴﺔ ﺇﻟﻰ ﺗﻘﻮﻳﺘﻬﺎ ﻟﺘﻘﻠﻴﻞ ﺍﻻﻫﺘﺰﺍﺯ ﻭ/
ﺃﻭ ﺍﻷﺣﻤﺎﻝ ﻏﻴﺮ ﺍﳌﺘﻮﺍﺯﻧﺔ .ﺗﻜﻮﻥ ﻃﺮﻳﻘﺔ ﺑﺴﻂ ﺍﻟﺴﺠﺎﺩ ﻋﻠﻰ ﺍﻷﺭﺿﻴﺎﺕ ﺑﺎﻹﺿﺎﻓﺔ ﺇﻟﻰ ﺃﺳﻄﺢ ﺍﻟﺒﻼﻁ ﺍﻟﻨﺎﻋﻤﺔ ﲟﺜﺎﺑﺔ ﻋﻮﺍﻣﻞ ﻣﺴﺎﻫﻤﺔ ﻓﻲ
ﻋﻤﻠﻴﺎﺕ ﺍﻻﻫﺘﺰﺍﺯ ﻭﺍﺣﺘﻤﺎﻟﻴﺔ ﲢﺮﻙ ﺍﻟﻐﺴﺎﻟﺔ ﺑﺸﻜﻞ ﻃﻔﻴﻒ ﺃﺛﻨﺎﺀ ﺩﻭﺭﺓ ﺍﻟﺘﻨﺸﻴﻒ.
ﻻ ﺗﻘﻢ ﻣﻄﻠﻘﹰ ﺎ ﺑﺘﺮﻛﻴﺐ ﺍﻟﻐﺴﺎﻟﺔ ﻋﻠﻰ ﺃﺭﺿﻴﺔ ﺃﻭ ﺑﻨﻴﺔ ﺿﻌﻴﻔﺔ.
ﺩﺭﺟﺔ ﺍﳊﺮﺍﺭﺓ ﺍﶈﻴﻄﺔ
ﺩﻭﻣﺎ ﺑﺒﻌﺾ ﺍﳌﺎﺀ ﻓﻲ ﺻﻤﺎﻡ ﺍﳌﺎﺀ ﻭﺍﳌﻀﺨﺔ ﻭﺃﺟﺰﺍﺀ ﻣﻦ
ﻻ ﺗﻘﻢ ﺑﺘﺮﻛﻴﺐ ﺍﻟﻐﺴﺎﻟﺔ ﻓﻲ ﻣﻨﺎﻃﻖ ﻗﺪ ﻳﺘﺠﻤﺪ ﻓﻴﻬﺎ ﺍﳌﺎﺀ ،ﺣﻴﺚ ﺇﻥ ﺍﻟﻐﺴﺎﻟﺔ ﲢﺘﻔﻆ ﹰ
ﺍﳋﺮﻃﻮﻡ .ﻭﳝﻜﻦ ﺃﻥ ﻳﺘﺴﺒﺐ ﺍﳌﺎﺀ ﺍﳌﺘﺠﻤﺪ ﺍﳌﻮﺟﻮﺩ ﻓﻲ ﺍﳌﻮﺍﺳﻴﺮ ﻓﻲ ﺇﳊﺎﻕ ﺿﺮﺭ ﺑﺎﻟﺴﻴﻮﺭ ﻭﺍﳌﻀﺨﺔ ﻭﺍﳌﻜﻮﻧﺎﺕ ﺍﻷﺧﺮﻯ.
ﺗﺮﻛﻴﺐ ﺍﻟﻘﻨﻄﺮﺓ ﺃﻭ ﺍﳋﺰﺍﻧﺔ
ﻟﺘﺸﻐﻴﻞ ﺍﻟﻐﺴﺎﻟﺔ ﺑﺸﻜﻞ ﺁﻣﻦ ﻭﺳﻠﻴﻢ ،ﻳﺠﺐ ﺗﻮﻓﻴﺮ ﺍﳊﺪ ﺍﻷﺩﻧﻰ ﻣﻦ ﺍﻟﻔﺮﺍﻏﺎﺕ ﺣﻮﻟﻬﺎ ﻛﻤﺎ ﻳﻠﻲ:
ﺍﳉﻮﺍﻧﺐ ـــ ٢٥ﱈ
ﺍﳉﺎﻧﺐ ﺍﳋﻠﻔﻲ ــ ٥١ﱈ
ﺍﳉﺰﺀ ﺍﻟﻌﻠﻮﻱ ــ ٢٥ﱈ
ﺍﻟﻮﺍﺟﻬﺔ ــ ٤٦٥ﱈ
ﻣﻌﺎ ،ﻳﺠﺐ ﺃﻥ ﻳﻜﻮﻥ ﺑﺎﳉﺎﻧﺐ ﺍﻟﻌﻠﻮﻱ ﻟﻠﻘﻨﻄﺮﺓ ﺃﻭ ﺍﳋﺰﺍﻧﺔ ﻓﺘﺤﺔ ﻫﻮﺍﺀ ﻏﻴﺮ ﻣﺴﺪﻭﺩﺓ ٤٦٥ﱈ ﻋﻠﻰ ﺍﻷﻗﻞ .ﻻ
ﻓﻲ ﺣﺎﻟﺔ ﺗﺮﻛﻴﺐ ﺍﻟﻐﺴﺎﻟﺔ ﻭﺍﻔﻒ ﹰ
ﺗﺘﻄﻠﺐ ﺍﻟﻐﺴﺎﻟﺔ ﻭﺣﺪﻫﺎ ﻓﺘﺤﺔ ﻫﻮﺍﺀ ﺑﻌﻴﻨﻬﺎ.
ﺗﺮﻛﻴﺐ ﺍﻟﻐﺴﺎﻟﺔ
ﺍﳋﻄﻮﺓ ﺭﻗﻢ ١
ﺍﺧﺘﻴﺎﺭ ﻣﻜﺎﻥ ﺍﻟﻐﺴﺎﻟﺔ
ﻗﺒﻞ ﺗﺮﻛﻴﺐ ﺍﻟﻐﺴﺎﻟﺔ ،ﺗﺄﻛﺪ ﻣﻦ ﺗﻮﻓﺮ ﻣﺎ ﻳﻠﻲ ﻓﻲ ﺍﳌﻜﺎﻥ ﺍﻟﺬﻱ ﻗﻤﺖ ﺑﺎﺧﺘﻴﺎﺭﻩ:
•
•
•
•
•
•
ﺳﻄﺢ ﺻﻠﺐ ﻭﻣﺴﺘﻮ ﺩﻭﻥ ﻭﺟﻮﺩ ﺳﺠﺎﺩ ﺃﻭ ﺃﺭﺿﻴﺔ ﻗﺪ ﺗﻌﻮﻕ ﻋﻤﻠﻴﺔ ﺍﻟﺘﻬﻮﻳﺔ
ﻣﻜﺎﻥ ﺑﻌﻴﺪ ﻋﻦ ﺃﺷﻌﺔ ﺍﻟﺸﻤﺲ ﺍﳌﺒﺎﺷﺮﺓ
ﺗﻬﻮﻳﺔ ﻛﺎﻓﻴﺔ
ﻻ ﻳﺼﻞ ﺇﻟﻰ ﻣﺮﺣﻠﺔ ﺍﻟﺘﺠﻤﺪ )ﺃﻗﻞ ﻣﻦ ٣٢ﺩﺭﺟﺔ ﻓﻬﺮﻧﻬﺎﻳﺖ ﺃﻭ ٠ﺩﺭﺟﺔ ﺳﻠﺰﻳﻮﺱ(
ﻳﻜﻮﻥ ﺑﻌﻴ ﹰﺪﺍ ﻋﻦ ﻣﺼﺎﺩﺭ ﺍﳊﺮﺍﺭﺓ ﻣﺜﻞ ﺍﻟﺒﺘﺮﻭﻝ ﺃﻭ ﺍﻟﻐﺎﺯ
ﺗﺘﻮﻓﺮ ﺑﻪ ﻣﺴﺎﺣﺔ ﻛﺎﻓﻴﺔ ﺣﺘﻰ ﻻ ﻳﺘﻢ ﻭﺿﻊ ﺍﻟﻐﺴﺎﻟﺔ ﻋﻠﻰ ﺳﻠﻚ ﺍﻟﻄﺎﻗﺔ
ﺇﻋﺪﺍﺩ ﺍﻟﻐﺴﺎﻟﺔ _١٥
2/14/2011 11:03:02 AM
WF9854LWN-02713K_AR_v1.indd Sec4:15
ﺇﻋﺪﺍﺩ ﺍﻟﻐﺴﺎﻟﺔ
ﺍﳋﻄﻮﺓ ﺭﻗﻢ ٢
ﻗﻢ ﺑﻔﻚ ﻣﺴﺎﻣﻴﺮ ﺍﻟﺸﺤﻦ
ﻗﺒﻞ ﺗﺮﻛﻴﺐ ﺟﻬﺎﺯ ﺍﻟﻐﺴﺎﻟﺔ ،ﻳﺠﺐ ﻓﻚ ﻣﺴﺎﻣﻴﺮ ﺍﻟﺸﺤﻦ ﺍﳋﻤﺴﺔ ﻣﻦ ﺍﻟﻠﻮﺣﺔ ﺍﳋﻠﻔﻴﺔ ﻟﻠﺠﻬﺎﺯ.
.١ﻗﻢ ﺑﻔﻚ ﺟﻤﻴﻊ ﺍﳌﺴﺎﻣﻴﺮ ﺑﻮﺍﺳﻄﺔ ﻣﻔﺘﺎﺡ ﺍﻟﺮﺑﻂ ﺍﳌﺮﻓﻖ ﻣﻊ ﺍﳉﻬﺎﺯ.
ﺍﳋﻴﺎﺭ
.٢ﺍﻣﺴﻚ ﺍﻟﺼﻮﺍﻣﻴﻞ ﺑﻮﺍﺳﻄﺔ ﻣﻔﺘﺎﺡ ﺍﻟﺮﺑﻂ ﻭﺍﺳﺤﺒﻬﺎ ﻣﻦ ﺧﻼﻝ ﺍﳉﺰﺀ ﺍﻟﻌﺮﻳﺾ ﻟﻠﻔﺘﺤﺔ.
ﻛﺮﺭ ﺫﻟﻚ ﻟﻔﻚ ﻛﻞ ﻣﺴﻤﺎﺭ.
.٣ﻗﻢ ﺑﺘﻐﻄﻴﺔ ﺟﻤﻴﻊ ﺍﻟﻔﺘﺤﺎﺕ ﺑﺎﺳﺘﺨﺪﺍﻡ ﺍﻷﻏﻄﻴﺔ ﺍﻟﺒﻼﺳﺘﻴﻜﻴﺔ ﺍﳌﺮﻓﻘﺔ ﻣﻊ ﺍﳉﻬﺎﺯ.
ﺍﳋﻴﺎﺭ
ﺍﳋﻴﺎﺭ
.٤ﻗﻢ ﺑﺤﻔﻆ ﻣﺴﺎﻣﻴﺮ ﺍﻟﺸﺤﻦ ﻓﻲ ﻣﻜﺎﻥ ﺑﻌﻴﺪ ﺁﻣﻦ ﻓﻘﺪ ﲢﺘﺎﺝ ﺇﻟﻰ ﻧﻘﻞ ﺍﻟﻐﺴﺎﻟﺔ ﺇﻟﻰ ﻣﻜﺎﻥ ﺁﺧﺮ ﻓﻲ ﺍﳌﺴﺘﻘﺒﻞ.
ﲢﺬﻳﺮ
ﻗﺪ ﺗﺸﻜﻞ ﻣﻮﺍﺩ ﺍﻟﺘﻌﺒﺌﺔ ﺧﻄﻮﺭﺓ ﻋﻠﻰ ﺍﻷﻃﻔﺎﻝ؛ ﺍﺣﺘﻔﻆ ﺑﻜﺎﻓﺔ ﻣﻮﺍﺩ ﺍﻟﺘﻌﺒﺌﺔ
)ﺍﻷﻛﻴﺎﺱ ﺍﻟﺒﻼﺳﺘﻴﻜﻴﺔ ﻭﺍﳌﻮﺍﺩ ﺍﳌﺼﻨﻮﻋﺔ ﻣﻦ ﻣﺎﺩﺓ ﺍﻟﺒﻮﻟﻴﺴﺘﻴﺮﻳﻦ ،ﺇﻟﺦ (.ﺑﻌﻴ ﹰﺪﺍ ﻋﻦ ﻣﺘﻨﺎﻭﻝ ﺍﻷﻃﻔﺎﻝ.
_١٦ﺇﻋﺪﺍﺩ ﺍﻟﻐﺴﺎﻟﺔ
2/14/2011 11:03:02 AM
WF9854LWN-02713K_AR_v1.indd Sec4:16
ﺍﳋﻄﻮﺓ ﺭﻗﻢ ٣
ﺿﺒﻂ ﺍﺳﺘﻮﺍﺀ ﺃﺭﺟﻞ ﺍﻟﻐﺴﺎﻟﺔ
ﻋﻨﺪ ﺗﺮﻛﻴﺐ ﺍﻟﻐﺴﺎﻟﺔ ،ﺗﺄﻛﺪ ﻣﻦ ﺗﻮﺻﻴﻞ ﻗﺎﺑﺲ ﺍﻟﺘﻴﺎﺭ ﺍﻟﻜﻬﺮﺑﻲ ﻭﺧﺮﻃﻮﻡ ﺗﻮﺭﻳﺪ ﺍﳌﺎﺀ ﻭﺧﺮﻃﻮﻡ ﺍﻟﺘﺼﺮﻳﻒ ﺑﺴﻬﻮﻟﺔ.
٠١ﺍﻹﻋﺪﺍﺩ
.١ﺿﻊ ﺍﻟﻐﺴﺎﻟﺔ ﻓﻲ ﺍﳌﻜﺎﻥ ﺍﳌﻨﺎﺳﺐ.
.٢ﺍﺟﻌﻞ ﺍﻟﻐﺴﺎﻟﺔ ﻣﺴﺘﻮﻳﺔ ﻋﻦ ﻃﺮﻳﻖ ﻟﻒ
ﺍﻷﻗﺪﺍﻡ ﺍﳌﺴﺘﻮﻳﺔ ﺇﻟﻰ ﺍﻟﺪﺍﺧﻞ ﻭﺍﳋﺎﺭﺝ
ﻳﺪﻭﻳﹰﺎ ﻛﻤﺎ ﻫﻮ ﻣﻄﻠﻮﺏ.
.٣ﻋﻨﺪ ﺍﺳﺘﻮﺍﺀ ﺍﻟﻐﺴﺎﻟﺔ ،ﺃﺣﻜﻢ ﺭﺑﻂ ﺍﻟﺼﻮﺍﻣﻴﻞ ﺑﺎﺳﺘﺨﺪﺍﻡ ﻣﻔﺘﺎﺡ ﺍﻟﺮﺑﻂ ﺍﳌﺮﻓﻖ ﻣﻊ
ﺍﻟﻐﺴﺎﻟﺔ.
ﺍﳋﻄﻮﺓ ﺭﻗﻢ ٤
ﺗﻮﺻﻴﻞ ﺍﳌﺎﺀ ﻭﺍﻟﺘﺼﺮﻳﻒ
ﺗﻮﺻﻴﻞ ﺧﺮﻃﻮﻡ ﺗﻮﺭﻳﺪ ﺍﳌﺎﺀ
.١ﺍﺳﺘﺨﺪﻡ ﻣﺜﺒﺖ ﺍﻟﺬﺭﺍﻉ ﺍﻟﺬﻱ ﻋﻠﻰ ﺷﻜﻞ ﺣﺮﻑ Lﺍﳋﺎﺹ ﺑﺨﺮﻃﻮﻡ ﺗﻮﺭﻳﺪ
ﺍﳌﺎﺀ ﺍﻟﺒﺎﺭﺩ ﻭﻗﻢ ﺑﺘﻮﺻﻠﻪ ﺇﻟﻰ ﻣﺪﺧﻞ ﺗﻮﺭﻳﺪ ﺍﳌﺎﺀ ﺍﻟﺒﺎﺭﺩ ﺍﳌﻮﺟﻮﺩ ﻓﻲ ﺍﳉﺎﻧﺐ
ﺍﳋﻠﻔﻲ ﻣﻦ ﺍﻟﻐﺴﺎﻟﺔ .ﻭﺃﺣﻜﻢ ﺭﺑﻄﻪ ﻳﺪﻭﻳﹰﺎ.
ﺍﳋﻴﺎﺭ
ﻳﺠﺐ ﺗﻮﺻﻴﻞ ﺃﺣﺪ ﻃﺮﻓﻲ ﺧﺮﻃﻮﻡ ﺗﻮﺭﻳﺪ ﺍﳌﺎﺀ ﺑﺎﻟﻐﺴﺎﻟﺔ ﻭﺍﻟﻄﺮﻑ ﺍﻵﺧﺮ
ﻟﻠﺨﺮﻃﻮﻡ ﺑﺼﻨﺒﻮﺭ ﺍﳌﺎﺀ .ﻻ ﲡﺬﺏ ﺧﺮﻃﻮﻡ ﺗﻮﺭﻳﺪ ﺍﳌﺎﺀ .ﺇﺫﺍ ﻛﺎﻥ ﺍﳋﺮﻃﻮﻡ
ﻗﺼﻴﺮﹰﺍ ﺟ ﹰﺪﺍ ،ﺍﺳﺘﺒﺪﻟﻪ ﺑﺨﺮﻃﻮﻡ ﺃﻃﻮﻝ ﻳﺘﺤﻤﻞ ﺍﻟﻀﻐﻂ ﺍﻟﻌﺎﻟﻲ.
.٢ﻗﻢ ﺑﺘﻮﺻﻴﻞ ﺍﻟﻄﺮﻑ ﺍﻵﺧﺮ ﳋﺮﻃﻮﻡ ﺗﻮﺭﻳﺪ ﺍﳌﺎﺀ ﺍﻟﺒﺎﺭﺩ ﺑﺼﻨﺒﻮﺭ ﺍﳌﺎﺀ ﺍﻟﺒﺎﺭﺩ
ﻭﺃﺣﻜﻢ ﺗﺜﺒﻴﺘﻪ ﻳﺪﻭﻳﹰﺎ .ﳝﻜﻨﻚ ،ﺇﺫﺍ ﻟﺰﻡ ﺍﻷﻣﺮ ،ﺇﻋﺎﺩﺓ ﺗﻮﺻﻴﻞ ﺧﺮﻃﻮﻡ ﺍﳌﺎﺀ
ﺑﺎﻟﻐﺴﺎﻟﺔ ﻣﻦ ﺧﻼﻝ ﺇﺭﺧﺎﺀ ﻣﺜﺒﺖ ﺍﳋﺮﻃﻮﻡ ﻭﻟﻔﻪ ﻭﺇﻋﺎﺩﺓ ﺭﺑﻄﻪ ﺑﺈﺣﻜﺎﻡ.
ﺑﺎﻟﻨﺴﺒﺔ ﻟﻠﻄﺮﺍﺯﺍﺕ ﺍﶈﺪﺩﺓ ﺍﳌﺰﻭﹼﺩﺓ ﲟﺪﺧﻞ ﺇﺿﺎﻓﻲ ﻟﺘﻮﺭﻳﺪ ﺍﳌﺎﺀ ﺍﻟﺴﺎﺧﻦ:
.١ﺍﺳﺘﺨﺪﻡ ﻣﺜﺒﺖ ﺍﻟﺬﺭﺍﻉ ﺍﻟﺬﻱ ﻋﻠﻰ ﺷﻜﻞ Lﺍﻷﺣﻤﺮ ﺍﳋﺎﺹ ﺑﺨﺮﻃﻮﻡ ﺗﻮﺭﻳﺪ ﺍﳌﺎﺀ ﺍﻟﺴﺎﺧﻦ ﻭﻗﻢ ﺑﺘﻮﺻﻴﻠﺔ ﲟﺪﺧﻞ ﺗﻮﺭﻳﺪ ﺍﳌﺎﺀ ﺍﻟﺴﺎﺧﻦ ﺍﳌﻮﺟﻮﺩ
ﻓﻲ ﺍﳉﺎﻧﺐ ﺍﳋﻠﻔﻲ ﻣﻦ ﺍﻟﻐﺴﺎﻟﺔ .ﻭﺃﺣﻜﻢ ﺭﺑﻄﻪ ﻳﺪﻭﻳﹰﺎ.
.٢ﻗﻢ ﺑﺘﻮﺻﻴﻞ ﺍﻟﻄﺮﻑ ﺍﻵﺧﺮ ﳋﺮﻃﻮﻡ ﺗﻮﺭﻳﺪ ﺍﳌﺎﺀ ﺍﻟﺴﺎﺧﻦ ﺑﺼﻨﺒﻮﺭ ﺍﳌﺎﺀ ﺍﻟﺴﺎﺧﻦ ﻭﺃﺣﻜﻢ ﺗﺜﺒﻴﺘﻪ ﻳﺪﻭﻳﹰﺎ.
.٣ﺍﺳﺘﺨﺪﻡ ﺧﺮﻃﻮﻡ ﻋﻠﻰ ﺷﻜﻞ Yﺇﺫﺍ ﺃﺭﺩﺕ ﺍﺳﺘﺨﺪﺍﻡ ﺍﳌﺎﺀ ﺍﻟﺒﺎﺭﺩ ﻓﻘﻂ.
ﺇﻋﺪﺍﺩ ﺍﻟﻐﺴﺎﻟﺔ _١٧
2/14/2011 11:03:02 AM
WF9854LWN-02713K_AR_v1.indd Sec4:17
ﺇﻋﺪﺍﺩ ﺍﻟﻐﺴﺎﻟﺔ
ﺗﻮﺻﻴﻞ ﺧﺮﻃﻮﻡ ﺗﻮﺭﻳﺪ ﺍﳌﺎﺀ )ﻃﺮﺍﺯﺍﺕ ﻣﺤﺪﺩﺓ(
ﺍﶈﻮﻝ ﻣﻦ ﺧﺮﻃﻮﻡ ﺗﻮﺭﻳﺪ ﺍﳌﺎﺀ.
.١ﻗﻢ ﺑﻔﻚ ﹼ
ﺍﶈﻮﻝ
ﹼ
ﺧﺮﻃﻮﻡ ﺗﻮﺭﻳﺪ ﺍﳌﺎﺀ
ﺑﺎﶈﻮﻝ.
.٢ﺃﻭﻻﹰ ،ﺑﺎﺳﺘﺨﺪﺍﻡ ﻣﻔﻚ ﺑﺮﺍﻏﻲ ﻣﻦ ﻧﻮﻉ " ،"+ﻗﻢ ﺑﻔﻚ ﺍﳌﺴﺎﻣﻴﺮ ﺍﻷﺭﺑﻌﺔ ﺍﳌﻮﺟﻮﺩﺓ
ﹼ
ﺍﶈﻮﻝ ﻭﺍﺟﻌﻞ ﺍﳉﺰﺀ ) (٢ﺑﺎﲡﺎﻩ ﺍﻟﺴﻬﻢ ﺣﺘﻰ ﺗﻜﻮﻥ ﻫﻨﺎﻙ ﻣﺴﺎﻓﺔ ﻣﻘﺪﺍﺭﻫﺎ ٥ﱈ
ﺛﻢ ﺃﺧﺮﺝ ﹼ
ﺑﻴﻨﻬﻤﺎ.
١
٥ﱈ
٢
ﺍﶈﻮﻝ
.٣ﻗﻢ ﺑﺘﻮﺻﻴﻞ ﹼ
ﺍﶈﻮﻝ ﺑﺼﻨﺒﻮﺭ ﺍﳌﺎﺀ ﻋﻦ ﻃﺮﻳﻖ ﺭﺑﻂ ﺍﳌﺴﺎﻣﻴﺮ ﺑﺈﺣﻜﺎﻡ ﺃﺛﻨﺎﺀ ﺭﻓﻊ ﹼ
ﻷﻋﻠﻰ.
ﺍﺟﻌﻞ ﺍﳉﺰﺀ ) (٢ﺑﺎﲡﺎﻩ ﺍﻟﺴﻬﻢ ﻭﻭﺻﻞ ﺍﳉﺰﺀ ) (١ﻭ ).(٢
ﺻﻨﺒﻮﺭ ﺍﳌﺎﺀ
١
٢
ﺑﺎﶈﻮﻝ .ﻋﻨﺪ ﺇﺭﺧﺎﺀ ﺍﳉﺰﺀ ) ،(٣ﻳﺘﺼﻞ
.٤ﻗﻢ ﺑﺘﻮﺻﻴﻞ ﺧﺮﻃﻮﻡ ﺗﻮﺭﻳﺪ ﺍﳌﺎﺀ
ﹼ
ﺑﺎﶈﻮﻝ ﺗﻠﻘﺎﺋﻴﺎ ﹰ ﻣﺤﺪﺛ ﹰﺎ ﺻﻮﺕ "ﻧﻘﺮﺓ".
ﺍﳋﺮﻃﻮﻡ
ﹼ
ﺑﺎﶈﻮﻝ ،ﺗﺄﻛﺪ ﻣﻦ ﺗﻮﺻﻴﻠﻪ ﺑﺸﻜﻞ
ﺑﻌﺪ ﺗﻮﺻﻴﻞ ﺧﺮﻃﻮﻡ ﺗﻮﺭﻳﺪ ﺍﳌﺎﺀ
ﹼ
ﺻﺤﻴﺢ ﻋﻦ ﻃﺮﻳﻖ ﺳﺤﺐ ﺧﺮﻃﻮﻡ ﺗﻮﺭﻳﺪ ﺍﳌﺎﺀ ﻷﺳﻔﻞ.
٣
.٥ﻗﻢ ﺑﺘﻮﺻﻴﻞ ﺍﻟﻄﺮﻑ ﺍﻵﺧﺮ ﻣﻦ ﺧﺮﻃﻮﻡ ﺗﻮﺭﻳﺪ ﺍﳌﺎﺀ ﺑﺼﻤﺎﻡ ﺩﺧﻮﻝ ﺍﳌﺎﺀ ﺍﳌﻮﺟﻮﺩ ﺑﺎﳉﺎﻧﺐ
ﺍﳋﻠﻔﻲ ﻣﻦ ﺍﻟﻐﺴﺎﻟﺔ .ﻟﻒ ﺧﺮﻃﻮﻡ ﺗﻮﺭﻳﺪ ﺍﳌﺎﺀ ﻓﻲ ﺍﲡﺎﻩ ﻋﻘﺎﺭﺏ ﺍﻟﺴﺎﻋﺔ.
ﺍﳋﻴﺎﺭ
_١٨ﺇﻋﺪﺍﺩ ﺍﻟﻐﺴﺎﻟﺔ
2/14/2011 11:03:02 AM
WF9854LWN-02713K_AR_v1.indd Sec4:18
.٦ﻗﻢ ﺑﺘﺸﻐﻴﻞ ﻣﺼﺪﺭ ﺗﻮﺭﻳﺪ ﺍﳌﺎﺀ ﻭﺗﺄﻛﺪ ﻣﻦ ﻋﺪﻡ ﻭﺟﻮﺩ ﺗﺴﺮﻳﺒﺎﺕ ﻣﻦ ﺻﻤﺎﻡ ﺍﳌﺎﺀ ﺃﻭ
ﺍﶈﻮﻝ .ﻗﻢ ﺑﺘﻜﺮﺍﺭ ﺍﳋﻄﻮﺍﺕ ﺍﻟﺴﺎﺑﻘﺔ ،ﻓﻲ ﺣﺎﻟﺔ ﺗﺴﺮﻳﺐ ﺍﳌﺎﺀ.
ﺍﻟﺼﻨﺒﻮﺭ ﺃﻭ ﹼ
ﲢﺬﻳﺮ
✗
٠١ﺍﻹﻋﺪﺍﺩ
•
ﻻ ﺗﺴﺘﺨﺪﻡ ﺍﻟﻐﺴﺎﻟﺔ ﻓﻲ ﺣﺎﻟﺔ ﺗﺴﺮﻳﺐ ﺍﳌﺎﺀ .ﻓﻘﺪ ﻳﺘﺴﺒﺐ ﺫﻟﻚ ﻓﻲ ﺣﺪﻭﺙ ﺻﺪﻣﺔ
ﻛﻬﺮﺑﻴﺔ ﺃﻭ ﺇﺻﺎﺑﺔ ﺟﺴﺪﻳﺔ.
✗
ﺇﺫﺍ ﻛﺎﻥ ﺻﻨﺒﻮﺭ ﺍﳌﺎﺀ ﻣﻦ ﺍﻟﻨﻮﻉ ﺍﻟﻘﻼﻭﻭﻅ ،ﻗﻢ ﺑﺘﻮﺻﻴﻞ ﺧﺮﻃﻮﻡ ﺗﻮﺭﻳﺪ ﺍﳌﺎﺀ ﺇﻟﻰ ﺍﻟﺼﻨﺒﻮﺭ
ﻛﻤﺎ ﻫﻮ ﻣﻮﺿﺢ.
ﺍﺳﺘﺨﺪﻡ ﺻﻨﺒﻮﺭ ﻣﻦ ﺍﻟﻨﻮﻉ ﺍﻟﻌﺎﺩﻱ ﻟﺘﻮﺭﻳﺪ ﺍﳌﺎﺀ .ﺇﺫﺍ ﻛﺎﻥ ﺍﻟﺼﻨﺒﻮﺭ
ﻣﺮﺑﻌﺎ ﺃﻭ ﻛﺒﻴﺮﹰﺍ ﺟ ﹰﺪﺍ ،ﺃﺯﻝ ﺍﳊﻠﻘﺔ ﺍﻟﻔﺎﺻﻠﺔ ﻗﺒﻞ ﺇﺩﺧﺎﻝ ﺍﻟﺼﻨﺒﻮﺭ ﻓﻲ
ﹰ
ﺍﶈﻮﻝ.
ﹼ
ﺇﻋﺪﺍﺩ ﺍﻟﻐﺴﺎﻟﺔ _١٩
2/14/2011 11:03:03 AM
WF9854LWN-02713K_AR_v1.indd Sec4:19
ﺇﻋﺪﺍﺩ ﺍﻟﻐﺴﺎﻟﺔ
ﺗﻮﺻﻴﻞ ﺧﺮﻃﻮﻡ ﺍﻟﺘﺼﺮﻳﻒ
ﳝﻜﻨﻚ ﻭﺿﻊ ﻧﻬﺎﻳﺔ ﺧﺮﻃﻮﻡ ﺍﻟﺘﺼﺮﻳﻒ ﺑﺜﻼﺙ ﻃﺮﻕ:
.١ﻓﻮﻕ ﺣﺎﻓﺔ ﺣﻮﺽ ﺍﻟﻐﺴﻴﻞ :ﻳﺠﺐ ﻭﺿﻊ ﺧﺮﻃﻮﻡ ﺍﻟﺘﺼﺮﻳﻒ ﻋﻠﻰ ﺍﺭﺗﻔﺎﻉ ﻳﺘﺮﺍﻭﺡ ﺑﲔ ٦٠ﻭ ٩٠ﺳﻢ .ﻭﻟﻺﺑﻘﺎﺀ ﻋﻠﻰ ﺍﻧﺜﻨﺎﺀ ﺧﺮﻃﻮﻡ ﺍﻟﺘﺼﺮﻳﻒ،
ﺍﺳﺘﺨﺪﻡ ﺣﺎﻣﻞ ﺍﳋﺮﻃﻮﻡ ﺍﻟﺒﻼﺳﺘﻴﻜﻲ ﺍﳌﺮﻓﻖ .ﺛﺒﺖ ﺍﳊﺎﻣﻞ ﻋﻠﻰ ﺍﳉﺪﺍﺭ ﺑﻮﺍﺳﻄﺔ ﺧﻄﺎﻑ ﺃﻭ ﻓﻲ ﺍﻟﺼﻨﺒﻮﺭ ﺑﻮﺍﺳﻄﺔ ﺳﻠﻚ ﺃﻭ ﺣﺒﻞ ﳌﻨﻊ
ﺳﻘﻮﻁ ﺧﺮﻃﻮﻡ ﺍﻟﺘﺼﺮﻳﻒ ﻋﻠﻰ ﺍﻷﺭﺽ.
ﺧﺮﻃﻮﻡ ﺍﻟﺘﺼﺮﻳﻒ
٩٠ ~ ٦٠ﺳﻢ
ﺣﺎﻣﻞ ﺍﳋﺮﻃﻮﻡ
.٢ﻓﻲ ﻓﺮﻉ ﺃﻧﺒﻮﺏ ﺗﺼﺮﻳﻒ ﺍﳊﻮﺽ :ﻳﺠﺐ ﺃﻥ ﻳﻜﻮﻥ ﻓﺮﻉ ﺃﻧﺒﻮﺏ ﺍﻟﺘﺼﺮﻳﻒ ﻓﻮﻕ ﺳﺒﺎﻛﺔ ﺍﳊﻮﺽ ﺑﺤﻴﺚ ﻳﻜﻮﻥ ﻃﺮﻑ ﺍﳋﺮﻃﻮﻡ ﻋﻠﻰ ﺍﺭﺗﻔﺎﻉ ٦٠
ﺳﻢ ﻋﻠﻰ ﺍﻷﻗﻞ ﻋﻦ ﺍﻷﺭﺽ.
.٣ﻓﻲ ﺃﻧﺒﻮﺏ ﺗﺼﺮﻳﻒ :ﻧﻮﺻﻲ ﺑﺎﺳﺘﺨﺪﺍﻡ ﺃﻧﺒﻮﺏ ﻋﻤﻮﺩﻱ ﺑﺎﺭﺗﻔﺎﻉ ٦٥ﺳﻢ؛ ﻋﻠﻰ ﺃﻻ ﻳﻘﻞ ﻃﻮﻟﻪ ﻋﻦ ٦٠ﺳﻢ ﻭﻻ ﻳﺰﻳﺪ ﻋﻦ ٩٠ﺳﻢ.
ﺍﳋﻄﻮﺓ ﺭﻗﻢ ٥
ﺗﺸﻐﻴﻞ ﺍﻟﻐﺴﺎﻟﺔ
ﻗﻢ ﺑﺘﻮﺻﻴﻞ ﺳﻠﻚ ﺍﻟﺘﻴﺎﺭ ﺍﻟﻜﻬﺮﺑﺎﺋﻲ ﲟﻘﺒﺲ ﺣﺎﺋﻂ ﲟﺨﺮﺝ ﺗﻴﺎﺭ ﻛﻬﺮﺑﻲ ﻣﻌﺘﻤﺪ ﺑﻘﺪﺭﺓ ﻣﻦ ٢٢٠ﺇﻟﻰ ٢٤٠ﻓﻮﻟﺖ ﺗﻴﺎﺭ ﻣﺘﺮﺩﺩ ﻭ ٦٠ﻫﺮﺗﺰ ﻣﺤﻤﻲ
ﲟﻨﺼﻬﺮ ﺃﻭ ﻗﺎﻃﻊ ﺩﺍﺋﺮﺓ ﻛﻬﺮﺑﺎﺋﻴﺔ) .ﳌﺰﻳﺪ ﻣﻦ ﺍﳌﻌﻠﻮﻣﺎﺕ ﺣﻮﻝ ﻣﺘﻄﻠﺒﺎﺕ ﺍﻟﺘﻮﺻﻴﻞ ﺍﻟﻜﻬﺮﺑﺎﺋﻲ ﻭﺍﻷﺭﺿﻲ ،ﺭﺍﺟﻊ ﺻﻔﺤﺔ ﺭﻗﻢ (.١٤
_٢٠ﺇﻋﺪﺍﺩ ﺍﻟﻐﺴﺎﻟﺔ
2/14/2011 11:03:03 AM
WF9854LWN-02713K_AR_v1.indd Sec4:20
ﻏﺴﻞ ﺍﳌﻼﺑﺲ
ﻣﻊ ﺍﻟﻐﺴﺎﻟﺔ ﺍﳉﺪﻳﺪﺓ ﻣﻦ ،Samsungﻳﻜﻮﻥ ﺍﻷﻣﺮ ﺍﻷﻛﺜﺮ ﺻﻌﻮﺑﺔ ﻫﻮ ﲢﺪﻳﺪ ﺍﻟﻜﻤﻴﺔ ﺍﻟﺘﻲ ﻳﺠﺐ ﻏﺴﻠﻬﺎ ﺃﻭﻻ ﹰ.
ﺍﻟﻐﺴﻞ ﻟﻠﻤﺮﺓ ﺍﻷﻭﻟﻰ
.١
.٢
.٣
.٤
ﺍﺿﻐﻂ ﻋﻠﻰ ﺍﻟﺰﺭ ) Powerﺗﺸﻐﻴﻞ(.
ﺃﺿﻒ ﻛﻤﻴﺔ ﻗﻠﻴﻠﺔ ﻣﻦ ﻣﺴﺤﻮﻕ ﺍﻟﻐﺴﻴﻞ ﻓﻲ ﺍﳉﺰﺀ ﺍﺼﺺ ﻟﻪ
ﻣﻮﺭﺩ ﺍﳌﺎﺀ ﺍﳌﺘﺼﻞ ﺑﺎﻟﻐﺴﺎﻟﺔ.
ﻗﻢ ﺑﺘﺸﻐﻴﻞ ﹼ
ﺍﺿﻐﻂ ﻋﻠﻰ ﺍﻟﺰﺭ ) Start/Pauseﺗﺸﻐﻴﻞ/ﺇﻳﻘﺎﻑ ﻣﺆﻗﺖ(.
٠٢ﻏﺴﻞ ﺍﳌﻼﺑﺲ
ﻗﺒﻞ ﻏﺴﻞ ﺍﳌﻼﺑﺲ ﻟﻠﻤﺮﺓ ﺍﻷﻭﻟﻰ ،ﻳﺠﺐ ﺗﺸﻐﻴﻞ ﺍﳉﻬﺎﺯ ﺩﻭﺭﺓ ﻛﺎﻣﻠﺔ )ﺃﻱ ﺑﺪﻭﻥ ﻣﻼﺑﺲ(.
ﻓﻲ ﺩﺭﺝ ﺍﳌﺴﺤﻮﻕ.
ﻳﺆﺩﻱ ﺫﻟﻚ ﺇﻟﻰ ﺍﻟﺘﺨﻠﺺ ﻣﻦ ﺍﳌﺎﺀ ﺍﳌﺘﺒﻘﻲ ﻓﻲ ﺍﻟﻐﺴﺎﻟﺔ ﻧﺘﻴﺠﺔ ﺍﻟﺘﺸﻐﻴﻞ ﺍﻻﺧﺘﺒﺎﺭﻱ
ﺍﻟﺬﻱ ﻗﺎﻣﺖ ﺑﻪ ﺍﻟﺸﺮﻛﺔ ﺍﳌﺼﻨﱢﻌﺔ ﻟﻠﺠﻬﺎﺯ.
ﺝﺭﺪﻟﺍ
ﺝﺭﺪﻟﺍ
ﺝﺭﺪﻟﺍ
:ﻣﺴﺤﻮﻕ ﻟﻠﻐﺴﻞ ﺍﻷﻭﻟﻲ ﺃﻭ ﻧﺸﺎ.
:ﻣﺴﺤﻮﻕ ﺍﻟﻐﺴﻴﻞ ﻟﺪﻭﺭﺓ ﺍﻟﻐﺴﻞ ﺍﻟﺮﺋﻴﺴﻴﺔ ﻭﻣﻮﺍﺩ ﺗﻨﻘﻴﻪ ﺍﳌﺎﺀ ﻭﻣﻮﺍﺩ ﻣﺎ ﻗﺒﻞ ﺍﻟﻨﻘﻊ ﻭﻣﺎﺩﺓ ﺍﻟﺘﺒﻴﻴﺾ ﻭﻣﻮﺍﺩ ﺇﺯﺍﻟﺔ ﺍﻟﺒﻘﻊ.
:ﺍﳌﻮﺍﺩ ﺍﻹﺿﺎﻓﻴﺔ ،ﻣﺜﻞ ﻣﻜﻮﻥ ﺃﻭ ﻣﻨﻌﻢ ﺍﻷﻗﻤﺸﺔ )ﺍﻣﻞﺀ ﺍﻟﺪﺭﺝ ﺑﺤﻴﺚ ﻻ ﺗﺘﺠﺎﻭﺯ ﺍﳊﺎﻓﺔ ﺍﻟﺴﻠﻔﻴﺔ )ﺍﳊﺪ ﺍﻷﻗﺼﻰ( ﺍﻟﻌﻼﻣﺔ "("A
ﺇﺭﺷﺎﺩﺍﺕ ﺃﺳﺎﺳﻴﺔ
.١ﻗﻢ ﺑﻮﺿﻊ ﺍﳌﻼﺑﺲ ﻓﻲ ﺍﻟﻐﺴﺎﻟﺔ.
ﲢﺬﻳﺮ
ﻻ ﺗﺘﺠﺎﻭﺯ ﺍﻟﻮﺯﻥ ﺍﶈﺪﺩ ﻟﻠﻐﺴﺎﻟﺔ .ﻟﺘﺤﺪﻳﺪ ﺳﻌﺔ ﺍﻟﻮﺯﻥ ﻟﻨﻮﻉ ﺍﳌﻼﺑﺲ ﺍﻟﺘﻲ ﺗﺮﻏﺐ ﻓﻲ ﻏﺴﻠﻬﺎ ،ﺭﺍﺟﻊ ﺍﳉﺪﻭﻝ ﺍﳌﻮﺟﻮﺩ ﻓﻲ ﺻﻔﺤﺔ ﺭﻗﻢ .٢٨
•
•
•
.٢
.٣
.٤
.٥
.٦
ﺗﺄﻛﺪ ﻣﻦ ﺃﻥ ﺍﳌﻼﺑﺲ ﻏﻴﺮ ﻋﺎﻟﻘﺔ ﺑﺎﻟﺒﺎﺏ ،ﺣﻴﺚ ﻗﺪ ﻳﺆﺩﻱ ﺫﻟﻚ ﺇﻟﻰ ﺗﺴﺮﺏ ﺍﳌﺎﺀ.
ﻗﺪ ﻳﺘﺒﻘﻲ ﻣﺴﺤﻮﻕ ﺍﻟﻐﺴﻴﻞ ﻓﻲ ﺍﳉﺰﺀ ﺍﳌﻄﺎﻃﻲ ﺍﻷﻣﺎﻣﻲ ﻟﻠﻐﺴﺎﻟﺔ ﺑﻌﺪ ﺩﻭﺭﺓ ﺍﻟﻐﺴﻴﻞ .ﻗﻢ ﺑﺈﺯﺍﻟﺔ ﺃﻱ ﻣﺴﺤﻮﻕ ﻣﺘﺒﻘﻲ ،ﻷﻥ ﺫﻟﻚ
ﻗﺪ ﻳﺘﺴﺒﺐ ﻓﻲ ﺗﺴﺮﺏ ﺍﳌﺎﺀ.
ﻻ ﺗﻘﻢ ﺑﻐﺴﻞ ﺍﻟﻌﻨﺎﺻﺮ ﺍﻟﻌﺎﺯﻟﺔ ﻟﻠﻤﺎﺀ.
ﺃﻏﻠﻖ ﺍﻟﺒﺎﺏ ﺣﺘﻰ ﻳﺜﺒﺖ.
ﻗﻢ ﺑﺘﺸﻐﻴﻞ ﺍﻟﻐﺴﺎﻟﺔ.
ﻗﻢ ﺑﺈﺿﺎﻓﺔ ﺍﳌﺴﺤﻮﻕ ﻭﺍﳌﻮﺍﺩ ﺍﻹﺿﺎﻓﻴﺔ ﺇﻟﻰ ﺩﺭﺝ ﺍﻟﺘﻮﺯﻳﻊ.
ﺣﺪﺩ ﺍﻟﺪﻭﺭﺓ ﻭﺍﳋﻴﺎﺭﺍﺕ ﺍﳌﻨﺎﺳﺒﺔ ﻟﻜﻤﻴﺔ ﺍﳌﻼﺑﺲ ﺍﻟﺘﻲ ﲤﺖ ﺇﺿﺎﻓﺘﻬﺎ.
ﺳﻴﻀﻲﺀ ﻣﺆﺷﺮ ﺍﻟﻐﺴﻞ ﻭﺳﻴﻈﻬﺮ ﻭﻗﺖ ﺍﻟﺪﻭﺭﺓ ﺍﶈﺪﺩ ﻋﻠﻰ ﻟﻮﺣﺔ ﺍﻟﻌﺮﺽ.
ﺍﺿﻐﻂ ﻋﻠﻰ ﺍﻟﺰﺭ ) Start/Pauseﺗﺸﻐﻴﻞ/ﺇﻳﻘﺎﻑ ﻣﺆﻗﺖ(.
ﻏﺴﻞ ﺍﳌﻼﺑﺲ _٢١
2/14/2011 11:03:04 AM
WF9854LWN-02713K_AR_v1.indd Sec5:21
ﻏﺴﻞ ﺍﳌﻼﺑﺲ
ﺍﺳﺘﺨﺪﺍﻡ ﻟﻮﺣﺔ ﺍﻟﺘﺤﻜﻢ
12
١٢
10
11
٩9 ١٠
١١
٨8
١
ﻟﻮﺣﺔ ﺍﻟﻌﺮﺽ ﺍﻟﺮﺳﻮﻣﻴﺔ ﺍﻟﺮﻗﻤﻴﺔ
٢
CYCLE SELECTOR
)ﻗﺮﺹ ﲢﺪﻳﺪ ﺍﻟﺪﻭﺭﺓ(
٧7
٦6
٣3 ٤4 ١1 ٥5
٢2
١1
ﺗﻌﺮﺽ ﺍﻟﻮﻗﺖ ﺍﳌﺘﺒﻘﻲ ﻟﺪﻭﺭﺓ ﺍﻟﻐﺴﻞ ﻭﻛﺎﻓﺔ ﺍﳌﻌﻠﻮﻣﺎﺕ ﺍﳋﺎﺻﺔ ﺑﺎﻟﺪﻭﺭﺓ ﻭﺭﺳﺎﺋﻞ ﺍﳋﻄﺄ.
ﺍﺧﺘﻴﺎﺭ ﻧﻮﻉ ﺍﻟﺘﺪﻭﻳﺮ ﻭﺳﺮﻋﺔ ﺍﻟﺘﻨﺸﻴﻒ ﻟﻠﺪﻭﺭﺓ.
ﳌﺰﻳﺪ ﻣﻦ ﺍﳌﻌﻠﻮﻣﺎﺕ ،ﺭﺍﺟﻊ "ﻏﺴﻞ ﺍﳌﻼﺑﺲ ﺑﺎﺳﺘﺨﺪﺍﻡ ﻗﺮﺹ ﲢﺪﻳﺪ ﺍﻟﺪﻭﺭﺓ") .ﺭﺍﺟﻊ ﺻﻔﺤﺔ (٢٥
) Cottonﻗﻄﻦ( -ﻟﻠﻤﻼﺑﺲ ﺍﻟﻘﻄﻨﻴﺔ ﺧﻔﻴﻔﺔ ﺃﻭ ﻣﺘﻮﺳﻄﺔ ﺍﻻﺗﺴﺎﺥ ﻭﺃﻏﻄﻴﺔ ﺍﻟﺴﺮﻳﺮ ﻭﻣﻔﺎﺭﺵ ﺍﳌﺎﺋﺪﺓ
ﻭﺍﳌﻼﺑﺲ ﺍﻟﺪﺍﺧﻠﻴﺔ ﻭﺍﳌﻨﺎﺷﻒ ﻭﺍﻟﻘﻤﺼﺎﻥ ،ﺇﻟﺦ.
) Syntheticsﺍﻷﻟﻴﺎﻑ ﺍﻟﺼﻨﺎﻋﻴﺔ( -ﻟﻐﺴﻞ ﺍﻟﺒﻠﻮﺯﺍﺕ ﻭﺍﻟﻘﻤﺼﺎﻥ ﻣﺘﻮﺳﻄﺔ ﺃﻭ ﺧﻔﻴﻔﺔ ﺍﻻﺗﺴﺎﺥ ﻭﻏﻴﺮﻫﺎ ﻣﻦ
ﺍﳌﻼﺑﺲ ﺍﳌﺼﻨﻮﻋﺔ ﻣﻦ ﺍﻟﺒﻮﻟﻴﺴﺘﺮ )ﺍﻟﺪﻳﻮﻟﲔ ﻭﺍﻟﺘﺮﻳﻔﻴﺮﺍ( ﻭﻣﺎﺩﺓ ﺍﻟﺒﻮﻟﻴﺎﻣﺎﻳﺪ )ﺍﻟﺒﻴﺮﻟﻮﻥ ﻭﺍﻟﻨﻴﻠﻮﻥ( ﺃﻭ ﺍﻷﻧﺴﺠﺔ
ﺍﻟﺼﻨﺎﻋﻴﺔ ﺍﻷﺧﺮﻯ.
) Denimﺍﳉﻴﻨﺰ( -ﻳﻀﻤﻦ ﻭﺟﻮﺩ ﻣﺴﺘﻮﻯ ﻣﺎﺀ ﺃﻋﻠﻰ ﻓﻲ ﺩﻭﺭﺓ ﺍﻟﻐﺴﻴﻞ ﺍﻷﺳﺎﺳﻴﺔ ﻭﺍﻟﺸﻄﻒ ﺍﻹﺿﺎﻓﻲ ﻋﺪﻡ
ﻭﺟﻮﺩ ﺃﻱ ﺑﻘﺎﻳﺎ ﻣﻦ ﻣﺴﺤﻮﻕ ﺍﻟﻐﺴﻴﻞ ﻓﻲ ﺍﳌﻼﺑﺲ.
) Sports Wearﻣﻼﺑﺲ ﺭﻳﺎﺿﻴﺔ( -ﺗﹸﺴﺘﺨﺪﻡ ﻟﻠﻤﻼﺑﺲ ﺍﳌﻘﺎﻭﻣﺔ ﻟﻠﻤﺎﺀ ﺃﻭ ﺫﺍﺕ ﺍﻟﻄﺒﻘﺔ ﺍﻟﻌﺎﺯﻟﺔ ﻟﻠﻤﺤﺎﻓﻈﺔ
ﻋﻠﻰ ﻧﻈﺎﻓﺔ ﻣﻈﻬﺮﻫﺎ ﻭﺟﻤﺎﻟﻬﺎ.
) Delicatesﺃﻧﺴﺠﺔ ﺭﻗﻴﻘﺔ( -ﻟﻸﻗﻤﺸﺔ ﺍﳋﻔﻴﻔﺔ ﻭﺣﻤﺎﻻﺕ ﺍﻟﺼﺪﺭ ﻭﺍﳌﻼﺑﺲ ﺍﻟﻨﺴﺎﺋﻴﺔ ﻭﺍﻟﻔﺴﺎﺗﲔ
ﻭﺍﻟﻘﻤﺼﺎﻥ ﻭﺍﻟﺒﻠﻮﺯﺍﺕ .ﻟﻠﺤﺼﻮﻝ ﻋﻠﻰ ﺃﻓﻀﻞ ﺍﻟﻨﺘﺎﺋﺞ ،ﺍﺳﺘﺨﺪﻡ ﻣﺴﺤﻮﻗﹰﺎ ﺳﺎﺋﻼ ﹰ.
) Woolﺻﻮﻑ( -ﺗﺴﺘﺨﺪﻡ ﻫﺬﻩ ﺍﻟﺪﻭﺭﺓ ﻟﻐﺴﻞ ﺍﳌﻼﺑﺲ ﺍﻟﺼﻮﻓﻴﺔ ﺍﻟﺘﻲ ﻳﺴﻤﺢ ﺑﻮﺿﻌﻬﺎ ﻓﻲ ﺍﻟﻐﺴﺎﻟﺔ ﻓﻘﻂ.
ﻳﺠﺐ ﺃﻥ ﺗﻘﻞ ﺍﳊﻤﻮﻟﺔ ﻋﻦ ٢٫٠ﻛﺠﻢ.
• ﺗﺘﻢ ﺩﻭﺭﺓ ﻏﺴﻴﻞ ) woolﺍﻟﺼﻮﻑ( ﺑﺎﺳﺘﺨﺪﺍﻡ ﻋﻤﻠﻴﺔ ﺍﻻﻫﺘﺰﺍﺯ ﺍﳋﻔﻴﻒ .ﻭﺃﺛﻨﺎﺀ ﻋﻤﻠﻴﺔ ﺍﻟﻐﺴﻴﻞ ،ﺗﺴﺘﻤﺮ
ﻋﻤﻠﻴﺘﺎ ﺍﻻﻫﺘﺰﺍﺯ ﺍﳋﻔﻴﻒ ﻭﺍﻟﻨﻘﻊ ﳊﻤﺎﻳﺔ ﺍﻷﻟﻴﺎﻑ ﺍﻟﺼﻮﻓﻴﺔ ﻣﻦ ﺍﻻﻧﻜﻤﺎﺵ /ﺍﻟﺘﻠﻒ ﻭﻟﻠﺤﺼﻮﻝ ﻋﻠﻰ
ﻧﻈﺎﻓﺔ ﻓﺎﺋﻘﺔ ﺑﺴﻬﻮﻟﺔ .ﻭﻻ ﺗﻌﺪ ﻋﻤﻠﻴﺔ ﺍﻟﺘﻮﻗﻒ ﻫﺬﻩ ﻣﺸﻜﻠﺔ.
• ﻳﹸﻨﺼﺢ ﺑﺎﺳﺘﺨﺪﺍﻡ ﻣﺴﺤﻮﻕ ﺗﻨﻈﻴﻒ ﻋﺎﺩﻱ ﻟﺪﻭﺭﺓ ) Woolﺍﻟﺼﻮﻑ( ،ﻟﻠﺤﺼﻮﻝ ﻋﻠﻰ ﻧﺘﺎﺋﺞ ﻏﺴﻞ ﺭﺍﺋﻌﺔ
ﻭﻟﻌﻨﺎﻳﺔ ﻓﺎﺋﻘﺔ ﺑﺎﻷﻟﻴﺎﻑ ﺍﻟﺼﻮﻓﻴﺔ.
ﰎ ﺍﻋﺘﻤﺎﺩ ﺩﻭﺭﺓ ﻏﺴﻞ ﺍﳌﻼﺑﺲ ﺍﻟﺼﻮﻓﻴﺔ ﻓﻲ ﻫﺬﻩ ﺍﻟﻐﺴﺎﻟﺔ ﻣﻦ ﻗﺒﻞ Woolmarkﻟﻐﺴﻞ ﻣﻨﺘﺠﺎﺕ
Woolmarkﺍﻟﺘﻲ ﳝﻜﻦ ﻭﺿﻌﻬﺎ ﻓﻲ ﺍﻟﻐﺴﺎﻟﺔ ﺷﺮﻳﻄﺔ ﺃﻥ ﻳﺘﻢ ﻏﺴﻞ ﺍﳌﻨﺘﺠﺎﺕ ﻭﻓﻘﹰ ﺎ ﻟﻠﺘﻌﻠﻴﻤﺎﺕ
ﺍﳌﻮﺟﻮﺩﺓ ﻋﻠﻰ ﺍﳌﻠﺼﻘﺎﺕ ﺍﳌﻮﺟﻮﺩﺓ ﻋﻠﻰ ﺍﳌﻼﺑﺲ ﻭﺍﻟﺘﻌﻠﻴﻤﺎﺕ ﺍﻟﺼﺎﺩﺭﺓ ﻣﻦ ﺍﻟﺸﺮﻛﺔ ﺍﳌﺼﻨﱢﻌﺔ ﻟﻬﺬﻩ
ﺍﻟﻐﺴﺎﻟﺔ) M0509 ،ﺍﻟﺮﻗﻢ ﺍﳌﻌﺘﻤﺪ ﺍﻟﺼﺎﺩﺭ ﻣﻦ (IWS NOM INEE Co., Ltd.
) Handwashﻏﺴﻞ ﻳﺪﻭﻱ( -ﺩﻭﺭﺓ ﻏﺴﻞ ﺑﺴﻴﻄﺔ ﻛﻤﺎ ﻟﻮ ﻛﻨﺖ ﺗﻐﺴﻞ ﺍﳌﻼﺑﺲ ﺑﺎﻟﻴﺪﻳﻦ.
ﺧﺼﻴﺼﺎ ﻟﺘﺘﻤﻜﻦ ﻣﻦ ﻏﺴﻞ ﺍﳌﻼﺑﺲ ﺑﻔﺎﻋﻠﻴﺔ ﺑﺄﻗﻞ
) Water Savingﺗﻮﻓﻴﺮ ﺍﳌﺎﺀ( -ﰎ ﺗﺼﻤﻴﻢ ﻫﺬﻩ ﺍﻟﺪﻭﺭﺓ
ﹰ
ﻛﻤﻴﺔ ﻣﻦ ﺍﳌﺎﺀ.
ﻟﻘﺪ ﰎ ﲢﺪﻳﺪ ﻣﻮﺍﺻﻔﺎﺕ ﻣﻠﺼﻖ ﺍﺳﺘﻬﻼﻙ ﺍﻟﻄﺎﻗﺔ ﺑﻮﺍﺳﻄﺔ ﺍﺳﺘﺨﺪﺍﻡ ﺍﻟﺒﺮﻧﺎﻣﺞ ﺍﻟﺘﺎﻟﻲ.
ﺇﻥ ﺍﻟﺒﺮﻧﺎﻣﺞ ﻣﻮﻓﺮ ﻟﻠﻤﻴﺎﻩ ﺑﻨﺴﺒﺔ ٤٠ﺑﺎﳌﺎﺋﺔ ٣ ،ﺷﻄﻔﺎﺕ ،ﻣﺮﹼﻛﺰ ،ﺑﻌﺪﺩ ١٤٠٠ﺩﻭﺭﺓ ﻓﻲ ﺍﻟﺪﻗﻴﻘﺔ.
) Dark Garmentﻣﻼﺑﺲ ﺩﺍﻛﻨﺔ( -ﺗﻀﻤﻦ ﺩﻭﺭﺍﺕ ﺍﻟﺸﻄﻒ ﺍﻹﺿﺎﻓﻴﺔ ﻭﺍﻟﺘﻨﺸﻴﻒ ﻣﻨﺨﻔﺾ ﺍﻟﺴﺮﻋﺔ ﻏﺴﻞ
ﻣﻼﺑﺴﻚ ﺍﻟﺪﺍﻛﻨﺔ ﺍﳌﻔﻀﻠﺔ ﺑﻠﻄﻒ ﻭﺷﻄﻔﻬﺎ ﺟﻴ ﹰﺪﺍ.
ﻳﻮﻣﻴﺎ ﻣﺜﻞ ﺍﳌﻼﺑﺲ ﺍﻟﺪﺍﺧﻠﻴﺔ ﻭﺍﻟﻘﻤﺼﺎﻥ.
) Daily Washﻏﺴﻞ ﻳﻮﻣﻲ( -ﻟﻠﻤﻼﺑﺲ ﺍﻟﺘﻲ ﺗﺴﺘﺨﺪﻡ
ﹰ
' ) Quick 29ﺳﺮﻳﻊ ' - (٢٩ﻟﻠﻤﻼﺑﺲ ﺧﻔﻴﻔﺔ ﺍﻻﺗﺴﺎﺥ ﺍﻟﺘﻲ ﲢﺘﺎﺟﻬﺎ ﺑﺴﺮﻋﺔ.
_٢٢ﻏﺴﻞ ﺍﳌﻼﺑﺲ
2/14/2011 11:03:05 AM
WF9854LWN-02713K_AR_v1.indd Sec5:22
) Spinﺗﻨﺸﻴﻒ( -ﺇﺟﺮﺍﺀ ﺩﻭﺭﺓ ﺗﻨﺸﻴﻒ ﺇﺿﺎﻓﻴﺔ ﻹﺯﺍﻟﺔ ﺍﳌﺰﻳﺪ ﻣﻦ ﺍﳌﺎﺀ.
) Rinse + Spinﺷﻄﻒ +ﺗﻨﺸﻴﻒ( -ﻟﻠﻤﻼﺑﺲ ﺍﻟﺘﻲ ﲢﺘﺎﺝ ﺇﻟﻰ ﺍﻟﺸﻄﻒ ﻓﻘﻂ ﺃﻭ ﻹﺿﺎﻓﺔ ﻣﻨﻌﻢ ﺍﻷﻗﻤﺸﺔ
ﺍﻟﺬﻱ ﻳﺘﻢ ﺇﺿﺎﻓﺘﻪ ﺃﺛﻨﺎﺀ ﺍﻟﺸﻄﻒ ﻓﻘﻂ.
) Eco Drum Cleanﺗﻨﻈﻴﻒ ﺍﳊﺎﻭﻳﺔ ﺻﺪﻳﻖ ﺍﻟﺒﻴﺌﺔ( -ﻟﺘﻨﻈﻴﻒ ﺍﳊﺎﻭﻳﺔ .ﻟﺘﻨﻈﻴﻒ ﺍﳊﺎﻭﻳﺔ ﻣﻦ ﺍﻷﺗﺮﺑﺔ
ﻭﺍﻟﺒﻜﺘﻴﺮﻳﺎ .ﻳﹸﻮﺻﻰ ﺗﺸﻐﻴﻠﻪ ﺑﺎﻧﺘﻈﺎﻡ )ﺑﻌﺪ ﻛﻞ ٤٠ﺩﻭﺭﺓ ﻏﺴﻴﻞ( ،ﺑﺪﻭﻥ ﻣﻨﻈﻒ ﺃﻭ ﻣﺒﻴﺾ.
٤
ﺯﺭ ﺍﻟﺘﺤﺪﻳﺪ DELAY END
)ﺗﺄﺟﻴﻞ ﺍﻟﺘﻮﻗﻒ(
ﺍﺿﻐﻂ ﻋﻠﻰ ﻫﺬﺍ ﺍﻟﺰﺭ ﺑﺸﻜﻞ ﻣﺘﻜﺮﺭ ﻟﻼﺧﺘﻴﺎﺭ ﻣﻦ ﺑﲔ ﺧﻴﺎﺭﺍﺕ ﻣﻴﺰﺓ ) Delay Endﺗﺄﺟﻴﻞ ﺍﻟﺘﻮﻗﻒ( ﺍﳌﺘﻮﻓﺮﺓ
)ﻣﻦ ٣ﺳﺎﻋﺎﺕ ﺇﻟﻰ ١٩ﺳﺎﻋﺔ ﺑﻮﺍﻗﻊ ﺯﻳﺎﺩﺓ ﺳﺎﻋﺔ ﻭﺍﺣﺪﺓ(.
ﺗﺸﻴﺮ ﺍﻟﺴﺎﻋﺔ ﺍﳌﻌﺮﻭﺿﺔ ﺇﻟﻰ ﻭﻗﺖ ﺍﻧﺘﻬﺎﺀ ﺩﻭﺭﺓ ﺍﻟﻐﺴﻴﻞ.
٥
ﺯﺭ ﺍﻟﺘﺤﺪﻳﺪ TEMPERATURE
)ﺩﺭﺟﺔ ﺍﳊﺮﺍﺭﺓ(
ﺍﺿﻐﻂ ﻋﻠﻰ ﻫﺬﺍ ﺍﻟﺰﺭ ﺑﺸﻜﻞ ﻣﺘﻜﺮﺭ ﻟﻠﺘﺒﺪﻳﻞ ﺑﲔ ﺧﻴﺎﺭﺍﺕ ﺩﺭﺟﺔ ﺣﺮﺍﺭﺓ ﺍﳌﺎﺀ ﺍﳌﺘﺎﺣﺔ:
)ﻣﺎﺀ ﺑﺎﺭﺩ ﻭ ٣٠ﺳﻠﺰﻳﻮﺱ ﻭ ٤٠ﺳﻠﺰﻳﻮﺱ ﻭ ٦٠ﺳﻠﺰﻳﻮﺱ ﻭ ٩٥ﺳﻠﺰﻳﻮﺱ(.
٦
ﺯﺭ ﺍﻟﺘﺤﺪﻳﺪ ) RINSEﺷﻄﻒ(
ﺍﺿﻐﻂ ﻋﻠﻰ ﻫﺬﺍ ﺍﻟﺰﺭ ﻹﺿﺎﻓﺔ ﺩﻭﺭﺍﺕ ﺷﻄﻒ ﺇﺿﺎﻓﻴﺔ .ﺍﳊﺪ ﺍﻷﻗﺼﻰ ﻟﻌﺪﺩ ﺩﻭﺭﺍﺕ ﺍﻟﺸﻄﻒ ﻫﻮ ﺧﻤﺴﺔ.
٧
ﺯﺭ ﺍﻟﺘﺤﺪﻳﺪ ) SPINﺗﻨﺸﻴﻒ(
٨
ﺯﺭ ﺍﻟﺘﺤﺪﻳﺪ WASH OPTION
)ﺧﻴﺎﺭ ﺍﻟﻐﺴﻞ(
ﺍﺿﻐﻂ ﻋﻠﻰ ﻫﺬﺍ ﺍﻟﺰﺭ ﺑﺸﻜﻞ ﻣﺘﻜﺮﺭ ﻟﻠﺘﺒﺪﻳﻞ ﺑﲔ ﺧﻴﺎﺭﺍﺕ ﺍﻟﻐﺴﻞ:
) Easy Ironﻛﻲ ﺳﻬﻞ( ) Soak ﻧﻘﻊ( ) Easy Iron + Soak ﻛﻲ ﺳﻬﻞ +ﻧﻘﻊ( ﺇﻳﻘﺎﻑ ﺗﺸﻐﻴﻞ
") Easy Ironﻛﻲ ﺳﻬﻞ(" :ﺍﺳﺘﺨﺪﻡ ﻫﺬﺍ ﺍﳋﻴﺎﺭ ﻟﺘﺤﻀﻴﺮ ﺍﻟﻐﺴﻴﻞ ﺣﺘﻰ ﳝﻜﻦ ﻛﻴﻪ ﺑﺴﻬﻮﻟﺔ.
") Soakﻧﻘﻊ(" :ﺍﺳﺘﺨﺪﻡ ﻫﺬﺍ ﺍﳋﻴﺎﺭ ﻹﺯﺍﻟﺔ ﺍﻟﺒﻘﻊ ﻣﻦ ﺍﻟﻐﺴﻴﻞ ﺑﻔﻌﺎﻟﻴﺔ ﻋﻦ ﻃﺮﻳﻖ ﻧﻘﻌﻪ.
• ﻳﺘﻢ ﺇﺟﺮﺍﺀ ﻭﻇﻴﻔﺔ ﺍﻟﻨﻘﻊ ﳌﺪﺓ ١٣ﺩﻗﻴﻘﺔ ﻓﻲ ﺩﻭﺭﺓ ﺍﻟﻐﺴﻞ.
• ﺗﺴﺘﻤﺮ ﻭﻇﻴﻔﺔ ﺍﻟﻨﻘﻊ ﳌﺪﺓ ٣٠ﺩﻗﻴﻘﺔ ﻣﻦ ﺧﻼﻝ ﺳﺖ ﺩﻭﺭﺍﺕ ،ﺣﻴﺚ ﺗﺴﺘﻤﺮ ﻛﻞ ﺩﻭﺭﺓ ﻧﻘﻊ ﳌﺪﺓ ﺩﻗﻴﻘﺔ ﻭﺍﺣﺪﺓ
ﺛﻢ ﺗﻘﻒ ﳌﺪﺓ ٤ﺩﻗﺎﺋﻖ.
• ﺗﺘﺎﺡ ﻭﻇﻴﻔﺔ ﺍﻟﻨﻘﻊ ﻣﻊ ﺑﺮﺍﻣﺞ ﺍﻟﻐﺴﻞ ﺍﻟﺘﺎﻟﻴﺔ ﻓﻘﻂ) Cotton :ﻗﻄﻦ( ﻭ ) Syntheticsﺃﻟﻴﺎﻑ ﺻﻨﺎﻋﻴﺔ( ﻭ
) Denimﺟﻴﻨﺰ( ﻭ ) Sports wearﻣﻼﺑﺲ ﺭﻳﺎﺿﻴﺔ( ﻭ ) Dark garmentﻣﻼﺑﺲ ﺩﺍﻛﻨﺔ( ﻭ
) Daily washﻏﺴﻞ ﻳﻮﻣﻲ(.
٩
ﺯﺭ ﺍﻟﺘﺤﺪﻳﺪ INTENSIVE WASH
)ﻏﺴﻞ ﻣﻜﺜﻒ(
ﺍﺿﻐﻂ ﻋﻠﻰ ﻫﺬﺍ ﺍﻟﺰﺭ ﻣﻊ ﺍﳌﻼﺑﺲ ﺍﳌﺘﺴﺨﺔ ﺑﺸﺪﺓ ﻭﺍﻟﺘﻲ ﲢﺘﺎﺝ ﺇﻟﻰ ﺍﻟﻐﺴﻞ ﺑﻜﺜﺎﻓﺔ .ﻳﺘﻢ ﺯﻳﺎﺩﺓ ﻣﺪﺓ ﺍﻟﺪﻭﺭﺓ
ﻟﻜﻞ ﺍﻟﺪﻭﺭﺍﺕ.
١٠
ﺯﺭ SOUND OFF
)ﺇﻳﻘﺎﻑ ﺗﺸﻐﻴﻞ ﺍﻟﺼﻮﺕ(
ﳝﻜﻦ ﺇﻳﻘﺎﻑ ﺗﺸﻐﻴﻞ ﺍﻟﺼﻮﺕ ﻟﻜﺎﻓﺔ ﺍﻟﺪﻭﺭﺍﺕ .ﻋﻨﺪ ﲢﺪﻳﺪ ﻫﺬﻩ ﺍﻟﻮﻇﻴﻔﺔ ،ﻳﺘﻢ ﺇﻳﻘﺎﻑ ﺗﺸﻐﻴﻞ ﺍﻟﺼﻮﺕ
ﻟﻜﺎﻓﺔ ﺍﻟﺪﻭﺭﺍﺕ.
• ﻋﻨﺪ ﺗﺸﻐﻴﻞ ﻭﻇﻴﻔﺔ ) Sound offﺇﻳﻘﺎﻑ ﺗﺸﻐﻴﻞ ﺍﻟﺼﻮﺕ( ،ﻳﻀﻲﺀ ﻣﺼﺒﺎﺡ ﺯﺭ
) Sound Offﺇﻳﻘﺎﻑ ﺗﺸﻐﻴﻞ ﺍﻟﺼﻮﺕ( ﻭﻟﻮﺣﺔ ﺍﻟﺘﺤﻜﻢ.
• ﻋﻨﺪ ﺇﻳﻘﺎﻑ ﺗﺸﻐﻴﻞ ﻭﻇﻴﻔﺔ ) Sound offﺇﻳﻘﺎﻑ ﺗﺸﻐﻴﻞ ﺍﻟﺼﻮﺕ( ،ﻳﺼﺪﺭ ﺻﻮﺕ ﺟﺮﺱ ﻭﻳﻨﻄﻔﺊ
ﻣﺼﺒﺎﺡ ﺍﻟﺰﺭ ﻭﻟﻮﺣﺔ ﺍﻟﺘﺤﻜﻢ.
١١
ﺯﺭ ﺍﻟﺘﺤﺪﻳﺪ START/PAUSE
)ﺗﺸﻐﻴﻞ/ﺇﻳﻘﺎﻑ ﻣﺆﻗﺖ(
ﺍﺿﻐﻂ ﻹﻳﻘﺎﻑ ﺍﻟﺪﻭﺭﺓ ﻣﺆﻗﺘﺎ ﹰ ﻭﺇﻋﺎﺩﺓ ﺗﺸﻐﻴﻠﻬﺎ.
١٢
ﺍﻟﺰﺭ ) POWERﺗﺸﻐﻴﻞ(
ﺍﺿﻐﻂ ﻋﻠﻰ ﻫﺬﺍ ﺍﻟﺰﺭ ﻣﺮﺓ ﻟﺘﺸﻐﻴﻞ ﺍﻟﻐﺴﺎﻟﺔ ،ﻭﺍﺿﻐﻂ ﻋﻠﻴﻪ ﻣﺮﺓ ﺃﺧﺮﻯ ﻹﻳﻘﺎﻑ ﺗﺸﻐﻴﻠﻬﺎ.
ﻓﻲ ﺣﺎﻟﺔ ﻋﺪﻡ ﺍﻟﻀﻐﻂ ﻋﻠﻰ ﺃﻱ ﻣﻦ ﺃﺯﺭﺍﺭ ﺍﻟﻐﺴﺎﻟﺔ ﳌﺪﺓ ﺗﺰﻳﺪ ﻋﻦ ١٠ﺩﻗﺎﺋﻖ ﺃﺛﻨﺎﺀ ﺗﺸﻐﻴﻠﻬﺎ ،ﻳﺘﻢ ﺇﻳﻘﺎﻑ
ﺗﻠﻘﺎﺋﻴﺎ.
ﺗﺸﻐﻴﻠﻬﺎ
ﹰ
٠٢ﻏﺴﻞ ﺍﳌﻼﺑﺲ
٣
ﺯﺭ ﺍﻟﺘﺤﺪﻳﺪ PREWASH
)ﻏﺴﻞ ﺃﻭﻟﻲ(
ﺍﺿﻐﻂ ﻋﻠﻰ ﻫﺬﺍ ﺍﻟﺰﺭ ﻟﺘﺤﺪﻳﺪ ﻏﺴﻞ ﺃﻭﻟﻲ ،ﺣﻴﺚ ﺗﺘﻮﻓﺮ ﻣﻴﺰﺓ ) Pre-washﻏﺴﻞ ﺃﻭﻟﻲ( ﻣﻊ ﺍﻟﺪﻭﺭﺍﺕ ﺍﻟﺘﺎﻟﻴﺔ
ﻓﻘﻂ:
) Cottonﻗﻄﻦ( ﻭ ) Syntheticsﺃﻟﻴﺎﻑ ﺻﻨﺎﻋﻴﺔ( ﻭ ) Denimﺟﻴﻨﺰ( ﻭ ) Sports Wearﻣﻼﺑﺲ ﺭﻳﺎﺿﻴﺔ( ﻭ
) Dark Garmentﻣﻼﺑﺲ ﺩﺍﻛﻨﺔ( ﻭ ) Daily Washﻏﺴﻴﻞ ﻳﻮﻣﻲ(.
ﺍﺿﻐﻂ ﻋﻠﻰ ﻫﺬﺍ ﺍﻟﺰﺭ ﺑﺸﻜﻞ ﻣﺘﻜﺮﺭ ﻟﻠﺘﺒﺪﻳﻞ ﺑﲔ ﺳﺮﻋﺎﺕ ﺩﻭﺭﺓ ﺍﻟﺘﻨﺸﻴﻒ ﺍﳌﺘﺎﺣﺔ.
WF9854
ﻭ
ﻭ ٤٠٠ﻭ ٨٠٠ﻭ ١٢٠٠ﻭ ١٤٠٠ﺩﻭﺭﺓ ﻓﻲ ﺍﻟﺪﻗﻴﻘﺔ
WF9852
ﻭ
ﻭ ٤٠٠ﻭ ٨٠٠ﻭ ١٠٠٠ﻭ ١٢٠٠ﺩﻭﺭﺓ ﻓﻲ ﺍﻟﺪﻗﻴﻘﺔ
WF9850
ﻭ
ﻭ ٤٠٠ﻭ ٦٠٠ﻭ ٨٠٠ﻭ ١٠٠٠ﺩﻭﺭﺓ ﻓﻲ ﺍﻟﺪﻗﻴﻘﺔ
") No spinﺑﺪﻭﻥ ﺗﻨﺸﻴﻒ(
ﺍﻟﻨﻬﺎﺋﻲ.
" -ﻳﺒﻘﻰ ﺍﻟﻐﺴﻴﻞ ﻣﻨﻘﻮﻋﹰ ﺎ ﻓﻲ ﻣﺎﺀ ﺍﻟﺸﻄﻒ ﺍﻟﻨﻬﺎﺋﻲ .ﻳﺠﺐ
") Rinse Holdﺍﻧﺘﻈﺎﺭ ﺍﻟﺸﻄﻒ(
ﺗﺸﻐﻴﻞ ﺩﻭﺭﺓ ) Drainﺗﺼﺮﻳﻒ( ﺃﻭ ) Spinﺗﻨﺸﻴﻒ( ﻗﺒﻞ ﺇﺧﺮﺍﺝ ﺍﳌﻼﺑﺲ.
" -ﺗﺒﻘﻰ ﺍﳌﻼﺑﺲ ﻓﻲ ﺍﳊﺎﻭﻳﺔ ﺩﻭﻥ ﺗﺸﻐﻴﻞ ﺩﻭﺭﺓ ﺍﻟﺘﻨﺸﻴﻒ ﺑﻌﺪ ﺗﺼﺮﻳﻒ ﺍﳌﺎﺀ
ﻏﺴﻞ ﺍﳌﻼﺑﺲ _٢٣
2/14/2011 11:03:05 AM
WF9854LWN-02713K_AR_v1.indd Sec5:23
ﻏﺴﻞ ﺍﳌﻼﺑﺲ
) Child Lockﺍﻟﺘﺄﻣﲔ ﺿﺪ ﻋﺒﺚ ﺍﻷﻃﻔﺎﻝ(
ﺗﺘﻴﺢ ﻟﻚ ﻭﻇﻴﻔﺔ ) Child Lockﺍﻟﺘﺄﻣﲔ ﺿﺪ ﻋﺒﺚ ﺍﻷﻃﻔﺎﻝ( ﻗﻔﻞ ﺍﻷﺯﺭﺍﺭ ﺣﺘﻰ ﻻ ﳝﻜﻦ ﺗﻐﻴﻴﺮ ﺩﻭﺭﺓ ﺍﻟﻐﺴﻴﻞ ﺍﻟﺘﻲ ﻗﻤﺖ ﺑﺎﺧﺘﻴﺎﺭﻫﺎ.
) Activating/Deactivatingﺍﻟﺘﻨﺸﻴﻂ /ﺇﻟﻐﺎﺀ ﺍﻟﺘﻨﺸﻴﻂ(
ﺇﺫﺍ ﻛﻨﺖ ﺗﺮﻏﺐ ﻓﻲ ﺗﺸﻐﻴﻞ ﻭﻇﻴﻔﺔ ) Child Lockﺍﻟﺘﺄﻣﲔ ﺿﺪ ﻋﺒﺚ ﺍﻷﻃﻔﺎﻝ( ﺃﻭ ﻋﺪﻡ
ﺗﺸﻐﻴﻠﻬﺎ ،ﺍﺿﻐﻂ ﻋﻠﻰ ﺍﻟﺰﺭﻳﻦ ) Temp.ﺩﺭﺟﺔ ﺍﳊﺮﺍﺭﺓ( ﻭ ) Rinseﺷﻄﻒ( ﻓﻲ ﻭﻗﺖ ﻭﺍﺣﺪ ﳌﺪﺓ
٣ﺛﻮﺍﻥ" .ﻳﻀﻲﺀ ﻣﺆﺷﺮ ") Child Lockﺍﻟﺘﺄﻣﲔ ﺿﺪ ﻋﺒﺚ ﺍﻷﻃﻔﺎﻝ( " ﻋﻨﺪ ﺗﺸﻐﻴﻞ ﻫﺬﻩ
ﺍﳌﻴﺰﺓ.
ﳝﻜﻦ ﺍﺳﺘﺨﺪﺍﻡ ﺍﻟﺰﺭ ) Powerﺗﺸﻐﻴﻞ( ﻓﻘﻂ ﻋﻨﺪ ﺗﻨﺸﻴﻂ ﻭﻇﻴﻔﺔ
) Child Lockﺍﻟﺘﺄﻣﲔ ﺿﺪ ﻋﺒﺚ ﺍﻷﻃﻔﺎﻝ( .ﻳﺴﺘﻤﺮ ﺗﺸﻐﻴﻞ ﻭﻇﻴﻔﺔ
) Child Lockﺍﻟﺘﺄﻣﲔ ﺿﺪ ﻋﺒﺚ ﺍﻷﻃﻔﺎﻝ( ﺣﺘﻰ ﺑﻌﺪ ﺗﺸﻐﻴﻞ ﺍﻟﻐﺴﺎﻟﺔ ﻭﺇﻳﻘﺎﻑ
ﺗﺸﻐﻴﻠﻬﺎ ﺃﻭ ﺑﻌﺪ ﻓﺼﻞ ﺗﻮﺻﻴﻞ ﺳﻠﻚ ﺍﻟﺘﻴﺎﺭ ﺍﻟﻜﻬﺮﺑﺎﺋﻲ ﻭﺇﻋﺎﺩﺓ ﺗﻮﺻﻴﻠﻪ.
٣ﺛﻮﺍﻥ
) Sound offﺇﻳﻘﺎﻑ ﺗﺸﻐﻴﻞ ﺍﻟﺼﻮﺕ(
ﳝﻜﻦ ﲢﺪﻳﺪ ﻭﻇﻴﻔﺔ ) Sound Offﺇﻳﻘﺎﻑ ﺗﺸﻐﻴﻞ ﺍﻟﺼﻮﺕ( ﻣﻊ ﻛﺎﻓﺔ ﺍﻟﺪﻭﺭﺍﺕ .ﻋﻨﺪ ﲢﺪﻳﺪ ﻫﺬﻩ ﺍﻟﻮﻇﻴﻔﺔ ،ﻳﺘﻢ ﺇﻳﻘﺎﻑ ﺗﺸﻐﻴﻞ ﺍﻟﺼﻮﺕ ﻟﻜﺎﻓﺔ
ﺍﻟﺪﻭﺭﺍﺕ .ﺣﺘﻰ ﻓﻲ ﺣﺎﻟﺔ ﺗﺸﻐﻴﻞ ﺍﻟﻄﺎﻗﺔ ﺃﻭ ﺇﻳﻘﺎﻑ ﺗﺸﻐﻴﻠﻬﺎ ﺑﺸﻜﻞ ﻣﺘﻜﺮﺭ ،ﻻ ﻳﺘﻐﻴﺮ ﺍﻹﻋﺪﺍﺩ ﺍﻟﺬﻱ ﰎ ﺍﺧﺘﻴﺎﺭﻩ.
) Activating/Deactivatingﺍﻟﺘﻨﺸﻴﻂ /ﺇﻟﻐﺎﺀ ﺍﻟﺘﻨﺸﻴﻂ(
ﺇﺫﺍ ﻛﻨﺖ ﺗﺮﻳﺪ ﺗﻨﺸﻴﻂ ﻭﻇﻴﻔﺔ ) Sound Offﺇﻳﻘﺎﻑ ﺗﺸﻐﻴﻞ ﺍﻟﺼﻮﺕ( ﺃﻭ ﺇﻳﻘﺎﻑ ﺗﺸﻐﻴﻠﻬﺎ ﺃﻭ ﺍﺿﻐﻂ ﻋﻠﻰ ﺍﻟﺰﺭ
) Sound Offﺇﻳﻘﺎﻑ ﺗﺸﻐﻴﻞ ﺍﻟﺼﻮﺕ( .ﻳﹸﻀﻲﺀ ﺍﻟﺰﺭ ") Sound Offﺇﻳﻘﺎﻑ ﺗﺸﻐﻴﻞ ﺍﻟﺼﻮﺕ( " ﻭﻣﺼﺒﺎﺡ ﺍﻟﺰﺭ
) Sound Offﺇﻳﻘﺎﻑ ﺗﺸﻐﻴﻞ ﺍﻟﺼﻮﺕ( ﻋﻨﺪ ﺗﻨﺸﻴﻂ ﻫﺬﺍ ﺍﻟﺰﺭ.
) Delay Endﺗﺄﺟﻴﻞ ﺍﻟﺘﻮﻗﻒ(
ﺗﻠﻘﺎﺋﻴﺎ ﻓﻲ ﻭﻗﺖ ﻻﺣﻖ ،ﻗﻢ ﺑﺎﺧﺘﻴﺎﺭ ﺗﺄﺟﻴﻞ ﺍﻟﻮﻗﺖ ﻣﻦ ٣ﺳﺎﻋﺎﺕ ﺣﺘﻰ ١٩ﺳﺎﻋﺔ.
ﳝﻜﻨﻚ ﺿﺒﻂ ﺍﻟﻐﺴﺎﻟﺔ ﻹﺟﺮﺍﺀ ﻋﻤﻠﻴﺔ ﺍﻟﻐﺴﻞ
ﹰ
)ﺑﺰﻳﺎﺩﺓ ﺳﺎﻋﺔ ﻭﺍﺣﺪﺓ( .ﺗﺸﻴﺮ ﺍﻟﺴﺎﻋﺔ ﺍﳌﻌﺮﻭﺿﺔ ﺇﻟﻰ ﺍﻟﻮﻗﺖ ﺍﻟﺬﻱ ﻳﺘﻢ ﺍﻻﻧﺘﻬﺎﺀ ﻓﻴﻪ ﻣﻦ ﻋﻤﻠﻴﺔ ﺍﻟﻐﺴﻞ.
ﺗﻠﻘﺎﺋﻴﺎ ﺃﻭ ﻳﺪﻭﻳﹰﺎ ﺣﺴﺐ ﻧﻮﻉ ﺍﳌﻼﺑﺲ ﺍﻟﺘﻲ ﺗﺮﻳﺪ ﻏﺴﻠﻬﺎ.
.١ﳝﻜﻨﻚ ﺿﺒﻂ ﺍﻟﻐﺴﺎﻟﺔ
ﹰ
.٢ﺍﺿﻐﻂ ﻋﻠﻰ ﺍﻟﺰﺭ ) Delay Endﺗﺄﺟﻴﻞ ﺍﻟﺘﻮﻗﻒ( ﺑﺸﻜﻞ ﻣﺘﻜﺮﺭ ﺣﺘﻰ ﻳﺘﻢ ﺗﻌﻴﲔ ﻭﻗﺖ ﺍﻟﺘﺄﺟﻴﻞ ﺍﳌﻄﻠﻮﺏ.
.٣ﺍﺿﻐﻂ ﻋﻠﻰ ﺍﻟﺰﺭ ) Start/Pauseﺗﺸﻐﻴﻞ/ﺇﻳﻘﺎﻑ ﻣﺆﻗﺖ( .ﻳﻀﻲﺀ ﻣﺆﺷﺮ ") Delay Endﺗﺄﺟﻴﻞ ﺍﻟﺘﻮﻗﻒ( " ،ﻭﺗﺒﺪﺃ ﺍﻟﺴﺎﻋﺔ ﺑﺎﻟﻌﺪ
ﺍﻟﺘﻨﺎﺯﻟﻲ ﺣﺘﻰ ﻳﻨﺘﻬﻲ ﺍﻟﻮﻗﺖ ﺍﶈﺪﺩ.
.٤ﻹﻟﻐﺎﺀ ﻭﻇﻴﻔﺔ ) Delay Endﺗﺄﺟﻴﻞ ﺍﻟﺘﻮﻗﻒ( ،ﺍﺿﻐﻂ ﻋﻠﻰ ﺍﻟﺰﺭ ) Powerﺗﺸﻐﻴﻞ( ﺛﻢ ﻗﻢ ﺑﺘﺸﻐﻴﻞ ﺍﻟﻐﺴﺎﻟﺔ ﻣﻦ ﺟﺪﻳﺪ.
_٢٤ﻏﺴﻞ ﺍﳌﻼﺑﺲ
2/14/2011 11:03:06 AM
WF9854LWN-02713K_AR_v1.indd Sec5:24
ﻏﺴﻞ ﺍﳌﻼﺑﺲ ﺑﺎﺳﺘﺨﺪﺍﻡ ﻗﺮﺹ ﲢﺪﻳﺪ ﺍﻟﺪﻭﺭﺓ
٠٢ﻏﺴﻞ ﺍﳌﻼﺑﺲ
ﺗﺘﻴﺢ ﺍﻟﻐﺴﺎﻟﺔ ﺍﳉﺪﻳﺪﺓ ﻏﺴﻞ ﺍﳌﻼﺑﺲ ﺑﺴﻬﻮﻟﺔ ،ﺑﺎﺳﺘﺨﺪﺍﻡ ﻧﻈﺎﻡ "ﺍﻟﺘﺤﻜﻢ ﺍﻟﺬﻛﻲ" ﺍﻷﻭﺗﻮﻣﺎﺗﻴﻜﻲ ﻣﻦ .Samsungﻋﻨﺪ ﺍﺧﺘﻴﺎﺭ ﺃﺣﺪ ﺑﺮﺍﻣﺞ
ﺍﻟﻐﺴﻞ ،ﺗﻘﻮﻡ ﺍﻟﻐﺴﺎﻟﺔ ﺑﻀﺒﻂ ﺩﺭﺟﺔ ﺍﳊﺮﺍﺭﺓ ﻭﻭﻗﺖ ﺍﻟﻐﺴﻞ ﻭﺳﺮﻋﺎﺕ ﺍﻟﻐﺴﻞ ﺍﳌﻨﺎﺳﺒﺔ.
.١ﺍﻓﺘﺢ ﺻﻨﺒﻮﺭ ﺍﳌﺎﺀ.
.٢ﺍﺿﻐﻂ ﻋﻠﻰ ﺍﻟﺰﺭ ) Powerﺗﺸﻐﻴﻞ(.
.٣ﺍﻓﺘﺢ ﺍﻟﺒﺎﺏ.
.٤ﺿﻊ ﺍﳌﻼﺑﺲ ﻗﻄﻌﺔ ﺑﻘﻄﻌﺔ ﻓﻲ ﺍﳊﺎﻭﻳﺔ ﺩﻭﻥ ﲡﺎﻭﺯ ﺳﻌﺘﻬﺎ.
.٥ﺃﻏﻠﻖ ﺍﻟﺒﺎﺏ.
.٦ﺃﺿﻒ ﻣﺴﺤﻮﻕ ﺍﻟﻐﺴﻴﻞ ﻭﻣﻨﻌﻢ ﺍﻷﻗﻤﺸﺔ ﻭﻣﺴﺤﻮﻕ ﺍﻟﻐﺴﻴﻞ ﺍﻷﻭﻟﻲ )ﺇﺫﺍ ﻟﺰﻡ ﺍﻷﻣﺮ( ﻓﻲ ﺍﻷﺩﺭﺍﺝ ﺍﳌﻨﺎﺳﺒﺔ.
ﺗﺘﻮﺍﻓﺮ ﻣﻴﺰﺓ ) Pre-washﻏﺴﻴﻞ ﺃﻭﻟﻲ( ﻋﻨﺪ ﲢﺪﻳﺪ ﺍﻟﺪﻭﺭﺍﺕ ) Cottonﻗﻄﻦ( ﻭ ) Syntheticsﺃﻟﻴﺎﻑ ﺻﻨﺎﻋﻴﺔ( ﻭ ) Denimﺟﻴﻨﺰ( ﻭ
) Sports Wearﻣﻼﺑﺲ ﺭﻳﺎﺿﻴﺔ( ﻭ ) Dark Garmentﻣﻼﺑﺲ ﺩﺍﻛﻨﺔ( ﻭ ) Daily Washﻏﺴﻴﻞ ﻳﻮﻣﻲ( ﻓﻘﻂ .ﻭﻳﻌﺪ ﺍﻟﻐﺴﻞ ﺍﻷﻭﻟﻲ ﺿﺮﻭﺭﻳﹰﺎ
ﻓﻘﻂ ﻓﻲ ﺣﺎﻟﺔ ﺍﻻﺗﺴﺎﺥ ﺍﻟﺸﺪﻳﺪ ﻟﻠﻤﻼﺑﺲ.
.٧ﺍﺳﺘﺨﺪﻡ ﻗﺮﺹ ﲢﺪﻳﺪ ﺍﻟﺪﻭﺭﺓ ﻟﺘﺤﺪﻳﺪ ﺍﻟﺪﻭﺭﺓ ﺍﳌﻨﺎﺳﺒﺔ ﻭﻓﻘﹰ ﺎ ﻟﻨﻮﻉ ﺍﳌﺎﺩﺓ) Cotton :ﻗﻄﻦ( ﻭ ) Syntheticsﺃﻟﻴﺎﻑ ﺻﻨﺎﻋﻴﺔ( ﻭ ) Denimﺟﻴﻨﺰ(
ﻭ ) Sports Wearﻣﻼﺑﺲ ﺭﻳﺎﺿﻴﺔ( ﻭ ) Delicatesﺃﻧﺴﺠﺔ ﺭﻗﻴﻘﺔ( ﻭ ) Woolﺻﻮﻑ( ﻭ ) Hand Washﻏﺴﻴﻞ ﻳﺪﻭﻱ( ﻭ
) Dark Garmentﻣﻼﺑﺲ ﺩﺍﻛﻨﺔ( ﻭ ) Daily Washﻏﺴﻴﻞ ﻳﻮﻣﻲ( ﻭ ') Quick 29ﺳﺮﻳﻊ ' .(٢٩ﺳﺘﻀﻲﺀ ﺍﳌﺆﺷﺮﺍﺕ ﺍﳌﺮﺗﺒﻄﺔ ﺍﻟﺪﻭﺭﺍﺕ ﻋﻠﻰ
ﻟﻮﺣﺔ ﺍﻟﺘﺤﻜﻢ.
.٨ﻓﻲ ﻫﺬﺍ ﺍﻟﻮﻗﺖ ،ﳝﻜﻨﻚ ﺍﻟﺘﺤﻜﻢ ﻓﻲ ﺩﺭﺟﺔ ﺣﺮﺍﺭﺓ ﻋﻤﻠﻴﺔ ﺍﻟﻐﺴﻞ ﻭﺣﺠﻢ ﺍﻟﺸﻄﻒ ﻭﺳﺮﻋﺔ ﺍﻟﺘﻨﺸﻴﻒ ﻭﻭﻗﺖ ﺍﻟﺘﺄﺟﻴﻞ ﺑﺎﻟﻀﻐﻂ ﻋﻠﻰ ﺯﺭ
ﺍﳋﻴﺎﺭ ﺍﳌﻨﺎﺳﺐ.
.٩ﺍﺿﻐﻂ ﻋﻠﻰ ﺍﻟﺰﺭ ) Start/Pauseﺗﺸﻐﻴﻞ/ﺇﻳﻘﺎﻑ ﻣﺆﻗﺖ( ﻭﻋﻨﺪﻫﺎ ﺗﺒﺪﺃ ﺍﻟﻐﺴﺎﻟﺔ ﻓﻲ ﺍﻟﻌﻤﻞ .ﻳﻀﻲﺀ ﻣﺆﺷﺮ ﺍﻟﻌﻤﻠﻴﺔ ﻭﻳﻈﻬﺮ ﺍﻟﻮﻗﺖ
ﺍﳌﺘﺒﻘﻲ ﻟﻠﺪﻭﺭﺓ ﻋﻠﻰ ﻟﻮﺣﺔ ﺍﻟﻌﺮﺽ.
ﺧﻴﺎﺭ ) Pauseﺇﻳﻘﺎﻑ ﻣﺆﻗﺖ(
ﻣﻦ ﺍﳌﻤﻜﻦ ﺇﺿﺎﻓﺔ/ﺇﺯﺍﻟﺔ ﻗﻄﻊ ﺍﳌﻼﺑﺲ ﻓﻲ ﻏﻀﻮﻥ ٥ﺩﻗﺎﺋﻖ ﻣﻦ ﺑﺪﺀ ﺍﻟﻐﺴﻞ.
.١ﺍﺿﻐﻂ ﻋﻠﻰ ﺍﻟﺰﺭ ) Start/Pauseﺗﺸﻐﻴﻞ/ﺇﻳﻘﺎﻑ ﻣﺆﻗﺖ( ﻹﻟﻐﺎﺀ ﻗﻔﻞ ﺍﻟﺒﺎﺏ.
ﻻ ﳝﻜﻦ ﻓﺘﺢ ﺍﻟﺒﺎﺏ ﻋﻨﺪﻣﺎ ﺗﻜﻮﻥ ﺩﺭﺟﺔ ﺣﺮﺍﺭﺓ ﺍﳌﺎﺀ "ﻋﺎﻟﻴﺔ ﺟﺪﺍ ﹰ" ﺃﻭ ﻣﺴﺘﻮﻯ ﺍﳌﺎﺀ "ﻋﺎﻟﻲ ﺟ ﹰﺪﺍ".
.٢ﺍﺿﻐﻂ ﻋﻠﻰ ﺍﻟﺰﺭ ) Start/Pauseﺗﺸﻐﻴﻞ/ﺇﻳﻘﺎﻑ ﻣﺆﻗﺖ( ﻹﻋﺎﺩﺓ ﺗﺸﻐﻴﻞ ﺍﻟﻐﺴﺎﻟﺔ.
ﻋﻨﺪ ﺍﻧﺘﻬﺎﺀ ﺍﻟﺪﻭﺭﺓ:
ﺑﻌﺪ ﺍﻧﺘﻬﺎﺀ ﺩﻭﺭﺓ ﺍﻟﻐﺴﻞ ﺑﺎﻟﻜﺎﻣﻞ ،ﻳﺘﻢ ﺇﻳﻘﺎﻑ ﺍﻟﻐﺴﺎﻟﺔ
ﺗﻠﻘﺎﺋﻴﺎ.
ﹰ
.١ﺍﻓﺘﺢ ﺍﻟﺒﺎﺏ.
.٢ﺃﺧﺮﺝ ﺍﳌﻼﺑﺲ.
ﻏﺴﻞ ﺍﳌﻼﺑﺲ _٢٥
2/14/2011 11:03:06 AM
WF9854LWN-02713K_AR_v1.indd Sec5:25
ﻏﺴﻞ ﺍﳌﻼﺑﺲ
ﻏﺴﻞ ﺍﳌﻼﺑﺲ ﻳﺪﻭﻳﹰﺎ
ﳝﻜﻨﻚ ﻏﺴﻞ ﺍﳌﻼﺑﺲ ﻳﺪﻭﻳﹰﺎ ﺩﻭﻥ ﺍﺳﺘﺨﺪﺍﻡ ) Cycle Selectorﻗﺮﺹ ﲢﺪﻳﺪ ﺍﻟﺪﻭﺭﺓ(.
.١ﻗﻢ ﺑﺘﺸﻐﻴﻞ ﻣﺼﺪﺭ ﺗﻮﺭﻳﺪ ﺍﳌﺎﺀ.
.٢ﺍﺿﻐﻂ ﻋﻠﻰ ﺯﺭ ) Powerﺗﺸﻐﻴﻞ( ﺍﳌﻮﺟﻮﺩ ﺑﺎﻟﻐﺴﺎﻟﺔ.
.٣ﺍﻓﺘﺢ ﺍﻟﺒﺎﺏ.
.٤ﺿﻊ ﺍﳌﻼﺑﺲ ﻗﻄﻌﺔ ﺑﻘﻄﻌﺔ ﻓﻲ ﺍﳊﺎﻭﻳﺔ ﺩﻭﻥ ﲡﺎﻭﺯ ﺳﻌﺘﻬﺎ.
.٥ﺃﻏﻠﻖ ﺍﻟﺒﺎﺏ.
.٦ﺃﺿﻒ ﻣﺴﺤﻮﻕ ﺍﻟﻐﺴﻴﻞ ،ﻭﺇﺫﺍ ﻟﺰﻡ ﺍﻷﻣﺮ ،ﺃﺿﻒ ﻣﻨﻌﻢ ﺍﻷﻗﻤﺸﺔ ﺃﻭ ﻣﺴﺤﻮﻕ ﺍﻟﻐﺴﻴﻞ ﺍﻷﻭﻟﻲ ﻓﻲ ﺍﻷﺩﺭﺍﺝ ﺍﳌﻨﺎﺳﺒﺔ.
.٧ﺍﺿﻐﻂ ﻋﻠﻰ ﺍﻟﺰﺭ ) Temp.ﺩﺭﺟﺔ ﺍﳊﺮﺍﺭﺓ( ﻟﺘﺤﺪﻳﺪ ﺩﺭﺟﺔ ﺍﳊﺮﺍﺭﺓ ﺍﳌﻄﻠﻮﺑﺔ) .ﻣﺎﺀ ﺑﺎﺭﺩ ﻭ °٣٠ﺳﻠﺰﻳﻮﺱ ﻭ °٤٠ﺳﻠﺰﻳﻮﺱ ﻭ °٦٠ﺳﻠﺰﻳﻮﺱ ﻭ
°٦٠ﺳﻠﺰﻳﻮﺱ(
.٨ﺍﺿﻐﻂ ﻋﻠﻰ ﺍﻟﺰﺭ ) Rinseﺷﻄﻒ( ﻟﺘﺤﺪﻳﺪ ﺍﻟﻌﺪﺩ ﺩﻭﺭﺍﺕ ﺍﻟﺸﻄﻒ ﺍﳌﻄﻠﻮﺑﺔ.
ﺍﳊﺪ ﺍﻷﻗﺼﻰ ﻟﻌﺪﺩ ﺩﻭﺭﺍﺕ ﺍﻟﺸﻄﻒ ﻫﻮ ﺧﻤﺴﺔ.
ﻳﺘﻢ ﺯﻳﺎﺩﺓ ﻣﺪﺓ ﺍﻟﻐﺴﻞ ﻭﻓﻘﹰ ﺎ ﻟﻌﺪﺩ ﺍﻟﺪﻭﺭﺍﺕ.
.٩ﺍﺿﻐﻂ ﻋﻠﻰ ﺍﻟﺰﺭ ) Spinﺗﻨﺸﻴﻒ( ﻟﺘﺤﺪﻳﺪ ﺳﺮﻋﺘﻪ.
ﺗﺘﻴﺢ ﻟﻚ ﻭﻇﻴﻔﺔ ﺍﻧﺘﻈﺎﺭ ﺍﻟﺸﻄﻒ ﺇﺧﺮﺍﺝ ﺍﳌﻼﺑﺲ ﺍﻟﺘﻲ ﻻ ﺗﺰﺍﻝ ﻣﺒﺘﻠﺔ ﻣﻦ ﺍﻟﻐﺴﺎﻟﺔ.
) Rinse Hold :ﺍﻧﺘﻈﺎﺭ ﺍﻟﺸﻄﻒ((
) ) No Spin :ﺑﺪﻭﻥ ﺗﻨﺸﻴﻒ(،
.١٠ﺍﺿﻐﻂ ﻋﻠﻰ ﺍﻟﺰﺭ ) Delay Endﺗﺄﺟﻴﻞ ﺍﻟﺘﻮﻗﻒ( ﺑﺸﻜﻞ ﻣﺘﻜﺮﺭ ﻟﻠﺘﻨﻘﻞ ﺑﲔ ﺧﻴﺎﺭﺍﺕ ) Delay Endﺗﺄﺟﻴﻞ ﺍﻟﺘﻮﻗﻒ( ﺍﳌﺘﻮﻓﺮﺓ ﺑﲔ
) ٣ﺇﻟﻰ ١٩ﺳﺎﻋﺔ ﺑﻮﺍﻗﻊ ﺯﻳﺎﺩﺓ ﺳﺎﻋﺔ ﻭﺍﺣﺪﺓ( .ﺗﺸﻴﺮ ﺍﻟﺴﺎﻋﺔ ﺍﳌﻌﺮﻭﺿﺔ ﺇﻟﻰ ﺍﻟﻮﻗﺖ ﺍﻟﺬﻱ ﻳﺘﻢ ﺍﻻﻧﺘﻬﺎﺀ ﻓﻴﻪ ﻣﻦ ﻋﻤﻠﻴﺔ ﺍﻟﻐﺴﻞ.
.١١ﺍﺿﻐﻂ ﻋﻠﻰ ﺍﻟﺰﺭ ) Start/Pauseﺗﺸﻐﻴﻞ/ﺇﻳﻘﺎﻑ ﻣﺆﻗﺖ( ﻭﻋﻨﺪﻫﺎ ﺳﺘﺒﺪﺃ ﺩﻭﺭﺓ ﺍﻟﻐﺴﺎﻟﺔ.
_٢٦ﻏﺴﻞ ﺍﳌﻼﺑﺲ
2/14/2011 11:03:07 AM
WF9854LWN-02713K_AR_v1.indd Sec5:26
ﺇﺭﺷﺎﺩﺍﺕ ﺣﻮﻝ ﺍﻟﻐﺴﻴﻞ
ﺍﺗﺒﻊ ﻫﺬﻩ ﺍﻟﺘﻌﻠﻴﻤﺎﺕ ﺍﻟﺒﺴﻴﻄﺔ ﻟﻠﺤﺼﻮﻝ ﻋﻠﻰ ﻣﻼﺑﺲ ﺃﻛﺜﺮ ﻧﻈﺎﻓﺔ ﻭﻏﺴﻞ ﺃﻛﺜﺮ ﻓﺎﻋﻠﻴﺔ.
ﺩﻭﻣﺎ ﻗﺒﻞ ﻏﺴﻠﻬﺎ.
ﻗﻢ ﺑﻔﺤﺺ ﺑﻄﺎﻗﺔ ﺍﻟﻌﻨﺎﻳﺔ ﺍﳌﻮﺟﻮﺩﺓ ﻋﻠﻰ ﺍﳌﻼﺑﺲ ﹰ
٠٢ﻏﺴﻞ ﺍﳌﻼﺑﺲ
ﻗﻢ ﺑﻔﺮﺯ ﺍﳌﻼﺑﺲ ﻭﻏﺴﻠﻬﺎ ﻭﻓﻘﹰ ﺎ ﻟﻠﻤﻌﺎﻳﻴﺮ ﺍﻟﺘﺎﻟﻴﺔ:
• ﺑﻄﺎﻗﺔ ﺍﻟﻌﻨﺎﻳﺔ :ﻗﻢ ﺑﻔﺮﺯ ﺍﳌﻼﺑﺲ ﺇﻟﻰ ﺃﻗﻄﺎﻥ ﻭﺃﻟﻴﺎﻑ ﻣﺨﻠﻮﻃﺔ ﻭﺃﻟﻴﺎﻑ ﺻﻨﺎﻋﻴﺔ ﻭﻣﻼﺑﺲ ﺣﺮﻳﺮﻳﺔ ﻭﺃﺻﻮﺍﻑ ﻭﺭﺍﻳﻮﻥ.
• ﺍﻟﻠﻮﻥ :ﻓﻢ ﺑﻔﺼﻞ ﺍﳌﻼﺑﺲ ﺍﻟﺒﻴﻀﺎﺀ ﻋﻦ ﺍﳌﻼﺑﺲ ﺍﳌﻠﻮﻧﺔ .ﺍﻏﺴﻞ ﺍﳌﻼﺑﺲ ﺍﳌﻠﻮﻧﺔ ﺍﳉﺪﻳﺪﺓ ﻛﻞ ﻋﻠﻰ ﺣﺪﺓ.
• ﺍﳊﺠﻢ :ﻳﻌﻤﻞ ﻭﺿﻊ ﺍﳌﻼﺑﺲ ﲟﺨﺘﻠﻒ ﺃﺣﺠﺎﻣﻬﺎ ﻓﻲ ﻣﺮﺓ ﻭﺍﺣﺪﺓ ﻋﻠﻰ ﲢﺴﲔ ﻋﻤﻠﻴﺔ ﺍﻟﻐﺴﻞ.
• ﺭﻗﺔ ﺍﳌﻠﻤﺲ :ﺍﻏﺴﻞ ﺍﳌﻼﺑﺲ ﺍﻟﺮﻗﻴﻘﺔ ﻛﻞ ﻋﻠﻰ ﺣﺪﺓ ،ﺑﺎﺳﺘﺨﺪﺍﻡ ﺍﻟﺪﻭﺭﺓ ) Delicateﺃﻧﺴﺠﺔ ﺭﻗﻴﻘﺔ( ﻟﻠﺤﺼﻮﻝ ﻋﻠﻰ ﻣﻼﺑﺲ ﺻﻮﻓﻴﺔ
ﻭﺳﺘﺎﺋﺮ ﻭﻣﻼﺑﺲ ﺣﺮﻳﺮﻳﺔ ﻧﻘﻴﺔ ﺗﺒﺪﻭ ﺟﺪﻳﺪﺓ .ﺍﻓﺤﺺ ﺍﻟﻌﻼﻣﺎﺕ ﺍﳌﻮﺟﻮﺩﺓ ﺑﺎﳌﻼﺑﺲ ﺍﻟﺘﻲ ﺗﺮﻳﺪ ﻏﺴﻠﻬﺎ ﺃﻭ ﺭﺍﺟﻊ ﺟﺪﻭﻝ ﺍﻟﻌﻨﺎﻳﺔ ﺑﺎﻷﻗﻤﺸﺔ ﻓﻲ
ﺍﳌﻠﺤﻖ.
ﺇﻓﺮﺍﻍ ﺍﳉﻴﻮﺏ
ﻗﻢ ﺑﺈﻓﺮﺍﻍ ﻛﺎﻓﺔ ﺟﻴﻮﺏ ﺍﳌﻼﺑﺲ ﻗﺒﻞ ﻛﻞ ﻋﻤﻠﻴﺔ ﻏﺴﻞ .ﻗﺪ ﺗﺘﺴﺒﺐ ﺍﻷﺷﻴﺎﺀ ﺍﻟﺼﻐﻴﺮﺓ ﻭﺍﻟﺼﻠﺒﺔ ﺫﺍﺕ ﺍﻷﺷﻜﺎﻝ ﻏﻴﺮ ﺍﳌﻨﺘﻈﻤﺔ ﻣﺜﻞ ﺍﻟﻌﻤﻼﺕ
ﺍﳌﻌﺪﻧﻴﺔ ﻭﺍﻟﺸﻔﺮﺍﺕ ﻭﺍﻟﺪﺑﺎﺑﻴﺲ ﻭﻣﺎﺳﻜﺎﺕ ﺍﻟﻮﺭﻕ ﻓﻲ ﺗﻠﻒ ﺍﻟﻐﺴﺎﻟﺔ .ﻻ ﺗﻘﻢ ﺑﻐﺴﻞ ﺍﳌﻼﺑﺲ ﺍﳌﺰﻭﹼﺩﺓ ﺑﺈﺑﺰﳝﺎﺕ ﺃﻭ ﺃﺯﺭﺍﺭ ﻛﺒﻴﺮﺓ ﺍﳊﺠﻢ ﺃﻭ ﺍﻷﺷﻴﺎﺀ
ﺍﳌﻌﺪﻧﻴﺔ ﺍﻷﺧﺮﻯ ﺛﻘﻴﻠﺔ ﺍﻟﻮﺯﻥ.
ﻗﺪ ﺗﺘﺴﺒﺐ ﺍﳌﻌﺎﺩﻥ ﺍﳌﺴﺘﺨﺪﻣﺔ ﻓﻲ ﺍﳌﻼﺑﺲ ﻓﻲ ﺗﻠﻔﻬﺎ ﻭﺗﻠﻒ ﺍﳊﻮﺽ .ﺍﻗﻠﺐ ﺍﳌﻼﺑﺲ ﺍﳌﺰﻳﻨﺔ ﺑﺎﻷﺯﺭﺍﺭ ﻭﺍﳌﻄﺮﺯﺓ ﻋﻠﻰ ﻇﻬﺮﻫﺎ ﻗﺒﻞ ﻏﺴﻠﻬﺎ .ﺇﺫﺍ
ﺗﺮﻛﺖ ﺳﺤﺎﺑﺎﺕ ﺍﻟﺴﺮﺍﻭﻳﻞ ﻭﺍﳉﻮﺍﻛﺖ ﻣﻔﺘﻮﺣﺔ ﺃﺛﻨﺎﺀ ﺍﻟﻐﺴﻞ ،ﻓﻘﺪ ﻳﺘﺴﺒﺐ ﺫﻟﻚ ﻓﻲ ﺗﻠﻒ ﺳﻠﺔ ﺍﻟﺘﻨﺸﻴﻒ .ﻳﺠﺐ ﺇﻏﻼﻕ ﺍﻟﺴﺤﺎﺑﺎﺕ ﻭﺗﺜﺒﻴﺘﻬﺎ
ﺑﺨﻴﻂ ﻗﺒﻞ ﺍﻟﻐﺴﻞ.
ﻗﺪ ﺗﺘﺸﺎﺑﻚ ﺍﳌﻼﺑﺲ ﺫﺍﺕ ﺍﳋﻴﻮﻁ ﺍﻟﻄﻮﻳﻠﺔ ﻣﻊ ﻣﻼﺑﺲ ﺃﺧﺮﻯ ﻭﻗﺪ ﻳﺆﺩﻱ ﺫﻟﻚ ﺇﻟﻰ ﺗﻠﻒ ﻫﺬﻩ ﺍﳌﻼﺑﺲ .ﺍﺣﺮﺹ ﻋﻠﻰ ﺗﺜﺒﻴﺖ ﺍﳋﻴﻮﻁ ﻗﺒﻞ ﺑﺪﺀ ﺍﻟﻐﺴﻞ.
ﺍﻟﻐﺴﻞ ﺍﻷﻭﻟﻲ ﻟﻠﻤﻼﺑﺲ ﺍﻟﻘﻄﻨﻴﺔ
ﺗﻘﺪﻡ ﻟﻚ ﺍﻟﻐﺴﺎﻟﺔ ﺍﳉﺪﻳﺪﺓ ﺑﺎﺳﺘﺨﺪﺍﻡ ﻣﺴﺎﺣﻴﻖ ﺍﻟﻐﺴﻴﻞ ﺍﳊﺪﻳﺜﺔ ﺃﻓﻀﻞ ﻧﺘﺎﺋﺞ ﻟﻌﻤﻠﻴﺎﺕ ﺍﻟﻐﺴﻞ ،ﻭﻣﻦ ﺛﻢ ﻓﻬﻲ ﻣﻮﻓﺮﺓ ﻟﻠﻄﺎﻗﺔ ﻭﺍﻟﻮﻗﺖ
ﻭﺍﳌﺎﺀ ﻭﺍﳌﺴﺤﻮﻕ .ﻟﻜﻦ ﺇﺫﺍ ﻛﺎﻧﺖ ﺍﳌﻼﺑﺲ ﺍﻟﻘﻄﻨﻴﺔ ﺷﺪﻳﺪﺓ ﺍﻻﺗﺴﺎﺥ ،ﺍﺳﺘﺨﺪﻡ ﺍﻟﻐﺴﻞ ﺍﻷﻭﻟﻲ ﻣﻊ ﻣﺴﺤﻮﻕ ﺍﻟﻐﺴﻴﻞ ﺍﻟﺬﻱ ﻳﺤﺘﻮﻱ ﻋﻠﻰ
ﺍﻟﺒﺮﻭﺗﲔ.
ﻏﺴﻞ ﺍﳌﻼﺑﺲ _٢٧
2/14/2011 11:03:07 AM
WF9854LWN-02713K_AR_v1.indd Sec5:27
ﻏﺴﻞ ﺍﳌﻼﺑﺲ
ﲢﺪﻳﺪ ﺳﻌﺔ ﻭﺯﻥ ﺍﳌﻼﺑﺲ
ﻻ ﺗﺘﺠﺎﻭﺯ ﺍﻟﻮﺯﻥ ﺍﶈﺪﺩ ﻟﻠﻐﺴﺎﻟﺔ ﺣﻴﺚ ﻳﺆﺩﻱ ﺫﻟﻚ ﺇﻟﻰ ﺍﳊﺼﻮﻝ ﻋﻠﻰ ﻧﺘﺎﺋﺞ ﻏﻴﺮ ﻣﺮﺿﻴﺔ .ﺍﺳﺘﺨﺪﻡ ﺍﳉﺪﻭﻝ ﺍﻟﺘﺎﻟﻲ ﻟﺘﺤﺪﻳﺪ ﺳﻌﺔ ﺍﻟﻮﺯﻥ ﻟﻨﻮﻉ
ﺍﳌﻼﺑﺲ ﺍﻟﺘﻲ ﺗﻘﻮﻡ ﺑﻐﺴﻠﻬﺎ.
ﻧﻮﻉ ﺍﻟﻘﻤﺎﺵ
ﺳﻌﺔ ﺍﻟﻮﺯﻥ
ﺍﻟﻄﺮﺍﺯ
WF9854/
WF9852/
WF9850
) Cottonﻗﻄﻦ(
ﻣﺘﻮﺳﻂ/ﺧﻔﻴﻒ ﺍﻻﺗﺴﺎﺥ -ﺷﺪﻳﺪ ﺍﻻﺗﺴﺎﺥ
٨٫٥ﻛﺠﻢ
) Syntheticsﺃﻟﻴﺎﻑ ﺍﻟﺼﻨﺎﻋﻴﺔ(
٣٫٠ﻛﺠﻢ
) Denimﺍﳉﻴﻨﺰ(
٣٫٠ﻛﺠﻢ
) Sports Wearﻣﻼﺑﺲ ﺭﻳﺎﺿﻴﺔ(
٢٫٥ﻛﺠﻢ
) Delicatesﺃﻧﺴﺠﺔ ﺭﻗﻴﻘﺔ(
٢٫٥ﻛﺠﻢ
) Woolﺻﻮﻑ(
٢٫٠ﻛﺠﻢ
•
•
•
ﻓﻲ ﺣﺎﻟﺔ ﻋﺪﻡ ﺗﻮﺯﻳﻊ ﺍﳌﻼﺑﺲ )ﻳﻀﻲﺀ " "UEﻋﻠﻰ ﻟﻮﺣﺔ ﺍﻟﻌﺮﺽ( ،ﻭﻓﻲ ﻫﺬﻩ ﺍﳊﺎﻟﺔ ،ﺃﻋﺪ ﺗﻮﺯﻳﻊ ﺍﳌﻼﺑﺲ.
ﺣﻴﺚ ﻳﺆﺩﻱ ﻋﺪﻡ ﺗﻮﺯﻳﻊ ﺍﳌﻼﺑﺲ ﺇﻟﻰ ﺗﻘﻠﻴﻞ ﻓﺎﻋﻠﻴﺔ ﺩﻭﺭﺓ ﺍﻟﺘﻨﺸﻴﻒ.
ﻋﻨﺪ ﻏﺴﻞ ﺍﳌﻔﺮﻭﺷﺎﺕ ﺃﻭ ﺍﻷﳊﻔﺔ ،ﻗﺪ ﺗﻄﻮﻝ ﻣﺪﺓ ﺍﻟﻐﺴﻞ ﺃﻭ ﺗﻘﻞ ﻓﺎﻋﻠﻴﺔ ﻋﻤﻠﻴﺔ ﺍﻟﺘﻨﺸﻴﻒ.
ﺑﺎﻟﻨﺴﺒﺔ ﻟﻠﻤﻔﺎﺭﺵ ﺃﻭ ﺍﻷﳊﻔﺔ ،ﻳﹸﻮﺻﻰ ﺃﻥ ﻳﻜﻮﻥ ﺍﻟﻮﺯﻥ ) ١٫٨ﻛﺠﻢ( ﺃﻭ ﺃﻗﻞ.
ﺗﺄﻛﺪ ﻣﻦ ﺇﺩﺧﺎﻝ ﺣﻤﺎﻻﺕ ﺍﻟﺼﺪﺭ )ﺍﻟﺘﻲ ﳝﻜﻦ ﻏﺴﻠﻬﺎ ﻓﻲ ﺍﳌﺎﺀ( ﻓﻲ ﺷﺒﻜﺔ ﻏﺴﻴﻞ )ﻳﺘﻢ ﺷﺮﺍﺅﻫﺎ ﺑﺸﻜﻞ ﻣﻨﻔﺼﻞ(.
•
•
ﺗﻨﺒﻴﻪ
ﻗﺪ ﺗﻨﻜﺴﺮ ﺍﻷﺟﺰﺍﺀ ﺍﳌﻌﺪﻧﻴﺔ ﺍﳌﻮﺟﻮﺩﺓ ﻓﻲ ﺣﻤﺎﻻﺕ ﺍﻟﺼﺪﺭ ﳑﺎ ﻳﺆﺩﻱ ﺇﻟﻰ ﺗﻠﻒ ﺍﻟﻐﺴﻴﻞ .ﻟﺬﺍ ﻳﺠﺐ
ﻋﻠﻴﻚ ﺃﻥ ﺗﺘﺄﻛﺪ ﻣﻦ ﻭﺿﻌﻬﻢ ﺩﺍﺧﻞ ﺷﺒﻜﺔ ﻏﺴﻴﻞ ﺟﻴﺪﺓ.
ﻗﺪ ﺗﺘﻌﻠﻖ ﺍﳌﻼﺑﺲ ﺍﻟﺼﻐﻴﺮﺓ ﻭﺍﳋﻔﻴﻔﺔ ﺑﺎﻟﺒﺎﺏ ﻣﺜﻞ ﺍﳉﻮﺍﺭﺏ ﻭﺍﻟﻘﻔﺎﺯﺍﺕ ﻭﺍﳌﻨﺴﻮﺟﺎﺕ ﻭﺍﳌﻨﺎﺩﻳﻞ .ﻟﺬﺍ
ﻳﺮﺟﻲ ﻭﺿﻌﻬﺎ ﺩﺍﺧﻞ ﺷﺒﻜﺔ ﻏﺴﻴﻞ ﺟﻴﺪﺓ.
ﻻ ﺗﻘﻢ ﺑﻐﺴﻞ ﺷﺒﻜﺔ ﺍﻟﻐﺴﻴﻞ ﻭﺣﺪﻫﺎ ﺩﻭﻥ ﻭﺟﻮﺩ ﻣﻼﺑﺲ ﺑﻬﺎ .ﻓﻘﺪ ﻳﺆﺩﻱ ﺫﻟﻚ ﺇﻟﻰ ﺣﺪﻭﺙ ﺍﻫﺘﺰﺍﺯﺍﺕ
ﻏﻴﺮ ﻃﺒﻴﻌﻴﺔ ﻓﻲ ﺍﻟﻐﺴﺎﻟﺔ ﳑﺎ ﻗﺪ ﻳﺘﺴﺒﺐ ﻓﻲ ﺣﺪﻭﺙ ﺇﺻﺎﺑﺎﺕ.
_٢٨ﻏﺴﻞ ﺍﳌﻼﺑﺲ
2/14/2011 11:03:07 AM
WF9854LWN-02713K_AR_v1.indd Sec5:28
ﻣﻌﻠﻮﻣﺎﺕ ﺣﻮﻝ ﻣﺴﺤﻮﻕ ﺍﻟﻐﺴﻴﻞ ﻭﺍﳌﻮﺍﺩ ﺍﻹﺿﺎﻓﻴﺔ
ﻣﺴﺤﻮﻕ ﺍﻟﻐﺴﻴﻞ ﺍﻟﺬﻱ ﳝﻜﻦ ﺍﺳﺘﺨﺪﺍﻣﻪ
ﻻ ﺗﺴﺘﺨﺪﻡ ﻣﻨﻈﻔﹰ ﺎ ﺻﻠ ﹰﺒﺎ ﺃﻭ ﺧﺸﻨﹰﺎ ﻷﻧﻪ ﻗﺪ ﻳﺘﺒﻘﻲ ﻓﻲ ﺩﻭﺭﺓ ﺍﻟﺸﻄﻒ .ﻗﺪ ﻳﺘﺴﺒﺐ ﻓﻲ ﺃﺩﺍﺀ ﺍﻟﻐﺴﺎﻟﺔ ﻟﺪﻭﺭﺓ ﺍﻟﺸﻄﻒ ﺑﺸﻜﻞ ﻏﻴﺮ
ﺻﺤﻴﺢ ﺃﻭ ﻳﺘﺴﺒﺐ ﻓﻲ ﺇﻋﺎﻗﺔ ﺗﺪﻓﻖ ﺍﳌﺎﺀ.
٠٢ﻏﺴﻞ ﺍﳌﻼﺑﺲ
ﻳﻌﺘﻤﺪ ﻧﻮﻉ ﻣﺴﺤﻮﻕ ﺍﻟﻐﺴﻴﻞ ﺍﻟﺬﻱ ﺗﺴﺘﺨﺪﻣﻪ ﻋﻠﻰ ﻧﻮﻉ ﺍﻟﻘﻤﺎﺵ )ﺍﻟﻘﻄﻦ ﺃﻭ ﺍﻷﻟﻴﺎﻑ ﺍﻟﺼﻨﺎﻋﻴﺔ ﺃﻭ ﺍﻷﻧﺴﺠﺔ ﺍﻟﺮﻗﻴﻘﺔ ﺃﻭ ﺍﻟﺼﻮﻑ( ،ﻭﺍﻷﻟﻮﺍﻥ
ﺧﺼﻴﺼﺎ ﻟﻠﻐﺴﺎﻻﺕ ﺍﻷﻭﺗﻮﻣﺎﺗﻴﻜﻴﺔ.
ﺩﻭﻣﺎ ﻣﺴﺤﻮﻕ ﺍﻟﻐﺴﻴﻞ ﺫﻱ "ﺍﻟﺮﻏﻮﺓ ﺍﻟﻘﻠﻴﻠﺔ" ﺍﳌﺼﻨﻊ
ﹰ
ﻭﺩﺭﺟﺔ ﺣﺮﺍﺭﺓ ﺍﳌﺎﺀ ﻭﺩﺭﺟﺔ ﺍﻻﺗﺴﺎﺥ .ﺍﺳﺘﺨﺪﻡ ﹰ
ﺍﺗﺒﻊ ﺗﻮﺻﻴﺎﺕ ﺍﻟﺸﺮﻛﺔ ﺍﳌﺼﻨﹼﻌﺔ ﳌﺴﺤﻮﻕ ﺍﻟﻐﺴﻴﻞ ﻭﻓﻘﹰ ﺎ ﻟﻮﺯﻥ ﺍﳌﻼﺑﺲ ﻭﺩﺭﺟﺔ ﺍﻻﺗﺴﺎﺥ ﻭﺩﺭﺟﺔ ﻧﻘﺎﺀ ﺍﳌﺎﺀ ﻓﻲ ﻣﻨﻄﻘﺘﻚ .ﻭﺇﺫﺍ ﻟﻢ ﺗﻜﻦ ﺗﻌﺮﻑ ﻣﺎ
ﻧﻘﻴﺎ ﺃﻡ ﻻ ﻓﻲ ﻣﻨﻄﻘﺘﻚ ،ﺍﺗﺼﻞ ﺑﺎﻟﻬﻴﺌﺔ ﺍﳌﺴﺌﻮﻟﺔ ﻋﻦ ﺍﳌﺎﺀ.
ﺇﺫﺍ ﻛﺎﻥ ﺍﳌﺎﺀ ﹰ
ﺩﺭﺝ ﻣﺴﺤﻮﻕ ﺍﻟﻐﺴﻴﻞ
ﲢﺘﻮﻯ ﺍﻟﻐﺴﺎﻟﺔ ﻋﻠﻰ ﺃﺩﺭﺍﺝ ﻣﻨﻔﺼﻠﺔ ﻟﺘﻮﺯﻳﻊ ﺍﳌﺴﺤﻮﻕ ﻭﻣﻨﻌﻢ ﺍﻷﻗﻤﺸﺔ .ﻗﻢ ﺑﺈﺿﺎﻓﺔ ﻛﺎﻓﺔ ﺍﳌﻮﺍﺩ ﺍﻹﺿﺎﻓﻴﺔ ﺍﳋﺎﺻﺔ ﺑﺘﻨﻈﻴﻒ ﺍﳌﻼﺑﺲ ﺇﻟﻰ
ﺍﻷﺩﺭﺍﺝ ﺍﳌﻨﺎﺳﺒﺔ ﻗﺒﻞ ﺑﺪﺀ ﺗﺸﻐﻴﻞ ﺍﻟﻐﺴﺎﻟﺔ.
ﻻ ﺗﻘﻢ ﺑﻔﺘﺢ ﺩﺭﺝ ﺍﳌﺴﺤﻮﻕ ﺃﺛﻨﺎﺀ ﺗﺸﻐﻴﻞ ﺍﻟﻐﺴﺎﻟﺔ.
.١
.٢
.٣
.٤
ﺍﺳﺤﺐ ﺩﺭﺝ ﻣﺴﺤﻮﻕ ﺍﻟﻐﺴﻴﻞ ﺍﳌﻮﺟﻮﺩ ﻋﻠﻰ ﺍﳉﺎﻧﺐ ﺍﻷﻳﺴﺮ ﻣﻦ ﻟﻮﺣﺔ ﺍﻟﺘﺤﻜﻢ.
ﻗﻢ ﺑﺈﺿﺎﻓﺔ ﻛﻤﻴﺔ ﻣﻦ ﻣﺴﺤﻮﻕ ﺍﻟﻐﺴﻴﻞ ﺍﳌﻮﺻﻰ ﺑﻪ ﻣﺒﺎﺷﺮﺓ ﻓﻲ ﺩﺭﺝ ﺍﳌﺴﺤﻮﻕ
ﻗﺒﻞ ﺗﺸﻐﻴﻞ ﺍﻟﻐﺴﺎﻟﺔ.
ﻗﻢ ﺑﺈﺿﺎﻓﺔ ﺍﻟﻜﻤﻴﺔ ﺍﳌﻮﺻﻰ ﺑﻬﺎ ﻣﻦ ﻣﻨﻌﻢ ﺍﻷﻗﻤﺸﺔ ﻓﻲ ﺍﻟﺪﺭﺝ ﺍﳋﺎﺻﺔ ﺑﻪ ﺇﺫﺍ ﻟﺰﻡ
ﺍﻷﻣﺮ.
ﻋﻨﺪ ﺍﺳﺘﺨﺪﺍﻡ ﺍﳋﻴﺎﺭ ) Pre-washﻏﺴﻞ ﺃﻭﻟﻲ( ،ﻗﻢ ﺑﺈﺿﺎﻓﺔ ﺍﻟﻜﻤﻴﺔ ﺍﳌﻮﺻﻰ ﺑﻬﺎ ﻣﻦ
ﻣﺴﺤﻮﻕ ﺍﻟﻐﺴﻴﻞ ﻓﻲ ﺩﺭﺝ ﺍﻟﻐﺴﻞ ﺍﻷﻭﻟﻲ .
ﻻ ﺗﺴﺘﺨﺪﻡ ﺃﻧﻮﺍﻉ ﺍﳌﺴﺎﺣﻴﻖ ﺍﻟﺘﺎﻟﻴﺔ ﻋﻨﺪ ﻏﺴﻞ ﺍﳌﻼﺑﺲ ﻛﺒﻴﺮﺓ ﺍﳊﺠﻢ.
•
•
ﻣﺴﺎﺣﻴﻖ ﺍﻟﻐﺴﻴﻞ ﺍﻟﺘﻲ ﺗﻜﻮﻥ ﻋﻠﻰ ﺷﻜﻞ ﺃﻟﻮﺍﺡ ﺃﻭ ﺃﻗﺮﺍﺹ
ﺍﳌﺴﺎﺣﻴﻖ ﺍﻟﺘﻲ ﺗﻜﻮﻥ ﻋﻠﻰ ﺷﻜﻞ ﻛﺮﺓ ﺃﻭ ﺷﺒﻜﺔ
ﻳﺠﺐ ﺇﺫﺍﺑﺔ ﻣﻨﻌﻢ ﺍﻷﻗﻤﺸﺔ ﺍﳌﺮﻛﺰ ﺃﻭ ﺍﻟﺴﻤﻴﻚ ﺑﻘﻠﻴﻞ ﻣﻦ ﺍﳌﺎﺀ ﻗﺒﻞ ﺻﺒﻪ ﻓﻲ ﺩﺭﺝ
ﺍﻟﺘﻮﺯﻳﻊ )ﳌﻨﻊ ﺇﻋﺎﻗﺔ ﺗﺪﻓﻖ ﺍﳌﺎﺀ(.
ﺍﳊﺪ ﺍﻷﻗﺼﻰ
ﻏﺴﻞ ﺍﳌﻼﺑﺲ _٢٩
2/14/2011 11:03:08 AM
WF9854LWN-02713K_AR_v1.indd Sec5:29
ﺗﻨﻈﻴﻒ ﺍﻟﻐﺴﺎﻟﺔ ﻭﺻﻴﺎﻧﺘﻬﺎ
ﻳﺆﺩﻱ ﺣﻔﻆ ﺍﻟﻐﺴﺎﻟﺔ ﻧﻈﻴﻔﺔ ﻋﻠﻰ ﲢﺴﲔ ﺃﺩﺍﺋﻬﺎ ،ﻭﲡﻨﺐ ﺍﻹﺻﻼﺣﺎﺕ ﻏﻴﺮ ﺍﻟﻀﺮﻭﺭﻳﺔ ،ﻭﺯﻳﺎﺩﺓ ﻋﻤﺮ ﺍﻟﻐﺴﺎﻟﺔ.
) ECO DRUM CLEANﺗﻨﻈﻴﻒ ﺍﳊﺎﻭﻳﺔ ﺻﺪﻳﻖ ﺍﻟﺒﻴﺌﺔ(
ﺗﻌﺪ ﻫﺬﻩ ﺍﻟﺪﻭﺭﺓ ﺩﻭﺭﺓ ﺗﻨﻈﻴﻒ ﺫﺍﺗﻲ ﻳﺘﻢ ﻣﻦ ﺧﻼﻟﻬﺎ ﺇﺯﺍﻟﺔ ﺍﻷﺗﺮﺑﺔ ﺍﻟﺘﻲ ﻗﺪ ﺗﻌﻠﻖ ﺑﺎﻟﻐﺴﺎﻟﺔ ﻣﻦ ﺍﻟﺪﺍﺧﻞ.
.١ﺍﺿﻐﻂ ﻋﻠﻰ ﺍﻟﺰﺭ ) Powerﺗﺸﻐﻴﻞ(.
.٢ﻗﻢ ﺑﺘﺪﻭﻳﺮ "ﻗﺮﺹ ﲢﺪﻳﺪ ﺍﻟﺪﻭﺭﺓ" ﺇﻟﻰ ) Eco Drum Cleanﺗﻨﻈﻴﻒ ﺍﳊﺎﻭﻳﺔ ﺻﺪﻳﻖ ﺍﻟﺒﻴﺌﺔ(.
• ﳝﻜﻨﻚ ﻓﻘﻂ ﺍﺳﺘﺨﺪﺍﻡ ﺍﻟﻮﻇﻴﻔﺔ ) Delay Endﺗﺄﺟﻴﻞ ﺍﻟﺘﻮﻗﻒ(.
• ﻳﺘﻢ ﺿﺒﻂ ﺩﺭﺟﺔ ﺣﺮﺍﺭﺓ ﺍﳌﻴﺎﻩ ﺃﺛﻨﺎﺀ Eco Drum Clean
)ﺗﻨﻈﻴﻒ ﺍﳊﺎﻭﻳﺔ ﺻﺪﻳﻖ ﺍﻟﺒﻴﺌﺔ( ﺇﻟﻰ °٧٠ﺳﻠﺰﻳﻮﺱ.
ﻻ ﳝﻜﻨﻚ ﺗﻐﻴﻴﺮ ﺩﺭﺟﺔ ﺍﳊﺮﺍﺭﺓ.
.٣ﺿﻊ ﺍﻟﻜﻤﻴﺔ ﺍﳌﻨﺎﺳﺒﺔ ﻣﻦ ﺍﳌﻨﻈﻒ ﻓﻲ ﺣﺠﻴﺮﺓ ﺍﳌﺴﺤﻮﻕ ﻭﺃﻏﻠﻖ ﺩﺭﺝ ﺍﳌﺴﺤﻮﻕ
)ﻋﻨﺪ ﺗﻨﻈﻴﻒ ﺍﳊﺎﻭﻳﺔ ﺑﺎﺳﺘﺨﺪﺍﻡ ﺳﺎﺋﻞ ﻣﻨﻈﻒ(.
• ﺗﺄﻛﺪ ﻣﻦ ﺍﺳﺘﺨﺪﺍﻡ ﺍﳌﻨﻈﻒ ﺍﳌﻮﺻﻰ ﺑﻪ ﻟﺘﻨﻈﻴﻒ ﺍﳊﺎﻭﻳﺔ.
• ﻳﻮﺟﺪ ﻧﻮﻋﺎﻥ ﻣﻦ ﺍﳌﻨﻈﻔﺎﺕ؛ ﺍﳌﺴﺤﻮﻕ ﻭﺍﻟﺴﺎﺋﻞ.
.٤ﺍﺿﻐﻂ ﻋﻠﻰ ﺍﻟﺰﺭ ) Start/Pauseﺗﺸﻐﻴﻞ/ﺇﻳﻘﺎﻑ ﻣﺆﻗﺖ(.
• ﺗﺒﺪﺃ ﺩﻭﺭﺓ ) Eco Drum Cleanﺗﻨﻈﻴﻒ ﺍﳊﺎﻭﻳﺔ ﺻﺪﻳﻖ ﺍﻟﺒﻴﺌﺔ( ﻋﻨﺪ ﺍﻟﻀﻐﻂ ﻋﻠﻰ ﺍﻟﺰﺭ ) Start/Pauseﺗﺸﻐﻴﻞ/ﺇﻳﻘﺎﻑ ﻣﺆﻗﺖ(.
ﺗﻨﺒﻴﻪ
•
•
•
•
•
•
ﳝﻜﻨﻚ ﺗﻨﻈﻴﻒ ﺍﳊﺎﻭﻳﺔ ﺑﺪﻭﻥ ﺍﺳﺘﺨﺪﺍﻡ ﻣﻨﻈﻒ ﺑﻮﺍﺳﻄﺔ ﺍﻟﺪﻭﺭﺓ ) Eco Drum Cleanﺗﻨﻈﻴﻒ ﺍﳊﺎﻭﻳﺔ ﺻﺪﻳﻖ ﺍﻟﺒﻴﺌﺔ(.
ﻻ ﺗﺴﺘﺨﺪﻡ ﺍﻟﺪﻭﺭﺓ ) Eco Drum Cleanﺗﻨﻈﻴﻒ ﺍﳊﺎﻭﻳﺔ ﺻﺪﻳﻖ ﺍﻟﺒﻴﺌﺔ( ﺃﺑ ﹰﺪﺍ ﻋﻨﺪ ﻭﺟﻮﺩ ﻣﻼﺑﺲ ﺩﺍﺧﻞ ﺍﻟﻐﺴﺎﻟﺔ .ﻗﺪ ﻳﺘﺴﺒﺐ ﺫﻟﻚ ﻓﻲ ﺗﻠﻒ
ﺍﻟﻨﺴﻴﺞ ﺃﻭ ﺣﺪﻭﺙ ﻣﺸﻜﻠﺔ ﻓﻲ ﺍﻟﻐﺴﺎﻟﺔ.
ﺍﺳﺘﺨﺪﻡ ١/١٠ﻓﻘﻂ ﻣﻦ ﻛﻤﻴﺔ ﻣﻨﻈﻒ ﺍﳊﺎﻭﻳﺔ ﺍﳌﻮﺻﻰ ﺑﻪ ﻣﻦ ﻗﺒﻞ ﺍﻟﺸﺮﻛﺔ ﺍﳌﺼﻨﹼﻌﺔ ﻟﻠﻤﻨﻈﻒ.
ﺗﺄﻛﺪ ﻣﻦ ﺍﺳﺘﺨﺪﺍﻡ ﺍﻷﻛﺴﺠﲔ ﺍﳌﺒﻴﺾ ﻓﻘﻂ ،ﺣﻴﺚ ﺃﻥ ﺍﺳﺘﺨﺪﺍﻡ ﺍﻟﻜﻠﻮﺭ ﺍﳌﺒﻴﺾ ﻗﺪ ﻳﺆﺩﻱ ﺇﻟﻰ ﺗﻐﻴﻴﺮ ﺍﻟﻠﻮﻥ ﺃﻭ ﺇﺯﺍﻟﺘﻪ.
ﺍﳌﻨﻈﻒ ﺍﳌﺴﺤﻮﻕ :ﺍﺳﺘﺨﺪﻡ ]ﺍﳌﻨﻈﻒ ﺍﳌﺒﻴﺾ ﺍﳌﺴﺤﻮﻕ[ ﺃﻭ ]ﺍﳌﻨﻈﻒ ﺍﳌﺴﺘﺨﺪﻡ ﻟﺘﻨﻈﻴﻒ ﺍﳊﺎﻭﻳﺔ ﻓﻘﻂ[.
ﺍﳌﻨﻈﻒ ﺍﻟﺴﺎﺋﻞ :ﺍﺳﺘﺨﺪﻡ ]ﺍﻷﻛﺴﺠﲔ ﺍﳌﺒﻴﺾ ﺍﻟﺴﺎﺋﻞ[ ﺃﻭ ]ﺍﳌﻨﻈﻒ ﺍﳌﺴﺘﺨﺪﻡ ﻟﺘﻨﻈﻴﻒ ﺍﳊﺎﻭﻳﺔ ﻓﻘﻂ[.
ﻭﻇﻴﻔﺔ ﺍﻟﺘﻨﺒﻴﻪ ﺍﻵﻟﻲ ﻟﺘﻨﻈﻴﻒ ﺍﳊﺎﻭﻳﺔ ﺻﺪﻳﻖ ﺍﻟﺒﻴﺌﺔ
• ﺇﺫﺍ ﻛﺎﻥ ﺍﳌﺆﺷﺮ ") Eco Drum Cleanﺗﻨﻈﻴﻒ ﺍﳊﺎﻭﻳﺔ ﺻﺪﻳﻖ ﺍﻟﺒﻴﺌﺔ(" ﻋﻠﻰ ﻟﻮﺣﺔ
ﺍﻟﻌﺮﺽ ﻭﺍﳌﺼﺒﺎﺡ ﺍﳌﻮﺟﻮﺩ ﻋﻠﻰ ) Cycle Selectorﻗﺮﺹ ﲢﺪﻳﺪ ﺍﻟﺪﻭﺭﺓ( ﻣﻀﺎ ﹰﺀ ﺑﻌﺪ
ﻋﻤﻠﻴﺔ ﺍﻟﻐﺴﻞ ،ﻳﺸﻴﺮ ﺫﻟﻚ ﺇﻟﻰ ﺿﺮﻭﺭﺓ ﺗﻨﻈﻴﻒ ﺍﳊﻮﺽ )ﺍﳊﺎﻭﻳﺔ( .ﻓﻲ ﻫﺬﻩ ﺍﳊﺎﻟﺔ ،ﻗﻢ
ﺑﺈﺧﺮﺍﺝ ﺍﻟﻐﺴﻴﻞ ﻣﻦ ﺍﻟﻐﺴﺎﻟﺔ ،ﺛﻢ ﻗﻢ ﺑﺘﺸﻐﻴﻠﻬﺎ ،ﻭﺗﻨﻈﻴﻒ ﺍﳊﺎﻭﻳﺔ ﺑﺎﺳﺘﺨﺪﺍﻡ
) Eco Drum Cleanﺗﻨﻈﻴﻒ ﺍﳊﺎﻭﻳﺔ ﺻﺪﻳﻖ ﺍﻟﺒﻴﺌﺔ(.
• ﺇﺫﺍ ﻟﻢ ﺗﻘﻢ ﺑﺘﺸﻐﻴﻞ ﺩﻭﺭﺓ ) Eco Drum Cleanﺗﻨﻈﻴﻒ ﺍﳊﺎﻭﻳﺔ ﺻﺪﻳﻖ ﺍﻟﺒﻴﺌﺔ( ،ﻳﺘﻢ
ﺇﻳﻘﺎﻑ ﺗﺸﻐﻴﻞ ﻣﺆﺷﺮ ") Eco Drum Cleanﺗﻨﻈﻴﻒ ﺍﳊﺎﻭﻳﺔ ﺻﺪﻳﻖ ﺍﻟﺒﻴﺌﺔ(" ﻋﻠﻰ ﻟﻮﺣﺔ
ﺍﻟﻌﺮﺽ ﻭﺍﳌﺼﺒﺎﺡ ﺍﳌﻮﺟﻮﺩ ﻋﻠﻰ ) Cycle Selectorﻗﺮﺹ ﲢﺪﻳﺪ ﺍﻟﺪﻭﺭﺓ( .ﻭﺑﺎﻟﺮﻏﻢ ﻣﻦ
ﺫﻟﻚ ،ﻳﺘﻢ ﺗﺸﻐﻴﻞ ﻣﺆﺷﺮ ") Eco Drum Cleanﺗﻨﻈﻴﻒ ﺍﳊﺎﻭﻳﺔ ﺻﺪﻳﻖ ﺍﻟﺒﻴﺌﺔ(" ﻋﻠﻰ
ﺍﻟﻠﻮﺣﺔ ﻭﺍﳌﺼﺒﺎﺡ ﺍﳌﻮﺟﻮﺩ ﻋﻠﻰ ) Cycle Selectorﻗﺮﺹ ﲢﺪﻳﺪ ﺍﻟﺪﻭﺭﺓ( ﻣﺮﺓ ﺃﺧﺮﻯ ﺑﻌﺪ
ﺩﻭﺭﺗﲔ ﻣﻦ ﺍﻟﻐﺴﻴﻞ .ﻭﻣﻊ ﺫﻟﻚ ،ﻻ ﻳﺆﺩﻱ ﺍﻷﻣﺮ ﺇﻟﻰ ﺣﺪﻭﺙ ﻣﺸﻜﻠﺔ ﻓﻲ ﺍﻟﻐﺴﺎﻟﺔ.
ﻭﻋﻤﻮﻣﺎ ،ﻓﺈﻥ ﻭﻇﻴﻔﺔ "ﺍﻟﺘﻨﺒﻴﻪ ﺍﻵﻟﻲ ﻟﺘﻨﻈﻴﻒ ﺍﳊﺎﻭﻳﺔ ﺻﺪﻳﻖ ﺍﻟﺒﻴﺌﺔ" ﺗﻈﻬﺮ ﻣﺮﺓ ﻓﻲ
•
ﹰ
ﺍﻟﺸﻬﺮ ﺗﻘﺮﻳ ﹰﺒﺎ ،ﻗﺪ ﻳﺨﺘﻠﻒ ﺗﻜﺮﺍﺭ ﺍﻟﺘﻨﺒﻴﻪ ﻭﻓﻘﹰ ﺎ ﻟﻌﺪﺩ ﻣﺮﺍﺕ ﺍﺳﺘﺨﺪﺍﻡ ﺍﻟﻐﺴﺎﻟﺔ.
_٣٠ﺗﻨﻈﻴﻒ ﺍﻟﻐﺴﺎﻟﺔ ﻭﺻﻴﺎﻧﺘﻬﺎ
2/14/2011 11:03:08 AM
WF9854LWN-02713K_AR_v1.indd Sec6:30
ﺗﺼﺮﻳﻒ ﺍﳌﺎﺀ ﻣﻦ ﺍﻟﻐﺴﺎﻟﺔ ﻋﻨﺪ ﺍﻟﻄﻮﺍﺭﺉ
.١ﻗﻢ ﺑﻔﺼﻞ ﺍﻟﻐﺴﺎﻟﺔ ﻣﻦ ﻣﺼﺪﺭ ﺍﻟﻄﺎﻗﺔ.
.٢ﺍﻓﺘﺢ ﻏﻄﺎﺀ ﺍﳌﺼﻔﺎﺓ ﺑﺎﺳﺘﺨﺪﺍﻡ ﻋﻤﻠﺔ ﻣﻌﺪﻧﻴﺔ ﺃﻭ ﻣﻔﺘﺎﺡ.
٠٣ﺍﻟﺘﻨﻈﻴﻒ ﻭﺍﻟﺼﻴﺎﻧﺔ
ﻏﻄﺎﺀ ﺍﳌﺼﻔﺎﺓ
.٣ﻓﻚ ﻏﻄﺎﺀ ﺍﻟﺘﺼﺮﻳﻒ ﻋﻨﺪ ﺍﻟﻄﻮﺍﺭﺉ ﻋﻦ ﻃﺮﻳﻖ ﻟﻔﻪ ﻟﻠﻴﺴﺎﺭ.
ﻏﻄﺎﺀ ﺗﺼﺮﻳﻒ ﺍﻟﻄﻮﺍﺭﺉ
.٤
.٥
.٦
.٧
ﺃﻣﺴﻚ ﺍﻟﻐﻄﺎﺀ ﻣﻦ ﻧﻬﺎﻳﺔ ﺃﻧﺒﻮﺏ ﺍﻟﺘﺼﺮﻳﻒ ﻋﻨﺪ ﺍﻟﻄﻮﺍﺭﺉ ﻭﺍﺟﺬﺑﻪ ﺑﺒﻂﺀ ﻣﺴﺎﻓﺔ ﺣﻮﺍﻟﻲ
١٥ﺳﻢ.
ﺍﺳﻤﺢ ﺑﺘﺪﻓﻖ ﺍﳌﺎﺀ ﺑﺄﻛﻤﻠﻪ ﻓﻲ ﻭﻋﺎﺀ.
ﺃﻋﺪ ﺇﺩﺧﺎﻝ ﺃﻧﺒﻮﺏ ﺍﻟﺘﺼﺮﻳﻒ ﻭﺛﺒﺖ ﺍﻟﻐﻄﺎﺀ ﻣﺮﺓ ﺃﺧﺮﻯ.
ﺃﻋﺪ ﻏﻄﺎﺀ ﺍﳌﺼﻔﺎﺓ ﺇﻟﻰ ﻣﻜﺎﻧﻪ.
ﺃﻧﺒﻮﺏ ﺗﺼﺮﻳﻒ
ﺍﻟﻄﻮﺍﺭﺉ
ﺗﻨﻈﻴﻒ ﺍﻷﺳﻄﺢ ﺍﳋﺎﺭﺟﻴﺔ
.١ﺍﻣﺴﺢ ﺍﻷﺳﻄﺢ ﺍﳋﺎﺭﺟﻴﺔ ﻟﻠﻐﺴﺎﻟﺔ ،ﲟﺎ ﻓﻲ ﺫﻟﻚ ﻟﻮﺣﺔ ﺍﻟﺘﺤﻜﻢ ﺑﻘﻄﻌﺔ ﻣﻦ ﺍﻟﻘﻤﺎﺵ ﺍﻟﻨﺎﻋﻢ ﻭﻣﺴﺤﻮﻕ ﺗﻨﻈﻴﻒ ﻣﻨﺰﻟﻲ ﻏﻴﺮ ﺧﺎﺩﺵ.
.٢ﺍﺳﺘﺨﺪﻡ ﻗﻄﻌﺔ ﻣﻦ ﺍﻟﻘﻤﺎﺵ ﺍﻟﻨﺎﻋﻢ ﻟﺘﺠﻔﻴﻒ ﺍﻷﺳﻄﺢ ﺍﳋﺎﺭﺟﻴﺔ.
.٣ﻻ ﺗﺼﺐ ﺍﳌﺎﺀ ﻋﻠﻰ ﺍﻟﻐﺴﺎﻟﺔ.
ﺗﻨﻈﻴﻒ ﺍﻟﻐﺴﺎﻟﺔ ﻭﺻﻴﺎﻧﺘﻬﺎ _٣١
2/14/2011 11:03:09 AM
WF9854LWN-02713K_AR_v1.indd Sec6:31
ﺗﻨﻈﻴﻒ ﺍﻟﻐﺴﺎﻟﺔ ﻭﺻﻴﺎﻧﺘﻬﺎ
ﺗﻨﻈﻴﻒ ﺩﺭﺝ ﻣﺴﺤﻮﻕ ﺍﻟﻐﺴﻴﻞ ﻭﺍﳉﺰﺀ ﺍﻟﺪﺍﺧﻠﻲ ﻣﻨﻪ
.١ﺍﺿﻐﻂ ﻋﻠﻰ ﺫﺭﺍﻉ ﺍﻹﻃﻼﻕ ﺍﳌﻮﺟﻮﺩ ﺩﺍﺧﻞ ﺩﺭﺝ ﻣﺴﺤﻮﻕ ﺍﻟﻐﺴﻴﻞ
ﻭﺍﺳﺤﺒﻪ ﺇﻟﻰ ﺍﳋﺎﺭﺝ.
.٢ﻗﻢ ﺑﺈﺯﺍﻟﺔ ﻏﻄﺎﺀ ﺍﻟﺸﻄﻒ ﻣﻦ ﺍﻟﺪﺭﺝ ﺍﺼﺺ ﻟﻠﻤﺴﺤﻮﻕ.
ﺫﺭﺍﻉ ﺍﻹﻃﻼﻕ
.٣ﺍﻏﺴﻞ ﻛﺎﻓﺔ ﺍﻷﺟﺰﺍﺀ ﺑﺎﳌﺎﺀ ﺍﳉﺎﺭﻱ.
.٤
.٥
.٦
.٧
ﻧﻈﻒ ﺍﳉﺰﺀ ﺍﻟﺪﺍﺧﻠﻲ ﻟﻠﺪﺭﺝ ﺑﺎﺳﺘﺨﺪﺍﻡ ﻓﺮﺷﺎﺓ ﺃﺳﻨﺎﻥ ﻗﺪﳝﺔ.
ﺿﻊ ﻣﻮﺯﹼﻉ ﺍﳌﺴﺤﻮﻕ ﺍﻟﺴﺎﺋﻞ ﻓﻲ ﻣﻜﺎﻧﻪ ﻋﻦ ﻃﺮﻳﻖ ﺩﻓﻌﻪ ﺑﺈﺣﻜﺎﻡ ﺩﺍﺧﻞ ﺍﻟﺪﺭﺝ.
ﺃﻋﺪ ﺍﻟﺪﺭﺝ ﺇﻟﻰ ﻣﻜﺎﻧﻪ.
ﻗﻢ ﺑﺘﺸﻐﻴﻞ ﺩﻭﺭﺓ ﺍﻟﺸﻄﻒ ﺩﻭﻥ ﻭﺟﻮﺩ ﺃﻱ ﻏﺴﻴﻞ ﻓﻲ ﺍﳊﺎﻭﻳﺔ ﻹﺯﺍﻟﺔ ﺃﻱ ﻣﺴﺤﻮﻕ ﻣﺘﺒﻖ.
_٣٢ﺗﻨﻈﻴﻒ ﺍﻟﻐﺴﺎﻟﺔ ﻭﺻﻴﺎﻧﺘﻬﺎ
2/14/2011 11:03:09 AM
WF9854LWN-02713K_AR_v1.indd Sec6:32
ﺗﻨﻈﻴﻒ ﻣﺼﻔﺎﺓ ﺍﻠﻔﺎﺕ
ﻧﻮﺻﻲ ﺑﺘﻨﻈﻴﻒ ﻣﺼﻔﺎﺓ ﺍﻠﻔﺎﺕ ٥ﺃﻭ ٦ﻣﺮﺍﺕ ﻓﻲ ﺍﻟﻌﺎﻡ ﺃﻭ ﻋﻨﺪ ﻋﺮﺽ ﺭﺳﺎﻟﺔ ﺍﳋﻄﺄ "."5E
)ﺭﺍﺟﻊ "ﺗﺼﺮﻳﻒ ﺍﳌﺎﺀ ﻣﻦ ﺍﻟﻐﺴﺎﻟﺔ ﻋﻨﺪ ﺍﻟﻄﻮﺍﺭﺉ" ﻓﻲ ﺍﻟﺼﻔﺤﺔ ﺍﻟﺴﺎﺑﻘﺔ(.
.١ﺍﻓﺘﺢ ﻏﻄﺎﺀ ﺍﳌﺼﻔﺎﺓ ﺑﺎﺳﺘﺨﺪﺍﻡ ﻣﻔﺘﺎﺡ ﺃﻭ ﻗﻄﻌﺔ ﻣﻌﺪﻧﻴﺔ.
.٢ﺃﺭﺥ ﻏﻄﺎﺀ ﺍﻟﺘﺼﺮﻳﻒ ﻋﻨﺪ ﺍﻟﻄﻮﺍﺭﺉ ﺑﻠﻔﻪ ﺇﻟﻰ ﺍﻟﻴﺴﺎﺭ ﻟﺼﺮﻑ ﺍﳌﺎﺀ ﻣﻦ ﺍﻟﻐﺴﺎﻟﺔ.
.٣ﻓﻚ ﻏﻄﺎﺀ ﻣﺼﻔﺎﺓ ﺍﻠﻔﺎﺕ.
.٤ﺍﻏﺴﻞ ﺃﻱ ﺃﻭﺳﺎﺥ ﺃﻭ ﺃﻱ ﻣﻮﺍﺩ ﺃﺧﺮﻯ ﻋﺎﻟﻘﺔ ﻓﻲ ﻣﺼﻔﺎﺓ ﺍﻠﻔﺎﺕ .ﺗﺄﻛﺪ ﻣﻦ ﺃﻥ ﻣﺮﻭﺣﺔ
ﻣﻀﺨﺔ ﺍﻟﺘﺼﺮﻳﻒ ﺍﳌﻮﺟﻮﺩﺓ ﺧﻠﻒ ﻣﺼﻔﺎﺓ ﺍﻠﻔﺎﺕ ﻏﻴﺮ ﻣﺴﺪﻭﺩﺓ.
.٥ﺿﻊ ﻏﻄﺎﺀ ﻣﺼﻔﺎﺓ ﺍﻠﻔﺎﺕ ﻓﻲ ﻣﻜﺎﻧﻪ.
.٦ﺿﻊ ﻏﻄﺎﺀ ﺍﳌﺼﻔﺎﺓ ﻓﻲ ﻣﻜﺎﻧﻪ.
٠٣ﺍﻟﺘﻨﻈﻴﻒ ﻭﺍﻟﺼﻴﺎﻧﺔ
ﻏﻄﺎﺀ ﻣﺼﻔﺎﺓ ﺍﻠﻔﺎﺕ
ﺗﻨﻈﻴﻒ ﺍﳌﺼﻔﺎﺓ ﺍﻟﺸﺒﻜﻴﺔ ﺍﳌﺘﺼﻠﺔ ﺑﺨﺮﻃﻮﻡ ﺍﳌﺎﺀ
ﻳﺠﺐ ﺗﻨﻈﻴﻒ ﺍﳌﺼﻔﺎﺓ ﺍﻟﺸﺒﻜﻴﺔ ﺍﳌﺘﺼﻠﺔ ﺑﺨﺮﻃﻮﻡ ﺍﳌﺎﺀ ﻣﺮﺓ ﻛﻞ ﻋﺎﻡ ﻋﻠﻰ ﺍﻷﻗﻞ ،ﺃﻭ ﻋﻨﺪ ﻇﻬﻮﺭ ﺭﺳﺎﻟﺔ ﺍﳋﻄﺄ ":"4E
.١
.٢
.٣
.٤
.٥
.٦
ﻗﻢ ﺑﺈﻳﻘﺎﻑ ﺗﺸﻐﻴﻞ ﻣﺼﺪﺭ ﺗﻮﺭﻳﺪ ﺍﳌﺎﺀ ﺇﻟﻰ ﺍﻟﻐﺴﺎﻟﺔ.
ﻓﻚ ﺍﳋﺮﻃﻮﻡ ﻣﻦ ﺍﳉﺎﻧﺐ ﺍﳋﻠﻔﻲ ﻟﻠﻐﺴﺎﻟﺔ .ﻗﻢ ﺑﺘﻐﻄﻴﺔ ﺍﳋﺮﻃﻮﻡ ﺑﻘﻄﻌﺔ ﻣﻦ ﺍﻟﻘﻤﺎﺵ ،ﳌﻨﻊ ﺗﺪﻓﻖ ﺍﳌﺎﺀ ﺑﺴﺒﺐ ﺍﻟﻀﻐﻂ ﺍﻟﻌﺎﻟﻲ ﻓﻲ
ﺍﳋﺮﻃﻮﻡ.
ﺃﻳﻀﺎ
ﺍﺳﺤﺐ ﺍﳌﺼﻔﺎﺓ ﺍﻟﺸﺒﻜﻴﺔ ﺇﻟﻰ ﺍﳋﺎﺭﺝ ﻣﻦ ﻃﺮﻑ ﺍﳋﺮﻃﻮﻡ ﺑﻠﻄﻒ ﺑﺎﺳﺘﺨﺪﺍﻡ ﺯﺭﺩﻳﺔ ﻭﺍﺷﻄﻔﻬﺎ ﺑﺎﳌﺎﺀ ﺣﺘﻰ ﺗﺼﺒﺢ ﻧﻈﻴﻔﺔ .ﻧﻈﻒ ﹰ
ﺍﳉﺰﺃﻳﻦ ﺍﻟﺪﺍﺧﻠﻲ ﻭﺍﳋﺎﺭﺟﻲ ﻟﻠﻮﺻﻠﺔ ﺍﳌﻠﻔﻮﻓﺔ.
ﺃﻋﺪ ﺍﳌﺼﻔﺎﺓ ﺇﻟﻰ ﻣﻜﺎﻧﻬﺎ.
ﺛﺒﺖ ﺍﳋﺮﻃﻮﻡ ﺑﺎﻟﻐﺴﺎﻟﺔ ﻣﺮﺓ ﺃﺧﺮﻯ.
ﺗﺄﻛﺪ ﺃﻥ ﺍﻟﻮﺻﻼﺕ ﻣﺤﻜﻤﺔ ﺿﺪ ﺍﳌﺎﺀ ﻭﻗﻢ ﺑﺘﺸﻐﻴﻞ ﺍﻟﺼﻨﺒﻮﺭ.
ﺇﺻﻼﺡ ﻏﺴﺎﻟﺔ ﻣﺘﺠﻤﺪﺓ
ﺇﺫﺍ ﺍﻧﺨﻔﻀﺖ ﺩﺭﺟﺔ ﺍﳊﺮﺍﺭﺓ ﺇﻟﻰ ﺃﻗﻞ ﻣﻦ ﺩﺭﺟﺔ ﺍﻟﺘﺠﻤﺪ ﻭﲡﻤﺪﺕ ﺍﻟﻐﺴﺎﻟﺔ:
.١
.٢
.٣
.٤
.٥
ﺍﻓﺼﻞ ﺍﻟﻐﺴﺎﻟﺔ ﻣﻦ ﻣﺼﺪﺭ ﺍﻟﺘﻴﺎﺭ ﺍﻟﻜﻬﺮﺑﻲ.
ﺻﺐ ﺍﳌﺎﺀ ﺍﻟﺪﺍﻓﺊ ﻋﻠﻰ ﺻﻨﺒﻮﺭ ﺍﳌﺎﺀ ﻟﻔﻚ ﺧﺮﻃﻮﻡ ﺗﻮﺭﻳﺪ ﺍﳌﺎﺀ.
ﻗﻢ ﺑﺈﺯﺍﻟﺔ ﺧﺮﻃﻮﻡ ﺗﻮﺭﻳﺪ ﺍﳌﺎﺀ ﻭﺍﻧﻘﻌﻪ ﻓﻲ ﺍﳌﺎﺀ ﺍﻟﺪﺍﻓﺊ.
ﺻﺐ ﺍﳌﺎﺀ ﺍﻟﺪﺍﻓﺊ ﻓﻲ ﺣﺎﻭﻳﺔ ﺍﻟﻐﺴﺎﻟﺔ ﻭﺍﺗﺮﻛﻪ ﳌﺪﺓ ١٠ﺩﻗﺎﺋﻖ.
ﺃﻋﺪ ﺗﻮﺻﻴﻞ ﺧﺮﻃﻮﻡ ﺗﻮﺭﻳﺪ ﺍﳌﺎﺀ ﺇﻟﻰ ﺻﻨﺒﻮﺭ ﺍﳌﺎﺀ ﻭﺗﺄﻛﺪ ﻣﻦ ﺃﻥ ﺗﻮﺭﻳﺪ ﺍﳌﺎﺀ ﻭﺍﻟﺘﺼﺮﻳﻒ ﻳﺘﻢ ﻛﻤﺎ ﻳﻨﺒﻐﻲ.
ﺗﺨﺰﻳﻦ ﺍﻟﻐﺴﺎﻟﺔ
ﺇﺫﺍ ﻛﻨﺖ ﺑﺤﺎﺟﺔ ﺇﻟﻰ ﺗﺨﺰﻳﻦ ﺍﻟﻐﺴﺎﻟﺔ ﳌﺪﺓ ﻃﻮﻳﻠﺔ ،ﻓﻤﻦ ﺍﳌﺴﺘﺤﺴﻦ ﺗﺼﺮﻳﻒ ﺍﳌﺎﺀ ﻣﻨﻬﺎ ﻭﻓﺼﻠﻬﺎ .ﻗﺪ ﺗﺘﻠﻒ ﺍﻟﻐﺴﺎﻟﺔ ﻓﻲ ﺣﺎﻟﺔ ﺗﺮﻙ ﻣﺎﺀ ﻓﻲ ﺍﳋﺮﺍﻃﻴﻢ
ﻭﺍﳌﻜﻮﻧﺎﺕ ﺍﻟﺪﺍﺧﻠﻴﺔ ﻗﺒﻞ ﺍﻟﺘﺨﺰﻳﻦ.
.١ﺍﺧﺘﺮ ﺍﻟﺪﻭﺭﺓ ') Quick 29ﺳﺮﻳﻊ ' (٢٩ﺛﻢ ﻗﻢ ﺑﺈﺿﺎﻓﺔ ﻣﺎﺩﺓ ﺗﺒﻴﻴﺾ ﻓﻲ ﺍﳊﺠﻴﺮﺓ ﺍﳋﺎﺻﺔ ﲟﺎﺩﺓ ﺍﻟﺘﺒﻴﻴﺾ .ﻗﻢ ﺑﺘﺸﻐﻴﻞ ﺍﻟﻐﺴﺎﻟﺔ ﻣﻦ ﺧﻼﻝ
ﺍﻟﺪﻭﺭﺓ ﺩﻭﻥ ﻭﺟﻮﺩ ﻣﻼﺑﺲ ﺑﻬﺎ.
.٢ﻗﻢ ﺑﻐﻠﻖ ﺻﻨﺎﺑﻴﺮ ﺍﳌﺎﺀ ﻭﺍﻓﺼﻞ ﺧﺮﺍﻃﻴﻢ ﺗﻮﺭﻳﺪ ﺍﳌﺎﺀ.
.٣ﻗﻢ ﺑﻔﺼﻞ ﺍﻟﻐﺴﺎﻟﺔ ﻋﻦ ﻣﺄﺧﺬ ﺍﻟﺘﻴﺎﺭ ﺍﻟﻜﻬﺮﺑﻲ ،ﻭﺍﺗﺮﻙ ﺑﺎﺏ ﺍﻟﻐﺴﺎﻟﺔ ﻣﻔﺘﻮ ﹰﺣﺎ ﻟﻠﺴﻤﺎﺡ ﺑﺪﺧﻮﻝ ﺍﻟﻬﻮﺍﺀ ﺩﺍﺧﻞ ﺍﳊﺎﻭﻳﺔ.
ﻓﻲ ﺣﺎﻟﺔ ﻗﻴﺎﻣﻚ ﺑﺘﺨﺰﻳﻦ ﺍﻟﻐﺴﺎﻟﺔ ﻓﻲ ﺩﺭﺟﺎﺕ ﺣﺮﺍﺭﺓ ﲢﺖ ﺩﺭﺟﺎﺕ ﺍﻟﺘﺠﻤﺪ ،ﺍﺗﺮﻙ ﻓﺮﺻﺔ ﳋﺮﻭﺝ ﺍﳌﺎﺀ ﺍﳌﺘﺒﻘﻲ ﻓﻲ ﺍﻟﻐﺴﺎﻟﺔ ﻗﺒﻞ
ﺍﺳﺘﺨﺪﺍﻣﻬﺎ.
ﺗﻨﻈﻴﻒ ﺍﻟﻐﺴﺎﻟﺔ ﻭﺻﻴﺎﻧﺘﻬﺎ _٣٣
2/14/2011 11:03:09 AM
WF9854LWN-02713K_AR_v1.indd Sec6:33
ﺍﺳﺘﻜﺸﺎﻑ ﺍﳌﺸﺎﻛﻞ ﻭﺣﻠﻬﺎ ﻭﺭﻣﻮﺯ
ﺍﳌﻌﻠﻮﻣﺎﺕ
ﲢﻘﻖ ﳑﺎ ﻳﻠﻲ ﺇﺫﺍ ﻛﺎﻧﺖ ﺍﻟﻐﺴﺎﻟﺔ...
ﺍﳌﺸﻜﻠﺔ
ﺍﳊﻞ
ﺍﻟﻐﺴﺎﻟﺔ ﻻ ﺗﻌﻤﻞ
•
•
•
•
ﺗﺄﻛﺪ ﻣﻦ ﺗﻮﺻﻴﻞ ﻗﺎﺑﺲ ﺍﻟﻐﺴﺎﻟﺔ ﲟﺼﺪﺭ ﺍﻟﺘﻴﺎﺭ ﺍﻟﻜﻬﺮﺑﺎﺋﻲ.
ﺗﺄﻛﺪ ﻣﻦ ﺇﻏﻼﻕ ﺍﻟﺒﺎﺏ ﺑﺈﺣﻜﺎﻡ.
ﺗﺄﻛﺪ ﻣﻦ ﻓﺘﺢ ﺻﻨﺒﻮﺭ )ﺻﻨﺎﺑﻴﺮ( ﻣﺼﺪﺭ ﺍﳌﺎﺀ.
ﺗﺄﻛﺪ ﻣﻦ ﺍﻟﻀﻐﻂ ﻋﻠﻰ ﺍﻟﺰﺭ ) Start/Pauseﺗﺸﻐﻴﻞ/ﺇﻳﻘﺎﻑ ﻣﺆﻗﺖ(.
ﻛﺎﻑ
ﻋﺪﻡ ﻭﺟﻮﺩ ﻣﺎﺀ ﺃﻭ ﻋﺪﻡ ﻭﺟﻮﺩ ﻣﺎﺀ ﹴ
•
•
•
•
ﲤﺎﻣﺎ.
ﺍﻓﺘﺢ ﺍﻟﺼﻨﺒﻮﺭ ﹰ
ﺗﺄﻛﺪ ﻣﻦ ﺃﻥ ﺧﺮﻃﻮﻡ ﺗﻮﺭﻳﺪ ﺍﳌﺎﺀ ﻏﻴﺮ ﻣﺘﺠﻤﺪ.
ﻓﻚ ﺛﻨﻴﺎﺕ ﺧﺮﺍﻃﻴﻢ ﺗﻮﺭﻳﺪ ﺍﳌﺎﺀ.
ﻧﻈﻒ ﺍﳌﺼﻔﺎﺓ ﺍﳌﻮﺟﻮﺩﺓ ﻋﻠﻰ ﺧﺮﻃﻮﻡ ﺗﻮﺭﻳﺪ ﺍﳌﺎﺀ.
ﻫﻞ ﻳﻮﺟﺪ ﻣﺴﺤﻮﻕ ﻏﺴﻴﻞ ﻓﻲ ﺍﻟﺪﺭﺝ
ﺑﻌﺪ ﺍﻛﺘﻤﺎﻝ ﺩﻭﺭﺓ ﺍﻟﻐﺴﻴﻞ
•
•
ﻛﺎﻑ.
ﺗﺄﻛﺪ ﻣﻦ ﺗﺸﻐﻴﻞ ﺍﻟﻐﺴﺎﻟﺔ ﺑﻀﻐﻂ ﻣﺎﺀ ﹴ
ﺗﺄﻛﺪ ﻣﻦ ﺇﺿﺎﻓﺔ ﻣﺴﺤﻮﻕ ﺍﻟﻐﺴﻴﻞ ﻓﻲ ﻣﻨﺘﺼﻒ ﺩﺭﺝ ﺍﳌﺴﺤﻮﻕ.
ﻣﺮﺗﻔﻌﺎ
ﺗﻬﺘﺰ ﺍﻟﻐﺴﺎﻟﺔ ﺃﻭ ﲢﺪﺙ ﺻﻮﺗﹰﺎ
ﹰ
•
ﺗﺄﻛﺪ ﻣﻦ ﺗﺮﻛﻴﺐ ﺍﻟﻐﺴﺎﻟﺔ ﻋﻠﻰ ﺳﻄﺢ ﻣﺴﺘﻮ .ﺇﺫﺍ ﻛﺎﻧﺖ ﺍﻷﺭﺽ ﻏﻴﺮ ﻣﺴﻄﺤﺔ ،ﺍﺿﺒﻂ ﺃﻗﺪﺍﻡ
ﺍﻟﻐﺴﺎﻟﺔ ﺣﺘﻰ ﺗﺴﺘﻘﺮ ﻋﻠﻰ ﺍﻷﺭﺿﻴﺔ.
ﺗﺄﻛﺪ ﻣﻦ ﻓﻚ ﻣﺴﺎﻣﻴﺮ ﺍﻟﺸﺤﻦ.
ﺗﺄﻛﺪ ﻣﻦ ﻋﺪﻡ ﻣﻼﻣﺴﺔ ﺍﻟﻐﺴﺎﻟﺔ ﻷﻱ ﺷﻲﺀ ﺁﺧﺮ.
ﺗﺄﻛﺪ ﻣﻦ ﺗﻮﺯﻳﻊ ﻭﺯﻥ ﺍﳌﻼﺑﺲ ﺍﳌﻮﺟﻮﺩﺓ ﻓﻲ ﺍﻟﻐﺴﺎﻟﺔ.
ﻻ ﻳﺘﻢ ﺗﺼﺮﻳﻒ ﺍﳌﺎﺀ ﻣﻦ ﺍﻟﻐﺴﺎﻟﺔ ﻭ/ﺃﻭ ﻻ
ﺗﻘﻢ ﺑﻌﻤﻠﻴﺔ ﺍﻟﺘﻨﺸﻴﻒ
•
•
ﻓﻚ ﺍﻟﺜﻨﻴﺎﺕ ﺍﳌﻮﺟﻮﺩﺓ ﻓﻲ ﺧﺮﻃﻮﻡ ﺍﻟﺘﺼﺮﻳﻒ .ﻗﻠﻞ ﻣﻦ ﺍﺳﺘﺨﺪﺍﻡ ﺍﳋﺮﺍﻃﻴﻢ ﺍﳌﻠﺘﻮﻳﺔ.
ﺗﺄﻛﺪ ﻣﻦ ﺃﻥ ﺍﳌﺼﻔﺎﺓ ﺍﻟﺸﺒﻜﻴﺔ ﺍﳌﺘﺼﻠﺔ ﺑﺨﺮﻃﻮﻡ ﺍﳌﺎﺀ ﻏﻴﺮ ﻣﺴﺪﻭﺩﺓ.
ﺍﻟﺒﺎﺏ ﻣﻐﻠﻖ ﻭﻻ ﳝﻜﻦ ﻓﺘﺤﻪ.
•
ﻻ ﳝﻜﻦ ﻓﺘﺢ ﺍﻟﺒﺎﺏ ﺇﻻ ﺑﻌﺪ ﻣﺮﻭﺭ ٣ﺩﻗﺎﺋﻖ ﻋﻠﻰ ﺗﻮﻗﻒ ﺍﻟﻐﺴﺎﻟﺔ ﻋﻦ ﺍﻟﻌﻤﻞ ﺃﻭ ﻓﺼﻞ ﺍﻟﺘﻴﺎﺭ ﺍﻟﻜﻬﺮﺑﻲ.
•
•
•
ﻓﻲ ﺣﺎﻟﺔ ﺍﺳﺘﻤﺮﺍﺭ ﺍﳌﺸﻜﻠﺔ ،ﺍﺗﺼﻞ ﲟﺮﻛﺰ ﺧﺪﻣﺔ ﻋﻤﻼﺀ Samsungﺍﶈﻠﻲ.
_٣٤ﺍﺳﺘﻜﺸﺎﻑ ﺍﳌﺸﺎﻛﻞ ﻭﺣﻠﻬﺎ ﻭﺭﻣﻮﺯ ﺍﳌﻌﻠﻮﻣﺎﺕ
2/14/2011 11:03:10 AM
WF9854LWN-02713K_AR_v1.indd Sec10:34
ﺭﻣﻮﺯ ﺍﳌﻌﻠﻮﻣﺎﺕ
ﺍﳊﻞ
ﺭﻣﺰ ﺍﻟﻜﻮﺩ
dE
•
ﺃﻏﻠﻖ ﺍﻟﺒﺎﺏ.
4E
•
•
ﺗﺄﻛﺪ ﺃﻥ ﺻﻨﺒﻮﺭ ﺗﻮﺭﻳﺪ ﺍﳌﺎﺀ ﻣﻔﺘﻮﺡ.
ﺗﺄﻛﺪ ﻣﻦ ﺿﻐﻂ ﺍﳌﺎﺀ.
5E
•
•
ﻧﻈﻒ ﻣﺼﻔﺎﺓ ﺍﻠﻔﺎﺕ.
ﺗﺄﻛﺪ ﻣﻦ ﺗﺮﻛﻴﺐ ﺧﺮﻃﻮﻡ ﺗﺼﺮﻳﻒ ﺍﳌﺎﺀ ﺑﻄﺮﻳﻘﺔ ﺻﺤﻴﺤﺔ.
•
ﻭﺯﻥ ﺍﳌﻼﺑﺲ ﻏﻴﺮ ﻣﻮﺯﹼﻉ .ﻗﻢ ﺑﺈﻋﺎﺩﺓ ﺗﻮﺯﻳﻊ ﺍﳌﻼﺑﺲ .ﻓﻲ ﺣﺎﻟﺔ ﻏﺴﻞ ﻗﻄﻌﺔ ﻭﺍﺣﺪﺓ ﻣﻦ ﺍﳌﻼﺑﺲ ،ﻣﺜﻞ ﺑﺮﻧﺲ
ﺣﻤﺎﻡ ﺃﻭ ﺟﻴﻨﺰ ،ﻗﺪ ﻻ ﺗﻜﻮﻥ ﻧﺘﻴﺠﺔ ﺍﻟﺘﺠﻔﻴﻒ ﺍﻟﻨﻬﺎﺋﻲ ﻣﺮﺿﻴﺔ ،ﻭﺗﻈﻬﺮ ﺭﺳﺎﻟﺔ ﺧﻄﺄ " "UEﻓﻲ ﺇﻃﺎﺭ
ﺍﻟﻌﺮﺽ.
•
ﺍﺗﺼﻞ ﲟﺮﻛﺰ ﺧﺪﻣﺔ ﻣﺎ ﺑﻌﺪ ﺍﻟﺒﻴﻊ.
UE
cE/3E
٠٤ﺍﺳﺘﻜﺸﺎﻑ ﺍﳌﺸﺎﻛﻞ ﻭﺣﻠﻬﺎ
ﻓﻲ ﺣﺎﻟﺔ ﺗﻌﺮﺽ ﺍﻟﻐﺴﺎﻟﺔ ﻷﻋﻄﺎﻝ ،ﻗﺪ ﻳﻈﻬﺮ ﺃﺣﺪ ﺭﻣﻮﺯ ﺍﳌﻌﻠﻮﻣﺎﺕ ﻋﻠﻰ ﻟﻮﺣﺔ ﺍﻟﻌﺮﺽ .ﻓﻲ ﺣﺎﻟﺔ ﺣﺪﻭﺙ ﺫﻟﻚ ،ﺍﻟﺮﺟﺎﺀ ﺍﻟﺘﺤﻘﻖ ﻣﻦ ﻫﺬﺍ ﺍﳉﺪﻭﻝ ﻭﻣﺤﺎﻭﻟﺔ ﺇﺟﺮﺍﺀ
ﺍﳊﻠﻮﻝ ﺍﳌﻘﺘﺮﺣﺔ ﻗﺒﻞ ﺍﻻﺗﺼﺎﻝ ﺑﺨﺪﻣﺔ ﺍﻟﻌﻤﻼﺀ.
ﺑﺎﻟﻨﺴﺒﺔ ﻟﻠﺮﻣﻮﺯ ﺍﻟﺘﻲ ﻟﻢ ﺗﺬﻛﺮ ﺃﻋﻼﻩ ،ﺃﻭ ﻓﻲ ﺣﺎﻟﺔ ﻋﺪﻡ ﻣﺴﺎﻫﻤﺔ ﺍﳊﻞ ﺍﳌﻘﺘﺮﺡ ﻓﻲ ﺣﻞ ﺍﳌﺸﻜﻠﺔ ،ﺍﺗﺼﻞ ﲟﺮﻛﺰ ﺧﺪﻣﺔ Samsungﺃﻭ ﺍﳌﻮﺯﹼﻉ ﺍﶈﻠﻲ ﺍﳌﻌﺘﻤﺪ ﺍﻟﺘﺎﺑﻊ
ﻟـ .Samsung
ﺍﺳﺘﻜﺸﺎﻑ ﺍﳌﺸﺎﻛﻞ ﻭﺣﻠﻬﺎ ﻭﺭﻣﻮﺯ ﺍﳌﻌﻠﻮﻣﺎﺕ _٣٥
2/14/2011 11:03:10 AM
WF9854LWN-02713K_AR_v1.indd Sec10:35
ﺟﺪﻭﻝ ﺍﻟﺪﻭﺭﺍﺕ
ﺟﺪﻭﻝ ﺍﻟﺪﻭﺭﺍﺕ
) ﺧﻴﺎﺭ ﺍﳌﺴﺘﺨﺪﻡ(
ﻣﺴﺤﻮﻕ ﺍﻟﻐﺴﻴﻞ
ﺃﻗﺼﻰ ﻭﺯﻥ )ﻛﺠﻢ(
ﺍﻟﺒﺮﻧﺎﻣﺞ
WF9854/
WF9852/
WF9850
ﻏﺴﻞ ﺃﻭﻟﻲ
ﻏﺴﻞ
ﻣﻨﻌﻢ ﺍﻷﻗﻤﺸﺔ
ﺩﺭﺟﺔ ﺍﳊﺮﺍﺭﺓ ﺍﻟﻘﺼﻮﻯ
)ﺩﺭﺟﺔ ﺳﻴﻠﻴﺰﻳﺔ(
) Cottonﻗﻄﻦ(
٨٫٥
ﻧﻌﻢ
٩٥
Synthetics
)ﺃﻟﻴﺎﻑ ﺍﻟﺼﻨﺎﻋﻴﺔ(
٣٫٠
ﻧﻌﻢ
٦٠
) Denimﺍﳉﻴﻨﺰ(
٣٫٠
ﻧﻌﻢ
٦٠
Sports Wear
)ﻣﻼﺑﺲ ﺭﻳﺎﺿﻴﺔ(
٢٫٥
ﻧﻌﻢ
٦٠
) Delicatesﺃﻧﺴﺠﺔ ﺭﻗﻴﻘﺔ(
٢٫٥
-
ﻧﻌﻢ
-
٤٠
) Woolﺻﻮﻑ(
٢٫٠
-
ﻧﻌﻢ
-
٤٠
) Handwashﻏﺴﻞ ﻳﺪﻭﻱ(
٢٫٠
-
ﻧﻌﻢ
٤٠
) Water Savingﺗﻮﻓﻴﺮ ﺍﳌﺎﺀ(
٨٫٥
ﻧﻌﻢ
٤٠
Dark Garment
)ﻣﻼﺑﺲ ﺩﺍﻛﻨﺔ(
٤٫٠
ﻧﻌﻢ
٤٠
) Daily Washﻏﺴﻞ ﻳﻮﻣﻲ(
٤٫٠
ﻧﻌﻢ
٦٠
') Quick 29ﺳﺮﻳﻊ '(٢٩
٣٫٠
-
ﻧﻌﻢ
٦٠
Eco Drum Clean
)ﺗﻨﻈﻴﻒ ﺍﳊﺎﻭﻳﺔ ﺻﺪﻳﻖ ﺍﻟﺒﻴﺌﺔ(
-
-
-
-
-
) Delay Endﺗﺄﺟﻴﻞ ﺍﻟﺘﻮﻗﻒ(
ﻣﺪﺓ ﺍﻟﺪﻭﺭﺓ
)ﺩﻗﻴﻘﺔ(
١٢٠
٩٠
ﻋﺪﺩ ﺍﻟﺪﻭﺭﺍﺕ ﻓﻲ ﺍﻟﺪﻗﻴﻘﺔ ﻟﺴﺮﻋﺔ ﺍﻟﺘﻨﺸﻴﻒ )ﺍﻟﻘﺼﻮﻯ(
ﺍﻟﺒﺮﻧﺎﻣﺞ
WF9854
WF9852
WF9850
) Cottonﻗﻄﻦ(
١٤٠٠
١٢٠٠
١٠٠٠
Synthetics
)ﺃﻟﻴﺎﻑ ﺍﻟﺼﻨﺎﻋﻴﺔ(
١٢٠٠
١٢٠٠
١٢٠٠
) Denimﺍﳉﻴﻨﺰ(
٨٠٠
٨٠٠
٨٠٠
٧٨
Sports Wear
)ﻣﻼﺑﺲ ﺭﻳﺎﺿﻴﺔ(
١٢٠٠
١٢٠٠
١٢٠٠
٧٣
) Delicatesﺃﻧﺴﺠﺔ ﺭﻗﻴﻘﺔ(
٨٠٠
٨٠٠
٨٠٠
٥٠
) Woolﺻﻮﻑ(
٨٠٠
٨٠٠
٨٠٠
٣٨
) Handwashﻏﺴﻞ ﻳﺪﻭﻱ(
٤٠٠
٤٠٠
٤٠٠
٣١
) Water Savingﺗﻮﻓﻴﺮ ﺍﳌﺎﺀ(
١٤٠٠
١٢٠٠
١٠٠٠
١٣٤
) Dark Garmentﻣﻼﺑﺲ ﺩﺍﻛﻨﺔ(
١٢٠٠
١٢٠٠
١٢٠٠
٧٨
) Daily Washﻏﺴﻞ ﻳﻮﻣﻲ(
١٢٠٠
١٢٠٠
١٢٠٠
٧٠
') Quick 29ﺳﺮﻳﻊ '(٢٩
١٤٠٠
١٢٠٠
١٠٠٠
٢٩
Eco Drum Clean
)ﺗﻨﻈﻴﻒ ﺍﳊﺎﻭﻳﺔ ﺻﺪﻳﻖ ﺍﻟﺒﻴﺌﺔ(
-
-
-
٨٦
.١
.٢
.٣
.٤
ﺗﺴﺘﻐﺮﻕ ﺩﻭﺭﺓ ﺍﻟﻐﺴﻞ ﺍﻷﻭﻟﻲ ﻣﺪﺓ ﺃﻃﻮﻝ ﺑﺤﻮﺍﻟﻲ ١٥ﺩﻗﻴﻘﺔ.
ﰎ ﻗﻴﺎﺱ ﺑﻴﺎﻧﺎﺕ ﻣﺪﺩ ﺍﻟﺪﻭﺭﺍﺕ ﻭﻓﻘﺎ ﹰ ﻟﻠﺸﺮﻭﻁ ﺍﳌﻨﺼﻮﺹ ﻋﻠﻴﻬﺎ ﻓﻲ ﻣﻘﻴﺎﺱ .IEC 60456/EN 60456
ﻗﺪ ﺗﺨﺘﻠﻒ ﻣﺪﺓ ﺍﻟﺪﻭﺭﺓ ﻓﻲ ﻛﻞ ﻣﻨﺰﻝ ﻋﻦ ﺍﻟﻘﻴﻢ ﺍﳌﺒﻴﻨﺔ ﻓﻲ ﺍﳉﺪﻭﻝ ﺑﺴﺒﺐ ﺍﻻﺧﺘﻼﻑ ﻓﻲ ﺿﻐﻂ ﺍﳌﺎﺀ ﻭﺩﺭﺟﺔ ﺍﳊﺮﺍﺭﺓ ﺍﳋﺎﺻﺔ ﺑﺘﻮﺭﻳﺪ ﺍﳌﺎﺀ ﻭﻛﻤﻴﺔ ﺍﻟﻐﺴﻴﻞ
ﻭﻧﻮﻋﻪ.
ﻋﻨﺪ ﲢﺪﻳﺪ ﺍﻟﻮﻇﻴﻔﺔ ) Intensive Washﻏﺴﻞ ﻣﻜﺜﻒ( ،ﺗﺘﻢ ﺯﻳﺎﺩﺓ ﻣﺪﺓ ﺍﻟﺪﻭﺭﺓ ﻟﻜﻞ ﺍﻟﺪﻭﺭﺍﺕ.
_٣٦ﺟﺪﻭﻝ ﺍﻟﺪﻭﺭﺍﺕ
2/14/2011 11:03:10 AM
WF9854LWN-02713K_AR_v1.indd Sec9:36
ﺍﳌﻠﺤﻖ
ﺟﺪﻭﻝ ﺍﻟﻌﻨﺎﻳﺔ ﺑﺎﻷﻗﻤﺸﺔ
ﻣﻮﺍﺩ ﻣﻘﺎﻭﻣﺔ
ﳝﻜﻦ ﺍﻟﻜﻲ ﻋﻨﺪ °١٠٠ﺳﻠﺰﻳﻮﺱ ﻛﺤﺪ ﺃﻗﺼﻰ
ﺍﳌﻼﺑﺲ ﺍﻟﺮﻗﻴﻘﺔ
ﻳﺤﻈﺮ ﺍﻟﻜﻲ
ﳝﻜﻦ ﺍﻟﻐﺴﻞ ﻋﻨﺪ °٩٥ﺳﻠﺰﻳﻮﺱ
ﳝﻜﻦ ﺍﺳﺘﺨﺪﺍﻡ ﺍﻟﺘﻨﻈﻴﻒ ﺍﳉﺎﻑ ﺑﺎﺳﺘﺨﺪﺍﻡ ﺃﻱ
ﻣﻮﺍﺩ ﻣﺬﻳﺒﺔ
ﳝﻜﻦ ﺍﻟﻐﺴﻞ ﻋﻨﺪ °٦٠ﺳﻠﺰﻳﻮﺱ
ﺍﻟﺘﻨﻈﻴﻒ ﺍﳉﺎﻑ ﺑﺎﻟﺒﺮﻭﻛﻠﻮﺭﻳﺪ ﺃﻭ ﺍﻟﻮﻗﻮﺩ ﺍﻔﻒ ﺃﻭ
ﺍﻟﻜﺤﻮﻝ ﺍﻟﻨﻘﻲ ﺃﻭ R113ﻓﻘﻂ
ﳝﻜﻦ ﺍﻟﻐﺴﻞ ﻋﻨﺪ °٤٠ﺳﻠﺰﻳﻮﺱ
ﺍﻟﺘﻨﻈﻴﻒ ﺍﳉﺎﻑ ﺑﻮﻗﻮﺩ ﺍﻟﻄﺎﺋﺮﺍﺕ ﺃﻭ ﺍﻟﻜﺤﻮﻝ ﺍﻟﻨﻘﻲ
ﺃﻭ R113ﻓﻘﻂ
ﳝﻜﻦ ﺍﻟﻐﺴﻞ ﻋﻨﺪ °٣٠ﺳﻠﺰﻳﻮﺱ
ﻳﺤﻈﺮ ﺍﺳﺘﺨﺪﺍﻡ ﺍﻟﺘﻨﻈﻴﻒ ﺍﳉﺎﻑ
ﳝﻜﻦ ﻏﺴﻠﻬﺎ ﺑﺎﻟﻴﺪ
ﲡﻔﻒ ﻭﻫﻲ ﻣﻔﺮﻭﺩﺓ
ﺗﻨﻈﻴﻒ ﺟﺎﻑ ﻓﻘﻂ
ﳝﻜﻦ ﻧﺸﺮﻫﺎ ﻟﺘﺠﻒ
ﳝﻜﻦ ﺍﺳﺘﺨﺪﺍﻡ ﻣﺎﺩﺓ ﺗﺒﻴﻴﺾ ﻣﻊ ﺍﳌﺎﺀ ﺍﻟﺒﺎﺭﺩ
ﲡﻔﻴﻒ ﺍﳌﻼﺑﺲ ﻭﻫﻲ ﻣﻌﻠﻘﺔ ﻋﻠﻰ ﺣﻤﺎﻟﺔ
ﻳﺤﻈﺮ ﺍﺳﺘﺨﺪﺍﻡ ﻣﺎﺩﺓ ﺗﺒﻴﻴﺾ
ﲡﻔﻴﻒ ﺑﺎﻟﺘﺪﻭﻳﺮ ،ﺣﺮﺍﺭﺓ ﻋﺎﺩﻳﺔ
ﳝﻜﻦ ﺍﻟﻜﻲ ﻋﻨﺪ °٢٠٠ﺳﻠﺰﻳﻮﺱ ﻛﺤﺪ ﺃﻗﺼﻰ
ﲡﻔﻴﻒ ﺑﺎﻟﺘﺪﻭﻳﺮ ،ﺣﺮﺍﺭﺓ ﺧﻔﻴﻔﺔ
ﳝﻜﻦ ﺍﻟﻜﻲ ﻋﻨﺪ °١٥٠ﺳﻠﺰﻳﻮﺱ ﻛﺤﺪ ﺃﻗﺼﻰ
ﻳﺤﻈﺮ ﲡﻔﻴﻔﻬﺎ ﺑﺎﻟﺘﺪﻭﻳﺮ
٠٦ﺍﳌﻠﺤﻖ
ﺗﻮﺿﺢ ﺍﻟﺮﻣﻮﺯ ﺍﻟﺘﺎﻟﻴﺔ ﺗﻌﻠﻴﻤﺎﺕ ﺍﻟﻌﻨﺎﻳﺔ ﺑﺎﳌﻼﺑﺲ .ﺗﺘﻀﻤﻦ ﺑﻄﺎﻗﺎﺕ ﺍﻟﻌﻨﺎﻳﺔ ﺃﺭﺑﻌﺔ ﺭﻣﻮﺯ ﻋﻠﻰ ﺍﻟﻨﺤﻮ ﺍﻟﺘﺎﻟﻲ :ﻏﺴﻴﻞ ﻭﺗﺒﻴﻴﺾ ﻭﲡﻔﻴﻒ ﻭﻛﻲ )ﻭﺗﻨﻈﻴﻒ ﺟﺎﻑ ﺇﺫﺍ
ﻟﺰﻡ ﺍﻷﻣﺮ( .ﻳﻀﻤﻦ ﺍﺳﺘﺨﺪﺍﻡ ﻫﺬﻩ ﺍﻟﺮﻣﻮﺯ ﺍﻟﺘﻨﺎﺳﻖ ﺑﲔ ﺍﻟﺸﺮﻛﺎﺕ ﺍﳌﺼﻨﹼﻌﺔ ﻟﻠﻤﻼﺑﺲ ﺍﶈﻠﻴﺔ ﻭﺍﳌﺴﺘﻮﺭﺩﺓ .ﺍﺗﺒﻊ ﺗﻌﻠﻴﻤﺎﺕ ﺑﻄﺎﻗﺔ ﺍﻟﻌﻨﺎﻳﺔ ﻟﺰﻳﺎﺩﺓ ﻋﻤﺮ ﺍﳌﻼﺑﺲ
ﻭﺗﻘﻠﻴﻞ ﻣﺸﺎﻛﻞ ﺍﻟﻐﺴﻴﻞ.
ﺣﻤﺎﻳﺔ ﺍﻟﺒﻴﺌﺔ
•
•
•
•
ﻫﺬﺍ ﺍﳉﻬﺎﺯ ﻣﺼﻨﻮﻉ ﻣﻦ ﻣﻮﺍﺩ ﻗﺎﺑﻠﺔ ﻹﻋﺎﺩﺓ ﺍﻟﺘﺪﻭﻳﺮ .ﺇﺫﺍ ﻗﺮﺭﺕ ﺍﻟﺘﺨﻠﺺ ﻣﻦ ﻫﺬﺍ ﺍﳉﻬﺎﺯ ،ﻳﺮﺟﻰ ﻣﺮﺍﻋﺎﺓ ﺍﻟﻘﻮﺍﻧﲔ ﺍﶈﻠﻴﺔ ﺍﳋﺎﺻﺔ ﺑﺎﻟﺘﺨﻠﺺ ﻣﻦ ﺍﻟﻨﻔﺎﻳﺎﺕ .ﺍﻗﻄﻊ
ﺳﻠﻚ ﺍﻟﺘﻴﺎﺭ ﺑﺤﻴﺚ ﻻ ﳝﻜﻦ ﺗﻮﺻﻴﻞ ﺍﳉﻬﺎﺯ ﲟﺼﺪﺭ ﻃﺎﻗﺔ .ﻗﻢ ﺑﺈﺯﺍﻟﺔ ﺍﻟﺒﺎﺏ ﳌﻨﻊ ﺗﻌﺮﺽ ﺍﳊﻴﻮﺍﻧﺎﺕ ﺃﻭ ﺍﻷﻃﻔﺎﻝ ﺍﻟﺼﻐﺎﺭ ﻟﻼﺣﺘﺒﺎﺱ ﺩﺍﺧﻞ ﺍﳉﻬﺎﺯ.
ﻻ ﺗﻀﻊ ﻣﺴﺤﻮﻕ ﻏﺴﻴﻞ ﺃﻛﺜﺮ ﻣﻦ ﺍﻟﻜﻤﻴﺔ ﺍﳌﺒﻴﻨﺔ ﻓﻲ ﺇﺭﺷﺎﺩﺍﺕ ﺍﻟﺸﺮﻛﺔ ﺍﳌﺼﻨﹼﻌﺔ ﳌﺴﺤﻮﻕ ﺍﻟﻐﺴﻴﻞ.
ﺍﺳﺘﺨﺪﻡ ﻣﻮﺍﺩ ﺇﺯﺍﻟﺔ ﺍﻟﺒﻘﻊ ﻭﻣﻮﺍﺩ ﺍﻟﺘﺒﻴﻴﺾ ﻗﺒﻞ ﺩﻭﺭﺓ ﺍﻟﻐﺴﻴﻞ ﻋﻨﺪ ﺍﳊﺎﺟﺔ ﻓﻘﻂ.
ﻭﻓﺮ ﺍﳌﺎﺀ ﻭﺍﻟﻜﻬﺮﺑﺎﺀ ﻣﻦ ﺧﻼﻝ ﺇﺟﺮﺍﺀ ﺍﻟﻐﺴﻞ ﺑﺄﻭﺯﺍﻥ ﻛﺎﻣﻠﺔ )ﺗﺨﺘﻠﻒ ﺍﻟﻜﻤﻴﺔ ﻭﻓﻘﺎ ﹰ ﻟﻠﺒﺮﻧﺎﻣﺞ ﺍﳌﺴﺘﺨﺪﻡ(.
ﺑﻴﺎﻥ ﺍﻟﺘﻮﺍﻓﻖ
ﻳﺘﻮﺍﻓﻖ ﻫﺬﺍ ﺍﳉﻬﺎﺯ ﻣﻊ ﻣﻘﺎﻳﻴﺲ ﺍﻟﺴﻼﻣﺔ ﺍﻷﻭﺭﻭﺑﻴﺔ EC directive 93/68ﻭ .EN Standard 60335
ﺍﳌﻠﺤﻖ _٣٧
2/14/2011 11:03:10 AM
WF9854LWN-02713K_AR_v1.indd Sec8:37
ﺍﳌﻠﺤﻖ
ﺍﳌﻮﺍﺻﻔﺎﺕ
ﻏﺴﺎﻟﺔ ﺃﻣﺎﻣﻴﺔ ﺍﻟﺘﺤﻤﻴﻞ
ﺍﻟﻨﻮﻉ
WF9854AW/WF9852AW/WF9850AW
WF9854FW/WF9852FW/WF9850FW
WF9854LW/WF9852LW/WF9850LW
ﺍﻷﺑﻌﺎﺩ
ﺍﻟﻌﺮﺽ ٥٩٨ﱈ × ﺍﻟﻌﻤﻖ ٦٠٠ﱈ × ﺍﻻﺭﺗﻔﺎﻉ ٨٤٤ﱈ
ﺿﻐﻂ ﺍﳌﺎﺀ
٥٠ﻛﻴﻠﻮﺑﺎﺳﻜﺎﻝ ~ ٨٠٠ﻛﻴﻠﻮﺑﺎﺳﻜﺎﻝ
ﻛﻤﻴﺔ ﺍﳌﺎﺀ
٦٣ﻟﺘﺮ
WF9854AW/
WF9854FW/
WF9854LW
ﺍﻟﻮﺯﻥ ﺍﻟﺼﺎﻓﻲ
WF9850AW/
WF9850FW/
WF9850LW
WF9852AW/
WF9852FW/
WF9852LW
٧٠ﻛﺠﻢ
ﺳﻌﺔ ﺍﻟﻐﺴﻴﻞ ﻭﺍﻟﺘﻨﺸﻴﻒ
٨٫٥ﻛﺠﻢ
WF9854AW/WF9852AW/WF9850AW
WF9854FW/WF9852FW/WF9850FW
WF9854LW/WF9852LW/WF9850LW
ﺍﻟﻄﺮﺍﺯ
ﺍﻟﻐﺴﻞ
ﺍﺳﺘﻬﻼﻙ ﺍﻟﻄﺎﻗﺔ
ﺍﻟﻐﺴﻞ ﻭﺍﻟﺘﺴﺨﲔ
ﺍﻟﻄﺮﺍﺯ
ﺍﻟﺘﻨﺸﻴﻒ
٢٢٠ﻓﻮﻟﺖ
١٥٠ﻭﺍﻁ
٢٤٠ﻓﻮﻟﺖ
١٥٠ﻭﺍﻁ
٢٢٠ﻓﻮﻟﺖ
٢٠٠٠ﻭﺍﻁ
٢٤٠ﻓﻮﻟﺖ
٢٤٠٠ﻭﺍﻁ
WF9854AW/
WF9854FW/
WF9854LW
٢٣٠ﻓﻮﻟﺖ
ﻭﺯﻥ ﺍﻟﻌﺒﻮﺓ
٣٥٠ﻭﺍﻁ
ﺍﻟﻀﺦ
٣٤ﻭﺍﻁ
ﺍﻟﻄﺮﺍﺯ
WF9854AW/WF9852AW/WF9850AW
WF9854FW/WF9852FW/WF9850FW
WF9854LW/WF9852LW/WF9850LW
ﺍﻟﻐﻼﻑ ﺍﻟﻮﺭﻗﻲ
٢٫٥ﻛﺠﻢ
ﺍﻟﻐﻼﻑ ﺍﻟﺒﻼﺳﺘﻴﻜﻲ
ﺩﻭﺭﺍﺕ ﺍﻟﺘﻨﺸﻴﻒ
WF9852AW/
WF9852FW/
WF9852LW
WF9850AW/
WF9850FW/
WF9850LW
٢٫٥ﻛﺠﻢ
ﺍﻟﻄﺮﺍﺯ
WF9854AW/
WF9854FW/
WF9854LW
WF9852AW/
WF9852FW/
WF9852LW
WF9850AW/
WF9850FW/
WF9850LW
ﺩﻭﺭﺓ ﻓﻲ ﺍﻟﺪﻗﻴﻘﺔ
١٤٠٠
١٢٠٠
١٠٠٠
ﻗﺪ ﻳﺘﻌﺮﺽ ﺷﻜﻞ ﺍﳌﻨﺘﺞ ﻭﻣﻮﺍﺻﻔﺎﺗﻪ ﻟﻠﺘﻐﻴﻴﺮ ﺩﻭﻥ ﺇﺧﻄﺎﺭ ﻣﺴﺒﻖ ﻷﻏﺮﺍﺽ ﲢﺴﲔ ﺍﳌﻨﺘﺞ.
_٣٨ﺍﳌﻠﺤﻖ
2/14/2011 11:03:12 AM
WF9854LWN-02713K_AR_v1.indd Sec8:38
ﻣﺬﻛﺮﺓ
WF9854LWN-02713K_AR_v1.indd Sec8:39
2/14/2011 11:03:12 AM
ﻫﻞ ﻟﺪﻳﻚ ﺃﺳﺌﻠﺔ ﺃﻭ ﺗﻌﻠﻴﻘﺎﺕ؟
ﺍﻟﺒﻠﺪ
ﺍﺗﺼﻞ ﺑـ
ﺃﻭ ﻗﻢ ﺑﺰﻳﺎﺭﺓ ﻣﻮﻗﻌﻨﺎ ﻋﻠﻰ ﺍﻹﻧﺘﺮﻧﺖ ﻋﻠﻰ
Saudi Arabia
9200-21230
www.samsung.com
ﺭﻗﻢ ﺍﻟﻜﻮﺩ DC68-02713K_AR
2/14/2011 11:03:12 AM
WF9854LWN-02713K_AR_v1.indd Sec8:40