1
WW10H9*****
WW90H9******
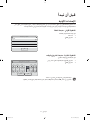
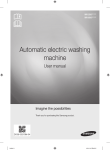
Automatic electric washing
machine
User manual
Imagine the possibilities
Thank you for purchasing this Samsung product.
DC68-03377M-03
Untitled-48 1
2015-01-26
3:31:28
Content
3
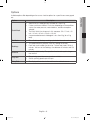
Safety information
What you need to know about the safety instructions. . . . . . . . . . . . . . . . . . . . . . . . . . . . . . . . 3
Important safety symbols. . . . . . . . . . . . . . . . . . . . . . . . . . . . . . . . . . . . . . . . . . . . . . . . . . . . . 3
Important safety precautions . . . . . . . . . . . . . . . . . . . . . . . . . . . . . . . . . . . . . . . . . . . . . . . . . . 4
11
Installation
What’s included. . . . . . . . . . . . . . . . . . . . . . . . . . . . . . . . . . . . . . . . . . . . . . . . . . . . . . . . . . . 11
Installation requirements. . . . . . . . . . . . . . . . . . . . . . . . . . . . . . . . . . . . . . . . . . . . . . . . . . . . . 12
Step-by-step installation. . . . . . . . . . . . . . . . . . . . . . . . . . . . . . . . . . . . . . . . . . . . . . . . . . . . . 14
18
Before you start
Initial settings. . . . . . . . . . . . . . . . . . . . . . . . . . . . . . . . . . . . . . . . . . . . . . . . . . . . . . . . . . . . . 18
Laundry guidelines. . . . . . . . . . . . . . . . . . . . . . . . . . . . . . . . . . . . . . . . . . . . . . . . . . . . . . . . . 20
Detergent Guidelines . . . . . . . . . . . . . . . . . . . . . . . . . . . . . . . . . . . . . . . . . . . . . . . . . . . . . . . 22
25
Operations
Screen. . . . . . . . . . . . . . . . . . . . . . . . . . . . . . . . . . . . . . . . . . . . . . . . . . . . . . . . . . . . . . . . . . 25
Simple steps to start . . . . . . . . . . . . . . . . . . . . . . . . . . . . . . . . . . . . . . . . . . . . . . . . . . . . . . . 28
Course overview . . . . . . . . . . . . . . . . . . . . . . . . . . . . . . . . . . . . . . . . . . . . . . . . . . . . . . . . . . 29
Settings. . . . . . . . . . . . . . . . . . . . . . . . . . . . . . . . . . . . . . . . . . . . . . . . . . . . . . . . . . . . . . . . . 33
Samsung Mobile Smart Control. . . . . . . . . . . . . . . . . . . . . . . . . . . . . . . . . . . . . . . . . . . . . . . 37
Samsung Smart Home app. . . . . . . . . . . . . . . . . . . . . . . . . . . . . . . . . . . . . . . . . . . . . . . . . . 39
Samsung Smart Washer app. . . . . . . . . . . . . . . . . . . . . . . . . . . . . . . . . . . . . . . . . . . . . . . . . 41
43
Maintenance
Eco Drum Clean. . . . . . . . . . . . . . . . . . . . . . . . . . . . . . . . . . . . . . . . . . . . . . . . . . . . . . . . . . . 43
Emergency drain . . . . . . . . . . . . . . . . . . . . . . . . . . . . . . . . . . . . . . . . . . . . . . . . . . . . . . . . . . 44
Cleaning. . . . . . . . . . . . . . . . . . . . . . . . . . . . . . . . . . . . . . . . . . . . . . . . . . . . . . . . . . . . . . . . . 45
Recovery from freezing. . . . . . . . . . . . . . . . . . . . . . . . . . . . . . . . . . . . . . . . . . . . . . . . . . . . . . 48
Care against an extended time of disuse . . . . . . . . . . . . . . . . . . . . . . . . . . . . . . . . . . . . . . . . 48
49
Troubleshooting
Checkpoints. . . . . . . . . . . . . . . . . . . . . . . . . . . . . . . . . . . . . . . . . . . . . . . . . . . . . . . . . . . . . . 49
Information codes . . . . . . . . . . . . . . . . . . . . . . . . . . . . . . . . . . . . . . . . . . . . . . . . . . . . . . . . . 50
51
Specifications
Protecting the environment. . . . . . . . . . . . . . . . . . . . . . . . . . . . . . . . . . . . . . . . . . . . . . . . . . . 51
Fabric care chart . . . . . . . . . . . . . . . . . . . . . . . . . . . . . . . . . . . . . . . . . . . . . . . . . . . . . . . . . . 51
Specification sheet. . . . . . . . . . . . . . . . . . . . . . . . . . . . . . . . . . . . . . . . . . . . . . . . . . . . . . . . . 52
Specification sheet (Only for Saudi arabia models). . . . . . . . . . . . . . . . . . . . . . . . . . . . . . . . . 53
English - 2
Untitled-48 2
2015-01-26
3:31:28
Safety information
SAFETY INFORMATION
Congratulations on your new Samsung washing machine. This manual contains important
information on the installation, use and care of your appliance. Please take some time to read this
manual to take full advantage of your washing machine’s many benefits and features.
What you need to know about the safety
instructions
Please read this manual thoroughly to ensure that you know how to safely and efficiently operate
the extensive features and functions of your new appliance. Please store the manual in a safe
location close to the appliance for future reference. Use this appliance only for its intended purpose
as described in this instruction manual.
Warnings and Important Safety Instructions in this manual do not cover all possible conditions and
situations that may occur. It is your responsibility to use common sense, caution and care when
installing, maintaining and operating your washing machine.
Because the following operating instructions cover various models, the characteristics of your
washing machine may differ slightly from those described in this manual and not all warning signs
may be applicable. If you have any questions or concerns, contact your nearest service centre or
find help and information online at www.samsung.com.
Important safety symbols
What the icons and signs in this user manual mean:
WARNING: Hazards or unsafe practices that may result in severe personal injury,
death and/or property damage.
CAUTION: Hazards or unsafe practices that may result in personal injury and/or
property damage.
NOTE
These warning signs are here to prevent injury to yourself and others.
Please follow them explicitly.
After reading this manual, store it in a safe place for future reference.
Read all instructions before using the appliance.
As with any equipment that uses electricity and moving parts, potential hazards exist. To safely
operate this appliance, familiarize yourself with its operation and exercise care when using it.
English - 3
Untitled-48 3
2015-01-26
3:31:28
Important safety precautions
WARNING: To reduce the risk of fire, electric shock, or injury to persons when using
your appliance, follow basic precautions, including the following:
Do not let children (or pets) play in or on your washing machine. The
washing machine door does not open easily from the inside and
children may be seriously injured if trapped inside.
This appliance is not to be used by persons (including children) with
reduced physical, sensory or mental capabilities, or lack of experience
and knowledge, unless they have been given supervision or instruction
concerning use of the appliance by a person responsible for their
safety.
Children should be supervised to ensure that they do not play with the
appliance.
For use in Europe: This appliance can be used by children aged from
8 years and above and persons with reduced physical, sensory or
mental capabilities or lack of experience and knowledge if they have
been given supervision or instruction concerning use of the appliance in
a safe way and understand the hazards involved. Children shall not play
with the appliance. Cleaning and user maintenance shall not be made
by children without supervision.
If the supply cord is damaged, it must be replaced by the manufacturer,
its service agent or similarly qualified persons in order to avoid a
hazard.
This appliance should be positioned so that the power plug, the water
supply taps, and the drain pipes are accessible.
For appliances with ventilation openings in the base, that a carpet must
not obstruct the openings.
The new hose-sets supplied with the appliance are to be used and that
old hose-sets should not be reused.
English - 4
Untitled-48 4
2015-01-26
3:31:28
SAFETY INFORMATION
CAUTION: In order to avoid a hazard due to inadvertent resetting of
the thermal cut-out, this appliance must not be supplied through an
external switching device, such as a timer, or connected to a circuit that
is regularly switched on and off by the utility.
WARNING: Critical installation WARNINGS
The installation of this appliance must be performed by a qualified technician or service company.
• Failure to do so may result in electric shock, fire, an explosion, problems with the product, or
injury.
The appliance is heavy, therefore take care when lifting it.
Plug the power cord into an AC 220 V / 50 Hz, AC 230 V / 60 Hz wall socket or higher and use the
socket for this appliance only. Never use an extension cord.
• Sharing a wall socket with other appliances using a power strip or extending the power cord
may result in electric shock or fire.
• Ensure that the power voltage, frequency, and current are the same as those of the product
specifications. Failure to do so may result in electric shock or fire. Plug the power plug into the
wall socket firmly.
Remove all foreign substances such as dust or water from the power plug terminals and contact
points using a dry cloth on a regular basis.
• Unplug the power plug and clean it with a dry cloth.
• Failure to do so may result in electric shock or fire.
Plug the power plug into the wall socket so that the cord is running towards the floor.
• If you plug the power plug into the socket in the opposite direction, the electric wires within the
cable may be damaged and this may result in electric shock or fire.
Keep all packaging materials out of the reach of children as these may be dangerous.
• If a child places a bag over its head, it may suffocate.
When the appliance, power plug or power cord is damaged, contact your nearest service centre.
This appliance must be properly grounded.
Do not ground the appliance to a gas pipe, plastic water pipe, or telephone line.
• This may result in electric shock, fire, an explosion, or problems with the product.
• Never plug the power cord into a socket that is not grounded correctly and make sure that it is
in accordance with local and national regulations.
Do not install this appliance near a heater or any inflammable material.
Do not install this appliance in a humid, oily or dusty location, or in a location exposed to direct
sunlight or water (rain drops).
Do not install this appliance in a location exposed to low temperatures.
• Frost may cause the tubes to burst.
Do not install this appliance in a location where gas may leak.
• This may result in electric shock or fire.
English - 5
Untitled-48 5
2015-01-26
3:31:28
Do not use an electric transformer.
• This may result in electric shock or fire.
Do not use a damaged power plug, damaged power cord, or loose wall socket.
• This may result in electric shock or fire.
Do not pull or excessively bend the power cord.
Do not twist or tie the power cord.
Do not hook the power cord over a metal object, place a heavy object on the power cord, insert
the power cord between objects, or push the power cord into the space behind the appliance.
• This may result in electric shock or fire.
Do not pull the power cord when unplugging the power plug.
• Unplug the power plug by holding the plug.
• Failure to do so may result in electric shock or fire.
CAUTION: Installation CAUTIONS
This appliance should be positioned in such a way that the power plug is easily accessible.
• Failure to do so may result in electric shock or fire due to electric leakage.
Install your appliance on a solid, level floor that can support its weight.
• Failure to do so may result in abnormal vibrations, movement, noise, or problems with the
product.
WARNING: Critical usage WARNINGS
If the appliance is flooded, turn off the water & power supplies immediately and contact your
nearest service centre.
• Do not touch the power plug with wet hands.
• Failure to do so may result in electric shock.
If the appliance generates a strange noise, a burning smell, or smoke, unplug the power plug
immediately and contact your nearest service centre.
• Failure to do so may result in electric shock or fire.
In the event of a gas leak (such as propane gas, LP gas, etc.), ventilate immediately without
touching the power plug. Do not touch the appliance or power cord.
• Do not use a ventilating fan.
• A spark may result in an explosion or fire.
Do not let children play in or on the washing machine. In addition, when disposing of the appliance,
remove the washing machine door lever.
• If trapped inside the product, children may suffocate to death.
Make sure to remove the packaging (sponge, styrofoam) attached to the bottom of the washing
machine before using it.
Do not wash items contaminated with gasoline, kerosene, benzene, paint thinner, alcohol or other
inflammable or explosive substances.
• This may result in electric shock, fire, or an explosion.
English - 6
Untitled-48 6
2015-01-26
3:31:28
SAFETY INFORMATION
Do not open the washing machine door by force while it is operating (high-temperature washing/
drying/spinning).
• Water flowing out of the washing machine may result in burns or cause the floor to be slippery.
This may result in injury.
• Opening the door by force may result in damage to the product or injury.
Do not insert your hand under the washing machine while an operation is in progress.
• This may result in injury.
Do not touch the power plug with wet hands.
• This may result in electric shock.
Do not turn the appliance off by unplugging the power plug while an operation is in progress.
• Plugging the power plug into the wall socket again may cause a spark and result in electric
shock or fire.
Do not let children or the infirm use this washing machine without proper supervision. Do not let
children climb in or onto the appliance.
• This may result in electric shock, burns or injury.
Do not insert your hand or a metal object under the washing machine while it is operating.
• This may result in injury.
Do not unplug the appliance by pulling the power cord. Always grip the plug firmly and pull it
straight out of the outlet.
• Damage to the power cord may cause a short-circuit, fire and/or electric shock.
Do not attempt to repair, disassemble, or modify the appliance yourself.
• Do not use a fuse (such as copper, steel wire, etc.) other than a standard fuse.
• When the appliance needs to be repaired or reinstalled, contact your nearest service centre.
• Failure to do so may result in electric shock, fire, problems with the product, or injury.
If the water supply hose comes loose from the water tap and floods the appliance, unplug the
power plug.
• Failure to do so may result in electric shock or fire.
Unplug the power plug when the appliance is not being used for long periods of time or during a
thunder or lightning storm.
• Failure to do so may result in electric shock or fire.
If any foreign substance enters into the appliance, unplug the power plug and contact you nearest
Samsung Customer Service.
• This may result in electric shock or fire.
English - 7
Untitled-48 7
2015-01-26
3:31:28
CAUTION: Usage CAUTIONS
When the washing machine is contaminated by a foreign substance such as detergent, dirt, food
waste, etc., unplug the power plug and clean the washing machine using a damp, soft cloth.
• Failure to do so may result in discolouration, deformation, damage, or rust.
The front glass may be broken by a strong impact. Take care when using the washing machine.
• If the glass is broken, it may result in injury.
After a water supply failure or when reconnecting the water supply hose, open the water tap slowly.
Open the water tap slowly after a long period of non-use.
• The air pressure in the water supply hose or the water pipe may damage a product part or
result in a water leak.
If a draining error occurs during an operation, check if there is a draining problem.
• If the washing machine is used when it is flooded because of a draining problem, it may result
in electric shock or fire.
Insert the laundry into the washing machine completely so that the laundry does not get caught in
the door.
• If laundry gets caught in the door, it may result in damage to the laundry or the washing
machine, or result in a water leak.
Turn the water supply off when the washing machine is not being used.
Ensure that the screws on the water supply hose connector are properly tightened.
• Failure to do so may result in property damage or injury.
Ensure that the rubber seal and front door glass are not contaminated by a foreign substance (e.g.
waste, thread, hair, etc.).
• If a foreign substance is caught in the door or the door is not completely closed, it may cause a
water leak.
Open the water tap and check if the water supply hose connector is firmly tightened and that there
is no water leak before using the product.
• If the screws on the water supply hose connector are loose, it may result in a water leak.
The product you have purchased is designed for domestic use only.
Using the product for business purposes qualifies as a product misuse. In this case, the product
will not be covered by the standard warranty provided by Samsung and no responsibility can be
attributed to Samsung for malfunctions or damages resulting from such misuse.
Do not stand on the appliance or place objects (such as laundry, lighted candles, lighted cigarettes,
dishes, chemicals, metal objects, etc.) on the appliance.
• This may result in electric shock, fire, problems with the product, or injury.
Do not spray volatile material such as insecticide onto the surface of the appliance.
• As well as being harmful to humans, this may result in electric shock, fire or problems with the
product.
Do not place objects that generate electromagnetic fields near the washing machine.
• This may result in injury due to a malfunction.
English - 8
Untitled-48 8
2015-01-26
3:31:28
Water drained during a high-temperature wash or drying cycle is hot. Do not touch the water.
• This may result in burns or injury.
SAFETY INFORMATION
Do not wash, spin, or dry water-proof seats, mats, or clothing (*) unless your appliance has a
special cycle for washing these items.
(*): Woollen bedding, rain covers, fishing vests, ski pants, sleeping bags, diaper covers, sweat suits,
and bicycle, motor cycle and car covers, etc.
• Do not wash thick or hard mats even if the washing machine mark is on the care label. This
may result in injury or damage to the washing machine, walls, floor, or clothing due to abnormal
vibrations.
• Do not wash throw rugs or doormats with rubber backing. The rubber backing may come off
and stick to inside the drum, and this may result in malfunction such as a drainage error.
Do not operate the washing machine when the detergent drawer is removed.
• This may result in electric shock or injury due to a water leak.
Do not touch the insides of the drum during or just after drying as it is hot.
• This may result in burns.
Do not insert your hand into the detergent drawer.
• This may result in injury as your hand may be caught by the detergent input device.
Do not place any objects (such as shoes, food waste, animals) other than laundry into the washing
machine.
• This may result in damage to the washing machine, or injury and death in the case of pets due
to the abnormal vibrations.
Do not press the buttons using sharp objects such as pins, knifes, fingernails, etc.
• This may result in electric shock or injury.
Do not wash laundry contaminated by oils, creams or lotions usually found in skincare shops or
massage clinics.
• This may cause the rubber seal to become deformed and result in a water leak.
Do not leave metal objects such as safety pins, hair pins or bleach in the drum for long periods of
time.
• This may cause the drum to rust.
• If rust starts appearing on the surface of the drum, apply a (neutral) cleansing agent to the
surface and use a sponge to clean it. Never use a metal brush.
Do not use dry cleaning detergent directly and do not wash, rinse, or spin laundry contaminated by
dry cleaning detergent.
• This may result in spontaneous combustion or ignition due to the heat from the oxidation of the
oil.
Do not use water from water cooling/heating devices.
• This may result in problems with the washing machine.
Do not use natural hand-washing soap for the washing machine.
• If it hardens and accumulates inside the washing machine, it may result in problems with the
product, discolouration, rust, or bad odours.
Place socks and brassieres in a washing net and wash them with the other laundry.
Do not wash large laundry items such as bedding in the washing net.
English - 9
Untitled-48 9
2015-01-26
3:31:28
• Failure to do so may result in injury due to abnormal vibrations.
Do not use hardened detergent.
• If it accumulates inside the washing machine, it may result in a water leak.
Make sure that the pockets of all the clothing items to be washed are empty.
• Hard, sharp objects such as coins, safety pins, nails, screws, or stones can cause extensive
damage to the appliance.
Do not wash clothing with large buckles, buttons or other heavy metal objects.
Sort the laundry by color on the basis of its colorfastness and select the recommended cycle,
water temperature and additional functions.
• This may result in discoloration or fabric damage.
Take care that children’s fingers are not caught in the door when you close it.
• Failure to do so may result in injury.
WARNING: Critical cleaning WARNINGS
Do not clean the appliance by spraying water directly onto it.
Do not use the a strong acidic cleaning agent.
Do not use benzene, thinner or alcohol to clean the appliance.
• This may result in discolouration, deformation, damage, electric shock or fire.
Before cleaning or performing maintenance, unplug the appliance from the wall socket.
• Failure to do so may result in electric shock or fire.
English - 10
Untitled-48 10
2015-01-26
3:31:29
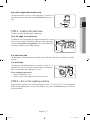
Installation
INSTALLATION
Follow these instructions carefully to ensure proper installation of the washing machine and to
prevent accidents when doing laundry.
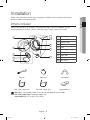
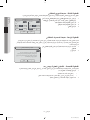
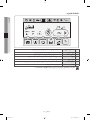
What’s included
Make sure all the parts are included in the product package. If you have a problem with the
washing machine or the parts, contact a local Samsung customer centre or the retailer.
1
3
2
5
4
6
8
7
9
10
1
Start button
2
Power button
3
Control screen
4
Door
5
Drum
6
Auto Dispense unit
7
Levelling feet
8
Debris filter
9
Emergency drain tube
10
Filter cover
Spanner
Bolt caps
Hose guide
Cold water supply hose
Hot water supply hose
Aqua pebble set
Bolt caps : The provided number (3 to 6) of bolt caps depends on the model.
Hot water supply hose: Applicable models only.
Aqua pebble set: 200 ml and 100 ml (MAX).
English - 11
Untitled-48 11
2015-01-26
3:31:29
Installation requirements
Electrical supply and grounding
• AC 220 V / 50 Hz, AC 230 V / 60 Hz fuse or circuit breaker is required
• Use an individual branch circuit specific to the washing machine
To ensure proper grounding, the washing machine comes with a power cord featuring a threeprong grounding plug for use in a properly installed and grounded outlet.
Check with a qualified electrician or serviceperson if you are not sure about the grounding.
Do not modify the provided plug. If it does not fit the outlet, call a qualified electrician to install a
proper outlet.
WARNING
• Do NOT use an extension cord.
• Use only the power cord that comes with the washing machine.
• Do NOT connect the ground wire to plastic plumbing, gas lines, or hot water pipes.
• Improperly connected grounding conductors may cause electric shock.
Water supply
A proper water pressure for this washing machine is between 50 kPa and 800 kPa. Water pressure
less than 50 kPa may cause the water valve not to close completely. Or, it may take longer to fill the
drum, causing the washing machine to turn off. Water taps must be within 120 cm from the rear of
the washing machine so that the provided inlet hoses reach the washing machine.
To reduce the risk of leaks
• Make sure water taps are easily accessible.
• Turn off the taps when the washing machine is not in use.
• Check for any leaks at the water inlet hose fittings on a regular basis.
CAUTION
Before using the washing machine for the first time, check all connections at the water valve
and taps for any leaks.
English - 12
Untitled-48 12
2015-01-26
3:31:29
Drain
INSTALLATION
Samsung recommends a standpipe in height of 65 cm. The drain hose must be connected through
the hose clip to the standpipe, and the standpipe must fully cover the drain hose.
Flooring
For best performance, the washing machine must be installed on a solid floor. Wood floors may
need to be reinforced to minimize vibration and/or unbalanced loads. Carpeting and soft tile
surfaces are not a good resistance to vibrations and may cause the washing machine to move
slightly during the spin cycle.
CAUTION
Do NOT install the washing machine on a platform or a poorly supported structure.
Water temperature
Do not install the washing machine in areas where water may freeze as the washing machine
always retains some water in its water valves, pumps, and/or hoses. Frozen water left in the
connection parts may cause damage to belts, the pump, and other components of the washing
machine.
Alcove or closet installation
Minimum clearance for stable operation:
Sides
25 mm
Rear
50 mm
Top
25 mm
Front
550 mm
If both the washing machine and a dryer are installed in the same location, the front of the alcove or
closet must have at least a 550 mm unobstructed air opening. Your washing machine alone does
not require a specific air opening.
English - 13
Untitled-48 13
2015-01-26
3:31:29
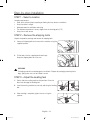
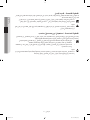
Step-by-step installation
STEP 1 - Select a location
Location requirements:
• Solid, level surface without carpeting or flooring that may obstruct ventilation
• Away from direct sunlight
• Adequate room for ventilation and wiring
• The ambient temperature is always higher than the freezing point (0 ˚C)
• Away from a heat source
STEP 2 – Remove the shipping bolts
Unpack the product package and remove all shipping bolts.
1. Loosen all shipping bolts on the rear of the machine using the
supplied spanner.
2. Fill the holes with the supplied plastic bolt caps.
Keep the shipping bolts for future use.
WARNING
Packaging materials can be dangerous to children. Dispose all packaging material (plastic
bags, polystyrene, etc.) out of children’s reach.
STEP 3 - Adjust the levelling feet
1. Gently slide the washing machine into position. Excessive
force may damage the levelling feet.
2. Level the washing machine by manually adjusting the levelling
feet.
3. When levelling is complete, tighten the nuts using the
spanner.
English - 14
Untitled-48 14
2015-01-26
3:31:30
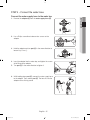
STEP 4 - Connect the water hose
Connect the water supply hose to the water tap.
INSTALLATION
1. Remove the adaptor (A) from the water supply hose (B).
A
B
2. Use a Philips screwdriver to loosen four screws on the
adaptor.
3. Hold the adaptor and turn part (C) in the arrow direction to
loosen it by 5 mm (*).
C
4. Insert the adaptor into the water tap, and tighten the screws
while lifting up the adaptor.
5. Turn part (C) in the arrow direction to tighten it.
C
6. While holding down part (E), connect the water supply hose
to the adaptor. Then, release part (E). The hose fits into the
adaptor with a clicking sound.
E
English - 15
Untitled-48 15
2015-01-26
3:31:30
7. Connect the other end of the water supply hose to the inlet
valve on the back of the washing machine. Turn the hose
clockwise to tighten.
8. Open the water tap and check if there are any leaks around
the connection areas. If there are water leaks, repeat the
steps above.
• If using a screw type of water tap, connect the water hose to
the water tap as shown.
WARNING
Stop using the washing machine if there is a water leak, and contact a local Samsung
service centre. Otherwise, this may cause electric shock.
CAUTION
Do not stretch the water supply hose by force. If the hose is too short, replace the hose with
a longer, high-pressure hose.
• After connecting the water supply hose to the adaptor, check if it is connected properly
by pulling the water supply hose downwards.
• Use a popular type of water taps. If the tap is square-shaped or too big, remove the
spacer ring before inserting the tap into the adaptor.
For models with an additional hot water inlet:
1. Connect the red end of the hot water supply hose to the hot
water inlet on the back of the machine.
2. Connect the other end of the hot water supply hose to the
hot water tap.
English - 16
Untitled-48 16
2015-01-26
3:31:30
Aqua hose (applicable models only)
INSTALLATION
The aqua hose alerts users of a risk of water leaks. It senses the
water flow and turns red on the centre indicator (A) in case of a
leak.
A
STEP 5 - Position the drain hose
The drain hose can be positioned in three ways:
Over the edge of a wash basin
The drain hose must be placed at a height of between 60 cm and
90 cm (*) from the floor. To keep the spout of the drain hose bent,
use the supplied plastic hose guide (A). Secure the guide to the
wall using a hook to ensure stable drainage.
A
ln a sink drain pipe
The drain pipe must be above the sink siphon so that the end of the hose is at least 60 cm above
the floor.
ln a drain pipe
The drain pipe should be between 60 cm and 90 cm high (*). It is
advisable to use a 65 cm high vertical pipe. Make sure the drain
hose is connected to the stand pipe at a slant.
Drain standpipe requirements:
• Minimum diameter of 5 cm
• Minimum carry-away capacity of 60 litres per minute
STEP 6 – Turn on the washing machine
Plug the power cord into a wall socket featuring an AC 220 V / 50 Hz, AC 230 V / 60 Hz approved
electrical outlet protected by a fuse or circuit breaker. Then, press the Power button to turn on the
washing machine.
English - 17
Untitled-48 17
2015-01-26
3:31:31
Before you start
Initial settings
When the washing machine turns on for the first time, the welcome screen appears with the
Samsung logo. Follow the onscreen instructions to complete the initial settings. You can change the
initial settings later by accessing the Settings screen.
STEP 1 - Set Language
Set a preferred menu language.
1. Select a language.
2. Tap Next.
Step 1 of 4. Set Language
English
Deutsch
Français
Next
STEP 2 - Set Date & Time
Set the current date and time.
1. Tap the arrows to set the time for each time element.
2. Tap Next.
Step 2 of 4. Set Date & Time
Day
Month
Year
01
01
2014
Previous
AM
PM
Hour
Minute
12
01
Next
The default time is set to the 12-hour format.
To switch between the AM and PM elements, simply tap the corresponding element.
English - 18
Untitled-48 18
2015-01-26
3:31:31
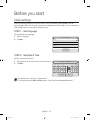
STEP 3 - Set Auto Dispense
1. Both Auto Detergent and Auto Softener are set
to On by default. To change the setting, slide the
corresponding bar to Off.
2. Set the Amount and the Water Hardness.
3. Set the Amount and the Concentration.
4. Tap Next.
BEFORE YOU START
The Auto Dispense unit dispenses an appropriate amount of detergent and fabric softener into the
drum according to the course and cycle.
Step 3 of 4. Set Auto Dispense
Auto Detergent
On
Amount
Less
Std.
More
Water Hardeness
Soft
Auto Softener
On
Amount
Less
Std.
More
2X
High
Concentration
Medium
Hard
Previous
Normal
Next
STEP 4 - Set Auto Update
Auto Update updates the firmware automatically for improved performance and/or to fix known
bugs through communication with the update server. Once the firmware is updated, some
functions of the washing machine may not be available depending on the firmware version.
1. To update the firmware automatically, set Auto
Update to On.
2. Tap Done.
Step 4 of 4. Set Auto Update
On
The Auto Update function automatically updates the software for
performance improvement purposes ot to fix bugs through
communicating with the update server. If you agree to this setting, it is
regarded as an agreement to running the auto update operation. When
the software is updated, some software features may become
Previous
Done
STEP 5 - Run Calibration (recommended)
Calibration ensures accurate weight detection by the washing machine. Make sure the drum is
empty before running Calibration.
1. Tap Settings > Calibration > Start.
• The door will be locked during the operation.
• The drum keeps rotating clockwise and anticlockwise for several minutes.
2. When complete, the washing machine turns off automatically.
English - 19
Untitled-48 19
2015-01-26
3:31:31
Laundry guidelines
STEP 1 - Sort
Sort the laundry according to these criteria:
•
•
•
•
Care Label: Sort the laundry into cottons, mixed fibres, synthetics, silks, wools, and rayon.
Colour: Separate whites from colours.
Size: Mixing different-sized items together in the drum improves the washing performance.
Sensitivity: Wash delicate items separately using an Easy Iron option for pure, new woollen
items, curtains, and silk items. Check the labels on the items.
Make sure to check the care label on the clothing, and sort them accordingly before starting
the wash.
STEP 2 - Empty pockets
Empty all the pockets of your laundry items
• Metal objects such as coins, pins, and buckles on clothing may damage other laundry items as
well as the drum.
Turn clothing with buttons and embroideries inside out
• If pants or jacket zippers are open while washing, the drum may be damaged. Zippers should
be closed and fixed with a string.
• Clothing with long strings may become entangled with other clothes. Make sure to tie the
strings before starting the wash.
STEP 3 - Use a laundry net
• Brassieres (water washable) must be placed in a laundry net. Metal parts of the brassieres may
break through and tear other laundry items.
• Small, light clothing such as socks, gloves, stockings, and handkerchiefs may become caught
around the door. Place them inside a fine laundry net.
• Do not wash the laundry net by itself without other laundry. This may cause abnormal vibrations
that could move the washing machine and result in injury.
STEP 4 - Prewash (if necessary)
Select the Prewash option for the selected course if the laundry is heavily soiled. Do not use the
Prewash option when detergent is manually added into the drum.
English - 20
Untitled-48 20
2015-01-26
3:31:31
STEP 5 - Determine the load capacity
BEFORE YOU START
Do not overload the washing machine. Overloading may cause the washing machine to not wash
properly. For the load capacity for the type of clothing, see page 29.
When washing bedding or bedding covers, the wash time may be lengthened or the spin
efficiency may be reduced. For bedding or bedding covers, the recommended maximum
spin cycle speed is 800 rpm, and the load capacity is 2.0 kg or less.
CAUTION
If the laundry is unbalanced and the “UE” error code is displayed, redistribute the load.
Unbalanced laundry may reduce the spinning performance.
STEP 6 - Apply a proper detergent type
The type of detergent depends on the type of fabric (cotton, synthetic, delicate items, wool),
colour, wash temperature, and degree of soiling. Always use “low suds” laundry detergent, which is
designed for automatic washing machines.
• Follow the detergent manufacturer’s recommendations based on the weight of the
laundry, the degree of soiling, and the hardness of the water in your local area. If you are
not sure about the water hardness, contact a local water authority.
• Do not use detergent that tends to be hardened or solidified. This detergent may remain
after the rinse cycle, blocking the drain outlet.
CAUTION
When washing wool using the wool course, use only a neutral liquid detergent. If used with
the Wool course, powder detergent may remain on the laundry and discolour the laundry.
English - 21
Untitled-48 21
2015-01-26
3:31:31
Detergent Guidelines
Auto Dispense
The washing machine provides a two-compartment dispenser: the left compartment for detergent,
and the right compartment for fabric softener. The Auto Dispense unit dispenses an appropriate
amount of detergent and fabric softener into the drum according to the course and cycle.
CAUTION
• Use only a liquid detergent and fabric softener with the Auto Dispense unit.
• Make sure the Auto Dispense unit is inserted completely. The washing machine will not
start operating until the Auto Dispense unit is inserted properly.
• When applying a different detergent, make sure to clean the detergent compartment first.
• Do not mix detergent with fabric softener in either compartment.
• To prevent detergent from hardening, do not open the cap once the detergent has been
applied to the compartment.
• Do not use any bleach that may cause corrosion and/or generate gas.
• Do not turn the Auto Dispense unit upside down. The content may spill out of the vents.
• Do not press the outlet at the bottom of the Auto Dispense unit while moving the unit.
The content may leak.
• Use caution when inputting detergent or fabric softener in the unit. The content may spill
around.
• Make sure to remove the Auto Dispense unit before applying detergents.
• When removing the Auto Dispense unit to check the remaining amount of detergent
upon or before an error message, the unit may have some small amount of detergent
remaining or leaking from the bottom of the unit.
• Fully insert the Auto Dispense unit. Incomplete insertion may cause the unit to fail in
dispensing.
• By default, Auto Dispense turns off in the Delicates, Wool, Baby Care, or Outdoor Care
courses.
To enable Auto Dispense in these courses, tap Settings or the Quick Panel Bar > Auto
Dispense, and change the settings as necessary.
English - 22
Untitled-48 22
2015-01-26
3:31:31
1. Open the door, and pull out the Auto Dispense unit from the
washing machine.
BEFORE YOU START
2. Turn the left knob anticlockwise to open, and apply detergent
to the left compartment to the max line.
3. Turn the right knob anticlockwise to open, and apply fabric
softener to the right compartment to the max line.
4. Lock the knobs by turning them clockwise.
5. Reinsert the Auto Dispense unit in the original position.
Use caution when inserting the unit as the content may spill
out of the vents on either side.
6. Turn on Auto Detergent and Auto Softener.
See “Auto Dispense” on page 33.
English - 23
Untitled-48 23
2015-01-26
3:31:32
Manual Dispense
In case you don’t want to use the dispenser (Auto Dispense unit), you can either dose the detergent
directly into the drum or use the provided aqua pebble when applying detergent manually. The
Aqua Pebbles comes in two sizes and are provided as accessories with your appliance. Choose an
Aqua Pebble that is appropriate for the detergent amount.
1. Turn off Auto Detergent.
See “Auto Dispense” on page 33.
2. Apply a powder, gel, or liquid detergent to a proper Aqua
pebble (A). Check the amount marker on the inner side of
the aqua pebble.
A
3. Insert the aqua pebble near the end of the drum.
When the wash is complete, remove the aqua pebble from the drum and keep it clean for
later use.
CAUTION
• Fabric softener can be applied only using the Auto Dispense unit. Manual input is not
allowed.
• Use caution when inserting the aqua pebble as it is supposed to be balanced at the first
of the wash. Tipping the aqua pebble before the start of a wash may cause detergent
residue on the laundry at the end of the wash, causing discolouration to laundry and/or
reduced washing performance.
• Do not apply detergent to both the auto detergent compartment and the aqua pebble.
• When applying a different detergent, make sure to clean the aqua pebble first.
• Do not insert the aqua pebble into a folded blanket or between different laundry items.
• Do not select the Pre Wash option when using the aqua pebble.
• A heavy application of detergent may cause the following problems, resulting in a system
failure and/or shortened product life.
• Excessive amounts of detergent cause bubble surpluses and extend the rinse time as a
result.
• This may also cause detergent remaining in the drum after the wash is complete.
• Apply appropriate amounts of detergent according to the specifications of the detergent
manufacturer.
• In case of manual detergent dosage, it is recommended to use the Aqua Pebble when
coloured laundry items are washed.
English - 24
Untitled-48 24
2015-01-26
3:31:32
Operations
OPERATIONS
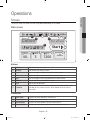
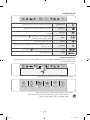
Screen
The actual screen may differ from the image below depending on the model.
Main screen
Most Used
Cotton
Temp.
40
1
A
3
°C
B
D
C
4
Rinse
3
12:00AM
2
Spin
8
1hr 21min
Start
5
1200
7
6
Options
Buttons
1
Course
Tap to enter the course tile.
2
Settings
Tap to enter the settings screen.
3
Temp.
Tap to change the temperature for the current course.
4
Rinse
Tap to change the rinse times for the current course.
5
Spin
Tap to change the spinning speed for the current course.
6
Options
Tap to enter the course options screen.
7
Start
Tap to start an operation.
8
Favourite
Tap to add the current course configuration to the Favourite list. You
can add up to 4 custom courses, which appear at the first of the
course tile.
Information
A
Most Used
Displays the most frequently used course.
B
Current course
Displays the current course.
C
Active option
Displays an active option(s) for the current course.
D
Estimated time
Displays the estimated operation time for the current course.
English - 25
Untitled-48 25
2015-01-26
3:31:32
Status bar
12:00AM
Auto Detergent
If this indicator turns on, Auto Detergent is enabled.
Auto Softener
If this indicator turns on, Auto Softener is enabled.
Door Lock
If this indicator turns on, the door is locked to prevent a door
opening during operation.
Child Lock
], the Child Lock is set
If this icon turns to a closed lock [
to prevent accidents by children or infants.
Network
It displays the Wi-Fi network connection state.
Smart Control
If this indicator turns on, the washing machine can be
controlled on a mobile device.
Sound
If the icon turns to Mute [
Time
The current time is displayed.
], no sound is output.
Quick panel bar
On the Quick panel bar, 6 items are available: Child Lock, Drum Light, Auto Detergent, Auto
Softener, Network, and Smart Control.
12:00AM
1. Tap the Status bar, or swipe it downward to display available items.
Child Lock
Drum
Light
Auto
Detergent
Auto
Softener
Network
Smart
Control
2. Tap to turn an item on/off, or change the current settings.
• For advanced settings, go to the settings screen, and make changes to your preference.
• Active items are lit while inactive items are greyed out.
English - 26
Untitled-48 26
2015-01-26
3:31:33
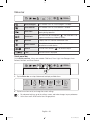
Options screen
OPERATIONS
12:00AM
Cotton
Temp.
40
Rinse
1hr 21min
Start
6
Spin
3 1200
1
2
3
Quick Wash
Pre Wash
Intensive
4
Soaking+
5
7
Easy Iron
1
Quick Wash
Specific for less soiled clothing for a load less than 2 kg.
2
Pre Wash
A preliminary washing cycle is added before the main wash.
3
Intensive
The operation time for each cycle is longer than normal.
4
Soaking+
This is useful to remove stubborn stains on laundry.
5
Easy Iron
This is useful to reduce wrinkles.
6
Delay End
Use this to specify the end time of a selected course. See page 32.
7
Return
Return to the main screen.
For details on each option, see “Options” on page 31.
English - 27
Untitled-48 27
2015-01-26
3:31:33
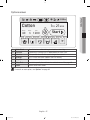
Simple steps to start
12:00AM
Most Used
Cotton
1
1hr 21min
Start
4
Temp.
Rinse
40
3
°C
Spin
1200
2
Options
3
Press the Power button to display the main screen.
On the main screen, tap the Course icon on the top centre to display the course tile.
Select a course. The washing machine supports 22 courses.
Change the course settings (Temp., Rinse, and Spin) if necessary.
Tap the Options icon at the bottom right corner. Then, select options and change the option
settings.
6. Tap Start.
1.
2.
3.
4.
5.
• The washing machine has the default course settings and options available for each
course. You can accept the default or make changes to your preference.
• You can select a course on the main screen. Simply swipe the screen to the left to open
the next course. To return to the previous list, simply swipe to the right.
English - 28
Untitled-48 28
2015-01-26
3:31:34
Course overview
Course
OPERATIONS
Standard courses
Description & Max load (kg)
Favourite
• Add the current course configuration to the Favourite list, and
quickly access the course configuration later. You can add up
to 4 custom courses, which appear at the first of the course
tile.
-
Most Used
• The most frequently used course is displayed on the upper
left corner of the main screen by default.
-
Auto Optimal
Wash
• Auto Optimal Wash adjusts the detergent amount and
the course cycles according to the laundry weight and
contamination level. This is best used with the Auto Dispense
feature.
Max
Cotton
• For cottons, bed linens, table linens, underwear, towels, or
shirts.
• The washing time and the number of rinse cycles are
automatically adjusted according to the load.
Max
Synthetics
• For blouses or shirts that are made of polyester (diolen,
trevira), polyamide (perlon, nylon), or the like.
5
Denim
• Featuring a higher water level in the main wash and an extra
rinse cycle to ensure that no powder detergent remains.
3
Dark Garment
• Featuring additional rinses and reduced spinning to ensure
that the laundry is washed gently and rinsed thoroughly.
4
Super Speed
• Fast completion within 1 hour for daily items such as
underwear and shirts.
5
Super Eco Wash
• The Eco Bubble technology helps reduce power
consumption. Featured by low-temperature washing
efficiency, Super Eco Wash compares its washing
performance and power saving to the conventional Eco
Bubble-less Cotton cycle.
4
Outdoor Care
• For outdoor clothes, skiwear, and sportswear that are made
of functional materials such as spandex, stretch, and microfibre.
2
Baby Care
• Featuring a high-temperature wash and extra rinses to ensure
that no powder detergent remains.
4
Wool
• Specific for machine-washable wool for loads less than 2.0
kg.
• The wool course features gentle cradling and soaking to
protect the wool fibres from shrinkage/distortion.
• A neutral detergent is recommended.
2
English - 29
Untitled-48 29
2015-01-26
3:31:34
Course
Description & Max load (kg)
Delicates
• For sheer fabrics, bras, lingerie (silk), and other handwashonly fabrics.
• For best performance, use liquid detergent.
Bedding
• For bed spreads, bed sheets, bedding covers, etc.
• For best results, wash only 1 type of bedding and make sure
the load weighs less than 2.5 kg.
2.5
Spin
• Featuring an additional spin cycle to remove water thoroughly.
-
Rinse+Spin
• Featuring an additional rinse after applying fabric softener to
the laundry.
-
Eco Drum Clean
• Cleans the drum by removing dirt and bacteria from the drum.
• Perform once every 40 washes with no detergent or bleach
applied.
• Make sure the drum is empty.
• Do not use any cleaning agents for cleaning the drum.
-
• Optimal performance with lower energy for cotton fabrics, bed
linens, table linens, underwear, towels, or shirts.
Max
Cotton
2
Specialty Cycle
Six specialty courses are designed to effectively remove specific types of stains and dirt that may
accumulate on specific types of activities ranging from household work to professional mountainclimbing.
Course
Description & Max load (kg)
Cooking&Dining
• This course removes food spills and cooking stains
efficiently.
4
Gardening
• This course removes grass and mud/dirt stains and cleans
sweat and skin oils efficiently.
4
Active Sports
• This course removes grass, soil, mud, light food stains,
sweat, and make-up efficiently.
• Do not use this course for waterproof clothing. This
may result in damage to the waterproof or breathable
capabilities.
4
Active Kids
• The Active Kids course is for most children’s clothing. This
course removes food, fruit juice, drinks, mud, soil, ink, and
crayon stains efficiently.
4
Working&Everyday
• The Working&Everyday course is for lightly soiled clothing.
This course removes light ink and pencil stains and cleans
normal day to day stains efficiently.
4
Hygiene Care
• This course removes skin oils and blood stains efficiently.
4
English - 30
Untitled-48 30
2015-01-26
3:31:34
Options
Options
OPERATIONS
Available options differ depending on the course. Inactive options for a specific course are greyed
out.
Description
Quick Wash
• Specific for less soiled garments for loads less than 2 kg.
• It takes a minimum of about 15 minutes, depending on the conditions
such as the water pressure, water hardness, and/or extra options
selected.
• The Quick Wash time increases in this sequence: Off > 15 min > 20
min > 30 min > 40 min > 50 min > 60 min.
• A recommended amount of detergent is less than 20 g (for a 2 kg
load).
Pre Wash
• This will add a preliminary washing cycle before the main wash cycle.
Soaking+
• This option effectively removes stains by soaking the laundry.
• Each soak cycle tumbles the drum for 1 minute and stands still for 4
minutes. You can set the Soaking+ time between 30 minutes and 150
minutes.
Intensive
• For badly soiled laundry. The operation time for each cycle is longer
than normal.
Easy Iron
• The spinning speed decreases to reduce wrinkles.
• Set the spinning speed up to 800 rpm.
Delay End
• The displayed time refers to the end time of a selected course.
English - 31
Untitled-48 31
2015-01-26
3:31:34
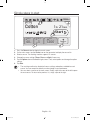
Delay End
You can set the washing machine to finish the current course at a specific hours later.
This is useful if you want to finish the wash by the time you come home from business.
1. Select a course. Then change the course settings if necessary.
2. Tap the Options icon at the bottom right corner.
Then, select options and change the option settings.
3. Tap Delay End.
4. Use the arrows to set the end time of the current course, and tap Start.
• To cancel the option, tap Cancel and return to the Options screen.
Use case
You want to finish a two-hour course 3 hours later from now. For this, you add the Delay End
option to the current course with the 3-hour setting, and press the Start/Pause button at 2:00 p.m.
Then, what happens? The washing machine starts operating at 3:00 p.m., and ends at 5:00 p.m.
Provided below is the time line for this example.
2:00 pm
Set the Delay End to 3 hours.
3:00 pm
Start
5:00 pm
End
English - 32
Untitled-48 32
2015-01-26
3:31:34
Settings
OPERATIONS
Child Lock
To prevent accidents by children or infants, Child Lock locks all buttons except for the Settings
button.
You can access the Child Lock menu from the Settings screen or the Quick panel bar.
• To set the Child Lock, tap Settings, and tap the Child Lock button.
• To activate Child Lock, press and hold the Activate button for 3 seconds.
• To deactivate Child Lock temporarily, press and hold the Temporarily Deactivate button for 3
seconds.
• To deactivate Child Lock completely, press and hold the Deactivate button for 3 seconds.
• To add detergent or more laundry in the drum, or to change the course settings in the
Child Lock state, you must first stop or release the Child Lock.
• The Child Lock will be reactivated one minute after it stops temporarily
Drum Light
• To turn the Drum Light on or off, tap Settings, and slide the Drum Light bar to On or Off.
• The drum light turns off automatically after 5 minutes.
Auto Dispense
The washing machine provides a two-compartment dispenser: one for detergent, and the other for
fabric softener. The Auto Dispense unit dispenses an appropriate amount of detergent and fabric
softener into the drum according to the course and cycle.
To enable the Auto Dispense
1.
2.
3.
4.
Tap Settings > Auto Dispense.
Slide the Auto Detergent bar to On, and set the Amount and the Water Hardness.
Slide the Auto Softener bar to On, and set the Amount and the Concentration.
Tap Save.
Brightness
Set the brightness of LCD screen
• Tap Settings, and tap the (-/+) signs to increase or decrease the brightness level.
Sound Theme
Set the volume level and beep melody.
1. Tap Settings > Sound Theme.
2. To adjust the volume, tap the (-/+) signs to increase or decrease the volume level.
3. To select a beep melody, tap a theme in the list.
English - 33
Untitled-48 33
2015-01-26
3:31:34
Date & Time
The default time is set to the 12-hour format.
1. Tap Settings > Date & Time.
2. Tap the arrows to change the time for each time element. For example, to change the date, use
the arrows above and below the date element.
3. To switch between the AM and PM elements, simply tap the corresponding element.
4. Tap Save.
Language
Select a preferred menu language.
• Tap Settings > Language, and select a preferred menu language.
Network
Auto setup
The washing machine supports Wi-Fi protocols of WEP, TKIP, and AES, but it does not come with
a router (AP).
1. Tap Settings > Network, and then slide the Network bar to On. The AP list appears.
2. Tap a network provider, and provide a password if asked.
3. Tap OK. When completed successfully, the selected network provider is ticked.
Manual setup
1. Enable Wi-Fi connection as instructed above.
2. Tap Set IP > Manual.
3. Provide an IP Address, Subnet mask, Gateway, and DNS, and then tap OK.
Wi-Fi connection
Once the network connection is established, the next time you want to turn the Wi-Fi connection
on or off, slide the Network bar to On or Off.
Easy Connection
Easy Connection enables you to easily configure the network settings including the authentication
procedure.
English - 34
Untitled-48 34
2015-01-26
3:31:34
Smart control
OPERATIONS
With Smart Control, you can control the washing machine on your mobile device. Tap this icon to
turn the Smart control function on or off.
1. Tap Settings > Slide the Smart Control bar to On.
2. Back on the main screen, Smart Control activated.
3. Tap Deactivate to disable the function, Smart Control deactivated.
• The icon is greyed out if Smart Control is not activated.
• Manipulation such as icon tapping or button pressing on the washing machine will
deactivate Smart Control.
• If wireless network not connected, Smart Control is not available.
• Select a connection method to external devices when tapping Smart Control.
Eco Check
The energy/water efficiency of the recent 4 courses is displayed with a technical summary of power
consumption, water levels, course settings, and options.
1. Tap Settings > Eco Check. A summary screen of the recent 4 courses appears.
2. Tap a course to display a technical summary of the selected course.
Self Check
The washing machine performs self-diagnosis on the current system. Operation errors and machine
problems can be found on the results screen.
• Tap Settings > Self Check > Start.
Calibration
Calibration ensures accurate weight detection by the washing machine. Make sure the drum is
empty before running Calibration.
1. Tap Settings > Calibration > Start.
• The door will be locked during the operation.
• The drum keeps rotating clockwise and anticlockwise for several minutes.
2. When complete, the washing machine turns off automatically.
English - 35
Untitled-48 35
2015-01-26
3:31:34
Update
When updates are available, the update notification appears on the screen.
To check the current firmware version
1. Tap Settings > Update to display the current firmware version.
2. To update the firmware manually, tap Update.
To update the firmware automatically
1. Tap Auto Update on the Settings screen.
2. Slide the Auto Update bar to On. The update proceeds without notification when updates are
available.
WARNING
Do not unplug the power cable of the washing machine or the router during the update.
Help
Refer to the user guide for product usage, and check the troubleshooting section against a
problem.
• Tap Settings > Help.
English - 36
Untitled-48 36
2015-01-26
3:31:34
Samsung Mobile Smart Control
OPERATIONS
This washer provides two different mobile control apps that you can use for controlling your washer
via a network connection.
Mobile apps that apply to the Smart Control feature of Samsung
smart washers
Samsung Smart Home
With the newly designed Samsung Smart Home app, you can access your washer on the move,
and control or check the operation status of your washer.
Download the “Samsung Smart Home” app from Play Store or Apple Store, and install on your
mobile device.
Samsung Smart Washer
The Samsung Smart Washer app lets you control the operation of the washer on your mobile
device in two categories: Indoor and Outdoor.
Download the “Samsung Smart Washer” app from Play Store or Apple Store, and install on your
mobile device.
Smart Control settings on the washer
To enable the Smart Control feature, choose a connection method to the mobile app.
Tap the Setup icon, and select Smart Control under the Network menu.
1. Choose a connection method to the mobile app.
12:00AM
Most Used
Cotton
Temp.
40
°C
2. Select “Samsung Smart Home” if you want to control the
washer through the Samsung integrated app.
Select “Samsung Smart Washer” if you want to control the
washer through the Samsung washer app.
Rinse
3
1
1hr 21min
Start
Spin
1200
rpm
Options
12:00AM
AB Language
English
Network
Wi-Fi
On
Easy Connection
Smart Control
Off
1
Maintenance
3. Once setup is complete, your changes are applied and you
may need to reconnect.
• Samsung Smart Home (Default)
• Samsung Smart Washer
12:00AM
Smart Control
1. You can select a connection method to external devices with
the Smart Control options.
2. Select “Samsung Smart Home” to remotely access devices through
the Samsung Smart Home app. Select “Samsung Smart Washer” to
Samsung Smart Home
Samsung Smart Washer
Save
English - 37
Untitled-48 37
2015-01-26
3:31:35
• By default, this product uses the newly designed Samsung Smart Home app as a
connection method, which is recommended.
• For iPhone models, the Samsung Smart Home app is scheduled to be available at the
Apple Store from the second half of 2014.
• In some countries, the Samsung Smart Home app may not be available. If this is the
case, use the Samsung Smart Washer app instead.
English - 38
Untitled-48 38
2015-01-26
3:31:35
Samsung Smart Home app
OPERATIONS
When using the Samsung Smart Home app, make sure “Samsung Smart Home” under the Setup
menu is selected.
The Samsung Smart Home app enables you to access and control the washing machine on the
move.
Installation
1. Visit Google Play Store for Android devices, or Apple App Store for iOS devices, and search for
Samsung Smart Home to select.
2. Download and install the Samsung Smart Home app on your mobile device.
• The Samsung Smart Home app supports Android OS 4.0 (ICS) or later which is
optimized for Samsung smartphones (Galaxy S and Galaxy Note series). Some functions
of this app may work differently on other devices.
• This app supports iOS 7 or later for iPhone models.
• For enhanced performance, the UI design of this app is subject to change without
notice.
• For iPhone models, this app is scheduled to be available from the latter half of 2014 at
Apple App Store.
Preparation
1. To enable the app, you are required to enter your Samsung account. You will be guided
in creating a Samsung account if you don't have one directly on the app. No other app is
necessary for this purpose.
2. To enable the app, first register your washing machine to the Samsung Smart Home service.
Select the washing machine in the device list of the Samsung Smart Home app.
Enter the necessary information about the wireless AP that you use for wireless connection.
Follow the onscreen instructions to configure settings for the washing machine.
On the washing machine, select Settings > Easy Connection to configure the network
settings.
5) When complete, you will see the washing machine icon on the app.
1)
2)
3)
4)
CAUTION
• Wi-Fi uncertified routers may fail to establish the connection.
• If installing the washing machine and the AP near microwave ovens or electric hairdryers,
Smart Control may not function properly due to electric interference.
• The washing machine supports only the Wi-Fi 2.4Ghz protocols.
• The surrounding environment may affect the wireless network performance.
• If you run the app without being logged in, you will see the Account guidance screen.
Once logged in, you can change your account settings in Settings > Account.
• Samsung smartphone users can automatically log into the app once registering their
account in Settings.
English - 39
Untitled-48 39
2015-01-26
3:31:35
Using the Samsung Smart Home app
Key features
• Integrated control of Samsung smart appliances
Register your Samsung smart devices to the Samsung Smart Home service that you can
leverage for easy access. Select the washing machine icon on the app to access the core
features of the washing machine on the move.
• Master key
The master key consists of 4 modes: Going out, Coming home, Good night, and Good
morning.
• Chat controls
Chat between smart devices and get the information to control the device.
• Home monitoring
Use the built-in camera of your smart device to monitor the living room while on the move.
• Customer support
Download the product manual or request for a service repair.
Some features of this service may not be available on the washing machine.
Samsung Smart Home Washing Machine app
Control and monitor the washing machine both home and on the move.
1. Register the washing machine to the Samsung Smart Home app.
2. To enable remote control, turn on Smart Control on the washing machine.
3. Select the washing machine icon on the mobile device and tap Start.
This product is a smart washing machine that supports the Samsung Smart Home
service.
For more information, visit www.samsung.com.
English - 40
Untitled-48 40
2015-01-26
3:31:35
Samsung Smart Washer app
OPERATIONS
When using the Samsung Smart Washer app, make sure “Samsung Smart Washer” under the
Setup menu is selected.
The Samsung Smart Washer app allows you to control some functions of the washing machine on
your mobile device.
Download
1. Search for Samsung Smart Washer at the Play Store or the Apple Store.
2. Download and install the app on the mobile device.
3. Run the Samsung Smart Washer app on your mobile device.
Connect to the washing machine
The washing machine must be connected to a Wi-Fi network.
Indoor control
To enable this mode, the mobile device must be connected to the same network as the washing
machine.
1. On the mobile device, tap Indoor control to display a list of available washing machine models.
2. Tap the model name of a washing machine to connect, and then tap OK. The authentication
window appears.
3. On the washing machine, tap Settings, and slide the Smart Control bar to On. The
authentication procedure begins.
The authentication procedure is required just once for the first use.
Outdoor control
To enable this mode, the washing machine must be registered to the Samsung Smart Appliance
site (www.samsungsmartappliance.com).
1. On the washing machine, tap Settings, and slide the Smart Control bar to On.
2. On the mobile device, tap Outdoor control, and provide the login credentials.
A list of registered devices appears.
3. Tap a device that you want to control from the list. Now, a remote connection will be
established automatically between the washing machine and the mobile device.
No authentication procedure is required.
English - 41
Untitled-48 41
2015-01-26
3:31:35
Registration
Register your washing machine to the Samsung Smart Appliance site (www.
samsungsmartappliance.com), and get remote access to the washing machine. The washing
machine must be connected to a Wi-Fi network.
1. Go to the Samsung Smart Appliance website (www.samsungsmartappliance.com).
2. Provide your Samsung account credentials to log in. If not a registered user, click Create a
Samsung account and follow the onscreen instructions.
3. Click My Page > Add device, and provide the MAC address of the washing machine.
To check the MAC address, tap Settings > Network on the washing machine.
4. Click Get Approval.
5. Tap Settings on the washing machine, and tap OK if asked to get approval.
Registered washing machines are found in the device list of the website.
Hereby, Samsung Electronics, declares that this washing machine is in compliance with the
essential requirements and other relevant provisions of Directive 1999/5/EC.
The official Declaration of conformity may be found at http://www.samsung.com, go to
Support > Search Product Support and enter the model name.
English - 42
Untitled-48 42
2015-01-26
3:31:35
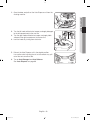
Maintenance
MAINTENANCE
Keep the washing machine clean to prevent deteriorated performance and to preserve its life cycle.
Eco Drum Clean
Perform this course regularly to clean the drum and to remove bacteria from it.
1. Tap Course > Eco Drum Clean.
2. Move to the main screen, and tap Start.
The water temperature for Eco Drum Clean is set to 70 °C, which cannot be changed.
CAUTION
Do not use any cleaning agents for cleaning the drum. Chemical residue in the drum
deteriorates the washing performance.
Eco Drum Clean reminder
• The Eco Drum Clean reminder appears on the main screen once every 40 washes. It is
advisable to perform the Eco Drum Clean regularly.
• When you first see this reminder, you can ignore the reminder (up to 6 times) by tapping
Remind later. From the 7th wash, the reminder does not appear. However, it appears again
on the second 40th wash.
English - 43
Untitled-48 43
2015-01-26
3:31:35
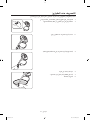
Emergency drain
In case of a power failure, drain the water inside the drum before taking out the laundry.
1. Unplug the power cord of the washing machine from the main
socket.
2. Gently press the top area of the filter cover to open.
3. Gently pull out the emergency drain tube.
4. While holding the end of the drain tube, open the tube cap.
5. Let the water run into a container.
6. Close the tube cap, and reinsert the drain tube.
7. Close the filter cover.
English - 44
Untitled-48 44
2015-01-26
3:31:35
Cleaning
MAINTENANCE
Surface of the washing machine
Use a soft cloth with a nonabrasive household detergent. Do not spray water onto the washing
machine.
Mesh filter
Clean the mesh filter of the water supply hose once or twice a year.
1. Turn off the washing machine, and unplug the power cord.
2. Close the water tap.
3. Loosen and disconnect the water supply hose from the
back of the washing machine. Cover the hose with a cloth to
prevent water from gushing out.
4. Use pliers to pull out the mesh filter from the inlet valve hole.
5. Submerge the mesh filter deeply in water so that the threaded
connector is also submerged.
6. Dry the mesh filter completely in the shade.
7. Reinsert the mesh filter into the water supply hose, and place
the water supply hose in the original position.
8. Open the water tap.
If the mesh filter is clogged, an error code of “4E” appears on the screen.
English - 45
Untitled-48 45
2015-01-26
3:31:36
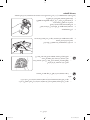
Debris filter
It is advisable to clean the debris filter 5 or 6 times a year to prevent its clogging. A clogged debris
filter may reduce the bubble effect.
1. Turn off the washing machine, and unplug the power cord.
2. Drain the remaining water inside the drum by referring to
“Emergency drain” on page 44.
3. Open the filter cover using a coin or key.
4. Turn the debris filter cap to the left, and drain off the remaining
water.
5. Remove the debris filter.
6. Clean the debris filter using soft brushes. Make sure the drain
pump propeller inside the filter is unclogged.
7. Reinsert the debris filter, and turn the filter cap to the right.
• To open the safety filter cap, push in and turn it
anticlockwise. The spring of the cap helps to open the
cap.
• To close the safety filter cap, turn it clockwise. The
spring makes a rattling sound, which is normal.
• If the debris filter is clogged, an error code of “5E” appears on the screen.
CAUTION
• Make sure the filter cap is closed properly after cleaning the filter. Otherwise, this may
cause a leak.
• Make sure the filter is inserted properly after cleaning it. Otherwise, this may cause an
operational failure or a leak.
English - 46
Untitled-48 46
2015-01-26
3:31:36
Auto Dispense unit
The Auto Dispense unit must be cleaned regularly to ensure proper operation at all times.
MAINTENANCE
1. Remove the Auto Dispense unit from the washing machine.
2. Wipe out the recess of the Auto Dispense unit using a dry
cloth.
3. Remove two knobs of the Auto Dispense unit as well as the
two caps at the bottom, and run water through the Auto
Dispense unit to clean the inner area.
Do not shake the Auto Dispense unit as you may be
spattered with water from the vent of the Auto Dispense unit.
4. Reinsert knobs and caps in the original position.
5. Reinsert the Auto Dispense unit in the original position.
English - 47
Untitled-48 47
2015-01-26
3:31:36
Recovery from freezing
The washing machine may freeze when it drops below 0 °C.
1. Turn off the washing machine, and unplug the power cord.
2. Pour warm water over the water tap to loosen the water supply hose.
3. Disconnect the water supply hose, and soak it in warm water.
4. Pour warm water into the drum and leave it for about 10 minutes.
5. Reconnect the water supply hose to the water tap.
If the washing machine still doesn’t operate normally, repeat the above steps until it operates
normally.
Care against an extended time of disuse
Avoid leaving the washing machine unused for an extended time.
If this is the case, drain the washing machine and unplug the power cord.
1. On the main screen, tap Course > Cotton with an option of Quick Wash.
2. Empty the drum, and tap Start.
3. When the course is complete, close the water tap and disconnect the water supply hose.
4. Turn off the washing machine, and unplug the power cord.
5. Open the door to let air circulate through the drum.
English - 48
Untitled-48 48
2015-01-26
3:31:36
Troubleshooting
TROUBLESHOOTING
Checkpoints
If you encounter a problem with the washing machine, first check the table below and try the
suggestions.
Problem
Action
The washing machine
won’t start.
•
•
•
•
Make sure the washing machine is plugged in.
Make sure the door is properly closed.
Make sure the water tap is open.
Tap Start again on the main screen.
Water supply is
insufficient, or no water
is supplied.
•
•
•
•
Open the water tap fully.
Make sure the water supply hose is not frozen.
Make sure the water supply hose is not kinked or clogged.
Clean the filter on the water supply hose.
• Make sure the washing machine is installed on a level floor. If the
floor is not level, use the levelling feet to adjust the level.
The washing machine
vibrates badly or makes • Make sure that the shipping bolts are removed.
noise.
• Make sure the washing machine is not touching any other object.
• Make sure the laundry load is balanced.
The washing machine
does not drain and/
or spin.
• Make sure the drain hose is straightened all the way to the drain
system.
• Make sure the debris filter is not clogged.
The door won’t open.
• Tap Start to stop operating the washing machine.
• The door remains locked during the heating cycle of the Sanitize
course.
• It may take several seconds to disengage the locking mechanism.
The washing machine
produces lots of
bubbles.
• Check if the Auto Detergent and Auto Softener settings are
properly specified.
• Make sure you use the recommended types of detergent as
appropriate.
I cannot apply
additional detergent.
• Check the remaining amount of detergent and fabric softener to
see if they are already up to the limit.
• Make sure the Auto Dispense function is enabled, with both the
Water Hardness and Concentration settings properly specified.
If a problem persists, contact a local Samsung service centre.
English - 49
Untitled-48 49
2015-01-26
3:31:36
Information codes
If the washing machine fails to operate, you may see an information code on the screen. Check the
table below and try the suggestions.
Problem
Action
DE
• Make sure the door is properly closed.
• Make sure laundry is not caught in the door.
4E
• Make sure the water tap is open.
• Make sure the washing machine is operating with sufficient water pressure,
• Clean the mesh filter as it may be clogged.
5E
• Clean the debris filter as it may be clogged.
• Make sure the drain hose is not kinked all the way to the drain system.
• Clean the mesh filter as it may be clogged.
UE
CE/3E/UC
• The laundry load is unbalanced. Spread the laundry evenly.
• This is not user-repairable. Contact a local Samsung service centre.
If any information code keeps appearing on the screen, contact a local Samsung service centre.
English - 50
Untitled-48 50
2015-01-26
3:31:36
Specifications
SPECIFICATIONS
Protecting the environment
• This appliance is manufactured from recyclable materials. If you decide to dispose of this
appliance, please observe local waste disposal regulations. Cut off the power cord so that the
appliance cannot be connected to a power source. Remove the door so that animals and small
children cannot get trapped inside the appliance.
• Do not exceed the detergent quantities recommended in the detergent manufacturer's
instructions.
• Use stain removal products and bleaches before the wash cycle only when strictly necessary.
• Save water and electricity by only washing full loads (the exact amount depends upon the
program used).
Fabric care chart
The following symbols provide garment care directions. The care labels include four symbols in
this order: washing, bleaching, drying and ironing (and dry cleaning when necessary). The use of
symbols ensures consistency among garment manufacturers of domestic and imported items.
Follow the care label directions to maximize garment life and reduce laundry problems.
Resistant material
Do not iron
Delicate fabric
Can be dry cleaned using any
solvent
Item can be washed at 95 ˚C
Dry Clean
Item can be washed at 60 ˚C
Dry clean with perchloride, lighter
fuel, pure alcohol or R113 only
Item can be washed at 40 ˚C
Dry clean with aviation fuel, pure
alcohol or R113 only
Item can be washed at 30 ˚C
Do not dry clean
Hand wash only
Dry flat
Dry clean only
Can be hung to dry
Can be bleached in cold water
Dry on clothes hanger
Do not bleach
Tumble dry, normal heat
Can be ironed at 200 ˚C max
Tumble dry, reduced heat
Can be ironed at 150 ˚C max
Do not tumble dry
Can be ironed at 100 ˚C max
English - 51
Untitled-48 51
2015-01-26
3:31:38
Specification sheet
TYPE
FRONT LOADING WASHING MACHINE
MODEL NAME
WW10H9*****
DIMENSIONS
W600xD600xH850(mm)
WATER PRESSURE
50 kPa ~ 800 kPa
WATER VOLUME
68 ℓ
NET WEIGHT
87 kg
WASH AND SPIN CAPACITY
WASHING
POWER
CONSUMPTION
10.0 kg
220 V
150 W
240 V
150 W
WASHING AND
HEATING
220 V
2000 W
240 V
2300 W
SPIN
220~240 V
700 W
PUMPING
SPIN REVOLUTIONS
30 W
rpm
1400, 1600
The energy label specifications have been determined by using the following program
according to UAE.S 5010 2:2013. (Only for U.A.E models)
• The program is " Cotton 60 ˚C".
English - 52
Untitled-48 52
2015-01-26
3:31:38
Specification sheet (Only for Saudi arabia models)
Country of origin
Made in Korea
The type number
WW90H9******
Kind of washing machine
Automatic electric Washing
machine
Washing system
Washing machine with drum
system
Rated voltage (volts)
230 V~
Rated frequency (Hz)
60 Hz
Rated power input (watt or
kW)
Rated power input
2200 W
Wash heater
2000 W
Main motor
540 W
Pump motor
30 W
Circulation motor
30 W
Standard (rated) washing capacity (kg)
9.0 kg
Standard quantity of used water (litre)
76 ℓ
Washing machine class
SPECIFICATIONS
The manufacturer’s name and/or his trademark
Class I
IP number
IPX4
The maximum permissible inlet water pressure
800 kPa
The minimum permissible inlet water pressure
50 kPa
Water volume
68 ℓ
Dimensions
W600 x D600 x H850 (mm)
Net weight
87 kg
Spin revolutions
1400 rpm
•
•
•
•
The washing machine shall not be installed at a humid place.
The wringer must be switched off when not in use.
The washing machine must not be operated by children.
The appearance and specifications of the product are subject to change without prior notice for
purposes of product enhancement.
• The hands shall not be inserted into running water extracting tub.
• The washing machine whose lid can be opened during water extraction, that if it takes 15 s or
more for complete stop of water-extracting chamber tub such a case should be understood as
a trouble.
The energy label specifications have been determined by using the following program
according to SASO 2692 and SASO 2693.
Cotton 40 ˚C, 2 rinses, Intensive, 1400 rpm
• The program for WW90H9****** is
English - 53
Untitled-48 53
2015-01-26
3:31:38
Memo
Untitled-48 54
2015-01-26
3:31:38
Memo
Untitled-48 55
2015-01-26
3:31:38
QUESTIONS OR COMMENTS?
COUNTRY
CALL
OR VISIT US ONLINE AT
U.A.E
800-SAMSUNG (726-7864)
www.samsung.com/ae/support (English)
www.samsung.com/ae_ar/support (Arabic)
SAUDI ARABIA
920021230
www.samsung.com/sa/support
www.samsung.com/sa_en/support (English)
DC68-03377M-03
Untitled-48 56
2015-01-26
3:31:38
*****WW10H9
******WW90H9
غسالة كهربائية أوتوماتيكية
دليل املستخدم
إمكانات هائلة
نشكرك على شراء هذا املنتج من .Samsung
DC68-03377M-03
3:34:02
2015-01-26
Untitled-49 1
احملتويات
3
معلومات السالمة
ما يجب أن تعرفه حول إرشادات السالمة3 . . . . . . . . . . . . . . . . . . . . . . . . . . . . . . . . . . . . . . . . . . . . . . . . . . . . . . . . . . . . . . . .
رموز السالمة الهامة 3 . . . . . . . . . . . . . . . . . . . . . . . . . . . . . . . . . . . . . . . . . . . . . . . . . . . . . . . . . . . . . . . . . . . . . . . . . . . . . . .
احتياطات السالمة الهامة4 . . . . . . . . . . . . . . . . . . . . . . . . . . . . . . . . . . . . . . . . . . . . . . . . . . . . . . . . . . . . . . . . . . . . . . . . . . .
التركيب
11
قبل أن تبدأ
18
العمليات
25
الصيانة
43
استكشاف املشكالت وإصالحها
49
املواصفات
51
محتويات العبوة 11 . . . . . . . . . . . . . . . . . . . . . . . . . . . . . . . . . . . . . . . . . . . . . . . . . . . . . . . . . . . . . . . . . . . . . . . . . . . . . . . . . .
متطلبات التركيب 12 . . . . . . . . . . . . . . . . . . . . . . . . . . . . . . . . . . . . . . . . . . . . . . . . . . . . . . . . . . . . . . . . . . . . . . . . . . . . . . . .
التركيب خطوة بخطوة 14 . . . . . . . . . . . . . . . . . . . . . . . . . . . . . . . . . . . . . . . . . . . . . . . . . . . . . . . . . . . . . . . . . . . . . . . . . . . .
اإلعدادات األولية 18 . . . . . . . . . . . . . . . . . . . . . . . . . . . . . . . . . . . . . . . . . . . . . . . . . . . . . . . . . . . . . . . . . . . . . . . . . . . . . . . . . .
إرشادات الغسيل20 . . . . . . . . . . . . . . . . . . . . . . . . . . . . . . . . . . . . . . . . . . . . . . . . . . . . . . . . . . . . . . . . . . . . . . . . . . . . . . . . . .
اإلرشادات اخلاصة باملسحوق 22 . . . . . . . . . . . . . . . . . . . . . . . . . . . . . . . . . . . . . . . . . . . . . . . . . . . . . . . . . . . . . . . . . . . . . . . . .
الشاشة 25 . . . . . . . . . . . . . . . . . . . . . . . . . . . . . . . . . . . . . . . . . . . . . . . . . . . . . . . . . . . . . . . . . . . . . . . . . . . . . . . . . . . . . . . .
خطوات بسيطة لبدء التشغيل28 . . . . . . . . . . . . . . . . . . . . . . . . . . . . . . . . . . . . . . . . . . . . . . . . . . . . . . . . . . . . . . . . . . . . . .
نظرة عامة على برامج الغسيل 29 . . . . . . . . . . . . . . . . . . . . . . . . . . . . . . . . . . . . . . . . . . . . . . . . . . . . . . . . . . . . . . . . . . . . . .
اإلعدادات 33 . . . . . . . . . . . . . . . . . . . . . . . . . . . . . . . . . . . . . . . . . . . . . . . . . . . . . . . . . . . . . . . . . . . . . . . . . . . . . . . . . . . . . . . .
التحكم الذكي عبر األجهزة احملمولة من 37 . . . . . . . . . . . . . . . . . . . . . . . . . . . . . . . . . . . . . . . . . . . . . . . . . . . . . . Samsung
تطبيق 39 . . . . . . . . . . . . . . . . . . . . . . . . . . . . . . . . . . . . . . . . . . . . . . . . . . . . . . . . . . . . . . . . . . . . . Samsung Smart Home
تطبيق غسالة الذكي من 41 . . . . . . . . . . . . . . . . . . . . . . . . . . . . . . . . . . . . . . . . . . . . . . . . . . . . . . . . . . . . . . . . . .Samsung
تنظيف احلوض 43 . . . . . . . . . . . . . . . . . . . . . . . . . . . . . . . . . . . . . . . . . . . . . . . . . . . . . . . . . . . . . . . . . . . . . . . . . . . . . . . . . . .
التصريف عند الطوارئ 44 . . . . . . . . . . . . . . . . . . . . . . . . . . . . . . . . . . . . . . . . . . . . . . . . . . . . . . . . . . . . . . . . . . . . . . . . . . . . .
التنظيف 45 . . . . . . . . . . . . . . . . . . . . . . . . . . . . . . . . . . . . . . . . . . . . . . . . . . . . . . . . . . . . . . . . . . . . . . . . . . . . . . . . . . . . . . . .
االستعادة بعد التجمد 48 . . . . . . . . . . . . . . . . . . . . . . . . . . . . . . . . . . . . . . . . . . . . . . . . . . . . . . . . . . . . . . . . . . . . . . . . . . . . .
العناية بالغسالة في حالة عدم االستعمال فترة مطولة48 . . . . . . . . . . . . . . . . . . . . . . . . . . . . . . . . . . . . . . . . . . . . . . . . . .
نقاط الفحص 49 . . . . . . . . . . . . . . . . . . . . . . . . . . . . . . . . . . . . . . . . . . . . . . . . . . . . . . . . . . . . . . . . . . . . . . . . . . . . . . . . . . . .
رموز املعلومات50 . . . . . . . . . . . . . . . . . . . . . . . . . . . . . . . . . . . . . . . . . . . . . . . . . . . . . . . . . . . . . . . . . . . . . . . . . . . . . . . . . . . .
حماية البيئة51 . . . . . . . . . . . . . . . . . . . . . . . . . . . . . . . . . . . . . . . . . . . . . . . . . . . . . . . . . . . . . . . . . . . . . . . . . . . . . . . . . . . . .
جدول العناية باألقمشة 51 . . . . . . . . . . . . . . . . . . . . . . . . . . . . . . . . . . . . . . . . . . . . . . . . . . . . . . . . . . . . . . . . . . . . . . . . . . . .
جدول املواصفات 52 . . . . . . . . . . . . . . . . . . . . . . . . . . . . . . . . . . . . . . . . . . . . . . . . . . . . . . . . . . . . . . . . . . . . . . . . . . . . . . . . . .
صفحة املواصفات (لطرز السعودية فقط) 53 . . . . . . . . . . . . . . . . . . . . . . . . . . . . . . . . . . . . . . . . . . . . . . . . . . . . . . . . . . . . .
فارسی 2 -
3:34:02
2015-01-26
Untitled-49 2
تهانينا على شرائك غسالة Samsungاجلديدة .يتضمن هذا الدليل معلومات هامة حول عملية تركيب اجلهاز واستخدامه
والعناية به .الرجاء قراءة هذا الدليل بعناية لتتمكن من االستفادة الكاملة من امليزات والفوائد العديدة املتوفرة بالغسالة.
ما يجب أن تعرفه حول إرشادات السالمة
مالسلا تامولعم
معلومات السالمة
يرجى قراءة هذا الدليل بعناية لضمان معرفة كيفية تشغيل امليزات والوظائف املتعددة لغسالتك اجلديدة بسالمة وفاعلية،
كما يجب االحتفاظ به في مكان آمن بالقرب من اجلهاز للرجوع إليه في املستقبل .استخدم هذا اجلهاز للغرض اخملصص له
فقط على النحو املوضح في دليل اإلرشادات الذي بني يديك.
ال تغطي التحذيرات وإرشادات السالمة الهامة الواردة في هذا الدليل كافة الظروف واملواقف احملتمل حدوثها ،لذا ،يجب
التعامل بحذر وانتباه وعناية عند تركيب الغسالة وصيانتها وتشغيلها.
ونظرًا ألن إرشادات التشغيل التالية تنطبق على ُطرز متعددة ،فإن خصائص الغسالة التي تستعملها قد تختلف قليال ً عن
تلك املوصوفة في هذا الدليل ،كما أن بعض عالمات التحذير املذكورة قد تكون غير قابلة للتطبيق .إذا كان لديك أي أسئلة أو
استفسارات ،اتصل بأقرب مركز خدمة ،أو ابحث عن التعليمات واملعلومات عبر اإلنترنت على املوقع .www.samsung.com
رموز السالمة الهامة
تشير الرموز والعالمات املوجودة في دليل املستخدم الذي بني يديك إلى ما يلي:
حتذير :املمارسات اخلطيرة أو غير اآلمنة التي قد تؤدي إلى إصابات خطيرة لألشخاص و/أو املوت و/أو تلف
باملمتلكات.
تنبيه :املمارسات اخلطيرة أو غير اآلمنة التي قد تؤدي إلى إصابات لألشخاص و/أو تلف باملمتلكات.
مالحظة:
تهدف عالمات التحذير هذه إلى منع حدوث إصابات لك ولآلخرين.
لذا ،يرجى اتّباعها بعناية.
وبعد قراءة هذا الدليل ،احتفظ به في مكان آمن للرجوع إليه في املستقبل.
اقرأ جميع اإلرشادات ً
أوال قبل استخدام اجلهاز.
يوجد احتمال التعرض للمخاطر ،كما هو احلال مع أي أجهزة تستخدم الطاقة الكهربية واألجزاء املتحركة .ولتشغيل هذا
اجلهاز بأمان ،يجب عليك التعرّف على طريقة تشغيله وتوخي احلذر أثناء استخدامه.
فارسی 3 -
3:34:02
2015-01-26
Untitled-49 3
احتياطات السالمة الهامة
حتذير :لتقليل احتماالت نشوب حريق أو التعرّض لصدمة كهربية أو حدوث إصابة جسدية ألشخاص أثناء
استخدام اجلهاز ،اتّبع احتياطات السالمة األساسية التالية:
ال تدع األطفال (أو احليوانات األليفة) يلعبون داخل الغسالة أو فوقها ،حيث إنه ال ميكن فتح
باب الغسالة بسهولة من الداخل ،وقد يصاب األطفال بإصابات بالغة اخلطورة في حالة
احتباسهم بداخلها.
يجب عدم استخدام هذا اجلهاز من قبل ذوي اإلعاقات البدنية أو احلسية أو العقلية أو من
تنقصهم املعرفة واخلبرة (مبا في ذلك األطفال) ،إال إذا كانوا حتت إشراف شخص يوفر لهم
ً
مسؤوال عن سالمتهم.
إرشادات استخدام اجلهاز ويكون
جتب مراقبة األطفال لضمان عدم عبثهم باجلهاز.
بالنسبة لالستخدام في أوروبا :ميكن أن يستخدم هذا اجلهاز األطفال الذين تبدأ أعمارهم
من 8سنوات فيما أكثر ،باإلضافة إلى األشخاص الذين يتميزون بقدرات عضلية أو حسية
أو عقلية قليلة أو أولئك الذين تنقصهم املعرّفة واخلبرة إذا كانوا حتت اإلشراف وواعني
لإلرشادات التي تتعلق باستخدام اجلهاز بطريقة آمنة وفهم اخملاطر املتضمنة في عملية
االستخدام .ويجب عدم السماح لألطفال باللعب بالغسالة ،كما يجب عدم السماح
لألطفال بالتنظيف أو الصيانة التي يقوم بها املستخدم دون إشراف.
في حالة تلف سلك التيار الكهربي ،يجب تغييره من قبل الشركة املصنِّعة أو وكيل
الصيانة اخلاص بها أو أي فني مؤهل لتجنب التعرض ألي خطر.
يجب وضع اجلهاز بحيث يسهل الوصول إلى قابس التيار الكهربي وصنابير التزوّد باملاء
وأنابيب تصريف املاء.
بالنسبة لألجهزة التي حتتوي على فتحات تهوية بقاعدتها ،يجب جتنب سد السجاد لهذه
الفتحات.
يجب استخدام مجموعة اخلرطوم املرفقة بالغسالة وال تعيد استخدام مجموعة اخلرطوم
القدمية.
تنبيه :لتجنب وجود خطر بسبب إعادة الضبط غير املقصود للقاطع احلراري ،يجب أال يتم
تزويد هذا اجلهاز بالطاقة من خالل جهاز فصل ووصل خارجي -مثل املؤقت -أو توصيله
بدائرة كهربائية يتم تشغيلها وإيقاف تشغيلها بصورة منتظمة من قبل مرفق اخلدمة
العامة.
فارسی 4 -
3:34:02
2015-01-26
Untitled-49 4
حتذير :حتذيرات التركيب الهامة
يجب توخي احلذر عند رفع الغسالة ألن وزنها ثقيل.
قم بتوصيل سلك الطاقة في مقبس حائط بقدرة 220فولط تيار متردد 50 /هرتز 230 ,فولط تيار متردد 60 /هرتز أو أعلى من
ذلك ،واستخدم املقبس لتشغيل هذا اجلهاز فقط .وال تستخدم سلك متديد مطلقً ا.
•قد تؤدي مشاركة مقبس احلائط مع أجهزة أخرى باستخدام مشترك كهرباء أو مد سلك التيار الكهربي إلى حدوث
صدمة كهربية أو نشوب حريق.
•تأكد من تطابق كل من اجلهد الكهربي والتردد والتيار مع القياسات اخلاصة مبواصفات املنتج ،فقد يؤدي عدم االلتزام
بذلك إلى التعرض لصدمة كهربية أو نشوب حريق .يجب التأكد من توصيل سلك التيار الكهربي مبأخذ احلائط بإحكام.
مالسلا تامولعم
يجب تركيب هذا اجلهاز بواسطة فني مؤهل أو شركة صيانة متخصصة.
•قد ينتج عن الفشل في اتباع هذه التعليمات حدوث صدمة كهربية أو حريق أو انفجار أو مشاكل تتعلق باملنتج أو
التعرض لإلصابة.
قم بإزالة أي مواد غريبة ،مثل األتربة أو املاء من النهايات الطرفية لقابس التيار الكهربي ونقاط االتصال باستخدام قطعة
قماش جافة بانتظام.
•افصل قابس التيار الكهربي ونظفه باستخدام قطعة قماش جافة.
•قد يؤدي عدم االلتزام بذلك إلى التعرض لصدمة كهربية أو نشوب حريق.
أدخل قابس التيار الكهربي في مأخذ احلائط بحيث يكون اجتاه السلك ناحية األرض.
•إذا قمت بإدخال قابس الطاقة في املأخذ في االجتاه املعاكس ،فقد تتلف األسالك الكهربائية املوجودة داخل الكبل وقد
يؤدي هذا األمر إلى حدوث صدمة كهربية أو نشوب حريق.
متاما عن متناول أيدي األطفال ،نظرًا ألنها قد متثل خطرًا عليهم.
احتفظ بجميع مواد التعبئة والتغليف بعيدة ً
•قد يؤدي وضع الطفل لكيس من أكياس التغليف فوق رأسه إلى إصابته باالختناق.
في حالة تلف اجلهاز أو قابس التيار الكهربي أو سلك التيار الكهربي ،فاتصل بأقرب مركز خدمة.
يجب توصيل اجلهاز باألرضي بشكل سليم.
ال تقم بتوصيل اجلهاز مباسورة غاز أو ماسورة ماء بالستيكي أو سلك تليفون.
•قد يؤدي ذلك إلى التعرّض لصدمة كهربية أو نشوب حريق أو حدوث انفجار أو مشكالت باملنتج.
•يجب عدم توصيل سلك التيار الكهربي مبأخذ لم يتم توصيله بأرضي بشكل صحيح ،وتأكد من أن ذلك يتم وفقً ا
للقوانني احمللية والدولية.
يجب عدم تركيب هذا اجلهاز بالقرب من سخان أو أي مواد ملتهبة.
ال تضع هذا اجلهاز في مكان رطب أو به زيت أو أي مكان به غبار أو في مكان عرضة لضوء الشمس املباشر أو املاء (قطرات
املطر).
يجب عدم تركيب هذا اجلهاز في مكان معرّض لدرجات حرارته منخفضة.
•قد يؤدي اجلليد إلى انفجار األنابيب.
يجب عدم تركيب هذا اجلهاز في موقع يكون به تسرب للغاز.
•قد ينتج عن هذا األمر حدوث صدمة كهربية أو نشوب حريق.
ً
كهربيا.
محوال
ال تستخدم
ً
•قد ينتج عن هذا األمر حدوث صدمة كهربية أو نشوب حريق.
ال تستخدم قابس تيار كهربي أو سلك تيار كهربي تالفً ا أو مقبس حائط غير ُمحكم.
•قد ينتج عن هذا األمر حدوث صدمة كهربية أو نشوب حريق.
فارسی 5 -
3:34:02
2015-01-26
Untitled-49 5
وال تسحب سلك التيار الكهربي أو تثنيه بشدة.
وال جتدل سلك التيار الكهربي أو تربطه.
ال تعلق سلك التيار الكهربي فوق شيء معدني أو تضع شي ًئا ثقيال ً فوقه أو مترر سلك التيار الكهربي بني أشياء أو تدفعه في
املساحة املوجودة خلف اجلهاز.
•قد ينتج عن هذا األمر حدوث صدمة كهربية أو نشوب حريق.
ال جتذب سلك التيار الكهربي عند فصل قابس التيار الكهربي.
•افصل قابس التيار الكهربي عن طريق اإلمساك بالقابس.
•قد يؤدي عدم االلتزام بذلك إلى التعرض لصدمة كهربية أو نشوب حريق.
تنبيه :تنبيهات التركيب
يجب تركيب هذا اجلهاز بطريقة ميكن من خاللها الوصول إلى قابس التيار الكهربي بسهولة.
•قد يؤدي عدم االلتزام بهذا األمر إلى حدوث صدمة كهربية أو نشوب حريق نتيجة لتسريب الكهرباء.
يجب تركيب اجلهاز على أرضية مستوية وصلبة تتحمل وزنه.
•قد ينتج عن عدم االلتزام بهذه التعليمات حدوث اهتزازات أو حتركات أو ضوضاء أو مشاكل غير طبيعية باملنتج.
حتذير :حتذيرات االستخدام الهامة
في حالة تعرض اجلهاز لكمية زائدة من املاء ،أوقف توريد املياه والتيار الكهربي بشكل فوري ،واتصل بأقرب مركز خدمة.
•ال تلمس قابس التيار الكهربي بيدين ُمبتلتني.
•قد يؤدي عدم االلتزام بذلك إلى حدوث صدمة كهربية.
في حالة إصدار اجلهاز لضوضاء غير طبيعية أو رائحة اشتعال أو دخان ،افصل قابس التيار الكهربي فورًا واتصل بأقرب مركز
خدمة.
•قد يؤدي عدم االلتزام بذلك إلى التعرض لصدمة كهربية أو نشوب حريق.
في حالة وجود تسريب للغاز (مثل غاز البروبان أو الغاز النفطي املُسال ،وما إلى ذلك) ،يجب تهوية املكان فورًا دون ملس قابس
التيار الكهربي .وال تلمس اجلهاز أو سلك التيار الكهربي.
•ال تستخدم مروحة تهوية.
•قد حتدث شرارة وتؤدي إلى حدوث صدمة كهربية أو نشوب حريق.
ال تدع األطفال يلعبون فوق الغسالة أو بداخلها .كذلك ،يجب فك حامل مقبض الغسالة عند التخلص من اجلهاز.
•قد يعلق الطفل في حالة انحشاره داخل الغسالة ويتعرض لالختناق حتى املوت.
تأكد من إزالة الغالف (اإلسفنج /الفوم) املوجود أسفل الغسالة قبل استخدامها.
يجب عدم غسل العناصر امللوثة باجلازولني أو الكيروسني أو البنزين أو مرقق الطالء أو الكحول أو أي مواد أخرى قابلة لالشتعال
أو االنفجار.
•قد ينتج عن هذا األمر حدوث صدمة كهربية أو نشوب حريق أو انفجار.
يجب عدم فتح باب الغسالة بالقوة أثناء التشغيل (الغسل/التجفيف/العصر عند درجة حرارة عالية).
•قد ينتج عن اندفاع املاء خارج الغسالة اإلصابة بحروق أو تصبح األرض منزلقة .قد ينتج عن ذلك حدوث إصابات.
•قد يؤدي فتح الباب بالقوة إلى تلف املنتج أو حدوث إصابة.
ال تضع يدك أسفل الغسالة أثناء تشغيلها.
•قد ينتج عن ذلك حدوث إصابات.
ال تلمس قابس التيار الكهربي بيدين ُمبتلتني.
•قد ينتج عن هذا األمر التعرض لصدمة كهربية.
فارسی 6 -
3:34:03
2015-01-26
Untitled-49 6
يجب عدم السماح لألطفال أو األفراد غير املؤهلني باستخدام هذه الغسالة دون إشراف كامل ، .كما يجب عدم السماح
لألطفال بالصعود فوق الغسالة.
•قد ينتج عن ذلك حدوث صدمة كهربية أو حروق أو إصابة.
ال تضع يدك أو أي كائن معدني أسفل الغسالة أثناء تشغيلها.
•قد ينتج عن ذلك حدوث إصابات.
مالسلا تامولعم
يجب عدم إيقاف تشغيل الغسالة بفصل قابس التيار الكهربي أثناء تشغيلها.
•قد يؤدي إدخال قابس التيار الكهربي مرة أخرى في مأخذ احلائط إلى حدوث شرارة ينتج عنها صدمة كهربية أو نشوب
حريق.
دائما مسك قابس الطاقة بإحكام وسحبه بشكل مستقيم
ال تفصل اجلهاز عن طريق سحب سلك التيار الكهربي ،بل يجب ً
من مخرج التيار الكهربي إلى اخلارج.
•قد يؤدي تلف سلك التيار الكهربي إلى حدوث قصر في الدائرة الكهربية و/أو حريق و/أو التعرّض لصدمة كهربية.
ال حتاول إصالح اجلهاز أو فكّه أو تعديله بنفسك.
•يجب عدم استخدام أي صمام كهربائي (مثل النحاس أو سلك معدني وما إلى ذلك) غير الصمام الكهربائي القياسي.
•اتصل بأقرب مركز خدمة عند احلاجة إلى إصالح اجلهاز أو إعادة تركيبه.
•قد قد يؤدي عدم االلتزام بهذه التعليمات حدوث صدمة كهربية أو نشوب حريق أو مشاكل تتعلق باملنتج أو التعرض
لإلصابة.
عندما يصبح خرطوم التزوّد باملاء غير محكم وينتج عنه تسريب للماء في اجلهاز ،يجب فصل سلك التيار الكهربي من مأخذ
الكهرباء.
•قد يؤدي عدم االلتزام بذلك إلى التعرض لصدمة كهربية أو نشوب حريق.
يجب فصل قابس التيار الكهربي عند عدم استخدام اجلهاز لفترات طويلة أو أثناء العواصف الرعدية أو البرق.
•قد يؤدي عدم االلتزام بذلك إلى التعرض لصدمة كهربية أو نشوب حريق.
في حالة دخول أي مادة غريبة ،مثل املاء إلى اجلهاز ،قم بفصل قابس التيار الكهربي واتصل بأقرب مركز خدمة لشركة
.Samsung
•قد ينتج عن هذا األمر حدوث صدمة كهربية أو نشوب حريق.
فارسی 7 -
3:34:03
2015-01-26
Untitled-49 7
تنبيه :تنبيهات االستخدام
عندما يعلق بالغسالة مادة غريبة ،مثل املنظفات أو األتربة أو مخلفات الطعام وما إلى ذلك ،افصل قابس التيار الكهربي
ونظف الغسالة باستخدام قطعة قماش رطبة وناعمة.
ّ
•قد يؤدي عدم االلتزام بهذا األمر إلى حدوث تغير في األلوان أو التشويه أو التلف أو الصدأ.
قد ينكسر الزجاج األمامي نتيجة حلدوث اصطدام قوي .لذا ،يجب احلرص عند استخدام الغسالة.
•قد حتدث إصابة في حالة انكسار الزجاج.
عند حدوث فشل في توريد املاء أو عند إعادة توصيل خرطوم توريد املاء ،يجب فتح الصنبور ببطء.
افتح الصنبور ببطء عند االستخدام بعد فترة طويلة من عدم االستخدام.
•قد يؤدي ضغط الهواء في خرطوم توريد املاء أو ماسورة املاء إلى تلف جزء من الغسالة أو حدوث تسرب للماء.
في حالة حدوث خطأ في عملية التصريف أثناء التشغيل ،حتقق من عدم وجود مشكلة تتعلق بالتصريف.
•قد يؤدي استخدام الغسالة أثناء تسرب املياه منها نتيجة وجود مشكلة بالتصريف إلى اإلصابة بصدمة كهربية أو
نشوب حريق نتيجة حلدوث تسرب كهربي.
يجب إدخال املالبس بالكامل في الغسالة بحيث ال تعلق بالباب.
•قد يؤدي ذلك إلى تلف املالبس أو الغسالة ،أو قد ينتج عنه حدوث تسريب للماء.
أغلق الصنبور في حالة عدم استخدام الغسالة.
تأكد من ربط مسامير خرطوم توريد املاء بإحكام.
•قد يؤدي عدم االلتزام بهذا األمر إلى تلف اجلهاز أو حدوث إصابات.
تأكد من عدم التصاق أي مواد غريبة باحلاجز املطاطي والزجاج األمامي للباب (على سبيل املثال ،مخلفات أو خيوط أو شعر ،وما
إلى ذلك).
•في حالة التصاق أي مادة غريبة في الباب أو لم يتم إغالقه جيداً ،فقد يتسبب ذلك في حدوث تسرب للماء.
يجب فتح الصنبور والتحقق من إحكام وصلة خرطوم املاء وعدم وجود تسريب للماء قبل استخدام املنتج.
•في حالة عدم إحكام ربط املسامير أو وصلة خرطوم توريد املاء ،قد يحدث تسريب للماء.
مت تصميم املنتج الذي قمت بشرائه لالستخدام املنزلي فقط.
يُعد استخدام املنتج ألغراض جتارية سوء استخدام له .وفي هذه احلالة ،ال يتم تغطية املنتج من قبل الضمان األساسي الذي
تقدمه شركة ،Samsungكما أن شركة Samsungال تتحمل أية مسئولية عن األعطال أو اخلسائر التي تنجم عن سوء
االستخدام.
ال تقف فوق اجلهاز أو تضع أشياء فوقه (مثل ،مالبس الغسيل أو شموع ُمضاءة أو سجائر مشتعلة أو أطباق أو مواد كيماوية أو
أشياء معدنية ،وما إلى ذلك).
•قد ينتج عن هذا األمر اإلصابة بصدمة كهربية أو نشوب حريق أو حدوث مشاكل باملنتج أو وقوع إصابات.
يجب عدم رش مواد متطايرة ،مثل املبيدات احلشرية ،فوق سطح اجلهاز.
أيضا اإلصابة بصدمة كهربية أو نشوب حريق أو حدوث مشاكل
•باإلضافة إلى أن هذا األمر يضر باإلنسان ،فقد ينتج عنه ً
باملنتج.
ال تضع أشيا ًء ينتج عنه مجاالت كهرومغناطيسية بالقرب من الغسالة.
•قد ينتج عن هذا حدوث إصابات شخصية نتيجة وجود خلل في وظائف التشغيل.
املاء الذي يتم تصريفه أثناء الغسل بدرجات حرارة عالية أو أثناء دورة التجفيف يكون ساخنًا ،فال تلمسه.
•قد ينتج عن هذا األمر حدوث حروق أو إصابات جسدية.
يجب عدم غسل مفروشات املقاعد أو السجاد أو األقمشة (*) املقاومة للماء أو عصرها أو جتفيفها ما لم يكن جهازك متضمنًا
دورة خاصة لغسلها.
(*) :املفروشات الصوفية أو األغطية املقاومة لألمطار أو سترات الصيد أو بنطلونات التزلج أو حقائب النوم أو أغطية احلفاضات
فارسی 8 -
3:34:03
2015-01-26
Untitled-49 8
يجب عدم تشغيل الغسالة في حالة عدم وجود درج املسحوق.
•قد ينتج عن هذا األمر حدوث صدمة كهربية أو إصابة جسدية نتيجة لتسرب املاء.
مالسلا تامولعم
أو املالبس الرياضية أو أغطية الدراجات والدراجات البخارية والسيارات ،وما إلى ذلك.
•يجب عدم غسل السجاد السميك أو الثقيل حتى في حالة وجود عالمة الغسالة على بطاقة العناية باملنتج .قد يؤدي
هذا األمر إلى حدوث إصابة أو تلف بالغسالة أو باحلوائط أو باألرضية أو باملالبس نتيجة لالهتزازات غير الطبيعية.
•ال تغسل السجاد الوبر أو ممسحة األرجل التي حتتوي على املطاط .فقد ينسلخ املطاط ويعلق باحلاوية من الداخل ،مما يؤدي
إلى حدوث قصور في أداء املنتج كأن حتدث مشكلة في التصريف.
يجب عدم ملس احلاوية من الداخل أثناء عملية التجفيف أو بعدها مباشرةً؛ حيث يكون ساخنًا.
•قد ينتج عن هذا األمر اإلصابة بحروق.
ال تضع يدك في درج املسحوق.
•قد ينتج عن هذا األمر حدوث إصابات ،حيث ميكن أن تصاب يديك عن طريق جهاز إضافة املسحوق.
جتنب وضع أي أشياء (مثل األحذية وبقايا الطعام واحليوانات) غير املالبس داخل الغسالة.
•قد يؤدي هذا األمر إلى تلف الغسالة أو حدوث إصابة ووفاة في حالة وجود حيوانات أليفة نتيجة لالهتزازات غير
الطبيعية.
يجب عدم الضغط على األزرار باستخدام أدوات حادة ،مثل املسامير أو السكاكني أو األظافر ،وما إلى ذلك.
•قد ينتج عن ذلك حدوث صدمة كهربية أو إصابة.
يُحظر غسل املالبس التي حتتوي على زيوت أو كرميات أو مستحضرات سائلة ،والتي توجد في متاجر املستحضرات اجللدية أو
عيادات التدليك عادةً.
•قد ينتج عن هذا األمر تشوه احلاجز املطاطي ويؤدي إلى تسرب املاء.
يجب عدم ترك أي أشياء معدنية ،مثل الدبابيس أو دبابيس الشعر أو مواد التبييض ،في احلاوية لفترات طويلة من الوقت.
•قد يؤدي هذا األمر إلى صدأ احلاوية.
•وفي حالة بدء ظهور الصدأ على سطح احلاوية ،قم بتنظيف سطحها باستخدام سائل تنظيف (متعادل) وإسفنج .وال
تستخدم فرشاة معدنية مطلقً ا.
ال تستخدم سائل تنظيف جاف بشكل مباشر ،وال تغسل املالبس أو تشطفها أو جتففها في حالة إضافة مسحوق تنظيف
جاف إليها.
•قد يؤدي هذا األمر إلى حدوث اشتعال فوري نتيجة للحرارة الناجتة عن تأكسد الزيت.
ال تستخدم املاء القادم من أجهزة تبريد/تسخني املاء.
•قد ينتج عن هذا األمر حدوث مشاكل في الغسالة.
ال تستخدم صابون غسل يدين متعادل بالغسالة.
•في حالة حدوث التراكم وتيبس داخل الغسالة ،قد حتدث مشاكل تتعلق باملنتج ،مثل تغير اللون أو الصدأ أو تولد رائحة
كريهة.
ميكنك وضع اجلوارب وحماالت الصدر داخل شبكة الغسيل وغسلها مع بقية املالبس.
ال تغسل عناصر الغسيل كبيرة احلجم ،مثل املفروشات ،في شبكة الغسيل.
•يؤدي عدم االلتزام بهذا األمر إلى حدوث إصابة نتيجة لالهتزازات غير الطبيعية.
ال تستخدم مسحوق غسيل متيبس.
•قد يحدث تسرّب للماء في حالة تراكم املسحوق املتيبس داخل الغسالة.
تأكد من إفراغ جميع جيوب املالبس التي سيتم غسلها.
•قد تتسبب األشياء الصلبة واحلادة مثل العمالت املعدنية أو الدبابيس أو املسامير أو املسامير القالووظ أو األحجار في
إحداث أضرار بالغة باجلهاز.
فارسی 9 -
3:34:03
2015-01-26
Untitled-49 9
ال تقم بغسل املالبس املزوّدة بإبزميات أو أزرار كبيرة احلجم أو األشياء املعدنية األخرى ثقيلة الوزن.
افرز الغسيل حسب اللون وفقً ا لثباته ثم حدد الدورة املناسبة ودرجة احلرارة املناسبة والوظائف اإلضافية.
•قد ينتج عن هذا األمر تغيير اللون أو تلف في النسيج.
توخ احلذر حتى ال تنحشر أصابع األطفال بالباب عند إغالقه.
•قد يؤدي عدم توخي احلذر إلى حدوث إصابة.
حتذير :حتذيرات التنظيف الهامة
ال تنظف اجلهاز برش املاء عليه مباشرة.
ال تستخدم عامل تنظيف حمضي قوي.
ال تستخدم البنزين أو مرقق الطالء أو الكحول لتنظيف اجلهاز.
•قد ينتج عن هذا األمر تغيير في اللون أو تشويه أو تلف أو حدوث صدمة كهربية أو نشوب حريق.
افصل قابس اجلهاز من مقبس احلائط قبل تنظيفه أو صيانته.
•قد يؤدي عدم االلتزام بذلك إلى التعرض لصدمة كهربية أو نشوب حريق.
فارسی 10 -
3:34:03
2015-01-26
Untitled-49 10
يُرجى اتباع هذه التعليمات بعناية لضمان التركيب السليم للغسالة ومنع وقوع احلوادث أثناء الغسيل.
محتويات العبوة
بيكرتلا
التركيب
يُرجى التحقق من وجود جميع القطع في عبوة املنتج .وإذا واجهتك مشكلة بالغسالة أو القطع ،يُرجى االتصال مبركز عمالء
Samsungباملنطقة أو بائع التجزئة.
١
٣
٢
٥
٤
٦
٨
٧
1
2
3
4
5
6
7
8
٩
9
١٠
10
زر البدء
زر الطاقة
شاشة التحكم
الباب
احلوض
وحدة التوزيع التلقائي
أرجل توازن
مصفاة اخمللفات
أنبوب التصريف عند
الطوارئ
غطاء املصفاة
مفتاح عادي
أغطية املسامير
دليل اخلرطوم
خرطوم املياه الباردة
خرطوم املياه الساخنة
مجموعة صحون املعايرة
أغطية املسامير :يعتمد عدد أغطية املسامير ( 3إلى )6املزودة على طراز الغسالة.
الطرز املنطبقة فقط.
خرطوم املاء الساخنُ :
مجموعة صحون املعايرة 200 :ملليلتر و 100ملليلتر (حد أقصى).
فارسی 11 -
3:34:03
2015-01-26
Untitled-49 11
متطلبات التركيب
التيار الكهربائي والتأريض
•يلزم توفر قاطع دائرة كهربية أو منصهر بقدرة 220فولط تيار متردد 50 /هرتز 230 ،فولط تيار متردد 60 /هرتز
• يجب استخدام دائرة فرعية مستقلة خصيصا ً للغسالة.
لضمان التأريض السليم ،يتم توريد الغسالة بكبل كهرباء به قابس أرضي بثالثة سنون لالستخدام في مأخذ أرضي مت تركيبه
وتأريضه بشكل سليم.
ويجب استشارة فني كهرباء أو فني خدمة وصيانة مؤهل إذا كنت غير متأكد من التأريض.
يجب عدم تعديل القابس املرفق بالغسالة .إذا لم تناسب منفذ اجلدار ،فاطلب فنيا ً كهربائيا ً لتركيب منفذ مناسب.
حتذير
•"ال" تستخدم مشتركاً.
•استخدم فقط كبل الكهرباء املزودة به الغسالة.
•"ال" توصل سلك األرضي إلى ماسورة بالستيكية أو خط غاز أو ماسورة ماء ساخن.
•ميكن أن تتسبب موصالت األرضي املوصلة بطريقة غير سليمة في التعرض إلى صدمة كهربية.
إمدادات املاء
ضغط املاء الصحيح لهذه الغسالة هو ما بني 50و 800كيلوباسكال .وميكن أن يتسبب ضغط املاء األقل من 50كيلوباسكال
في عدم غلق صمام دخول املاء بالكامل .أو قد تستغرق الغسالة وقتا ً أطول في تعبئة احلوض مما يسبب إيقاف تشغيل
الغسالة .ويجب أن ال تزيد املسافة من صنبور املياه إلى اجلزء اخللفي من الغسالة عن 120سم حتى ميكن أن يصل إليها
خرطوم دخول املاء املزودة به الغسالة.
وللحد من خطر التسريب:
•تأكد من سهولة الوصول إلى صنابير املياه.
•أغلق صنابير املياه عندما ال تستخدم الغسالة.
•افحص بحثا ً عن أية تسريبات عند وصالت خرطوم دخول املاء بانتظام.
تنبيه
قبل استعمال الغسالة ألول مرة افحص جميع التوصيالت عند صمام دخول املاء والصنابير بحثا ً عن أية تسريبات.
فارسی 12 -
3:34:03
2015-01-26
Untitled-49 12
الصرف
األرضية
بيكرتلا
توصي Samsungباستعمال ماسورة رأسية بارتفاع 65سم .ويجب توصيل خرطوم الصرف من خالل مشبك اخلرطوم إلى
املاسورة الرأسية التي يجب أن تغطي اخلرطوم بالكامل.
يجب تركيب الغسالة على أرضية جامدة للحصول على أفضل أداء .وقد حتتاج األرضيات اخلشبية إلى تدعيم لتقليل االهتزاز
و /أو األحمال غير املتوازنة .واألسطح املغطاة باملوكيت والسجاجيد والبالط اخلفيف ال تقاوم االهتزاز بشكل جيد وميكن أن
تتسبب في زحف الغسالة ً
قليال في الدوران.
تنبيه
"ال" تركب الغسالة على منصة أو هيكل ضعيف التدعيم.
درجة حرارة املاء
ال تركب الغسالة في مناطق ميكن أن يتجمد فيها املاء ،حيث حتتفظ الغسالة دائما ً ببعض املاء في صمامات املاء و /أو
املضخات و /أو اخلراطيم اخلاصة بها .وميكن أن يتسبب املاء املتجمد املتبقي في قطع التوصيل في تلف السيور واملضخة
واملكونات األخرى للغسالة.
التركيب في ارتداد أو خزانة
حدود اخللوص الدنيا للتشغيل الثابت:
اجلوانب
اجلزء العلوي
اجلزء اخللفي
اجلزء األمامي
25مم
25مم
50مم
550مم
إذا مت تركيب غسالة ومجفف في نفس املوقع ،يجب أن يكون أمام االرتداد أو اخلزانة مساحة خالية من العوائق حلركة الهواء
بطول 550مم على األقل .وال حتتاج الغسالة وحدها إلى مساحة محددة حلركة الهواء.
فارسی 13 -
3:34:03
2015-01-26
Untitled-49 13
التركيب خطوة بخطوة
اخلطوة األولى -اختيار املوقع
متطلبات املوقع:
مستو بدون موكيت أو سجاد أو غطاء أرضية ميكن أن يعيق التهوية
جامد
•سطح
ٍ
•بعيد عن ضوء الشمس املباشر
•مساحة كافية للتهوية ومترير األسالك
•درجة احلرارة احمليطة أعلى دائما ً من درجة التجمد (صفر درجة مئوية)
•بعيد عن مصادر احلرارة
اخلطوة الثانية -فك مسامير الشحن
فرغ محتويات صندوق شحن الغسالة وفك جميع مسامير الشحن.
أرخ جميع مسامير الشحن باجلزء اخللفي للغسالة باملفتاح العادي املورد معها.
ِ 1 .1
2 .2امأل الثقوب بأغطية املسامير البالستيكية املوردة مع الغسالة.
احتفظ مبسامير الشحن لالستخدام في املستقبل.
حتذير
ً
ً
مواد التغليف ميكن أن تشكل خطرا على األطفال .فتخلص منها جميعا (أكياس بالستيكية ،ألواح البوليسترين ،الخ)
بعيدا ً عن متناول األطفال.
اخلطوة الثالثة -ضبط أرجل التوازن
1 .1قم بإزاحة الغسالة برفق في مكانها ،فالقوة الزائدة قد تسبب تلف أرجل
التوازن.
2 .2قم مبوازنة الغسالة عن طريق ضبط أرجل التوازن باليد.
3 .3عندما يكتمل التوازن أحكم ربط الصواميل باملفتاح العادي.
فارسی 14 -
3:34:04
2015-01-26
Untitled-49 14
اخلطوة الرابعة -توصيل خرطوم املاء
بيكرتلا
أوصل خرطوم املاء بصنبور املياه.
1 .1انزع املهايئ ( )Aمن خرطوم املاء (.)B
A
B
2 .2استخدم مفكا ً برأس رباعي (صليبة) إلرخاء ربط املسامير األربعة باملهايئ.
3 .3أمسك املهايئ ولف صامولة ( )Cباجتاه السهم الرخائها حوالي 5مم (*).
C
4 .4أدخل صنبور املياه في املهايئ ،واربط املسامير بينما ترفع املهايئ ألعلى.
5 .5لف صامولة ( )Cباجتاه السهم لربطها.
C
6 .6بينما تضغط احللقة (Eـ)ألسفل أوصل خرطوم املاء باملهايئ .ثم اترك احللقة
( ،)Eفيركب اخلرطوم في املهايئ محدثا ً صوت طقطقة.
E
فارسی 15 -
3:34:04
2015-01-26
Untitled-49 15
7 .7أوصل الطرف اآلخر خلرطوم املاء بصمام دخول املاء املوجود على اجلانب اخللفي
للغسالة .ولف رأس اخلرطوم لربطه.
8 .8افتح صنبور املياه للتأكد إذا كانت هناك أية تسريبات حول مناطق التوصيل.
فإن وُجدت تسريبات مياه ،فكرر اخلطوات السابقة.
•إذا كان صنبور املياه من النوع ذي األسنان ،فأوصل خرطوم املاء به كما هو مبني.
حتذير
أوقف استعمال الغسالة في حالة وجود تسريب مياه ،واتصل مبركز خدمة Samsungمبنطقتك؛ وإال ،فقد يتسبب
ذلك في حدوث صدمة كهربية.
تنبيه
ال متط خرطوم املاء بالقوة؛ فإن كان قصيرا ً استبدله بخرطوم أطول للضغط العالي.
•بعد توصيل خرطوم املاء باملهايئ تأكد من التوصيل السليم بجذب اخلرطوم ألسفل.
•استخدم صنبور مياه من النوع الشائع .وإذا كان الصنبور مربعا ً أو أكبر من الالزم ،فانزع حلقة املباعدة قبل إدخال
الصنبور في املهايئ.
للطرز اجملهزة مبدخل ماء ساخن:
بالنسبة ُ
1 .1أوصل الطرف األحمر خلرطوم املاء الساخن مبدخل املاء الساخن املوجود على
اجلانب اخللفي للغسالة.
2 .2أوصل الطرف اآلخر خلرطوم املاء الساخن بصنبور املياه الساخنة.
فارسی 16 -
3:34:05
2015-01-26
Untitled-49 16
(الطرز املنطبقة فقط)
خرطوم التنبيه من التسرب ُ
بيكرتلا
ينبه خرطوم التنبيه من التسرب املستخدمني إلى وجود خطر تسريبات مياه .وهو
يستشعر تدفق املياه ويتحول إلى اللون األحمر في منتصف املؤشر ( )Aفي حالة
وجود تسريب.
A
اخلطوة اخلامسة -وضع خرطوم الصرف
ميكن وضع خرطوم الصرف بثالث طرق:
فوق حافة حوض غسيل
يجب وضع خرطوم الصرف بارتفاع بني 60سم و 90سم (*) من سطح األرضية.
وللمحافظة على انثناء فوهة خرطوم الصرف استخدم دليل اخلرطوم البالستيكي
( )Aاملورد مع الغسالة .وثبت الدليل باجلدار باستخدام خطاف لضمان الصرف
املستقر.
A
في ماسورة صرف حوض
يجب أن تكون ماسورة الصرف فوق طرد (سيفون) احلوض حتى يكون طرف اخلرطوم على ارتفاع 60سم على األقل من األرضية.
في ماسورة صرف
يجب أن تكون ماسورة الصرف على ارتفاع ما بني 60سم و 90سم(*) .ويُنصح
باستخدام ماسورة رأسية بطول 65سم .وتأكد من توصيل خرطوم الصرف
باملاسورة الرأسية ً
مائال.
متطلبات ماسورة الصرف الرأسية
•قطر بحد أدنى 5سم
•سعة اإلزاحة الدنيا 60لترا ً في الدقيقة
اخلطوة السادسة -تشغيل الغسالة
وصل سلك التيار الكهربائي مبقبس حائط معتمد بقدرة 220فولط تيار متردد 50 /هرتز 230 ،فولط تيار متردد 60 /هرتز
ّ
محمي بصمام كهربائي أو قاطع دائرة كهربائية .ثم اضغط على الزر ( Powerالطاقة) لتشغيل الغسالة.
فارسی 17 -
3:34:05
2015-01-26
Untitled-49 17
قبل أن تبدأ
اإلعدادات األولية
عند تشغيل الغسالة ألول مرة ،تظهر شاشة الترحيب مع شعار .Samsungوعليك أن تتبع التعليمات التي تظهر على
الشاشة إلكمال اإلعدادات األولية .وميكن تغيير اإلعدادات األولية الحقا ً بالدخول إلى شاشة اإلعدادات.
اخلطوة األولى -ضبط اللغة
قم بإعداد لغة القوائم املفضلة.
1 .1حدد لغة.
2 .2انقر فوق التالي.
ﺍﳋﻄﻮﺓ ١ﻣﻦ .٤ﺿﺒﻂ ﺍﻟﻠﻐﺔ
English
Deutsch
Français
ﺍﻟﺘﺎﻟﻲ
اخلطوة الثانية -ضبط التاريخ والوقت
قم بضبط التاريخ والوقت احلاليني.
1 .1انقر فوق األسهم لضبط الوقت لكل عنصر زمني.
2 .2انقر فوق التالي.
ﺍﳋﻄﻮﺓ ٢ﻣﻦ .٤ﺿﺒﻂ ﺍﻟﺘﺎﺭﻳﺦ ﻭﺍﻟﻮﻗﺖ
ﺍﻟﺪﻗﻴﻘﺔ
ﺍﻟﺴﺎﻋﺔ
٠١
١٢
ﺹ
ﻡ
ﺍﻟﺴﻨﺔ
ﺍﻟﺸﻬﺮ
ﺍﻟﻴﻮﻡ
٢٠١٤
٠١
٠١
ﺍﻟﺘﺎﻟﻲ
ﺍﻟﺴﺎﺑﻖ
الوقت االفتراضي مضبوط على تنسيق 12ساعة.
للتحويل بني عنصر ( AMصباحاً) وعنصر ( PMمسا ًء) ،قم ببساطة بالنقر فوق العنصر املطلوب.
فارسی 18 -
3:34:05
2015-01-26
Untitled-49 18
اخلطوة الثالثة -ضبط التوزيع التلقائي
ﻋﺎﻟﻲ
ﻋﺎﺩﻱ
ﺿﻌﻴﻒ
ﺍﻟﺘﺎﻟﻲ
ﺧﺸﻦ
ﻭﺳﻂ
أدبت نأ لبق
تطلق وحدة التوزيع التلقائي الكمية املالئمة من املسحوق ومنعم األقمشة في احلوض طبقا ً للبرنامج والدورة.
1 .1ومت تعيني خيار مسحوق تلقائي وخيار منعم تلقائي افتراضيا ً على
ﺍﳋﻄﻮﺓ ٣ﻣﻦ .٤ﺃﺿﺒﻂ ﺍﳌﻮﺯﻉ ﺍﻟﺘﻠﻘﺎﺋﻲ
وضع تشغيل .ولتغيير اإلعداد ،حرّك الشريط املطلوب إلىإيقاف.
ﺗﺸﻐﻴﻞ
ﺗﺸﻐﻴﻞ
ﻣﺴﺤﻮﻕ ﺗﻠﻘﺎﺋﻲ
ﻣﻨﻌﻢ ﺗﻠﻘﺎﺋﻲ
2 .2قم بتعيني الكمية وكذلك خشونة املاء.
ﺍﻟﻜﻤﻴﺔ
ﺍﻟﻜﻤﻴﺔ
3 .3قم بتعيني الكمية وكذلك التركيز.
ﺃﻗﻞ
ﻗﻴﺎﺳﻲ
ﺃﻛﺜﺮ
ﺃﻗﻞ
ﻗﻴﺎﺳﻲ
ﺃﻛﺜﺮ
4 .4انقر فوق التالي.
ﺧﺸﻮﻧﺔ ﺍﳌﺎﺀ
ﺍﻟﺘﺮﻛﻴﺰ
ﻧﺎﻋﻢ
ﺍﻟﺴﺎﺑﻖ
اخلطوة الرابعة -ضبط التحديث التلقائي
حتديث تلقائي حتدث هذه الوظيفة البرمجيات الثابتة تلقائيا ً من أجل حتسني أداء الغسالة و /أو إصالح عيوب معروفة من
خالل االتصال بخادم التحديث .وعند حتديث البرمجيات الثابتة ،ميكن أن ال تكون بعض وظائف الغسالة متاحة تبعا ً إلصدار
البرمجيات الثابت.
1 .1لتحديث البرمجيات الثابتة تلقائياً ،قم بتعيني حتديث تلقائي على
ﺍﳋﻄﻮﺓ ٤ﻣﻦ .٤ﺿﺒﻂ ﺍﻟﺘﺤﺪﻳﺚ ﺍﻟﺘﻠﻘﺎﺋﻲ
تشغيل.
ﺗﺸﻐﻴﻞ
2 .2انقر فوق مت.
ﺗﻠﻘﺎﺋﻴﺎ ﻷﻏﺮﺍﺽ ﲢﺴﲔ ﺍﻷﺩﺍﺀ،
ﲢﺪﺙ ﻭﻇﻴﻔﺔ "ﺍﻟﺘﺤﺪﻳﺚ ﺍﻟﺘﻠﻘﺎﺋﻲ" ﺍﻟﺒﺮﺍﻣﺞ
ﹰ
ﺃﻭ ﻟﺘﺼﺤﻴﺢ ﺍﻷﺧﻄﺎﺀ ﻣﻦ ﺧﻼﻝ ﺍﻻﺗﺼﺎﻝ ﺑﺨﺎﺩﻡ ﺍﻟﺘﺤﺪﻳﺚ .ﺇﺫﺍ ﻭﺍﻓﻘﺖ ﻋﻠﻰ ﻫﺬﺍ ﺍﻹﻋﺪﺍﺩ،
ﻓﺴﻮﻑ ﻳﻌﺘﺒﺮ ﺫﻟﻚ ﻣﻮﺍﻓﻘ ﹰﺔ ﻋﻠﻰ ﺗﺸﻐﻴﻞ ﻋﻤﻠﻴﺔ ﺍﻟﺘﺤﺪﻳﺚ ﺍﻟﺘﻠﻘﺎﺋﻲ .ﻋﻨﺪ ﲢﺪﻳﺚ ﺍﻟﺒﺮﺍﻣﺞ،
ﻗﺪ ﺗﺼﺒﺢ ﺑﻌﺾ ﺍﳌﻴﺰﺍﺕ ﻏﻴﺮ ﻣﺘﺎﺣﺔ ﻭﻓﻘﹰ ﺎ ﻟﻠﺘﺤﺪﻳﺚ.
ﰎ
ﺍﻟﺴﺎﺑﻖ
اخلطوة اخلامسة -تشغيل املعايرة (يوصى به)
معايرة تضمن هذه الوظيفة تعرف الغسالة على الوزن الدقيق .وتأكد من أن احلوض فارغ قبل تشغيل وظيفة معايرة.
1 .1انقر فوق اإلعدادات > معايرة > بدء.
•ينغلق الباب أثناء هذه العملية.
•يستمر احلوض في الدوران باجتاه عقارب الساعة وعكسه لعدة دقائق.
2 .2عند االنتهاء ،تتوقف الغسالة عن التشغيل تلقائياً.
فارسی 19 -
3:34:06
2015-01-26
Untitled-49 19
إرشادات الغسيل
اخلطوة األولى -الفرز
قم بفرز الغسيل طبقا ً لهذه املعايير:
•بطاقة العناية :قم بفرز الغسيل إلى مالبس قطنية ،وألياف مختلطة ،ومواد اصطناعية ،وحرير ،وصوف ،وريون.
•اللون :افصل املالبس البيضاء عن امللونة.
•املقاس :إن مزج مالبس مختلفة املقاسات باحلوض يحسن عملية الغسيل.
•احلساسية :اغسل املالبس واألقمشة الرقيقة بشكل منفصل باستخدام خيار "كوي سهل" بالنسبة للمالبس
واألقمشة الصوفية اخلالصة اجلديدة والستائر واحلرير .وراجع بطاقات هذه املالبس واألقمشة.
افحص بطاقة العناية املوجودة على املالبس ،وافرزها طبقا ً لذلك قبل الشروع في عملية الغسيل.
اخلطوة الثانية -تفريغ اجليوب
يجب تفريغ جميع جيوب املالبس املراد غسلها.
•ميكن أن تتسبب القطع املعدنية مثل العمالت والدبابيس واإلبزمي التي توجد باملالبس في إتالف قطع الغسيل األخرى
واحلوض كذلك.
يجب قلب املالبس التي به أزرار وتطريز من الداخل للخارج.
•إذا كانت سحابات البنطلونات أو اجلواكت مفتوحة أثناء الغسيل ،ميكنها إتالف احلوض .ولذا يجب قفل السوست
وتثبيتها باخليط.
•ميكن أن تتشابك املالبس ذات اخليوط الطويلة مع املالبس األخرى .فتأكد من ربط هذه اخليوط قبل بدء الغسيل.
اخلطوة الثالثة -استخدام شبكة غسيل
•يجب وضع حماالت الصدر (السوتيان) (القابلة للغسل باملاء) في شبكة غسيل ،إذ ميكن أن تخترقها قطعها املعدنية
ومتزق قطع الغسيل األخرى.
•ميكن أن تنحشر املالبس الصغيرة اخلفيفة مثل اجلوارب والقفازات واملناديل حول باب الغسالة .فضعها في شبكة غسيل
خفيفة.
•ال تغسل شبكة الغسيل وحدها بدون مالبس أو قطع غسيل أخرى .فقد يسبب ذلك اهتزازا ً غير عادي ميكنه حتريك
الغسالة والتسبب في التعرض إلصابات.
اخلطوة الرابعة -قبل الغسيل (عند الضرورة)
متسخا بشدة .ال تستخدم اخليار الغسل األولي في حالة إضافة
حدد اخليار الغسل األولي للدورة احملددة إذا كان الغسيل
ً
املسحوق يدويًا إلى احلاوية.
فارسی 20 -
3:34:06
2015-01-26
Untitled-49 20
احلمل
اخلطوة اخلامسة -حتديد ِ
تنبيه
حلمل .فالغسيل غير املتزن يقلل
إذا كانت مالبس أو منسوجات الغسيل غير متزنة وظهر رمز خطأ " ،"UEفأعد توزيع ا ِ
من أداء الغسالة في الدوران.
أدبت نأ لبق
ال تفرط في تعبئة الغسالة باملالبس أو املنسوجات ،ألنه قد يتسبب في عدم الغسل اجليد .وملعرفة سعة احلمل لنوع املالبس
احملدد يُرجى مراجعة الصفحة .29
عند غسل مفروشات أو أغطية السرير ميكن أن يطول زمن الغسيل أو تنخفض كفاءة الدوران .وسرعة الدوران
القصوى املوصى بها لشراشف وأغطية السرير هي 800لفة في الدقيقة ،وسعة احلمل هي 2كجم أو أقل.
اخلطوة السادسة -استعمال نوع مسحوق مناسب
يعتمد نوع املسحوق على نوع القماش (قطن ،مواد اصطناعية ،ناعم ،صوف) ،واللون ،ودرجة حراراة الغسيل ،ودرجة االتساخ.
واستخدم دائما ً مسحوق غسيل "منخفض الرغوة" مصمم للغساالت األوتوماتيكية.
•اتبع تعليمات الشركة املصنعة للمسحوق فيما يتعلق بوزن الغسيل ،ودرجة االتساخ ،وخشونة املاء في
منطقتك .وإذا كنت ال تعلم مدى خشونة املاء ،فاتصل بهيئة املياه اخلاصة مبنطقتك.
•ال تستخدم مسحوقا ً مييل إلى التقسي أو التصلب .فهذا النوع من املسحوق ميكن أن يتبقى بعد دورة الشطف
ويسد منفذ الصرف.
تنبيه
عندما تغسل منسوجات صوفية باستخدام دورة الصوف استخدم مسحوقا ً سائال ً محايدا ً فقط؛ فاملسحوق البودرة
إذا استخدم مع برنامج الصوف ميكن أن يتبقى على الغسيل ويجعل لونه باهتاً.
فارسی 21 -
3:34:06
2015-01-26
Untitled-49 21
اإلرشادات اخلاصة باملسحوق
التوزيع التلقائي
إن الغسالة مجهزة بوحدة توزيع من حجرتني :احلجرة اليسرى للمسحوق واليمنى ملنعم األقمشة .تطلق وحدة التوزيع
التلقائي الكمية املالئمة من املسحوق ومنعم األقمشة في احلوض طبقا ً للبرنامج والدورة.
تنبيه
•استخدم مسحوقا ً
ً
سائال ومنعم أقمشة في وحدة التوزيع التلقائي.
•تأكد من إدخال الوحدة بالكامل ،فلن تعمل الغسالة إذا لم تكن وحدة التوزيع التلقائي مدخلة في موضعها
ً
إدخاال سليماً.
•عند وضع مسحوق مختلف يجب تنظيف حجرة املسحوق ً
أوال.
•ال تخلط املسحوق مع منعم األقمشة في أي من احلجرتني.
•ملنع املسحوق من التصلب ال تفتح الغطاء بعد وضع املسحوق في احلجرة.
•ال تستخدم أي مبيضات ميكنها أن تتسبب في التآكل و /أو إطالق غاز.
•ال تقلب وحدة التوزيع التلقائي رأسا ً على عقب ،إذ ميكن أن تسقط احملتويات من الفتحات.
•ال تضغط على اخملرج املوجود أسفل وحدة "التوزيع التلقائي" أثناء نقل الوحدة .فقد يحدث تسرب للمحتويات
املوجودة بداخله.
•توخ احلذر عند وضع املسحوق أو منعم األقمشة في الوحدة .فقد تنسكب احملتويات حول الوحدة.
•تأكد من إزالة وحدة "التوزيع التلقائي" قبل إضافة مساحيق الغسيل.
•قد حتتوي الوحدة على كمية قليلة متبقية من مسحوق الغسيل أو تتسرب من أسفلها عند إزالة وحدة "التوزيع
التلقائي" للتحقق من الكمية املتبقية من مسحوق الغسيل عند ظهور رسالة خطأ أو قبل ظهورها.
•أدخل وحدة "التوزيع التلقائي" بالكامل .قد يؤدي عدم إدخالها بالكامل إلى فشل الوحدة في التوزيع.
افتراضيا أثناء تشغيل الدورة ناعم أو صوف أو مالبس الطفل أو للعناية باملالبس
•يتم إيقاف تشغيل توزيع تلقائي
ً
اخلارجية.
غير
تلقائي،
توزيع
>
السريعة
اللوحة
شريط
أو
اإلعدادات
فوق
انقر
الدورات،
هذه
في
تلقائي
توزيع
لتمكني
ّ
اإلعدادات حسب احلاجة.
فارسی 22 -
3:34:06
2015-01-26
Untitled-49 22
1 .1افتح الباب واسحب وحدة التوزيع التلقائي خلارج الغسالة.
أدبت نأ لبق
2 .2أدر القبضة اليسرى عكس اجتاه دوران عقارب الساعة للفتح وضع املسحوق
باحلجرة اليسرى حتى خط احلد األقصى.
3 .3أدر القبضة اليمنى عكس اجتاه دوران عقارب الساعة للفتح وضع املنعم
باحلجرة اليمنى حتى خط احلد األقصى.
4 .4اقفل القبضتني بتدويرهما باجتاه دوران عقارب الساعة.
5 .5أعد إدخال وحدة التوزيع التلقائي في موضعها األصلي،
وانتبه وأنت تدخلها حتى ال تسقط محتوياتها من الفتحات التي على اجلانبني.
6 .6قم بتشغيل مسحوق تلقائي وكذلك منعم تلقائي.
يُرجى مراجعة "التوزيع التلقائي" بالصفحة .33
فارسی 23 -
3:34:06
2015-01-26
Untitled-49 23
التوزيع اليدوي
إذا كنت ال تريد استخدام املوزّع (وحدة التوزيع التقائي) ،ميكنك إما وضع املسحوق مباشرة في احلاوية أو استخدام كرات
الغسيل املتوفرة عند وضع املسحوق يدويًا .تأتي كرات الغسيل بحجمني وتتوافر كملحقات مع اجلهاز .اختر كرات الغسيل
املناسبة لكمية املسحوق.
1 .1أطفأ وظيفة مسحوق تلقائي.
يُرجى مراجعة "التوزيع التلقائي" بالصفحة .33
ً
سائال في صحن املعايرة (أ)املناسب .وراجع عالمة
2 .2ضع مسحوقا ً بودرة أو جل أو
الكمية على اجلانب الداخلي للصحن،
A
3 .3أدخل الصحن بالقرب من نهاية احلوض.
عند االنتهاء من الغسيل أخرج صحن املعايرة من احلوض واحتفظ به نظيفا ً لالستعمال الحقاً.
تنبيه
منعم األقمشة إال باستخدام وحدة توزيع تلقائي ،وال يُسمح بإدخاله يدويًا.
•ال ميكن وضع ّ
•يجب احلرص عند إدخال صحن املعايرة حيث يُفترض أن يكون متزنا ً في أول الغسيل .وميكن أن تتسبب إمالة
الصحن قبل بدء الغسيل وجود بقايا مسحوق على الغسيل في نهاية الغسيل ،مما يجعل لونه باهتا ً و /أو يقلل
من كفاءة الغسل.
•ال تضع املسحوق في حجرة املسحوق بوحدة التوزيع التلقائي وصحن املعايرة.
•عند وضع مسحوق مختلف يجب تنظيف الصحن ً
أوال.
•ال تضع صحن املعايرة في بطانية ملفوفة أو بني قطع الغسيل اخملتلفة.
•ال تختر قبل الغسل عند استخدام صحن املعايرة.
•قد يؤدي استعمال كميات كبيرة من املسحوق إلى حدوث املشكالت التالية ،مما يتسبب في حدوث خلل باجلهاز و/
أو ِقصر عمر املنتج.
•يؤدي استخدام كميات كبيرة من املسحوق إلى زيادة الفقاعات أكثر من الالزم ،مما يتسبب في متديد وقت
الشطف.
أيضا إلى بقاء املسحوق في احلوض بعد اكتمال الغسل.
•قد يؤدي ذلك ً
•استعمل كميات مناسبة من املسحوق حسب مواصفات الشركة املصنّعة للمسحوق.
•في حالة إضافة املسحوق يدويًا ،يُنصح باستخدام كرات الغسيل عند غسل قطع املالبس امللونة.
فارسی 24 -
3:34:06
2015-01-26
Untitled-49 24
تايلمعلا
العمليات
الشاشة
ميكن أن تختلف الشاشة الفعلية عن الصورة املبينة فيما يلي تبعا ً للطراز.
الشاشة الرئيسية
AM
٢
٨
١
A
B
D
C
٧
٦
٤
٥
٣
األزرار
1
2
3
4
5
6
7
البرنامج
اإلعدادات
درجة احلرارة
شطف
دوران
اخليارات
بدء
8
مفضل
انقر للدخول إلى لوحة برامج الغسيل.
انقر للدخول إلى شاشة اإلعدادات.
انقر لتغيير درجة حرارة في برنامج الغسيل احلالي.
انقر لتغيير أزمنة الشطف في برنامج الغسيل احلالي.
انقر لتغيير سرعة الدوران في برنامج الغسيل احلالي.
انقر للدخول إلى شاشة إعدادات برنامج الغسيل.
انقر لتبدأ العملية.
انقر إلضافة تكوين برنامج الغسيل احلالي إلى قائمة التفضيالت .وميكنك إضافة حتى
عدد 4برامج غسيل مخصصة ،والتي تظهر على أول لوحة برامج الغسيل.
املعلومات
A
B
C
D
أكثر استخدام
البرنامج احلالي
اخليار النشط
الوقت املُقدر
تعرض برنامج الغسيل األكثر استخداماً.
يعرض برنامج الغسيل احلالي.
يعرض اخليار (أو اخليارات) النشط في برنامج الغسيل احلالي.
يعرض وقت التشغيل املُقدر لبرنامج الغسيل احلالي.
فارسی 25 -
3:34:06
2015-01-26
Untitled-49 25
شريط املعلومات
AM
مسحوق تلقائي
عندما يضيئ هذا املؤشر يتم متكني خيار مسحوق تلقائي.
منعم تلقائي
عندما يضيئ هذا املؤشر يتم متكني خيار منعم تلقائي.
ِقفل الباب
عندما يضيئ هذا املؤشر يُقفل باب الغسالة ملنع فتحه أثناء تشغيل
الغسالة.
التأمني ضد عبث
األطفال
عندما يتحول هذا الرمز إلى ِقفل مغلق [
األطفال ملنع وقوع حوادث من األطفال.
الشبكة
يعرض حالة اتصال شبكة .Wi-Fi
حتكم ذكي
عندما يضيئ هذا املؤشر ميكن التحكم في الغسالة بجهاز متنقل [هاتف
محمول ،جوال ،الخ].
صوت
عندما يتحول هذا الرمز إلى صامت [
الوقت
يتم عرض الوقت احلالي.
] يتم تشغيل التأمني ضد عبث
] ال يَصدر صوت.
شريط اللوحة السريعة
يوجد 6عناصر متاحة على شريط اللوحة السريعة :التأمني ضد عبث األطفال ،وإضاءة احلوض ،ومسحوق تلقائي ،ومنعم
تلقائي ،والشبكة ،وحتكم ذكي.
AM
1 .1انقر فوق شريط املعلومات ،أو اسحبه ألسفل لعرض العناصر املتاحة.
ﲢﻜﻢ ﺫﻛﻲ
ﺍﻟﺸﺒﻜﺔ
ﻣﻨﻌﻢ ﺗﻠﻘﺎﺋﻲ
ﻣﺴﺤﻮﻕ ﺗﻠﻘﺎﺋﻲ
ﺇﺿﺎﺀﺓ ﺍﳊﻮﺽ
ﻗﻔﻞ ﺍﻷﻃﻔﺎﻝ
2 .2انقر فوق العنصر لتشغيله أو إيقاف تشغيله ،أو لتغيير اإلعدادات احلالية.
•لإلعدادات املتقدمة ،انتقل إلى شاشة اإلعدادات وقم بتغييرات حسب تفضيالتك.
•العناصر النشطة تضئ وغير النشطة تظهر رمادية اللون.
فارسی 26 -
3:34:08
2015-01-26
Untitled-49 26
شاشة اخليارات
تايلمعلا
AM
1
2
3
4
5
6
7
الغسيل السريع
قبل الغسل
غسيل مكثف
+نقع
كوي سهل
تأجيل التوقف
عودة
حتديدا ً للمالبس أقل اتساخا ً بحمل أقل من كيلوجرامني.
يتم إضافة دورة غسيل أولية قبل الغسيل الرئيسي.
وقت التشغيل لكل دورة أطول من التشغيل العادي.
مفيد في إزالة البقع العنيدة باملالبس واملنسوجات املراد غسلها.
مفيد في تقليل التجاعيد ("الكرمشة").
استخدم هذا اخليار لتحديد وقت انتهاء برنامج غسيل مختار .يُرجى مراجعة الصفحة .32
للعودة إلى الشاشة الرئيسية
للمزيد من التفاصيل حول كل خيار ،يُرجى مراجعة "اخليارات" بالصفحة .31
فارسی 27 -
3:34:08
2015-01-26
Untitled-49 27
خطوات بسيطة لبدء التشغيل
AM
١
٤
٣
.1
.2
.3
.4
.5
.6
٢
1اضغط زر الطاقة لعرض الشاشة الرئيسية.
2انقر فوق رمز البرنامج أعلى منتصف الشاشة الرئيسية لعرض لوحة البرامج.
3حدد برنامج غسيل .وتعمل الغسالة على 22برنامج غسيل.
غير إعدادات برنامج الغسيل (درجة احلرارة ،وشطف وكذلك دوران إذا لزم األمر.
ّ 4
وغير إعدادات اخليار أو اخليارات.
اخليارات
حدد
ثم
السفلي.
اليمنى
بالزاوية
اخليارات
رمز
فوق
انقر
5
ّ
6انقر فوق بدء.
•توجد بالغسالة إعدادات افتراضية برامج غسيل وخيارات متاحة لكل برنامج منها .فيمكنك قبول هذه
اإلعدادات واخليارات أو عمل تغييرات حسبما تفضل.
•ميكنك اختيار برنامج غسيل على الشاشة الرئيسية؛ فما عليك سوى أن تقوم ببساطة بسحب الشاشة
للجهة اليسرى لفتح برنامج الغسيل التالي .وللعودة إلى القائمة السابقة اسحب الشاشة ببساطة لليمني.
فارسی 28 -
3:34:08
2015-01-26
Untitled-49 28
نظرة عامة على برامج الغسيل
البرنامج
مفضل
أكثر استخدام
الغسيل الذكي األمثل
قطن
مواد اصطناعية
قماش قطني
مالبس داكنة
سرعة فائقة
غسيل الفقاعات اخلارق
للعناية باملالبس
اخلارجية
مالبس الطفل
صوف
ناعم
شراشف
الوصف واحلمل األقصى (كجم)
•أضف تكوين برنامج الغسيل احلالي إلى قائمة التفضيالت ،وقم بالوصول
بسرعة إلى هذا التكوين الحقاً .وميكنك إضافة حتى عدد 4برامج غسيل
مخصصة ،والتي تظهر على أول لوحة برامج الغسيل.
•يتم عرض برنامج الغسيل األكثر استخداما ً وتكرارا ً بالزواية اليسرى العلوية
للشاشة الرئيسية افتراضياً.
•الغسيل الذكي األمثل يضبط هذا اخليار كمية املسحوق ودورات برامج
الغسيل طبقا ً لوزن الغسيل ومستوى االتساخ .ومن األفضل استخدام لهذا
اخليار يكون مع ميزة التوزيع التلقائي.
•للمالبس القطنية أو بياضات السرير أو السفرة أو املالبس الداخلية أو
املناشف أو القمصان.
ً
•يتم تعديل وقت الغسيل وعدد دورات الشطف تلقائيا حسب احلمل.
•للبلوزات أو القمصان املصنوعة من البوليستر (دايولني ،تريفيرا) ،أو البولي
أميدات (بيرلون ،نايلون) أو ما يشابهها.
•كمية مياه أكبر في الغسلة الرئيسية ودورة شطف إضافية لضمان عدم
وجود بقايا مسحوق بودرة.
•دورات شطف إضافية ودوران بسرعة منخفضة لضمان الغسل برفق
والشطف التام.
•إجناز غسيل سريع خالل ساعة للمالبس اليومية مثل املالبس الداخلية
والقمصان.
•تعمل تقنية ( Eco Bubbleالفقاعات االقتصادية) على تقليل استهالك
الطاقة .فدورة الغسل االقتصادي الفائق املميزة بكفاءتها في الغسل على
درجات حرارة منخفضة تتفوق من حيث األداء في الغسل وتوفير الطاقة عن
دورة غسل القطنيات االقتصادي دون فقاعات.
•للمالبس اخلارجية ومالبس التزلج والتزحلق واملالبس الرياضية املصنوعة من
مواد وظيفية مثل سبانديكس والقماش املطاطي واأللياف الدقيقة.
•غسيل على درجة حرارة عالية ودورات شطف إضافية لضمان عدم وجود بقايا
للمسحوق البودرة.
•حتديدا ً للمالبس الصوفية القابلة للغسل باآلالت وأحمال أقل من
كيلوجرامني.
•ويتضمن برنامج الصوف رجرجة رفيقة ونقعا ً حلماية ألياف الصف من
االنكماش و /أو التشوه.
•ويوصى باستخدام مسحوق محايد.
•األقمشة اخلفيفة وحماالت الصدر واملالبس النسائية التحتانية (احلرير)
واألقمشة التي تُغسل باليد فقط.
•للحصول على أفضل النتائج ،استخدم مسحوقًا (املنظف الصناعي) على
شكل سائل.
•ملفروشات السرير ومالءاته وأغطيته ،ومفروشاته األخرى.
•وللحصول على أفضل النتائج ،اغسل نوعا ً واحدا ً من مفروشات السرير وتأكد
من أن ِاحلمل يقل عن 2.5كجم.
تايلمعلا
برامج الغسيل االفتراضية
احلمل
األقصى
احلمل
األقصى
5
3
4
5
4
2
4
2
2
2.5
فارسی 29 -
3:34:08
2015-01-26
Untitled-49 29
البرنامج
دوران
دوران+شطف
تنظيف احلوض
قطن
الوصف واحلمل األقصى (كجم)
•دوران إضافي إلزالة املاء إزالة تامة.
•دورة شطف إضافية بعد وضع منعم أقمشة للغسيل.
•ينظف احلوض بتخليصه من األوساخ والبكتريا.
•نظف احلوض مرة كل 40غسلة بدون مسحوق أو مبيض.
•تأكد من أن احلوض فارغ.
•ال تستخدم أي مواد لتنظيف احلوض.
•أداء مثال بطاقة أقل للمنسوجات القطنية أو بياضات السرير أو السفرة أو
املالبس الداخلية أو املناشف أو القمصان
احلمل
األقصى
البرامج املتخصصة
مت تصميم ستة برامج متخصصة إلزالة فعالة ألنواع محددة من البقع واألوساخ التي ميكن أن تتراكم في أنواع محددة من
األنشطة تتراوح من األعمال املنزلية إلى تسلق اجلبال للمحترفني.
البرنامج
طهي و تناول الطعام
احلدائق
رياضات نشطة
أطفال نشيطني
العمل اليومي
الرعاية الصحية
الوصف واحلمل األقصى (كجم)
•يزيل هذا البرنامج انسكابات الطعام وبقع الطهي بكفاءة.
•ويزيل هذا البرنامج بقع العشب والطني/التراب ،وينظف آثار العرق ودهون
البشرة بكفاءة.
•ويُزيل هذا البرنامج بقع العشب والتربة والطني واألطعمة اخلفيفة وبقع العرق
ومواد التجميل بكفاءة.
•ال تستخدم هذا البرنامج مع املالبس املقاومة لنفاذية املاء ،فقد يتسبب ذلك
في تلف إمكانات مقاومة املاء أو تخلل الهواء وتبخر العرق.
•يُستخدم برنامج أطفال نشيطني ملعظم مالبس األطفال .ويزيل هذا البرنامج
بقع الطعام وعصير الفواكه واملشروبات والطني والتربة واحلبر وأقالم التلوين
بكفاءة.
•تناسب دورة العمل اليومي املالبس خفيفة االتساخ .ويُزيل هذا البرنامج بقع
احلبر والقلم الرصاص اخلفيفة ،وينظف البقع اليومية العادية بكفاءة.
•ويُزيل هذا البرنامج دهون البشرة وبقع الدم بكفاءة.
4
4
4
4
4
4
فارسی 30 -
3:34:08
2015-01-26
Untitled-49 30
اخليارات
تتفاوت اخليارات املتاحة باختالف برنامج الغسيل .وتظهر اخليارات غير النشطة لبرنامج غسيل محدد باللون الرمادي (باهتة).
الغسيل السريع
قبل الغسل
+نقع
غسيل مكثف
كوي سهل
تأجيل التوقف
تايلمعلا
اخليارات
الوصف
•حتديدا ً للمالبس أقل اتساخا ً بحمل أقل من كيلوجرامني.
•يستغرق حوالي 15دقيقة كحد أدنى ،حسب احلاالت مثل ضغط و /أو خشونة املاء و /أو
اخليارات اإلضافية احملددة.
•ويزداد وقت خيار الغسيل السريع التسلسل التالي :إيقاف التشغيل > 15دقيقة > 20
دقيقة > 30دقيقة > 40دقيقة > 50دقيقة > 60دقيقة.
•كمية املسحوق املوصى بها هي أقل من 20جرام (حلمل 2كجم).
•يضيف هذا اخليار دورة غسيل أولية قبل الغسيل الرئيسي.
•هذا اخليار يزيل البقع بفعالية عن طريق نقع الغسيل.
•يلف احلوض في كل دورة نقع ملدة دقيقة واحدة ويتوقف ملدة أربع دقائق .ميكنك ضبط وقت
+نقع ين 30و 150دقيقة.
•للغسيل املتسخ بشدة .وقت التشغيل لكل دورة أطول من التشغيل العادي.
•تنخفض سرعة الدوران لتقلل التجاعيد.
•اضبط سرعة الدوران حتى 800لفة في الدقيقة.
•يشير الوقت املعروض إلى وقت انتهاء برنامج غسيل مختار.
فارسی 31 -
3:34:08
2015-01-26
Untitled-49 31
تأجيل التوقف
ميكنك ضبط الغسالة لكي تُنهي البرنامج احلالي في وقت محدد الحقاً.
وهذا مفيد إذا كنت تريد أن تُنهي الغسيل في الوقت الذي تعود فيه للمنزل من العمل.
غير إعدادات البرنامج إذا لزم األمر.
1 .1حدد برنامج غسيل .ثم ّ
2 .2انقر فوق رمز اخليارات بالزاوية اليمنى السفلي.
وغير إعدادات اخليار أو اخليارات.
ثم حدد اخليارات ّ
3 .3انقر فوق تأجيل التوقف.
4 .4استخدم االسهم لتعيني وقت انتهاء البرنامج احلالي ،وانقر فوق بدء.
•إللغاء اخليار انقر فوق إلغاء وعد إلى شاشة اخليارات.
مثال
ترغب في االنتهاء من برنامج غسيل مدته ساعتان بعد ثالث ساعات من اآلن .ولتحقيق ذلك ،تضيف خيار تأجيل التوقف
إلى البرنامج احلالي بإعداد الثالث ساعات ،وتضغط زر بدء الساعة 2:00بعد الظهر؛ فماذا يحدث؟ تبدأ الغسالة في العمل
الساعة 3:00بعد الظهر وتنتهي الساعة 5:00مسا ًء .وفيما يلي اخملطط الزمني لهذا املثال.
٢:٠٠ﻡ
ﺿﺒﻂ ﺗﺄﺟﻴﻞ ﺍﻟﺘﻮﻗﻒ ﻋﻠﻰ ٣ﺳﺎﻋﺎﺕ.
٥:٠٠ﻡ
ﺍﻧﺘﻬﺎﺀ
٣:٠٠ﻡ
ﺑﺪﺀ
فارسی 32 -
3:34:08
2015-01-26
Untitled-49 32
اإلعدادات
ملنع وقوع حوادث من األطفال ،يعمل التأمني ضد عبث األطفال على قفل جميع األزرار عدا زر اإلعدادات.
ميكنك الوصول إلى قائمة التأمني ضد عبث األطفال من شاشة اإلعدادات أو شريط اللوحة السريعة.
•لتعيني (تشغيل) التأمني ضد عبث األطفال ،انقر فوق اإلعدادات ،وانقر فوق زر التأمني ضد عبث األطفال .
•لتحرير التأمني ضد عبث األطفال ،انقر فوق زر التأمني ضد عبث األطفال إليقافه مؤقتاً ،ثم انقر فوق الزر مرة أخرى
ثوان.
واستمر في الضغط عليه ملدة ٍ 3
ثوان.
3
تنشيطملدة
الزر
على
االستمرار
مع
اضغط
•لتنشيط التأمني ضد عبث األطفال،
ٍ
ثوان.
3
ملدة
ا
ت
مؤق
التنشيط
إلغاء
الزر
على
االستمرار
مع
اضغط
ا،
ت
مؤق
األطفال
•إللغاء تنشيط التأمني ضد عبث
ً
ً
ٍ
ثوان.
3
ملدة
التنشيط
إلغاء
الزر
على
االستمرار
مع
اضغط
ا،
متام
األطفال
عبث
•إللغاء تنشيط التأمني ضد
ً
ٍ
•إلضافة مسحوق ،أو غسيل أكثر في احلوض ،أو لتغيير إعدادات برنامج الغسيل في حالة تعيني (تشغيل) التأمني
ضد عبث األطفال يجب أن تقوم ً
أوال بإيقاف أو حترير التأمني ضد عبث األطفال.
•سوف يتم تنشيط التأمني ضد عبث األطفال بعد دقيقة واحدة من إيقافه مؤقتاً.
تايلمعلا
التأمني ضد عبث األطفال
إضاءة احلوض
•لتشغيل إضاءة احلوض (مصباح احلوض) أو إطفائها ،انقر فوق اإلعدادات ,وقم بإزاحة شريط إضاءة احلوض إلى تشغيل
أو إيقاف.
•تنطفئ إضاءة احلوض تلقائيا ً بعد خمس دقائق.
التوزيع التلقائي
إن الغسالة مجهزة بوحدة توزيع من حجرتني :واحدة للمسحوق واخلرى ملنعم األقمشة .تطلق وحدة التوزيع التلقائي الكمية
املالئمة من املسحوق ومنعم األقمشة في احلوض طبقا ً للبرنامج والدورة.
متكني التوزيع التلقائي
.1
.2
.3
.4
1انقر فوق اإلعدادات > توزيع تلقائي.
2قم بإزاحة شريط مسحوق تلقائي إلى وضع تشغيل وقم بتعيني الكمية وكذلك خشونة املاء.
3قم بإزاحة شريط منعم تلقائي إلى وضع تشغيل وقم بتعيني الكمية وكذلك التركيز.
4انقر فوق حفظ
السطوع
تعيني سطوع شاشة الكريستال السائل (إل سي دي).
•انقر فوق اإلعدادات ،وانقر فوق عالمتي " "+/-لزيادة أو تخفيض مستوى السطوع.
سمة الصوت
تعيني مستوى الصوت والنغمة.
1 .1انقر فوق اإلعدادات > سمة الصوت.
2 .2لتعديل مستوى الصوت انقر فوق عالمتي " "+/-لزيادة أو تخفيض مستوى الصوت.
3 .3الختيار نغمة انقر فوق أحد املوضوعات في القائمة.
فارسی 33 -
3:34:08
2015-01-26
Untitled-49 33
التاريخ والوقت
الوقت االفتراضي مضبوط على تنسيق 12ساعة.
1 .1انقر فوق اإلعدادات > التاريخ والوقت.
2 .2انقر فوق األسهم لتغيير الوقت لكل عنصر زمني .وعلى سبيل املثال ،لتغير التاريخ استخدم االسهم التي فوق وحتت
عنصر التاريخ.
3 .3للتحويل بني عنصر صباحا ً وعنصر مسا ًء ،قم ببساطة بالنقر فوق العنصر املطلوب.
4 .4انقر فوق حفظ
اللغة
حتديد لغة قوائم مفضلة.
•انقر فوق اإلعدادات > اللغة ،وحدد لغة قوائم مفضلة.
الشبكة
اإلعداد األوتوماتيكي
تدعم الغسالة بروتوكوالت " Wi-Fiاخلصوصية السلكية املكافئة" ( )WEPو"بروتوكول تكامل املفتاح املؤقت" ( )TKIPو "معيار
التشفير املتقدم" ( ،)AESولكن ال يتم توريد الغسالة مبوجه (راوتر أو بروتوكول تطبيقات).
1 .1انقر فوق اإلعدادات > الشبكة ثم قم بإزاحة شريط الشبكة إلى وضع تشغيل .تظهر قائمة بروتوكول التطبيقات).
2 .2انقر فوق موفر شبكة ،واكتب كلمة مرور إذا ُطلب منك ذلك.
3 .3انقر فوق موافق .وعند اكتمال العملية بنجاح ،تظهر عالمة بجانب موفر الشبكة احملدد.
اإلعداد اليدوي
1 .1يتم متكني اتصال Wi-Fiكما مت إيضاحه عاليه.
2 .2انقر فوق عنوان P > Iيدوي.
3 .3اذكر عنوان (IPعنوان بروتوكول إنترنت) ،و قناع الشبكة الفرعية ،واملدخل و(DNSنظام أسماء مجاالت) ،ثم انقر فوق
موافق.
اتصال Wi-Fi
عندما يتم إنشاء اتصال الشبكة تقوم في املرة التالية التي ترغب فيها تشغيل أو إيقاف تشغيل اتصال ، Wi-Fiقم بإزاحة
شريط الشبكة إلى تشغيل أو إيقاف.
االتصال السهل
( Easy Connectionاالتصال السهل) متكنك هذه الوظيفة من تكوين إعدادات الشبكة بسهولة مبا في ذلك إجراء املصادقة.
فارسی 34 -
3:34:09
2015-01-26
Untitled-49 34
التحكم الذكي
تايلمعلا
متكنك وظيفة حتكم ذكي من التحكم بالغسالة من جهازك املتنقل (هاتف محمول ،جوال ،الخ) .انقر هذا الرمز لتشغيل أو
إيقاف تشغيل وظيفة حتكم ذكي.
1 .1انقر فوق اإلعدادات وقم بإزاحة شريط حتكم ذكي إلى تشغيل.
منشطا.
2 .2عند العودة إلى الشاشة الرئيسية يكون حتكم ذكي
ً
3 .3اضغط على إلغاء تنشيط لتعطيل الوظيفة ،يتم إلغاء تنشيط حتكم ذكي.
•يظهر الرمز رماديا ً (باهتاً) إذا لم تكن وظيفة حتكم ذكي نشطة.
•إن تصرفات مثل النقر فوق الرموز أو الضغط على األزرار بالغسالة سوف تلغي تنشيط وظيفة حتكم ذكي.
•في حالة عدم توصيل شبكة السلكية ,ال تتاح امليزة حتكم ذكي.
•حدد طريقة االتصال باألجهزة اخلارجية عند النقر فوق حتكم ذكي.
فحص االستعمال االقتصادي
يتم عرض كفاءة استهالك الكهرباء واملاء باألربعة برامج غسيل األخيرة في ملخص فني باستهالك الكهرباء وكميات املاء
وإعدادات برامج الغسيل واخليارات.
1 .1انقر فوق اإلعدادات > التحقق املسبق .فتظهر شاشة مبلخص برامج الغسيل األربعة األخيرة.
2 .2انقر فوق برنامج غسيل لعرض ملخص فني بالبرنامج احملدد.
الفحص الذاتي
تقوم الغسالة بتشخيص ذاتي للنظام احلالي .وميكن االطالع على أخطاء التشغيل ومشاكل الغسالة على شاشة النتائج.
•انقر فوق اإلعدادات > التحقق الذاتي > بدء.
املعايرة
معايرة تضمن هذه الوظيفة تعرف الغسالة على الوزن الدقيق .وتأكد من أن احلوض فارغ قبل تشغيل وظيفة معايرة.
1 .1انقر فوق اإلعدادات > معايرة > بدء.
•ينغلق الباب أثناء هذه العملية.
•يستمر احلوض في الدوران باجتاه عقارب الساعة وعكسه لعدة دقائق.
2 .2عند االنتهاء ،تتوقف الغسالة عن التشغيل تلقائياً.
فارسی 35 -
3:34:09
2015-01-26
Untitled-49 35
التحديث
عندما تتوافر التحديثات يظهر إعالم التحديث على الشاشة.
فحص إصدار البرمجيات الثابتة احلالي
1 .1انقر فوق اإلعدادات > حتديث لعرض إصدار البرمجيات الثابتة احلالي.
2 .2لتحديث البرمجيات الثابتة يدوياً ،انقر فوق حتديث.
حتديث البرمجيات الثابتة تلقائيا ً
1 .1اضغط على حتديث تلقائي في شاشة اإلعدادات.
2 .2قم بإزاحة شريط حتديث تلقائي إلى وضع تشغيل .ويتم التحديث بدون إعالم عندما تتوافر حتديثات.
حتذير
ال تفصل قابس كبل كهرباء الغسالة أو املوجه (الرواتر) أثناء التحديث.
املساعدة
يُرجى مراجعة دليل االستعمال ملعرفة كيفية استعمال الغسالة ،وكذلك قسم استكشاف املشكالت وإصالحها عندما
تواجهك مشكلة.
•انقر فوق اإلعدادات > مساعدة.
فارسی 36 -
3:34:09
2015-01-26
Untitled-49 36
التحكم الذكي عبر األجهزة احملمولة من Samsung
تطبيقا األجهزة احملمولة اللذان يدعمان ميزة التحكم الذكي في الغساالت الذكية
من Samsung
تايلمعلا
توفر هذه الغسالة تطبيقني مختلفني للتحكم عبر األجهزة احملمولة ،وميكن استخدامهما للتحكم في الغسالة عبر االتصال
بالشبكة.
Samsung Smart Home
مع تطبيق Samsung Smart Homeاملصمم حديثًا ،أصبح بإمكانك الوصول إلى غسالتك أثناء تنقلك ،والتحكم في حالة
عملها أو فحصها.
قم بتنزيل تطبيق " "Samsung Smart Homeمن Play Storeأو Apple Storeوتثبيته على جهازك احملمول.
Samsung Smart Washer
يتيح لك Samsung Smart Washerإمكانية التحكم في عمل الغسالة من جهازك احملمول .وينقسم أسلوب التحكم إلى
فئتني هما( Indoor :داخلي) و ( Outdoorخارجي).
قم بتنزيل تطبيق " "Samsung Smart Washerمن Play Storeأو ،Apple Storeوتثبيته على جهازك احملمول.
إعدادات التحكم الذكي على الغسالة
لتمكني ميزة التحكم الذكي ،اختر طريق ًة لالتصال بالتطبيق املثبت على اجلهاز احملمول.
اضغط على رمز اإلعداد ،ثم حدد التحكم الذكي ضمن القائمة الشبكة.
1 .1اختر طريق ًة لالتصال بالتطبيق املثبت على اجلهاز احملمول.
ﺹ
1
١٢٠٠
2 .2حدد " "Samsung Smart Homeإذا كنت تريد التحكم في الغسالة عبر
التطبيق املتكامل من .Samsung
حدد " "Samsung Smart Washerإذا كنت تريد التحكم في الغسالة عبر
تطبيق الغسالة من .Samsung
ﻝ/ﺩ
ﺹ
ﺍﻟﻌﺮﺑﻴﺔ
ABﺍﻟﻠﻐﺔ
ﺍﻟﺸﺒﻜﺔ
ﺍﺗﺼﺎﻝ Wi-Fi
ﺗﺸﻐﻴﻞ
ﺍﻻﺗﺼﺎﻝ ﺍﻟﺴﻬﻞ
ﲢﻜﻢ ﺫﻛﻲ
ﺍﻟﺼﻴﺎﻧﺔ
3 .3مبجرد اكتمال اإلعداد ،يتم تطبيق التغييرات التي أجريتها ،وقد حتتاج إلى إعادة
االتصال.
•( Samsung Smart Homeاالفتراضي)
•Samsung Smart Washer
ﺃﻳﻘﺎﻑ
1
ﺹ
ﲢﻜﻢ ﺫﻛﻲ
.١ﳝﻜﻨﻚ ﲢﺪﻳﺪ ﻃﺮﻳﻘﺔ ﺍﺗﺼﺎﻝ ﺑﺎﻷﺟﻬﺰﺓ ﺍﳋﺎﺭﺟﻴﺔ ﻣﻦ ﺧﻼﻝ ﺧﻴﺎﺭﺍﺕ ) Smart Controlﲢﻜﻢ ﺫﻛﻲ(.
.٢ﺣﺪﺩ " "Samsung Smart Homeﻟﻠﻮﺻﻮﻝ ﻋﻦ ﺑ ﹸﻌﺪ ﺇﻟﻰ ﺍﻷﺟﻬﺰﺓ ﻣﻦ ﺧﻼﻝ ﺗﻄﺒﻴﻖ
" ."Samsung Smart Homeﺣﺪﺩ " "Samsung Smart Washerﻟﻠﻮﺻﻮﻝ ﻋﻦ ﺑ ﹸﻌﺪ ﺇﻟﻰ ﻏﺴﺎﻻﺕ
Samsungﺍﻟﺬﻛﻴﺔ ﻣﻦ ﺧﻼﻝ ﺗﻄﺒﻴﻖ "."Samsung Smart Washer
Samsung Smart Home
Samsung Smart Washer
ﺣﻔﻆ
فارسی 37 -
3:34:09
2015-01-26
Untitled-49 37
•يستخدم هذا املنتج تطبيق Samsung Smart Homeاملصمم حديثًا كوسيلة لالتصال بشكل افتراضي ،وهي
الوسيلة التي يُنصح بها.
لطرُز ،iPhoneمن املقرر أن يتوفر تطبيق Samsung Smart Homeعلى Apple Storeاعتبارًا من النصف
•بالنسبة ُ
الثاني من عام .2014
•في بعض البلدان ،قد ال يتوفر تطبيق .Samsung Smart Homeإذا كان ذلك هو الوضع لديك ،فاستخدم تطبيق
Samsung Smart Washerكحل بديل.
فارسی 38 -
3:34:09
2015-01-26
Untitled-49 38
تطبيق Samsung Smart Home
التركيب
تايلمعلا
عند استخدام تطبيق ،Samsung Smart Homeتأكد من حتديد " "Samsung Smart Homeضمن القائمة إعداد.
ميك ِّنك تطبيق Samsung Smart Homeمن الوصول إلى الغسالة والتحكم فيها أثناء تنقلك.
1 .1تفضل بزيارة Play Storeاخلاص بشركة Googleلألجهزة التي تعمل بنظام Androidأو App Storeاخلاص بشركة Apple
لألجهزة التي تعمل بنظام ،iOSوابحث عن تطبيق Samsung Smart Homeلتحديده.
2 .2نزّل تطبيق Samsung Smart Homeوث ّبته على جهازك احملمول.
•يدعم تطبيق Samsung Smart Homeاإلصدار ICS)( 4.0 Android OSأو األحدث الذي يعمل على حتسني
الهواتف الذكية من ( Samsungالسلسلتان Galaxy Sو .)Galaxy Noteقد تعمل بعض وظائف هذا التطبيق
بشكل مختلف في أجهزة أخرى.
•يدعم هذا التطبيق إصدار نظام التشغيل 7 iOSأو األحدث لطرز .iPhone
محسن ،يخضع تصميم واجهة املستخدم اخلاص بهذا التطبيق للتغيير دون إشعار.
•للحصول على أداء
ّ
•بالنسبة لطرز ،iPhoneتتم جدولة هذا التطبيق ليكون متا ًحا بحلول النصف الثاني من عام 2014في App
Storeاخلاص بشركة .Apple
اإلعداد
1 .1لتمكني التطبيق ،يلزمك الدخول إلى حساب Samsungاخلاص بك .سيتم توجيهك إلنشاء حساب Samsungإن لم يكن
لديك واح ًدا مباشرة في التطبيق .ال يلزمك تطبيق آخر لذلك.
سجل ً
أوال غسالتك على خدمة .Samsung Smart Home
2 .2لتمكني التطبيقّ ،
)1
)2
)3
)4
)5
1حدد الغسالة من قائمة األجهزة اخلاصة بتطبيق .Samsung Smart Home
2أدخل املعلومات الالزمة اخلاصة بجهاز APالالسلكي الذي تستخدمه في التوصيل الالسلكي.
3اتبع التعليمات الظاهرة على الشاشة لتكوين اإلعدادات اخلاصة بالغسالة.
4حدد من الغسالة اإلعدادات > ( Easy Connectionاالتصال السهل) لتكوين إعدادات الشبكة.
5عند اكتمال التكوين ،سيظهر رمز الغسالة في التطبيق.
تنبيه
•قد تفشل املوجهات غير املعتمدة لشبكات Wi-Fiفي إنشاء االتصال.
•إذا مت تركيب الغسالة وكان جهاز APقري ًبا من أفران امليكرويف أو مجففات الشعر الكهربائية ،فإن ميزة Smart
( Controlالتحكم الذكي) قد ال تعمل بشكل صحيح بسبب التداخل الكهربائي.
•تدعم الغسالة بروتوكوالت Wi-Fiبتردد 2.4جيجاهرتز فقط.
•قد تؤثر البيئة احمليطة على أداء الشبكة الالسلكية.
•إذا قمت بتشغيل التطبيق من دون تسجيل الدخول ،ستظهر لك الشاشة ( Account guidanceإرشادات حول
احلساب) .ومبجرد تسجيل الدخول ،ميكنك تغيير إعدادات احلساب من ( Settingsاإلعدادات) > ( Accountاحلساب).
تلقائيا مبجرد أن يقوموا بتسجيل حسابهم في
•ميكن ملستخدمي الهاتف الذكي من Samsungتسجيل الدخول
ً
( Settingsاإلعدادات).
فارسی 39 -
3:34:09
2015-01-26
Untitled-49 39
استخدام تطبيق Samsung Smart Home
امليزات األساسية
•التحكم الكامل في أجهزة Samsungالذكية
سجل أجهزة Samsungالذكية في خدمة Samsung Smart Homeبحيث تتمكن من االستفادة من إمكانية الوصول
ّ
السريع .حدد رمز الغسالة املوجود في التطبيق للوصول إلى امليزات األساسية للغسالة أثناء تنقلك.
•املفتاح العمومي
يتكون املفتاح العمومي من 4أوضاع هي( Going out :خروج من املنزل) و( Coming homeدخول املنزل) و( Good nightغسل
ليلي) و( Good morningغسل صباحي).
•مفاتيح التحكم في الدردشة
للدردشة بني األجهزة الذكية واحلصول على معلومات للتحكم في اجلهاز.
•املتابعة املنزلية
الستخدام كاميرا اجلهاز الذكي املدمجة ملتابعة غرفة اجللوس أثناء تنقلك.
•دعم العمالء
لتنزيل دليل املنتج أو طلب إجراء أعمال صيانة.
قد ال تكون بعض ميزات هذه اخلدمة متوفرة في الغسالة.
تطبيق Samsung Smart Home Washing Machine
ميكنك التحكم في الغسالة ومتابعتها من املنزل أو أثناء تنقلك.
سجل الغسالة على تطبيق .Samsung Smart Home
ّ 1 .1
2 .2لتمكني ميزة التحكم عن بُعد ،شغّل ميزة حتكم ذكي من الغسالة.
3 .3حدد رمز الغسالة من اجلهاز احملمول وانقر فوق ( Startتشغيل).
هذا املنتج عبارة عن غسالة ذكية تدعم خدمة .Samsung Smart Home
ملزيد من املعلومات ،تفضل بزيارة .www.samsung.com
فارسی 40 -
3:34:09
2015-01-26
Untitled-49 40
تطبيق غسالة الذكي من Samsung
تايلمعلا
عند استخدام تطبيق ،Samsung Smart Washerتأكد من حتديد " "Samsung Smart Washerضمن القائمة إعداد.
يسمح لك تطبيق Samsung Smart Washerبالتحكم في بعض وظائف الغسالة من جهاز متنقل (هاتف محمول ،جوال،
الخ).
تنزيل التطبيق
1 .1ابحث عن Samsung Smart Washerفي Play Storeو في .Apple Store
2 .2قم بتنزيل وتثبيت التطبيق على اجلهاز املتنقل.
3 .3قم بشغيل تطبيق Samsung Smart Washerعلى جهازك املتنقل.
التوصيل بالغسالة
يجب أن تكون الغسالة متصلة بشبكة .Wi-Fi
التحكم الداخلي
لتمكني هذا الوضع ،يجب توصيل اجلهاز احملمول إلى نفس الشبكة املتصلة بها الغسالة.
1 .1على اجلهاز املتنقل ،انقر فوق التحكم من داخل املنزل لعرض قائمة ُطرز الغساالت املتوافرة.
2 .2انقر فوق اسم طراز الغسالة ثم فوق ( OKموافق) ،فتظهر نافذة املصادقة.
3 .3انقر على الغسالة فوق اإلعدادات وقم بإزاحة شريط حتكم ذكي إلى وضع تشغيل .فيبدأ إجراء املصادقة.
إجراء املصادقة مطلوبة مرة واحدة فقط عند االستعمال ألول مرة.
التحكم اخلارجي
لتمكني هذا الوضع ،يجب تسجيل الغسالة مبوقع ( Samsung Smart Applianceأجهزة Samsungالذكية) (www.
.)samsungsmartappliance.com
1 .1انقر على الغسالة فوق اإلعدادات وقم بإزاحة شريط حتكم ذكي إلى وضع تشغيل.
2 .2انقر على اجلهاز املتنقل (هاتف محمول ،جوال ،الخ) فوق التحكم من خارج املنزل واكتب بيانات تسجيل الدخول،
فتظهر قائمة باألجهزة املسجلة.
3 .3انقر فوق اجلهاز الذي تريد التحكم فيه بالقائمة .واآلن سوف يتم إنشاء اتصال عن بُعد تلقائيا ً بني الغسالة واجلهاز
املتنقل.
ليست هناك حاجة إلى إجراء مصادقة.
فارسی 41 -
3:34:09
2015-01-26
Untitled-49 41
التسجيل
سجل غسالتك مبوقع ( Samsung Smart Applianceأجهزة Samsungالذكية) (,)www.samsungsmartappliance.com
ّ
واحصل على وصول عن بُعيد إلى الغسالة .يجب أن تكون الغسالة متصلة بشبكة .Wi-Fi
1 .1انتقل إلى موقع ( Samsung Smart Applianceأجهزة Samsungالذكية) (.)www.samsungsmartappliance.com
2 .2اذكر بيانات حساب Samsungاخلاص بك لتسجيل الدخول .وإذا لم تكن مستخدما ً مسجالً ،فانقر فوق "Create a
( "Samsung accountإنشاء حساب )Samsungواتبع التعليمات التي على الشاشة.
3 .3انقر فوق ( My Pageصفحتي) > ( Add deviceإضافة جهاز) ،واكتب عنوان حتكم وصول الوسائط (املعروف بعنوان )MAC
اخلاص بالغسالة.
للتحقق من عنوان ،MACانقر فوق اإلعدادات > الشبكة على الغسالة.
4 .4انقر فوق ( Get Approvalاحلصول على املوافقة).
5 .5انقر فوق اإلعدادات على الغسالة ثم فوق ( OKموافق) إذا ُطلب منك احلصول على املوافقة.
ميك العثور على الغساالت املسجلة بقائمة األجهزة مبوقع الويب.
بنا ًء على ذلك ،تعلن شركة Samsung Electronicsأن هذه الغسالة تتوافق مع املتطلبات األساسية واألحكام ذات
الصلة األخرى للتوجيه .1999/5/EC
ميكن العثور على إعالن التوافق الرسمي على موقع ,http://www.samsung.comانتقل إلى الدعم > البحث عن دعم
املنتج وأدخل اسم الطراز.
فارسی 42 -
3:34:09
2015-01-26
Untitled-49 42
يجب احملافظة على نظافة الغسالة ملنع األداء املتدني ،وكذلك احملافظة عليها حتى نهاية عمرها االفتراضي.
تنظيف احلوض
ةنايصلا
الصيانة
يجب تشغيل برنامج الغسيل هذا بانتظام لتنظيف احلوض وإزالة البكتريا منه.
1 .1انقر فوق البرنامج > تنظيف احلوض.
2 .2انتقل للشاشة الرئيسية وانقر فوق بدء.
مت ضبط درجة حرارة املاء من أجل تنظيف احلوض على 70درجة مئوية ،والتي ال ميكن تغييرها.
تنبيه
ال تستخدم أي مواد لتنظيف احلوض .تعمل بقايا املواد الكيميائية التي توجد في احلوض على تدهور مستوى الغسيل.
تذكير تنظيف احلوض
•تظهر رسالة تذكير تنظيف احلوض على الشاشة الرئيسية مرة كل 40غسلة .ويُنصح بإجراء تنظيف احلوض بانتظام.
•عندما ترى هذه الرسالة ألول مرة ميكنك إهمالها (حتى 6مرات) بالنقر فوق التذكير الحقا ً .ومن الغسلة السابعة ال
تظهر الرسالة ،ولكنها تعاود الظهور في الغسلة األربعني الثانية.
فارسی 43 -
3:34:09
2015-01-26
Untitled-49 43
التصريف عند الطوارئ
عندما ينقطع التيار الكهربائي يجب تصريف املاء الذي بداخل احلوض قبل إخراج الغسيل.
1 .1افصل قابس كبل الكهرباء اخلاص بالغسالة من املأخذ الرئيسي.
2 .2اضغط برفق على اجلزء العلوي من غطاء املصفاة لفتحها.
3 .3اسحب أنبوب التصريف عند الطوارئ برفق.
4 .4أمسك نهاية أنبوب التصريف وفي هذه األثناء افتح غطاءه.
5 .5اترك املاء ينساب في حاوية.
6 .6أعد غلق الغطاء وأعد إدخال أنبوب التصريف.
7 .7أغلق باب املصفاة.
فارسی 44 -
3:34:10
2015-01-26
Untitled-49 44
التنظيف
استخدم قطعة قماش ناعمة مبللة مبنظف صناعي منزلي غير كاشط .ال ترش املاء على الغسالة.
ةنايصلا
سطح بدن الغسالة
املصفاة
نظف مصفاة خرطوم املاء مرة أو مرتني في السنة.
1 .1أوقف تشغيل الغسالة وافصل قابس كبل الكهرباء.
2 .2أغلق صنبور املياه.
وغط اخلرطوم بقطعة
للغسالة،
اخللفي
اجلانب
من
املاء
خرطوم
أرخ وافصل
ِ
ِ 3 .3
قماش لتمنع املاء من االندفاع للخارج.
.4
.5
.6
.7
.8
4استخدم زرادية لسحب املصفاة من ثقب صمام دخول املاء.
غطس املصفاة بعمق في املاء حتى يُغمر املوصل املسنن باملاء كذلك.
ّ 5
6جفف املصفاة بالكامل في الظل.
7أعد تركيب املصفاة في خرطوم املاء وأعد اخلرطوم إلى مكانه األصلي.
8افتح صنبور املياه.
إذا كانت املصفاة مسدودة ،يظهر رمز خطأ " "4Eعلى الشاشة.
فارسی 45 -
3:34:10
2015-01-26
Untitled-49 45
مصفاة اخمللفات
يُنصح بتنظيف مصفاة اخمللفات 5أو 6مرات في السنة ملنع انسداده .فانسداد هذه املصفاة قد يحد من فعل الفقاعات.
1 .1أوقف تشغيل الغسالة وافصل قابس كبل الكهرباء.
2 .2صرّف املاء املتبقى في احلوض -يُرجى مراجعة "التصريف عند الطوارئ"
(التصريف عند الطوارئ) بالصفحة .44
3 .3افتح غطاء املصفاة بعملة معدنية أو مفتاح.
4 .4لف غطاء مصفاة اخمللفات إلى اجلهة اليسرى ،وصرّف املاء املتبقي.
5 .5أخرج مصفاة اخمللفات.
نظف مصفاة اخمللفات بفرشاة ناعمة .وتأكد من عدم إعاقة مروحة مضخة
ّ 6 .6
التصريف املوجودة داخل املصفاة.
7 .7أعد تركيب مصفاة اخمللفات ،ولف الغطاء إلى جهة اليمني.
•لفتح غطاء أمان املصفاة ،اضغطه للداخل ولفه عكس اجتاه دوران
عقارب الساعة .وسيساعد نابض الغطاء على فتحه.
•وإلغالق غطاء أمان املصفاة ،لفه في اجتاه دوران عقارب الساعة .ويحدث
النابض صوت خشخشة ،وهو أمر طبيعي.
•إذا كانت املصفاة مسدودة ،يظهر رمز خطأ " "5Eعلى الشاشة.
تنبيه
•تأكد من غلق غطاء املصفاة غلقا ً سليما ً بعد تنظيف املصفاة ،لئال يتسبب في حدوث تسريب.
•تأكد من إدخال املصفاة بالشكل السليم بعد تنظيفه ،لئال يتسبب في فشل تشغيلي أو تسريب.
فارسی 46 -
3:34:10
2015-01-26
Untitled-49 46
وحدة التوزيع التلقائي
ةنايصلا
يجب تنظيف وحدة التوزيع التلقائي بانتظام لضمان التشغيل السليم في جميع األوقات.
1 .1أخرج الوحدة من الغسالة.
2 .2امسح جتويف الوحدة (املوجودة بالغسالة) بقطعة قماش جافة.
3 .3فك القبضتني من الوحدة وكذلك الغطاءين املوجودين بأسفلها ،ودع املاء مير
ً
متخلال الوحدات لتنظيفها من الداخل.
ال ترج الوحدة ألنه قد يتناثر عليك املاء من فتحات الوحدة.
4 .4أعد إدخال القبضتني والغطاءين في مكانهما األصلي.
5 .5أعد إدخال وحدة التوزيع التلقائي في موضعها األصلي،
فارسی 47 -
3:34:11
2015-01-26
Untitled-49 47
االستعادة بعد التجمد
ميكن أن تتجمد الغسالة عندما تنخفض درجة احلرارة إلى أقل من درجة صفر مئوية.
1 .1أوقف تشغيل الغسالة وافصل قابس كبل الكهرباء.
2 .2صب املاء الدافئ على صنبور املياه إلرخاء خرطوم املاء.
3 .3افصل خرطوم املاء وانقعه في املاء الدافئ.
4 .4صب املاء الدافئ في احلوض واتركه ملدة 10دقائق.
5 .5أعد توصيل خرطوم املاء إلى صنبور املياه.
إذا استمرت الغسالة ال تعمل بالشكل العادي ،فكرر اخلطوات السابقة حتى تعمل بطبيعتها العادية.
العناية بالغسالة في حالة عدم االستعمال فترة مطولة.
يجب جتنب عدم استعمال الغسالة لفترة زمنية مطولة؛
ولكن إذا حدث ذلك ،يجب تصريف املاء من الغسالة وفصل قابس كبل الكهرباء.
1 .1انقر على الشاشة الرئيسية فوق البرنامج > قطن مع خيار الغسيل السريع.
2 .2أفرغ احلوض وانقر فوق بدء.
3 .3عندما ينتهي برنامج الغسيل أغلق صنبور املياه وافصل خرطوم املاء.
4 .4أوقف تشغيل الغسالة وافصل قابس كبل الكهرباء.
5 .5افتح الباب ودع الهواء يتخلل احلوض.
فارسی 48 -
3:34:11
2015-01-26
Untitled-49 48
نقاط الفحص
إذا واجهتك مشكلة في الغسالة ،يجب ً
أوال مراجعة اجلدول التالي وجتربة االقتراحات.
املشكلة
الغسالة ال تعمل.
تغذية املاء غير كافية ،أو ال
يوجد تغذية باملاء.
الغسالة تهتز بشدة أو تصدر
ضوضا ًء.
الغسالة ال تصرف املاء و /أو ال
تقوم بالدوران.
الباب ال يفتح.
الغسالة تنتج كمية كبيرة
من الفقاعات.
ال أستطيع أن أضع مسحوقا ً
إضافياً.
اإلجراء
•تأكد من توصيل الغسالة بالتيار الكهربائي.
•تأكد أن الباب مغلق غلقا ً سليماً.
•تأكد أن صنبور املياه مفتوح.
•انقر فوق بدء مرة أخرى على الشاشة الرئيسية.
•افتح صنبور املياه بالكامل.
•تأكد من أن خرطوم املاء غير متجمد.
•تأكد من أن خرطوم املاء ليس مثنيا ً أو مسدودًا.
•نظف املصفاة املوجودة بخرطوم املاء.
•تأكد من تركيب الغسالة على أرضية مستوية .إذا كانت األرضية غير مستوية،
فاستخدم أرجل الغسالة لضبط توازنها.
•تأكد من فك (نزع) مسامير الشحن.
•تأكد من عدم مالمسة الغسالة ألي شيء آخر.
•تأكد من توازن حمل الغسيل.
•تأكد من استقامة خرطوم الصرف على كامل طوله حتى نظام الصرف.
•تأكد من عدم انسداد مصفاة اخمللفات.
•انقر فوق بدء إليقاف تشغيل الغسالة.
•يظل باب الغسالة مغلقً ا أثناء دورة التسخني في الدورة ( Sanitizeتعقيم).
ثوان.
•ميكن أن يستغرق فك تعشيق آلية القفل بضع ٍ
•تأكد من حتديد اإلعدادين مسحوق تلقائي وكذلك منعم تلقائي بالطريقة
الصحيحة.
•تأكد من استخدامك ألنواع املسحوق املوصى بها كما هو مطلوب.
•افحص الكمية املتبقية من املسحوق ومنعم األقمشة لترى إذا كانت عند احلد
األقصى بالفعل.
•تأكد من متكني وظيفة توزيع تلقائي مع التحديد السليم إلعداد ّي خشونة املاء
وكذلك التركيز.
الصإو تالكشملا فاشكتسا
استكشاف املشكالت وإصالحها
في حالة استمرار املشكلة ،اتصل مبركز خدمة عمالء Samsungمبنطقتك.
فارسی 49 -
3:34:11
2015-01-26
Untitled-49 49
رموز املعلومات
عندما ال تعمل الغسالة ميكن أن ترى أحد رموز املعلومات على الشاشة .فقم مبراجعة اجلدول التالي وجتربة االقتراحات.
املشكلة
DE
4E
5E
UE
CE/3E/UC
اإلجراء
•تأكد أن الباب مغلق غلقا ً سليماً.
•تأكد من عدم وجود مالبس عالقة بالباب.
•تأكد أن صنبور املياه مفتوح.
•تأكد من تشغيل الغسالة بضغط ماء كاف.
•نظف املصفاة التي قد تكون مسدودة.
•نظف مصفاة اخمللفات التي قد تكون مسدودة
•تأكد من عدم انثناء خرطوم الصرف على كامل طوله حتى نظام الصرف.
•نظف املصفاة التي قد تكون مسدودة.
•حمل الغسيل غير متوازن .وزع الغسيل بالتساوي.
•هذا العطل ال يصلحه املستخدم .فاتصل مبركز خدمة عمالء Samsungمبنطقتك.
إذا استمر رمز معلومات في الظهور على الشاشة ،فاتصل مبركز خدمة عمالء Samsungمبنطقتك.
فارسی 50 -
3:34:11
2015-01-26
Untitled-49 50
افصاوملا
املواصفات
حماية البيئة
•هذا اجلهاز مصنوع من مواد قابلة إلعادة التدوير .إذا قررت التخلص من هذا اجلهاز ،يُرجى مراعاة القوانني احمللية اخلاصة
بالتخلص من النفايات .اقطع سلك التيار بحيث ال ميكن توصيل اجلهاز مبصدر طاقة .فك الباب ملنع تعرض احليوانات أو
األطفال الصغار لالحتباس داخل اجلهاز.
•ال تضع مسحوق غسيل أكثر من الكمية املبينة في إرشادات الشركة املصنِّعة ملسحوق الغسيل.
•استخدم مواد إزالة البقع ومواد التبييض قبل دورة الغسيل عند احلاجة فقط.
•وفر املياه والكهرباء من خالل إجراء الغسل بأوزان كاملة (تختلف الكمية وفقً ا للبرنامج املستخدم).
جدول العناية باألقمشة
توضح الرموز التالية تعليمات العناية باملالبس .تشتمل بطاقات العناية على أربعة رموز بالترتيب التالي :غسيل ،وتبييض،
وجتفيف ،وكي (وتنظيف جاف عند الضرورة) .يضمن استخدام هذه الرموز التناسق بني الشركات املصنّعة للمالبس احمللية
واملستوردة .اتبع تعليمات بطاقة العناية لزيادة عمر املالبس وتقليل مشاكل الغسيل.
مواد مقاومة
ممنوع الكي
املالبس الناعمة
ميكن إجراء تنظيف جاف باستخدام أي مواد
مذيبة
تنظيف جاف
ميكن الغسل عند 95درجة مئوية
ميكن الغسل عند 60درجة مئوية
التنظيف اجلاف بالبروكلوريد أو الوقود اخملفف
أو الكحول النقي أو R113فقط
التنظيف اجلاف بوقود الطائرات أو الكحول
النقي أو R113فقط
ممنوع استخدام التنظيف اجلاف
غسل يدوي فقط
جتفف وهي مفرودة
تنظيف جاف فقط
ميكن تعليقها لتجف
ميكن استخدام مادة تبييض مع املياه البارد
جتفيف املالبس وهي معلقة على حمالة
يحظر استخدام مادة تبييض
جتفيف بالتدوير ،حرارة عادية
ميكن الكي عند ˚200سلزيوس كحد أقصى
جتفيف بالتدوير ،حرارة خفيفة
ميكن الكي عند ˚150سلزيوس كحد أقصى
يحظر جتفيفها بالتدوير
ميكن الغسل عند 40درجة مئوية
ميكن الغسل عند 30درجة مئوية
ميكن الكي عند ˚100سلزيوس كحد أقصى
فارسی 51 -
3:34:12
2015-01-26
Untitled-49 51
جدول املواصفات
النوع
اسم الطراز
األبعاد
ضغط املاء
كمية املاء
الوزن الصافي
سعة الغسل والتنشيف
الغسل
استهالك الطاقة
الغسل والتسخني
التنشيف
220فولت
240فولت
220فولت
240فولت
220إلى 240
فولت
الضخ
دورات التنشيف
دورة في الدقيقة
غسالة أمامية التحميل
*****WW10H9
عرض x 600عمق x 600ارتفاع ( 850مم)
50كيلو باسكال aإلى 800كيلو باسكال
L 68
87كجم
10.0كجم
150واط
150واط
2000واط
2300واط
700واط
30واط
1600 ,1400
مت حتديد مواصفات ملصق الطاقة باستخدام البرنامج اآلتي وفقً ا للمعيار ( UAE.S 5010 2:2013لطرز اإلمارات العربية
املتحدة فقط).
•الدورة هي
قطن عند 60درجة مئوية.
فارسی 52 -
3:34:12
2015-01-26
Untitled-49 52
صفحة املواصفات (لطرز السعودية فقط)
بلد املنشأ
املوديل
نوع الغسالة
نظام الغسل
اجلهد املق ّدر (بالفولت)
التردد املق ّدر (هرتز)
مدخالت الطاقة املُق ّدرة
سخان الغسل
مدخالت الطاقة املُق ّدرة (بالواط أو
احملرك الرئيسي
الكيلوواط)
محرك املضخة
محرك الدوران
سعة الغسل القياسية (املق ّدرة) (كجم(
الكمية القياسية للمياه املستخدمة (لتر)
فئة الغسالة
رقم IP
احلد األقصى املسموح به لضغط دخول املاء
احلد األدنى املسموح به لضغط دخول املاء
حجم املاء
األبعاد
الوزن الصافي
دورات العصر
صنعت في كوريا
******WW90H9
غسالة كهربائية أوتوماتيكية
غسالة بنظام احلاوية
230فولت تقري ًبا
60كجم
2200واط
2000واط
540واط
30واط
30واط
9.0كجم
76لتر
الفئة I
IPX4
800كيلوباسكال
50كيلوباسكال
68لتر
العرض ×600العمق × 600االرتفاع
( 850مم)
87كجم
1400دورة في الدقيقة
افصاوملا
اسم الشركة املصنّعة و/أو عالمتها التجارية
•يجب أال يتم تركيب الغسالة في مكان رطب.
•يتعني ايقاف تشغيل العصارة في حالة عدم األستخدام.
•يجب أال يقوم األطفال بتشغيل الغسالة.
•قد يتعرض شكل املنتج ومواصفاته للتغيير دون إخطار مسبق ألغراض حتسني املنتج.
•يجب عدم ادخال يديك لداخل حوض املاء اثناء التشغيل
•الغساالت الي باالمكان فتح غطائها اثناء التشغيل والتي حتتاج 15ثانية او اكثر ليتوقف احلوض عن الدوران يجب اعتباره
عطل
مت حتديد مواصفات ملصق الطاقة باستخدام البرنامج اآلتي وفقً ا للمعيارين SASO 2692و .SASO 2693
•برنامج ****** WW90H9هو
قطن عند درجة 40درجة مئوية ،شطفتان ،مكثف 1400 ،لفة في الدقيقة
فارسی 53 -
3:34:12
2015-01-26
Untitled-49 53
مذكرة
Untitled-49 54
2015-01-26
3:34:12
مذكرة
Untitled-49 55
2015-01-26
3:34:12
هل لديك أي أسئلة أو تعليقات؟
أو تفضل بزيارة موقعنا على اإلنترنت
www.samsung.com/ae/support (English)
www.samsung.com/ae_ar/support (Arabic)
www.samsung.com/sa/support
www.samsung.com/sa_en/support (English)
اتصل
البلد
800-SAMSUNG (726-7864)
U.A.E
920021230
SAUDI ARABIA
DC68-03377M-03
Untitled-49 56
2015-01-26
3:34:12