1
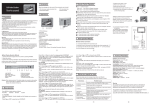
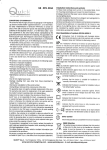
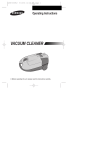
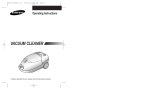
DJ68-00186G (0.0)
3/21/03 11:41 AM
Page 1
Operating Instructions
VC-6000 SERIES
VACUUM CLEANER
❈ Before operating this unit, please read the instructions carefully.
DJ68-00186G (0.0)
3/21/03 11:41 AM
Page 2
IMPORTANT SAFEGUARDS
▲
This appliance must be connected to the same main voltage as
shown on the rating plate.
▲
This vacuum cleaner is not suitable for removing any kind of liquid.
▲
Carpets treated with a liquid cleaner must be allowed to dry before
being cleaned with the unit.
▲
Never operate the vacuum cleaner without a dust bag.
▲
The cover cannot be closed if a dust bag is inserted. Please do not
close forcibly.
▲
Keep children away from this vacuum cleaner. It must not be used
on people or animals.
▲
Never use your appliance to vacuum matches, glowing embers, or
cigarette-ends. Avoid vacuuming hard, pointed objects, since they
may damage the appliance or dust bag.
▲
If your vacuum cleaner has a fault, please contact your electrical
retailer or an auth-orized service agent.
▲
If the main cable is defective, the complete cable winder must be
replaced by a service agent.
PROTECTING THE ENVIRONMENT
▲
Once you have unpacked the unit, do not simply throw the packing
into the household waste.
▲
Take them to the appropriate collecting points for recycling.
1
DJ68-00186G (0.0)
3/21/03 11:41 AM
Page 3
IDENTIFICATIONS OF PARTS
HANDLE
SUCTION HOSE
AIR REGULATOR
DUST-FULL INDICATOR
TUBE*
CORD REWIND BUTTON
BUTTON FOR SUCTION
HOSE REMOVAL
POWER CONTROL SWITCH*
ON/OFF BUTTON
CARRYING
HANDLE
CLAMPER FOR DUST BAG
COMPARTMENT
FLOOR NOZZLE*
RUG/FLOOR SELECTOR
▲
Features marked with * may vary according to model.
ASSEMBLING THE VACUUM - CLEANER READY FOR USE
1) Connect the suction hose to the
suction tube.
2) Connect the suction tubes together
(depending on model).
3) Connect the nozzle to the suction
tube.
4) Connect the body connector to the body
of the cleaner.
2
OPTION : Adjusting the telescopic
tube(depending on model).
DJ68-00186G (0.0)
3/21/03 11:41 AM
Page 4
POWER CORD
1) PULLING OUT
The power cord is long enough to
be drawn out for convenience.
2) REWINDING
When you have finished cleaning,
disconnect the plug from the
electrical outlet and simply press
the cord rewind button lightly with
your toe.
NOTE : When removing the power cord from the electrical outlet, grasp
the plug, not the cord.
ON / OFF SWITCH
With the cord plugged into an
electrical outlet, start or stop the
vacuum cleaner by pushing lightly
downward on the switch with your
toe.
POWER CONTROL(VARIABLE CONTROL TYPE ONLY )
The vacuuming power can be
adjusted to suit any situation with the
electrical power control.
M I N = For delicate fabrics, e.g.net
curtains.
MAX = For hard floors and heavily
soiled carpets.
3
DJ68-00186G (0.0)
3/21/03 11:41 AM
Page 5
DUST-FULL INDICATOR
If the “Dust-Full” indicator changes to “RED” while you are cleaning, the
dust bag requires replacement.
NOTE : If the “Dust-Full” indicator continues to display “RED” even after
changing the dust bag, turn the cleaner off and check whether the
hose, tube or nozzle is clogged.
CREVICE
• Crevice tool for
radiators, crevice,
corners, between
cushions.
USING THE ACCESSORIES
DUSTING
• Dusting brush for
furniture, shelves,
books, etc.
• Before use, assemble
the dusting brush to
the crevice tool.
TOOL STORAGE
Your cleaner features a tool storage
device.
Assemble the accessory hanger on to the
extension tube. It can be used to store the
cleaning tools while they are not in use.
This tool can be separated into two parts.
USING THE BLOWER
Located on the left rear side of the
cleaner.
1) Disconnect the hose from the body
of the cleaner.
2) Connect the hose clamper to the
blow hole.
4
DJ68-00186G (0.0)
3/21/03 11:41 AM
Page 6
REPLACING THE DUST BAG
1) To open the dust cover of the
dust bagcompartment, press
the clamper upward.
(The clamper is located at the
front of the dust cover)
2) Remove the carrying bag from
the cleaner.
3) After removing the used dust
bag, insert the cardboard bag
collar of the new dust bag into
the carrying bag.
4) Press the dust cover down
gently until the clamper relocks.
NOTE : Used dust bag can be
sealed by removing the film
from the paper and sticking
the latter over the suction
opening. (ONLY PAPER BAG)
FOR CLOTH FILTER BAG
After using, if the cloth filter bag is full of dust, clean the cloth filter bag and
use it again.
5
DJ68-00186G (0.0)
3/21/03 11:41 AM
Page 7
MAINTENANCE OR REPLACEMENT OF THE FILTERS
1) INLET-FILTER.
• Open the dust cover.
• After detaching the filter, wash it lightly
withwater, dry it in the shade, and then
insert it in its original position.
• Close the dust cover.
2) OUTLET-FILTER.
• To open the filter cover, press front and pull
it simultaneously.
• Remove and replace the dirty microfilter.
• Close the cover.
USAGE OF FLOOR NOZZLE
CARING THE TURBINE (TURBINE BRUSH ONLY)
Open the cover.
After cleaning the turbine, reposition it
Push up the both sides of cover. into its' own place.
Lift it upwards and detach it.
It cannot be reassembled if the ends of
turbine are reversed.
If you washing the turbine, it should be
dried thoroughly.
To reattach the cover, align hinges
of cover with slots on the inner
sides of nozzle.
After aligning, press the both sides
of cover.
slots
6
DJ68-00186G (0.0)
3/21/03 11:41 AM
Page 8
USAGE OF FLOOR NOZZLE
FOR RUG / FLOOR SELECTOR
Before use make sure that the position of the selector is in the right
position for the type of surface to be cleaned.
Select the carpet indicator ➀ when cleaning carpets..
Select flat surface indicator ➁ when cleaning the floors, tiles, etc.
FOR UNIVERSAL BRUSH
Use the floor nozzle for all cleaning surfaces.
NOTE : For optimum efficiency, clean floor brush with crevice tool.
TROUBLE SHOOTING
PROBLEM
CAUSE
REMEDY
Motor does not start.
No power supply.
Check cable, plug and
socket.
Suction force is gradually
decreasing.
Filter, nozzle, suction hose Remove the object.
or tube is blocked.
Cord does not rewind fully. Check that the cord is not Pull the cord out 2~3m &
twisted or wound unevenly. push down the cord rewind
button.
7
DJ68-00186G REV (0.0)