1
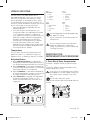
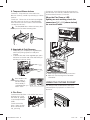
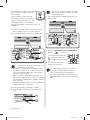
Refrigerator
user manual
This manual is made with 100 % recycled paper.
English
imagine the possibilities
Thank you for purchasing a Samsung product.
Free Standing Appliance
DA99-03404A-13.indd 01
2015. 4. 25.
8:33
safety information
SAFETY INFORMATION
• Before operating the appliance, please read this
manual thoroughly and retain it at a safe place near the
appliance for your future reference.
• Use this appliance only for its intended purpose as
described in this instruction manual. This appliance is
not intended for use by persons (including children)
with reduced physical, sensory or mental capabilities,
or lack of experience and knowledge, unless they have
been given supervision or instruction concerning use of
the appliance by a person responsible for their safety.
• This appliance can be used by children aged from 8
years and above and persons with reduced physical,
sensory or mental capabilities or lack of experience
and knowledge if they have been given supervision or
instruction concerning use of the appliance in a safe
way and understand the hazards involved.
Children shall not play with the appliance.
Cleaning and user maintenance shall not be made by
children without supervision.
• Warnings and Important Safety Instructions in this
manual do not cover all possible conditions and
situations that may occur. It is your responsibility to
use common sense, caution, and care when installing,
maintaining, and operating your appliance.
• Because these following operating instructions cover
various models, the characteristics of your refrigerator
may differ slightly from those described in this manual
and not all warning signs may be applicable. If you
have any questions or concerns, contact your nearest
service center or find help and information online at
www.samsung.com.
Important safety symbols and
precautions:
WARNING
CAUTION
Hazards or unsafe practices that may result in
severe personal injury or death.
Hazards or unsafe practices that may result
in minor personal injury or property
damage.
Do NOT attempt.
Unplug the power plug from the wall socket.
Make sure the machine is grounded to prevent
electric shock.
Call the contact center for help.
Note.
These warning signs are here to prevent injury to you
and others.
Please follow them carefully.
After reading this section, keep it in a safe place for
future reference.
CE Notice
This product has been determined to be in compliance
with the Low Voltage Directive(2006/95/EC), the
Electromagnetic Compatibility Directive (2004/108/EC),
RoHS Directive (2011/65/EU), Commission Delegated
Regulation (EU) No 1060/2010 and the Eco-Design
Directive(2009/125/EC) implemented by Regulation (EC)
No 643/2009 of the European Union.
WARNING
• When transporting and installing the
appliance,care should be taken to ensure
that no parts of the refrigerating circuit are
damaged.
• R-600a or R-134a is used as a refrigerant. Check
the compressor label on the rear of the appliance or
the rating label inside the refrigerator to see which
refrigerant is used for your refrigerator.
• When this product contains flammable gas (Refrigerant
R-600a),
-
Do NOT disassemble.
Do NOT touch.
Follow directions carefully.
SEVERE WARNING SIGNS
FOR TRANSPORTATION AND
SITE
-
Refrigerant leaking from the pipe work could ignite or
cause an eye injury. If a leak is detected, avoid any
naked flames or potential sources of ignition and air
the room in which the appliance is standing for several
minutes.
In order to avoid the creation of a flammable gas-air
mixture if a leak in the refrigerating circuit occurs, the
size of the room in which the appliance may be sited
depends on the amount of refrigerant used.
02_ safety information
DA99-03404A-13.indd 02
2015. 4. 25.
8:33
-
-
Never start up an appliance showing any signs of
damage. If in doubt, consult your dealer. The room
where the refrigerator will be sited must be 1m³ in size
for every 8g of R-600a refrigerant inside the appliance.
The amount of refrigerant in your particular appliance is
shown on the identification plate inside the appliance.
If the appliance contains isobutane refrigerant
(R-600a), a natural gas with high environmental
compatibility that is, however, also combustible. When
transporting and installing the appliance, care should
be taken to ensure that no parts of the refrigerating
circuit are damaged.
-
If you connect the power plug upside down, wire can
get cut off and a cause fire or an electric shock.
• Make sure that the power plug is not squashed or
damaged by the back of the refrigerator.
• When moving the refrigerator, be careful not to roll over
or damage the power cord.
- This constitutes a fire hazard.
• The appliance must be positioned so that the plug is
accessible after installation.
• The refrigerator must be grounded.
-
WARNING
SEVERE WARNING SIGNS
FOR INSTALLATION
• Do not install this appliance in a humid, oily or
dusty location, in a location exposed to direct
sunlight and water (rain drops).
-
Deteriorated insulation of electrical parts may cause an
electric shock or fire.
• Do not place this refrigerator in direct sunlight or
expose to the heat from stoves, room heaters or other
appliances.
• Do not plug several appliances into the same multiple
power board.
The refrigerator should always be plugged into its own
individual electrical outlet which has a voltage rating
that matched the rating plate.
This provides the best performance and also prevents
overloading house wiring circuits, which could cause a
fire hazard from overheated wires. If the wall socket is
loose, do not insert the power plug.
- There is a risk of electric shock or fire.
• Do not use a cord that shows cracks or abrasion
damage along its length or at either end.
• Do not bend the power cord excessively or place
heavy articles on it.
• Do not use aerosols near the refrigerator.
You must ground the refrigerator to prevent any power
leakages or electric shocks caused by current leakage
from the refrigerator.
• Never use gas pipes, telephone lines or other potential
lightening rods as ground.
-
Improper use of the ground plug can result in an
electric shock.
• If the power cord is damaged, have it
replaced immediately by the manufacturer or
its service agent.
• The fuse on the refrigerator must be changed by a
qualified technician or service company.
-
Failing to do so may result in an electric shock or
personal injury.
-
Aerosols used near the refrigerator may cause an
explosion or fire.
• Do not install this appliance in a location where gas
may leak.
CAUTION
• Keep ventilation opening in the appliance
enclosure or mounting structure clear of
obstruction.
• Allow the appliance to stand for 2 hours after
installation.
-
-
WARNING
-
Failing to do so may result in an electric shock, fire,
explosion, problems with the product, or injury.
• This refrigerator must be properly installed and located
in accordance with the manual before it is used.
• Connect the power plug in proper position with the
cord hanging down.
SEVERE WARNING SIGNS
FOR USING
• Do not insert the power plug with wet hands.
• Do not store articles on the top of the
appliance.
This may result in an electric shock or fire.
• The installation or any service of this appliance
is recommended by a qualified technician or
service company.
CAUTION SIGNS FOR
INSTALLATION
-
When you open or close the door, the articles may fall
and cause a personal injury and/or material damage.
• Do not put items filled with water on the refrigerator.
- If spilled, there is a risk of fire or electric shock.
• Do not let children hang on the door.
- Failure to do so may cause serious personal injury.
• Do not leave the doors of the refrigerator open while
the refrigerator is unattended and do not let children
enter inside the refrigerator.
safety information _03
DA99-03404A-13.indd 03
2015. 4. 25.
8:33
• Do not allow babies or children go inside the drawer.
It can cause death from suffocation by entrapment or
personal injury.
• Do not sit on the Freezer door.
• Do not disassemble or repair the refrigerator
by yourself.
-
-
- The door may be broken and cause a personal injury.
• To prevent children entrapment, you must reinstall the
divider using provided screws after cleaning or other
actions if you removed the divider from the drawer.
• Never put fingers or other objects into the dispenser
hole.
-
Failure to do so may cause personal injury or material
damage.
• Do not store volatile or flammable substances such
as benzene, thinner, alcohol, ether or LP gas in the
refrigerator.
-
The storage of any of such products may cause an
explosion.
• Do not store low temperature-sensitive pharmaceutical
products, scientific materials or other low temperaturesensitive products in the refrigerator.
-
Products that require strict temperature controls must
not be stored in the refrigerator.
• Do not place or use electrical appliance inside the
refrigerator, unless they are of a type recommended by
the manufacturer.
• Do not use a hair dryer to dry the inside of the
refrigerator. Do not place a lighted candle in the
refrigerator for removing bad odors.
- This may result in an electric shock or fire.
• Do not touch the inside walls of the freezer or products
stored in the freezer with wet hands.
- This may cause frostbite.
• Do not use me chanical devices or any other means
to accelerate the defrosting process, other than those
recommended by the manufacturer.
• Do not damage the refrigerant circuit.
• This product is intended only for the storage
of food in a domestic environment.
• Bottles should be stored tightly together so that they
do not fall out.
• In the event of a gas leak (such as propane gas, LP
gas, etc.), ventilate immediately without touching the
power plug. Do not touch the appliance or power cord.
- Do not use a ventilating fan.
- A spark may result in an explosion or fire.
• Use only the LED Lamps provided by manufacturer or
service agent.
• Children should be supervised to ensure that they do
not play with and/or climb into the appliance.
-
Keep fingers out of “pinch point” areas; clearances
between the doors and cabinet are necessarily small.
Be careful when you open the doors when children are
in the area.
You run a risk of causing a fire, malfunction and/ or
personal injury. In case of malfunction, please contact
your service agent.
• If the appliance generates a strange noise, a
burning or smell or smoke, unplug the power
plug immediately and contact your nearest
service center.
- Failing to do so may result in an electric or fire hazards.
• If you experience difficulty when changing the light,
contact service agent.
• If the products is equipped with the LED Lamp, do
not disassemble the Lamp Cover and LED Lamp by
yourself.
- Please contact your service agent.
• If any dust or water is in the refrigerator, pull out power
plug and contact your Samsung Electronics service
center.
-
There is a risk of fire.
CAUTION
CAUTION SIGNS FOR USING
• To get best performance from the product,
-
Do not place foods too closely in front of the vents
at the rear of the appliance as it can obstruct free air
circulation in the refrigerator compartment.
- Wrap the food up properly or place it in airtight
containers before putting it into the refrigerator.
- Do not put any newly introduced food for freezing near
to already existing food.
• Do not place carbonated or fizzy drinks in the freezer
compartment. Do not put bottles or glass containers in
the freezer.
-
When the contents freeze, the glass may break and
cause personal injury and property damage.
• Do not change or modify the functionality of the
refrigerator.
-
Changes or modifications may result in a personal
injury and/or property damage. Any changes or
modifications performed by a 3rd party on this
completed appliance are neither covered under
Samsung warranty service, nor is Samsung
responsible for safety issues and damages that result
from 3rd party modifications.
• Do not block air holes.
-
If the air holes are blocked, especially with a plastic
bag, the refrigerator can be over cooled. If this cooling
period lasts too long, the water filter may break and
cause water leakage.
• Please observe maximum storage times and expiry
dates of frozen goods.
04_ safety information
DA99-03404A-13.indd 04
2015. 4. 25.
8:33
• Fill the water tank, ice tray, water cubes only with
potable water.
• Use only the ice-maker provided with the refrigerator.
• The water supply to this refrigerator must only be
installed/connected by a suitably qualified person and
connected to a potable water supply only.
• In order to operate the ice-maker properly, water
pressure of 138~862kpa(1.4~8.8kgf/cm3) is required.
• Do not spray volatile material such as insecticide onto
the surface of the appliance.
-
As well as being harmful to humans, it may also result
in an electric shock, fire or problems with the product.
CAUTION
CAUTION SIGNS
FOR CLEANING AND
MAINTENANCE
• Do not directly spray water inside or outside
the refrigerator.
- There is a risk of fire or electric shock.
• Do not use or place any substances sensitive to
temperature such as inflammable sprays, inflammable
objects, dry ice, medicine, or chemicals near the
refrigerator. Do not keep volatile or inflammable objects
or substances (benzene, thinner, propane gas, etc.) in
the refrigerator.
- This refrigerator is for storing food only.
- This may result in a fire or an explosion.
• Do not spray cleaning products directly on the display.
- Printed letters on the display may come off.
• Remove any foreign matter or dust from the power
plug pins. But do not use a wet or damp cloth when
cleaning the plug, remove any foreign material or dust
from the power plug pins.
- Otherwise there is a risk of fire or electric shock.
• Never put fingers or other objects into the dispenser
hole and ice chute.
-
contact your local authority in regard to safe disposal
of this product. Cyclopentane is used as an insulation
blowing gas. The gases in insulation material require
special disposal procedure. Please contact your
local authorities in regard to the environmentally safe
disposal of this product. Ensure that none of the pipes
on the back of the appliances are damaged prior to
disposal. The pipes shall be broken in the open space.
• It is hazardous for anyone other than an Authorised
Service Person to service this appliance. In Queensland
– the authorized Service Person MUST hold a Gas
Work Authorisation or Licence for hydrocarbon
refrigerants, to carry out Servicing or repairs which
involve the removal of covers. (For Australia only)
• When disposing of this product or other refrigerators,
remove the door/door seals, door latch so that small
children or animals cannot become trapped inside.
Leave the shelves in place so that children may not
easily climb inside. Children should be supervised to
ensure that they do not play with the old appliance.
• Please dispose of the packaging material for this
product in an environmentally friendly manner.
ADDITIONAL TIPS FOR PROPER
USAGE
• In the event of a power failure, call the local office of
your Electricity Company and ask how long it is going
to last.
-
•
•
It may cause a personal injury or material damage.
• Unplug the refrigerator before cleaning and
performing maintenance.
•
•
WARNING
SEVERE WARNING SIGNS
FOR DISPOSAL
• Ensure that none of the pipes on the back of
the appliance are damaged prior to disposal.
• R-600a or R-134a is used as a refrigerant. Check
the compressor label on the rear of the appliance or
the rating label inside the refrigerator to see which
refrigerant is used for your refrigerator. When this
product contains flammable gas (Refrigerant R-600a),
•
•
Most power failures that are corrected within an hour
or two will not affect your refrigerator temperatures.
However, you should minimize the number of door
openings while the power is off.
Should the power failure last more than 24 hours,
remove all frozen food.
If keys are provided with the refrigerator, the keys
should be kept out of the reach of children and not be
in the vicinity of the appliance.
The appliance might not operate consistently (possibility
of temperature becoming too warm in the refrigerator)
when sited for an extended period of time below the
cold end of the range of temperature for which the
refrigerating appliance is designed.
Do not store food which spoils easily at low
temperature, such as bananas, melons.
Your appliance is frost free, which means there is no
need to manually defrost your appliance, as this will be
carried out automatically.
Temperature rise during defrosting can comply with
ISO requirements. But if you want to prevent an
undue rise in the temperature of the frozen food while
defrosting the appliance, please wrap the frozen food
up in several layers of newspaper.
Any increase in temperature of frozen food during
defrosting can shorten its storage life.
safety information _05
DA99-03404A-13.indd 05
2015. 4. 25.
8:33
Saving Energy Tips
-
-
-
-
-
-
Install the appliance in a cool, dry room with adequate
ventilation.
Ensure that it is not exposed to direct sunlight and
never put it near a direct source of heat (radiator, for
example).
Never block any vents or grilles on the appliance.
Allow warm food to cool down before placing it in the
appliance.
Put frozen food in the refrigerator to thaw. You can
then use the low temperatures of the frozen products
to cool food in the refrigerator.
Do not keep the door of the appliance open for too
long when putting food in or taking food out. The
shorter time for which the door is open, the less ice will
form in the freezer.
Clean the rear of the refrigerator regularly. Dust
increases energy consumption.
Do not set temperature colder than necessary.
Ensure sufficient air exhaust at the refrigerator base
and at the back wall of the refrigerator. Do not cover air
vent openings.
Allow clearance to the right, left, back and top when
installing.
This will help reduce power consumption and keep
your energy bills lower.
For the most efficient use of energy, please keep the
all inner fittings such as baskets, drawers, shelves on
the position supplied by manufacturer.
This appliance is intended to be used
in household and similar applications
such as
-
staff kitchen areas in shops, offices and other working
environments;
farm houses and by clients in hotels, motels and other
residential type environments;
bed and breakfast type environments;
catering and similar non-retail applications.
Contents
SETTING UP YOUR REFRIGERATOR ………………………………………………… 07
OPERATING YOUR SAMSUNG REFRIGERATOR …………………………………… 13
TROUBLESHOOTING …………………………………………………………………… 22
06_ safety information
DA99-03404A-13.indd 06
2015. 4. 25.
8:33
Setting up your refrigerator
50 mm
125°
335 mm
908 mm
108 mm
46 mm
1233 mm
A location with easy access to the water supply.
A location without direct exposure to sunlight.
A location with level (or nearly level) flooring.
A location with enough space for the Refrigerator
doors to open easily.
• Allow sufficient space to the right, left, back and
top for air circulation.
If the Refrigerator does not have enough space,
the internal cooling system may not work
properly.
• Please ensure that appliance can be moved freely
in the event of maintenance & service.
• Do not install the Refrigerator where the
temperature will go below 50 ºF (10 ºC).
748 mm
•
•
•
•
125°
1578 mm
Selecting the best location for the
Refrigerator
01 SETTING UP
Congratulations on your purchase of the Samsung
Refrigerator. We hope you enjoy the state-of-art
features and efficiencies that this new appliance
offers.
1346 mm
GETTING READY TO INSTALL
THE REFRIGERATOR
Each measurement based on the design
dimension, so it may differ depending on
the measuring method.
When moving your refrigerator
To prevent floor damage be sure the front leveling
legs are in the up position(above the floor).
B
Refer to ‘ADJUSTING THE DOORS’ in the manual
(at page 10)
A
E
C
Depth “A”
D
858 mm
Width “B”
908 mm
Height “C”
1740 mm
Overall Height “D”
1774 mm
Depth “E”
920 mm
FLOORING
For proper installation, this refrigerator must be
placed on a level surface of hard material that is the
same height as the rest of the flooring. This surface
should be strong enough to support a fully loaded
refrigerator. To protect the finish of the flooring, cut
a large section of the cardboard carton and place
under the refrigerator where you are working. When
moving, be sure to pull the unit straight out and push
back in straight.
setting up _07
DA99-03404A-13.indd 07
2015. 4. 25.
8:33
REMOVING THE
REFRIGERATOR DOORS
2. Disconnect two connectors ( 3 ) at each side of
the top cap and the one connector ( 4 ) on left
side door. Remove the tube ( 5 ) with pressing the
dark gray color part ( 6 ) of the water line coupler.
If the Refrigerator is too large to pass through your
doorway easily, you can remove the refrigerator
doors.
WARNING
4
Disconnect power to the refrigerator before
removing the door or drawer.
3
5
• Be careful not to drop, damage or scratch
the door/drawer while removing them.
• Be careful not to get injured while removing the
door/drawer.
• Reattach the door/drawer properly to avoid:
- Moisture from air leakage.
- Uneven door alignment.
- Wasting energy due to improper door seal.
6
3. Remove the 3 hex head bolts ( 7 ) attached to
the upper left and right door hinges with a socket
wrench (10 mm). Remove the ground screw ( 8 )
attached to the upper left and right door hinges
with a philips screwdriver(+). Remove the upper
left and right door hinges ( 9 ).
Tools you will need (Not provided)
Socket wrench
8
7
9
Philips
screwdriver (+)
Flat-blade
screwdriver (-)
Socket wrench
(10 mm)
4. Lift the door straight up to remove.
Pliers
Allen wrench
(3/16”) (5 mm)
Disassemble the Refrigerator doors
1. With the door opened, remove the Hinge Cover
cap ( 1 ) with a Flat head screwdriver, and close
the door. Remove the 3 screws holding down the
Hinge Cover and remove the Hinge Cover ( 2 ) .
5. Remove the screw ( 10 ) attached to the
lower left and right door hinges with a philips
screwdriver(+). Remove the 2 hex head bolts ( 11 )
attached to the lower left and right door hinges
with an allen wrench (3/16”). Remove the lower
left and right door hinges ( 12 ).
12
2
10
11
Allen wrench
1
08_ setting up
DA99-03404A-13.indd 08
2015. 4. 25.
8:33
REATTACHING THE
REFRIGERATOR DOORS
To reattach the fridge doors, assemble parts in
reverse order.
CAUTION
When reassembling it, be sure to connect the
wire harness.
If it is not connected, the Flex Room does not
work.
4. Remove 2 hex head bolts from sides with a
socket wrench (10 mm)
Type A
01 SETTING UP
1. The Water Line must be fully inserted to the
center of transparent coupler (Type A) or the
Guide Lines (Type B) to prevent water leakage
from the dispenser.
Type B
Dispenser
5. Lift up the Flex door from the rails.
Center of Transparent coupler
The Guide Lines
DISASSEMBLE THE FLEX DOOR
1. Take out the Flex Zone ( 1 ) by lifting it up.
CAUTION
Putting too much food into the freezer
drawers can prevent the freezer from closing
completely and can cause frost build-up.
1
2. Take off the cover ( 2 ) w/harness with a flatblade screwdriver (-).
ASSEMBLE THE FLEX DOOR
2
To reattach the flex door,assemble parts in reverse
order.
CAUTION
3. Press the locking tab and separate the Wire
Connector.
Be sure to connect the Flex Door Wire
Connector.
If it is not connected, the Flex Room does not
work.
setting up _09
DA99-03404A-13.indd 09
2015. 4. 25.
8:33
DISASSEMBLE THE FREEZER
DRAWER
ASSEMBLE THE FREEZER
DRAWER
1. Push the upper drawer in completely.
To reattach the freezer drawer, assemble parts in
reverse order.
ADJUSTING THE DOORS
2. Remove the tilting pocket ( 1 ) by pulling on both
brackets ( 2 ) upward at the same time.
1
Now that the doors are back on the Refrigerator, you
want to make sure the Refrigerator is level so that
you can make final adjustments. If the Refrigerator
is not level, it will not be possible to get the doors
perfectly even.
Insert a flat-blade screwdriver (-) into a notch on the
left control lever, and turn it count clockwise to level
the refrigerator. (You turn the lever clockwise to lower
the refrigerator and counterclockwise to raise it.)
2
3. Take out the lower basket ( 3 ) by lifting the
basket up from rail system.
3
flat-blade
screwdriver(-)
4. Remove four 10 mm hex-head bolts from both
sides.
CAUTION
Control
Lever
Both control levers must be touching the floor
to avoid possible personal injury or property
damage because of tipping.
If the right side is lower, perform the same
procedure, but with the right control lever.
5. Lift the freezer door up from the rails.
10_ setting up
DA99-03404A-13.indd 10
2015. 4. 25.
8:33
MAKING MINOR ADJUSTMENTS
BETWEEN DOORS
1. Locate the height-adjuster ( 1 ) in the freezer
drawer.
Unscrew the four Phillips screws ( 2 ) slightly to
loosen the door.
Remember a level Refrigerator is necessary for
getting the doors perfectly even. If you need
help, review the previous section on leveling the
Refrigerator.
1
2
2. Loosen the controller screw ( 3 ) with a Phillips
screwdriver.
1. If you open the drawer ( 1 ), you can see the
lower hinge ( 2 ) .
2. Insert a philips screwdriver (+) ( 3 ) into the shaft
( 4 ) of the lower hinge.
3. Adjust the height by turning a philips screwdriver
(+) ( 3 ) clockwise ( DOWN ) or counterclockwise
( UP ).
01 SETTING UP
Adjustment
part
Fixed
Part
3
2
4
1
3. Find the best level to align the door slope.
3
When you turn a philips screwdriver (+)
counterclockwise ( ), the door will
move up.
ADJUSTING THE FREEZER
DRAWER LEVEL
Adjustment part
Freezer Drawer
Example)
The slope is about 2mm (0.08inch) as shown below.
- Rotate the Height Adjuster to -2.0 to reduce the door slope.
Slope
Reference
plane
After adjustment, first tighten screw ( 3 ) and
then screw ( 2 ) .
CHECKING THE WATER LINE
A water dispenser is one of the helpful features on
your new Samsung Refrigerator. To help promote
better health, the Samsung water filter removes
unwanted particles from your water.
setting up _11
DA99-03404A-13.indd 11
2015. 4. 25.
8:33
However, it does not sterilize or destroy
microorganisms. You may need to purchase a
water purifying system to do that. In order for the
ice-maker to operate properly, a water pressure of
138~862 Kpa is required.
INSTALLING THE WATER LINE
Under normal conditions, a 170 cc (5.75 oz.) cup
can be filled in 10 seconds. If the Refrigerator
is installed in an area with low water pressure
(below 138Kpa), you can install a booster pump to
compensate for the low pressure.
There are several items that you need to purchase to
complete this connection. You may find these items
sold as a kit at your local hardware store.
Make sure the water storage tank inside the
Refrigerator is properly filled. To do this, press the
water dispenser lever until the water runs from the
water outlet.
Connecting the water line to the
Refrigerator.
•
6.35 mm compression
nut
•
copper tubing
•
plastic tubing
•
ferrule
Water line installation kits are available at extra cost
from your dealer.
We recommend using a water supply kit that
contains copper tubing.
Refrigerator
The new hose-sets supplied with the
appliance are to be used and that old
hose-sets should not be reused.
Compression
nut (A) (1/4”)
(Supplied)
Plastic tubing (A)
(Supplied)
Compression
fitting (Supplied)
Check the accessory list below.
Ferrule (Not
supplied)
Compression fitting
Compression nut
Molded
end(Bulb)
Copper tubing
(Not supplied)
or
Compression
nut (B) (1/4”)
(Not supplied)
Plastic tubing (B)
(Not supplied)
Household water line
Connecting to the water supply line
1. First, shut off the main water supply line and turn
the ice-maker off.
2. Locate the nearest cold water drinking line.
3. After connecting the water supply with water
filter, turn on water supply and Flush 3L through
filter before use (flush approximately 6 minutes).
Cold Water Line
Pipe clamp
Water line
installation
kit
Shut off valve
1. Slip the compression nut through the supplied
plastic tubing(A).
2. Tighten the compression nut (A) onto the
6.35 mm compression fitting.
- If you are using copper tubing, slip the
compression nut (B)(not included) and ferrule
(not included) on copper tubing (not included) as
shown.
- If you are using plastic tubing (B), insert the
molded end(Bulb) of the plastic tubing (B)into
the compression fitting. Do not use without the
molded end(Bulb) of the plastic tubing (B).
3. Tighten the compression nut (B)onto the
compression fitting. Do not over-tighten the
compression nut (B).
4. Turn water on and check for any leakage.
Only connect the water line to a drinkable water
source. If you have to repair or disassemble the
water line, cut off 6.35 mm of the plastic tubing to
make sure you get a snug, leak-free connection.
12_ setting up
DA99-03404A-13.indd 12
2015. 4. 25.
8:33
operating your samsung
refrigerator
USING THE CONTROL PANEL
4
2
5
3
6
10
9
7
(1)
Energy
Saver
(2)
Power
Freeze
(Filter Reset)
8
Press the Energy Saver button for better
energy efficiency.
The Energy Saver icon lights up when you
press the Energy Saver button.
The Energy Saver function is automatically
set to “ON” when power is supplied to the
refrigerator.
If condensation or water drops appear on
the doors, turn the Energy Saver mode off.
The Power Freeze function substantially
speeds up the freezer compressor,
causing the freezer to cool down rapidly
to a temperature you choose. When you
press the Power Freeze button, the Power
Freeze icon lights up.
Power Freeze is useful if you need to quick
freeze an item, to make a large quantity of
ice, or to cool the freezer rapidly if it has
warmed dramatically (for example, if the
door was left open).
To turn off Power Freeze, press the Power
Freeze button again. Power Freeze turns
off automatically after 72hours to decrease
energy consumption.
When you use this function the energy
consumption of the refrigerator will
increase. Remember to turn it off when you
don’t need it and return the freezer to your
original temperature setting. If you need to
freeze large amount of food stuff, activate
Power Freeze function at least 24 hours
before.
The Alarm/Hold 3 sec for Filter Reset
button serves two purposes:
To turn the door open alarm on and off
To reset the water filter life indicator.
1)
Door Alarm Function
If the door alarm is set to On, an alarm
beeps if any refrigerator door is left open
for more than three minutes.
The beeping stops when you close the
door. The door alarm function is pre-set
to On in the factory. You can turn it off by
pressing and then releasing the Alarm/
Hold button. You can turn it back on in the
same fashion. The icon lights up when the
function is on.
2)
02 OPERATING
1
(3)
Alarm /
hold 3
sec for
Filter
Reset
Water Filter Life Indicator Function
After you replace the water filter, press and
hold the Alarm/Hold 3 sec for Filter Reset
button to re-set the water filter life indicator.
The Filter icon will turn red to let you know
it is time to change the water filter after six
months (about 1135 L).
Some areas have large amounts
of lime in their water, which causes
the water filter to clog more quickly.
If this is the case in your area, you
will have to change the filter more
frequently than every six months.
(4)
Lighting
Pressing the Lighting button turns on the
Dispenser LED lamp (under the display)
in continuous mode so that it stays on
continuously. The button also lights up. If
you want the Dispenser lamp to come on
only when some one uses the dispenser,
press the Lighting button to turn the
continuous mode off.
operating _13
DA99-03404A-13.indd 13
2015. 4. 25.
8:33
(5)
Power
Cool
(6)
Ice Off
(Hold 3 sec
for Child lock)
(7)
Cubed Ice
(8)
Crushed
Ice
(Cubed) (Crushed)
(9)
Ice Off
The Power Cool function substantially
speeds up the refrigerator compressor,
causing the refrigerator to cool down
rapidly to a temperature you choose. When
you press the Power Cool button, the
Power Cool icon lights up.
Power Cool is useful if you need to quickly
cool items or need to cool the refrigerator
rapidly if it has warmed dramatically (for
example, if the door was left open).
To turn off Power Cool, press the Power
Cool button again. Power Cool turns off
automatically after 2 1/2 hours to decrease
energy consumption.
When you turn on Power Cool, the
refrigerator’s compressor speeds
up and is louder than during normal
operation.
If you don’t want to make more ice, press
the Ice Off button. Pressing this button
3 second locks the display panel and
dispenser buttons so the buttons can not
be used.The Child Lock icon lights up to
indicate you’ve activated the Child Lock
function.
Press the Cubed Ice or Crushed Ice
button to select the type of ice you want
dispensed. Each time you press the
button, the cubed and crushed ice modes
alternate and the Cubed or Crushed ice
icon lights up, indicating your selection.
If you don’t need ice, turn the function off
to save on water and energy consumption
(See Ice Off below).
If you don’t want to make more ice, press
the Ice Off button.
The icon will light up and the Ice-Maker
stops making ice.
We recommend you stop ice making if the
following occur:
-
There is enough ice in the ice bucket.
You want to save water and energy.
Water is not being supplied to the
refrigerator.
If the ice maker function is ON, and
the water line is not connected,
there will be a water valve noise
from back of the unit. Press the
Ice Off (6) button until the Ice Off
indicator (
) illuminates.
( 10 )
Filter
(Red)
(Reset the
indicator)
Water filter usage
1. Normally the filter indicator is blue,
yellow, or green when you purchase or
install your refrigerator, depending on
your model.
2. After you use about 1020 L of water,
the filter indicator turns Light Pink.
(about 5 months)
3. After you use about 1135 L of water,
the filter indicator turns Red. (about
6 months) The icon will blink red for
several seconds when you open or
close the door.
4. Remove the old water filter and install a
new one when the filter indicator is red.
Reset the filter indicator by pressing
Alam/Hold 3 sec for Filter Reset button
for 3sec.
• If water is not dispensing or
dispensing slowly, you need to
replace the water filter because
the water filter is clogged.
• Some areas have large amounts
of lime in their water, which
causes the water filter to clog
more quickly.
USING THE CONTROL PANEL
Basic temperature of Freezer and
Refrigerator Compartments
The basic temperature and/or recommended
temperature of Freezer and Refrigerator
Compartments are -19°C and 3°C respectively.
If the temperature of Freezer and Refrigerator
Compartments are too high or low, adjust the
temperature manually.
Controlling the Freezer temperature
The Freezer temperature can be set between -14ºC
and -22ºC to suit your particular needs. Press
the Freezer button repeatedly until the desired
temperature is shown in the temperature display.
The temperature will move 1°C degrees with each
press (-19°C → -20°C → -21°C → -22°C → -14°C →
-15°C → -16°C → -17°C → -18°C → -19°C). Keep
in mind that foods like ice cream may melt at 0°C.
The temperature display will move sequentially from
-22°C to -14°C.
14_ operating
DA99-03404A-13.indd 14
2015. 4. 25.
8:33
Controlling the Refrigerator
temperature
You can choose the type of ice by pushing the
cubed or crushed button first.
The Refrigerator temperature can be set between
7ºC and 1ºC to suit your particular needs. Press
the Fridge button repeatedly until the desired
temperature is shown in the temperature display.
Using the Water lever
(2)
Press the Fridge button to set your desired
temperature. After a few seconds, the Fridge will
begin adjusting towards the newly set temperature.
This will be reflected in the digital display.
- The temperature of the Freezer, fridge
or Convertible Room may rise when you
open the doors too frequently, or if a large
amount of warm or hot food is placed
inside.
- This may cause the digital display to blink. Once
the Freezer and fridge temperature return to their
normal set temperatures, the blinking will stop.
- If the blinking continues, you may need to “reset”
the Refrigerator. Try unplugging the appliance,
wait for around 10 minutes and then plug the
power cord back in.
- If there is an communication error between the
Display and Main Controller, the Convertible
Display light may blink. Once the normal set
temperatures are reached, the blinking will stop.
If the blinking continues for a long period of time,
please contact a Samsung Electronics Service
Center.
USING THE COLD WATER
DISPENSER
Press the Ice / Water button to select the type of you
want.
Even if you push the water
and Ice lever simultaneously,
the dispenser operates only
the option you selected or
pushed first.
Using the ice lever ( 1 )
2
Using the Ice & Water Dispenser
together
To get Ice and water, push the Ice lever ( 1 ) first for
ice, then move your glass glass down and press the
water dispenser lever ( 2 ) for water.
CAUTION
Do not pull the
lever out. You could
damage or break the
lever’s spring.
check the water
level
• To clean the
ice bin/bucket,
wash with a mild
detergent, rinse
well, and dry
Test button
thoroughly it.
Do not use harsh or abrasive cleaners or
solvents.
When you select Cubed Ice after using the
Crushed Ice mode, a small amount of residual
crushed ice might be produced.
In case ice doesn’t come out, pull out the ice
bucket and press the test button located on the
right side of ice maker.
Do not press the test button continuously when
the tray is filled with ice or water. Water may
overflow or ice may jam the bucket.
Normal Use
CAUTION
•
•
•
•
NO ICE
Select this if you want to turn ice
maker off
1
02 OPERATING
The temperature will move 1°C degrees with each
press (3°C → 2°C → 1°C → 7°C → 6°C → 5°C →
4°C → 3°C). The temperature control process for the
Fridge works just like the Freezer process.
Push the Water lever
dispenser ( 2 ) gently with your
glass. Water will be released
from the dispenser.
To fill the ice bucket to maximum capacity after
installation, follow these steps:
1. Allow your refrigerator to operate and cool down
for 24 hours (or 1 full day).
- Waiting 24 hours will allow your ice maker to
cool properly.
2. Dispense 4 to 6 ice cubes into the glass.
3. After 8, and then 16 hours, dispense a full glass
of ice.
Push the Ice lever dispenser ( 1 ) gently with your
glass. Ice will be released from the dispenser.
operating _15
DA99-03404A-13.indd 15
2015. 4. 25.
8:33
• When you press the Test button, you will hear the
refrigerator chime (ding-dong). When the chime
sounds, release the Test button.
• The chime sounds automatically again to let you
know the ice maker is working well.
CAUTION
CAUTION
If a power failure occurs, ice cubes may melt
then freeze together when the power comes
back on, causing the dispenser to be out of
order. To prevent this problem, after a power
failure, pull out the ice bucket and discard the
residual ice or water.
After you dump the ice from the ice bucket,
you should press the dispenser lever once
with the ‘ICE CUBED’ or ‘CRUSHED’
function ON. The ice maker will make new ice
faster after you return the ice bucket in the
refrigerator.
If you use all the ice at once, you must
repeat Steps 2 and 3 on the previous page.
However, only wait 8 hours before dispensing
the first 4 to 6 ice cubes. This will replenish
the ice cubes and ensure maximum ice
production.
Water clouding phenomenon
All water provided to refrigerators flows through the core filter
which is an alkaline water filter. In this process, the pressure
in the water that has flowed out of the filter gets increased,
and oxygen and nitrogen become saturated. When this water
flows out in the air, the pressure plummets and the oxygen
and nitrogen get supersaturated so that they turn into gas
bubbles. The water could look misty due to these oxygen
bubbles.The water may look temporarily cloudy due to these
oxygen bubbles. After a few seconds, the water will look clear.
Please wait 1 second before removing the cup after
dispensing water to prevent spills. Do not pull out the
lever dispenser after taking out ice or water. It comes back
automatically. Ice is made in cubes.
When you select “Crushed”, the ice-maker grinds the ice
cubes into crushed ice.
PARTS AND FEATURES
Use this page to become more familiar with the
parts and features of the Refrigerator.
( 1 )
( 2 )
( 3 )
( 13 )
( 4 )
( 14 )
( 5 )
( 6 )
( 8 )
( 9 )
( 7 )
( 15 )
( 9 )
( 10 )
( 11 )
( 12 )
Using the ice off function
PULL
PUSH
When selecting the Ice Off mode, remove all ice cubes
from the bucket. If you are not using the ice dispenser, the
ice cubes may clump together. Pull the lock lever forward
to throw away ice cubes or remove clumped ice from the
bucket. Push the bucket back until you hear a click.
If you have a long vacation or business trip, close
the water valve and shut off the water supply to
the Refrigerator. This will help prevent accidental
leakages. Do not disassemble the Ice-maker
personally. It may cause disorder. Do not wash or
spray the ice bucket with water. Just wipe it with a
dry cloth. In order to operate the ice-maker properly,
water pressure of 138~862 Kpa is required.
(1)
Light
(2)
FF Ice-Maker
(3)
Foldable-Shelf
(4)
Fixed-Shelf
(5)
Vertical Hinged Section
(6)
Vegetable & Fruit Drawers
(7)
Water Filter
(8)
Light
(9)
Auto Closer
( 10 ) Convertible Room
( 11 ) Auto Pull Out Drawer
( 12 ) Freezer Drawer Bin
( 13 ) Fixed-Shelf
( 14 ) 2 Step Foldable-Shelf
( 15 ) Door Bins
16_ operating
DA99-03404A-13.indd 16
2015. 4. 25.
8:33
USING FLEX ZONE
•
•
•
•
wine
cocktails
cakes
cheeses
Deli
Snacks
•
•
•
•
Cold
Drinks
Meat
Fish
•
•
•
•
•
•
•
•
bottled water
juice
soft drinks
beer
pineapples
lemons
biscuits
potatoes
steaks
cold cuts
bacon
chili dogs
Fruit and vegetables may be damaged under
the “Meat Fish” setting.
Do not store lettuce or other leafy produce in
the Flex Zone.
CAUTION
02 OPERATING
The Flex Zone is a full-width drawer with an
adjustable temperature control. You can use the
Flex Zone for large party trays, deli items, wines,
pizzas, beverages, or miscellaneous items. There
is a temperature sensor which lets you adjust the
amount of cold air allowed into the Zone. The control
buttons are located on the cap door center.
• Press the Temp button repeatedly until your
desired mode is lit.
• Each time you press the Temp button, you
change the mode in this order: Meat/Fish mode
(-1°C), Cold Drinks mode (1°C), Deli/Snack
(3°C), Wine/Party Dishes (5°C) mode. Initially, the
Cold Drinks mode is selected. The refrigerator
will adjust the temperature in the Flex Zone
automatically to the temperature you selected.
• The Flex Zone Temp. Display may change
depending on the number of items inside, where
they are located, the ambient temperature, and
how often the door is opened.
Wine
Party Dishes
Do not store glass bottles in the Flex Zone
under the “Cold Drinks” or “Meat/Fish”
setting. If they are frozen, they can break and
cause personal injury.
Temperature
You can select your Flex Zone temperature from
Meat/Fish mode (-1°C), Cold Drinks mode (1°C),
Deli/Snack (3°C), or Wine/Party Dishes (5°C) mode.
REMOVING THE
REFRIGERATOR ACCESSORIES
Selection Button
1. When “Wine/Party Dishes” is selected, the
temperature of Flex Zone will be kept around 5°C.
This feature helps keep food fresh for a long time.
2. When “Deli/Snack” is selected, the temperature
of Flex Zone will be kept around 3°C. This feature
helps keep food fresh for a longer time.
3. When “Cold Drink” is selected, the temperature
of Flex Zone will be kept around 1°C. This feature
also helps keep drinks cold and refreshing.
4. When “Meat/Fish” is selected, the temperature
of Flex Zone will be kept around -1°C. This
feature also helps keep meat or fish fresh for a
longer time.
1. Door Bins & Dairy Compartment
To remove - Simply lift the bin up and pull straight
out.
To relocate - Slide it in above the desired location
and push down until it stops.
CAUTION
Injury may occur if the door bins are not firmly
assembled. Do not allow children to play with
bins. Sharp corners of the bins may cause
injury.
Do not adjust a bin full of foods.
Dust removal method - Remove the guard and wash
in water.
operating _17
DA99-03404A-13.indd 17
2015. 4. 25.
8:33
2. Tempered Glass shelves
To remove - Tilt up the front of the shelf in the
direction shown (1) and lift it up vertically (2). Pull the
shelf out.
To relocate - Tilt the front of the shelf up and guide
the shelf hooks into the slots at a desired height.
Then lower the front of the shelf so that the hooks
can drop into the slots.
CAUTION
Tilt the front of the Flex Zone up, place the back of
the Flex Zone onto the rails, and then lower the front
until the whole Zone rests on the rails.
When the Flex Zone or LED
lighting are not working, check the
connectors [ ( 1 ), ( 2 ) shown below]
for cracks or leaks.
The Tempered Glass shelves are heavy. Use
special care when removing them.
1
2
2
3. Vegetable & Fruit Drawers
• After pulling out completely the vegetable pan,
take it out by lifting up the front and pull it
forward.
• To remove the shelf of the vegetable pan, press
the button on the left side of the shelf while you
are lifting it. Pull it out slowly.
Rounded up while pressing
the button
Button
CAUTION
Reassemble in the
inverse order of
the disassembly.
The assembly is
completed when you
hear a “Click”.
1
1. Refer to page 9 for disassembly instructions.
2. Open the cover housing with a flat-blade
screwdriver.
USING THE TILTING POCKET
The Tilting Pocket can be used to store up to
a 406mm pizza if you place it as shown in the
illustration.
4. Flex Zone
To remove the Flex Zone – Pull the Flex door out to
full extension. Lift the
Flex Zone up, pulling it
to your body with both
hands.
To relocate the Flex
Zone – Open the Flex
door to full extension.
18_ operating
DA99-03404A-13.indd 18
2015. 4. 25.
8:33
REMOVING THE FREEZER
ACCESSORIES
1. Tilting Pocket
To remove - Pull the brackets upward until you hear
a clicking sound and remove the pocket
To replace - Hook the ends of the pocket into both
brackets ( 1 ) and push down until it locks into place.
1
WARNING
Do not use Benzene, Thinner or Clorox™ for
cleaning. They may damage the surface of the
appliance and can create a risk of fire.
2. Auto Pull out Drawer
Do not spray the refrigerator with water while it is
plugged in, as it may cause an electric shock.
To remove - Pull the drawer out to full extension. Tilt
up rear of drawer and lift straight out.
Do not clean the refrigerator with benzene, thinner or
car detergent for risk of fire.
02 OPERATING
CLEANING THE REFRIGERATOR
To relocate - Place the drawer onto the rails by tilting
it up. Lower the drawer into place until it is horizontal
and slide the drawer in.
2
CHANGING THE INTERIOR
LIGHTS
1
CAUTION
3. Freezer Drawer
If Users randomly exchange the LED lamp by
yourself, this may result in an electric shock or
personal injury.
To remove the freezer drawer - Pull the freezer
drawer out fully. Tilt up the rear of the bin and lift it
out to remove.
To relocate the freezer drawer - Place the bin into
the rail assembly.
You can scratch the side of the bin if you
CAUTION twist it left or right when disassembling or
re-assembling it.
CAUTION
WARNING
WARNING
Do not allow babies or children go inside
the freezer drawer. They could damage the
refrigerator and seriously injure themselves.
Do not sit on the freezer door. The door may
break. Do not allow children to climb into the
freezer drawer.
Do not remove the divider.
Do not disassemble or replace the LED type
Lighting. To change the LED Type Lighting
contact Samsung service center or your
authorised Samsung dealer.
CHANGING THE WATER FILTER
WARNING
To reduce risk of water damage to your
property DO NOT use generic brands of water
filters in your SAMSUNG Refrigerator.
USE ONLY SAMSUNG BRAND WATER
FILTER.
SAMSUNG will not be legally responsible
for any damage, including, but not limited to
property damage caused by water leakage
from use of a generic water filter. SAMSUNG
Refrigerators are designed to work ONLY
WITH SAMSUNG Water Filter.
If trapped inside, children may become injury
and suffocate to death.
operating _19
DA99-03404A-13.indd 19
2015. 4. 25.
8:33
The Filter light turns red to let you know
when it is time to change your water
filter cartridge.
• If you are in trouble of inserting the water
filter as high pressure of water, shut off the
water supply valve.
• The locked symbol should be lined up with the
indicator line.
To give you time to get a new filter,
the red light comes on just before the
capacity of the current filter runs out.
(Red)
Changing the filter on time provides
you with the freshest, cleanest water from your
refrigerator.
1. Shut off the water supply. Then, turn the water
filter ( 1 ) about 1/4 turn, counter-clockwise.
2. Pull the water filter ( 1 ) from the case filter ( 2 ).
4
5. press the “Alarm/hold 3 sec for Filter Reset”
2
1
• To change the water filter more easily, shut
off the water supply valve.
• Sometimes, it is hard to disassemble the water
filter because impurities in the water cause it to
stick. If you are having difficulties, grip the water
filter firmly and pull it hard.
• When you pull the water filter, a little water can
leak from the opening. This is normal. To minimize
the water leaks, keep the filter cartridge horizontal
when you pull it.
• To prevent overflow, empty the water tray filter ( 3 )
and dry around of case filter ( 2 ).
button (
(Filter Reset)
) for about
3 seconds to reset the water
filter. The color of indicator (
) changes from red to light
off.
6. If you turned off the water
supply, turn it back on.
For a replacement water filter, you can visit
your local home Improvement center or
contact the Samsung Parts distributor.
Be sure the replacement water filter has the
SAMSUNG logo on the box and on the water
filter.
3. Insert the new filter into the filter case ( 4 )
4. Push the filter, and then turn it clockwise until it
locks.
2
3
20_ operating
DA99-03404A-13.indd 20
2015. 4. 25.
8:33
Removing any residual matter inside
the water supply line after installing
the water filter.
02 OPERATING
1. Turn ON the main water supply
and supply water from water
supply line.
2. Run water through the
dispenser until the water runs
clear (approx. 6 to 7 minutes).
This will clean the water supply system and
remove air from the lines.
3. Additional flushing may be required in some
households.
4. Open the Refrigerator door and make sure there
are no water leaks coming from the water filter.
Be sure to flush the dispenser thoroughly,
otherwise water may drip from the dispenser.
This means that there is still air in the line.
Reverse Osmosis Water Supply
IMPORTANT : The pressure of the water supply
coming out of a reverse osmosis system going to
the water inlet valve of the refrigerator needs to be
between 35 and 120 psi (241 and 827 kPa).
If a reverse osmosis water filtration system is
connected to your cold water supply, the water
pressure to the reverse osmosis system needs to be
a minimum of 40 to 60 psi (276 to 414 kPa.)
If the water pressure to the reverse osmosis system
is less than 40 to 60 psi (276 to 414 kPa):
• Check to see whether the sediment filter in the
reverse osmosis system is blocked. Replace the
filter if necessary.
• Allow the storage tank on the reverse osmosis
system to refill after heavy usage.
• If your refrigerator has a water filter, it may
further reduce the water pressure when used
in conjunction with a reverse osmosis system.
Remove the water filter.
If you have questions about your water pressure, call
a licensed, qualified plumber.
operating _21
DA99-03404A-13.indd 21
2015. 4. 25.
8:34
Troubleshooting
PROBLEM
SOLUTION
The refrigerator does not
work at all or it does not
chill sufficiently.
•
•
The food in the fridge is
frozen.
•
•
•
•
Check if the set temperature on the digital display is too low.
Try setting the refrigerator to a warmer temperature.
Is the temperature in the room too low? Set the refrigerator warmer.
Did you store the food which is juicy in the coldest part of the refrigerator? Try
moving those items to the other shelves in fridge instead of keeping them in the
colder areas or bins.
You hear unusual noise
or sounds.
•
•
Check that the refrigerator is level and stable.
Is the back of the refrigerator too close to the wall, preventing proper ventilation?
Try moving the back of the refrigerator at least 50 mm from the wall.
Was anything dropped behind or under the refrigerator?
A “ticking” sound is heard from inside the refrigerator. It is normal and occurs
because various accessories are contracting or expanding according to the
temperature of the refrigerator interior.
If it sounds as if something is hitting something else inside the refrigerator, this is
normal. The sound is caused by the compressor operating at high capacity.
•
•
•
•
•
The cabinet-door sealing
area of the appliance is
hot and condensation is
occurring.
Ice Maker is not
producing ice.
You can hear water
bubbling in the
refrigerator.
There is a bad smell in
the refrigerator.
•
•
•
•
•
•
Check that the power plug is properly connected.
Check if the set temperature on the digital display is warmer than the freezer or
fridge inner temperature. If it is, set the refrigerator colder.
Is the refrigerator in direct sunlight or located near a heat source?
Is the back of the refrigerator too close to the wall, preventing proper ventilation?
Some heat is normal as anti-condensators are installed in the vertical hinged
section of the refrigerator to prevent condensation.
Is the refrigerator door ajar? Condensation can occur when you leave the door
open for a long time.
Did you wait for 12 hours after installation of the water supply line before making
ice?
Is the water line connected and the shut-off valve opened?
Did you manually stop the ice making function?
Is the freezer temperature too warm? Try setting the freezer temperature lower.
•
This is normal. The bubbling comes from refrigerant circulating through the
refrigerator.
•
•
•
Check for spoiled food.
Foods with strong odors (for example, fish) should be tightly covered.
Clean out your freezer periodically and throw away any spoiled or suspicious
food.
Frost forms on the walls
of the freezer.
•
•
•
Is the air vent blocked? Remove any obstructions so air can circulate freely.
Allow sufficient space between the stored foods for efficient air circulation.
Is the freezer drawer closed properly?
Water dispenser is not
functioning.
•
•
•
•
Is the water line connected and the shut-off valve opened?
Has the water supply line tubing been crushed or kinked?
Make sure the tubing is free and clear of any obstruction.
Is the water tank frozen because the fridge temperature is too low?
Try selecting a warmer setting on the Digital display.
Auto close system does
not work with the freezer
door.
•
•
Is there an imbalance between the right and left parts of the door?
Open and close the door smoothly 1~2 times. After you do this, the auto close
system usually works properly again.
Try opening the door smoothly to avoid unbalancing the right part and the left
part of the door.
•
22_ troubleshooting
DA99-03404A-13.indd 22
2015. 4. 25.
8:34
Ambient Room Temperature Limits
This refrigerator is designed to operate in ambient temperatures specified by its temperature class marked
on the rating plate.
Class
Symbol
Extended Temperate
Temperate
Ambient Temperature range (°C)
IEC 62552 (ISO 15502)
ISO 8561
SN
+10 to +32
+10 to +32
N
+16 to +32
+16 to +32
Subtropical
ST
+16 to +38
+18 to +38
Tropical
T
+16 to +43
+18 to +43
Internal temperatures may be affected by such factors as the location of the fridge/freezer, ambient temperature and the frequency with which you open the door. Adjust the temperature as
required to compensate for these factors.
English
Correct Disposal of This Product
(Waste Electrical & Electronic Equipment)
(Applicable in countries with separate collection systems)
This marking on the product, accessories or literature indicates that the product and its electronic accessories (e.g. charger, headset, USB cable) should not be disposed of with other
household waste at the end of their working life. To prevent possible harm to the environment
or human health from uncontrolled waste disposal, please separate these items from other
types of waste and recycle them responsibly to promote the sustainable reuse of material
resources.
Household users should contact either the retailer where they purchased this product, or their
local government office, for details of where and how they can take these items for environmentally safe recycling.
Business users should contact their supplier and check the terms and conditions of the purchase contract. This product and its electronic accessories should not be mixed with other
commercial wastes for disposal.
Contact SAMSUNG WORLD WIDE
If you have any questions or comments relating to Samsung products, please contact the SAMSUNG
customer care center.
COUNTRY
AUSTRIA
COLOMBIA
EIRE
HONG KONG
INDIA
MALAYSIA
NEW ZEALAND
PANAMA
PHILIPPINES
CALL
0800-SAMSUNG (0800-7267864)
[Only for Premium HA] 0800-366661
[Only for Dealers] 0810-112233
Bogotá 600 12 72
Gratis desde cualquier parte del país 01 8000 112
112 ó desde su celular #SAM(726)
Web site
www.samsung.com/at/support
www.samsung.com/co/support
0818 717100
www.samsung.com/ie/support
(852) 3698-4698
www.samsung.com/hk/support (Chinese)
www.samsung.com/hk_en/support (English)
1800 3000 8282 - Toll Free
1800 266 8282 - Toll Free
1800-88-9999
603-77137477 (Overseas contact)
www.samsung.com/in/support
www.samsung.com/my/support
0800 726 786
www.samsung.com/nz/support
800-7267
800-0101
1-800-10-7267864 [PLDT]
1-800-8-7267864 [Globe landline and Mobile]
02-4222111 [Other landline]
www.samsung.com/latin/support (Spanish)
www.samsung.com/latin_en/support (English)
www.samsung.com/sg/support
www.samsung.com/ph/support
SINGAPORE
1800-SAMSUNG(726-7864)
SOUTH AFRICA
0860-SAMSUNG (726-7864)
www.samsung.com/support
U.K
0330 SAMSUNG (7267864)
www.samsung.com/uk/support
DA99-03404A-13.indd 23
2015. 4. 25.
8:34
DA99-03404A-13
DA99-03404A-13.indd 24
2015. 4. 25.
8:34