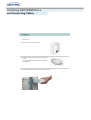
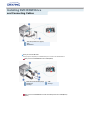
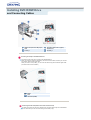
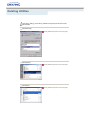
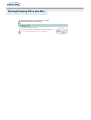
1
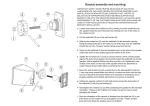
Visit the Customer Support homepage of the Samsung Electronics Optical Media Solution
Division (http://samsungelectronics.com) to find out about the latest Samsung ODD
firmwares and learn how to use them.
Select Language
English
Index
Main Page
Safety Precautions
Features
Safety Precautions
Exterior
During Installation
System Requirements
During Operating
Features
Others
Installing DVD±R/RW Drive and
Connecting Cables
Installing Device Driver and Confirming
The Installation
Installing Drive
Firmware Update
Connecting Cables
Confirming the Installation of Device Driver
Installing the MS-DOS device driver
How To Use The DVD±R/RW Drive
Storing/Cleaning Drive and Disc
How to Use the Drive
Cleaning the Drive
How to Use DVD±R/RW and Other Discs
Storing the Disc
Deleting Utilities
Cleaning the Disc
Troubleshooting
When the on/off Light Blinks
Product Specifications
Safety Precautions
Safety Precautions
This symbol indicates explanations about extremely dangerous matters. If users ignore this
symbol and handle the device the wrong way, serious injury or death could result.
This symbol indicates explanations about dangerous matters. If users ignore this symbol and
handle the device the wrong way, damage to home or property could result.
Important to read and understand at all times
Do not disassemble
Always make sure that the disc does not have a crack before use. If the disc has a crack (especially
around the center hole), it is recommended to make a copy immediately and use the copy instead.
When a cracked disc is used continuously, the size of the crack is likely to grow and this will
eventually result in irreparable damage to the disc.
Safety Precautions
During Installation
Do not drop the drive, and protect it from severe shocks.
- It can damage the drive or cause it to malfunction.
Do not place the drive in direct sunlight.
Avoid low or high temperature environments.
Avoid high-humidity environments.
Safety Precautions
Veiligheidsinstructies
During Operating
Handle with caution to prevent damage from external shock.
Do not drop the drive, and protect it from severe shocks.
- It can damage the drive or cause it to malfunction.
Do not move the drive while in operation and do not attempt to open
the disc tray by force.
Make sure to close all working programs before attempting to open the
tray and always use the open/close button.
Do not insert a pin into the emergency opening while in operation.
Do not insert hands in the tray while in operation.
This may cause damage to the product or human body
Do not use cracked, distorted or damaged discs.
In particular, a disc with a crack on the inner tracks may break
while in use.
Safety Precautions
Veiligheidsinstructies
Others
Never allow food particles or foreign substances to enter the drive
casing.
To protect against the risk of fire, do not spill such liquids as
alcohol and benzene on the drive.
Do not disassemble, attempt to repair or modify the device
without express approval as directed in the manual.
- To reduce the risk of damage, electric shock, and fire.
Features
DVD±R/RW Drive
40-pin interface cable
audio cable
four screws to install the drive
drive installation instruction sheets
software programs
(software: Nero Express 6.3, InCD 4,WinDVD Creator, WinDVD Recorder, Intervideo DVD Copy,
Acrobat Reader 5.0, DirectX 9.0)
Features
You need to have an IBM-compatible PC with the following specifications.
Item
OS
Description
Microsoft Windows 98/2000/Me/XP(SP 1.0 or higher)
CPU
500MHz or greater IBM-compatible PC
RAM
128Mbytes or greater
HDD
Access time 19 msec, transfer speed 6 Gbps or faster
Features
Versatile Multimedia Features
DVD-R : Read / Write
DVD-RW : Read / Write / Rewrite allowed
DVD+R : Read / Write
DVD+RW : Read / Write / Rewrite allowed
DVD-ROM : Read
CD-R : Read / Write
DVD-RAM : Read
CD-RW : Read / Write / Rewrite allowed
Supports Read (playback) for various types of
discs
See table below for details
Disc Type
CD
Writable
Rewritable
Read
CD-STAMP
×
×
O
CD-R
O
×
O
(O)
O
O
DVD-STAMP
×
×
O
DVD-R For General Ver 2.1
O
×
O
(O)
O
O
DVD+R Basic Ver 1.11
O
×
O
DVD+RW Basic Ver 1.2
(O)
O
O
DVD-RAM Read Ver 2.1
×
×
O
CD-RW
DVD
DVD-RW Ver 1.1
Writable : write once, read many times.
Rewritable : write data one or more times.
DVD Recommended Disc Types
DVD-R Media (8X / 4X / 2X, 4.7GB For General DISC)
Taiyo-Yuden / Taiyo-Yuden, TDK, Mitsubishi Chemical, Hitachi Maxell, Fuji Film, PVC, Panasonic,
RiTEK, CMC, UNIFINO / Taiyo-Yuden, TDK, Mitsubishi Chemical, Hitachi Maxell, PVC, Panasonic,
RiTEK, CMC
DVD-RW Media (4X / 2X)
TDK, Mitsubishi Chemical, JVC, PVC, RiTEK, CMC / TDK, Mitsubishi Chemical, JVC
DVD+R Media (8X / 4X / 2.4X)
Taiyo-Yuden / RICOH, Taiyo-Yuden, Mitsubishi Chemical, RiTEK, CMC / RICOH, Mitsubishi
Chemical, RiTEK, CMC, Prodisc, Optdisc
DVD+RW Media (4X / 2.4X)
RICOH, Mitsubishi Chemical, RiTEK, CMC / RICOH, Mitsubishi Chemical, RiTEK, CMC
CD Recommended Disc Types
CD-R Media (32X / 16X / 12X)
Taiyo-Yuden, RICOH, Mitsubishi Chemical, Hitachi Maxell, Fiji Film, RiTEK(Phtharo), CMC / Pioneer,
Mitsubishi Chemical, Princo, RiTEK(Cyanine), Princo / TDK, Mitsubishi Chemical
CD-RW Media (4X)
RICOH, Mitsubishi Chemical, RiTEK, CMC
HS CD-RW Media (10X)
RICOH, Mitsubishi Chemical, CMC
US CD-RW Media (16X)
Mitsubishi Chemical
Features
Buffer underrun prevention technology included
What is " buffer underrun prevention technology "?
A technology to prevent "buffer underrun" errors in which the data transmission speed is not as
fast as the data writing speed when data is being recorded on a CD.
Reading / Recording Speed
Reading Speed(MAX)
DVD-ROM(S)(12x), DVD-ROM(D)(8x), CD-ROM (40x),DVD-R (8x), DVD-RW (4.8x), DVD+R (8x),
DVD+RW (4.8x), CD-R (40x), CD-RW (24x), DVD-RAM Ver2.1 (2X)
Recording Speed(MAX)
DVD-R (8x), DVD-RW (4x), DVD+R (8x), DVD+RW (4x), CD-R (32x), CD-RW (16x)
Ultra Speed CD-RW DISC(24X higher) does not support Recording.
We recommend using the 'Recommended Disc Types'.
When you use the other disc, may affect Reading / Recording of the data.
Installing DVD R/RW Drive
and Connecting Cables
1. Turn the PC off.
2. Open the cover as shown in the picture.
3. If necessary, attach the support devices on both sides of
the drive
- The support devices are PC accessories. Purchase a
pair if necessary.
4. Insert the DVD±R/RW Drive after removing the plate as below
Installing DVD R/RW Drive
and Connecting Cables
Connecting the Power Cable
Hold the power cable (with four pins) in the power box within the computer with the cutoff edges(
facing up and connect it to the power port in the back of the DVD±R/RW Drive
)
1 +5V DC
A - Cutoff edges
2 Ground
3 Ground
4 +12V DC
Improperly connected power cable may cause malfunction. Check the direction of the
power cable and the cutoff edges before connecting the cable.
Connecting E-IDE Cable
When you use one E-IDE cable
Set the jumper to SL (slave) in the Master/Slave port in the back of the DVD±R/RW Drive.
Installing DVD R/RW Drive
and Connecting Cables
a
: Slave Drive (Select the SL jumper)
b
: HDD
c
: MotherBoard
When you use two E-IDE cables
Set the jumper to MA (Master) in the Master/Slave port in the back of the DVD±R/RW Drive.
When you have one DVD±R/RW Drive: Set it to MA (Master)
a
: Master Drive (Select the MA jumper)
b
: HDD
c
: Motherboard
d
: Primary 1
e
: Secondly 1
When you have one DVD±R/RW Drive and the other ODD products: Set it to MA (Master) /
SL (Slave),
Installing DVD R/RW Drive
and Connecting Cables
a
: Master Drive (Select the MA jumper)
b
: Slave Drive (Select the SL jumper)
c
: HDD
d
: Motherboard
e
: Primary 1
f
: Secondly 1
Connecting the Jumper to the Master/Slave Port
Connect the jumper to the slot in the back of the DVD±R/RW Drive.
When you connect the jumper to MA (Master), the drive runs as the master, and when you connect it
to SL (Slave), the drive runs as the slave.
When you connect it to CS (CSEL), you can control the device using the host interface signal CSEL.
(Connection to MA is recommended.)
MA : Master
SL : Slave
CS : Cable Select(CSEL)
Connecting the Audio Cable (When Connected to the Sound Card)
To listen to the sound from the drive in Analog mode, connect the audio output on the DVD±R/RW
drive to the audio input of the sound card using an audio cable (4-pin).
Installing Device Driver and
Confirming the Installation
1. Go to http://samsung-ODD.com
2. Click Firmware on the menu bar (in the upper right-hand corner).
3. Click "Download Live Update Full Version."
(Click Firmware Downloads to manually download Firmware; select a drive model from the list and click
to start downloading.)
Installing Device Driver and
Confirming the Installation
Confirming Using [Device Manager]
Windows 98/Me
1. Click [Start] - [Settings] - [Control Panel] [System]
2. Click on the [Device Manager] tab in the
System Properties window.
3. Click CDROM drive in the Device
Manager window.
1 in the picture in the left appear if the
driver is installed properly.
Windows 2000
1. Click [Start] - [Settings] - [Control Panel] [System]
2. Click on the [Hardware] tab in the System
Properties window and then click on the
[Device Manager] tab.
3. Click DVD/CD-ROM drive in the Device
Manager window.
1 in the picture in the left appear if the
driver is installed properly.
Windows XP
1. Go to [Start] - [Settings] - [Control Panel] [Performance and Maintenance]
2. Click [Administrative Tools] icon in the
Performance and Maintenance window.
3. Click [Computer Management] icon in the
Administrative Tools window.
4. Click [Device Manger] icon in the
Administrative Tools window and then
click DVD/CD-ROM drive.
1 in the picture in the left appear if the
driver is installed properly.
Installing Device Driver and
Confirming the Installation
Automatic Setup
The device driver is located in the 'Dos_driver' folder of the CD which is provided with the DVD±R/RW
Drive
1. Insert the CD provided with the DVD±R/RW Drive and open the 'Dos_driver' folder.
2. Run the CDSETUP.EXE file in the 'Dos_driver' folder.
3. When Setup is successfully completed, click 'OK' button or press the 'Enter' key.
4. Reboot the computer.
The MS-DOS device driver is used to detect a DVD-MULTI drive in MS-DOS and supports
only the read function as in the case of a CD-ROM drive. We recommend that you not
install the MS-DOS device driver when you use the record function.
Manual Setup
1. Make the C:\SAMSUNG directory.
2. Copy the files from the CD provided with the DVD±R/RW Drive to the C:\SAMSUNG directory.
To do so, type "COPY D:\Dos_driver *.* C:\SAMSUNG" after the C:\ prompt and press [Enter].
3. Edit the 'CONFIG.SYS' file.
Add the DEVICE=C:\SAMSUNG\SSCDROM.SYS \D:SSCD000 /UDMA entry.
4. Edit the 'AUTOEXEC.BAT' file.
Add the C:\SAMSUNG\MSCDEX/D:SSCD000 entry.
5. Reboot the computer.
How To Use The DVD R/RW Drive
When the On/Off light is orange, do not turn the PC off or remove the DVD±R/RW Drive as it may
cause damage in the drive.
How to Use a Horizontally Installed Drive
You can use 3.15 Inch or 4.72 Inch (8cm or 12cm)
discs.
The drive cannot read the disc properly if any part of the
disc is place outside the tray guiding line.
How to Use a Vertically Installed Drive
This drive can be installed vertically.
You can use only the 4.72 Inch(12cm) discs.
(You cannot use the 3.15 Inch(8cm) discs)
The drive cannot read the disc properly if any part of the
disc is place outside the tray guiding line.
How To Use The DVD R/RW Drive
The DVD±R/RW drive allows writing DVD±RW discs using Nero Express and enables
"packet writing" (high-speed recording) using InCD.
The drive also allows writing DVD±R discs using Nero Express.
Unauthorized copying of DVD or software titles is illegal and the individuals that make
illegal copies will be held responsible for any copyright infringement.
Using low-quality discs may lengthen the recording time or not supporting due to
reduction in double speed.
You can use the DVD±R/RW Drive to playback music CDs, CD-ROM, CD-R/RW, or DVD-ROM discs, like
a CD-ROM drive or a DVD-ROM drive. If your computer recognizes the [CD-ROM] icon designated to the
DVD±R/RW Drive as the 'E:' drive, insert a CD-ROM or a DVD-ROM disc and access the 'E:' drive.
(The actual drive letter of the DVD±R/RW Drive may vary depending on the user's system environment.)
To Playback a DVD Video Disc :
You need a DVD decoder board or the DVD decoder software program.
(Provided with WinDVD Recorder)
Use WinDVD Recorder to change the region code of the DVD±R/RW Drive.
Deleting Utilities
Click [Start] - [Setting] - [Control Panel] - [Add/Remove Programs] and a window as shown
below appears.
[ Windows 98 / Me ]
Click the [Add/Remove] button to remove the program.
[ Windows 2000 ]
Click the [Add/Remove] button to remove the program.
[ Windows XP ]
Click the [Add/Remove] button to remove the program.
Storing/Cleaning Drive and Disc
This part of the manual is to prevent damages or data loss.
Read carefully and use the device properly.
Turn the PC off and pull out the drive.
Remove any foreign objects from the surface of the drive using soft cloth.
Do not use benzene, paint thinner, or any other solvents.
Storing/Cleaning Drive and Disc
This part of the manual is to prevent damages or data loss.
Read carefully and use the device properly.
Do not place it under the direct sunlight.
Place it so that it sits on its side on a flat surface.
Do not scratch or place a label on the disc.
Handle the disc with caution to prevent damage from external shock.
Do not expose it to severe temperature fluctuations.
(Exposure to such environment may cause congealing.)
Storing/Cleaning Drive and Disc
This part of the manual is to prevent damages or data loss.
Read carefully and use the device properly.
Do not touch the surface of the disc.
Place your fingers on the edge of the disc to hold.
Clean the disc lightly with soft cotton cloth, starting from the center and move to
the edge of the disc.
Use only disc cleaning liquids. Do not use benzene, paint thinner, or any other solvents.
If the disc surface becomes dirty with fingerprints, foreign substances or dust, the disc may not
function properly.
Storing/Cleaning Drive and Disc
This part of the manual is to prevent damages or data loss.
Read carefully and use the device properly.
On/Off Lamp
Meaning
Disc Lead-In
Green: Blinks every 0.8 seconds.
Writing
Green: On
Reading
Green: On
Audio Playback [Analog Mode]
Green: Blinks every 1.6 seconds.
Audio Playback [Digital Mode]
Green: Blinks every 1.6 seconds.
Read Fail
Green: On
Standby
Off
No Disc
Off
The indicator light turns off when the drive is not in use (standby) after disc lead-in.
Troubleshooting
Problem
The tray won't open.
Meaning / Solution
See if the PC on.
Make sure the power cable within the PC is connected properly.
If the tray still won't open with the power on, turn the power off and
insert a pin(paper clip) into the emergency hole to open.
The tray won't close.
Make sure the disc has been inserted properly.
The PC is not working properly.
See if the jumper(s) is properly connected to the Master/Slave
Selection port.
See if the drive is properly connected to the PC.
See if the floppy disc remains in the PC.
The drive is not working properly.
See if the drive is connected properly to the PC.
See if the device drive program has been installed properly.
No sound is heard from an audio
CD.
Check whether the audio cable is correctly connected to the sound
output terminal on the drive and the sound card CD-IN terminal.
Check that the sound card is operational.
If the Digital CD Audio Output box is checked, no sound comes
out of the analog audio outputterminal of the driver.
Check the condition of the CD and wipe the surface of the CD
clean before use.
The Window OS can't detect the
drive.
See if the device drive program has been installed properly.
The system reads the DVD-RAM
disc but won't write.
The drive supports only reading of DVD-RAM discs and therefore
does not allow writing.
The system won't read the disc.
See if the system detects the drive.
Can be an OS problem. Try reinstalling the Windows OS program.
Make sure you use the types of discs that are supported by the drive.
See if the on/off light turns into green.
Make sure you inserted the disc with the label facing up.
Make sure you are using the right program for disc playback.
See if the disc is clean.
See if any congealing has occurred.
Make sure the region code of the drive matches the disc number.
The drive is connected to the
sound card but cannot seem to
detect it.
Your sound card is using AT BUS interface.
Connect the card to the E-IDE port or replace the card with a new
card with the built-in E-IDE interface capacity.
Specifications
SH-W08A
Category
DVD R/RW Drive
DVD : DVD-R, DVD-RW, DVD+R, DVD+RW, DVD-ROM,
DVD-Video
DISC
Interface
Support
Usable Discs
CD :
Disc Diameter
4.72 Inch or 3.15 Inch (120mm or 80mm)
CD-ROM, CD-R, CD-RW, CD-DA, CD+E(G)
CD-MIDI, CD-TEXT, CD-ROM XA, Mixed Mode CD
CD-I, CD-I Bridge (Photo-CD, Video-CD),
Multisession CD (Photo-CD, CD-EXTRA, Portforio)
Interface Port
ATA/ATAPI (E-IDE)
PIO mode
PIO Mode 4: 16.7MB/sec
DMA mode
ACCESS TIME CD-ROM
(Random)
DVD-ROM
Ultra DMA Mode 2: 33.3MB/sec
110ms (typ)
130ms (typ)
Media Type
DVD+R
DVD+RW
DVD-R
DVD-RW
Write
Read
PCAV 8X (Max 16.2MB/sec)
CAV 12X (16.2MB/sec)
CLV 4X (Max 5.4MB/sec)
CAV 8X (10.8MB/sec)
PCAV 8X (Max 10.8MB/sec)
CAV 8X (10.8MB/sec)
CLV 4X (Max 5.4MB/sec)
CAV 8X (10.8MB/sec)
-
CAV 12X (16.2MB/sec)
Data Transfer DVD-ROM(Single)
Speed
CD-ROM
-
CAV 40X (6.0MB/sec)
CD-R
PCAV 40X (Max 6.0MB/sec)
CAV 40X (6.0MB/sec)
US-RW
PCAV 24X (Max 3.6MB/sec)
CAV 32X (4.8MB/sec)
HS-RW
CLV 10X (Max 1.5MB/sec)
CAV 32X (4.8MB/sec)
CLV 4X (Max 0.6MB/sec)
CAV 32X (4.8MB/sec)
CD-RW
Buffer Memory
2MB
Drive Installation
Operating
Environment
Temperature
Humidity
Horizontal / Vertical (cannot use 3.15 Inch (80mm) discs)
41°F ~ 122°F (5°C ~ 45°C)
10% ~ 80% (RH)
Size(Width x Height x Length)
5.83 X 1.65 X 7.24 Inch (148.2 X 42 X 184mm)
Weight
880g
MTBF
125,000 POH(Duty 20%)
Note
Does not support DVD-R for Authoring, DVD-RAM
Cannot playback or record on both sides of a two-sided disc simultaneously.
The read/write capacity of the supported discs depends on the condition of the disc
and the recording format of the drive. Therefore, the read/write quality may not be perfect.
Fcc information to the user
This equipment has been tested and found to comply with the limits for a class B digital device. pursuant
to part 15 of the FCC rules.
These limits are designed to provide reasonable protection against harmful interference in a residential
installation. this equipment generates.
Uses and can radiate radio frequency energy and. if not installed and used in accordance with the
instructions. may cause harmful interference to radio communications However. there is no guarantee
that interference will not occur in a particular installation.
If this equipment does cause harmful interference to radio or television reception.
Wiich can be determined by tuming the equipment off and on. the user is encouraged to try to correct
the interference by one or more of the following measures.
Reorient or relocate the receiving antenna.
Increase the separation between the equipment and receiver.
Connect the equipment into an outlet on a circuit different from that to which the receiver is connected.
Consult the dealer or experienced radio TV technician for help.
CAUTION
Change or modifications not expressly approded by the manufacturer responslble for comliance could
void the user's authority to operate the equipment.
Laser Standand
IEC 60825-1 : 1993 + A1 : 1997 + A2 : 2001
The product specifications above may be changed improve device performance without prior
notice.