1
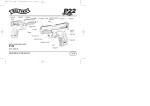
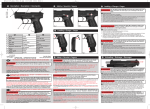
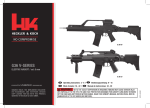
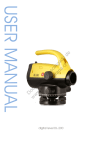
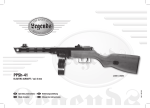
anl_usa.qxd
29.04.2002 10:58
manual
safety
extractor
Seite 1
stabilizer
frontsight
slide Loaded chamber rear sight
indicator
hammer
barrel
trigger lock
muzzle
manual
safety
trigger
slide stop
mounting rail
takedown lever
backstrap
magazine catch
Semi-Automatic pistol
P 22
Cal. .22l.r.
Operating instructions
grip
magazine
USA
anl_usa.qxd
29.04.2002 10:58
Seite 2
Important instructions for the use of firearms
Table of contents
It should be remembered that even the safest gun is potentially dangerous to you and others when it is not properly
handled.
First of all read and understand the operating instructions
and learn how the weapon works and is to be
handled.Always treat an unloaded weapon as if it were
loaded.
Components.............................................................1
page
General...................................................................2
Operation of safeties...................................................3-4
Inspections ....................................................................5
Loading the pistol...........................................................6
Insertion of the first cartridge......................................6
Always bear in mind: Keep your finger away
from the trigger unless you really intend to
fire. Always keep your weapon pointing in a
safe direction so that you and others cannot
be endangered.
Firing........................................................................7
Decocking the hammer...............................................7
Pistol with empty magazine............................................7
Unloading the pistol....................................................8
Disassembly and reassembly of the pistol...............8
Do not use force when disassembling or assembling
your weapon. A gun can only be safe as long as it is in a
flawless technical condition.
Incorrect handling and lack of maintenance may lead to
malfunctions and reduced safety of the weapon.
Always be aware of possible risks from dropping your
pistol or from corrosion or other external influences. In
such cases, have your weapon inspected by a competent gunsmith before using it again.
Unauthorized modifications to the mechanism, damages
caused by the application of force and modifications
effected by third parties will lead to the manufacturer not
to assume any liability. Only an authorized and qualified
gunsmith is allowed to work on a gun.
Adaptation of the grip.................................................9
Sights.....................................................................9
Changing the barrel.....................................................10
Cleaning.......................................................................11
Storage.........................................................................12
Repairs ...................................................................12
Warranty ......................................................................12
Technical data........................................................13
Parts/exploded view................................................14/15
Special accessories.....................................................16
2
anl_usa.qxd
29.04.2002 10:58
Seite 3
Operation of the safeties (safety devices)
fig. 1
1. Manual safety
safety engaged
fig. 2
To engage the safety, turn the safety lever, as shown in
fig. 1, to the lower position.
safety
disengaged
pistol ready
to fire
CAUTION: It should be made a common habit to leave the manual safety engaged until you really intend to fire.
2. Trigger lock
The enclosed key is used to lock the trigger
mechanism of the P 22. Without the key it is
impossible to disengage the safety. Use this feature to prevent unauthorized persons from using
your weapon.
fig. 3
safety engaged
fig. 4
safety
disengaged
pistol ready
to fire
3. Drop safety (automatic internal safety)
The drop safety (firing pin safety) is only disengaged when the trigger is pulled. If, after a fall, the hammer was released,
then the firing pin would not be activated.
3
anl_usa.qxd
29.04.2002 10:58
Seite 4
4. Magazine safety
Without the magazine inserted, the magazine safety of the P 22 prevents a round to be fired. A cartridge in the chamber
cannot be ignited.
Always inspect the chamber of your pistol after the magazine has been removed from the gun. Make sure
that no cartridge is left in the chamber after the safety has been engaged.
fig. 5
5. Loaded chamber indicator
A small slot in the upper part of the slide allows for an
inspection of the chamber to see if a cartridge has been
loaded (fig. 5).
CAUTION:
All safety devices of the weapon are mechanical safeties, and the shooter is the only one who can engage and
disengage these safeties.
NEVER RELY SOLELY ON MECHANICAL SAFETIES - always be extremely careful and avoid situations which
4
could lead to an accident.
anl_usa.qxd
29.04.2002 10:58
Seite 5
Inspections before use
Make sure that the pistol is unloaded (chamber cleared, barrel clear of any obstructions, magazine empty) for
inspection and that the safety is engaged.
Functional inspection
1. Remove the magazine, retract the slide. After the slide has been released, the mainspring must press the slide fully
forward.
2. Insert the empty magazine, retract the slide. The slide must be caught in its rearmost position.
3. Remove the magazine, slightly retract the slide. After the slide has been released, the mainspring must press the slide
fully forward.
4. To decock the gun, insert the empty magazine, hold the hammer with your thumb, pull the trigger and let the hammer
slowly travel forward.
5. Insert the empty magazine, fully retract the slide. The slide must be caught in its rearmost position.
6. Press down the slide stop. The mainspring must press the slide fully forward. Decock the hammer.
7. Remove the magazine, pull the trigger. The hammer must not fall.
Inspection after use
Make sure that the pistol is unloaded (chamber and barrel must be clear) after use, that the magazine is empty
and that the safety is engaged. Decock the hammer.
5
anl_usa.qxd
29.04.2002 10:58
Seite 6
CAUTION: Read and understand the operating instructions thoroughly before you
load your gun.
Malfunction may occur when ammunition with low propellent charge is fired.
Loading the pistol
Engage safety.
fig. 6
Press magazine catch and remove empty magazine (fig. 6). Use the side-mounted button to
press the follower down and insert a cartridge under the magazine lips (fig. 7). Do not use
force. Damaged magazine lips will cause malfunctions and will render the weapon useless.
Tap the back of the loaded magazine against the palm of your hand. Properly positioned
cartridges inside the magazine help to prevent stoppages. When a magazine is to be emptied,
remove the cartridges one after the other by pushing them to the front side of the magazine.
Push the loaded magazine into the magazine well until the magazine catch locks it.
Loading the chamber with the first cartridge
Pick up the gun with your shooting hand, hold it at an angle of approx. 45 degrees and point
the muzzle in a safe direction. Use other hand to retract slide. release slide. The slide travels
forward and inserts the first round into the chamber, the hammer is now cocked.
Leave the safety engaged until you really intend to fire.
fig. 7
CAUTION! Your gun is now ready to fire. Regard safety instructions, keep
shooting finger away from trigger until you really intend to fire.
If you do not fire your gun immediately after loading it, decock hammer.
fig. 8
6
anl_usa.qxd
29.04.2002 10:58
Seite 7
Firing
You may fire this pistol in two different ways: Double action or single action
To fire it "double action" means that the gun is loaded but the hammer is not cocked. You will have to fully pull the trigger
to fire a round.
To fire it "single action" means that the gun is loaded and that the hammer is manually cocked before firing.
The action of the slide then automatically reloads the pistol and cocks the hammer.
Decocking the hammer.
Engage the safety. Hold the hammer with your thumb, pull the trigger and let the hammer slowly travel forward.
Keep the pistol pointing in a safe
direction when decocking it so that no
other persons are endangered.
Pistol with empty magazine
After the last round was fired, the slide stop holds the
slide in its opened position. Engage the safety.
In case you intend to commence shooting, replace empty
magazine by a full one. Press the slide stop lever
(fig. 9), the slide will travel forward and load the chamber
with the first round. Keep your weapon in your shooting
hand and keep it pointing in a safe direction so that there
is no danger for other persons.
CAUTION! The pistol is ready to fire.
Regard safety instructions and leave your
shooting finger off the trigger.
fig. 9
7
anl_usa.qxd
29.04.2002 10:58
Seite 8
If shooting is not to commence, engage safety, remove magazine and inspect the chamber, it must be clear (fig. 10). Close breech and decock
hammer.
fig. 10
Unloading your pistol
Engage safety. Remove magazine and retract slide. The round in the
chamber is extracted and ejected.
Make a visual inspection of the barrel - it must be clear!
Allow slide to travel forward and decock hammer.
Disassembly and reassembly of the pistol
It is not necessary to strip the pistol any further as is described in this
manual. Further disassembly, improper assembly and disregard of the
instructions will lead to loss of warranty, and under no circumstances will
the manufacturer then be liable for damages to persons or property.
To do so, engage the safety, remove the magazine and inspect
the weapon, it must be unloaded.
With the 5” version first remove the stabilizer (see page 11)
Press the takedown lever down and cock the hammer. Fully retract the
slide, lift its rear section and push slide forward off the receiver. Remove
guidance rod. Assembly of the gun is in reverse order.
fig. 11
8
anl_usa.qxd
29.04.2002 10:58
Seite 9
Adaptation of the grip
In order to adapt the grip of the weapon to your hand, the
backstrap of the pistol can be changed. Remove the pin (as
shown in fig. 12) with the tool, change the backstrap and reinsert the pin afterwards.
fig. 12
Sights
The front sight is interchangeable for elevation adjustment, and
the sight is adjustable for windage.
Windage adjustment:
Turn screw on the sight to the right if weapon fires to the right,
turn it to the left if weapon fires to the left.
Elevation adjustment:
Elevation adjustment is changed by mounting front sights of
different height. If weapon fires too low, a lower front sight is to
be mounted, if it fires too high, a higher front sight is to be
mounted.
To change the front sight, use a screwdriver to press it out of
its seat on the slide.
fig. 13
9
anl_usa.qxd
29.04.2002 10:59
Seite 10
Interchangeable barrel
Additional 5 inch or 3,4 inch barrel available as accessory.
(see page 16)
Prior to the barrel change, engage the safety, remove
the magazine and make sure that the weapon is
unloaded.
Push the takedown lever down, cock the hammer and remove
the slide.
Use the enclosed spanner to release the barrel nut. Remove the
barrel sleeve and pull the barrel to the rear from the receiver.
fig. 15
fig. 14
fig. 16
10
anl_usa.qxd
29.04.2002 10:59
Seite 11
Assembly is in reverse order.
Make sure that the web on the receiver bridge is embedded
in the notch of the barrel sleeve.
Install mainspring no. 2668904. For running the slide onto
the receiver, use the mounting pin no. 2668891 (fig. 15/16).
2.
Mount the stabilizer, fix it with the worm screw and jam it
with the stabilizer screws. (fig. 17)
The front sight on the slide is to be replaced by a plug
(2661314).
To disassemble the stabilizer first remove the worm screw
(fig. 17/part no. 2) then release the stabilizer screws
(fig. 17/part no. 3). Now remove the stabilizer.
1.
fig. 17
3.
Cleaning
In order to keep the weapon functional and to extend its service life, it should be cleaned and maintained at regular intervals.
Engage the safety, remove the magazine, open the slide and inspect the chamber.
Disassemble the weapon, clean fouled parts of breech, magazine lips, follower and receiver with a brush and a cloth.
Clean the barrel with an oil-soaked brush and then dry it with cleaning patches, always begin at the chamber. Repeat
these steps until barrel is clean. Apply a thin coat of oil to all metal parts.
Reassemble gun and check for proper function.
11
anl_usa.qxd
29.04.2002 10:59
Seite 12
Storage
Never leave a loaded pistol unattended!
Always keep and store your pistol in unloaded condition with the safety engaged.
Keep Pistol away from children and unauthorized persons. Weapon and ammunition are to be stored separately.
Repair of Walther-weapons
CAUTION! A weapon which fails to function properly is dangerous. It should be safely kept in a way that prevents its use
before it is repaired. It is difficult to repair a weapon, and improper assembly can lead to dangerous malfunctions.
Only let an authorized and qualified gunsmith inspect and repair your weapon!
Warranty for Walther-weapons
Within the first year after the date of purchase, the Walther company will repair or replace your defective weapon free of
costs provided the defect was not caused by own fault. Please hand the weapon over to an authorized dealer, describe
the problem and enclose a proof of purchase.
IMPORTANT! When transporting a firearm, make sure that it is unloaded and that the safety is engaged.
12
anl_usa.qxd
29.04.2002 10:59
Seite 13
Technical data
caliber
.22 l.r.
action
blowback
trigger
DA / SA
trigger weight, normal
(single action)
approx. 77.6 ounce
/
ca. 2.2 kg
trigger weight
(double action)
approx. 197.5 ounce
/
ca. 5.6 kg
trigger travel
(single action)
approx. 0.16 inch
/
ca. 4mm
trigger travel
(double action)
approx. 0.63 inch
/
ca. 16mm
magazine capacity
10 rounds
dimensions (length/height/width)
6.26/4.49/1.14 inch
(7.84/4.49/1.14 inch)
/
/
159/114/29 mm
(199/114/29 mm)
barrel length
3.43 inch (5 inch)
/
87 mm (127 mm)
sight length
5.12 inch (6.7 inch)
/
130 mm (170 mm)
width of rear sight notch
0.18 inch
/
4.5 mm
front sight width
0.14 inch
/
3.6 mm
weight (without magazine)
15.2 ounce (18.5 ounce)
/
430 g (525 g)
weight magazine (empty)
1.8 ounce
/
50 g
13
anl_usa.qxd
29.04.2002 10:59
Seite 14
Designation of components
Pos. designation
article no.
Pos. designation
article no.
Pos. designation
1
2
3
4
5
6
7
8
9
10
11
12
13
14
15
16
17
18
19
20
21
22
23
24
266
267
267
266
266
267
266
267
266
266
266
266
266
266
266
266
266
266
266
266
266
266
266
266
25
26
27
28
29
30
31
32
33
34
35
36
37
38
39
40
41
42
43
44
45
46
47
266
266
266
266
266
266
266
266
266
266
266
266
266
266
266
266
266
266
267
266
266
266
266
48
49
50
51
52
53
54
55
56
57
58
59
60
61
62
63
64
65
66
67
68
69
70
71
receiver, polymer
sideplate, left
sideplate, right
stove bolt
stove bolt
trigger assembly
straight pin
hammer assembly
sear
sear spring
ejector
magazine catch
straight pin
dowel pin
slide stop lever
slide stop spring
takedown lever
dowel pin
dowel pin
retaining pin
spring guidance rod
mainspring
magazine safety
magazine safety spring
04
04
04
05
97
04
05
04
06
06
06
06
84
07
07
07
07
07
07
07
07
89
08
08
82
61
53
12
22
37
47
45
44
52
79
95
75
17
25
33
41
50
68
76
84
04
06
14
trigger lock
trigger lock spring
backstrap
backstrap, large
key for trigger lock
slide
breech block
dowel pin
extractor
spring
pin
firing pin
firing pin spring
safety block
safety lever, left
safety lever, right
screw
ball for safety lever
spring for sayfty lever
firing pin safety
spring
barrel 3,4 inch
barrel sleeve
08
08
08
08
08
08
08
08
09
09
09
09
09
09
09
09
09
09
08
10
10
10
10
22
31
49
57
65
73
81
90
03
11
20
38
46
54
62
71
89
97
10
04
12
47
55
article no.
barrel nut
266 10 63
spanner
266 10 71
barrel 5 inch
266 10 80
barrel sleeve, long
266 10 98
stabilizer assembly
267 04 70
allen key
218 98 01
allen key
266 84 91
magazine body
266 11 36
follower
266 11 44
magazine button
266 11 52
magazine butt plate
266 11 61
magazine spring
266 11 79
butt plate holder
299 11 87
magazine butt plate, large 266 12 41
rear sight
267 04 88
rear sight screw
266 12 68
washer
266 12 76
front sight 3
267 04 96
front sight 2
267 05 00
front sight 4
267 05 18
filler plug
266 13 14
simulating divice
260 83 32
mounting pin
266 88 91
worm screw
266 84 91
14
anl_usa.qxd
29.04.2002 10:59
Seite 15
15
anl_usa.qxd
29.04.2002 10:59
Seite 16
Special accessories
barrel, interchangeable
barrel length 5 inch (127 mm)
Part. no.: 265 93 01
spanner for barrel
Part. no.: 266 10 71
magazine
Part. no.: 265 93 44
key for trigger lock
Part. no.: 266 08 65
magazine
Part. no.: 265 93 36
barrel, interchangeable
barrel length 3,4 inch (87 mm)
Part. no.: 265 92 98
16
29.04.2002 10:59
Walther USA
2100 Roosevelt Ave.
Springfield, MA 01102
USA
Phone: +1-800-372-6454
Fax: +1-413-747-3682
Seite 17
All technical changes and modifications reserved
art. no.: 266 1446 (Walther USA)
anl_usa.qxd