1
HIGH VIBRATION V2
User Manual
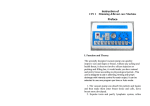
Orange LED, indicates end
of program and device in
standby mode.
LCD display
High Vibration V2
Recharging /
Finished
Program +
List - Start List +
M1
Program -
Your Body, Your Friend
On Off Recharge
K1
B1
B2
5VDC for battery
recharging
Bracelet connectors
Description
High Vibration v2.0 is a wellness device that can enhance the wellbeing of the user.
The device is powered from an internal rechargeable battery supplies the device for at least 20h
following full recharge.
Recharging the battery is performed by attaching the stabilized 5V DC wall mount power supply,
provided with the HV2 device, to be plugged into the 220V mains.
While recharging, the bracelet connectors are automatically disconnected internally and the device
does not provide any output signal.
Bracelets and DC power supply other than the ones provided shall not be used. In order to replace
the bracelets or the DC power supply, the manufacturer shall be contacted.
Size: 17 x 8,5 x 3,5 cm. Approximate weight: 300g.
The HV2 implements several programs, having shortcuts as follows :
Base
Detoxification
Reconstruction Free Life
Neural 1
B
D
L
N1
1
Neural 2
Fit
Kidney
Holistic
OM1
OM2
MA2
Harmony
Harmony Plus
Buzzer
N2
F
K
T
O1
O2
MA2
H
M
Z
Note : Buzzer is not properly a program ; it just transmits a brief audible warning. Selecting it by
pressing List+ appends it to the list of all programs that were entered on the list.
Procedure for use
1. Attach bracelets at the base of the wrists, about where the watch is worn. Connect bracelet
cables to the bracelet connectors B1 and B2 of the device;
2. Push the K1 switch in the left position (On); the LCD displays the message “HV2 ver. xx.x”,
according to the version of the device. The battery voltage is also displayed – it can range
between 3,43V and 4,23V. A voltage close to the higher limit indicates that the battery is
charged ; close to the lower limit, the battery is nearly discharged and its recharging can be
necessary.
As a variant, the charging status in % can be explicitly shown.
3. The device automatically tests that the bracelets are connected to the user. In case the body
resistance is not perceived, the device stops with an error message, “Bracelet error”. If this
happens, please attach the bracelets and restart the device. If the message persists, the
electrical contact along the circuit is lost and the bracelets or the bracelet cords need
replacement.
4. Other tests are also performed automatically. If any error message (other than “Bracelet
error”) is issued, please turn the device off and then on again. If the error message persists,
please contact the manufacturer for a repair.
5. After all tests are performed, the LCD displays the message “Base”. If this does no happen,
please turn the device off and then on again.
6. Select the desired program by pressing the buttons Program + or Program –.
7. Running successively a list of two or more programs can be performed automatically. To do
this, select the first desired program and enter it on the list by pressing the button List +.
Continue by selecting the subsequent program by pressing Program+ or Program-, and then
by pressing List. The current list is displayed on the LCD. If an erroneous entry was
2
performed, the last entry on the list can be deleted by pressing List-. The procedure is
continued until all desired programs are entered. If needed (for intensive treatments), the
same program can be entered on the list for several times.
8. Press the Start button. The program (or the list of programs) starts and the time until
completion is displayed.
9. Upon ending, the “Program end” message is displayed, together with the updated battery
voltage. As a variant, the battery charging status in % is displayed.
10. A few seconds following the end, the device enters a power-saving, stand-by mode and the
orange status LED is turned on.
11. The device can be stopped by pressing the K1 in the middle position (Off).
In order to get the desired results, please allow the program(s) to end – until the message
Program end is displayed or the orange LED turns on.
Charging the rechargeable battery
Upon switching the device on, the LCD displays the battery voltage. As mentioned before, a voltage
close to the higher limit indicates that the battery is charged ; close to the lower limit, the battery is
nearly discharged and its recharging can be necessary.
The device is typically used for a list of programs. Most of the times, for a given user the list is the
same for several weeks. We recommend that, when the list is first entered, to write down the
battery indication (in V or %) before and after running the list. The difference between the two
values indicates how much of the battery voltage (or charge in %) is taken by the given treatment.
This tells how much above the minimum voltage of 3,43V (or 0%) is needed to have a subsequent
completed, or whether the battery should be recharged prior the next treatment.
A rule of thumb is simply to recharge when the battery voltage drops below 3,5 ÷ 3,6V or,
correspondingly, below 10% ÷ 20%.
The recharging procedure is the following:
1. Press the K1 switch on the Right position (Recharge).
2. Plug the power supply into the 220V mains and its 5V jack into the M1 connector ; the LCD
lights up and displays “Charging”, indicating that charging takes place.
If the LCD does not light up, please check the contact between the jack and the M1
connector.
3. If instead of displaying “Charging”, the LCD displays “Modify switch”, please check the K1
switch, which probably is not in the Recharge position. Please first press K1 in the Recharge
position, then unplug and re-plug the power supply jack. The LCD message should become
“Charging”.
3
4. While recharging, the LCD also displays “Battery” and its voltage – without being necessarily
lit. The relative place of the voltage within the 3,43V – 4,2V range is an indication of the
charging status and can provide an idea about the remaining time until charging is complete.
In variant, the charging status can be displayed in %.
The fact that charging takes place can be checked in two ways:
- even if unlit, the display indicates “Charging” and “Battery”, as described above;
- upon pressing any button, the LCD lights up for a few seconds and displays as above.
It should be noted that charging needs not to be complete, up to a full 4,2V or 100%; if
needed, charging can be interrupted: unplug the 5V jack from the M1 connector and press
the K1 switch in the Off position.
5. Following a number of hours, when the battery is fully recharged, the LCD lights up again and
displays “End charging”. Upon getting this message, we recommend that the charger be
unplugged and the K1 switch pressed in the center position (Off). Note, however, that the
battery isn’t harmed if the device stays in the End of charging mode.
6.
If after a sufficient number of hours the charging doesn’t finish and the battery voltage gets
stabilized at a value less than 4,2V, corresponding to less than 100%, this means that the
battery lifetime has ended and the battery needs to be replaced. Similarly, if charging from a
low voltage near 3,43V to the full voltage of 4,2V (or from nearly 0 to 100%) takes a very
short time, this also means that the battery lifetime has ended and the battery needs to be
replaced. For battery replacement, please contact the manufacturer.
Warning: The power supply should not be connected to the device during treatment. The device
perceives the external voltage at the charging connector and, to avoid accidents, automatically
disconnects the bracelets. Consequently, in this case the device does not provide any signal to the
bracelets.
4