1
User's Guide
REFERENCE
86 A2 22FA 02
extreme computing
bullx cluster suite
extreme computing
bullx cluster suite
User's Guide
Software
July 2009
BULL CEDOC
357 AVENUE PATTON
B.P.20845
49008 ANGERS CEDEX 01
FRANCE
REFERENCE
86 A2 22FA 02
The following copyright notice protects this book under Copyright laws which prohibit such actions as, but not limited
to, copying, distributing, modifying, and making derivative works.
Copyright © Bull SAS 2009
Printed in France
Trademarks and Acknowledgements
We acknowledge the rights of the proprietors of the trademarks mentioned in this manual.
All brand names and software and hardware product names are subject to trademark and/or patent protection.
Quoting of brand and product names is for information purposes only and does not represent trademark misuse.
The information in this document is subject to change without notice. Bull will not be liable for errors
contained herein, or for incidental or consequential damages in connection with the use of this material.
Preface
Scope and Objectives
The purpose of this guide is to describe the tools and libraries included in the bullx cluster
suite delivery which allow the development and testing of application programs on the Bull
extreme computing clusters. In addition various open source and proprietary tools are
described.
Intended Readers
This guide is for users and developers of Bull extreme computing applications.
Prerequisites
The installation of all hardware and software components of the cluster must have been
completed. The cluster administrator must have carried out basic administration tasks
(creation of users, definition of the file systems, network configuration, etc).
See the Administrator’s Guide for more details.
Structure
This guide is organized as follows:
Chapter 1.
Introduction to the extreme computing Environment.
Provides a general introduction to software environment.
Two types of programming libraries are used when running programs in the extreme
computing environment: Parallel libraries and Mathematical libraries. These are described
in the chapters 2 and 3:
Chapter 2.
Parallel Libraries.
Describes the Message Passing Interface (MPI) libraries to be used when
parallel programming.
Chapter 3.
Scientific Libraries.
Describes the scientific libraries and scientific functions delivered with the
bullx cluster suite delivery and how these should be invoked. Some of
Intel’s and NVIDIA proprietary libraries are also described.
Chapter 4.
Compilers.
Describes the compilers available and how to use them.
Chapter 5.
The User’s Environment.
Describes the user's environment on extreme computing clusters, including
how clusters are accessed and the use of the file systems. A description of
Modules which can be used to change and compare environments is also
included.
Preface
i
Chapter 6.
Resource Management using SLURM
Describes the SLURM Resource Management utilities and commands.
Chapter 7.
Batch Management and Launching an Application
Describes how to use the PBS Professional Batch Manager and different
program launching options.
Chapter 8.
Debugging Tools.
Describes some debugging tools.
Glossary and Acronyms
Provides a Glossary and lists some of the Acronyms used in the manual.
Bibliography
Refer to the manuals included on the documentation CD delivered with your system OR
download the latest manuals for your bullx cluster suite release, and for your cluster
hardware, from: http://support.bull.com/
The bullx cluster suite Documentation CD-ROM (86 A2 12FB) includes the following
manuals:
bullx cluster suite Installation and Configuration Guide (86 A2 19FA)
bullx cluster suite Administrator’s Guide (86 A2 20FA)
bullx cluster suite User's Guide (86 A2 22FA)
bullx cluster suite Maintenance Guide (86 A2 24FA)
bullx cluster suite Application Tuning Guide (86 A2 23FA)
bullx cluster suite High Availability Guide (86 A2 25FA)
InfiniBand Guide (86 A2 42FD)
LDAP Authentication Guide (86 A2 41FD)
The following document is delivered separately:
The Software Release Bulletin (SRB) (86 A2 73EJ)
mportant
The Software Release Bulletin contains the latest information for your delivery. This should
be read first. Contact your support representative for more information.
For Bull System Manager, refer to the Bull System Manager documentation suite.
For clusters which use the PBS Professional Batch Manager:
PBS Professional 10.0 Administrator’s Guide (on the PBS Professional CD-ROM)
PBS Professional 10.0 User’s Guide (on the PBS Professional CD-ROM)
ii
bullx cluster suite - User's Guide
For clusters which use LSF:
LSF Installation and Configuration Guide (86 A2 39FB) (on the LSF CD-ROM)
Installing Platform LSF on UNIX and Linux (on the LSF CD-ROM)
For clusters which include the Bull Cool Cabinet:
Site Preparation Guide (86 A1 40FA)
R@ck'nRoll & R@ck-to-Build Installation and Service Guide (86 A1 17FA)
Cool Cabinet Installation Guide (86 A1 20EV)
Cool Cabinet Console User's Guide (86 A1 41FA)
Cool Cabinet Service Guide (86 A7 42FA)
Highlighting
Commands entered by the user are in a frame in ‘Courier’ font, as shown below:
mkdir /var/lib/newdir
System messages displayed on the screen are in ‘Courier New’ font between 2
dotted lines, as shown below.
Enter the number for the path :
Values to be entered in by the user are in ‘Courier New’, for example:
COM1
Commands, files, directories and other items whose names are predefined by the
system are in ‘Bold’, as shown below:
The /etc/sysconfig/dump file.
The use of Italics identifies publications, chapters, sections, figures, and tables that are
referenced.
< > identifies parameters to be supplied by the user, for example:
<node_name>
WARNING
A Warning notice indicates an action that could cause damage to a program, device,
system, or data.
Preface
iii
iv
bullx cluster suite - User's Guide
Table of Contents
Preface.................................................................................................................... i
Chapter 1.
Introduction to the extreme computing Environment.............................. 1-1
1.1
Software Configuration .................................................................................................... 1-1
1.1.1
Operating System and Installation............................................................................ 1-1
1.2
Program Execution Environment ........................................................................................ 1-2
1.2.1
Resource Management ........................................................................................... 1-2
1.2.2
Batch Management ................................................................................................ 1-2
1.2.3
Parallel processing and MPI libraries........................................................................ 1-3
1.2.4
Data and Files ....................................................................................................... 1-3
Chapter 2.
Parallel Libraries............................................................................. 2-1
2.1
Overview of Parallel Libraries ........................................................................................... 2-1
2.2
MPIBull2 ........................................................................................................................ 2-2
2.2.1
Quick Start for MPIBull2 ......................................................................................... 2-2
2.2.2
MPIBull2 Compilers ................................................................................................ 2-2
2.2.3
Configuring MPIBull2 ............................................................................................. 2-3
2.2.4
Running MPIBull2................................................................................................... 2-3
2.2.5
MPIBull2_1.3.x features.......................................................................................... 2-3
2.2.6
Advanced features ................................................................................................. 2-4
2.2.7
MPIBull2 Tools ....................................................................................................... 2-9
2.2.8
MPIBull2 – Example of use .................................................................................... 2-11
2.2.9
MPIBull2 and NFS Clusters.................................................................................... 2-12
2.2.10 Debugging.......................................................................................................... 2-13
2.3
mpibull2-params ........................................................................................................... 2-14
2.3.1
The mpibull2-params command ............................................................................. 2-14
2.3.2
Family names ...................................................................................................... 2-17
2.4
Managing your MPI environment .................................................................................... 2-18
2.5
Profiling with mpianalyser .............................................................................................. 2-19
Chapter 3.
Scientific Libraries .......................................................................... 3-1
3.1
Overview ....................................................................................................................... 3-1
3.2
Bull Scientific Studio ........................................................................................................ 3-1
3.2.1
Scientific Libraries and Documentation ..................................................................... 3-2
3.2.2
BLACS .................................................................................................................. 3-3
3.2.3
SCALAPACK ......................................................................................................... 3-4
3.2.4
Blocksolve95 ......................................................................................................... 3-5
3.2.5
lapack .................................................................................................................. 3-5
3.2.6
SuperLU ................................................................................................................ 3-6
3.2.7
FFTW ................................................................................................................... 3-6
3.2.8
PETSc ................................................................................................................... 3-7
3.2.9
NETCDF ............................................................................................................... 3-7
Table of Contents
v
3.2.10
3.2.11
3.2.12
3.2.13
3.2.14
3.2.15
3.2.16
3.2.17
3.2.18
3.2.19
3.3
Intel Scientific Libraries................................................................................................... 3-13
3.3.1
Intel Math Kernel Library ....................................................................................... 3-13
3.3.2
Intel Cluster Math Kernel Library ............................................................................ 3-13
3.3.3
BLAS................................................................................................................... 3-13
3.3.4
PBLAS ................................................................................................................. 3-14
3.3.5
LAPACK .............................................................................................................. 3-14
3.4
NVIDIA CUDA Scientific Libraries.................................................................................... 3-14
3.4.1
CUFFT................................................................................................................. 3-14
3.4.2
CUBLAS .............................................................................................................. 3-15
Chapter 4.
Compilers ......................................................................................4-1
4.1
Overview ....................................................................................................................... 4-1
4.2
Intel® Fortran Compiler Professional Edition for Linux ........................................................... 4-1
4.3
Intel® C++ Compiler Professional Edition for Linux ................................................................ 4-2
4.4
Intel Compiler Licenses ..................................................................................................... 4-3
4.5
Intel Math Kernel Library Licenses ...................................................................................... 4-4
4.6
GNU Compilers .............................................................................................................. 4-4
4.7
NVIDIA nvcc C Compiler.................................................................................................. 4-4
4.7.1
Compiling with nvcc and MPI .................................................................................. 4-5
Chapter 5.
vi
pNETCDF.............................................................................................................. 3-7
METIS and PARMETIS ............................................................................................. 3-8
SciPort .................................................................................................................. 3-8
gmp_sci ................................................................................................................ 3-8
MPFR .................................................................................................................... 3-9
sHDF5/pHDF5 ...................................................................................................... 3-9
ga/Global Array ................................................................................................. 3-10
gsl ...................................................................................................................... 3-10
pgapack ............................................................................................................. 3-11
valgrind .............................................................................................................. 3-12
The User's Environment ....................................................................5-1
5.1
Cluster Access and Security .............................................................................................. 5-1
5.1.1
ssh (Secure Shell) ................................................................................................... 5-1
5.2
Global File Systems ......................................................................................................... 5-2
5.3
Environment Modules....................................................................................................... 5-2
5.3.1
Using Modules....................................................................................................... 5-2
5.3.2
Setting Up the Shell RC Files .................................................................................... 5-4
5.4
Module Files ................................................................................................................... 5-5
5.4.1
Upgrading via the Modules Command ..................................................................... 5-6
5.5
The Module Command..................................................................................................... 5-7
5.5.1
modulefiles ............................................................................................................ 5-7
5.5.2
Modules Package Initialization ................................................................................ 5-8
5.5.3
Examples of Initialization ........................................................................................ 5-9
5.5.4
Modulecmd Startup ................................................................................................ 5-9
bullx cluster suite - User's Guide
5.5.5
5.5.6
5.5.7
5.6
Module Command Line Switches ............................................................................. 5-9
Module Sub-Commands........................................................................................ 5-10
Modules Environment Variables ............................................................................. 5-12
The NVIDIA CUDA Development Environment .................................................................. 5-14
5.6.1
bullx cluster suite and CUDA ................................................................................. 5-14
5.6.2
NVIDA CUDATM Toolkit and Software Developer Kit ................................................ 5-15
Chapter 6.
Resource Management using SLURM ................................................. 6-1
6.1
SLURM Resource Management Utilities .............................................................................. 6-1
6.2
MPI Support ................................................................................................................... 6-2
6.3
SRUN ............................................................................................................................ 6-4
6.4
SBATCH (batch) .............................................................................................................. 6-5
6.5
SALLOC (allocation) ........................................................................................................ 6-6
6.6
SATTACH....................................................................................................................... 6-7
6.7
SACCTMGR ................................................................................................................... 6-8
6.8
SBCAST ......................................................................................................................... 6-9
6.9
SQUEUE (List Jobs) ........................................................................................................ 6-10
6.10
SINFO (Report Partition and Node Information) ................................................................ 6-11
6.11
SCANCEL (Signal/Cancel Jobs)...................................................................................... 6-12
6.12
SACCT (Accounting Data) .............................................................................................. 6-13
6.13
STRIGGER .................................................................................................................... 6-14
6.14
SVIEW ......................................................................................................................... 6-15
6.15
Global Accounting API .................................................................................................. 6-16
Chapter 7.
Launching an Application ................................................................ 7-1
7.1
PBS Professional Batch Manager.............................................................................. 7-1
Pre-requisites ......................................................................................................... 7-1
Submitting a script ................................................................................................. 7-1
Launching a job..................................................................................................... 7-2
Displaying the results for a job ................................................................................ 7-2
Tracing a job ........................................................................................................ 7-2
Exiting a job.......................................................................................................... 7-3
7.2
Using
7.1.1
7.1.2
7.1.3
7.1.4
7.1.5
7.1.6
Launching an Application without a Batch Manager............................................................ 7-3
Chapter 8.
Application Debugging Tools ........................................................... 8-1
8.1
Overview ....................................................................................................................... 8-1
8.2
GDB .............................................................................................................................. 8-1
8.3
IDB ................................................................................................................................ 8-1
8.4
TotaLView ...................................................................................................................... 8-2
8.5
DDT............................................................................................................................... 8-3
Table of Contents
vii
8.6
MALLOC_CHECK_ - Debugging Memory Problems in C programs ........................................ 8-5
8.7
Electric Fence.................................................................................................................. 8-7
Glossary and Acronyms ....................................................................................... G-1
Index................................................................................................................... I-1
List of Figures
Figure
Figure
Figure
Figure
Figure
Figure
2-1.
2-2.
3-1.
3-2.
6-1.
8-1
Figure 8-2.
MPIBull2 Linking Strategies .......................................................................................... 2-5
MPD ring ................................................................................................................... 2-6
Bull Scientific Studio structure ....................................................................................... 3-2
Interdependence of the different mathematical libraries (Scientific Studio and Intel)............. 3-4
MPI Process Management With and Without Resource Manager ..................................... 6-2
Totalview graphical interface – image taken from
http://www.totalviewtech.com/productsTV.htm ............................................................. 8-2
The Graphical User Interface for DDT ............................................................................ 8-4
List of Tables
Table 5-1.
Table 7-1.
viii
Examples of different module configurations .................................................................. 5-3
Launching an application without a Batch Manager for different clusters ........................... 7-3
bullx cluster suite - User's Guide
Chapter 1. Introduction to the extreme computing
Environment
The term extreme computing describes the development and execution of large scientific
applications and programs that require a powerful computation facility which can process
enormous amounts of data to give highly precise results.
The bullx cluster suite is a software suite that is used to operate and manage a Bull extreme
computing cluster of Xeon-based nodes. These clusters are based on Bull platforms using
InfiniBand stacks or with Gigabit Ethernet networks. The bullx cluster suite includes both Bull
proprietary and Open Source software, which provides the infrastructure for optimal
interconnect performance.
The Bull extreme computing cluster includes an administrative network based on a 10/100
Mbit or a Gigabit Ethernet network, and a separate console management network.
The bullx cluster suite delivery also provides a full environment for development, including
optimized scientific libraries, MPI libraries, as well as debugging and performance
optimization tools.
This manual describes these software components, and explains how to work within the
bullx cluster suite environment.
1.1
1.1.1
Software Configuration
Operating System and Installation
The bullx cluster suite is based on a standard Linux distribution, combined with a number of
Open Source applications that exploit the best from the Open Systems community. This
combined with technology from Bull and its partners, results in a powerful, complete
solution for the development, execution, and management of parallel and serial
applications simultaneously.
Its key features are:
Strong manageability, through Bull’s systems management suite that is linked to stateof-the-art workload management software.
High-bandwidth, low-latency interconnect networks.
Scalable high performance file systems, both distributed and parallel.
All cluster nodes use the same Linux distribution. Parallel commands are provided to supply
users and system administrators with single-system attributes, which make it easier to
manage and to use cluster resources.
Software installation is carried out by first creating an image on a node, loading this image
onto the Management Node, and then distributing it to the other nodes using the Image
Building and Deployment (KSIS) utility. This distribution is performed via the administration
network.
Introduction to the extreme computing Environment
1-1
1.2
Program Execution Environment
When a user logs onto the system, the login session is directed to one of several nodes
where the user may then develop and execute their applications. Applications can be
executed on other cluster nodes apart from the user login system. For development, the
environment consists of:
Standard Linux tools such as GCC (a collection of free compilers that can compile
C/C++ and FORTRAN), GDB Gnu Debugger, and other third-party tools including the
Intel FORTRAN Compiler, the Intel C Compiler, Intel MKL libraries and Intel Debugger
IDB.
Optimized parallel libraries that are part of the bullx cluster suite. These libraries
include the Bull MPI2 message-passing library. Bull MPI2 complies with the MPI1 and
2 standards and is a high performance, high quality native implementation. Bull MPI2
exploits shared memory for intra-node communication. It includes a trace and profiling
tool, enabling data to be tracked.
Modules software provides a means for predefining and changing environments. Each
one includes a compiler, a debugger and library releases which are compatible with
each other. So it is easy to invoke one given environment in order to perform tests and
then compare the results with other environments.
1.2.1
Resource Management
The resource manager is responsible for the allocation of resources to jobs. The resources
are provided by nodes that are designated as compute resources. Processes of the job are
assigned to and executed on these allocated resources.
Both Gigabit Ethernet and InfiniBand clusters use the SLURM (Simple Linux Utility for
Resource Management) open-source, highly scalable cluster management and job
scheduling system. SLURM has the following functions.
It allocates compute resources, in terms of processing power and Computer Nodes to
jobs for specified periods of time. If required the resources may be allocated
exclusively with priorities set for jobs.
It is also used to launch and monitor jobs on sets of allocated nodes, and will also
resolve any resource conflicts between pending jobs.
It helps to exploit the parallel processing capability of a cluster.
See
1.2.2
Administrator’s Guide and Chapter 6 in this manual for more information on SLURM
Batch Management
Different possibilities exist for handling batch jobs for extreme computing clusters.
PBS-Professional, a sophisticated, scalable, robust Batch Manager from Altair
Engineering is supported as a standard. PBS Pro can also be integrated with the MPI
libraries.
1-2
bullx cluster suite - User's Guide
See
PBS-Professional Administrator’s Guide and User’s Guide available on the PBS-Pro CDROM delivered for the clusters which use PBS-Pro, and the PBS-Pro web site
http://www.pbsgridworks.com.
mportant
PBS Pro does not work with SLURM and should only be installed on clusters which do not
use SLURM.
LSF, a software from Platform™ Company for managing and accelerating batch
workload processing for compute-and data-intensive applications is optional on Bull
extreme computing.
1.2.3
Parallel processing and MPI libraries
A common approach to parallel programming is to use a message passing library, where
a process uses library calls to exchange messages (information) with another process. This
message passing allows processes running on multiple processors to cooperate.
Simply stated, a MPI (Message Passing Interface) provides a standard for writing messagepassing programs. A MPI application is a set of autonomous processes, each one running
its own code, and communicating with each other through calls to subroutines of the MPI
library.
Bull MPI2, Bull’s second generation MPI library, is included in the bullx cluster suite
delivery. This library enables dynamic communication with different device libraries,
including InfiniBand (IB) interconnects, socket Ethernet/IB/EIB devices or single machine
devices. Bull MPI2 is fully integrated with the SLURM resource manager.
See
1.2.4
Chapter 2 for more information on MPI Libraries.
Data and Files
Application file I/O operations may be performed using locally mounted storage devices,
or alternatively, on remote storage devices using either Lustre or the NFS file systems. By
using separate interconnects for administration and I/O operations, the Bull cluster system
administrator is able to isolate user application traffic from administrative operations and
monitoring. With this separation, application I/O performance and process communication
can be made more predictable while still enabling administrative operations to proceed.
Introduction to the extreme computing Environment
1-3
1-4
bullx cluster suite - User's Guide
Chapter 2. Parallel Libraries
This chapter describes the following topics:
2.1 Overview of Parallel Libraries
2.2 MPIBull2
2.3 mpibull2-params
2.4 Managing your MPI environment
2.5 Profiling with mpianalyser
2.1
Overview of Parallel Libraries
A common approach to parallel programming is to use a message passing library, where
a process uses library calls to exchange messages (information) with another process. This
message passing allows processes running on multiple processors to cooperate.
Simply stated, a MPI (Message Passing Interface) provides a standard for writing messagepassing programs. A MPI application is a set of autonomous processes, each one running
its own code, and communicating with each other through calls to subroutines of the MPI
library.
Programming with MPI
It is not in the scope of the present guide to describe how to program with MPI. Please,
refer to the Web, where you will find complete information.
Parallel Libraries
2-1
2.2
MPIBull2
MPIBull2 is a second generation MPI library. This library enables dynamic communication
with different device libraries, including InfiniBand (IB) interconnects, socket
Ethernet/IB/EIB devices or single machine devices.
MPIBull2 conforms to the MPI-2 standard.
2.2.1
Quick Start for MPIBull2
mportant
MPIBULL2 is usually installed in the /opt/mpi/mpibull2-<version> directory. The
environmental variables MPI_HOME, PATH, LD_LIBRARY_PATH, MAN_PATH,
PYTHON_PATH will need to be set or updated. These variables should not be set by the
user. Use the setenv_mpibull2.{sh,csh} environment setting file, which may be sourced from
the ${mpibull2_install_path}/share directory by a user or added to the profile for all users
by the administrator.
2.2.2
MPIBull2 Compilers
The MPIBull2 library has been compiled with the latest Intel compilers, which, according to
Bull’s test farms, are the fastest ones available for the Xeon architecture. Bull uses Intel Icc
and Ifort compilers to compile the MPI libraries. It is possible for the user to use their own
compilers to compile their applications for example gcc, however see below.
In order to check the configuration and the compilers used to compile the MPI libraries look
at the ${mpibull2_install_path}/share/doc/compilers_version text file.
MPI applications should be compiled using the MPIBull2 MPI wrapper to compilers:
C programs:
mpicc your-code.c
C++ programs:
mpiCC your-code.cc
or
mpic++ your-code.cc (for case-insensitive file systems)
F77 programs:
mpif77 your-code.f
F90 programs:
mpif90 your-code.f90
Wrappers to compilers simply add various command line flags and invoke a back-end
compiler; they are not compilers in themselves.
The command below is used to override the compiler type used by the wrapper. –cc, -fc -,
and cxx and used for C, Fortran and C++ wrappers.
mpi_user >>> mpicc -cc=gcc prog.c -o prog
2-2
bullx cluster suite - User's Guide
2.2.3
Configuring MPIBull2
MPIBull2 may be used for different architectures including standalone SMPs, Ethernet,
Infiniband or Quadrics Clusters.
You have to select the device that will use MPIBull2 before launching an application with
MPIBull2.
The list of possible devices available is as follows:
osock is the default device. This uses sockets to communicate and is the device of
choice for Ethernet clusters.
oshm should be used on a standalone machines, communication is through
shared memory.
ibmr_gen2, otherwise known as InfiniBand multi-rail gen2. This works over
InfiniBand’s verbs interface.
The device is selected by using the mpibull2-devices command with the –d switch, for
example, enter the command below to use the shared memory device:
mpi_user >>> mpibull2-devices –d=oshm
For more information on the mpibull2-devices command, see section 2.2.7.
2.2.4
Running MPIBull2
The MPI application requires a launching system in order to spawn the processes onto the
cluster. Bull provides the SLURM Resource Manager as well as the MPD subsystem.
For MPIBull2 to communicate with SLURM and MPD, the PMI interface has to be defined.
By default, MPIBull2 is linked with MPD’s PMI interface.
If you are using SLURM, you must ensure that MPIBULL2_PRELIBS includes -lpmi so that your
MPI application can be linked with SLURM’s PMI library.
See
Chapter 6 for more information on SLURM
Section 2.2.6.3 for more information on MPD
Chapter 7 for more information on batch managers and launching jobs on extreme
computing clusters.
2.2.5
MPIBull2_1.3.x features
MPIBull2_1.3.x includes the following features:
It only has to be compiled once, supports the NovaScale architecture, and is
compatible with the more powerful interconnects.
It is designed so that both development and testing times are reduced and it delivers
high performance on NovaScale architectures.
Parallel Libraries
2-3
Fully compatible with MPICH2 MPI libraries. Just set the library path to get all the
MPIBull2 features.
Supports both MPI 1.2 and MPI 2 standard functionalities including
Dynamic processes (osock only)
One-sided communications
Extended collectives
Thread safety (see the Thread-Safety Section below)
ROMIO including the latest patches developed by Bull
Multi-device functionality: delivers high performance with an accelerated multi-device
support layer for fast interconnects. The library supports:
Sockets-based messaging (for Ethernet, SDP, SCI and EIP)
Hybrid shared memory-based messaging for shared memory
InfiniBand architecture multirails driver Gen2
Easy Runtime Selection: makes it easy and cost-effective to support multiple platforms.
With MPIBull2 Library, both users and developers can select drivers at runtime easily,
without modifying the application code. The application is built once and works for all
interconnects supported by Bull.
Ensures that the applications achieve a high performance with a high degree of
interoperability with standard tools and architectures.
Common feature for all devices:
FUTEX (Fast User mode muTEX) mechanism in user mode
2.2.6
2.2.6.1
Advanced features
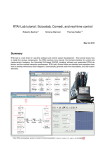
MPIBull2 Linking Strategies
Designed to reduce development and testing time, MPIBull2 includes two linking strategies
for users.
Firstly, the user can choose to build his application and link dynamically, leaving the
choice of the MPI driver until later, according to which resources are available. For
instance, if a small Ethernet cluster is the only resource available, the user compiles and
links dynamically, using an osock driver, whilst waiting for access to a bigger cluster via a
different InfiniBand interconnect and which uses the ibmr_gen2 driver at runtime.
Secondly, the User might want to use an out-of-the-box application, designed for a specific
MPI device. Bull provides the combination of a MPI Core and all its supported devices,
which enables static libraries to be linked to by the User’s application.
2-4
bullx cluster suite - User's Guide
Figure 2-1. MPIBull2 Linking Strategies
2.2.6.2
Thread-safety
If the application needs an MPI Library which provides MPI_THREAD_MULTIPLE threadsafety level, then choose a device which supports thread safety and select a *_ts device.
Use the mpibull2-device commands.
Note
Thread-safety within the MPI Library requires data locking. Linking with such a library may
impact performance. A loss of around 10 to 30% has been observed on microbenchmarks.
Not all MPI Drivers are delivered with a thread-safe version. Devices known to support
MPI_THREAD_MULTIPLE include osock and oshm.
2.2.6.3
Using MPD
MPD is a simple launching system from MPICH-2.
To use it, you need to launch the MPD daemons on Compute hosts.
If you have a single machine, just launch mpd & and your MPD setup is complete.
If you need to spawn MPI processes across several machines, you must use mpdboot to
create a launching ring on the cluster. This is done as follows:
1.
Create the hosts list:
mpi_user >>> export cluster_machines="host1 host2 host3 host4"
2.
Create the file used to store host information:
mpi_user >>> for i in $cluster_machines; do echo "$i" >> machinefiles; done
3.
Boot the MPD system on all the hosts:
mpi_user >>> mpdboot -n $(cat $clustermachines | wc -l) -f machinefiles
Parallel Libraries
2-5
4.
Check if everything is OK:
mpi_user >>> mpdtrace
5.
Run the application or try hostname:
mpi_user >>> mpiexec -n 4 ./your_application
MPI Process Daemons (MPD) run on all nodes in a ring like structure and may be used in
order to manage the launch of the different processes. MPIBull2 library is PMI compliant
which means it can interact with any other PMI PM. This software has been developed by
ANL. In order to set up the system the MPD ring must firstly be knitted using the procedure
below:
1.
At the $HOME prompt edit the .mpd.conf file by adding something like
MPD_SECRETWORD=your_password and chmod 600 to the file.
2.
Create a boot sequence file. Any type of file may be used. The MPD system will by
default use the mpd.hosts file in your $HOME directory if a specific file is not specified
in the boot sequence. This contains a list of hosts, separated by carriage returns. Semicolons can be added to the host to specify the number of CPUS for the host, for
example.
host1:4
host2:8
Figure 2-2. MPD ring
3.
Boot the ring by using the mpdboot command, and specify the number of hosts to be
included in the ring.
mpdboot -n 2 -f myhosts_file
Check that the ring is functioning correctly by using the mpdtrace or mpdringtest
commands. If everything is okay, then jobs may be run on the cluster.
2-6
bullx cluster suite - User's Guide
2.2.6.4
Dynamic Process Services
The main goal of these services is to provide a means to develop software using multi-agent
or master/server paradigms. They provide a mechanism to establish communication
between newly created processes and an existing MPI application (MPI_COMM_SPAWN).
They also provide a mechanism to establish communication between two existing MPI
applications, even when one did not 'start' the other (MPI_PUBLISH_NAME) .
MPI_PUBLISH_NAME structure
MPI_PUBLISH_NAME (service_name, info, port_name)
IN
IN
IN
service_name
info
port_name
a service name to associate with the port (string)
implementation-specific information (handle)
a port name (string)
Although these paradigms are useful for extreme computing clusters there may be a
performance impact. MPIBull2 includes these Dynamic Process Services, but with some
restrictions:
Only the osock socket MPI driver can be used with these dynamic processes.
A PMI server implementing spawn answering routines must be used as follows.
For all Bull clusters the MPD sub-system is used - see the sections above for more
details.
For clusters which use SLURM, a MPD ring must be deployed once SLURM's
allocation has been guaranteed.
PBS Professional clusters can use MPD without any restrictions.
The quantity of processes which can be spawned depend on the reservation previously
allocated with the Batch Manager /Scheduler (if used)
See
The chapter on Process Creation and Management in the MPI-2.1 Standard documentation
available from http://www.mpi-forum.org/docs/ for more information.
MPI Ports Publishing Example
Sever
Command
mpiexec -n 1 ./server
mpiexec -n 4 ./toy
(MPI_Open_port) + (MPI_Publish_name)
MPIBull2 1.3.9-s (Astlik) MPI_THREAD_FUNNELED
(device osock)
MPIBull2 1.3.9-s (Astlik)
MPI_THREAD_FUNNELED (device osock)
Process
Client
Server is waiting for connections
(MPI_Get_attribute)
Got the universe size from server
(MPI_Lookup_name)
Lookup found service
attag#0$port#35453$description#10.11.0.11
$ifname#10.11.0.11$ port [x4]
Parallel Libraries
2-7
(MPI_Comm_accept)
(MPI_Comm_connect) + (MPI_Send / MPI_Recv)
Master available, Received from 0
Sent stuff to the commInter
Now time to merge the communication
Recv stuff to the commInter
(MPI_Comm_merge)
Establish communication with 1st slave
Master Process at work, merge comm
Accept communication to port
Master: number of tasks to distribute: 10
Slave 1 available
Sent a message to the following MPI process
Slave 2 available
Sent stuff to the commInter
Recv stuff to the commInter
Slave Process at work, merge comm
Sent stuff to the commInter
Recv stuff to the commInter
Slave Process at work, merge comm
Sent stuff to the commInter
Recv stuff to the commInter
Slave Process at work, merge comm
Process 1 with 1 Threads runs at work
1: Got task from 900001 to 1000000
Merged and disconnected
Disconnected from slave, Send message to
Master
(MPI_Comm_disconnect)
Slave 3 available
[compute]
Disconnected from slave, Send message to
Master
I give up
(MPI_Comm_Unpublish_name)
(MPI_Close_Port)
1: Wallclock Time: 45.2732
Assigned tasks: ----0 0---1 [x10]
3: Wallclock Time: 45.2732
Unpublishing my service toyMaster
2: Wallclock Time: 45.2732
Closing my port of connection (master)
master disconnected from 1
master disconnected from 2
master disconnected from 3
Master with 1 Threads joins computation (univ: 1)
disconnected from server
0: Wallclock Time: 45.2757
2-8
bullx cluster suite - User's Guide
2.2.7
2.2.7.1
MPIBull2 Tools
MPIBull2-devices
This tool may be used to change the user's preferences. It can also be used to disable a
library. For example, if the program has already been compiled and the intention is to use
dynamic MPI Devices which have already been linked with the MPI Core, then it is now
possible to specify a particular runtime device with this tool. The following options are
available with MPIBULL2-devices
-dl
Provides list of drivers. This is also supported by MPI wrappers.
-dlv
Provides list of drivers with versions of the drivers.
mpi_user >>> mpibull2-devices -dl
MPIBULL2 Communication Devices :
+ Original Devices :
*oshm
: Shared Memory device, to be used on a single machine [static][dynamic]
*osock : Socket protocol (can be used over IPoIB, SDP, SCI...) [static][dynamic]
******
-c
Obtains details of the user's configuration.
mpi_user >>> mpibull2-devices -c
MPIBULL2 home : /install_path
User prefs
:
\__ Directory
: /home_nfs/mpi_user/.MPIBull2/
\__ Custom devices
: /home_nfs/mpi_user/.MPIBull2//site_libs
\__ MPI Core flavor
: Standard / Error detection on
\__ MPI Communication Driver
: oshm (Shared Memory device, to be used on
a single machine) [static][dynamic]
-d=xxx
Sets the communication device driver specified.
mpi_user >>> mpibull2-devices -d=ibmr_gen2
2.2.7.2
mpibull2-launch
This is a meta-launcher which connects to whatever process manager is specified by the
user. It is used to ensure compatibility between different process manager launchers, and
also to allow users to specify their custom key bindings.
The purpose of mpibull2-launch is to help users to retain their launching commands.
mpibull2-launch also interprets user’s special keybindings, in order to allow the user to
retain their preferences, regardless of the cluster and the MPI library. This means that the
user’s scripts will not need changing, except for the particular environment variables that
are required.
The mpibull2-launch tool provides default keybindings. The user can check them using the
--metahelp option. If the user wishes to check some of the CPM (Cluster Process Manager)
special commands, they should use --options with the CPM launch name command (e.g.
--options srun).
Parallel Libraries
2-9
Some tool commands and ‘device’ functionalities rely on the implementation of the MPI
components. This simple tool maps keybindings to the underlying CPM. Therefore, a unique
command can be used to launch a job on a different CPM, using the same syntax.
mpibull2-launch system takes in account the fact that a user might want to choose their own
keybindings. A template file, named keylayout.tmp1, may be found in the tools rpm which
may be used to construct individual keybinding preferences.
Launching a job on a cluster using mpibull2-launch
For a SLURM CPM use a command similar to the one below and set
MPIBULL2_LAUNCHER=srun to make this command compatible with the SLURM CPM.
mpibull2-launch -n 16 -N 2 -ptest ./job
Example for a user who wants to use the Y key for the partition
PM Partition to use+Y:+partition:
The user should edit a file using the format found in the example template, and then add
custom bindings using the –custom_keybindings option. The + sign is used to separate the
fields. The first field is the name of the command, the second the short option, with a colon
if an argument is needed, and the third field is the long option.
2.2.7.3
mpiexec
This is a launcher which connects to the MPD ring.
2.2.7.4
mpirun
This is a launcher which connects to the MPD ring.
2.2.7.5
mpicc, mpiCC, mpicxx, mpif77 and mpif90
These are all compiler wrappers and are available, for C, C++, Fortran 77 and Fortran 90
languages. These allow the user to concentrate on developing the application without
having to think about the internal mechanics of MPI. The man page files provide more
details about wrappers.
When using compiling tools, the wrappers need to know which communication device and
a linking strategy they should use. The compiling tools parse as long as some of the
following conditions have been met:
The device and linking strategy has been specified in the command line using the -sd
options.
The environment variables DEF_MPIDEV, DEF_MPIDEV_LINK (required to ensure
compatibility), MPIBULL2_COMM_DRIVER, and MPIBULL2_LINK_STRATEGY have
been set.
The preferences have already been set up; the tools will use the device they find in the
environment using the MPIBULL2-devices tool.
2-10
bullx cluster suite - User's Guide
The tools take the system default, using the dynamic socket device.
Note
One can obtain better performance using the –fast/-static options to link statically with one
of the dependent libraries, as shown in the commands below.
mpicc –static prog.c
mpicc –fast prog.c
2.2.8
2.2.8.1
MPIBull2 – Example of use
Setting up the devices
When compiling an application the user may wish to keep the makefiles and build files
which have already been generated. Bull has taken this into account. The code and build
files can be kept as they are. All the user needs to do is to set up a few variables or use the
MPIBULL2-devices tool.
During the installation process, the /etc/profile.d/mpibull2.sh file will have been modified
by the System Administrator according to the user’s needs. This file determines the default
settings (by default the rpm sets the osock socket/TCP/IP driver). It is possible to override
these settings by using environment variables – this is practical as it avoids modifying
makefiles - or by using the tools options. For example, the user can statically link their
application against a static driver as shown below. The default linking is dynamic, and this
enables drive modification during runtime. Linking statically, as shown below, overrides the
user's preferences but does not change them.
mpi_user >>> mpicc -sd=ibmr_gen2 prog.c -o prog
mpicc : Linking statically MPI library with device (ibmr_gen2)
The following environment variables may also be used
MPIBULL2_COMM_DRIVER
Specifies the default device to be linked against
MPIBULL2_LINK_STRATEGY
Specifies the link strategy (the default is dynamic)
(this is required to ensure compatibility)
MPIBULL2_MPITOOLS_VERBOSE
Provides information when building (the default is
verbose off)
mpi_user >>> export DEF_MPIDEV=ibmr_gen2
mpi_user >>> export MPIBULL2_MPITOOLS_VERBOSE=1
mpi_user >>> mpicc prog.c -o prog
mpicc : Using environment MPI variable specifications
mpicc : Linking dynamically MPI library with device (ibmr_gen2)
2.2.8.2
Submitting a job
If a user wants to submit a job, then according to the process management system, they
can use MPIEXEC, MPIRUN, SRUN or MPIBULL2-LAUNCH to launch the processes on the
cluster (the online man pages gives details of all the options for these launchers)
Parallel Libraries
2-11
2.2.9
MPIBull2 and NFS Clusters
To use MPI and NFS together, the shared NFS directory must be mounted with the no
attribute caching (noac) option added; otherwise the performance of the Input/Output
operations will be impacted. To do this, edit the /etc/fstab file for the NFS directories on
each client machine in a multi-host MPI environment.
Note
All the commands below must be carried out as root.
Run the command below on the NFS client machines:
grep nfs_noac /etc/fstab
The fstab entry for /nfs_noac should appear as below:
/nfs_noac /nfs_noac nfs bg,intr,noac 0 0
If the noac option is not present, add it and then remount the NFS directory on each
machine using the commands below.
umount /nfs_noac
mount /nfs_noac
To improve performance, export the NFS directory from the NFS server with the async
option.
This is done by editing the /etc/exports file on the NFS server to include the async option,
as below.
Example
The following is an example of an export entry that includes the async option for
/nfs_noac:
grep nfs_noac /etc/exports
/nfs_noac
*(rw,async)
If the async option is not present, add it and export the new value:
exportfs -a
2-12
bullx cluster suite - User's Guide
2.2.10
2.2.10.1
Debugging
Parallel gdb
With the mpiexec launching tool it is possible to add the Gnu DeBugger in the global
options by using -gdb. All the gdb outputs are then aggregated, indicating when there are
differences between processes. The -gdb option is very useful as it helps to pinpoint faulty
code very quickly without the need of intervention by external software.
Refer to the gdb man page for more details about the options which are available.
2.2.10.2
Totalview
Totalview is a proprietary software application and is not included in the bullx cluster suite
distribution. See chapter 8 for more details.
It is possible to submit jobs using the SLURM resource manage with a command similar to
the format below or via MPD.
totalview srun –a <args> ./prog <progs_args>
Alternatively, it is possible to use MPI process daemons (MPD) and to synchronize Totalview
with the processes running on the MPD ring.
mpiexec -tv <args> ./prog <progs_args>
2.2.10.3
MARMOT MPI Debugger
MARMOT is an MPI debugging library. MARMOT surveys and automatically checks the
correct usage of the MPI calls and their arguments made during runtime. It does not replace
classical debuggers, but is used in addition to them.
The usage of the MARMOT library will be specified when linking and building an
application. This library will be linked to the application and to the MPIBULL2 library.
It is possible to specify the usage of this library manually by using the
MPIBULL2_USE_MPI_MARMOT environment variable, as shown in the example below;
export MPIBULL2_USE_MPI_MARMOT=1
mpicc bench.c -o bench
or by using the -marmot option with the MPI compiler wrapper, as shown below:
mpicc -marmot bench.c -o bench
See
the documentation in the share section of the marmot package, or go to
http://www.hlrs.de/organization/amt/projects/marmot/ for more details on Marmot.
Parallel Libraries
2-13
2.3
mpibull2-params
mpibull2-params is a tool that is used to list/modify/save/restore the environment variables
that are used by the mpibull2 library and/or by the communication device libraries
(InfiniBand, Quadrics, etc.). The behaviour of the mpibull2 MPI library may be modified
using environment variable parameters to meet the specific needs of an application. The
purpose of the mpibull2-params tool is to help mpibull2 users to manage different sets of
parameters. For example, different parameter combinations can be tested separately on a
given application, in order to find the combination that is best suited to its needs. This is
facilitated by the fact that mpibull2-params allow parameters to be set/unset dynamically.
Once a specific combination of parameters has been tested and found to be good for a
particular context, they can be saved into a file by a mpibull2 user. Using the mpibull2params tool, this file can then be used to restore the set of parameters, combined in exactly
the same way, at a later date.
Notes
The effectiveness of a set of parameters will vary according to the application. For
instance, a particular set of parameters may ensure low latency for an application, but
reduce the bandwidth. By carefully defining the parameters for an application the
optimum, in terms of both latency and bandwidth, may be obtained.
Some parameters are located in the /proc file system and only super users can modify
them.
The entry point of the mpibull2-params tool is an internal function of the environment. This
function calls an executable to manage the MPI parameter settings and to create two
temporary files. According to which shell is being used, one of these two files will be used
to set the environment and the two temporary files will then be removed. To update your
environment automatically with this function, please source either the
$MPI_HOME/bin/setenv_mpibull2.sh file or the $MPI_HOME/bin/setenv_mpibull2.csh
file, according to which shell is used.
2.3.1
The mpibull2-params command
SYNOPSIS
mpibull2-params <operation_type> [options]
Actions
The following actions are possible for the mpibull2-params command:
2-14
-l
List the MPI parameters and their values
-f
List families of parameters
-m
Modify a MPI parameter
-d
Display all modified parameters
-s
Save the current configuration into a file
bullx cluster suite - User's Guide
-r
Restore a configuration from a file
-h
Show help message and exit
Options
The following options and arguments are possible for the mpibull2-params command.
Note
The options shown can be combined, for example, -li or can be listed separately, for
example –l –i. The different option combinations for each argument are shown below.
-l [iv] [PNAME]
List current default values of all MPI parameters. Use the PNAME argument (this could be a
list) to specify a precise MPI parameter name or just a part of a name. Use the -v (verbose)
option to display all possible values, including the default. Use the -i option to list all
information.
Examples
This command will list all the parameters with the string ‘all’ or ‘shm’ in their name.
mpibull2-params -l | grep -e all -e shm will return the same result.
mpibull2-params -l all shm
This command will display all information - possible values, family, purpose, etc. for each
parameter name which includes the string ‘all’. This command will also indicate when the
current value has been returned by getenv() i.e. the parameter has been modified in the
current environment.
mpibull2-params -li all
This command will display current and possible values for each parameter name which
includes the string ‘rom’. It is practical to run this command before a parameter is modified.
mpibull2-params -lv rom
-f [l[iv]] [FNAME]
List all the default family names. Use the FNAME argument (this could be a list) to specify a
precise family name or just a part of a name. Use the -l option to list all parameters for the
family specified. –l, -v and -i options are as described above.
Examples
This command will list all family names with the string ‘band’ in their names.
mpibull2-params -f band
Parallel Libraries
2-15
For each family name with the string ‘band’ inside, this command will list all the parameters
and current values.
mpibull2-params -fl band
-m [v] [PARAMETER VALUE]
Modify a MPI PARAMETER with VALUE. The exact name of the parameter should be used
to modify a parameter. The parameter is set in the environment, independently of the shell
syntax (ksh/csh) being used. The keyword ‘default’ should be used to restore the parameter
to its original value. If necessary, the parameter can then be unset in its environment. The
-m operator lists all the modified MPI parameters by comparing all the MPI parameters with
their default values. If none of the MPI parameters have been modified then nothing is
displayed. The –m operator is like the -d option. Use the -v option for a verbose mode.
Examples
This command will set the ROMIO_LUSTRE parameter in the current environment.
mpibull2-params -m mpibull2_romio_lustre true
This command will unset the ROMIO_LUSTRE parameter in the environment in which it is
running and returns it to its default value.
mpibull2-params -m mpibull2_romio_lustre default
-d [v]
This will display the difference between the current and the default configurations. Displays
all modified MPI parameters by comparing all MPI parameters with their default values.
-s [v] [FILE]
This will save all modified MPI parameters into FILE. It is not possible to overwrite an
existing file, an error will be returned if one exists. Without any specific arguments, this file
will create a file named with the date and time of the day in the current directory. This
command works silently by default. Use the -v option to list all modified MPI parameters in
a standard output.
Example
This command will, for example, try to save all the MPI parameters into the file named
Thu_Feb_14_15_50_28_2008.
mpibull2-params -sv
Output Example:
save the current setting :
mpibull2_mpid_xxx=1
1 parameter(s) saved.
2-16
bullx cluster suite - User's Guide
-r [v] [FILE]
Restore all the MPI parameters found in FILE and set the environment. Without any
arguments, this will restore all modified MPI parameters to their default value. This
command works silently, in the background, by default. Use the -v option to list all restored
parameters in a standard output.
Example
This command will restore all modified parameters to default.
mpibull2-params -r
-h
Displays the help page
2.3.2
Family names
The command mpibull2-params –f will list the parameter family names which are possible
for a particular cluster environment.
Some of the parameter family names which are possible for bullx cluster suite are listed
below.
LK_Ethernet_Core_driver
LK_IPv4_route
LK_IPv4_driver
OpenFabrics_IB_driver
Marmot_Debugging_Library
MPI_Collective_Algorithms
MPI_Errors
CH3_drivers
CH3_drivers_Shared_Memory
Execution_Environment
Infiniband_RDMA_IMBR_mpibull2_driver
Infiniband_Gen2_mpibull2_driver
UDAPL_mpibull2_driver
IBA-VAPI_mpibull2_driver
MPIBull2_Postal_Service
MPIBull2_Romio
Run the command mpibull2-params <fl> <family> to see the list of individual parameters
included in the parameter families used within your cluster environment.
Parallel Libraries
2-17
2.4
Managing your MPI environment
Bull provides different MPI libraries for different user requirements. In order to help users
manage different environment configurations, Bull also ships Modules which can be used to
switch from one MPI library environment to another. This relies on the module software –
see Chapter 5.
The directory used to store the module files is /opt/mpi/modulefiles/, into which the
different module files that include the mpich, vltmpi libraries for InfiniBand, and MPIBull2
environments are placed.
mportant
It is recommended that a file is created, for example 99-mpimodules.sh and
99-mpimodules.sh .csh, and this is added to the /etc/profile.d/ directory. The line below
should be pasted into this file. This will make the configuration environment available to all
users.
module use -a /opt/mpi/modulefiles
1.
To check the modules which are available run the following command:
module av
This will give output similar to that below:
------------------- /opt/mpi/modulefiles -----------------mpibull2/1.2.8-1.t
mpich/1.2.7-p1
vltmpi/24-1
2.
To see which modules are loaded run the command:
module li
This will give output similar to that below:
Currently Loaded Modulefiles:
1) oscar-modules/1.0.3
3.
To change MPI environments run the following commands according to your needs:
module load mpich
module li
Currently Loaded Modulefiles:
1) oscar-modules/1.0.3
2) mpich/1.2.7-p1
4.
To check which MPI environment is loaded run the command below:
which mpicc
This will give output similar to that below:
/opt/mpi/mpich-1.2.7-p1/bin/mpicc
2-18
bullx cluster suite - User's Guide
5.
To remove a module (e.g. mpich) run the command below:
module rm mpich
6.
Then load the new MPI environment by running the load command, as below:
module load mpibull2
2.5
Profiling with mpianalyser
mpianalyser is a profiling tool, developed by Bull for its own MPI_Bull implementation. This
is a non-intrusive tool which allows the display of data from counters that has been logged
when the application is run.
See
Chapter 1 in the Application Tuning Guide for details on mpianalyser and profilecomm.
Parallel Libraries
2-19
2-20
bullx cluster suite - User's Guide
Chapter 3. Scientific Libraries
This chapter describes the following topics:
3.1 Overview
3.2 Bull Scientific Studio
3.3 Intel Scientific Libraries
3.4 NVIDIA CUDA Scientific Libraries
Important
See the Software Release Bulletin for details of the Scientific Libraries included with your
delivery.
3.1
Overview
Scientific Libraries include tested, optimized and validated functions that spare users the
need to develop such subprograms themselves.
The advantages of scientific libraries are:
Portability
Support for different types of data (real, complex, double precision, etc.)
Support for different kinds of storage (banded matrix, symmetrical, etc.)
The following sets of scientific libraries are available for Bull extreme computing clusters.
Bull Scientific Studio is included in the bullx cluster suite delivery and includes a range of
Open Source libraries that can be used to facilitate the development and execution of a
wide range of applications.
See
The Software Release Bulletin for your delivery for details of the Scientific Studio libraries
included in your release.
Proprietary scientific libraries that have to be purchased separately are available from
®
®
Intel , and from NVIDIA for those clusters which include NVIDIA graphic card
accelerators.
3.2
Bull Scientific Studio
Bull Scientific Studio is based on the Open Source Management Framework (OSMF), and
provides an integrated set of up-to-date and tested mathematical scientific libraries that can
be used in multiple environments. They simplify modeling by fixing priorities, ensuring the
cluster is in full production for the maximum amount of time, and are ideally suited for large
multi-core systems.
Scientific Libraries
3-1
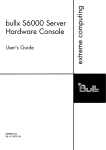
Figure 3-1. Bull Scientific Studio structure
3.2.1
Scientific Libraries and Documentation
The scientific libraries are delivered with the tools included in Bull Scientific Studio for
developing and running your application.
All the libraries included in Bull Scientific Studio are documented in a two rpm files called
SciStudio_shelf and OpenS_shelf as shown in Figure 3-1 . This file is included in the bullx
cluster suite delivery and can be installed on any system. The install paths are:
/opt/scilibs/ SCISTUDIO_SHELF/SciStudio_shelf -<version>
/opt/opens/OPENS_SHELF/OpenS_shelf-<version>/
The SciStudio_shelf and the OpenS_shelf rpm are generated for each release and contain
the documentation for each library included in the release. The documentation for each
library is included in the directory for each library based on the type of library. All of the
Scientific Studio libraries are found in /opt/scilibs/SCISTUDIO_SHELF/SciStudio_shelf<version> and the OpenS library documentation is found under
/opt/opens/OPENS_SHELF/OpenS_shelf-<versions>.
For example, the SciStudio libraries are found under /SCISTUDIO_SHELF/SciStudio_shelf<version>/<library name>, for example, the SCIPORT documentation is included in the
folder
/opt/scilibs/SCISTUDIO_SHELF/SciStudio_shelf-<version>/SCIPORT/sciport<version>
If there are multiple versions of a library then there is a separate directory for each version
number.
A typical documentation directory structure for a shelf rpm files is shown below:
Packaging information
Configuration information
README, notice
Changelogs
Installation
3-2
bullx cluster suite - User's Guide
Documentation
HowTos, tips
Manuals
Examples/tutorials
Support
Troubleshooting
Bug reports
FAQs
External documents
Documents related to the subject
Weblinks
The following scientific libraries are included in Bull Scientific Studio.
3.2.2
BLACS
BLACS stands for Basic Linear Algebra Communication Subprograms.
BLACS is a specialized communications library that uses message passing. After defining a
process chart, it exchanges vectors, matrices and blocks and so on. It can be compiled on
top of MPI systems.
BLACS uses MPI and uses MPIBull2 libraries. More information is available from
documentation included in the SciStudio_shelf rpm. When this is installed the
documentation files will be located under:
/opt/scilibs/SCISTUDIO_SHELF/SciStudio_shelf-<version>/BLACS/blacs-<ver>
3.2.2.1
Using BLACS
BLACS is located in the following directory:
/opt/scilibs/BLACS/blacs-<version>/mpibull2-<version>
The libraries include the following:
libblacsCinit_MPI-LINUX-0.a
libblacsF77init_MPI-LINUX-0.a
libblacs_MPI-LINUX-0.a
3.2.2.2
Testing the Installation of the Library
The installation of the library can be tested using the tests found in the following directory:
/opt/scilibs/BLACS/blacs-<version>/mpibull2-<version>/tests
Setting Up the Environment
First, the MPI_HOME and LD_LIBRARY_PATH variables must be set up to point to the MPI
libraries that are to be tested.
Scientific Libraries
3-3
export MPI_HOME=/opt/mpi/mpibull2-<version>/
export PATH=$MPI_HOME/bin:$PATH
export LD_LIRARY_PATH=$MPI_HOME/lib:$LD_LIRARY_PATH
Running the Tests
Then, run the tests as follows:
mpirun -np 4 xCbtest_MPI-LINUX-0
mpirun -np 4 xFbtest_MPI-LINUX-0
3.2.3
SCALAPACK
SCALAPACK stands for: SCALable Linear Algebra PACKage.
This library is the scalable version of LAPACK. Both libraries use block partitioning to
reduce data exchanges between the different memory levels to a minimum. SCALAPACK is
used above all for eigenvalue problems and factorizations (LU, Cholesky and QR).
Matrices are distributed using BLACS.
More information is available from documentation included in the SciStudio_shelf rpm.
When this is installed the documentation files will be located under:
/opt/scilibs/SCISTUDIO_SHELF/SciStudio_shelf-<version>/SCALAPACK/ScaLAPACK<ver>
Used for complex
computations (system
resolution, eigenvalue
computations, etc.)
Global
Local
Sequential
equivalent of
SCALAPACK
Message passing primitive
Figure 3-2. Interdependence of the different mathematical libraries (Scientific Studio and Intel)
3-4
bullx cluster suite - User's Guide
3.2.3.1
Using SCALAPACK
Local component routines are called by a single process with arguments residing in local
memory.
Global component routines are synchronous and parallel. They are called with arguments
that are matrices or vectors distributed over all the processes.
SCALAPACK uses MPIBull2.
The default installation of this library is as follows:
/opt/scilibs/SCALAPACK/ScaLAPACK--<version>/mpibull2-<version>
The following library is provided:
Libscalapack.a
Several tests are provided in the following directory:
/opt/scilibs/SCALAPACK/ScaLAPACK-<version>/mpibull2-<version>/tests
3.2.4
Blocksolve95
BlockSolve95 is a scalable parallel software library primarily intended for the solution of
sparse linear systems that arise from physical models, especially problems involving
multiple degrees of freedom at each node.
BlockSolve95 uses the MPIBull2 library.
The default installation of this library is as follows:
/opt/scilibs/BLOCKSOLVE95/BlockSolve95--<version>/mpibull2-<version>/lib/lib0/linux
The following library is provided:
libBS95.a
Some examples are also provided in the following directory.
/opt/scilibs/BLOCKSOLVE95/BlockSolve95-<version>/mpibull2-<version>/examples
More information is available from documentation included in the SciStudio_shelf rpm.
When this is installed the documentation files will be located under:
/opt/scilibs/SCISTUDIO_SHELF/SciStudio_shelf-<version>/BLOCKSOLVE95/BlockSolve95-<ver>
3.2.5
lapack
lapack_sci is a set of Fortran 77 routines used to resolve linear algebra problems such as
the resolution of linear systems, eigenvalue computations, matrix computations, etc.
However, it is not written for a parallel architecture.
The default installation of this library is as follows:
/opt/scilibs/LAPACK_SCI/lapack_sci-<version>
Scientific Libraries
3-5
More information is available from documentation included in the SciStudio_shelf rpm.
When this is installed the documentation files will be located under:
/opt/scilibs/SCISTUDIO_SHELF/SciStudio_shelf--<version>/ LAPACK_SCI -<version>
3.2.6
SuperLU
This library is used for the direct solution of large, sparse, nonsymmetrical systems of linear
equations on high performance machines. The routines will perform an LU decomposition
with partial pivoting and triangular systems solves through forward and back substitution.
The factorization routines can handle non-square matrices, but the triangular solves are
performed only for square matrices. The matrix commands may be pre-ordered, either
through library or user supplied routines. This pre-ordering for sparse equations is
completely separate from the factorization.
Working precision iterative refinement subroutines are provided for improved backward
stability. Routines are also provided to equilibrate the system, estimate the condition
number, calculate the relative backward error and estimate error bounds for the refined
solutions. SuperLU_Dist is used for distributed memory.
More information is available from documentation included in the SciStudio_shelf rpm.
When this is installed the documentation files will be located under:
/opt/scilibs/SCISTUDIO_SHELF/SciStudio_shelf-<version>/SUPERLU_DIST/SuperLU_DISC-<version>
/opt/scilibs/SCISTUDIO_SHELF/SciStudio_shelf-<version>/SUPERLU_MT/SuperLU_MT-<version>
/opt/scilibs/SCISTUDIO_SHELF/SciStudio_shelf-<version>/SUPERLU_SEQ/SuperLU_SEQ-<version>
SuperLU Libraires
The following SuperLU Libraries are provided:
/opt/scilibs/SUPERLU_DIST/SuperLU_DIST-<version>/mpibull2-<version>/lib/superlu_lnx_x86_64.a
/opt/scilibs/SUPERLU_MT/SuperLU-MT-<version>/lib/ superlu_mt_PTHREAD.a
/opt/scilibs/SUPERLU_SEQ/SuperLU-SEQ-2.0/lib/superlu_x86_64.a
/opt/scilibs/SUPERLU_SEQ/SuperLU-SEQ3 /lib/superlu_x86_64.a
Tests are provided for each library under the following directory:
/opt/scilibs/SUPERLU_<type>/SuperLU_<type>-<version>/test directory
3.2.7
FFTW
FFTW stands for the Fastest Fourier Transform in the West. FFTW is a C subroutine library
for computing a discrete Fourier transform (DFT) in one or more dimensions, of arbitrary
input size, and using both real and complex data.
There are three versions of FFTW in this distribution. They are located in the following
directories:
/opt/scilibs/FFTW/FFTW3-<version>/lib
/opt/scilibs/FFTW/fftw-2<version>/mpibull2-<version>/lib
Tests are also available in the following directory:
/opt/scilibs/FFTW/fftw--<version>/test
3-6
bullx cluster suite - User's Guide
More information is available from documentation included in the SciStudio_shelf rpm.
When this is installed the documentation files will be located under:
/opt/scilibs/SCISTUDIO_SHELF/SciStudio_shelf-<version>/FFTW/fftw-<version>
3.2.8
PETSc
PETSc stands for Portable, Extensible Toolkit for Scientific Computation. PETSc is a suite of
data structures and routines for the scalable (parallel) solution of scientific applications
modeled by partial differential equations. It employs the MPI standard for all messagepassing communications (see http://www.mcs.anl.gov/mpi for more details).
The Pets library is available in the following directory:
/opt/scilibs/PETSC/PETSc-2.3.3-p0/mpibull2-<version>/lib/linux-intel-opt/
More information is available from documentation included in the SciStudio_shelf rpm.
When this is installed the documentation files will be located under:
/opt/scilibs/SCISTUDIO_SHELF/SciStudio_shelf-<version>/PETSC/PETSc -<version>
3.2.9
NETCDF
NetCDF (Network Common Data Form) allows the management of input/output data.
NetCDF is an interface for array-oriented data access, and is a library that provides an
implementation of the interface. The NetCDF library also defines a machine-independent
format for representing scientific data. Together, the interface, library, and format support
the creation, access, and sharing of scientific data.
The library is located in the following directories:
/opt/scilibs/NETCDF/netCDF-<version>/bin
/opt/scilibs/NETCDF /netCDF-<version>/include
/opt/scilibs/NETCDF /netCDF-<version>/lib
/opt/scilibs/NETCDF /netCDF-<version>/man
More information is available from documentation included in the SciStudio_shelf rpm.
When this is installed the documentation files will be located under:
/opt/scilibs/SCISTUDIO_SHELF/SciStudio_shelf-<version>/NETCDF/netCDF-<version>
3.2.10
pNETCDF
Parallel-NetCDF library provides high-performance I/O while still maintaining file-format
compatibility with Unidata's NetCDF. NetCDF (Network Common Data Form) is a set of
software libraries and machine-independent data formats that support the creation, access,
and sharing of array-oriented scientific data.
The library is located in the following directories:
/opt/scilibs/PNETCDF/pNetCDF-<version>>/mpibull2-<version>/bin
/opt/scilibs/PNETCDF /pNetCDF-<version>>/mpibull2-<version>/include
/opt/scilibs/PNETCDF /pNetCDF-<version>>/mpibull2-<version>/lib
Scientific Libraries
3-7
/opt/scilibs/PNETCDF /pNetCDF-<version>/mpibull2-<version>/man
More information is available from documentation included in the SciStudio_shelf rpm.
When this is installed the documentation files will be located under:
/opt/scilibs/SCISTUDIO_SHELF/SciStudio_shelf-<version>/PNETCDF/pNetCDF-<version>
3.2.11
METIS and PARMETIS
METIS is a set of serial programs for partitioning graphs, partitioning finite element meshes,
and producing fill reducing orderings for sparse matrices. The algorithms implemented in
METIS are based on the multilevel recursive-bisection, multilevel k-way, and multi-constraint
partitioning schemes developed in our lab.
ParMETIS is an MPI-based parallel library that implements a variety of algorithms for
partitioning unstructured graphs, meshes, and for computing fill-reducing orderings of
sparse matrices. ParMETIS extends the functionality provided by METIS and includes
routines that are especially suited for parallel Adaptive Mesh Refinement computations and
large scale numerical simulations.
The libraries for ParmMETIS are located in the following directory:
/opt/scilibs/PARMETIS/ParMETIS<version>/mpibull2-<version>/lib
More information is available from documentation included in the SciStudio_shelf rpm.
When this is installed the documentation files will be located under:
/opt/scilibs/SCISTUDIO_SHELF/SciStudio_shelf-<version>/PARMETIS/ParMETIS-<version>
3.2.12
SciPort
SCIPORT is a portable implementation of CRAY SCILIB that provides both single and
double precision object libraries. SCIPORTS provides single precision and SCIPORTD
provides double precision.
The libraries for SCIPORT can be found in the following directory:
/opt/scilibs/SCIPORT/sciport-<versions>/lib/
More information is available from documentation included in the SciStudio_shelf rpm.
When this is installed the documentation files will be located under:
/opt/scilibs/SCISTUDIO_SHELF/SciStudio_shelf-<version>/SCIPORT/sciport-<version>
3.2.13
gmp_sci
GMP is a free library for arbitrary precision arithmetic, operating on signed integers,
rational numbers, and floating point numbers. There is no practical limit to the precision
except the ones implied by the available memory in the machine GMP runs on. GMP has a
rich set of functions, and the functions have a regular interface.
The main target applications for GMP are cryptography applications and research, Internet
security applications, algebra systems, computational algebra research, etc.
3-8
bullx cluster suite - User's Guide
GMP is carefully designed to be as fast as possible, both for small operands and for huge
operands. The speed is achieved by using full words as the basic arithmetic type, by using
fast algorithms, with highly optimized assembly code for the most common inner loops for
a lot of CPUs, and by a general emphasis on speed.
GMP is faster than any other big num library. The advantage for GMP increases with the
operand sizes for many operations, since GMP uses asymptotically faster algorithms.
The libraries for GMP_SCI can be found in the following directory:
/opt/scilibs/GMP_SCI/gmp_sci-<version>/lib/
/opt/scilibs/GMP_SCI/gmp_sci-<version>/include
/opt/scilibs/GMP_SCI/gmp_sci-<version>/info
More information is available from documentation included in the SciStudio_shelf rpm.
When this is installed the documentation files will be located under:
/opt/scilibs/SCISTUDIO_SHELF/SciStudio_shelf-<version>/GMP/gmp -<version>
3.2.14
MPFR
The MPFR library is a C library for multiple-precision, floating-point computations with
correct rounding. MPFR has continuously been supported by the INRIA (Institut National de
Recherche en Informatique et en Automatique) and the current main authors come from the
CACAO and Arénaire project-teams at Loria (Nancy, France) and LIP (Lyon, France)
respectively. MPFR is based on the GMP multiple-precision library.
The main goal of MPFR is to provide a library for multiple-precision floating-point
computation which is both efficient and has a well-defined semantics.
The libraries for MPFR can be found in the following directory:
/opt/scilibs/MPFR/MPFR--<version>/lib/
/opt/scilibs/MPFR/MPFR--<version>/include
/opt/scilibs/MPFR/MPFR--<version>/info
More information is available from the documentation included in the SciStudio_shelf rpm.
When this is installed the documentation files will be located under:
/opt/scilibs/SCISTUDIO_SHELF/SciStudio_shelf-<version>/MPFR/MPFR-<version>
3.2.15
sHDF5/pHDF5
The HDF5 technology suite includes :
A versatile data model that can represent very complex data objects and a wide
variety of metadata.
A completely portable file format with no limit on the number or size of data objects in
the collection.
A software library that runs on a range of computational platforms, from laptops to
massively parallel systems, and implements a high-level API with C, C++, Fortran 90,
and Java interfaces.
Scientific Libraries
3-9
A rich set of integrated performance features that allow for access time and storage
space optimizations.
Tools and applications for managing, manipulating, viewing, and analyzing the data
in the collection
The libraries for sHDF5/pHDF5 can be found in the following directory:
/opt/scilibs/PHDF5/pHDF5-<version>/mpibull2--<version>/lib
/opt/scilibs/PHDF5/pHDF5--<version>/mpibull2--<version>/bin
/opt/scilibs/PHDF5/pHDF5--<version>/mpibull2--<version>/include
/opt/scilibs/PHDF5/pHDF5--<version>/mpibull2--<version>/doc
/opt/scilibs/SHDF5/sHDF5-<version>/lib
/opt/scilibs/SHDF5/sHDF5--<version>/bin
/opt/scilibs/SHDF5/sHDF5--<version>/include
/opt/scilibs/SHDF5/sHDF5--<version>/doc
More information is available from documentation included in the SciStudio_shelf rpm.
When this is installed the documentation files will be located under:
/opt/scilibs/SCISTUDIO_SHELF/SciStudio_shelf-<version>/PHDF5/pHDF5-<version>
/opt/scilibs/SCISTUDIO_SHELF/SciStudio_shelf-<version>/SHDF5/sHDF5-<version>
3.2.16
ga/Global Array
The Global Arrays (GA) toolkit provides an efficient and portable ‘shared-memory’
programming interface for distributed-memory computers. Each process in a MIMD parallel
program can asynchronously access logical blocks of physically distributed dense multidimensional arrays, without the need for explicit cooperation with other processes. Unlike
other shared-memory environments, the GA model exposes the non-uniform memory access
(NUMA) characteristics of the high performance computers to the programmer, and takes
into account the fact that access to a remote portion of the shared data is slower than to the
local portion. The location information for the shared data is available, and direct access to
the local portions of shared data is provided.
The libraries for ga are located in the following directory:
/opt/opens/GA/ga-<version>/mpibull2-<version>/lib
More information is available from documentation included in the OpenS_shelf rpm. When
this is installed the documentation files will be located under:
/opt/opens/OPENS_SHELF/OpenS_shelf-<version>/GlobalArray /ga-<version>
3.2.17
gsl
The GNU Scientific Library (GSL) is a numerical library for C and C++ programmers. It is
free software provided under the GNU General Public License. The library provides a wide
range of mathematical routines such as random number generators, special functions and
least-squares fitting. There are over 1000 functions in total with an extensive test suite. The
complete range of subject areas covered by the library includes:
3-10
bullx cluster suite - User's Guide
Complex Numbers
Roots of Polynomials
Special Functions
Vectors and Matrices
Permutations
Sorting
BLAS Support
Linear Algebra
Eigensystems
Fast Fourier Transforms
Quadrature
Random Numbers
Quasi-Random Sequences
Random Distributions
Statistics
Histograms
N-Tuples
Monte Carlo Integration
Simulated Annealing
Differential Equations
Interpolation
Numerical Differentiation
Chebyshev Approximation
Series Acceleration
Discrete Hankel Transforms
Root-Finding
Minimization
Least-Squares Fitting
Physical Constants
IEEE Floating-Point
Discrete Wavelet Transforms
Basis splines
The gsl libraries can be found in the following directory:
/opt/scilibs/GSL/GSL--<version>/lib
/opt/scilibs/GSL/GSL---<version>/bin
/opt/scilibs/GSL/GSL---<version>/include
/opt/scilibs/GSL/GSL---<version>/doc
More information is available from documentation included in the SciStudio_shelf rpm.
When this is installed the documentation files will be located under:
/opt/scilibs/SCISTUDIO_SHELF/SciStudio_shelf-<version>/GSL/gsl-<version>/
3.2.18
pgapack
PGAPack is a general-purpose, data-structure-neutral, parallel genetic algorithm package
developed by Argonne National Laboratory
The libraries for pga can be found in the following directory:
/opt/scilibs/ PGAPACK/pgapack--<version>/mpibull2--<version>/lib
/opt/scilibs /PGAPACK/pgapack--<version>/mpibull2--<version>/doc
/opt/scilibs /PGAPACK/pgapack--<version>/mpibull2--<version>/include
/opt/scilibs /PGAPACK/pgapack--<version>/mpibull2--<version>/man
More information is available from the documentation included in the SciStudio_shelf rpm.
When this is installed the documentation files will be located under:
/opt/scilibs/SCISTUDIO_SHELF/SciStudio_shelf-<version>/PGAPACK/pgapack-<version>/
Scientific Libraries
3-11
3.2.19
valgrind
Valgrind is an award-winning instrumentation framework for building dynamic analysis
tools. There are Valgrind tools that can automatically detect many memory management
and threading bugs, and profile your programs in detail. You can also use Valgrind to
build new tools. The Valgrind distribution currently includes five production-quality tools: a
memory error detector, a thread error detector, a cache and branch-prediction profiler, a
call-graph generating cache profiler, and a heap profiler. It also includes two experimental
tools: a data race detector, and an instant memory leak detector.
The libraries for Valgrind are located in the following directory:
/opt/opens/VALGRIND_OPENS/valgrind_OpenS--<version>/share/doc/valgrind/
/opt/opens/VALGRIND_OPENS/valgrind_OpenS-<version>/bin
/opt/opens/VALGRIND_OPENS/valgrind_OpenS-<version>/valgrind/include
/opt/opens/VALGRIND_OPENS/valgrind_OpenS-<version>/valgrind/lib
/opt/opens/VALGRIND_OPENS/valgrind_OpenS-<version>/include/valgrind/vki/
/opt/opens/VALGRIND_OPENS/valgrind_OpenS-<version>/man
/opt/opens/VALGRIND_OPENS/valgrind_OpenS-<version>/lib/valgrind/amd64-linux
/opt/opens/VALGRIND_OPENS/valgrind_OpenS-<version>/lib/valgrind/ x86-linux
More information is available from documentation included in the SciStudio_shelf rpm.
When this is installed the documentation files will be located under:
/opt/opens/OPENS_SHELF/OpenS_shelf-<version>/VALGRIND/valgrind-<version>
3-12
bullx cluster suite - User's Guide
3.3
Intel Scientific Libraries
Note
3.3.1
®
The scientific libraries in this section are all Intel proprietary libraries and must be bought
separately
Intel Math Kernel Library
This library, which has been optimized by Intel for its processors, contains, among other
things, the following libraries: BLAS, LAPACK and FFT.
The Intel Cluster MKL is a fully thread-safe library.
The library is located in the /opt/intel/mkl<release_nb>/ directory.
To use it, the environment has to be set by updating the LD_LIBRARY_PATH variable:
export LD_LIBRARY_PATH=/opt/intel/mkl<release_nb>/lib/64:$LD_LIBRARY_PATH
Example for MKL 7.2:
export LD_LIBRARY_PATH=/opt/intel/mkl72/lib/64:$LD_LIBRARY_PATH
3.3.2
Intel Cluster Math Kernel Library
The Intel Cluster Math Kernel Library contains all the highly optimized math functions of the
Math Kernel Library plus ScaLAPACK for Linux Clusters.
The Intel Cluster MKL is a fully thread-safe library and provides C and Fortran interfaces.
The Cluster MKL library is located in the /opt/intel/mkl<release_nb>cluster/ directory.
3.3.3
BLAS
BLAS stands for Basic Linear Algebra Subprograms.
This library contains linear algebraic operations that include matrixes and vectors. Its
functions are separated into three parts:
Level 1 routine to represent vectors and vector/vector operations.
Level 2 routines to represent matrixes and matrix/vector operations.
Level 3 routines mainly for matrix/matrix operations.
This library is included in the Intel MKL package.
For more information see www.netlib.org/blas.
Scientific Libraries
3-13
3.3.4
PBLAS
PBLAS stands for Parallel Basic Linear Algebra Subprograms.
PBLAS is the parallelized version of BLAS for distributed memory machines. It requires the
cyclic distribution by matrix block that the BLACS library offers.
This library is included in the Intel MKL package.
3.3.5
LAPACK
LAPACK stands for Linear Algebra PACKage.
This is a set of Fortran 77 routines used to resolve linear algebra problems such as the
resolution of linear systems, eigenvalue computations, matrix computations, etc. However, it
is not written for a parallel architecture.
This library is included in the Intel MKL package.
3.4
NVIDIA CUDA Scientific Libraries
For clusters which include NVIDIA Tesla graphic accelerators the NVIDIA Compute Unified
Device Architecture (CUDATM) Toolkit, including versions of the CUFFT and the CUBLAS
scientific libraries, is installed automatically on the LOGIN, COMPUTE and COMPUTEX
nodes.
mportant
The CUFFT and CUBLAS libraries are not ABI compatible by symbol, by call, or by libname
with the libraries included in Bull Scientific Studio. The use of the NVIDIA CUBLAS and
CUFFT libraries needs to be made explicit and is exclusive to systems which include the
NVIDIA Tesla graphic accelerators.
3.4.1
CUFFT
CUFFT, the NVIDIA® CUDA™ Fast Fourier Transform (FFT) library is used for computing
discrete Fourier transforms of complex or real-valued data sets. The CUFFT library provides
a simple interface for computing parallel FFTs on a Compute Node connected to a Tesla
graphic accelerator, allowing the floating-point power and parallelism of the node to be
fully exploited.
FFT libraries vary in terms of supported transform sizes and data types. For example, some
libraries only implement Radix-2 FFTs, restricting the transform size to a power of two,
while other implementations support arbitrary transform sizes. The CUFFT library delivered
with bullx cluster suite supports the following features:
1D, 2D, and 3D transforms of complex and real-valued data.
Batch execution of multiple 1D transforms in parallel.
3-14
bullx cluster suite - User's Guide
2D and 3D transforms in the [2, 16384] range in any dimension.
1D transforms up to 8 million elements.
In-place and out-of-place transforms for real and complex data.
The interface to the CUFFT library is the header file cufft.h. Applications using CUFFT need
to link against the cufft.so Linux DSO when building for the device, and against the
cufftemu.so Linux DSO when building for device emulation.
See
3.4.2
The CUDA CUFFT Library document available from www.nvidia.com for more information
regarding types, API functions, code examples and the use of this library.
CUBLAS
CUBLAS is an implementation of BLAS (Basic Linear Algebra Subprograms) on top of the
NVIDIA® CUDA™ driver. The library is self-contained at the API level, that is, no direct
interaction with the CUDA driver is necessary.
The basic model by which applications use the CUBLAS library is to create matrix and
vector objects in the memory space of the Tesla graphics accelerator, fill them with data,
call a sequence of CUBLAS functions, and, finally, load the results back to the host. To
accomplish this, CUBLAS provides helper functions for creating and destroying objects in
the graphics accelerator memory space, and for writing data to and retrieving data from
these objects.
Because the CUBLAS core functions (as opposed to the helper functions) do not return an
error status directly (for reasons of compatibility with existing BLAS libraries), CUBLAS
provides a separate function, that retrieves the last recorded error to help debugging.
The interface to the CUBLAS library is the header file cublas.h. Applications using CUBLAS
need to link against the cublas.so Linux DSO when building for the device, and against the
cublasemu.so Linux DSO when building for device emulation.
See
The CUDA CUBLAS Library document available from www.nvidia.com for more information
regarding functions for this library.
Scientific Libraries
3-15
3-16
bullx cluster suite - User's Guide
Chapter 4. Compilers
This chapter describes the following topics:
4.1 Overview
4.2 Intel® Fortran Compiler Professional Edition for Linux
4.3 Intel® C++ Compiler Professional Edition for Linux
4.4 Intel Compiler Licenses
4.5 Intel Math Kernel Library Licenses
4.6 GNU Compilers
4.7 NVIDIA nvcc C Compiler
4.1
Overview
Compilers play an essential role in exploiting the full potential of Xeon® processors. Bull
therefore recommends the use of Intel® C/C++ and Intel® Fortran compilers.
GNU compilers are also available. However, these compilers are unable to compile/link
any program which uses MPI_Bull. For MPI_Bull programs it is essential that Intel compilers
are used.
Alternatively, clusters that use NVIDIA Tesla graphic accelerators connected to the Compute
Nodes will use the compilers supplied with the NVIDIA CUDATM Toolkit and Software
Development Kit.
4.2
Intel® Fortran Compiler Professional Edition for Linux
The current version of the Intel® Fortran compiler is version 11. This supports the Fortran
95, Fortran 90, Fortran 77, Fortran IV standards whilst including many features from the
Fortran 2003 language standard.
The main features of this compiler are:
Advanced optimization features including auto-vectorization, High-Performance
Parallel Optimizer (HPO), Interprocedural Optimization (IPO), Profile Guided
Optimization (PGO) and Optimized Code Debugging.
Multi-threaded Application Support including OpenMP and Auto Parallelization to
convert serial applications into parallel applications to fully exploit the processing
power that is available
Data preloading
Loop unrolling
The Professional Edition includes the Intel® Math Kernel Library (Intel® MKL) with its
optimized functions for maths processing. It is also compatible with GNU products.
It also supports big endian encoded files. Finally, this compiler allows the execution of
applications which combine programs written in C and Fortran.
See
www.intel.com for more details.
Compilers
4-1
Different versions of the compiler may be installed to ensure compatibility with the compiler
versions used to compile the libraries and applications on your system.
Note
It may be necessary to contact the System Administrator to ascertain the location of the
compilers on your system. The paths shown in the examples below may vary.
To specify a particular environment use the command below.
source /opt/intel/Compiler/<maj_ver_nb>/<min_ver_nb>/bin/ifortvars.sh intel64
For example:
To use version 11.0.069 of the Fortran compiler:
source /opt/intel/Compiler/11.0/069/bin/ifortvars.sh intel64
To display the version of the active compiler, enter:
ifort --version
To obtain the compiler documentation go to:
/opt/intel/Compiler/11.0/069/Documentation
Remember that if you are using MPI_Bull then a compiler version has to be used which is
compatible with the compiler originally used to compile the MPI library.
4.3
Intel® C++ Compiler Professional Edition for Linux
The current version of the Intel C++ compiler is version 11.
The main features of this compiler are:
Advanced optimization features including auto-vectorization, High-Performance
Parallel Optimizer (HPO), Interprocedural Optimization (IPO), Profile Guided
Optimization (PGO) and Optimized Code Debugging.
Multi-threaded Application Support including OpenMP and Auto Parallelization to
convert serial applications into parallel applications to fully exploit the processing
power that is available
Data preloading
Loop unrolling
The Professional Edition includes Intel® Threading Building Blocks (Intel® TBB), Intel
Integrated Performance Primitives (Intel® IPP) and the Intel® Math Kernel Library (Intel® MKL)
with its optimized functions for maths processing. It is also compatible with GNU products.
See
4-2
www.intel.com for more details.
bullx cluster suite - User's Guide
Different versions of the compiler may be installed to ensure compatibility with the compiler
version used to compile the libraries and applications on your system.
Note
It may be necessary to contact the System Administrator to ascertain the location of the
compilers on your system. The paths shown in the examples below may vary.
To specify a particular environment use the command below:
source /opt/intel/Compiler/<maj_ver_nb>/<min_ver_nb>/bin/iccvars.sh intel64
For example:
To use version 11.0.069 of the C/C++ compiler:
source /opt/intel/Compiler/11.0/069/bin/iccvars.sh intel64
To display the version of the active compiler, enter:
icc --version
To obtain the compiler documentation go to:
/opt/intel/Compiler/11.0/069/Documentation
Remember that if you are using MPI_Bull then a compiler version has to be used which is
compatible with the compiler originally used to compile the MPI library.
4.4
Intel Compiler Licenses
Three types of Intel
Compiler licenses are available:
Single User: allows one user to operate the product on multiple computers as long as
only one copy is in use at any given time.
Node-Locked: locked to a node, allows any user who has access to this node to
operate the product concurrently with other users, limited to the number of licenses
purchased.
Floating: locked to a network, allows any user who has access to the network server to
operate the product concurrently with other users, limited to the number of licenses
purchased.
The node-locked and floating licenses are managed by FlexLM from Macrovision.
License installation, and FlexLM configuration, may differ according to your compiler, the
license type, the number of licenses purchased, and the period of support for your product.
Please check the Bull Product Designation document delivered with your compiler and
follow the instructions contained therein.
Compilers
4-3
4.5
Intel Math Kernel Library Licenses
Intel Math Kernel Library licenses are required for each Node on which you compile with
MKL. However, the runtime libraries which are used on the compute nodes do not require a
license fee.
4.6
GNU Compilers
GCC, a collection of free compilers that can compile both C/C++ and Fortran, is part of the
installed Linux distribution.
4.7
NVIDIA nvcc C Compiler
For clusters which include NVIDIA Tesla graphic accelerators the NVIDIA Compute Unified
Device Architecture (CUDATM) Toolkit is installed automatically on the LOGIN, COMPUTE
and COMPUTEX nodes. The NVIDIA CUDATM Toolkit provides a C development
environment that includes the nvcc compiler. This compiler provides command line options
to invoke the different tools required for each compilation stage.
nvcc’s basic workflow consists in separating device code from host code and compiling the
device code into a binary form or cubin object. The generated host code is outputted,
either as C code that can be compiled using another tool, or directly as object code that
invokes the host compiler during the last compilation stage.
Source files for CUDA applications consist of a mixture of conventional C++ ‘host’ code
and graphic accelerator device functions. The CUDA compilation trajectory separates the
device functions from the host code, compiles the device functions using proprietary
NVIDIA compilers/assemblers, compiles the host code using the general purpose C/C++
compiler that is available on the host platform, and afterwards embeds the compiled
graphic accelerator functions as load images in the host object file. In the linking stage,
specific CUDA runtime libraries are added to support remote SIMD procedure calls and to
provide explicit GPU manipulations, such as allocation of GPU memory buffers and hostGPU data transfer.
The compilation trajectory involves several splitting, compilation, preprocessing, and
merging steps for each CUDA source file. These steps are subtly different for different
modes of CUDA compilation (such as compilation for device emulation, or the generation
of ‘fat device code binaries’). It is the purpose of the CUDA nvcc compiler driver to keep
the intricate details of CUDA compilation hidden from developers. Additionally, instead of
being a specific CUDA compilation driver, nvcc mimics the behavior of general purpose
compiler drivers, e.g. GCC, in that it accepts a range of conventional compiler options, for
example to define macros and include/library paths, and to manage the compilation
process. All non-CUDA compilation steps are forwarded to the general C compiler that is
available on the platform.
4-4
bullx cluster suite - User's Guide
4.7.1
Compiling with nvcc and MPI
The CUDA development environment uses a makefile system. A set of makefile rules
indicates how to interact with the files the make encounters including the .cu source files,
and .c or .cxx/cpp host code files.
Note
Only C and C++ formats are accepted in the CUDA programming environment. Fortran
programs should call the functions from C or C++ libraries. The user can program in any
language (Python, etc.) as long as C/C++ routines are called.
Using the makefile system for the CUDA development environment
Carry out the following steps to use the makefile system
1.
Create the directory for the application code and populate it with the .cu and/of .cpp
source files.
2.
Set the environment:
module load cuda
3.
Create a makefile to build your application, as shown below.
# Add source files here
EXECUTABLE
:= bitonic
# Cuda source files (compiled with nvcc)
CUFILES
:= bitonic.cu
# C/C++ source files (compiled with gcc/c++)
CCFILES
:= bitonic_gold.cpp
######################################################################
# Rules and targets
ifneq ($(CUDA_MAKEFILE),)
include $(CUDA_MAKEFILE)
endif
The makefile in the example above builds an application named bitonic from two
source files, bitonic.cu and bitonic_gold.cpp.
4.
For the .cu file, by default nvcc wraps C++, so the SEEK* variables and the mpi.h
prototype file must be unset, as the two C++ name spaces collide.
#undef SEEK_SET
#undef SEEK_END
#undef SEEK_CUR
#include <mpi.h>
int main(int argc, char** argv)
{
CUT_DEVICE_INIT(argc, argv);
int values[NUM];
int err = MPI_Init(NULL,NULL);
for(int i = 0; i < NUM; i++)
{
Compilers
4-5
}
values[i] = rand();
int * dvalues;
CUDA_SAFE_CALL(cudaMalloc((void**)&dvalues, sizeof(int) * NUM));
CUDA_SAFE_CALL(cudaMemcpy(dvalues, values, sizeof(int) *...
It will now be possible to compile.
See
4-6
5.
The makefile system will automatically recognize your MPI compiler and use it to
obtain the right options. This has been tested for MPIBull products, as well as OpenMPI
and MPICH products.
6.
The makefile system will create two directories in your application directory. These are
linux and obj, and are used to store the executable file and the object files
respectively.
The NVIDIA CUDA Compute Unified Device Architecture Programming Guide and The
CUDA Compiler Driver document available from www.nvidia.com for more information.
bullx cluster suite - User's Guide
Chapter 5. The User's Environment
This chapter describes how to access the extreme computing environment, how to use file
systems, and how to use the modules package to switch and compare environments:
5.1 Cluster Access and Security
5.2 Global File Systems
5.3 Environment Modules
5.4 Module Files
5.5 The Module Command
5.6 The NVIDIA CUDA Development Environment
5.1
Cluster Access and Security
Typically, users connect to and use a cluster as described below:
Users log on to the cluster platform either through Service Nodes or through the Login
Node when the configuration includes these special Login Node(s). Once logged on to
a node, users can then launch their jobs.
Compilation is possible on all nodes which have compilers installed on them. The best
approach is that compilers reside on Login Nodes, so that they do not interfere with
performance on the Compute Nodes.
5.1.1
ssh (Secure Shell)
The ssh command is used to access a cluster node.
Syntax:
ssh [-l login_name] hostname | user@hostname [command]
ssh [-afgknqstvxACNTX1246] [-b bind_address] [-c cipher_spec]
[-e escape_char] [-i identity_file] [-l login_name] [-m mac_spec]
[-o option] [-p port] [-F configfile] [-L port:host:hostport]
[-R port:host:hostport] [-D port] hostname | user@hostname [command]
ssh (ssh client) can also be used as a command to log onto a remote machine and to
execute commands on it. It replaces rlogin and rsh, and provides secure encrypted
communications between two untrusted hosts over an insecure network. X11 connections
and arbitrary TCP/IP ports can also be forwarded over the secure channel. ssh connects
and logs onto the specified hostname. The user must verify his/her identity, using the
appropriate protocol, before being granted access to the remote machine.
The User's Environment
5-1
5.2
Global File Systems
The bullx cluster suite uses the NFS distributed file system.
5.3
Environment Modules
Environment modules provide a great way to customize your shell environment easily,
particularly on the fly.
For instance an environment can consist of one set of compatible products including a
defined release of a FORTRAN compiler, a C compiler, a debugger and mathematical
libraries. In this way you can easily reproduce trial conditions, or use only proven
environments.
The Modules environment is a program that can read and list module files returning
commands; suitable for the shell to interpret, and most importantly for the eval command.
Modulefiles is a kind of flat database which uses files.
In UNIX a child process can not modify its parent environment.
So how does Modules do this? Modules parses the given modules file and produces the
appropriate shell commands to set/unset/append/un-append onto an environment
variable. These commands are eval'd by the shell. Each shell provides some mechanism
where commands can be executed and the resulting output can, in turn, be executed as
shell commands. In the C-shell & Bourne shell and derivatives this is the eval command.
This is the only way that a child process can modify the parent's (login shell) environment.
Hence the module command itself is a shell alias or function that performs these operations.
To the user, it looks just like any other command.
The module command is only used in the development environment and not in other
environments such as that for administration node.
See
5.3.1
http://modules.sourceforge.net/ for more details.
Using Modules
The following command gives the list of available modules on a cluster.
module avail
------------------------ /opt/modules/version -----------------------3.1.6
------------------- /opt/modules/3.1.6/modulefiles ------------------dot
module-info null
module-cvs modules
use.own
---------------------- /opt/modules/modulefiles ---------------------oscar-modules/1.0.3 (default)
Modules available for the user are listed under the line /opt/modules/modulefiles.
5-2
bullx cluster suite - User's Guide
The command to load a module is:
module load module_name
The command to verify the loaded modules list is:
module list
Using the avail command it is possible that some modules will be marked (default):
module avail
These modules are those which have been loaded without the user specifying a module
version number. For example the following commands are the same:
module load configuration
module load configuration/2
The module unload command unloads a module.
The module purge command clears all the modules from the environment.
module purge
It is not possible to load modules which include different versions of intel_cc or intel_fc at
the same time because they cause conflicts.
Module Configuration Examples
Note
The configurations shown below are examples only. The module configurations for bullx
cluster suite will differ.
intel_fc –version 8.0.046
intel_cc –version 8.0.066
intel_db –version 8.1.3
intel_mkl –version 7.0.017
intel_fc –version 8.0.049
intel_cc –version 8.0.071
intel_db –version 8.1.3
intel_mkl –version 7.0.017
intel_fc –version 8.0.061
intel_cc –version 8.0.071
intel_db –version 8.1.3
intel_mkl –version 7.0.017
intel_fc –version 8.0.019
intel_cc –version 8.0.022
intel_db –version 8.1.3
intel_mkl –version 7.0.017
Configuration/1
Configuration/2
Configuration/3
Configuration/4
Table 5-1.
Examples of different module configurations
The User's Environment
5-3
5.3.2
Setting Up the Shell RC Files
A quick tutorial on Shell rc (run-command) files follows. When a user logs in and if they
have /bin/csh(/bin/sh) as their shell, the first rc fire to be parsed by the shell is
/etc/csh.login & /etc/csh.cshrc (/etc/profile) (the order is implementation dependent),
and then the user's $HOME/.cshrc ($HOME/.kshenv) and finally $HOME/.login
($HOME/.profile).
All the other login shells are based on /bin/csh and /bin/sh with additional features and
rc files. Certain environment variables and aliases (functions) need to be set for Modules to
work correctly. This is handled by the Module init files in /opt/modules /default/init,
which contains separate init files for each of the various supported shells, where the default
is a symbolic link to a module command version.
Skeleton Shell RC ("Dot'') Files
The skeleton files provide a "default'' environment for new users when they are added to
your system, this can be used if you do not have the time to set them up individually. The
files are usually placed in /etc/skel (or wherever you specified with the
--with-skel-path=<path> option to the configuration script), and contains a minimal set of
"dot'' files and directories that every new user should start with.
The skeleton files are copied to the new user's $HOME directory with the "-m'' option
added to the "useradd'' command. A set of sample "dot'' files are located in ./etc/skel.
Copy everything but the .*.in and CVS files and directories to the skeleton directory. Edit
and tailor for your system.
If you have a pre-existing set of skeleton files, then make sure the following minimum set
exists: .cshrc, .login, .kshenv, .profile. These can be automatically updated with the
command:
env HOME=/etc/skel/opt/modules/default/bin/add.modules
Inspect the new ‘dot’ files and if they are OK, then remove all the .*.old (original) files. An
alternative way of setting-up the users' dot files can be found in ./ext.
This model can be used with the --with-dot-ext configure option.
User Shell RC ("Dot'') Files
The final step for a functioning modules environment is to modify the user ‘dot’ files to
source the right files. One way to do this is to put a message in the /etc/motd telling each
user to run the command:
/opt/modules/default/bin/add.modules
This is a script that parses their existing "dot'' files prepending the appropriate commands
to initialize the Modules environment.
The user can re-run this script and it will find and remember what modules they initially
loaded and then strip out the previous module initialization and restore it with an upgraded
one.
5-4
bullx cluster suite - User's Guide
If the user lacks a necessary "dot'' file, the script will copy one over from the skeleton
directory. The user will have to logout and login for it to come into effect.
Another way is for the system administrator to "su - username" to each user and run it
interactively. The process can be semi-automated with a single line command that obviates
the need for direct interaction:
su - username -c "yes | /opt/modules/modules/default/bin/add.modules"
Power users can create a script to directly parse the /etc/passwd file to perform this
command. Otherwise, just copy the passwd file and edit it to execute this command for
each valid user.
5.4
Module Files
Once the above steps have been performed, then it is important to have module files in
each of the modulefiles directories. For example, the following module files will be
installed:
--------- /opt/modules/3.0.9-rko/modulefiles ---------dot
module-info modules
null
use.own
If you do not have your own module files in /opt/modules/modulefiles then copy "null'' to
that directory. On some systems an empty modulefiles directory will cause a core dump,
whilst on other systems there will be no problem. Use
/opt/modules/default/modulefiles/modules as a template for creating your own module files.
For more information run:
module load modules
You will then have ready access to the module(1) modulefile(4) man pages, as well as the
versions directory. Study the man pages carefully.
The version directory may look something like this:
---------------- /opt/modules/versions ---------------3.0.5-rko 3.0.6-rko 3.0.7-rko 3.0.8-rko 3.0.9-rko
The model you should use for modulefiles is "name/version''. For example,
/opt/modules/modulefiles directory may have a directory named "firefox'' which contains
the following module files: 301, 405c, 451c, etc.
When it is displayed with module avail it looks something like this:
firefox/301
firefox/405c
firefox/451c(default)
firefox/45c
firefox/46
The default is established with .version file in the firefox directory and it looks something
like this:
The User's Environment
5-5
#%Module1.0###########################################################
##
## version file for Firefox
##
set ModulesVersion
"451c"
If the user does "module load firefox'', then the default firefox/451c will be used. The
default can be changed by editing the .version file to point to a different module file in that
directory. If no .version file exists then Modules will just use the last module in the
alphabetical ordered directory listed as the default.
5.4.1
Upgrading via the Modules Command
The theory is that Modules should use a similar package/version locality as the package
environments it helps to define. Switching between versions of the module command should
be as easy as switching between different packages via the module command. Suppose
there is a change from 3.0.5-rko to version 3.0.6-rko. The goal is to semi-automate the
changes to the user ‘dot' files so that the user is oblivious to the change.
The first step is to install the new module command & files to /opt/modules/3.0.6-rko/.
Test it out by loading with ‘module load modules 3.0.6-rko’. You may get an error like:
3.0.6-rko (25):ERROR:152: Module 'modules' is currently not loaded. This is OK and
should not appear with future versions.
Make sure you have the new version with ‘module –version’. If it seems stable enough, then
advertise it to your more adventurous users. Once you are satisfied that it appears to work
adequately well, then go into /opt/modules remove the old ‘default’ symbolic link to the
new versions.
For example
cd /opt/modules
rm default; ln -s 3.0.6-rko default
This new version is now the default and will be referenced by all the users that log in and
by those that have not loaded a specific module command version.
5-6
bullx cluster suite - User's Guide
5.5
The Module Command
Synopsis
module [ switches ] [ sub-command ] [ sub-command-args ]
The Module command provides a user interface to the Modules package. The Modules
package provides for the dynamic modification of the user's environment via modulefiles.
Each modulefile contains the information needed to configure the shell for an application.
Once the Modules package is initialized, the environment can be modified on a permodule basis using the module command which interprets modulefiles. Typically
modulefiles instruct the module command to alter or to set shell environment variables such
as PATH, MANPATH, etc. modulefiles may be shared by many users on a system and users
may have their own collection to supplement or replace the shared modulefiles.
The modulefiles are added to and removed from the current environment by the user. The
environment changes contained in a modulefile can be summarized through the module
command as well. If no arguments are given, a summary of the module usage and subcommands are shown.
The action for the module command to take is described by the sub-command and its
associated arguments.
5.5.1
modulefiles
modulefiles are the files containing TCL code for the Modules package.
modulefiles are written in the Tool Command Language, TCL(3) and are interpreted by the
modulecmd program via the module(1) user interface. modulefiles can be loaded,
unloaded, or switched on-the-fly while the user is working.
A modulefile begins with the magic cookie, '#%Module'. A version number may be placed
after this string. The version number is useful as the format of modulefiles may change. If a
version number does not exist, then modulecmd will assume the modulefile is compatible
with the latest version. The current version for modulefiles will be 1.0. Files without the
magic cookie will not be interpreted by modulecmd.
Each modulefile contains the changes to a user's environment needed to access an
application. TCL is a simple programming language which permits modulefiles to be
arbitrarily complex, depending on the needs of the application and the modulefile writer. If
support for extended tcl (tclX) has been configured for your installation of modules, you
may also use all the extended commands provided by tclX. modulefiles can be used to
implement site policies regarding the access and use of applications.
The User's Environment
5-7
A typical modulefiles file is a simple bit of code that sets or adds entries to the PATH,
MANPATH, or other environment variables. TCL has conditional statements that are
evaluated when the modulefile is loaded. This is very effective for managing path or
environment changes due to different OS releases or architectures. The user environment
information is encapsulated into a single modulefile kept in a central location. The same
modulefile is used by all users independent of the machine. So, from the user's perspective,
starting an application is exactly the same regardless of the machine or platform they are
on.
modulefiles also hide the notion of different types of shells. From the user's perspective,
changing the environment for one shell looks exactly the same as changing the environment
for another shell. This is useful for new or novice users and eliminates the need for
statements such as "if you're using the C Shell do this ..., otherwise if you're using the
Bourne shell do this ..." Announcing and accessing new software is uniform and
independent of the user's shell. From the modulefile writer's perspective, this means one set
of information will take care of all types of shells.
Example of a Module file
#%Module1.0###########################################################
####
##
## C/C++
##
set INTEL intel_cc
module-whatis
EM64T"
"loads the icc 10.1.011 (Intel C/C++) environment for
set iccroot /opt/intel/cce/10.1.011
prepend-path
PATH
$iccroot/bin
prepend-path
LD_LIBRARY_PATH $iccroot/lib
setenv
MANPATH
:$iccroot/man
prepend-path
INTEL_LICENSE_FILE
$iccroot/licenses:/opt/intel/licenses
5.5.2
Modules Package Initialization
The Modules package and the module command are initialized when a shell-specific
initialization script is sourced into the shell. The script creates the module command as
either an alias or function, creates Modules environment variables, and saves a snapshot of
the environment in ${HOME }/.modulesbeginenv. The module alias or function executes
the modulecmd program located in ${MODULESHOME }/bin and has the shell evaluate
the command's output. The first argument to modulecmd specifies the type of shell.
The initialization scripts are kept in ${MODULESHOME }/init/shellname where shellname
is the name of the sourcing shell. For example, a C Shell user sources the
${MODULESHOME }/init/csh script. The sh, csh, tcsh, bash, ksh, and zsh shells are all
supported by modulecmd. In addition, python and perl "shells" are supported which writes
the environment changes to stdout as python or perl code.
5-8
bullx cluster suite - User's Guide
5.5.3
Examples of Initialization
In the following examples, replace ${MODULESHOME } with the actual directory name.
C Shell initialization (and derivatives)
source ${MODULESHOME }/init/csh module load modulefile modulefile
Bourne Shell (sh) (and derivatives)
${MODULESHOME }/init/sh module load modulefile modulefile
Perl
require "${MODULESHOME }/init/perl"; &module("load modulefile modulefile ");
5.5.4
Modulecmd Startup
Upon invocation modulecmd sources rc files which contain global, user and modulefile
specific setups. These files are interpreted as modulefiles.
Upon invocation of modulecmd module RC files are sourced in the following order:
5.5.5
1.
Global RC file as specified by ${MODULERCFILE } or ${MODULESHOME }/etc/rc
2.
User specific module RC file ${HOME }/.modulerc
3.
All .module rc and .version files found during modulefile searches.
Module Command Line Switches
The module command accepts command line switches as its first parameter. These may be
used to control output format of all information displayed and the module behaviour in the
case of locating and interpreting module files.
All switches may be entered either in short or long notation. The following switches are
accepted:
--force, -f
Force active dependency resolution. This will result in modules found using a prereq
command inside a module file being loaded automatically. Unloading module files using
this switch will result in all required modules which have been loaded automatically using
the -f switch being unloaded. This switch is experimental at the moment.
--terse, -t
Display avail and list output in short format.
--long, -l
Display avail and list output in long format.
The User's Environment
5-9
--human, -h
Display short output of the avail and list commands in human readable format.
--verbose, -v
Enable verbose messages during module command execution.
--silent, -s
Disable verbose messages. Redirect stderr to /dev/null if stderr is found not to be a tty.
This is a useful option for module commands being written into .cshrc , .login or .profile
files, because some remote shells (e.g. rsh (1) ) and remote execution commands (e.g. rdist)
get confused if there is output on stderr.
--create, -c
Create caches for module avail and module apropos . You must be granted write access to
the ${MODULEHOME }/modulefiles/ directory if you try to invoke module with the -c
option.
--icase, -i
This is a case insensitive module parameter evaluation. Currently only implemented for the
module apropos command.
--userlvl <lvl>, -u <lvl>
Set the user level to the specified value. The argument of this option may be one of:
novice
nov Novice
expert
exp Experienced module user
advanced adv Advanced module user
5.5.6
Module Sub-Commands
Print the use of each sub-command. If an argument is given, print the Module specific
help information for the modulefile.
help [modulefile...]
Load modulefile into the shell environment.
load modulefile [modulefile...]
add modulefile [modulefile...]
Remove modulefile from the shell environment.
unload modulefile [modulefile...]
rm modulefile [modulefile...]
Switch loaded modulefile1 with modulefile2.
switch modulefile1 modulefile2
swap modulefile1 modulefile2
5-10
bullx cluster suite - User's Guide
Display information about a modulefile. The display sub-command will list the full
path of the modulefile and all (or most) of the environment changes the modulefile will
make when loaded. (It will not display any environment changes found within
conditional statements).
display modulefile [modulefile...]
List loaded modules.
show modulefile [modulefile...]
list
avail [path...]
List all available modulefiles in the current MODULEPATH. All directories in the
MODULEPATH are recursively searched for files containing the modulefile magic
cookie. If an argument is given, then each directory in the MODULEPATH is searched
for modulefiles whose pathname match the argument. Multiple versions of an
application can be supported by creating a subdirectory for the application containing
modulefiles for each version.
use directory [directory...]
Prepend directory to the MODULEPATH environment variable. The --append flag will
append the directory to MODULEPATH.
use [-a|--append] directory [directory...]
Remove directory from the MODULEPATH environment variable.
unuse directory [directory...]
Attempt to reload all loaded modulefiles. The environment will be reconfigured to
match the saved ${HOME }/.modulesbeginenv and the modulefiles will be reloaded.
The update command will only change the environment variables that the modulefiles
set.
update
Force the Modules Package to believe that no modules are currently loaded.
clear
Unload all loaded modulefiles.
purge
Display the modulefile information set up by the module-whatis commands inside
the specified modulefiles. If no modulefiles are specified, all the whatis information
lines will be shown.
whatis [modulefile [modulefile...]]
The User's Environment
5-11
Searches through the whatis information of all modulefiles for the specified string. All
module whatis information matching the search string will be displayed.
apropos string
keyword string
Add modulefile to the shell's initialization file in the user's home directory. The startup
files checked are .cshrc, .login, and .csh_variables for the C Shell; .profile for the
Bourne and Korn Shells; .bashrc, .bash_env, and .bash_profile for the GNU Bourne
Again Shell; .zshrc, .zshenv, and .zlogin for zsh. The .modules file is checked for all
shells. If a 'module load' line is found in any of these files, the modulefile(s) is(are)
appended to any existing list of modulefiles. The 'module load' line must be located in
at least one of the files listed above for any of the 'init' sub-commands to work
properly. If the 'module load' line is found in multiple shell initialization files, all of the
lines are changed.
initadd modulefile [modulefile...]
Does the same as initadd but prepends the given modules to the beginning of the list.
initrm modulefile [modulefile...] Remove modulefile from the shell's
initialization files.
initprepend modulefile [modulefile...]
Switch modulefile1 with modulefile2 in the shell's initialization files.
initswitch modulefile1 modulefile2
List all of the modulefiles loaded from the shell's initialization file.
initlist
Clear all of the modulefiles from the shell's initialization files.
initclear
5.5.7
Modules Environment Variables
Environment variables are unset when unloading a modulefile. Thus, it is possible to load a
modulefile and then unload it without having the environment variables return to their prior
state.
MODULESHOME
This is the location of the master Modules package file directory containing module
command initialization scripts, the executable program modulecmd, and a directory
containing a collection of master modulefiles.
MODULEPATH
This is the path that the module command searches when looking for modulefiles. Typically,
it is set to the master modulefiles directory, ${MODULESHOME }/modulefiles, by the
initialization script. MODULEPATH can be set using 'module use' or by the module
initialization script to search group or personal modulefile directories before or after the
master modulefile directory.
5-12
bullx cluster suite - User's Guide
LOADEDMODULES
A colon separated list of all loaded modulefiles.
_LOADED_MODULEFILES_
A colon separated list of the full pathname for all loaded modulefiles.
_MODULESBEGINENV_
The filename of the file containing the initialization environment snapshot.
Files
/opt
The MODULESHOME directory.
${MODULESHOME}/etc/rc
The system-wide modules rc file. The location of this file can be changed using the
MODULERCFILE environment variable as described above.
${HOME}/.modulerc
The user specific modules rc file.
${MODULESHOME}/modulefiles
The directory for system-wide modulefiles. The location of the directory can be changed
using the MODULEPATH environment variable as described above.
${MODULESHOME}/bin/modulecmd
The modulefile interpreter that gets executed upon each invocation of a module.
${MODULESHOME}/init/shellname
The Modules package initialization file sourced into the user's environment.
${MODULESHOME}/init/.modulespath
The initial search path setup for module files. This file is read by all shell init files.
${MODULEPATH}/.moduleavailcache
File containing the cached list of all modulefiles for each directory in the MODULEPATH
(only when the avail cache is enabled).
${MODULEPATH}/.moduleavailcachedir
File containing the names and modification times for all sub-directories with an avail cache.
${HOME}/.modulesbeginenv
A snapshot of the user's environment taken when Modules are initialized. This information
is used by the module update sub-command.
The User's Environment
5-13
5.6
The NVIDIA CUDA Development Environment
For clusters which include NVIDIA Tesla graphic accelerators the NVIDIA Compute Unified
Device Architecture (CUDATM) Toolkit is installed automatically on the LOGIN, COMPUTE
and COMPUTEX nodes so that the NVIDIA nvcc C compiler is in place for the application.
Note
The NVIDIA Tesla C1060 card is used on NovaScale R425 servers only, whereas the
NVIDIA Tesla S1070 accelerator is used by both NovaScale R422 E1 and R425 servers.
CUDA is a parallel programming environment designed to scale parallelism so that all the
processor cores available are exploited. As it builds on C extensions the CUDA
development environment is easily mastered by application developers.
At its core are three key abstractions – a hierarchy of thread groups, shared memories, and
barrier synchronizations.
These abstractions provide fine-grained data parallelism and thread parallelism, nested
within coarse-grained data parallelism and task parallelism. They guide the programmer to
partition the problem into coarse sub-problems that can be solved independently in
parallel, and then into finer pieces that can be solved cooperatively in parallel. Such
decomposition preserves language expressivity by allowing threads to cooperate when
solving each sub-problem, and at the same time enables transparent scalability since each
sub-problem can be scheduled to be solved on any of the available processor cores. A
compiled CUDA program can therefore execute on any number of processor cores, and
only the runtime system needs to know the physical processor count.
See
5.6.1
The NVIDIA CUDA Compute Unified Device Architecture Programming Guide and the
other documents in the /opt/cuda/doc directory for more information.
bullx cluster suite and CUDA
Bull provides a CUDA development environment based on the NVIDIA (CUDATM) Toolkit,
including the nvcc compiler and runtime libraries. The NVIDIA Software Developer Kit
(SDK), including utilities and project examples, is also delivered.
The CUDA Toolkit is delivered as RPMs and installed in /opt/cuda/ and includes the bin,
lib and man sub directories. These files are sourced to load the CUDA environment
variables by, for example by using the command below:
source /opt/cuda/bin/cudavars.sh
Alternatively, the module can be loaded from the command line, for example:
module load cuda
5-14
bullx cluster suite - User's Guide
NVIDIA recommends that the SDK is copied into the file system for each user. To do this a
makefile is used, this produces around 60 MBs of binaries and libraries for each user. The
SDK is installed in the /opt/cuda/sdk directory. A patch has been applied to some of the
files in order to suppress the relative paths that obliged the user to develop inside SDK.
These patches are mainly related to the CUDA environment and the MPI options provided
for the nvcc compiler and linker.
Programme examples are included in the /opt/cuda/sdk/projects directory. These
programmes and the use of SDK are not documented; however the source code can be
examined to obtain an idea of developing a program in the CUDA environment.
SDK will be delivered precompiled to save time for the user and includes macros to help
error tracking.
5.6.2
NVIDA CUDATM Toolkit and Software Developer Kit
The NVIDIA CUDATM Toolkit provides a complete C development environment including:
The nvcc C compiler
CUDA FFT and BLAS libraries
A visual profiler
A GDB debugger
CUDA runtime driver
CUDA programming manual
The NVIDIA CUDA Developer Software Developer Kit provides CUDA examples, with the
source code, to help get started with the CUDA environment. Examples include:
Matrix multiplication
Matrix transpose
Performance profiling using timers
Parallel prefix sum (scan) of large arrays
Parallel Mersenne Twister (random number generation)
See
The CUDA Zone at www.nvidia.com for more examples of applications developed within
the CUDA environment, and for additional development tools and help.
The User's Environment
5-15
5-16
bullx cluster suite - User's Guide
Chapter 6. Resource Management using SLURM
6.1
SLURM Resource Management Utilities
As a cluster resource manager, SLURM has three key functions. Firstly, it allocates exclusive
and/or non-exclusive access to resources (Compute Nodes) to users for a time period so
that they can perform work. Secondly, it provides a framework for starting, executing, and
monitoring work (normally a parallel job) on the set of allocated nodes. Finally, it arbitrates
conflicting requests for resources by managing a queue of pending work.
Users interact with SLURM through various command line utilities:
SRUN to submit a job for execution.
SBATCH for submitting a batch script to SLURM
SALLOC for allocating resources for a SLURM job
SATTACH to attach to a running SLURM job step.
STRIGGER used to set, get or clear SLURM event triggers.
SBCAST to transmit a file to all nodes running a job.
SCANCEL to terminate a pending or running job.
SQUEUE to monitor job queues.
SINFO to monitor partition and the overall system state.
SACCTMGR to view and modify SLURM account information. Used with the slurmdbd
daemon
SACCT to display data for all jobs and job steps in the SLURM accounting log.
SVIEW used to display SLURM state information graphically. Requires an Xwindows
capable display.
Global Accounting API for merging the data from a LSF accounting file and the SLURM
accounting file into a single record.
mportant
SLURM does not work with PBS Professional Resource Manager and should only be
installed on clusters which do not use PBS PRO.
Note
There is only a general explanation of each command in the following sections. For
complete and detailed information please refer to the man pages. For example, man srun.
Resource Management using SLURM
6-1
6.2
MPI Support
The PMI (Process Management Interface) is provided by MPIBull2 to launch processes on a
cluster and provide services to the MPI interface. For example, a call to pmi_get_appnum
returns the job id. This interface uses sockets to exchange messages.
In MPIBull2, this mechanism uses the MPD daemons running on each compute node.
Daemons can exchange information and answer the PMI calls.
SLURM replaces the Process Management Interface with its own implementation and its
own daemons. No MPD is needed and when a PMI request is sent (for example
pmi_get_appnum), a SLURM extension must answer this request.
The following diagrams show the difference between the use of PMI with and without a
resource manager that allows process management.
Figure 6-1. MPI Process Management With and Without Resource Manager
6-2
bullx cluster suite - User's Guide
MPIBull2 jobs can be launched directly by the srun command. SLURM's none MPI plug-in
must be used to establish communications between the launched tasks. This can be
accomplished either using the SLURM configuration parameter MpiDefault=none in
slurm.conf or srun's --mpi=none option. The program must also be linked with SLURM's
implementation of the PMI library so that tasks can communicate host and port information
at startup. (The system administrator can add this option to the mpicc and mpif77
commands directly, so the user will not need to bother). Do not use SLURM's MVAPICH
plug-in for MPIBull2.
$ mpicc -L<path_to_slurm_lib> -lpmi ...
$ srun -n20 --mpi=none a.out
Notes
Some MPIBull2 functions are not currently supported by the PMI library integrated with
SLURM.
Set the environment variable PMI_DEBUG to a numeric value of 1 or higher for the PMI
library to print debugging information.
Resource Management using SLURM
6-3
6.3
SRUN
SRUN submits jobs to run under SLURM management. SRUN can submit an interactive job
and then persist to shepherd the job as it runs. SLURM associates every set of parallel tasks
("job steps") with the SRUN instance that initiated that set.
SRUN options allow the user to both:
Specify the parallel environment for job(s), such as the number of nodes used, node
partition, distribution of processes among nodes, and total time.
Control the behavior of a parallel job as it runs, such as redirecting or labeling its
output or specifying its reporting verbosity.
NAME
srun - run parallel jobs
SYNOPSIS
srun [OPTIONS] executable [args...]
DESCRIPTION
Run a parallel job on cluster managed by SLURM. If necessary, srun will first create a
resource allocation in which to run the parallel job.
OPTIONS
Please refer to the man page for more details on the options, including examples of use.
Example
$ man srun
6-4
bullx cluster suite - User's Guide
6.4
SBATCH (batch)
NAME
SBATCH – Submit a batch script to SLURM
SYNOPSIS
sbatch [OPTIONS] SCRIPT [ARGS…]
DESCRIPTION
sbatch submits a batch script to SLURM. The batch script may be linked to sbatch using its
file name and the command line. If no file name is specified, sbatch will read in a script
from standard input. The batch script may contain options preceded with #SBATCH before
any executable commands in the script.
sbatch exits immediately after the script has been successfully transferred to the SLURM
controller and assigned a SLURM job ID. The batch script may not be granted resources
immediately, and may sit in the queue of pending jobs for some time before the required
resources become available.
When the batch script is granted the resources for its job allocation, SLURM will run a
single copy of the batch script on the first node in the set of allocated nodes.
OPTIONS
Please refer to the man page for more details on the options, including examples of use.
Example
$ man sbatch
Resource Management using SLURM
6-5
6.5
SALLOC (allocation)
NAME
SALLOC - Obtain a SLURM job allocation (a set of nodes), execute a command, and then
release the allocation when the command is finished.
SYNOPSIS
salloc [OPTIONS] [<command> [command_args]]
DESCRIPTION
salloc is used to define a SLURM job allocation, which is a set of resources (nodes),
possibly with some constraints (e.g. number of processors per node). When salloc obtains
the requested allocation, it will then run the command specified by the user. Finally, when
the user specified command is complete, salloc relinquishes the job allocation.
The command may be any program the user wishes. Some typical commands are xterm, a
shell script containing srun commands, and srun.
OPTIONS
Please refer to the man page for more details on the options, including examples of use.
Example
$ man salloc
6-6
bullx cluster suite - User's Guide
6.6
SATTACH
NAME
sattach - Attach to a SLURM job step.
SYNOPSIS
sattach [OPTIONS] <jobid.stepid>
DESCRIPTION
sattach attaches to a running SLURM job step. By attaching, it makes available the I/O
streams for all the tasks of a running SLURM job step. It also suitable for use with a parallel
debugger like TotalView.
OPTIONS
Please refer to the man page for more details on the options, including examples of use.
Example
$ man sattach
Resource Management using SLURM
6-7
6.7
SACCTMGR
NAME
sacctmgr - Used to view and modify SLURM account information.
SYNOPSIS
sacctmgr [OPTIONS] [COMMAND]
DESCRIPTION
sacctmgr is used to view or modify SLURM account information. The account information is
maintained within a database with the interface being provided by slurmdbd (Slurm
Database daemon). This database serves as a central storehouse of user and computer
information for multiple computers at a single site. SLURM account information is recorded
based upon four parameters that form what is referred to as an association.
These parameters are user, cluster, partition, and account:
user is the login name.
cluster is the name of a Slurm managed cluster as specified by the ClusterName
parameter in the slurm.conf configuration file.
partition is the name of a Slurm partition on that cluster.
account is the bank account for a job.
The intended mode of operation is to initiate the sacctmgr command, add, delete, modify,
and/or list association records then commit the changes and exit.
OPTIONS
Please refer to the man page for more details on the options, including examples of use.
Example
$ man sacctmgr
6-8
bullx cluster suite - User's Guide
6.8
SBCAST
sbcast is used to copy a file to local disk on all nodes allocated to a job. This should be
executed after a resource allocation has taken place and can be faster than using a single
file system mounted on multiple nodes.
NAME
sbcast - transmit a file to the nodes allocated to a SLURM job.
SYNOPSIS
sbcast [-CfpsvV] SOURCE DEST
DESCRIPTION
sbcast is used to transmit a file to all nodes allocated to the SLURM job which is currently
active. This command should only be executed within a SLURM batch job or within the shell
spawned after the resources have been allocated to a SLURM. SOURCE is the name of the
file on the current node. DEST should be the fully qualified pathname for the file copy to be
created on each node. DEST should be on the local file system for these nodes.
Note
Parallel file systems may provide better performance than sbcast.
OPTIONS
Please refer to the man page for more details on the options, including examples of use.
Example
$ man sbcast
Resource Management using SLURM
6-9
6.9
SQUEUE (List Jobs)
SQUEUE displays (by default) the queue of running and waiting jobs (or "job steps"),
including the JobId (used for SCANCEL), and the nodes assigned to each running job.
However, SQUEUE reports can be customized to cover any of the 24 different job
properties, sorted according to the most important properties. It also displays the job ID
and job name for every job being managed by the SLURM control daemon (SLURMCTLD).
The status and resource information for each job (such as time used so far, or a list of
committed nodes) are displayed in a table whose content and format can be set using the
SQUEUE options.
NAME
SQUEUE - view information about jobs located in the SLURM scheduling queue.
SYNOPSIS
squeue [OPTIONS...]
DESCRIPTION
SQUEUE is used to view job and job step information for jobs managed by SLURM.
OPTIONS
Please refer to the man page for more details on the options, including examples of use.
Example
$ man squeue
6-10 bullx cluster suite - User's Guide
6.10
SINFO (Report Partition and Node Information)
SINFO displays a summary of status information on SLURM-managed partitions and nodes
(not jobs). Customizable SINFO reports can cover the node count, state, and name list for
a whole partition, or the CPUs, memory, disk space, or current status for individual nodes
as specified. These reports can assist in planning job submittals and avoiding hardware
problems. The SINFO output is a table whose content and format can be controlled using
the SINFO options.
NAME
SINFO - view information about SLURM nodes and partitions.
SYNOPSIS
sinfo [OPTIONS...]
DESCRIPTION
SINFO is used to view partition and node information for a system running SLURM.
OPTIONS
Please refer to the man page for more details on the options, including examples of use.
Example
$ man sinfo
Resource Management using SLURM 6-11
6.11
SCANCEL (Signal/Cancel Jobs)
SCANCEL cancels a running or waiting job, or sends a specified signal to all processes on
all nodes associated with a job (only job owners or their administrators can cancel jobs).
SCANCEL may also be used to cancel a single job step instead of the whole job.
NAME
SCANCEL - Used to signal jobs or job steps that are under the control of SLURM.
SYNOPSIS
scancel [OPTIONS...] [job_id[.step_id]] [job_id[.step_id]...]
DESCRIPTION
SCANCEL is used to signal or cancel jobs or job steps. An arbitrary number of jobs or job
steps may be signaled using job specification filters or a space-separated list of specific job
and/or job step IDs. A job or job step can only be signaled by the owner of that job or
user root. If an attempt is made by an unauthorized user to signal a job or job step, an
error message will be printed and the job will not be signaled.
OPTIONS
Please refer to the man page for more details on the options, including examples of use.
Example
$ man scancel
6-12 bullx cluster suite - User's Guide
6.12
SACCT (Accounting Data)
NAME
SACCT - displays accounting data for all jobs and job steps in the SLURM job accounting
log.
SYNOPSIS
sacct options
DESCRIPTION
Accounting information for jobs invoked with SLURM is logged in the job accounting log
file.
The SACCT command displays job accounting data stored in the job accounting log file in
a variety of forms for your analysis. The SACCT command displays information about jobs,
job steps, status, and exit codes by default. The output can be tailored with the use of the -fields= option to specify the fields to be shown.
For the root user, the SACCT command displays job accounting data for all users, although
there are options to filter the output to report only the jobs from a specified user or group.
For the non-root user, the SACCT command limits the display of job accounting data to
jobs that were launched with their own user identifier (UID) by default. Data for other users
can be displayed with the --all, --user, or --uid options.
Note
Much of the data reported by SACCT has been generated by the wait3() and getrusage()
system calls. Some systems gather and report incomplete information for these calls;
SACCT reports values of 0 for this missing data. See the getrusage man page for your
system to obtain information about which data are actually available on your system.
OPTIONS
Please refer to the man page for more details on the options, including examples of use.
Example
$ man sacct
Resource Management using SLURM 6-13
6.13
STRIGGER
NAME
strigger - Used to set, get or clear SLURM trigger information.
SYNOPSIS
strigger --set [OPTIONS...]
strigger --get [OPTIONS...]
strigger --clear [OPTIONS...]
DESCRIPTION
strigger is used to set, get or clear SLURM trigger information. Triggers include events such
as a node failing, a job reaching its time limit or a job terminating.
These events can cause actions such as the execution of an arbitrary script. Typical uses
include notifying system administrators regarding node failures and terminating a job when
its time limit is approaching.
Trigger events are not processed instantly, but a check is performed for trigger events on a
periodic basis (currently every 15 seconds). Any trigger events which occur within that
interval will be compared against the trigger programs set at the end of the time interval.
The trigger program will be executed once for any event occurring in that interval with a
hostlist expression for the nodelist or job ID as an argument to the program. The record of
those events (e.g. nodes which went DOWN in the previous 15 seconds) will then be
cleared. The trigger program must set a new trigger before the end of the next interval to
insure that no trigger events are missed. If desired, multiple trigger programs can be set for
the same event.
mportant
This command can only set triggers if run by the user SlurmUser unless SlurmUser is
configured as root user. This is required for the slurmctld daemon to set the appropriate
user and group IDs for the executed program. Also note that the program is executed on
the same node that the slurmctld daemon uses rather than on an allocated Compute Node.
To check the value of SlurmUser, run the command:
scontrol show config | grep SlurmUser
OPTIONS
Please refer to the man page for more details on the options, including examples of use.
Example
$ man strigger
6-14 bullx cluster suite - User's Guide
6.14
SVIEW
NAME
sview - Graphical user interface to view and modify SLURM state.
Note
This command requires an XWindows capable display.
SYNOPSIS
sview
DESCRIPTION
sview can be used to view the SLURM configuration, job, step, node and partition state
information. Authorized users can also modify select information.
The primary display modes are Jobs and Partitions, each with a selection tab. There is also
an optional map of the nodes on the left side of the window which will show the nodes
associated with each job or partition. Left-click on the tab of the display you would like to
see. Right-click on the tab in order to control which fields will be displayed.
Within the display window, left-click on the header to control the sort order of entries (e.g.
increasing or decreasing) in the display. You can also left-click and drag the headers to
move them right or left in the display. If a JobID has an arrow next to it, click on that arrow
to display or hide information about that job’s steps. Right-click on a line of the display to
get more information about the record.
There is an Admin Mode option which permits the root user to modify many of the fields
displayed, such as node state or job time limit. In the mode, a SLURM Reconfigure Action is
also available. It is recommended that Admin Mode be used only while modifications are
actively being made. Disable Admin Mode immediately after the changes to avoid making
unintended changes.
OPTIONS
Please refer to the man page for more details on the options, including examples of use.
Example
$ man sview
See
https://computing.llnl.gov/linux/slurm/documentation.html for more information.
Resource Management using SLURM 6-15
6.15
Global Accounting API
Note
The Global Accounting API only applies to clusters which use SLURM and the Load Sharing
Facility (LSF) batch manager from Platform Computing together.
Both the LSF and SLURM products can produce an accounting file. The Global Accounting
API offers the capability of merging the data from these two accounting files and presenting
it as a single record to the program using this API.
Perform the following steps to call the Global Accounting API:
1.
After SLURM has been installed (assumes /usr folder), build the Global Accounting API
library by going to the /usr/lib/slurm/bullacct folder and executing the following
command:
make –f makefile-lib
This will build the library libcombine_acct.a. This makefile-lib assumes that the SLURM
product is installed in the /usr folder, and LSF is installed in /app/slurm/lsf/6.2. If this
is not the case, the SLURM_BASE and LSF_BASE variables in the makefile-lib file must
be modified to point to the correct location.
2.
After the library is built, add the library /usr/lib/slurm/bullacct/libcombine_acct.a to
the link option when building an application that will use this API.
3.
In the user application program, add the following:
//
//
for new accounting record
assumes Slurm is installed under the opt/slurm folder
#include "/usr/lib/slurm/bullacct/combine_acct.h"
// define file pointer for LSF and Slurm log file
FILE *lsb_acct_fg = NULL;
// file pointer for LSF accounting log file
FILE *slurm_acct_fg = NULL; // file pointer for Slurm log file
int status, jobId;
struct CombineAcct newAcct; // define variable for the new records
// call cacct_init routine to open lsf and slurm log file,
// and initialize the newAcct structure
status = cacct_init(&lsb_acct_fg, &slurm_acct_fg, &newAcct);
//
//
//
//
if the status returns 0 imply no error,
all log files are opened successfully.
then call get_combine_acct_info rountine to get the
combine accounting record.
//
//
//
//
//
//
//
//
//
//
//
the calling sequence is
int get_combine_acct_info(File *lsb_acct_fg,
File *slurm_acct_fg,
int
jobId,
CombineAcct *newAcct);
where:
lsb_acct_fg is the pointer to the LSF accounting log file
slurm_acct_fg is the pointer to the Slurm accounting log file
jobid is the job Id from the LSF accounting log file
newAcct is the address of the variable to hold the new record
information.
6-16 bullx cluster suite - User's Guide
//
//
//
//
//
//
//
This routine will use the input LSF job ID to locate the LSF accounting
information in the LSF log file, then get the SLURM_JOBID and locate the
SLURM accounting information in the SLURM log file.
This routine will return a zero to indicate that both records are found
and processed successfully, otherwise one or both records are in error
and the content in the newAcct variable is undefined.
For example:
//
to get the combine acct information for a specified jobid(2010)
jobId = 2010;
status = get_combine_acct_info(lsb_acct_fg,
slurm_acct_fg,
jobId,
&newAcct);
//
to display the record call display_combine_acct_record routine.
display_combine_acct_record(&newAcct);
// when finished accessing the record, the user must close the log files and
// the free memory used in the newAcct variable by calling cacct_wrapup
// routine.
// For example:
//
if (lsb_acct_fg != NULL)
// if open successfully before
cacct_wrapup(&lsb_acct_fg, &slurm_acct_fg, &newAcct);
//
//
//
//
if an extra combine account variable is needed , the user can define
the new variable and call init_cacct_rec to initialize the record
and call free_cacct_ptrs to free the memory used in the new variable.
For example:
//
to define variable for the new record
struct CombineAcct otherAcct;
//
before using the variable otherAcct do:
init_cacct_rec(&otherAcct);
//
//
when done do the following to free the memory used by the otherAcct
variable.
free_cacct_ptrs(&otherAcct);
The new record contains the combined accounting information as follows:
/* combine LSF and SLURM acct log information */
struct CombineAcct {
/* part one is the LSF information */
char
char
time_t
int
int
long
int
time_t
time_t
time_t
time_t
char
char
char
char
char
char
evenType[50];
versionNumber[50];
eventTime;
jobId;
userId;
options;
numProcessors;
submitTime;
beginTime;
termTime;
startTime;
userName[MAX_LSB_NAME_LEN];
queue[MAX_LSB_NAME_LEN];
*resReq;
*dependCond;
*preExecCmd;
/* the command string to be pre_executed */
fromHost[MAXHOSTNAMELEN];
Resource Management using SLURM 6-17
char
char
char
char
char
int
char
int
char
int
double
char
char
struct
char
char
cwd[MAXFILENAMELEN];
inFile[MAXFILENAMELEN];
outFile[MAXFILENAMELEN];
errFile[MAXFILENAMELEN];
jobFile[MAXFILENAMELEN];
numAskedHosts;
**askedHosts;
numExecHosts;
**execHosts;
jStatus;
hostFactor;
jobName[MAXLINELEN];
command[MAXLINELEN];
lsfRusage LSFrusage;
*mailUser;
*projectName;
int
int
char
char
int
int
int
char
char
char
char
int
char
int
char
exitStatus;
maxNumProcessors;
*loginShell;
/* login shell specified by user */
*timeEvent;
idx;
/* array idx, must be 0 in JOB_NEW */
maxRMem;
maxRswap;
inFileSpool[MAXFILENAMELEN]; /* spool input file */
commandSpool[MAXFILENAMELEN]; /* spool command file */
*rsvId;
*sla;
/* The service class under which the job runs. */
exceptMask;
*additionalInfo;
exitInfo;
*warningAction;
/* warning action, SIGNAL | CHKPNT |
command, NULL if unspecified */
warningTimePeriod;
/* warning time period in seconds,
-1 if unspecified */
*chargedSAAP;
*licenseProject;
/* License Project */
slurmJobId;
/* job id from slurm */
int
char
char
int
/* job status */
/* user option mail string */
/* the project name for this job, used
for accounting purposes */
/* job status */
/* part two is the SLURM info minus the duplicated infomation from LSF */
long
char
int
int
int
double
int
int
double
int
int
double
int
int
char
char
int
int
int
int
char
priority;
partition[64];
gid;
blockId;
numTasks;
aveVsize;
maxRss;
maxRssTaskId;
aveRss;
maxPages;
maxpagestaskId;
avePages;
minCpu;
minCpuTaskId;
stepName[NAME_SIZE];
stepNodes[STEP_NODE_BUF_SIZE];
maxVsizeNode;
maxRssNodeId;
maxPagesNodeId;
minCpuTimeNodeId;
*account;
};
6-18 bullx cluster suite - User's Guide
/*
/*
/*
/*
/*
/*
/*
/*
/*
/*
/*
/*
/*
/*
/*
/*
/*
/*
/*
/*
/*
priority */
partition node */
group ID */
Block ID */
nproc */
ave vsize */
max rss */
max rss task */
ave rss */
max pages */
max pages task */
ave pages */
min cpu */
min cpu task */
step process name */
step node list */
max vsize node */
max rss node */
max pages node */
min cpu node */
account number */
Chapter 7. Launching an Application
7.1
Using PBS Professional Batch Manager
PBS Professional Batch Manager from Altair Engineering is the batch manager used by
bullx cluster suite to run batch jobs.
See
The PBS Professional Administrator’s Guide and User’s Guide available on the PBS
Professional CD-ROM for more information on the options for using PBS Professional.
Important:
PBS Professional does not work with SLURM and should only be installed on clusters which
do not use SLURM. If SLURM has been installed see your System Administrator or chapter 8
in the Administrator’s Guide.
7.1.1
7.1.2
Pre-requisites
1.
The User ssh keys should have been dispatched so that the User can access the
Compute Nodes. See the Administrator’s Guide for details on how to do this.
2.
To use PBS Professional with MPIBull2, the home directory of the user should include
the mpd.conf file which includes the user’s password details. Only the user should
have read and write rights for the mpd.conf file.
3.
If necessary add the /opt/pbs/default to the user’s PATH.
Submitting a script
Run the command below to see the job submission script, named test.pbs, in this example:
cat test.pbs
The script will appear, similar to that below, and can be edited if necessary.
#!/bin/bash
#PBS -l select=2:ncpus=3:mpiprocs=3
#PBS -l place=scatter
source /opt/mpi/mpibull2-<version>/share/setenv_mpibull2.sh
mpirun -n 6 hostname
Launching an Application
7-1
7.1.3
Launching a job
Use the qsub command to launch a job with this script, as below:
qsub test.pbs
The output will be in the format:
466.zeus0
This indicates that the number of the job is 466 on machine zeus0.
7.1.4
Displaying the results for a job
Use the command qstat to see the details of the jobs submitted.
qstat -an
zeus0:
Req'd Req'd
Elap
Job ID
Username
Queue Jobname
SessID NDS TSK Memory Time S Time
--------------- -------- -------- ---------- ------ --- --- ------ -----466.zeus0 <user_name> workq test.pbs 11449
2
6
--- R 00:00
zeus8/0*3+zeus9/0*3
Here it is possible to see that, as specified in the script, the job is running on 3 CPUs on
two nodes, named zeus8 and zeus9.
7.1.5
Tracing a job
Run the command tracejob to see the progress for a specific job, for example 466:
tracejob 466
This will give output, similar to that below, showing all the job execution steps that have
been carried out.
Job: 466.zeus0
10/30/2007 12:43:46 L
Considering job to run
10/30/2007 12:43:46 S
enqueuing into workq, state 1 hop 1
10/30/2007 12:43:46 S
Job Queued at request of user@zeus0, owner =
<user_name>@zeus0, job name = test.pbs, queue = workq
10/30/2007 12:43:46 S
Job Run at request of Scheduler@zeus0 on hosts
(zeus8:ncpus=3:mpiprocs=3)+(zeus9:ncpus=3:mpiprocs=3)
10/30/2007 12:43:46 S
Job Modified at request of Scheduler@zeus0
10/30/2007 12:43:46 L
Job run
10/30/2007 12:43:48 S
Obit received momhop:1 serverhop:1 state:4
substate:42
10/30/2007 12:43:48 S
Exit_status=0 resources_used.cpupercent=0
resources_used.cput=00:00:01 resources_used.mem=2764kb
resources_used.ncpus=6
resources_used.vmem=30612kb
resources_used.walltime=00:00:02
10/30/2007 12:43:48 S
dequeuing from workq, state 5
7-2
bullx cluster suite - User's Guide
7.1.6
Exiting a job
If a job exits before it has completed then use the command in the format below to look at
the error log:
cat test.pbs.e466
If the mpirun -n 6 hostname command in the job script completes successfully, run the
command below.
cat essai.pbs.o466
The output will list the nodes used, for example:
zeus8
zeus8
zeus8
zeus9
zeus9
zeus9
7.2
Launching an Application without a Batch Manager
Platform
Application
Serial
Clusters with
no Resource
Manager
none
OpenMP
none
MPIBull2
mpiexec/mpirun (MPD)
Parallel
Serial
Clusters with
SLURM
Parallel
Table 7-1.
Launching tool
srun
OpenMP on
one node
salloc
srun –c <no. of CPUs>
MPI
srun
Hybrid (MPI +
OpenMP)
srun –c <no. of CPUs per MPI task>
Launching an application without a Batch Manager for different clusters
Launching an Application
7-3
7-4
bullx cluster suite - User's Guide
Chapter 8. Application Debugging Tools
8.1
Overview
There are two types of debuggers; symbolic ones and non-symbolic ones.
A symbolic debugger gives access to a program's source code. This means that:
The lines of the source file can be accessed.
The program variables can be accessed by name.
Whereas a non-symbolic debugger enables access to the lines of the machine code
program only and to the top physical addresses.
The following debugging tools are described:
8.2 GDB
8.3 IDB
8.4 TotaLView
8.5 DDT
8.6 MALLOC_CHECK_ - Debugging Memory Problems in C programs
8.7 Electric Fence
8.2
GDB
GDB stands for Gnu DeBugger. It is a powerful Open-source debugger, which can be used
either through a command line interface, or a graphical interface such as XXGDB or DDD
(Data Display Debugger). It is also possible to use an emacs/xemacs interface.
GDB supports parallel applications and threads.
GDB is published under the GNU license.
8.3
IDB
IDB is a debugger delivered with Intel compilers. It can be used with C/C++ and F90
programs.
Application Debugging Tools
8-1
8.4
TotaLView
Figure 8-1
Totalview graphical interface – image taken from
http://www.totalviewtech.com/productsTV.htm
TotalViewTM is a proprietary software application and is not included with the bullx cluster
suite delivery. TotalviewTM is used in the same way as standard symbolic debuggers for C,
C++ and Fortran (77, 90 and HPF) programs. It can also debug MPI or OpenMPI
applications. TotalViewTM has the advantage of being a debugger which supports multiprocesses and multi-threading. It can take control of the various processes or threads of the
program and make it possible for the user to visualize the evolution of the execution in the
same window or in different windows. The processes may be local or remote.
It works equally as well with mono-processor, SMP, clustered, distributed and MPP systems.
8-2
bullx cluster suite - User's Guide
TotalViewTM accepts new processes and threads exactly as generated by the application
and regardless of the processor used for the execution. It is also possible to connect to a
process started up outside TotalViewTM. Data tables can be filtered, displayed, and viewed
in order to monitor the behavior of the program. Finally, you can descend ("call the
components and details of…") into the objects and structures of the program.
The program which needs debugging must be compiled with the ‘- g’ option, and then
breakpoints should be added to the program to control its execution.
TotalViewTM is an XWindows application. Context-sensitive help provides you with basic
information. You may download TotalViewTM in the directory /opt/totalview.
Before running TotalViewTM, update your environment by using the following command:
source /opt/totalview/totalview-vars.sh
Then enter:
totalview&
See
8.5
http://www.totalviewtech.com/productsTV.htm for additional information, and for copies
of the documentation for TotalviewTM.
DDT
DDTTM is a proprietary debugging tool from Allinea and is not included with the bullx
cluster suite delivery.
Its source code browser shows at a glance the state of the processes within a parallel job,
and simplifies the task of debugging large numbers of simultaneous processes. DDT has a
range of features designed to debug effectively - from deadlock and memory leak tools, to
data comparison and group wise process control, and it interoperates with all known
MPIBull2 implementations
For multi-threaded or OpenMP development DDT allows threads to be controlled
individually and collectively, with advanced capabilities to examine data across threads.
The Parallel Stack Viewer allows the program state of all processes and threads to be seen
at a glance making parallel programs easier to manage.
Application Debugging Tools
8-3
Figure 8-2. The Graphical User Interface for DDT
DDT can find memory leaks, and detect common memory usage errors before your
program crashes.
A programmable STL Wizard enables C++ Standard Template Library variables and the
abstract data they represent -including lists, maps, sets, multimaps, and strings – to be
viewed easily.
Developers of scientific code have full access to modules, allocated data, strings and
derived types for Fortran 77, 90, and 95.
MPI message queues can be examined in order to identify deadlocks in parallel code and
data may be viewed in 3D with the multi-dimensional array viewer.
It is possible to run DDT with the PBS-Professional Batch Manager.
See
8-4
http://allinea.com/ for more information refer.
bullx cluster suite - User's Guide
8.6
MALLOC_CHECK_ - Debugging Memory Problems in C
programs
When developing an application, the developer should ensure that all the buffers allocated
during the run-time of the application are freed afterwards. However, even if he is vigilant,
it is not unusual for memory leaks to be introduced into the code.
A simple way to detect these memory leaks is to use the environment variable
MALLOC_CHECK __. This variable ensures that allocation routines check that each
allocated buffer is freed correctly. The routines then become more ‘tolerant’ and allow byte
overflows on both sides of blocks or for the block to be released again.
According to the value of MALLOC_CHECK __, when a release or allocation error appears
the application behaves as follows:
If MALLOC_CHECK __ is set to 1, an error message is written when exiting normally.
If MALLOC_CHECK __ is set to 2, an error message is written when exiting normally
and the process aborts. A core file is created. You should check that it is possible to
create a core file by using the command ulimit –c. If not, enter the command ulimit -c
unlimited.
For any other value of MALLOC_CHECK __, the error is ignored and no message
appears.
Example.c program
#include <stdio.h>
#include <stdlib.h>
#define SIZE 256
int main(void){
char *buffer;
buffer = (char *)calloc(256*sizeof(char));
if(!buffer){
perror(``malloc failed'');
exit(-1);
}
strcpy(buffer, ``fills the buffer'');
free(buffer);
fprintf(stdout, ``Buffer freed for the first time'');
free(buffer);
fprintf(stdout,``Buffer freed for the second time'');
return(0);
}
A program which is executed with the environmental variable MALLOC_CHECK __ set to 1
gives the following result:
$ export MALLOC_CHECK__=1
$./example
Buffer freed for the first time
Segmentation fault
Application Debugging Tools
8-5
$ ulimit –c 0
# The limit for the core file size must be changed to allow files bigger
than 0 bytes to be generated
$ ulimit –c unlimited
# Allows an unlimited core file to be generated
A program which is executed with the environmental variable MALLOC_CHECK __ set to 2
gives the following result:
$ export MALLOC_CHECK__=2
$ ./example
Buffer freed for the first time
Segmentation fault (core dumped)
Example Program Analysis using the GDB Debugger
The core file should be analyzed to identify where the problem is (the program should be
compiled with the option - G):
$ gdb example -c core
GNU gdb 6.3-debian
Copyright 2004 Free Software Foundation, Inc.
GDB is free software, covered by the GNU General Public License, and
you are welcome to change it and/or distribute copies of it under
certain conditions.
Type "show copying" to see the conditions. There is absolutely no
warranty for GDB. Type "show warranty" for details.
This GDB was configured as "i386-linux"...Using host libthread_db
library "/lib/libthread_db.so.1".
Core was generated by `./example’.
Program terminated with signal 11, Segmentation fault.
Reading symbols from /lib/libc.so.6...done.
Loaded symbols for /lib/libc.so.6
Reading symbols from /lib/ld-linux.so.2...done.
Loaded symbols for /lib/ld-linux.so.2
#0 0x40097354 in mallopt () from /lib/libc.so.6
(gdb) bt
#0 0x40097354 in mallopt () from /lib/libc.so.6
#1 0x4009615f in free () from /lib/libc.so.6
#2 0x0804852f in main () at exemple.c:18
(gdb)
The bt command is used to display the current memory stack. In this example the last line
indicates the problem came from line 18 in the main function of the example.c file. Looking
at the example.c program on the previous page we can see that line 18 corresponds to the
second call to the free function which created the memory overflow.
8-6
bullx cluster suite - User's Guide
8.7
Electric Fence
Electric Fence is an open source malloc debugger for Linux and Unix. It stops your program
on the exact instruction that overruns or under-runs a malloc() buffer.
Electric Fence is installed on the Management Node only.
Electric Fence helps you detect two common programming bugs:
Software that overruns the boundaries of a malloc() memory allocation.
Software that touches a memory allocation that has been released by free().
You can use the following example, replacing icc --version by the command line of
your program.
[test@host ]$LD_PRELOAD=/usr/local/tools/ElectricFence-2.2.2/lib/libefence.so.0.0
icc --version
Electric Fence 2.2.0 Copyright (C) 1987-1999 Bruce Perens <[email protected]>
……..
See
http://perens.com/FreeSoftware/ for more information about Electric Fence.
Application Debugging Tools
8-7
8-8
bullx cluster suite - User's Guide
Glossary and Acronyms
BSBR
A
Bull System Backup Restore
ABI
BSM
Application Binary Interface
Bull System Manager
ACL
Access Control List
ACT
Administration Configuration Tool
ANL
Argonne National Laboratory (MPICH2)
API
Application Programmer Interface
ARP
Address Resolution Protocol
ASIC
Application Specific Integrated Circuit
C
CGI
Common Gateway Interface
CLI
Command Line Interface
ClusterDB
Cluster Database
CLM
Cluster Management
CMC
Chassis Management Controller
ConMan
B
A management tool, based on telnet, enabling
access to all the consoles of the cluster.
BAS
Cron
Bull Advanced Server
BIOS
Basic Input Output System
Blade
Thin server that is inserted in a blade chassis
BLACS
Basic Linear Algebra Communication Subprograms
BLAS
Basic Linear Algebra Subprograms
BMC
Baseboard Management Controller
A UNIX command for scheduling jobs to be
executed sometime in the future. A cron is normally
used to schedule a job that is executed periodically
- for example, to send out a notice every morning. It
is also a daemon process, meaning that it runs
continuously, waiting for specific events to occur.
CUBLAS
CUDA™ BLAS
CUDA™
Compute Unified Device Architecture
CUFFT
CUDA™ Fast Fourier Transform
Glossary and Acronyms
G-1
CVS
EULA
Concurrent Versions System
End User License Agreement (Microsoft)
Cygwin
A Linux-like environment for Windows. Bull cluster
management tools use Cygwin to provide SSH
support on a Windows system, enabling command
mode access.
F
FDA
Fibre Disk Array
FFT
D
Fast Fourier Transform
DDN
FFTW
Data Direct Networks
Fastest Fourier Transform in the West
DDR
FRU
Double Data Rate
Field Replaceable Unit
DHCP
FTP
Dynamic Host Configuration Protocol
File Transfer Protocol
DLID
Destination Local Indentifier
G
DNS
Ganglia
Domain Name Server:
A server that retains the addresses and routing
information for TCP/IP LAN users.
A distributed monitoring tool used to view
information associated with a node, such as CPU
load, memory consumption, and network load.
DSO
GCC
Dynamic Shared Object
GNU C Compiler
GDB
E
Gnu Debugger
EBP
GFS
End Bad Packet Delimiter
Global File System
ECT
GMP
Embedded Configuration Tool
GNU Multiprecision Library
EIP
GID
Encapsulated IP
Group ID
EPM
GNU
Errors per Million
GNU's Not Unix
G-2
bullx cluster suite - User's Guide
GPL
General Public License
GPT
each processor, resulting in increased utilization of
processor resources.
GUID Partition Table
I
Gratuitous ARP
IB
A gratuitous ARP request is an Address Resolution
Protocol request packet where the source and
destination IP are both set to the IP of the machine
issuing the packet and the destination MAC is the
broadcast address xx:xx:xx:xx:xx:xx.
Ordinarily, no reply packet will occur. Gratuitous
ARP reply is a reply to which no request has been
made.
InfiniBand
GSL
GNU Scientific Library
GT/s
Giga transfers per second
GUI
Graphical User Interface
GUID
Globally Unique Identifier
H
IBTA
InfiniBand Trade Association
ICC
Intel C Compiler
IDE
Integrated Device Electronics
IFORT
®
Intel Fortran Compiler
IMB
Intel MPI Benchmarks
INCA
Integrated Cluster Architecture:
Bull Blade platform
IOC
Input/Output Board Compact with 6 PCI Slots
HBA
IPMI
Host Bus Adapter
Intelligent Platform Management Interface
HCA
IPO
Host Channel Adapter
Interprocedural Optimization
HDD
IPoIB
Hard Disk Drive
Internet Protocol over InfiniBand
HoQ
IPR
Head of Queue
IP Router
HPC
iSM
High Performance Computing
Storage Manager (FDA storage systems)
Hyper-Threading
ISV
A technology that enables multi-threaded software
applications to process threads in parallel, within
Independent Software Vendor
Glossary and Acronyms
G-3
LVM
K
Logical Volume Manager
KDC
Key Distribution Centre
LVS
Linux Virtual Server
KSIS
Utility for Image Building and Deployment
KVM
M
Keyboard Video Mouse (allows the keyboard, video
monitor and mouse to be connected to the node)
MAC
L
MAD
Management Datagram
LAN
Local Area Network
LAPACK
Linear Algebra PACKage
Managed Switch
A switch with no management interface and/or
configuration options.
MDS
MetaData Server
LDAP
Lightweight Directory Access Protocol
MDT
MetaData Target
LDIF
LDAP Data Interchange Format:
A plain text data interchange format to represent
LDAP directory contents and update requests. LDIF
conveys directory content as a set of records, one
record for each object (or entry). It represents
update requests, such as Add, Modify, Delete, and
Rename, as a set of records, one record for each
update request.
LKCD
Linux Kernel Crash Dump:
A tool used to capture and analyze crash dumps.
MFT
Mellanox Firmware Tools
MIB
Management Information Base
MKL
Maths Kernel Library
MPD
MPI Process Daemons
MPFR
LOV
Logical Object Volume
LSF
Load Sharing Facility
LUN
Logical Unit Number
G-4
Media Access Control (a unique identifier address
attached to most forms of networking equipment).
bullx cluster suite - User's Guide
C library for multiple-precision, floating-point
computations
MPI
Message Passing Interface
MTBF
Mean Time Between Failures
MTU
OpenIB
Maximum Transmission Unit
Open InfiniBand
OpenSSH
N
Open Source implementation of the SSH protocol
Nagios
OSC
A tool used to monitor the services and resources of
Bull HPC clusters.
Object Storage Client
NETCDF
Object Storage Server
Network Common Data Form
NFS
OSS
OST
Object Storage Target
Network File System
NIC
Network Interface Card
NIS
Network Information Service
NS
NovaScale
NTP
Network Time Protocol
NUMA
Non Uniform Memory Access
NVRAM
Non Volatile Random Access Memory
O
OFA
Open Fabrics Alliance
OFED
P
PAM
Platform Administration and Maintenance Software
PAPI
Performance Application Programming Interface
PBLAS
Parallel Basic Linear Algebra Subprograms
PBS
Portable Batch System
PCI
Peripheral Component Interconnect (Intel)
PDSH
Parallel Distributed Shell
PDU
Power Distribution Unit
PETSc
Open Fabrics Enterprise Distribution
Portable, Extensible Toolkit for Scientific
Computation
OPMA
PGAPACK
Open Platform Management Architecture
Parallel Genetic Algorithm Package
OpenSM
Open Subnet Manager
Glossary and Acronyms
G-5
PM
RSA
Performance Manager
Rivest, Shamir and Adleman, the developers of the
RSA public key cryptosystem
Platform Management
PMI
Process Management Interface
S
SA
PMU
Performance Monitoring Unit
pNETCDF
Parallel NetCDF (Network Common Data Form)
Subnet Agent
SAFTE
SCSI Accessible Fault Tolerant Enclosures
SAN
PVFS
Parallel Virtual File System
Storage Area Network
SCALAPACK
SCALable Linear Algebra PACKage
Q
SCSI
QDR
Quad Data Rate
QoS
Quality of Service:
A set of rules which guarantee a defined level of
quality in terms of transmission rates, error rates,
and other characteristics for a network.
Small Computer System Interface
SCIPORT
Portable implementation of CRAY SCILIB
SDP
Socket Direct Protocol
SDPOIB
Sockets Direct Protocol over Infiniband
R
SDR
RAID
Sensor Data Record
Redundant Array of Independent Disks
RDMA
Remote Direct Memory Access
ROM
Read Only Memory
RPC
Single Data Rate
SFP
Small Form-factor Pluggable transceiver - extractable
optical or electrical transmitter/receiver module.
SEL
System Event Log
Remote Procedure Call
RPM
SIOH
Server Input/Output Hub
RPM Package Manager
SIS
System Installation Suite
G-6
bullx cluster suite - User's Guide
SL
Service Level
SL2VL
Service Level to Virtual Lane
SLURM
Simple Linux Utility for Resource Management – an
open source, highly scalable cluster management
and job scheduling system.
SM
Subnet Manager
SMP
Symmetric Multi Processing:
The processing of programs by multiple processors
that share a common operating system and
memory.
SNMP
Simple Network Management Protocol
SOL
Serial Over LAN
SPOF
Single Point of Failure
SSH
Secure Shell
Syslog-ng
System Log New Generation
T
TCL
Tool Command Language
TCP
Transmission Control Protocol
U
UDP
User Datagram Protocol
UID
User ID
ULP
Upper Layer Protocol
USB
Universal Serial Bus
UTC
Coordinated Universal Time
V
VCRC
Variant Cyclic Redundancy Check
VDM
Voltaire Device Manager
VFM
Voltaire Fabric Manager
VGA
Video Graphic Adapter
VL
Virtual Lane
VLAN
Virtual Local Area Network
VNC
Virtual Network Computing:
Used to enable access to Windows systems and
Windows applications from the Bull NovaScale
cluster management system.
TFTP
Trivial File Transfer Protocol
TGT
Ticket-Granting Ticket
Glossary and Acronyms
G-7
W
WWPN
World–Wide Port Name
X
XFS
eXtended File System
XHPC
Xeon High Performance Computing
XIB
Xeon InfiniBand
XRC
Extended Reliable Connection:
Included in Mellanox ConnectX HCAs for memory
scalability
G-8
bullx cluster suite - User's Guide
Index
B
Batch Management, 7-1
BLACS, 3-3
BLAS, 3-13
BlockSolve95, 3-5
Bull Scientific Studio, 3-1
bullx cluster suite definition, 1-1
C
NFS, 1-3, 5-2
G
ga/Global Array, 3-10
gmp_sci, 3-8
GSL, 3-10
I
IDB, 8-1
Intel C++ compiler, 4-2
Intel compiler licenses, 4-3
Compiler
C, 1-2
Fortran, 1-2, 4-1
GCC, 1-2, 4-4
GNU compilers, 4-1
Intel C C++, 4-2
NVIDIA nvcc, 4-4
NVIDIA nvcc and MPI, 4-5
K
Compiler licenses, 4-3
FlexLM, 4-3
lapack_sci, 3-5
CUDA makefile system, 4-5
Intel Fortran compiler, 4-1
KSIS, 1-1
L
LSF, 6-16
CUDA Toolkit, 5-14
M
D
METIS, 3-8
Debugger
DDT, 8-3
Electric Fence, 8-7
GDB, 1-2, 8-1, 8-6
Intel Debugger, 1-2, 8-1
MALLOC_CHECK, 8-5
Non-symbolic debugger, 8-1
Symbolic debugger, 8-1
TotalView, 8-2
Modules, 1-2, 5-2
command line switches, 5-9
Commands, 5-2, 5-7
Environment variables, 5-12
modulecmd, 5-9
Modulefiles, 5-7
modulefiles directories, 5-5
Shell RC files, 5-4
Sub-Commands, 5-10
TCL, 5-7
E
MPFR, 3-9
eval command, 5-2
F
FFTW, 3-6
File System
MPI libraries
Bull MPI2, 1-2
Bull MPI22, 1-3
MPI-2 standard, 2-2
MPIBull2, 2-2
Features, 2-3
Index
I-1
MPI_COMM_SPAWN, 2-7
MPI_PUBLISH_NAME, 2-7
Thread-safety, 2-5
MPIBull2-devices, 2-9
MPIBull2-launch, 2-9
N
rlogin, 5-1
rsh, 5-1
S
SCALAPACK, 3-4
NETCDF, 3-7
Nodes
Compilation nodes, 5-1
login node, 5-1
Service node, 5-1
NVIDIA
CUDA
cubin object, 4-4
CUDA Toolkit, 4-4, 5-14, 5-15
Software Developer Kit, 5-14, 5-15
NVIDIA Scientific Libraries
CUBLAS, 3-15
CUFTT, 3-14
NVIDIA Scientific Libraries, 3-14
O
OpenS_shelf rpm, 3-2
P
Parallel Libraries, 2-1
PARAMETIS, 3-8
PBLAS, 3-14
PBS Professional
Job script, 7-1
Launching a job, 7-2
Tracing a job, 7-2
Using, 7-1
Performance and Profiling Tools
Profilecomm, 2-19
PETSc, 3-7
pgapack, 3-11
pNETCDF, 3-7
profilecomm, 2-19
I-2
R
bullx cluster suite - User's Guide
Scientific Libraries, 3-1
BLACS, 3-3
BLAS, 3-13
BlockSolve95, 3-5
Cluster MKL (Intel Cluster Math Kernel Library),
3-13
FFTW, 3-6
ga/Global Array, 3-10
gmp_sci, 3-8
GSL, 3-10
LAPACK, 3-14
lapack_sci, 3-5
METIS, 3-8
MKL (Intel Math Kernel Library), 3-13
MPFRi, 3-9
NetCDF, 3-7
PARAMETIS, 3-8
PBLAS, 3-14
PETSc, 3-7
pgapack, 3-11
pNETCDF, 3-7
SCALAPACK, 3-4
SCIPORT, 3-8
sHDF5/pHDF5, 3-9
SuperLU, 3-6
valgrind, 3-12
Scientific Studio, 3-1
SCIPORT, 3-8
SciStudio_shelf rpm, 3-2
Secure Shell
ssh command, 5-1
sHDF5/pHDF5, 3-9
SLURM
Command Line Utilities, 6-1
Global Accounting API, 6-1, 6-16
sacct command, 6-1, 6-13
sacctmgr command, 6-1, 6-8
salloc command, 6-1, 6-6
sattach command, 6-1, 6-7
sbatch command, 6-1, 6-5
sbcast command, 6-9
scancel command, 6-1, 6-12
sinfo command, 6-1, 6-11
squeue command, 6-1, 6-10
srun command, 6-1, 6-4
strigger command, 6-1, 6-14
sview command, 6-1, 6-15
T
TCL, 5-7
V
valgrind, 3-12
SuperLU, 3-6
Index
I-3
I-4
bullx cluster suite - User's Guide
BULL CEDOC
357 AVENUE PATTON
B.P.20845
49008 ANGERS CEDEX 01
FRANCE
REFERENCE
86 A2 22FA 02