1
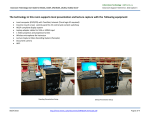
Classroom Technology User Guide for BG101, CC307, LEC201, OC203, SC137 Information Technology | [email protected] Classroom Support Hotline Ext. 1010 option 4 The technology in this room supports local presentation and lecture capture with the following equipment: Local computer (DVD/CD) with TrentNet, Internet (Trent login ID required) Crestron touch screen control panel for AV control and content switching HDCP compliant display system Laptop adapter cables for VGA or HDMI input 1 Video projector and projection Screen Wireless microphone for Instructor Lecture Capture Video Recording System (Panopto) Document camera WiFi Standing Presentation Setup 07/08/2015 http://www.trentu.ca/it/documents/CC307UserGuide.pdf Sitting Presentation Setup 1/4 Information Technology | [email protected] Classroom Support Hotline Ext. 1010 option 4 Classroom Technology User Guide for BG101, CC307, LEC201, OC203, SC137 Getting Started in the Room Locate the AV touch (control) panel on the podium at the front of the room. If the screen is blank, touch it anywhere to wake it up. Adjustable Monitor Arm Laptop Power Outlet Laptop Adapter - HDMI Laptop Adapter - VGA AV Touch Panel - touch to start system - select input source for local presentation - control video camera Document Camera Local PC Wireless Microphone – security peg required from IT Service Desk in Bata Library to unlock 07/08/2015 http://www.trentu.ca/it/documents/CC307UserGuide.pdf Local Monitor 1/4 Information Technology | [email protected] Classroom Support Hotline Ext. 1010 option 4 Classroom Technology User Guide for BG101, CC307, LEC201, OC203, SC137 Getting Started with the Touch Panel If the panel is dark simply tap the surface to wake it up. This is the first screen you should see upon waking the panel. Touch again to bring up the main menu. The projector will come on and screen will lower. To begin a Local Presentation, start below. Starting a Local Presentation To begin using the room for a presentation, choose your desired source from the menu. This will project the image for the selected source. Power on Local PC in the podium rack if needed and login with your Trent username and password. Insert your USB memory stick if presenting from that device. Optionally, present from a personal laptop by connecting to one of the adapter cables on the podium. Switch from one input source to the other as desired. To adjust volume during a local presentation, simply press the up or down arrow in the Volume box on the right of every screen. Tap Mics On or Mics Off to disable (mute) and enable the wireless microphone (note: button indicates current status of Mic) Temporarily cancel video projection by tapping Projector Mute. Tap again to reenable. To control the lecture capture video camera tap the Camera Control tab to access the controls. When you are done your presentation, please be sure to turn off the system by using the Shutdown button in the upper right. Instructions for this button are on page 4. 07/08/2015 http://www.trentu.ca/it/documents/CC307UserGuide.pdf 1/4 Information Technology | [email protected] Classroom Support Hotline Ext. 1010 option 4 Classroom Technology User Guide for BG101, CC307, LEC201, OC203, SC137 Camera Control for Lecture Capture To start the video camera press ON under Power. Login to the local PC and start the Panopto recording system. You can verify the camera focus by looking at the viewing frame under Primary Source on the left side of the Panopto window . Also, retrieve wireless microphone from podium storage drawer, switch ON beltpack and attach lapel mic to your shirt in the frontal chest area. (Note: a security peg is required to unlock the wireless microphone from the podium storage drawer. Pegs are available for loan from the I.T. Service Desk in Bata Library) Select a camera Preset from the menu to suit your preference. Podium Zoom is recommended for a typical lecture scenario Tap Auto Focus to reset camera to default focus if needed. Tap the Presentation Control tab to return to the main sources menu Powering Off When you are finished using the equipment in the room, logoff the local PC and press the red Shutdown button on the touch panel found in the top right corner of every screen. You are presented with the option to cancel in case you accidentally pressed the Shutdown button. To continue with ending your session, press the green Yes button. To return to the previous screen, press the red No button. Also remember to: turn off the document camera if used, remove personal USB memory sticks, disconnect laptop and re-secure the wireless microphone in the podium storage drawer if used. System shutdown will turn off the projector and raise the screen automatically. 07/08/2015 http://www.trentu.ca/it/documents/CC307UserGuide.pdf 1/4