1
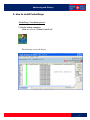
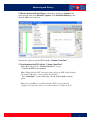
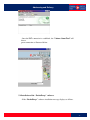
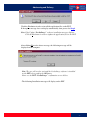
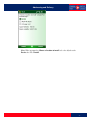
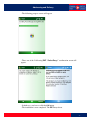
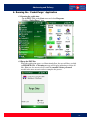
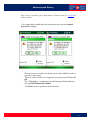
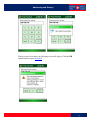
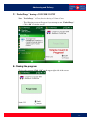
#
Addressing and Delivery
PocketPurge
Installation and Technical User Guide
Version 1.3
September 2012
-1-
#
Addressing and Delivery
Table of content
1. Purpose of this document.................................... 3
2. History.................................................................. 3
3. Target Audience .................................................. 3
4. Application Overview.......................................... 3
5. How to install PocketPurge................................. 4
5.1 On the desktop computer:.............................. 4
5.2 Ensure that Install PocketPurge .................... 5
5.3 Synchronizing the PDT with the “Volume
Count Tool’’. ......................................................... 5
5.4 Installation of the ‘‘PocketPurge’’ software. 6
6. Running the ‘‘PocketPurge’’ Application....... 10
6.1 Opening the application................................ 10
6.2 Purge the PDT files ....................................... 10
7. ‘‘PocketPurge’’ during a VOLUME COUNT 13
8. Closing the program.......................................... 13
-2-
#
Addressing and Delivery
1. Purpose of this document
The purpose of this document is to provide information related to the technical
installation and how to use the program.
2. History
The PocketPurge was created in early 2000 in order to fix memory issues with the
Symbol MC70 Portable Data Terminal (PDT). The issues were that when the Route
Measurement Officer (RMO) was continuously transferring information over to the PDT
the system ran out of memory. This forced the user to re-image the PDT and re-install all
PocketPC software applications which was time consuming. The PocketPurge software
has since been implemented to both the MC70 and the CN50 PDT’s.
3. Target Audience
All users of the MC70 and the CN50 who need to transfer data to the PDT.
4. Application Overview
Every time the PDT is loaded with depot information, the disk storage space is reduced
and requires a cleanup prior to the next depot load. The PocketPurge program will clean
up and free up storage space.
-3-
#
Addressing and Delivery
5. How to install PocketPurge
“PocketPurge’’ Installation process
5.1 On the desktop computer:
- Click and open the “Volume Count Tool’’
- The following screen will display.
-4-
#
Addressing and Delivery
5.2 Ensure that Install PocketPurge is checked by clicking on Options from
tool bar menu, then select PocketPC Options. If the Install PocketPurge is not
checked, click on it to check it.
You are now ready to sync the PDT with the “Volume Count Tool’’.
5.3 Synchronizing the PDT with the “Volume Count Tool’’.
Note: Make sure that the “Volume Count Tool’’ is open
- Connect the PDT to the computer.
Note: Ensure that the PDT is properly plugged into the PDT cradle and that
the cradle USB cable is connected into the computer.
- The “ActiveSync’’ screen will display. Ensure that the Sync icon turns
green.
Note: the green Sync icon confirms that the PDT is connected to the
computer. You may then want to close this window by clicking on the X.
-5-
#
Addressing and Delivery
- Once the PDT connection is established, the “Volume Count Tool” will
show a
green connection as illustrated below.
5.4 Installation of the ‘‘PocketPurge’’ software.
- If the “PocketPurge’’ software installation message displays as follows.
-6-
#
Addressing and Delivery
Click the Yes button in order to install the application files to the PDT.
If the update message does not display automatically, then proceed to Step6.
Note: If the Update “PocketPurge’’ software installation message displays,
Click the Yes button in order to update the application files to the PDT.
After clicking Yes to the above message, the following message will be
displayed on the computer.
Note: The user will need to wait until the PocketPurge software is installed
on the PDT before pushing the OK button.
Please see the PDT ‘‘PocketPurge’’ confirmation screen bellow.
- The following Installation message will display on the PDT.
-7-
#
Addressing and Delivery
Note: When prompted to Choose a location to install select the default value
Device then Click Install.
-8-
#
Addressing and Delivery
- The following progress screen will appear.
- Then, one of the 2 following PDT ‘‘PocketPurge’’ confirmation screen will
appear.
- In both case, you have to click the Ok button.
- The installation is now completed. The PDT may reboot.
-9-
#
Addressing and Delivery
6. Running the ‘‘PocketPurge’’ Application
6.1 Opening the application
- On the PDT, click on the Start menu and select Programs.
- Click the “PocketPurge’’ icon.
6.2 Purge the PDT files
When the application opens, see illustration bellow, the user will have to click
on PURGE DATA. A Warning message will display indicating to delete all
files. However, the user needs to record the encoded 6 letter password
needed in the next screen in order to complete the process.
- 10 -
#
Addressing and Delivery
Note: You are not able to purge data during a Volume Count. See section7 for
further details.
See example below which shows the warning message with the encoded
password of (kkqino).
-
The user needs to record the encoded password and click Yes in order to
proceed to other screen.
The next screen will ask you to input the recorded password. Then click
Ok.
The ‘‘PocketPurge’’ exclamation box will come up with the following
message: Files Deleted Successfully.
Click Ok in order to go back to the main screen.
- 11 -
#
Addressing and Delivery
If the password is incorrect, the following screen will display. Click the OK
button and then repeat Section6.2.
- 12 -
#
Addressing and Delivery
7. ‘‘PocketPurge’’ during a VOLUME COUNT
Note: ’’PocketPurge’’ will not function during a Volume Count.
- The following screen will appear if you attempt to run ‘‘PocketPurge’’.
- Click “Ok” to exit the screen.
8. Closing the program
To close the program, Click “Ok” on the upper right side of the screen.
- 13 -