1
Manuel d’installation pour coffre Titan Touring Arctic Cat 2012 châssis ProClimb M
Installation manual for Arctic Cat 2012 ProClimb M Titan Touring cargo box
Pour les modèles / For models: ProClimb M Standard, ProClimb M SNO PRO, ProClimb M SNO PRO LIMITED, ProClimb M HCR
Merci de faire confiance aux produits RTK.
Il est très facile d’installer ce produit sur votre
véhicule récréatif. Vous n’avez qu’à suivre les
étapes indiquées plus bas.
Thank you for your confidence in RTK
products. It’s easy to install this product on
your recreational vehicle. Simply follow the
steps listed below.
Liste de pièces et boulonneries/Listes of parts and bolts
A: 4 boulons/bolts 5/16 x
2 x 1/4
B: 4 boutons de fixation/ fastening buttons
E: 4 écrous/nut
C: 4 espaceurs/spaceurs 1x1
F: 4 Rondelles de renfort/reinforcing washers
D: 4 rondelles/washer
Étape 1 / Step 1:
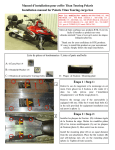
Mesurer ¾” du haut du tunnel et 14 ½ ’’ à partir de la fixture du siège. Marquer l’emplacement du premier trou. Mesurer 11” à partir du
premier trou vers l’arrière du tunnel et marquer le second trou (comme sur la photo 1). Refaire l’opération de l’autre côté de la motoneige. Percer les 4 trous marqués avec une mèche 5/16.
Measure ¾” from the top of the tunnel and 14½” from the seat fixture. Mark the position of the first hole. Measure 11” from the first
hole towards the back of the tunnel and mark the second hole (as in photo 1). Repeat this step on the other side of the snowmobile.
Drill the 4 holes as marked with a 5/16 bit.
3/4’’
3/4’’
11’’
14 1/2’’
1
Étape 2 / Step 2:
Installer les 4 boulons (pièce A), les 4 boutons de fixation (B) et les
4 espaceurs ( C) à l’extérieur du tunnel et les 4 rondelles de renfort
(F), les 4 rondelles plates (D) et les 4 écrous € à l’intérieur du tunnel.
(comme indiqué sur la photo 2). Bien serrer le tout.
Vous pouvez maintenant installer votre coffre Titan Touring en glissant le coffre dans les ouvertures avant (voir cercle rouge photo 5) et
ensuite, descendre l’arrière du coffre fermement dans les fixations
auto bloquante (voir flèche rouge photo 5).
A+B+C
A+B+C
Install the 4 bolts (part A), 4 fastening buttons (B) and 4 spacers (C)
to the outside of the tunnel and the 4 reinforcing washers (F), 4 flat
washers (D) and 4 nuts (E) on the inside of the tunnel (as in photo
2). Ensure all is tightly fastened.
Install the Titan Touring cargo box by sliding the cargo box in the
openings in front of the box (see red circle in photo 3) and then
firmly push down on the back of the box into the self-locking bindings (see red arrow in photo 3).
E+D+F
2
IMPORTANT : VERROUILLEZ LE COFFRE EN TOUT TEMPS LORSQUE LE
VÉHICULE EST EN FONCTION !
IMPORTANT: CARGO BOXES SHOULD BE LOCKED AT ALL TIMES WHILE VEHICULE IN MOTION !
DANGER : NE PAS TRANSPORTER DE MATIÈRES INFLAMMABLES TEL
QUE DE L’ESSENCE, À L’INTÉRIEUR DU COMPARTIMENT DU COFFRE
DANGER : DO NOT CARRY FLAMMABLE MATERIELS SUCH AS GASOLINE CONTAINERS, INSIDE THE CARGO AREA.
Voici le schéma du montage des composantes électriques pour les
modèles avec lumières seulement (sur certains véhicules un relais
est nécessaire) :
For the models with lights only:assembling scheme of the electrical
components (a relay is required on certain vehicule) :
A– Connexion du filage des poignées chauffantes vers la batterie
A– Connect electric wire of heated grips (battery side)
3
Pour maximiser le confort du passager, vous pouvez vous
procurer les
repose pied de
luxe RTK
For optimum
Passenger
comfort, you can
obtain RTK
deluxe footrests
Mise à la terre / Ground
Courant positif— accessoires
Positive accessories—current
B– Connexion du filage des lumières
B– Connect electric wire of lights
Courant positif— accessoires
Positive accessories—current
Lumières de freins / Parking light
Industries Rototeck inc./
Rototeck Industries inc.
418-860-3336
www.rototeck.com
Fabriqué au Canada
Merci de votre intérêt
pour nos produits
Made in Canada
Thanks for your interest
in our products
Mise à la terre / Ground
La couleur des fils peut différer d’un véhicule à l’autre. Se fier vraiment à la
description inscrite et non à la couleur du fil de votre véhicule pour le montage. L’installation par un technicien est recommandée. The colour of the wires
can differ from vehicule model to another. For the assembly, you must trust
the written description and not the colour of the wire of your vehicule. The
installation by a technician is recommended.