1
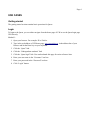
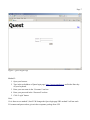
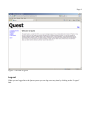
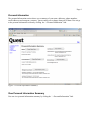
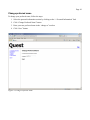
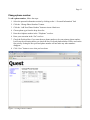
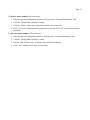
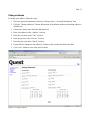
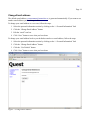
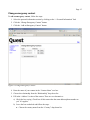
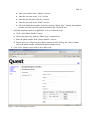
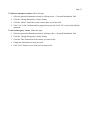
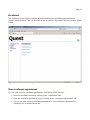
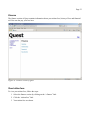
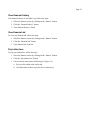
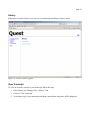
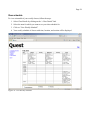
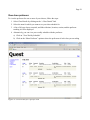
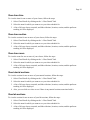
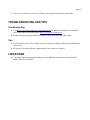
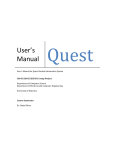
Page 1
Quest System User Manual
CS445/ECE451/SE463/CS645
Assignment 4
Group of
Benoit St-Pierre<[email protected]>;
David Johansson<[email protected]>;
Jun Xu<[email protected]>;
Kevin Chan<[email protected]>;
Table of Contents
Introduction................................................................................................................................................4
Product Overview..................................................................................................................................4
New in this version................................................................................................................................4
Conventions...............................................................................................................................................4
User Assumptions..................................................................................................................................4
Terms.....................................................................................................................................................5
Abbreviations........................................................................................................................................5
Organization of this Manual..................................................................................................................5
Use Cases...................................................................................................................................................6
Getting started.......................................................................................................................................6
Login.................................................................................................................................................6
Log out..............................................................................................................................................8
Personal Information.............................................................................................................................9
View Personal Information Summary..............................................................................................9
Change preferred name...................................................................................................................10
Change phone number....................................................................................................................11
Change address...............................................................................................................................13
Change Email address.....................................................................................................................14
Change emergency contact.............................................................................................................15
Enrollment...........................................................................................................................................18
View enrollment appointment.........................................................................................................18
Apply for a course..........................................................................................................................19
Pre-apply for a course.....................................................................................................................20
Swap a course.................................................................................................................................21
Drop a course..................................................................................................................................22
Finance................................................................................................................................................23
View tuition fees.............................................................................................................................23
View financial history.....................................................................................................................24
View financial aid...........................................................................................................................24
Pay tuition fees...............................................................................................................................24
History.................................................................................................................................................26
View Transcript...............................................................................................................................26
View Course History.......................................................................................................................27
Class Details........................................................................................................................................27
View schedule.................................................................................................................................28
View class professor.......................................................................................................................29
View class time...............................................................................................................................30
View class section...........................................................................................................................30
View class room..............................................................................................................................30
View tutorial sections.....................................................................................................................30
View lab sections............................................................................................................................30
Troubleshooting and Tips.........................................................................................................................31
Troubleshooting...................................................................................................................................31
Tips......................................................................................................................................................31
Limitations...............................................................................................................................................31
List of Figures
Figure 1: Quest Login Page.......................................................................................................................7
Figure 2: Welcome to Quest.......................................................................................................................8
Figure 3: Personal Information Summary..................................................................................................9
Figure 4: Change Preferred Name............................................................................................................10
Figure 5: Change Phone Number.............................................................................................................11
Figure 6: Change Address........................................................................................................................13
Figure 7: Change Email Address.............................................................................................................14
Figure 8: Change Emergency Contact.....................................................................................................15
Figure 9: Add an Emergency Contact......................................................................................................16
Figure 10: Enrollment section of Quest...................................................................................................18
Figure 11: Course application in Quest....................................................................................................19
Figure 12: Search for a course in Quest...................................................................................................20
Figure 13: The course list show the courses you are currently enrolled in..............................................22
Figure 14: Finance section of Quest........................................................................................................23
Figure 15: Students can choose different ways to pay their tuition fees..................................................25
Figure 16: History section of Quest.........................................................................................................26
Figure 17: Class Details section of Quest................................................................................................27
Figure 18: View Weekly Schedule...........................................................................................................28
Figure 19: Class Details for a specific term.............................................................................................29
Page 4
INTRODUCTION
Product Overview
The Quest System is a student tool which you can use to manage all aspects of your student profile at
the University of Waterloo. Using the Quest system you can change your personal information such as
phone number and address, and manage your schedule by adding, removing or swapping courses.
Detailed information about your current classes are also found using this system, details such as class
rooms, instructors, tutorial and lab sections.
Financial information regarding your account is also provided by the Quest system as well as historical
records of your payments. Upon request, Quest can also generate an unofficial transcript and let you
know your current academic standing with the University of Waterloo.
All communications with the Quest system require authentication and are encrypted to help protect
your privacy.
New in this version
A major interface redesign has been performed to reduce the amount of navigation required to get to
most parts of the Quest system. A navigation menu on the left-hand side of the site now offers an easy
way to navigate without having to step through multiple levels of links.
Online help documentation is now available through a link in the top-right corner. The help displayed
by the link will be information for the currently displayed page. All information within this manual can
be found using this help function.
Student fees can now be paid directly within the Quest website. Visa and Mastercard credit payments
are currently accepted.
Your preffered name can now be changed directly within your personal information page now, as well
as your home and mailing addresses. The default email addres associated to your account has also been
changed to @uwaterloo.ca rather than departmental specific addresses. You can change this if you
wish.
CONVENTIONS
User Assumptions
This user's manual assumes you have basic computer usage skills and understand some fundamental
computer interface concepts such as the pointer, scrolling windows, text-fields and basic web-browsing
skills.
To use the Quest system an Internet connection to the University of Waterloo's website is required.
Also, a modern web browser capable of Javascript is required to log into the Quest system.
It is expected that you have logged-in before attempting to perform any of the tasks described within
this manual. If you require help logging in, step-by-step instructions are given in the Getting Started
section of this manual.
Page 5
Terms
Here is a list of various terminology conventions used throughout this manual:
Enrolment Appoitment
Period of time when students may register for classes.
Quest System
The web application used by students to manage their accounts with the
University of Waterloo.
Undergraduate
Student who has yet to complete a post secondary degree.
Username
Identifier provided in the mail in your Acceptance Package.
Abbreviations
The following is a list of abbreviations used in this manual:
IE
Internet Explorer
URL
Uniform Resource Locator
UW
The University of Waterloo
Organization of this Manual
This manual is meant to provide you with help for specific tasks which you may wish to execute while
using the Quest System.
The first section of this manual provides general information regarding the conventions used in the
manual as well as providing a description of the Quest System's purpose. The second section is made
up of tutorials regarding specific tasks, organized by logical groups.
The Getting Started section covers logging into the system as well as logging out. The Personal
Information section covers changing your personal details such as phone number and address. The
Enrollment section covers viewing your enrollment appointments as well as adding, dropping and
swapping classes. This section also covers finding courses to enroll in. The Finance section covers
viewing your tuition fees and financial aid as well as how to pay your tuition. The History section
covers how to view your past courses you have taken as well as how to see your unofficial transcript.
The last section, Class Details, covers how to find out your class rooms, professors, section numbers as
well as any tutorial or lab sections linked to classes you are currently enrolled in. A general time table
of your schedule is also available in this section.
Following the user tasks general troubleshooting tips and system limitations are given.
Page 6
USE CASES
Getting started
The getting started section contains basic operations for Quest.
Login
To login to the Quest, you can either navigate from the home page of UW or use the Quest login page
URL directly.
Method 1:
1. Open your browser. For example: IE or Firefox.
2. Type in the web address of UW home page, www.uwaterloo.ca, in the address bar of your
browser and hit the Enter key on your keyboard.
3. Click the “Quest” link.
4. Click the “Undergraduate students” link.
5. Click the “Quest login” link. You can bookmark this page for easier reference later.
6. Enter your user name in the “Username” text box.
7. Enter your password in the “Password” text box.
8. Click “Login” button.
Page 7
Figure 1: Quest Login Page
Method 2:
1. Open your browser.
2. Type in the web address of Quest login page, https://quest.uwaterloo.ca, and hit the Enter key
on your keyboard.
3. Enter your user name in the “Username” text box.
4. Enter your password in the “Password” text box.
5. Click “Login” button.
Note:
1.It is faster to use method 2, but if UW changes the Quest login page URL method 2 will not work.
2.Username and password are given in the acceptance package from UW.
Page 8
Figure 2: Welcome to Quest
Log out
When you are logged in to the Quest system you can log out at any time by clicking on the “Logout”
link.
Page 9
Personal Information
The personal information section shows you a summary of your name, addresses, phone numbers,
email addresses and emergency contacts . Quest enables you to change almost all of them. You can go
to the personal information section by clicking the “+ Personal Information” link.
Figure 3: Personal Information Summary
View Personal Information Summary
You can view personal information summary by clicking the “+ Personal Information” link.
Page 10
Change preferred name
To change your preferred name, follow the steps:
1. Select the personal information section by clicking on the “+ Personal Information” link
2. Click “Change Preferred Name” button
3. Enter your new preferred name in the “change to” text box
4. Click “Save” button
Figure 4: Change Preferred Name
Page 11
Change phone number
To add a phone number, follow the steps:
1. Select the personal information section by clicking on the “+ Personal Information” link
2. Click the “Change Phone Numbers” button.
3. Click the “Add New Phone Number” button to insert a blank row.
4. Choose phone type from the drop down list.
5. Enter the telephone number in the “Telephone” text box.
6. Enter your extension in the “Ext” text box.
7. Check the Preferred box if you want the new phone number to be your primary phone number.
It will stay the old setting unless you check the box. Preferred phone number will be used on the
first priority. Setting the new preferred phone number will not make any other numbers
disappear.
8. Click “Save” button to save what you have done.
Figure 5: Change Phone Number
Page 12
To delete a phone number, follow the steps:
1. Select the personal information section by clicking on the “+ Personal Information” link
2. Click the “Change Phone Numbers” button.
3. Click the “Delete” button next to the phone number you do not want.
4. Click “Yes” in the confirmation box popped out to proceed. Click “No” to cancel the deletion
operation.
To edit your phone number, follow the steps:
1. Select the personal information section by clicking on the “Personal Information” link.
2. Click the “Change Phone Numbers” button.
3. Edit any field of Phone Type, Telephone, Ext and Preferred directly.
4. Click “Save” button to save what you have done.
Page 13
Change address
To change your address, follow the steps:
1. Select the personal information section by clicking on the “+ Personal Information” link
2. Click the “Change Addresses” button. Information for both home address and mailing address is
editable now.
3. Choose the country name from the drop down list.
4. Enter your address in the “Address” text box.
5. Enter the city name in the “City” text box
6. Enter the provine in the “Provine” text box
7. Enter the post code in the “Postal” text box.
8. Set the date for changes to take effect by clicking on the calender and choose the date.
9. Click “Save” button to save what you have done.
Figure 6: Change Address
Page 14
Change Email address
The default email address, [email protected] ,is generated automatically. If you want to use
another email address you can change it here.
To change your email address to a new one, follow the steps:
1. Select the personal information section by clicking on the “+ Personal Information” link
2. Click the “Change Email address” button.
3. Edit the “email” text box.
4. Click “Save” button to save what you have done.
To change your email address back to your default uwaterloo.ca email address, follow the steps:
1. Select the personal information section by clicking on the “+ Personal Information” link
2. Click the “Change Email address” button.
3. Click the “Use Default” button.
4. Click “Save” button to save what you have done.
Figure 7: Change Email Address
Page 15
Change emergency contact
To add an emergency contact, follow the steps:
1. Select the personal information section by clicking on the “+ Personal Information” link
2. Click the “Change Emergency Contact” button.
3. Click the “Add an Emergency Contact” button.
Figure 8: Change Emergency Contact
4. Enter the name of your contact in the “Contact Name” text box.
5. Choose the relationship from the “Relationship” drop down list.
6. Fill in the “Address” section of the contact. There are two alternatives:
a) Check the box saying “Check here if this contact has the same address/phone number as
you” if it applies.
b) Leave the box unchecked and follow the steps:
●
Choose the country name from the “Country” drop down list.
Page 16
●
Enter your address in the “Address” text box.
●
Enter the city name in the “City” text box
●
Enter the provine in the “Provine” text box
●
Enter the post code in the “Postal” text box.
●
Fill in the blank phone number record by selecting “Phone Type”, entering the telephone
number, enter the extension, and check/uncheck the “Preferred” box
7. Add other telephone numbers if applicable. To do so, follow the steps:
a) Click “Add a Phone Number” button.
b) Choose the phone type from the “Phone Type” drop down list.
c) Enter the phone number in the “Phone Number” text box
d) Repeat steps a to c if there are more phone numbers to add. Clicking the “Delete” button
next to the phone number will delete the phone number record.
8. Click “Save” button to save what yo have done so far.
Figure 9: Add an Emergency Contact
Page 17
To delete an emergency contact, follow the steps:
1. Select the personal information section by clicking on the “+ Personal Information” link
2. Click the “Change Emergency Contact” button.
3. Click the “Delete” button next to the contact name you do not need.
4. Click “Yes” in the confirmation box popped out to proceed. Click “No” to cancel the deletion
operation.
To edit an emergency contact, follow the steps:
1. Select the personal information section by clicking on the “+ Personal Information” link
2. Click the “Change Emergency Contact” button.
3. Click the “Edit” button next to the contact you want to edit.
4. Change the information to what you need.
5. Click “Save” button to save what you have done so far.
Page 18
Enrollment
The enrollment section of Quest contains information about your enrollment appointments and
currently enrolled courses. You can also find courses to enroll in, drop courses and swap courses in this
section.
Figure 10: Enrollment section of Quest
View enrollment appointment
To view when your next enrollment appointment is scheduled, follow the steps:
1. Select the enrollment section by clicking on the “+enrollment” link.
2. Enter the enrollment appointment view by clicking on the “enrollment appointment” link.
3. You can see when your next enrollment appointment is. If no enrollment appointment is
scheduled, you are notified about this.
Page 19
Apply for a course
You can apply to a course by following the steps:
1. Select the enrollment section by clicking on the “+enrollment” link.
2. Enter the course application by clicking on the “apply for a course” link.
3. You have two alternatives for how you want to select a course to apply for (see Figure 11):
a. Enter the course code for the course you want to apply for, e.g. “CS445”.
b. Click the “find course” button to open a list of courses. Here you can search for courses,
filter courses and sort the list of courses. By clicking on the “more information” button you
can see the course description, professor and other detailed information about a course.
Click on the course number or course name for the course you want to apply for. (See
Figure 12).
4. Select the course section from the drop down list. This list contains all available course sections
for the currently selected course.
5. To submit the course application click the “submit” button.
Figure 11: Course application in Quest
Page 20
Figure 12: Search for a course in Quest
Pre-apply for a course
You can pre-apply to a course by following the steps:
1. Select the enrollment section by clicking on the “+enrollment” link.
2. Click the “pre-apply for a course” link.
3. You have two alternatives for how you want to select a course to pre-apply for (see Figure 11):
a. Enter the course code for the course you want to pre-apply for, e.g. “CS445”.
b. Click the “find course” button to open a list of courses. Here you can search for courses,
filter the list of courses and sort the list of courses. Click on the course number or course
name for the course you want to pre-apply for. (See Figure 12).
4. Select the course section from the drop down list. This list contains all available course sections
for the currently selected course.
Page 21
5. To submit the application and pre-apply for the selected course, click the “submit” button.
Swap a course
You can swap a course you are currently enrolled in by following the steps:
1. Select the enrollment section by clicking on the “+enrollment” link.
2. Click the “course list” link.
3. All courses you are currently enrolled in are listed. (See Figure 13).
4. Click the “swap” link for the course you want to drop.
5. You have two alternatives for how you want to select a course to swap to:
a. Enter the course code for the course you want to swap to, e.g. “CS445”.
b. Click the “find course” button to open a list of courses. Here you can search for courses,
filter courses and sort the list of courses. Click on the course number or course name for the
course you want to swap to.
6. Select the course section from the drop down list. This list contains all available course sections
for the currently selected course.
7. To swap course, click the “Submit” button.
8. You're asked if you want to swap the course you are currently enrolled in to the course you
selected. Select “Yes” to swap the course or “No” if you don't want to swap the course.
9. If you are denied to enroll in the course you selected to swap to, the course you selected to drop
will not be dropped.
Page 22
Figure 13: The course list show the courses you are currently enrolled in.
Drop a course
You can drop a course you are currently enrolled in by following the steps:
1. Select the enrollment section by clicking on the “+enrollment” link.
2. Click the “course list” link.
3. All courses you are currently enrolled in are listed. (See Figure 13).
4. Click the “drop” link for the course you want to drop.
5. You're asked if you want drop the course. Select yes to drop the course or no if you don't want
to drop the course.
Page 23
Finance
The finance section of Quest contains information about your tuition fees, history of fees and financial
aid. You can also pay your fees here.
Figure 14: Finance section of Quest
View tuition fees
To view your tuition fees, follow the steps:
1. Select the finance section by clicking on the “+finance” link.
2. Click the “tuition fees” link.
3. Your tuition fees are shown.
Page 24
View financial history
Your financial history is available if you follow the steps:
1. Select the finance section by clicking on the “finance” button.
2. Click the “financial history” button.
3. Your financial history is listed.
View financial aid
To view you financial aid, follow the steps:
1. Select the finance section by clicking on the “finance” button.
2. Click the “financial aid” button.
3. Your financial aid is shown.
Pay tuition fees
To pay your tuition fees, follow the steps:
1. Select the finance section by clicking on the “finance” button.
2. Click the “pay tuition fees” button.
3. You can choose between the following (See Figure 15):
a. Pay your fees online with credit card.
b. Get instructions on how to pay the fees in other ways.
Page 25
Figure 15: Students can choose different ways to pay their tuition fees.
Page 26
History
In the history section of Quest, you can view your transcript and history of past courses.
Figure 16: History section of Quest
View Transcript
To view an electronic version of your transcript, follow the steps:
1. Select History by clicking on the “+History” link
2. Click on “View Transcript”
3. A electronic copy of your transcript indicating courses taken and grades will be displayed
Page 27
View Course History
To view your past course history, follow the steps:
1. Select History by clicking on the “+History” link
2. Click on “View Course History”
3. A list of all courses, including their grades, term taken, professor, and section you have
completed, your overall average and major average will be displayed
Class Details
The Class Details section contains the detailed information about the classes you are currently taking
and has previously taken. You can also view a weekly schedule of your class in the form of a timetable.
Figure 17: Class Details section of Quest
Page 28
View schedule
To view a timetable of your weekly classes, follow the steps:
1. Select Class Details by clicking on the “+Class Details” link
2. Select the term for which you want to see your class schedule for
3. Click on “View Weekly Schedule”
4. Your weekly schedule of classes with time, location, and section will be displayed
Figure 18: View Weekly Schedule
Page 29
View class professor
To view the professor for one or more of your classes, follow the steps:
1. Select Class Details by clicking on the “+Class Details” link
2. Select the term for which you want to see your class schedule for
3. A list of all your classes, tutorials, and labs with time, location, section, and the professor
teaching it will be displayed
4. Alternatively, you can view your weekly schedule with the professor:
a) Click on “View Weekly Schedule”
b) Click on the “Show Professor” option to show the professors of each class you are taking
Figure 19: Class Details for a specific term
Page 30
View class time
To view the time for one or more of your classes, follow the steps:
1. Select Class Details by clicking on the “+Class Details” link
2. Select the term for which you want to see your class schedule for
3. A list of all your classes, tutorials, and labs with time, location, section, and the professor
teaching it will be displayed
View class section
To view the section for one or more of your classes, follow the steps:
1. Select Class Details by clicking on the “+Class Details” link
2. Select the term for which you want to see your class schedule for
3. A list of all your classes, tutorials, and labs with time, location, section, and the professor
teaching it will be displayed
View class room
To view the room for one or more of your classes, follow the steps:
1. Select Class Details by clicking on the “+Class Details” link
2. Select the term for which you want to see your class schedule for
3. A list of all your classes, tutorials, and labs with time, location, section, and the professor
teaching it will be displayed
View tutorial sections
To view the section for one or more of your tutorial sessions, follow the steps:
1. Select Class Details by clicking on the “+Class Details” link
2. Select the term for which you want to see your class schedule for
3. A list of all your classes, tutorials, and labs with time, location, section, and the professor
teaching it will be displayed
4. Also, you can click on a class to see if there is any tutorial sections associated with it
View lab sections
To view the section for one or more of your lab sessions, follow the steps:
1. Select Class Details by clicking on the “+Class Details” link
2. Select the term for which you want to see your class schedule for
3. A list of all your classes, tutorials, and labs with time, location, section, and the professor
teaching it will be displayed
Page 31
4. Also, you can click on a class to see if there is any tutorial sections associated with it
TROUBLESHOOTING AND TIPS
Troubleshooting
●
Visit http://www.quest.uwaterloo.ca/help/index.html for detailed information. It is under the
help section on the Quest home page http://www.quest.uwaterloo.ca/ .
●
Each section has its help available by clicking “Help” link on the top right conner.
Tips
●
Do not forget to click “Save” button after you make some changes, otherwise the information
will be lost.
●
Do not use Visa card or Master card payment if you want to save money.
LIMITATIONS
●
Visa card or Mastercard payment charges you an additional convenience fee based on the
tuition. The rate is about 5%.