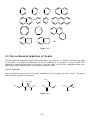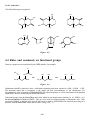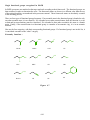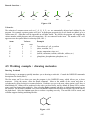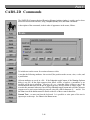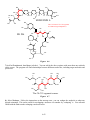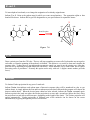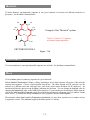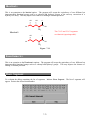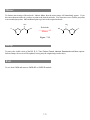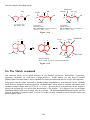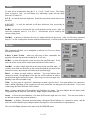
1
The Chiron Program
USER'S MANUAL
(Version 5.0)
The Chiron Program
PRECURSOR MANUAL
(Version 5.0)
An interactive computer program for the analysis and perception of functional and stereochemical features in molecules, and for the selection of
precursors in organic synthesis.
Featuring :
CARS-2D
CASA
CAPS
CARS-3D
REAL-TIME
Computer Assisted Reaction Schemes
Computer Assisted Stereochemical Analysis
Computer Assisted Precursor Selection
3-Dimensional Drawing and Simulation
Real-time 3D molecule manipulation
The Chiron Team :
Benoît Larouche
Benoit Carrier
Xinxia Cai
Bo Huang
(Analyst)
(Programmer)
(Precursor Database)
(Precursor Database)
Professor S. Hanessian
Department of Chemistry
Université de Montréal
P.O. Box 6128, Station Centre-ville
Montréal, Québec, H3C 3J7
FAX : (514) 343-5728
E-mail : [email protected]
Copyright ©1998
______________________________________________________________________________
Licensing Information
The Chiron program is Copyright © 1998, by Professor Stephen Hanessian, Université de
Montréal with all rights reserved. Both the material and the right to use them are owned
exclusively by Prof. S. Hanessian and Université de Montréal.
Please do not duplicate the Chiron program except for your personnal backups. You may use the
Chiron program on any computer owned by you.
Trademarks
• The Chiron Program is a registered trademark of Professor Stephen Hanessian, Université
de Montréal.
• Adobe, PageMaker, PDF and PostScript are registered trademarks of Adobe Systems
Incorporated.
• Apple, LaserWriter, Macintosh, QuickDraw are registered trademarks of Apple Computer,
Inc.
• Exceed is a registered trademark of Hummingbird Communications Ltd.
• eXodus is a registered trademark of White Pine Software, Inc.
• IRIX and ShowCase are trademarks of Silicon Graphics.
• MacroModel is a trademark of Columbia University.
• REACCS, ISIS and MACCS are trademarks of Molecular Design Limited.
• SYBYL is a trademark of Tripos, Inc.
• SYNLIB is a trademark of Smith Kline & French Laboratories, Inc.
• TEKTRONIX is a registered trademark of Tektronix, Inc.
• UNIX is a trademark of AT&T/Bell Laboratories.
• Microsoft Word is a registered trademark of Microsoft Corporation.
______________________________________________________________________________
Table of Contents
TABLE OF CONTENTS.................................................................................................. 1
PART 1......................................................................................................................... 5
Foreword . . . . . . . . . . . . . . . . . . . . . . . . . . . . . . . . . . . . . . . . . . . . . . . . . . . . . . . . . . . . . . . . . . . . . . . . . . . . . . . . . . . . . . . . . . . . . . . . . . . . . . . . . . . . . . . . . . . . . . . 5
1.1 The Chiron Program Publications ..................................................................................................................... 6
1.2 Overview of the modules................................................................................................................................. 6
1.3 Some of The Chiron Program features ............................................................................................................... 7
1.4 Structure of the manual ................................................................................................................................... 8
1.5 Notation....................................................................................................................................................... 9
PART 2....................................................................................................................... 1 0
Installation and Execution . . . . . . . . . . . . . . . . . . . . . . . . . . . . . . . . . . . . . . . . . . . . . . . . . . . . . . . . . . . . . . . . . . . . . . . . . . . . . . . . . . . . . . . . . . . . . . . . 1 0
2.1 Installation ................................................................................................................................................. 10
2.2 Running the program.................................................................................................................................... 11
2.3 Batch Jobs .................................................................................................................................................. 11
2.4 The Chiron Program on an X-Server................................................................................................................ 12
2.5 Troubleshooting .......................................................................................................................................... 14
PART 3....................................................................................................................... 1 5
Menu Bar. . . . . . . . . . . . . . . . . . . . . . . . . . . . . . . . . . . . . . . . . . . . . . . . . . . . . . . . . . . . . . . . . . . . . . . . . . . . . . . . . . . . . . . . . . . . . . . . . . . . . . . . . . . . . . . . . . . . . 1 5
File Menu.......................................................................................................................................................... 15
File organization............................................................................................................................................... 15
Current File ..................................................................................................................................................... 18
Load ............................................................................................................................................................... 18
Load Number.................................................................................................................................................... 18
Add................................................................................................................................................................. 18
Add Number ..................................................................................................................................................... 19
Save ............................................................................................................................................................... 19
Replace Molecule .............................................................................................................................................. 19
Replace Molecule Number .................................................................................................................................. 19
Delete Molecule ................................................................................................................................................ 20
New Database................................................................................................................................................... 20
Remove Database .............................................................................................................................................. 20
New File ......................................................................................................................................................... 20
Remove File .................................................................................................................................................... 20
File List.......................................................................................................................................................... 20
Scan Database................................................................................................................................................... 20
Scan Exact ....................................................................................................................................................... 22
Scan Diastereomer............................................................................................................................................. 22
Scan Double..................................................................................................................................................... 23
Import/Export................................................................................................................................................... 23
Print............................................................................................................................................................... 24
Change Password .............................................................................................................................................. 26
Quit................................................................................................................................................................ 26
Module Menu ...................................................................................................................................................... 26
CARS-2D........................................................................................................................................................ 26
CARS-3D........................................................................................................................................................ 26
CASA............................................................................................................................................................. 26
CAPS............................................................................................................................................................. 27
Real Time........................................................................................................................................................ 27
1-1
Extra Menu ........................................................................................................................................................ 27
Molecular Composition...................................................................................................................................... 27
Show Functions................................................................................................................................................ 27
Show Connectivity Table ................................................................................................................................... 28
Atom Menu........................................................................................................................................................ 28
C, H, O, N, S .................................................................................................................................................. 28
Other…........................................................................................................................................................... 29
Periodic Table................................................................................................................................................... 30
Options Menu..................................................................................................................................................... 31
Drawing Options (CARS-2D).............................................................................................................................. 31
Drawing Options (CARS-3D).............................................................................................................................. 31
Program Preferences........................................................................................................................................... 32
Color Preferences .............................................................................................................................................. 34
Help Menu.......................................................................................................................................................... 36
On Version ...................................................................................................................................................... 36
On Context ...................................................................................................................................................... 36
PART 4....................................................................................................................... 3 7
CARS-2D . . . . . . . . . . . . . . . . . . . . . . . . . . . . . . . . . . . . . . . . . . . . . . . . . . . . . . . . . . . . . . . . . . . . . . . . . . . . . . . . . . . . . . . . . . . . . . . . . . . . . . . . . . . . . . . . . . . . 3 7
4.1 Acyclic and alicyclic molecules....................................................................................................................... 37
4.2 Carbocyclic molecules .................................................................................................................................. 37
4.3 Stereochemical depiction of bonds................................................................................................................... 39
4.4 Rules and comments on functional groups ........................................................................................................ 40
4.5 Working example : drawing molecules............................................................................................................. 43
4.6 Adding to the precursor database...................................................................................................................... 45
PART 5....................................................................................................................... 4 6
CARS-2D Commands . . . . . . . . . . . . . . . . . . . . . . . . . . . . . . . . . . . . . . . . . . . . . . . . . . . . . . . . . . . . . . . . . . . . . . . . . . . . . . . . . . . . . . . . . . . . . . . . . . . . . . 4 6
Texts................................................................................................................................................................. 46
Arrows .............................................................................................................................................................. 48
Icons................................................................................................................................................................. 49
Bonds................................................................................................................................................................ 50
Peptide .............................................................................................................................................................. 51
Build ................................................................................................................................................................. 52
Grid .................................................................................................................................................................. 53
Draw ................................................................................................................................................................. 54
Alpha, Beta ........................................................................................................................................................ 55
Atoms............................................................................................................................................................... 55
Undo................................................................................................................................................................. 55
Update ............................................................................................................................................................... 55
Reshape ............................................................................................................................................................ 56
Move ................................................................................................................................................................ 56
Delete................................................................................................................................................................ 56
Scale................................................................................................................................................................. 57
Rotate ............................................................................................................................................................... 58
Clear................................................................................................................................................................. 59
PART 6....................................................................................................................... 6 0
C A S A. . . . . . . . . . . . . . . . . . . . . . . . . . . . . . . . . . . . . . . . . . . . . . . . . . . . . . . . . . . . . . . . . . . . . . . . . . . . . . . . . . . . . . . . . . . . . . . . . . . . . . . . . . . . . . . . . . . . . . . . . 6 0
6.1 Working examples for CASA......................................................................................................................... 60
PART 7...................................................................................................................... 6 5
1-2
CASA Commands. . . . . . . . . . . . . . . . . . . . . . . . . . . . . . . . . . . . . . . . . . . . . . . . . . . . . . . . . . . . . . . . . . . . . . . . . . . . . . . . . . . . . . . . . . . . . . . . . . . . . . . . . . . 6 5
RS.................................................................................................................................................................... 66
EZ.................................................................................................................................................................... 68
R and S ............................................................................................................................................................. 69
Tree .................................................................................................................................................................. 69
Fischer .............................................................................................................................................................. 69
Extended ............................................................................................................................................................ 70
Reshape............................................................................................................................................................. 70
Identical............................................................................................................................................................. 71
Enantiomeric ...................................................................................................................................................... 71
Meso................................................................................................................................................................. 71
Identical+............................................................................................................................................................ 72
Enantiomeric+ .................................................................................................................................................... 72
Show Segment.................................................................................................................................................... 72
Mirror ............................................................................................................................................................... 73
Scrap................................................................................................................................................................. 73
Exit .................................................................................................................................................................. 73
PART 8....................................................................................................................... 7 4
CAPS ......................................................................................................................... 7 4
8.1 CAPS overview........................................................................................................................................... 75
8.2 Working examples for CAPS ......................................................................................................................... 80
8.3 Cleaved and reshaped precursors ...................................................................................................................... 81
8.4 Working examples for cleaved and reshaped precursors......................................................................................... 83
8.5 The More option.......................................................................................................................................... 83
8.6 The Match command .................................................................................................................................... 84
8.7 Matching a given structure............................................................................................................................. 86
8.8 Working examples for Match ......................................................................................................................... 87
8.9 Aromatic precursors...................................................................................................................................... 88
PART 9....................................................................................................................... 8 9
CAPS Command . . . . . . . . . . . . . . . . . . . . . . . . . . . . . . . . . . . . . . . . . . . . . . . . . . . . . . . . . . . . . . . . . . . . . . . . . . . . . . . . . . . . . . . . . . . . . . . . . . . . . . . . . . . . 8 9
File................................................................................................................................................................... 90
Functions........................................................................................................................................................... 91
Parameters.......................................................................................................................................................... 92
Find.................................................................................................................................................................. 95
RSP (Rapid Scanning of Precursors) ....................................................................................................................... 96
RSBC (Rapid Scanning of Best Combinations) ......................................................................................................... 96
Place / Transformation.......................................................................................................................................... 97
Report............................................................................................................................................................... 98
Points ..............................................................................................................................................................102
Batch................................................................................................................................................................103
Save Job ...........................................................................................................................................................103
Load Job ...........................................................................................................................................................103
Delete...............................................................................................................................................................103
Move ...............................................................................................................................................................104
Scrap................................................................................................................................................................104
Exit .................................................................................................................................................................104
PART 10 .................................................................................................................. 1 0 5
CARS-3D . . . . . . . . . . . . . . . . . . . . . . . . . . . . . . . . . . . . . . . . . . . . . . . . . . . . . . . . . . . . . . . . . . . . . . . . . . . . . . . . . . . . . . . . . . . . . . . . . . . . . . . . . . . . . . . . . . . 1 0 5
10.1 Entering CARS-3D ...................................................................................................................................106
10.2 Molecule representation..............................................................................................................................106
10.3 The projection ..........................................................................................................................................107
1-3
10.4 Molecule drawing......................................................................................................................................108
10.5 Transferring molecules from CARS-2D to CARS-3D ......................................................................................109
10.6 Molecule manipulation...............................................................................................................................109
10.7 Energy minimized structures........................................................................................................................110
PART 11 .................................................................................................................. 1 1 1
CARS-3D Commands . . . . . . . . . . . . . . . . . . . . . . . . . . . . . . . . . . . . . . . . . . . . . . . . . . . . . . . . . . . . . . . . . . . . . . . . . . . . . . . . . . . . . . . . . . . . . . . . . . . . . 1 1 1
Text, Arrows, Icons, Bonds ..................................................................................................................................112
Build ................................................................................................................................................................112
Draw3D............................................................................................................................................................112
Draw ................................................................................................................................................................113
Atoms, Undo, Update..........................................................................................................................................113
Hydrogen ..........................................................................................................................................................113
Analyze .............................................................................................................................................................114
Deep ................................................................................................................................................................114
Move, Delete......................................................................................................................................................114
Scale................................................................................................................................................................115
Rotate ...............................................................................................................................................................115
PART 12 ................................................................................................................... 1 1 6
Real Time Module. . . . . . . . . . . . . . . . . . . . . . . . . . . . . . . . . . . . . . . . . . . . . . . . . . . . . . . . . . . . . . . . . . . . . . . . . . . . . . . . . . . . . . . . . . . . . . . . . . . . . . . . . 1 1 6
12.1 Hardware configuration ...............................................................................................................................117
12.2 Working example for Real-Time ..................................................................................................................117
12.3 Real Time Commands................................................................................................................................118
Current :............................................................................................................................................................118
View:................................................................................................................................................................118
Axis..................................................................................................................................................................118
Move Axis.........................................................................................................................................................119
Clip..................................................................................................................................................................119
Translate............................................................................................................................................................119
Scale.................................................................................................................................................................120
Rotate ...............................................................................................................................................................120
Auto Rot ...........................................................................................................................................................121
Bond Rot ...........................................................................................................................................................121
Twist ................................................................................................................................................................121
Shape................................................................................................................................................................122
Shade ................................................................................................................................................................124
Help..................................................................................................................................................................124
Exit ..................................................................................................................................................................124
Quit ..................................................................................................................................................................125
APPENDIX A ............................................................................................................ 1 2 6
Chiron Interchange Format . . . . . . . . . . . . . . . . . . . . . . . . . . . . . . . . . . . . . . . . . . . . . . . . . . . . . . . . . . . . . . . . . . . . . . . . . . . . . . . . . . . . . . . . . . . . . . 1 2 6
APPENDIX B ............................................................................................................ 1 2 8
Icon Definition Format . . . . . . . . . . . . . . . . . . . . . . . . . . . . . . . . . . . . . . . . . . . . . . . . . . . . . . . . . . . . . . . . . . . . . . . . . . . . . . . . . . . . . . . . . . . . . . . . . . . 1 2 8
INDEX...................................................................................................................... 1 3 1
ACKNOWLEDGMENTS ............................................................................................. 1 3 5
1-4
Part 1
Foreword
The Chiron Program is the name given to an interactive computer program developed in the laboratories of
Professor Stephen Hanessian at the Université de Montréal.
The program offers the user some unique capabilities for the analysis and perception of stereochemical features in
organic molecules. Its strongest attribute is the speed with which it can carry out such operations, since these
would normally require a much longer period of time if done visually, even with the aid of molecular models.
The program will “see” a molecule in a multitude of perspectives and it will present the user with possibilities that
may have otherwise eluded the human eye. This is evident in CAPS , where The program will decode the
stereochemical and functional complexities of a target structure and relate them to structures or sub-structures
derived from more than 3100 optically active precursor molecules and more than 13400 racemic or achiral
precursors.
The program consists of four modules : CARS-2D (Computer Assisted Reaction Schemes), CASA (Computer
Assisted Stereochemical Analysis), CAPS (Computer Assisted Precursor Selection) and CARS-3D (3D drawing
and simulation). Each module has working examples in this manual. A fifth module, which runs on Silicon
Graphics computers, allows manipulation of molecules in real time. Part 12 of this manual explains the
capabilities of this module.
The term Chiron is derived from “chiral synthon”. See “Total Synthesis of Natural Products - The "Chiron"
Approach”, S. Hanessian, Pergamon Press, Oxford, U.K. 1983
1-5
1.1 The Chiron Program Publications
“Computer-Assisted Perception of Simularity Using the Chiron Program: A Powerful Tool for the Analysis and
Prediction of Biogenetic Patterns”, Stephen Hanessian,* Maurizio Botta, Benoît Larouche, and Ani Boyaroglu,
J. Chem. Inf. Comput. Sci., Vol. 32, No. 6, pp. 718-722, 1992
“The Psychobiological Basis of Heuristic Synthesis Planning - Man, Machine and the Chiron Approach”,
Stephen Hanessian,* Jonathan Franco, and Benoît Larouche, Pure & Appl. Chem., Vol. 62, No. 10, pp.18871910, 1990
“Computer-Assisted Analysis and Perception of Stereochimal Features in Organic Molecules Using the CHIRON
Program”, Stephen Hanessian,* Jonathan Franco, Gilbert Gagnon, Dominic Laramée, and Benoît Larouche, J .
Chem. Inf. Comput. Sci., Vol. 30, No. 4, pp. 413-425, 1990
“Total Synthesis of (+)-Meroquinene”, Stephen Hanessian,* Anne-Marie Faucher and Serge Leger, Tetrahedron,
Vol. 46, No. 1, pp. 231-243, 1990
“Synthetic Studies on the Mevinic Acids Using the Chiron Approach: Total Synthesis of (+)-Dihydromevinolin”,
Stephen Hanessian,* Patrick J. Roy, Marino Petrini, Paul J. Hodges, Romano Di Fabio, and Germano
Carganico, J. Org. Chem., Vol. 55, No. 22, pp. 5766-5777, 1990
“Progress in Natural Product Chemistry by the Chiron and Related Approaches - Synthesis of Avermectin B 1a”,
Stephen Hanessian,* Antonio Ugolini, Paul J. Hodges, Pierre Beaulieu, Daniel Dubé and Christiane André, Pure
& Appl. Chem., Vol. 59, No. 3, pp. 299-316, 1987
1.2 Overview of the modules
CARS-2D (Computer Assisted Reaction Schemes)
allows you to draw molecules and reaction schemes with arrows, reagents, texts, icons, etc. for slides,
publications, etc.
CASA (Computer Assisted Stereochemical Analysis)
allows you to obtain the following information on molecules:
• R/S absolute stereochemical assignment of asymmetric atoms
• E/Z olefin geometry
• Fischer projections
• Extended projections
• Mirror images
• Chiral segment recognition (IDENTICAL, ENANTIOMERIC, MESO)
CAPS (Computer Assisted Precursor Selection)
allows you to select appropriate optically active starting materials (chiral, achiral or racemic) for the synthesis of a
given molecule. A new option, RSBC, allows you to scan the best precursor combinations for one or more
targets. Also, the Match option will allow you to overlay a molecule onto the frame of another one in a more
general way.
1-6
CARS-3D (3D drawing and simulation)
allows you to draw and visualize molecules in 3 dimensions, with simultaneous projection along two planes.
CASA and CAPS are both operative in 3D.
Real Time (real-time 3D molecule manipulation)
allows you to visualize molecules in 3 dimensions, using real-time rotation. Various display options are available,
including dual views and stereoscopic viewing.
1.3 Some of The Chiron Program features
Here is a list of the program’s most prominent features:
• Capability to read and write chemical file formats: MacroModel, Sybyl (mol & mol2), MDL MOLfile,
PDB, SMD, X-Ray, CSSR and ChemDraw.
• Possibility of interfacing your own database with the program precursor and molecule database using The
Chiron Program Interchange Format.
• Precursor selection from achiral or racemic compounds.
• Aromatic and heteroaromatic precursor search.
• Identification of duplicate precursors, using the Morgan algorithm. Exact and diastereomer searches.
• Scanning option with function recognition, name and reference search, formula search, etc.
• Postscript output (black & white or color) on PostScript printer. An option is available for Postscript
output of precursors, 15 to a page (as in the precursor manual).
• Stereoscopic display of molecules, both on the screen and on printouts.
• Optional printing of molecules according to the ball and stick model, on PostScript laser printers.
• User control of screen colors for molecules, atoms, texts, arrows.
• Possibility of defining your own templates for drawing molecules.
• Direct-access files for faster file operations, such as loading molecules.
• Densely packed file format, for molecule files that take up less disk space.
• Interactive access to the periodic table of elements.
• Absolute stereochemical notation assignments for asymmetric centers.
• Optional onscreen display of the “priority tree” of the bond weigths used in the RS algorithm.
• Generation of Fischer and Extended projection for molecules or segments.
• Possibility of adding boxes, brackets, parenthesis and other graphic objects on reaction schemes.
• Geometric embellishment of the molecule.
1-7
• Automatic transfer of molecule’s 2D structure to 3D structure; the reverse is also available for 3D -> 2D
transfer. Exceptions are in the case of bridged, polycyclic and related structures.
• 2-D drawing of peptides using symbolic notations.
The current version of the program depends heavily on pattern recognition. Remember that it will only work with
what you have drawn on the screen and with what is in its memory. The program has great eyes, but it doesn’t
have your instincts, judgment, intuition or experience. In the final analysis, you will have to decide what to do
with the information that is presented to you on the screen. The working examples and publications are good
reference points.
1.4 Structure of the manual
This manual will introduce you to the program, and how to best use it.
Part 2 explains how to run the program on your Silicon Graphics computer.
Part 3 describe the Menu items, which are available from any module.
Parts 4 and 5 describe the CARS-2D module. Part 4 contains a general description, while Part 5 details
each CARS-2D command and dialog.
Parts 6 and 7 describe the CASA module. Part 6 contains a general description, while Part 7 details each
CASA command and dialog.
Parts 8 and 9 describe the CAPS module. Part 8 contains a general description, and details on how to best
use the precursor search options. Part 9 details each CAPS command and dialog.
Parts 10 and 11 describe the CARS-3D module. Part 10 contains a general description, while Part 11
details each CARS-3D command and dialog.
Part 12 describes the Real Time module. It describes the module as a whole, and then details each
command and dialog.
Every molecule in this manual was created using the MacChiron program using the Print (To File) command, then
inserted into a word processor.
1-8
1.5 Notation
Throughout this manual, the following conventions are observed :
• The program refers to “The Chiron Program”.
• Button and menu item names are set in a different Typeface to highlight them.
• Input from the user is set in boldface.
• Program “answers” to the user are set in italics.
• General program output is set in the Courier typeface.
• CARS-2D, CARS-3D, CASA, CAPS and REAL-TIME are termed modules.
The following figure shows terms that are used in this manual to describe the graphic user interface:
Menu Bar
Work Area
Dialog
Command
Pulldown Menu
Text Box
Menu items
Push Button
Radio Buttons
Option Menu
Toggle Button
Popup Menu
(use right mouse button)
Message Area
Palette Window
Main Window
1-9
Part 2
Installation and Execution
Note: If the new version (5.0) of the Chiron program is already installed, you can go directly to Part 2.2.
2.1 Installation
The CD-ROM you received contains the executable version of The Chiron Program and all the script and data
files. It is a complete system with two central databases, and many users can be added to the system, each with
their own files. All files are archived in the /CDROM/sgi/chiron5_0.tar file on the CD-ROM.
To install the Chiron program, run the Bourne shell script install.sh directly from the CD.
% /CDROM/sgi/install.sh
The xchiron program and its related files are organized as follow:
Structure of $CHIRON_HOME directory
CHIRON_HOME
xchiron
chiron.sh
chiron.1
mdltochiron
chiron
• User molecule and
precursor data files
• Configuration and
preference files
main
• Main molecule
• Initialization files
CHIRON
• Main precursor
from the litterature
chiron_user
• User’s copies of
the Chiron files
doc
• Chiron Program
manuals in PDF.
COMMERCIAL
• Main precursor
commercially
available
Figure 2.1
The installation script also installed a modified copy of the chiron.sh script named chiron into a binary directory.
The chiron script sets the environment variable CHIRON_HOME , then start the $CHIRON_HOME/xchiron
binary program.
You can also install the unformatted nroff manual page of the program ($CHIRON_HOME/chiron.1) into your
local man directory.
2-10
2.2 Running the program
If you have indicated a binary directory included in your search path during the installation, you can simply start
the program by typing:
% chiron
otherwise, you will have to specify the whole path as indicated by the installation script.
Individual users may be added automatically by the program if you run it in a directory where there is no user
database. If you answer ‘Yes’ to a confirmation dialog, the program will install a new user database by copying
the content of the $CHIRON_HOME/chiron_user directory into your current working directory. If you already
have a user database created with a previous version of the program, please enter into the chiron subdirectory
before running the program. Please note that old preferences are lost in the process of upgrading to The Chiron
Program version 5.0.
All users will have read-only access to the main databases, but can read and write to their own files; initially, there
are less than 5 kb allocated per user database. Users can modify the main database by typing in the correct
password when the program prompts for it. The person responsible for the program should modify the password
after installation (note the original encrypted chain in $CHIRON_HOME/main/mainpassword.dat in case you
forget the new one); the default password for the program is (in capital letters) :
CHIRON
2.3 Batch Jobs
Precursor searches may be done in batch mode after the search parameters have been selected. Once all
parameters are specified, select Batch instead of Find. You will have to enter a name for this job. The job is
entered in a local queue. You can put more than one job in this queue. To start the search in background:
% chiron -b &
You will then see the list of jobs that are waiting. After you indicate Batch, you cannot remove the job from the
queue in Chiron, but you can do it by editing the filebatch.dat file in your current working directory.
To retrieve the precursors found for each target, use the Get command. You can kill a job that is executing in
batch by typing % kill %#, where # is the number of the job (between square brackets , which you should
have noted when you type the command; otherwise use the jobs command). If you stop the job, or if it was not
completed, you can send it again in batch, and non-completed jobs will be run again (completed jobs will not be
searched for).
2-11
2.4 The Chiron Program on an X-Server
The program may be run on a X terminal, or on a personal computer like a Macintosh or an IBM-PC. The Realtime module will not work on such terminals even if they support OpenGL. To enable your personal computer to
run the program, you must have an X-Server. There are many software packages available that will do this. We
have tested the program on a Macintosh using eXodus from White Pine software, Inc (www.wpine.com). On an
IBM-PC we used Exceed from Hummingbird Communications Ltd (www.hummingbird.com).
Your personal computer will need to be networked since it must communicate with the Silicon Graphics computer
where the program actually runs. This connection may be set up in several ways, but the most desirable approach
is to have an Ethernet card on your personnal computer, and to connect it to the same network as the host SGI
computer.
Once you have connected your personnal computer to the network, and installed the appropriate software, you are
ready to use your personal computer as an X-Server. You should also have installed The Chiron Program on
your SGI computer.
Please note that the information in the next sections is not intended as an endorsement. We only include the
information as we had the possibility to use a demo version of these products. In the same way, the following
information is not intended to be a complete procedure on how to use these softwares, but just hints on how to
quickly configure them and run The Chiron Program.
Using eXodus on a Macintosh:
We will discuss two different ways of starting The Chiron Program using eXodus. In both cases, you must be
sure that your screen type is rooted. Otherwise you will encounter problems with a few options of the programs
like Show Segments and RSBC.
• Launch eXodus
• Select the Server Settings item in the Settings menu.
• On the left section, select the Screens icon (the first one).
• On the right section of the dialog, be sure the screen type is set to Rooted.
• Click OK
1) Using an xterm:
•
Start an xterm session. A Sample xterm is provided with eXodus in the Connections menu.
•
Start The Chiron Program with the usual command.
2) Using the connection manager:
•
Select Connection Manager from the Connections menu.
•
Modify the setup, so it will lool like:
2-12
Figure 2.2
•
Select the Connect button. The next time you will want to start The Chiron Program, you will be able
to do it simply by selecting the Chiron item from the Connections menu.
Since a Macintosh has only a one button mouse, you will have to use a combination of key-mouse events to
simulate a 3-buttons mouse. If you are using the default eXodus setup, you can access the Atoms popup menu
(right mouse button) by pressing the <Command>-3 keys on the keyboard. To see or change the mouse setup of
your X-Server, select the Server Settings item from the Settings menu, then select the Mouse Buttons icon.
Using Exceed on an IBM-PC compatible:
You can use the Client Wizard provided with Exceed to easily start an xterm session or directly start The Chiron
Program. You can also easily create shortcuts for them.
The default Exodus X-Server settings does not refresh The Chiron Program’s window when you move a dialog
on the top of The Chiron Program. To solve that problem, start the Xconfig program, select the Performance
button, then turn off the Batch Requests toggle button. Inside The Chiron Program, you can also use the Update
command (or press the p key) to refresh the screen.
1) Using an xterm:
•
Launch Exceed Client Wizard
•
Fill up the name of your SGI workstation in the Host text box, then specify SGI IRIX for Host_Type.
•
Select Xterm and use default values for the Application and Parameter text box.
•
Fill your username and password for your account on the SGI, then click the Run button, or continue
to create a shortcut.
•
Start The Chiron Program with the usual command.
2-13
2) Directly starting The Chiron Program
3) Edit the file exceed_path/user/Stdappdb.txt, and add the following line in the SGI IRIX section:
4) SGI IRIX/Chiron
/chiron_path/chiron
where /chiron_path/chiron is the chiron startup script on your SGI computer.
Proceed like for 1), but select the Chiron popup menu item instead of XTerm.
Using a different X-Server:
If you use an X server that we have not tested, it will probably work correctly. Changing some server settings
may fix a problem that you may encounter.
2.5 Troubleshooting
The program has been thoroughly tested, and will seldom crash, even if we have made many modifications in the
program to make it easier to use and X11/Motif complient. If it does, try first to see if anything simple could have
caused the crash (a quota exceeded, or a file privilege problem for example); if you cannot solve the problem, and
it appears unrelated to your specific setup, send an email to The Chiron Program development team, or send a
FAX. Describe the type of SGI you have and its operating system, and how and when the program crashed, what
you were asking of it, etc...
If you get to the Chiron menu and start the program but it does not work properly, try the following:
• Verify that the files on the main account are accessible to every user.
• Verify that the owner of the account is the owner of the files.
• Verify that all files are in the correct location and that the directory structure is OK.
• If it still refuses to work, contact The Chiron Program development team.
If you find some imperfection in the program, or if you have any suggestions, please contact :
The Chiron Program Development Team
Benoît Larouche, Benoit Carrier
Stephen Hanessian laboratory
FAX: (514) 343-5728
E-mail: [email protected]
2-14
Part 3
Menu Bar
File Menu
File organization
There are two kinds of files (Molecule and Precursor) and two kinds of ownership (User and Main). These two
factors make 4 different kinds of files that all work the same; file commands will work on all 4 file types. You can
select the current file kind with the Molecule and Precursor radio buttons. You can select the current file
ownership with the User and Main radio buttons. These radio buttons are located in most file operation dialogs.
The 4 file types are each represented by a maximum of 50 files. In each file you can save as many molecules as
you want (a molecule is a complete screen, which means that if there is more than one molecule on the screen,
such as in a reaction scheme, they will all be saved as a single item). On The Chiron Program CD-ROM there will
already be some files you cannot delete. You can add files to all file systems, and delete files if you wish. You
can see the list of files by using the Current File command in the File menu after you select the desired file system
with Molecule/Precursor and User/Main.
3-15
For each of the 4 file types, there is a single current file, which is the one you will Load from and Save in, etc. If
the current file is not the right one, you can change it by selecting the proper radio button to the left of every file
name in the Current File dialog. Also, each of the non-current files can be specified as ON or OFF by selecting the
to the left of every file name. This toggle is used for two purposes : the scanning commands in
toggle box
Scan Database and precursor searches. In both cases the program will travel from file to file, considering only
the files that are ON and skipping files that are OFF. During a precursor search, the program will search for
precursors only in files that are ON. The Scan option will look at and select only molecules or precursors in those
files.
In this version, the Main/Precursor files are divided into databases. This organization gives you the possibility of
adding your own Main/Precursors databases without modifying the databases that comes with the program. You
can have a maximum of 20 databases. Like the file list, you can select the current database by selecting the radio
button to the left of the database name, and turn ON or OFF some databases by selecting the toggle box to the left
of the database name.
File Kind
Ownership
ON/OFF Column
Current Column
Figure 3.1
The following figure is a diagram of the file organization, including the files that are already on the CD-ROM.
3-16
File organization
Main
User
Precursor
CHIRON
Molecule
…
ACYCLIC-3
ACYCLIC-4
ACYCLIC-5
ACYCLIC-6
ACYCLIC-7-PLUS
AROMATIC
AROMATIC-CONDENSED
CARBOCYCLIC
CARBOCYCLIC-BRANCHED
CARBOCYCLIC-BRIDGED
COMBINATION
HETEROAROMATIC
HETEROAROMATIC-COND…
HETEROCYCLIC
MACROCYCLIC
NUCLEOSIDE
POLYAROMATIC
POLYCARBOCYCLIC
POLYHETEROAROMATIC
POLYHETEROCYCLIC
STEROID
MATCH
...
COMMERCIAL
ACYCLIC-3
ACYCLIC-4
ACYCLIC-5
ACYCLIC-6
ACYCLIC-7-PLUS
AROMATIC
AROMATIC-CONDENSED
CARBOCYCLIC
CARBOCYCLIC-BRANCHED
CARBOCYCLIC-BRIDGED
COMBINATION
HETEROAROMATIC
HETEROAROMATIC-COND…
HETEROCYCLIC
MACROCYCLIC
NUCLEOSIDE
POLYAROMATIC
POLYCARBOCYCLIC
POLYHETEROAROMATIC
POLYHETEROCYCLIC
STEROID
...
1- Acivicin
2- Thienamycin
3- Avermectin Aglycone
4- Forskolin
5- Erythronolide A
6- Amphotericin aglycone
7- Dihydromevinolin
8- Compactin
9- Gibberellic acid
10- Leukotriene precursor
TARGET
EXAMPLE
EXAMPLE 3D
TEMPLATE
TEMPLATE 3D
L_AMINOACID
D_AMINOACID
...
11- Ionomycin
12- Morphine
13- Butaclamol
14- Penem FCE
15- Macbecin
16- Nicotine
17- Monensin A
18- HuperzineA
19- Picotoxinin
etc...
Figure 3.2
3-17
Precursor
WORKING_FILE
...
Molecule
WORKING_FILE
...
Current File
This command will let you select the current file, as well as
which files are active; if you are working with
Main/Precursor files, you will be able to select the current
database, as well as databases that are active; if you are
working with Molecule files, you will also be able to select
the current template file.
Accept All : to select all databases or molecules.
Exclude All : to exclude all molecules except the current
one.
Select Template : to select the current file as the template
file. There is a User template file and a Main template file.
If you press the Select Template button in you own file
(User), you will be able to get those templates by selecting
User in the Build dialog. If you do it for Main files than you
will get them with Main in the Build dialog.
Load
To load a molecule or precursor from the current file and display it on the screen. A list of what is in the current
file will appear on the dialog. Select the name of the molecule or precursor you want; and it will appear on the
screen, erasing anything that was previously there.
Load Number
To load a molecule or precursor from the current file and display it
on the screen.
Type the number of the molecule or precursor you want in the text
box, then select the Load button. The molecule or precursor will
appear on the screen, erasing anything that was previously there.
Add
To add a molecule or precursor on the screen, without erasing anything that is currently there. A list of what is in
the current file will appear on the dialog. Select the name of the molecule or precursor you want. Point to where
you want to center the molecule/precursor and it will appear on the screen.
3-18
Add Number
To add a molecule or precursor on the screen selected by number, without erasing anything that is currently
there. Type the number of the molecule or precursor you want in the text box. Point to where you want to center
the molecule/precursor and it will appear on the screen.
Save
To save a molecule or precursor on the screen in the current file. Any
information obtained through CASA or CAPS will be saved along with
the target (for example: a molecule with precursors, a Fischer
projection, R and S, etc.). Type the name, then the optional reference.
You should indicate if your precursor is racemic or not. In such case
the program will add dl- automatically at the beginning of the name.
For precursors, it will also indicate the overlapping structure by
drawing a box around atoms. You can select/deselect an atom by
clicking on it. You should indicate the default selection if your are not
too familiar with the CAPS way to search. The molecule or precursor
will be appended to the current file. You can use the paste facility to
enter data in a text box.
Replace Molecule
To save a molecule or precursor on the screen in the current file, replacing an existing entry. A list of what is in
the current file will appear on the dialog. Select the name of the molecule or precursor you want in the list. The
name and reference text box will be updated with the selected molecule. You can use the paste facility to enter data
in a text box. You will be asked for confirmation, as you will permanently lose anything that was previously in
the file at that location. This option is not as fast as Save or Load because direct acces file has to be reorganized.
Replace Molecule Number
To save a molecule or precursor on the screen in the current file,
replacing an existing entry. Type the number of the molecule or
precursor you want to replace in the number text box. The name and
reference text box will be updated with the selected molecule. You can
use the paste facility to enter data in a text box. You will be asked for
confirmation, as you will permanently lose anything that was
previously in the file at that location. This option is not as fast as Save
or Load because the direct access file has to be reorganized.
3-19
Delete Molecule
To delete entries permanently from the current file. Select the molecules you want to delete (Use the Shift key to
extend the selection, and the Control key to add/remove a single item to the selection). You will be asked for
confirmation.
New Database
To create a new database for precursors. Type the name of the new database in the dialog. The name must not
already exist. You can add a new database to the main database by typing the correct password when prompted.
This option is only available when the Main/Precursor file type is selected. You can use the Current File menu item
to change the file type.
Remove Database
To remove the current database. You will be asked for confirmation. You cannot remove the Chiron and
Commercial database.
New File
To create a new file for molecules or precursors, depending on the current User/Molecule setting. Type the name
of the new file in the dialog. The name must not already exist. You can add a new file to the main database by
typing the correct password when prompted.
Remove File
To remove the current file. You will be asked for confirmation. You cannot remove original files which came
with the program.
File List
This command will list in a file the contents of the current molecule file, with molecule names, references, etc. An
alphabetically ordered list will follow, sorted according to the sub-chain which begins with the first capital letters.
The program will ask you for a file name, and for the number of the first and last molecules to list.
Scan Database
Allows you to search in all active databases and all active files for molecules or precursors . Select the parameters,
then click the Search button. The program will search for molecules that satisfy all the parameters. For example,
a search with the parameters specified in the Scan dialog picture will find all molecules that have the molecular
formula “C5H*O5” and has the characters string “ose” in its name.
3-20
File : to select the databases and files to scan in. See the Current File command.
Function : this command will allow you to select which functional groups you want to find in the database. For
each function, you can specify a function that must be present , or must not be present
be present , in a molecule or precursor. Also see Show Functions in the Extra menu.
, or may or may not
Commercial : this toggle box will allow you to search for commercial product available in your own database.
However it is not useful with precursors provided with the program since all commercial precursors are in the
same database. When Commercial is checked, the program will search for molecules that have a special character
string (ex: commercial) in the reference field.
You can add a new string by editing the file
$CHIRON_HOME/main/commercial.dat. Here is the content of the commercial.dat file:
3-21
COMMERCIAL
ALDRICH
FLUKA
EASTMAN
MERCK INDEX
SIGMA
SUMITOMO
LANCASTER
Formula : to scan the database for a specified molecular formula, like C6H10O7N. You can use the wild card *
to match anything. For example if you are searching for the name of all precursors that have 7 carbons and 5
oxygens then ask for C7*O5*.
Name / Ref : to scan the database for a specified string to be found either in the molecule name or in the
reference. You can use the wild card * in the name. For example if you search for WOOD for the reference then
you will get some Woodward precursors. If you search for DEOXY*GLU for the name you can get any
precursors that have a DEOXY sub-chain, followed by anything (possibly nothing at all) and somewhere after by
the sub-chain GLU, such as 2-Deoxy-D-GLUCOSE. Something like 2-Deoxy-3-Amino-GLUCONIC ACID
would be also found.
Search : to start a database scan using the current parameters. The program will search only files that are active
and start with the current file (See “File organization” at the beginning of this chapter). Those parameters are
independent and you can build any combination. By default, if you don't indicate any parameter, then it will
accept everything and present molecules one after the other.
Load : to retrieve a saved search. You can also Load a normal molecule or precursor file like the Target molecule
file.
Save : to save the current scan results.
Scan : this option will propose all molecules or precursors found in the current search result.
Print : to optain a PostScript graphic lising of all molecules found in the current search result. Also see the
Print/From File option from the File menu.
Scan Exact
To locate a precursor or molecule that is currently on the screen into a file. It will look into all active databases and
files for an exact match.
Scan Diastereomer
To find identical precursors in the same way as Exact, including diastereomeric precursors that have the same
framework, with one or more different asymmetric centers. The figure below demonstrates what is found when
you indicate Diastereoisomers for 2-Amino-2-Deoxy-D-ALTROSE.
3-22
OH
DIASTEREOMER OPTION
OH
NH2
O
HO
O
HO
OH
OH
2-Amino-2-deoxy-D-allose
NH2
OH
NH2
OH
OH
2-Amino-2-deoxy-D-glucose
O
HO
OH
OH
NH2
OH
OH
NH2
O
HO
O
HO
OH
OH
2-Amino-2-deoxy-D-galactose
OH
OH
2-Amino-2-deoxy-D-mannose
Figure 3.3
Scan Double
This command will search for duplicates in a precursor file. It will look into all active databases and files and
compare all pairs one by one to see if a structure appears twice. It uses the Morgan name of all molecules that are
already saved in the file and compares them. The result will appear in a text dialog.
Warning : The program may not recognize subtle differences in highly symmetrical molecules. So verify the
structure of duplicated molecule before deleting anything. Even if there is only a little difference (like a protecting
group OMe instead of OH) it will be considered different. It will find every duplicated molecule whichever way
they are drawn and numbered.
Import/Export
To import or export molecules from/to other chemical file formats. (CIF, MacroModel, MDL MOLfile, Sybyl
(mol & mol2), Synlib, PDB, SMD, X–RAY, CSSR and ChemDraw CT).
The program supports two-way transfer of structure data files with other programs. It is thus possible to work on
a molecule with the program, transfer (Export) it to a file, and call it back in Isis, Chemdraw, etc. The reverse
(Import) process is also possible. This operation is done simply by indicating the Export or Import menu item. A
file selection dialog will appear with an option menu containing every supported molecule file format. Select the
desired file format, then follow the instructions below to go from The Chiron Program to another program.
Chiron program ➞ MacroModel, Sybyl, MDL MOLfile, Synlib, PDB, SMD, X-RAY, CSSR
and ChemDraw CT.
Draw the structure of your molecule and indicate Export in the File menu. Select the desired file format in the
option menu, type in the file name, then indicate OK.
MacroModel, Sybyl, MDL MOLfile, Synlib and PDB ➞ Chiron program.
Select the Import menu item from the File menu, a file selection dialog will appear. Locate the file name in the right
directory and then click OK. If the file name is missing, replace the extension (Ex: *.mol2) in the Filter text box
by *, then indicate the Filter button.
Note : when transferring a structure from The Chiron Program to another program for minimization, 2-D
structures will have to be reshaped in the other program. Remember that 3-D structures in this program are not
energy minimized structures.
If you are transferring a 3D-type structure, be sure you are in the CARS-3D module before you proceed.
3-23
If you Import a molecule, you will lose the previous molecule on the screen.
Chiron program ⇔ Chemdraw interface
The program supports the Chemdraw Connection Table file format.
Chiron program ⇔ Sybyl interface
The program supports two formats of Sybyl, MOL and MOL2. Make sure you are in the CARS-3D mode, do not
add hydrogens before going from Sybyl to The Chiron Program. Unrecognized atoms will be transferred as
carbons. Change them using the Atom command. For polyaromatic compounds, it may be necessary to delete an
extra double bond using Draw or Delete.
Chiron program ⇔ PDB interface
Note that molecules containing more than 255 atoms are not read, and that the only words that The Chiron
Program recognizes are ATOM, HETATM, TER and CONECT.
Chiron program ⇔ X-Ray interface
The X-Ray format recognized by the program is the following : one line per atom, consisting of a chemical
symbol (A6) and X, Y, Z coordinates spaced by one space. The program reads X-Ray data for any cell
parameters (i.e. α, β, γ, |a|, |b|, |c| ).
Print
To print the molecules currently on the screen according to the current options.
3-24
Print From :
Select Screen to print the information currently on the screen. Every molecule in this manual was created using
this option (To File), then inserted into a word processor.
Select File to print every molecule or precursor in the current file, in a format identical to the one found in the
precursor manual (15 per page). You will be asked for the first and last molecules to print, and for the number
of the first page. Odd- and even-numbered pages are printed correctly for double-sided reproduction.
Print To :
Select Printer to send the Postscript information directly on the printer using the command in the Command text
box.
Select File to save the Postscript information on the file specified in the File text box. Use the Browse button to
change the file name.
Print Kind : PostScript / PostScript-B&S :
Select Postscript to print what is on the screen.
Select PostScript-B&S to produce molecule printouts that resemble the “ball and stick” molecular model.
PostScript-B&S has a parameter list allowing you to change atom and bond sizes and colors; it also permits the
printing of stereoscopic images. Texts, arrows and icons are not printed by PostScript-B&S. PostScript-B&S
is only available in CARS-3D.
Figure 3.4
EPS Format : The graphic description generated by the program is standard with the Adobe-3.0 Encapsulated
PostScript File (EPSF) format. The EPSF format is a standard format for importing and exporting PostScript
language files among applications in a variety of heterogeneous environments. Typically, the purpose of the
EPS file is to be included in another PostScript language page description like PageMaker, Microsoft Word,
ShowCase, etc.
Options : Allows you to specify the output exactly as you want it. The first five options are common to
PostScript and PostScript B&S . These parameters are saved when you exit the program.
The font index is the following:
1) Times-Roman
2) Times-Italic
3) Courier
3-25
4) Helvetica
5) Bookman-Light
6) AvantGarde-Book
7) NewCenturySchlbk-Roman
8) Palatino-Roman
9) ZapfChancery-MediumItalic
Change Password
This command will allow you to modify the main database access password. If you correctly type the old
password, you will be asked to type in the new password; you will then be asked to re-type it, to make sure that
you have not made any typing mistakes. If the two spellings match, the password will be changed to the one you
typed. The default password when you receive the CDROM is CHIRON (in capital letters).
Quit
This command will allow you to quit The Chiron Program.
Module Menu
CARS-2D
To enter the CARS-2D module. If you have a molecule in 3D, the program will try to figure a suitable 2D
conformation of the molecules on the screen and will add alpha and beta bonds to preserve their stereochemistry.
See section 10.5 for details and limitations.
CARS-3D
To enter the CARS-3D module. If you have a molecule in 2D, the molecule’s 3D configuration will automatically
be computed if possible; see section 10.5 for details and limitations.
CASA
To enter the CASA module, from where you can perform stereochemical analysis on your molecule. CASA is
capable of handling 2D and 3D molecules. Note that individual R and S options (for assigning alpha and beta
bonds) as well as Extended projections and the Reshape option are not supported for three dimensional
molecules. Selecting Exit from the CASA menu will bring you back to the previous module.
3-26
CAPS
To enter the CAPS module, from where you can search for precursors for your molecules. CAPS is capable of
analyzing 2D and 3D molecules, and matching them with 2D or 3D precursors. You can search for 2D or 3D
precursors, and they will be presented in 3D using Place, RSP and RSBC . The scoring is the same if the target
is correctly entered in 3D. Selecting Exit from the CAPS menu will bring you back to the previous module.
Real Time
To enter the Real-time module which allows you to rotate molecules in real time and manipulate them as you want.
Presently, this command works only on a Silicon Graphics Inc. workstation. See Part 12 for details.
Extra Menu
Molecular Composition
To obtain the molecular formula, molecular weight and % elemental composition of the molecule on the screen.
You can also get the molecular weight and composition of any molecule, by typing its formula on the Molecular
Formula text box (ex.: C10H22O3N). The atomic weights are obtained from the periodic table. The result can be
written into a file or printed.
Show Functions
This option will show you functionalities in the molecule on the screen. Those functionalities are the same as the
ones you have to specify with Function when you select the Scan/Database and CAPS/Function command. So if
you are not sure if some special cases are included in one functionality, then you can try it with this option.
For example if you draw the following molecule, then the program will show you :
O
NH2
Me
HO
OH
OH
Y ACID-COOX/LACTONE
ALDEHYDE/CHX
KETONE
METHYL/KETONE
Y ALCOHOL-OX
PRIM-ALCOHOL
Y SEC-ALCOHOL
TER-ALCOHOL
DIOL-POLYOL
ACETAL-OO/SS
Y METHYL
PRIM-METHYL
EPOXIDE
HALOGEN
METHYLENE
Y C-BRANCH
Y ALKENE
SUBST-ALKENE
TERM-ALKENE
ALKYNE
Y TERM-ALKYNE
ORGANOMETALLIC
PHOSPHONATE
PHOSPHINE
3-27
Y SEC-METHYL
TER-METHYL
Y AMINE-NHX
Y PRIM-AMINE
SEC-AMINE
TER-AMINE
NITRILE
AMIDE-CONHX/LACTAM
NITRO-NITROSO
ETHER
THIOL
SULFIDE
SULFOXIDE
SULFONE
Y CH2
Y PHENYL-FUNCT
Y PHENOL-PhOX
ANILINE-PhNX
TOLUENE-PhMe
Figure 3.5
Show Connectivity Table
To obtain a connectivity table for a molecule on the screen. The result can be written into a file or printed.
OH
NH2
S
Me
NH2
OH
Cl
N
O
N
O
O
O
OH
Thienamycin
Formula = C11H16O4N2S
Molecular Weight = 272.318
Atom Number = 18
11 x C
= 132.121, 48.51%
16 x H
= 16.126, 5.92%
4 x O
= 63.997, 23.50%
2 x N
= 28.013, 10.28%
1 x S
= 32.060, 11.77%
Acivicin
Formula = C5H7O3N2Cl
Molecular Weight = 178.574
Atom Number = 11
5 x C
= 60.055, 33.63%
7 x H
= 7.055, 3.95%
3 x O
= 47.998, 26.87%
2 x N
= 28.013, 15.68%
1 x Cl = 35.452, 19.85%
Figure 3.6
Atom Menu
C, H, O, N, S
To replace an existing atom with an oxygen, nitrogen, carbon, sulfur, hydrogen or any other
atom. All atoms are carbons by default. Select C, H, O, N, S, or Other… and point to the
atom to be changed. You can also select any atom by using the periodic table.
You can also press the right mouse button to have access to the Atom popup menu.
3-28
Other…
The Other menu item include atoms or functions in a molecule other than those available directly. All the atoms of
the periodic table are recognized by the program, but their names must be entered correctly: Co identifies a Cobalt
atom, but not CO, cO or co. An atom/function name is limited in length to 100 characters.
The program can also handle lone pairs. To add a lone pair to a molecule, type ‘lp’, ‘:’ or ‘..’ and indicate the
atom you wish to change to a lone pair. Two points will appear in the work area to signal the presence of a lone
pair.
It is also possible to insert different isotopes of an atom: to add a deuterium atom, enter ‘D’, for a tritium atom,
type ‘T’. Other isotopes are specified by typing their atomic symbol, a star and their atomic weight (ex.: C*13).
It is also possible to insert charges on an atom. For example, O+ will be recognized as an oxygen with a positive
charge; O+1 will not be recognized.
Isotopes and lone pairs are taken into consideration by the procedure that assigns weights to atoms in the process
of characterizing R and S asymmetric centers.
If the Subscript toggle button, in the Drawing Option dialog, is set to ON (its default value), all the digits that
follow a letter, (, ), [, ], { or } will automatically be written as subscripts. Similarly, all + and - signs at the end
of a characters sequence will automatically be written as superscripts.
It is possible to force a substring of a text or atom name into subscript or superscript, simply by using these three
special characters:
^ : enter superscript mode.
@ : enter subscript mode.
& : return to normal display mode.
To include one of these characters as part of a text or atom name (and not as control characters), simply type it
following an exclamation mark (!).
Here are a few examples of texts that you might want to put on the screen, and the strings you would have to type
to produce these texts with Subscript ON and Subscript OFF.
Desired atom or text
Subscript ON
Subscript OFF
CH2COOCa2+B1a10-4 mol @ 20oCIf you want an ! -
CH2COO-Ca^2+B@1a10^-4& mol !@ 20^o&CIf you want an !! -
CH@2&COO^Ca^2+
B@1a
10^-4& mol !@ 20^o&C
If you want an !!
3-29
Periodic Table
To take a look at the periodic table of elements. It is possible to check some properties of an atom just by clicking
on an atom box. All the values have been taken from the Sargent-Welch Scientific Company’s periodic table.
3-30
Options Menu
Drawing Options (CARS-2D)
All Numbered : to obtain atom numbers next to each atom. You can
add numbers more specifically with the Visible Number command in
the Build dialog.
Carbon Numbered : to obtain the molecule's carbon numbers.
No Number : to erase all numbers on any atoms.
Wedge : to change the display mode for alpha and beta bonds. The default value OFF displays rectangular
alpha/beta bonds; if set ON, they will be take a triangular shape. Note that rectangular beta bonds and wide
bonds look quite alike; be careful when using both on the same molecule.
Draw : to change the drawing mode. With Draw set to OFF, the user draws by indicating the end points for
every bond (like for other programs you are used to); it is not necessary to indicate each time you start a new
bond or a new molecule. With Draw set to ON, drawing proceeds as described in the Draw command. It is faster
this way since there are less branch points in a molecule than atoms.
Subscript : with Subscript set to ON, the program will automatically write some sequences of characters in texts
and atom names in subscripts or superscripts. All digits following a letter or one of the (,),{,},[ or ] symbols will
be written as subscripts. With Subscript set OFF, the user must specify the characters to be put in subscript or
superscript himself, using the special control characters @, ^ and &; see the Atom menu for details on the use of
these control characters.
Hydrogen : to include methyls (as Me) and hydrogens next to atoms (example OH, NH2). By default hydrogens
are included; therefore all unfilled valencies are assumed to be occupied by bonds to hydrogen.
Drawing Options (CARS-3D)
All Numbered : see CARS-2D above.
Carbon Numbered : see CARS-2D above.
No Number : see CARS-2D above.
Floor : to either display or remove the molecules’ reflections on the
floor of the box. Note that no reflections are drawn if the box is not
active (see Box).
Wall : to either display or remove the molecules’ reflections on the left wall of the box. Note that no projections
are drawn if the box is not active (see Box).
Box : toggles the display of the CARS-3D box.
Depth : to toggle the highlighting of molecules’ frontmost bonds.
3-31
Hydrogen : see CARS-2D above.
Perspective : to modify the viewing distance from the box. A large number reduces the perspective (just like a
camera with a zoom), while a small number increases the perspective (camera with wide angle lens).
Change Viewing Point : to change the observer’s viewing point. Select this command, then indicate a point
that will become the new viewing point; the small cross represents the current point. The screen’s contents will
be redrawn in the new perspective. This option is useful to enlarge or decrease the viewing surface of the wall or
the floor to better see the projections.
Program Preferences
Allows you to change program preferences.
Note : Old “Program Preferences” are lost in the process of upgrading to The Chiron Program version 5.0.
1- Default line width : width for all lines except large lines.
2- Large line width : width for large lines.
3- Atom font size : font size for atom.
4- Atom number font size : font size for atom number.
5- Input precision : radius of the circle within which an atom is recognized.
6- Atom clip distance : bond clipping distance around an atom with a displayed name.
7- Number-Atom distance : average distance from number to atom.
8- Double bonds distance : distance between lines in double bonds.
9- Triple bonds distance : distance between lines in triple bonds.
10- Alpha bonds width : width of the small side of the triangle in alpha bonds.
11- Beta bonds width : width of the small side of the triangle in beta bonds.
12- Alpha bonds lines : number of lines in alpha bonds.
13- Dotted line distance : distance between dots in a dotted line.
14- Standard arrow head length : arrow head length for standard arrows.
15- Standard arrow head width : arrow head half-width for standard arrows.
16- Full arrow head length : arrow head length for full arrows.
3-32
17- Full arrow head width : arrow head half-width for full arrows.
18- Double arrow head length : arrow head length for double arrows.
19- Double arrow head half-width : arrow head half-width for double arrows.
20- Double arrow body width : arrow body width for double arrows.
21- Equilibrium arrow head length : arrow head length for equilibrium arrows.
22- Equilibrium arrow head half-width : arrow head half-width for equilibrium arrows.
23- Equilibrium arrow body width : arrow body width for equilibrium arrows.
24- Reversed-leave at 0 :
User Level: Level of messages to user (Beginner, Expert).
Recover : to recover your work.
11
9
5
on atom
outside atom
1
Me
12
8
6
7
16
14
10
17
15
18
21
23
22
20
Figure 3.7
3-33
19
Color Preferences
This dialog allows you to change the default color settings for some features of the program. The 32 virtual colors
are saved when you exit the program.
You can change the 32 virtual colors by editing the
$CHIRON_HOME/main/term.def file. You can use color indices on a non-color terminal and save a molecule
with appropriate colors; you can then load this molecule on a color terminal with correct color indices, or print on
a color printer, even if the terminal doesn’t support any color.
In all cases, to modify a color setting, select the appropriate radio button object, then select the color box you want
for that object. Object (Molecule, Atom, Text, Arrow) already on the screen and saved in file will keep their
colors.
Molecule : the default color for new molecules. After you change this index, any new molecules you draw will
be drawn in this color.
Molecule(H) : the default color for molecule highlighting. This color will be used for new precursor skeletons,
for Identical, Enantiomeric and Meso chains, and when you color bonds with All Bonds and 1 Bond in the Bonds
dialog.
Atom : the default color for atoms. After you change this index, any new atoms you draw will be drawn in this
color.
Atom(H) : the highlight color for atoms you select with the All Atoms and 1 Atom buttons in the Bonds dialog.
Arrow : the default color for arrows.
Arrow(H) : the highlight color for arrows when you select them with the Color command in the Arrow dialog.
Text : default color for text (R and S will be of this color).
Text(H) : highlight color for text you select with the Color command in the Text dialog.
Number : default color for atom numbers.
3-34
Background : the background color.
Grid : the color used for the grid. We suggest you use a dark color, similar to the default dark blue, to clearly see
the molecules you draw over it, which are in the Molecule color.
Template : the color used for templates in CARS-2D and CARS-3D.
Save : allows you to save the current color setup.
Load : allows you to load a previously saved object color setup.
For coloring bonds, see the Bonds commands in the CARS-2D menu.
The Chiron Program virtual colors:
Index
0
1
2
3
4
5
6
7
8
9
10
11
12
13
14
15
16
17
18
19
20
21
22
23
24
25
26
27
28
29
30
31
RGB color
0
0
0
255
0
0
0 255
0
255 255
0
0
0 255
255
0 255
0 255 255
255 255 255
255 150 255
0 140
0
60 130 255
0 120 120
255 128
0
45 255 140
140 140 140
50 170
0
215 160
0
225 145 165
185 70 60
200 255 25
230 110 90
33 96 197
225 125 250
250 140 65
90 190 150
252 185 148
50 210 179
255 255 128
255 128 128
255 65 20
255 40 170
0
0 110
Lightness
0
76
150
227
28
105
178
255
193
83
123
84
152
179
140
115
159
171
103
213
144
88
169
165
156
201
159
241
166
117
119
12
3-35
Color name
BLACK
RED
GREEN
YELLOW
BLUE
MAGENTA
CYAN
WHITE
MAUVE
DARK GREEN
SKY BLUE
BLUE-GRAY
ORANGE
TURQUOISE
GRAY
MEDIUM GREEN
OCHRE
LIGHT PINK
BROWN
YELLOW GREEN
LIGHT BROWN
MEDIUM BLUE
LILAC
LIGHT ORANGE
BLUE-GREEN
FLESH
LIGHT BLUE-GREEN
LIGHT YELLOW
SALMON
DARK ORANGE
PINK
DARK BLUE
Help Menu
On Version
To displays the program’s design credits.
On Context
To obtain a brief explanation for each command. Select On Context and the comand you wish to have
information on.
3-36
Part 4
CARS-2D
With this module, you can draw molecules (up to a maximum of 255 atoms) that are chemically recognizable. The
alpha-beta designation is used to specify asymmetric centers. The user must respect some rules on how to draw
molecules. The following sections explain some aspects of these rules.
4.1 Acyclic and alicyclic molecules
Draw acyclic molecules in extended (zig-zag) projections and not as Fischer projections. Avoid placing three
atoms in a line. It is understood that the main carbon chain is in the plane of the paper; alpha bonds extend below
that plane, and beta bonds extend above it.
HO
OH
Me
HO
OH
OH
Me
SH
NH2
OH
OH
O
Recognized
Not Recognized
Figure 4.1
4.2 Carbocyclic molecules
Do not indent carbon atoms in ring forms. Angles should always extend outwards. Chair forms are not recognized
in 2D, since molecules are planar; the indented center would be considered in the wrong perspective (R/S
reversed). Chair forms are for use in the 3D module; use chair forms in 2D for drawing schemes only.
In the figure below, the arrows indicate atoms for which stereochemistry is not recognized.
4-37
Not recognized
Recognized
(use 3D drawing mode)
H
=
=
All equivalent and recognized
H
H
=
=
H
Not recognized in 2D
may cause problems at junctures.
Figure 4.2
Aromatic compounds : aromatic rings are recognized when fully drawn. Enter double bonds according to the
type of aromatic ring you want. Here are some examples of aromatic rings that are recognized by the program
(they are available in the aromatic template set) :
4-38
N
X
X
HN
etc...
X
NH
Figure 4.3
4.3 Stereochemical depiction of bonds
The stereochemical orientation of single bonds (substituents), ring junctures, etc. should be specified using alpha
or beta bonds. Unassigned stereochemistry will not be recognized by the program, or it may consider both
possibilities. Alpha and beta bonds have a direction; point the wedge away from the originating carbon atom.
Bonds should always originate from a carbon atom toward other atoms.
Acyclic molecules :
Show one stereodescriptor in the case of a single substituent, or two descriptors for tertiary centers. The shorter
chain should be regarded as a substituent.
OH
Me
H2N
NH2
O
Me
OH
NH2
Me
O
O
O
Figure 4.4
4-39
Me
OH
Cyclic molecules :
All of the following are recognized :
Me
OH
Me
H
H
OH
OH
Me
Me
Me
H
Me
Me
HO
OH
NH2
O
NH
O
NH2
HO
O
Figure 4.5
4.4 Rules and comments on functional groups
Protective groups are not considered by the CAPS module. For example:
O
Me
O
Me
HN
Me
Me
=
OH
NH2
Me
OX
Me
=
Me
NX
Me
Figure 4.6
Substituents should be entered as above, with bonds separating each atom, and not as -OMe, -COOH, -COX.
The important aspect that is recognized is the alpha and beta stereochemistry of the substituents. For
stereochemistry to be recognized in CASA and CAPS, all functional groups, as well as stereochemical designation
(alpha/beta), must be drawn using the CARS-2D module.
Functional groups from the Atoms/Other menu item which are not unique atom symbols (as Ac, NHCbz, etc.)
are not recognized in CASA and CAPS. They are to be used for reaction schemes or illustrations only. Only
true atomic symbols, as defined in the periodic table, may be used by CAPS/CASA for chemical processing (it is
possible, with the Atom/Other, menu item to enter Cl, Mg, F, Br, …).
4-40
Single functional groups recognized in C A P S
In CAPS, precursors are matched on the target molecule according to their framework. The functional groups are
then examined, in order to determine the score. The framework atoms are drawn in a different color than the rest
of the molecule and they are numbered in the precursors manual. Those framework atoms are absolutely essential
to the matching process.
There are four types of functional group placements. If an essential atom in the functional group is bonded to only
one other essential atom, it is an extremity. If it is bonded to two other essential atoms, then the function is set on
a chain and its stereochemistry must be considered. If it is bonded to three other essentials, this atom is a branch
point. Finally, if the essential atom in a functional group is a member of an aromatic ring, it is in an aromatic
function.
Here are the four categories, with their corresponding functional groups. If a functional group is not in this list, it
is considered a member of the “other” category.
Extremity functions :
OX
NHX
O
X
O
O
COOX
CONX
CX
COX
NHX
OX
X
Me
X
CXX
NHX
OX
Cl,F,I
CH3
SH
N
HALO
CN
SX
Figure 4.7
4-41
Ph
Chain functions :
OX
NoF
NHX
OX
NHX
X
Me
CH3
SH
SX
O
CX
X
X
Ket
BranchC
N
Cl,F,I
CN
OX
Halo
Ph
X
BranchO
Figure 4.8
Aromatic functions :
H
H
Me
Cl,F,I
CH3
CX
CX
Halo
OX
OX
NHX
OH
NHX
SX
O
SX
COOX
Figure 4.9
4-42
O
CHO
Branch functions :
Me
OX
H
H
Me
OX
CH3
CX
Met
CX
Figure 4.10
Valencies
The valencies of common atoms such as C, O, N, S, P, etc. are automatically adjusted and validated by the
program. For example, a primary amine will “lose” its hydrogens progressively as new bonds are added, up to a
valence state of 5. After that it will be impossible to add other bonds. By default, the program will complete the
valence number with hydrogens, and will assume that + H’s are connected to the atom. The number of H’s will
appear next to the symbol name in subscript (NH2, OH...).
Atom
C
O
N
S
P
Valence
min
max
4
4
2
3
3
5
2
6
3
6
Example
Tetravalent sp3, sp2, sp carbon
(ether, oxonium, etc.)
(amine, ammonium, nitro, etc.)
(sulfide, sulfonium, sulfone, sulfoxide, sulfate, etc.)
(phosphine, phosphonium, phosphate, etc.)
4.5 Working example : drawing molecules
Drawing freehand
The following is an attempt to quickly introduce you to drawing a molecule. Consult the CARS-2D commands
descriptions for details (Part 5).
The first menu you’ll see when you start the program is the CARS-2D menu, which allows you to draw
structures. Using the mouse, select the Draw command. Move to the middle of the screen and draw a
cyclohexane by going clockwise or counterclockwise. Each time you go to the next carbon (point) you’ll leave a
bond behind you. Atoms will be numbered in the order you draw them, and by default all atoms will be carbon
atoms, until you change them explicitly. Now select the Alpha command and draw an alpha bond somewhere on
the structure. Do the same with Beta. Now select the Atom/O menu item and insert an oxygen (OH) at the end of
the alpha bond. Select the Update menu box to redraw everything correctly. The structure will be erased, and
will then reappear looking something like this:
OH
Me
Figure 4.11
4-43
You can also use the Shape command to reshapes molecules according to ideal bond lengths and angles.
Note that the hydrogens were added automatically. When a bond is left with no substituents, it will be considered
to be a methyl. Try out Delete. To delete an atom or bond, you must point at it.
When you draw a molecule, you should always select the Draw command when you want to interrupt the
sequence of lines (bonds). To draw another molecule on the screen, select Draw, and proceed as above. Now,
draw L-Proline next to the previous structure:
OH
OH
NH
Me
O
Figure 4.12
Try out the Texts and Arrows commands to add texts and arrows on the screen. Practice drawing more elaborate
molecules:
O
O
Me
Me
HO
Me
OH
Me
OH
O
O
OH
HO
NH2
Me
O
N
OH
Me
O
OH
Me
N
Me
ERYTHRONOLIDE A
Figure 4.13
Drawing using Build (templates) and the Grid
Make sure you are in CARS-2D . Select the Build command. Select Templates in the Build dialog and draw a
structure by selecting an atom of a template, then the desired position for that atom; select another set of templates
by chosing Main or User . Try out the Duplicate Structure and Renumber commands.
1) Use the Draw command for bonds, double bonds, etc. (remember, the numbering of atoms follows their
drawing order). Atom numbering can be changed with the Renumber command in the Build dialog. When you
want to start a new branch on your molecule, you must select the Draw command again. To draw a separate
molecule, you must select the Draw command and proceed.
4-44
2) Use the Alpha and Beta commands to specify stereochemical assignments (all alpha or beta bonds can be
included in sequence if there are more than one of each).
3) Place all the required atoms by selecting them from the Atom menu (C, H, O, N, S) or by entering them via the
Atom/Other menu item. Atoms are changed simply by pointing to the bond extremity where you wish the atom
to be. Similar atoms can be entered in sequence (for example all oxygens in the molecule). Remember that
hydrogens (OH, NH 2, etc.) are automatically added, as are methyl groups. By default an atom is a carbon
unless you specify it as a hetero atom.
4) To specify the stereochemistry of ring junctions use the Alpha or Beta commands.
5) When the structure, functional groups, stereochemical features, etc. have been drawn, select Update to clean
up the drawing. You are now ready to do the following:
• Save the structure (User/Molecule)
• proceed with CASA or CAPS
• proceed with CARS-2D (reaction schemes, etc.)
6) Select the Grid command. You can now draw structures by joining the intersection points of the Grid.
Expert Mode:
You will notice that some letters in the palette tools commands are underlined. Typing those letters on the
keyboard will activate the corresponding commands; these shortcuts can be used to select commands without
using the mouse. There is also a shortcut for the Alpha and Beta commands.
4.6 Adding to the precursor database
You will surely want to increase the number of precursors in the main database. You can create a new database,
then import your precursors by using the File/Import (CIF format) menu item. Your precursors should be in the
Chiron Program Interchange Format (see Appendix A). To transfer your molecules to CIF format, you can use
the mdltochiron program, which will convert a MDL SDfile to CIF. If your molecules are in a different chemical
file format, you can use the Babel freeware program available on the Internet to convert them into MDL file
format. You can also write a program to transfer your files to the CIF, or you can redraw your precursors with
the program, which can also be quite fast if you only have few precursors. Also, precursors are sometimes not
properly numbered or well drawn, so it would be a good idea to use the program to redraw and remember them.
To add your own main precursors database, be sure your are in the Main/Precursor file type by selecting the
File/Current menu item, then create a new database by using the File/DatabaseOperation/New Database menu
item. When you use the Import menu item, ask for automatic classification.
If you add your own precursors to The Chiron Program library, use a meaningful reference so you can easily
recognize your own precursors and index your own database.
You will find the Print (From File) command very useful; it will print your precursor database on a PostScript
printer, using the same format as the precursor manual.
4-45
Part 5
CARS-2D Commands
The CARS-2D (Computer Assisted Reaction Schemes) palette window is mainly used to draw
molecules and reaction schemes, using Template (Build), Grid, and Draw commands.
A description of the commands, in their order of appearance in the menu, follows.
Texts
To include text on the screen for reaction schemes or titles.
A text has the following attributes : the text itself, the position on the screen, a size, a color, and
a justification.
All texts attributes are saved in a file. If the Subscript toggle button of the Drawing Options
dialog is set ON, all the digit sequences that follow a letter, a bracket, a parenthese or an
accolade will be put in subscript. Likewise, all + or - signs that follow a letter or one of the
aforementioned characters will be put in superscript (they will be treated as charge signs). To
overrule this automatic behaviour, turn OFF the Subscript toggle button and select the character
sequences to be put in super/subscript yourself, using the control characters @, ^ and &. See
the Other item in the Atoms menu for details on the use of these control characters.
Current Text : to enter text from the keyboard. It is possible to write parts of the text in
superscript or subscript. See Other in the Atoms menu.
5-46
Justification : usually when you indicate the position of a text on the screen you do so by indicating the lower
left corner of the first letter of the text. However, if you want the right side of a text to finish at an exact place on
the screen you will have to move the text several times to get it correctly. With this option you can indicate the
relative position in the text on the screen. The position of the point relative to the text is the same as the small
circle in the following figure:
Middle Left
Middle Center
Middle Right
ABCDEF
ABCDEF
ABCDEF
Lower Left
Lower Center
Lower Right
ABCDEF
ABCDEF
ABCDEF
Figure 5.1
Place : to place the current text on the screen. It is possible to write parts of the text in superscript or subscript.
You can place the same text several times consecutively.
Get : to get a text that is already on the screen and its attributes. Indicate Get and the text you want to be the
current one. You can then use Place to put a copy of the current text to somewhere else, or Modify to modify an
existing text.
Modify : allows you to change a text already on the screen by the current text. To make corrections to a text that
is on the screen, first Get the text, do your corrections or change a text’s attributes, indicate Modify, and point to
the text to be modified.
Move : to move text to a new position on the screen. Indicate the text to move and the new position. The text
will keep all its attributes.
Delete : to delete text from the screen.
Size : to change the size of a text that is already on the screen.
Color : to change the color of a text. When locating a text it will be of the default text color, which is the color of
Text in the Color dialog. When you indicate Color and a text, the text will become of the color of Text(H). You
can toggle back to the default color by indicating the text another time. If you change the default color for text, it
will not change the color for text on screen.
Size slider : to change the current text size. By default a text is of size 12 and the default font is Times. You can
change the current size between 1 and 128 so that every text you put on the screen will use the closest font
depending of the kind of terminal you have. Even if the size is discontinuous to the font, the real continuous value
is remembered for a text and you will get the exact size on the printer even if you cannot see the difference on the
screen. You will also get more precise text size if you save for example your molecule in a file and load it on
another terminal that has more fonts.
5-47
Arrows
*
*
*
*
*
*
(*) Using the Straight option
Figure 5.2
To draw, move and delete arrows on the screen.
Display box : by indicating this button, you will change the current arrow type and see it
change. You can get simple arrow, double line arrow, full arrow head and equilibrium
arrow.
Double : to draw a two-headed arrow. The arrow at left will be updated to get two heads. You can double head
any kind of arrow. Equilibrium arrows always have two heads; if double is OFF, the equilibrium arrow will be
drawn with one of its components half as long as the other and if it is ON, both components will have the same
length.
Straight : this button allows you to draw arrows horizontally or vertically easily. When you indicate the tip of
the arrow, the program will align it on a vertical or horizontal line.
Draw : to draw an arrow. You will have to indicate the end and the tip of the arrow inside the work area. You
can draw several arrows, one after the other.
Move : to move arrows on the screen. You will have to indicate any point of the arrow to let the program know
which arrow you want to move. Then indicate the new position. The arrow will be translated without rotating, so
that the point that you selected on the arrow will now be at the point you indicated to select the new position.
Move One : to move only one extremity of an arrow. Indicate an extremity, then indicate its new position. The
other end will not move.
Delete : to delete arrows from the screen.
Color : to change the color of an arrow on the screen to the Arrow(H) color. Select it again to return to the Arrow
color. See the Options/Color Preferences menu item.
5-48
Icons
To add various graphic figures to reaction schemes.
Display box : to select the current icon; among the available “icons”, we have
included brackets, accolades, boxes (plain, shaded and round) and parentheses.
Furthermore, you can define your own icons; see Appendix B for details.
Double : to draw paired icons. Linear icons (anything except a box) may be at least
as useful as pairs of “mirror-image” icons as they may be by themselves. This
option allows the automatic creation of these pairs of icons at draw time, if Double is
ON. In that case, you will be prompted for a third control point, which will indicate
the distance between the twin icons.
With boxes, this has no effect whatsoever. If you decide to design your own icons,
be careful: the Double option is effective with all linear icons, even if, in your case,
it is unsuitable.
Draw : to add the current icon to the reaction scheme. You will be prompted for
two “control points”; for boxes, they are the top-left and bottom-right corners, and
for other pre-defined objects, they are the extremities. User-defined icons may have
completely different control points.
Move :
to translate an icon on the screen, without altering its shape or its
orientation.
Delete : to remove an icon from the reaction scheme.
Fill, Stroke, Width : the icon dialog has been designed as an enhancement for reaction schemes, and therefore
for molecules printouts. These three options have no effect on the screen; they only influence PostScript
printouts. Fill changes the interior shade of objects, Stroke the line shade and Width the line width. Modifications
to these values only influences icons created afterwards: icons created before “remember” their old colors and line
widths. This allows you to create a pair of black brackets, change Stroke to 0.8 (light gray, 0 being black and 1
being white) and add a light gray box to the same scheme. The default values are white for Fill, black for Stroke
and 2 point for Width.
Note : The CIF format does not save information about icons.
5-49
Bonds
This dialog allows you to put different types of bonds on the molecule for
reaction scheme purposes. These bonds do not hold any chemical significance
to the program. To change the type of a bond, simply select the desired dialog
box and point to one or more bonds in the molecule.
Simple : to change back to an ordinary bond.
Large : to change to a large bond (as in the precursor framework).
Cleave : to change to a dotted line across the bond, representing a cleaved
bond.
Large Cleave : to change to a dotted line across a large bond, showing a
cleave.
Arrow : to change to a large arrow bond, like the last bond of the chain for
Identical in CASA . The arrowhead will point towards the atom nearest to the
point you indicate.
ZigZag : to draw racemic bonds using wiggly lines.
Dash : to change to a dashed bond.
1 Atom : to selectively color atoms with the Atom(H) color. If you select an atom twice, it will toggle back to the
Atom color. You can change the default and highlight atom colors in the Color Preferences dialog.
All Atoms : to color all atoms of a molecule with the Atom(H) color. If there is more than one molecule, indicate
any atom of the molecule you want to color.
1 Bond : to selectively color bonds with the Molecule(H) color. If you select a bond twice, it will toggle back to
the Molecule color. You can change the default and highlight bond colors in the Color Preferences dialog.
All Bonds : to color all bonds of a molecule with the Molecule(H) color. If there is more than one molecule,
indicate any atom of the molecule you want to color.
5-50
Peptide
L-Amino Acids / D-Amino Acids : to toggle between
L-amino acids and D-amino acids. It is possible, for
instance, to draw a peptide with D and L amino acids
like D-Ala-L-Phe-D-Lys.
Left-Right Drawing / Right-Left Drawing : in LeftRight Drawing mode, new peptides are drawn from left
to right; in Right-Left Drawing mode, from right to left.
Clear : to remove the peptide sequence of amino acid
symbols.
Build : create a peptide sequence once the amino acid
symbols have been selected.
Insert : to insert one or more amino acids in an
existing peptide. We recommend that you use this
option only with molecules built with the peptide Build
command.
Replace : to replace a peptidic segment by another.
You will have to select two peptidic bonds before
replacement; they will be cleaved, and the amino acids
between them will be eliminated. Replacing a segment
by nothing deletes the original segment and welds the
molecule. To replace a segment that includes the first
(or last) amino acid of a peptide, Extend with the new
segment and delete the useless amino acids afterwards.
Extend : to add one or more amino acids at one end of a peptide. You will have to select an atom from which
the new segment will originate. If you select a nitrogen atom, it will become the last atom of the new segment; if
you select an oxygen, it will become the first atom of the new segment and will be replaced by a nitrogen.
Delete : to delete one or more amino acids. You will have to select two peptidic bonds.
Upside Down : to redraw a selected peptide upside down. This may be useful if you are trying to draw a cyclic
peptide; however, the terminal units have to be joined using the Draw.
Manual Reverse : “Manual Reverse” of a selected peptide; if it was drawn from left to right, it will be redrawn
from right to left. Again, this is mostly useful for the drawing of cyclic peptides.
Scrap : to discard all changes made since entering the Peptide dialog.
Note : For Proline, the amide bond will be drawn in a cisoid geometry. Use Twist in the Rotate dialog to
transform it to transoid.
5-51
HN
HN
Twist (1,2)
Me
1
O
OH
2
O
NH
O
NH
O
Me
OH
Figure 5.3
Build
To erase the drawing and numbering of schemes and molecules.
Duplicate Structure : to duplicate a structure that is on the screen. Select this
command, and specify an atom from the structure you want to duplicate. Indicate a
new position for the duplicated structure.
Visible Number : by selecting this command you will be able to selectively display or
hide the atom number of any atom on the screen by pointing to it. You can select
several atoms consecutively. If you point to a numbered atom, the number will
disappear.
Renumber : to renumber all, some, or one of the atoms in the molecule. Indicate this
option and point consecutively to the atoms that will be renumbered from the number
in the From text box. Note that you can have several atoms with the same number.
From : to indicate the number from which to start renumbering.
Reset : to reset the start renumbering to 1.
Reorder Table : once you have renumbered a molecule or precursor, selecting this
command will change the ordering in the connection table so that the order in the table
will correspond to the numbers on the screen. You don’t have to renumber all the
atoms; just renumber the essential atoms and the program will renumber the rest for
you.
Original Numbering : if you wish to return to the original numbering for the molecule (before you entered the
Build dialog and until you selected Reorder Table).
Template : to use predrawn forms to draw molecule.
There are different sets of templates in CARS-2D and in CARS-3D . In CARS-2D , the default template set will
allow you to draw almost any molecule, but if you wish you can build your own template set (for a single user, or
for every user through the main files). To use the default set, select Template in the Build dialog. Now point to
any template atom, and select a new position for it. You can weld templates together to create polycyclic
molecules, etc. If you want to create your own templates, just draw them and save them in one of your files
(create a new one for them). In the Current File dialog, select the file you saved to be the current file with the radio
button, then click the Set Template button. Choose User in Build to access your own templates. You can also
save a new set of templates for each user in a new Main file, and access them with Main Template instead of User
Template. You can use any molecule as a template, but all stereochemistry will be lost.
5-52
You put templates on the screen by indicating an atom of a template (an X will appear on the atom) and then
indicating the new position for that atom. You can attach to molecules (such as for spiro centers), or place the
template in an empty spot. You may also connect a template along a bond. Select the bond on the template; an X
will appear in the middle of the bond. Now select the desired target bond on a molecule. Lastly, indicate a point
anywhere on the side of the bond where you want to see the template appear (since placement would otherwise be
ambiguous). Remember that templates are randomly numbered, so use Renumber to change the numbering.
The default set of templates, with an example of their use :
Me
OH
O
Me
NH2
Figure 5.4
User : to use the molecules in the user molecule file system as templates.
Main : to use the molecules in the main molecule file system as templates.
Grid
A hexagonal grid will appear on the screen; its purpose is to help the user draw molecules. Every point you
indicate will be moved to the nearest grid point except when you try to select an atom, bond or text. You can
remove the grid by selecting Grid again. Note that the grid is active even outside the hexagon, along the same
imaginary pattern.
5-53
AMPHOTERICIN B AGLYCONE
OH
OH
38
Me
2
O
6
10
8
12
36
5
O
OH
OH
9
7
11
OH
OH
30
28
26
24
22
31
29
27
25
23
O
17
49
18
OH
20
Me
33
16
O
39
32
34
OH
13
Me
35
54
14
15
3
1
37
HO
4
21
19
OH
Figure 5.5
Draw
Along with the Alpha, Beta and Templates commands, this command is used to draw the carbon framework of
molecules. Note : The maximum number of atoms on the screen is 255, excluding not explicitly drawn
hydrogens.
To begin drawing on an empty screen, indicate Draw and the position of the first atom. Indicate the position of
next atoms in the main chain. By default, all atoms created are carbons until you change them. The program will
always add a bond between the new atom you are creating and the previous one, except for the first atom you
indicate after Draw. So you must indicate Draw to start a new branch and the atom you want to attach to. The
carbons will be numbered in the order they are entered in. You can change this numbering with Renumber in the
Build menu.
All bonds are assumed to be occupied by unspecified hydrogens. Hydrogens need never be drawn except for
clarity (stereochemistry at ring junctions, etc). Double and triple bonds can be drawn by activating the second
point two or three consecutive times or by going back on a bond.
After you indicate Update, the molecule will be redrawn. Remember to insert all extra atoms and functional
groups before you update, otherwise all extremities will become methyls.
To facilitate the drawing of rings and long chains, Template in Build and Grid can be used.
You can change the drawing mode in the Drawing Options menu item. Then you will have to indicate every time
both extremities of every bond, which is time consuming for long chains, but more practical if you have a lot of
branch points.
5-54
Alpha, Beta
To indicate stereochemistry with a hashed line or solid wedge representing an alpha or beta
bond, respectively. Draw the alpha or beta bond by indicating the origin and the apex of the
bond; the hashed or solid wedge will immediately appear. Alpha and beta bonds can be drawn
in sequence without reactivation. You have to reactivate when switching from one to the other,
however. The program can display alpha and beta bonds as wedges or rods. To toggle
between these modes, use the Drawing Options dialog in the Options menu. Be careful when
using wide bonds and rod-shaped alpha/beta bonds on the same molecule, since it would be
easy to mistake the wide bonds for beta bonds.
OH
OH
NH2
NH2
Figure 5.6
Atoms
To include the current atoms or functions in a molecule. To change the current atom, see the Atom menu.
Undo
Used to erase bonds that have been drawn with Draw. The last bond drawn will be erased first. You can erase
double and triple bonds step by step. You can continue to draw after Undo without indicating Draw again, but
you have to indicate the atom to attach to.
Note : Undo works only with Draw and Reshape.
Update
To redraw all objects on the screen.
5-55
Reshape
This option reshapes molecules according to ideal bond lengths and angles. Rings will be drawn as regular
polygons, all bonds (with the possible exception of those involving a hydrogen) will be normalized to the same
length, etc. If necessary, alpha and beta bonds will be interchanged to maintain the original stereochemistry.
Acyclic chains will be reshaped to an extended zig-zag (horizontal) form.
See section 10.5 for exceptions and limitations. Molecules that cause problems with the 2D to 3D transfer will
usually give poor results here.
Note : You can return to the original molecule with the Undo command.
Move
To move atoms, molecules, texts, arrows and icons on the screen.
Atom : to move a single atom of a molecule. Point to the atom that is to be moved,
then indicate the new position; the atom and its bonds will move to the new position.
If you move the atom too far, you will be asked to confirm, since almost every time,
the user actually wants to move the entire molecule.
All : to move everything that is on the screen : atoms, molecules, texts, arrow and
icon. Indicate any point on the screen, then the new position for this point. Those
two points specify an offset that will be added to everything on the screen.
Molecule : point to any atom of a molecule. Indicate the new position for that point, and the molecule will
reappear at the new position.
Arrow : to move an arrow to a new position on the screen. Point to an arrow, and indicate a new position, the
arrow will be translated without rotating.
Text : to move text to a new position on the screen. Point to the desired text, then indicate a new position and the
text will move there.
Icon : to move icon to a new position on the screen. Point to the desired icon, then indicate a new position and
the icon will move there.
Frame : to move everything within a frame. Indicate two diagonally opposite corners of a frame; an X will
appear at the bottom left corner. Indicate a new position for this corner of the frame. Everything that is inside the
frame will be moved according to the translation you've indicated between the two points.
Delete
To delete atoms, bonds, molecules, texts, arrows and icons from the screen.
Atom : to delete an atom or a molecule. By default, delete atom is selected. If you
wish to delete an atom, simply point to it; the atom and its corresponding bonds will
be deleted.
Bond : to delete a bond from a molecule. Point to the center of the bond to be
deleted. Atoms at the extremities of the deleted bond will remain except if the deleted
5-56
bond was the last one connected.
Molecule : to delete an entire molecule from the screen. Indicate any atom of the molecule to be deleted.
Arrow : to delete arrows from the screen. Point anywhere on the arrow to be deleted.
Text : to delete text from the screen. Point anywhere on the text to be deleted. To delete just one part of a text
use Modify in theText dialog.
Icon : to delete icons from the screen. Point anywhere on the icon to be deleted and you will be asked to
confirm.
Frame : to delete everything within a frame (atoms, texts, arrows, icons). Indicate Frame, followed by the two
diagonally opposite corners on the screen where a rectangle will appear. Indicate a point inside the frame to
confirm (or outside the frame to abort the operation), and everything inside the rectangle will disappear.
O
O
Me
O
Me
S
O
NH
S
HO
HO
S
Me
O
Delete frame
Example
Example
Figure 5.7
Scale
To scale one or all molecules along the X, Y or X and Y axes. The scaling factor is
preset to 1.00; you can change it by indicating a point with the slider between 0.25
and 4.00.
X : to scale horizontally, preserving the height of the molecule.
Y : to scale vertically, preserving the width of the molecule.
X & Y : to scale the molecule in both directions at the same time, keeping the
proportions of the molecule (which is what you will want most of the time).
All Mol. : to increase or decrease the size of all molecules on the screen. After you select this command, select X ,
Y or X & Y. All molecules will be scaled by the current scaling factor.
One Mol. : to increase or decrease the size of a single molecule on the screen. After you select this command,
select X, Y or X & Y and point to an atom of the desired molecule. It will be scaled by the current scaling factor.
5-57
H2N
H2N
H2N
H2N
NH
NH
NH
O
NH
O
O
O
Scale Y
Scale X
Scale XY
Figure 5.8
Rotate
To rotate molecules and perform other similar manipulations. You can specify
the angle by indicating the angle value with the slider.
All Mol. : to rotate all molecules on the screen by the specified angle. Every
molecule on the screen will be rotated (texts and arrows will not move).
One Mol. : to rotate a single molecule on the screen by the specified angle. If
you have more than one molecule on the screen then indicate any atom of the
molecule to rotate; the molecule will rotate by the specified angle.
Bend : to change the angle between two bonds. First, specify the desired
angle, then select Bend and three consecutive atoms. The angle between the
three atoms will be set to the new value by moving the appendage of the third
atom.
Me
O
HO
OH
H 2N
OH
Me
O
OH
HO
HO
OH
NH2
OH
OH
Me
NH2
O
45 degrees
-90 degrees
Figure 5.9
Twist : to twist part of a molecule that lies in the plane of the screen in 2D. It will twist all atoms that are
connected to the second atom you indicate by 180 degrees, along the axis that passes through the atoms you
indicated. Note that it doesn’t make sense to twist within a ring.
5-58
Second atom
O
OH
First atom
OH
H2N
OH
Me
OH
Twist
O
HO
O
Me
OH
NH2
O
Me
Me
Figure 5.10
Flip : to flip the molecule horizontally around the vertical axis that passes through the center of a molecule. Every
alpha and beta bond will be inverted, keeping the molecule itself unchanged.
OH
OH
Me
Flip
Me
OH
OH
Figure 5.11
Restore : returns the molecule to its original position (before you entered the Rotate dialog).
Clear
To clear the work area. You will be asked to confirm.
5-59
Part 6
CASA
The CASA module will recognize the stereochemical features in your molecules from many different perspectives.
6.1 Working examples for CASA
After a molecule has been drawn on the screen or loaded from a file using CARS , activate the CASA module by
pointing to the CASA menu box.
Examine the commands in the menu and select the operation you want. Point to the appropriate menu box and the
information will appear on the screen.
Enter or draw a molecule of your choice (ex. Forskolin etc.).
1) Ask for R/S; observe, then indicate Tree and click on any asymmetric carbon center. Finally, indicate two
points (the top and the bottom-left extremities of the tree) to place it. You can now use the Scrap option to erase
the R/S descriptors and the Priority Tree from the screen.
22
OH
1
11
16
Me
S
10
5
Me
12
O
S
Priority Tree
R
20
Me
9
9
O4
O
8
R
R
OH
S 26 S 7
11
HO
10
8
26
O
H S
Me Me
OH
Me
O
O
22
22
FORSKOLIN
R and S
O
12
7
4
Me
1
20
5
Me
16
Weight Decreasing
Figure 6.1
R/S notation applies only to asymmetric atoms with four ligands (ex. C, S). Compounds with chiral axes,
planes, etc. are not considered. In cases where the program cannot make an assignment for a non-planar carbon
(equal priorities), the program will display an asterisk (*) near the atom instead of an R or S. You will also see a
(-) near the center, if the positions in space of the three bonded atoms are too ambiguous to determine the R/S
descriptor (correct topology but insufficient stereochemical information). Go to the next chapter for a full
explanation of the RS option and its implementation. The asterisk (*) and (-) notation can be removed in CARS2D using Delete in the Texts option.
OH
HO
OH
OH
R
S
OH
S
*
Me
r
O
OH
S
OH
*
O
6-60
Me
R
r
NH2
OH
Figure 6.2
2) Place a structure with no stereochemical designation on the screen. Select R or S and point to the desired
atom; the computer will insert alpha and beta bonds as appropriate.
3) Load the Leukotriene precursor and ask for E/Z.
OH
Z
E
O
E
OH
SH
Me
Z
Figure 6.3
4) Load Erythronolide A. Select Fischer. Select a sequence of carbon atoms, or simply select the first and last
carbon atoms. The program will choose the shortest carbon chain between the two atoms. Indicate Fischer again
to terminate your selection. At the program’s request, indicate two points on the screen along a vertical axis, and
the Fischer projection will appear. Do the same again, but reverse the order of the carbon atoms. Note the
upside-down projections (and a different idea for a synthetic precursor!).
5) Ask for an Extended projection for the segment of your choice. Indicate the chain (as with Fischer), and
Extended again to terminate your selection. Indicate the left side of the projection. Scrap the Fischer and
Extended projections.
Fischer
Fischer
15
1
O
Me
2
9
Me
Me
11
7
OH
12
6
HO
Me
XO
HO
Me
4
OH
Me
14
3
8
10
HO
Me
HO
5
6
OH
14
O
1
Me
15
O
HO
Me
Me
7
HO
11
12
Me
14
Me HO Me
2
Ext. Proj.
1
4
3
OH
5
10
9
OH
6-61
O
2
1
Me Me OH
7
OH
Me
Me
8
6
4
3
15
Me
Me
OH
6
5
OH
OX
13
ERYTHRONOLIDE A
O
Me
8
O
Me
10
OH
2
8
9
3
10
9
Me
OH
4
OH
Me
5
Me
Me
11
7
13
13
12
12
11
13
OH
Figure 6.4
6) Ask for Identical segments. The program will find segments that are identical (superimposable), and will
display them as chains with the correct numbers. Select chain number 1 and observe. Select With Comment
Underneath, then select another chain in the dialog’s list, and finally point on the screen where you want the text
to appear. Use the Show Segment command to access the other chains. The program will find relationships
between differents molecules.
23
Me
14
HO
Me
24
O
25
13
O
Me
26
12
Me
11
Me
O
O
The C11-C14 and C23-C26 segments
are identical (superimposable).
OH
O
Me
OH
Figure 6.5
6-62
HO
7
Me
Me
O
Me
6
H
O
5
O
O
O
Me H
4
H
O
HO
H
OH
OH
Me
MONENSIN A
Me
HO
Me
Me
8
HO
Me
The C4-C8 and C27-C23 segments
are identical (superimposable).
Me
Me
O
27
Me
FK 506
23
25
26
O
N
O
24
OH
O
Me
O
O
Me
Me
O
OH
Me
O
O
Me
Figure 6.6
7) Ask for Enantiomeric, then Meso (as below). You can ask for the above options with more than one molecule
on the screen. The program will find relationships between differents molecules, including target molecules and
precursors.
OH
OH
HO
OH
HO
OH
10
O
HO
12
4
6
7
OH
5
8
O
OH
9
11
NH2
OH
OH
OH
The C4-C12 segment is meso.
Figure 6.7
8) Select Reshape. Follow the instructions on the message area; you can reshape the molecule to adopt any
desired orientation. This can be useful for overlapping a structure over another by “reshaping” it. You can enter
CASA with the Grid to make reshaping a molecule easier.
6-63
OH
Me
OH
12
14
OH
15
9
7
HO
10
8
O
O
OH
OH
11
OH
13
OH
16
O
Me
O
17
20
18
Me
19
AMPHOTERICIN B AGLYCONE
OH
Reshape example
OH
OH
OH
7
8
19
11
9
CX
12
18
OH
10
CX
OH
15
13
OH
OX
14
17
16
CX
Figure 6.8
6-64
OX
OH
Part 7
CASA Commands
O
26
9
Me
R
2
S
7
27
20
R
16
14
Me
1
Me
O
4
S
3
S
R
5
R
4
22
HO
22
18
Me
20
14
XO
HO
5
6
Me
OH
24
OH
Me
26
O
HO
29
Me
Me
HO
26
20
The C3-C7 and C9-C13 segments
are identical (superimposable).
OH
9
O
8
Me
24
Me
6
OH
4
OH
3
OX
18
14
Priority Tree
10
Me
18
13
29
OH
5
11
12
Me
12
11
7
Me
10
13
Me
8
9
OH
R
2
6
Me
3
7
O
15
Me
OH
12
13
HO
OH
11
Me
15
R
8
10
R
Fischer
1
Me
28
HO
Fischer
24
Me
2
1
15
12
13
HO
11
Me
28
29
16
O
18
20
Me
Me
22
HO Me
24
26
29
Me
Me
Me OH
10
14 HO
27
2
4
14
8
6
1
Me
1
15
Me
9
26
Ext. Proj.
5
3
OH
7
OH
Weight Decreasing
Figure 7.1
7-65
10
9
12
11
O
OH
13
15
OX
RS
Absolute stereochemical notation assignments for asymmetric centers only (excluding compounds with chiral
axes, planes, etc.) - will be executed immediately upon indicating RS . The R/S designations will appear next to
the corresponding centers. The algorithm to find the assignment of each stereochemical center uses t
he original publication of Cahn, Ingold and Prelog (see Angew. Chem. Internat. Edit / Vol. 5 (1966) / No. 4. and
Angew. Chem. Int. Engl. 21 (1982) 567-583). There are still some cases that have not yet been implemented (see
rule 4 below).
Me
Me
OH
Me
N
R
R
S
Cl
H
OH
*
S
S
Me
S
S
HO
OH
H
R
Cl
Me
Figure 7.2
rule 0 (Nearer end of axis or side of plane precedes further)
Since we do not consider either plane or axis of symmetry, this rule was not implemented.
rule 1 (Higher atomic number precedes lower)
Fully implemented.
rule 2 (Higher atomic mass number precedes lower)
Fully implemented.
OH
R
C*13
Figure 7.3
7-66
N
rule 3 (Seqcis precedes Seqtrans)
The double bond case (E=Seqtrans and Z=Seqcis) is fully implemented, even the special case when the E/Z
configuration can only be computed by using the center we want to determine. For cis-trans in ring compounds,
these rules should only be used as a preliminary indication for rule 4, which is not implemented yet.
OH
Cl
H OH
R
R
Me
H
H
S
Me
Cl
HO
Figure 7.4
rule 4 ( Like pair R,R or S,S precedes unlike pair R,S or S,R; and M, M or P, P precedes M ,
P or P, M; and R, M or S, P precedes R, P or S, M; and M, R or P, S precedes M, S
or P, R)
This rule is not implemented.
Ex. : Only partial R/S assignments are made by the program for :
O
OH
OH
HO
R
HO
*
*
R
R
HO
OH
*
R
OH
*
OH
OH
Figure 7.5
7-67
rule 5 ( R precedes S; M precedes P; and r precedes s)
Fully implemented. You should be careful when you see that the program assigns a pseudoasymmetric value
(small r and s), since rule 4 is not implemented yet.
OH
R
Me
Me
r
OH
OH
S
S
Me
Me
S
Me
s
Me
R
Me
OH
S
Me
Correct assignment by CHIRON
Wrong assignment by CHIRON
the center can’t be determined using rule 4
the center should be determined as S using rule 4
(like pair S,S precedes unlike pair R,S)
Figure 7.6
Non-carbon atom
If the atom has 4 ligands, the program will order those ligands correctly and will assign the right descriptors to
them. You should be careful when using structures that have asymmetric centers with bonded lone pairs. In those
cases you should implicitly draw the hydrogens, because the hydrogens precede the lone pairs in the sequence
rules, and the only atom that can be omitted for the RS selection is the one located last in the order (when
assigning a descriptor to a carbon atom, the hydrogens are often omitted). If there are more than four atoms
bonded to the asymmetric center, the result can not be guaranteed. The program will use the 4 heaviest atoms to
determine the descriptor, which is not always the right thing to do. Draw sulfoxides with a single bond to the
oxygen.
OH
S+
Me
R
Figure 7.7
EZ
Defines olefin geometry. Indicate EZ, and the designations will appear next to the corresponding bond. The
priority of each ligand is found using the CIP rules, as for RS.
7-68
R and S
To insert alpha or beta bonds, or to change the assignation of an already asigned atom.
Indicate R or S . Point to the carbon atom for which you want stereochemistry. The appropriate alpha or beta
bond will be drawn. Indicate R/S to get R/S designations as you specified next to asymmetric atoms.
S
OH
OH
NH2
OH
OH
NH2
OH
OH
R and S option
OH
O
OH
OH
O
OH
Me
Me
R
Figure 7.8
Tree
Draw a priority tree from the CIP rules. The tree will stop expanding as soon as all of its branches are not equal to
each other, or when the spanning of the molecule is finished. This option is very useful to learn and visualize the
sequence rules. To draw the tree, just indicate the asymmetric center you want to see the priority tree. After that,
place the tree by indicating its top and bottom-left extremities. All the branches will be sorted from left to right in
decreasing order of precedence. Presently this option works only with rule 1 (higher atomic number precedes
lower).
Fischer
To obtain a Fischer projection for any part of a molecule.
Indicate Fischer, then indicate each carbon atom of interest in sequence (they will be numbered in color as you
indicate them), or simply indicate the first and last carbon atom (note that in this mode the program will choose the
shortest carbon chain). When the desired atom chain has been selected, indicate the Fischer command again.
Indicate a point in the work area where the Fischer projection is to start, and a second one (below the first) where
the projection is to end (allow sufficient space, depending on the length of the chain). The Fischer projection will
appear automatically. Fischer projections of different parts of the molecule can be shown on the screen
simultaneously by going through this process several times.
7-69
23
Me
16
14
HO
13
25
21
17
18
O
HO
27
HO
1
CX
XO
CX
8
OH
21
OX
22
9
2
8
20
6
7
OX
19
5
XO
28
O
9
Me
4
Me
10
17
18
26
19
XO
3
20
11
2
Me
O
12
Me
16
XC
O
15
Fischer
1
Me
24
22
Fischer
3
7
23
10
11
24
Me
25
OX
4
6
O
5
Me
OH
12
Me
13
OH
14
Me
Me
26
27
AVERMECTIN AGLYCONE
15
Fischer
Fischer
1
5
11
NH2
4
Cl
2
OH
3
H2N
2
XO
3
1
5
N
7
O
8
O
4
7
N
8
O
XC
3
XC
2
28
ACIVICIN
5
11
Figure 7.9
Extended
To obtain an extended projection of any part of a molecule. Indicate Extended, specify the desired chain as with
Fischer. When the desired atom chain has been selected, indicate the Extended command again. Indicate the
leftmost end of the zigzag chain in the work area where the extended projection will appear automatically.
Reshape
To draw a rotamer of a molecule segment. Indicate Reshape, then specify the chain as with Fischer. For every
atom of the selected chain, indicate the new position in an empty part of the work area (you will be prompted by
atom number). It can be useful to bring the Grid in CASA, in order to reshape the molecule in a nice-looking way.
7-70
Identical
To locate identical, superimposable segments in any given molecule or between two different molecules or
precursors. See the Meso command below.
O
Me
Me
HO
OH
Me
Me
OH
Example of the "Identical" options
Me
O
OH
The C3-C7 and C9-C13 segments
are identical (superimposable).
Me
O
OH
Me
ERYTHRONOLIDE A
Figure 7.10
Enantiomeric
To locate enantiomeric, non-superimposable segments in a molecule. See the Meso command below.
Meso
To locate Meso (plane of symmetry) segments in a given molecule.
Indicate Identical, Enantiomeric or Meso, a dialog containing a list of chiral segments will appear if the molecule
contains such segments. Choose a chiral segment from the list. The chiral segment will be projected over the
molecule in a different color and with large lines, and all the carbon atoms included will be numbered. An
arrowhead will also be drawn (except for Meso), indicating the direction. You can change the highlight color by
changing the Molecule(H) index in the CARS Color sub-menu. If you want the text describing the chiral segment,
click on the With Comment Underneath toggle box of the dialog and the text will appear when you indicate a point
on the screen. To reobtain the dialog containing the list of segments, indicate Show Segment.
The minimum carbon chain length for Enantiomeric and Identical is 4, since these options have to compare at least
2 asymmetric centers. The minimum length for the Meso option is 5 carbons.
7-71
Identical+
This is an extension to the Identical option. The program will accept the equivalency of two different but
interconvertible functional groups such as a carbonyl and hydroxyl groups or the one-way conversion of a
hydroxy to a deoxy. This may improve the chances of finding a common precursor.
OH
O
OH
Me
OH
NH2
The C1-C6 and C1-C6 segments
are identical (superimposable).
Identical+
OH
O
Me
OH
NH2
Figure 7.11
Enantiomeric+
This is an extension to the Enantiomeric options. The program will accept the equivalency of two different but
interconvertible functional groups such as a carbonyl and hydroxyl groups. This may improve the chances of
finding a common precursor.
Show Segment
To re-obtain the dialog containing the list of segments. Indicate Show Segment. The list of segments will
appear. Point to the desired chain number.
7-72
Mirror
To obtain a mirror image of the molecule. Indicate Mirror, then the mirror image will immediately appear. If you
have more than one molecule, you have to point to the desired molecule. You can mirror even a Fischer projection
or an extended projection. Indicate Mirror again to go back to the original molecule.
NH2
NH2
OH
Cl
Acivicin
HO
Cl
Mirror
N
O
O
O
O
N
Figure 7.12
Scrap
To remove the visible results of the RS, R, S, Tree, Fischer, Extend, Identical, Enantiomeric and Meso options.
Indicate Scrap; the screen will be updated, leaving only the original target molecule(s).
Exit
To exit from CASA and return to CARS-2D or CARS-3D module.
7-73
Part 8
CAPS
In this version, 16587 precursors (of these, 3130 are optically active) are provided with the program with name*,
molecular formula, reference or source. 1927 are racemic compounds, and 11530 are achiral precursors. They
are divided into 21 files according to their framework shape. There is also a file for "match_type” precursors.
Here is the list of the precursor files (refer to the precursor manual) :
1. ACYCLIC-3
2. ACYCLIC -4
3. ACYCLIC-5
4. ACYCLIC-6
5. ACYCLIC-7-PLUS
6. AROMATIC
7. AROMATIC-CONDENSED
8. CARBOCYCLIC
9. CARBOCYCLIC-BRANCHED
10. CARBOCYCLIC-BRIGED
11. COMBINATION
12. HETEROAROMATIC
13. HETEROAROMATIC -CONDENSED
14. HETEROCYCLIC
15. MACROCYCLIC
16. MATCH
17. NUCLEOSIDE
18. POLYAROMATIC
19. POLYCARBOCYCLIC
20. POLYHETEROCYCLIC
21. STEROID
The list of precursors, which is representative rather than exhaustive, has been gathered from four sources:
1) commercial products
2) products of microbiological or enzymatic processes (90% e.e. or d.e.), designated by the letter [M] after
the name
3) products obtained by resolution, designated by [R]
4) products obtainable by chemical manipulation of readily available compounds using a reasonable number
of steps.
The precursors are depicted as basic structures, without protective groups or extra substituents, even if they were
reported as derivatives in the original publication. For example, all sugars are entered as acyclic (aldehydo) forms
rather than furanose or pyranose forms. Azido or cyano groups are arbitrarily considered as amino groups in the
corresponding precursors (amino sugars). Lactones may also be entered as the corresponding free acids.
* The naming of the precursors follows standard “everyday” nomenclature and not CA nomenclature in some
cases. It is felt that for the purposes of the program, the names are easily recognized as such. They could be
changed if desired to adapt to current CA or IUPAC policy. Naming compound presently does not allow
numbering like 3a, 4H. In such cases numbering will be continuous.
8-74
8.1 CAPS overview
Generally, the program will “adjust” the shape of the precursor carbon framework to best overlap with that of the
target. However, stereochemical information (R, S, etc.) as well as precursor selection is best obtained on flat
(hexagonal, etc.) or extended (zig-zag) type structures and not chair or boat forms, unless the chair forms are not
heavily substituted, particularly at the “indented” carbon atoms. In general “concave” centers should be avoided,
such as concave carbons in a chair form. In such cases, draw the molecule using CARS-3D and proceed as
usual.
In some cases, precursors will be formed for segments of the target molecule that bear no asymmetric center.
While this may be regarded as wasteful in terms of chirality, in the few cases that this is encountered, the carbon
framework of the precursor is well utilized.
Aromatic rings will appear in two perspectives, because of a rotation around a single bond. This may control the
position of a substituent with regards to its overlap with the target.
PRECURSORS
TARGET
X
X
Me
Me
Me
X
C3 match C2
Higher score
C5 match C2
Lower score
Figure 8.1
Here is the usual way to work with CAPS . Enter the CAPS module with your target molecule by selecting the
CAPS box in the Module menu. You can then change some parameters, and start a search by selecting Find.
Default parameters will make for a good search, but will look at every precursor in every file, trying to match them
everywhere onto the target, and the search will be very time consuming. You can help the program find
precursors faster by reducing the number of precursors to examine according to the type of precursor you want,
and possibly by specifying only part of the target to be matched against. The time it takes to find precursors is
directly proportional to the number of precursors it examines and to the number of atoms in the substructure of the
target to be matched. You can also use the Automatic File Selection, which will select the appropriate files to
search in.
For example, if your target is a heterocycle and you only want heterocyclic precursors, you can ask the program to
search only in the HETEROCYCLIC file, which contains about 1141 precursors, making the search more than 14
times faster (16587 / 1141). As a second example, if your target has about 30 carbons but you only ask for
precursors for a 6 carbon chain within the structure, the search will be more than 5 times faster. If you ask only
for the ACYCLIC-6 file (about 455 precursors), the search will be 36 times faster; if you specified both
parameters, the search would be 5 x 36 = 180 times faster. As you can see, the more you narrow down the search
the faster it is. We suggest you use “global” searches in batch mode only.
8-75
Flow chart of
CAPS commands
Draw Target
CAPS
Specify Files, Functions and Parameters
RSP
RSBC
Rapid
Scanning of
Precursors
Rapid
Scanning of
Best
Combinations
Batch
Find
Load Job
Hit
Save Job
Report
Text or Postscript
Precursors or
Best Combinations
• Name
• Reference
• File
• Score
• Match
Place / Transformation
Structure
• Name
• Reference
• File
• Score
• Match
• Transformations
(Chemical Operations)
Figure 8.2
When searching for precursors using the CAPS module, it is advisable to keep a few things in mind:
Remember that the program can only work with what is in its memory. It cannot invent new precursors. If the
best precursor (or the precursor you have in mind) is not in the database, it will obviously not be found. On the
other hand, you can add new precursors if you wish and build your own database.
Since the process is based on pattern recognition, the program may suggest the same precursor more than once,
but shown in different perspectives (it may be rotated around an axis, etc). This may show you different synthetic
possibilities for each perspective (see next page the example with (R)-5-hydroxy-2-piperidone in the CAPS
analysis of a heterocyclic target). Furthermore, the program may suggest a precursor which may not be suitable
as such, but it will make you think of a better one (Figure 8.3).
8-76
Elim
Elim
CX Inv
H
A
Annulate
3
10
Elim
CX
4
HO
3
5
4
9
NH
O
B
2
NH
HO
H
(R)-5-Hydroxy-2-piperidone
C.C. Deanne et al; JCS Chem.Commun.,813(1969)
DB=CHIRON, F=HETEROCYCLIC
28% # 44, P-M : 1-1/6-9
OH
5
3
2
6
CX
Elim
4
HO
Annulate
SELAGINE
6
2
O
O
NH
CX
Oxid.
(R)-5-Hydroxy-2-piperidone
C.C. Deanne et al; JCS Chem.Commun.,813(1969)
DB=CHIRON, F=HETEROCYCLIC
26% # 44, P-M : 1-1/6-2
Figure 8.3
Once the program has selected precursors, you may find some to be “impractical”. This is to be expected, since
the program is only decoding the hidden symmetry of the target for you, and expressing it in the precursor (and
vice-versa). You have to make the final decision with regards to synthetic feasibility. Remember also that there
might always be an “ideal” precursor that was not found because the parameters chosen were too restrictive.
It is possible to display two target molecules on the screen and ask for precursors for both at the same time. In
this case, number the atoms of the target molecules differently, i.e. 1-16 for target A and 17-31 for target B,
otherwise you will be confused when atom numbers are referenced.
Once the program has found precursors, you can examine the list of found precursors using the Report command,
you will have also the possibility to get the report on a file or sent to a printer. The RSP command (Rapid
Scanning of Precursors) is the best way to view the precursors that were found. They will be presented in
decreasing order of score, so you will see the best one first (according to the program’s scoring system). You
will see the sub-structure which was matched by the precursor in the molecule highlighting color. When scanning
through the precursors, note the ones you prefer; you can then place several on the screen with Place.
To use Place, indicate the desired center of the precursor. If a precursor is not well positioned, you can Move it
along with all of its associated information (texts and arrows). If With Transformation is asked for, you’ll need
more room.
8-77
CAPS using the Place command:
NH2
NH2
OH
Cl
OH
N
HO
O
O
OH
ACIVICIN
(2S,3R)-2-Amino-3,4-dihydroxy butyric acid
S. Saito et al, T.L., 26, 5309 (1985), F=ACYCLIC-3-4
86% # 17, P-M : 1-1/4-4
OH
O
O
OH
HO
NH2
OH
O
OH
(R,R)-Tartaric acid
Ald 25,138-0, F=ACYCLIC-3-4
73% # 86, P-M : 1-1/4-4
O
HO
OH
NH2
OH
2-Amino-2-deoxy-D-mannose
Comm., F=ACYCLIC-6
65% # 42, P-M : 1-1/5-5 (Cleaved and reshaped)
OH
O
L-Vinyl glycine, F=ACYCLIC-3-4
S. Hanessian et al, T.L., 25, 1425 (1984)
65% # 23, P-M : 1-1/3-3
Figure 8.4
CAPS using the Place command (With Transformation):
Modify
OH
Deoxy
NH2
NH2
O
HO
OH
Cl
N
O
OH
O
Cleave
ACIVICIN
OH
Annulate
Oxid.
2-Amino-2-deoxy-D-mannose
Comm., F=ACYCLIC-6
65% # 42, P-M : 1-1/5-5 (Cleaved and reshaped)
Figure 8.5
8-78
Other CAPS examples:
CX
HO
H
Me
2
4
Me
4
3
9
OH
5
7
2
8
9
6
1
8
Me
PUNCTATIN A
J. Am. Chem. Soc., 109, 3017(1987)
Branch
7
Me
O
Red.
10
OH
O
5
1
3
6
Annulate
Branch
10
(8S)-8-Methyl-4,9-hydrindene-1,5-dione (Hajos diketone)
Z. Hajos et al; Org. Syn., 63, 26 (1984)
DB=CHIRON, F=POLYCARBOCYCLIC
77% # 17, P-M : 10-10/9-3 (Paquette’s Choice)
Figure 8.6
Me
OX
Branch
O
OH
6
16
20
Me
Me
1
5
3
O
6
Me
10
OX
9
OX
7
8
Branch
11
Me Me
H
Me Me
O
2
7
4
17
1
4
OH
3
Me
O
8
10
12
Me
5
O
2
Annulate
13
OH
18
alpha-Ionone
Aldrich I-1,240-9
DB=COMMERCIAL, F=CARBOCYCLIC-BRANCHED
85% # 10, P-M : 7-18/13-16 (Corey’s choice)
FORSKOLIN
J. Am. Chem. Soc., 110, 3672 (1988)
Figure 8.7
2
HO
1
O
3
2
HO
O
4
3
OH
1
5
O
4
6
5
OH
O
H
6
Me
(3R,5S)-3-Hydroxy-5,6-epoxy hexanoic acid
Y. Guindon et al; T.L., 26, 1185 (1985)
DB=CHIRON, F=ACYCLIC-6
91% # 57, P-M : 1-1/6-6
COMPACTIN
Figure 8.8
8-79
CAPS with the Common precursor option:
OH
Me
Me
24
14
HO
1
HO
23
O
2
3
O
25
13
O
Me
Me
O
4
26
OH
12
11
Me
Me
O
O
(2S,3R)-2-Hydroxy-3-methyl succinic acid
K. Mori et al; Tet., 36, 87 (1980)
DB=CHIRON, F=ACYCLIC-4
78% # 33, P-M : 1-14/4-11
OH
OH
4
O
O
Me
3
Me
2
HO
OH
O
1
OH
(2S,3R)-2-Hydroxy-3-methyl succinic acid
K. Mori et al; Tet., 36, 87 (1980)
DB=CHIRON, F=ACYCLIC-4
65% # 33, P-M : 1-26/4-23
AVERMECTIN AGLYCONE
Figure 8.9
8.2 Working examples for CAPS
After a molecule has been drawn on the screen or loaded from a file using the CARS menu, move it to the top lefthand corner of the screen. For the following examples, load the target molecules from the Main/Molecule file
TARGET, select the CAPS command, select parameters as specified and press Find.
Acivicin :
• Select the File command. On the File section of the dialog, select the radio button to the left of ACYCLIC-4 ,
then click on the Exclude All button. Click OK. You now have only one active file.
• Select Find.
• When done, use RSP to scan through the found precursors.
Thienamycin:
• Select File. On the File dialog, select the radio button to the left of HETEROCYCLIC, then click on Exclude All.
Select OK. You now have only one active file.
• Select Functions and point to Secondary-Alcohol and Methyl to get a Y on the left of both. Click Done.
• Select Parameters, then set Minimum Score(%) to 50. Click Done.
• Select Find.
• Use RSP when done.
8-80
Avermectin :
• Go to File and point to the ACYCLIC-5 radio button. Click Exclude All, then select the toggle button to the left
of ACYCLIC-6 to accept it. Click Done. You now have only two active files.
• Select Parameters. Select the Specific Atoms, and point to atoms 23 and 28 (upper right). Click OK on the
Specific Atom dialog. Set the Minimum Asymmetric Center to 2 to get precursors which have at least 2
asymmetric centers. Set the Minimum Score(%) to 50. Click Done.
• Find, RSP.
Forskolin :
• Select File. Point to the COMMERCIAL radio button, then point to the CARBOCYCLIC-BRANCHED radio
button. From the CAPS Search option menu, select the Single Precursor item, then enter 10 (alpha-Ionone) in
the Precursor # text box. You will now search only for a single precursor (user’s choice).
• In the Parameters dialog, set the Minimum Score (%) to 30.
• Select Find.
• Use Place, indicate With Transformation to display the results with transformations.
Morphine :
• Select AROMATIC in File.
• In the Parameters dialog, set the Minimum Score(%) to 50. Set the Minimum Asymmetric Center to 0. Set the
Maximum Asymmetric Center to 0 (achiral precursors only).
• Find, RSP.
8.3 Cleaved and reshaped precursors
The CAPS module has an option to cleave and reshape acyclic and cyclic precursors. Diols, double bonds and
ketones are cleaved and the sites of the cleavage are replaced by an atom X which represents a given oxidation
state. The cleaved and reshaped precursor automatically adopts the shape of the carbon skeleton of the
corresponding substructure in the target molecule.
To search in this mode, one must select the Acyclic or Cyclic Cleave options. It is possible to view the precursors
Reshaped, As Drawn individually .
The following are examples of cleaved and reshaped precursors :
8-81
OH
Annulate
OX
8
1
Me
S
6
9
6
NH2
2
6
7
1
5
N
7
Deoxy
O
5
OH
Extend
3
X
2
1
5
O
X
4
4
O
Cleave
OH
7
2
Modify O
NH2
3
NH2
OH
Annulate
THIENAMYCIN
(1R,2R)-2-Amino-4-cyclohexene-1-carboxylic acid [M]
S. Kobayashi et al; T.L., 25, 2557 (1984)
DB=CHIRON, F=CARBOCYCLIC-BRANCHED
52% # 11, P-M : 7-7/6-8 (Cleaved)
52% # 11, P-M : 4-2/7-7 (Cleaved and reshaped)
Figure 8.10
OH
H
Me
O
H
10
14
Me
O
Me
Me
2
Annulate
Extend
O
6
10
6
O
11
2
8
7
3
12
1
Me
4
1
X
5
5
3
8
4
Annulate
22
3
7
1
13
H
6
CX
CX
Cleave
2
Me
10
O
Extend
X
Deoxy
Me
(R)-5-Methylbicyclo[3.3.0]oct-1-ene-3,6-dione
D.W. Brooks et al; JOC, 52, 2036 (1987)
DB=CHIRON, F=POLYCARBOCYCLIC
60% # 59, P-M : 10-22/8-13 (Cleaved)
60% # 59, P-M : 4-6/10-22 (Cleaved and reshaped)
ALBOLIC ACID
Figure 8.11
O
2
Red
Extend
12
3
7
H
OH
1
4
20
HIRSUTIC ACID
6
3
HO
O
9
7
3
9
7
4
O
2
1
Me
H
Me
O
H
O
5
8
Me
5
HO
Cleave
OH
H
6
1
2
X
X
Me
6
5
H
CX
H
(4S,6R,7R)-Bicyclo[3:2:0]-4-carboxy-4-methyl-1-heptanone
A.E.Greene et al; JOC, 50, 3957 (1985)
DB=CHIRON, F=POLYCARBOCYCLIC
73% # 13, P-M : 8-20/9-12 (Cleaved)
Figure 8.12
8-82
OH
4
8
X
OH
4
10
OH
9
O
4
7
Cleave
6
NHX
OH
3
5
6
2
7
1
5
Oxid.
Elim
3
X
8
1
5
8
2
4
6
2
3
9
9
8
O
NH
(+)-MEROQUINENE
O
7
OH
NHX
Extend
OH
Annulate
(1R,2R)-2-Carboxymethyl-1-hydroxymethyl-4-cyclohexene [M]
J.B. Jones et al; JACS, 104, 4659 (1982)
DB=CHIRON, F=CARBOCYCLIC-BRANCHED
65% # 22, P-M : 7-2/9-6 (Cleaved)
65% # 22, P-M : 4-10/9-6 (Cleaved and reshaped)
Figure 8.13
8.4 Working examples for cleaved and reshaped precursors
Acivicin (acyclic cleaves) :
•
•
•
•
•
Select ACYCLIC-6 in File.
Select Acyclic Cleave in Parameters.
Select Functions and choose Secondary-Alcohol and Amine-NHX.
F ind .
Select the Place command and put precursor 1 and 2 on the screen With Transformation to get chemical
transformations.
Thienamycin (cyclic cleave) :
• Select CARBOCYCLIC-BRANCHED in File. Click Exclude All, then point the HETEROCYCLIC toggle
button to make it active.
• In the Parameters dialog, Select Cyclic Cleave. Set Minimum Score(%) to 50. Set Minimum Atom Number to 7
(precursors with at least 7 skeleton atoms). Set Minimum Asymmetric Center to 2.
• Find.
• Place found number 7 (place it Reshaped and As Drawn).
8.5 The More option
This option allows you to see precursors which are good matches except for one or two unfavored
transformations. (Ex. oxidation of an unactivated carbon atom). Normally such precursors will not be seen
because of their very low score (usually less than 0). However with the More option, they can be seen and the
Place command (With Transformation) option indicates the “PROBLEM” centers. This allows the user to modify
that precursor so as to make it a better matching one.
8-83
Here are examples of the More option :
NH2
4
Cl
2
4
OH
N
O
1
3
5
O
O
O
Annulate
ACIVICIN
OH
2
Me
1
3
5
4
OH
2
Me
1
5
OX NH2
Modify
3
PROBLEM
OX NH2
MODIFY
Annulate
L-Norvaline
Aldrich 85,163-9
DB=COMMERCIAL, F=ACYCLIC-5
-1383% # 7, P-M : 1-1/5-5
L-Norvaline
Aldrich 85,163-9
DB=COMMERCIAL, F=ACYCLIC-5
45% # 7, P-M : 1-1/5-5
Figure 8.14
8
Deoxy
O
15
Me
Me
1
7
7
6
10
H
Me
10
1
7
2
8
6
8
2
3
9
5
Me
PROBLEM
OXID.
Me
1
2
9
6
O
O
10
3
4
3
4
Cleave
9
5
X
CX
4
CX
Annulate
X
Extend
Ketone precursor
65% # 1, P-M : 4-4/10-15 (Cleaved and reshaped)
Figure 8.15
8.6 The Match command
This command allows you to match structures in your database (precursors, intermediates, by-products,
proprietary compounds, etc.) with those of target structures. In this manner, you may discover potential
pharmacophores structural mimics, hence candidates for chemical modification and new uses for old compounds.
In this option only the carbon framework is matched without consideration of stereochemical overlap. In Match
All all atoms are accepted in matching operation. In Match Exact, carbon atoms are matched with carbon atoms
and hetero atoms for hetero atoms (ex: N for N, O, S, etc.). Be aware that if your parameters are not restrictive
enough, the program will very quickly find the maximum of 200 matches. It is suggested you use the Single
Precursor parameter in File to try to match only one precursor. The All Atoms/Specific Atoms parameter will also
decrease the number of matches found. You can see on the next page examples of chiral structural mimics and
pharmacophore search.
8-84
HO
7
Me
Me
O
10
H
15
Me
13
12
O
O
5
14
11
9
6
O
H
Me
O
H
H
3
4
1
2
Me
OH
O
Me Me
9
Me
7
HO
6
Me
OH
11
12
15
HO
3
4
1
2
OH
4
O
13
Me
OH O
OH
OH
2
Me
Me
3
1
O
12
9
14
5
OH
OH
Me
5
Me
6
Me
14
11
HO
Me
HO
7
OH
13
OH
8 10
8
10
OH
OH
MONENSIN A
(Target)
Me
Me
H O
Me
O
HO
Me
Me
8
ERYTHRONOLIDE A SECO ACID
Abbott, F= MATCH
Match#9, P-M:1-15/15-1
Me
ERYTHRONOLIDE A SECO ACID
(Precursor)
Figure 8.16
13
2
HO
12
1
3
11
4
Butaclamol
DB=USER, F=WORKING_FILE
Match # 1, P-M : 1-8/14-1
14
9
11
8
10
12
10
O
H
13
9
7
18
5
14
N
6
N
Me
HO
13
8
6
N
12
7
14
MORPHINE
9
11
O
8
10
H
H
5
4
7
6
N
HO
Me
1
3
FENTANYL
DB=CHIRON, F=MATCH
Match # 3, P-M : 6-18/14-1
2
Me
Me
Figure 8.17
8-85
Me
Me 15
When in Match mode, all search parameters can be used except for Minimum Score/ Maximum Score, since no
scores are given for matching precursors. This command works by finding precursors with the same or lower
number of essential carbons and other atoms as found in the target structure. The idea here is that if there is a
good match, it is easier to extend the precursor chain than to shorten it. Non-essential atoms in a precursor will
simply not match any segment of a target, but will be used to compute the final score.
Acyclic precursors will match acyclic and cyclic targets in many ways. Cyclic (alicyclic, aromatic) precursors will
match the corresponding cyclic portions of the target. If there are any “residual” (non-essential) atoms, they’ll
either extend in different ways to match any remaining atoms in the target, or dangle in space somewhere. Branch
points and ring junctions will exactly match equivalent parts of the molecule. To become more familiar with this
command, try a few matches and scan over the hits with RSP.
Hetero atoms (N,S,O, etc.) can be considered as interchangeable in the Match Exact mode. All atoms are
interchangeable in the Match All mode, even carbon with non-carbon. You can therefore make the match as
restricted or as general as desired.
The designation of essential atoms in a precursor (highlighted skeleton) determines which atoms will be matched
with the target structure. Consideration should be given to the type of match, i.e. searching for new synthetic
uses, or pharmacophore matching with known targets.
It is important that essential atoms in potential precursors be entered manually when being saved, in order to give
the structure flexibility for matching. Thus, for synthetic uses, the carbon atoms in the main framework of the
precursor should be essential, as well as important hetero atoms which you feel should find counterparts in the
target structure, or those which are difficult to modify chemically (for example, a ring hetero atom).
For pharmacophore matching, consider the specified atoms of the target as representing the pharmacophore.
Remember that those portions of the precursors that mimic potential targets should be entered as essential atoms
when the precursor is saved. You can consider the “phenethylamine” portion of a precursor as being essential in
the search for analgesics.
8.7 Matching a given structure
Draw the target structure in the usual way. Enter one or more structures as precursors in one of your precursor
files, giving them a name, reference and essential skeleton as for ordinary synthetic precursors. Go to CAPS with
the target and activate the Match Exact (match exact: that is C for C and hetero atom for hetero atom only) or
Match All (match all: all atoms interchangeably) mode by selecting the Match Exact radio button in the Parameters
dialog. When you ask for a match and you get a hit, you’ll observe when placing it on the screen a reshaping of
the precursor framework, as it adopts the shape of the target (regardless of functional group overlap). Sometimes,
functional groups also overlap in one combination or another. You can then decide the extent of regio- and
stereochemical convergence (pharmacophore overlap?), and plan your chemistry accordingly (i.e. modify your
precursor chemically, etc). See Figure 8.16 for an example, in which Monensin was entered as a target and
Erythronolide A as a precursor. All framework carbon atoms in erythronolide A were entered as essential atoms
when it was saved. The lactone ring oxygen and the substituents were not entered as essential. Note the
“reshaping” of the macrolide and the excellent functional/stereochemical convergence. Only one overlap
combination is shown. Figure 8.17 shows the reshaping of butaclamol and fentanyl into a Morphine perspective.
A direct application of the Match option could be found in a preliminary, rapid survey of possible pharmacophores
or structural mimics. Thus, one can search for a Match of precursors with a given target having a certain topology
and complement of important functional groups. This process can be considered as a pre-selection of potential
pharmacophore-mimics. Those precursors can then be subjected to a chemical modification program as well as to
energy minimization. A lot of time can be saved by first finding promising precursor structures using this simple
protocol provided by The Chiron Program, then moving on to more sophisticated methods.
You can rapidly draw a target shape without functionality just to see molecules adopt the same shape (see example
next page).
8-86
OH
OH
8
4
O
9
13
6
4
HO
3
5
14
17
2
1
15
16
3
12
7
11
10
14
6
2
8
7
1
11
HO
N
Me
1
6
10
9
13
MORPHINE
Gates, Tschudi, JACS, 74, 1109 (1952)
DB=CHIRON, F=MATCH
Match # 4, P-M : 1-13/14-1
2
5
12
9
5
3
4
O
13
7
8
14
N
Me
Figure 8.18
8.8 Working examples for Match
The following precursors are in precursor file Match :
1) Leukotriene precursor (framework carbon atoms are essential)
2) Apomorphine (phenenylamine portion essential only)
3) Fentanyl (phenethylamine portion essential only)
4) Morphine (Hetero atoms and ethylene bridge are non essential)
5) Nicotine (framework carbons and pyrrolidine N are essential)
6) Mescaline (all framework carbon atoms and N are essential)
7) Octoclothepin (phenenylamine portion essential only)
8) Psilocin (all framework carbon atoms and N are essential)
9) Erythronolide A Seco Acid (only framework carbon atoms are essential)
10) Pseudomonic Acid (only framework carbon atoms are essential)
11) Compactin (framework carbon atoms are essential)
12) Erythronolide A (only framework carbon atoms are essential)
13) Muscarone (framework carbons and side chain amino group are essential)
Forskolin :
• Load Forskolin and enter the CAPS module.
• On the File dialog, select the MATCH file in the CHIRON database, then select the Single Precursor item from
the CAPS search option menu, then enter 9 (Erythronolide A Seco Acid) in the Precursor # text box.
• Find.
• Use RSP and notice the matching chain on the target.
• You can start another search with Pseudomonic acid.
• Keep the same parameters.
• Find, then ask for number 10. Use RSP.
Shapes :
•
•
•
•
Draw a steroid or eicosanoid shape.
Repeat as above.
Select Find and ask for the precursors of your choice.
Use RSP to scan the matches found.
8-87
• Start a search with Match All instead of Match Exact.
8.9 Aromatic precursors
The Chiron Program databases contains many aromatic and heteroaromatic precursors. The program will only
match an aromatic compound over an aromatic part of the target. The program will also try to match an aromatic
compound over a carbocyclic part of the target, but it will lose a lot of points. If you want to search such
precursors then ask only for aromatic and lower the minimum score enough. By default, the program will not not
try to match a aliphatic precursors to match on aromatic target. If you want the program to allow that kind of
match, select the Allow Non-Aromatic on Aromatic radio button in the Parameters Dialog.
To get aromatic hits you only have to ask for AROMATIC, AROMATIC-CONDENSED, POLYAROMATIC,
HETEROAROMATIC, HETEROAROMATIC-CONDENSED, or POLYHETEROAROMATIC files in the File
option in CAPS . Also in the COMBINATION file you will find examples of non-aromatic compounds
(hydroaromatics).
Example of an aromatic precursor (DL-Dopa) found by the program for the Morphine:
2
HO
8
HO
1
3
9
7
11
4
4
10
12
O
6
HO
H
3
5
9
14
2
HO
N
1
Me
NH2
O
HO
DL-DOPA, 97%
Aldrich 10,216-4
DB=COMMERCIAL, F=AROMATIC
72% # 216, P-M : 1-14/9-1
MORPHINE
Figure 8.19
8-88
Part 9
CAPS Command
To search precursors for a target molecule, load the molecule onto the screen, enter the CAPS
module, select the search parameters, and press Find. You will find general information in
the previous section. This section will explain the CAPS commands in detail.
The File, Functions and Parameters commands will allow you to specify search parameters.
Annulate
Me
NH2
CX
NH
2
5
4
6
10
O
OH
1
4
9
OH
3
OH
O
O
5
HO
O
L-Glutamic acid (Oppolzer’s Choice)
Ald 12,843-0, F=ACYCLIC-5
63% # 4, P-M : 1-6/5-10
ALPHA-KAINIC ACID
Annulate
H
O
O
6
8
H
HO
Me
Me
10
14
Me
H
Me
24
5
CX
8
11
1
1
2
H
H
Me
Extend
7
9
HO
OH
O
4
Me
9
Extend
13
3
Modify
12
OPHIOBOLIN C
(4R,5R)-5-Hydroxymethyl-5-methyl1-exomethylene-cyclopentane-4-acetic acid
T. Money et al, CJC, 63, 3182 (1985)
56% # 34, P-M : 7-8/9-24
Figure 9.1
9-89
File
To specify the databases and files you want to search in.
Using File, you can change the current database or file by pointing to the radio button
to the left of the desired
database or file name. You can also turn the databases or files ON or OFF by pointing to the toggle button to
the left of the database or file name. If you only want to use a few files, for example ACYCLIC-5, ACYCLIC-6
and ACYCLIC-7-PLUS, it is faster to make one of them the current file, to ask for Exclude All, and finally to turn
the other two back ON. For more information about the file organization, see the File Organization section in Part
3.
Automatic File Selection:
The program will automatically select files to search into. You can then add or remove files by turning them ON
or OFF.
Precursor #:
After selecting the Single Precursor item in the CAPS Search menu item, enter the number of the precursor in the
current database/file you want to search for.
9-90
Functions
To select the functions that you may or may not want on a precursor.
The program will only try to match precursors that correspond to all
functional groups you selected. The more selective you are, the faster the
search will be. These groups can be anywhere in the precursor, and not
necessarily in the expected positions. The program will not search for
precursors which don’t have the required functions. The program must
match the precursor before seeing if the functional group is in the right
place. The Functions command works the same way as the Function submenu option in Scan menu, but after selecting a precursor that matches all
parameters, it will try to match it on the target molecule.
Select Functions in CAPS , then point to the functional groups you want
(once) or don’t want (twice) on the screen. You will get a or an to
the left of it. If there is no Y or N in the toggle box(like ), then the
functional group will not be considered, and it may or may not be present
in the precursor. To accept all functional groups, select Accept All. Be
aware that if you start a search, all functions are memorized for the next
search (without exiting from CAPS). So if you change your mind, don’t
forget to indicate Accept All and the new functional groups.
For example, if you select Acid and Amine (put a to the left of both). When you select Find the program will
search only for Amino Acid precursors. If you search in the ACYCLIC-6 file, it will search only for acyclic amino
acid precursors of length 6. If you select Carbocyclic the program will search only for carbocyclic amino acid
precursors. You can put an to the left of Alcohol; it will then search for amino acid precursors that do not
contain any alcohol groups. You can use any combination of and and the program will only try to match
precursors that correspond
Specifying Acyclic, Aldehyde and Polyol will most probably find carbohydrate precursors. If you add Amine, you
will get aminodeoxy carbohydrate precursors. If you ask instead for CH2 , you will get deoxy carbohydrate
precursors.
Specifying Carbocycle (not branched) and putting an
precursors such as Inositol.
9-91
to the left of CH2 will get you fully saturated polyol
Parameters
Score (%) :
This search parameter is to specify the minimum and maximum score to get precursors.
Scores are given by the program based on the degree of framework, functional and stereochemical convergence
between the precursor and the target. When the program finds a hit it will calculate a score and if this is higher
than the minimum score and lower than the maximum then it will add this hit to the other precursors found. Note
that the search will not be faster if you are more selective for those parameters since the program must do all the
work to see if the precursor is good enough to be kept.
Note that you can ask for a negative minimum score for precursors such as -100 in order to find precursors that
may be quite difficult to use as starting materials.
Atom Number :
To specify the minimum and maximum number of atoms on a precursor skeleton.
Those two parameters allow you to change the minimum and maximum number of essential atoms of the
precursor. These are atoms that must match the target structure or substructure. The portion of the precursor that
9-92
matches the target appears in a different color. Essential atoms are numbered when they appear on the screen and
in the precursor manual.
For example if you ask for CARBOCYCLIC precursors with minimum atom number equal to 6 and maximum
atom number to 6, you will get only cyclohexane rings without carbon branches. If you ask the same in
CARBOCYCLIC-BRANCHED you may get a cyclopentane ring with a branch of 1 carbon atom or a cyclobutane
ring with a branch of 2 or two branches of 1. This option is useless for ACYCLIC-5 or ACYCLIC-6 files since
all precursors in those files have exactly 5 and 6 essential atoms. By default, all precursors are searched.
Asymmetric Center :
To specify minimum and maximum number of asymmetric centers in a precursor.
You will be able to cut down in search time in a very significant manner and to get only those precursors with the
desired number of asymmetric centers.
For example, if you ask for a minimum of 3 asymmetric centers the program will search only for precursors that
have at least 3 centers, so the search will be faster and you will get a better choice of precursors.
Achiral precursors : If you ask for a minimum of zero and a maximum of zero, the program will search only
for achiral precursors.
Matching :
To search for chiral, racemic and achiral precursors based on a scoring system. Matching “shapes” are also
searched.
This parameter can be set to Chiral, Racemic , Match All or Match Exact by selecting the proper radio button. In
general, searches will be conducted for chiral, racemic and achiral precursors by matching carbon framework,
functional groups and stereochemistry. Scores are given based on degree of convergence, feasibility of
transformations to be done, and other parameters.
For an optically pure target, chiral non-racemic precursors will come out with higher scores if the convergence is
good. Racemic precursors will consider the target or its mirror image, hence a lower score compared to the pure
enantiomer. Lastly, achiral precursors will be found with a much lower score.
The Racemic parameter will compute a score without considering stereochemistry. It may be used for racemic
targets, and it will search for racemic precursors as well as chiral and achiral ones.
The Matching parameter includes Match Exact ( where carbon atoms match other carbon atoms, but not hetero
atoms) and Match All ( where all atoms can be interchanged). With this parameter, priority is given to framework
superposition, and it is useful for finding structural mimics and pharmacophore types of target molecules. Match
does not consider any score, hence it is a different type of precursor search.
Cleaving :
This parameter specifies cleave and reshape operations. If you use the default No Cleave parameter, the program
will not cleave any precursors and the match will proceed in the usual way.
If you specify Cyclic Cleave, the program will cleave rings in a number of ways and will try to match the cleaved
precursor in every possible perspective onto the target. This is a very powerful option that allows you to find
precursors that cannot be found easily with the human eye. Depending of the difficulty of the cleave, there will be
a corresponding lowering of the score. You can see examples in the previous chapter. Cyclic Cleave will cleave
vicinal diols, olefins, as well as ketones in the alpha-position (ex. Baeyer-Villiger reaction).
If you specify Acylic Cleave, the program will cleave acyclic precursors or acyclic parts of cyclic precursors and
will try to match those shortened precursors onto the target. You should only use this mode if you think there
might be a longer precursor that may match better after one extremity is cleaved.
9-93
Specific :
To search precursors for a specific chain of atoms in the target molecule.
By default, All Atoms means that all atoms are considered in the target (i.e. the whole molecule). When the
Specific Atoms radio button is selected, you can point to the first and last atoms to search precursors for that
substructure. If you want two substructures in different parts of the molecule, start with the first atom and point
to the last atom twice before resuming with the second substructure. If you want to get All Atoms back indicate All
Atoms. The program will not attempt to match other parts of the target molecule; the search will therefore be
faster. Terminal substitution must be considered as part of the substructure in the search, i.e. they must be
indicated as specific also (ex. Forskolin). The specific part of the target will be drawn in a different color during
the search.
Critical :
To specify critical atoms and functional groups that have to be matched perfectly (ex. OH for OH, etc.).
With Critical Atoms parameter you point to an atom of the target (generally a carbon) and only precursors that will
match it perfectly will be chosen. You have to indicate the squeleton atoms of the target and not the functional
groups. Usually you will only ask for one or two critical carbon atoms because the likehood of perfect matching
will be much less. The program will indicate the critical atoms (among the essential atoms) by displaying their
atom numbers in a different color during the search. Note that this option doesn't make the search much faster,
but it would be very useful if the database of precursors is very large.
To cancel Critical Atoms, indicate No Critical.
Additional :
Select More to find additional precursors that fit adequately except for a functional group that is very hard to
modify chemically. In the Just mode, these groups are worth -9999 points each and the precursor will be
rejected. In More mode, their score is set to -100. The More options finds a precursor that would have been
overlooked otherwise. With the With Transformation option in Place, a “problem!” message will appear around
the trouble making atom or group. This option is there to suggest alternate ideas, and to modify the precursor
accordingly.
Similar :
Select Remove to remove similar precursor and keeps only the best ones. For example, if two precursors are
identical except for one functional group, the program will only keep the one that has the easiest chemical
transformation to make to get the right functional group on the target. Remove, the default option will keep every
precursor found.
Deoxy
NH2
NH2
OH
Cl
4
HO
N
O
Acivicin
OH
2
3
5
O
1
OH
Keep
NH2
OH
O
HO
4
5
OH
2
3
OH
1
O
Remove
Figure 9.2
Aromatic :
By default, the program will not try to match a aliphatic precursors to match on aromatic target. If you want the
program to allow that kind of match, select the Allow Non-Aromatic on Aromatic radio button.
9-94
Reshaping :
This parameter indicates the way in which precursors will be drawn with the RSP , RSBC , Report and Place
(With Transformation) options. This mode must be selected before calling any of the four options.
Reshape :
indicates that the precursor will be reshaped according to the contours of the target’s
corresponding carbon skeleton.
As Drawn : indicates that the precursor will be redrawn exactly as it was in the database.
Sorting :
The By Score mode allows you to see the precursors in decreasing scoring percentage. The Common mode
displays the precursors in alphabetical order.
After the program has found some precursors, it will display them in decreasing order of score, letting you see the
best ones first (by default). If you want, you can sort the list of precursors found by alphabetical order of name,
in order to get precursors that are found more than once for the same target back to back. By placing common
precursors together in the list you will be able to see if a precursor can be used to synthetize different parts of the
target.
You can specify this mode before or after indicating Find.
Find
To begin the search for precursors to a target molecule.
When all parameters have been set, indicate Find to start the search. You can stop the search at any time by
pressing the Stop button.
If you have indicated Critical Atoms, their atom numbers will be displayed in color. The specific part of the target
molecule will be highlighted.
After indicating Find you will see a dialog which shows the updated searching information, that is, current
database, current file, the number of precursor it has searched in the current file, the number of precursors found
up to date, the score (%) of the best found precursor.
After you get some hits, use commands like RSP, RSBC, Place or Report to see the results.
9-95
In Match mode, the program will stop searching after it has found 200 precursors. In Chiral and Racemic mode,
the program will keep only the best 200 precursors.
RSP (Rapid Scanning of Precursors)
To rapidly visualize the precursors that were found on the screen.
After the program finds precursors, you can scan through them by selecting the RSP command. When you
indicate a point on the screen where all precursors will appear, the following dialog will appear.
Press the First button to display the first non-discarded precursor. Press Previous to see the previous nondiscarded precursor. Press the Next button to display the next non-discarded precursor. Press Last to see the last
non-discarded precursor. Move the slider to see a specific precursor list number. Press Discard Current to
discard the current precursor from the list. Press Discard Rest to discard the following precursors (the current
precursor will not be discarded). Press Done to stop the scan and keep the precursor on the screen or Cancel to
remove it. When the target molecule is somewhat large, the structure may be compressed on the screen.
Discarded precursors are logically discarded (not physically). You may undiscard a precursor by dragging the
slider bar to the list number of the precursor you want to see. When you save a precursor job, the program will
not save discarded precursors in the file, and all remaining precursors will be numbered consecutively. When you
use the Report command, only remaining precursors will be listed.
RSBC (Rapid Scanning of Best Combinations)
To rapidly visualize the best combinations of precursors that were found on the screen.
After selecting RSBC the program will move and scale the target molecule in the middle of the screen, and place
the precursors if the combination is made of only two precursors. If there are more than 2 precursors for a given
combination, the program will ask you for the location of each precursor.
You press the First button to display the first combination of precursors. Press Previous to see the previous
combination. Press Next button to display the next combination. Press Last to see the last combination. Press
Done to stop the scan and keep the information that was added on the screen or Cancel to remove it.
When the target molecule is somewhat large, the structure may be compressed on the screen. For better result, we
suggest you to use this command only with the target molecule on the screen.
9-96
Hit # 1
Overall Score = 67%
Overlap Index = 82%
Average Precursor Score = 74%
O
39
OH
8
26
7
9
34
19
28
HO
OH
4
O1
4
23
22
O 35
41
16
14
10
5
21
17
15
HO
HO
H
31
5
6
40
Me
OH
6
Me
20
18
2
3
O
38
30
O
13
29
24
12
25
3
O
Me
36
37
H
2
11
9
Me
1
8
27
2
10
H
42
5
7
(4S,5R)-4,5,6-Trihydroxy-hex-1-ene
DB=CHIRON, F=ACYCLIC-5 # 75
Precursor List # 1, Score = 88 %
6
OH
43
Kijanolide
O
11
Me
33
H
O
O
Me
3
4
32
1-Oxaspiro[4.5]deca-6,9-diene-2,8-dione
DB=CHIRON, F=COMBINATION # 322
Precursor List # 53, Score = 64 %
O
H
12
S
1
8
O
7
9
2
10
3
6
5
4
H
dl-(1R,2S,9S,10R)-2-(SO2Ph)Me-8-oxo1,2,10,5,6,7,8,9-octaHnaphthalene-1-COOEt
DB=CHIRON, F=POLYCARBOCYCLIC # 448
Precursor List # 27 (Racemic), Score = 70 %
Figure 9.3
Place / Transformation
To place the precursor(s) that you wish to visualize on the screen.
Select Place. Move the slider to the list number of the precursor you want to see (and not its file number), then
indicate a point on the screen that correponds to the center of the precursor structure (note the highlighted substructure of the target which is already colored).
Select Reshaped to indicate that you want the precursor to be reshaped according to the contours of the target’s
corresponding substructure or As Drawn if you want the precursor to be redrawn exactly as it was in the database
9-97
Check the With Transformation toggle button to have chemical transformations appear as keywords for a given
precursor. You must check the toggle box before indicating a point on the screen, then you must indicate the
positions of “chemical messages” around specified target atoms. Keep in mind that there is text under the
structure. However if there is not enough room, the program will bring the structure back inside the work area,
where you can move it using the Move command or delete it with the Delete command (to delete all precursors,
use Scrap).
Report
To obtain a listing of all the precursors or best combinations found for the target on the screen.
This information can be either viewed on a text window, saved to a file or printed. You can obtain the information
in text format or a PostScript graphic listing containing the target molecule and all the precursors found.
Report Kind :
Select Precursors to obtain a listing of the precursors found for the target on the screen.
Select Best Combinations to obtain a listing of the best combinations found.
Output Kind :
Select Text Only to obtain a text. For every hit, the precursor, hit number, score, name and reference of the
precursor and its file name with precursor number in this file are given. On the last line you will get information
about the matched atoms in the chains of precursor [P] and molecule [M]. For all essential atoms of the
precursor, you will get the number of the matching atom in the target.
Select PostScript to obtain a graphic listing containing the same information as in the Text Only option but also
including the precursor image. An asterisk indicates an asymmetric carbon in the target.
Select MDL SDfile to obtain a listing of the best combinations found.
List To :
9-98
Select Printer to send the Postscript information directly on the printer specified in the Command text box.
Select File to save the Postscript information on the file specified in the File text box. Use the Browse button to
change the file name.
Here is an example of a Precursors/PostScript graphic listing obtained after searching ACYCLIC-5 precursors for
Acivicin.
9-99
CHIRON 5.0
Precursor Search List
1999/12/31
Acivicin
Search Parameters:
Matching: Chiral
Score (%): 65 - 100
Atom # 3 - 255
Asymmetric # 1 - 100
Cleave: No Cleave
Similar: Accepted
More option: Off
11
Databases:
Chiron
Commercial
NH2
4
6
9
2
Cl
3
1
5
N
7
O8
O
10
7 hits (6 discarded)
OH
Files:
Acyclic-5
Acivicin
1
PRECURSOR # 1, SCORE = 80%
NH2
Name = (2S,3R)-2-Amino-3,5-dihydroxy pentanoic acid
4
HO
3
OH
Ref = S. Saito et al; T.L., 26, 5309 (1985)
2
1
5
Database = CHIRON, File = ACYCLIC-5 # 6
O
OH
Match P/M 1:1 2:2* 3:3* 4:4 5:5
*
HO
4
PRECURSOR # 2, SCORE = 73%
NH2
OH
3
Name = (2S,3S,4R) 2-Amino-3,4,5-trihydroxy-pentanoic acid
OH
2
Ref = G. Casiraghi et al; T.L., 35, 2423(1994)
1
5
Database = CHIRON, File = ACYCLIC-5 #183
O
OH
Match P/M 1:1 2:2* 3:3* 4:4 5:5
*
HO
4
PRECURSOR # 3, SCORE = 70%
OH
OH
3
Name = L-Arabinose
O
2
5
Ref = Aldrich A9,190-6
1
Database = COMMERCIAL, File = ACYCLIC-5 # 10
OH
Match P/M 1:1 2:2* 3:3* 4:4 5:5
*
PRECURSOR # 4, SCORE = 70%
NH2
Name = (3R,4R)-3,5-Dihydroxy-4-amino pentanoic acid
2
HO
3
1
OH
4
Ref = P. Garner; T.L., 25, 5855 (1984)
5
Database = CHIRON, File = ACYCLIC-5 # 7
OH
O
Match P/M 1:5 2:4 3:3* 4:2* 5:1
*
HO
4
PRECURSOR # 5, SCORE = 70%
OH
OH
3
Name = D-Xylose
O
2
5
Ref = Aldrich X107-5
1
Database = COMMERCIAL, File = ACYCLIC-5 # 14
OH
Match P/M 1:1 2:2* 3:3* 4:4 5:5
*
PRECURSOR # 6, SCORE = 69%
O
HO
2
OH
3
Name = (3R,4S)-Xylulose
OH
4
1
Ref = Aldrich 28,417-3
5
Database = COMMERCIAL, File = ACYCLIC-5 # 50
OH
Match P/M 1:5 2:4 3:3* 4:2* 5:1
*
HO
4
PRECURSOR # 7, SCORE = 68%
OH
OH
3
5
Name = L-Arabitol
OH
2
Ref = Fluka 10870
1
Database = COMMERCIAL, File = ACYCLIC-5 #351
OH
Match P/M 1:1 2:2* 3:3* 4:4 5:5
*
Points
To see how each precursor got its score.
A table of the precursor match on the target, including the points (in percentages) given for the chemical
transformations and the ratio of importance for each center of the target is shown. You can also see losses and
bonuses.
O
Me
OH
Me
HO
Me
6
OH
Me
OH
1
O
OH
3
OH
2
Me
2,4-Dideoxy-2,4-di-C-methyl-D-glucose
S. Hanessian et al; CJC, 55, 1111 (1977)
DB=CHIRON, F=ACYCLIC-6
78% # 37, P-M : 1-1/6-6
Me
O
OH
4
Me
O
5
Me
OH
Me
ERYTHRONOLIDE A
Figure 9.4
-------------- PRECURSOR SCORING DETAILS --------------Name
Ref
Dbase
File
Score
=
=
=
=
=
2,4-Dideoxy-2,4-di-C-methyl-D-glucose
S. Hanessian et al; CJC, 55, 1111 (1977)
CHIRON
ACYCLIC-6 # 37
78%
Prec
----
Mol
---
MatchKind
---------
FunctP
------
1
2
3
4
5
6
1
2
3
4
5
6
Extremity
Chain
Chain
Chain
Chain
Extremity
COX
CHMe
CHOX
CHMe
CHOX
CH2OX
Losses and
-8
-7
8
FunctM
------
r
l
r
r
COOX
CHMe
CHOX
CHMe
CHOX
CXX
r
l
r
l
Ratio
-----
Score
-----
7%
20%
17%
20%
17%
19%
90%
100%
100%
100%
70%
50%
bonuses :
%
Precursor extremity matches asymmetric center
%
Too many chemical manipulations to do
%
Miscellanous Bonus
9-102
Batch
To save targets and parameters for a batch job.
Precursor searches may be done in batch mode after the search parameters have been selected. Once all
parameters are specified, select Batch instead of Find. You will have to enter a name for this job. The job is
entered in a local queue. You can put more than one job in this queue. To start the search in background:
% chiron -b &
You will then see the list of jobs that are waiting. After you indicate Batch, you cannot remove the job from the
queue in Chiron, but you can do it by editing the filebatch.dat file in your current working directory.
To retrieve the precursors found for each target, use the Get command. You can kill a job that is executing in
batch by typing % kill %#, where # is the number of the job (between square brackets , which you should
have noted when you type the command; otherwise use the jobs command). If you stop the job, or if it was not
completed, you can send it again in batch, and non-completed jobs will be run again (completed jobs will not be
searched for).
Save Job
To save the currently found precursors in a file.
After you have found precursors, you can save them with the target and parameters in a file for future
consultation. You will have to give a name to this job. You can recover it with Load Job just by going in CAPS
without molecules and by entering the same name as in Load Job. You can save more than one job if you want.
The program will not save discarded precursors in the file, and all remaining precursors will be numbered
consecutively.
The target and parameters are saved in a packed file into your current working directory with the name you
indicated followed by the extension ‘.bat’. Precursors found will be saved in a packed file similarly named but
with the ‘.get’ extension. Those two files are the same as for a batch job. You can delete them with the rm
command.
Load Job
To retrieve saved jobs or batch jobs when done.
When the batch job is completed, you can get the results back by selecting Load Job and selecting the same job.
You can also retrieve a saved job by using the same name. Note that any previous target and precursors on the
screen will be lost.
Delete
With this command you can delete any precursor that was placed on the screen using Place, RSP, or RSBC .
Select Delete and point to an atom of the precursor to delete. Text and arrows (for With Transformation) that are
linked to this precursor will be deleted along with it. Note that you will not be able to delete a precursors added by
the RSP or RSBC commands without first closing the RSP or RSBC dialog.
9-103
Move
To move a precursor previously placed on the screen.
Select Move and an atom of the precursor to move. Indicate the new position, and the structrure will move
according to this translation, along with texts and arrows that were placed with it.
Scrap
To delete all precursors from the screen, leaving only the target.
After you indicate Scrap, the target will reappear alone on the screen. You can then place other precursors on the
screen or continue with another search.
Exit
To exit from CAPS and return to CARS-2D or CARS-3D module.
9-104
Part 10
CARS-3D
The problem of representing a three dimensional object on a flat computer screen is a difficult one. Two major
obstacles must be overcome, namely loss of information on the positions of atoms, and cluttering up of the screen
with information that prevents the user from easily recognizing the structure.
We have devised some artifacts which help to simulate depth and perspective. This is achieved by “enclosing” the
molecule in a box and by projecting its shadows on the walls and floor of the box. Selective highlighting of the
frontmost bonds is possible.
CARS-3D has most of the features of CARS-2D , but it also offers additional possibilities for molecule input,
such as a semi-automatic drawing mechanism and manipulation of bonds and atoms in space.
CARS-3D was implemented to offer an alternative way to enter molecules with complex or ambiguous two
dimensional “alpha-beta” representations, such as bridged structures. It can also be used in conjunction with
precursor search analysis as offered by CASA and CAPS . In CAPS , framework overlap will be achieved with
the correct precursors; however, the substituents may be somewhat off-plane, since the precursor molecules were
entered in the CARS-2D mode.
CARS-3D
INPUT
MANIPULATION
Draw
Draw3D
2D->3D
Build
File
Atom
Detach
O,N,C,S,H
Move
Rotate
Twist
Deep
Delete
Scale
Figure 10.1
10-105
10.1 Entering CARS-3D
Entering CARS-3D is done by selecting the CARS-3D item in the Module menu. The CARS-3D menu will
appear, and the program will try to compute a suitable 3D configuration for the molecules on the screen, see 10.5
for details.
You may return to CARS-2D by selecting the CARS-2D option, and the program will try to build a good 2D
representation for the 3D molecules (which may or may not have been transferred from CARS-2D in the first
place), including alpha and beta bonds where necessary to preserve the molecule’s stereochemistry. You may also
go directly to CASA or CAPS by selecting their respective menu boxes.
10.2 Molecule representation
We have included some features to help in the recognition of three dimensional molecules on a flat surface such as
the terminal screen. A brief description of each follows. Figure 10.2 shows examples of the box, molecules and
their reflections on the left wall and floor.
Me
O
HO
AVERMECTIN AGLYCONE
O
Me
O
Me
O
Me
O
Me
O
Me
Me
Me
Me
O
OHO
OH
O
HO
Me
Figure 10.2
10-106
O
To properly recognize a three dimensional molecule, a reference background must be provided. In CARS-3D ,
this function is fulfilled by the box. Its role is threefold:
1) The box helps you visualize a molecule’s dimensions in space, by offering reference objects (shadows) on
the left wall and on the floor.
2) It defines the limits of the work space offered by CARS-3D.
3) It represents the perspective in which the molecule will be displayed in 3D.
10.3 The projection
The Drawing Options menu offers three options to alter the box’s appearance: Box, which toggles the box
display, Perspective, which provides and controls the perspective effect, and Change Viewing Point, which
allows you to change the observation point into the box, thus changing your viewing angle on the molecule.
The shadows of a molecule will appear on the left wall and on the floor of the box. For most molecules, a quick
look at it and its shadows should reveal the position of its atoms. This feature is most useful in Draw3D to help
you determine the orientation of the bonds proposed by the program as you draw the molecule. Each projection
can be displayed or eliminated individually, using the Floor and Wall commands. The usefulness of the
projections becomes evident for moderately complex molecules. With increasing complexity however, the
projected bonds may interfere, resulting in a loss of viewing perspective.
The program offers the interesting capability to select the projection of an atom or a molecule when you have to
identify one (at any time). For example, if you want to delete an atom, but the area is too crowded, you can do it
on the projection rather than the structure.
10-107
10.4 Molecule drawing
Draw and Undo : these options remain the same as in CARS-2D . Draw can only input molecules without
perspective, lying in a plane parallel to the screen. See below for drawing in Draw3D.
Build : Build options work exactly as in CARS-2D . There are several set of templates in 3D, and you can use
your own template sets if you wish. Use of the templates is highly recommended for drawing 3D structures.
First set of Templates :
Figure 10.3
Draw3D : Draw3D is a semi-automatic drawing system. Start drawing by selecting Start, then choosing a
starting point on the screen. Draw3D will propose a series of possible bonds extending from this point (they will
appear dashed). You can examine the different proposed bonds by selecting the Next command. The Bond
command will convert the current proposed bond into a real one, and a new set of proposed bonds will appear at
the end of this bond. As you go along, observe the perspective reflections which indicate the direction of the
proposed bonds in space. Draw3D also has a few options to append substituents, modify proposed bonds and an
Undo command. Here are some guidelines for drawing with Draw3D:
1) Select Start to start drawing a branch. Draw3D will ask you to choose a starting point.
2) If you indicate an atom, Draw3D will propose the first of a series of possible bonds that may be added to this
atom (always based on the tetrahedral geometry of an SP3 carbon). If you indicate an unoccupied point in
space, Draw3D will respond by proposing the first of eight bonds lying in the plane of the screen, from which
you may start building the skeleton.
3) You can now browse through the different proposed bonds by selecting Next. Draw3D will display each
proposed bond in turn. Repeat until you obtain the one you want (look at the reflections!). If you miss the
bond, keep on selecting Next; it will come back.
4) Once the bond you want is displayed, select Bond. Draw3D will redraw the proposed bond as a real one. It
will then move to the end of the new bond to propose another set of bonds. If the other end of the new bond
is near enough to another atom, Draw3D will close the ring by connecting this bond to the atom. Using these
10-108
options, it is possible to draw regular chains and some rings. For others, use the Template command (see 7
below).
5) To draw branch points, just follow a chain to the end, then as Draw3D is proposing bonds, select Back.
Draw3D will backtrack and propose bonds for the last atom drawn that still has room for bonds. From there
you can continue drawing branches or backtracking. Note however that backtracking will stop at the point
where you last indicated Start.
6) Adding substituents to a molecule can be done in two ways :
•
Draw the skeleton and bonds, then insert O , N , S , H , etc. atoms from the Atom menu (or use the right
mouse button to access the atom popup menu) as in CARS-2D.
•
Draw the skeleton (or chain) using Start, etc. Insert O , N , S and H atoms at the tip of the current
proposed bond by selecting the correct atom name from the submenu and selecting Bond. The bond will
be made real, with the proper substituent at its end, and the program will backtrack to the previous atom on
the chain as described earlier. To return to skeleton building in the normal way, select the C menu item.
7) Input of regular shapes is quite easy with these options, but shapes like 5-carbon rings are difficult. Use the
Template option. As an alternative, you can use the Twist L and Twist R commands. Pivot the bond
proposed by Draw3D around the previous bond by increments of 10° until you close the ring.
10.5 Transferring molecules from CARS-2D to CARS-3D
When you switch from CARS-2D to CARS-3D , the program tries to compute the 3D configuration of all the
molecules on the screen, up to a maximum of twelve. The reverse process is also possible. Obviously, this is an
enormous job; the procedure therefore has its shortcomings:
1) For cyclohexane rings, the chair conformation is always used and the possibility of a boat is neglected;
2) When no stereochemistry is indicated at the intersection of two rings, the in-ring bonds will be
considered as equatorial;
3) The transfer is not recommended for rings larger than 20 membered-rings;
4) The CARS-2D to CARS-3D transfer in this version is inoperative for bridged structures (ex.Bicyclo
2:2:1, etc);
All in all, from 5% to 10% of all molecules will give less than optimal results. With the reverse function (CARS3D to CARS-2D ), this may be worse. Since there are several degrees of freedom lost in the process of going
from a tri-dimensional space to a flat surface, the results may be far less interesting: chains may overlap, queer
distributions of alpha/beta bonds may arise, “standard” schemes for peptides and acyclic molecules are not always
respected. Note that this reverse process is also much slower.
10.6 Molecule manipulation
The Rotate, Move , and Scale options from CARS-2D are also available in CARS-3D . In addition, CARS-3D
includes the Deep option for special three dimensional visualization.
Hydrogen : to add or remove hydrogen atoms in 3 dimensions. Added hydrogens will replace free valencies.
Analyse : to get some fundamental quantities for molecules, like distance and angle between atoms. You can
also ask for a stereoscopic view of the molecule on the screen.
Deep : Molecules in CARS-3D are in a box measuring 1000 units of distance along the X, Y and Z axes.
Translation of the molecule on the X and Y axes is accomplished through Move . Deep allows you to move the
10-109
molecule in the depthwise direction (Z axis) by going In or Out of the screen by the specified step value. You can
change the depth of all molecules, a single molecule or an atom.
Move : moves the molecule in a plane parallel to the screen.
Delete : works exactly as in CARS-2D , but in CARS-3D , you can select an object on the wall or on the floor
(shadows).
Scale : CARS-3D’s Scale has been generalized to allow scaling of the molecule along the X, Y, and/or Z axes.
Rotate : you can specify the axis along which you want the molecule to be rotated by indicating the X, Y or Z
box. You will also find commands that will allow you to manipulate a molecule as if it were a plastic ball and
stick model, like Twist, Invert, Newman.
45 degrees
NH2
O
NH2
O
OH
HO
OH
HO
O
OH
O
OH
Original
Rotate Y
OH
NH2
O
O
H2N
O
OH
HO
OH
OH
Rotate Z
Rotate X
O
HO
Figure 10.4
10.7 Energy minimized structures
Molecules drawn with Chiron CARS-3D are not energy minimized. However, for most rings (Template), the
structure represents an energy close to the minimum.
10-110
Part 11
CARS-3D Commands
You will find in this section all CARS-3D commands in their menu order. General information
and examples can be found in Part 10.
Options not described in this chapter work exactly as in CARS-2D.
Me
Bafilomycin A1
Me
HO
Me
Me
O
Me
O
Me
O
HO
HO
O
Me
OH
Me
Me
Me
O
Me
Figure 11.1
The structure of Bafilomycin A1 was imported from X-ray coordinates in the Cambridge
Crystallographic Database (see the Import command in Part 3).
11-111
Text, Arrows, Icons, Bonds
As in CARS-2D. Note that the positions of texts, arrows and icons are relative to the surface of the screen, not
the 3D box. If the point of view is changed, arrows, icons and texts will not move.
Build
Works as in CARS-2D, with the exception of the Template command, whose sets are different. In 3D you cannot
select a template by one of its bonds, only by an atom.
Draw3D
Use Draw3D for semi-automatic input of molecules in three dimensions. Once you
have activated the command, you can start drawing by selecting Start from the dialog.
Start : initiates the drawing process. After selecting Start, if you indicate an existing
atom, Draw3D will propose a bond to be appended to it; however, if the atom has
already filled all its valencies you will not be able to start from there. If you indicate an
empty point in space, the program will propose one of a series of eight bonds. To make
a real bond out of the proposed one select Bond. You must choose Start before any
other sub-menu command.
Bond : to make a real bond out of a proposed one. When in substituent adding mode,
it will put the substituent at the end of the bond and backtrack (see Back). Draw3D will
automatically close the ring if it finds that the new bond has its extremity close enough
to another atom.
Back : to return to a previous atom where there is room for new bonds to be proposed. This backwards search
terminates upon reaching the atom where the last Start command began.
Next : to browse through the various proposed bonds. Everytime you select Next, the next proposed bond in
the sequence will be drawn, and so on until you wrap around to the first proposed bond again.
Twist L, Twist R : to twist a proposed bond in increments of 10 degrees in opposite directions. Twisting is not
permitted for bonds connected to an atom with three other bonds.
Undo : to remove the most recently added bond. In Draw3D mode, it will remove the last bond you added since
using Start, Back, or Bond. In substituent adding mode, Draw3D will then propose bonds for the atom where the
deleted bond was attached.
11-112
Draw
To draws strictly planar molecules unless connecting structures of different depths. It works the same way as in
CARS-2D. To draw in three dimensions, use Draw3D.
Atoms, Undo, Update
As in CARS-2D.
Hydrogen
Add Hydrogens : to add hydrogen atoms to the molecule in 3-dimensions. Hydrogens
will replace invisible free valencies. The molecules resulting from this option are not
minimized, but they make a good starting point for minimization on another program
such as MacroModel or Sybyl. You can remove the newly added hydrogens with the
Delete Hydrogens command.
Delete Hydrogens : to delete all hydrogens from the molecule on the screen.
Delete Lone Pair : to delete all lone pairs from the molecule on the screen.
All Molecule : to add hygrogens to or delete hydrogens from all molecules on the
screen.
One Molecule : to add hygrogens to or delete hydrogens from a single molecule on the
screen.
H
H
O
H
O
Me
H
OH
Me
Me
Me
HO
Add Hydrogen
O
O
H
H H
O
H
Me
Me
H
Figure 11.2
11-113
O
O
H H
H
H
O
H H
H
H
H
H
O
HH
H
H
H
H
H
H
H
H
OH O
H
H
O
H
H
H
Analyze
Distance : to obtain the distance between two atoms in a molecule. Note that the box’s width is 1000. It will
also give you a distance in Å (± 5%), taking into account the average of the C-C bonds in your molecule.
Coordinates : to get an atom’s coordinates (X,Y,Z) in the box. The origin of the box is at the rearmost bottom
left corner. The width of the box is 1000 in all directions. The X axis is horizontal, the Y axis is vertical and the
Z axis is perpendicular to the screen, pointing outwards.
Angle : gives you the angle formed by two consecutive bonds. You will be asked to select three consecutive
atoms; the program will then give you the angle in degrees.
Stereo : displays a static, stereoscopic image of the molecule on the screen. You can then visualize the
molecule’s 3D structure, using stereoscopic mirrors. The stereo image remains until you press Return.
Deep
This sub-menu allows you to move the molecule along the Z axis that is going in and out
of the screen plane.
All : sends every molecule on the screen deeper, using the current depth offset. Watch
the projections on the floor and the wall to evaluate the depth change.
One : moves an entire molecule. If there is only one molecule on the screen the program
will move it automatically to its new position; otherwise, you will be asked to specify an
atom of the desired molecule.
Atoms : to change the depth of individual atoms, leaving the rest of the molecule
untouched.
Offset : changes the current depth offset which you can see in the cursor scaling box.
Move, Delete
As in CARS-2D.
11-114
Scale
To scale one or all molecules along the X, Y, Z or X, Y and Y axes. The scaling
factor is preset to 1.00; you can change it by indicating a point with the slider
between 0.25 and 4.00.
X, Y, Z : to scale the molecule depthwise. Watch the projections on the sides to see
the effect.
X &Y & Z :
to scale the molecule in all three directions, thus preserving its
proportions.
All Mol. : to increase or decrease the size of all molecules on the screen. After you
select this command, select X , Y or X & Y . All molecules will be scaled by the
current scaling factor.
One Mol. : to increase or decrease the size of a single molecule on the screen. After you select this command,
select X, Y or X & Y and point to an atom of the desired molecule. It will be scaled by the current scaling factor.
Rotate
This command will allow you to manipulate a molecule as if it were a plastic
ball and stick model.
X Axis, Y Axis, Z Axis : when you select one of these commands, the
program will rotate the molecule around the X, Y or Z axis.
All Mol. : to rotate all molecules on the screen by the specified angle. Every
molecule on the screen will be rotated (texts and arrows will not move).
One Mol. : to rotate a single molecule on the screen by the specified angle. If
you have more than one molecule on the screen then indicate any atom of the
molecule to rotate; the molecule will rotate by the specified angle.
Bend : to change an angle within a molecule. You must indicate three
consecutive atoms; the appendage of the last one will be redrawn in order to
get the desired angle between the atoms. Don’t forget to select an angle first.
Bending is not allowed within a ring.
Twist : to pivot parts of a molecule’s substructure around a specific bond. You must indicate two consecutive
atoms, and the appendage of the second one will twist around the axis that passes by both atoms. If you twist
within a ring, the entire molecule will be rotated.
Axis : to rotate a molecule in 3D around the axis formed by two atoms. You must indicate the two atoms (order
is important) and the molecule will rotate by “Angle” degrees around their axis.
Invert : to invert the stereochemistry of an atom (left becomes right and vice-versa). You can select Invert a
second time to restore the previous position.)
Newman : to display a Newman projection along a designated bond. Indicate two consecutive atoms, and the
molecule will be rotated in space and presented in a perspective where both atoms are superimposed.
The rest of the Rotate submenu is the same as in the CARS-2D menu.
11-115
Part 12
Real Time Module
The Real-time module will allow you to manipulate a molecule in real time. Real-time refers
to the fact that calculations for the manipulation and movement of molecules are fast enough
to give the user an impression of smooth movement.
This module is most useful to see a molecule in movement, or to rotate a molecule to the
desired angle for a picture.
Most functions apply only to the current molecule (see the Current command in this
section). The Shape and Shade command lets you change the way molecules are
displayed. You can easily learn the commands by trial and error. If you need some
assistance, select the Help command, which will display on-line documention identical to
this manual. However, if you wish to have a simple introduction to this module, you can
follow the working example in the next section.
Note that this module is only available on Silicon Graphics workstations.
Figure 12.1
Ionomycin Ca Salt and Avermectin B1A were imported from X-ray structures.
12-116
12.1 Hardware configuration
Except for this module, the program will run very well under the minimum configuration of Silicon Graphics
workstation, that is with 8 bit planes. For certain options of this module you will need more bit planes. The
following table gives you the bit planes needed to run some Real options.
• Atoms, Bonds in Flat-Shading or Gouraud-Shading:
24 Z-Buffer bit planes
• Shape Menu (See Shape Menu):
24 Color bit planes
• Depth (See Shade Menu):
24 Color bit planes
• All the other options:
12 Color Bit planes
Other options will still work with 8 bit planes, but you will loose the most significant bit of the index color. In
other words, when you enter to the real time module, every color between 16 and 31 will be replaced by the color
between 0 and 15.
12.2 Working example for Real-Time
•
•
•
•
•
•
•
•
•
•
•
•
•
•
Enter the program and select the CARS-3D item in the Module menu.
From the File menu, select Current File and choose Example 3D in Main/Molecule.
From the File menu, select Load, then Forskolin.
Select Real Time from the Module menu to enter in the real-time module.
By default you are in manual rotation (Rotate)
Indicate a point anywhere on the screen and hold the left button; move the mouse.
Point to the auto-rotation command box (Auto Rot) and do the same.
Turn the molecule and use Translate to move the molecule.
Scale the molecule by holding the left button up and down.
Quit the Real Time module and load Huperzine A in the same file.
Return to Real Time and change the shape of the molecule by going in Shape.
In the Shapes section, point on the Style option menu and select Ball & Sticks.
Press Done and play with it.
Do the same after drawing your own molecule with CARS-3D.
Remember that the above 2D ➝ 3D options do not translate into energy-minimized structure.
12-117
12.3 Real Time Commands
Current :
Current Molecule Control. This command lets you change the current molecule. Real Time options affect only
the current molecule. It is also possible to select all molecules at the same time, by clicking until they are all
highlighted or by pressing the space bar (pressing space bar again will reset the current molecule to the one more
recently selected).
Left Button
Selects a new current molecule each time you press it.
Middle Button
The middle button has no effect.
Right Button
Let you select the current molecule by clicking one of its atoms or bonds.
View:
Use this command to select the view mode you want :
Mono : only the front view is displayed.
Stereo : display two slightly offset, right and left views.
Double : display front and top views. This view mode is useful when you work along the Z axis, since it is
difficult to keep a good perception of distance.
Left Button
Switch from one mode to the next one each time you press it.
Middle Button
The middle button has no effect.
Right Button
The right button has no effect.
Axis
Axis lets you show, hide or change the width of the axes.
Left Button
The left button will allow you to enlarge or shrink the axes of rotation, by moving the mouse up or down
respectively.
Middle Button
12-118
The middle button will allow you to enlarge or shrink the base of the axes of rotation, by moving the mouse up or
down respectively.
Right Button
The right button has no effect.
Move Axis
Move rotation center. This option lets you detach the center of the molecule from the center of rotation. When
you use this mode.
Left Button
While pressing the left button, move the mouse in the direction you want to move the molecule. The molecule will
move, but not the rotation center. A line will be displayed that connects the center of rotation to the center of the
molecule.
Middle Button
The middle button lets you move the center of the molecule along the Z axis.
Right Button
The right button will allow you to lengthen or shorten the distance between the center of rotation and the center of
a molecule.
Clip
Clipping plane control. To move the far and near clipping planes. This lets you hide parts of the molecule(s)
along the Z axis; you can only see what is located between the far and near clipping planes.
Left Button
While you press the left button, you can push the two clipping planes farther back (by moving the mouse up) or
bring them closer (by moving the mouse down).
Middle Button
While you press the middle button, you can widen (by moving the mouse up) or shorten (by moving the mouse
down) the clipping depth.
Right Button
Lets you set the front and back clipping planes to be as close to each other as possible without hiding any part of
any molecule.
Translate
Use this command to move the current molecule in any direction you want.
12-119
Left Button
While pressing the left button you can move the molecule along the screen’s plane by moving the mouse in the
desired direction.
Middle Button
The middle button lets you tranlate the molecule along the Z axis. When you move the mouse up, the molecule
will move away; when you move the mouse down, the molecule will move closer.
Right Button
The right button has no effect.
Scale
Scaling control. Lets you scale the molecule up by moving the mouse up, and down by moving the mouse down.
There are no limitations for the size.
Left Button
While pressing the left button you can change up or down the scaling.
Middle Button
The middle button has no effect.
Right Button
The right button lets you put the scaling the way it was before entering into this module.
Rotate
Molecule rotation. This manual rotation command lets you view the molecule at any angle. This is the most
useful command when it comes to manipulating the molecule.
Left Button
Use the left button to rotate the molecule along an axis which is perpendicular to the direction you move the
mouse. The distance you move the mouse determines the amount of rotation. If you want to change the direction
of rotation, it is best to release the button and press it again before moving in the other direction.
Middle Button
The middle button lets you rotate the molecule along the Z axis. While you press the button, move the mouse up
or down to turn the molecule counter-clockwise or clockwise respectively (note that this system provides an
intuitive feeling if the cursor is to the right of the molecule being rotated).
Right Button
The right button has no effect.
12-120
Auto Rot
Automatic rotation. With this command you can give the molecule an automatic rotation in any direction and
speed.
Left Button
To change the axis of rotation for the current molecule. While pressing the left button, move the mouse in the
direction you want to rotate. The speed of the molecule will be evaluated using the distance between the position
where you press the button and the position where you release it.
Middle Button
With the left button, you can only rotate along an axis that is parallel to the screen. With this button, you can
change the axis of rotation with relation to the Z axis (perpendicular to the screen).
Right Button
The right button has no effect.
Bond Rot
Bond Axis Rotation. This option lets you rotate a molecule around the axis of a bond.
Left Button
You can rotate the molecule automatically with this button. While pressing the left button, move the mouse up or
down to rotate in any direction; the speed of rotation will be calculated from the distance you move the mouse.
Middle Button
Using the middle button, you can rotate the molecule manually just like the Rotate command; keep the mouse
button pressed, and move the mouse up or down to rotate in one or the other direction.
Right Button
This button lets you select which bond the molecule will rotate around. To select the bond, simply point the
mouse to any bond and push the right button; the axis of rotation will now be parallel to this bond.
Twist
This command lets you twist a part of the molecule around a bond. This option works only with Mono View.
Left Button
Using the left button, you can twist the part of the molecule you selected before with the Right button. Keep the
mouse button pressed, and move the mouse up or down to twist.
Middle Button
The middle button has no effect.
Right Button
12-121
This button lets you select which bond the molecule will twist around. To select the bond, simply point the mouse
to any bond and push the right button; select the part of the bond closest to the part of the molecule that is to be
twisted.
Shape
This menu will allow you to change the drawing parameters. There are 4 sections in this dialog, Shapes, Atoms,
Bonds and Labels:
12-122
Shapes :
Style : allow you to load predefined sets of parameters. You can choose a predefined set of parameters
by selecting the desired item in the Style option menu.
Plain : simple line representation (as in CARS-3D).
CPK : each atom will be represented as a shaded sphere. The bonds are not drawn.
Ball & Stick : the molecule is displayed in a manner similar to a ball and stick model, with shaded bonds
and atoms.
Stick : the molecule is displayed in a manner similar to the ball and stick model, with shaded bonds and
atoms. The atom radius are the same as the bond’s radius.
Old : reset all parameters as they were when you entered the Real Time module.
Load : to load a previously saved set of parameters.
Save : to save the current set of parameters.
Note : If you use the CPK model, you have to be sure to set the back and front clipping plane as near as
possible to the molecule (use right button of the Clip option )
Atoms : lets you change the way atoms are displayed.
Radius : to set the radius of carbon atoms. The value you enter is in the same range as 3D coordinates. The
radius for other elements will be calculated from this radius and from the Van der Waals radius of each atom.
Points # : to change the number of points used to draw the atom. This is used along with the number of lines
(Line #).
Line # : to change the number of circles used to draw the atom.
The number of lines (Line #) tells you how many circles there are on the sphere, and the number of points (Points
#) is the number of points in each circle. It is better to have the same number in Line # and Points # , to get the
impression of a regular surface.
Bonds : to change the way bonds are displayed
Radius : to set the radius of every bonds.
Points # : to change the number of points used to draw the atom. This is used along with the number of lines
(Line #).
Line # : to change the number of circles used to draw the bond.
Sep : to change the internal separation between two lines of a double or a triple bond.
The number of lines (Line #) tells you how many circles there are on the sphere, and the number of points (Points
#) is the number of points in each circle. It is better to have the same number in Line # and Points # , to get the
impression of a regular surface.
Labels : to select how each atom's letters are displayed.
12-123
Plain : no letters are displayed.
Symbols : the atom's symbol is displayed.
Symbols & Numbers : the atom's symbol and number are displayed.
Symbols & H : the atom’s symbol with hydrogens extension are displayed.
Symbols H & Numbers : the atom’s symbol with hydrogens extension and number are displayed.
Shade
Depth :
Difference for Depth Cueing : this parameter is used to select the relative brightness of near objects, compared
to that of far objects. If it is set to 0, all objects will be in the same color (no depth cueing), and if it set to the
maximum, the objects nearest to the far clipping plane will be in black.
Color : to change the color of the molecule on the screen.
Standard : the color of each atom will be the standard color for that element (Oxygen=red, Nitrogen=green,
etc).
User : the color will be exactly the same as in the CARS-3D module.
Atom Color : to modify the color index of any atom.
Help
When you select this menu box, the program will enter help mode, and the next command you will select will be
explained instead of being executed.
Exit
Exit the Real-time module. All changes will take effect and the molecule(s) will reappear in CARS-3D as it
appears when you exit.
12-124
Quit
Quit the Real-time module. All changes will be discarded; the molecule will be restored as it was before entering
this menu.
12-125
Appendix A
Chiron Interchange Format
The Chiron Interchange Format is used for the following purposes :
• Moving several molecules from one file to another
• Moving molecules from your own file to the main database, when new molecules are to be made
available to everyone.
• To transfer molecules and precursors to and from any database (you need to interface it). To transfer
molecules from one machine to another (from a Macintosh to a SGI for example).
To move molecules from one file to another, first select the right file system and the correct current file.
Select Export from the File menu. A file selection dialog will appear. Select CIF from the option menu,
then specify the range of molecules or precursors you want. To import your molecules, change the file
system and the current file, then select the Import command from the File menu, using the same file name
and CIF file format.
If your university or company has a database of precursors or molecules and you want to use as targets or
precursors in the program, you can transfer them to the CIF format by writing a program to list your
molecules in a text file using the format specified below. Molecules or precursors are listed sequentially in
the file. Every field in the CIF format is a fixed length, and is easily accessible with any language. If some
field does not mean anything to you, use the default value. To become more familiar with the format, save a
simple molecule in CIF format with Export in the File menu (without color) and compare the text with the
picture.
1-126
11
NH2
6
9
4
Cl
2
OH
3
CIF example for Acivicin
1
5
N
7
O
8
O
10
Figure A-1
---000000000111111111122222222223333333333444444444455555555556666666666777777777
---123456789012345678901234567890123456789012345678901234567890123456789012345678
--------------------------------------------------------------------------------01|CHIRON 5.0
02|Acivicin
03|The reference
04|[0-0-0]
05|0
06| 11
07|C
1 0 1
0
0.000
0 0 344 658 500 10 10
9
2
0
0 ******
08|C
2 0 1
0
0.000
0 0 293 687 500 11
3
1
0
0
0 A*****
09|C
3 0 1
0
0.000
0 0 239 659 500
4
8
2
0
0
0 *B****
10|C
4 0 1
0
0.000
0 0 185 687 500
5
3
0
0
0
0 ******
11|C
5 0 1
0
0.000
0 0 132 660 500
6
7
7
4
0
0 ******
12|Cl
6 0 1
0
0.000
0 0
81 684 500
5
0
0
0
0
0 ******
13|N
7 0 1
0
0.000
0 0 157 603 500
8
5
5
0
0
0 ******
14|O
8 0 1
0
0.000
0 0 216 603 500
7
3
0
0
0
0 ******
15|O
9 0 1
0
0.000
0 0 400 688 500
1
0
0
0
0
0 ******
16|O
10 0 1
0
0.000
0 0 344 598 500
1
1
0
0
0
0 ******
17|N
11 0 1
0
0.000
0 0 293 747 500
2
0
0
0
0
0 ******
18| 1
18|CIF example for Acivicin
20|3792 7091 18 1
0 0000000 0
21| 1
22|6255 6314 3606 6314 0 3 0
---------------------------------------------------------------------------------
01| Chiron Version:A100
02| Molecule name: A100. (1)
03| Molecule reference: A100. (1)
04| CAS Number: (Put [0-0-0] for default) :A100
05| 1 if molecule is racemic: I1.
06| Number of atoms: I3.
07 - 15| Description of the molecule. One line per atom.
Atom name: A6, X, atom number: I3, X, Value: I1 (2), X, WithNo: I1 (2), X,
MatchNo: I3 (2), X, Charge: F7.3, X, Isotope: I3 (2), X, Racemic: I1 (2), X,
Position(X, Y, Z): 3 * (I5, X), bonds: 6 * (I3, X), bond type: 6 * C (4).
18| Number of texts: I3.
(Two lines per text, one for the text and one for the description).
19| The text: A100. (1)
20| X position: I4, X, Y position: I4, X, Font size: I4, X, text kind: I2 (3), X,
text font: I3 (2), Text style: 7 * C (2), X, color: I:2.
21| Number of arrows.
(One line per arrow).
22| X start: I4, X, Y start: I4, X, X end: I4, X, Y end: I4, X, Double head: I1 (5),
X, ArrowKind: I2 (6), X, color: I2.
-----------------------------------------------------------------------------------------------------------------------------------------------------------------------------------------------------------------------------------------(1)
(2)
(3)
1-100 characters.
Put 0 for default.
Put 1 for default.
(4)
* = planar
A = alpha
B = beta.
(5 )
0 = false
1 = true.
1-127
(6)
1 = straight
2 = double
3 = full head
4 = equilibrium
Appendix B
Icon Definition Format
By “icons” we mean graphic objects included in the program which will enhance the quality of your reaction
schemes. For convenience, the icons have been defined in an external file which allows you to draw more icons
and include them in the program.
A) icon.def file format
The icon definition file is located in the main directory of your Chiron program file system.
Its format is quite simple. The only valid information on the first line of the file is an integer marking the number
of icon definitions in the file; do not forget to change this number if you add or delete definitions. The actual
definitions follow this first line; there are no blank lines in the file. Comments may be added at the end of every
line, but there may not be full comment lines.
B) defining an icon
An icon is defined in three steps:
1) On the first line of the definition, a letter determines the icon’s structure, its orientation and the meaning of its
control points.
• a Vertical icon is marked by a V; its first control point is its top extremity and its second control point is its
bottom extremity.
• a Horizontal icon is marked by an H; its first control point is its left extremity and its second control point is
its right extremity.
• a Rectangular icon is marked by an R; its first control point is its top-left corner and its second control point
is its bottom-right corner.
Note that the control points of user-defined icons may have completely different meanings, but those indicated
above represent a convenient (and simple) standard and we recommend that you follow it, if at all possible.
2) On the second line, an integer indicates the number of segments in the definition; a segment is a single line or
circular arc.
3) All the segments are then defined, at the rate of one per line. This line contains the following data:
• A character for the Segment Type: A indicates an arc, L indicates a line.
• The X and Y coordinates of the segment’s starting point, then those of the ending point.
• If the segment is an arc, the X and Y coordinates of the arc’s center of curve and a character indicating
Clockwise (C) or Counterclockwise (K) rotation.
• A character indicating whether or not the segment is at the end of a path to be filled: F indicates that the path
is to be filled with a shade specified immediately after it in the definition (that shade is defined by a number
between 0 and 1, 0 being black and 1 being white), f indicates to fill the path with a shade defined at runtime (and thus variable among the instances of this icon), X indicates that the path is not to be filled right
now.
• A character indicating if the segment is at the end of a path to be stroked right away: S indicates that the path
is to be drawn and that the pen shade is specified immediately afterwards; s indicates that the path is to be
stroked in a shade determined at runtime; X indicates that the path is not to be stroked right now.
1-128
• If the path is to be stroked, there must be an additional character defining the appropriate line width for the
path: L indicates that the line width is fixed in the file and determined immediately afterwards, l indicates that
the line width will be set at runtime.
Blanks (one or more) must separate each of theses items. The coordinates of the segment’s extremities (and of the
center of curve, if the segment is an arc) must be defined relative to the control points. The first control
point is set at coordinates (0,0) and the second one is at (1,0) for V and H icons and at (1,1) for R icons. When
you define an icon, place the points where they would be if the real coordinates of the control points were always
(0,0) and (1,0) or (1,1).
Example: defining the left accolade ( ‘{‘ ).
The vertical, left accolade is a V icon, and we will separate it into six segments. We start drawing the accolade at
(0,0); its first control point will therefore represent the beginning of the icon. The first segment is an arc, leading
to (1/6, -1/6). As we need a quarter of a circle to represent it correctly, the center of the corresponding circle must
be set at (1/6, 0), and the arc must be drawn counterclockwise (otherwise, we would end up with the
complementary 270 degrees).
There is no reason to stroke at this point (and obviously none to fill, as the accolade will remain an open path all
the way), so we continue without doing it, and we indicate it by adding X X at the end of the segment’s line,
which is now completed and looks like:
A 0 0 0.1666 -0.1666 0.1666 0 K X X
The next segment is a line going from (1/6 -1/6) to (1/3, -1/6). In PostScript, it is always preferable to avoid
breaking a path (because the PS pen always traces the breaks and considers them valid parts of a path!), so we
will begin this segment where the last one ended. We will not stroke the path until the very last segment, so the
definition of this line is:
L 0.1666 -0.1666 0.3333 -0.1666 X X
We skip the next few segments and reach the last one. Obviously, if we want anything at all to appear on the
printouts, we must call a STROKE after this last segment. We decide that all of our accolades will always be
black, so we may set the color in the file. If we wanted to allow accolades of different colors, but otherwise
absolutely identical, we would mark it by inserting an ‘s’ at the appropriate position and choose the colors at
runtime. Let’s suppose that all of these accolades will always be drawn with 4 point lines. The extension at the
end of the segment’s definition will be ‘X S 0 L 4’.
It is now time to present the whole definition. If there were no accolades in ICON.DEF, we could add our
definition at the end of the file, using any available editor. Always remember to change the integer on the first line
of the file when you add definitions: otherwise, the program will not read the new ones. The complete definition
is:
V
6
A
L
A
A
L
A
*** optional comments permitted at the end of every line ***
0 0 0.1666 -0.1666 0.1666 0 K X X
0.1666 -0.1666 0.3333 -0.1666 X X
0.3333 -0.1666 0.5 -0.3333 0.3333 -0.3333 C X X
0.5 -0.3333 0.6666 -0.1666 0.6666 -0.1666 C X X
0.6666 -0.1666 0.8333 -0.1666 X X
0.8333
-0.1666
1
0
0.8333
0
K
1-129
X
S
0.0
L
4
1-130
Index
Automatic File Selection, 90
Axis, 115, 118
—!—
!, 29
—B—
—&—
Back, 112
Background, 34
Ball & Stick, 123
ball and stick, 25
Batch, 103
Batch Jobs, 11
Bend, 58, 115
beta, 31, 55
bit planes, 117
Bond, 50, 112
Bond Rot, 121
Bonds, 123
bonds distance, 32
bonds width, 32
Box, 31, 107
Branch functions, 43
Build, 52, 112
&, 29
—@—
@, 29
—^—
^, 29
—|—
|a|, 24
|b|, 24
|c|, 24
—1—
—C—
1 Atom, 50
1 Bond, 50
C, 28
C, H, O, N, S, 28
CAPS, 6, 27
Carbocyclic molecules, 37
Carbon Numbered, 31
CARS-2D, 6, 26
CARS-2D to CARS-3D, 109
CARS-3D, 7, 26
CASA, 6, 26
CASA Commands, 65
CD-ROM, 10
Chain functions, 42
Change Password, 26
Change Viewing Point, 32
charges, 29
ChemDraw CT, 23
Chiron Interchange Format, 126
Chiron Program, 5
chiron.1, 10
CHIRON_HOME, 10
CIF, 23, 45, 49, 126
Clear, 59
Cleave, 50
Cleaved precursors, 81
Cleaving, 93
Clip, 119
clip distance, 32
Color, 124
Color Preferences, 34
Commercial, 21
Common, 80
Connectivity Table, 28
CPK, 123
Critical, 94
CSSR, 23
—2—
2D to 3D, 109
—A—
Accept All, 18
Achiral precursors, 93
Acyclic molecules, 37, 39
Add, 18
Add Hydrogens, 113
Add Number, 19
Adding precursor. See Precursor database
Additional, 94
alicyclic molecules, 37
All Atoms, 50
All Bonds, 50
All Numbered, 31
alpha, 31, 55
Alpha lines, 32
Aromatic, 94
Aromatic compounds, 38
Aromatic functions, 42
Aromatic precursors, 88
Arrow, 34, 48, 50
arrow head length, 32
arrow head width, 32
Asymmetric Center, 93
Atom, 34
Atom Color, 124
Atom Menu, 28
Atom number, 31, 32, 34, 52, 92
Atoms, 55, 123
Auto Rot, 121
1-131
—G—
Current, 118
current file, 16, 18
Current Text, 46
Cyclic molecules, 40
graphic user interface, 9
Grid, 34, 44, 53
—H—
—D—
H, 28
Help, 124
Hydrogen, 31, 32, 43
D-Amino Acids, 51
Dash, 50
Deep, 114
Delete, 56, 103
Delete Hydrogens, 113
Delete Lone Pair, 113
Delete Molecule, 20
Depth, 31, 124
Dotted line, 32
Double, 49, 118
Draw, 31, 54, 113
Draw3D, 108, 112
Drawing Options, 31
Duplicate, 52
—I—
IBM-PC, 12
Icon, 49
Icon Definition Format, 128
icon.def, 128
Identical, 71
Identical+, 72
Import, 23
Input precision, 32
install.sh, 10
Installation, 10
Invert, 115
isotopes, 29
—E—
Enantiomeric, 71
Enantiomeric+, 72
EPS, 25
Exceed, 12
Exclude All, 18
Exit, 73, 104, 124
eXodus, 12
Export, 23, 126
Extended, 70
Extra Menu, 27
Extremity functions, 41
EZ, 68
—J—
Justification, 47
—L—
Labels, 123
L-Amino Acids, 51
Large, 50
Large Cleave, 50
line width, 32
Load, 18
Load Job, 103
Load Number, 18
Lone Pair, 113
lone pairs, 29
—F—
File, 21, 90
file formats, 23
File List, 20
File Menu, 15
File organization, 15
Fill, 49
Find, 95
Fischer, 69
Flip, 59
Floor, 31, 107
font, 25
font size, 32
Foreword, 5
Formula, 22
Function, 21, 91
functional groups, 40
Functions, 27, 41
—M—
Macintosh, 12
MacroModel, 23
mainpassword.dat, 11
Match, 84
Matching, 93
MDL, 23
Menu Bar, 15
Meso, 71
Mirror, 73
Module Menu, 26
modules, 6
mol, 23
mol2, 23
Molecular Composition, 27
Molecule, 34
1-132
—R—
MOLfile, 23
Mono, 118
More, 83
Move, 56, 104
Move Axis, 119
R, 69
Rapid Scanning. See RSP. See RSP
Real Time, 7, 12, 27, 116
Recover, 33
Ref, 22
Remove Database, 20
Remove File, 20
Renumber, 52
Reorder Table, 52
Replace Molecule, 19
Replace Molecule Number, 19
Report, 98
Reshape, 56, 70
reshaped precursors, 81
Reshaping, 95
Rotate, 58, 115, 120
RS, 66
RSBC, 96
RSP, 96
—N—
N, 28
Name, 22
New Database, 20
New File, 20
Newman, 115
Next, 112
No Number, 31
normal, 29
Notation, 9
Number. See Atom Number
Number-Atom distance, 32
numbers color, 94
—O—
—S—
O, 28
On Context, 36
On Version, 36
Options Menu, 31
Other, 29
S, 28, 69
Save, 19
Save Job, 103
Scale, 57, 115, 120
Scan Database, 20
Scan Diastereomer, 22
Scan Double, 23
Scan Exact, 22
Score, 92
Scrap, 73, 104
Search, 22
Select Template, 18
Sep, 123
Shade, 124
shadows, 107
Shape, 122
Shapes, 123
Show Connectivity Table, 28
Show Functions, 27
Show Segment, 72
Similar, 94
Simple, 50
SMD, 23
Sorting, 95
Specific, 94
Start, 112
Stereo, 118
stereochemical assignments, 66
stereochemistry, 39
Stick, 123
Stroke, 49
subscript, 29, 31, 46
superscript, 29, 46
Sybyl, 23
Symbols, 124
—P—
Parameters, 92
password, 11, 26
PDB, 23
Peptide, 51
Periodic Table, 30
Perspective, 32, 107
Place, 97
Points, 102
PostScript, 25
Precursor #, 90
Precursor database, 45
precursor manual, 25
Preferences. See Program Preferences
Print, 24
Print From, 25
Print Kind, 25
Print To, 25
priority tree, 69
Program Preferences, 32
projection, 107
Publications, 6
—Q—
Quit, 26, 125
1-133
Width, 49
Working example : drawing molecules, 43
Working example for Real-Time, 117
Working examples for CAPS, 80
Working examples for CASA, 60
Working examples for Cleaved and reshaped
precursors, 83
Working examples for Match, 87
Synlib, 23
—T—
Template, 34, 44, 52
term.def, 34
Text, 34, 46
Transformation, 97
Translate, 119
Tree, 69
Troubleshooting, 14
Twist, 58, 115, 121
Twist L, 112
Twist R, 112
—X—
X terminal, 12
X–RAY, 23
X-Server, 12
—U—
—Z—
Undo, 55, 112
Update, 55
user database, 11
User Level, 33
Z-Buffer, 117
ZigZag, 50
—_—
α, 24
—V—
Valencies , 43
View, 118
Viewing Point, 107
virtual colors, 35
Visible Number, 31
—_—
β, 24
—_—
γ, 24
—W—
Wall, 31, 107
Wedge, 31
1-134
Acknowledgments
We wish to thank many colleagues in industry, academia and various institutes for their
comments, collaboration and encouragement in the realization of this project.
We also thank la Direction des infrastructures Technologiques d'Enseignement et de
Recherche, Université de Montréal for their collaboration.
The version 5.0 manual was edited by Bo Huang, Benoît Larouche. We thank Xinxia
Cai and Bo Huang for updating the Chiron precursor database for version 5.0.
We are greatly indebted to former members of the Chiron team for their technical
input in the realization of this project:
Gilbert Gagnon, Ani Glamyan, Serge Meynard, Maximilien Lincourt, Eric
Lauzon, Luc Trépanier, Bertrand Leboeuf, Serge Léger, François Major, Daniel
Forest, Daniel Léveillé and Kimberlee Potter.
Special thanks go to Luc Forest (deceased, May 1991), and Jonathan Franco.
1-135
1-136