1
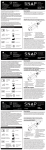
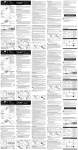
BIOLOCK 333
Keyless Fingerprint Lock
User Manual
Trademark
2008 New Biometric Solution (NBS) LLC. All rights Reserved.
www.biolockusa.com
[email protected]
Customer Service Hotline: 1-866-572-LOCK
(5625)
User Manual
Content
CHAPTER1. INTRODUCTION.............................................................2
1.1
1.2
1.3
1.4
1.5
1.6
1.7
1.8
MODEL NUMBER ..............................................................................2
MAIN FEATURES ..............................................................................2
STRUCTURE & COMPONENTS .........................................................3
DIMENSION ......................................................................................3
PACKING LIST ..................................................................................4
WEIGHT ...........................................................................................5
TECHNICAL SPECIFICATION ............................................................5
POWER SUPPLY FOR EMERGENCY ..................................................5
CHAPTER2. OPERATION INSTRUCTION........................................6
2.1
2.2
2.3
2.4
2.5
2.6
2.7
2.8
2.9
KEYPAD DESCRIPTION.....................................................................6
USER GRADES ................................................................................6
HOW TO ENROLL YOUR FINGERPRINT .............................................7
REVIEW THE USERS.......................................................................10
DELETE THE USERS.......................................................................10
CLEAR ALL USERS ........................................................................11
ACCESS MODE ..............................................................................12
NORMAL OPEN & NORMAL CLOSE SETTING ...............................13
LOW BATTERY ALERT ....................................................................13
CHAPTER3. INSTALLATION.............................................................14
3.1
3.2
3.3
3.4
3.5
3.6
TOOLS REQUIRED FOR INSTALLATION ...........................................14
DOOR REQUIREMENT.....................................................................15
LATCH SIZE ....................................................................................15
INSTALLATION STEPS ....................................................................16
INSTALLATION DIAGRAM ................................................................18
TIPS FOR INSTALLATION ................................................................18
CHAPTER4. MAINTENANCE ............................................................19
-1-
User Manual
Chapter1. Introduction
1.1
Model number
Model
BIOLOCK 333
Picture
1.2
Main features
Durable Fingerprint Reader Adopt optical fingerprint sensor
Fingerprint can't be duplicated
IR Remote Control
Zinc alloy die-casting body
Simple user interface (Easy operation keys)
Compatible with cylinder door
Users capacity up to 99 users
Working temperature -13°F to 125° F
4 (AA) alkaline battery, external power supply port (emergency)
Fingerprint sensor resolution 500DPI
Reversible Handle (Handle can be converted to be used
on either a right-hand or left-hand door)
-2-
User Manual
1.3
Structure & Components
1.4
Dimension
(In CM)
Front View
Back View
-3-
User Manual
1.5
Packing List
Bag A Includes:
Bag B Includes:
Strike (1pc)
1.2” Screw
for Adjustable latch (2pc)
Strike plate (1pc)
(2 Extra 1.2” screws included for
replacement)
1.2” Screw
for strike plate (2pc)
Bag C Includes:
Bag D Includes:
Long Connector Screw (3pc)
Mechanical Keys (3pc)
(for use if your door
width is 1.6 - 2 inches)
Alan Wrench (1pc)
Loose Parts:
Part #1. Short connector screw
( 3 pcs)
Part #4. Back Panel(1pc)
Part #7. IR Remote (1pc)
Part #2. Adjustable single latch
2-3/8” or 2-3/4”(1pc)
Square spindle ( 1pc)
Part #3. Front Panel(1pc)
Part #5. Rubber gasket (2pcs)
Part #6. Iron fixing board (1pc)
Iron fixing board screw (2pc)
Part #8. Batter cover screw
(1pc)
Part #9. Manual & template (1pc)
-4-
User Manual
1.6
Weight
Parts
Front plate
Back plate
Latch
Accessories
Total
1.7
N.W. (Lbs)
2.27
1.54
0.26
1.10
5.17
Technical Specification
Item
Sensor
Resolution
Scanning time
FRR(False Rejection Rate)
FAR(False Acceptance Rate)
Users capacity
Battery
Working current
Standby current
Description
Optical
500DPI
<1s
0.01%
0.0001%
99 (Each user one fingerprint)
4 AA Alkaline battery
0-150mA
0uA
Fingerprint, Mechanical key,
Remote control (Optional)
-13 °F to 125 ° F
20%-80%
15%RH to 95% RH
Opening method
Working temperature
Working humidity
Humidity
1.8
Power supply for emergency
When battery voltage is low, you can unlock with external power supply
or mechanical key
-5-
User Manual
Chapter2. Operation Instruction
2.1
Keypad description
Front Key
Back keys
Front Body Key
The power key on front is to power the system and light the reader.
Back body Keys
The power key on back body is to power the system and operate the lock.
There are also other 4 keys, Add key, Delete key, Confirmation key, Clear key,
2.2
User Grades
There are three grades user: Super Master (S), Master (M), User (U)
Super Master (S) – “Super Master” is No.1 user who registers the fingerprint
in the lock.
The “Super Master” can add or delete users from No.2 to
No. 99..
Master
(M) – “Master” is No.2 or No.3 user who registers the fingerprint
in the lock
The “Master” can add or delete users from No.4 to No.99.
The master could not add or delete mutually.
User
(U) – “User” is No.4 to No.99 users who can only open the
door with fingerprint registered under the permission of the
Super Master or the Master.
-6-
User Manual
2.3
How to enroll your fingerprint
2.3.1 Enroll the super master
1.Press the indoor Power Key
2.Press the Add Key
3.The reader will light after the beep
4. Place your finger once
5. After the beep, place your finger 6. The super master is registered.
one more time, then the red light &
Operation is complete
the green light will shines 3 times in
sequence.
-7-
User Manual
2.3.2 Enroll the master
1.Press the indoor Power Key
2.Press the Add Key
3.The reader will light after the beep.
4. Verify the finger of the super
master(N°1) to get access.
5. First available master number will
display.(N°2 or N°3)
6. Select the master number.
Then press OK
8. Then place the finger of the master one more
7. Place the finger of the master once
for registration.
sequence. The Operation is complete.
time. The light will flash 3 times in
-8-
User Manual
2.3.3 Enroll the user
1.Press the indoor Power Key
2.Press the Add Key
3.The reader will light after the beep.
4. Verify the super master or master
finger to get access
5. First available user will display.
Choose the user number by “+” or “-” 6. The reader will light, place the
finger of the user once
key. Then press OK (N°4 or N°99)
8. Then place the finger of the user 8. The registration is not complete if
one more time. The light will shine 3
the red light flash..
times in sequence. The Operation is
complete.
Remarks: The master could not be reregistered as a user.
-9-
User Manual
2.4
Review the users
1.Press the indoor Power Key once
2.Press the indoor Power Key one
more time
3. The total number of user will be 4.Then, the super master and the
displayed (Super master, masters and master.
users)
5. and then all users
2.5
6. Log out the system
Delete the users
1.Press the indoor power key
2.Press the Delete key
-10-
User Manual
3.The reader will light after the beep.
4.Verify the super master or master
finger to get access
5. User number is displayed, Choose 6.Select the user then press OK
the user you want to cancel by “+” or
“-” key。
2.6
Clear all users
1.Press the indoor Power Key
2.Press the Clear Key
3. Place the fingerprint of the
Super Master
4.After the beep, all fingerprints
will be canceled
-11-
User Manual
2.7
Access mode
2.7.1 Unlock by fingerprint
2.Place the finger who is recorded,
then there will be a beep and the door
will unlock.
1. Press the start button.
3.Turn the
Handle and
open the door
2.7.2 Unlock by indoor remote control
Unlock the door from inside from any
directions within the range Press the
push button on the back lock body.
To ensure prolonged battery
life, please be sure to turn off
the remote control push
button when not in use.
-12-
User Manual
2.7.3 Unlock by key
2. Remove the Handle and you will
see a key hole
1. Remove the screw with
included allen wrench
3. Insert the key and turn to open
2.8 Normal Open & Normal Close Setting
The lock has a “Passage Mode Key” which allow you to keep the door open.
Normal Open
Normal Close
Switch the lock to “Normal Open”. Then simply press the power key, and your
door will unlock. It will lock again after 5 sseconds. To set unlock by fingerprint
mode, switch the lock to Normal Close, and now the lock will require a
registered fingerprint to unlock.
2.9
Low battery alert
When the battery is below 4.3 V, the lock will send a signal after any operation.
The indicator beeps for 15 times within 3 times in unite. You still be able to use
the lock more than 50 times. Change the battery quickly.
-13-
User Manual
Chapter3. Installation
3.1 Tools required for installation
1.Pencil
2.Tape
3.Measure
4.Drill
5.Auger for basket hole
Diameter: 2-1/8”(54mm)
6. Auger for latch hole
Diameter: 1” (25.4mm)
7.Auger for fixing screw
Diameter: 3/8” (10mm)
8. Screw driver
9.Knife
10. File
11.Hammer
12.Chisel
-14-
User Manual
3.2 Door requirement
4-3/4”
From 1.25” to 2”
If your door thickness is from 1.25” to 1.65” use the short connector screws
If your door thickness is from 1.65” to 2.0” use the long connector screws
If the door surface is decorated, the distance from then decorative edge
to the door frame must be above 4-3/4 inch.
3.3
Latch size
-15-
User Manual
3.4
Installation steps
1. Remove your old handle. Then place
the template so the large handle hole
lines up with the pre-existing hole in the
door. Determine the handle line and drill
holes with the template board (part #9)
2. Then attach the latch (part #2) with
the 1.2” screws (in Bag B)
3. Put the square spindle (part #2)
through the basket hole
4. Place the rubber gasket (part #5) on
the back of the front panel (part # 3) &
feed the black wire connector through
the gasket hole and then through the
door hole to the other side. Then install
the front panel (part #3).
5. Place the other rubber gasket (part #5)
on the inside of the door and attach the
back iron board (part #6) on the rubber
gasket (part #5) with the iron fixing board
screws (part #6)
-16-
User Manual
6.Connect the cable to the back panel
(part #4) Please refer to Section 3.6.
7. Attach the back panel (part #4) to
front panel connectors with 3 connector
screws. If your door thickness is from
1.25” to 1.65” use short connector
screws (Part #1). If your door thickness
is from 1.65” to 2.0” use long
connector screws (Bag B).
8. Install the batteries into the
compartment on the back panel.
9. Attach the battery cover with battery
cover screw (part # 8)
10. Cut hole for strike and strike plate
-17-
11. Attach the strike and strike plate with
strike screws (in Bag A)
User Manual
3.4.1
Reversible Handle
1. Remove the screw with included
allen wrench
2. Remove the handle covering the key
hole
3. Flip the handle to the reverse
direction
4. Place the handle back onto the lock
6. Make sure to reverse the handle on
both indoor and outdoor handles. The
reverse handle is now ready for use.
5. Using the allen wrench screw the
handle back into place
-18-
User Manual
3.5
Installation diagram
Hole size on the door frame
Holes size on door
3.6
Tips for installation
Please insert the cable as picture below with care.
NOTE!
Please make sure to put the cable in
the red circle space before you
attach the back panel to prevent
wire from breaking.
-19-
User Manual
Chapter4. Maintenance
1. Warranty will become void if the warranty seal on the back of the front
and back panel is broken.
2. Change the battery timely when low power alert sounds.
3. Keep away from corrosive material or any liquid,
4. Do not hang anything on the handle.
5. Keep the emergency key.
6. Keep the surface of the sensor clean and dry.
7. Keep your fingers clean when using this product.
8. In the state of new lock (factory setting), the lock can be unlocked with
any fingerprint.
9. When opening the door, if the lock beeps an alarm and the indicator
light flashes red, it's indicating the lock is in insufficient voltage level.
Please change the batteries.
10. This product can save 99 fingerprints, among which 1 is the Super
Master (Code: 01), and 2 Masters (Code: 02-03), and the other 96 are
member fingerprints (Code: 04-99)
11. Deletion of fingerprint is to delete each fingerprint separately according to its code; the fingerprint cannot be deleted unless you know the
code.
12. Do not clean the lock surface with corrosive substance, or else the
protection layer may be damaged and thus influence the gloss of the lock
surface. Therefore please clean the lock surface periodically with furniture polish wax (e.g. Pledge).
13. If the latch bolt fails to draw back and forth freely, or the door cannot
be closed normally due to the distortion of the door, please adjust the
strike plate's position.
14. When the fingerprint and password fails to work, use the mechanical
key to open the door; please keep the mechanical key in a proper place.
15. Customer Service Hotline: 1-866-572-LOCK
(5625)
-20-