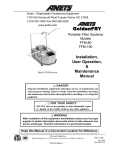
1
Anemos Installation manual A05271-ING 0.03.2014 INSTALLATION MANUAL ORIGINAL INSTRUCTIONS INDEX Dear Installer This manual contains advice for a rapid and precise installation of the various components. Although we are sure that you know how to use our products we still recommend that you read our indications carefully. We always welcome any suggestions or indications on possible improvements to the installation techniques or the layout of the manual. We would also remind you that during installation you should always use materials that are in full respect of the environment. It is also good practice to release, in addition to the declaration of conformity as required by law, a final declaration of correct installation according to the specifications in the manual. Symbols Controls Checking material, unpacking and preparation Main components and assembly sequence 1 Ceiling box 2 Wall box 3 Box safety screws 4 Laying guides with ceiling box 5 Laying guides with wall box 6 Check laying of guides 7 Positioning locking elements 8 Inserting terminals into canvas 9 Inserting terminal into inner housing on side guides 10 Manual operation 11 Awning descent ascent procedure 12 Changing the canvas 13 Fastening the box with side fittings 3 5 6 8 9 12 14 15 16 17 19 20 21 21 22 24 25 RESERVED FOR SPECIALIST TECHNICIANS: Electrical connections Programming motor limit switch with locks Motor limit switch programming procedure Troubleshooting Comparative wind load table 26 27 28 32 33 ANEMOS is a CORRADI S.p.A. product. All technical interventions necessary for the installation must be carried out by authorised and specialised technicians. All unauthorised interventions (tampering, technical modification etc.) during the warranty period will invalidate said warranty. CORRADI S.p.A. reserves the right to make technical modifications to the components or products, except for the main features, at any time and without prior notice. 2 di 34 CORRADI SPA INSTALLATION MANUAL ANEMOS 0.03.2014 SYMBOLS SYMBOLS The symbols indicated are used to draw the attention of the installer to arguments of particular importancefor the safety of persons, the product or to indicate particular operating conditions In the case of any incompatibility, contact CORRADI S.p.A. GENERAL SAFETY WARNINGS Destination of use Any improper use of HELYOS LIBERTY relieves CORRADI S.p.A. of all liability. When using the canvas it is good practice to remember that all moving parts can be a source of danger. Attention: general operating note Do not remove any casings after the installation and, if they are removed for maintenance, make sure that before removal the power supply is cut off (in case of motorised movement). Attention: greater attention to what you are reading Attention: general hazard; possible risk of damage to persons, property, components It is recommended never to intervene on moving parts and to ensure that no operator is near to the awning before reactivating it after a technical or maintenance intervention. Attention: risk of electrical hazard It is compulsory to cut off the power supply (if present) when carrying out an installation, maintenance, repair or adjustment intervention. Attention: risk of crushing hands It is recommended that a caution sign be placed on the power supply master switch with the following indications: “Attention! Do not touch. Service personnel at work”. Contact: CORRADI S.p.A. or the authorised retailer GENERAL PRECAUTION Before undertaking any assembly, maintenance or cleaning operations, make sure that you have fully understood the indications in this manual. Failure to respect the regulations contained herein relieves CORRADI S.p.A. of all responsibility for damage caused to persons, animals, property and/or components. The installation personnel must scrupulously respect the local accident prevention regulations in force. All electrical connections for movement, installation of automation accessories etc. must only be made by qualified personnel. If the structure is motorised and installed at a height of less than 250 cm from the ground, the control button must be of the ‘dead-man’ type and the opening and closing operations must be clearly visible. 0.03.2014 PRECAUTIONS AND WARNINGS The maintenance and installation personnel (installers, electricians etc.) must have sufficient expertise and psychophysical and attitudinal requirements for undertaking the tasks at hand. Always check the correct mounting and working efficiency of the electrical and manual drives during the assembly. In case of anomalies, immediately stop the work and contact the service department of CORRADI S.p.A. CORRADI SPA INSTALLATION MANUAL ANEMOS 3 di 34 SYMBOLS The use of non-original spare parts, or unauthorised interventions or modifications shall relieve CORRADI S.p.A. of any responsibility for damage caused to persons, animals or property. It is absolutely forbidden to tamper with the fixings, the supports, the guides, the fixtures, the command and idler units and any other component of the HELYOS LIBERTY. ATTENTION All values indicated are expressed in centimetres (unless otherwise specified). PRELIMINARY CHECKS On receipt of the packed goods and before starting their assembly, check the integrity of the material and the presence of all the components necessary for the installation. Carefully follow the information contained in the “Material check, unpacking and preparation” section. In case of anomalies, immediately contact the authorised retailer or CORRADI S.p.A. 4 di 34 CORRADI SPA INSTALLATION MANUAL ANEMOS 0.03.2014 CONTROLS ANEMOS It is custom designed and built for the client to protect from the sun and inclement weather, with the exception of snow; the structure is fully self-supporting and may be used in winds of up to class 8 on the Beaufort scale as shown in table 2 p.45. On the anchored canvas version, the canvas must be removed if the wind exceeds the values indicated in table 2 p.45. ELECTRIC COMMAND In case of EXYL ANEMOS with a wall-switch, push the switch in the low area in order to move the awning downwards, push it in the up area to move the awning upwards. Once you release the switch the awning will stop. The drive must be installed between 90 and 120 cm off the ground. MANUAL DRIVE If the ANEMOS is fitted with manual drive, to open and close the canvas, insert the manual winding handle in the seat of the gearbox and turn clockwise (to raise the canvas) or anticlockwise (to lower the canvas). Canvas ascent Canvas descent RADIO CONTROL If ANEMOS is equipped with radio control, the canvas lift, lower and stop movements are explained in the “motor and automatism” manual. 0.03.2014 CORRADI SPA INSTALLATION MANUAL ANEMOS 5 di 34 MATERIAL CHECK, UNPACKING AND PREPARATION '"$4*.*-&1-"5& PRELIMINARY CHECKS The ANEMOS awning is delivered in a strong package that protects it from knocks or scratches because it is contained in special polystyrene seats. There is a label on the cover that indicates: t.BOVGBDUVSFSEBUB t0SEFSOVNCFS t/BNFPGBEESFTTFF t$VTUPNFSSFGFSFODFOVNCFS t/¡PGUIFQBSDFM t8FJHIU Before opening the package, check that the data corresponds with that in your possession. All the elements necessary for mounting the awning, the accessories needed for mounting and the installation, the use and maintenance manual are inside the package and contained in special seats. N.B.: fixing elements such as screws, plugs etc. are not included and must be chosen by the installer based on the type of fixture foreseen (wall, wood, metal etc.). 6 di 34 Proceed as follows: - Remove the elements from the packing. WARNING: do not use a knife to avoid the risk of ruining the paint or metal elements. - The elements (cassette, guides and terminal) carry a further label indicating: t0SEFSEBUF t$VTUPNFSOBNF t3FGFSFODF t.FBTVSFNFOUEFUBJMTPGUIFPQFOJOHJOXIJDIUIFBXOJOHJTUPCFJOTUBMMFE t.FBTVSFTPGUIFDBTTFUUFTFSWJDFJOEJDBUJPO $IFDL UIBU UIF EBUB JOEJDBUFE PO UIF DBTTFUUF DPSSFTQPOET UP UIBU JOEJDBUFE PO UIF MBCFMPOUIFHVJEFTBOEPOUIFUFSNJOBM CORRADI SPA INSTALLATION MANUAL ANEMOS 0.03.2014 MATERIAL CHECK, UNPACKING AND PREPARATION Cassette Terminal Lateral guides Winding handle Once the cassette has been removed from the packing, place it on the ground facing upwards (the part to be fixed to the ceiling, to prevent damaging the painting on the side in view). The same for the lateral guides which should be placed on the ground resting on the side to be fixed to the wall. WARNING: Packed together with the cassette are the following accessories: t4UBOEBSEPWFSIFBEBODIPSBHFCSBDLFUTQFSBXOJOHVQUPNFUSFTMPOHGPSMBSHFSTJ[FT tGSPOUGBTUFOJOHCSBDLFUTJGTUSVDUVSFGSPOUGBTUFOJOHSFRVJSFE t5FNQMBUFTGPSESJMMJOH t$PNQFOTBUJPOXBTIFST tHVJEFTIJNT tXJUI"/&.04MPDLTDSFXTJODMVEFE 0.03.2014 ATTENTION: packed together with the guides are the following: tSVCCFSHBTLFUTDPOUBJOFEJOTJEFUIFHVJEFT Before starting the mounting, check the integrity of all the elements and that all the accessories are present. If not, contact CORRADI S.p.A. immediately. Start the mounting following the instructions shown in the next paragraphs. CORRADI SPA INSTALLATION MANUAL ANEMOS 7 di 34 MAIN COMPONENTS AND MOUNTING SEQUENCE 3 1 P - support plates (fitted box support) S - dust excluder brush (upper air tightness) 1 2 C - canvas storage box 4 G - side sliding guide 3 L - Cristal canvas M - motorreducer (electric drive) 6 A - handle fitting (manual drive) 4 5 T - terminal with draught excluder gasket 6 7 8 di 34 7 CORRADI SPA INSTALLATION MANUAL ANEMOS 5IFHFOFSBMDPOöHVSBUJPOPGBO"/&.04BTTFNCMZJT TIPXO 4UBSU UIF JOTUBMMBUJPO QSPDFFEJOH JO UIF GPMMPXJOH PSEFS 1 - Fastening support plates 2 - Attaching the box 3 - Laying the guides 4 - Inserting gaskets 5 - Inserting terminal into canvas 6 - Inserting stop unit 7 - Lower lock + foot 0.03.2014 1 CASSETTE TO THE CEILING Positioning support plates INSIDE Hole position Cardboard template P OUTSIDE OUTER EDGE OUTSIDE OUTER EDGE Positioning the cardboard templates for drilling Cardboard template fig. 1 If the box is to be installed on the outer edge of the structure, position the cardboard templates provided perfectly against the outer edge and against the right and left sides. For ANEMOS lengths up to 2 metres, there are 2 supports. For width 201 to 300 cm = 3 fittings. For width 301 to 400 cm = 4 fittings. For width 401 to 500 cm = 5 fittings. 0.03.2014 fig. 2 t%SJMMVTJOHBESJMMCJUUIBUJTTVJUBCMFGPSUIFUZQFPGmYJOHUPCFVTFE t*OTFSUUIFQMVHTXIFOGPSFTFFOEFQFOEJOHPOUIFUZQFPGmYUVSFFOWJTBHFEXBMMXPPENFUBMFUD t'JYUIFTVQQPSUQMBUFT1) to the ceiling, oriented as indicated in the figure. Attention: Use flat countersunk screws. Do not fully fix. Attention: read the following notes carefully. CORRADI SPA INSTALLATION MANUAL ANEMOS 9 di 34 1 CASSONETTO A SOFFITTO Sequence for hooking up the cassette 1 $ C OUTSIDE OUTSIDE P 2 $ fig. 3 t)PPLVQBOEmYUIFDBTTFUUFC) to the support plates with a slight rotation upwards, starting from the outside part (sequence 1 - 2). fig. 4 t0ODFUIFDBTTFUUFJTJOTFSUFEQSFTTUJHIUMZUIFTVQQMJFEOZMPOQJOTP) to stabilise the fixing. Pay attention to the sense of insertion. 10 di 34 CORRADI SPA INSTALLATION MANUAL ANEMOS 0.03.2014 1 CASSETTE TO THE CEILING Positioning support plates Check the alignment R P X X1 fig. 5 "55&/5*0/t$"44&55&$0.1&/4"5*0/ Before fastening the plates (1), it is essential to check that the top part (box support) is horizontal. If there is a difference between X and X1, insert the special plastic washers (R) provided between the ceiling and the plate to compensate until it is horizontal. )PSJ[POUBMJUZJTUIFPQUJNBMDPOEJUJPOGPSFOBCMJOHUIFUFSNJOBMMPDLUPXPSLQSPQFSMZ fig. 6 t$BSFGVMMZDIFDLUIFBMJHONFOUPGUIFTVQQPSUQMBUFTCFGPSFmOBMMZmYJOHUIFN t'JOBMMZmYUIFN Check the alignment /PUF The function of the support plates is to support the cassette before mounting the lateral guides. Check the parallelism and compensation 0.03.2014 CORRADI SPA INSTALLATION MANUAL ANEMOS 11 di 34 2 WALL BOX A B B A fig.9 - On the motor side, take out the cotter pin (A) not present on the model with manual drive - Support the roller - On the opposite side, apply slight pressure with a screwdriver to release the coupling (B) To install ANEMOS on a wall, proceed as follows: fig.7 - Open box (A) by removing the cover (B) /#SFNFNCFSUPVOTDSFXUIFTDSFXT A A A fig. 8 - Remove the two covers (A) by sliding them slightly inwards and take them out. 12 di 34 fig. 10 - Take out the canvas roller (A) CORRADI SPA INSTALLATION MANUAL ANEMOS 0.03.2014 2 WALL BOX A 10 cm 10 cm A fig.11 - Rest the ANEMOS box on the wall, centring it in position. - From the lower edge of the cassette, measure 10 cm to the lower edge of the beam. - Mark out on the wall the position of the 4 or 6 holes in the box (A). - Remove the box, drill the wall using a drill bit suitable for the type of fixture envisaged (wood, wall, metal etc.). 0.03.2014 fig.12 - Insert the plugs (if foreseen) in the drilled holes and fix the cassette with the supplied countersunk screws and washers. CORRADI SPA INSTALLATION MANUAL ANEMOS 13 di 34 3 BOX SAFETY SCREWS Safety screw fig.13 Safety screw if ANEMOS higher than 260 cm. 14 di 34 CORRADI SPA INSTALLATION MANUAL ANEMOS 0.03.2014 4 INSTALLING THE GUIDES WITH CASSETTE TO THE CEILING Position the guides to mark the holes INSIDE OUTSIDE Box tooth profile G1 G1 Guide G1 G2 OUTSIDE G3 G4 G1 (SX) OUTSIDE G1 (DX) G1 G2 G3 fig. 14 The guides are made up of the following elements: - guide (G1), pre-drilled in 3 positions for vertical fastening. two brushes (G2) stop for lower locking (G3) foot (G4) - Position the RIGHT and LEFT guides (G1) under the box to mark out the drill holes. 0.03.2014 fig. 15 G4 "UUFOUJPO UIFWFSUJDBMHVJEFTTIPVMECFSFTUFEVOEFSUIFCPYBHBJOTUUIFPVUFSXBMM - When the tracing is completed, remove the guides, drill with a drill bit suitable to the type of fixing (wood, wall, metal etc.), insert the plugs, if envisaged. - Remount the guides as already described but do not fix completely. "UUFOUJPOSFBEUIFGPMMPXJOHOPUFTDBSFGVMMZ CORRADI SPA INSTALLATION MANUAL ANEMOS 15 di 34 5 LAYING GUIDES WITH WALL BOX fig. 16 "UUFOUJPO UIFWFSUJDBMHVJEFTTIPVMECFSFTUFEVOEFSUIFCPYBHBJOTUUIFPVUFSXBMM - When the tracing is completed, remove the guides, drill with a drill bit suitable to the type of fixing (on wood, wall or metal), insert the plugs, if envisaged. - Remount the guides as already described but do not fix completely. "UUFOUJPOSFBEUIFGPMMPXJOHOPUFTDBSFGVMMZ 16 di 34 CORRADI SPA INSTALLATION MANUAL ANEMOS 0.03.2014 6 CHECK LAYING OF GUIDES Check the parallelism, perpendicularity, and the square of the lateral guides. Compartment width R G1 Perfect condition Conditions to be corrected ( intervention point) fig. 17 8"3/*/(t(6*%&40''4&5 Before the final fixing of the left and right fixed guides G1, it is essential that their parallelism, perpendicularity and square respect to the cassette are checked. fig. 18 If necessary, correct any problems by using the special plastic washers (R) provided, which should be inserted between the surface and the guide (G1), at the point to be offset up or down until the correction has been made. The respect of these checks ensures the ideal condition for perfect sliding of the awning during opening and closing. Note: any spaces created between the guide and the vertical support will be covered by the closing gasket. The figure highlights the possible problems that could arise. - Finally fix the guides. 0.03.2014 CORRADI SPA INSTALLATION MANUAL ANEMOS 17 di 34 MANUAL LATCH ELECTRIC LATCH ELIMINATE THE PLASTIC TUBE INSIDE THE ANTI-DRAUGHT fig. 19-a Version with manual latches. 18 di 34 ELIMINATE THE PLASTIC TUBE INSIDE THE ANTI-DRAUGHT fig. 19-b Version with electric latches. CORRADI SPA INSTALLATION MANUAL ANEMOS 0.03.2014 7 POSITIONING LOCKING ELEMENTS $ A B Intermediate positioning A B $ A A Lower positioning H1 H1 $ B B A A $ fig. 20 Insert the locking elements (A) into the relative housing on the vertical guides (B). Position the locking elements (A) at the required height (H1 equal for RIGHT and LEFT guides). Stop the locking elements (A) with dowels ($). 0.03.2014 CORRADI SPA INSTALLATION MANUAL ANEMOS 19 di 34 8 - INSERTING TERMINAL INTO CANVAS Screw present if ANEMOS over 2.6 m. A - T L . . fig.21 .BOVBMESJWFNPEFM fig.22 Electrical control model - Use the handle to lower the canvas. - Take care that the canvas (-) lowers by approximately 50/60 cm, enabling the end to be taken out from inside the guides. - Insert the terminal (5) in the canvas (-) sliding it into the housing and then fasten with the screws provided. - Open the box by removing the cover. - Manually unwind the canvas (A). - Take care that the canvas (-) lowers by approximately 50/60 cm, enabling the end to be taken out from inside the guides. - Insert terminal (5) in canvas (-), sliding it into the housing and then fasten it with screws (.). 20 di 34 CORRADI SPA INSTALLATION MANUAL ANEMOS 0.03.2014 9 INSERTING TERMINAL INTO INNER HOUSING ON SIDE GUIDES 10 MANUAL OPERATION B A fig.23 Insert terminal (A) into the inner housing of side guides (B), taking care not to tension or tear the canvas. fig.24 ."/6"-01&3"5*0/ For ANEMOS manual model. Use the supplied winding handle to lift or lower the awning. It should be inserted in the coupling protruding at the top and then turned (see figure). 0.03.2014 CORRADI SPA INSTALLATION MANUAL ANEMOS 21 di 34 11 AWNING MANUAL DESCENT - ASCENT PROCEDURE A B i9w-"5$) */4&35*0/ C D i:w-"5$)%*4 */4&35*0/ fig.25 Manual operation - Adjusting the motor limit stops: lower limit stop = few cm below guide locks. - (A) Run the motor in descent until the terminal reaches the lower limit stop; move the latches across against the guides and lock them by tightening the knobs slightly (callout X). - (B) Press the up button: the motor stops automatically at the suitable tension. - ($) To release the awning, press the descent button to loosen the canvas; dis-insert the latches by moving them away from the guides (Callout Y). - (%) Press the up button to wind up the awning. *OUIFWFSTJPOXJUIFMFDUSJDMBUDIFTPQFSBUJPOT9#$:BSFDBSSJFEPVUBVUPNBUJDBMMZ 22 di 34 CORRADI SPA INSTALLATION MANUAL ANEMOS 0.03.2014 11 AWNING MOTORISED DESCENT - ASCENT PROCEDURE A B i9w-"5$) */4&35*0/ C D i:w-"5$)%*4 */4&35*0/ fig.26 Electric canvas operation/manual latch operation - Adjusting the motor limit stops: lower limit stop = few cm below guide locks. - (A) Run the motor in descent until the terminal reaches the lower limit stop; move the latches across against the guides and lock them by tightening the knobs slightly (callout X). - (B) Press the up button: the motor stops automatically at the suitable tension. - ($) To release the awning, press the descent button to loosen the canvas; dis-insert the latches by moving them away from the guides (Callout Y). - (%) Press the up button to wind up the awning. *OUIFWFSTJPOXJUIFMFDUSJDMBUDIFTPQFSBUJPOT9#$:BSFDBSSJFEPVUBVUPNBUJDBMMZ 0.03.2014 CORRADI SPA INSTALLATION MANUAL ANEMOS 23 di 34 12 CHANGING THE CANVAS Rullo "55&/5*0/ "55&/5*0/ A Telo D B C fig.27 - (A) Open the box. - (B) Open the awning until the canvas is completely loosened (wind-up device roller “uncovered” by the canvas). - ($) Lift the terminal at one end, taking it out of the guides together with the canvas: take care not to tear the canvas at the top where it inserts into the guides. - (%) Remove the canvas from the roller by simply pulling on the profile, then remove it from the terminal after having removed the side screws. - Install the new canvas by carrying out the above operations in reverse order. 24 di 34 CORRADI SPA INSTALLATION MANUAL ANEMOS 0.03.2014 13 FASTENING THE BOX WITH SIDE FITTINGS N.B.: This type of installation is only possible up to a width of 3.5 m and a height of 2.5 m; beyond those dimensions, a ceiling or wall box must be installed with multiple fastening points. B A A B A t Max 3,5 m B 2,5 mt Max B fig.28 - Insert the box by sliding the four pins (A) into the grooves on the plates (B) until they are fully inserted. - Check the stability of the cassette. 0.03.2014 fig.29 - Drill the upright pillar in correspondence with the front hole on the two plates (A) and tighten a hexagonal head self-tapping screw (B), which will secure the box in position to prevent any accidental movements. CORRADI SPA INSTALLATION MANUAL ANEMOS 25 di 34 RESERVED FOR SPECIALIST TECHNICIANS ELECTRICAL CONNECTIONS 1. WARNINGS This sheet gives important information on safe installation and use. Comply with the instructions and store them carefully for future reference. The VENUS HOOK motor is specifically designed to handle the ANEMOS product. Any other use is improper and forbidden. .0503%3*7&/"/&.04 After having installed the ANEMOS frame, proceed as follows before running the motor: 1. Check the electrical system is earthed. 2. Size the electrical system based on the input of the motors to be installed. 3. Ensure the motor has an earth connection; do not run the motor if it is not earthed. 4. Insulate any unused cables (grey-black cable for button controls). Once the motor is connected to the power line, before starting the programming procedure outlined in the laying manual, open the canvas all the way to the ground using the remote control and, only then, return the terminal to intermediate position (central). It is then possible to start the motor programming procedure outlined in the laying manual. All motors are tested and, if applied correctly, this additional note to the laying procedure will guarantee correct operation of the ANEMOS motors. On the other hand, failure to apply or incorrect application of the procedure relieves Corradi SpA of any liability for motor malfunctions. *.1035"/5/05&40/3"%*04:45&.4 t It is not advisable to use radio systems in areas with strong interference (e.g. near police stations, airports, banks, hospitals etc.). t A technical inspection should be carried out prior to installing any radio system to identify any sources of interference. t Radio systems can be used solely where any disturbance or malfunction of the transmitter or receiver does not constitute a risk factor, or if such risk factor is cancelled out by appropriate safety systems. t The presence of radio devices operating at the same transmission frequency (e.g. alarms and radio headphones) can interfere with the radio receiver of the control unit, reducing the range of the transmitters and limiting the full capacity of the system, and thus reducing system performance *.1035"/5 /05& '03 .0503 130(3"..*/( öSTU JOTUBMMBUJPO Before programming the motor, deactivate the canvas locking system on both sides of the ANEMOS (Fig. 01), to enable the motor to identify the limit switch during the initial activation. &-&$53*$"-$0//&$5*0/4'*( The product must be installed by a qualified technician who can respect all the regulations and laws in force on the territory. t Make the connections with the power supply disconnected. t Take care when operating on the product, and use suitable tools. t The motor must be connected with the earth wire (yellow/ green). t Check that the electrical power supply line does not depend on circuits destined for illumination. t The power supply line must be protected by a suitable thermo magnetic or differential cut-off switch. t When using more than one radio device in the same system, the distance between them must not be less than 1.5 m. t Do not install the product close to metallic surfaces. t Do not modify or replace parts without the authorisation of the manufacturer. t If the manual controls are not used, suitably insulate the black and grey conductors. t The antenna cable is exposed to mains voltage. It is forbidden and dangerous to cut or tamper with the antenna cable in any way. t For your own safety, it is forbidden to operate in proximity to the roller tube with the motor powered up. t Ensure that the ANEMOS is installed in full compliance with the standard regulations. t Friction against the normal opening and closing of the canvas can strongly limit system performance. $POOFDUJPOXJSJOHEJBHSBN 5&$)/*$"-'&"563&4 BUBUFNQFSBUVSFPG¡$ t.PUPSEBUBTFFMBCFMBöYFEUPUIFNPUPS t3BEJPGSFRVFODZ.)[ tNBYUSBOTNJUUFSTTUPSFEVQUP t3BOHFFTUJNBUFE NJOPQFOHSPVOENJOTJEFCVJMEJOHT Motor cable grey black brown blue yellow/green L (phase) N (neutral) Main voltage 26 di 34 CORRADI SPA INSTALLATION MANUAL ANEMOS 0.03.2014 4.1 Power supply The motor must be powered at 230 Vac and 50 Hz frequency. The mains voltage must be applied to the brown and blue wires (Fig. 02) Potential RADIO interference 4.2 Connecting the control buttons The manual control buttons must be connected to the grey and black wires; the contacts must close on the brown wire. The control buttons must be switches with unstable positions. To apply an ascent or descent command, press the button for at least 0.5 sec; to lock the manoeuvre press any one of the control buttons briefly. More control buttons can be connected to one another through a parallel connection. The control buttons are subjected to mains voltage and must therefore be suitably insulated and protected. Restricted potential RADIO interference &/(*/&)&"% "%+"$&/550 &/(*/&)&"% 5. CHANGING THE CANVAS Warning: If changing the canvas, it is STRICTLY FORBIDDEN to leave the motor coupled to the support bracket (Fig. 3). NO 108&3$"#-&065-&550"70*%8"5&3 */'*-53"5*0/ CORRECT 'JH 0.03.2014 INCORRECT CORRADI SPA INSTALLATION MANUAL ANEMOS 27 di 34 RESERVED FOR SPECIALIST TECHNICIANS MOTOR LIMIT SWITCH PROGRAMMING PROCEDURE WITH LOCKS RESERVED FOR SPECIALIST TECHNICIANS MOTOR LIMIT SWITCH PROGRAMMING PROCEDURE "3$03"%*0$0/530- MENU JOTFSUJOHSFQMBDJOHUIFCBUUFSZ The transmitter is powered by a Cr2032 battery. To insert the battery, remove the battery plate on the back of the transmitter, insert the battery, ensuring the polarity is correct, and close the plate. Using batteries other than those envisaged can cause a risk of explosion. Flat batteries must be disposed of in appropriate containers. It is advisable to replace the battery every 2 years. PROG 'BTUFOJOHUIFXBMMTVQQPSU Using a screwdriver, remove the central cover from the support. Fasten the support to the wall using the anchors provided (36 mm space between holes). Re-insert the cover. /PUFTPOSBEJPTZTUFNT It is not advisable to use radio systems in areas with strong interference (e.g. near police stations, airports, banks, hospitals etc.). A technical inspection is recommended prior to installing any radio system to identify any sources of interference. Radio systems can be used where any disturbance or malfunction of the transmitter or receiver does not constitute a risk factor, or if such risk factor is cancelled out by appropriate safety systems. The presence of radio devices operating at the same transmission frequency (433.42 MHz) can interfere with the radio receiver, reducing system capacity and limiting system operability. #BTJDGVODUJPOT ascent Stop descent 5FDIOJDBMGFBUVSFT - Power supply: 1 CR2032 battery - Dimensions: 42x140x16 mm - Weight: 50 g - Operating temperature: from -20 to +55°C - Radio frequency: 433.42 MHz - ARCO5 radio channels: 5 + sequencer - ARCO10 radio channels: 10 + sequencer - ARCO20 radio channels: 20 + 4 programmable units Prev channel Next channel %JTQPTBM At the end of the product’s life cycle, it must be disposed of according to local regulations. This product may contain substances harmful for the environment or human health and must be disposed of separately from domestic waste. 28 di 34 CORRADI SPA INSTALLATION MANUAL ANEMOS 0.03.2014 .0503*/45"--"5*0/7*"53"/4.*55&3 This motor is compatible with ARCO, FLUTE transmitters and equivalent. Before beginning the programming procedure, read the transmitter instruction manual and identify the UP, STOP, DOWN, PROG required for programming the motor. The following description includes a very generic representation of the transmitter. A C B Press UP ON E :&4 3x /0 Power the motor F D Does the motor move up? Within 15 seconds, press transmitter PROG briefly Press PROG Move the motor to intermediate position adapter mounted? 1st movement HOOKS ABSENT 2nd movement HOOKS ABSENT 3rd movement HOOKS ABSENT Press STOP to select Press STOP to select Press STOP to select I Fine adjustment needed? :&4 J The motor moves down L Fine adjustment Upper limit stop? /0 needed? Stop manually Wait 10 seconds Travel learned successfully!! Stop manually K See point N «Fine Adjustment» :&4 The motor moves up Wait for automatic stop (or stop manually) /0 /0 M H Compensated :&4 G The motor moves up in brief movements. Each movement corresponds to a specific application. Press STOP 3 times Wait for automatic stop. Go to point M :&4 See point N «Fine Adjustment» /0 Wait 10 seconds Some notes on motor programming via transmitter: - Point 08.B: once transmitter PROG is pressed, wired controls are inhibited. - Point 08.C: the motor has «manned» movement: on pressing UP or DOWN on the transmitter, the motor runs in a certain direction until the button is released. - Point 08.E: the STOP button on the transmitter must be pressed briefly 3 times, with approximately 1 second between one press and the next. If the button is pressed a number of times other than 3, the motor gives an error signal. - Point 08.F: approximately 5 seconds pass between one movement and the next. if no option is selected, the motor moves down briefly. In this case repeat point 08.E. Point 08.G: from this movement the motor is «jogged»: to run the motor, press UP or DOWN, to stop the motor press STOP briefly. - Point 08.N: during the fine adjustment process, holding down UP or DOWN jogs the motor in the selected direction. /'*/&"%+645.&/5 Press PROG 0.03.2014 Limit stop precision adjustment Press PROG CORRADI SPA INSTALLATION MANUAL ANEMOS 29 di 34 RESERVED FOR SPECIALIST TECHNICIANS MOTOR LIMIT SWITCH PROGRAMMING PROCEDURE RESERVED FOR SPECIALIST TECHNICIANS MOTOR LIMIT SWITCH PROGRAMMING PROCEDURE .PEJöDBUJPOPGGVODUJPO-*'5*/(50326&3&%6$5*0/ Modification of function 09 - LIFTING TORQUE REDUCTION 01.Select the correct radio channel and move the motor to intermediate position. 02.Press MENU for approximately 5 seconds. “rS” appears on the display. 03.Press NEXT 9 times. 09 appears on the display. 04.Press STOP once. The receiver signals the current value(*). 05.Use PREV and NEXT to set the new value(**). 06.Press STOP once. The receiver signals the new value. (*) only if the receiver envisages the modification and the signal of parameter «torque reduction». Example: if the value of the parameter is 3: 3 brief movements. (**) See the receiver manual for the range of admitted values. Example: to set the parameter to 3: (0 times PREV) - 3 times NEXT. .PEJöDBUJPOPGGVODUJPO5&/4*0/*/( 01.Select the correct radio channel and move the motor to intermediate position. 02.Press MENU for approximately 5 seconds. “rS” appears on the display. 03.Press PREV once and NEXT 1 times. 4 appears on the display. 04.Press STOP once. The receiver signals the current value(*). 05.Press NEXT to select the tension value - see table (it appears on the display). 06.Press STOP once. The motor signals the new value with no. of movements. 07.Press STOP once to confirm. Setting 1 calculated torque (minimum) 2 Number Movements Setting 1 minimum medium low torque 2 medium 3 medium torque 3 high 4 medium high torque 4 maximum 5 high torque 6 maximum torque 30 di 34 AUTOZERO MODE TRACTION ON HOOKS TORQUE REDUCTION (TRO) Number Movements .PEJöDBUJPOPGGVODUJPO$"/7"43&-&"4& 01.Select the correct radio channel and move the motor to intermediate position. 02.Press MENU for approximately 5 seconds. “rS” appears on the display. 03.Press PREV once and NEXT once. 1 appears on the display. 04.Press STOP once. The receiver signals the current value(*). 05.Use PREV and NEXT to set the new value(**). 06.Press STOP once. The receiver signals the new value. (*) only if the receiver envisages the modification and the signal of parameter «canvas release». Example: if the value of the parameter is 2: 2 brief movements. (**) See the receiver manual for the range of admitted values. Example: to set the parameter to 2: (0 times PREV) - 2 times NEXT. CORRADI SPA INSTALLATION MANUAL ANEMOS Number Movements Setting 1 autozero without release 2 autozero with release 3 autozero with release every 30 lift manoeuvres 0.03.2014 .PEJöDBUJPOPGGVODUJPO%&4$&/50#45"$-& 01.Select the correct radio channel and move the motor to intermediate position. 02.Press MENU for approximately 5 seconds. “rS” appears on the display. 03.Press PREV once and NEXT 1 times. 3 appears on the display. 04.Press STOP once. The receiver signals the current value(*). 05.Use PREV and NEXT to set the new value(**). 06.Press STOP once. The receiver signals the new value. (*) only if the receiver envisages the modification and the signal of parameter «descent obstacle». Example: if the value of the parameter is 4: 4 brief movements. (**) See the receiver manual for the range of admitted values. Example: to set the parameter to 4: (0 times PREV) - 4 times NEXT. DESCENT OBSTACLE (FOD) Number Movements Setting 1 Function Inactive 2 Minimum sensitivity 3 Medium sensitivity 4 Maximum sensitivity 6TFPGGVODUJPO3&4&53&$&*7&3 ATTENTION: To carry out this procedure, use a channel stored SOLELY IN THE RECEIVER BEING RESET; if several devices are tuned to the same channel, power only the device being reset. 01.Select the channel tuned to the receiver being «reset». 02.Press MENU for approximately 5 seconds. “rS” appears on the display. 03.Press PREV 2 times and NEXT 9 times. 29 appears on the display. 04.Press STOP once. The receiver signals it is ready to be reset (through visual or audible signals, see receiver instruction manual); on the transmitter, all LEDs and segments of display flash for a few seconds 05. Press PREV and NEXT together until the receiver signals factory settings have been restored. 06. See the receiver instruction manual to install the receiver again. &OUFSJOHBOFXUSBOTNJUUFSJOUIFNFNPSZ - Move the motor to intermediate position so that the motor signal movements are visible. - Press 130( on a portable stored transmitter for about 4 sec, until the motor makes 2 upward movements to signal “transmitters programming” mode. - Within 8 sec, press 4501 on the transmitter to be stored (if radio sensors are used, press the key indicated in the radio sensor instruction leaflet). The motor memorises the code and signals the operation with a small upward movement. *.1035"/5/05&'035)&*/45"--&3 In some installations, the structure may go OUT OF SQUARE. Under these circumstances the lower limit stop automatic learning procedure may not exactly meet the requirements of the installation (when the canvas is fully lowered the lower pad is partially squashed on one side and not against the ground on the other). In this case the following steps are recommended: - reduce the out of square to a minimum; - repeat the stroke learning procedure, fixing the lower limit stop manually, as described in point 5.1 or 5.2 note 1; in particular, the lower limit stop should be fixed slightly higher than the motor’s automatic stop point. 0.03.2014 CORRADI SPA INSTALLATION MANUAL ANEMOS 31 di 34 RESERVED FOR SPECIALIST TECHNICIANS MOTOR LIMIT SWITCH PROGRAMMING PROCEDURE TROUBLESHOOTING t5IFNPUPSSFEVDFSEPFTOPUXPSLt Check: - the wiring to the motor reducer - the thermal cut-out (wait until the motor cools down) - the compliance of the wires used (see wiring diagram) - the remote control battery (if envisaged). If necessary, replace it with a battery of the same characteristics (see p. 4) - the remote control is correctly stored in the motor - the remote control is compatible (if not original CORRADI S.p.A.) - absence of radio interference t5IFBXOJOHDMPTFTöSTUt Check: - limit switch adjustment (vedi pag. 53) 32 di 34 5306#-&4)005*/( "55&/5*0/TBGFUZXBSOJOHT &WFSZ JOUFSWFOUJPO NVTU CF DBSSJFE PVU CZ TVJUBCMZ USBJOFE QFSTPOOFM BOE BMM QSFDBVUJPOTNVTUCFUBLFOUPQSFWFOUBDDJEFOUBMNPWFNFOUTPSFMFDUSJDBMTIPDLT Problem Possible cause Tests and remedies The motor does not start when the There is no mains supply. command is given. Check the electric current. The motor starts but the canvas does not move. Contact the dealer. The canvas moves in stops and The runners are dirty or are not Clean the runners. correctly aligned. starts. Request of assistance Requests for assistance should first be made directly to the retailer. Only in case of necessity should you directly contact CORRADI S.p.A. CORRADI SPA INSTALLATION MANUAL ANEMOS 0.03.2014 COMPARATIVE WIND LOAD DATA SHEET L H Table 1 - Effects of wind on ANEMOS 0.03.2014 ANEMOS Width of the awning (cm) 100 150 200 250 300 350 400 450 500 Wind speed (km/h) 95.5 78 67.5 60.5 55 51 48 38 38 Value Beaufort scale 10 9 8 7 7 7 6 5 5 Wind resistance class (UNI EN 13561) h 300 cm 3 3 3 3 3 3 3 2 2 Wind resistance class (UNI EN 13561) h 350 cm 2 2 2 2 2 2 2 1 1 CORRADI SPA INSTALLATION MANUAL ANEMOS 33 di 34 CORRADIGROUP Corradi SpA Corradi System Srl 39, Via G. Brini 40128 Bologna - Italy 18, Via A. Einstein 47122 Forlì - Italy T +39 051 4188 411 F +39 051 4188 400 T +39 0543 796617 F +39 0543 794339 E [email protected] E [email protected] www.corradi.eu