1
User Guide
Packard Bell EasyNote TE
- 1
T A B LE OF C ON TENTS
Starting your computer
Optimizing battery life...............................
4
Battery-low warning..................................
Wireless connection ........................................... 4
Registration ........................................................ 5 Software
Software installation ........................................... 6
Using Windows and your software ..................
Recovery ............................................................ 6
Welcome Center ......................................
Having trouble? .................................................. 6
Internet security offer ...............................
Productivity software ................................
Computer Basics
8
Packard Bell Recovery Management.......
Safety and comfort ............................................. 8
Playing multimedia files............................
Safety precautions ...................................... 8
AutoPlay...................................................
Health precautions .................................... 11
Playing downloaded files..........................
Getting to know your computer
14
Social networks (optional) ........................
Top view - display ............................................ 15
Internet
Top view - keyboard......................................... 16
Special keys.............................................. 17 First steps on the net .......................................
Protecting your computer .........................
Touchpad .................................................. 19
Choose an Internet Service Provider .......
Front view......................................................... 21
Network connections................................
Left view ........................................................... 22
Surf the Net! .............................................
Right view......................................................... 24
Security ....................................................
Base view......................................................... 26
Upgrading your computer
27 Helpdesk
Expanding through options .............................. 27 Safe computing................................................
Maintenance.............................................
Connectivity options.................................. 27
Updates....................................................
Power supply
32
Windows Remote Assistance...................
AC power adapter ............................................ 32
Recovery
Battery pack ..................................................... 33
Battery pack characteristics ...................... 33 Packard Bell Recovery Management ..............
Creating recovery discs............................
Replacing the battery pack ....................... 35
Installing or removing the battery pack ..... 35 Recovering your system ..................................
Types of recovery.....................................
Charging the battery ................................. 36
Checking the battery level......................... 36
2 - Table of Contents
37
37
39
39
39
39
40
40
40
42
42
43
48
48
48
48
50
54
54
68
68
68
75
77
78
78
79
81
83
Regulatory information
89
Environment
105
Software license
108
Index
111
Copyright © 03/2012. All Rights Reserved.
Packard Bell EasyNote TE User Guide
Original Issue: 2 March 2012
Visit registration.packardbell.com and discover the benefits of being a customer of
Packard Bell.
Remark: All images are for reference purposes only. Actual configuration may vary.
Table of Contents - 3
S T A R T I N G Y O U R COMPUTER
Thank you for purchasing this Packard Bell computer!
This guide has been designed to introduce you to the features of your
computer and assist in your computing experience.
After setting up and starting your computer, as shown in the setup
instructions, it will ask you questions that will help you connect to the
Internet. Your computer will then configure installed software.
WIRELESS CONNECTION
To connect to a wireless network, first check the wireless features of your
computer are on, and that the router or modem you want to connect to is
also correctly configured.
• If wireless is not on, press the communication key (
Launch Manager and make sure Wi-Fi is On.
) to open the
• Your computer will detect and display any available networks, select
your network and enter the password, if required.
• After a short delay, your computer should connect to the Internet.
If your network is not detected, or your computer does not connect to the
Internet, please refer to your ISP or router’s documentation. After your
computer starts and you can use it, open Internet Explorer and follow the
instructions.
4 - Starting your computer
Alternatively, use a network cable to connect directly to a network port
on your router. Please refer to your ISP or router’s guide.
REGISTRATION
When using your computer for the first time, it is recommended that you
register it. This gives you access to some useful benefits, such as:
• Faster service from our trained representatives.
• Membership in the Packard Bell community: receive promotions and
participate in customer surveys.
• The latest news from Packard Bell.
How to register
During the initial startup of your computer, a window will invite you to
register. Please fill in the information and click Next. The second window
you'll see contains optional fields that will help us to provide you with a
more personable customer service experience.
Another option
Another way to register your Packard Bell product is to visit our website at
registration.packardbell.com. Choose your country and follow the
simple instructions.
After registering, you will be sent a confirmation email with important
information that you should keep in a safe place.
Starting your computer - 5
SOFTWARE INSTALLATION
Your computer will automatically install software and prepare your
computer for use. This may take some time, please do not turn off your
computer; wait until the installation has finished.
RECOVERY
You should create recovery discs as soon as you are able. The Packard
Bell Recovery Management program allow you to create recovery discs
and then to restore or reinstall applications and drivers provided by
Packard Bell.
HAVING TROUBLE?
Packard Bell provides several options to support your purchase.
Packard Bell support
Make sure you write down your computer serial number, date and place of
purchase and model name on the area provided in this guide; save your
proof of purchase. Before you call us, please write down any error
message that accompanies the problem, and have the computer in front of
you and switched on if possible. Having these items to hand when
contacting us will ensure better and quicker service.
Packard Bell website
Remember to visit www.packardbell.com - Check out the support section
for up-to-date information, help, drivers and downloads.
6 - Starting your computer
Warranty and contact information
You can find information about the warranty for your computer and how to
contact technical support in your computer’s Warranty.
Starting your computer - 7
C OMPUTER B ASICS
SAFETY AND COMFORT
Safety precautions
Please follow the guidelines below to use your computer comfortably and
to avoid health problems.
Computer environment
Make sure that the computer:
• Is used on a stable surface, stand or table. A fall can seriously damage
the computer.
• Is not used on a surface that vibrates, or used when taking part in sport,
exercise or other activities in a dynamic environment. Vibration or
movement can loosen fastenings, damage internal components and
even cause battery leakage.
• Is away from direct sunlight and sources of heat.
• Is away from magnetic fields or any device generating static electricity.
• Is kept at least 30 centimetres (one foot) away from a mobile phone.
• Is not in a dusty or damp environment.
• Is not used near water. Never spill liquids of any kind on or into your
computer.
• Is not placed on a carpet or any other surface that may have an
electrical charge.
8 - Computer Basics
Please note
• Slots and openings are provided for ventilation to ensure reliable
operation of the product and to protect it from overheating. These
openings must not be blocked or covered. The openings should never
be blocked by placing the product on a bed, sofa, rug or other similar
surface. This product should never be placed near or over a radiator or
heat register, or in a built-in installation unless proper ventilation is
provided.
• Never push objects of any kind into this product through cabinet slots as
they may touch dangerous voltage points or short-out parts that could
result in a fire or electric shock. Never spill liquid of any kind onto or into
the product.
• To avoid damage of internal components and to prevent battery
leakage, do not place the product on a vibrating surface.
• Never use it under sporting, exercising, or any vibrating environment
which will probably cause unexpected short current or damage rotor
devices, HDD, optical drive, and even exposure risk from lithium battery
pack.
Cables
Make sure that:
• Cables are not strained and that there is no risk of people walking or
tripping over them.
• Other devices do not crush the cables.
Computer Basics - 9
• The power cable is connected to the computer before connecting the
power cable to the AC power outlet.
• The power cable is unplugged from the power outlet before
disconnecting the power cable from the computer.
• Three-pin power cords are connected to a grounded power outlet.
• The power outlet is easily accessible and as close to the computer as
possible (do not overload it with too many adapters).
If your computer uses an external AC adapter:
• Do not cover or place objects on the AC adapter. Allow the adapter to
cool properly during use by keeping it clear of objects.
• Only use the AC adapter that is supplied with your computer. Although
other adapters may look similar, using them can damage your computer.
If a replacement is required, use only parts certified for use with your
computer.
Cleaning your computer
• Always unplug your computer from the power outlet before cleaning it.
• Do not use liquid or aerosol cleaners, use a damp cloth instead.
• Never spray cleaning product directly on the screen.
• If you spill liquid on your computer, switch it off immediately, unplug the
AC adapter, remove the battery and make sure it is completely dry
before switching it on again. Wait overnight if necessary.
Note: If your computer includes slots for memory cards or expansion
devices, plastic ’dummies’ may be installed in the card slots. Dummies
10 - Computer Basics
protect unused slots from dust, metal objects or other particles. Save
the dummies for use when no cards are in the slots.
Servicing your computer
Do not attempt to service your computer yourself, as opening or removing
covers may expose you to dangerous voltage or other risks. Refer all
servicing to qualified service personnel.
Unplug your computer from the wall outlet and refer servicing to qualified
service personnel when:
•
•
•
•
•
•
the power cord or plug is damaged, cut or frayed,
liquid was spilled into the product,
the product was exposed to rain or water,
the product has been dropped or the case has been damaged,
the product exhibits a distinct change in performance,
the product does not operate normally after following the operating
instructions
Note: Adjust only those controls that are covered by the operating
instructions, since improper adjustment of other controls may result in
damage and will often require extensive work by a qualified technician
to restore the product to normal condition.
Health precautions
• The bottom surface, areas around ventilation openings and AC adapter
may get hot. To avoid injury, ensure they do not come in contact with
your skin or body.
Computer Basics - 11
• Your device and its enhancements may contain small parts. Keep them
out of the reach of small children.
• The computer and accessories may contain small parts. Keep them out
of the reach of small children.
• If you work or play for hours at a time, then make sure you take regular
breaks. Look away from the computer's screen once in a while. Do not
use your computer if you are tired.
• Arrange your computer so that you can work in a natural and relaxed
position. Place items that you use frequently within easy reach.
• Position your computer directly in front of you for increased safety and
comfort. Ensure that your keyboard and touchpad are at a comfortable
height. The screen should be about 45-70 cm (18-30 inches) from your
eyes.
If you use your computer for long periods while sitting at a desk, invest
in an external keyboard for improved comfort.
• To protect your hearing, when using speakers or headphones, increase
volume gradually until you can hear clearly and comfortably; do not
increase the volume level after your ears have adjusted. Do not listen to
high volumes for extended periods. Do not increase the volume to block
out noisy surroundings; decrease the volume if you cannot hear people
speaking near you.
• The computer’s underside, power adapter and the air from
ventilation slots may become hot during use. Avoid
continuous body contact and do not place the computer on
your lap while it is operating.
12 - Computer Basics
• Ensure that the computer’s ventilation slots and openings are never
obstructed or covered. Do not place the computer on a soft surface
(such as a carpet, chair or bed) that may block ventilation slots.
• Do not push objects of any kind into ventilation or case slots as they
may touch dangerous voltage points or short-out parts that may result in
a fire or electric shock.
• Some disorders of the hands, wrists, arms, neck, shoulders, legs and
back may be associated with, or aggravated by certain repetitive
actions. To reduce your risk of developing these disorders, type with
your wrists straight and your hands and wrists floating above the
keyboard. If you experience periods of pain, tingling, numbness or other
discomfort, please contact your doctor.
• We advise that parents monitor the use of games by their children. If you
or your child experience any of the following symptoms: dizziness,
blurred vision, eye or muscle twitches, loss of consciousness,
disorientation, any involuntary movement or convulsion, IMMEDIATELY
discontinue use and consult your doctor. This may happen even if the
person has no medical history of epilepsy.
Computer Basics - 13
G ETTING T O KNOW Y O U R
COMPUTER
After setting up your computer, as illustrated in the setup instructions, let
us show you around your new Packard Bell computer.
Packard Bell EasyNote TE
14 - Getting to know your computer
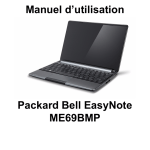
TOP VIEW - DISPLAY
#
Icon
Item
Description
1
Webcam
Web camera for video communication.
A light next to the Webcam indicates that the
webcam is active.
2
Display screen
Also called Liquid-Crystal Display (LCD),
displays computer output.
3
Microphone
Internal microphone for sound recording.
Getting to know your computer - 15
TOP VIEW - KEYBOARD
#
Icon
Item
1
Power button /
indicator
2
Keyboard
3
Touchpad
16 - Getting to know your computer
Description
Turns the computer on and off. Indicates the
computer's power status.
For entering data into your computer.
- Special keys are described on page 17.
Touch-sensitive pointing device which
functions like a computer mouse.
#
Icon
Item
Description
4
Click buttons (left
and right)
The left and right side of the button function as
left and right selection buttons.
5
Speakers
Deliver stereo audio output.
Special keys
Your computer’s keyboard includes keys that activate special functions.
The function of each key is clearly marked with an icon.
Icon
Fn
Function
Description
Hotkey for second
function
Activates a second function on certain keys.
E.g. press the Fn key to activate the F1 to F12 keys.
Help
Opens the help menu.
Backup
Allows you to create backup copies of your computer;
either the entire system or only selected files and
folders. Create a regular schedule or make copies
whenever you want.
Communication
Enables/disables the computer’s communication
devices.
Display toggle
Switches display output between the display screen,
external monitor (if connected) and both.
Screen blank
Turns the display screen backlight off to save power.
Press any key to return.
Getting to know your computer - 17
Icon
Function
Description
Touchpad toggle
Turns the internal touchpad on and off.
Play/Pause
Play or pause a selected media file.
Stop
Stop playing the selected media file.
Previous
Return to the previous media file.
Next
Jump to the next media file.
Brightness down
Decreases the screen brightness.
Brightness up
Increases the screen brightness.
Opens the Social Networks application.
Social Networking
- If this application is not installed, the key will start
your instant messenging application.
Volume up
Increases the sound volume.
Volume down
Decreases the sound volume.
Speaker toggle
Turns the speakers on and off.
18 - Getting to know your computer
Hotkeys
The computer uses hotkeys (key combinations) to access function keys
and navigation commands.
To activate hotkeys, press and hold the Fn key (bottom left) before
pressing the other key in the hotkey combination.
Hotkey
Function
Description
Fn + Special keys
(see page 17)
Function keys
Activates the F1 to F12 keys.
Fn +
Home
Scrolls to the beginning of a document.
Fn +
End
Scrolls to the end of a document.
Fn +
Page up
Scrolls up a page in a document.
Fn +
Page Down
Scrolls down a page in a document.
- Note: It is not necessary to press the Fn key to use the F1 to F12 function keys when
starting your computer or when using the BIOS.
To swap the hotkey and special function of the F1 to F12 keys, change the function
key setting in the BIOS (to open the BIOS press F2 when starting your computer,
then select the Main menu and change Function key behavior to Function keys).
Touchpad
The touchpad controls the arrow on the screen; called the pointer or
the cursor. When you slide your finger across the touch-sensitive pad,
the pointer will follow this movement.
Getting to know your computer - 19
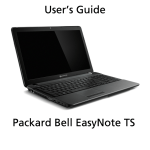
Multi-gesture
The touchpad supports Multi-gesture commands; it can recognise patterns
that use more than one finger. This allows you to control applications with
a few simple gestures, such as:
• Pinch: Quickly zoom in and out of
photos, maps and documents with a
simple finger-thumb gesture.
• Flip: Browse photos, websites or
documents by sliding two fingers horizontally.
• Rotate: Rotate photos or PDF files in 90° steps with a two-finger pivot
motion.
• Scroll: Swiftly navigate web pages, documents and music playlists up
or down by moving two fingers vertically.
20 - Getting to know your computer
FRONT VIEW
#
Icon
1
Item
Multi-in-1 card reader
Description
Accepts Secure Digital (SD), MultiMediaCard
(MMC), Memory Stick PRO (MS PRO), xDPicture Card (xD).
- Push to remove/install the card. Only one
card can operate at any given time.
Power indicator
Indicates the computer's power status.
Indicates the computer's battery status.
Battery indicator
2
- Charging: The light shows amber when the
battery is charging.
- Fully charged: The light shows blue when in
AC mode.
HDD indicator
Indicates when the hard disk drive is active.
Communication
indicator
Indicates the computer’s wireless connectivity
device status.
- Note: The front panel indicators are visible even when the computer cover is closed.
Getting to know your computer - 21
LEFT VIEW
#
Icon
Item
Description
1
DC-in jack
Connects to your computer’s AC adapter.
2
Ethernet (RJ-45) port
Connects to an Ethernet 10/100/1000-based
network.
3
Ventilation and
cooling fan
Allows the computer to stay cool.
4
External display
(VGA) port
Connects to a display device (e.g., external
monitor, LCD projector).
5
HDMI port
Supports high-definition digital video
connections.
- Do not cover or obstruct the openings.
Connects to USB devices.
6
USB port
22 - Getting to know your computer
- If a port is black, it is USB 2.0 compatible, if
it is blue it is also USB 3.0 compatible (see
below).
#
Icon
Item
Microphone jack
7
Headphones /
speaker jack
Description
Accepts inputs from external microphones.
Connects to audio line-out devices (e.g.,
speakers, headphones).
- Supports compatible 3.5 mm headsets with
built-in microphone (e.g. Acer smart
handheld headsets).
Information on USB 3.0
• Compatible with USB 3.0 and earlier devices.
• For optimal performance, use USB 3.0-certified devices.
• Defined by the USB 3.0 specification (SuperSpeed USB).
Getting to know your computer - 23
RIGHT VIEW
#
Icon
Item
Description
Connects to USB devices.
- If a port is black, it is USB 2.0 compatible, if
it is blue it is also USB 3.0 compatible (see
below).
1
USB ports
2
Optical drive
Internal optical drive; accepts CDs or DVDs.
3
Optical disk access
indicator
Lights up when the optical drive is active.
4
Optical drive eject
button
Ejects the optical disk from the drive.
5
Emergency eject
hole
24 - Getting to know your computer
Ejects the optical drive tray when the computer
is turned off.
- Carefully insert a straightened paper clip to
eject the optical drive tray.
#
Icon
Item
Kensington lock slot
6
Description
Connects to a Kensington-compatible
computer security lock.
- Wrap the computer security lock cable
around an immovable object such as a table
or handle of a locked drawer.
Insert the lock into the notch and turn the key
to secure the lock.
Some keyless models are also available.
Information on USB 3.0
• Compatible with USB 3.0 and earlier devices.
• For optimal performance, use USB 3.0-certified devices.
• Defined by the USB 3.0 specification (SuperSpeed USB).
Getting to know your computer - 25
BASE VIEW
#
Icon
Item
Description
Battery release latch
Releases the battery for removal. Insert a
suitable tool and slide to release.
Memory
compartment
Houses the computer's main memory.
Hard disk bay
Houses the computer's hard disk (secured with
screws).
3
Battery bay
Houses the computer's battery pack.
4
Ventilation and
cooling fan
Allows the computer to stay cool.
1
2
26 - Getting to know your computer
- Do not cover or obstruct the openings.
U PGRADING YOUR COMPUTER
EXPANDING THROUGH OPTIONS
Your computer offers you many options for a complete computing
experience.
Connectivity options
Ports allow you to connect peripheral devices to your computer. For
instructions on how to connect different external devices to the computer,
read the following section.
Memory card reader
Memory cards are used in a wide selection of digital
cameras, PDAs, MP3 players and mobile phones.
Inserting a memory card
1. Align the card so that the connector points towards
the port, with the connectors facing down.
2. Carefully slide the card into the port. If you find you need to use any
force to insert the card, try reorientating the card slightly.
3. Push the card until it clicks into place. A few millimetres of the card will
extend from beyond the slot.
If the card contains some files, the Windows Auto Play window may
appear (this depends on the contents of the card) and ask you if you wish
Upgrading your computer - 27
to use a program to access the contents of the card. Select an option
here if it is appropriate, otherwise select Cancel. If the card contains no
files, or unknown files, a window will open showing the contents of the
card.
SD, SDHC and SDXC cards
Different types of SD cards cover different capacities, while using the
same overall design. SD cards contain up to 4 GB, SDHC cards contain
up to 32 GB, and SDXC cards can contain up to 2048 GB (2 TB). Your
computer provides an SDHC or SDXC compatible card reader.
Note: SDXC memory cards can only be used in an SDXC-compatible
reader; SD and SDHC cards can be used in either type.
Removing a card from an memory card reader
1. Click on the Safely Remove
Hardware icon in the Notification
Area (next to the clock).
2. Click on Eject SD Card (or the
name of the device).
3. Wait until a Safe to Remove
Hardware message is displayed.
4. Remove the card.
28 - Upgrading your computer
1
2
Built-in networking
The built-in networking allows you to connect
your computer to an Ethernet-based network.
Connect an Ethernet cable from the Ethernet
(RJ-45) port on the chassis of the computer to
a network jack or hub on your network.
Universal Serial Bus (USB)
The USB port is a high-speed serial bus
which allows you to connect USB peripherals
without taking up system resources.
Certain computers may include one or more
USB 3.0 ports. These resemble standard
USB ports, except they include additional
internal connections and are blue. You may
use USB 3.0 compatible devices with these
ports to benefit from faster transfer speeds.
Upgrading your computer - 29
Video port
Connect to a monitor with a VGA or DVI port (the type of connection
supported depends on your computer’s configuration). The appropriate
cable is usually included with the monitor.
Follow these steps to connect an monitor to your computer:
1. Check that the computer is powered off and the monitor power switch is
turned off.
2. Attach the video cable to the monitor port on the computer. Secure the
cable connection with the screws provided.
3. Connect the monitor power cable and plug it into a properly grounded
wall outlet.
4. Follow any setup instructions in the monitor's user's guide.
5. Turn on power to the monitor, then the computer.
6. Make sure that the current resolution and refresh rate do not exceed the
specifications of the monitor. If necessary change the display settings
used by the computer.
Note: To access the display controls: Click on Start, Control Panel,
Appearance and Personalization. Click on the Display category,
then select Change Display Settings.
30 - Upgrading your computer
High-Definition Multimedia Interface (only for certain models)
HDMI (High-Definition Multimedia
Interface) is an industry-supported,
uncompressed, all-digital audio/video
interface. HDMI provides an interface
between any compatible digital audio/
video source, such as a set-top box,
DVD player, and A/V receiver and a
compatible digital audio and/or video
monitor, such as a digital television
(DTV), over a single cable.
Use the HDMI port on your computer to connect with high-end audio and
video equipment. Single cable implementation allows tidy setup and fast
connection.
Headphones and microphone
These two ports allow you to connect audio devices. Use the headphone
port to plug in stereo headphones or powered speakers. Plugging an
audio device to the headphone port disables the built-in speakers. Use the
microphone port to connect an external microphone for mono recording;
plugging in an external microphone disables the built-in microphone.
Upgrading your computer - 31
P OWER SUPPLY
AC POWER ADAPTER
Your computer can use the supplied external power adapter (a power
'brick') to run on AC power. A power cable is provided that is appropriate
for the country where the computer was purchased.
The power adapter provides adequate power to run your computer and
recharge the battery pack at the same time.
Caution: Do not cover or place objects on the AC adapter.
Keeping the adapter clear of objects allows the adapter to cool
properly during use.
Only use the AC adapter that is supplied with your computer. Although
other adapters may look similar, using them can damage your computer.
32 - Power supply
Warning: The AC adapter and the underside of the computer can
become hot after prolonged use. This is normal, but may cause
injury with prolonged contact.
BATTERY PACK
The computer uses a battery pack that gives you extended use between
charges.
Battery pack characteristics
The battery pack has the following characteristics:
• Employs current battery technology standards.
• Delivers a battery-low warning.
The battery is recharged whenever you connect the computer to the AC
adapter. Your computer supports charge-in-use, enabling you to recharge
the battery while you continue to operate the computer. However,
recharging with the computer turned off results in a significantly faster
charge time.
The battery will come in handy when you travel or during a power failure. It
is advisable to have an extra fully-charged battery pack available as
backup. Contact your dealer for details on ordering a spare battery pack.
Maximizing the battery’s life
Like all other batteries, your computer’s battery will degrade over time.
This means that the battery's performance will diminish with time and use.
Power supply - 33
To maximize your battery’s life, you are advised to adhere to the
recommendations set out below.
Conditioning a new battery pack
Before you use a battery pack for the first time, there is a “conditioning”
process that you should follow:
1. Insert the new battery without turning the computer on.
2. Connect the AC adapter and fully charge the battery.
3. Disconnect the AC adapter.
4. Turn on the computer and operate using battery power.
5. Fully deplete the battery.
6. Reconnect the AC adapter and fully charge the battery again.
Follow these steps again until the battery has been charged and
discharged three times.
Use this conditioning process for all new batteries, or if a battery hasn’t
been used for a long time. If the computer is to be stored for more than
two weeks, you are advised to remove the battery pack from the unit.
Warning: Do not expose battery packs to temperatures below 0
°C (32 °F) or above 45 °C (113 °F). Extreme temperatures may
adversely affect the battery pack.
By following the battery conditioning process you condition your battery to
accept the maximum possible charge. Failure to follow this procedure will
prevent you from obtaining the maximum battery charge, and will also
shorten the effective lifespan of the battery.
34 - Power supply
In addition, the useful lifespan of the battery is adversely affected by the
following usage patterns:
• Using the computer on constant AC power with the battery inserted. If
you want to use constant AC power, you are advised to remove the
battery pack after it is fully charged.
• Not discharging and recharging the battery to its extremes, as described
above.
• Frequent use; the more you use the battery, the faster it will reach the
end of its effective life. A standard computer battery has a life span of
about 300 charges.
Replacing the battery pack
The notebook uses lithium batteries. Replace the battery with the same
type as that which came bundled with your product. Use of another battery
may present a risk of fire or explosion.
Warning: Batteries may explode if not handled properly. Do not
disassemble or dispose of them in fire. Keep them away from
children. Follow local regulations when disposing of used
batteries.
Installing or removing the battery pack
Important! Before removing the battery from the unit, connect the AC
adapter if you want to continue using your computer. Otherwise, turn
off the computer first.
Power supply - 35
To install a battery pack:
1. Align the battery with the open battery bay; make sure that the end with
the contacts will enter first, and that the top surface of the battery is
facing up.
2. Slide the battery into the battery bay and gently push until the battery
locks in place.
To remove a battery pack:
1. Slide the battery release latch to release the battery.
2. Pull the battery from the battery bay.
Charging the battery
To charge the battery, first make sure that it is correctly installed in the
battery bay. Plug the AC adapter into the computer, and connect to a
mains power outlet. You can continue to operate your computer on AC
power while your battery is charging. However, charging the battery with
the computer turned off results in a significantly faster charge time.
Note: You are advised to charge the battery before retiring for the day.
Charging the battery overnight before traveling enables you to start
the next day with a fully-charged battery.
Checking the battery level
The Windows power meter indicates the current battery level. Rest the
cursor over the battery/power icon on the taskbar to see the battery’s
present charge level.
36 - Power supply
Optimizing battery life
Optimizing battery life helps you get the most out of battery operation,
prolonging the charge/recharge cycle and improving recharging efficiency.
You are advised to follow the suggestions set out below:
• Purchase an extra battery pack.
• Use AC power whenever possible, reserving battery for on-the-go use.
• Eject a PC Card if it is not being used, as it will continue to draw power
(for selected models).
• Store the battery pack in a cool, dry place. The recommended
temperature is 10 °C (50 °F) to 30 °C (86 °F). Higher temperatures
cause the battery to self-discharge faster.
• Excessive recharging decreases the battery life.
• Look after your AC adapter and battery.
Battery-low warning
When using battery power pay attention to the Windows power meter.
Warning: Connect the AC adapter as soon as possible after the
battery-low warning appears. Data will be lost if the battery to
become fully depleted and the computer shuts down.
Power supply - 37
When the battery-low warning appears, the recommended course of
action depends on your situation:
Situation
The AC adapter and
a power outlet are
available.
Recommended Action
1. Plug the AC adapter into the computer, and then
connect to the mains power supply.
2. Save all necessary files.
3. Resume work.
Turn off the computer if you want to
recharge the battery rapidly.
An extra fully charged 1. Save all necessary files.
battery pack is
2. Close all applications.
available.
3. Shut down the operating system to turn off the
computer.
4. Replace the battery pack.
The AC adapter or a
power outlet is
unavailable.
You have no spare
battery pack.
38 - Power supply
5. Turn on the computer and resume work.
1. Save all necessary files.
2. Close all applications.
3. Shut down the operating system to turn off the
computer.
S OFTWARE
USING WINDOWS AND YOUR SOFTWARE
Packard Bell computers include software to help you use your computer;
the programs and categories available on your computer depend on the
model purchased.
Welcome Center
The first time you turn on your computer, the Welcome Center window
opens. The Welcome Center introduces you to the new features and tools
of Windows. You can access the Welcome Center later by clicking Start
> Getting Started.
Internet security offer
It is vital to protect your computer from viruses and attacks over the
Internet (see Security on page 54). An comprehensive Internet security
suite, including a free trial subscription period, is offered when you first
start your computer. You should activate this protection before connecting
to the Internet. This security suite protects your computer from the most
recent online threats and protects your personal data (bank account
credentials, credit card numbers, passwords, and more).
Software - 39
Productivity software
Work Great with Microsoft® Office 2010 - Express your ideas, solve
problems and simplify everyday projects with Office 2010.
Photo editing - Easily edit and print your photos with Windows Live Photo
Gallery. Then share them on Facebook, YouTube™ or Windows Live.
Search & Decide with Bing™ - Find and organize the answers you need
using Bing™, so you can make faster, more informed decisions.
Packard Bell Recovery Management
To prepare your computer for system recovery options, you should create
a set of recovery discs as soon as possible. See page 78 for more
information.
Playing multimedia files
You may use the media software on your computer to play music, films or
photo slide-shows and watch television (if your computer has a TV tuner).
One or more media programs are installed on your computer, Windows
Media Player and optionally Windows Media Center are provided by
Microsoft. Other media programs may have been installed by Packard Bell
to provide an improved media experience.
Windows Media Player
Windows Media Player may be used to play MP3 or WMA audio files or
most video files.
40 - Software
Windows Media Center (optional)
Certain computers include all-inone media ‘centers’ such as
Windows Media Center. These
programs can handle a variety of
multimedia content, presented with
simple menus that may be easily
controlled with a remote control.
You may watch live or recorded TV
(if your computer has a TV tuner),
listen to digital music, view pictures and personal videos, or access
content from online services.
To start the media program installed on your computer, click on Start >
Windows Media Center.
Setup
Caution: If your computer includes a remote control or TV tuner
they must be connected and active before starting the media
program for the first time.
The first time you start the media program, it will start a setup wizard,
which will configure some basic settings. If available, select the Express
setup option, you may then configure additional options as needed.
Note: If you have an Internet connection, the Guide (Electronic
Program Guide) allows you to view a list of current TV shows. This
shows channel and network information, as well as the title,
description and scheduled broadcast time of shows.
Software - 41
AutoPlay
The Windows AutoPlay function allows
you to choose the way Windows handles
media files on devices with removable
storage (digital camera, etc).
If you have inserted a disk that contains
files (such as a USB key or memory card),
Windows will display a dialog box and ask
you to choose how you want to open the
files.
Playing downloaded files
Downloaded files may work with the media programs installed on your
computer, or may require specific programs. Files that include DRM
functions may only play in specific programs (e.g. iTunes, Windows Media
Player) or only on devices certified for use with the each type of file.
42 - Software
Social networks (optional)
The Social Networks application allows you
to quickly view your friends' updates, and
make your own updates without leaving the
desktop. You can receive notifications and
status updates directly to your desktop, using
the sidebar to monitor multiple social
networks (Facebook, YouTube, Flickr and
Twitter).
Note: The Social Networks application is a pre-installed option and
may not be installed on all computers.
Be aware of your friends' messages and posted images as they happen; a
visible notification will alert you whenever a friend (or subscription) shows
some activity.
If your computer's keyboard features the optional Social
Networks key, press it to open the Social Networks application.
Log in... or Sign up
The top of the application shows your profile picture and account
information from Facebook. If you have not yet created or accessed your
Facebook profile, the top image is the anonymous white-on-blue
placeholder, and no information is shown.
When you first start the Social Networks application, you will be asked to
Log in to your social networks. If this does not happen automatically, click
Software - 43
Log In, at the top of the Social Networks window. If you just want to create
a new Facebook profile, click Sign Up and follow the instructions.
Note: All social activities require Internet access. Make sure you are
connected to the Internet before using this application.
Authorize access
To receive updates, you must authorize access to your social network
accounts; each account must be activated separately. Click on the tab for
the network you want to activate.
You need your account name and password for each network, or to create
a new account if you do not have one.
If you already have an account, click the Log In button to activate access,
or Sign up to create an account.
If you choose to create a new account please fill in the requested
information, with your email and an appropriate password. You will then
continue to authorize access for your account.
If requested, please allow access for all steps, this will ensure all Social
Networks features work normally.
Note: Note down all information you use for new accounts, including
the account name, email address and password. Keep this
information hidden in a safe place, so you may refer to it when you
access your accounts in the future.
44 - Software
Accessing your social networks
Once you have authorized access, your profile picture and
status information will be displayed. You may update this
information with a click.
Quick actions
Click on a link to see more in a new window. I.e. click on a
Facebook entry to open your Facebook account and view
the entire entry; click on a YouTube video title to view the
video.
Enter your status in the What's on your mind? box and
click Share. You friends on Facebook will see your status
instantly.
To create a new album of photos in Facebook, select the images you want
to add, drag them to your profile picture. You will be prompted for an
album name and description. Click on Upload to start copying the images
to your Facebook account.
Click the arrows in the bottom bar
to see more pages, if there are
more entries than can be shown on a page.
Click on the question mark in the top bar
Networks.
to see the help file for Social
Software - 45
Click on the arrow in the top bar to hide the full application and display a
small alert bar on the top of your screen. Click the alert bar (below) to see
the full window with a summary of your friends' activities.
Note: Do not use the X icon to exit Social Networks, unless you want
to stop sending or receiving updates. Use the arrow in the top bar
to display the alert bar.
Checking your news feeds and information
Select the tab for the network you want to view:
A series of buttons for the network are available for each network. Hover
over the button to see a description. Select the button you want to see and
scroll through the list of items.
Example of Facebook tabs:
The first button, and the section viewed when a tab is first selected, are
the News Feed (for Facebook), Most Viewed for YouTube and Contacts
for Flickr. If there are more entries than can be shown on one page, use
the arrows in the bottom bar to see more pages.
46 - Software
Changing settings
Click the settings icon
to access settings for the social networks.
Live Update - If the Live Update button is active, you may download and
install an updated version of the Social Networks application.
Click the tab for a network to see specific settings; you may set how often
a network is checked (the refresh frequency) and logout from specific
networks in this section.
Click the X to exit the Settings section.
Software - 47
I NTERNET
FIRST STEPS ON THE NET
Protecting your computer
It is vital to protect your computer from viruses and attacks over the
Internet (see Internet security offer on page 25 and Security on page 54).
A comprehensive Internet security program is offered when you first start
your computer. You should activate this protection as soon as possible,
certainly before you connect to the Internet.
Choose an Internet Service Provider
Using the Internet has become a natural part of daily
computing. Just a few simple steps can connect you to a
vast collection of knowledge and communication tools.
To accomplish these steps you should first select an
Internet Service Provider (ISP), which supplies the
connection between your computer and the Internet. You
should research the ISPs available in your region, not
forgetting to talk to friends and family about their experiences or to check
reviews and consumer reports. The ISP you select will provide instructions
on how to connect to the Internet (you may need additional software or a
special ‘box’ that connects to your phone line).
48 - Internet
Connection types
Depending on your computer model, your location and your communication
needs, you have several ways to connect to the Internet.
Dial-up
Some computers include a telephone dial-up (‘modem’) connector. This
allows you to connect to the Internet using your telephone line. With a dialup connection, you cannot use the modem and the telephone
simultaneously on a single phone line. This type of connection is
recommended only if you have limited use of the Internet as the
connection speed is low and connection time is typically charged per hour.
DSL (e.g. ADSL)
DSL (Digital Subscriber Line) is an ‘always-on’ connection that runs over
the phone line. As DSL and phone do not use the same frequencies, you
can use your telephone at the same time you are connected to the Internet
(this requires a ‘micro-filter’ on each telephone socket to avoid
interference). To be eligible for DSL, you must be located near an DSLequipped phone exchange (service is sometimes unavailable in rural
areas). Connection speeds vary depending on your location, but DSL
generally provides very fast and reliable Internet connection. As the
connection is always-on, it is generally charged at fixed monthly rates.
Note: A DSL connection requires an appropriate modem. A modem is
usually provided by the ISP when you register. Many of these modems
include an ‘router’ that provides network and wi-fi access.
Internet - 49
Cable
A cable connection provides fast and always-on Internet service via a
cable television line. This service is generally available in large cities. You
can use your telephone and watch cable TV at the same time you are
connected to the Internet.
3G (WWAN or 'Wireless Wide-Area Network')
A 3G connection allows you to use cellular networks (such as those used
by a mobile phone) to connect to the Internet while away from home. The
socket for a SIM card may be built in to your computer, or may require an
external device, such as a USB modem or even an appropriately equipped
mobile phone.
Note: If your computer includes a SIM card slot, you require a
compatible SIM card and a contract with a cellular provider.
Before using the 3G features, check with your service provider to see
if any additional charges will be incurred, especially roaming charges.
Network connections
A LAN (Local Area Network) is a group of computers (for example, within
an office building or home) that share a common communications line and
resources. When you set up a network, you can share files, peripheral
devices (such as a printer) and an Internet connection. You can set up a
LAN using wired technologies (such as Ethernet) or wireless technologies
(such as WiFi or Bluetooth).
50 - Internet
Wireless networks
A wireless LAN or WLAN is a wireless local area network, which may link
two or more computers without using wires. Setting up a wireless network
is easy and allows you to share files, peripheral devices and an Internet
connection.
What are benefits of a wireless network?
Mobility
Wireless LAN systems allow you and other users of your home network to
share access to files and devices connected to the network, for example a
printer or scanner.
Also you can share an internet connection with other computers in your
home.
Installation speed and simplicity
Installing a wireless LAN system can be fast and easy and eliminates the
need to pull cables through walls and ceilings.
Components of a wireless LAN
To set up your Wireless network at home you need to have the following:
Access point (router)
Access points (routers) are two-way transceivers that broadcast data into
the surrounding environment. Access points act as a mediator between
wired and wireless network. Most routers have a built-in DSL modem that
will allow you access to a high speed DSL internet connection. The ISP
(Internet Service Provider) you have chosen normally supplies a modem/
Internet - 51
router with the subscription to their services. Read carefully the
documentation supplied with your Access point/router for detailed setup
instructions.
Network cable (RJ45)
A network cable (also called RJ45 cable) is used to connect the host
computer to the access point (see illustration below); this type of cable
may also be used to connect peripheral devices to the access point.
Wireless adapter
An internal wireless adapter is normally already installed in your
computer. A button or controls in Windows allow you to activate or
deactivate the adapter.
52 - Internet
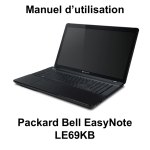
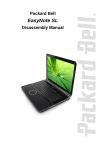
Diagram of a working network
1. Access point/router
4
2. Desktop computer
3. Modem
4. Printer
5
1
5. Portable computer
3
6. PDA/Smartphone
7
7. Network cables
(RJ45)
2
6
Turning on/off a wireless network connection
Most computers feature a ‘WiFi’ button that turns the network connection
on or off. If your computer has wireless access, but does not feature a
Communication button, you may turn your wireless network on or off, or
control what is shared over the network with the network management
options. Click on Start
> Control Panel > Network and Internet >
Network and Sharing Center.
Warning: Using wireless devices while flying in aircraft is
prohibited. Switch off all devices before boarding an aircraft;
Internet - 53
they may be dangerous to the operation of the aircraft, disrupt
communications, and even be illegal.
Surf the Net!
To surf the Internet, you need a program called an
Internet browser. Internet Explorer provides an easy and
secure web browsing experience. As soon as you have
your Internet access installed and you are connected,
click on the Internet Explorer shortcut located on the
Windows desktop and take your Internet experience to a
new level!
Packard Bell website
To get you started why not visit our website, www.packardbell.com.
Packard Bell is dedicated to provide you with on-going personalised
support. Check out our Support section to get help tailored to your needs.
www.packardbell.com is your portal to a world of online activities and
services: visit us regularly for the latest information and downloads!
Security
You are probably eager to explore everything the Internet has to offer. In
order for you to be safe online, Packard Bell has pre-installed Symantec’s
award-winning Norton Internet Security™ on your computer.
54 - Internet
Norton Internet Security runs quietly in the background to block today’s
complex threats and protect your identity when you shop, bank, or browse
online.
Norton Internet Security blocks online identity theft, detects and eliminates
spyware, removes viruses and Internet worms, protects against hackers.
Definitions
What is a virus?
Malicious software, typically called ‘viruses’, are programs designed to
infect and damage computers. Most viruses are transmitted over the
Internet, emails or malicious Web sites. A typical virus will replicate and
pass itself undetected to multiple computers. Other forms of nuisance,
such as Trojan horses, worms or spam can infect your computer in various
ways, using up resources or clogging up a network.
Note: Packard Bell guarantees that your computer was 100% virus
free at the time of purchase and does not cover damages due to
viruses.
What is spyware?
Spyware refers to generally unwanted programs that are downloaded onto
your computer while connected to the Internet, often without you knowing
it. Once it has infected your computer, it can snoop on your browsing
activity, collect personal information, cause pop-up ads to appear, or even
change the configuration of your computer. Spyware consumes resources
on your computer; it can slow down your Internet connection or entire
computer system, and even cause crashes.
Internet - 55
Spyware is sometimes used by unscrupulous companies to monitor and
track the sites you visit on the Internet so as to determine your web-surfing
habits and display targeted pop-up ads on your screen. However, some
kinds of spyware go beyond simple tracking and actually monitor
keystrokes and capture passwords, posing a serious security risk.
What is malware?
Malicious software, also known as malware, is software designed to
deliberately harm your computer. For example, viruses, worms, and
Trojan horses are malicious software. To help protect your computer
against malware, make sure it is using up-to-date antivirus and antimalware software.
What is a personal firewall?
A personal firewall is a software program designed to prevent
unauthorized access to or from a private network. It acts as a shield to
protect your Internet connection from unwanted connections, some of
which may attempt to take control of your computer to install or redistribute viruses or malicious programs. Each connection to your
computer is monitored - programs that attempt to receive information
without your permission are detected and the firewall will display an alert.
You can then decide if you will allow the connection, if the connection is to
a program you are currently using then normally you would allow it (i.e. a
game connecting to a multi-player server or an encyclopaedia making a
content update).
56 - Internet
How to protect your computer
Cybercrime prevention can be straight-forward - when armed with a little
technical advice and common sense, many attacks can be avoided. In
general, online criminals are trying to make their money as quickly and
easily as possible. The more difficult you make their job, the more likely
they are to leave you alone and move on to an easier target. The tips
below provide basic information on how you can prevent online fraud.
Keep your computer current with the latest patches and updates
One of the best ways to keep attackers away from your computer is to
apply patches and other software fixes when they become available. By
regularly updating your computer, you block attackers from being able to
take advantage of software flaws (vulnerabilities) that they could otherwise
use to break into your system.
While keeping your computer up-to-date will not protect you from all
attacks, it makes it much more difficult for hackers to gain access to your
system, blocks many basic and automated attacks completely, and might
be enough to discourage less-determined attackers, so they will give up
and look for a more vulnerable computer elsewhere.
More recent versions of Microsoft Windows and other popular software
can be configured to download and apply updates automatically so that
you do not have to remember to check for the latest software. Taking
advantage of auto-update features in your software is a great start toward
keeping yourself safe online.
Internet - 57
Protect your computer with security software
Several types of security software are necessary for basic online security.
Security software essentials include firewall and antivirus programs. A
firewall is usually your computer's first line of defense-it controls who and
what can communicate with your computer online. You could think of a
firewall as a sort of "policeman" that watches all the data attempting to
flow in and out of your computer on the Internet, allowing communications
that it knows are safe and blocking "bad" traffic such as attacks from ever
reaching your computer.
The next line of defense many times is your antivirus software, which
monitors all online activities such as email messages and Web browsing
and protects an individual from viruses, worms, Trojan horse and other
types of malicious programs. Your antivirus and antispyware software
should be configured to update itself, and it should do so every time you
connect to the Internet.
Integrated security suites such as Norton Internet Security, which combine
firewall, antivirus, antispyware with other features such as antispam and
parental controls, have become popular as they offer all the security
software needed for online protection in a single package. Many people
find using a comprehensive security suite an attractive alternative to
installing, configuring and updating several different types of security
software.
A complete version of Norton Internet Security™ is pre-installed on
your Packard Bell system. It includes a free trial subscription to
protection updates. Make sure you Activate it!
58 - Internet
Choose strong passwords and keep them safe
Passwords are a fact of life on the Internet today; we use them for
everything from ordering flowers and online banking to logging into our
favorite airline Web site to see how many miles we have accumulated.
The following tips can help make your online experiences secure:
• Selecting a password that cannot be easily guessed is the first step
toward keeping passwords secure and out of the wrong hands. Strong
passwords have eight characters or more and use a combination of
letters, numbers and symbols (e.g., # $ % ! ?). Avoid using any of the
following as your password: your login name, anything based on your
personal information such as your last name, and words that can be
found in the dictionary, especially "password". Try to select especially
strong, unique passwords for protecting activities like online banking.
• Keep your passwords in a safe place and try not to use the same
password for every service you use online.
• Change passwords on a regular basis, at least every 90 days. This can
limit the damage caused by someone who has already gained access to
your account. If you notice something suspicious with one of your online
accounts, one of the first steps you can take is to change your
password.
Protect your personal information
Exercise caution when sharing personal information such as your name,
home address, phone number, and email address online. To take
advantage of many online services, you will inevitably have to provide
personal information in order to handle billing and shipping of purchased
Internet - 59
goods. Since not divulging any personal information is rarely possible, the
following list contains some advice for how to share personal information
safely online:
• Keep an eye out for phony email messages. Things that indicate a
message may be fraudulent are misspellings, poor grammar, odd
phrasing, Web site addresses with strange extensions, Web site
addresses that are entirely numbers where there are normally words,
and anything else out of the ordinary. Additionally, phishing messages
will often tell you that you have to act quickly to keep your account open,
update your security, or urge you to provide information immediately or
else something bad will happen. Don't take the bait.
• Don't respond to email messages that ask for personal
information. Legitimate companies will not use email messages to ask
for your personal information. When in doubt, contact the company by
phone or by typing in the company Web address into your Web browser.
Don't click on the links in these messages as they make take you to
fraudulent, malicious Web sites.
• Steer clear of fraudulent Web sites used to steal personal
information. When visiting a Web site, type the address (URL) directly
into the Web browser rather than following a link within an email or
instant message. Fraudsters often forge these links to make them look
convincing.
A shopping, banking or any other Web site where sensitive information
should have an "S" after the letters "http" (i.e. https://www.yourbank.com
not http://www.yourbank.com). The "s" stands for secure and should
appear when you are in an area requesting you to login or provide other
60 - Internet
sensitive data. Another sign that you have a secure connection is the
small lock icon in the bottom of your web browser (usually the right-hand
corner).
• Pay attention to privacy policies on Web sites and in software. It is
important to understand how an organization might collect and use your
personal information before you share it with them.
• Guard your email address. Spammers and "phishers" sometimes send
millions of messages to email addresses that may or may not exist in
hopes of finding a potential victim. Responding to these messages or
even downloading images ensures you will be added to their lists for
more of the same messages in the future. Also be careful when posting
your email address online in newsgroups, blogs or online communities.
Online offers that look too good to be true usually are
The old saying "there's no such thing as a free lunch" still rings true today.
Supposedly "free" software such as screen savers or smileys, secret
investment tricks sure to make you untold fortunes, and contests that
you've surprisingly won without entering are the enticing hooks used by
companies to grab your attention.
While you may not directly pay for the software or service with money, the
free software or service you asked for may have been bundled with
advertising software ("adware") that tracks your behavior and displays
unwanted advertisements. You may have to divulge personal information
or purchase something else in order to claim your supposed content
winnings. If an offer looks so good it's hard to believe, ask for someone
else's opinion, read the fine print, or even better, simply ignore it.
Internet - 61
Review bank and credit card statements regularly
The impact of identity theft and online crimes can be greatly reduced if you
can catch it shortly after your data is stolen or when the first use of your
information is attempted. One of the easiest ways to get the tip-off that
something has gone wrong is by reviewing the monthly statements
provided by your bank and credit card companies for anything out of the
ordinary.
Additionally, many banks and services use fraud prevention systems that
call out unusual purchasing behavior (i.e. if you live in Texas and all of the
sudden start buying refrigerators in Budapest). In order to confirm these
out of the ordinary purchases, they might call you and ask you to confirm
them. Don't take these calls lightly; this is your hint that something bad
may have happened and you should take necessary action.
Protect your computer with Windows security tools
Windows provides a variety of protection applications.
Windows Action Center
Windows provides a central area from where you can control the security
settings of your computer, helping you to protect it from Internet attacks
and ensuring that the latest security updates have been downloaded and
installed on your computer.
To open the Action Center, click on Start
and Security > Action Center.
62 - Internet
> Control Panel > System
Alternatively, if a security alert
has been reported (in the
Notification Area, next to the
clock) then you can click on the
notification balloon or double-click
on the small Security Alert icon.
The Action Center indicates the
status and settings used for
important applications that protect
your computer. In addition
Windows
Firewall,
Windows
Defender and Windows Automatic Updates are provided by Microsoft as
part of a comprehensive system to defend your computer. The antivirus
application varies according to the program installed on your computer.
Windows Firewall
Windows has a firewall that protects your computer when connected to the
Internet. It stops programs from accessing the Internet without your
permission.
Internet - 63
Certain programs need access
to the Internet to function
properly, or even to function at
all. If this is the case, you will
usually be asked to allow
access when you install a
program, or the first time you
use it. To check firewall
settings, click on Start
>
Control Panel > System and
Security > Windows Firewall.
Note: When you first start to use a Firewall it is in a ‘Learning mode’,
you may see pop-up windows alerting you that certain programs you
know and trust wish to access the internet. After a period of time the
Firewall will know your list of trusted programs and won’t ask for
permission the next time the program tries to connect to the internet.
The Firewall also protects your computer from programs from the
internet trying to access your computer; this sometimes is necessary
to allow access for program updates, downloads, etc.
Caution: Please note that most security software suites provide
similar functionality and will disable Windows Firewall in order to
improve system performance.
Windows Updates
If you have an active Internet connection, Windows can check for
important updates for your computer and install them automatically. These
64 - Internet
updates include security patches and program updates that can improve
your computing experience and help protect your computer against new
viruses and attacks.
Windows Defender
Windows Defender helps protect
your computer against malicious
and unwanted software, such as
spyware and adware. Windows
Defender is installed and turned
on by default.
To help protect your privacy and
your
computer,
Windows
Defender
includes
real-time
protection options. Real-time
protection alerts you when
spyware and other potentially
unwanted software attempt to install themselves or run on your computer.
You are also alerted if programs attempt to change important Windows
settings.
Note: Windows Defender works with your Windows Update settings
to automatically install the latest definitions.
Caution: Please note that most security software suites provide
similar functionality and will disable Windows Defender in order
to improve system performance.
Internet - 65
User Account Control
The User Accounts control panel can help prevent unauthorized changes
to your computer. User Accounts will ask you for permission or an
administrator password before performing actions that could potentially
affect your computer's operation or that change settings that affect other
users. When you see a User Account message, read it carefully, and then
make sure the name of the action or program that's about to start is one
that you intended to start.
By verifying these actions before they start, User Account settings can
help prevent malicious software (malware) and spyware from installing or
making changes to your computer without permission.
To access User Account settings, click on Start
> Control Panel >
User Accounts and Family Safety > User Accounts.
Note: You may turn off the User Account Control Messages (not
recommended) in the User Account Control settings window.
66 - Internet
Internet Explorer security settings
Internet sites use small files called cookies to keep track of user
preferences and information. You can adjust your Internet browser's
security settings to determine how much -or how little- information you are
willing to accept from a Web site.
To access Internet Explorer security settings:
1. In Internet Explorer, click on Tools > Internet Options.
2. In the Privacy tab, move the slider up or down to select a setting.
How do I know when my computer is at risk?
If the Action Center reports an alert, or if your computer behaves
erratically, crashes unexpectedly or if some of your programs do not work
correctly, your computer may be infected by malicious software. However,
do not blame every computer problem on a virus! If you suspect your
computer is infected, the first thing to do is update, if you have not already
done so, and run your antivirus and anti-spyware software.
Internet - 67
H ELPDESK
SAFE COMPUTING
To make the most of your new computer and ensure it runs smoothly for a
long time, you should use the programs below and regularly perform the
actions described in this guide.
Maintenance
Recommended maintenance tasks
There are several tasks you should perform periodically (about once per
month) to ensure your computer stays in good health:
Error checking
Using the Check Disk tool regularly prevents your system from getting
unreliable and information getting lost. It checks and repairs two types of
errors:
• file system errors, such as fragmented files that were not deleted and
files with invalid sizes or dates;
• physical errors, which may occur on your hard disk as it wears out over
time.
1. Click on Start
> Computer. Right-click on the Packard Bell (C:)
icon and select Properties.
2. Click on Tools and Check Now in the Error-checking section.
68 - Helpdesk
3. Tick Automatically fix file system errors in the options area. If you tick
Scan for and attempt recovery of bad sectors, your computer will
carry out the physical error checking when you next restart your
computer. Click on Start to proceed.
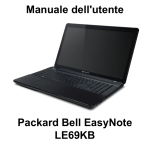
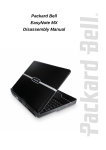
Disk Cleanup
The Disk Cleanup Wizard helps
free up space on your disk drive. It
searches your drive and displays
unused files, such as temporary
Internet files, files in the Recycle
Bin and other temporary files that
you may safely delete.
1. Click on Start
> Computer.
Right-click on the Packard Bell
icon and select Properties.
2. Select the General tab and click
on the Disk Cleanup button
(next to the diagram of the disk
drive.
3. Tick each category in the Files to
delete area you wish to delete
and click on OK.
Helpdesk - 69
Disk Defragmenter
With the creation and deletion of files over time, scattering occurs all over
the hard disk area and affects performance. The Disk Defragmenter helps
you rearrange the items stored on your hard drive to make your computer
run faster and more efficiently.
Running the Disk Defragmenter once a month (depending on computer
usage) will decrease wear and tear on your hard drive and thus decrease
the chance of a fault developing at a later date.
1. Perform a Disk Cleanup and
close all open programs.
2. Click on Start
> Computer.
Right-click on the Packard Bell
icon and select Properties.
3. Click on Tools and Defragment
now....
4. Click on the volume you want to
defragment
and
click
on
Defragment to start. The whole
process may take several hours
to complete. It is best not to use your computer while running the Disk
Defragmenter as any changes on your system may cause the process
to restart. If your hard disk is divided into several partitions you should
perform the same action for each partition.
70 - Helpdesk
Manage your hard disk drive (HDD)
Check the remaining free space on your hard disk drive
1. Click on Start
> Computer.
2. Right-click on the Packard Bell icon and select
Properties.
3. The Hard Disk Properties window displays the
amount of used space and free space on your
hard disk. If your hard disk is almost full (less
than 200 MB remaining), you should consider
freeing some space.
To see easily how much space is used and how
much is left, simply place your pointer over the
hard disk drive icon. The information will
automatically appear.
Free some Space on your hard disk drive
1. Empty the Recycle Bin: When you delete a file
from your computer, Windows places it in the
Recycle Bin. All the deleted files remain there until
you decide to permanently delete them from your
computer or to restore them to their original
location. Double-click on the Recycle Bin on the
Windows desktop and click on Empty Recycle
Bin or select only the items you want to delete. Items deleted from
external devices, such as memory cards, do not go to the Recycle Bin,
they are permanently deleted.
Helpdesk - 71
2. Uninstall the programs you no longer use:
Click on Start
Features.
> Control Panel > Programs > Programs and
3. Archive files on an external hard disk drive and delete them from the
hard disk.
Run Windows System Tools
Windows includes some convenient tools to keep your computer in good
shape. Use these tools on a regular basis to maintain a reliable and
speedy system! To make it easier, System Tools includes a Scheduled
Tasks utility, which you can customise to run specific tasks regularly.
To access the list of System Tools, click Start
> All Programs, then the
Accessories folder in the list of programs and finally select System Tools.
72 - Helpdesk
Windows System Restore.
System Restore monitors changes to your computer and automatically
creates restore points that store your computer’s configuration each time a
major change occurs (such as installing programs). It can undo harmful
changes to your computer and restore settings and performance without
removing your personal data files (such as documents, browsing history,
photos, favourites, or emails).
Note: If you only need to uninstall a program, do not use System
Restore. To uninstall a program use Programs and Features in the
Control Panel.
To start System Restore from the Windows desktop:
Click Start
> All Programs > Accessories > System Tools >
System Restore.
Helpdesk - 73
If you cannot access the Windows desktop:
1. Press the Alt+F10 key upon start-up when the Packard Bell logo
appears. This will open the Recovery Program.
2. Select Windows System Restore and click Next. Your computer will
automatically restart and open System Restore.
System Restore options
Restore your computer to an earlier time
This option will return to your computer to how it was on an earlier date,
without affecting your personal documents or emails (it will not restore lost
documents either). By default Windows saves snapshots of itself when
major changes are made to the Operating System (e.g. driver installations
or specific software). This is useful when a driver installation failed, or
when you changed a system setting, and it did not work.
1. Click Next.
2. Select from the list the date when the restore point was created and
click Next.
3. In the confirmation screen, click on Finish to restore the computer to the
selected date and time.
74 - Helpdesk
Create a Restore Point
Windows creates restore points automatically at regularly scheduled times
or before certain programs or drivers are installed. This option allows you
to create your own restore points when you need to.
1. Click Start
> Control Panel > System and Security > System.
Click on System protection in the sidebar and then click the Create...
button.
2. Enter a description to identify this restore point. System Restore
automatically adds the date and time to this name.
3. To finish, click on Create.
Undo the last restoration
If the system fails after restoring the computer to a certain date, you can
use this option to undo the restoration.
Alternately, you can use Last Known Good Configuration to restore the
system to your most recent settings that worked.
1. Restart the computer, press F8 to access advanced startup options.
2. Use the arrow keys to highlight Last Known Good Configuration and
press Enter.
Updates
As new viruses, worms, and other threats are discovered every day,
keeping your security applications and operating system up-to-date is
crucial.
To keep your computer safe and reliable:
Helpdesk - 75
• Perform updates when prompted by Windows Action Center.
• Use Microsoft Windows Automatic Updates.
• Run Windows Update.
Internet security
Norton Internet Security, combined with other security applications can
protect your computer from Internet attacks and ensure that the latest
security updates have been downloaded and installed on your computer.
Norton Internet Security performs automatic updates through Live Update.
You can also start a manual update from the main interface of Norton
Internet Security and the Live Update link.
Operating system, software and drivers
Windows Update can help you
keep your computer up-to-date. It
allows you to choose and download
updates for your computer's
operating system, software, and
hardware.
New content is added to Windows
Update regularly, so you can
always get the most recent updates
and solutions to protect your
computer and keep it running smoothly.
• Start
76 - Helpdesk
> Control Panel > System and Security > Windows Update.
Windows Remote Assistance
Remote Assistance allows a Windows user to temporarily take over a
remote Windows computer over a network or the internet to resolve
issues. Remote Assistance makes it possible to diagnose and repair
problems with a computer without personally visiting it.
You can access Remote Assistance by clicking on Start
> All
Programs > Maintenance > Windows Remote Assistance. Upon
launching Remote Assistance, you will see a screen giving you the choice
of either inviting someone to help you or offering to help someone.
Helpdesk - 77
R ECOVERY
PACKARD BELL RECOVERY MANAGEMENT
Note: Packard Bell Recovery Management is only available with a
preinstalled Windows operating system.
If your computer experiences problems that are not recoverable by other
methods, you may need to reinstall the Windows operating system and
factory-loaded software and drivers. To ensure you can recover your
computer when needed, you should create a recovery backup as soon as
possible.
Packard Bell Recovery Management consists of the following functions:
1. Backup:
• Create Factory Default Backup
• Backup Drivers and Applications
2. Restore:
• Restore Operating System to Factory Defaults
• Restore Operating System and Retain User Data
• Reinstall Drivers or Applications
This chapter will guide you through each process.
78 - Recovery
Creating recovery discs
To reinstall using discs, you must create a set of recovery discs
beforehand. Throughout the process, you will be guided by on-screen
instructions. Please read them carefully!
1. Click on Start
> All Programs > Packard Bell, then click on
Packard Bell Recovery Management.
2. To create recovery discs for the hard drive’s entire original contents,
including Windows and all factory-loaded software and drivers, click
Create Factory Default Disc.
- OR To create recovery discs for only the factory-loaded software and drivers,
click Create Drivers and Applications Backup Disc.
Recovery - 79
Important: We recommend that you create each type of recovery
disc as soon as possible.
The Create Factory Default Backup dialog box opens.
This dialog box tells you the number of blank, recordable discs you will
need to complete the recovery discs. Make sure that you have the
required number of identical, blank discs ready before continuing.
80 - Recovery
3. Insert a blank disc into the drive indicated in the Backup to list, then click
Next. You will be shown the backup progress on the screen.
The drive ejects each disc as it completes burning it.
4. Remove the disc from the drive and mark it with a permanent marker.
Important: Write a unique, descriptive label on each disc, such as
‘Windows Recovery Disc 1 of 2’ or ‘Apps/Drivers Recovery disc’.
Make sure you keep the discs in a safe place that you will
remember.
5. If multiple discs are required, insert a new disc when prompted, then
click OK. Continue until the process is complete.
RECOVERING YOUR SYSTEM
If Packard Bell support did not help fix your problem, you can use the
Packard Bell Recovery Management program. This will restore your
Recovery - 81
computer to the same state as when you purchased it, while giving you an
option to retain all settings and personal data for later retrieval.
To recover your system:
1. Perform minor fixes.
If only one or two items of software or hardware have stopped working
correctly, the problem may be solved by reinstalling the software or the
device drivers.
To recover software and drivers that were pre-installed at the factory, see
“Recovering pre-installed software and drivers” on page 83.
For instructions on reinstalling software and drivers that were not preinstalled, see that product’s documentation or technical support Web
site.
2. Revert to a previous system condition.
If reinstalling software or drivers does not help, then the problem may be
solved by returning your system to a previous state when everything was
working correctly.
For instructions, see “Returning to a previous system condition” on page
84.
3. Reset your system to its factory condition.
If nothing else has solved the problem and you want to reset your system
to factory condition, see “Returning your system to its factory condition”
on page 85.
82 - Recovery
Types of recovery
Recovering pre-installed software and drivers
As a troubleshooting step, you may need to reinstall the software and
device drivers that came pre-installed on your computer from the factory.
You can recover using either your hard drive or the backup you have
created.
• New software - If you need to recover software that did not come preinstalled on your computer, you need to follow that software’s installation
instructions.
• New device drivers - If you need to recover device drivers that did not
come pre-installed on your computer, follow the instructions provided
with the device.
To recover your pre-installed software and drivers:
1. Click on Start
> All Programs > Packard Bell, then click on
Packard Bell Recovery Management. Packard Bell Recovery
Management opens.
- OR If you are recovering from your driver and application recovery backup,
insert it into the disc drive, then go to Step 3 after the Packard Bell
Application Recovery main menu opens.
2. Click on the Restore tab, then click Reinstall Drivers or Applications.
The Packard Bell Application Recovery main menu opens.
Recovery - 83
3. Click on Contents. A list of software and device drivers opens.
4. Click on the install icon for the item you want to install, then follow the
on-screen prompts to complete the installation. Repeat this step for
each item you want to reinstall.
Returning to a previous system condition
Microsoft System Restore periodically takes ’snapshots’ of your system
settings and saves them as restore points. In most cases of hard-toresolve software problems, you can return to one of these restore points to
get your system running again.
Windows automatically creates an additional restore point each day, and
also each time you install software or device drivers.
84 - Recovery
Help: For more information about using Microsoft System Restore,
click Start, then click Help and Support. Type windows system
restore in the Search Help box, then press Enter.
To return to a restore point:
1. Click on Start
> Control Panel > System and Security > Action
Center, then click on Recovery.
2. Click on Open System Restore, then Next.
3. Click on he restore point you want, click on Next, then Finish. A
confirmation message box appears.
4. Click on Yes. Your system is restored using the restore point you
specified. This process may take several minutes, and may restart your
computer.
Returning your system to its factory condition
If your computer experiences problems that are not recoverable by other
methods, you may need to reinstall everything to return your system to its
factory condition. You can reinstall using either your hard drive or the
recovery discs you have created.
Caution: This complete recovery deletes everything on your hard
drive, then reinstalls Windows and all software and drivers that
were pre-installed on your system. If you can access important
files on your hard drive, back them up now.
• If you can still run Windows, see “Recovering from within Windows”
below.
Recovery - 85
• If you cannot run Windows and your original hard drive is still working,
see “Recovering from the hard drive during startup” on page 87.
• If you cannot run Windows and your original hard drive has been
completely re-formatted or you have installed a replacement hard drive,
see “Recovering from your recovery discs” on page 87.
Recovering from within Windows
To reinstall Windows and all pre-installed software and drivers:
1. Click on Start
> All Programs > Packard Bell, then click on
Packard Bell Recovery Management. Packard Bell Recovery
Management opens.
2. Click on the Restore tab, then Restore system to factory default. The
Confirm Restoration dialog box opens.
3. Click on Yes, then Start. A dialog box displays information about the
hard drive that the operating system will be recovered to.
Caution: Continuing the process will erase all files on your hard
drive.
4. Click on OK. The recovery process begins by restarting your computer,
then continues by copying files to your hard drive. This process may
take a while, but a Packard Bell Recovery Management screen shows
you its progress.
When the recovery has finished, a dialog box prompts you to restart your
computer.
5. Click on OK. Your computer restarts.
6. Follow the on-screen prompts for first-time system setup.
86 - Recovery
Recovering from the hard drive during startup
To reinstall Windows and all pre-installed software and drivers:
1. Turn on your computer, then press Alt+F10 during startup. Packard Bell
Recovery Management opens.
2. Click on Restore system from factory default.
Caution: Continuing the process will erase all files on your hard
drive.
3. Click on Next. Your hard drive’s original, factory-loaded contents are
recovered. This process will take several minutes.
Recovering from your recovery discs
To reinstall Windows and all pre-installed software and drivers:
1. Turn on your computer, insert the first system recovery disc into your
optical disc drive, then restart your computer.
Caution: Continuing the process will erase all files on your hard
drive.
2. If it is not already enabled, you must enable the F12 Boot Menu:
1. Press F2 when starting your computer.
2. Use the left or right arrow keys to select the Main menu.
3. Press the down key until F12 Boot Menu is selected, press F5 to
change this setting to Enabled.
4. Use the left or right arrow keys to select the Exit menu.
5. Select Save Changes and Exit and press Enter. Select OK to
confirm.
Recovery - 87
6. Your computer will restart.
3. During startup, press F12 to open the boot menu. The boot menu allows
you to select which device to start from, such as the hard drive or an
optical disc.
4. Use your arrow keys to select the line CDROM/DVD (this line may start
with ’IDE 1...’), then press Enter. Windows installs from the recovery
disc you inserted.
5. Insert the second recovery disc when prompted, then follow the on-screen
prompts to complete the recovery.
88 - Recovery
R EGULATORY INFORMATION
PREVENTION OF HEARING LOSS
- Caution: Permanent hearing loss may occur if earphones or headphones
are used at high volume for prolonged periods of time.
- A pleine puissance, l’écoute prolongée du baladeur peut endommager
l’oreille de l’utilisateur.
CAUTION when listening:
To protect your hearing, follow these instructions.
- Increase the volume gradually until you can hear clearly and comfortably.
- Do not increase the volume level after your ears have adjusted.
- Do not listen to music at high volumes for extended periods.
- Do not increase the volume to block out noisy surroundings.
- Decrease the volume if you can’t hear people speaking near you.
RADIO DEVICE REGULATORY NOTICE
- Note: Regulatory information below is for models with wireless LAN and/or Bluetooth
only.
WIRELESS ADAPTER REGULATORY INFORMATION
USA — FCC and FAA
The FCC with its action in ET Docket 96-8 has adopted a safety standard for human
exposure to radio frequency (RF) electromagnetic energy emitted by FCC certified
equipment. The wireless adapter meets the Human Exposure limits found in OET Bulletin
65, supplement C, 2001, and ANSI/IEEE C95.1, 1992. Proper operation of this radio
according to the instructions found in this manual will result in exposure substantially
below the FCC’s recommended limits.
Regulatory information - 89
- The following safety precautions should be observed:
Do not touch or move antenna while the unit is transmitting or receiving.
- Do not hold any component containing the radio such that the antenna is very close
or touching any exposed parts of the body, especially the face or eyes, while
transmitting.
- Do not operate the radio or attempt to transmit data unless the antenna is connected;
this behavior may cause damage to the radio.
Use in specific environments:
- The use of wireless adapters in hazardous locations is limited by the constraints
posed by the safety directors of such environments.
- The use of wireless adapters on airplanes is governed by the Federal Aviation
Administration (FAA).
- The use of wireless adapters in hospitals is restricted to the limits set forth by each
hospital.
Antenna Use
In order to comply with FCC RF exposure limits, low gain integrated antennas should be
located at a minimum distance of 20 cm (8 inches) or more from the body of all persons
or at a minimum distance as specified by the FCC module grant conditions. FCC grants
can be viewed from the FCC Equipment Authorization website at https://fjallfoss.fcc.gov/
oetcf/eas/reports/GenericSearch.cfm by entering the FCC ID printed on the module label.
Explosive Device Proximity Warning
Warning: Do not operate a portable transmitter (including this wireless adapter) near
unshielded blasting caps or in an explosive environment unless the transmitter has been
modified to be qualified for such use
Antenna Warnings
- Warning: To comply with the FCC and ANSI C95.1 RF exposure limits, it is
recommended that for the wireless adapter installed in a desktop or portable
computer, the antenna for this wireless adapter to be installed so as to provide a
90 - Regulatory information
separation distance of at least 20 cm (8 inches) from all persons or at the minimum
distance as specified by the module grant conditions. FCC grants can be viewed from
the FCC Equipment Authorization website at https://fjallfoss.fcc.gov/oetcf/eas/
reports/GenericSearch.cfm by entering the FCC ID printed on the module label.
- Warning: The wireless adapter is not designed for use with high-gain directional
antennas.
Use On Aircraft Caution
- Caution: Regulations of the FCC and FAA prohibit airborne operation of radiofrequency wireless devices (wireless adapters) because their signals could interfere
with critical interfere with critical aircraft instruments.
Local Restrictions on 802.11a, 802.11b, 802.11g and 802.11n Radio Usage
- Caution: Due to the fact that the frequencies used by 802.11a, 802.11b, 802.11g and
802.11n wireless LAN devices may not yet be harmonized in all countries, 802.11a,
802.11b, 802.11g and 802.11n products are designed for use only in specific
countries, and are not allowed to be operated in countries other than those of
designated use. As a user of these products, you are responsible for ensuring that
the products are used only in the countries for which they were intended and for
verifying that they are configured with the correct selection of frequency and channel
for the country of use. Any deviation from the permissible power and frequency
settings for the country of use is an infringement of national law and may be punished
as such.
Wireless Interoperability
The wireless adapter is designed to be interoperable with other wireless LAN products
that are based on direct sequence spread spectrum (DSSS) radio technology and to
comply with the following standards:
- IEEE Std. 802.11b compliant Standard on Wireless LAN
- IEEE Std. 802.11g compliant Standard on Wireless LAN
- IEEE Std. 802.11a compliant Standard on Wireless LAN (applies to devices
supporting 802.11a)
Regulatory information - 91
- IEEE Std. 802.11n draft 2.0 compliant on Wireless LAN
- Wireless Fidelity certification, as defined by the Wi-Fi Alliance
The Wireless Adapter and Your Health
The wireless adapter, like other radio devices, emits radio frequency electromagnetic
energy. The level of energy emitted by the wireless adapter, however, is less than the
electromagnetic energy emitted by other wireless devices such as mobile phones. The
wireless adapter operates within the guidelines found in radio frequency safety standards
and recommendations. These standards and recommendations reflect the consensus of
the scientific community and result from deliberations of panels and committees of
scientists who continually review and interpret the extensive research literature. In some
situations or environments, the use of the wireless adapter may be restricted by the
proprietor of the building or responsible representatives of the applicable organization.
Examples of such situations may include:
- Using the wireless adapter on board airplanes, or
- Using the wireless adapter in any other environment where the risk of interference
with other devices or services is perceived or identified as being harmful.
If you are uncertain of the policy that applies to the use of wireless adapters in a specific
organization or environment (an airport, for example), you are encouraged to ask for
authorization to use the adapter before you turn it on.
FCC Radio Frequency Interference Requirements (applies to device supporting
802.11a)
This device is restricted to indoor use due to its operation in the 5.15 to 5.25 GHz and
5.470 to 5.725 GHz frequency ranges. FCC requires this product to be used indoors for
the frequency ranges 5.15 to 5.25 GHz and 5.470 to 5.725 GHz to reduce the potential
for harmful interference to co-channel mobile satellite systems. High power radars are
allocated as primary users of the 5.25 to 5.35 GHz and 5.65 to 5.85 GHz bands. These
radar stations can cause interference with and /or damage this device. No configuration
92 - Regulatory information
controls are provided for this wireless adapter allowing any change in the frequency of
operations outside the FCC grant of authorization for U.S operation according to Part
15.407 of the FCC rules.
USA — Federal Communications Commission (FCC)
This device complies with Part 15 of the FCC Rules. Operation of the device is subject to
the following two conditions:
- This device may not cause harmful interference.
- This device must accept any interference that may cause undesired operation.
- Note: The radiated output power of the adapter is far below the FCC radio frequency
exposure limits. Nevertheless, the adapter should be used in such a manner that the
potential for human contact during normal operation is minimized. To avoid the
possibility of exceeding the FCC radio frequency exposure limits, you should keep a
distance of at least 20 cm between you (or any other person in the vicinity), or the
minimum separation distance as specified by the FCC grant conditions, and the
antenna that is built into the computer. Details of the authorized configurations can
be found at http://www.fcc.gov/oet/ea/ by entering the FCC ID number on the device.
Interference Statement
This wireless adapter has been tested and found to comply with the limits for a Class B
digital device, pursuant to Part 15 of the FCC Rules. These limits are designed to provide
reasonable protection against harmful interference in a residential installation. This
wireless adapter generates, uses, and can radiate radio frequency energy. If the wireless
adapter is not installed and used in accordance with the instructions, the wireless adapter
may cause harmful interference to radio communications. There is no guarantee,
however, that such interference will not occur in a particular installation. If this wireless
adapter does cause harmful interference to radio or television reception (which can be
determined by turning the equipment off and on), the user is encouraged to try to correct
the interference by taking one or more of the following measures:
- Reorient or relocate the receiving antenna of the equipment experiencing the
interference.
Regulatory information - 93
- Increase the distance between the wireless adapter and the equipment experiencing
the interference.
- Connect the computer with the wireless adapter to an outlet on a circuit different from
that to which the equipment experiencing the interference is connected.
- Consult the dealer or an experienced radio/TV technician for help.
- Note: The adapter must be installed and used in strict accordance with the
manufacturer's instructions as described in the user documentation that comes with
the product. Any other installation or use will violate FCC Part 15 regulations.
Canada — Industry Canada (IC)
This device complies with RSS210 of Industry Canada. Cet appareil se conforme à
RSS210 de Canada d'Industrie.
- Caution: When machine supports and using IEEE 802.11a wireless LAN, this
product is restricted to indoor use due to its operation in the 5.15- to 5.25 GHz
frequency range. Industry Canada requires this product to be used indoors for the
frequency range of 5.15 GHz to 5.25 GHz to reduce the potential for harmful
interference to co-channel mobile satellite systems. High power radar is allocated as
the primary user of the 5.25 to 5.35 GHz and 5.65 to 5.85 GHz bands. These radar
stations can cause interference with and/or damage to this device. The maximum
allowed antenna gain for use with this device is 6dBi in order to comply with the
E.I.R.P limit for the 5.25 to 5.35 and 5.725 to 5.85 GHz frequency range in point-topoint operation. To comply with RF exposure requirements all antennas should be
located at a minimum distance of 20 cm, or the minimum separation distance allowed
by the module approval, from the body of all persons.
- Attention: l’utilisation d’un réseau sans fil IEEE802.11a est réstreinte à une
utilisation en intérieur à cause du fonctionement dans la bande de fréquence 5,15 5,25 GHz. Industry Canada requiert que ce produit soit utilisé à l’intérieur des
bâtiments pour la bande de fréquence 5,15 - 5,25 GHz afin de réduire les possibilités
d’interférences nuisibles aux canaux co-existants des systèmes de transmission
satellites. Les radars de puissances ont fait l’objet d’une allocation primaire de
94 - Regulatory information
fréquences dans les bandes 5,25 - 5,35 GHz et 5 65 - 5 85 GHz. Ces stations radar
peuvent créer des interférences avec ce produit et/ou lui être nuisible. Le gain
d’antenne maximum permissible pour une utilisation avec ce produit est de 6 dBi afin
d’être conforme aux limites de puissance isotropique rayonnée équivalente (P.I.R.E.)
applicable dans les bandes 5,25 - 5,35 GHz et 5,725 - 5,85 GHz en fonctionement
point-à-point. Se pour conformer aux conditions d'exposition de RF toutes les
antennes devraient être localisées à une distance minimum de 20 cm, ou la distance
de séparation minimum permise par l'approbation de module, du corps de toutes les
personnes.
This Class B digital apparatus complies with Canadian ICES-003.
Cet appareil numérique de la classe B est conforme a la norme NMB-003 du Canada.
"To prevent radio interference to the licensed service, this device is intended to be
operated indoors and away from windows to provide maximum shielding. Equipment (or
its transmit antenna) that is installed outdoors is subject to licensing."
« Pour empêcher que cet appareil cause du brouillage au service faisant l'objet d'une
licence, il doit être utilisé a l'intérieur et devrait être placé loin des fenêtres afin de fournir
un écran de blindage maximal. Si le matériel (ou son antenne d'émission) est installé à
l'extérieur, il doit faire l'objet d'une licence. »
European Union
List of applicable countries
This product must be used in strict accordance with the regulations and constraints in the
country of use. For further information, contact the local office in the country of use.
Please see http://ec.europa.eu/enterprise/rtte/implem.htm for the latest country list.
List of National Codes
THIS EQUIPMENT MAY BE OPERATED IN THE FOLLOWING COUNTRIES:I
Country
ISO 3166
2 letter
code
Country
ISO 3166
2 letter
code
Country
ISO 3166
2 letter
code
Country
ISO 3166
2 letter
code
Austria
AT
Germany
DE
Malta
MT
United Kingdom
GB
Regulatory information - 95
Belgium
BE
Greece
GR
Netherlands
NT
Iceland
Cyprus
CY
Hungary
HU
Poland
PL
Liechtenstein
IS
LI
Czech Republic
CZ
Ireland
IE
Portugal
PT
Norway
NO
Denmark
DK
Italy
IT
Slovakia
SK
Switzerland
CH
Estonia
EE
Latvia
LV
Slovenia
SL
Bulgaria
BG
Finland
FI
Lithuania
LT
Spain
ES
Romania
RO
France
FR
Luxembourg
LU
Sweden
SE
Turkey
TR
The low band 5.15 -5.35 GHz is for indoor use only.
This equipment complies with the essential requirements of the European Union directive
1999/5/EC. See Statements of European Union Compliance, and more details refer to the
attached Declaration of Conformity.
English
Hereby, Acer Inc., declares that this notebook PC is in
compliance with the essential requirements and other
relevant provisions of Directive 1999/5/EC.
Finnish
Acer Inc. vakuuttaa täten että notebook PC tyyppinen laite on
direktiivin 1999/5/EY oleellisten vaatimusten ja sitä koskevien
direktiivin muiden ehtojen mukainen.
Hierbij verklaart Acer Inc. dat het toestel notebook PC in
overeenstemming is met de essentiële eisen en de andere
relevante bepalingen van richtlijn 1999/5/EG
Dutch
Bij deze verklaart Acer Inc. dat deze notebook PC voldoet aan
de essentiële eisen en aan de overige relevante bepalingen
van Richtlijn 1999/5/EC.
96 - Regulatory information
Par la présente Acer Inc. déclare que l'appareil notebook PC
est conforme aux exigences essentielles et aux autres
dispositions pertinentes de la directive 1999/5/CE
French
Par la présente, Acer Inc. déclare que ce notebook PC est
conforme aux exigences essentielles et aux autres
dispositions de la directive 1999/5/CE qui lui sont applicables
Swedish
Härmed intygar Acer Inc. att denna notebook PC står I
överensstämmelse med de väsentliga egenskapskrav och
övriga relevanta bestämmelser som framgår av direktiv 1999/
5/EG.
Danish
Undertegnede Acer Inc. erklærer herved, at følgende udstyr
notebook PC overholder de væsentlige krav og øvrige
relevante krav i direktiv 1999/5/EF
Hiermit erklärt Acer Inc., dass sich dieser/diese/dieses
notebook PC in Übereinstimmung mit den grundlegenden
Anforderungen und den anderen relevanten Vorschriften der
Richtlinie 1999/5/EG befindet". (BMWi)
German
Hiermit erklärt Acer Inc. die Übereinstimmung des Gerätes
notebook PC mit den grundlegenden Anforderungen und den
anderen relevanten Festlegungen der Richtlinie 1999/5/EG.
(Wien)
Regulatory information - 97
Greek
ΜΕ ΤΗΝ ΠΑΡΟΥΣΑ Acer Inc. ∆ΗΛΩΝΕΙ ΟΤΙ notebook PC
ΣΥΜΜΟΡΦΩΝΕΤΑΙ ΠΡΟΣ ΤΙΣ ΟΥΣΙΩ∆ΕΙΣ ΑΠΑΙΤΗΣΕΙΣ
ΚΑΙ ΤΙΣ ΛΟΙΠΕΣ ΣΧΕΤΙΚΕΣ ∆ΙΑΤΑΞΕΙΣ ΤΗΣ Ο∆ΗΓΙΑΣ
1999/5/ΕΚ
Italian
Con la presente Acer Inc. dichiara che questo notebook PC è
conforme ai requisiti essenziali ed alle altre disposizioni
pertinenti stabilite dalla direttiva 1999/5/CE.
Spanish
Por medio de la presente Acer Inc. declara que el notebook
PC cumple con los requisitos esenciales y cualesquiera otras
disposiciones aplicables o exigibles de la Directiva 1999/5/CE
Portuguese
Acer Inc. declara que este notebook PC está conforme com
os requisitos essenciais e outras disposições da Directiva
1999/5/CE.
France
Pour la France métropolitaine :
2,400 - 2,4835 GHz (Canaux 1à 13) autorisé en usage intérieur
2,400 - 2,454 GHz (canaux 1 à 7) autorisé en usage extérieur
Pour la Guyane et la Réunion :
2,400 - 2,4835 GHz (Canaux 1à 13) autorisé en usage intérieur
2,420 - 2,4835 GHz (canaux 5 à 13) autorisé en usage extérieur
Pour tout le territoire Français :
Seulement 5,15 -5,35 GHz autorisé pour le 802.11a
98 - Regulatory information
L'utilisation de cet equipement (2,4 GHz WLAN) est soumise à certaines restrictions :
- La puissance maximale autorisée en intérieur est de 100 mW pour 2400 - 2483,5 MHz.
- La puissance maximale autorisée est de 100 mW en extérieur pour 2400 - 2454 MHz.
- La puissance maximale autorisée est de 10 mW en extérieur, 2454 - 2483,5 MHz.
Pour les dernières restrictions, voir http://www.art-telecom.fr.
Italy
The use of these equipments is regulated by:
1.D.L.gs 1.8.2003, n. 259, article 104 (activity subject to general authorization) for outdoor
use and article 105 (free use) for indoor use, in both cases for private use.
2.D.M. 28.5.03, for supply to public of RLAN access to networks and telecom services.
L’uso degli apparati è regolamentato da:
1.D.L.gs 1.8.2003, n. 259, articoli 104 (attività soggette ad autorizzazione generale) se
utilizzati al di fuori del proprio fondo e 105 (libero uso) se utilizzati entro il proprio fondo,
in entrambi i casi per uso private.
2.D.M. 28.5.03, per la fornitura al pubblico dell’accesso R-LAN alle reti e ai servizi di
telecomunicazioni.
Belgium
Dans le cas d'une utilisation privée, à l'extérieur d'un bâtiment, au-dessus d'un espace
public, aucun enregistrement n'est nécessaire pour une distance de moins de 300 m.
Pour une distance supérieure à 300 m un enregistrement auprès de l'IBPT est requise.
Pour les enregistrements et licences, veuillez contacter l'IBPT.
In geval van privé-gebruik, buiten een gebouw, op een openbare plaats, is geen registratie
nodig, wanneer de afstand minder dan 300 m is. Voor een afstand groter dan 300 m is
een registratie bij BIPT vereist. Voor registraties en licenties, gelieve BIPT te contacteren.
Regulatory information - 99
Brazil
Este equipamento opera em caráter secundário, isto é, não tem direito a proteção contra
interferência prejudicial, mesmo de estações do mesmo tipo, e não pode causar
interferência a sistemas operando em caráter primário.
Pakistan
Pakistan Telecommunication Authority (PTA) Approved
Morocco
The operation of this product in the radio channel 2 (2417 MHz) is not authorized in the
following cities: Agadir, Assa-Zag, Cabo Negro, Chaouen, Goulmima, Oujda, Tan Tan,
Taourirt, Taroudant and Taza.
The operation of this product in the radio channels 4, 5, 6 and 7 (2425 - 2442 MHz) is not
authorized in the following cities: Aéroport Mohamed V, Agadir, Aguelmous, Anza,
Benslimane, Béni Hafida, Cabo Negro, Casablanca, Fès, Lakbab, Marrakech, Merchich,
Mohammédia, Rabat, Salé, Tanger, Tan Tan, Taounate, Tit Mellil, Zag.
Japan
5 GHz 帯は室内でのみ使用のこと
Korea
당해 무선설비는 운용 중 전파혼신 가능성이 있음
Taiwan
第十二條
經型式認證合格之低功率射頻電機,非經許可,公司、商號或使用者均不得擅自變更頻率、
加大功率或變更原設計之特性及功能。
第十四條
低功率射頻電機之使用不得影響飛航安全及干擾合法通信 ; 經發現有干擾現象時,應立即
停用,並改善至無干擾時方得繼續使用。
前項合法通信,指依電信法規定作業之無線通信。
低功率射頻電機須忍受合法通信或工業、科學及醫療用電波輻射性電機設備之干擾。
100 - Regulatory information
MODIFICATIONS TO THE PRODUCT
CE Marking
Packard Bell cannot be held responsible for unauthorized modifications made by the user
and the consequences thereof, which may alter the conformity of the product with the CE
Marking.
Radio frequency interference
The manufacturer is not responsible for any radio or TV interference caused by
unauthorised modifications to this equipment.
CONNECTIONS AND REMOTE EARTHS
PELV (Protected Extra Low Voltage)
To ensure the extra-low voltage integrity of the equipment, only connect equipment with
mains-protected electrically-compatible circuits to the external ports.
SELV (Safety Extra Low Voltage)
Every input and output of this product is classified as Safety Extra Low Voltage.
Remote earths
To prevent electrical shock, connect all local (individual office) computers and computer
support equipment to the same electrical circuit of the building wiring. If you are unsure,
check the building wiring to avoid remote earth conditions.
Building supply
Only connect the equipment to a building supply that is in accordance with current wiring
regulations in your country. In the U.K., these are the IEE regulations.
POWER SUPPLY AND CABLES
Power supply
The power supply socket-inlet and socket-outlet (if equipped) are classified as Hazardous
Voltage.
Regulatory information - 101
You must unplug the power supply cord and remove the battery to disconnect the
equipment from the power supply. In that aim, the socket-outlet should be installed near
to the equipment and should be easily accessible.
Input rating: Refer to the rating label on the bottom of the computer and ensure that your
power adapter complies with the specified rating.
Under no circumstances should the user attempt to disassemble the power supply. The
power supply has no user-replaceable parts. Inside the power supply are hazardous
voltages that can cause serious personal injury.
A defective power supply must be returned to your dealer.
Power cables and plug
This Product requires a three-wire grounded power cord and plug. The plug only fits in a
grounded power outlet. Make sure the power outlet is properly grounded before inserting
the plug. Do not insert the plug into a non-grounded power outlet. Contact your electrician
for details.
The cord length must not exceed 2.5 metres. To prevent electrical hazards, do not remove
or disable the ground contact on the power cord. Replace the power cord if it gets
damaged. Contact your dealer for an exact replacement. In Europe, the plug must be
rated for 250 VAC, 10 amp minimum. The plug must display an international agency
approval marking. The cord must be suitable for use in the end-user country. Consult your
dealer or the local electrical authorities if you are unsure of the type of power cord to use
in your country.
Cables
For cables which are not delivered with the Product in the computer's packaging:
The EMC performance of the system is guaranteed only if the cable and interface use
efficient shielding.
The use of shielded interface cable is required for USB, IEEE1394, serial, printer, game,
analog or digital audio/ video, PS2, TV or FM antennas, and generally all high-speed
cable interfaces.
102 - Regulatory information
Use only UL Listed No. 26AWG or larger telecommunication cords.
Only Ethernet LAN or RTC modem cable can have length exceeding 3 metres.
Packard Bell recommends that you add a ferrite core round clip to each cable connecting
your computer to a hardware device that was not included with your computer.
- Ferrite reference: 28A-2029 from Steward (two loops)
During product certification, Packard Bell used the following cable quality:
- USB2.0 Certified Cables from Hama 46778
- IEEE1394 shielded FireWire from Hama 50011
- RCA-RCA shielded Audio/Video Cables from Thomson KHC001M, KHC012M,
KHC028M
- Stereo Jack shielded Audio cables from Hama 43330H, 42714H
Heat Build-up and Portable Computers
The AC adapter and the underside of the computer can become hot after prolonged use.
Sustained physical contact with either should be avoided.
CHASSIS COVER REMOVAL AND REPLACEMENT
Before removing the chassis cover to service or modify the equipment, you must
disconnect all power and modem cords, and remove or disable the battery.
- Caution: Some components inside the computer can become hot after prolonged
use.
You then must close the chassis before you plug in and switch on the equipment.
LASER COMPLIANCE STATEMENT
The optical devices are tested and certified to be compliant with International
Electrotechnical Commission IEC60825-1 and European EN60825-1 standards for Class
1 laser products.
Class 1 laser products are not considered hazardous. The optical devices are designed
such that there is never human access to laser radiation above a Class 1 level during
normal operation or prescribed maintenance conditions.
Regulatory information - 103
The optical devices installed in your computer are designed for use solely as components
of such electronic product and therefore do not comply with the appropriate requirements
of Code of Federal Regulation Sec. 1040.10 and Sec. 1040.11 for COMPLETE laser
products.
Because exposure to laser radiation is extremely hazardous, under no circumstances
should the user attempt to disassemble the laser device.
PACKAGING
The packaging of this product is compliant with the European Environmental Directive 94/
62/EC from December 20th 1994 and its equivalent in the French Legislation by the
Decree 98-638 from july 20th 1998.
COMPLIANT WITH RUSSIAN REGULATORY CERTIFICATION
104 - Regulatory information
E NVIRONMENT
OUR COMMITMENT TO ENVIRONMENTAL PROTECTION
Environment has been at the heart of our products.
Packard Bell is committed to limit the environmental impact of its products during product
life cycle.
Starting at design phase, with a very strict procurement policy, maximum attention is given
to electronic components in order to limit their weight in heavy metals such as lead,
cadmium, chromium, mercury, etc. Suppliers are asked, for each part of any product, to
respect all regulations.
As far as end-of-life products are concerned, measures have been taken to anticipate and
facilitate the recycling of all our products. Thus, all plastic parts heavier than 25 grams
used in Packard Bell products are labelled ISO 11469. This label allows a quick
recognition of the material and eases its valorisation. Likewise, desktop computers are
designed to be easily dismantled, with screws being replaced by clips.
PRODUCT DISPOSAL
The 2002/96/EC Directive, known as Waste Electrical and Electronic
Equipment (WEEE) Directive, requires that used electrical and electronic
products must be disposed of separately from normal household waste in
order to promote reuse, recycling and other forms of recovery and to
reduce the quantity of waste to be eliminated with a view to reducing
landfill and incineration. The crossed-out dustbin logo is there to remind
you that these products must be sorted separately for disposal. These
rules concern all Packard Bell products and also all accessories, such as keyboard,
mouse, speakers, remote control, etc. When you have to dispose of such products, make
sure that they are correctly recycled by checking with your local authority, or by returning
your old equipment to your retailer if you are replacing it. For information, visit
www.packardbell.com/recycling.
Environment - 105
Battery disposal (when applicable)
Before disposing of your equipment ensure that you have removed any batteries that may
be fitted in the equipment. European law states that batteries must be collected for
disposal separately from household waste. Do not throw your used batteries in the
dustbin. Dispose of your used batteries via a battery collection scheme where available,
or ask your distributor or local authority what infrastructures you can use. Your efforts will
enable the safe collection, recycling and destruction of used batteries and will help protect
the environment and reduce health hazards.
- Caution: Risk of explosion if battery is replaced by an incorrect type. Dispose of
used batteries according to the instructions.
Mercury advisory
For electronic products containing a non-LED-backlit LCD/CRT monitor or
display: Lamp(s) inside this product contain mercury and must be recycled or
disposed of according to local, state or federal laws. For more information,
contact the Electronic Industries Alliance at www.eiae.org. for lamp-specific
disposal information, check www.lamprecycle.org.
ENERGY STAR
Packard Bell's ENERGY STAR qualified products save your money by
reducing energy cost and protecting the environment without sacrificing
features or performance. Packard Bell is proud to offer our customers
products with the ENERGY STAR mark.
What is ENERGY STAR?
Products that are ENERGY STAR qualified use less energy and prevent greenhouse gas
emissions by meeting strict energy efficiency guidelines set by the U.S. Environmental
Protection Agency. Packard Bell is committed to offering products and services worldwide
that help customers save money, conserve energy and improve the quality of our
environment. The more energy we can save through higher energy efficiency, the more
we reduce greenhouse gases and the risks of climate change. More information refers to
www.energystar.gov or www.energystar.gov/powermanagement.
106 - Environment
- Note: Information in this section may not apply to your computer.
Packard Bell ENERGY STAR qualified products:
- produce less heat and reduce cooling loads in warmer climates.
- automatically go into "display Sleep" and "computer Sleep" mode after 10 and 30
minutes of inactivity, respectively.
- wake from "Sleep" mode if the keyboard is pressed or mouse is moved.
- save more than 80% energy when in "Sleep" mode.
ENERGY STAR and the ENERGY STAR mark are registered U.S. marks.
Environment - 107
S OFTWARE LICENSE
- Note: Most of the software applications are already preinstalled on your Packard Bell
computer. They are ready to use or to set up. However, some titles require a CD or
DVD to run. You will find these discs in your computer's packaging.
Packard Bell License Agreement (CD and/or DVD Products). This copy of the original is
your proof of license. Please treat it as valuable property.
Important!
Read carefully before installing the software.
The following License Agreement applies to you. This is a legal agreement between you
(either individual or an entity) and Packard Bell. By installing the software you are
agreeing to be bound by the terms of this Agreement. If you do not agree to the terms of
this Agreement, promptly return your entire computer system, the unopened software
packet(s), if any, as well as the accompanying terms (including written materials or other
container(s)) in the place you obtained them for a full refund.
PACKARD BELL SOFTWARE LICENSE
1. Grant of License
This Packard Bell License Agreement (“License”) permits you to use one copy of the
specified version of the Packard Bell SOFTWARE identified above (which may include at
least one CD or DVD disc) on any single computer, provided the SOFTWARE is in use on
only one computer at any time. If you have multiple Licenses for the SOFTWARE, then at
any time you may have as many copies of the SOFTWARE in use as you have Licenses.
The SOFTWARE is “in use” on a computer when it is loaded into the temporary memory
(i.e. RAM) or installed in the permanent memory (e.g. hard disk, CD and/or DVD, or other
storage device of that computer, except that a copy installed on a network server for the
sole purpose of distribution of other computer is not “in use.” If the anticipated number of
users of the SOFTWARE will exceed the number of applicable Licenses, then you must
have a reasonable mechanism or process in place to assure that the number of persons
108 - Software license
using the SOFTWARE concurrently does no exceed the number of Licenses. If the
SOFTWARE is permanently installed on the hard disk or the storage device of a computer
(other than a network server) and one person uses that computer more than 80% of the
time it is in use, then that person may also use the SOFTWARE on a portable or home
computer.
2. Copyright
The SOFTWARE is owned by Packard Bell or its suppliers and is protected by United
States copyright laws and international treaty provision. Therefore, you must treat the
SOFTWARE like any other copyrighted material (e.g. a book or musical recording) except
that you may transfer the CD and/or DVD disc portion of the SOFTWARE, if any, to a
single hard disk provided you keep the original solely for backup or archival purposes. You
may not copy the CD and/or DVD disc portion of the SOFTWARE or the written materials
accompanying the SOFTWARE.
3. Other restrictions
You may not rent or lease the SOFTWARE, but you may transfer the SOFTWARE and
accompanying written materials on a permanent basis provided you retain no copies and
the recipient agrees to the terms of this Agreement. You may not reverse engineer,
decompile or disassemble the SOFTWARE. Any transfer of the SOFTWARE must include
the most recent update and all prior versions.
THIRD PARTY SOFTWARE OR FREE SOFTWARE LICENSE INFORMATION
Software pre-loaded, embedded or otherwise distributed with the products provided by
Packard Bell does contain free or third party software programs (the “Free Software”),
which are licensed under the terms GNU General Public License (the “GPL”). The Free
Software is marked as such. Your copying, distribution and/or modification of the Free
Software shall be subject to the terms of the GPL.
The Free Software is distributed in the hope that, but it will be useful WITHOUT ANY
WARRANTY; without even the implied warranty of MERCHANTABILITY or FITNESS
FOR A PARTICULAR PURPOSE. The provisions of the GNU General Public License
shall always apply. You may access http://www.gnu.org directly to obtain a copy of the
Software license - 109
GPL or write to the free Software Foundation, Inc. and request a copy. The address of the
Free Software Foundation, Inc is: 59 Temple Place - Suite 330, Boston, MA, 02111-1307,
USA.
For a period of three (3) years as commencing from your receipt of this software, you may
obtain a complete machine-readable copy of the source code for the Free Software under
the terms of the GPL without charge except for the cost of media, shipping, and handling,
upon a written request to us.
Contact us if you have any further questions. Our mailing address is 8F, 88, Sec. 1, Hsin
Tai Wu Rd., Hsichih, New Taipei City 221, Taiwan.
110 - Software license
I NDEX
A
Autoplay .............................................. 42
B
Batteries ............................................ 106
low conditions ................................ 38
battery disposal .................................. 106
maximizing life ............................... 33
battery pack
optimizing ...................................... 37
battery-low warning ........................ 37
removing ....................................... 36
characteristics ................................ 33
using the first time .......................... 34
charging......................................... 36 brightness
hotkeys .......................................... 18
checking charge level ..................... 36
installing ........................................ 36 Browser ............................................... 54
C
Cables ........................................... 9, 101
on indicator .................................... 21
charging
Computer environment ........................... 8
checking level ................................ 36 connections
network ......................................... 29
Cleaning your computer ........................ 10
computer
Cursor ................................................. 19
features ......................................... 14
D
Disk Cleanup ....................................... 69
Packard Bell Website .....................
Disk Defragmenter ............................... 70 Download ............................................
Display
Drives
hotkeys .......................................... 17
Memory card reader .......................
Documentation
DSL .....................................................
54
42
27
49
Index - 111
E
Electronic Program Guide ..................... 41 Epilepsy warning .................................. 13
Environment....................................... 105 Error checking...................................... 68
F
Firewall .......................................... 56, 63 front view ............................................. 21
H
HDD (Hard Disk Drive)
Health precautions ............................... 11
Free space..................................... 69 Helpdesk ............................................. 68
Management .................................. 71 hotkeys ................................................ 19
I
Interference ....................................... 101
Firewall .................................... 56, 63
Internet
Internet Service Provider (ISP) ............. 48
Connection .............................. 48, 49
K
hotkeys .......................................... 19
Keyboard
L
LAN (Local Area Network) .................... 50 left view ............................................... 21
Last Known Good Configuration............ 75
M
Maintenance
Malware...............................................
HDD management ......................... 71 Memory card reader .............................
Recovery Management Program .... 40, Modem ................................................
Multimedia files ....................................
78
System tools .................................. 72
56
27
49
40
N
network ................................................ 29 Network connections ............................ 50
112 - Index
Norton Internet Security .................. 54, 58
P
Packard Bell
Pointer................................................. 19
Recovery Management Program .... 40, ports .................................................... 27
Power cords........................................... 9
78
Website ......................................... 54
R
Recovery
Removable media devices ....................
Recovery Management Program .... 40, Removing hardware .............................
Removing software ..............................
78
System Restore ............................. 73 Restore points......................................
Regulatory Information ................. 89, 105
28
28
71
74
S
Safe Computing ................................... 68
Safety precautions ................................ 8
Security
Antivirus......................................... 56
Updates ................................... 64, 75
Windows Action Center ............ 62, 75
Software
Removing software......................... 71
Software License.......................... 108
speakers
hotkey ...........................................
Spyware ..............................................
Support
Packard Bell Website .....................
System Restore ...................................
System tools
Disk Cleanup .................................
Disk Defragmenter .........................
Error checking................................
Windows System Restore...............
18
55
54
73
69
70
68
73
T
TV tuner............................................... 40
U
Uninstalling hardware ........................... 28 Update
Windows automatic updates ..... 64, 76
universal serial bus............................... 29
Index - 113
User Account Control ........................... 66
V
view
front ............................................... 22
left ................................................. 22
right ............................................... 24
W
Warranty ............................................... 7
Welcome Center .................................. 39
WiFi ............................................... 50, 51
Windows
System Restore ............................. 73
Using Windows .............................. 39
Welcome Center ............................ 39
114 - Index
Windows Action Center ............ 62, 75
Windows automatic updates ..... 64, 76
Windows Defender ......................... 65
Windows Media Center ............ 40, 41
Windows Media Player ................... 40
Windows Remote Assistance.......... 77