1
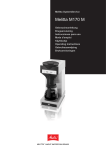
Operating Instructions Melitta® Cafina® XT4 Melitta Professional Coffee Solutions Contents 1 General ���������������������������������������������������������� 4 8.2 Cleaning intervals ���������������������������������������� 22 8.3 Cleaning prompt and dispensing lock���������� 22 8.4 Cleaning agent��������������������������������������������� 22 8.5 When using canisters����������������������������������� 23 8.6 Daily cleaning����������������������������������������������� 23 8.6.1 Cleaning the grounds drawer����������������� 23 8.6.2 Running the cleaning programme���������� 23 8.6.3 Cleaning the instant system������������������� 25 8.6.4 Cleaning the bean container������������������ 27 8.7 Cleaning the instant container��������������������� 27 8.8 External cleaning������������������������������������������ 28 1.1 Manufacturer information����������������������������� 4 1.2 About these instructions�������������������������������� 4 1.3 Explanation of symbols���������������������������������� 4 1.4 Description����������������������������������������������������� 4 1.5Accessories����������������������������������������������������� 5 2 Safety ������������������������������������������������������������ 5 2.1 Intended use�������������������������������������������������� 5 2.2 Safety information����������������������������������������� 5 2.2.1General����������������������������������������������������� 5 2.2.2Personnel�������������������������������������������������� 5 2.2.3 Correct use����������������������������������������������� 6 3 4 Technical data ������������������������������������������������ 6 Installation ����������������������������������������������������� 7 4.1Prerequisites�������������������������������������������������� 7 4.1.1 Water connection������������������������������������� 7 4.1.2 Electrical connection�������������������������������� 7 4.1.3 Installation location���������������������������������� 7 4.1.4 Product material��������������������������������������� 7 4.2 Canister operation (option)���������������������������� 8 4.2.1 Filling the freshwater canister������������������ 8 4.2.2 Emptying the waste water canister���������� 8 5 9 Maintenance ����������������������������������������������� 28 9.1 9.2 Safety measures������������������������������������������� 28 Intervals������������������������������������������������������� 28 10 Recycling and disposal ��������������������������������� 29 10.1 10.2 10.3 10.4 Waste disposal��������������������������������������������� 29 Waste water disposal����������������������������������� 29 Cleaning agent disposal������������������������������� 29 Machine disposal����������������������������������������� 29 11 Displays ������������������������������������������������������� 29 Operation ������������������������������������������������������ 9 5.1 Switching the machine on and off����������������� 9 5.2Filling������������������������������������������������������������ 10 5.2.1 Filling the coffee supply�������������������������� 10 5.2.2 Filling the instant powder (option)��������� 11 5.2.3 Filling the milk (option)�������������������������� 12 5.3 Confirming fill levels������������������������������������� 12 5.4 Emptying the coffee grounds drawer����������� 13 5.5 Switching the milk system on and off (option) ��������������������������������������������������������������������� 13 5.6 Switching the instant system on and off (option)�������������������������������������������������������� 14 6 Dispensing products ������������������������������������� 14 6.1 6.2 6.3 6.4 6.5 6.6 6.7 7 Setting for product dispensing��������������������� 14 Dispensing coffee, coffee and milk, and milk products������������������������������������������������������� 15 Dispensing hot water (option)��������������������� 15 Dispensing steam (option)��������������������������� 16 Dispensing a double product����������������������� 16 Multiple dispensing of a single product������� 17 Preparing coffee from coffee powder���������� 17 Settings �������������������������������������������������������� 18 7.1 Open basic menu����������������������������������������� 18 7.2 Activating manager operation���������������������� 18 7.2.1 Open the "Additional options" menu����� 18 7.2.2 Displaying info���������������������������������������� 19 7.2.3 Changing fill levels to intermediate values ���������������������������������������������������������������� 19 7.2.4 Changing products���������������������������������� 20 7.2.5 Changing operating parameters������������� 20 8 Cleaning ������������������������������������������������������� 21 8.1 Safety measures������������������������������������������� 21 2 28429 • 20150501 Chapter overview Translation of the original operating instructions 28429 • 20150501 General 1 Safety 2 Technical data 3 Installation 4 Operation 5 Dispensing products 6 Settings 7 Cleaning 8 Maintenance 9 Recycling and disposal 10 Displays 11 3 General 1 General 1.1 Manufacturer information 1.4 Melitta Professional Coffee Solutions GmbH & Co. KG Zechenstr. 60 32429 Minden Germany Internet: www.melitta-professional.de 1.2 About these instructions These instructions form part of the equipment. They contain important information on safety, installation, usage and cleaning. Observing these instructions helps preserve your safety and helps avoid damage to the product. Description This machine is a automated coffee machine. Depending on the machine equipment level, the following products can be dispensed: ͵͵ Coffee, coffee and milk, and milk products ͵͵ Instant products ͵͵ Hot water and steam The housing is made from aluminium and high-quality plastic. The design of this machine and all attachments permits the following owner obligations to be met: ͵͵ HACCP hygiene guidelines ͵͵ Accident prevention regulations for electrical safety in the commercial sector 3 Changes to these instructions due to technical modifications reserved. Reprints, translations and reproductions in any form, including excerpts, require written agreement from the publisher. 2 1 The copyright is held by the manufacturer. 1.3 5 6 Explanation of symbols 12 DANGER Danger to life! Identifies hazards that could result in serious health consequences or even death if the corresponding hazard notice is not observed. 7 11 WARNING Personal injury! Identifies hazards that could result in health consequences if the corresponding hazard notice is not observed. CAUTION Minor injuries! Identifies hazards that could result in minor injuries. NOTE Property damage! Identifies the risk of possible property damage. Note Identifies usage tips and useful information. 4 8 9 10 000101 1 Fig. 1: Overview 1 2 3 4 5 6 7 8 9 Bean container 1 (front) Bean container 2 (rear) Chute (rear bean container 1) Instant container cover (including instant container) Mixer unit (behind the unit door) Unit door with operating unit Hot water lance (option) Product outlet (height-adjustable) Coffee grounds drawer (behind the grounds drawer door) 10 Drip grid 11 Steam lance (option) 12 Main switch (behind the unit door) The nameplate is located on the inside of the coffee grounds drawer. 4 28429 • 20150501 Safety 1.5 Accessories The following accessories are supplied: ͵͵ 1 cleaning container ͵͵ 1 drain clip ͵͵ 1 extraction tool ͵͵ 1 tin Coffee cleaning tabs (art. no. 24718) ͵͵ 1 milk cleaner container liquid concentrate (RFM) (art. no. 24720) ͵͵ 1 coffee measure 6 g ͵͵ 1 operating instructions 2 Safety 2.1 Intended use This machine is an automated coffee machine for dispensing coffee, coffee and milk, and milk products as well as hot water with increased daily requirements for beverages in the gastronomic sector. The following operating modes are available: • Operation by trained personnel • Supervised self-service operation (SS mode) • Operation with fixed water connection • Non-pressurised operation via fresh water and waste water canisters • Stationary installation within dry, enclosed spaces This machine is not intended for the following uses: • areas with high air humidity (e.g. areas with consideration amounts of steam) or outdoors • on board vehicles or mobile facilities (please contact the manufacturer). 2.2 Safety information 2.2.1 General 2.2.2 Personnel • This machine is only permitted to be used by children • • • • • • • • • • of 8 years and over as well as persons with reduced physical, sensory or mental capabilities if supervised or trained in the safe use of the equipment. Children under 8 years of age must be kept away from the machine. Children must not be permitted to play with the equipment. Cleaning and user maintenance are permitted to be carried out by children only under supervision. Persons with reduced experience and knowledge must be able to recognise hazards arising from incorrect operation. A user is only permitted to operate the machine without supervision if the machine has been explained to that user to facilitate safe operation. In self-service operation, the machine must be supervised by trained personnel. Repairs and maintenance work is only permitted to be carried out by Melitta customer service or by specialist personnel authorised by the manufacturer. Repair work performed incorrectly can result in considerable risk to the user. Access to the area reserved for customer service is only permitted to persons who have the knowledge and practical experience of the equipment, particularly in regard to safety and hygiene. Settings, cleaning and preparations on the machine are only permitted to be carried out by persons trained by the installation engineer or by the manufacturer. Faulty components are only permitted to be replaced by original spare parts. Otherwise the warranty conditions will be void. The following safety instructions relate to the machine only. There may also be legal requirements placed on the owner/operator, such as appropriate food hygiene and work safety. • Only use the machine when you have read and understood the instructions in full. • Only operate the machine observing all information and guidelines in these instructions. • Keep these instructions at the place of use of the machine. 28429 • 20150501 5 1 2 Technical data 2.2.3 Correct use 3 Technical data • The machine can be damaged due to water 2 3 • • • • • • • • • penetration. The machine is not protected against jets of water. Protect the machine against water and and spraywater. ͵͵ Never hose down the machine with water. ͵͵ Do not use any water jets, high pressure or steam cleaners to clean the machine. ͵͵ The machine is not suitable for installation on a surface where a water jet might be used. When the machine is unattended for extended periods, switch it off at the main switch and close the water tap. Never open the covers unless explicitly instructed to do so. Similarly, never remove bolts and the housing parts attached using them. When touching live parts there is a danger of death due to electrical voltage. Never reach into a machine opening when the machine is running. Do hold any body parts under the outlets when hot liquids or steam is being dispensed. This occurs in the following situations: ͵͵ after switching on, ͵͵ when beverages are being dispensed, ͵͵ during automatic cleaning, ͵͵ during rinsing operations (e.g. when switching off) Do not touch any hot parts. When products are being dispensed, there is a risk of scalding from the actual products. Always take care when handling hot beverages. Take note of any visible damage or malfunctions. Obvious malfunctions include water leaks, odours and heat formation, unusual noises as well as error messages on the display. In the event of any unusual situations: ͵͵ Remove the mains plug, ͵͵ Turn off the water supply, ͵͵ Contact customer service, ͵͵ Have the machine checked and serviced by customer service. Clean the machine at least once per day, especially the parts transporting milk. Impurities could cause health problems. Comply with all intervals for cleaning, inspection and maintenance, as specified in the instructions. Otherwise, the safety, functional reliability and durability may be impaired. 6 Machine specifications Dimensions (W x D x H) 300 x 580 x 715 mm Weight approx. 60 kg Coffee supply 2 x 3 l / 2 x approx. 1000 g Instant supply 1 x approx. 1300 g Coffee grounds drawer capacity For approx. 30 portions Operating data Hourly output approx. 20 l hot water or approx. 100 cups of café crème Permissible ambient temperature + 5-30 °C Permissible air humidity < 80% non-condensing Connections Power supply 200-240 V, 50-60 Hz Power consumption 2175-3040 W Factory-installed fuse 16 A (required) Connection 1.8 m mains cable with shock-proof mains plug Fresh water connection G ¾" outer thread Fresh water pressure At least 0.25 MPa (2.5 bar) at approx. 2 l/ min., a pressure reducer is required for static pressures of 0.6 MPa (6 bar) and above Fresh water carbonate hardness 1-3 °dKH no action required, 4 °dKH and above: decarbonisation system required (e.g. Brita Purity), less than 1° dKH: consult manufacturer Waste water connection At least DN 25 ‑ NW 1" Noise level < 70 dB(A) 28429 • 20150501 Installation 4 Installation The machine and all attachments are set up and installed by customer service ready for use. Only permit changes to the installation or positioning to be carried out by customer service due to the associated hazards. 4.1 Prerequisites Make sure that the following prerequisites are met before you use the machine and any attachments: 4.1.1 Water connection The water connection must be easy to turn off at any time during operation (stop valve). For the connection of this machine to the water supply, all national regulations must be observed as appropriate, e.g. EN 61770. The limit values for water pressure and carbonate hardness as given in the technical data must be observed. 4.1.3 Installation location The machine must only be installed and used in closed dry rooms, it must not be operated outdoors. The effects of humidity and temperature may adversely affect the function and safety of the machine. The machine and all attachments may only be installed or stored at locations safe from freezing. The installation location must provide adequate clearances from walls and objects due to heat formation and to operate the machine. Distances To the back At least 5 cm To the top At least 20 cm For self-service operation the machine must be installed in such a way that it can be permanently monitored by instructed personnel. Only use a new tube set. Old or used tube sets are not permitted to be re-connected. The machine and all attachments must be in a horizontal position and free of vibration. Adjustable machine feet are available for alignment on slightly uneven surfaces. The water drain is only permitted to be installed via a permanent connection with odour trap protected against blockages and backflow. This prevents contamination in the machine due to backflow waste water. 4.1.4 4.1.2 Extraneous matter such as pieces of wood, stones or metal, etc. must be removed to prevent damage to the grinder. Electrical connection The supply voltage must match the specifications on the nameplate. The supply line must be fuse-protected by the customer using a fault current circuit breaker (FCCB) (max. 30 mA). Product material Coffee beans must be suitable for use in commercial coffee machines. Ground coffee or instant powder must be suitable for use in commercial coffee machines. Only use dry and loose material without clumps. When connected via a mains plug, the socket must be easily accessible during operation to allow the plug to be removed in the event of an error. Due to the high load, a single socket is required for the machine and each attachment. 28429 • 20150501 7 4 Installation 4.2 Canister operation (option) If your machine cannot be permanently connected to the freshwater and waste water system, you can also operate it with two canisters. Also observe the limit values for the water carbonate hardness in this process. Where necessary, the freshwater supply must be topped up via the water filter (e.g. BRITA-Purity). The canisters are only permitted to be installed by customer service. Note Particular care with hygiene is required for canister operation. Observe the relevant notes in Chapter 8.5 on page 23. 4 In daily operation the freshwater canister must be filled with sufficient water and the waste water canister can be drained as necessary. 4.2.1 Filling the freshwater canister 1. Unfasten the quick-connect coupling of the infeed tube (1). ͵͵ Move the ring backwards on the coupling piece. ͵͵ Remove the plug connector from the coupling piece. 2. Unscrew the cover from the canister. 3. Clean the canister and its cover area before filling with standard dishwashing agent and rinse the cleaning residues thoroughly. 4. Fill the canister with fresh water. ͵͵ Observe the limit values for the water carbonate hardness. Where necessary, the freshwater supply must be topped up via the water filter (e.g. BRITA-Purity). 5. Screw the cover back onto the canister. 6. Connect the supply tube (1) to the canister. ͵͵ Fit the plug connector onto the coupling piece. ͵͵ Check that the plug connection is secure. 99 The fresh water canister is ready for operation. 4.2.2 Emptying the waste water canister 1. Remove the discharge tube (2) from the canister cover. 2. Unscrew the cover from the canister. 3. Empty the canister. 4. Screw the cover back onto the canister. 5. Insert the discharge tube (2) through the hole in the canister cover. 99 The waste water canister is ready for operation. 1 000112 2 Fig. 2: Canister operation 8 28429 • 20150501 Operation 5 Operation Once the activation process is complete, the products that can be dispensed are shown on the display. Initial commissioning is carried out by customer service. If you want to put the machine back into operation following a standstill, carry out a cleaning operation as described (see Chapter 8 on page 21). 5.1 99 The machine is ready for operation. Note After switching on the machine, the fill levels of the supply containers must be checked. If necessary, the supply containers must be filled and the fill levels confirmed. Switching the machine on and off In daily operation it is sufficient to switch the machine on and off via the control unit only. 1 3 2 000107 000115 5 Fig. 3: Switch on the main switch Fig. 4: Open basic menu 1. Check that the water tap is open. 2. Open the machine door (3) using the machine key (1). 3. Switch the machine on (2). 4. Close the machine door (3). 1. On the control unit, press the button until the basic menu is displayed. ͵͵ A password must be entered first according to the operating mode. The activation process is started and takes a few minutes. CAUTION Risk of burns on the beverage outlet! Hot water runs out of the beverage outlet when the lines are rinsed. • Do not reach underneath the outlets. The functions "Turn ON" and "Turn OFF" are actuated via the same button. 1 Turn ON Hopper fill levels Switch OFF milk system Switch OFF instant system The lines are rinsed. Additional options The machine is heated to the required temperature. The required temperature is built up in the steam boiler. 28429 • 20150501 000108 Login Fig. 5: Switch on the machine 2. In the basic menu, press the button (1). ͵͵ When switching on, the machine is switched on. ͵͵ When switching off, the machine goes to standby mode. 9 Operation Note For hygiene reasons, it is only permitted to switch off the machine when cleaned. Always use the "Clean and switch OFF" function. The "Turn OFF" function is only permitted to be used if a cleaning process has been carried out and no further products have been dispensed. 5.2 Filling Note After each filling of a supply container, the fill levels in the machine must be confirmed (see Chapter 5.3 on page 12). 5.2.1 Filling the coffee supply There will be one or two bean containers depending on the model. Clean and switch OFF button until the 1. On the control unit, press the basic menu is displayed. ͵͵ A password must be entered first according to the operating mode. 2. Select the "Cleaning" function. ͵͵ The remaining procedure is described in Chapter 8.6.2 on page 23. 2 99 The cleaning programme has been carried out. The machine is then switched off. 000102 5 1 For an extended standstill If the machine will not be used for an extended period, close the water tap and switch off the main switch. Note For hygiene reasons, it is only permitted to switch off the machine when cleaned. If you want to take the machine out of operation, contact customer service. 10 Fig. 6: Filling the bean container 1. Remove the cover on the bean container. 2. Fill the relevant beans into the corresponding bean container, e.g. espresso beans in container 1 (1) and coffee beans in container 2 (2). 3. Re-fit the lid. 99 The bean container has been filled. 28429 • 20150501 Operation To simplify filling, the relevant container can be removed. 5.2.2 Filling the instant powder (option) NOTE Damage to the instant container cover! The lid on the instant container cover cannot be removed. Trying to remove the lid could damage the cover. Only open the container cover with the machine key. 1 000103 2 1 2 1. 2. 3. 4. 5. 6. Remove the cover on the bean container. Turn the lever (1) a ¾ turn anticlockwise. Remove the bean container (2). Fill the coffee beans into the bean container. Re-fit the bean container back onto the machine. Turn the lever (1) a ¾ turn clockwise back to the original position. 7. Re-fit the lid. 000104 Fig. 7: Removing the bean container Fig. 8: Open the instant container cover 1. Open the cover (1) using the machine key (2). 2. Carefully lift the cover upwards. 99 The bean container has been filled. 2 000105 1 Note After each filling of the coffee supply, the coffee grounds drawer should also be emptied (see Chapter 5.4 on page 13). Fig. 9: Fill instant container 3. Turn the powder chute (2) upwards so that no powder can fall out. 4. Remove the instant container (1). 5. Remove the lid on the instant container. 6. Fill instant powder into the container. ͵͵ Ensure that the powder is not compressed. 7. Re-fit the lid. 28429 • 20150501 11 5 Operation 8. Re-fit the instant container. 9. Turn the powder chute downwards to direct it into the mixer unit. 10. Carefully fold the cover downwards. 11. Lock the cover with the machine key. ͵͵ The prompt "Rinse instant mixer" appears on the display. 12. Press the "Rinse instant mixer" button. ͵͵ Any remaining powder is rinsed out. 99 The instant container has been filled. 5.2.3 Filling the milk (option) 5.3 Confirming fill levels After each filling of a supply container, the fill level must be confirmed via the basic menu. button until the 1. On the control unit, press the basic menu is displayed. ͵͵ A password must be entered first according to the operating mode. 2. Press the "Hopper fill levels" button (1). The "Hopper fill levels" submenu is displayed. 3. Press the relevant button to confirm the fill levels: ͵͵ "Bean hopper 1 full" for bean container 1 ͵͵ "Bean hopper 2 full" for bean container 2 ͵͵ "Instant full" for instant containers ͵͵ or "All containers full" for all containers. Turn ON Hopper fill levels Switch OFF milk system Rinse instant mixer Pre-heating brewing system 000106 2 Cleaning Additional options Login 2 Fig. 10: Filling the milk container 1. Open the door of the refrigerator. 2. Fill the milk container (2) with pre-cooled milk or prepare a container filled with pre-cooled milk. 3. Fit the milk suction tube (1) into the container. 4. Close the door of the refrigerator. Switch OFF instant system 000109 1 5 1 Fig. 11: Confirming fill levels 4. Exit the settings by pressing the button (2). 99 The basic menu is displayed and the fill levels are confirmed. 99 The milk supply has been filled. The menu is closed by pressing the 12 button again. 28429 • 20150501 Operation 5.4 5.5 Emptying the coffee grounds drawer The coffee grounds drawer must be emptied when the coffee grounds cannot be disposed of via the optional container. When the coffee grounds drawer is nearly full or full, this is displayed via the following symbols: When the grounds drawer is full, no more products containing coffee can be dispensed. The products are removed from the display. Switching the milk system on and off (option) Use the "Switch OFF milk system" function if you do not want to dispense milk products or if you want to take the milk preparation system out of service temporarily. One application would be, for example, that in canteen operation the milk system is cleaned and shut down for close of business to prevent germs. Before switching off the milk system, the cleaning programme must be run each time (see Chapter 8.6.2 on page 23). button until the 1. On the control unit, press the basic menu is displayed. ͵͵ A password must be entered first according to the operating mode. Turn ON Hopper fill levels Switch OFF milk system Rinse instant mixer 2 3 4 Cleaning Switch OFF instant system Additional options Login Fig. 12: Emptying the coffee grounds drawer 1. 2. 3. 4. 5. 6. 7. Swivel the steam lance (1) (if present) forwards. Pull the beverage outlet (3) fully upwards. Open the coffee grounds door (2) by touching. Remove the coffee grounds drawer (4). Empty the coffee grounds into the household waste. Re-fit the coffee grounds drawer (4). Close the coffee grounds drawer (2). After removing the coffee grounds drawer, the following symbol is displayed: The coffee grounds drawer is not inserted or is incorrectly inserted. The symbol is displayed until the grounds drawer has been correctly re-inserted. If the the coffee grounds drawer has been removed for longer than three seconds, a prompt to confirm whether or not the grounds drawer has been drained appears after being re-inserted. Fig. 13: Switch OFF milk system 2. Press the "Switch OFF milk system" button (1). ͵͵ All products containing milk are removed from the display. Note The products are only available again once the milk system has been switched back on again. 3. In the basic menu, press the "Switch ON milk system" button. ͵͵ After switching on the milk system, the prompt "Switch ON milk system?" appears. If switched on, the milk system is rinsed. 4. Fill the milk as described in Chapter 5.2.3 on page 12. 99 The milk system is ready for use. 8. Confirm the prompt by pressing the "Yes" button. 99 The coffee grounds drawer has been emptied. 28429 • 20150501 5 000128 1 000117 Pre-heating brewing system 1 13 Dispensing products 5.6 Switching the instant system on and off (option) Note Before dispensing products, all supply containers must be inserted and filled as otherwise no more products can be dispensed. button until the 1. On the control unit, press the basic menu is displayed. ͵͵ A password must be entered first according to the operating mode. Once the machine has heated up, the products are shown on the display that can be dispensed. Products that are not available due to a fault are not shown on the display. Hopper fill levels Rinse instant mixer Pre-heating brewing system Switch OFF milk system Switch OFF instant system Cleaning CAUTION Risk of burns due to hot products! Contact with the product dispensed can result in burns. • Do not reach underneath the outlets during operation. 1 6.1 Additional options 000129 Login Fig. 14: Switch OFF instant system 6 Dispensing products Use the "Switch OFF instant system" function for the situation where no instant products are being dispensed or you want to take instant preparation out of service temporarily. Turn ON 5 6 2. Press the "Switch OFF instant system" button (1). ͵͵ All instant products are removed from the display. Note The products are only available again once the instant system has been switched back on again. Setting for product dispensing Depending on the settings by customer service, the following presets are possible for product dispensing: Touch operation Dispensing is carried out for as long as the button is held down. Rest operation Dispensing of the set quantity. Stop mode Dispensing is carried out until the cancel button is pressed or the maximum preset quantity is reached. 3. In the basic menu, press the "Switch ON instant system" button. ͵͵ After switching on the instant system, the prompt "Switch ON instant system and rinse instant mixer?" appears. If confirmed with "Yes", the mixer unit is rinsed. CAUTION Risk of burns on the beverage outlet! Hot water runs out of the beverage outlet when the mixer unit is rinsed. • Do not reach underneath the beverage outlet. 4. Fill the instant powder as described in Chapter 5.2.2 on page 11. 99 The instant system is ready for use. 14 28429 • 20150501 Dispensing products 6.2 Dispensing coffee, coffee and milk, and milk products 6.3 Dispensing hot water (option) Note If there is no hot water lance fitted, hot water is also dispensed via the beverage outlet. 1 1 000110 2 2 1. Push the drink outlet (1) upwards so that the required cup fits underneath. 2. Position the cups, pots or glasses onto the drip grid (2). 3. Move the beverage outlet downwards until just over the cup edge. 4. Press the button on the control unit next to the product displayed. 99 The product is dispensed. 28429 • 20150501 000111 Fig. 15: Dispensing products Fig. 16: Dispensing hot water 1. Position the cup underneath the hot water lance (1) on the grip grid (2). 2. Press the button on the control unit for dispensing hot water. 6 99 The product is dispensed. 15 Dispensing products 6.4 Dispensing steam (option) 6.5 CAUTION Risk of burns due to hot steam lance! Contact with the steam lance and steam can result in burns. • Only grip the steam lance on the handle during operation. • Only touch the steam lance with bare hands when cleaning. Dispensing a double product If this function is approved by customer service, you can request two portions of a coffee/milk product and fill two cups simultaneously. 1 6 1 1 2 2 000113 000125 2 Fig. 17: Dispensing steam Fig. 18: Dispensing a double product 1. Hold the cup for frothing milk underneath the steam lance (2). ͵͵ Only grip the steam lance on the handle (1). 2. Press the button on the control unit for dispensing steam. 3. Remove the cup underneath the steam lance after frothing. 4. Then press the button for steam dispensing again to blow out the steam line. 5. Clean the steam lance from outside immediately with a clean and dry cloth to remove milk residues. 1. Position a cup (2) in the centre underneath one dispensing nozzle each (1). 2. Press the button on the control unit for the required product twice briefly. 16 The symbol for selecting a double product is shown on the display. 99 Two portions of the required product are dispensed. 28429 • 20150501 Dispensing products 6.6 Multiple dispensing of a single product If this function has been approved by customer service, multiple portions of a coffee/milk product can be requested as necessary and dispensed directly in sequence. The advantage of multiple dispensing is that you do not need to select the product again for every subsequent portion. 6.7 Preparing coffee from coffee powder The manual coffee chute can be used to prepare coffee from coffee powder without removing beans from the bean container. This is normally used to prepare decaffeinated coffee. Another type of coffee powder can normally also be added via the chute, however. 1. Position a cup underneath the beverage outlet. 2. Press the button on the control unit for the required product multiple times in succession depending on the number of portions you want to dispense. 1 3. If a portion has been dispensed, put the cup to one side and place another cup underneath the beverage outlet. Note When you press the cancel button, the product started is still dispensed and the dispensing of other products is cancelled. 99 The multiple dispensing operation is complete. 000114 The symbol for multiple product dispensing is shown on the display and the preselected number of portions is displayed. The portions are prepared and dispensed in succession. Fig. 19: Fill coffee powder 1. Press the product button on the control unit for the manual coffee addition. The symbol for the manual coffee addition is shown on the display. 2. Open the flap (1). 3. Add a heaped dosage spoon (approx. 8-9 g) of coffee powder via the chute. ͵͵ Do not fill too much coffee powder into the chute. Otherwise, the machine cancels the operation with an error message. The coffee powder is dispensed via the coffee grounds drawer. 4. Close the flap (1). 5. Confirm the filling process using the "OK" button. 99 The coffee addition is confirmed and the product is dispensed. 28429 • 20150501 17 6 Settings 7 Settings 7.2 The machine is preset to ensure that it is ready for immediate use for normal operation. Activating manager operation Manager operation gives you access to advanced settings. The functions described here are only accessible if enabled by customer service. Note Press the button next to the relevant display to select a function or to change the setting. 1 Manager Service 7.1 Open basic menu 000126 Login 2 Fig. 21: Login 000115 1. 2. 3. 4. In the basic menu, press the "Login" button (2). Press the "Manager" button (1). Enter the password to log in as a manager. Confirm the addition with the "OK" button. ͵͵ The basic menu is displayed. 99 Manager operation is activated. Fig. 20: Exit basic menu 7 button until the Note A password must be entered first according to the operating mode. 2. First enter a password in self-service operation. In waiter operation, the basic menu can be selected directly. 99 The basic menu is ready for selection. The menu is closed using the button. 7.2.1 Open the "Additional options" menu In the "Additional options" menu you can change the settings according to your needs. Turn ON Rinse instant mixer Pre-heating brewing system Cleaning Login Hopper fill levels Switch OFF milk system Switch OFF instant system Additional options 1 000116 1. On the control unit, press the basic menu is displayed. Fig. 22: Basic menu 1. In the basic menu, press button (1) to open the "Additional options". 18 28429 • 20150501 Settings 7.2.2 Manager Displaying info In the "Info" menu you can display various information. 1. Select the "Info" menu. 2. Select a submenu. Info ›› Filling levels ›› Products ›› Operating parameters ›› "General" submenu Enter 000127 Esc Fig. 23: Additional options in manager operation 99 The available options are displayed. Note With limited user rights (Login as User), the "Additional options" menu only contains the "Info" submenu. Menu option Display Machine software Installed software version Date/Time Set time and date Cleaning times Set times for automatic cleaning Water filter Residual capacity of the water filter in litres and date for filter changes 2. Select an option to open the relevant submenu. "Product counter" submenu Making a selection and changing values Here you can read off the total of all products prepared overall. It is also possible to read off how often a single product was prepared on that day. 3. Press one of the adjacent buttons to select the required function and change the settings. ͵͵ Use the "" buttons to select the required option. ͵͵ Use the "Enter" button to open the selected submenu or function. ͵͵ Use the "Esc" button to cancel the setting and return to the last selection. ͵͵ Change the values using the "+/-" buttons. ͵͵ Use the "" buttons to select the point to be changed. Saving or rejecting changes ͵͵ Use the "Enter" button to save your settings. ͵͵ Use the "Esc" button to reject the settings and return to the previous menu level. button to close the menu. 4. Press the 99 The settings have been made and the menu is closed. 28429 • 20150501 1. Select the relevant product. ͵͵ The total and the daily total are displayed. 2. Press the "Clear" button to reset the daily total displayed for the product selected. 99 The product statistics is read off or the daily counter reset. 7.2.3 Changing fill levels to intermediate values Instead of confirming the fill levels of the containers, it is also possible to set intermediate levels. 1. 2. 3. 4. Select the "Filling levels" menu. Select "Bean hopper 1", "Bean hopper 2" or "Instant". Change the fill levels using the "+/-" buttons. Press the "Enter" button to save the settings. 99 The new fill levels have been saved. 19 7 Settings 7.2.4 Changing the displays and lighting Changing products Here you can change the values for the product components. 1. Select the "Products" menu to display a list of all products. 2. Select the product to be changed. 3. Press the "Enter" button to select the product. 4. Press the "Enter" button again to edit the product. 5. Select the component to be changed (e.g. coffee grounds) or the value to be changed (e.g. price, article number). 6. Change the values for the product using the "+/-" buttons. 7. Press the "Enter" button to save the settings. 99 The values for the product components are saved. 7.2.5 Changing operating parameters 1. Select the "Operating parameters" menu. 2. Select one of the menu options below: Menu option Function Display • Brightness Setting for the operating mode • Brightness (Standby) Setting for standby mode Spout lighting • Brightness Infinite setting of the brightness Front lights Switching the accounting on or off (option) • Color Here you can switch the accounting system on or off globally assuming an accounting system is connected. Switching between red, green, blue or RGB colours • Brightness Infinite setting of the brightness Note Whether or not a product is chargeable is set for the relevant product in the "Products" menu. 7 The "+/-" buttons can be used to change the contrast and the brightness of the display as well as the colour of the lighting. 1. Select the "Operating parameters" menu. 2. Select the "Billing" submenu. 3. Select one of the menu options below: Menu option Function Off Switch off the accounting system. On Switch on the accounting system. Free of charge Switch on the accounting system without charging for the product. • RGB (Only displayed if Individual mixing of the RGB has been selected colours first under "Color".) 3. Press the "Enter" button to save the settings. 99 The changed settings for the display and lighting have been saved. 4. Press the "Enter" button to save the setting. 99 The setting for the accounting system has been saved. 20 28429 • 20150501 Cleaning 8 Set times 1. Select the "Operating parameters" menu. 2. Select the "General" submenu. 3. Open the menu option you want to change. ͵͵ Use the "" buttons to select the point to be changed. ͵͵ Change the value using the "+/-" buttons. ͵͵ The Esc button is used to reject the setting. ͵͵ The "Enter" button is used to confirm the setting. Menu option Function Cleaning time 1 or 2 Change the time for the automatic cleaning prompt on the display. If the cleaning prompt is to only appear once a day, the first and second cleaning operations must have the same times set. Date/Time Set time and date. Daylight saving time Select between "Automatic" and "No". 4. Press the "Enter" button to save the settings. Cleaning Clean the coffee machine carefully in accordance with the following specifications to maintain the value and hygiene of the machine. Note The following website provides all specific information on the machine and cleaning agents: www.planerhandbuch.de 8.1 Safety measures DANGER Risk of fatal electric shock! Danger of death when touching live parts. • Never open covers unless explicitly instructed to do so. • Never remove bolts and the housing parts attached using them. • Do not clean the machine or the installation are of the machine with a water jet, high pressure or steam cleaner. • Never hose down the machine with water. • Only clean the machine with a damp cloth. 99 The changed times have been saved. NOTE Machine damage! Water penetration can damage the machine and cause a short circuit. • Do not clean the machine or the installation are of the machine with a water jet, high pressure or steam cleaner. • Never hose down the machine with water. • Only clean the machine with a damp cloth. 28429 • 20150501 21 7 8 Cleaning 8.2 8.4 Interval Which parts? How to clean After every use Steam lance Dispense steam for approx. 2 seconds, then clean with a clean, dry cloth. Daily (1) Milk and brewing system Start cleaning programme Daily Instant system Clean Daily Coffee grounds drawer Clean Daily (1) All systems/parts that have been used at least once. Clean with a clean, damp cloth. 1x weekly (1) Beverage outlet Clean thoroughly with a clean, damp cloth; use a damp brush if necessary. Following an extended standstill Milk and brewing system Start cleaning programme. As required (once a month) Bean and instant containers Clean As required (once a month) Housing parts • Surfaces, plastic parts, painted surfaces Clean externally with a clean, damp cloth. (1) 8 Cleaning intervals Cleaning agent Only use the cleaning agents given as these are optimal for the automatic cleaning programme: • Coffee cleaning tabs (art. no. 24718) • Milk cleaner liquid concentrate (RFM) (art. no. 24720) CAUTION Damage to health due to cleaning agents! The components of the cleaning agent may irritate eyes and skin, and be harmful to health if inhaled or swallowed. • Always keep cleaning agents out of the reach of children. • Only use cleaning agents given in the instructions, otherwise the legal warranty will become void. • Wear gloves. • Observe warning notes on the cleaning agent containers. • Observe the recommended usage quantity. More often with greater contamination. 8.3 Cleaning prompt and dispensing lock If cleaning if required (e.g. one of the programmed cleaning times has been exceeded), the cleaning prompt flashes on the display. Products can then only be dispensed for a limited time or number of products. If no cleaning work is carried out, the product dispensing is then locked. The products are no longer displayed and cannot be dispensed. To reset the cleaning prompt or dispensing lock, the machine must be cleaned. 22 28429 • 20150501 Cleaning 8.5 When using canisters 1. Empty both canisters daily. ͵͵ Do not leave any water residue in the canisters; even fresh water quickly becomes contaminated. 2. Also observe the limit values for water carbonate hardness during canister operation. ͵͵ Where necessary, the freshwater supply must be topped up via a water filter (e.g. BRITA-Purity). 3. Before filling the fresh water canister and its lid area, clean with standard dishwashing agent and rinse the cleaner residues thoroughly. 4. Also clean the waste water container on a daily basis with rinsing agent to avoid odours forming due to organic residues in the waste water. 5. Clean the filter sieve in the freshwater canister as necessary (at least once a month). ͵͵ The filter housing is located on the inside of the lid. ͵͵ Unscrew the narrow housing cap on the bottom end of the filter housing with the FEP tube and rinse the mesh insert. 6. Ensure that the fresh water canister is filled with sufficient water and that the waste water canister is empty before you start the cleaning programme. 8.6 8.6.2 Running the cleaning programme CAUTION Risk of burns! There is a risk of burns on hot components or due to hot liquids. • Do not hold any body parts underneath the beverage outlet when the cleaning programme is running and the rinsing processes. • Note that the water in the drip tray may be hot. Preparatory activities (option) The preparatory activities must only be carried out when a milk system is present and has been used. 1. Damp-clean the milk tube coming out of the machine. 2. Clean the inside of the refrigerator (if present) the door and the door seals with a standard cleaning agent. ͵͵ Leave the door open during the complete cleaning work. Condensate may otherwise form that could result in impaired function. Daily cleaning No product dispensing is possible during cleaning. The product dispensing can be continued only after the cleaning programme has been ended and all containers have been re-fitted. Cleaning the grounds drawer The coffee grounds drawer must be cleaned when the coffee grounds cannot be disposed of via the optional container. 1. Empty the coffee grounds drawer as described in Chapter 5.4 on page 13. 2. Clean the coffee grounds drawer. ͵͵ Rinse the grounds drawer with water. ͵͵ For stubborn contamination, the grounds drawer can be cleaned in the dishwasher at max. 60 °C. 3. Wipe the insert compartment of the grounds drawer with a damp cleaning cloth. 4. Re-insert the coffee grounds drawer. 5. Follow the instructions on the display. 000119 8.6.1 1 Fig. 24: Cleaning container 3. Replace the milk container with the empty cleaning container (1). 4. Fit the milk hose into the cleaning container. 99 The coffee grounds drawer has been cleaned. 28429 • 20150501 23 8 Cleaning Start cleaning programme The machine cleaning programme primarily runs automatically. button until the 1. On the control unit, press the basic menu is displayed. ͵͵ A password must be entered first according to the operating mode. 2. Select the "Cleaning" function. ͵͵ The cleaning menu is displayed. If prompted to clean the instant system first, carry this out first (see Chapter 8.6.3 on page 25) and then confirm the complete re-fit. If a system has already been cleaned, this part of the cleaning programme is skipped automatically. If both systems have already been cleaned, a prompt is displayed as necessary as to whether or not to carry out cleaning anyway. ͵͵ If confirmed with "Yes", both systems are cleaned. ͵͵ If confirmed with "No", neither system is cleaned. The machine is then switched off or depending on the selection, it goes back to operational readiness mode. Clean and switch OFF Clean milk system (option) Intermediate cleaning 000118 Login Fig. 25: Cleaning menu 3. Select an option. 8 Menu option Function Clean and switch OFF Have the milk and brewing system cleaned; the machine will then switch off. Intermediate cleaning Have the milk and brewing system cleaned; then continue operating the machine. The following messages may be displayed before the cleaning menu: The capacity of the water filter has been exhausted: have the water filter replaced by customer service. Only applies to grounds drop in the container: empty the container as necessary. 1. Create a cleaning solution. ͵͵ Mix ½ litre (500 ml) of cold water with 25 ml of the RFM cleaner. 2. Fill the cleaning container with the prepared cleaning solution. 3. Fit the milk hose into the cleaning solution. 4. Confirm the "Milk cleaner prepared" prompt shown on the display with "OK". ͵͵ The milk system is then cleaned. ͵͵ After rinsing, the "Rinsing pitcher filled with clean water?" prompt is displayed. CAUTION Health risk! Cleaning residue could be harmful to health. • The milk system must be rinsed with clean water. 5. Empty the container with the cleaning solution and rinse out the container. 6. Fill ½ litre (500 ml) of clear water into the container. 7. Insert the milk hose into the water. 8. Confirm the prompt with "OK". ͵͵ The milk system is then rinsed with clean water. 99 The milk system is cleaned. Note Continue reading the next page to continue cleaning. 4. Press the "OK" button after completing the work. 24 28429 • 20150501 Cleaning Clean brewing system 8.6.3 Cleaning the instant system 1. Open the machine door using the key. 2. Lift the instant container cover upwards. 3. Carry out the steps as described below. Removing the mixer unit 000120 1 1 Fig. 26: Cleaning tablet The "Drop in cleaning tablet" prompt is displayed. 1. 2. 3. 4. 2 Open the flap (1). Place a cleaning tablet into the chute. Close the flap (1). Confirm the prompt with the "OK" button. ͵͵ The brewing system begins with the automatic cleaning. ͵͵ The cleaning process takes a few minutes. 3 4 5 6 99 The brewing system is cleaned. 000121 The machine is then switched off or depending on the selection, it goes back to operational readiness mode. Fig. 27: Mixer unit Final activities 1. Clean the outlet area after the automatic cleaning process is complete. See Chapter 8.8 on page 28. 2. Place a container with pre-cooled milk into the refrigerator if continuing to operate the machine directly. 3. Place the milk hose into the milk container. 99 The cleaning of the milk and brewing system is complete. 28429 • 20150501 1. Turn the powder chute (2) upwards so that no powder can fall out. 2. Remove the instant container (1). 3. Remove the powder chute (2). 4. Remove the hose (6) on the mixer unit and on the beverage outlet. 5. Turn the mixer flange (5) anticlockwise until the arrow is on the "lock open" symbol. 6. Remove the entire mixer housing (4) forwards. 7. Remove the cover (3). 25 8 Cleaning Assembling the mixer unit Assembly is carried out in the reverse order as the removal process. 2 000122 1 Fig. 28: Removing the mixer impeller 1 2 99 The mixer unit has been removed. Cleaning the mixer unit 1. Clean all parts thoroughly with hot water and a cleaner suitable for milk products. ͵͵ Dishwater cleaning is possible at max. 60 °C. 2. Rinse all parts thoroughly with clean water. 3. Dry the parts in full. ͵͵ To avoid the instant powder forming clumps, the parts must be absolutely dry. 4. Damp-clean the area around the axle. ͵͵ This is the area where the mixer impeller is located. 000123 8. Remove the mixer impeller (1) from the axle either by hand or using the removal tool (2) provided. Fig. 29: Fit the mixer impeller 1. Insert the mixer impeller onto the axle as far as it will go. ͵͵ Note that the flattened side (1) matches up with the arrow (2) on the mixer impeller. 1 99 The mixer unit has been cleaned. 2 8 3 4 6 000121 5 Fig. 30: Mixer unit 2. Re-fit the cover (3). 3. Fit the mixer unit (4). 4. Turn the mixer flange (5) firmly in the clockwise direction until the arrow is pointing to the "closed lock" symbol. 26 28429 • 20150501 Cleaning 5. Fit the hose (6) fully onto the mixer unit and on the beverage outlet. ͵͵ Check that the tube is fitted securely. 6. Fit the powder chute (2) so that it is pointing upwards. ͵͵ Do not reach into the cleaned powder chute with your fingers. 7. Fit the instant container (1) onto the machine. 8. Rotate the powder chute downwards so that it projects into the mixer unit. 8.7 Cleaning the instant container NOTE Damage to the instant container cover! The lid on the instant container cover cannot be removed. Trying to remove the lid could damage the cover. Only open the container cover with the machine key. 99 The mixer unit has been installed. 8.6.4 Cleaning the bean container 1 2 000104 1 2 000103 Fig. 32: Instant container cover 1. Open the cover (1) with the key (2). 2. Lift the cover upwards. Fig. 31: Bean container 6. 7. 8. 9. Remove the cover from the bean containers. Turn the lever (1) a ¾ turn anticlockwise. Remove the bean container (2). Empty the bean container. Clean the parts in hot water with rinsing agent. ͵͵ Dishwater cleaning is possible at max. 60 °C. Dry the parts in full. Re-fit the parts. Turn the lever (1) by a ¾ turn back to the original position. Re-fit the lid. 99 The bean containers are cleaned. 1 8 2 Fig. 33: Instant container 3. Turn the powder chute (2) upwards so that no powder can fall out. 4. Remove the instant container (1). 5. Empty the instant container. 6. Clean the parts in hot water with rinsing agent. ͵͵ Dishwater cleaning is possible at max. 60 °C. 7. Dry the parts in full. ͵͵ To avoid the instant powder forming clumps, the parts must be absolutely dry. 99 The instant container has been cleaned. 28429 • 20150501 000105 1. 2. 3. 4. 5. 27 Maintenance 8.8 9 External cleaning Note Do not use any abrasive agents or sharp objects. • Clean the parts with a clean, damp cloth only. 1. Wipe down the plastic parts, painted surfaces and surfaces with a damp cloth. Maintenance In the event of any questions relating to servicing, maintenance and disposal, contact your dealer. Repairs and servicing work is only permitted to be carried out by Melitta customer service or by specialist personnel authorised by the manufacturer. 9.1 Safety measures WARNING Malfunctions! Important safety functions could be interrupted in the event of visible damage or malfunctions. Obvious malfunctions include water leaks, odours and heat formation as well as error messages on the display. In the event of a malfunction: • Remove the mains plug. • Switch off the water supply. • Have the machine checked and serviced by customer service. 2 3 1 000124 9.2 Fig. 34: External cleaning 2. Remove the drip grid (3). 8 9 CAUTION Risk of scalding! The water in the drip tray may still be hot. • Allow the water to cool down. 3. Wipe the drip tray (1) thoroughly. 4. Clean the beverage outlet (2) on the underside with a standard brush. 99 The external cleaning is complete. Intervals After every 30,000 cups or twelve operating months (depending on which comes first), the machine and all attachments must be maintained by customer service (chargeable). • Ensure that the maintenance work date is scheduled well in advance to avoid unnecessary wear. • Observe the intervals for changing the filter given in the manufacturer's instructions. • Replace the water filter every twelve months at the latest to prevent germs and water contamination. On request, the manufacturer offers a comprehensive maintenance contract that also ensures that all inspection and maintenance intervals are observed. The inspection of the system required by law to be carried out by the commercial operator must be carried out and documented every four years by an authorised electrical engineer for correct condition. This can only be carried out and certified by customer service (no further testing is required before the first commissioning process). 28 28429 • 20150501 Recycling and disposal 10 Recycling and disposal This machine and all attachments are designed and manufactured to permit environmentally friendly disposal. 10.1 Waste disposal The waste produced during brewing are organic only and are not therefore permitted to be disposed of in the normal household waste. 10.2 Waste water disposal The waste water produced during brewing and cleaning conform to the features of general household waste water and is not therefore permitted to be conveyed into the normal sewerage system. 10.3 Cleaning agent disposal The cleaning agents recommended in these instructions conform to legal regulations when used correctly and are not therefore permitted to be conveyed into the normal sewerage system with the rinsing water with no further measures. 10.4 Machine disposal This machine and all attachments contain high quality raw materials that should be recycled. Do not dispose of equipment in the household waste! For disposal, observe the appropriate national and regional laws and guidelines. 11 Displays Heating up Wait until the machine is heated to the required temperature. Water pressure too low Check that the water tap is open or if the filter in the freshwater supply is contaminated. Steam boiler pressure too low Wait until the machine has reached the required pressure. Bean container 1 empty Fill bean container and confirm new fill level. Bean container 2 empty Fill bean container and confirm new fill level. Cleaning prompt Clean the machine – only a few products can be dispensed at present. The symbol flashes. Forced cleaning Clean the machine – no products can be dispensed at present. The symbol is shown continuously. Cleaning active Wait until the cleaning programme has been completed. Both symbols appear alternating as an animation. Coffee grounds drawer almost full Only a few products can be dispensed at present. Empty the grounds drawer and confirm. Both symbols appear alternating as an animation. 10 11 28429 • 20150501 29 Displays Check grounds drawer The coffee grounds drawer is not inserted or is incorrectly inserted, or the chute is dirty. No products can be dispensed. This symbol appears alternately with the "Coffee grounds drawer almost full" symbols. Set time The time or date is not correctly set. Set the clock. Empty grounds container Only with grounds drop in the container: reminder to empty the container. Empty the container as necessary. Water filter worn out Have the water filter replaced by customer service. The milk system can only be switched on/off if it has been cleaned! Clean milk system This appears when the milk system is switched off for an extended period or if a non-cleaned milk system is switched off. Instant container cover open Close the instant container cover. Drop in cleaning tablet Insert a cleaning tablet into the chute for manual coffee addition. Coin slot Only in combination with a billing system: please insert the specified amount. No change given Only in combination with a billing system: currently no change is given. Insert the correct money only. Charging cancelled Only in combination with a billing system: there is no connection to the billing system (e.g. billing system off, no power supply, etc.). Chargeable products are not displayed. Please wait Manual coffee addition Add ground coffee into the chute for manual coffee addition. Too much ground coffee Too much ground coffee has been added. This symbol appears alternately with the "Confirmation required" symbol. The operation is cancelled when confirmed. Confirmation required Confirm the required action. Open the machine door Close the machine door. 11 Instant container empty Fill the instant container and confirm the fill level. 30 28429 • 20150501 Notes 28429 • 20150501 31 Melitta Professional Coffee Solutions GmbH & Co. KG • Zechenstr. 60 • 32429 Minden • GERMANY Phone: +49 571 5049-0 • Fax: +49 571 5049-233 • [email protected] • www.melitta-professional.de ® Registered trademark of a Melitta Group company. • 20150501 • Item no. 28429 Melitta macht Kaffee zum Genuss®