1
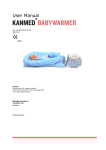
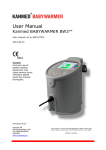
User Manual
Art. No BW-50-070/10
2010 05
0413
Caution
Please read this manual carefully.
Incorrect use of patient warming equipment
may cause patient injury.
Manufactured by:
KANMED AB
Sweden
Distributed by:
User Manual
BW-50-070/10
Contents
1
2
3
4
5
6
7
8
9
10
11
12
13
14
KANMED Baby Warmer - Quick instruction ..................................................................... 3
Safety Instructions ...................................................................................................... 4
General description ..................................................................................................... 5
Description of functions ............................................................................................... 8
Getting ready for the baby ........................................................................................... 8
Daily use and practical hints ......................................................................................... 8
Cleaning and maintenance ........................................................................................... 9
Alarm functions and indication .................................................................................... 11
Trouble shooting ....................................................................................................... 11
Safety systems available ........................................................................................... 12
Accessories, Spare parts and technical documentation .................................................. 13
Technical data ......................................................................................................... 14
Warranty ................................................................................................................ 15
Disposal .................................................................................................................. 15
NOTE: This manual is valid for all KANMED Baby Warmer of model KBW50 recognised by the blue silicone
rubber edges on the control unit.
This user manual contains important safety information and must be read carefully and shall be saved for
future reference.
KANMED Baby Warmer placed in the KANMED Baby Bed
A perfect combination
Page 2 of 16
User Manual
1
BW-50-070/10
KANMED Baby Warmer - Quick instruction
Always leave the unit switched on so that it is ready for the next baby!
Refer to the Users manual whenever in doubt. Se also the Baby Warmer Video “Handling Instructions”
Filling the water mattress
1. Use the filling tube to fill the water mattress with warm water (about 350C).
2. Fill to the level mark. Check by standing the water mattress upright. If the bed is to be tilted please read
chapter 3 Water Mattress, in the users manual.
3. Add one complete bottle of KANMED anti algae, preferably via the filling tube.
4. There must be no air in the water mattress. Place the water mattress on a flat surface. Grip the open mattress
nipple to lift the mattress up a bit and press all air bubbles out. Lower the nipple and close it.
Inserting the Heating Pad and Nest
1. Place the water mattress on a flat surface to insert the heating pad.
2. Turn the water mattress upside down and insert the Heating Pad in the pocket with its printed text towards the
water.
3. Turn the water mattress over again.
4. Insert the water mattress with heating pad into the nest pocket. Use the opening in the head end of the nest to
assist in fitting the Nest to the water mattress.
Preparing the bed
1. Ensure that the bed has holes in the bottom.
2. Place the Baby Warmer on the cot mattress.
3. Place the Baby Warmer in the KANMED Baby Bed or any other suitable bed.
4. Protect the Nest with a sheet that is soft but not too thick.
Connecting the Control unit
1. Connect the Heating Pad at the back of the Control Unit. Don’t over tighten.
2. Connect the power cable at the back of the Control Unit and switch it on.
3. Hang the Control Unit in a safe place where it can be seen.
4. Press the start button on the front panel and observe that it starts at 370C after a short self test.
Placing the baby
1. Only when the desired temperature is reached, you can place the baby in the nest.
2. Position the lightly dressed baby (diaper, long arm T-shirt, bare legs and a cap on very small ones) on its back
in the nest.
3. Adjust the nest size by pulling the string. Hide the cord under the mattress.
4. Cover the baby with suitable cover, such as 1-3 layers of cotton blankets.
Temperature setting
1. All babies are individuals and their temperature must be controlled frequently until you are familiar with the
baby’s reaction to the water temperature. Overheating is often caused by covering the baby too much.
2. 370C is a good starting temperature for slightly hypothermic babies and for babies weighing less than 1000g.
3. 36.50C is the most common temperature for babies weighing more than 1000g
4. As the baby’s weight increases, the temperature is primarily controlled by changing the amount of blankets that
cover the Baby and secondly by changing the temperature in 0.50C increments.
5. When the lightly dressed and covered baby is maintaining body temperature with a water temperature of about
35.5 - 360C, then the baby is most often ready for a standard cot that has no warming.
Maintenance
1. Wash the nest at maximum 900C. Preferably 600C. Dry tumble it. KANMED recommends you to change the
Baby Nest once a year.
2. Surface disinfect the water mattress and the heating pad
3. Change water every 3 months and add a new bottle of anti algae.
4.
See the user’s manual for further maintenance instructions and periodical safety checks.
Page 3 of 16
User Manual
2
BW-50-070/10
Safety Instructions
Please read this manual carefully and you will find the KANMED Baby Warmer to be easy and safe to use.
Intended use
The intended use of the KANMED Baby Warmer is to keep newborn and premature babies normothermic.
KANMED Baby Warmer BW50 is designed for hospital use only.
It must be used according to the instructions in this manual and according to established clinical routines
and by qualified personnel.
Explanation of symbols
Check users manual!
Risk of explosion if used in
presence of inflammable
gasses
Protection grade BF,
Defibrillator safe
Temperature selection
Button
Key to select temperatures
outside 35 – 370C
Called “Temp lock“ in text
Alarm button
To silence ∆T alarm for 10
minutes
∆T
Over temperature alarm
H2O
Indicates that the Water
Mattress is missing or in
the wrong position
Indicates Heating Pad fault
Certified by SEMKO
according to EN 60-601-1,
EN 60 601-1-2 ,
EN 60-601-2-35
CE0413
Technical failure in the
control unit
60
o
Indicates water temperature
deviation more than +/- 1 oC
from selected value
60
o
Can be centrifuged at low
speed
Fullfills MDD 93/42 EEC. ECType examination certificate
issued by a Notified Body
(0413= Intertech SEMKO,
Sweden)
Machine washable at
maximum 60 0C
Tumble-dry
No dry cleaning
I
O
On
Off
START / STAND-BY
Battery
Direct current
Equi potential connector
∼
Alternating Current
Abbreviation for KANMED
Baby Warmer 50W
IPX 1 Drip proof
Control unit BW-50
IPX 7 Water proof
Heating Pad
KBW 50
ETL approved for Canada/US! Note! only
labelled on units sold to Canada/USA
Page 4 of 16
User Manual
BW-50-070/10
General Safety instructions
•
•
•
•
•
•
•
•
Read this user’s manual carefully.
Please be aware that the acoustic alarm has a sound level of 55dBA (adapted for use in silent
environments).
Check each time the unit is started that it performs the self test as described in section 10. If the self
test is not performing as described, leave the unit to a qualified technician.
Don't fold or bend the Heating Pad sharply.
Only use Heating Pad BW-50-002 together with control unit BW-50.
Don't pull the Heating Pad cable or use it for carrying the Heating Pad.
Use only in hospitals and by qualified personnel.
Please be aware that use of HF surgical instruments, endocardial catheters or similar devices may
interfere with the BW-50 and may require special precautions regarding potential equalization etc.
Safety Instructions for KANMED Baby Warmer 50W
•
•
•
•
•
•
•
•
•
•
•
•
•
•
Always fill the Water Mattress to the required level before the unit is brought into use. Preferably fill
with lukewarm water at around 350 C.
Replace the Water Mattress every 3 years.
Always place the Heating Pad inside the pocket of the Water Mattress before you switch on the unit.
Make sure that the text side of the Heating Pad is turned towards the Water Mattress.
Make sure that there are at least 2 holes in the bottom of the bed. If feasible the connection cable to
the Heating Pad can be thread through a suitably placed hole.
Always place the baby with its head towards the closed semicircular part of the KANMED Baby Nest.
Make sure that the adjusting string is placed outside the Baby Nest to prevent it from interfering with
the baby.
Check the water temperature regularly.
Check the temperature of the baby regularly.
Continue to use appropriate monitoring of vital signs.
NOTE: A cold Water Mattress or a Mattress which is cooling down due to the heating being
switched off will decrease the temperature of the baby. Likewise, a too warm Water
Mattress can give the baby a fever.
Check the integrity of the KANMED Baby Nest so that the filling material does not leak out. Replace the
nest after one year of use.
When the unit is delivered it is factory clean but not sterilised. Please clean according to your standard
hospital routines.
Please note that the control unit BW-50 shall be placed horizontally on a flat surface or mounted with
the front end up - at a maximum angle of 45 degrees in order to fulfil the IPX1 water protection
requirements.
3
General description
The KANMED Baby Warmer consists of 4 major components:
•
•
•
•
Control Unit
KANMED Baby Nest
Heating Pad
Water Mattress
Page 5 of 16
User Manual
BW-50-070/10
Control Unit
The Control Unit can be connected to all existing mains power supply voltages (observe fuse change) and
frequencies or be battery powered from 12 - 24 Volts. See technical section.
The handle is designed so that the control unit can be safely hung on the edge of the bed or on the bed
frame.
Front Panel
1.
Indicators, not
selectable temperatures
Button for temperature
selection
Indicators,
selectable temperatures
Button for setting temperatures
outside the 35 - 37OC range
Indicator for Mains power
Indicator for battery power
Alarm indicators
On /Off, Start button
Silence alarm button
2.
3.
4.
5.
6.
7.
8.
9.
Rear Panel
1.
Earth potential
connection stud
Mains voltage
indicator
Fuse holder
Locker for
fuse holder
Heating Pad
connector
Mains switch
Mains socket
Connector for
external 12/24V battery
2.
3.
4.
5.
6.
7.
8.
The Heating Pad
Avoid bending the Heating Pad.
The design and construction of the Heating Pad has reduced magnetic and electrical fields to normal
background levels and thereby making them harmless.
The voltage to the Heating Pad is SELV (24V DC, Safe Extra Low Voltage).
See technical data for information about warming up times.
Explanation of the drawings on the Heating Pad
Please
1.
2.
3.
4.
5.
make them available while reading this
Heating Pad BW-50-002 may only be connected to Control Unit BW-50.
Never place a baby or a child directly on the Heating Pad.
The Heating Pad must be inserted in the pocket under the Water Mattress.
The correct amount of water is obtained by filling the Water Mattress to the level mark.
The Heating Pad must be inserted into the pocket of the Water Mattress with its illustrations facing
the Water Mattress. This is best done if the Water Mattress is placed upside down on a flat surface.
6. The Heating Pad and the Water Mattress shall not be exposed to sharp objects.
7. For cleaning and disinfecting see user’s manual.
8. The Heating Pad must be stored flat or rolled with a diameter of at least 10 cm (4"). Do not fold
Page 6 of 16
User Manual
BW-50-070/10
The Water Mattress
When filled to the level mark it contains about 4.5 litres of water. If you plan to tilt the bed then add 2 cm
of water. Fill by using the filling tube. Add Anti Algae every 3 months. Water molecules diffuse through the
material. This is normal. Therefore the water level should be checked regularly
NOTE: Do not tilt the Water Mattress if the temperature must be higher than 37OC. The very
sensitive over temperature circuit can alarm and switch off the warming.
When tilting during warming up, too little water will make the over temperature alarm go off.
Explanation of the drawings on the Water Mattress
9. The level mark on the Water Mattress indicates standard water amount. If tilting is required please
add 2 cm more water.
10. Place the Water Mattress in an upright position and fill it with the enclosed Filling Tube. When the
desired level has been reached, add Anti Algae carefully through the filling hole or via the Filling
Tube. Follow the caution instruction on the Anti Algae package. NOTE: Air pressure may build
while filling. Interrupt filling and release air if necessary.
11. Remove air bubbles, Very Important. Place the Water Mattress on a flat surface and lift the filling
hole 5 to 10 cm upwards. Press the air bubbles towards the hole repeatedly until all major air
bubbles are expelled.
12. Lower the filling hole while pressing the Water Mattress so that no air enters and insert the plug.
13. Turn the Water Mattress upside down and insert the Heating Pad in the pocket.
14. The Water Mattress and the Heating Pad is inserted into the KANMED Baby Nest.
The KANMED Baby Nest
Different types of KANMED Baby Nests are available. Please check with your supplier or on internet
www.KANMED.se
The KANMED Baby Nest is intended to prevent the baby from rolling off the water mattress, to facilitate
correct positioning and to create a tight and cosy environment around the baby.
By pulling the strings one can adjust the collar from being wide open and flat to become a tight raised wall
around the baby. The Baby Nest consists of a bag into which the Water Mattress and Heating Pad is
inserted.
Note: Check the Baby Nest regularly for damages. To reduce the risk of a nest splitting during washing we
recommend that the nest is used for only one year.
!
Page 7 of 16
User Manual
4
BW-50-070/10
Description of functions
Start and self test
Every time the Control Unit is switched on it performs a self test of all functions and the internal safety
circuits. (See chapter 10 for a detailed description of the self test). If the Control Unit does not detect any
faults, the warming will start automatically at a factory pre-set temperature of 37 OC.
That the Unit is warming is indicated by a temperature lamp being lit. (Wait about 10 seconds after start)
If the unit do not self test exactly as described in this manual- then you must not use it!
Warming can only start if no faults are detected.
Temperature indication and selection
The actual water temperature is indicated by a blinking lamp and the selected by a constantly lit lamp.
That the selected temperature is reached is indicated by a constantly lit temperature lamp.
The temperature lamps have different colours as described below.
Lamp Colour
Green
Temperature range
35 - 37 oC
Comment
Selected by pressing the temperature
button
Yellow
34, 34.5, 37.5 and 38 oC
Can only be selected if the temp lock
key is pressed and hold in at the same
time
Only for indication
20- 30 and 39-42 oC
Red
Symbol(s)
+
Alarms
Description and checks of the function of alarms is found in the technical section.
Stop the acoustic alarm by pressing the alarm button or switch the unit off by pressing the Start/ Stand By
button. Only ∆T can be cancelled for 10 minutes by pressing the alarm button.
Try to rectify the cause for an alarm (see section trouble shooting) and switch on the unit again.
If the alarm still goes on - contact a qualified technician.
5
Getting ready for the baby
Please follow the Quick Start instruction on page 3.
Ensure that all parts are available and in good condition.
See also the video “Handling Instructions”
Always place the KANMED Baby Warmer on the ordinary mattress of a baby cot or any other surface that is
heat insulating.
6
Daily use and practical hints
Always leave the unit switched on, even in the storage room, so that the water mattress is warm and
ready.
Delivery Wards
•
Use it for children that for different reasons have lost heat after the delivery.
•
Low birth weight or premature babies that do not need all the resources of an intensive care
department can thanks to the KANMED Baby Warmer be kept with the mother in the ward.
•
In rooms with low temperatures.
Transport of babies inside the hospital
If the child is normally covered and in a standard cot, the water temperature will only drop about 1.50 C
per hour when the power is disconnected.
Page 8 of 16
User Manual
BW-50-070/10
When transporting in an ambulance (ground or air)
The KANMED Baby Warmer can be powered from a 12 - 24 Volt battery. During transport it will keep the
baby warm and provide a soft chock absorbing support.
NOTE: When powering with 12V battery the warming capacity is reduced, see technical section. Note that
local restrictions and rules apply for transport of patients.
In Maternity Wards it allows more children to stay with their mother and will save costs.
"In between" babies, that are babies between 2000 and 2500 gram, born around pregnancy week 35 - 38,
are often not capable of maintaining a normal body temperature during their first days after birth. KANMED
Baby Warmer keeps them at normal temperature and allows them to stay with their mothers.
Uneasy, stressed and screaming babies can often find a soothing and relaxing environment on the warm
water mattress thereby relieving the staff or mother.
Neonatal intensive care departments
KANMED Baby Warmer can be used to reduce the time the baby needs to spend in an incubator.
KANMED Baby Warmer can replace the incubator when the baby is mostly in need of the warming.
Vital signs monitoring can easily be continued in the KANMED Baby Warmer and the KANMED Baby Bed
The KANMED Baby Warmer can also be used inside an incubator to help obtain correct body temperature,
especially in older single wall units. This has not been tested by KANMED and is the sole responsibility of
the hospital.
NOTE: The function and temperature regulation of the KANMED Baby Warmer is not influenced by the
incubator.
Try it for children in need of a soft warm support, for instance children suffering from hydrocephalus,
fractures or headaches after delivery with a forceps or a suction device, colicky pains, etc.
NIDCAP, Developmental Care and Kangaroo care
In these treatment forms the sleeping and rest as well as positioning of the baby plays an essential role.
The warm soft water mattress resembles the warmth of a mothers skin making the KANMED Baby Warmer
the ideal tool to ensure quality sleep. Kangaroo care is encouraged in open systems.
Photo therapy
KANMED Baby Warmer is very suited for Photo therapy by using an overhead lamp and especially for new
blue lights that do not give any heat.
7
Cleaning and maintenance
Cleaning and disinfecting
GENERAL: The user of KANMED equipment shall not use any methods for cleaning and decontamination
other than those recommended by KANMED without first checking with KANMED that these methods do not
harm the equipment. KANMED equipment withstands all known cleaning and disinfection liquids.
Do not autoclave any parts. Protect yourself according to hospital routines.
Control Unit
•
Remove the mains cable and the Heating Pad.
• Wipe off with a cloth moistened with cleaning and disinfectant liquid that you normally use for
technical equipment.
• Always clean between patients or per your own routines.
Water Mattress
•
Add Anti Algae from day one!
•
Clean with water and wipe off with a cloth moistened with cleaning and disinfectant liquid that you
normally use for plastics.
•
If HIV or Hepatitis is suspected cleaning can be done with much stronger agents such as ethyl
alcohol (50 %), formaldehyde or chloramines. Continued next page……..
Page 9 of 16
User Manual
•
•
BW-50-070/10
Note: Flushing the inside using pure alcohol stronger than 50% may remove the printed
instructions on the mattress.
Always clean between patients or per your own routines.
Heating Pad
•
Use same method as for Water Mattress.
•
Avoid fluids in the connector.
•
Always clean between patients or per your own routines.
KANMED Baby Nest.
•
May be machine washed at temperatures up to 60OC.
•
Centrifuge at medium to low speed.
•
Always dry tumble.
•
If needed, the nest can withstand 90 degree washing but this may shorten the lifetime.
•
Check for damages after washing.
•
Always wash between patients or per your own routines.
Periodical exchanges
Water in Water Mattress
•
Every 3 months
•
Do not forget to add a whole bottle of KANMED anti algae
The Water Mattress
The Water Mattress should be changed at least every third year to avoid leakages
KANMED Baby Nest
The Baby Nest is a consumable. The KANMED Baby Nest containing filling material must be changed as
soon as it shows signs of damage or wear, at least after one year of use.
Periodical Checks
Recommended checks
To be done by
Interval
Water Mattress and water level, Heating Pad,
Baby Nest - are they clean and undamaged ?
Cables and connectors - are they clean and
undamaged ?
Self test at start
Check of safety systems as per chapter 10
Electronic safety test
Temperature check as below
The user
Every time the bed is
made
At each start
Replacement of the internal 1.5V battery
(LR6/AA type)
Technician
The user
The user
Technician or user
Technician
Technician or user
At each start
Every year
Every year
Every year or when in
doubt
Every year
Temperature Check
To perform the temperature check a precision thermometer preferably with a skin sensor is needed.
•
Make up the bed as for normal use and place the skin probe in the centre on top of the Water
Mattress. Cover the probe with an insulating material.
•
Start the unit and wait until the Control Unit indicates that set temperature is reached.
•
Check that the precision thermometer and the Control Unit displays the same temperature, allowed
difference +/- 0.5OC.
Page 10 of 16
User Manual
8
BW-50-070/10
Alarm functions and indication
In case of an alarm, the associated red lamp will be lit and the beeper will sound intermittently. Only the
∆T alarm can be silenced for 10 minutes by pressing the alarm button. All other alarms require some
action.
In most alarm conditions the warming will stop. This can be seen by the fact that no temperature lamp is
lit. In such case the only way to silence the alarm is to press the Start/Standby knob.
Alarm
Symbol
Over-temperature
Temperature deviation
Reason
Warming
Water temperature > 39.5 oC
Will stop
∆T
The water-temperature deviates
Continues for 10
more than +/- 1oC
min.
NOTE: This alarm is not activated until set temperature is reached or 4 hours after start - whichever
happens first. The alarm can be silenced for 10 min. but if after that the temperature still differs more
than +/- 1 oC the warming will stop.
No Water Mattress
The heating pad is not inserted into
Stops
H2O
the water mattress or too little
water
Pad fault
Heating pad is faulty or not
Will not start or
connected
stops
Control Unit fault
Technical failure
Will not start or
stops
Supply voltage failure
Supply voltage (mains or
battery)has disappeared or been
switched off without pressing
Start/Standby first
Internal battery is weak or missing
at start up. Press and hold the
Alarm button when restarting.
Replace battery as soon as possible
Stops
Internal battery
9
∆T+H2O+
Will not start
Trouble shooting
Symptom
Probable cause
Remedy
No lamp lit
No supply voltage connected
Power switch on rear panel in
“OFF” position.
Control Unit fuses blown
Connect supply cable
Check On/Off switch
lamp is blinking and the
acoustic alarm is on
lamp is blinking
lamp is lit
Supply voltage has disappeared
during warming
The water temperature is >
39,5oC.
Error in the Control Unit or the
Heating Pad
Too little water during warming
up with tilt
Water temperature deviates
more that +/- 1oC from
selected value.
Check fuses/contact
technician
Check supply voltage and that
the unit automatically starts
when supply voltage is restored
Check if some external heat
source has influenced the unit.
Let a technician check the unit.
Add 2 cm water above the level
line.
Check for any external
influences. Has the unit been
moved to another bed without
switching it off?
The selected water temperature Check the bedding. Is the water
has not been reached after 4
mattress placed on an
hours
insulating surface?
Restart again.
Page 11 of 16
User Manual
H2O lamps is lit
lamp is lit
lamp is lit
, H2O and
are blinking
10
The Heating Pad is not inserted
in the Water mattress or there
is no water in the mattress,
The Heating Pad is not
connected,
Heating Pad is faulty
Technical fault in Control Unit
Element in the Heating Pad
might be faulty
Internal 1,5 V battery low or
missing and must be replaced
as soon as possible
BW-50-070/10
Correct the position of the
Heating Pad and/or add water
in the Water Mattress.
Check pad connection
Try another Heating Pad
Leave the unit to a technician
Check with another Heating Pad
or leave it to a technician
Battery has to be replaced by a
technician
Bypass by making a new start
but keep the Alarm button
pressed continuously until the
self test has ended.
Safety systems available
Test instructions
Self test at start
Connect the control unit to mains supply and Heating Pad. Switch on the mains switch at the rear panel
and check that the mains indicator lamp is lit.
Press Start/Standby and check that the following happens in the order described below.
1.
2.
3.
4.
5.
All alarm lamps are lit and the beeper sounds for about 0.5 sec.
All lamps starting from Control unit lamp and ending with 42 oC are lit in consecutive order.
One of the temperature lamps blinks 5 times indicating PROM version
Temperature lamp 37 is lit.
If the self test is performed as described above it is ready for use.
Over temperature alarm
1.
2.
3.
4.
Start the unit and observe self test is OK
Fill a bucket (Height about 30 cm and min. diameter 20 cm) with warm water (38 oC)
Roll the Heating Pad loosely and insert it fully in the water.
Slowly fill with warm water until the temperature reaches 39.5 oC.
NOTE: It will take a few minutes for the sensor in the Heating Pad to reach 39.5 oC.
5. Check that the over-temperature lamp is lit and that the beeper sounds at 39.5 oC ± 1 oC.
NOTE: During this test other alarm lamps may be lit and the beeper may sound but this does not
influence the test.
Temperature deviation alarm ∆T
This alarm can only be activated after the selected temperature has been reached.
There are 2 ways of performing this test.
Testing at normal use and when the set temperature has been reached.
1. Note actual temperature
2. Pull out the Heating Pad from the pocket of the mattress so that temperature sensor T1 is cooled.
3. Check that the alarm lamp is lit when the temperature has dropped 1 oC
Testing with a water container
1. Fill a water container with 36 oC water and insert the Heating Pad
2. Start the warming and wait until the temperature lamps indicates that the set value has been
reached.
3. Fill slowly with hot or cold water and note that the ∆T lamp is lit when the temperature has
changed more than 1 oC
Page 12 of 16
User Manual
BW-50-070/10
Missing Water Mattress alarm H2O
1. Start the unit and observe an “OK” self test.
2. Place the Heating Pad without the Water Mattress on a flat surface.
3. Wait 5 to 7 minutes and check that the H2O alarm lamp is lit.
NOTE: The Heating pad must be at room temperature before starting this test.
Heating Pad fault alarm
For this test the heating pad is not connected to the control unit.
Start the warming and check that the Heating Pad symbol and the Pad lamp are lit after about 3 sec. and
that the beeper sounds.
Supply voltage failure alarm
For this test the unit must be assembled completely with Water Mattress and Heating Pad
1. Start the warming
2. After about one minute, select a temperature different from 37 oC and make a note of it.
3. Wait about 2 minutes and then disconnect the supply voltage by using the mains switch or pulling
out the mains plug.
4. Check that the temperature lamp is off and that the Control unit lamp starts to blink and that the
acoustic alarm beeps intermittently for at least 10 minutes
5. Switch on supply voltage again and check that the self test is performed OK and that the warming
starts at the value selected before supply voltage interruption.
Internal 1.5 V battery test
This test may only be done by a qualified technician. During this test the heating pad must be connected
and the internal 1,5 Volt battery removed from its holder by opening the Control Unit.
1. Press start and check that the red lamps for, ∆T, H2O and
blinks. Press Start/standby
2. Make a new start but keep the alarm button pressed continuously until the self test has ended.
3. Check that the warming starts i.e. that the missing or "dead" battery can be bypassed.
11
Accessories, Spare parts and technical documentation
Your local supplier has all information about available spare parts and accessories or check
www.KANMED.se
User Manuals in many languages can be downloaded from www.KANMED.se
KANMED or your local distributor will provide a spare part price list as well as a service manual that
contains all information necessary to perform maintenance, and simpler repairs.
Article number
Description
Quantity
BW-50-002
BW-50-003
BW-50-025
BW-50-005
BW-50-029
BW-50-007
Heating Pad BW50
Water Mattress BW50
KANMED Baby Nest
Filling Tube BW50
Anti algae
Battery Cable for Control Unit
BW50
1
1
1( 5 pack available)
1
Box of 20
1
Spare parts
700-0001
700-0079
700-0324
699-1171
Fuse T 1A ( F1,F2, 220 -240V)
Fuse T 2A (F1,F2, 110 -115 V)
Fuse T 3,15A (F3 + F4)
Mains Cord 230V
Page 13 of 16
Pack of 10
Pack of 10
Pack of 10
1
User Manual
12
BW-50-070/10
Technical data
Heating Pad
Voltage
24 Volt AC from Control Unit BW-50 when powering with mains power or 24 V DC
when powering from 24V battery source
Power consumption
50 Watt ,12 Watt when powering the Control Unit from a 12 Volt battery.
Dimensions and Weight
Length 580 mm, With 250 mm, Thickness 2 mm, Weight 0.5 Kg
Length of connection cable
1,2 m
Material cover
PVC
Watertight
Yes, except connector
Conductivity - surface
Not electrically conductive
Radiation
No measurable magnetic and electrical fields
Control Unit
Mains power
220 -240 V AC
Battery power
12 - 24 V DC ( Limited warming capacity at 12 V DC)
or 110 - 120 V AC
Frequency
50 - 60 Hz
Power consumption
Max 65VA
Temperatures available
34 OC - 38 OC in steps of 0.5 OC
Accuracy
±0.5 OC
Resolution
0.5 OC
Auditory Alarm
55 dBA Sound level
Indication of temperatures
and alarms
LED 35 -37 OC are green, 34, 34.5, 37.5 and 38 OC are yellow
< 34, >38 OC are red alarms
Over temperature alarm
At a water temperature of 39.5 ± 1 OC
Dimensions and Weight
Length 210 mm, With 165 mm, Height 120 mm, Weight about 3 kg
Fuses F1, F2
220-240 V AC: T 1A L250V,
Mode of use
Designed for continuous use
110-120 V AC: T 2A L250V
Water protection
Drip proof when installed according to section 2
Internal Battery
Alkaline, 1.5V size LR6(AA) (Only for power failure alarm)
Water Mattress
Dimensions and Weight
Length 600 mm, With 270 mm, Height 30 mm,
Other sizes might be available. Please contact your local supplier.
Weight about 0.5 kg
Material
PVC
Anti Algae recommended
KANMED Bottle 119 ml fluid
Poly [Oxyethylene (dimethylimino) ethylene (dimethyliminio)
ethelyenedichloride] 10% Inert ingredients 90%
KANMED Baby Nest
Dimensions
Length 650 mm, Width 450 mm Height 50 mm flattened
Material
Cover: High quality cotton and polyester
Filling of collar: Polyester fibre. Always tumble dry
Washing
Recommended temperature 600C, Can tolerate 900C but may shorten lifetime
Other sizes and materials are available. Please contact your local supplier.
Warming Capacity
(Fill with warm water to reduce the warming up time)
Normal conditions
About 4-50C per hour. (Room temperature about 220C and filled with 4,5 litres of
water and placed on the mattress of a baby bed and covered with the nest and a
sheet. Connection to mains or a 24V battery)
12 V Battery
About 1.50C per hour up to set temperature minus 60C
About 0.50C per hour up to set temperature minus 20C
About 0.30C per hour up to set temperature
Twin Mattress
If not filled with warm water the ∆T alarm will be activated after 4 hours. Restart and
the temperature will be reached. A “naked” twin mattress will not reach set
temperature due to excessive heat loss
Page 14 of 16
User Manual
BW-50-070/10
Safety Standards
Standards
EN 60 601-1 , EN 60 601-1-2, EN 60 601-2-35
Protection type
BF, Defibrillator safe Class I
CE marking
Fulfils MDD 93/42 EEC. MDD class IIB.
(EC 0413= Intertech SEMKO, Sweden)
Environmental Conditions / Storage
Surrounding temperatures
In use: +10 to + 34 OC
Storing
-40
Humidity
10 - 100%, condensing
to + 70 OC
EMC Guidelines
The BW-50 Baby Warming system should not be used adjacent to, or stacked with other equipment. If adjacent or
stacked use is necessary, the BW-50 Baby warming system should be observed to verify normal operation in the
configuration in which it is used.
Additional EMC information can be found in the service manual.
Connection to battery
If the Control Unit is to be connected to a battery (12-24 V, from a vehicle etc.) use the Battery Cable BW-50-007.
Connect the battery cable to the Battery inlet and secure it with the locker ring. Connect the other end (fitted with
cigarette lighter plug) to the vehicles cigarette lighter socket or similar outlet. If the lighter plug has to be changed to
another model or if the power is taken from batteries directly then note that the white cable is + and the brown is (minus)
Modifications
Any modifications on the control unit, heating pad and water mattress will void KANMED’s responsibilities totally and
are not allowed without the written consent of KANMED.
Expected lifetimes
Control unit BW-50 Kanmed warrants a safe lifetime for Control unit BW-50 of 10 years from first day of use. This is
under the condition that the unit has been serviced according to the user and or service manual and that the unit has
not been modified or changed in any way or for any reason.
Heating Pad. Heating Pads are consumable products and the expected lifetime is one to two years depending how
they are handled and how often they are used.
13
Warranty
KANMED warrants the purchaser that the Control Unit BW-50, Heating Pad BW-50-002, are free from
defects in material and workmanship for a period of 12 month from the date of delivery.
The KANMED Baby Nest and associated parts are warranted to be free of defects at the time of delivery.
The sole obligation of KANMED with respect to any such defect is limited to the repair with new or remanufactured parts or, at the discretion of KANMED, replacement of the equipment or refunding of the
purchase price.
This warranty shall not apply if the product has been modified, adjusted or repaired other than by KANMED
or by organisations authorised by KANMED or modified, adjusted or repaired not in accordance with written
instructions provided by KANMED. Neither shall the warranty apply if the equipment has been subject to
misuse, negligence or accident.
These warranties are made on the condition that prompt notification of a defect is given to KANMED or its
authorised dealers within the warranty period.
KANMED shall have the sole right to determine whether a defect exists.
KANMED shall not in any case be liable for special or consequential damages arising from the breach of
warranty, breach of contract, negligence or any other legal theory.
14
Disposal
When the KANMED Baby Warmer have reached end of life, it should be recycled in accordance
with the EU 2002/96/EC (WEEE) directive if applicable.
Page 15 of 16
User Manual
KANMED AB
Gårdsfogdevägen 18B
SE-168 66 BROMMA – Stockholm
Sweden
Telephone
Telefax
+46 8 56 48 06 30
+46 8 56 48 06 39
E-Mail: [email protected]
Home page: www.KANMED.se
Distributed by:
Page 16 of 16
BW-50-070/10