1
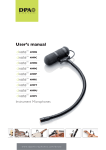
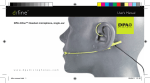
User’s Manual
4099 Clip Microphones
DPA 4099B
DPA 4099C
DPA 4099D
DPA 4099G
DPA 4099P
DPA 4099S
DPA 4099T
DPA 4099U
DPA 4099V
A
CONTENTS
Product description. . . . . . . . . . . . . . . . . . . . . . . . . . . . . .
4099B for Bass and more. . . . . . . . . . . . . . . . . . . . . . . . .
4099C for Cello and more . . . . . . . . . . . . . . . . . . . . . . . .
4099D for Drums. . . . . . . . . . . . . . . . . . . . . . . . . . . . . . .
4099G for Guitar, Dobro, and more. . . . . . . . . . . . . . . . .
4099P Stereo Microphone System for Piano and more. .
4099S for Saxophones, Bass Clarinet, and more. . . . . . . .
4099T for Brass. . . . . . . . . . . . . . . . . . . . . . . . . . . . . . . . .
4099U Universal Clip Microphone. . . . . . . . . . . . . . . . . . .
4099V for Violin, Mandolin, and more. . . . . . . . . . . . . . .
Application notes. . . . . . . . . . . . . . . . . . . . . . . . . . . . . . . .
Using the DPA adapters. . . . . . . . . . . . . . . . . . . . . . . . . . .
Microphone maintenance. . . . . . . . . . . . . . . . . . . . . . . . .
Specifications and graphs. . . . . . . . . . . . . . . . . . . . . . . . . .
Service and repair. . . . . . . . . . . . . . . . . . . . . . . . . . . . . . .
Warranty. . . . . . . . . . . . . . . . . . . . . . . . . . . . . . . . . . . . . . .
2
.
.
.
.
.
.
.
.
.
.
.
.
.
.
.
.
.
.
.
.
.
.
3
3
4
5
8
9
10
. 11
12
14
15
17
19
20
22
23
PRODUCT DESCRIPTION
The DPA 4099 instrument clip microphone is lightweight,
flexible and simple to mount, making it the perfect match for
your instrument.
It carries a superb natural sound quality and maximum off-axis
rejection to achieve excellent gain-before-feedback characteristics
for live sound reinforcement.
This is the ultimate miking solution for your live instrument applications.
Two different microphone sensitivities are available:
• Normal sensitivity for bass, cello, guitar, piano, saxophone,
violin, and universal use (marked with a black cable relief at the
connector end).
• Extra low sensitivity with ultra high sound pressure capability
for brass and drums (marked with a white cable relief at the
connector end).
4099B Clip Microphone for Bass and more
Mounting the gooseneck
Secure the gooseneck by sliding the fixation part over the grip:
3
Mounting the microphone
Mount the 4099B on the bass by attaching it on the two outer
strings between the bridge and the tailpiece.
Let the holder curve inwards.
Adjust the gooseneck and microphone angle to your desired
taste.
For the most natural sound: Below the bridge, between instrument top (belly) and strings. For the highest output: angled to
one of the f-holes.
4099C Clip Microphone for Cello and more
Mounting the gooseneck
Secure the gooseneck by sliding the fixation part over the grip:
4
Mounting the microphone
Mount the 4099C on the cello between the bridge and the
tailpiece. Attach it on the two outer strings, let the holder curve
outwards.
Adjust the gooseneck and microphone angle to your desired
taste. For the most natural sound: Below the bridge, between
instrument top (belly) and strings. For the highest output: angled to one of the f-holes.
4099D Clip Microphone for Drums
Mounting the gooseneck
Secure the gooseneck in the holder.
The gooseneck securing part can be angled 90 degrees offering maximum placement possibilities. Detach the part from
the clip and re-mount it turned 90 degrees for a horizontal
gooseneck arm.
5
Mounting on instrument
The enclosed clip fits most drums and percussion instruments
and can be mounted two ways, either upwards or downwards:
Clip mounted upwards.
Upward turning clip positioning allows for mic placements
across the drum skin and will be the most typical live application choice for rock. Point the microphone to the middle of
the drum to get more low-end richness or to the edge to get
more crispy bite.
Clip mounted downwards.
Downward turning clip positioning allows for mic placements a
little further away from the drum and will be a preferred choice
for most invisible placements suitable for TV productions. Sonically, this position will also often be the choice for jazz.
6
Application note, Snare Drum
A snare drum may benefit from a two-microphone setup, one
on top and one below the drum; the upper mic will focus on
the “in-your-face” punch and the lower mic on the snare highfrequency bite from below the drum. Shift polarity on one of
them and blend them in desired balance.
Application note, Bass Drum
The VC4099 clip (optional accessory) also fits the bass drum
rim. The bass drum, too, can benefit from a two-microphone
setup, one on the stroke side and one on the front side. Shift
polarity on one of them and blend them in the desired balance,
controlling the “kick” sound and the low frequency component.
7
4099G Clip Microphone
for Guitar, Dobro, and more
Adjusting the clip height
The height of the 4099G clip can easily be adjusted to fit a wide
variety of stringed instruments with a body depth between 35
mm (1.4 in) and 122 mm (4.8 in).. Press the lock on the side of
the clip to increase height:
Place the clip in its maximum position on the instrument, and
reduce the height to fit the instrument, by pressing the parts
firmly together.
Mounting the gooseneck
Choose the desired gooseneck height and place it in the grip.
Secure the gooseneck by sliding the fixation part over the grip:
Mounting on instrument
The 4099 can be easily readjusted and moved to different
instruments by using just one hand. Squeeze the two clamp
knobs on the clip to expand it, mount on the instrument, and
then release.
8
It will now fit the shape of the instrument. This will vary depending on the required instrument and playing style.
Application note
A recommended miking placement for the most balanced
sound is where the fretboard meets the body, typically above
the 12th fret.
For optimum volume, point the microphone toward the sound
hole. A blend between your guitar’s pick-up and the 4099
condenser microphone is often a good choice on stage. This
can provide even more gain before feedback while keeping a
natural guitar tone. The DAO4099 Double Cable will reduce
cable clutter.
4099P Stereo Microphone System
for Piano and more
Mounting the gooseneck in holders
Secure the goosenecks in the holders by sliding the fixation
part over the grip:
9
Placement of microphones
Place the holders in the piano frame and adjust the microphone
angle to preferred sonic taste. The microphones can be spaced
apart, angled apart, or both.
Specifications specific to the 4099P
Sensitivity selection tolerance for pair: ± 1 dB at 1 kHz.
Any 4099 microphone within this sensitivity tolerance is marked
with a white dot on the gooseneck fixation part.
4099S Clip Microphone
for Saxophones, Bass Clarinet, and more
Mounting the gooseneck
Secure the gooseneck by sliding the fixation part over the grip:
Mounting on instrument
The 4099S can be easily readjusted and moved to different
instruments by using just one hand. Squeeze the two clamp
knobs on the clip to expand it, mount on the instrument, and
then release. It will now fit the shape of the instrument. This will
vary depending on the required instrument and playing style.
10
Application note, soprano sax: For a round and warm character,
place the 4099S as far away from the bell as possible. Place it in
front of the bell for a harder sound with more bite.
Application note
Alto/tenor/baritone sax: To create the most balanced sound,
do not point the microphone directly into the bell, but angle
it between the bell and the keys. In this way you will obtain a
nice blend from the two sound components of the saxophone.
4099T Clip Microphone for Brass
Mounting the gooseneck
Secure the gooseneck by sliding the fixation part over the grip:
Mounting on instrument
The 4099T can be easily readjusted and moved to different
instruments by using just one hand. Squeeze the two clamp
knobs on the clip to expand it, mount on the instrument, and
then release. It will now fit the shape of the instrument. This will
vary depending on the required instrument and playing style.
11
Adjusting the gooseneck and microphone angle
The gooseneck can flex in all directions. Bend the gooseneck to
fit the natural curves of the instrument.
Turn the microphone to the desired angle.
Application notes
Ftor trumpet, trombone (and instruments of similar sizes): For
the smoothest sound, do not point the microphone directly into
the center of the bell, but position it between the center position
and the bell’s edge.
All types of mutes can be used together with the 4099.
4099U Universal Clip Microphone
Mounting the gooseneck
Secure the goosenecks in the holder by sliding the fixation part
over the grip:
12
The gooseneck securing part can be angled 90 degrees offering maximum placement possibilities. Detach the part from
the clip and re-mount it turned 90 degrees for a horizontal
gooseneck arm.
Application note
Close-miking instruments like oboe, clarinet, soprano saxophone,
and bassoon calls for certain care in the placement and angling
of the microphone. The 4099 holds a supercardioid directionality and may end up creating an uneven timbre.
Tip: Create as much distance as possible with the gooseneck
and place the mic head above the bell. Twist it backwards to the
instrument and point it towards the upper joint (the keys closest
to the mouthpiece). In this way the entire instrument range will
be covered most naturally.
Place the hook-and-loop fastener around the instrument and
insert the end into the opening below the gooseneck.
Tight firmly if necessary by pushing the holder at the same time.
13
4099V Clip Microphone
for Violin, Mandolin, and more
Adjusting the clip height
The height of the VC4099 Violin Clip can easily be adjusted
to fit a wide variety of stringed instruments with a body depth
between 35 mm (1.4 in) and 55 mm (2.1 in).. Press the lock on
the side of the clip to increase height.
Adjusting the gooseneck and microphone angle
The gooseneck can flex in all directions. Bend the gooseneck to
fit the natural curves of the instrument.
Turn the microphone to the desired angle.
Application note
Most players prefer the 4099 to be placed on the left side
of the instrument to avoid restricting the player’s movement.
Point the microphone away from the performer’s head to avoid
breath noise.
For optimum volume, point the microphone toward the f-hole.
Please note that this also makes the sound character a little
duller, which may or may not suit your taste. If not, point the
microphone at the bridge.
14
GENERAL APPLICATION NOTES
• Always use the 4099 in its dedicated foam windscreen and
shock absorbing rubber mounts.
• When running wireless, it is recommended to use a low-cut
filter at 80 Hz in the transmitter to avoid handling and moving
noise. This low-cut filter is built into the DAD4099 XLR adapter
supplied with 4099G, 4099V 4099S, and 4099T.
• The optional DMM0007 Universal Surface Mounts can be
useful to control the cable run along the instrument.
Tip: The same gooseneck microphone boom can be used with
alternate clips that are specific to each instrument.
Bear in mind the difference in mic sensitivity according to different instruments’ sound pressure levels – see page 3.
15
16
BC4099 Clip for Bass and more
CC4099 Clip for Cello and more
DC4099 Clip for Drum
GC4099 Guitar Clip
PC4099 Magnet Mount for Piano
and more
STC4099 Sax/Trumpet Clip
UC4099 Universal Clip
VC4099 Violin Clip
USING THE DPA ADAPTERS
All DPA 4099 clip microphone cables are terminated with a
proprietary MicroDot connector. When used in conjunction with
our range of over 35 adapters, the MicroDot connector provides
the ability to connect to virtually all available pro wireless systems.
Various wireless systems require the use of electronics inside the
adapter to optimize the signal level, the DC offset, and powering of the built-in microphone preamplifier. Using the adapters
from DPA ensures the correct electronic circuit with the listed
types of wireless systems (please visit www.dpamicrophones.com/
adapters).
The enclosed XLR adapter allows the 4099 to work as a regular 48V phantom powered microphone. The belt clip can be
removed and replaced with the enclosed ring for use of the
adapter directly in stage boxes or mixing consoles. Dismount the
cap of the adapter, remove the belt clip and place the black ring
instead. Remount the cap.
Do not attempt to employ non-standard adapters or connectors
as you might damage the microphone.
A connector-tightening tool is supplied with each adapter and
should be employed whenever the MicroDot connector needs
to be tightened. Utilize the tightening tool before use to ensure
the connection is secure and that the cable cannot rotate by
the cable relief.
Enclosed adapter
DAD6001-BC
DPA 4099B
DPA 4099C
DPA 4099D
DPA 4099P
DPA 4099U
DAD4099
DPA 4099G
DPA 4099S
DPA 4099T
DPA 4099V
17
The DAD4099 adapter features a permanent second-order
low-cut filter at 80 Hz. The filter minimizes handling and wind
noise at the microphone output without compromising sound
quality, as guitar, sax, trumpet and violin have no appreciable
frequency response below 80 Hz.
Signal - phase
3
Signal + phase
Ground
2
1
External view of the output connector of the DAD4099 and
DAD6001-BC.
18
MICROPHONE MAINTENANCE
DPA 4099 is designed with highly resistant and protective materials in the construction so do not try to clean the microphone
as it is unnecessary.
Do not use any spray or fluid containing chemicals that could
remove static electricity on or close to the microphone. This
could cause permanent damage.
Should the foam windscreen need replacement, remove it from
the microphone. Draw the windscreen, not the microphone,
away from the shock mount, while holding the microphone
cable. Cleaning or washing of the windscreen can be done in
distilled water.
For cable cleaning; Use organic oil (e.g. olive oil) or lukewarm,
distilled water to remove residue from tape or glue.
The DPA 4099 is very resistant to humidity and sweat, but keep
it away from unnecessary exposure to water and cleaning fluids
(keep element dry at all times). It should not be used in direct,
heavy rain.
Avoid excessive pressure on the microphone element. The microphone will not perform to its specifications if the directional
tube under the foam windscreen has been bent from its original
shape.
If the directional tube becomes misshapen, it should be reshaped as close as possible to its original cylindrical shape.
To minimize potential cable damage, wind up excess cable in
soft figure-of-eight loops (preferably 6 – 8 cm (2.5 – 3 in) in
diameter), this also helps to reduce handling noise. Do not bend
the cable or rub it harshly, that may stress the inner cores and
cause them to break over time.
19
Directional characteristics
Supercardioid
Principle of operation
Pressure gradient
Cartridge type
Pre-polarized condenser
Frequency range
20 Hz - 20 kHz
Frequency range, ± 2 dB, 20 cm (7.9 in) distance
80 Hz - 15 kHz with 2 dB soft boost at 10 - 12 kHz
Second order low-cut filter at 80 Hz with DAD4099
Sensitivity, nominal ± 3 dB at 1 kHz
4099B/4099C/4099G/4099P/4099S/4099U/4099V:
6 mV/Pa; - 44 dB re. 1 V/Pa
4099D/4099T: 2 mV/Pa; -54 dB re. 1 V/Pa
Equivalent noise level, A-weighted
4099B/4099C/4099G/4099P/4099S/4099U/4099V:
Typ. 23 dB(A) re. 20 µPa (max. 26 dB(A))
4099D/4099T: Typ. 28 dB(A) re. 20 µPa (max. 31 dB(A))
S/N ratio (A-weighted), re. 1 kHz at 1 Pa (94 dB SPL)
4099B/4099C/4099G/4099P/4099S/4099U/4099V: 71 dB
4099D/4099T: 66 dB
Total Harmonic Distortion (THD)
< 1 % up to 123 dB SPL peak
< 1 % up to 120 dB SPL RMS sine
Dynamic range
4099B/4099C/4099G/4099P/4099S/4099U/4099V: 100 dB
4099D/4099T: 95 dB
Max. SPL, peak before clipping
4099B/4099C/4099G/4099P/4099S/4099U/4099V: 142 dB
4099D/4099T: 152 dB
Output impedance
From MicroDot: 30 – 40 ohm
From DAD4099/DAD6001-BC: 100 ohm
Cable drive capability
Up to 300 m (984 ft) with DAD4099 or DAD6001-BC XLR adapter
Output balance principle
Signal balanced with DAD4099 or DAD6001-BC XLR adapter
Common Mode Rejection Ratio (CMRR)
> 60 dB from 50 Hz to 15 kHz with DAD4099 or DAD6001-BC XLR
adapter
20
Power supply
Min. 5 V – max. 50 V through DPA adapter for wireless systems
48 V phantom power ±4 V with DAD4099 or DAD6001-BC XLR
adapter XLR adapter
Current consumption
Typ. 1.5 mA (microphone)
3.5 mA with DAD4099 or DAD6001-BC XLR adapter
Connector
MicroDot
Color
Black
Weight
4099B: 46 g (1.62 oz)
4099C: 38 g (1.34 oz)
4099D: 38 g (1.34 oz)
4099G: 36 g (1.27 oz)
4099P: 46 g (1.62 oz)
4099S: 31 g (1.1 oz)
4099T: 31 g (1.1 oz)
4099U: 41 g (1.4 oz)
4099V: 33 g (1.16 oz)
Capsule diameter
5.4 mm (0.2 in)
5 dB
16 kHz
1 kHz
2 kHz
250 Hz
500 Hz
8 kHz
4 kHz
Polar Pattern
Directional characteristics of DPA 4099 (normalized)
21
10
dB
0
0˚
30˚
180˚
-10
60˚
-20
20 Hz
90˚
50
100
200
500
1 kHz
2
5
10
20
40
1 kHz
2
5
10
20
40
On-Axis Frequency Response
Measured at 20 cm (7.9 in) distance
10
10 cm
dB
15 cm
0
20 cm
30 cm
-10
100 cm
-20
20 Hz
50
100
200
500
The Proximity Effect
The proximity effect exhibited by DPA 4099
SERVICE & REPAIR
Products from DPA Microphones are extremely stable and there should not
be any significant change in the specifications with time and use. If, however, you are not satisfied with the characteristics exhibited by your product,
contact your nearest DPA Microphones representative for further details of
service and the repair facilities that are available.
22
10
dB
0
-10
DAD4099
-20
20 Hz
50
100
200
500
1 kHz
2
5
10
20
40
On-Axis Frequency Response with DAD4099 XLR Adapter
Measured at 20 cm (7.9 in) distance
10
dB
0
-10
-20
20 Hz
50
100
200
500
1 kHz
2
5
10
20
40
On-Axis Frequency Response with DAD4099 XLR Adapter
Measured at 10 cm (3.9 in) distance
WARRANTY
All products from DPA Microphones are covered by a two-year limited
warranty on both mechanical functionality and documented specifications
as long as the items are not mistreated, abused, or modified in any way. In
case of a warranty claim, your invoice is your warranty registration.
Find
your
nearest
DPA
representative
on
our
website,
www.dpamicrophones.com, or send e-mail to [email protected].
23
DPI4099- 4
DPI4099-3
Headquarters
DPA Microphones A/S
Gydevang 42-44
DK-3450 Alleroed, Denmark
Tel: +45 4814 2828
Fax: +45 4814 2700
[email protected]
www.dpamicrophones.com
US Sales Office
DPA Microphones, Inc.
2432 N. Main St., Suite 200
Longmont, CO 80501, USA
Tel: +1 303-485-1025
Fax: +1 303-485-6470
[email protected]
www.dpamicrophones.com