1
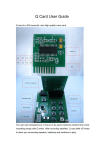
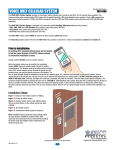
Integrated Circuits Inc.
Q Card
Q Card User Guide
Small size, easy to use, high quality recording sound card. Simply insert the Q Card to the Q Writer and start recording
with microphone or line-in cable connected to PC, cell phone or MP3 Player. Once recording is finished and tested the
playback, add speaker, battery and button to the Q card for playback.
Features
Up to 340 seconds recording length of 7 sections of any duration.
Record with microphone in or Line-in cable
Usage up to 100,000 times
16 bit high quality playback, 8bits, 12K sample rate
Operation DC 3~6.5V
Dimension: 4.3 cm x 3.5 cm x 0.4 cm (LxWxH)
Q Writer
Q Card
3.5mm line in jack
Socket
MIC/LINE IN
switch
S001-S007 buttons
Microphone
Erase Key
Power 4.5v
connector
REC/PLAY switch
Ver. A
Page 1 of 4
Integrated Circuits Inc.
Q Card
To Record the sound or messages
1. Insert the Q Card into the socket of the Q Writer with the smooth side facing the buttons of the Q Writer.
2. Connect the cable of speaker/battery holder to the Power 4.5v connector of the Q Writer.
3. Slide the MIC/LINE-IN switch to the left for microphone recording or to the right for line in recording.
4. For line-in recording, connect one end of the 3.5mm line in cable to the 3.5m audio jack and the other end to the PC,
MP3 player, cell phones or other multimedia devices.
5. Slide the REC/PLAY switch to REC position.
6. Press and release the first button S001. When you hear a short beep sound and the LED is ON, start recording the
first section. For Line-in recording, start playing the sound on the multimedia device.
7. Press the same button again to stop. When you hear a short beep sound and the LED is OFF, the recording is
stopped.
8. Repeat steps 6-7 for each of the remaining 6 buttons (S002-S007)
9. Each section can have different duration. When the total duration reach to 340secs., you will hear a 2 seconds long beep
To indicate it can not save any more data.
To delete or change the recording
1. You’ll hear the “ beep beep” sound if there are messages in. Keep pressing the Erase button (S008) and then press
the section button (S001-S007) that you want to change or delete. The LED will be ON during the deletion.
2. Start the new recording for that section or leave it blank
3. To change the duration of the deleted section, you must delete other sections to give room for the new recordings.
To test the recordings
1. Slide the REC/PLAY switch to PLAY position.
2. Press and release each of the S001-S007 button to playback. LED is ON during the playback.
3. When the playback is finished, the LED will be OFF
Connecting the Accessories
1. Once the recording is finished and tested the playback, turn off the power of battery holder, unplug the Q Card from
the Q Writer,
2. Connect the speaker to the Speaker I/O pin, battery (6v) to the Power I/O.
3. Connect one wire of the trigger buttons or switches to the corresponding S1-S7 I/O pins and the second wire to
GND. Note S0 is not used for triggers.
4. Press the buttons S1-S7 to playback the corresponding recordings.
Ver. A
Page 2 of 4
Integrated Circuits Inc.
Q Card
Power pin
S2
S4
S6
S8
S1
S3
S5
S7
Speaker pin
The font
The back
M1
M2
M0
M3
REC
M4
MICM5
MIC+
M6
MICG
M7
VDD
VSS
VOUT2 VOUT1
Triggering buttons can be tact switches, tilt switches, PIR motion sensors, light sensors,
Q Card Trigger Connection
Example: 7 trigger buttons.
Ver. A
Page 3 of 4
Integrated Circuits Inc.
Q Card
HISTORY
Ver. A (2014/02/26)
- Original version data sheet for Q Card User Guide .
Ver. A
Page 4 of 4