1
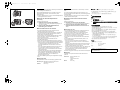
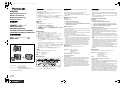
DMW-LFAC1_B4.fm
1 ページ 2014年9月2日 火曜日 午後1時5分
取扱説明書/
Operating Instructions/
Manuel d’utilisation/
Bedienungsanleitung/
Istruzioni d’uso/
使用說明書
自動開閉レンズキャップ
AUTO LENS CAP
PROTÈGE-OBJECTIF
AUTOMATIK-OBJEKTIVDECKEL
CHIUSURA AUTOMATICA OBIETTIVO
自動開閉鏡頭蓋
品番/Model No./Modèle/Model Nr./Modello N./ 型號
DMW-LFAC1
1
日本語
このたびは、パナソニック製品をお買い上げいただき、
まこと
にありがとうございます。
≥ 取扱説明書をよくお読みのうえ、正しく安全にお使いください。
≥ この取扱説明書は大切に保管してください。
この自動開閉レンズキャップは、
パナソニック製デジタルカ
メラ DMC-LX100 専用です。
(2014 年 9 月現在)
1
レンズフロントリングを取り外す
≥レンズフロントリングの紛失にお気をつけください。
2
自動開閉レンズキャップを矢印の方向に
「カチッ」と音が
するまで回す
∫ 使用上のお願い
≥ フィルター類と同時に取り付けることはできません。
≥ 自動開閉レンズキャップは、防じん仕様ではありません。ほこり・砂
などの多い場所でのご使用を避けてください。
≥ 破損や変形につながる強い衝撃を与えないようお気をつけください。
≥ 自動開閉レンズキャップの中央を強く押さないでください。
≥ お手入れの際は、乾いた柔らかい布でふいてください。
– 使用後は自動開閉レンズキャップを取り外し、自動開閉レンズ
キャップの内側およびレンズの周りの汚れ・ほこりをふき取って
ください。
– 汚れがひどいときは、水に浸した布をよく絞ってから汚れをふき
取り、そのあと、乾いた布でふいてください。
– ベンジン、
シンナー、アルコール、
台所洗剤などの溶剤は、自動開
閉レンズキャップが変質したり、塗装がはげるおそれがあります
ので使用しないでください。
≥ お使いのデジタルカメラの取扱説明書を必ずお読みください。
外形寸法: 最大径 約59.9 mm
全長 約8.2 mm
質量:
約12.2 g
∫ お問い合わせ先
Panasonic Corporation
Kadoma, Osaka, Japan
Importer for Europe: Panasonic Marketing Europe GmbH
Panasonic Testing Centre
Winsbergring 15, 22525 Hamburg, Germany
C Panasonic Corporation 2014
VQT5L06
F0914HN0
until
2014/9/19
Le protège-objectif est compatible uniquement avec le DMC-LX100,
un appareil photo numérique de Panasonic. (À compter de septembre
2014)
• Vous pouvez enregistrer des images sans retirer le protège-objectif
de l’appareil photo numérique.
∫ 取り付け方
準備:
カメラの電源を[OFF]にしてください。
この仕様は、性能向上のため変更することがあります。
Manufactured by:
The auto lens cap can only be used with the DMC-LX100, a
Panasonic digital camera. (As of September 2014)
• You can record images without removing the auto lens cap from the
digital camera.
∫ Attaching the auto lens cap
1
パナソニック株式会社 AVCネットワークス社
〒 571-8504 大阪府門真市松生町1番 15 号
FRANÇAIS
Veuillez lire intégralement ces instructions et les conserver pour
référence ultérieure.
≥ デジタルカメラから自動開閉レンズキャップを取り外すことなく
撮影することができます。
∫ 仕様
2
ENGLISH
Read these instructions completely and keep them for future
reference.
Preparation:
Turn off the camera.
2
Remove the lens front ring.
• Be careful not to lose the lens front ring.
Rotate the auto lens cap in the direction of the arrow
until it clicks into place.
∫ Cautions for use
• The auto lens cap and any type of filter cannot be attached to the
camera at the same time.
• The auto lens cap is not dust-proof. Avoid using the auto lens cap in
places with a lot of dust, sand, etc.
• Be careful not to expose the auto lens cap to strong impact that will
cause damage or deformation.
• Do not press the center area of the auto lens cap hard.
• Before cleaning the auto lens cap, wipe the auto lens cap with a dry
soft cloth.
– After use, remove the auto lens cap, and wipe off stains and dust
on the inside of the auto lens cap and the area around the lens.
– When the auto lens cap is soiled badly, it can be cleaned by wiping
the dirt off with a wrung wet cloth, and then with a dry cloth.
– Do not use solvents such as benzine, thinner, alcohol, kitchen
detergents, etc., to clean the auto lens cap, since it may cause
deterioration of the auto lens cap or the coating may peel off.
• Be sure to read the operating instructions of your digital camera.
∫ Specifications
Specifications are subject to change without notice.
Dimensions:
Maximum Diameter
approx. 59.9 mm (2.36q)
Overall Length
approx. 8.2 mm (0.32q)
Mass (Weight):Approx. 12.2 g (0.0268 lb)
Only for US and Canada
Limited Warranty:
Panasonic warrants the enclosed AUTO LENS CAP to the original
purchaser to be free of defects in materials and workmanship for
90 days from the date of original consumer purchase.
This warranty does not include damages caused by accidents,
misuse or modifications. If the item is defective within the warranty
period, we will repair or replace it, with new or refurbished parts,
without charge or refund your purchase price at our option, if the
AUTO LENS CAP is sent (postage prepaid) to the address indicated
in the warranty section of the operating manual enclosed with the
digital camera.
∫ Installation du protège-objectif
Préparatifs :
Mettez la caméra hors marche.
1 Retirez la bague frontale de l’objectif.
• Prenez garde à ne pas perdre la bague frontale de l’objectif.
2 Tournez le protège-objectif en direction de la flèche
jusqu’à ce qu’il s’arrête avec un déclic.
∫ Précautions d’utilisation
• Le protège-objectif et quelconque type de filtres ne peuvent pas être
installés sur l’appareil en même temps.
• Le protège-objectif n’est pas à l’épreuve de la poussière. Éviter
d’utiliser le protège-objectif dans des endroits où il y a beaucoup de
poussière, de sable, etc.
• Prenez garde à ne pas exposer le protège-objectif à des chocs
violents car ils peuvent causer des dommages ou des déformations.
• N’appuyez pas sur la partie centrale du protège-objectif avec trop de
force.
• Avant de nettoyer le protège-objectif, essuyez-le avec un chiffon sec
doux.
– Après utilisation, retirer le protège-objectif et essuyer les taches et
la poussière à l’intérieur de celui-ci ainsi qu’autour de l’objectif.
– Si le protège-objectif est très sale, il peut être nettoyé à l’aide d’un
chiffon humide bien essoré, puis d’un chiffon sec.
– N’utilisez pas de solvants comme la benzine, du diluant, l’alcool, le
liquide vaisselle, etc., pour nettoyer le protège-objectif, car cela
pourrait l’abîmer ou décoller son revêtement extérieur.
• Assurez-vous de lire le manuel d’utilisation de votre appareil photo
numérique.
∫ Spécifications
Les spécifications pourraient être modifiées sans préavis.
Dimensions:
Poids:
Diamètre maximum d’environ
59,9 mm (2,36 po)
Longueur totale d’environ
8,2 mm (0,32 po)
Environ 12,2 g (0,0268 lb)
Seulement pour les États-Unis et le Canada
Garantie limitée :
Panasonic garantit à l’acheteur original et pendant 90 jours après la
date d’achat originale, que le PROTÈGE-OBJECTIF est exempt de
défauts de main-d’œuvre et de matériau.
La garantie ne couvre pas les dommages attribuables à un accident,
un usage abusif ou des modifications. Dans le cas où l’article
deviendrait défectueux pendant la période de la garantie, Panasonic
le réparera ou le remplacera, sans frais, avec des pièces nouvelles ou
remises à neuf ou, à son entière discrétion, remboursera le coût de
votre achat, à la condition que le PROTÈGE-OBJECTIF soit envoyé
(dûment affranchi) à l’adresse indiquée à la section portant sur la
garantie dans le manuel de l’utilisateur fourni avec l’appareil photo.
DMW-LFAC1_B4.fm
1
2
2 ページ 2014年9月2日 火曜日 午後1時5分
DEUTSCH
ITALIANO
中文 (繁體)
Lesen Sie diese Bedienungsanleitung vollständig und bewahren Sie
sie für zukünftige Konsultationen auf.
Leggere per intero queste istruzioni e conservarle per un utilizzo
futuro.
Der Automatik-Objektivdeckel kann nur mit DMC-LX100, einer
Digital-Kamera von Panasonic, verwendet werden. (Stand:
September 2014)
• Sie können Bilder aufnehmen, ohne den Automatik-Objektivdeckel
von der Digital-Kamera zu entfernen.
La chiusura automatica obiettivo può essere usata solo con la
fotocamera digitale Panasonic DMC-LX100. (informazioni aggiornate
a settembre 2014)
• È possibile scattare foto senza rimuovere il chiusura automatica
obiettivo dalla fotocamera digitale.
∫ Anbringen des Automatik-Objektivdeckels
∫ Installazione della chiusura automatica obiettivo
Vorbereitung:
Schalten Sie die Kamera aus.
Preparazione:
Spegnere la fotocamera.
1
Entfernen Sie den Frontring des Objektivs.
1
• Bewahren Sie den Frontring des Objektivs sorgfältig auf, um
ihn nicht zu verlieren.
2
2
Drehen Sie den Automatik-Objektivdeckel in
Pfeilrichtung, bis er einrastet.
∫ Vorsichtsmaßnahmen für den Gebrauch
• Der Automatik-Objektivdeckel und ein Filter können nicht
gleichzeitig an der Kamera angebracht sein.
• Der Automatik-Objektivdeckel ist nicht staubdicht. Vermeiden Sie
die Verwendung des Automatik-Objektivdeckels an Orten mit
starkem Staub- und Sandaufkommen etc.
• Achten Sie darauf, den Automatik-Objektivdeckel keinen starken
Stößen auszusetzen, da diese zu Beschädigungen oder
Verformungen führen können.
• Drücken Sie nicht fest auf den mittleren Bereich des
Automatik-Objektivdeckels.
• Wischen Sie den Automatik-Objektivdeckel mit einem trockenen,
weichen Tuch ab, bevor Sie den Automatik-Objektivdeckel reinigen.
– Entfernen Sie den Automatik-Objektivdeckel nach dem Gebrauch
und wischen Sie Flecken und Staub vom Inneren des
Automatik-Objektivdeckels sowie vom Bereich um die Linse
herum ab.
– Wenn der Automatik-Objektivdeckel stark verschmutzt ist, kann
er durch Abwischen des Schmutzes mit einem feuchten,
ausgewrungenen Tuch und anschließend mit einem trockenen
Tuch gereinigt werden.
– Verwenden Sie zur Reinigung des Automatik-Objektivdeckels
keine Lösungsmittel wie Waschbenzin, Verdünner, Alkohol,
Küchenreiniger etc., da diese Mittel zur Beschädigung des
Automatik-Objektivdeckels oder zum Abblättern der
Beschichtung führen können.
• Lesen Sie die Bedienungsanleitung Ihrer Digitalkamera sorgfältig
durch.
Rimuovere l’anello anteriore dell’obiettivo.
• Fare attenzione a non perdere l’anello anteriore dell’obiettivo.
Ruotare la chiusura automatica obiettivo nella
direzione della freccia finché non si arresta con un
“clic”.
∫ Precauzioni per l’uso
• Non è possibile fissare alla fotocamera contemporaneamente la
chiusura automatica obiettivo e un filtro di qualsiasi tipo.
• La chiusura automatica obiettivo non è resistente alla polvere.
Evitare di usarla in luoghi con molta polvere, sabbia, ecc.
• Fare attenzione a non esporre la chiusura automatica obiettivo a
forti impatti che causeranno danni o deformazioni.
• Non premere con forza l’area centrale della chiusura automatica
obiettivo.
• Prima di pulire la chiusura automatica obiettivo, pulirla con un
panno asciutto morbido.
– Dopo l’uso, rimuovere la chiusura automatica obiettivo e
rimuovere macchie e polvere al suo interno e nell’area attorno
all’obiettivo.
– Quando la chiusura automatica obiettivo è estremamente sporca,
è possibile pulirla rimuovendo la sporcizia con un panno umido
strizzato, e quindi passando un panno asciutto.
– Non utilizzare solventi come benzina, diluenti, alcol, detergenti da
cucina, ecc. per pulire la chiusura automatica obiettivo, per
evitare di deteriorare la chiusura automatica obiettivo o di
rimuovere la finitura esterna.
• Ricordarsi di leggere le istruzioni per l’uso della fotocamera digitale.
∫ Specifiche
È possibile che le specifiche subiscano delle modifiche senza
preavviso.
Dimensioni:
∫ Technische Daten
Die Spezifikationen können ohne Ankündigung geändert werden.
Abmessungen: Maximaler Durchmesser etwa 59,9 mm
Gesamtlänge etwa 8,2 mm
Gewicht:
Etwa 12,2 g
Massa:
Diametro massimo circa
59,9 mm
Lunghezza totale circa
8,2 mm
Circa 12,2 g
請完整閱讀本使用說明書,並將其妥善保管好,以便日後參考。
本自動開閉鏡頭蓋只能在 Panasonic 數位相機 DMC-LX100 上使用。
(截至 2014 年 9 月)
• 可以不從數位相機上取下自動開閉鏡頭蓋而錄製影像。
∫ 安裝自動開閉鏡頭蓋
準備:
關閉相機。
1
取下鏡頭前環。
• 請注意不要將鏡頭前環弄丟。
2
朝箭頭指示的方向轉動自動開閉鏡頭蓋直到發出喀噠聲到
位為止。
∫ 使用時的注意事項
• 不能將自動開閉鏡頭蓋和任何濾鏡類同時安裝在相機上。
• 本自動開閉鏡頭蓋不是防塵規格。 請避免在有很多灰塵、沙子等的場
所使用本自動開閉鏡頭蓋。
• 請注意不要使自動開閉鏡頭蓋受到強烈撞擊,這會導致損壞或變形。
• 請勿用力按自動開閉鏡頭蓋的中央區域。
• 清潔自動開閉鏡頭蓋之前,請先用軟的乾布擦拭自動開閉鏡頭蓋。
– 使用後,請取下自動開閉鏡頭蓋,然後擦去自動開閉鏡頭蓋的內側
及鏡頭周圍區域的污穢和灰塵。
– 當自動開閉鏡頭蓋被弄得非常髒時,可以先用擰乾的濕布擦去污
垢,然後再用乾布擦拭。
– 請勿使用汽油、稀釋劑、酒精、廚房清潔劑等溶劑清潔自動開閉鏡頭
蓋,否則可能會造成自動開閉鏡頭蓋變質,或塗層可能會剝落。
• 請務必閱讀您的數位相機的使用說明書。
∫ 規格
規格如有變更,恕不另行通知。
尺寸 :
重量 :
最大直徑約 59.9 mm
全長約 8.2 mm
約 12.2 g
進口廠商 : 台松電器販賣股份有限公司
地址 : 新北市中和區員山路 579 號
電話 :(02)2223-5121