1
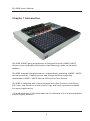
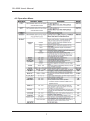
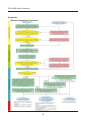
SU-6080 User's Manual
SU-6080 User's Manual
Contents
Chapter 1 Introduction............................................................3
Chapter 2 Overview................................................................4
Chapter 3 Accessories............................................................5
Chapter 4 Functions...............................................................6
Chapter 5 Basic Maintain.....................................................15
Appendix............................................................................... 16
2
SU-6080 User's Manual
Chapter 1 Introduction
SU-6080 e-MMC gang programmer is designed to meet e-MMC/ eMCP
device content duplication/verification manufacturing needs on industrial
platform.
SU-6080 features high-performance, independently operating e-MMC / eMCP
device sockets by 1 master source and 8 target sockets supporting
mainstream e-MMC / eMCP devices with various form factors.
SU-6080 is equipped with unique software and offers Partition, Auto,Mirror,
File, User, and AutoScan mode of both Copy and Verify operations suitable
for various applications.
* All product photos in this document are for reference only; the actual product
may be slightly different.
3
SU-6080 User's Manual
Chapter 2 Overview
2.1 Features
(1) 1x Master + 8x Target Independent e-MMC / eMCP sockets.
(2) Supports e-MMC BOOT-1/2, General Purpose-1/2/3/4, and User Data
Area Partitions as well as EXT_CSD register settings copy and verify
operation.
(3) Supports MMCA 4.5 compatible e-MMC / eMCP devices.
(4) Supports e-MMC 8-bit mode working.
(5) Copy/Verification operation in Partition / Auto / File / Mirror / User /
AutoScan mode.
(6) On-the-fly checksum generation during verify operation.
(7) Provides EXT_CSD setting checksum info.
(8) Supports enabling SANITIZE register setting function for MMCA 4.5
e-MMC / eMCP.
(9) Supports boot re-size function with e-MMC / eMCP equipped with
boot re-size function.
(10) Replaceable e-MMC / eMCP device socket module is available.
(11) Equipped with 1 MicroSD card socket module for firmware update
requirement.
2.2 Specifications
‧Power Requirements: 100-240V, 50/60 Hz, 35W
‧Card Slots: MMCA, 4.5 compatible ; Master x 1, Target x 8
SD 3.0 compatible ; Firmware Update Use x 1
‧Dimensions: 352mm x W 302mm x H 60mm
‧Display: 16x2 Backlit LCD
2.3 Applications
‧e-MMC / eMCP IC Programming Auto Handler.
‧e-MMC / eMCP IC Programmer.
4
SU-6080 User's Manual
Chapter 3 Accessories
‧SU-6080
‧MicroSD Socket Module (Purchasable)
‧OQC Report x1
‧12x16mm 169-ball e-MMC/eMCP Socket Module (Purchasable)
‧12x18mm 169-ball e-MMC/eMCP Socket Module (Purchasable)
‧14x18mm 169-ball e-MMC/eMCP Socket Module (Purchasable)
‧11.5x13mm 153-ball e-MMC/eMCP Socket Module (Purchasable)
‧14x18mm 100-ball e-MMC Socket Module (Purchasable)
5
SU-6080 User's Manual
Chapter 4 Functions
4.1 LED Indicators
Beneath each socket module there are two indicators indicating
operation status.
6
SU-6080 User's Manual
4.2 Operation Menu
7
SU-6080 User's Manual
*1 : If you do not know which mode should be used, we recommend
you do SrcScan (Source Scan) first and use ATSCAN (AutoScan)
Mode. Another choice is Mirror Mode; it is the safest way to do the
operation but the operation time would be longer. The other choice
is PARTTN (Partition) Mode; it is faster then Mirror Mode and also
safe but should notice that if there is any data in the Bottom area of
e-MMC content.
*2 : Please be noted that different mode leads to different checksum.
*3 : The time costs by the SrcScan (Source Scan) operation depends on
the content size of source e-MMC; same volume e-MMC with more
content and the scan speed will be faster, e.g. the Source Scan time
of a 8g e-MMC with 4g content will be much shorter than which of a
8g e-MMC with only 1g content.
*4 : FORMAT function is mainly for SD socket; not suitable for e-MMC
socket and not useful for any new e-MMC card.
*5 : Not suitable for e-MMC operation.
*6 : To use User Mode, operaton length in option UserSz and BottomSz
should be defined first.
*7 : If the gang programmer is manually operated, please set this option
to OPRNT. If the gang programmer is automatically operated,
e.g. the gang programmer is placed on an automatic platform or is
connected to a HMI controller, please set this option to HOST.
*8 : Please be noted that certain end-point device platform may request
certain data to be placed in the bottom area of the e-MMC. To
find out if there’s data in the bottom area, you can use SrcCksm
function - define BottomSz to 000MB, then run SrcCksm PARTTN
and get the first checksum; then define BottomSz to 001MB and
run SrcCksm PARTTN to get the second checksum. If these two
checksums are different, it means there’s data located in the bottom
area. At this time please check with the source e-MMC provider to
get more info about the size of bottom area.
*9 : When IDCHK is set to ON, MFR_ID (Manufacturer ID) and OEM_ID
of cards in target slots must be match with the ID of card in source
slot at card initialization. If the target e-MMCs are mixed up with ICs
of different MFR_ID and OEM_ID that not qualified with the source
IC, you can set this option to ON to filter them out.
8
SU-6080 User's Manual
*10 : If the fail rate of copy operation is high, you can consider setting
this option to 25MHz to decrease the copy speed to get more
stability.
*11 : Please always leave this option to 0; unless the gang programmer
always hangs in the process of operation, then try setting this
option to 1/2/3.
*12 : Please be noted that partition for e-MMC is an OTP operation;
once the e-MMC has been partitioned, it cannot be partitioned any
more. In the same way, once the e-MMC had been copied and
used before, there is a very big chance that it had been partitioned;
therefore if you want to make this e-MMC to be copied again with
another source e-MMC, even their MFR_ID and OEM_ID are the
same and the copy/verify operation shows no error, eventually the
target e-MMC still may not work as the source e-MMC; because
their partition structure are not the same. To avoid this situation,
please always use new e-MMC on target slot; if the target e-MMCs
are mixed up with used ICs, you can set this option to ON to filter
those partitioned ICs out.
*13 : This function will only temporarily power off the target slot but not
the whole gang programmer, after copy operation is done and
before verify operation starts.
*14 : This function is designed for those manual operators; at manual
working process, often the target slot shows error after initialization
is just because the e-MMC is not correctly placed. Setting this
option to ON will offer a chance to re-place the e-MMC after the
first initialization.
*15 : SYSINFO contains serial no. of the gang programmer and 5
firmware image version info. SLOT-0 ~ 9 INFO contains serial no.
of the e-MMC module, USE record, PASS record, FAIL record, and
PFREC record (the latest 32 times fail rate).
9
SU-6080 User's Manual
4.3 Operation Mode
PARTTN – Partition Mode
Partition Mode copy entire only partitioned area designated by MBR
partition table entries in exact sector by sector, byte by byte mirroring
manner.
In the case if only a portion of the source card is used while only the
allocated areas are to be copied and verified, using Partition Mode
can reduce the operation time and pertaining the exactness of copy
required.
This allows source card with multiple partitions or partitions formatted to
file system other than FAT16/32 to be copied and/or verified, provided
that the partitions are made based on MBR and partition table entry.
The MS extended partition table entry format is also supported.
It is recommended to use Partition Mode when sector-by-sector, byteby-byte exactness of new copies required and the MBR partition table
allocated area is smaller than the card capacity.
Please be noted that if there’s certain data in the bottom area of e-MMC,
BottomSz should also be properly set.
MIRROR – Mirror Mode
Mirror Mode copy entire source card content onto target cards in exact
sector by sector, byte by byte mirroring manner.
This allows source card with multiple partitions or partitions formatted to
file system other than FAT16/32 to be copied/verified.
It is recommended to use Mirror Mode, when sector-by-sector, byte-bybyte exactness of new copies is required.
Mirror Mode is the safest mode to do the operation, but the operation
time will be longer.
AUTO – Auto Mode (Not Recommended for e-MMC operation)
Auto Mode automatically scan source card and copy/verify only those
space occupied by user data.
Use target card with the same labeled capacity as the source card in
Auto Mode. The Auto Mode allows target cards with +/- 5% capacity
variation from source cards.
In Auto Mode, the gang programmer automatically adjusts partition size
to fully utilize storage space of target card. At the mean time, the
10
SU-6080 User's Manual
gang programmer automatically identifies storage area that is occupied
by user data in the source card. Only the storage area occupied by user
data are copied and verified to reduce overall operation duration.
Only when the source card is formatted as FAT16/32 file system is
supported by Auto Mode. It is recommended to use Auto Mode, when
source and target cards are with the same labeled capacity and are
formatted to FAT16/32 file systems.
FILE – File Mode (Not Recommended for e-MMC operation)
File Mode browse source card root directories and subfolders and then
copy/verify all file automatically.
Source card must be formatted under FAT16/32 file system. In File
Mode Copy operation, the target cards are first being re-formatted to the
same file system as the source card while utilizing all storage space
available. And then, the gang programmer browses root directory and
sub-folders and copy each file found onto the target cards. This allows
the target cards with different capacities to be supported. (However,
target card shall be supported by the source card formatted file system.)
In File Mode Verify operation, the gang programmer browse root
directory and sub-folders. Mark each file found and try to open file with
the same file name within the same directory in the target cards. If the
corresponding file is found file verify operation is performed and then
continue to next file or directory until all files and directories are verified.
It is recommended to use File Mode, when source and target cards are
with different labeled capacity and are formatted to FAT 16/32 file
systems.
USER – User Mode
User Mode offers user full control over operation length starting from
LBA sector 0. Under user mode, source data are sector-by-sector
copied and verified as Mirror Mode. But the operation length is user
defined by the UserSz option in 0.1GB unit.
Please be noted that if there’s certain data in the bottom area of e-MMC,
BottomSz should also be properly set.
11
SU-6080 User's Manual
ATSCAN – AutoScan Mode (Most Recommended for e-MMC operation)
The AutoScan mode allow users to search through entire user data area
of master IC for valid user data and store the scan result back to master
IC.
Using AutoScan mode, users may safely expedite COPY/VERIFY
operation disregarding the operating system, partitioning, or file system
format being used and recorded in the source IC.
To use the AutoScan feature, please follow below instructions:
Procedure A - For NEW master IC with updated content:
1. Power ON the gang programmer , and then place the master IC into
source slot.
2. Scroll the menu to "SrcScan" and press START.
3. The Source Scan operation begin. Wait until source scan operation
complete, this may takes a while depends on the capacity of master
IC and the size of recorded user data.
4. When the display indicates "Save ScanList Y"If user intend to save scan result into master IC, please press START.
If user DO NOT intends to save scan result into master IC, please
press LEFT/RIGHT key to switch the option to "Save ScanList N" and
then press START.
Saving SrcScan result means saving the ScanList to master IC, which
eliminate the needs to re-perform SrcScan again after powering off
the gang programmer.
The gang programmer will automatically search through master IC for
available empty space to save ScanList data. The ScanList data will
not participate with Copy/Verify/SourceChecksum operations under
AutoScan mode.
However, a master IC that contains saved ScanList data may result in
variation of Copy/Verify/SourceChecksum operation under operation
mode other than AutoScan mode.
If you do not want to put any data other than original content into the
master IC, please do not save scanlist to master IC; at this condition
please remember not to power off the gang programmer, or the
scanlist data will gone.
5. Now the gang programmer is ready to perform operation under
AutoScan Mode. Insert target e-MMC, scroll the menu to COPY
ATSCAN / VRFY ATSCAN / SrcCksm ATSCAN and then press
START to start operation.
12
SU-6080 User's Manual
Procedure B - For master IC that performed SrcScan with saved
ScanList data, and with content that has NOT been updated:
1.Power ON the gang programmer and place the master IC into source
slot.
2. Now the gang programmer is ready to perform operation under
AutoScan Mode. Insert target e-MMC, scroll the menu to COPY
ATSCAN / VRFY ATSCAN / SrcCksm ATSCAN and then press
START to start operation.
4.4 Operation Statistics
Operation statistics is displayed after selected operation is finished.
Statistics includes:
Pass / Fail Quantity
Indicate pass/fail card quantity during operation.
Copy / Verify Speed
Indicate average user data copy/verify speed (in MB/sec).
Total Operation Time
Indicate period of time elapsed during selected operation (in second).
Total Operation Data Capacity
Indicate total amount of data being copied/verified (in KB).
EXT_CSD Setting Checksum
Indicate source EXT_CSD setting checksum generated during VERIFY
operation.
Source Data Checksum (32 bits)
Indicate source data checksum or source EXT_CSD setting + data
checksum generated during VERIFY operation. (Checksum is displayed
only after COPY+VERIFY or VERIFY operation.)
13
SU-6080 User's Manual
4.5 Test Mode
A test utility is equipped in the gang programmer for basic functionality
test and ROM image update.
Entering Test Mode
1. Switch off the power of the gang programmer.
2. Press and hold the START button; while holding START button,
switch on the power of the gang programmer. Hold the START button
for a while and then the test menu will show.
Test Mode Menu
14
SU-6080 User's Manual
Chaper 5 Basic Maintain
5.1 ROM Image Update
1. Prepare a MicroSD card and quick-format the card on PC with a
MicroSD card reader. (Please make sure formatting the card with
default settings and giving the MicroSD card a disk label name.)
2. Copy the released ROM image file (SU_6080.BIN) to the root directory
of the MicroSD card. (If the original image file name is in form of
yyyymmdd SU_6080.BIN, please rename it to SU_6080.BIN.)
3. Insert the MicroSD card with ROM image file to the MicroSD socket
module on the gang programmer.
4. Turn on thegang programmer and enter test mode.
5. Select IMAGE UPDATE and press START.
6. LCM displays confirmation page, press RIGHT to switch the option to Y,
and then press START to proceed image update.
7. The gang programmer will query MicroSD slot, search for ROM image
file, and automatically complete the ROM image update.
8. Wait until LCM display returns to IMAGE UPDATE page.
9. The ROM image update is now complete. Turn off the gang programmer
and then turn it on again for the changes taking effect.
10.To confirm a successful ROM image update, enter test mode again
and select IMAGE VERSION to show current ROM image version; or
use System Info function in the operation menu.
15
SU-6080 User's Manual
Appendix
Manual Operation Procedure
16
Document No.: 130731-V1.0
TEL: +886-2-2999-1860#15
E-mail: [email protected]
Web: www.leap.com.tw