1
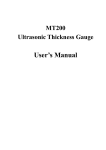
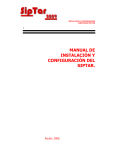
VR-101 series HD 720P High Definition Handheld Driving Recorder User Manual Please read the user manual carefully before use and keep for future reference. All rights reserved. © Mitech Technologies Co., Ltd. This user manual is subject to change without prior notice. Safety Precautions Please use this device according to the operation instructions and warnings on the user manual. Before you cleanse the device, make sure the power is switched off and Micro SD card is removed. Warnings: Do not use this device in a humid (relative humidity above 80%), gaseous conductive environment. Do not drop the device in case it might break. Do not block or cover the ventilation holes on the device. Please put this device on a well-ventilated place and do not put other objects in the device. Do not use the device for a long time or put the device in an overheated environment (over 45°C), this will affect product lifetime. Warranty period of the product is 1 year, (battery is 6 months). Battery life will be shortened if operated in an overheated environment. Please make sure the cigarette lighter receptacle voltage match the mini USB power cable voltage. Danger:Do not constantly watch the LCD screen on the device while driving. Pre-operation Instruction Instructions: Make sure power is switched off before you cleanse the device. Please use neutral cleaner to cleanse the device. Please remove power cable when device is not in use. Please switch the device off and remove power cable when you leave your car; also put the device in a place that is not exposed to direct sunlight or high temperature. Do not put the device on overheated places. Due to this product is a camera device, it is subject to various conditions such as when entering tunnels, daytime backlighting or lack of lighting. These might affect the recording quality. When the lighting conditions are less than ideal, please turn on the headlight for a better recording quality. Please be noted that stained or over-colored windshield might affect the recording quality, such as unclear or distorted images. Please be noted that removing Micro SD card without switching off the device might cause loss or damage of data. Please stop recording before you remove Micro SD card. It is recommended to store important data to other storage devices such as PC/Laptop, removable hard drive or CD/DVD discs. We are not responsible for any loss of data whatsoever. We are not responsible for any unexplained reasons of improper operating environment or operating methods. Please do not remove or adjust the mounting bracket for your driving safety. 1 Things to be avoided: Do not block or cover the ventilation holes and slots on the device. When removing the device from the mounting bracket, please be careful not to break the mortise and tenon. When unexpected shutdown happens, simply long press power switch to turn the device on. Do not try to disassemble and repair the device. Possible reasons for unexpected shutdown include (1) incompatible memory card, (2) severe vibration while driving, (3) battery is low, (4) unsteady voltage. When the device is out of order, please contact distributor for repair or replacement service. Warranty shall not apply to the following conditions: improper maintaining or cleaning, modification or repair by the customer. Avoid dropping, crushing the device. Avoid water or liquids that may penetrate inside the device. Battery: Do not disassemble or expose battery to overheated environment (over 45°C). It is recommended not to use the device in a car that has an interior temperature over 40°C. Do not incinerate battery or discard batter in the fire. Please use the genuine power cable for battery charging. For environmental protection, please recycle used battery. Do not litter. Product Introduction Features: This product is a camcorder device used when driving vehicles and it has the following features: HD 1.3 Mega pixel camera. Ultra wide angle (130°), clear video resolution, and no blind spots from left to right views. 2”HD LCD full color screen. Resolution options: 1280x720 (default), 848x480, 320x240. HD 720P Mode @ 30 FPS. H.264 video compression HD 720P HD video. Support HDMI output. Low Lux enhanced image processing for better recording quality at night time. Built-in time and date display on recorded videos. Built-in high-speed video processing technology. Support Zoom 4X (Max.) Storage: 4GB above Class 6 SDHC memory cards. Support up to 32 GB. Power supply and charging battery via mini USB power cable (5 Vdc). If connected to PC/Laptop, it can recharge the battery and download the videos/photos from the memory card. Automatic loop recording when car starts. Automatically stop recording when car stops. Loop recording time span options: 5/10/15 Minutes. Support battery life detection and battery protective circuit for safety. 2 Built-in audio and video recording can be played simultaneously. Built-in photo shooting. Multi-language interface: Traditional/Simplified Chinese, English, French, German, Spanish, Italian, Portuguese and Japanese. Accessories: HD Smart DVR Driving Recorder(1) Mini USB power cable (1) Mounting Bracket (1) User Manual (1) 4GB Micro SD Card (Class 6 ) (1) (Note: optional accessory for dealers only) Exterior Overview 3 Dimension (mm) Exterior Description 1. Power Switch 8. Microphone 2. Bracket Tenon 9. Play Button 3. Lens 10. Rightward Button 4. REC/OK Button 11. Downward Button 5. Speaker 12. Menu Button 6. Product Logo 13. LCD Screen 7. HDMI output 14. Mini USB/Power Input Port 4 15. Micro SD Card Slot Installation Please install the device on a flat place while the car is stopped. Please double-check the accessories and fully understand the installation instructions before you install the device. Please be noted not to let the device hinder driver’s visibility. Look for the best recording spot before you fix the bracket on the windshield. Try to hide cables for safety and beauty purpose. After fixing the bracket, please adjust the camera angle to get better recording results (no more than 1°). Recommended place to fix the bracket (see below): 5 Guide to Controls Power Switch Key: Automatic recording when car starts. Press Power Switch anytime will automatically power off the device. Power on the device and it will start to record again. Record / Confirm Button: (1) Switch Recording [Start / Stop] (2) Confirm button for system parameter setup. Menu Button: Switch Record Mode (Playback Mode) and System Setup when device is not recording. When device is recording, press Menu will turn off the screen (for energy-saving purpose, device is still recording.) Downward Button: Select function under menu. Rightward Button: Select function under menu and enter submenu. Photoshoot Mode when device is recording. Play Button: Playback recorded videos in the device when it is not recording 6 System Parameter Setup Resolution: Press Menu→Downward buttons to enter submenu [720P→WVGA→QVGA], press Downward to select and then press REC/OK to confirm. Loop Recording: Press Menu→Downward twice→REC/OK to enter submenu and [Off→5 Minutes→10 Minutes→15 Minutes], press Downward to select and then press REC/OK to confirm Date/Time: Press Menu twice→Downward→REC/OK to enter submenu [year/month/day; hour/minute/second]. Press Rightward and Downward to adjust numbers, press Rightward to adjust item, and then press REC/OK to confirm. Auto Power Off: Press Menu twice→Downward twice→REC/OK to enter submenu [Off→2 Minutes→5 Minutes→10 Minutes], press Downward to select and then press REC/OK to confirm. Beep Sound: Press Menu twice→Downward three times→REC/OK to enter submenu [Off→On], press Downward to select and then press REC/OK to confirm. Language: Press Menu twice→Downward four times→REC/OK to enter submenu [English→Deutsch→Français→ Espanñl→Italiano→Português→Traditional Chinese→Simplified Chinese→Japanese], press Downward to select and then press REC/OK to confirm. Microphone: Press Menu twice→Downward five times→REC/OK to enter submenu [Off→On], press Downward to select and then press REC/OK to confirm. Default Setting: 7 Press Menu twice→Downward six times→REC/OK to enter submenu [Return menu setting to defaults→ Cancel→OK], press Downward to select and press OK to confirm. Version: Press Menu twice→Downward seven times→REC/OK to check version and then press REC/OK to confirm. Digital Zoom: Under Record Mode, press Downward to change Zoom multiple setting instantly. After Zoom multiple setting, the device will continue to record. Under Non-Record Mode, press Downward to change Zoom multiple setting instantly, after Zoom multiple setting, the device will continue to record. Guide to Playback Mode Press Play button while device is not recording to switch to Playback Mode. Press Play again to switch to Record Mode. Under Record Mode, press Rightward to select recorded video files, press REC/OK to play. When playing back video files, press Downward to adjust volume levels (loud to quiet). Delete Videos: Under Playback Mode, press Menu to enter submenu [Delete、Format], press Downward to select and then press REC/OK to confirm. 1. Select Delete and enter submenu [Delete Current→Delete All], press Downward to select and then press REC/OK to confirm. 2. Select Format and enter submenu [Cancel→OK], press Downward to select and then press REC/OK to confirm. Guide to Record Mode Automatic loop recording when car starts. The flashing red dot on the top left-hand corner on the screen indicates the device is recording. When recording, press Menu will turn off the LCD screen but device is still recording. Press Menu again will turn on the screen. Press REC/OK to switch [Start / Stop] recording. When recording, press Rightward to take a single photo shoot anytime. 8 Guide to HDMI Output HDMI output: Connect HDMI cable (C Type) to HDMI-supported devices to playback recorded video files from Micro SD card, these videos will not show on the LCD screen on the device at the same time. Guide to USB Connection Connect driving recorder to a PC/Laptop via USB cable, when Mass Storage shows on the screen, press REC/OK to confirm, thus it works as a removable storage and recorded files can be read directly. Guide to Format Memory Card Memory Card has been formatted at the factory. If you use other memory card, format it before use. How to format memory card: under Non-Record Mode, press Play to switch to Playback Mode, press Menu to enter submenu, press Downward to select Format, and then press REC/OK to confirm. Or you can format memory card on a PC/Laptop, please select 32K for cluster size. Guide to Files inside Micro SD Memory Card DCIM\Date of Recording: Recorded video files will be stored to the directory (\DCIM\Date of Recording) and will be named Date of Recording XXXX.AVI. Files can be played via Windows Media Player or other media players. 9 Specification Power Input Voltage Input: 12 Vdc, Output:5Vdc (Note: for charging main device power and battery.) Built-in Battery 320 mAh (About 1 hour recording time) Mini USB Cable Input Voltage: 12Vdc. Output Voltage: 5Vdc. Battery Life Detection Yes Battery Protective Circuit Yes Sensor Pixel 1.3 Mega Pixel HD (CMOS) Camera Angle 130° Optical Glass Lens (Wild Angle) LCD Full Color TFT LCD 2” Temperature Operating Temperature -20°C~+60℃ Audio Record / Play Built-in Microphone / Speaker Video Loop Recording OFF/5/10/15 Minutes (Default: 5 Minutes) Motion Detection Yes Auto Record Automatic loop recording when car starts. Camera Automatically stop recording when car stops. Backup before Shutdown Yes Zoom 4X (Max.) Image Compression Format H.264 (Advanced Video Coding) Processing Image File Format AVI (can be played on Windows Media Player) Resolution 1280*720 (HD), 848*480, 320*240 FPS 720p 30 fps Output HDMI Time / Date Display YYYYMMDD/HHMMSS Photo shoot Photo shoot when recording (photos will not be Photo shoot overlapped with loop record) Format JPEG Storage Micro SD Support 4-32 GB Micro SD Card (Class 6 Above) Language 9 Languages Traditional Chinese, Simplified Chinese, English, French, German, Spanish, Italian, Portuguese and Japanese. Exterior Accessories Dimension (L*W*H) 75mm*45mm*23.5mm USB Interface Charging, Power Supply, Connect to PC/Laptop Color Choices Black, White, Red. (according to product spec) Mounting Bracket Suction Type or Sticker Type (according to product) Power Cable (5V 500mAh) Length: 3.5 M Micro SD Card (Class6 ) Optional (SDHC) Note: The power cable of this product has been designed for special protection, it is recommended to use this power cable for charging main device. 10