1
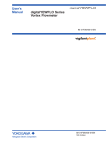
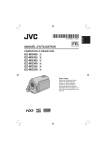
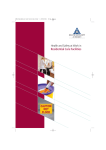
User’s Manual
E-TENS
1. Product Description:
Wandy© Medium Frequency Interference Treatment Device - E-TENS (ET-F01), features 4
independent operating channels with adjustable pulse intensities and timer across 7 modes in
both TENS/EMS functions.
1
Creation Date:
Revise Date:
7th Nov. 2012
User’s Manual
E-TENS
2. Device Pupose:
(1) To reduce shoulder/back muscle pain and nerve ending paralysis, while improving overall
blood circulation in the treatment area.
(2)Stimulates the muscle by using electrodes on the treatment area.
3. E-TENS ET-F01 Outline:
A. Body
O
A-1. Main Power Switch (ON/OFF)
A-2. DC Input Socket (+
- )
A-3. Lead Wire Output Sockets
A-4. Soft Power Switch (ON/OFF)
A-5. CH Channel Switch (CH1~CH4)
A-6. Mode Switch (MODE)
A-7. Intensity Adjustment Key (UP)
A-8. Intensity Adjustment Key (DOWN)
A-9. Channel Off Switch (CH OFF)
2
Creation Date:
Revise Date:
7th Nov. 2012
User’s Manual
E-TENS
B. Leadwires
(Specifications: H3.8+2ΦPin(Red&Black) Black Wire L=1100mm,OD=1.5X3.0)
B-1. Input Lead Wire Socket
B-2. Electrode Leads
C. Wandy© Self-Adhesive Electrode Pads
- Sizes Included:P4-50mm(8pcs)
C-1. Electrode Lead Sockets
3
Creation Date:
Revise Date:
7th Nov. 2012
User’s Manual
E-TENS
D. Power Adaptor (AC to DC):(UL or IEC certified)
(Specifications: Input AC 100V-240V,50-60HZ Output DC 15V 2A)
.
4
Creation Date:
Revise Date:
7th Nov. 2012
User’s Manual
E-TENS
4. Operating Instructions:
A) Turning On the Device:
Step
1
2
3
4
Illustration
Instruction
Please check that the Main Power Switch
(A-1) is turned to the “OFF” position.
Connect the DC Output socket (D-1-4) to the
DC Input Socket (A-2).
Connect the AC Output Socket (D-1-2) to the
AC Input Socket (D-1-3).
Plug in the AC Plug (D-1-1) to the household
electrical outlet (AC Terminal).
5
Creation Date:
Revise Date:
7th Nov. 2012
User’s Manual
Step
E-TENS
Illustration
Instruction
Connect the Electrode Leads (B-2) to the
5
Electrode Lead Sockets (C-1).
Connect the Input Lead Wire Socket (B-1)
to the Output Lead Wire Socket (A-3) from
6
CH1~CH4.
Note: Illustrated channel is CH1.
Place Wandy© Self Adhesive Electrode
7
Pads on the area to be treated.
Turn the Main Power Switch (A-1) to the
8
“ON” position. The E-TENS system is now
in standby mode.
6
Creation Date:
Revise Date:
7th Nov. 2012
User’s Manual
E-TENS
B) Operating :
(Note. A beep will sound when a key is pressed)
Step
Illustration
Instruction
To turn on the LCD display, press once
on the “ON/OFF” Power Switch (A-4)
1
on the control panel. (Note. The word
“WELCOME” should appear on the
screen once it is turned on).
Choose the desired channel by pressing
selected CH Switch (A-5), and the LCD
2
display will show the selected channel
(CH) on the screen.
Note: Illustrated channel is CH1。
~ Selecting The Modes ~
3
Press the MODE Switch (A-6) to change
modes. The LCD display will indicate
the current MODE with an arrow
showing the present settings.
7
Creation Date:
Revise Date:
7th Nov. 2012
User’s Manual
Step
E-TENS
Illustration
Instruction
Press the Adjustment “UP” (A-7) or
“DOWN” Key (A-8) to choose the
desired mode. (Note. A “beep” will
sound with each adjustment). The
LCD display will then show the
current selected mode
4
(MODE1~MODE7).
Suggestion: For Muscle Stimulation
(EMS Function), select MODE1~3.
For muscle pain relief (TENS
Function) select Mode 4~6 and
MODE7 (the automated cycle of all
previous 6 modes).
~ Selecting The Waveforms ~
To change Burst (or Modulation),
press the MODE Switch (A-6) until
the LCD display “
” marks BURST
(or MODUL) and adjust it with the
5
Adjustment “UP” or “DOWN” Key .
Note: When MODE is selected to
MODE1~3and MODE7, LCD will
display “BURST” , and when MODE
is selected to MODE4~6 LCD will
display “MODUL”.
8
Creation Date:
Revise Date:
7th Nov. 2012
User’s Manual
Step
E-TENS
Illustration
Instruction
To select pulse frequency, press on the Adjustment
“UP” (A-7) or “DOWN” Key (A-8). LCD will indicate
the pulse frequency per second (0~100BPS or MPS)
on the screen.
When using MODE7, the pulse frequency will be
displayed as AUTO on the LCD screen, and the
system will automatically adjust the pulse
frequency as it cycles all the previous 6 modes.
Note: The following are the adjustment ranges of
BURST or MODUL pulse frequency:
6
1 ~ 6 BPS or MPS
(1 BPS increase/decrease with each adjustment)
6 ~ 10 BPS or MPS
(2 BPS increase/decrease with each adjustment)
10~ 30 BPS or MPS
(5 BPS increase/decrease with each adjustment)
30~ 60 BPS or MPS
(10 BPS increase/decrease with each adjustment)
60~100 BPS or MPS
(20 BPS increase/decrease with each adjustment)
9
Creation Date:
Revise Date:
7th Nov. 2012
User’s Manual
Step
E-TENS
Illustration
Instruction
~ Time Selection ~
7
Press the MODE Switch (A-6) until
the LCD marker
points to TIMER.
Press the Adjustment “UP” (A-7) or
“DOWN” (A-8) Keys to set the
desired duration of treatment. The
timer increases/decrease at 5
8
minutes of interval. (Note. A “beep”
will sound with each adjustment).
LCD will continue to display the
remaining treatment time.
10
Creation Date:
Revise Date:
7th Nov. 2012
User’s Manual
Step
E-TENS
Illustration
Instruction
~ Selecting the Intensity ~
9
Press the MODE Switch (A-6) until the
LCD marker
points to LEVEL.
Please press the Adjustment UP (A-7) or
DOWN (A-8) Keys to adjust the current
intensity level. (Note. A “beep” will
sound with each adjustment).
Treatment intensity ranges from gentle
10
to intense and is displayed as: 1 to 20
PWR respectively on the LCD screen.
Press the Adjustment UP Key (A-7) to
increase the treatment intensity, and
DOWN Key (A-8) to decrease the
intensity.
11
Creation Date:
Revise Date:
7th Nov. 2012
User’s Manual
Step
E-TENS
Illustration
Instruction
~Changing the Channel Settings ~
If you need to change the Channel
setting during a treatment session,
11
please select the treatment Channel and
press on the CH Key (A-5) to change the
current setting.
Once the treatment channel is selected,
press the MODE Switch Key (A-6), using
the marker
12
on the LCD screen, to
adjust the setting to the desired
function. (Note. A “beep” will sound
with each adjustment).
Please press the Adjustment UP (A-7) or
DOWN (A-8) Keys, to adjust to desired
13
intensity level. (Note. A “beep” will
sound with each adjustment).
12
Creation Date:
Revise Date:
7th Nov. 2012
User’s Manual
E-TENS
C) Pausing & Turning off the Device:
Step
Illustration
Instruction
~Pausing Treatment~
1
To pause during a treatment
session, press on the selected CH
Key (A-5) for the current treatment
channel.
Press the CH OFF Key (A-9) to pause
the selected channel. The intensity
level will be reset to zero (LCD will
2
also display 0 at this point).
Note: The rest of the settings for
the selected channel or other
channels will not be changed.
~Resuming Treatment~
3
Press the CH Key (A-5) to resume
treatment for the selected channel.
13
Creation Date:
Revise Date:
7th Nov. 2012
User’s Manual
Step
E-TENS
Illustration
Instruction
Press the MODE Switch (A-6) until
4
LCD marker
points to LEVEL.
Please press the Adjustment UP
(A-7) or DOWN (A-8) Keys to adjust
the current intensity level.
(Note. A “beep” will sound with
each adjustment). Treatment
intensity ranges from gentle to
5
intense and is displayed as: 1 to 20
PWR respectively on the LCD
screen. Press the Adjustment UP
Key (A-7) to increase the
treatment intensity, and DOWN
Key (A-8) to decrease the intensity.
14
Creation Date:
Revise Date:
7th Nov. 2012
User’s Manual
Step
E-TENS
Illustration
Instruction
To stop all treatment channels, press
the ON/OFF Switch (A-4) to turn off all
channels at once and each settings will
reset to default, except for BURST (or
6
MODUL) selection. If a treatment
session (or setting) needs to be
resumed, please follow procedure B).
To turn off power, please turn the Main
Power Switch (A-1) to the OFF position.
7
All settings will reset to default.
15
Creation Date:
Revise Date:
7th Nov. 2012
User’s Manual
E-TENS
D) Turning Off:
Step
Illustration
Instruction
Current output(s) will stop when
treatment time reaches the end.
TIMER and LEVEL on the LCD screen
1
will display 0 MIN and 0 PWR at this
point. Alarm will sound every minute
as a reminder at the end of all
treatment session(s).
To turn off power, please turn the
2
Main Power Switch (A-1) to the OFF
position. All settings will reset to
default.
Please unplug the AC Input Plug
(D-1-1) (AC 100~240V,50~ 60HZ) from
3
the AC terminal. Avoid leaving the
Input Plug on the AC terminal when
device is not in use to lower risk of
permanent damage on the adaptor.
16
Creation Date:
Revise Date:
7th Nov. 2012
User’s Manual
E-TENS
E ) Trouble Shooting for System Malfunctioning
If the LCD screen is malfunctioning, yet all operating instructions are followed correctly,
please try the trouble shooting procedures below:
(1) Please check if the AC Input plug (D-1-1) is plugged to the AC terminal.
(2) Please check if the AC output Socket (D-1-2) is firmly attached to the AC Input Socket (D-1-3).
Also check if the DC Output Socket (D-1-4) is firmly attached to the DC Input Socket (A-2).
(3) Please check if the system Main Power Switch (A-1) is switched ON.
If problem still persists after applying all of the above procedures, please follow the steps
below:
(1) Switch the Main Power Switch (A-1) to the OFF position.
(2) Detach the AC Output Socket (D-1-2), DC Output Socket (D-1-4) and the AC Input Plug ( D-1-1 ).
(3) Repeat the operating Instructions A) to re-start the system.
F ) Precautions & Warnings:
1. Precautions Before Use:
(1) Patients with「Pacemaker」installed are strictly banned from using this system. Patients with
known heart condition/diseases must consult a qualified physician for permissions prior to
using this device.
(2) Consult a qualified physician before applying the treatment to areas on the neck, head and/or
near the heart. Please avoid applying treatment to these areas without a qualified physician’s
instruction.
(3) Consult a qualified physician prior to using this device during pregnancy.
(4) This device is not recommended for children aged 12 and under. Please consult a qualified
physician for recommended treatment on children.
(5) Patients with acute or infective diseases should follow their physician’s supervision while
applying treatment programs of the current device.
17
Creation Date:
Revise Date:
7th Nov. 2012
User’s Manual
E-TENS
(6) Patients with pain that originate from organ disease(s) and/or stroke, must obtain their
physician’s permission to use this device.
(7) Patients with bleeding symptoms must not use this device.
(8) DO NOT use this device within 1 hour of mealtime.
(9) Patients with cancer must consult their physician prior to using this device.
(10) DO NOT use this device near any shortwave or microwave devices, it may cause unstable
system output.
(11) DO NOT use this device at the same time with using other high frequency device/surgical
equipments to avoid burn in the treatment areas and/or risk of damage to the system.
(12) If problem continues, please contact your local dealer or the T.Y.Sherry © headquarter for
assistance. DO NOT perform self maintenance or attempt to disassemble the device.
2. Notes Before Use:
(1) Please read this manual over carefully prior to using this device.
(2) Please keep the Self Adhesive Pads clean, to ensure the quality of the treatment.
(3) Please make sure the Self Adhesive Pads are clean and are firmly attached to the treatment
area before use.
3. Suggestion for Intensity Setting:
For best treatment result, please select the appropriate intensity & recommended duration
(20~30 minutes).
4.Life time :
Device life time is 2 year.
18
Creation Date:
Revise Date:
7th Nov. 2012
User’s Manual
E-TENS
G) Maintenance & Storage:
1. Please turn off the Main Power Switch after each treatment session.
2. Please store this system in the original storage case as provided.
3. Please store the device in a cool and dry environment (under room temperature). Do not
store it in a humid environment or under high temperature.
4. Please clean with a dry cloth or ethanol wiper when necessary.
5. For repair, please send the device back to the original place of purchase or to T.Y.Sherry ©
Headquarter. DO NOT attempt to perform self-repair.
H ) Label Identification Method
1.Model:ET-F01
2. Serial Number ( S/N XXXXXXXX )
3. Produced By: T.Y Sherry International Co., Ltd.
4. Address: No. 48 Lane 392, Fu Teh 1st Rd. Shi-Chih 221 Taipei Taiwan
5. Production Date: yyyy/mm
6. Input Voltage: AC100 - 240V
7. DC Current: DC15V
50 - 60Hz
2A
8. Output Voltage: 0Vp-p ~ 70Vp-p (with 500Ω output impedance)
9.
“Please Read this Manual Before Use”
10.
“ BF Type Contact Product”
11.
“Double Insulation Product”
12.Adaptor Supplier:Mepos
13.
EC REP
M/N:HPU32B-106
Obelis S.A.Av.de Tervuren,34 Bte 44 B-1040Bruxelles,Belgium.
19
Creation Date:
Revise Date:
7th Nov. 2012
User’s Manual
E-TENS
I ) Conditions of use,Transportation and storage
Conditions of use:Temp. 5℃-40℃,Humidity 15%-93%(No Condensation),Atmospheric Pressure
700hPa-1060hPa.
Conditions Transportation and storage:Tamp. -25 ℃ -70 ℃ ,Humidity less than 93%(No
condensation),Atmospheric Pressure 700hPa-1060hPa.
J ) Watse Disposal Recommendation
Please dispose the device and any of its parts according to the local waste disposal
regvlations.
2. Device Pupose:
(1) To reduce shoulder/back muscle pain and nerve ending paralysis, while improving overall
blood circulation in the treatment area.
(2)Stimulates the muscle by using electrodes on the treatment area.
5. Wandy © Self Adhesive Electrodes:
1. The Wandy © Self Adhesive Electrodes are uniquely designed with low-impedance conductive
medium, and top quality hydrogel to maximize the electrodes’ performance.
2. The Wandy © Self Adhesive Electrode Pads have been qualified for GMP from the Health
Deparment of Taiwan (Permission ID: Taiwan Health Department No. 001357).
3. METHODF OF USE:
(1) Please Clean the skin area (where applicable) with ethanol or water before use.
(2) Please detach the Self adhesive electrode from the protective liner, then attached it to
where applicable (Do not detach the protective liner when electrodes are not in use, to prevent
the conductive gel from drying out.)
(3) Please attach the Electrode Leads (Pin or Button Type) to the Electrode Lead Sockets.
(4) After use, please remove the Electrode Leads from the Electrode Lead Sockets, then gently
lift the electrode up from the corner (please do not lift the electrode from the electrode leads)
to avoid damaging the electrode.
20
Creation Date:
Revise Date:
7th Nov. 2012
User’s Manual
E-TENS
WRONG CORRECT
(5) Please place the electrode back to the protective liner and into the original bag after use,
and store it in the shads, under room temperature of 25 Celsius degree.
(6) Remember to clean the skin after the electrode is removed from the treatment area.
Warning:
(1) Please do not place the electrode directly on wounds or broken skin.
(2) While in use, please do not remove the electrode from the treatment area.
(3) When electrodes lose adhesiveness or becomes dirty after multiple uses, please discard
the old electrodes and replace them with new electrodes.
!
Caution:
If skin experiences allergic reactions and/or irritation to the electrodes, please stop use and
seek professional medical advice immediately.
6. Specifications:
A) Power Adaptor Specification ( +
Input Power: AC 100 - 240V
DC 15V
-
)
50-60HZ
2A
B) Output Specification (Under 500Ω Impedance)
Output Intensity :0Vp-p ~ 70Vp-p
Frequency : 1Hz ~ 7.5KHz
C) Body Specification
Body Weight:::0.92KGS
Body Dimension: Height 60mm
Width 170mm
D) Electrodes are applied parts of this device
21
Creation Date:
Revise Date:
7th Nov. 2012
Length 240mm
User’s Manual
E-TENS
7.Operation Modes:
Function
Specifications
Mode 1
1.Frequency:2.5 KHz
2.Variable BURST Rate Frequency:0~100 Hz
3.Adjustable Output Period:5~60 Minutes, 5 Minute Per Step
4.Adjustable Intensity:0~70 Vp-p, 20 LEVEL
Mode 2
1.Frequency:5.0 KHz
2.Variable BURST Rate Frequency:0~100 Hz
3.Adjustable Output Period:5~60 Minutes, 5 Minutes Per Step
4.Adjustable Intensity:0~70 Vp-p, 20 LEVEL
Mode 3
1.Frequency:7.5 KHz
2.Variable BURST rate frequency:0~100 Hz
3.Adjustable Output Period:5~60 Minutes, 5 Minutes Per Step
4.Adjustable Intensity:0~70 Vp-p, 20 LEVEL
Mode 4
1.Frequency:2.5 KHz
2.Variable MODUL Rate Frequency:1~100 Hz
3.Adjustable Output Period:5~60 Minutes, 5 Minute Per Step
4.Adjustable Intensity:0~70 Vp-p, 20 LEVEL
Mode 5
1.Frequency:5.0 KHz
2.Variable MODUL Rate Frequency:1~100 Hz
3.Adjustable Output Period:5~60 Minutes, 5 Minutes Per Step
4.Adjustable Intensity:0~70 Vp-p, 20 LEVEL
Mode 6
1.Frequency:7.5 KHz
2.Variable MODUL Rate Frequency:1~100 Hz
3.Adjustable Output Period:5~60 Minutes, 5 Minutes Per Step
4.Adjustable Intensity:0~70 Vp-p, 20 LEVEL
Mode 7
1.Frequency:7.5 KHz → 5.0 KHz → 2.5 KHz Circulating For 1 Minute Each
2.Variable BURST Rate and MODUL Rate:1 →2 →10 →50 →100 Hz Auto
Circulation, 3 Minutes Per Frequency,30 Minutes For Full Circulation
3.Adjustable Output Period:5~60Minutes,5 Minutes Per Step
4.Adjustable Intensity:0~70 Vp-p, 20 LEVEL
Suggestion: For Muscle Stimulation (EMS Function), select MODE1~3.
For muscle pain relief
(TENS Function) select Mode 4~6 and MODE7 (the automated cycle of all previous 6 modes).
22
Creation Date:
Revise Date:
7th Nov. 2012