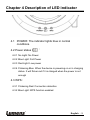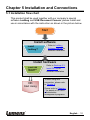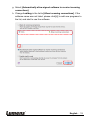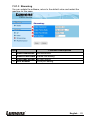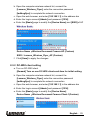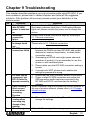
1
DC-W50 Wireless Docking User Manual - English [Important] To download the latest version of Quick Start Guide, multilingual user manual, software, or driver, etc., please visit Lumens http://www.Mylumens.com/support.php Table of Contents Copyright Information ..................................................................................... 2 Chapter 1 Safety Instructions......................................................................... 3 Precautions ................................................................................................ 4 FCC Statement........................................................................................... 4 EN55022 (CE Radiation) Warning .............................................................. 5 Chapter 2 Package Contents .......................................................................... 6 Chapter 3 Product Overview .......................................................................... 7 3.1 3.2 DC-W50 ............................................................................................ 7 Lock USB Connector Holder ............................................................. 8 Chapter 4 Description of LED indicator ......................................................... 9 Chapter 5 Installation and Connections ...................................................... 10 5.1 5.2 5.3 Installation flow chart ...................................................................... 10 Installing Application Software ........................................................ 11 Install DC125 .................................................................................. 12 Chapter 6 Start Using .................................................................................... 13 6.1 Start wireless connection ................................................................ 14 6.1.1 Manual connection.......................................................................... 15 6.1.2 WPS connection ............................................................................. 15 6.1.3 Change the SSID ............................................................................ 15 6.2 Change the firewall settings ............................................................ 16 6.2.1 Windows XP ................................................................................... 16 6.2.2 Windows 7 ...................................................................................... 17 6.2.3 Windows 8 ...................................................................................... 18 6.2.4 MAC OS X 10.7 / 10.8 / 10.9 .......................................................... 18 Chapter 7 Administration Menu ................................................................... 20 7.1 Wireless .......................................................................................... 20 7.1.1 Basic ............................................................................................... 20 7.2 System............................................................................................ 21 Chapter 8 Set DC-W50 for AP use ................................................................ 24 8.1 8.2 8.3 Connection diagram........................................................................ 24 Equipment requirements ................................................................. 24 DC-W50 setup ................................................................................ 24 Chapter 9 Troubleshooting ........................................................................... 27 English - 1 Copyright Information Copyrights © Lumens Digital Optics Inc. All rights reserved. Lumens is a trademark that is currently being registered by Lumens Digital Optics Inc. Copying, reproducing or transmitting this file is not allowed if a license is not provided by Lumens Digital Optics Inc. unless copying this file is for the purpose of backup after purchasing this product. In order to keep improving the product, Lumens Digital Optics Inc. hereby reserves the right to make changes to product specifications without prior notice. The information in this file is subject to change without prior notice. To fully explain or describe how this product should be used, this manual may refer to names of other products or companies without any intention of infringement. Disclaimer of warranties: Lumens Digital Optics Inc. is neither responsible for any possible technological, editorial errors or omissions, nor responsible for any incidental or related damages arising from providing this file, using, or operating this product. English - 2 Chapter 1 Safety Instructions Please use the product following the safety instructions below: 1. Operation 1.1 1.2 1.3 1.4 1.5 1.6 Please use the product in the recommended operating environment. Do not place Light Engine in tilted position. Do not place the product on an unstable trolley, stand or table. Do not use this product near water or source of heat. Use attachments only as recommended. Use the type of power source indicated on this Product. If you are not sure of the type of power available, consult your dealer or local electricity company for advice. 1.7 Always take the following precautions when handling the plug. Failure to do so may result in sparks or fire. Ensure the plug is free of dust before inserting it into a socket. Ensure that the plug is inserted into the socket securely. 1.8 Do not overload wall sockets, extension cords or multi-way plug boards to avoid potential risks. 1.9 Do not block slots and openings in the case of this product as poor ventilation may lead to overheating of this product. 1.10 Except as specifically instructed in this User Manual, do not attempt to open or remove covers by yourself. It may expose you to electric shock or other hazards. Refer all servicing to licensed service personnel. 1.11 Unplug the HD Camera from the wall outlet and refer servicing to licensed service personnel when the following situations happen: If the power cord or plug becomes damaged or frayed. If liquid is spilled into the Product or the Product has been exposed to rain or water. 2 Installation 2.1 Do not install this product in the embedded way unless there is proper ventilation device. 3 Battery 3.1 The batteries for this product is not removable, in case of failure, please consult with the original factory for maintenance. 3.2 Do not use the product any more when the indicator flickers red indicating low power, otherwise the capacity of storage of the battery would be affected. English - 3 3.3 The charging of the product may cause overheating, do not place the product in the place where it is badly ventilated. 4 Storage 4.1 Do not place the Product where the cord can be stepped on as this may result in fraying or damage to the lead or the plug. 4.2 Never push objects of any kind through cabinet slots. Never allow liquid of any kind to spill into the Product. 4.3 Unplug this product during thunderstorms or if it is not going to be used for an extended period. 4.4 Do not place this product or accessories on top of vibrating equipment or heated objects. 5 Cleaning 5.1 Unplug all the cables before cleaning. Use a damp cloth for cleaning. Do not use liquid or aerosol cleaners. Precautions Warning 1: To reduce the risk of fire or electric shock, do not expose this appliance to rain or moisture. Note Risk of Electric Shock Please do not open it by yourself. Caution: To reduce the risk of electric shock, do not remove cover (or back). No user-serviceable parts inside. Refer servicing to licensed service personnel. This symbol indicates that this equipment may contain dangerous voltage which could cause electric shock. This symbol indicates that there are important operating and maintenance instructions in this User Manual with this unit. FCC Statement This equipment has been tested and found to comply with the limits for a Class A digital device, pursuant to part 15 of the FCC Rules. These limits are designed to provide reasonable protection against harmful interference in a residential installation. This equipment generates, uses and can radiate radio frequency energy and, if not installed and used in accordance with the instructions, may English - 4 cause harmful interference to radio communications. However, there is no guarantee that interference will not occur in a particular installation. If this equipment does cause harmful interference to radio or television reception, which can be determined by turning the equipment off and on, the user is encouraged to try to correct the interference by one or more of the following measures: —Reorient or relocate the receiving antenna. —Increase the separation between the equipment and receiver. —Connect the equipment into an outlet on a circuit different from that to which the receiver is connected. —Consult the dealer or an experienced radio/TV technician for help. FCC Radiation Exposure Statement This device complies with FCC radiation exposure limits set forth for an uncontrolled environment and it also complies with Part 15 of the FCC RF Rules. This equipment must be installed and operated in accordance with provided instructions and the antenna(s) used for this transmitter must be installed to provide a separation distance of at least 20 cm from all persons and must not be co-located or operating in conjunction with any other antenna or transmitter. End-users and installers must be provide with antenna installation instructions and consider removing the no-collocation statement. This device complies with Part 15 of the FCC Rules. Operation is subject to the following two conditions: (1) this device may not cause harmful interference, and (2) this device must accept any interference received, including interference that may cause undesired operation. Caution Any changes or modifications not expressly approved by the party responsible for compliance could void the user's authority to operate the equipment. EN55022 (CE Radiation) Warning This product is intended for use in a commercial, industrial, or educational environment. It is not intended for residential use. This is a Class A product. In a residential environment it may cause radio interference, in which case the user may be required to take adequate measures. The typical use is in a conference room, reception room or hall. English - 5 Chapter 2 Package Contents DC-W50 Quick Start Guide USB connector holder (For download of other language versions, please visit Lumens website) Adapter Power Cord Appearance may vary depending on country/region English - 6 Chapter 3 Product Overview 3.1 DC-W50 7. LED Indicator 6. LAN 5. USB connector fixing hole 4. USB Port 1. Power Switch 3. Default Values 2. WPS Button 8. HDMI Output English - 7 3.2 Lock USB Connector Holder 3 1 2 1. Disconnect the ball chain on the USB connector holder. 2. Thread the ball chain through the connector fixing hole on DC-W50. 3. Shackle the ball chain. English - 8 Chapter 4 Description of LED indicator 4.1 POWER: The indicator lights blue in normal conditions. 4.2 Power status : 4.2.1 No Light: No Power 4.2.2 Blue Light: Full Power 4.2.3 Red Light: Low power 4.2.4 Flickering Blue: When the device is powering on or in charging status. It will flicker red if it is charged when the power is not enough 4.3 WPS: 4.3.1 Flickering Red: Connection detection 4.3.2 Blue Light: WPS function enabled English - 9 Chapter 5 Installation and Connections 5.1 Installation flow chart This product shall be used together with our company’s special software Ladibug and USB Document Camera, please install and use in accordance with the instruction as shown in the picture below. Start Install software Install Ladibug™ Refer to Ladibug Software Manual for software installation Install hardware Install USB Document Camera OK Start Using Refer to Sections 5.3 Install DC125 for hardware installation To start using and connection, please refer to Chapter 6. Please refer to Chapters 7 for details of DC-W50 administrative management programs. English - 10 5.2 Installing Application Software 5.2.1 System Requirements Windows Vista / Windows XP Windows 7 / 8 MAC OS X 10.7 / 10.8 / 10.9 ® Min CPU: Intel Core 2 Min CPU: Intel Core 2 Min CPU: Intel Pentium Duo 2 GHz Min Memory: 1 GB RAM Duo 2 GHz Min Memory: 1 GB 2 GHz Intel Core 2 Duo Min Memory: 1 GB Supporting Direct X 9 Min Resolution: 1024 x (32-bits)/2 GB(64-bits) Supporting Direct X 9 768 and WDDM 1.0 DDR2 667 Hz or above Min Resolution: 1024 x 768 Min Hard Drive Space: 1 Min Resolution: 1024 x 24-bit full color display GB Windows XP SP2 or 768 Min Hard Drive Space: 1 Min Hard Drive Space: 1 GB above GB QuickTime 7.4.5 or above 5.2.2 Install Ladibug™ Please download Ladibug™ and Ladibug Software User Manual software at Lumens website. a. Windows System: Please use Ladibug PC 3.x b. MAC System: Please use Ladibug MAC 3.x c. iOS System: Please search Ladibug on App Store, iPad shall use iOS 7.0 version or above English - 11 5.3 Install DC125 5.3.1 Install DC125 on DC-W50 5.3.2 Install USB connector holder on DC125 and DC-W50 USB Connector Holder English - 12 Chapter 6 Start Using 7 2 1. Charge the unit for 3 hours before the first use. 2. Switch power to [ON]. (Caution: When the unit is fully charged, indicator lights blue) 3. To start connection of DC-W50 with computer, please follow the steps of 6.1.1 Manual connection. 4. Modify [Device Name] and [SSID] before the first use. Please follow the steps of 6.1.3 Change the SSID for modification. 5. Double click on 6. Click icon to open Ladibug™ Software. to open [Search Window]. 7. Select [Wireless Document Camera] to search for the DC-W50 which can be connected. After finishing the search in the list, click [Wireless Document Camera-1] (default name). 8. Select administrator (Admin) or viewer (Viewer) to login in. To login as an administrator, please enter the password [1234] (default password) and press [Log In] to connect. If firewall warning occurs in the first use, please check the “LAN” and then press “Allow to Access”. When POWER Frequency setting page displays, please complete the settings following the instructions on the screen. <Remark> You are advised to confirm the local voltage/frequency before setting the POWER Frequency. For example, 60 Hz is applicable for America, Taiwan, Japan, etc; 50 Hz is applicable for Europe or other English - 13 regions. <Remark> For more information on the operation of Document Camera, please refer to Document Camera User Manual <Remark> Please refer to User Manual for Ladibug Software for how to operate the Ladibug in details 6.1 Start wireless connection [Note] How to improve the wireless signal quality The working frequency band of IEEE 802.11 b/g/n is 2.4 or 5 GHz. The application of wireless equipment at adjacent frequency channel will interfere with each other, and such interferences include the same frequency interference and adjacent channel interference. In order to avoid interference, in the same space and between different wireless network groups, such as wireless telephone, Bluetooth devices, microwave oven and other equipment which might interfere the network communication, in case there is any of such equipment nearby your wireless device, please turn off such equipment, and move them to further places, or set the frequency channel of which to the channel at a distance of 2 or above channels. Materials applied on the wall in the room, arrangement of the furniture, even the open or close of the door will influence the wireless signal. The wireless AP shall, to the greatest extent, be placed in the open space free of barrier. It is the best place to obtain the optimal signal coverage effect. For the degree of influence on signal, please refer to the table below: Environment material Air Wood Parget Possible degree of influence Similar environment Compartment Interior wall Asbestos Ceiling General glass Window Water Brick Marble Cement/concrete Metal Aquarium General internal and external wall Floor Floor, external wall Steel cabinet and steel compartment The more, the larger degree of influence English - 14 6.1.1 Manual connection a. Open the computer wireless network list. For iPad users, go to [Settings] -> [Wifi] to select wireless network. b. Select the [Lumens_Wireless_Flyer] in the network list, click [Connection] and then input the password for connection (pre-set password [ladibugflyer]) to start the connection. 6.1.2 WPS connection a. Open the wireless network list on the computer. b. Select the [Lumens_Wireless_Flyer] in the network list, press the [Connection] and then press the WPS on DC-W50, the connection will be completed after the WPS light turns to blue. [Remark] WPS only supports encryption mode of higher security level. To connect with WPS, use by default or modify DC-W50 settings by changing the encryption mode to WPA or WPA2. 6.1.3 Change the SSID a. Open the Internet Explorer webpage browser, and enter [192.168.1.1] (default) in the address bar. b. Enter the Login Name [Admin]. c. Enter the Password ([1234] by default), and click the [Login] button. d. Enter the [Basic] page. e. Enter new [Device Name] and [SSID], and click [Save] to apply the changes. [Note] Please use English letters and numbers in Device Name and SSID name. Device Name: Device name of Document Camera SSID: Device name of wireless network f. Please refer to 6.1.1 Manual connection for reconnection. English - 15 6.2 Change the firewall settings 6.2.1 Windows XP a. Select [Console] in [Start] menu. b. Click [Information Security Center], and then click [Windows Firewall]. [Remark] Click [Windows Firewall] in the traditional view of [Console]. c. In [Windows Firewall Setting] window, click the tab [Exceptions]. d. Be sure to select Ladibug under [Programs and Services], and then click [OK]. e. If Ladibug was not listed under [Programs and Services], then click [Add Program]. f. Select the Ladibug program, then click [OK]. If it was not listed, please click [Browse], select Ladibug program, and then click [Enable]. [Remark] Ladibug View may be displayed in the form of Ladibug.exe. g. Exit [Windows Firewall Setting], and start to use the software. English - 16 6.2.2 Windows 7 a. Select [Console] in [Start] menu. b. Click [System and Security], and then click [Allow a program through Windows Firewall]. [Remark] Click [Windows Firewall] in the icon view of [Console]. c. Select [Change settings] in [Allowed programs and features] window. d. Please select Ladibug program in the list. e. If Ladibug was not listed, please click [Allow another program], and then you will find Ladibug program. f. Select Ladibug, and then click [Add]. If it was not listed, please click [Browse], select Ladibug program, and then click [Enable]. [Remark] Ladibug View may be displayed in the form of Ladibug.exe. g. Click [OK] in [Allowed Program] window. h. Close [Windows Firewall Setting] window. English - 17 6.2.3 Windows 8 a. Point the mouse to the upper right corner of the screen and move the mouse pointer down, then press [Search] and input the firewall in the search block, click or press [Allow the Application Program or Function to pass Windows Firewall]. b. Click or press [Change Settings]. System may ask for your system administrator password or confirm your selection. c. In the allowed application program list, find Ladibug, check the checkbox beside the application program, and then click or press [Confirm]. 6.2.4 MAC OS X 10.7 / 10.8 / 10.9 a. Select the setting of [System Preferences] in the Apple Menu. b. Click [Security]. c. Click the tab [Firewall]. d. Click the lock on the lower left corner to unlock the panel, and enter the username and password of the Administrator. e. Click [Start] to enable the firewall. f. Click [Advanced] at the lower right corner. English - 18 g. Select [Automatically allow signed software to receive incoming connections]. h. Change Ladibug in the list to [Allow incoming connections]. If the software name was not listed, please click [+] to add new programs to the list, and start to use the software. English - 19 Chapter 7 Administration Menu 7.1 Wireless 7.1.1 Basic After you enter the webpage, the [Basic] page displays. You can check and modify the current setting of the DC-W50 1 2 3 4 5 6 7 8 9 10 NO Item 1. Device Name 2. WPS Wireless Mode: AP Function Descriptions Set device name of Document Camera Turn on/off the WPS function Setup item when DC-W50 is set for wireless access point or single unit use 3. Frequency 2.4 GHz/5 GHz frequency band setting 4. SSID Set device name of wireless network 5. Channel 2.4 GHz channel: 1 ~ 11 5 GHz channel: CH149 5745 MHz, CH153 5765 MHz, CH157 5785 MHz, CH161 5805 MHz, CH165 5825 MHz 6. Encryption Encryption mode settings 7. Password Set the passport for connection to wireless access point Wireless Mode: Client Setup item when DC-W50 is set for Client use 8. SSID Device name of wireless access point 9. Encryption Encryption mode settings 10. Password Enter the password for connecting the wireless English - 20 access point 7.2 System 7.2.1.1 IP-LAN Network setting page 1 2 3 4 NO 1 2 3 4 Function Descriptions IP address setting Netmask Turn on/off DHCP function Available address range IP Subnet Mask DHCP DHCP Server Address Range 7.2.1.2 User-User Configure Administration page for change of webpage password 1 2 3 NO 1 Administrator 2 3 Function Descriptions Webpage administration account (cannot be changed) Password New password Password(Confirm) Re-type password for confirmation English - 21 7.2.1.3 Streaming You can update the software, return to the default value and restart the machine on this page. 1 2 3 4 NO 1 2 3 4 Function Descriptions Video Resolution Set Resolution Video Frame Rate Frame rate setting Video Max Bitrate Bit rate setting Port Number COM port setting English - 22 7.2.1.4 Maintenance You can update the software, return to the default value and restart the machine on this page. 1 2 3 4 5 NO 1 Current Firmware Version 2 Image File 3 Reboot 4 Reset to factory default 5 Read Error Code Function Descriptions DC-W50 Firmware Version Upload the updated firmware file Restart the DC-W50 Reset to the default value Read the error codes caused by equipment abnormality English - 23 Chapter 8 Set DC-W50 for AP use Through this connection method, multiple DC-W50 can be controlled through DC-W50 at AP terminal 8.1 Connection diagram DC-W50 (Client) DC-W50 (AP) DC-W50 (Client) Computer 8.2 Equipment requirements Two or more DC-W50 One computer equipment One router (depending on network requirements) 8.3 DC-W50 setup 8.3.1 DC-W50 host setup a. Turn on DC-W50 host English - 24 b. Open the computer wireless network list, connect the [Lumens_Wireless_Flyer], enter the connection password [ladibugflyer] to complete the network connection. c. Open the web browser, and enter [192.168.1.1] in the address bar d. Enter the Login account [Admin] and password [1234] e. Enter the [Basic] page to modify the [Device Name] and [SSID] of AP Device Name:Wireless Document Camera-AP (Custom) SSID:Lumens_Wireless_Flyer_AP (Custom) f. Click [Save] to apply the changes 8.3.2 DC-W50 client setting a. Turn on DC-W50 client [Remark] Turn on one DC-W50 client each time for initial setting. b. Open the computer wireless network list, connect the [Lumens_Wireless_Flyer], enter the connection password [ladibugflyer] to complete the network connection c. Open the web browser, and enter [192.168.1.1] in the address bar d. Enter the Login account [Admin] and password [1234] e. Enter the [Basic] page to modify the [Device Name] Device Name:Wireless Document Camera-Client-1(Custom) English - 25 f. Select the wireless mode as [Client] and enter the SSID of AP [Lumens_Wireless_Flyer_AP] and connection password [ladibugflyer] g. Click [Save] to apply the changes 8.3.3 Start Using a. Open the computer wireless network list, connect the [Lumens_Wireless_Flyer_ap], enter the connection password [ladibugflyer] and complete the network re-connection with DC-W50 AP terminal b. Start the Ladibug software c. Click to open [Search Window] d. Select “Wireless Document Camera” to search for the DC-W50 which can be connected. After finishing the search in the list, click to select one DC-W50 to start operation e. If it is necessary to switch to other DC-W50s, please open the [Search Window] again and click other DC-W50s English - 26 Chapter 9 Troubleshooting This chapter describes problems you may encounter while using DC-W50. If you have questions, please refer to related chapters and follow all the suggested solutions. If the problem still occurred, please contact your distributor or the service center. No. 1 Problems No indicator is on after DC-W50 power is switched on Solutions Please make sure DC-W50 has enough battery power (the battery indicator lights blue). If the battery indicator lights red, please connect the power cord to charge the device. 2 Automatic connection failed. Auto connection is always timed out DC-W50 connection failed Please follow manual connection steps by referring to 6.1.1 Manual connection. 3 4 It is recommended that you use the manual connection. Please refer to 6.1.1 Manual connection. 1. 2. 3. 4. 5 DC-W50 can be connected, but DC125 failed to operate normally. 6 Open Ladibug™, black screen occurs when executing Proview If the computer crashes when executing any change of any settings The webpage 7 8 Confirm that there is no barrier interfering the signal between the WLAN card and DC-W50, and proper distance for wireless transmission, to obtain better connection quality. Overheating of WLAN card might cause abnormal operation of product. It is recommended to use this product in well ventilated place. Please make sure that DC-W50 connection setting is correct. If encrypt with WEP, please check whether the settings or password is wrong. 1. 2. Ensure that the USB connector holder is connected. Please re-start DC-W50 connection and confirm the USB connection holder has been connected to the DC-W50 and DC125, and then start the Ladibug™ software. When connection might be blocked by firewall because of the use of wireless network, please refer to 6.2 Change firewall settings. 1. Please first close the Ladibug™, and then start to change the settings. Method 1: Please log in the webpage again. English - 27 cannot be displayed when the setting is updated Method 2: Please follow the steps of 6.1.1 Manual connection for reconnection Method 3: Please press and hold the DC-W50 [Reset] button for 5 seconds. After restarting, please follow the steps of Chapter 6 Start Using for reconnection. If the problem still occurs, please contact your distributor. 9 The corresponding DC-W50 cannot be identified when two or more DC-W50s are connected Please follow the steps of 6.1.3 Change the SSID to modify the SSID. 10 If you forget the password and cannot log in the administrator webpage Please press and hold the DC-W50 [Reset] button for 5 seconds and restore the factory default values. 11 What if the signal is weaker? 1. 2. 12 13 14 The DC-W50 client cannot be found when using Ladibug software I cannot connect with WPS after modifying DC-W50 encryption settings Upload function is not available Please adjust the place of DC-W50 to obtain better connection quality. Please go to the administrator webpage and set DC-W50 at different channel frequencies so as to avoid the interference of signal transmission. Please reset DC-W50 client (press the DC-W50 [Reset] button for 5 seconds till restarting is completed), and reset in accordance with the 8.3.2 DC-W50 client setting, and resume operation. At present WPS only supports WPA/WPA2 encryption mode of higher security level. Therefore, the encryption set to WEP or off cannot support WPS. Please refer to 6.1.1 Manual connection for how to connect without WPS. The upload function is not available because the computer wireless network is connected to DC-W50, and not connected with the Internet. Please refer to the following solutions : 1. After completing the Ladibug operation, connect the wireless network to the Internet again. Then the upload function can be used 2. Use an additional network line to connect the computer with the Internet. Then the upload function can be used while you are operating the Ladibug English - 28