1
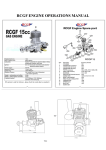
OWNERS MANUAL
MT-57
OWNER'S MANUAL
READ SAFETY INSTRUCTIONS BEFORE STARTING ENGINE!
CONGRATULATIONS and THANK YOU for purchasing one of the highest quality, high-performance model
aircraft engines available. Your MT engine has been specifically designed, developed and manufactured from
proprietary components for model use. It is very powerful, extremely lightweight, easy to handle and adjust,
and should provide years of outstanding performance. It is extremely important to read and understand all of the
instructions contained in this manual before starting your engine, especially the Safety Instructions.
The importance of following the safety instructions at all times cannot be over-emphasized! MT engines
start very easily and develops enough horsepower to cause serious injury or death to the operator and bystanders.
We here at MT are concerned for your safety and the safety of others so PLEASE follow the safety instructions
at all times!
UPON RECEIVING:
Inspect the engine before signing for it and have the delivery agent note any damage to the carton and/or motor.
Also report any shipping damage to us immediately.
If it appears that the engine has been run – it has.
proper operation.
We try to test-run as many engines as possible to ensure
DISCLAIMER:
MT engines are intended for model use only and should never be used in any form of manned craft or vehicle.
MT reserves the right to change prices, models, designs, components, specifications, and accessories of all
products, at any time, without prior notice or obligation. MT shall not be responsible or otherwise liable in
any way for any form of loss, injury, or damage that may result from the use of its products.
SAFETY INSTRUCTIONS
Failure to follow these safety instructions may result in very serious injury to the operator and/or bystanders.
Please follow these instructions at all times!
1. NEVER start the engine without a helper to hold the aircraft!
2. Use safety glasses or other suitable eye protection when starting or running the engine.
3. Do not run the engine in the presence of loose gravel, sand, dirt, or other materials that may be
picked-up by the propeller and blown into the faces of the operator or helper.
4. Never operate the engine in a confined space (garage, basement, etc.).
5. Do not allow loose articles or clothing (such as transmitter straps, shirt & jacket sleeves, ties, scarves,
etc.) near the propeller. Also keep loose objects (such as pens & pencils, eyeglasses, screwdrivers, etc.)
out of shirt and jacket pockets to keep them from accidentally falling into the propeller.
6. Do not let anyone stand in front of propeller or in line with the propeller arc when starting or running the
engine. Be sure engine is pointing away from people and be sure to stand behind the engine when
running up. Keep spectators at a safe distance, and be sure that children and pets are well supervised.
7. Do not lean-over the engine/prop when starting or running.
8. Never adjust the engine while it is running.
Always stop it first!
9. Never allow the propeller blades to touch spinner cutouts.
10. Do not touch the engine/exhaust until it has had sufficient time to cool, or severe burns may result.
Also keep fuel from contacting hot engine parts - wait until the engine cools before fueling.
11. Always use a balanced propeller that is in perfect condition. Propellers that have cracks, nicks, or that
have struck any object (including the ground) should be immediately discarded - damage is not always
visible.
12. Make sure that the propeller is securely tightened and periodically check for tightness.
13. Keep all engine fuel in a safe place.
times.
It is extremely flammable and must be handled with care at all
14. Install an ignition switch and make sure that the throttle linkage is adjusted so that the engine may be
stopped by turning off the switch and/or by closing the carburetor.
15. Stay clear of the propeller when turning the ignition system on and off as the ignition can fire.
ENGINE SETUP, BREAK-IN AND PROPELLER SELECTION (MUST READ)
The MT is made of exceptionally lightweight components that are designed to deliver peak performance.
Therefore care must be taken in mounting the engine and its various parts. The engine and propeller mounting
components are exceptionally strong if mounted as described below but can also be damaged if not mounted
properly. Please read and follow the instructions below to ensure proper mounting of the engine and propeller.
CRANKSHAFT STUD:
IMPORTANT!
When installing the propeller make sure the stud is screwed-in far enough to extend past the 7/16”
shoulder of the prop hub. The crankcase stud must engage the thick part of the hub in order to
provide the necessary strength. If the stud is not screwed-in far enough failure can occur possibly
resulting in the loss if the airframe, serious injury or death.
ENGINE MOUNTING:
IMPORTANT!
Use high-quality bolts, washers, and aircraft locking nuts to secure the engine to the airframe. The
firewall should be at least 1/4" thick for the larger engines. It must be of suitable material (such as
aircraft plywood), and must be securely attached to the airframe. For engines with a rear-mounting
ring, it is important for the mounting ring to be supported around its entire circumference. If the
engine requires a standoff start with a flat piece of plywood or suitable material and make a donut
shaped piece that provides contact all around the mounting ring. The use of dowels or other type of
individual stand offs can cause the mounting ears to be loaded in a twisted state which may result
in cracking and failure of the engine mount! Check the mounting bolts periodically to ensure they
are still tightened.
DRILLING THE PROPELLER AND SPINNER BACK PLATE.
The crank shaft is 8mm x 1.25 in size while the aluminum shoulder that protrudes from the prop hub
is 7/16” in diameter. You must therefore drill the spinner back plate and the rear of the prop hub to
7/16”. The rear of the prop hub must be drilled deep enough to accept the remaining 7/16” aluminum
shoulder that protrudes through the spinner back plate.
Some prop hubs have two holes tapped into the front to keep the spinner and propeller from rotating on
the hub. Insert two hardened cap head screws into the holes and tighten securely. Then drill 2 holes
in the back of the spinner back plate that are the same size as the screw heads so the screw heads will fit
into the holes when the spinner back plate is inserted on the shaft. This will keep the spinner back
plate from rotating on the shaft and if the back plate is knurled it will keep the prop from rotating on the
shaft as well. Hint: put some lipstick on the screw heads and carefully put the back plate on the shaft
and press it against the screw heads to mark the location of holes to be drilled.
SPINNER NUT AND PROP WASHER.
The crankshaft threads are 10mm x 1.25 so use an 10mm X 1.25 spinner adapter nut to mount the
spinner. Use a steel washer between the aluminum prop washer and the nut to prevent the nut
from digging into the front of the aluminum prop washer. If the nut is allowed to dig into the
aluminum prop washer it may give the impression that it is tight when in fact it is not applying sufficient
pressure against the prop.
IGNITION WIRING INSTRUCTIONS – READ CAREFULLY.
It is important to understand how the ignition system is to be wired. The pair of Black and red leads
must be connected through a switch to a 4.8v power source of at least 1000mAh capacity (the ignition
system draws approximately 1 amp at full throttle). The wiring should be at least 18 gauge to prevent
Use a high-quality NiCad or Nickel Metal Hydride battery that is in top condition.
voltage drop.
The three-wire Deans connector from the ignition module must be connected to the 3 wire Deans
connector that is attached to the Hall Effect sensor on the engine. The Deans connectors are polarized.
If there is a braid or ground strap that exits next to the spark plug cap it must be attached to the base of
the spark plug for proper grounding – small hose clamps work well for attaching ground straps to the
base of the plugs.
The ignition has been timed at the factory and further adjustment is not required.
COWL DUCTING:
MT engines produce an enormous amount of power in a very small and light package. For this reason
the engines must be properly cooled by ducting. Ducting must be installed in the cowling to force air
to flow over and through the cylinder cooling fins. The ducting should fit up against the front of the
cowl just below the crank shaft housing and should extend rearward to within 1/8" of the cylinders.
The duct should be located such that it is ¼ -½ way up the width of the cylinder(s) in order to force air
over the tops and down the front of the cylinder(s).
The ducting must prevent air from escaping the
cowl without flowing over and through the cooling fins.
BREAK-IN:
The engine should be installed in an aircraft and flown to help with the break-in process. This allows
the engine to be loaded and unloaded using the throttle and will also help with cooling. Using break-in
oil as described under General Information will facilitate the break-in process. Refer to the propeller
chart below. Recommended propeller sizes are for aerobatic flying, and may vary depending on your
needs, altitude, and conditions.
GENERAL INFORMATION
ENGINE PLACEMENT:
If at all possible, mount the engine so that it is completely enclosed within the cowl, especially the
carburetor. This will allow the engine to run at its best. If the engine is mounted such that the
carburetor is sticking out of the cowl, it is altogether possible that the carb will be subjected to irregular
airflow and as a result, may run erratically. There should be at least 1 ½" of clearance between the
bottom of the carburetor and the cowl. If there is not enough clearance, cut a hole in the bottom of the
cowl right beneath the carb. The hole should be the same size as the carburetor.
FUEL LINE and FUEL TANK:
Use only fuel line and fuel tank fittings that are compatible with gasoline. Tygon and neoprene are two
such compatible materials. Be sure to clamp the fuel line to all fuel tank fittings and clunk and be sure
that the clunk does not touch the rear of the gas tank when held vertical. The inside diameter of the
fuel line and tank fittings should be at least as big as the diameter of the fuel inlet nipple on the
carburetor.
FUEL:
We recommend standard 87 octane unleaded gasoline for your MT (Chevron and Texaco seem to work
very well). Higher-octane fuel will not generate more power and may cause the engine to run slower
and overheat. Try what is recommended first!
Note: The use of alcohol is to be avoided and will void the warranty. Alcohol-based fuels are
highly corrosive to the carburetor and internal engine parts, and the carburetor must be modified
in order to pass the proper amount of fuel to the engine – otherwise severe overheating will occur
and the engine will be damaged.
BREAK-IN OIL:
We recommend the use of a petroleum-based oil, such as Lawn Boy Ashless or Pennzoil for Air
Cooled Engines for breaking-in all MT engines. Use the break-in oil until approximately 5 gallons of
fuel has been run through the engine.
ALWAYS MIX THE OIL ACCORDING TO THE
MANUFACTURERS INSTRUCTIONS!
Using the break-in oil will help to ensure the proper seating of the rings to the cylinder walls.
IMPORTANT if the full potential of the engine is to be realized.
This is
NORMAL OIL AFTER BREAK-IN:
After break-in we recommend using AMSOIL Series 2000 2-Cycle Racing Oil mixed according to the
manufacturers instructions (50:1). It burns very clean and provides excellent protection. It is
important to note that mixing AMSOIL (and other oils) at a lower than recommended ratio (more oil)
ALWAYS MIX THE OIL
may cause carbon build-up, ring seizing, and plug fouling.
ACCORDING TO THE MANUFACTURERS INSTRUCTIONS!
Other high-quality synthetic or mineral oils may be used provided that they are intended for 2-stroke use
in air-cooled engines and are mixed according to the manufacturers instructions. Mineral oils are
preferred because they have fewer tendencies to foul the spark plugs.
SPARK PLUGS:
We recommend using the type of spark plugs that are supplied with the engine. In general use NGK
CM-6 spark plugs for the Xtreme series of engines and NGK BPMR6F plugs for other MT engines.
If an
The “R” indicates that it is a resistor plug which is very important in preventing interference.
alternate plug is to be used, it must be of the same type, heat range, reach, and diameter where the spark
plug cap must engage.
SPARK PLUG GAP:
The normal range for the spark plug gap is .020” - .025”. Do not exceed these limits. We recommend
starting with a gap of .022”. If the engine runs rough in the midrange after the carburetor and ignition
have been properly adjusted, then try increasing the gap slightly. If the engine misses at full throttle,
try decreasing the gap slightly.
FUEL FILTERS:
Always use high quality fuel filters (use more than one) on your fueling system (fuel can) to prevent
foreign particles from entering your aircraft fuel tank.
Most fuel filters that are typically used for glow engines are not fine enough to filter properly.
However there are a few available that are fine enough, such as the PRO Filters sold by Horizon
Hobbies. Some lawnmower shops also sell small felt filters that are suitable for gas.
Be sure to thoroughly flush the fuel tank before installing it to make sure there is no plastic flashing or
other material that may form a blockage in the carburetor. If the fuel tank is clean and a high-quality
fine fuel filter is used on the fueling system, there is no need for a fuel filter in the aircraft.
CARBURATOR/MIXTURE BASICS:
The engine will run properly when it is receiving the correct fuel mixture (amount of air and fuel) from
the carburetor.
The amount of air it receives is controlled by the throttle (butterfly) and how far it is open. The
amount of fuel that it receives depends on the settings of the Low- and High-end needles.
The engine draws fuel from the low-end (idle) needle at all times. As the engine RPMs increase to
2,000 – 3,500 (called the midrange) it also draws fuel from the high-end needle. As the RPMs increase
further, it draws even more fuel from the high-end needle. The trick is to adjust the needles so that the
engine gets the right amount of fuel for all throttle settings (butterfly openings).
The term “Lean” means that there is less fuel or more air being delivered to the engine from the
carburetor for a given butterfly opening (throttle setting). The engine will run faster, smoother, and
hotter as the mixture is “leaned”, provided that it is not leaned too much causing the engine to over heat
and "sag".
The term “Rich” means that there is more fuel being delivered to the engine by the carburetor for a
given throttle setting. The engine will typically run slower, cooler, and less smoothly and will
probably foul the spark plugs if it is too rich.
Generally, the Low-end needle is set as lean as possible while still retaining the ability to instantly
transition from idle to the midrange. If the idle is set too lean, the engine will hesitate and probably die
if the throttle is advanced quickly from idle. If the idle is set too rich, it will spit, sputter, and burble
when the throttle is moved quickly from low to high because it is trying to burn excess fuel.
The High-end needle is set correctly when the engine turns maximum RPM without overheating. If set
too lean over-heating will occur, causing the engine to “sag” or otherwise slow-down and will cause
damage to the engine. This can show up while flying when the aircraft is climbing vertically or pulling
through loops. If set too rich, the engine will not run smoothly and will not develop full power.
The carburetor has two black needles that are used to adjust Low-end (idle and midrange) and High-end
(full throttle) fuel mixtures. They are marked on the carb body next to the needles “L” and “H”
respectively.
When a needle is screwed “in” (turned clockwise) it “leans” the mixture by restricting fuel flow. When a
needle is screwed “out” (turned counter-clockwise or CCW) it richens the mixture by allowing more
fuel to flow through the carburetor and into the engine.
If for any reason the needle settings are completely lost, the low-end needle should be reset to 1 ¼ turns
open and the high-end needle set to 1 ½ turns open in order to begin re-tuning the engine. Start by
screwing the needles all of the way in, but be careful and do not to over-tighten them or their seats may
be damaged. Close them just enough to be snug. Now open them 1 ¼ and 1 ½ turns for initial
settings.
Note: The carburetor may be equipped with a brass fitting containing a screwdriver slot - this is the
accelerator pump and should not be adjusted!
STARTING AND ADJUSTING YOUR MT ENGINE.
CAUTION!
Please review and become familiar with all safety instructions before attempting to start your
engine.
Do not attempt to start the engine without a helper to hold the aircraft!
Be sure that the ignition has been completely and correctly wired before starting the engine.
Always treat the engine as though it could fire and run at full power at any time.
PREPARE THE ENGINE FOR STARTING:
If it is the first time the engine is to be run the needles should already be at the factory settings. This
should result in preliminary settings that will allow the engine to idle and to run slightly rich at full
throttle
After filling the fuel tank with the proper gas/oil mixture, make sure the ignition is turned OFF and
make sure a helper is securely holding the aircraft!
Choking The Engine
There are three methods of choking MT engines depending on how the carburetor is configured.
If the carburetor has a fuel bulb/reservoir, depress the bulb until it is full and excess fuel
squirts out.
If the carburetor has a choke (a butterfly at the carb opening) close the butterfly so that it
covers the intake and flip the prop until fuel appears at the carburetor.
If the carburetor has no choke place your thumb over the carb intake and rotate the propeller
until fuel appears at the carb opening.
STARTING THE ENGINE:
1. Make sure the ignition is turned OFF!
2. Choke the engine using one of the methods described above.
3. Set the throttle to full idle (the butterfly open approximately 1/32” to 1/16”).
4. Turn the ignition system ON.
5. Flip the prop CCW until the engine fires.
and then stop.
If the carb is equipped with a choke the engine will fire
At this point open the choke and flip the prop until the engine fires and runs (usually
3-5 flips).
6. Let the engine warm-up for a while before advancing the throttle.
ADJUST THE CARBURATOR LOW-END FOR IDLE AND TRANSITION:
WARNING! Do not attempt to adjust the engine while it is running.
engine stopped and ignition switched OFF!
Make all adjustments with the
Once the engine is started and allowed to warm up, check the idle and transition.
The engine should idle slowly and reliably from 1,000 to 1,500 RPM.
If the engine is running very rough (popping, spitting/sputtering, and burbling) and is having difficulty
running at low rpm, try leaning (turn clockwise) the Low-end needle “L” 1/8 turn at a time until it runs
smoothly. (The low-end needle is the one that is closest to the engine.)
Once it runs fairly smooth at idle, try advancing the throttle quickly to about 1/3 throttle (2500-3500
RPM). If the engine hesitates and/or quits, it is too lean, and the low-end needle should be richened
(CCW) 1/16 turn at a time. If the engine spits and sputters before coming up to speed, it is probably
still too rich and the low-end needle should be leaned (turned CW) 1/16 turn at a time.
Repeat this test and adjustment until the engine idles smoothly and transitions to the midrange cleanly.
Get it as close as you can and then proceed with adjusting the high-end below.
In general, the low-end needle should be as lean as possible (screwed "in") while retaining the ability to
transition smoothly and cleanly from idle to midrange when the throttle stick is advanced quickly. If it
hesitates or cuts out then the low-end needle is too lean. If it burbles and sputters before coming up to
speed the low-end needle is too rich.
ADJUST THE CARBURATOR HIGH-END:
WARNING! Do not attempt to adjust the engine while it is running.
engine stopped and the ignition switched OFF!
Make all adjustments with the
Once the low-end has been adjusted, it is time to adjust the High-end “H” needle. The idea is to start
with the engine running rich at full throttle and then to lean-it-out to the correct setting.
Advance the throttle to full open and listen to the engine. It should be popping on occasion and not
running completely smooth. If the engine is running smoothly, then richen the high-end needle (turn
CCW) until it is not running smoothly. This is done in order to ensure that the engine is running rich.
Now using a tachometer, lean the high-end needle (turn clockwise) 1/8 turn at a time until maximum
RPM is achieved. Let the engine run a bit (5-10 seconds) at each setting so that it comes up to
operating temperature at that needle setting. When the needle is turned 1/8 turn and the engine drops in
RPM, then the needle has been adjusted too far. At this point richen the needle (turn CCW) about
1/8-1/4 turn and check the RPM to ensure that it is still close to maximum. The trick is to find the
needle setting where the engine first reaches maximum RPM and then to back it off (CCW) just a bit.
The engine should run smoothly at full throttle.
Now check the idle and transition again and re-adjust the Low-end needle if necessary. If the Low-end
is adjusted again, then re-adjust the High-end as described above. Repeat the procedure until the
engine is running smoothly at all throttle settings, and the engine accelerates quickly and smoothly from
idle.
Listen to the engine in flight. Pull the plane vertical and also fly some loops and listen for the engine
“sagging” or dropping in RPM. If the engine is sagging on vertical lines or going over the top of loops,
it is too lean – richen the High-end needle slightly and try it again.
Note: This is not a glow engine and it is not a good idea to run the engine too rich as it will generate
carbon deposits, foul the spark plugs and may cause the piston rings to seize on the pistons.
TROUBLESHOOTING
ENGINE RUNS FINE ON THE GROUND BUT GETS VERY RICH ON TAKEOFF AND IN FLIGHT
This is typically caused by a positive pressure building-up inside the cowl, or the carb diaphragm vent
hole(s) being exposed to direct prop blast or ram air.
The vent hole(s) is in the plate on the metering side of the carb (the side opposite from where the fuel
tubing attaches). Sometimes the hole(s) is centered in the plate and sometimes it is towards one edge.
When extra air pressure (anything greater than normal atmospheric pressure) is applied to the vent
hole(s) it can depress the diaphragm on the other side of the plate. As the diaphragm depresses, it
opens a metering valve causing more fuel to flow through the carb, which makes the engine run rich.
More often than not, the additional pressure is not realized or noticed until the aircraft starts moving and
picks up speed. It is therefore not unusual for the engine to "go rich" during the take-off roll and
remain rich while it is flying if the diaphragm is subjected to extra air pressure. When the aircraft lands
and is held stationary the problem goes away and the engine runs fine.
Possible Solutions:
Solution-1:
If the vent hole(s) is facing forward and appears to be in a position that is subjected to ram air
or prop blast, then installing a dam or small plate in front of the carb to deflect the air away from
the vent may cure the problem. If this does not cure the problem, then try solution-2.
Solution-2:
The idea is to let the diaphragm sense normal air pressure. This can be done by forcing the
vent hole to breathe through a piece of fuel tubing that is routed to the inside of the fuselage.
Remove the carb plate with the vent hole(s) in it and solder a piece of brass tubing (3/8" 1/2" long) into or over the vent hole so that the vent must breath through the tube. Reinstall the
carb plate. Now take a piece of fuel tubing and attach one end to the brass tube and run the
other end through the firewall into the fuse. The vent will now sense the air pressure inside of
the fuse, instead of the pressure in the cowl.
NOTES:
If there are vent holes located towards the edge of the plate, then seal them with glue, solder,
or some suitable material that is not affected by the fuel. Drill a new hole in the center of the
plate and solder the brass tube into this hole. The diaphragm must breath through the brass
tube!
Make sure the brass tube does not protrude past the back of the plate where it may interfere
with the diaphragm.
Use a low temperature silver solder such as "Stay Bright" to solder the brass tube into the
vent hole.
It may be necessary to seal-off the fuse at the firewall or hatch to keep the entire fuse from
being pressurized.
THE ENGINE RUNS ERATICALLY (RICHENS AND LEANS) WHILE IN FLIGHT
If the engine runs steady on the ground but fluctuates while in the air, especially when changing aircraft
attitude, it is a sign of erratic airflow over the carburetor intake. This airflow can change the pressure
that is sensed by the carburetor venturi and can cause richening and leaning of the mixture during flight.
This condition is often present when the carburetor is sticking out of the cowl and is subject to the
slipstream. The cowl will block airflow, or will cause air to be rammed into the carb, depending on the
attitude of the aircraft.
Possible Solutions
Solution-1
An aluminum plate may be bolted to the front of the carburetor such that it hangs down
approximately ¾” – 1” below the carb body and blocks airflow over the venturi. If this does
not work, the plate may be made longer and bent rearward so that it deflects air away from the
carb venturi. However, do not get the plate too close to the venturi. Two of the screws that
hold the diaphragm cover may be used to attach the plate.
Solution-2
Obtain a carburetor stack or velocity stack and bolt it onto the carburetor. It lengthens the air
column over the venturi and will block/smooth much of the erratic airflow. These stacks
typically have a bevel and can be rotated to provide a little ram-air effect. Experiment with the
position of the bevel in order to achieve the best air flow/performance.
ENGINE HAS BEEN RUNNING FINE BUT SUDDENLY BEGINS TO RUN ERATICALLY
If the engine has been running fine and then begins to run erratically over time it means that something
has gone wrong. Do not adjust the needles! Instead, do the following:
Check the Ignition Battery:
Check the ignition battery and make sure it is still providing its rated voltage and capacity while
under load.
Check All Ignition Connections:
Make sure all ignition components are securely plugged-in and all ground straps are securely
attached to the engine.
Check the Spark Plugs:
Check the spark plugs to make sure they are not fouled.
If they appear to be fouled, replace them.
Check the Hall Effect pick-up wires:
If the pick-up wires chafe against the case it may cause intermittent shorting and erratic running.
Inspect the 3 twisted wires carefully to ensure they are not shorting against the case
Check the internal Carb Filter:
The carburetor screen may have become plugged.
clogged.
It is a very fine wire mesh screen and is easily
Remove the carb plate on the fuel inlet side of the carb (observe the position of all gaskets). The
fuel filter sits in a depression and should be visible. If it appears clogged, it can be carefully
removed with a pin and cleaned with gasoline. Then carefully reinstall the filter.
If the filter does not appear to be clogged, the remainder of the carburetor may be disassembled
and the needles removed and the whole unit flushed out with gasoline or alcohol. Be very careful
and do not disturb the little spring-loaded lever on the diaphragm side of the carb – its setting is
very critical and should not be disturbed unless experienced with this part.
ENGINE MAINTENANCE
It is advisable to drain the fuel tank after each day of flying.
Use only fresh gasoline.
If the gasoline begins to smell like varnish, replace it with fresh fuel.
If the engine is not going to be used for several weeks, start the engine after emptying the fuel tank to purge the
remaining fuel from the carb.
Inspect the spark plugs periodically. The electrode should be a light tan in color if the mixture is correct.
lighter color typically indicates a leaner fuel mixture while a darker color indicates a richer mixture.
A
Periodically check that the propeller is tight, especially if a wooden propeller is used as the wood will compress
over time and the prop bolt will no longer be tight.
Make sure the spinner has not slipped and be sure the prop is not touching the spinner.
Specifications:
•
•
•
•
•
•
•
•
•
•
•
•
•
Displacement: 3.5ci (57cc)
Carburetor: Walbro HDA-246 (15.3mm Venturi)
Ignition: CDI Electronic ignition w/Auto timing advance
Power supply: 4.8V – 6.0V
Weight 3.9 lbs (62oz) including ignition and muffler
Maximum output: 6.0 BHP
Maximum RPM 9000
Idle rpm 1300 RPM
Fuel: Unleaded Gasoline (85 to 92 Octane)
OIL: 2-cycle (Pennzoil for Air Cooled Engines recommended)
MIX: 1:32 to 1:50
Prop selection: 21X8 – 24X8
Static thrust: 24X8 prop ~ 32 pounds
Badger Canyon Model Aircraft Engines
1118 2nd Ave - Longmont, CO 80501
Phone: (303) 746-5362
E-Mail: [email protected]