Transcript
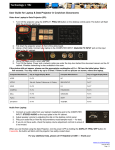
PC
AUDIO VISUAL USER GUIDE FOR AV03 EQUIPMENT
Connect your PC to VGA/Audio
input in the wall
Press AVPC button
The projector will start after
warm up and the image should
be visible
Press VOLUME UP or VOLUME DOWN
to increase or decrease Volume on any input
To move Screen up
use ↑ To move Screen
Down use ↓
While System is off
VCR
Press VCR button
The projector will start after a short
warm up period and the input will be
displayed on the screen
Ensure VCR/DVD combo is on and
insert cassette
Use PLAY, STOP, PAUSE
buttons on the panel as required
LAPTOP
Connect your laptop to VGA/Audio input
in the wall
Press LAPTOP button
The projector will start after warm up
and your image should be visible
If no image is visible, toggle FN F8, FN
F5 or FN F4 on your keyboard to display
the image
To Switch off, press and hold the
SYSTEM OFF button for 2 secs
DVD
Press DVD button
The projector will start after a short warm up period
and the input will be displayed on the screen
Ensure VCR/DVD combo is on and insert Disc into
DVD tray
Use PLAY, STOP, PAUSE buttons on the
panel as required
If you require Chapter selection or other menu items,
press MENU and use ENTER and ARROW
keys to navigate through the menu
If No Image is displayed
through the data projector please
toggle the below Function keys for
your brand of PC
Function + F2: Leader
Function + F4: Compaq, HP
Function + F5: Acer, Toshiba
Function + F7: Sony, Apple
Function + F8: Asus, Dell
PLEASE CALL 88555 FOR ASSISTANCE
Do not attempt to switch the system
back on until the LED has STOPPED
FLASHING