1
Getting connected
with your TM
T-Gateway
LET’S GET THIS SHOW
ON THE ROAD
This guide is designed to help you get started
with your new T-Gateway™. Please make sure
you keep it in a safe place, as you may find
you need to refer to it again at a later date.
2
WHAT’S
INSIDE
INTRODUCING YOUR T-GATEWAY™
04
Welcome to BigPond ADSL
What’s in the Box
About your T-Gateway
05
06
08
GETTING STARTED WITH YOUR T-GATEWAY
13
Power on your T-Gateway
Connect your T-Gateway to the filter/splitter
Connect with a wall-mounted phone
CONNECTING DEVICES TO YOUR T-GATEWAY
Connect via Ethernet Cable
Connect via Wi-Fi
Activate your T-Gateway and broadband service
MANAGING YOUR T-GATEWAY
The Gateway Management Interface
How To
Troubleshooting
14
19
24
30
31
36
38
59
60
61
75
3
INTRODUCING
YOUR T-GATEWAY
In this section:
WELCOME TO YOUR T-GATEWAY
5
Learn what your T-Gateway can do
5
WHAT’S IN THE BOX
6
Check that you have everything to get started
7
ABOUT YOUR T-GATEWAY
Learn what all the parts of your T-Gateway do
4
8
10
WELCOME TO
YOUR T-GATEWAY
CONGRATULATIONS ON YOUR NEW CONNECTION
Thank you for choosing BigPond Broadband and this T-Gateway, your new connection to
the world of high-speed Internet and home entertainment.
Your T-Gateway lets you connect all your compatible devices using the Ethernet ports
and Wi-Fi such as: T-Hub®, T-Box®, computers, smartphones, tablets, game consoles
and even your smart TV!
We’re sure you’re already happy with your purchase, but we’d like to highlight some of
the exciting things you can do with the T-Gateway:
•
•
•
•
Turn your portable hard drive into a shared storage device using the USB port,
Easily share media throughout your home with any devices that are DLNA certified®,
Share your printer across all your networked computers using the USB port,
If your ADSL service isn’t available you will have peace of mind knowing that if you have
a Telstra or BigPond Mobile Broadband you can still access the internet via your
T-Gateway as a backup,
• Securely share your internet connection with guests, using multiple SSIDs.
Note: Not sure what USB ports are? Unsure whether your device is DLNA certified®?
Turn to page 82 for a glossary that explains the meaning of these terms, and more.
5
WHAT’S IN
THE BOX
HERE’S WHAT COMES WITH YOUR T-GATEWAY
5.
1.
6.
WIRELESS
SECURITY CARD
4.
2.
3.
1. T-Gateway
2. Power adaptor
3. Ethernet Cable
Connect your computer or other device via a cable.
4. 2 x Telephone cables (T-Gateway), 2x Filter/splitters
Connect your phone on your ADSL line.
5. User guide
Detailed information about your T-Gateway.
6. Wireless security card
Contains the details you’ll need to connect any device to your T-Gateway via Wi-Fi.
6
BEFORE YOU
GET STARTED
CONFIRM YOUR LINE HAS BEEN ACTIVATED
It can take a few days after you place your order for ADSL to be activated
on your line.
Check if your ADSL service has been activated by visiting
telstra.com/trackmyorder and entering your 12 digit order number,
or contact us through one of the options in the ‘More Help’ section.
If you have a compatible Telstra or BigPond Mobile Broadband service,
you can use it to get online until your ADSL service is active.
CHECK YOU HAVE EVERYTHING YOU NEED
Check that you’ve got all the contents in the image to the left. If anything is
missing, contact us via the ‘More Help’ section.
Got more than two phones? You’ll need additional filters. You can find them
at a Telstra Shop. If you have a wall-mounted phone or you need a special
filter, please contact us through one of the options in the ‘More Help’ section.
7
ABOUT YOUR
T-GATEWAY
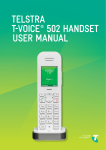
YOUR T-GATEWAY FROM THE FRONT
Your Gateway has 8 indicator lights on the front panel.
These lights are active when:
1
2
3
4
5
6
7
8
8
1. Ethernet
A device is connected to your T-Gateway via Ethernet cable.
2. Wireless
A device is connected to your T-Gateway via Wi-Fi.
3. Voice
Your Telstra Internet call is made via your T-Gateway (not available on ADSL).
4. WAN
Your T-Gateway is connected to an active ADSL line/ NBN port.
5. Internet
Your ADSL line has a working Internet connection.
6. DECT
Your cordless handset is paired with your T-Gateway.
7. WPS
Secure setup is active on your T-Gateway.
8. Status/ECO Power
Your T-Gateway is on or in idle mode.
NEED TO KNOW MORE?
The indicator lights will change depending on the status of your Gateway.
For an explanation of what the lights mean, see page 79.
To understand more about the terms used here, see page 81.
9
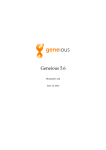
YOUR T-GATEWAY FROM THE BACK & SIDE
technicolor
TG797n v3
SN : C P 1 3 0 4 R A Z Y M
MAC : A 4 B 1 E 9 9 8 7 C 4 2
ACCESS KEY : MCH9Z2P0
GW : DSLCBA649EKV6
N104006
OUI - SN : A 4 B 1 E 9 - C P 1 3 0 4 R A Z Y M
wireless user codes
7353-9124
1
WPS
2
DECT
PSTN
3
10
4
Network Name:
Wireless Key:
Te l s t r a 9 8 7 C 4 3
C319224D6B
DSL
1
2
Made in Vietnam
Rated Input:
3
5
12V
2A
GbE
6
WAN
R ESET
7 8 9
10
1. WPS (Wi-Fi Protected Setup) button
Press this button to activate WPS (see page 80 for an explanation of
WPS LED colours).
2. DECT button
Press this button to pair your T-Hub and/or T-Hub 2 handset
(or other DECT compliant handsets) with your T-Gateway.
3. Telephone port (green)
This port is currently not in use for ADSL services.
4. Telephone port (black)
Connect one of the included grey telephone cables from here to your
‘Local Phone’ socket on the filter/splitter to allow calls to be made
with any DECT paired handset.
5. Ethernet Ports 1-3 (yellow: Fast Ethernet)
Connect any devices such as computers, smart TV’s, T-Hub®,
T-Box® or printers via a cable.
6. Ethernet Port 4 (yellow: Gigabit Ethernet or GbE)
Connect any devices such as game consoles or a T-Box for super-fast speeds.
7. Gigabit Ethernet port WAN (red)
This port is to connect your T-Gateway to your Velocity or Telstra on the
NBN service allowing high speed transfer over Fibre networks.
8. Power Socket
Used with the supplied power adaptor in the kit.
9. Power button
This button is to turn your T-Gateway on and off.
10. USB ports (Back port – High Power 1000mA; Side port – Normal Power 500mA)
Connect USB hard drives or printers; or connect a Telstra Mobile Broadband device
for Internet without ADSL on any of the USB ports.
11
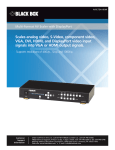
NOW LET’S GET YOU CONNECTED
So now that you have an idea of what your Gateway can do, it’s time to help
you get it all working. In the next two sections, we’ll help you set up your
Gateway and connect your devices to it:
T
T-Gateway
™
Power
SmartT
SmartTV
T
Table
t
T x
T-Bo
Phone
Line
Filter/Splitter
Handset
T
T-Hu
b
Personal Computer
GETTING STARTED WITH YOUR T-GATEWAY
Power on your T-Gateway and connect it to your phone line – see page 14.
CONNECTING DEVICES TO YOUR T-GATEWAY
Connect devices using Ethernet cable or Wi-Fi – see page 31.
12
GETTING STARTED
WITH YOUR T-GATEWAY
In this section:
POWER ON YOUR T-GATEWAY
Connect your T-Gateway to power and switch it on – 4 tasks
CONNECT YOUR T-GATEWAY TO YOUR PHONE LINE
Connect your T-Gateway and install filter/splitters on your phone – 4 tasks
Connect the wall-mounted filter/splitter - 4 tasks
14
15
19
20
24
13
POWER ON
YOUR T-GATEWAY
STEP 1:
Plug your T-Gateway into the power point.
technicolor
TG797n v3
SN : C P 1 3 0 4 R A Z Y M
MAC : A 4 B 1 E 9 9 8 7 C 4 2
ACCESS KEY : MCH9Z2P0
GW : DSLCBA649EKV6
N104006
OUI - SN : A 4 B 1 E 9 - C P 1 3 0 4 R A Z Y M
wireless user codes
7353-9124
Network Name:
Wireless Key:
Te l s t r a 9 8 7 C 4 3
C319224D6B
Made in Vietnam
Rated Input:
12V
2A
WPS
DECT
PSTN
DSL
1
2
3
GbE
WAN
R ESET
CABL
Connect the power adaptor from the kit to the power socket on
the bottom right of the back of your T-Gateway.
Important Note: Make sure you place your T-Gateway in a location that’s close to a
working phone socket and power point for your ADSL service.
14
wireless user codes
7353-9124
Network Name:
Wireless Key:
Te l s t r a 9 8 7 C 4 3
C319224D6B
DSL
Made in Vietnam
Rated Input:
12V
2A
STEP 2:
Plug the other end of the power adaptor firmly into a wall socket
and make sure it is switched on.
technicolor
technicolor
TG797n v3
TG797n v3
SN : C P 1 3 0 4SN
R A: Z Y
CM
P1304RAZYM
MAC : A 4 B 1 EMAC
9 9 8:7 CA442B 1 E 9 9 8 7 C 4 2
1
ACCESS KEYACCESS
: MCH9Z2P0
KEY : MCH9Z2P0
2
3
GW : DSLCBA649EKV6
GW : DSLCBA649EKV6
N104006
OUI - SN : A 4OUI
B 1 E-9SN
-CP
: 1A340B
41
REA9Z-YCM
P1304RAZYM
GbE
N104006
WAN
R ESET
w i r e l e s s uwsi er er l ce os d
s euss e r c o d e s
7353-9124
7353-9124
N e t w o r k N aNmeet :w o r k N a m e :
W i r e l e s s KWe iyr :e l e s s K e y :
T e l s t r a 9 8 7 TCe4l 3s t r a 9 8 7 C 4 3
C319224D6B
C319224D6B
WPS
WPS
DECT
DECT
PSTN PSTN
DSL
DSL 1
M a d e i n V i e t nM
am
ade in Vietnam
Rated Input: R
12V
a t e d I n p2A
ut:
1 2
2 3
3 GbE
12V
2A
GbEWAN WAN
R ESET
R ESET
Important Note: If you have power saving power boards, check that the adaptor is
plugged into an ‘always-on’ socket.
15
7353-9124
Wireless Key:
Made in Vietnam
C319224D6B
Rated Input:
12V
2A
STEP 3:
Press the Power button on the bottom right at the back of
your Gateway to switch it on.
technicolor
TG797n v3
SN : C P 1 3 0 4 R A Z Y M
MAC : A 4 B 1 E 9 9 8 7 C 4 2
ACCESS KEY : MCH9Z2P0
GW : DSLCBA649EKV6
N104006
OUI - SN : A 4 B 1 E 9 - C P 1 3 0 4 R A Z Y M
wireless user codes
7353-9124
WPS
2
Network Name:
Wireless Key:
Te l s t r a 9 8 7 C 4 3
C319224D6B
3
Made in Vietnam
Rated Input:
12V
2A
GbE
WAN
DECT
PSTN
16
DSL
1
2
3
GbE
WAN
R ESET
R ESET
STEP 4:
Wait a couple of minutes until the light labelled ECO on the front of
your T-Gateway stops blinking green and becomes a steady RED.
A
B
17
STEP 5: COMPLETE
The first step is complete! Your T-Gateway is now powered up and
ready for you to connect to your phone line.
SEQUENCE & DURATION OF THE ECO LED
The ECO indicator will go through the following sequence of light status
when you turn on the gateway:
1. Steady Green – this will last roughly 20 seconds
2. Blinking Red – this will last roughly 20 seconds
3. Steady Green – this will last roughly 15 seconds
4. Steady Red – Proceed with the next section.
IS THE ECO LIGHT NOT ON?
If the ECO indicator light doesn’t come on, check that the power adaptor is plugged
in firmly and that the switch is on, at both ends.
If the light comes on but doesn’t turn to a solid red, try cycling the power
(switch your T-Gateway off and on again).
If your T-Gateway still doesn’t work, you may have a faulty component.
Please contact us through one of the options in the ‘More Help’ section,
to arrange for a replacement.
18
CONNECTtechnicolor
YOUR T-GATEWAY
TO YOUR PHONE LINE
TG797n v3
SN : C P 1 3 0 4 R A Z Y M
MAC : A 4 B 1 E 9 9 8 7 C 4 2
ACCESS KEY : MCH9Z2P0
GW : DSLCBA649EKV6
CONNECT YOUR T-GATEWAY TO THE FILTER/SPLITTER
N104006
OUI - SN : A 4 B 1 E 9 - C P 1 3 0 4 R A Z Y M
wireless user codes
STEP 1:
7353-9124
Take one of the grey phone cables from the kit and connect
it to the
grey DSL socket at the back of the Gateway.
Network Name:
Wireless Key:
Te l s t r a 9 8 7 C 4 3
C319224D6B
technicolor
Made in Vietnam
Rated Input:
12V
2A
TG797n v3
SN : C P 1 3 0 4 R A Z Y M
MAC : A 4 B 1 E 9 9 8 7 C 4 2
ACCESS KEY : MCH9Z2P0
GW : DSLCBA649EKV6
N104006
OUI - SN : A 4 B 1 E 9 - C P 1 3 0 4 R A Z Y M
wireless user codes
7353-9124
Network Name:
Wireless Key:
Te l s t r a 9 8 7 C 4 3
C319224D6B
Made in Vietnam
Rated Input:
12V
2A
WPS
DECT
PSTN
DSL
DSL
PSTN
1
12
3
2
GbE
WAN
3
R ESET
GbE
WAN
19
L
CA E
LO ON
PH
L
CA E
LO ON
PH
SL M
AD DE
O
M
SL M
AD DE
O
M
STEP 2:
Take a filter/splitter from the kit and connect the other end of the
phone cable to the ‘ADSL MODEM’ socket on the filter/splitter.
L
CA E
LO ON
PH
SL M
AD DE
O
M
L
CA E
LO ON
PH
SL M
AD DE
O
M
L
CA E
LO ON
PH
SL M
AD DE
O
M
Note: Got a wall-mounted phone and socket? Turn to page 24 for instructions.
L
CA E
LO ON
PH
SL M
AD DE
O
M
20
STEP 3:
Unplug your existing phone cable from the wall socket and connect it to the
‘LOCAL PHONE’ socket on the filter/splitter.
L
CA E
LO ON
PH
SL M
AD DE
O
M
L
CA E
LO ON
PH
SL M
AD DE
O
M
CALLS
SL M
AD DE
O
L M
CA E
LO ON
PH
REDIAL
RECALL
IN USE
CHARGING
PAGE
Important Note: If you don’t have a home phone near your T-Gateway, skip this step.
CALLS
L
CA E
LO ON
PH
REDIAL
RECALL
SL M
AD DE
O
M
IN USE
CHARGING
PAGE
21
STEP 4:
Connect the short cable that’s part of the filter/splitter
(it’s labelled ‘Wall socket’) to the phone wall socket.
L
CA E
LO ON
PH
SL M
AD DE
O
M
L
CA E
LO ON
PH
SL M
AD DE
O
M
SL M
AD DE
O
L M
CA E
LO ON
PH
SL M
AD DE
O
L M
CA E
LO ON
PH
22
STEP 5: COMPLETE
The WAN indicator on your T-Gateway (see page 79) should flash green then
become a steady green in a few minutes. Your T-Gateway is ready for you to
connect your devices and to activate it.
Important Note: Is the WAN indicator not green? Turn to page 79 for assistance.
DO YOU HAVE A PHONE ELSEWHERE IN YOUR HOME?
To avoid the ADSL signal interfering with phone calls, you need a filter on every
phone connected to a wall socket on your ADSL line.
Follow tasks 3 and 4 to connect the second provided filter/splitter to any additional
phones on this line.
If you have more than two phones connected to your ADSL line, you’ll need
additional filters. You can find them at a Telstra Shop near you.
If you have more than 4 phone devices or a Back to Base alarm system, you’ll need
to have a central filter installed. We can do this for you for a fee.
23
CONNECT WITH A
WALL-MOUNTED PHONE
DO YOU HAVE A WALL-MOUNTED ADSL FILTER/SPLITTER?
Wall-mounted phones need a special filter/splitter that is not included with
your T-Gateway.
These filter/splitters mount directly on your existing wall plate, meaning they
take up less space on your wall.
If you didn’t order a wall-mounted filter/splitter along with your T-Gateway,
please contact us through one of the options in the ‘More Help’ section.
CONNECT THE WALL-MOUNTED FILTER/SPLITTER
STEP 1:
Take the phone off the wall by applying firm upwards pressure,
and unplug the short cable from the wall plate.
24
LOCAL
PHONE
STEP 2:
ADSL
MODEM
Plug the cable labelled LINE on the filter/splitter into the wall plate socket.
Align the mounting screws on the filter/splitter and wall plate then slide the
filter/splitter down onto the wall plate until it stops sliding and is secure.
25
STEP 3:
Plug the cable on the phone into the socket on the front of the wall-mounted
filter/splitter that’s labelled LOCAL PHONE.
Align the mounting holes on the phone with the mounting screws on the
filter/splitter then slide the phone down until it stops sliding and is secure.
LOCAL
PHONE
26
ADS
MOD
STEP 4:
Plug the grey phone cable from our Gateway into the socket on the filter/
splitter labelled ADSL MODEM.
ADSL
MODEM
Note: Your wall phone filter/splitter includes an additional socket for other phone
devices if you need it.
27
STEP 5: COMPLETE
The WAN indicator on your Gateway (see page 79) should flash green then
become a steady green in a few minutes. Your Gateway is ready for you to
connect your devices and to activate it.
Note: Is the WAN indicator not green? Turn to page 75 for assistance.
28
SOME QUESTIONS
BEFORE YOU CONNECT
YOUR DEVICES
CHECK THAT YOUR T-GATEWAY & PHONES ARE CONNECTED
Before you start connecting your devices, let’s do a quick check that everything is
working as expected.
DO YOU HAVE A GREEN LIGHT?
If your ADSL line has been activated, the WAN indicator (see page 79) should now
be a steady green.
If the indicator isn’t green, and you’ve received confirmation that your ADSL line
is active, try turning the power off & on your T-Gateway and check that all cable
connections are secure.
If this doesn’t help, you may have faulty equipment or a line fault. Please contact
us through one of the options in the ‘More Help’ section for assistance.
CAN YOU MAKE CALLS?
After connecting filters/splitters, it’s important to check that your home phone/s still
work correctly.
You can do this by checking that you have a dial tone, and that there is no interference
on your phone line.
If there is interference or no dial tone, check that all connections are secure.
If this doesn’t help, you may have faulty equipment. Please contact us through one of
the options in the ‘More Help’ section.
GOT MOBILE BROADBAND?
If your ADSL line hasn’t been activated yet, and you have Telstra/BigPond Mobile
Broadband with a USB dongle, you can use this to connect to the Internet while
you wait.
Proceed to the next section and connect your devices to your T-Gateway.
Once you access the T-Gateway Management Interface (see page 60), you’ll have an
option to set up Mobile Broadband. Instructions will be provided at that point.
29
CONNECTING DEVICES
TO YOUR T-GATEWAY
In this section:
CONNECT VIA ETHERNET CABLE
31
Ethernet provides the best speed and reliability. It’s ideal for computers
or other devices that are located near your T-Gateway and can be reached
by Ethernet cables – 3 tasks.
CONNECT VIA WI-FI
Wi-Fi is great for mobility around the house, and for any device that doesn’t
have an Ethernet port, like T-Hub 2, smartphones and tablets.
30
36
CONNECT VIA
ETHERNET CABLE
CONNECT YOUR DEVICE TO YOUR T-GATEWAY
STEP 1:
Connect the yellow Ethernet cable from the kit to any of the yellow Ethernet ports
at the back of your T-Gateway.
technicolor
TG797n v3
SN : C P 1 3 0 4 R A Z Y M
MAC : A 4 B 1 E 9 9 8 7 C 4 2
ACCESS KEY : MCH9Z2P0
GW : DSLCBA649EKV6
technicolor
TG797n v3
N104006
OUI - SN : A 4 B 1 E 9 - C P 1 3 0 4 R A Z Y M
w i r e l e sSN
s :u CsPe1 3r 0 4cRoA d
es
ZYM
MAC : A 4 B 1 E 9 9 8 7 C 4 2
ACCESS KEY : MCH9Z2P0
7353-9124
GW : DSLCBA649EKV6
Network Name:
Wireless Key:
Te l s t r a 9 8 7 C 4 3
M a d e i n V i e t n aN104006
m
OUI - SN : A 4 B 1CE3
9 -1C9P2
13
RA
2044D
6ZBY M
Rated Input:
wireless user codes
12V
2A
7353-9124
Network Name:
Wireless Key:
Te l s t r a 9 8 7 C 4 3
C319224D6B
Made in Vietnam
Rated Input:
12V
2A
WPS
WPS
DECT
DECT
PSTN
DSL
PSTN
1
DSL
1
2
2
3
3
GbE
GbE
WAN
WAN
R ESET
R ESET
Note: If your device will be used to share media with other computers, use the Gigabit
Ethernet port number 4.
31
STEP 2:
Connect the other end to the Ethernet port on your device and make sure
the device is powered on.
1
2
Important Note: Ethernet ports are normally located on the side of laptops; or the
back of desktops, smart TV’s and game consoles.
32
STEP 3:
Wait for a connection to be established. Your device should indicate that an
Ethernet connection has been established. This generally takes around 15 seconds.
{IMAGE OF A COMPUTER DESKTOP
WITH MAGNIFIED VIEW ON THE
SYSTEM TASK BAR}
Important Note: Some devices may need you to activate the Ethernet function
manually. If this is the case, please refer to the instructions that came with your device.
33
STEP 4: COMPLETE
The Ethernet indicator on your T-Gateway (see page 57)
should now be steady or flashing green.
{IMAGE OF THE FRONT OF THE
GATEWAY WITH MAGNIFIED VIEW
ON THE ETHERNET LED}
WHAT’S NEXT? GET ACTIVATED!
If you’re setting up your T-Gateway for the first time, you may need to first
activate it to get on the internet. Turn to page 57 and activate your T-Gateway
so you can get online. Otherwise, you’re now ready to go!
If you also want to connect a wireless (Wi-Fi) device to your T-Gateway,
turn to page 36.
34
IS YOUR ETHERNET CABLE NOT LONG ENOUGH?
You can purchase longer cables from any good electronics store if the cable supplied
with your T-Gateway is not long enough. Keep in mind that longer cables can cause
slower internal connection speeds.
IS THE ETHERNET LIGHT NOT ON?
If the Ethernet indicator doesn’t come on, check that the cable is plugged in firmly
at both ends.
Also check the device you are trying to connect to your Gateway is powered on and
ready to connect (see the device’s manual for instructions).
If this doesn’t help, you may have a fault in your device, your Gateway or the Ethernet
cable. Please contact us through one of the options in the ‘More Help’ section.
35
CONNECT
VIA WI-FI
INSTRUCTIONS TO CONNECT VIA WI-FI USING:
OS X
For any iMac, MacBook or Mac Pro
Windows®
Windows® XP
Windows® 7
Windows® 8
All other devices
For phones, tablets, smart TV’s and game consoles
WIRELESS
SECURITY CARD
Wireless Network Name (SSID):
Telstra987C43
Wireless Security Key (WPA):
C319224D6B
Keep the Wireless (Wi-Fi) Security Card that came in the box nearby;
you’ll need it to connect your devices to your T-Gateway. If you
happen to lose the card that comes with your kit – don’t worry!
The Wi-Fi details are printed on the back of the modem.
36
BEFORE YOU BEGIN: IMPORTANT INFORMATION ABOUT WI-FI
Your T-Gateway uses the latest Wi-Fi technology (802.11n) to give you fast wireless
coverage throughout your home.
In order to get optimal Wi-Fi performance, you should try to place your T-Gateway
as centred in your home as possible.
The range and speed you get from devices you connect will depend on a number
of factors, including:
•
•
•
•
The wireless capabilities of your device, and its distance,
The distance of your device from your T-Gateway,
Other electrical equipment nearby, such as cordless telephones and microwaves,
Thick walls and other physical obstacles, such as Fish Tanks and large mirrors.
To get the greatest range and speed from your Wi-Fi connection, avoid placing it near
cordless phones operating on the 2.4GHz band (Check your Cordless phone user
manual if unsure).
You can access the T-Gateway Management console anytime by opening a browser
and entering ‘10.0.0.138’ in the address bar of your browser.
IS YOUR ECO LIGHT BLUE?
If the ECO LED is lit up blue, then your T-Gateway Wi-Fi is switched off. Turn it back on
by pressing the ECO button on the front.
DO YOU NEED MORE RANGE?
Your T-Gateway has a strong Wi-Fi signal that can provide most houses with fast
wireless throughput.
If you need more speed at a greater distance, we offer Home Network Extenders.
These boost the signal strength and help it reach further through your house,
or out to your backyard.
Extenders are available for purchase at any Telstra store.
37
CONNECT YOUR MAC TO YOUR T-GATEWAY
STEP 1:
On the top menu bar, click on the Wi-Fi icon
and you will get a menu.
If the Wi-Fi is not on, click ‘Turn Wi-Fi On’ to turn it on.
38
STEP 2:
You’ll see a list of available wireless networks. Click on the one that matches the
Wireless Network Name (SSID) on your Wireless security card.
Note: If you don’t see the wireless network name, please turn to page 76 for assistance.
39
STEP 3:
You’ll then be prompted to enter a password in the text box. Enter the Wireless security
key (WPA) from your Wireless Security Card.
Note: Ensure you enter your Wireless Security Key (WPA) exactly as it appears,
as it is case sensitive.
40
CHECK THAT THE CONNECTION HAS BEEN ESTABLISHED
STEP 4:
Wait for a connection to be established. Visit ‘10.0.0.138’ on your desired browser
to activate or manage your T-Gateway.
41
STEP 5: COMPLETE
The Wireless indicator on your T-Gateway (see page 79) should now be steady or
flashing green. The Wireless Network icon in the menu bar should also indicate
that a connection has been established.
A
B
WHAT’S NEXT? GET ACTIVATED!
If you’re setting up your T-Gateway for the first time, you may need to first activate
it to get on the internet. Turn to page 57 and activate your T-Gateway so you can
get online.
Otherwise, you‘re now ready to go! You can visit our online forum on
www.crowdsupport.telstra.com.au to get some ideas about what you can do.
CAN’T CONNECT?
If your computer’s wireless adaptor is on and you can’t connect to your T-Gateway,
or the connection drops out, please turn to page 75 for assistance.
42
CONNECT VIA WI-FI
WINDOWS XP
CONNECT YOUR WINDOWS XP PC TO YOUR T-GATEWAY
STEP 1:
Click on the Wireless Network icon
located in the system tray,
on the bottom right of your desktop.
Important Note: If you don’t see this wireless icon it could mean that your wireless
button/switch is off or your computer may need a wireless adaptor, check that your
wireless adaptor is powered on. For laptops, there may be a physical switch.
43
STEP 2:
You’ll see a list of available wireless network names. Double click on the one
that matches the Wireless Network Name on your Wireless security card.
Note: If you don’t see the wireless network name, please turn to page 76 for assistance.
44
STEP 3:
You’ll then be prompted to enter a password or security key in the text box.
Enter the Wireless Security Key (WPA) from your Wireless Security Card.
Important Note: Ensure you enter your Wireless Security Key (WPA) exactly as it
appears, as it is case sensitive.
45
CHECK THAT THE CONNECTION HAS BEEN ESTABLISHED
STEP 4:
Wait for a connection to be established. Visit ‘10.0.0.138’ on your desired
browser to activate or manage your T-Gateway.
46
STEP 5: COMPLETE
The Wireless indicator on your T-Gateway (see page 79) should now be steady or
flashing green. The Wireless Network icon in the menu bar should also indicate
that a connection has been established.
WHAT’S NEXT? GET ACTIVATED!
If you’re setting up your T-Gateway for the first time, you may need to first activate
it to get on the internet. Turn to page 57 and activate your T-Gateway so you can
get online.
Otherwise, you‘re now ready to go!
CAN’T CONNECT?
If your computer’s wireless adaptor is on and you can’t connect to your T-Gateway,
or the connection drops out, please turn to page 76 for assistance.
47
CONNECT VIA WI-FI
WINDOWS 7
CONNECT YOUR WINDOWS 7 PC TO YOUR T-GATEWAY
STEP 1:
Click on the Wireless Network icon
on the bottom right of your desktop.
located in the system tray
Note: If you don’t see this icon, check that wireless is powered on. For laptops, there
may be a physical switch.
48
STEP 2:
You’ll see a list of available wireless network names. Double click on the one
that matches the Wireless Network Name on your Wireless security card.
Note: If you don’t see the wireless network name, please turn to page 77 for assistance.
49
STEP 3:
You’ll then be prompted to enter a password or security key in the text box.
Enter the Wireless Security Key (WPA) from your Wireless Security Card.
Note: Ensure you enter your Wireless Security Key (WPA) exactly as it appears,
as it is case sensitive.
50
CHECK THAT THE CONNECTION HAS BEEN ESTABLISHED
STEP 4:
Wait for a connection to be established. Visit ‘10.0.0.138’ on your
desired browser to activate or manage your T-Gateway.
51
STEP 5: COMPLETE
The Wireless indicator on your T-Gateway (see page 79) should now be steady or
flashing green. The Wireless Network icon in the menu bar should also indicate
that a connection has been established.
WHAT’S NEXT? GET ACTIVATED!
If you’re setting up your T-Gateway for the first time, you may need to first activate it to
get on the internet. Turn to page 57 and activate your T-Gateway so you can get online.
Otherwise, you‘re now ready to go!
CAN’T CONNECT?
If your computer’s wireless adaptor is on and you can’t connect to your T-Gateway,
or the connection drops out, please turn to page 76 for assistance.
52
CONNECT VIA WI-FI
OTHER DEVICES
CONNECT YOUR DEVICE TO YOUR T-GATEWAY
STEP 1:
On your phone, tablet, T-Hub 2, smart TV or gaming console navigate to the
wireless networking section and switch on Wi-Fi. Please refer to the guides
that came with your device for assistance.
STEP 2:
You’ll see a list of available wireless networks. Click on the one that matches
the WIRELESS NETWORK NAME on your Wireless security card.
53
STEP 3:
You’ll then be prompted to enter a password in the text box. Enter the
Wireless Security Key (WPA) from your Wireless Security Card.
Note: Ensure you enter your Wireless Security Key (WPA) exactly as it appears,
as it is case sensitive.
STEP 4:
Wait for a connection to be established. This generally takes up to 30 seconds.
54
STEP 5: COMPLETE
The Wireless indicator on your T-Gateway (see page 79) should now be steady or
flashing green. Your device should also indicate a connection has been established.
WHAT’S NEXT? GET ACTIVATED!
If you’re setting up your T-Gateway for the first time, you may need to first activate it to
get on the internet. Turn to page 57 and activate your T-Gateway so you can get online.
Otherwise, you‘re now ready to go!
CAN’T CONNECT?
If your computer’s wireless adaptor is on and you can’t connect to your T-Gateway,
or the connection drops out, please turn to page 75 for assistance.
55
CONNECT VIA WI-FI
TROUBLESHOOT YOUR WI-FI CONNECTION
ARE YOU ABLE TO CONNECT?
If your device has a Wi-Fi connection, the WIRELESS light should be steady or
flashing green.
If the light isn’t green, try switching the Wi-Fi function on your device off then on again.
If this doesn’t help, you may also try connecting with another Wi-Fi enabled device.
If this doesn’t work, you may have a faulty device.
If you still can’t connect, you may have a faulty T-Gateway. Please contact us through
one of the options in the ‘More Help’ section.
IS YOUR CONNECTION STABLE?
The range and speed you get with your devices will depend on factors such as distance
from the T-Gateway and other devices in your home.
If your connection isn’t strong, or it drops out, try moving your device closer to your
T-Gateway, or try connecting using the Ethernet cable.
You can check out the HELP section on your T-Gateway, which has links to useful tools
allowing you to measure your Wi-Fi connection in the various spots within your home.
If you can’t move your device, or you need a fast connection at that distance, you may
want to consider a Home Network Extender. Read the next panel for more information.
DO YOU NEED MORE RANGE?
Your T-Gateway has a strong Wi-Fi signal that can provide most houses with fast
wireless throughput.
If you need more speed at a greater distance, we offer Home Network Extenders.
These boost the signal strength and help it reach all the way through your house,
or out to your backyard.
Extenders are available for purchase at Telstra shops.
56
ACTIVATE YOUR
T-GATEWAY
ACTIVATE YOUR BIGPOND ADSL SERVICE & GET CONNECTED
STEP 1:
Open a web browser on your device. On a PC, it may be Internet Explorer.
On a Mac, it may be Safari.
Other devices may have their own web browser.
STEP 2:
Enter http://10.0.0.138 in your browser’s address bar and go to the page.
57
STEP 3: COMPLETE
You will now be shown the Gateway Management Interface landing page.
Turn to page 81 for an explanation of what each section means.
58
MANAGING
YOUR T-GATEWAY
In this section:
THE GATEWAY MANAGEMENT INTERFACE
60
An introduction to the functions you can manage on your
Gateway via the T-Gateway Management Interface
60
HOW TO
Access your gateway web interface
Change your internet password on your gateway
Restart your T-Gateway
Reset your T-Gateway to Factory Default settings
Use the ‘Help’ feature on your T-Gateway
TROUBLESHOOTING
Can’t connect to my internet service
Can’t access my gateway web interface
Can’t connect to my T-Gateway via Wi-Fi with additional devices
My internet service is running slow
61
61
63
66
70
73
75
75
76
77
77
59
THE GATEWAY MANAGEMENT INTERFACE
Your T-Gateway is designed to make getting on the internet and creating a home
network as easy as possible.
However in some cases, you may need to manage your T-Gateway more directly.
For this, you will have to access the Gateway Management Interface.
Some of the things you can do via the Gateway Management Interface include:
• Share your music, photos and videos across multiple devices in your home network
• Add parental controls, to restrict access to certain sites
• Set up Telstra/BigPond Mobile Broadband, as a backup for when ADSL isn’t available
• Manage your wireless network name and password
ARE YOU AN ADVANCED USER?
The Gateway Management Interface also gives you access to more advanced settings.
Advanced settings such as Port Forwarding, Port Triggering, additional DHCP range,
etc are accessible for configuration.
Your T-Gateway is optimised for use on Telstra products.
It’s important to be aware that Telstra may not support any changes you make to the
default configuration on your T-Gateway.
You will be responsible for any advanced changes you make.
60
HOW TO: ACCESS YOUR GATEWAY WEB INTERFACE
STEP 1:
Open a web browser on your device. On a PC, it may be Internet Explorer.
On a Mac, it may be Safari.
Other devices may have their own web browser.
STEP 2:
Enter http://10.0.0.138 in your browser’s address bar and go to the page.
61
STEP 3: COMPLETE
{INSERT IMAGE OF BROWSER +
LANDING PAGE}
You will now be shown the Gateway Management Interface landing page.
Turn to page 81 for an explanation of what each section means.
62
HOW TO: CHANGE YOUR INTERNET PASSWORD
ON THE GATEWAY
STEP 1:
Open a web browser on your device. On a PC, it may be Internet Explorer.
On a Mac, it may be Safari.
Other devices may have their own web browser.
STEP 2:
Enter http://10.0.0.138 in your browser’s address bar and go to the page.
63
STEP 3:
{INSERT IMAGE OF BROWSER + LANDING PAGE}
You will now be shown the Gateway Management Interface landing page.
Turn to page 81 for an explanation of what each section means.
STEP 4:
{INSERT IMAGE OF GATEWAY INTERFACE}
Under Broadband Connection, click on PPPoEDSL.
Note: Each time you change your BigPond Internet Password either through
‘My Account’ or through our helpdesk, you must update this password field with
the new one.
64
STEP 5: COMPLETE
Once you have typed in your new password, click on Connect.
65
HOW TO: RESTART YOUR GATEWAY
STEP 1:
Open a web browser on your device. On a PC, it may be Internet Explorer.
On a Mac, it may be Safari.
Other devices may have their own web browser.
STEP 2:
Enter http://10.0.0.138 in your browser’s address bar and go to the page.
66
STEP 3:
You will now be shown the Gateway Management Interface landing page.
Turn to page 81 for an explanation of what each section means.
STEP 4:
On the Gateway Interface, click on Technicolor Gateway.
67
STEP 5:
Under Pick a task..., click on Restart my Technicolor Gateway.
68
STEP 6: COMPLETE
On the Warning page, click on Yes, restart my Technicolor Gateway.
69
HOW TO: RESET YOUR GATEWAY TO
FACTORY DEFAULT SETTINGS
STEP 1:
Open a web browser on your device. On a PC, it may be Internet Explorer.
On a Mac, it may be Safari.
Other devices may have their own web browser.
STEP 2:
Enter http://10.0.0.138 in your browser’s address bar and go to the page.
70
STEP 3:
You will now be shown the Gateway Management Interface landing page.
Turn to page 81 for an explanation of what each section means.
STEP 4:
On the Gateway Interface, click on Technicolor Gateway.
71
STEP 5:
Under Pick a task..., click on Reset my Technicolor Gateway.
STEP 6: COMPLETE
On the Warning: Reset to Factory Defaults page, click on Yes,
reset my Technicolor Gateway.
72
HOW TO: USE THE ‘HELP’ FEATURE ON YOUR GATEWAY
STEP 1:
Open a web browser on your device. On a PC, it may be Internet Explorer.
On a Mac, it may be Safari.
Other devices may have their own web browser.
STEP 2:
Enter http://10.0.0.138 in your browser’s address bar and go to the page.
73
STEP 3:
You will now be shown the Gateway Management Interface landing page.
Turn to page 81 for an explanation of what each section means.
STEP 4:
On the Gateway Management Interface, click on Help.
Note: This will open the Help menu in a new tab or pop up window. The help content is
related to the category/topic, from where you have clicked on the Help button.
74
TROUBLESHOOTING: CAN’T CONNECT TO MY INTERNET SERVICE
One of the first things to do if your Internet service isn’t working, is to check
your T-Gateway lights and find out what to do using the table below.
T-GATEWAY LIGHT STATUS
Power light is off
Power is on
and WAN light
is blinking
Power is on, WAN light
is solid Green and Internet
light is solid red/off
WHAT IT MEANS
WHAT TO DO
There is a problem
with your power
supply or
power is off
• Check your power cable is plugged in
correctly at the socket and that the main
power is on.
• Check the T-Gateway Power button is on
(back of the Gateway).
The T-Gateway
has power, but
cannot find an
ADSL signal on
the telephone line
• Make sure you are trying to connect to your
ADSL service on the activation day you were
advised. If not, please wait til that day.
• Check that your telephone cable is connected
to the Gateway, in the grey port and the
socket on the wall.
• Check that you have a dial tone, using an
existing Telephone in your home.
• Reboot your modem.
• If there is no dial tone, there is likely to be
a problem with your telephone line. Please
contact us through one of the options in the
‘More Help’ section.
The T-Gateway can • Check that you have typed the correct
find an ADSL signal, username on your gateway.
but cannot connect • Re-type your password for your internet
to the Internet
service on your gateway.
• Reboot your modem.
• Attempt to access a website.
• Check that you haven’t got any outstanding
bills, which may have caused your service to
be suspended.
• Check for any service outages on 133 933.
75
TROUBLESHOOTING: CAN’T ACCESS MY GATEWAY
WEB INTERFACE
One of the first things to do is to look at the T-Gateway lights,
which will provide you further information on what may prevent
you from accessing your gateway interface.
T-GATEWAY LIGHT STATUS
WHAT IT MEANS
WHAT TO DO
If connected via a ‘Ethernet –Wired’ connection
Ethernet light is off
The Ethernet port
• Ensure your Ethernet cable that it is properly
on the T-Gateway
connected to the gateway or your device.
or your device is not • Try connecting the Ethernet cable on another
working properly
Ethernet port on the gateway.
• Check your connection with a different
Ethernet cable.
• Restart your gateway by turning it on & off,
using the Power button on the back.
• Reset your gateway to ‘Factory Default’
settings, by pressing the ‘Reset’ pin, using a
pen or toothpick, on the back of the gateway.
If connected via a ‘Wi-Fi’ connection
Wi-Fi light is off,
but Status
light is solid green
Wi-Fi light is off,
and Status light is
solid blue
76
There is no device
connected on Wi-Fi
to the T-Gateway
• Check that you used the correct Wi-Fi
details from the supplied Wi-Fi key card.
• Check that you have turned on the
Wi-Fi radio on your device.
• Restart your T-Gateway by turning it on & off,
using the Power button on the back.
• Reset your gateway to ‘Factory Default’
settings, by pressing the ‘Reset’ pin,
using a pen or toothpick, on the back
of the gateway.
The Wi-Fi access
point is disabled
• Press the ECO/Status button on the front
to turn your Wi-Fi access point on.
• Reset your T-Gateway to ‘Factory Default’
settings, by pressing the ‘Reset’ pin,
using a pen or toothpick, on the back of
the T-Gateway.
TROUBLESHOOTING: CAN’T CONNECT TO
MY GATEWAY ON WI-FI WITH ADDITIONAL DEVICES
One of the first things to do is to look at the T-Gateway lights,
which will provide you further information on what may
prevent you from accessing the Internet.
T-GATEWAY LIGHT STATUS
Wi-Fi light is on
and Status light
is solid green
WHAT IT MEANS
WHAT TO DO
There is a device
connected to the
T-Gateway, but
additional device is
unable to connect
• Check that you used the correct Wi-Fi
details from the supplied Wi-Fi key card.
• Check that you have turned on the Wi-Fi
radio on your additional device.
• Check that you are in Wi-Fi range of
the gateway.
• Check your device manual/help guide,
to ensure it supports the correct Wi-Fi
security encryption.
TROUBLESHOOTING: MY INTERNET SERVICE IS RUNNING SLOW
If you are experiencing a slow internet service, please use the ‘How To:
Access my Gateway Management Interface’ and ‘How To: Use the ‘Help’
feature on your gateway’ for further assistance.
77
FURTHER INFORMATION
AND HELP
In this section:
INDICATOR LIGHTS
Details of the different states for each indicator light on
the front of your T-Gateway, and what they mean
79
81
GLOSSARY
A simple explanation of the technical terms used in this guide,
such as ADSL and WPS
81
MORE HELP
Contact options if you need more in-depth help
with your T-Gateway. We’re always ready to help
78
83
INDICATOR LIGHTS
ON YOUR GATEWAY
UNDERSTANDING WHAT YOUR GATEWAY IS TELLING YOU
The front of your Gateway has 8 indicator lights. These pages explain
what it means when each of them is steady, blinking or off.
INDICATOR LIGHT
DESCRIPTION
Ethernet
Green LED
Steady Green - Ethernet connection detected, but there is no activity.
Blinking Green - Ethernet connection detected, and activity is ongoing.
Off - No Ethernet connection detected.
Wireless
Green LED
Steady Green - Wireless device connected, but there is no activity.
Blinking Green - Wireless device connected and activity is ongoing.
Off - No wireless device connected.
Voice
Green LED
Steady Green - SIP/VoIP service is registered, but no call is being made.
Blinking Green - SIP/VoIP service is registered, and a call is being made.
Off - No SIP/VoIP service is registered.
WAN – Wide Area Network WAN – Wide Area Network
Green LED
Steady Green - ADSL line is synchronised (connected) and working.
Slow Blinking Green - Trying to detect an ADSL signal.
Fast Blinking Green - ADSL signal has been detected and the Gateway
is trying to synchronise (connect).
79
INDICATOR LIGHT
DESCRIPTION
Internet
Green LED
Steady Green - Connected to the Internet, but there is no activity.
Blinking Green - Connected to the Internet and activity is ongoing.
Red LED
Steady Red - Internet connection has failed.
Off - No connection to the Internet.
DECT – Digital Enhanced Cordless Telecommunications
Green LED
Steady Green - DECT device connected and ready for use.
Orange LED
Blinking Orange - DECT device in pairing mode is connecting.
Off - DECT not connected.
WPS – Wi-Fi Protected Setup
Green LED
Steady Green - WPS pairing setup successful.
Orange LED
Blinking Orange - WPS pairing process in progress.
Red LED
Fast Blinking Red - WPS error detected.
Off - WPS is not in progress.
Power/Status/ECO
Green LED
Orange LED
Steady Green - WPS pairing setup successful.
Blinking Red - Gateway is starting up.
Steady Red - Gateway has started, but not connected to the Internet.
Steady Blue - ECO mode is active, Wi-Fi service has been turned off,
all other functions are in operation.
Off - Power is off.
80
GLOSSARY OF
TERMS USED
UNDERSTANDING WHAT YOUR GATEWAY IS TELLING YOU
Below is an explanation of key technical terms used in this guide,
to help you understand more about how your T-Gateway works.
ADSL
Asynchronous Digital Subscriber Line – a technology that provides fast
broadband over your existing copper/telephone line.
DECT
Digital Enhanced Cordless Telecommunications – a digital communication
standard, used for creating cordless home phone systems.
DLNA®
Digital Living Network Alliance – is a cross-industry organisation of leading
consumer electronics, computing industry and mobile device companies.
The organisation provides a certification program with the aim to enable a
seamless environment for sharing digital media content in and around the
home on any DLNA Certified® consumer electronic device.
ETHERNET
Is a computer networking technology for local area networks (LANs).
This networking technology is standardised by the IEEE.
IEEE
The Institute of Electrical and Electronics Engineers is dedicated to
advancing technological innovation and excellence.
GATEWAY
Is a networking device that allows the connection of a local area network (LAN)
to a wide area network (WAN), such as the Internet.
LAN
Local Area Network is a computer network that is connected within a limited area,
such as home, school or office buildings.
NAS
Network Attached Storage is a device connected on your network allowing
you to store and access files from any device inside that network.
ROUTER
Is a device that manages the data packets between computer networks of
two or more data lines from different networks.
SSID
Service Set Identification is the visible Wireless network name of a wireless access
point. It is used in order for wireless devices to connect to your wireless network.
USB
Universal Serial Bus is an industry standard developed in the mid 1990s that
defines the cables, connectors and communications protocols used in a bus
for connection, communication and power supply between computer and
electronic devices.
81
82
VOIP
Voice over Internet Protocol, commonly refers to the communication protocols,
technologies, methodologies and transmission techniques involved in the
delivery of voice communications and multimedia sessions over Internet
Protocol networks, such as the Internet.
WAN
Wide Area Network is a network that covers a broad area or referred to an Internet
connection, since the Internet itself is considered to be a WAN as well.
WI-FI
Wireless Fidelity.
WPA
Wi-Fi Protected Access – is a security protocol and security certification program
developed by the Wi-Fi Alliance to secure wireless computer networks.
WPA2
Wi-Fi Protected Access II – is a security protocol and security certification
program developed by the Wi-Fi Alliance to secure wireless computer networks.
WPS
Wireless Protected Setup.
OPTIONS FOR FURTHER ASSISTANCE
GET MORE HELP WITH
YOUR T-GATEWAY
ASK A QUESTION ONLINE
If you have Internet access, we offer some great ways for you to
get help online:
CROWDSUPPORT
Telstra’s online community, 24x7. Join us to get support and advice
about products and services from Telstra staff and your fellow users.
Go to: crowdsupport.telstra.com.au
FACEBOOK & TWITTER
Our support staff is on Facebook and Twitter 24x7 to answer your
queries. Great for quick questions!
Facebook: facebook.com/Telstra
Twitter: twitter.com/Telstra
GET MORE DETAILED HELP
If you need more in-depth support from us, check our website or
give us a call; we’re always available
Go to: www.telstra.com/help
TELEPHONE SUPPORT
Our support centre is open 24x7, on 13 3933.
83
NOTES
84
™
and ® are trade marks and registered trade marks of Telstra Corporation Limited, ABN 33 051 775 556.
85
for more information
www.telstra.com/help;
www.telstra.com/apps;
www.telstra.com/myonlinetoolkit
13 7663
visit a telstra store