1
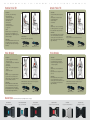
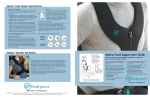
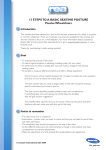
Hip Belt Specifications
ANGLES OF ATTACHMENT
The angle that the hip belt is attached to the wheelchair has a direct
effect on the angle of pull on the pelvis.
60°
45°
0°
is not possible, measure from ASIS to ASIS and add a couple of inches.
The correct belt size for the individual has padding that covers all of
the bony prominences.
Considerations:
• A 60° angle of attachment to the seat rail positions
the hip belt anterior and inferior to the ASIS, which
reduces the tendency of the client with a posterior
pelvic tilt to slip underneath the belt.
• A higher angle of attachment on the back post encourages a posterior pelvic tilt, which assists in positioning clients with an anterior
pelvic tilt.
• The secondary straps of a 4-point hip belt are attached to the seat
post between 45° and 90° to hold the primary padded strap in place
and to prevent the belt from riding into the abdomen or twisting.
• The angle of attachment may have to be compromised in order to
accommodate such situations as wounds in the pelvic area, unstable hip joints or gastric tubes.
XS 5"–9" (13cm–23cm)
S 7"–11" (18cm–28cm)
M 9"–15" (23cm–38cm)
L 13"–19" (33cm–48cm)
Hip Belt User’s Guide
The pelvis is the key to postural alignment as it dictates the position of the trunk, head and extremities.
ATTACHING TO THE FRAME
The Cinch-Mount end-fittings provide a quick and easy method for
achieving precise adjustments when fitting the belt to the wheelchair.
Used in conjunction with the FrameSaver Clamp, a wide variety of suitable mounting locations can be created. Proper mounting can also
extend the life of the belt and improve its pressure distribution. Mount the
belt to the wheelchair frame as close to the pelvis as possible. Consider
interference with any other devices and wheelchair mechanics.
Install in 3 Easy Steps:
TIGHTENING THE BELT
Keep belt tightened at adjustment straps during fitting and daily use to
ensure correct pad placement. For padded hip belts the pads are to be
touching when correctly tightened. For non-padded hip belts the adjustment strap at the buckle should be approximately 3" (76 mm) long.
Education of the caregiver is essential for correct hip belt positioning.
Bodypoint Hip Belts are designed for positioning, not as a safety restraint for
transport. Do not mistake a positioning-belt with a "seat-belt.” The requirements of a
belt used for postural support are very different from the requirements of a belt used
for transportation safety.
SIZING
Measure hip width to determine the belt size required. The suggested
method for measuring hip width is from trochanter to trochanter. If this
Every client is unique and individual, as is every positioning problem. There is no
“correct” solution to a specific problem. Keeping in mind that the least amount of
intervention is preferable. Adaptive equipment that limits a client’s active movement
must be monitored continuously.
1
Pull Styles
2
3
Two vs. Four Point
REAL-PULL HIP BELT
Operator: Caregiver
Adjustment: Tightens in the direction from the rear
of the pad to the center, with a pulley-like mechanism.
Buckles: Side-release, metal push button and
compact buckles.
Applications: Clients with high tone. Allows the
caregiver to position one side of the pelvis, lock it
in place and then position the other side.
Two-Point Hip Belt: The belt has two
points of attachment to the wheelchair.
Suitable when the belt is addressing low tone
or weakness.
CENTER-PULL HIP BELT
Operator: User or caregiver
Four-Point Hip Belt: The belt has four points of
attachment to the wheelchair. Primary attachments position the belt like two-point hip belt
and secondary attachments anchor the belt in
position to prevent it from riding up into the
abdomen or twisting. Holds the pelvis much
more aggressively for situations when the person has a lot of movement.
Adjustment: Tightens away from the center.
Buckles: Available with full buckle range.
Applications: Clients with low muscle tone or weakness.
DUAL-PULL HIP BELT
Operator: User or caregiver
Adjustment: Tightens from both sides of the buckle
away from the center.
Buckles: Side-release buckle only.
Applications: Clients who require greater adjustment
range to accommodate clothing and weight changes.
800.547.5716 | BODYPOINT.COM
Warranty: All Bodypoint products carry an unconditional guarantee against defects in workmanship and materials. Items found to be defective will be repaired or replaced at the discretion of Bodypoint.
IDEAL POSTURE:
• Neutral alignment of spine and head
• Level pelvis
• Shoulders slightly posterior to pelvis
PRIMARY SUPPORT SURFACES CONSIDERATIONS:
• Fitted to the individual
• Solid seat and back
• Correct back height depends on the amount
of trunk support needed
• Seat depth allows 1" (25mm) from back of
knee to front of seat
• Seat width allows 1⁄2" (13mm) on either side
• Correct use of lateral supports
• Correct armrest height allows for 30° shoulder
flexion and 60° elbow flexion
• Footplate position allows 2" (51mm) clearance
from floor and femurs to be parallel to seat
• Stable cushion
• Achieve balance between support and function
Good posture is the result of balancing the skeleton in
relation to gravity. The long-term goals for a good posture are to increase function of the individual, provide
pressure relief and reduce demands on muscles.
There are three points for pelvic stabilization:
the seat, the back and an anterior support.
A.S.I.S.
Anterior Superior
Iliac Spine.
Key orientation
point to assess
pelvic position
and to determine
belt placement.
Ideal Posture:
Hips: 100°
Knees: 105°
Ankles: 90°
R
E
C
O
M
M
E
N
D
A
T
I
O
N
S
F
O
R
T
R
E
A
Posterior Pelvic Tilt
T
M
E
N
T
O
F
P
O
S
I
T
I
O
N
I
N
G
T
E
N
D
E
N
C
I
E
Anterior Pelvic Tilt
ASSESSMENT
• Sacral sitting - most common tendency
• ASIS higher than PSIS
(Posterior Superior Iliac Spine)
• Tends to slide out of chair
• Flexed lumbar spine
• Thoracic kyphosis
• Shoulders protracted
• Increased cervical extension
• ‘C’ type posture
ASSESSMENT
• ASIS lower than PSIS (Posterior Superior Iliac
Spine)
• Thoracic kyphosis is reduced or reversed
• Increased lumbar lordosis
• Shoulders retracted
• Trunk extension
CAUSES
Wheelchair issues: such as seat depth too long,
back support too short, and footplates too low.
Physical conditions: such as tight hamstrings, muscle
weakness, and kyphosis.
ATTACHMENT
Position the padded belt anterior and inferior to the
ASIS and attach at a 60° angle to the seat posts.
(See back page for Hip Belt options and Angles of
Attachment).
CAUSES
Wheelchair issues – such as seat to back angle
too small. Physical conditions – such as tight hip
flexors, weak abdomen muscles, and lordosis.
Uncorrected posture.
Improved positioning with
Hip Belt (HB104) shown.
HIP BELT OPTIONS
The objective of the belt is to prevent sliding.
HB202 Two-Point Dual-Pull
ATTACHMENT
Position the padded belt over the ASIS and attach
at 90° to the wheelchair back posts. Anchor the
secondary straps to the seat posts between 45°
and 90°. (See back page for Hip Belt options and
Angles of Attachment).
HB104 Two-Point Center-Pull
Uncorrected posture.
Improved positioning with Hip
Belt (HB505) shown.
HIP BELT OPTIONS
The objective of the belt is to resist forward tilt of the pelvis.
HB505 Four-Point Dual-Pull
HB512 Four-Point Rear-Pull
Pelvic Rotation
Pelvic Obliquity
ASSESSMENT
• One ASIS is higher than the other – obliquity
refers to the lower side
• Compensatory C-shaped curve in the lumbar and
thoracic spine
• Lateral tendency
• Shoulder on the side of the obliquity tends to be
elevated
• Usually involves rotation
CAUSES
Wheelchair issues: such as sling back/seat upholstery, wheelchair too wide, and seat too short.
Physical conditions: such as irregular trunk muscle
tone, muscle imbalance, and scoliosis.
ASSESSMENT
• One ASIS is more forward than the other
• One hip abducted and one hip adducted
• Appears to have leg length discrepancy or a
‘wind-swept’ appearance
CAUSES
Wheelchair issues: such as seat depth too short
or too wide.
Physical conditions: such as seat depth too short
or too wide.
Uncorrected posture.
ATTACHMENT
Position the padded belt over the ASIS and attach
at 60° to the wheelchair back posts. When using a
Four-Point Hip Belt, anchor the secondary straps to
the seat posts between 45° and 90°. (See back page
for Hip Belt options and Angles of Attachment).
Improved positioning with
Hip Belt (HB402) shown.
HIP BELT OPTIONS: The objective of the belt is to bring the pelvis
down and back into the seating system.
HB402 Two-Point Rear-Pull
ATTACHMENT
Position the padded belt over ASIS and attach at
90° to the wheelchair back posts. Anchor the
secondary straps to the seat posts between 45° and
90°. (See back page for Hip Belt options and
Angles of Attachment).
HB512 Four Point Rear-Pull
Uncorrected posture.
Improved positioning with
Hip Belt (HB512) shown.
HIP BELT OPTIONS: The objective of the belt is to bring the
pelvis back into position and hold it there.
HB402 Two-Point Rear-Pull
HB512 Four-Point Rear-Pull
Buckle Styles Consider the needs of the person operating the belt (user vs. caregiver).
Metal Push-button
Extra Small Metal Push-button
Plastic Push-button
Compact Push-button
Aircraft Latch
Plastic Side Release
Very easy release button action
Strong, secure, child-sized buckle
Low profile and easy to release
Firm button action prevents accidental release
Easy to operate with limited hand function
Lightweight, secure snap action
S