1
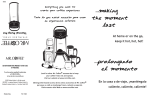
Sprayer User Guide − "REAL" Drum Top Sprayer
Instructions For Use
•
Position the "REAL" Drum Top Sprayer on top of the container you wish to dispense
from and insert the clear plastic suction hose. The brass suction nozzle has been
threaded so that a garden hose may be connected to it to lengthen the suction line or
give the operator the ability to spray water. The maximum vertical self prime is 4.5m.
•
Check the switch is turned to the "OFF" position, then connect to the power source. For
the AC version, insert the plug into a grounded power outlet. For the DC version,
connect the RED (+) clamp to the positive battery terminal. Then connect the BLACK (−)
clamp to a grounded metal portion of the chasis or engine. For stand alone battery
applications the BLACK (−) clamp may be connected directly to the negative battery
terminal.
•
Position spray wand tip into container to dispense from, squeeze the spraygun trigger,
and move switch to the "ON" position to allow unit to prime. Alternatively, remove the
spray control gun, insert end into container, move switch to the "ON" position and allow
unit to prime.
•
The pump is primed once straight liquid is discharged from the spray wand, rather than
a mixture of air and liquid. When primed, move switch to "OFF" and connect the spray
gun and wand if not already connected. If the product must be circulated before
spraying, leave unit "ON" with hose or wand end in the container and allow product to
circulate. The "REAL" DrumTop Sprayer is supplied with a recirculator kit which will
continue to recirculate material during operation. Allow time for initial mixing before
commencing spraying.
CUSTOMER SERVICE CENTRE
1300 780 250
Maintenance & Care
WARNINGS!
•
•
•
•
Always unplug unit before attempting to service.
Release pressure before disconnecting spray gun and spray wand.
Disconnect or unplug unit when not in use.
Never immerse pump.
Must be cleaned after every use:
•
•
•
After spraying, remove the suction hose from the container. Insert the wand tip into the
container and squeeze the spray gun trigger. Allow the unit to expel the unused material
back into the container. The wand and spray tip are left attached for this process to
provide a back pressure that will help expel 90% of the unused material out of the unit.
Remove unit from the spraying solution container, and circulate either soapand water,
diesel or other recommended cleaning solution through the unit until it comes out clean
and clear. NEVER USE XYLENE.
Drain all liquid from the pump. Do NOT allow liquid to freeze in the pump. Failure to do
so will result in damage to internal components of the pump.
Trouble−shooting
Fault
Action
Pump will not start
Check the circuit breaker
Check for proper voltage (+/−10%) & good electrical
connections
Check pressure switch for proper operation
Check motor for an open or grounded circuit
Check for a locked drive assembly
Leaks from pump head or switch Check for loose screws at the switch or pump head
Switch diaphragm may be torn or pinched
Check pump diaphragm for tears or holes
CUSTOMER SERVICE CENTRE
1300 780 250
Noisy or rough operation
Check for loose upper housing or drive screws
Is the surface that the pump is sitting on magnifying
the normal noise?
Pump will not prime
Out of product
Check for debris in the strainer
Check for a vacuum leak in the suction tube
Check suction tube & outlet hose for kinks or clogs
Check for debris in the valve plate
Check for proper voltage (+/−10%) with the pump
operating
Check upper housing for cracks
Be sure that the shut−off valve or spray tip is open &
free of debris.
Pump will not shut off
If a recirculator is installed it will need to be turned
up to175psi for the pressure switch to operate
Check that the outlet hose is closed & does not leak
Check for trapped air in the head or outlet hose
Check for proper voltage (+/−10%) to pump
Check valve assembly for wear
Check for loose drive assembly or upper housing
screws
Check pressure switch to be sure it has not been
moved out of adjustment
CUSTOMER SERVICE CENTRE
1300 780 250
REAL Drum Top Sprayer Parts Diagram
Reel & Pump Part Diagrams
CUSTOMER SERVICE CENTRE
1300 780 250