1
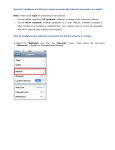
Manual Registration
This user guide will assist you in manually registering your dial-up Internet connection.
This guide applies to dial-up Internet.
To troubleshoot your email account, follow these three easy steps:
1. Refer to the “Internet and Email Settings” section of our website
2. Write down the email and Internet settings for your account and plan. You will need:
o Your username and password
o Your internet domain name
o Your incoming (POP3) mail server address
o Your outgoing (SMTP) mail server address
3. Follow the steps in this user guide
To complete this task you will require the following tools:
• Windows 2000 or Windows XP
If you need further help please contact our Customer Care number.
Page 1 of 10
Manual Registration
In the Windows desktop follow the
menu path Start > Settings > Control
Panel (Windows 2000) or Start >
Control Panel (Windows XP).
The Control Panel screen is displayed.
NOTE: If the Control Panel screen has
the heading Pick a Category, follow the
menu path Control Panel > Switch to
Classic View.
In the Control Panel screen:
1
Double-click Internet
Options.
The Internet Properties screen is
displayed.
1
Page 2 of 10
Manual Registration
In the Internet Properties screen:
1
Click the Connections tab.
2
Click on the existing
connection in the Dial-up and
Virtual Private Network
settings field.
1
2
4
NOTE: If there is no
4.
connection here skip to
3
3
to remove
Click
the dial-up account.
NOTE: Only remove accounts
if they are no longer in use
NOTE: Repeat 2 to 3
until all existing accounts are
removed.
4
Click
continue.
to
The Type of Connection screen is
displayed.
Page 3 of 10
Manual Registration
In the Type of Connection screen:
1
Select the Dial-up to private
network radio button.
2
Click
continue.
to
The Phone Number to Dial screen is
displayed.
1
2
Page 4 of 10
Manual Registration
In the Phone Number to Dial screen:
1
Type the megapop dial-up
phone number in the Phone
number field.
2
Click
continue.
to
The next screen displayed will be
determined by your computer’s setup.
If the Connection Availability screen is
displayed, continue to the next page.
1
If the Finished screen is displayed, skip
the next page.
2
Page 5 of 10
Manual Registration
In the Connection Availability screen:
NOTE: This screen may not be
displayed. Skip this page if the
Connection Availability screen is not
displayed.
1
Select the For all users radio
button.
2
Click
continue.
to
The Finished screen is displayed.
1
2
Page 6 of 10
Manual Registration
In the Finished screen:
1
2
Type a name for your Internet
connection in the Type a
name you want for this
connection field.
Click
continue.
to
The settings screen for your connection
is displayed.
1
2
Page 7 of 10
Manual Registration
In the connection settings screen:
1
Enter the manual registration
username in the User name
field in the format.
Enter guestreg in the
Password field.
2
3
NOTE: Enter the password
carefully. The Password field
is case sensitive.
Click
to continue.
The Internet Properties screen is
displayed.
1
2
3
Page 8 of 10
Manual Registration
In the Internet Properties screen:
1
Click
to continue.
Close the Control Panel screen and
restart the computer to save the
settings.
Once the computer has restarted,
continue to the next page.
1
Page 9 of 10
Manual Registration
Follow the menu path Start > Programs
> Internet Explorer to open Internet
Explorer.
The Dial-up Connection screen is
displayed.
In the Dial-up Connection screen:
1
Ensure guestreg appears in
the User name field.
2
Ensure the Password field is
not blank. If the Password
field is blank enter 6H8VTX69
as the password.
3
Click
continue.
1
2
to
Wait for the connection to
establish. This may take a
minute or two.
The Registration Server page is
displayed.
In the Registration Server page,
double-click the New User option to
begin the registration process.
Manual registration is complete.
Restart the computer to ensure all
settings are applied.
Page 10 of 10