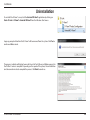
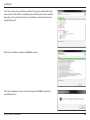
1
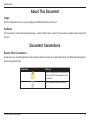
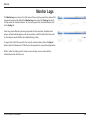
April 24, 2015 Version 1.10 D-View 7 Network Management System User Manual Preface D-Link reserves the right to revise this publication and to make changes in the content hereof without obligation to notify any person or organization of such revisions or changes. Information in this document may become obsolete as our services and websites develop and change. Manual Revisions Revision Date Description 1.0 April 11, 2014 Initial release 1.1 April 24, 20145 Corrections Trademarks D-Link and the D-Link logo are trademarks or registered trademarks of D-Link Corporation or its subsidiaries in the United States or other countries. All other company or product names mentioned herein are trademarks or registered trademarks of their respective companies. Copyright © 2015 D-Link Corporation. All rights reserved. This publication may not be reproduced, in whole or in part, without prior expressed written permission from D-Link Corporation. D-Link D-View 7 User Manual 2 Table of Contents Introduction.................................................................................... 4 About This Document.......................................................... 5 Document Conventions...................................................... 5 Available License................................................................... 7 System Requirements.......................................................... 8 Understanding Basic D-View Concepts......................... 9 D-View 7 Server................................................................10 Probe....................................................................................11 Sensor..................................................................................12 Databases...........................................................................13 D-View 7 Setup and Configuration.......................................14 Installation.............................................................................15 Uninstallation........................................................................22 Activation...............................................................................24 Upgrading From A Previous Version.............................26 Launching the D-View 7 Dashboard.............................27 Logging into the D-View 7 Dashboard........................28 Dashboard..............................................................................29 Dashboard Interface.......................................................30 Customized Dashboard.................................................31 Customized Dashboard Widgets................................32 Inventory........................................................................................33 Unmanaged...........................................................................34 Managed.................................................................................35 Device Detail Overview.....................................................36 Device Detail Sensors.........................................................37 D-Link D-View 7 User Manual Device Details Monitor Views..........................................38 Device Details Logs.............................................................39 Device Details Settings......................................................40 Monitor...........................................................................................44 Device View............................................................................45 Topology View......................................................................46 Rack View................................................................................50 Event View..............................................................................52 Monitor Logs.........................................................................53 Maintenance.................................................................................54 Batch Configuration............................................................55 Firmware Management.....................................................56 Configuration Backup & Restore....................................57 Task Management...............................................................60 System.............................................................................................61 License.....................................................................................62 Discovery & Probe Setting................................................63 User Management...............................................................64 Sensor Setting.......................................................................66 System Log.............................................................................67 About.......................................................................................68 3 Introduction Introduction D-Link strives to provide easy-to-use devices and software for users. Networking is a core technology for data communication. Based on abundant experience and profound understanding on end-user network management requirements, D-Link introduces D-View 7. Network administrators can now efficiently manage and monitor, device configuration, fault tolerance, performance, and security of multiple networks and management switches with D-View 7, a Simple Network Management Protocol (SNMP) Network Management System. This is a comprehensive standards-based management tool designed to centrally manage critical network characteristics such as availability, reliability and resilience in a consistent manner. D-View accommodates a wide range of devices including: Wireless AP Wireless Controller Unified AP Unified Switch Smart / Managed Switches Other SNMP supported devices This guide does not discuss network design, management concepts or provide detailed explanations of SNMP, MIB, RMON and associated concepts. We assume the reader is familiar with these networking concepts; hence variables defined in D-View menus are self-explanatory. D-Link D-View 7 User Manual 4 Introduction About This Document Scope Use this document to learn, use, and configure the different features of D-View 7. Audience This document is written for network managers, system administrators, and/or IT personnel who would need to work with D-View 7. Document Conventions Reader Alert Conventions Reader alerts are used throughout this document to notify the reader of essential information. The following table explains the meaning of each alert. Reader Alert Meaning Alerts to supplementary information that is not essential to the completion of the task at hand. Alerts to supplementary information. D-Link D-View 7 User Manual 5 Introduction Style Conventions The following table explains the meaning of each style convention used in this guide. Style Element Bold font Italic font Courier New font Courier New Bold font D-Link D-View 7 User Manual Meaning Use for describing user interface elements and characters that need to be typed into the interface. For example, Hierarchy Topology Workplace and type http://192.168.1.1. Variables for which the reader must supply a specific value. For example: Filename.ext can refer to any valid file name. Samples of code and file paths and names. A command that is typed at the command prompt. For example, ipconfig. 6 Introduction Available License After installing D-View, the trial version is automatically activated and allows evaluation of the product with a full feature set with no expiration date. The trial version includes support for 25 nodes and 2 probes. Additional licenses can be purchased and added at any time. Added licenses are accumulated, and there is no expiration date on additional license. Licenses are sold in electronic packs for adding additional nodes, or additional probes. The two types of licenses are different and need to be purchased separately. A node is any SNMP devices discovered in D-View 7. The node license determines how many devices the D-View 7 can manage. A probe is the remote agent which communicates between the D-View 7 server and devices. The probe license determines how many probes a D-View 7 server can use to communicate with devices from different subnets. An example for a need to purchase additional licenses would be; 1) A single location has 290 nodes that need to be monitored. In this example an additional 250 node license pack, and a 25 node license pack could be combined with the default free 25 node licenses to allow up to 300 nodes. 2) Four separate locations each have 5 nodes. In this example an additional 5 probe license pack could be combined with the default free 2 probe license to allow up to 7 probes, that could discover a total of 25 nodes (the default 25 node licenses included with D-View 7). To find out more about how to activate additional licenses on the D-View 7 server, please see Activation on page 24. To find out more about how to manage additional licenses on the D-View 7 server, please see License on page 62. D-Link D-View 7 User Manual 7 Introduction System Requirements Server Requirements • • • • • • • CPU Duel Core 3.0 GHz or above RAM 4 GB or above HD Space 120 GB or above (Depends on the number of devices managed) Windows 7 64 Bits (Professional Edition or above) Windows 8 64 Bits (Professional Edition or above) Windows Server 2008 64 Bits (Standard Edition or above) Windows Server 2012 64 Bits (Standard Edition or above) Probe System Requirement 7 • • • • • • • • CPU Single Core 2.0 GHz or above RAM 2 GB or above Operation System Windows XP 32 or 64 bits Windows 7 32 or 64 bits Windows 8 32 or 64 bits Windows Server 2008 32 or 64 bits Windows Server 2012 32 or 64 bits Support both 32 or 64 bits OS, All language Version Client System Requirements • • • CPU Single Core 2.0 GHz or above RAM 2 GB or above Chrome, Firefox, and IE 10 or above D-Link D-View 7 User Manual 8 Introduction Understanding Basic D-View Concepts D-View 7 has been redesigned to utilize a more streamlined server and probe architecture. Each component has a fundamental role, and they work together to give network administrators a greater level of control and management ability over the network. The D-View 7 server is responsible for collecting and storing data that it receives from various probes. It analyzes and compiles the data received and presents it in easy to understand graphs or data views. The server also acts a centralized command center, allowing network administrators to target specific devices or network segments and perform maintenance and administration without any complicated setup. A probe is used to collect data from SNMP devices, issue command to devices, and communicate with core server. After installing D-View 7, it will have an embedded local probe but an administrator can install additional probes if needed. Probes allows administrators to effectively monitor parts of networks that would otherwise be unaccessible due to firewalls, NAT, or a complicated network environment what make devices hard to access through SNMP. D-Link D-View 7 User Manual 9 Introduction D-View 7 Server Utilizing the server-probe architecture enables D-View 7 to get a view of the overall network topology versus traditional network management systems. Deploying probes in network segments that would otherwise be unaccessible from the outside allows network administrators to gain full control of networked resources without having to reconfigure the network in a way that could potentially be not secure. The server-probe architecture also facilitates a more secure networking environment by eliminating the need to have unnecessary ports open for each segment of the network that needs to be monitored. By deploying a probe within the desired network segment, certain ports such as SNMP, Trap, or others that could potentially be exploited are no longer required to be exposed. D-View 7 leverages ports 80 and 443 to communicate securely, and over standardized communication protocols that leave the network security uncompromised. D-Link D-View 7 User Manual 10 Introduction Probe D-View 7 probes are the primary component in connecting networking devices with the D-View 7 server. Probes run as a background process, performing network discovery for new devices, polling existing devices for statistics data, and acting as a staging point for forwarding data to the D-View server for networks behind a firewall or in a NAT environment. Probes for D-View 7 are not limited to D-Link products, and will communicate with any network device that supports industry standard reporting protocols based on SNMP. Deploying individual probes for a particular network segment helps to alleviate bandwidth constraints, as that data is collected by the probe before being forwarded to the D-View 7 server to be compiled and analyzed. This reduces network overhead by reducing the number of open connections, and the need to have all of the devices communicating directly with the server. Separating network devices into groups also becomes easier as identification based on a number of criteria can more easily be applied for a given network topology. Probes are also responsible for executing commands received from the D-View 7 administrator on devices that are directly connected to the probe. Examples of this would be performing a reboot, managing event logs, or making changes to a configuration on a device. D-Link D-View 7 User Manual 11 Introduction Sensor D-View 7 comes preconfigured with a number of sensors that can be used to gather network statistics. Sensors can also be customized down to the device level in order to give network administrators up-to-date information based on any number of criteria. Administrators can log into the D-View 7 server and use the sensor setup wizard to specify a metric such as CPU utilization, and then assign the sensor to any number of devices, groups, or whole network segments. Sensors will then be deployed to the device dashboard, and will gather the necessary information in realtime, updating at specified intervals, and storing the analyzed data for historical reporting. Sensors can also be assigned to separate workspaces within D-View 7, allowing administrators to create different network environments based on access controls built into D-View 7. This will help to create different workspaces for different teams based on the same number of devices and network topology, but enable different teams to focus on what matters. D-Link D-View 7 User Manual 12 Introduction Databases The D-View 7 backend is built on MongoDB, a document-oriented NoSQL database. MongoDB is made available under the GNU AGPL v3.0 license and the driver is based on Apache License v2.0. The aim of MongoDB is to provide a database that delivers high performance, high availability, and automatic scaling. Some of the key features of MongoDB are; • • • • • • Support for embedded data models reduces I/O activity on database system. Indexes support faster queries and can include keys from embedded documents and arrays. Provide automatic failover. Provide data redundancy. Automatic sharding distributes data across a cluster of machines. Replica sets can provide eventually-consistent reads for low-latency high throughput deployments. To find out more information about MongoDB, please visit the main MongoDB website at http://www.mongodb.org http://docs.mongodb.org/manual/administration/production-notes/ Note: For production environments, please ensure that D-View 7 and MongoDB are installed onto a 64 bit operating system. D-Link D-View 7 User Manual 13 Installation D-View 7 Setup and Configuration To install D-View 7, please make sure that the system it will be installed on meets the following requirements: • • Is running Windows 7 Professional 64-bit (or higher), Windows 8 Professional 64-bit, Windows Server 2008 Standard 64-bit (or higher) or Windows Server 2012 Standard 64-bit (or higher) Is connected to a network that has Internet access Additionally, the following components are also needed. If any of the below components are not present at the time of the D-View 7 installation, the installation wizard will install the missing components. • • • • • IIS .NET Framework 4.0 Windows Firewall is enabled ASP, ASP.NET, ISAPI Extensions, and ISAPI Filters are installed MongoDB To begin the installation process, download the D-View 7 setup application from the D-View website. After the download has completed, navigate to where the setup application was downloaded to, and double-click on the setup application to begin. The setup application by default installs all of the necessary components needed to operate in trial mode. Trial mode has all of the same features as a licensed D-View 7 server, but is limited to 25 nodes and 2 probes. To learn more about licensing and the activation process for D-View 7, please refer to Activation on page 24. D-Link D-View 7 User Manual 14 Installation Installation After double-clicking the setup application file, the installation wizard will start. Select the preferred language to install. Currently D-View 7 supports the following languages: • • • English Simplified Chinese Traditional Chinese After selecting the preferred installation language, D-View 7 will check to make sure that the necessary components needed to run are installed and properly configured. Click Start Installation to continue. If D-View 7 detects that any components are not present or configured properly, it can attempt to download, install, and configure the missing components. Missing or improperly configured components will have a red X listed next to their name. Click Configuring the Installation Environment to have D-View attempt to fix any issues. D-Link D-View 7 User Manual 15 Installation The D-View 7 setup application will display its current progress for each missing or not properly configured component. Depending on the speed of the network connection, or if an additional component is already installed but not configured properly, the setup application can take several minutes to complete. If an additional component is already installed, but needs to make changes that might impact other applications, the installation wizard will wait for user confirmation to continue. D-Link D-View 7 User Manual 16 Installation After the D-View 7 setup application has completed configuring the system environment, each additional component should have a green checkmark listed next to its name. Click Next to continue the installation process. D-View 7 also requires MongoDB and can either download and install MongoDB, or use an existing MongoDB installation. To continue, choose to either Install a new MongoDB or Use an Existing MongoDB and then click Next. D-Link D-View 7 User Manual 17 Installation If D-View 7 will be installed using an existing MongoDB instance, enter the hostname or IP address of the database. An admin level account for the existing MongoDB database is also needed as the D-View 7 installation wizard will need to configure settings to operate properly. Enter the Username and Password and click Check Connection to verify that the credentials are valid. Once the existing MongoDB credentials have been verified, click Next to continue. If D-View 7 will be installed with a new MongoDB instance, click Browse to navigate to the folder where the MongoDB application will be installed to. Also enter the Username and Password that will become the administrative account for the D-View 7 MongoDB instance. Once the MongoDB installation path has been chosen, and the D-View 7 administrative credentials have been set, click Next to continue. D-Link D-View 7 User Manual 18 Installation The D-View 7 setup application will continue the installation process by creating the necessary database with the credentials supplied. Depending on the speed of the network connection, or if additional components are needed, the setup application can take several minutes to complete the MongoDB installation process. If D-View 7 needs to make changes that might impact other applications, the installation wizard will wait for user confirmation to continue or not. Once the D-View 7 setup application has completed the MongoDB installation, it will load the MongoDB service and initialize the D-View 7 database. Depending on whether D-View is using a new or existing database, the initialization process could take several minutes to complete. After the database has been successfully setup and started, the D-View 7 setup will continue. Accept the software license by checking off the license agreement button, and click Next when ready. D-Link D-View 7 User Manual 19 Installation By default, the main D-View 7 application will install itself into the Program Files directory "C:\Program Files\D-Link\D-View 7\". If a different installation path is desired, click Browse to navigate to the folder where the D-View 7 application will be installed to. Next, enter the default URL that users will use to access the D-View 7 application. This can be either a hostname such as domainname.com or an IP address such as 192.168.0.100. The Web Destination Folder is usually "C:\inetpub\wwwroot\DView7 Web\". If a different path for the web site is desired, click Browse to navigate to the folder where the D-View 7 web files will be installed to. A probe will also be set up for the current subnet that the D-View 7 server is attached to. From the drop down menu, select the correct IP address that the probe will use to determine which subnet to monitor. Click Next when ready. D-View 7 installs shortcuts in the Windows start menu to provide access to the management panel and for uninstallation. If a different path for the shortcut is desired, enter the name of the folder where the D-View 7 shortcuts will be created. Click Install when ready. The progress indicator will display how much time is left until the installation process is completed. Depending on the speed of the system, the setup application can take several minutes to complete the installation process. D-Link D-View 7 User Manual 20 Installation At the end of the installation process, the setup application will display a summary of all of the changes that were made to the system. Click Next to finalize the D-View 7 installation. The D-View 7 setup is now complete. D-View 7 can now be accessed by typing in "http://<hostname or IP>/DView7/" into any browser. D-Link D-View 7 User Manual 21 Installation Uninstallation To uninstall the D-View 7 server, start the Uninstall D-View7 application by clicking on Start > D-Link > D-View7 > Uninstall D-View7 from the Windows Start menu. A pop-up prompt will confirm that D-View 7 will be removed from the system. Click Yes to continue or No to cancel. The progress indicator will display how much time is left until the uninstallation process for the D-View 7 service is complete. Depending on the speed of the system, the uninstallation can take several minutes to complete the process. Click Next to continue. D-Link D-View 7 User Manual 22 Installation The D-View 7 probe service will also be uninstalled. The progress indicator will display how much time is left until the uninstallation process for the probe service is complete. Depending on the speed of the system, the uninstallation can take several minutes to complete the process. When the uninstallation is complete, click Next to continue. The D-View 7 application has been successfully removed. Click OK to complete the uninstallation process. D-Link D-View 7 User Manual 23 Installation Activation Activation of additional licenses can be completed either online or offline. The activation wizard can be started at any time by clicking on the Upgrade button located at the top of the D-View toolbar. Licenses can also be added from the License management page. To learn more about license management, please see License on page 62. Clicking the Upgrade button will open the License activation wizard and will allow D-View to either be activated over the Internet, or activated using a license file that has been transferred from another system. If activating over the Internet, enter the license key that was given with the purchased additional node or probe license pack. Multiple licenses can be activated at the same time by clicking on the "+" sign next to the license key field. The system will automatically recognize what type of license is being added and will verify it with D-Link's licensing servers. Once the license has been verified, the license key will be added to the license management page. To learn more about license management, please see License on page 62. If offline activation is required, click Browse to navigate to the folder where the D-View 7 activation file is located. Click Next to continue. D-Link D-View 7 User Manual 24 Installation If the license key entered or activation file used can not be verified with D-Link's activation servers, please check to ensure that the license key does not contain any invalid characters and that the MAC address of the system being used matches the MAC address that was used to register D-View. Once the license key or activation file has been verified, the D-View 7 server will automatically adjust the number of available nodes or probes, depending on the license type. Licenses can be managed by clicking on System > License from the D-View 7 tool bar. For more information about licenses, please see License on page 62. D-Link D-View 7 User Manual 25 Installation Upgrading From A Previous Version It is not possible to migrate the data from an existing D-View 6.0 installation to D-View 7 due to the new database technology introduced with D-View 7. D-View 7 uses a completely different design and architecture that allows network administrators to more easily manage end devices as well as streamline their workflow process. If D-View 6 is currently installed on a network, a number of steps can be taken to ensure that deploying D-View 7 goes smoothly: 1. Install D-View 7 on a new server. 2. Collect the subnet information and SNMP communities from D-View 6. 3. Configure the discovery network and SNMP communities in the D-View 7 and start to discover the network. Note: Do not install D-View 6 and D-View 7 on the same server! Doing so will cause database and network conflicts. D-Link D-View 7 User Manual 26 Dashboard Launching the D-View 7 Dashboard To start the D-View 7 dashboard click on Start > All Programs > D-Link > D-View 7 > D-View 7. The default web browser will launch and present the login screen. D-Link D-View 7 User Manual 27 Dashboard Logging into the D-View 7 Dashboard To log into D-View 7 enter an email/username and password and then click Login. The default login credentials for the administrator account are email: "admin" and password: "admin". This password can be changed later from the User Profile > Security panel. D-Link D-View 7 User Manual 28 Dashboard Dashboard D-View’s dashboard interface provides easy access to all views and tools from a single location. The dashboard is made up of a number of different widgets that can be created and rearranged based on the current users preferences. By default, D-View will open the Overview dashboard. This dashboard contains a basic set of metrics that would be helpful to a network administrator. The widgets contained within the Overview dashboard can be rearranged by clicking and dragging a widget title bar. D-View also has a Wireless dashboard, which contains widgets that are specific to the wireless capable devices that are present on the D-View managed network. For more details on how to use and manage the Overview and Wireless dashboard, please see Dashboard Interface on page 30. D-Link D-View 7 User Manual 29 Dashboard Dashboard Interface Each widget in the Overview and Wireless dashboard has three available options to help customize the displayed data by either changing the widget style, changing the time period for the data being displayed, or to completely minimize the widget from view. To change the widget display type, click on the drop down option. This will allow the widget to switch between a visual graph mode, or a grid/table view that displays data only. To change the time period for the data that is currently displayed, click on the drop down menu and select the time period desired. If the time period option is greyed out, the widget is only able to display the most current available data. To hide the widget from view, click on the "-" sign. To expand the widget and show its data again, click on the "+" sign. At any point the widgets may be rearranged by clicking and dragging the title bar into the desired order. D-Link D-View 7 User Manual 30 Dashboard Customized Dashboard D-View allows for the creation of customized dashboards that contain a variety of different metrics. Dashboards are unique to the current workspace, so if more than one user shares a workspace, the newly created dashboard will be shared among the users. If it is necessary to separate dashboards between different users, the users must be in different workspaces. To find out more about setting up workspaces, please see User Management on page 64. To begin creating a customized dashboard, hover over the Dashboard menu item, and click on Customized If D-View has just been installed, or if this is a new workspace, the customized dashboard list will be empty. Click on the Create a New Dashboard link to start creating a new dashboard. When the Create New Dashboard dialogue box opens, enter a unique name for the dashboard. An optional description for the dashboard may also be entered to help identify it. Click Create to save the dashboard to the current workspace. The newly created dashboard will appear in a column list on the left side of the browser. To add another customized dashboard, click on the "+" sign at the top of the dashboard list. To hide the dashboard list from view, click the "<<" sign at the top of the dashboard list. Dashboards may also be filtered by entering a part or the whole name of the dashboard into the search box. The dashboard list can be reordered by clicking the left part of the dashboard name, and dragging the selected item either up or down in the list. To rename or delete a dashboard, click on the drop down menu item located on the right part of the dashboard name. D-Link D-View 7 User Manual 31 Dashboard Customized Dashboard Widgets If this is a new dashboard, click on the Add a New Widget link to begin adding a new widget. If this is an existing dashboard, click on the Add Widget button located in the upper right of the Custom View area. When the Create New Widget dialogue box opens, enter a unique name for the widget, and select the device that will provide the sensor data for the widget. The available types of sensors will change depending on the type of device that is selected. Some sensor options have additional options that must be specified before the widget can successfully be created. By default, the interval for the time period is set to 1 minute. Click Create to save the widget to the dashboard. Once the widget has been saved, it will appear in the Custom View area. To rename a widget, click on the name in the widgets title bar. To change the widget display type, click on the drop down option. This will allow the widget to switch between a visual graph mode, or a grid/table view that displays data only. To change the time period for the data that is currently displayed, click on the drop down menu and select the time period desired. If the time period option is greyed out, the widget is only able to display the most current available data. To display information about the device that the widget is associated with, hover over the information icon. To hide the widget from view, click on the "-" sign. To expand the widget and show its data again, click on the "+" sign. At any point the widgets may be rearranged by clicking and dragging the title bar into the desired order. To delete the widget, click on the X icon. A confirmation dialogue box will open to confirm the widget deletion. D-Link D-View 7 User Manual 32 Inventory Inventory The Inventory list shows hardware devices that are on the network and their relevant information such as IP address, Serial Numbers, and Firmware. The inventory list is separated into two major sections, managed and unmanaged. By default, the Inventory list will open the D-View Managed devices panel view. The managed device list can be further organized by applying labels to groups of devices. When a new device is added to the network, D-View will automatically add it to the unmanaged device list if it is discoverable. Devices that are in the managed list will be moved to the unmanaged list if they have been deleted from a specifically labelled group. To create a new label click on the "+" sign in the upper left corner of the device list column. A popup window will open; enter a unique label name, assign a color to the label, and add a description to describe the label. Click Create to save the label to the device list. Labels are unique to the workspace that the user is currently in, and users in the same workspace will share labels. The newly created inventory label will appear in a column list on the left side of the browser. To add another inventory label, click on the "+" sign at the top of the inventory label list. To hide the inventory label list from view, click the "<<" sign at the top of the inventory label list. Inventory labels may also be filtered by entering a part or the whole name of the inventory label into the search box. The inventory label list can be reordered by clicking the left part of the label name, and dragging the selected item either up or down in the list. To rename or delete an inventory label, click on the drop down menu item located on the right part of the inventory label name. To add a device to a newly created inventory label, click on the D-View Managed link at the top of the inventory label list. In the D-View Managed panel, use the checkbox to select which devices to apply a label to and then click the Label drop down menu item to select the appropriate labels. Click Apply to save the selected label to the chosen devices. D-Link D-View 7 User Manual 33 Inventory Unmanaged By default, newly discovered devices will appear in the Unmanaged device panel view. To move devices from unmanaged to the managed device panel view, use the checkbox to select which devices to move, then click Move to Managed. To completely remove a device from D-View management, click on the Delete Device button. Note: This will permanently remove the device and cannot be undone. To export a list of all of the devices currently in the Unmanaged device panel view, click on Export to download a CSV file that can be imported into a spreadsheet application. Devices may also be filtered by entering a keyword into the search box. Available search options will automatically appear under the search box, select the field to filter the results by. The advance search will allow for multiple filtering criteria. D-Link D-View 7 User Manual 34 Inventory Managed Devices that are in the Managed device panel view can be directly managed by selecting either the System Name, or IP Address of the device. The number of devices that are currently in the Managed devices list, as well as the number of online, and offline devices is displayed in both the Inventory List column, as well in the device panel view. To move devices between managed and unmanaged, use the checkbox to select which devices to move, then click Move to Unmanaged. To add a device to an inventory label, use the checkbox to select which devices to apply a label to and then click the Label drop down menu item to select the appropriate labels. Click Apply to save the selected label to the chosen devices. To export a list of all of the devices currently in the Managed device panel view, click on Export to download a CSV file that can be imported into a spreadsheet application. Devices may also be filtered by entering a keyword into the search box. Available search options will automatically appear under the search box, select the field to filter the results by. The advance search will allow for multiple filtering criteria. To reorder the current device panel view, click on the column title to sort by either ascending or descending. To manage a device, click on its corresponding System Name, or IP Address link. D-Link D-View 7 User Manual 35 Inventory Device Detail Overview The device detail overview gives a more complete dashboard view of a device. The default overview tab displays basic information that allows network administrators to get the information they need as quickly as possible. The number and type of widgets, as well as available tabs displayed will depend on the type of devices. Certain functions will also be available, such as the ability to Reboot a device, or configure additional settings. By default widgets are not able to be edited, and will only display information that has been manual entered. To edit information for a widget click on the Edit icon. This will allow the user to add information to any of the editable fields for that widget. D-Link D-View 7 User Manual 36 Inventory Device Detail Sensors Every class of device has its own default sensors that can be accessed from the device detail sensors tab. For example, wireless access points will have sensors for different types of metrics that relate to wireless clients, wireless traffic, or ping time. While routers and switches will have sensors that show metrics such as CPU utilization, wire speeds, and wired error packets. Customized sensors can be setup and applied to any device that is in the D-View Managed inventory list. For more information on how to create new sensors, please refer to Sensor Setting on page 66. D-Link D-View 7 User Manual 37 Inventory Device Details Monitor Views The monitor views tab displays a list of all the topologies that the currently selected device is a part of. Clicking on the name link to a topology will open a new window with the topology view that includes the currently selected device. Topologies may also be filtered by name by entering a keyword into the search box. The monitor view displays the name of the topology, they type of topology it is a part of, the date the topology was created, the number of devices that are associated with the topology, and if available a description of the topology. D-Link D-View 7 User Manual 38 Inventory Device Details Logs Devices that have support for local or remote logging will have a logs tab, which list all of the events for that device. D-View 7 supports both the Trap and Syslog standards and can receive either if a remote networking device is configured properly. The Logs view can be filtered by time period using the drop down menu. The events are listed in chronological order, starting with the name of the event, the SNMP version that was used by the remote device, the category of event for the message, and the message itself. Devices that have notifications setup correctly will also have their events added to the D-View tool panel event notification area. These alerts are for all devices setup correctly and clicking on either Critical, Warning, Informative, System, or Unmanaged will allow the administrator to review and take action as necessary. To configure a device to use D-View 7 as a Trap or Syslog server, click on the Settings tab and refer to Device Details Settings on page 40. D-Link D-View 7 User Manual 39 Inventory Device Details Settings The Device Details Settings tab is available for devices that are able to receive configuration commands from the D-View 7 server. This will include classes of device such as managed switches, managed access points, and routers/firewall devices. Some of the options for the settings tab may change depending on the device. Options for APs SNTP / NTP This option shows wether or not the device currently selected is Status: configured to send status updates for NTP. To configure this option, use the management software for the device. DHCP Server This option shows wether or not the device currently selected is Status: configured to send status updates for DHCP. To configure this option, use the management software for the device. Trap Status: If the currently selected device is able to send Trap status to D-View and is not currently configured to do so, D-View 7 can attempt to configure the device. To do so, click on the "Set D-View as Trap Server" button. D-View 7 will attempt to make the necessary changes on the currently selected device and if successful, will change the interface to show that the option has been toggled on. Syslog Status: If the currently selected device is able to send Syslog status to D-View and is not currently configured to do so, D-View 7 can attempt to configure the device. To do so, click on the "Set D-View as Syslog Server" button. D-View 7 will attempt to make the necessary changes on the currently selected device and if successful, will change the interface to show that the option has been toggled on. Operation Mode: This shows the current operating state of the device. To configure this option, use the management software for the device. D-Link D-View 7 User Manual 40 Inventory SSH Status: If the currently selected device supports remote SSH log in, the SSH service for the device can be controlled by D-View 7. Use the toggle to enable or disable the remote SSH service. If the status is reported as "Not Supported" the service may still be available, but status notifications may not be enabled. To enable status notifications for SSH, use the management software for the device. By default, SSH is set to port 22. If the SSH service is running on a non standard port, enter the correct port by clicking on the edit button and entering the correct port value. Telnet Status: If the currently selected device supports remote Telnet log in, the Telnet service for the device can be controlled by D-View 7. Use the toggle to enable or disable the remote Telnet service. If the status is reported as "Not Supported" the service may still be available, but status notifications may not be enabled. To enable status notifications for Telnet, use the management software for the device. By default, Telnet is set to port 23. If the Telnet service is running on a non standard port, enter the correct port by clicking on the edit button and entering the correct port value. Web Status: If the currently selected device supports remote Web log in, the status of the SSH service for the device can be controlled by D-View 7. Use the toggle to enable or disable the remote SSH service. If the status is reported as "Not Supported" the service may still be available, but status notifications are not enabled. To enable status notifications for SSH, use the management software for the device. By default, Web Status is set to port 80. If the remote Web log in service is running on a non standard port, enter the correct port by clicking on the edit button and entering the correct port value. D-Link D-View 7 User Manual 41 Inventory Options for Managed Switches SNTP / NTP This option shows wether or not the device currently selected is Status: configured to send status updates for NTP. To configure this option, use the management software for the device. DHCP Server This option shows wether or not the device currently selected is Status: configured to send status updates for DHCP. To configure this option, use the management software for the device. Trap Status: If the currently selected device is able to send Trap status to D-View and is not currently configured to do so, D-View 7 can attempt to configure the device. To do so, click on the "Set D-View as Trap Server" button. D-View 7 will attempt to make the necessary changes on the currently selected device and if successful, will change the interface to show that the option has been toggled on. Syslog Status: If the currently selected device is able to send Syslog status to D-View and is not currently configured to do so, D-View 7 can attempt to configure the device. To do so, click on the "Set D-View as Syslog Server" button. D-View 7 will attempt to make the necessary changes on the currently selected device and if successful, will change the interface to show that the option has been toggled on. Spanning Tree: If the selected managed switch supports the spanning tree protocol, D -View 7 can enable or disable the service. To enable the spanning tree protocol ensure that the on/off toggle is set to On. LLDP Status: If the selected managed switch supports status updates from the Link Layer Discovery Protocol, D -View 7 can enable or disable the service. To enable LLDP status updates ensure that the on/off toggle is set to On. Safeguard If the selected managed switch supports D-Link's Safeguard Engine, Engine: D -View 7 can enable or disable the service. To enable Safeguard Engine updates ensure that the on/off toggle is set to On. D-Link D-View 7 User Manual 42 Inventory POE Status: If the selected managed switch supports status updates for Power over Ethernet, D -View 7 can enable or disable the service. To enable PoE status updates ensure that the on/off toggle is set to On. RMON: If the selected managed switch supports status updates for Remote Network Monitoring, D -View 7 can enable or disable the service. To enable RMON status updates ensure that the on/off toggle is set to On. SSH Status: If the currently selected device supports remote SSH log in, the SSH service for the device can be controlled by D-View 7. Use the toggle to enable or disable the remote SSH service. If the status is reported as "Not Available" the service may still be available, but status notifications may not be enabled. To enable status notifications for SSH, use the management software for the device. By default, SSH is set to port 22. If the SSH service is running on a non standard port, enter the correct port by clicking on the edit button and entering the correct port value. Telnet Status: If the currently selected device supports remote Telnet log in, the Telnet service for the device can be controlled by D-View 7. Use the toggle to enable or disable the remote Telnet service. If the status is reported as "Not Available" the service may still be available, but status notifications may not be enabled. To enable status notifications for Telnet, use the management software for the device. By default, Telnet is set to port 23. If the Telnet service is running on a non standard port, enter the correct port by clicking on the edit button and entering the correct port value. Web Status: If the currently selected device supports remote Web log in, the status of the SSH service for the device can be controlled by D-View 7. Use the toggle to enable or disable the remote SSH service. If the status is reported as "Not Available" the service may still be available, but status notifications are not enabled. To enable status notifications for SSH, use the management software for the device. By default, Web Status is set to port 80. If the remote Web log in service is running on a non standard port, enter the correct port by clicking on the edit button and entering the correct port value. D-Link D-View 7 User Manual 43 Monitor Monitor The Monitor section contains various views that give network administrators a visual overview of different aspects of their network. The default view for Monitor is the Device View Switch tab. The Device View list all of the discovered devices by category. Topology view shows how devices are interconnected with the use of topology maps. Rack View can be used to simulate physical racks, and network stack layouts. Event View keeps a log of all received events by discovered devices in chronological order. Monitor Logs displays captured Trap and Syslog messages from devices on the network. To learn more about Device View, please refer to Device View on page 45. To learn more about Topology View, please refer to Topology View on page 46. To learn more about Rack View, please refer to Rack View on page 50. To learn more about Event View, please refer to Event View on page 52. To learn more about Monitor Logs, please refer to Monitor Logs on page 53. D-Link D-View 7 User Manual 44 Monitor Device View The Device View section shows devices listed by type and gives more insight into certain aspects of each type of hardware than the inventory page. The default view for Monitor is the switch tab. For each category of device, the status, most recent event, and other relevant information such as IP, MAC address, and others is shown. Clicking on a devices name or IP address will open that device's detail page. Clicking on the link to the probe that it is attached to will open the probe's detail page. To export a list of all of the devices currently in the Managed device panel view, click on Export to download a CSV file that can be imported into a spreadsheet application. Devices may also be filtered by entering a keyword into the search box. Available search options will automatically appear under the search box, select the field to filter the results by. The advance search will allow for multiple filtering criteria. To reorder the current device panel view, click on the column title to sort by either ascending or descending. For some categories of devices, the column list can be customized by clicking on the "+" at the end of the column list. From the drop down menu, select which columns to display and click Apply to save the changes. To manage a device, click on its corresponding System Name, or IP Address link. D-Link D-View 7 User Manual 45 Monitor Topology View The Topology View creates network maps based on the interconnecting devices that have been discovered by a probe on a subnet. The default Topology View is the initial probe that was installed on the D-View 7 server system. Additional probes, and subnets are listed in the probe list, located on the left side of the screen. Clicking on the gear icon will display a menu that can be used to toggle the display of certain event levels for the devices that are shown in the topology map. Click the "<<" icon to hide the topology list. The Topology View always shows the Default tab, which contains the D-View 7 probe, its subnet, and all devices on the subnet that have been discovered. To customize the view, click on the Customized tab. To create a new topology, click on the "+" located at the upper left hand corner of the topology list. This will open the Create New Topology wizard. To generate a topology, choose to either Automatically, or Manually generate a topology. If Automatically generating a topology, choose a central switch, will be the starting point for the topology map. Next, select the number of hops that should be included in the topology map. A list of linked devices will be shown that will be used to create the topology map. Click Next to continue. If Manually generating a topology, select the devices that should be used from the list of available devices. Click Next to continue. D-Link D-View 7 User Manual 46 Monitor Enter a name for the topology map that will be shown in the topology list. Optionally, enter a description to help identify the topology map. Next, select the display type for the topology map. A star topology will show connections, starting from the central switch, moving outwards by the specified number of hops. A tree view reorients the same information in a top down view, starting with the central switch and moving downward by the specified number of hops. The central device for display can also be changed by clicking on the drop down menu and selecting any listed device to be used as the starting point. Leaving the Auto option checked will create the map using the central switch that was selected in the previous step. Click Back to make any changes, or click Apply to save the new topology map. Topology maps may also be filtered by entering a part or the whole name of the topology label into the search box. The topology list can be reordered by clicking the left part of the name, and dragging the selected item either up or down in the list. To rename or delete an topology map, click on the drop down menu item located on the right part of the topology name. Navigating the topology map is done by left clicking anywhere on the map and dragging the map in the desired direction. Use the "+" or "-" controls to zoom in and out on the map. Clicking the target icon will zoom the map out and center it on the central switch for the current topology. In the default topology view, the map layout can be changed from a top down tree, to a star view by clicking on either option. The Display button shows a drop down menu that can toggle the display of informational elements. Clicking the refresh icon will redraw the map with the most current information. Clicking the Export button will create a PNG image file of the current view. D-Link D-View 7 User Manual 47 Monitor Hovering the mouse cursor over any device will open a pop up window that contains some basic information for that device, such as the devices IP address, MAC address, and recent events that originated from the device. In the customized topology view, it is also possible to edit the connections between devices. With a customized topology selected, click on the Edit button. The top section of the topology map will change, displaying the edit functions available for the current topology map. The Auto Arrangement button will open a pop up that enables changing the display type of the current topology map, as well as changing the central starting device. The Edit Devices button will open a pop up that can be used to select new devices to be added, or to remove existing devices. To remove existing devices, uncheck the device and click Save. To add new devices, click All. The device list will refresh and display all available devices. Check which devices to add and click Save. D-Link D-View 7 User Manual 48 Monitor The Edit Lines button will open a pop up that can be used to change the type of line that is shown connecting devices. Click on any line between two devices and then click Edit Lines. The Link Type can be changed from Normal Link, to LACP Link and the subnet type can also be set. Click OK to save any changes. Drawing new connections between devices is done by hovering over an existing device. A red dot will appear and the mouse cursor will change to a pencil cursor. Click and drag from the existing device to any other device to create the line. To edit the newly created link, click the line and then click Edit Lines. Any existing line or device can also be deleted by clicking the desired link or device and then clicking the Delete button. D-Link D-View 7 User Manual 49 Monitor Rack View The Rack View creates virtual racks that can simulate physical racks, or be used to group devices based on preference. Multiple racks are listed in the rack list, located on the left side of the screen. To create a new rack group click on the "+" sign in the upper left corner of the rack group column. A pop up window will open; enter a unique rack group name, and add a description to describe the rack group. Click Create to save the rack group to the rack group list. Labels are unique to the workspace that the user is currently in, and users in the same workspace will share labels. The newly created rack group will appear in a column list on the left side of the browser. To add another rack group, click on the "+" sign at the top of the rack group list. To hide the rack group list from view, click the "<<" sign at the top of the rack group list. Rack groups may also be filtered by entering a part or the whole name of the rack group into the search box. The rack group list can be reordered by clicking the left part of the label name, and dragging the selected item either up or down in the list. To rename or delete an rack group, click on the drop down menu item located on the right part of the rack group name. D-Link D-View 7 User Manual 50 Monitor To create a rack click the Add Rack button. This will add an empty rack to the rack view for the current rack group. The rack will be empty, and created with the default title of "New Rack" To change the rack title, click the title and enter the desired value. To add a device to the rack, click the "+" sign in the upper right corner of the virtual rack. Clicking the "+" sign will open a pop up window with a list of available devices. Select the devices to add the to rack and click Add. Newly added devices will be added into the rack. Devices can be moved between racks by clicking and dragging the desired device to any available rack. D-Link D-View 7 User Manual 51 Monitor Event View The Event View shows a list of all received events from devices that have been discovered and all system events that have taken place on the D-View 7 server. By default, the Event View shows the Device tab, which list events for discovered devices. To show events for the D-View 7 server, click on the System tab. Each tab in Event View has an Active Events section, as well as an Acknowledged Events section. New events will be stored in the Active Events section until they have been marked as acknowledged. To move between each section, click on either the Active Events button or Acknowledged Events button. To archive events, use the check box to select the event. The Acknowledge button will appear in the upper left corner of the Event View window. Events may also be filtered by entering a keyword into the search box. Available search options will automatically appear under the search box, select the field to filter the results by. The advance search will allow for multiple filtering criteria. To export a list of all of the events for the currently selected section, click on the Export button which will download a CSV file that can be imported into a spreadsheet application. While in the Device tab, clicking on the link to a source will open a new window with the detailed device view for that event. D-Link D-View 7 User Manual 52 Monitor Monitor Logs The Monitor Logs view shows a list of all received Trap and Syslog events from devices that have been discovered. By default, the Monitor Logs view shows the Trap Log tab, which list Trap events for discovered devices. To show Syslog events for discovered devices, click on the Syslog tab. Events may also be filtered by entering a keyword into the search box. Available search options will automatically appear under the search box, select the field to filter the results by. The advance search will allow for multiple filtering criteria. To export a list of all of the events for the currently selected section, click on the Export button, which will download a CSV file that can be imported into a spreadsheet application. While in either tab, clicking on the link to a source will open a new window with the detailed device view for that event. D-Link D-View 7 User Manual 53 Maintenance Maintenance The Maintenance section contains Batch Config, Firmware Management, Config Management, Task Management. Batch Config contains a number of different templates that can be used to configure multiple devices at the same time. It is also possible to use the built-in Script Template editor to create customized templates that can be saved for later use. Firmware Management is used to deploy firmware upgrades to multiple devices at the same time. Config Management is used to backup and restore configurations for a single or multiple devices at the same time. Task Management is used to view and manage currently running as well as historical task. To learn more about Batch Config please refer to Batch Configuration on page 55. To learn more about Firmware Management please refer to Firmware Management on page 56. To learn more about Config Management please refer to Configuration Backup & Restore on page 57. To learn more about Task Management please refer to Task Management on page 60. D-Link D-View 7 User Manual 54 Maintenance Batch Configuration Groups of devices can be simultaneously configured or controlled using the Batch Config utility. There are a number of default configuration templates that can be used, which are sorted by the device type they are applicable to. The default view for Batch Config is the Common Template section. The general configuration templates listed apply to a range of devices. To begin using a template. Click on the Create button. A pop up window will appear that will list the steps necessary to create a task that can either be run on a recurring basis, or one time only. The steps to complete task creation are outlined below: 1. Set the configuration behavior. For example, the LLDP Status Configuration task has the option to either enable or disable the LLDP status setting on a device. 2. Select the device(s) that the task will be assigned to. 3. Set the name of the task. This will be the name that the task will be identified as on the device. Optionally, set a description and a schedule to run the task. 4. Check to ensure that all of the details of the task are correct. If they are, click Submit to finalize the task. Otherwise, click Back to make any desired changes. Customized batch configurations can also be created by using the Script Template function. To create a custom template, click on the Script Template tab and then click on the "+" sign at the top of the script template list. A pop up window will open where the custom script name, description, and custom commands can be entered. Basic guidelines for creating custom scripts can be found in the online help, which can be accessed by clicking on the button at the upper right corner of the command line input box. Once a custom script has been successfully created, a new task for the custom script can be made by clicking on the Create button at the lower right corner of the Script Template view. The process for creating a new task is the same as the one used with the pre-made batch configuration templates found in the Config Template tab. D-Link D-View 7 User Manual 55 Maintenance Firmware Management The Firmware Management view is used to manage the deployment and tracking of firmware to devices on the network. The default view for Firmware Management shows a list of devices that have been remotely upgraded using D-View 7's firmware deployment feature. The list can be sorted and searched using the advance search function. Deploying new firmware to a single device or multiple devices can be accomplished by clicking the Firmware Upgrade button. A pop up window will open where the firmware binary and the target devices can be selected. Note: Ensure that the firmware binary selected matches the type of device selected in the first step of the firmware deployment process. Selecting the wrong type of device will cause the process to not complete properly. It is also important to follow any precautions listed on the firmware download page to ensure that the process completes without any issues. After selecting the proper firmware binary and selecting the proper device to upload the firmware into, click Next. Set the task details that will be used to identify the job for that device. Optionally, set a description and a time to live for the job. The default expiration time for the firmware upgrade process is 1 hour. Click Next to continue. Confirm all of the details are correct and click Submit to finalize the firmware upgrade process. Click Back to make any changes. The task will begin immediately and the status of the task can be found by going to the Task Management view under the Maintenance section. To find out more about Task Management, please see Task Management on page 60. D-Link D-View 7 User Manual 56 Maintenance Configuration Backup & Restore The Config Management view is used to backup and restore configurations for a single or multiple devices at the same time. The default view for Config Management shows a list of previous backup or restore task that have been performed. The list can be sorted by any of the listed columns, and can be filtered using the advance search feature. The Export button will download a copy of all the jobs currently displayed. To backup a single device or multiple device configuration, click on the Backup button. A pop up window will open which can be used to select the device(s) that will have their configurations backed up. Click Next to continue. Enter a name for the task that will be used by D-View 7's Task Management feature to track the backup process. Optionally, enter a description and the frequency of the backup job that will be performed. If necessary, the start time can also be delayed, or time to live can be adjusted to allow the backup job more time to complete. Click Next to continue. D-Link D-View 7 User Manual 57 Maintenance Confirm all of the details are correct and click Submit to finalize the configuration backup process. Click Back to make any changes. The task will begin immediately and the status of the task can be found by going to the Task Management view under the Maintenance section. To find out more about Task Management, please see Task Management on page 60. To begin the configuration restore process, click on the Restore button. A pop up window will open which can be used to select the source file for the configuration restore process. Choosing the System option will use a configuration file for a device that has been successfully backed up using the D-View 7 backup process. Choosing the System option allows for multiple devices to be restored at the same time, provided that the device has been successfully backed up using the D-View 7 backup process previously. The Upload option will allow a single device to be restored, using a configuration file that has been generated for a specific device. Click Next to continue. If the System option was chosen, select the device(s) that will have its configuration restored. The device list will show the last configuration backup that was successfully performed. Devices can be filtered by using the advance search feature. Click Next to continue. Enter a name for the task that will be used by D-View 7's Task Management feature to track D-Link D-View 7 User Manual 58 Maintenance the restore process. Optionally, enter a description or adjust the time to live to allow the restore job more time to complete. Click Next to continue. Confirm all of the details are correct and click Submit to finalize the configuration restore process. Click Back to make any changes. The task will begin immediately and the status of the task can be found by going to the Task Management view under the Maintenance section. To find out more about Task Management, please see Task Management on page 60. D-Link D-View 7 User Manual 59 Maintenance Task Management The Task Management view is used to view and manage currently running as well as track task that have been previously run. The default view for Task Management shows a list of current task that are being performed, as well as task that occur on a recurring basis. The list can be sorted by any of the listed columns, and can be filtered using the advance search feature. The Export button will download a copy of all the jobs currently displayed. The latest results for any job can be seen by clicking on the link listed in the Latest Result column. Details for the job can also be found by clicking on the Magnifying Glass icon. Clicking on the Pause icon will cause the job to suspend until the Play icon is clicked, resuming the job. The Trash icon will delete the job. To view a list of previously completed task, click on the Historical tab. The Historical Task list can be sorted by any of the listed columns, and can be filtered using the advance search feature. The Export button will download a copy of all the jobs currently displayed. D-Link D-View 7 User Manual 60 System System The System section contains License, Discovery, User / Workspace, Sensor Settings, System Logs, and About. The License page is used to view and manage licenses for nodes as well as probes that are attached to the D-View 7 server. The Discovery page is used to manage the discovery function of the different probes that are used to discover devices. The User/Workspace page is used for account and workspace management. The Sensor Settings page is used to create sensors that are used by devices to generate the data needed for the device dashboard widgets. The System Logs page is used to view system events that have taken place on the D-View 7 server. The About page shows information related to D-View 7. To learn more about License please refer to License on page 62. To learn more about Discovery please refer toDiscovery & Probe Setting on page 63. To learn more about User/Workspace please refer toUser Management on page 64. To learn more about Sensor Settings please refer to Sensor Setting on page 66. To learn more about System Logs please refer to System Log on page 67. To learn more about About please refer to About on page 68. D-Link D-View 7 User Manual 61 System License The License view allows the D-View 7 administrator to perform activations for adding nodes or probes, as well as managing existing licenses. The License List Export button will download a copy of all the data for both probes and nodes. The Probe Server List Export button will download all of the information related to probe statuses that are currently on the network. To add a new license for either a probe or node, click on the Add License button. This will open a pop up window that will start the activation wizard. To find out more about the activation process, please see Activation on page 24. To deactivate a license, click on the Deactivate License. The deactivation process can not be reversed. Once you deactivate, you will unable to use the full version of D-View 7. The D-View 7 installation will be unavailable until you reset or reinstall D-View 7. All of the license(s) listed will be released at the same time, and it is not possible to deactivate a single license number. Activating a probe is a two part process. To activate a probe, first add the additional probe license following the activation process outlined on page 24. Next, click on the Add Probe button in the Probe Server List section of the License view. Enter a name to help identify the probe. Click Next to continue. D-View 7 will automatically assign an available license code to the newly created probe. It will also issue an activation code that will need to be entered into the probe server to activate it. Write down the activation code, and enter it into the remote probe server to finish the probe activation process. The probe will remain inactive on D-View 7 server until the activation code has been entered and has successfully connected back to the D-View 7 server. D-Link D-View 7 User Manual 62 System Discovery & Probe Setting The Discovery view allows the D-View 7 administrator to monitor and manage active probes that are paired with the D-View 7 server. Each probe is listed in its own widget that gives basic details such as the probes MAC address, version, system uptime, and the discovery interval for detecting new devices on the network. To make any changes to an existing probes setting, click on the Edit icon in the upper right corner of a probes widget. A pop up window will open that displays all of the available options and rules that have been set for the selected probe. Auto discovery must be set to On in order for the discovery rules to be effective. To add a new discovery rule, click on "+ Add Rule" which will expand the rule set by one line. Enter the SNMP version that will apply to the rule, the IP coverage (range or subnet), the Read Only and Read Write community values, and optionally an alias to help identify the rule. Click Add to save the rule. To finalize the changes to the probe, click the Save button. D-Link D-View 7 User Manual 63 System User Management The User / Workspace view shows all of the user accounts and all of the available work spaces. By default, the User / Workspace list will show all the user accounts for all workspaces. Users on the D-View 7 server can be assigned to a specific workspace, which can be configured to limit the amount of or type of devices that are available to those users. To create a new workspace click on the "+" sign in the upper left corner of the workspace list column. A popup window will open; enter a unique workspace name, and add a description to describe the workspace. Click Next to continue. Select the devices that will be a part of the workspace. If the selected device has any devices it depends on, such as a wireless controller, make sure to add those as well. Click Next to continue. For each device, set the device privileges for the workspace. Privileges can be set on both the device and its modules. Click Submit to save the workspace to the workspace list. The newly created workspace will appear in a column list on the left side of the browser. To hide the workspace list from view, click the "<<" sign at the top of the workspace list. Workspaces may also be filtered by entering a part or the whole name of the workspace name into the search box. The workspace list can be reordered by clicking the left part of the workspace name, and dragging the selected item either up or down in the list. To rename or delete a workspace, click on the drop down menu item located on the right part of the workspace name. The Export button will download a copy of all the jobs currently displayed. D-Link D-View 7 User Manual 64 System To add a new user to the D-View 7 Server, click on the New User button. A pop up window will open. Enter the new users account name, password, email address, and set the account to either be active or inactive. If the account is set to Inactive, the user can be sent an email address with an activation link, to both verify their email and activate the account. Optionally, enter a description to help identify the user account. The account type can be set to Admin, or Normal User. If the account is set to Normal User, a drop down area will appear that will allow the administrator to set the user account privileges. The account privileges are based on workspaces, so it is important to ensure that the workspace has the correct permissions for the devices that the users is going to be assigned to. Click Submit to save the newly created user account. There is no limit to the number of user accounts or workspaces on the D-View 7 server. D-Link D-View 7 User Manual 65 System Sensor Setting The System Logs view shows a list of available sensors based on the type of data collected by the sensor. The sensors configured here will show up as a widget on the dashboard of a device that the sensor is assigned to. Certain sensors will not be applicable to specific types of devices (e.g. Wireless sensors for switches or other devices that have no wireless capability). To create a new sensor for a single device or multiple devices, select the sensor type based on the desired data to be collected, and click on the New Sensor button. A pop up window will open. Enter a unique name that will be used to identify the sensor in the sensor list. Using the drop down menu, select a time interval for how often the sensor will collect data from the assigned device(s). Optionally, enter a description to help identify the sensor. Click Next to continue. Sensors can be configured to send alerts based on certain thresholds. An administrator can also configure notifications to be sent when either an informative event, warning event, or critical event is detected on a device. Depending on the type of sensor, notifications can also be sent for certain types of devices (e.g. Wireless AP sensors can apply to a standalone AP, a managed AP, or a rogue AP). To configure a notification, first enable the event level desired. The hierarchy of event levels always goes from Info, to Warning, to Critical. To enable a Critical level event, Info and Warning must also be enabled. Next set the threshold level. For some sensors this will be a numerical value, for other sensors such as CPU Utilization it will be a percentage. Set the number of times the event must be detected. If an event is detected multiple times, the alert can also be escalated to a higher priority by enabling Escalation. Set escalation to On or Off, and set the number of times the event must be repeated before being escalated. Escalation can only be enabled if the higher priority alert level is also enabled. To reset all entered values, click the Reset button. Click Next to continue. Select the device(s) that will be assigned to the new sensor. Devices can be filtered by using the advance search feature. Click Finish to save the new sensor. To view the new sensor, go to the Inventory View and find a device that the newly created sensor was assigned to. The sensor will appear as a new widget within the devices detailed dashboard view. D-Link D-View 7 User Manual 66 System System Log The System Logs view shows a list of all events that have taken place on the D-View 7 server. Events may be filtered by entering a keyword into the search box. Available search options will automatically appear under the search box, select the field to filter the results by. The advance search will allow for multiple filtering criteria. To export a list of all of the events, click on Export to download a CSV file that can be imported into a spreadsheet application. D-Link D-View 7 User Manual 67 System About The About view shows the D-View 7 administrator details relevant to the D-View 7 server such as IP, MAC address, system uptime, and software version. By default, the About view shows the Support Device Model List tab, which list all of the devices that the current version of D-View 7 that is installed is compatible with. To show customized identified devices, click on the Customized Identified Device Model List tab. Devices may be filtered by entering a keyword into the search box. Available search options will automatically appear under the search box, select the field to filter the results by. The advance search will allow for multiple filtering criteria. Devices in the Customized Identified Device Model List tab can be edited by clicking on the Edit icon. This will pop up a window that will allow the administrator to input custom values for the Device Type, Model Name, Hardware Version, and Vendor. The About view also allows the administrator to set the email settings for D-View 7 server. To edit the email settings used, click on the Edit icon next to SMTP Server. This will pop up a window that will allow the administrator to set the proper hostname and credentials that D-View 7 will use to send emails. D-Link D-View 7 User Manual 68