1
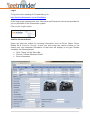
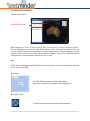
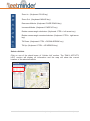
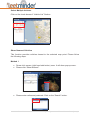
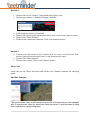
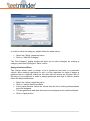
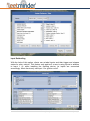
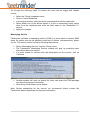
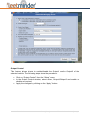
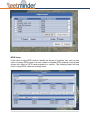
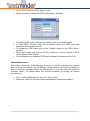
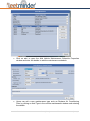
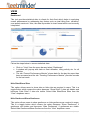
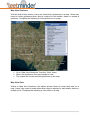
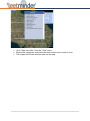
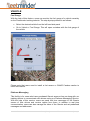
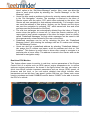
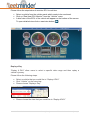
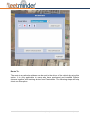
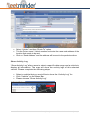
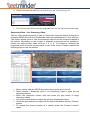
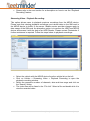
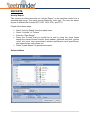
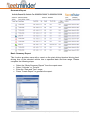
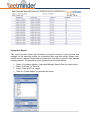
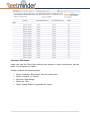
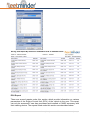
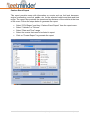
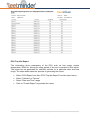
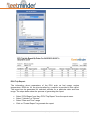
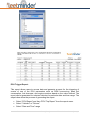
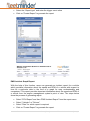
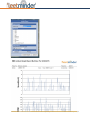
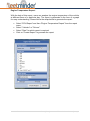
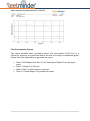
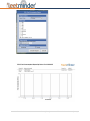
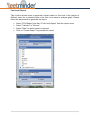
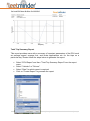
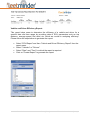
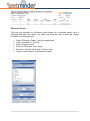
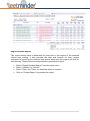
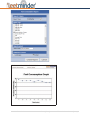
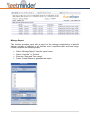
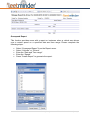
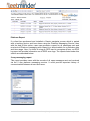
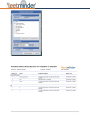
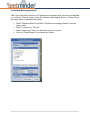
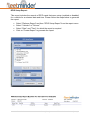
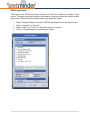
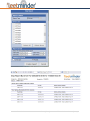
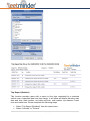
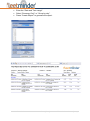
ONLINE TRACKING
USER MANUAL
TABLE OF CONTENTS
TITLE
PAGE
Setup
View
Alerts
Vehicle
Reports
www.fleetminder.com.au
2
16
19
21
30
1300 1 fleet (35338)
©fleetminder 2015
1|P ag e
SETUP
The Fleetminder Tracking system can be tracked online by using the Fleetminder
Tracking website. The Website requires a Login and Password for Authentication.
When logged in, it will allow you to track your vehicles no matter where you are and
generate reports.
Prerequisite
Ensure that you are using Internet Explorer version 7.0 or above, Firefox or Chrome.
The screen resolution should be set equal to or greater than 1280 x 1024.
Change Internet settings
The internet explorer settings have to be set to check for new versions of the
website every time that the web site is visited. Please follow the following steps.
Access Internet Options from the Settings menu in Internet Explorer.
From the Internet options, go to the general tab then browsing history and click on
settings, followed by setting the checking for newer versions setting to “Every time I
visit the webpage”.
www.fleetminder.com.au
1300 1 fleet (35338)
©fleetminder 2015
2|P ag e
Login
To log into online tracking for Fleetminder go to:
http://tracking.fleetminder.com.au/fleetfinder
At the login page, please enter your Username and Password, which was provided to
you on purchase of the Fleetminder system.
Click on the ‘Login’ button
Vehicle allotment detail
Users can allot the vehicle by entering information such as Driver Name, Driver
Mobile No & V e h i cl e G r o u p . U sers c a n also enter the vehicle number in the
search box and complete information of that user will display in the grid. Please
complete the following steps.
•
•
•
Click “Setup” on the Menu Bar.
Choose “Vehicle Allotment Detail”.
Enter information.
www.fleetminder.com.au
1300 1 fleet (35338)
©fleetminder 2015
3|P ag e
On-line tracking window
Vehicle List Section
Vehicle list section
After logging in, click on the orange bar “Click here to open tracking panel”
that is displayed on the left side of the screen. The “Vehicle List” Section lists all
of your fleets’ vehicles and indicates the name under which they are registered, their
location and the time of the last time or distance update. This section indicates which
vehicles are in use and which vehicle are not in use.
Map
“Map” will be displayed on the Right side of the screen. It will indicate which vehicles
are in use on the Map.
Mini Map
The Mini Map provides a small map legend,
giving the user better bearings during navigation.
Navigator Tools
To move the map in horizontal and vertical direction.
www.fleetminder.com.au
1300 1 fleet (35338)
©fleetminder 2015
4|P ag e
To zoom out the map.
To zoom in the map.
2D :
3D :
Road :
Aerial :
Bird’s eye:
Labels:
To show the map in 2D mode.
To show the map in 3D mode.
To see Road Map, select Road
To see Aerial Map, select Aerial
Birds eye image of the location.
To show city and road names on the Aerial Map.
3D Map
Users can click 3D icon to view the maps in 3D mode. Please make sure that
the computer has installed the Virtual Earth 3D software. To install the software,
please visit http://go.microsoft.com/fwlink/?LinkId=72623.
Note: For some areas, 3D mode is not able.
After installing 3D map, click 3D icon. The 3D map will be displayed on the right
side of the screen.
www.fleetminder.com.au
1300 1 fleet (35338)
©fleetminder 2015
5|P ag e
Zoom In: (Keyboard: PLUS key)
Zoom Out: (Keyboard: MINUS key)
Decrease Altitude: (Keyboard: PAGE DOWN key)
Increase Altitude: (Keyboard: PAGE UP key)
Rotate camera angle clockwise: (Keyboard: CTRL + left arrow key)
Rotate camera angle counterclockwise: (Keyboard: CTRL + right arrow
key)
Tilt Down: (Keyboard: CTRL + DOWN ARROW key)
Tilt Up: (Keyboard: CTRL + UP ARROW key)
Select a Vehicle
Click on one of the check boxes of “Vehicle List” section. The “DAILY ACTIVITY
LOG” section will display all information and the map will show the current
location of the selected vehicle
www.fleetminder.com.au
1300 1 fleet (35338)
©fleetminder 2015
6|P ag e
Select Multiple Vehicles
Click on the check boxes of “Vehicle List” Section.
Show Nearest Vehicles
This function provides vehicles closest to the selected map point. Please follow
the following steps.
Method 1
•
•
Pease click mouse (right hand side button) once. It will show pop-up menu.
Please click “Show Nearest”.
•
Please enter radius and postcode. Click on the “Search” button.
www.fleetminder.com.au
1300 1 fleet (35338)
©fleetminder 2015
7|P ag e
Method 2:
•
•
Please click on the “Search” (right hand side button) once.
Please type address – Address, Suburb, Australia.
•
•
•
•
It will show the location of the MAP
Please click mouse (right hand side button) once. It will show a pop-up menu.
Please click “Show Nearest”.
Please enter radius and postcode. Click on the search button.
Method 3:
•
•
•
Please point the mouse to the location that you want to search and click
mouse (right hand side button) once. It will show pop-up menu.
Please click “Show Nearest”.
Please enter radius. Click on the “Search” button.
Show Site
Users can set up “Sites” that their staff usually visit. Please complete the following
steps.
Add Site Category
This option allows users to add categories to the list of sites so they can be managed
well. It is particularly useful for clients who have more than 10 sites and want to keep
them organised by categorising them.
www.fleetminder.com.au
1300 1 fleet (35338)
©fleetminder 2015
8|P ag e
In order to add a site category, please follow the steps below:
•
•
Select the “Setup” dropdown menu.
Click on “Add Site Category”
The “Site Category” popup window will allow you to add a category by entering a
category name and clicking the “Save” button.
Assign Geofences/Sites
This feature allows users to assign a list of geofences and sites to a particular
vehicle. After creating a geofence or site, it is very important for users to assign a
geofence/site to a specific vehicle as the client will not receive an entry/exit alert if
this step is not completed. In order to assign geofences and sites to vehicle, please
follow the steps listed below:
•
•
•
•
•
Select the “Setup” dropdown menu
Click on “Assign Geofences/Sites
In the popup window, select the vehicle from the list to which geofences/sites
are to be assigned
Tick the geofences and sites that need to be assigned to the vehicle selected
Click on Apply button
www.fleetminder.com.au
1300 1 fleet (35338)
©fleetminder 2015
9|P ag e
Input Relabelling
With the help of this option, clients can re-label inputs and their trigger and release
states for every vehicle. This feature only applies if a user is using inputs in addition
to Input 1 i.e. while installing the tracking device, its inputs are connected
accordingly. Most clients only use Input 1 for ignition on/off.
www.fleetminder.com.au
1300 1 fleet (35338)
©fleetminder 2015
10 | P a g e
Go through the following steps to rename the input and its trigger and release
events:
•
•
•
•
•
Select the "Setup" dropdown menu
Click on "Input Relabeling”
In the popup window, select the driver and respective vehicle registration
Select either one of the default labels or to set a customised name, select
other from the dropdown and write the label name in the “Relabelled To”
column.
Apply the changes
Messaging Service
Fleetminder provides a messaging service (FMS) if a client wants to receive SMS
alerts for events such as the geofence entry/exit of vehicle, overspeed alert, power
cut etc. The service can be set up by following steps below:
•
•
•
•
•
Select “Messaging Service” from the “Setup” menu.
The Fleetminder Messaging Service window will pop up providing basic
information about the service
If a client wishes to continue with the subscription for the service, click on
“Continue”
Another window will open up where the client can select the FMS package
and enter the payment information
After filling out all details, press Submit
Note: Before subscribing for the service, we recommend clients contact the
Fleetminder Admin department for payment information.
www.fleetminder.com.au
1300 1 fleet (35338)
©fleetminder 2015
11 | P a g e
Output Control
This feature allows clients to enable/disable the Output1 and/or Output2 of the
selected vehicle. The following steps show the procedure:
•
•
•
Click on “Output Control” from the “Setup” menu
In the Output Control window, select driver, Output1/Output2 and enable or
disable as required
Apply the changes by clicking on the “Apply” button
www.fleetminder.com.au
1300 1 fleet (35338)
©fleetminder 2015
12 | P a g e
RFID Setup
If the client is using RFID cards to identify the drivers of vehicles, they can use this
option to assign RFID cards to drivers, enable or disable RFID cards as required and
access the record of RFID cards swiped for a vehicle. The following steps will help
client’s setup RFID cards and manage them:
www.fleetminder.com.au
1300 1 fleet (35338)
©fleetminder 2015
13 | P a g e
•
•
Go to “RFID Setup” from the “Setup” menu
Select a vehicle for which an RFID card needs to be setup
•
•
To add an RFID card of a driver to a vehicle, click on the “Add” button
In “Add RFID” window, enter the information about the RFID card and
respective driver and press OK
To enable the RFID card, click on the “Enable” button in the “RFID Setup”
window
Select date range and click on the “Go” button to receive records of RFID
cards swiped in that vehicle
If an unidentified (or disabled) RFID card is swiped, the Status will be “Fail”
•
•
•
Vehicle Maintenance
This feature allows the Fleet Manager to set up a vehicle’s maintenance related
alerts such as tyre change, oil filter change, vehicle service, etc. based on distance,
date or odometer readings. When the maintenance is due, the user will receive a
reminder email. The below steps will provide guidance on setting up vehicle
maintenance:
•
•
Go to “Vehicle Maintenance” from the “Setup” menu
Select the vehicle to view its current maintenance schedule and status
www.fleetminder.com.au
1300 1 fleet (35338)
©fleetminder 2015
14 | P a g e
•
Click on add, to open the Add Vehicle Maintenance Schedule Properties
window and enter the details to add the maintenance schedule.
•
Users can add a new maintenance type such as Replace Air Conditioning
Filter by clicking on Add Type in the vehicle maintenance window and entering
the details.
www.fleetminder.com.au
1300 1 fleet (35338)
©fleetminder 2015
15 | P a g e
VIEW
Dashboard
This tool provides statistical data to clients for their fleet which helps in analysing
overall performance by addressing key factors such as total idling time, utilisation,
over-speed events etc. Also, the data is provided in chart format which can be easily
interpreted.
Follow the steps below to access statistical data:
•
•
•
Click on “View” from the menu bar and select “Dashboard”
A window will pop-up with data on fleet utilisation, idling activity etc. for all
vehicles
The tab “Current Performance Metrics” shows data for the day the report has
been accessed and the tab “Trending Performance Metrics” provides records
for the last week.
Hide Sites/Show Sites
This option allows users to show sites or hide sites as required in maps. This is a
toggle button which means the option becomes “Show Sites” if sites are hidden and
becomes “Hide Sites” if sites are visible. Select Hide Sites/Show Sites from the
“View” dropdown menu.
Hide Geofences/Show Geofences
This option allows users to show geofences or hide geofences as required in maps.
This is a toggle button which means the option becomes “Show Geofences” if
geofences are hidden and becomes “Hide Geofences” if geofences are visible.
Select Hide Geofences/Show Geofences from the “View” dropdown menu.
www.fleetminder.com.au
1300 1 fleet (35338)
©fleetminder 2015
16 | P a g e
Map View Geofence
With the help of this feature, users can locate their geofences on a map. Users may
need to locate geofences when they’re required to edit details, delete or redraw a
geofence. Complete the following to view geofences on a map:
•
•
•
Go to “Map View Geofence” from the “View” menu
Select the geofences that users needs to view
The system will locate selected geofences on the map
Map View Sites
Similar to Map View Geofence, this option allows clients to locate their sites on a
map. Users may need to locate sites when they’re required to edit details, delete or
redraw a site. Complete the following to view sites on a map:
www.fleetminder.com.au
1300 1 fleet (35338)
©fleetminder 2015
17 | P a g e
•
•
•
Go to “Map View Site” from the “View” menu
Expand the categories and select the sites that the user needs to view
The system will locate selected sites on the map
www.fleetminder.com.au
1300 1 fleet (35338)
©fleetminder 2015
18 | P a g e
ALERTS
General Alert
This section helps users to setup and alter alert details for various events. Users can
setup alerts such as “Internal Battery Alert”, “Overspeed” Alert and “Idle Alert” for all
vehicles or a particular vehicle by entering alert parameters and recipient details in
the general alert window. For example, when an over-speed alert has been set to
110kmph for a vehicle and a recipient’s email address has been added in the
system, an email alert will be sent to the recipient’s email address every time that
vehicle exceeds 110kmph. Instructions to setup general alerts are as follows:
•
•
•
•
•
Open the General Alert window by selecting “General Alert” from the “Alert”
menu
Select the vehicle for which alerts need to be set up. If there is no vehicle
selected, alerts and recipients will be setup for all vehicles
Enter parameters of alerts that need to be setup
Enter recipient details. Alerts can be sent to recipient via email and SMS. For
SMS alerts, users need to subscribe to the FMS service
“Save” the changes and press “Cancel” to exit window
Engine Management Alert
This option allows users to setup alerts for parameters related to the engine
management of the vehicle. Users can setup email/SMS alerts for parameters such
as max. RPM, overheating, driver overtime, etc. A CAN55 device is installed along
with a tracking device to receive data from OBD port and alert the recipients. The
following steps show the process of setting up Engine Management Alerts:
www.fleetminder.com.au
1300 1 fleet (35338)
©fleetminder 2015
19 | P a g e
•
•
•
•
Select Alert > Engine Management Alert and the Engine Management Alert
window will popup
Select the vehicle for which alerts need to be set up. If there is no vehicle
selected, alerts and recipients will be setup for all vehicles
Fill in the maximum parameter trigger values to setup alerts
Enter the details of recipients and save changes
Turn Geofence Alert On/Off
This option allows users to turn geofence alerts on/off for all vehicles as required. By
default, geofence alerts are ON, but users can turn them OFF anytime.
Turn Ignition Alert On/Off
This option allows users to turn the ignition alert On/Off for all vehicles as required.
By default, the ignition alert is turned OFF, but users can turn them ON anytime. If
there are many vehicles in the fleet, users needs to be careful while turning the
ignition alert on as it may trigger many alerts.
www.fleetminder.com.au
1300 1 fleet (35338)
©fleetminder 2015
20 | P a g e
VEHICLE
Fuel Gauge
With the help of this feature, users can monitor the fuel gauge of a vehicle remotely
on the Fleetminder tracking website. The step by step process is as follows:
•
•
Select the desired vehicle from the left hand side panel
Go to Vehicle > Fuel Gauge. This will open a window with the fuel gauge of
the vehicle
Please note that users need to install a fuel sensor or CAN55 Canbus monitor to
utilise this feature.
Platinum Messaging
This facility is for users who have purchased Garmin screens from us along with our
tracking device to communicate with drivers using our Platinum Messaging Service.
With the help of this service, users can send real time messages to the Garmin
screen of their drivers and receive replies from them. In addition to real time
communication, users can also manage the inbox of the Garmin and set predefined
messages and addresses.
www.fleetminder.com.au
1300 1 fleet (35338)
©fleetminder 2015
21 | P a g e
Please note, the Garmin screens are programmed to shut down when the IGNITION
is turned off to avoid draining of vehicle battery. Therefore, the Platinum Messaging
Service cannot be used when vehicle is stationary and the IGNITION is turned OFF.
The following steps provide a guide on using the service:
•
•
•
•
•
Please select the “Platinum Messaging” option from the “Vehicle” menu
Select the driver from the left hand side section with the name “Device List”
In order to send Real Time Messages, please select the respective tab
highlighted in blue, and type the message in the “2 way messaging” section
and hit the “Send Message” button.
The first tick next to the message means it has been sent and the second
means it has been delivered successfully
By default the message is displayed on screen, however if users want to send
messages to the inbox without notifying the driver, please select the “Go to
www.fleetminder.com.au
1300 1 fleet (35338)
©fleetminder 2015
22 | P a g e
•
•
•
•
Inbox” option in the “Set Inbox Message” section. Also, users can allow the
driver to send quick replies by selecting the “Yes/No Message” or the “Ok
Message” option
Users can also send an address to drivers by entering names and addresses
in the “Set Navigation” window. The message is received in the inbox of
Garmin screen with the option “GO” which when selected by the driver, the
Garmin will start navigating to that address automatically. For example, users
can send the address of next pickup / delivery on the Garmin and the driver
can start the navigation by pressing “GO” which saves both time and effort
and improves the performance of the fleet.
The real time messages are automatically deleted from the inbox of Garmin
screen when the ignition is turned off (i.e. when the Garmin switches off). If
users want to keep certain messages in the inbox for longer, there is a facility
called “Predefined Messages” through which messages can be saved in the
inbox permanently unless deleted by the user or the driver.
Predefined messages can be set by selecting the blue tab “Predefined
Message Admin” and entering the message with an ID number and clicking
the “Set Message” button.
Users can also set a predefined address by selecting “Predefined Address”
tab, assign the ID number and name, enter the address and click on “Set
Location”. This feature is useful when a driver often needs to navigate to a
particular site or home office. The address is saved in the Garmin and can be
selected for navigation easily.
Real-time ECU Monitor:
This feature allows users to monitor in real-time, various parameters of the Engine
Control Unit of a vehicle such as RPM, speed, engine temperature etc. to ensure
optimum engine performance. As shown in the figure below, the user can select a
quick view which includes important parameters such as torque, RPM, speed, oil
pressure and fuel level, or you can select detailed view which includes other
parameters such as idle time, max speed, ignition ON time, etc. Please note, users
need to purchase and install CANBUS monitor device “CAN55” to be able to monitor
the ECU of a vehicle.
www.fleetminder.com.au
1300 1 fleet (35338)
©fleetminder 2015
23 | P a g e
Please follow the steps below to monitor ECU in real time.
•
•
•
Select a vehicle from the vehicle panel which needs to be monitored.
Click on “Real time ECU Monitor” from the “Vehicle” menu
A brief view of the ECU of the vehicle will appear on the bottom of the screen.
To open detailed view click on maximise button (
)
Replay a Day
“Replay A DAY” allow users to select a specific date range and then replay a
vehicle’s journey.
Please follow the following steps.
•
•
•
Select a vehicle that you would like to “Replay A DAY”
Click “Vehicle” on the menu bar.
Please choose “Replay a Day”
•
Please choose the date that you would like to “Replay A DAY”
www.fleetminder.com.au
1300 1 fleet (35338)
©fleetminder 2015
24 | P a g e
•
As the replay function steps through the day, the activity log will match the
icons that will be shown as GREEN on the right hand side map.
These buttons can allow you stop/pause/play/rewind/forward “Replay a day”.
Route Optimisation:
With the help of this feature, users can find the shortest or least time consuming
route between two addresses. The following steps will provide you guidance on
using this feature.
•
•
•
•
Select “Vehicle” and then “Route Optimisation”
In the “Get Direction” window, select “Shortest time” or Shortest Distance” as
needed
Enter the addresses of two locations by clicking on “Add Route”
Selecting “Get Direction” will show the route between two locations
www.fleetminder.com.au
1300 1 fleet (35338)
©fleetminder 2015
25 | P a g e
Route To:
The route to a particular address can be sent to the driver of the vehicle by using this
option. It is only applicable to users who have purchased and installed Garmin
screens together with tracking device from Fleetminder. The following steps will help
client use this option.
www.fleetminder.com.au
1300 1 fleet (35338)
©fleetminder 2015
26 | P a g e
•
•
•
Select “Vehicle” and then “Route To” option
Tick the Driver name / Vehicle number and enter the name and address of the
location that needs to be sent
Click on “Send Address” and the address will be sent to the particular driver
Show Activity Log
“Show Activity Log” allow users to select a specific date range and a vehicle to
display all information. The map will show the activity logs of this selected
vehicle. Please complete the following steps.
•
•
•
Select a vehicle that you would like to show the “Activity Log” for
Click “Vehicle” on the Menu Bar.
Please choose “Show Activity Log”.
www.fleetminder.com.au
1300 1 fleet (35338)
©fleetminder 2015
27 | P a g e
•
Please choose the date you would like to get “Activity Log” for
•
The Activity log will be shown as green dots on the right hand side map.
Streaming Video - Live Streaming Video:
The live video streaming facility is only for clients who have purchased 4-channel or
8-channel MDVR devices from Fleetminder and have installed them in their vehicles.
This feature allows client to view live streamed videos from the cameras installed in
the vehicle. Depending on the number of channels purchased and its installation,
clients can select screen views such as 4, 6, 8, 9, 16 screens by selecting the
respective button from the tool bar menu on top of the screen. Please complete the
following steps to use this feature:
•
•
•
•
•
•
Select vehicle with the MDVR device from the vehicle list on the left
Select Vehicle > Streaming Video > Live Streaming Video to open the live
streaming window.
Select the respective screen view and press the play button to begin
streaming videos.
Use mute/unmute button to adjust the volume of streamed videos.
Users can also capture an image with the help of the button with the “Camera”
symbol
To request the current location of a vehicle, press the “Current Location”
option
www.fleetminder.com.au
1300 1 fleet (35338)
©fleetminder 2015
28 | P a g e
•
Please refer to the next section for a description on how to use the “Playback
Recording” feature
Streaming Video - Playback Recording:
This option allows users to playback previous recordings from the MDVR device.
Please note that viewing playback recordings use internet data on the SIM card in
the MDVR device to buffer to the server. Mobile service provider charges apply to
data usage of the SIM card. An alternative option is to remove the HDD from MDVR
device and access it with the help of an HDD Reader. Please contact Fleetminder if
further assistance is required. Follow the steps below to playback recordings:
•
•
•
•
Select the vehicle with the MDVR device from the vehicle list on the left
Click on Vehicle > Streaming Video > Playback Recording to open the
playback recording window.
Select the respective number of channels, date and time range and click on
the “Search” button
The video files will be listed in the “File List”. Select a file and double click it to
view the recorded video
www.fleetminder.com.au
1300 1 fleet (35338)
©fleetminder 2015
29 | P a g e
REPORTS
Activity Report
This function provides users with an “Activity Report” on the selected vehicle over a
specified date range. This report can be filtered by event type. The user can export
reports to different file formats (RPT, PDF, DOC, EXL, and TXT).
Please follow these steps:
•
•
•
•
•
Select “Activity Report” from the report menu
Select “Vehicles” or “Drivers”
Enter the “Date Range”
Select the “Events” that you would like to see by using the check boxes
beside the events.(Events include: timed update, geofence entry/exit, ignition
on/off, site in/out, door open/closed, window open/closed, boot open/closed,
skip open/closed, main power cut)
Press “Create Report” to generate the report.
Selection Menu
www.fleetminder.com.au
1300 1 fleet (35338)
©fleetminder 2015
30 | P a g e
Generated Report
Basic Summary Report
This function provides users with a report on the start driving time/end driving time/
driving time of the selected vehicle over a specified date and time range. Please
complete the following steps.
•
•
•
•
Select the “Basic Summary Report” from the report menu.
Select “Vehicles” or “Drivers”.
Enter the “Date and Time” range.
Press “Create Report” to generate the report.
www.fleetminder.com.au
1300 1 fleet (35338)
©fleetminder 2015
31 | P a g e
Cumulative Report
This report provides users with information on ignition runtime, input1 runtime and
mileage for the selected vehicle for a particular date and time range. Please note,
clients need to request Fleetminder to enable the cumulative report for their desired
tracking devices. To generate a report, please follow the steps below:
•
•
•
•
Select “Cumulative (Ignition, Input and Mileage) Report from the report menu
Select “Vehicles” or “Drivers”
Select “Date and Time” range
Click on “Create Report” to generate the report
www.fleetminder.com.au
1300 1 fleet (35338)
©fleetminder 2015
32 | P a g e
Customer Site Report
Users can view the ‘Sites’ that vehicles have visited on a per vehicle basis, per site
basis, or a combination of both.
Please complete the following steps.
•
•
•
•
•
Select “Customer Site Report” from the report menu.
Select “Vehicles” or “Drivers”.
Enter the “Date Range”.
Select the “Site”
Press “Create Report” to generate the report.
www.fleetminder.com.au
1300 1 fleet (35338)
©fleetminder 2015
33 | P a g e
Driving Time Report
This function provides users with a report on the driving time of the selected vehicle
over a specified date and time range. Please complete the following steps.
•
•
•
•
Select “Driving Time Report” from the report menu.
Select “Vehicles” or “Drivers”.
Enter the “Date and Time” range.
Press “Create Report” to generate the report.
www.fleetminder.com.au
1300 1 fleet (35338)
©fleetminder 2015
34 | P a g e
ECU Report
There are several reports under this section which provide information on various
parameters of the Engine Control Unit (ECU) of the vehicle to the user. This report
can only be accessed if user has purchased and installed a CAN55 accessory with
their tracking device. The reports listed under this section are described below:
www.fleetminder.com.au
1300 1 fleet (35338)
©fleetminder 2015
35 | P a g e
Canbus Event Report
This report provides users with information on events such as fuel level decrease,
engine overheating, max fuel paddle, etc. for the selected vehicle and date and time
range. The report also provides the speed and trip distance of the vehicle at the time
of the event. Follow the steps below to generate the report:
•
•
•
•
•
Select "ECU Report” and then “Canbus Event Report” from the report menu.
Select "Vehicles" or "Drivers"
Select "Date and Time" range
Select the events that need to be listed in report
Click on "Create Report" to generate the report
www.fleetminder.com.au
1300 1 fleet (35338)
©fleetminder 2015
36 | P a g e
ECU Trip Idle Report
The information about parameters of the ECU such as fuel usage, engine
temperature, RPM etc. during the idling period of the trip is provided in this report.
The report can be generated for selected vehicles for a particular date and time
range. The steps below show the process of generating the report:
•
•
•
•
Select "ECU Report" and then "ECU Trip Idle Report" from the report menu.
Select "Vehicles" or "Drivers"
Select "Date and Time" range
Click on "Create Report" to generate the report
www.fleetminder.com.au
1300 1 fleet (35338)
©fleetminder 2015
37 | P a g e
ECU Trip Report:
The information about parameters of the ECU such as fuel usage, engine
temperature, RPM etc. for the trips travelled by a vehicle is provided in this report.
The report can be generated for selected vehicles for a particular date and time
range. The steps below show the process of generating the report:
•
•
•
•
Select "ECU Report" and then "ECU Trip Report" from the report menu.
Select "Vehicles" or "Drivers"
Select "Date and Time" range
Click on "Create Report" to generate the report
www.fleetminder.com.au
1300 1 fleet (35338)
©fleetminder 2015
38 | P a g e
ECU Trigger Report:
This report allows users to access data and generate a report for the triggering of
events of one of the ECU parameters such as RPM overrunning, peak fuel
consumption, fuel decrease, and engine overtime based on the value entered. The
report can be generated for selected vehicles for particular date and time range. The
steps below show the process of generating the report:
•
•
•
Select "ECU Report" and then "ECU Trip Report" from the report menu.
Select "Vehicles" or "Drivers"
Select "Date and Time" range
www.fleetminder.com.au
1300 1 fleet (35338)
©fleetminder 2015
39 | P a g e
•
•
Select the “Report type” and enter the trigger event value
Click on "Create Report" to generate the report
EMS Incident Graph Report:
With the help of this function, users can generate an incident report for a vehicle
which provides information about the speed and RPM of a vehicle with respect to
time for a particular date in the form of a graph for easy understanding and
comparison. This report provides important information about the speed and RPM of
a vehicle from the engine management system’s point of view. The steps below
show the process of generating report:
•
•
•
•
Select "ECU Report" and then "EMS Incident Report" from the report menu.
Select "Vehicles" or "Drivers"
Select "Date” for which report is required
Click on "Create Report" to generate the report
www.fleetminder.com.au
1300 1 fleet (35338)
©fleetminder 2015
40 | P a g e
www.fleetminder.com.au
1300 1 fleet (35338)
©fleetminder 2015
41 | P a g e
Engine Temperature Report:
With the help of this report, users can analyse the engine temperature of the vehicle
at different times of a particular day. The report is generated in the form of a graph
for easy understanding. Please follow the steps below to generate the report:
•
•
•
•
Select "ECU Report" and then "Engine Temperature Report" from the report
menu.
Select "Vehicles" or "Drivers"
Select "Date" for which report is required
Click on "Create Report" to generate the report
www.fleetminder.com.au
1300 1 fleet (35338)
©fleetminder 2015
42 | P a g e
Fuel Consumption Report:
This report provides users information about fuel consumption (L/100 km) of a
vehicle for a journey on a particular date in the form of an easy to understand graph.
Please follow the steps below to generate the report:
•
•
•
•
Select "ECU Report" and then "Fuel Consumption Report" from the report
menu.
Select "Vehicles" or "Drivers"
Select "Date" for which report is required
Click on "Create Report" to generate the report
www.fleetminder.com.au
1300 1 fleet (35338)
©fleetminder 2015
43 | P a g e
www.fleetminder.com.au
1300 1 fleet (35338)
©fleetminder 2015
44 | P a g e
Fuel Level Report
This function allows users to generate a report based on fuel level of the vehicle at
different times for a particular date in the form of an easy to analyse graph. Please
follow the steps below to generate the report:
•
•
•
•
Select "ECU Report" and then "Fuel Level Report" from the report menu.
Select "Vehicles" or "Drivers"
Select "Date" for which report is required
Click on "Create Report" to generate the report
www.fleetminder.com.au
1300 1 fleet (35338)
©fleetminder 2015
45 | P a g e
Total Trip Summary Report
This report provides users with a summary of important parameters of the ECU such
as average speed, average fuel, and brake applications etc. for the trips on a
particular day. Please follow the steps below to generate the report:
•
•
•
•
Select "ECU Report" and then "Total Trip Summary Report" from the report
menu.
Select "Vehicles" or "Drivers"
Select "Date" for which report is required
Click on "Create Report" to generate the report
www.fleetminder.com.au
1300 1 fleet (35338)
©fleetminder 2015
46 | P a g e
Vehicle and Driver Efficiency Report:
This report helps users to determine the efficiency of a vehicle and driver for a
specific date and time range by providing data of ECU parameters such as trip
distance, average speed, fuel used, etc. which are crucial in analysing efficiency.
Please follow the steps below to generate the report:
•
•
•
•
Select "ECU Report" and then "Vehicle and Driver Efficiency Report" from the
report menu.
Select "Vehicles" or "Drivers"
Select "Date" and “Time” for which the report is required
Click on "Create Report" to generate the report
www.fleetminder.com.au
1300 1 fleet (35338)
©fleetminder 2015
47 | P a g e
Efficiency Report
The user can generate an efficiency report based on a selected vehicle over a
specified date and time range. The report will show the cost of each trip. Please
complete the following steps.
•
•
•
•
•
•
Select “Efficiency Report” from the report menu.
Select “Vehicles” or “Drivers”.
Select “Report Period”.
Enter the “Date and Time” range.
Enter the “Cost Per Kms” and “Cost Per Hour”
Press “Create Report” to generate the report.
www.fleetminder.com.au
1300 1 fleet (35338)
©fleetminder 2015
48 | P a g e
Engine Runtime Report
This report allows users to determine the total time of the engine of the selected
vehicle was running. It also provides the date and location for every engine
on/engine off event for the selected time period along with the engine run-time for
each journey. Please follow the steps below to generate the report:
•
•
•
•
Select "Engine Runtime Report" from the report menu.
Select "Vehicles" or "Drivers"
Select "Date" and "Time" for which the report is required
Click on "Create Report" to generate the report
www.fleetminder.com.au
1300 1 fleet (35338)
©fleetminder 2015
49 | P a g e
Fuel Consumption Report
This function provides users with a report on the fuel consumption of the selected
vehicle over a specified date and time range. Please complete the following steps.
•
•
•
•
Select “Fuel Consumption Report” from the report menu.
Select “Vehicles” or “Drivers”.
Enter the “Date”.
Press “Create Report” to generate the report.
www.fleetminder.com.au
1300 1 fleet (35338)
©fleetminder 2015
50 | P a g e
www.fleetminder.com.au
1300 1 fleet (35338)
©fleetminder 2015
51 | P a g e
Geofence Report
Users can generate a geofence report based on entry/exit times. The report will
show when a vehicle arrived and left a particular geofence. Please complete the
following steps.
•
•
•
•
•
Select “Geofence Report” from the report menu.
Select “Vehicles” or “Drivers”.
Select “Geofences”.
Enter the “Date and Time” range.
Press “Create Report” to generate the report.
Idle Report
This function provides users with a report on the idling times of the selected vehicle
over a specified date and time range. Please complete the following steps.
•
•
•
•
•
Select “Idle Report” from the report menu.
Select “Vehicles” or “Drivers”.
Enter the “Date and Time” range.
Enter the “Idle Time”.
Press “Create Report” to generate the report.
www.fleetminder.com.au
1300 1 fleet (35338)
©fleetminder 2015
52 | P a g e
Mileage Report
This function provides users with a report on the mileage completed by a specific
vehicle, number of vehicles or all vehicles over a specified date and time range.
Please complete the following steps.
•
•
•
•
Select “Mileage Report” from the report menu.
Select “Vehicles” or “Drivers”.
Enter the “Date and Time range”.
Press “Create Report to generate the report.
www.fleetminder.com.au
1300 1 fleet (35338)
©fleetminder 2015
53 | P a g e
Overspeed Report
This function provides users with a report on instances when a vehicle was driven
over a certain speed on a specified date and time range. Please complete the
following steps:
•
•
•
•
•
Select “Overspeed Report” from the Report menu.
Select “Vehicles” or “Drivers”.
Enter the “Date and Time range”.
Enter the “Speed”.
Press “Create Report” to generate the report.
www.fleetminder.com.au
1300 1 fleet (35338)
©fleetminder 2015
54 | P a g e
Platinum Report
If a client has purchased and installed a Garmin navigator screen which is paired
with a tracking device, and have been using the Platinum Messaging Service, then
with the help of this option, users can generate a report for all messages sent and
received via Platinum messaging with respect to a driver/vehicle for a particular date
and time range. Also, if a client is using an RFID card to recognise drivers, an RFID
log report will provide information on all RFID scan logs. The reports listed under this
section are described below:
2 way messaging report
This report provides users with the records of all open messages sent and received
via the 2 way platinum messaging service. It could provide important history of
communication between drivers and users.
www.fleetminder.com.au
1300 1 fleet (35338)
©fleetminder 2015
55 | P a g e
Please follow the steps below to generate the report:
•
•
•
•
Select “Platinum Report" and then "2-way messaging Report" from the report
menu.
Select "Vehicles" or "Drivers"
Select "Date" and "Time" for which the report is required
Click on "Create Report" to generate the report
Predefined Address Report:
This report provides users the history record of all predefined addresses sent by a
user to a driver’s Garmin screen using the Platinum Messaging Service. Please
follow the steps below to generate the report:
•
•
•
•
Select "Platinum Report" and then "Predefined address Report" from the
report menu.
Select "Vehicles" or "Drivers"
Select "Date" and "Time" for which the report is required
Click on "Create Report" to generate the report
www.fleetminder.com.au
1300 1 fleet (35338)
©fleetminder 2015
56 | P a g e
www.fleetminder.com.au
1300 1 fleet (35338)
©fleetminder 2015
57 | P a g e
Predefined Messaging Report:
This report provides a history of all predefined messages that were set and deleted
on a driver’s Garmin screen using the Platinum Messaging Service. Please follow
the steps below to generate the report:
•
•
•
•
Select "Platinum Report" and then "Predefined messages Report" from the
report menu.
Select "Vehicles" or "Drivers"
Select "Date" and "Time" for which the report is required
Click on "Create Report" to generate the report
www.fleetminder.com.au
1300 1 fleet (35338)
©fleetminder 2015
58 | P a g e
RFID Setup Report:
This report includes the records of RFID cards that were setup (enabled or disabled)
for a vehicle for a selected date and time. Please follow the steps below to generate
the report:
•
•
•
•
Select "Platinum Report" and then "RFID Setup Report" from the report menu.
Select "Vehicles" or "Drivers"
Select "Date" and "Time" for which the report is required
Click on "Create Report" to generate the report
www.fleetminder.com.au
1300 1 fleet (35338)
©fleetminder 2015
59 | P a g e
RFID Logs Report:
The history of all RFID card scans (Success or Fail) for a vehicle, are listed in this
report. The report provides important information on drivers driving the vehicle at any
given time. Please follow the steps below to generate the report:
•
•
•
•
Select "Platinum Report" and then "RFID Logs Report" from the report menu.
Select "Vehicles" or "Drivers"
Select "Date" and "Time" for which the report is required
Click on "Create Report" to generate the report
www.fleetminder.com.au
1300 1 fleet (35338)
©fleetminder 2015
60 | P a g e
Route to Report
If a user has been sending routes to a driver via the “Route to” option in the vehicle
menu, a “Route to” report can be generated which lists the details of all routes sent.
Please follow the steps below to generate the report:
•
•
•
•
Select "Route to Report" from the report menu.
Select "Vehicles" or "Drivers"
Select "Date" and "Time" for which the report is required
Click on "Create Report" to generate the report
www.fleetminder.com.au
1300 1 fleet (35338)
©fleetminder 2015
61 | P a g e
Service History
The service history report provides users with all the service related information such
as odometer reading, total job cost etc. for each service that was logged for a
vehicle. This data is extremely useful for engine maintenance records. Please follow
the steps below to generate the report:
•
•
•
•
Select "Service History Report" from the report menu.
Select "Vehicles" or "Drivers”
Select "Date" and "Time" for which the report is required
Click on "Create Report" to generate the report
www.fleetminder.com.au
1300 1 fleet (35338)
©fleetminder 2015
62 | P a g e
Speed Analysis Report
This function provides users with a report of when a vehicle was driven at different
speed ranges on a specified date .The user can select the speed range from the
speed bands. Please complete the following steps.
•
•
•
•
•
•
Select “Speed Analysis Report” from the report menu.
Select “Report Type”.
Select “Vehicles” or “Drivers”.
Select “Speed Bands”.
Enter the “Date and Time” range.
Press “Create Report” to generate the report.
www.fleetminder.com.au
1300 1 fleet (35338)
©fleetminder 2015
63 | P a g e
Stop Report
This function provides users with a report on the stops completed by a selected
vehicle over a specified date and time range. Please complete the following steps:
•
•
•
•
Select “Stop Report” from the report menu.
Select “Vehicles” or “Drivers”.
Enter the “Date and Time range”.
Press “Create Report” to generate the report.
www.fleetminder.com.au
1300 1 fleet (35338)
©fleetminder 2015
64 | P a g e
www.fleetminder.com.au
1300 1 fleet (35338)
©fleetminder 2015
65 | P a g e
Temperature Analysis
The temperature analysis report contains temperatures recorded for vehicles with
the help of a temperature sensor. Client’s needs to purchase and install temperature
sensor hardware to have temperature logs and hence this report. Please follow the
steps below to generate the report:
•
•
•
•
Select "Temperature Analysis Report" from the report menu.
Select "Vehicle" or "Driver”
Select "Date" and "Time" for which the report is required
Click on "Create Report" to generate the report
Trip Report
This function provides users with a report on the trips completed by a selected
vehicle over a specified date and time range. Please follow the following steps.
•
•
•
•
•
Select “Trip Report” from the report menu.
Select “Vehicles” or “Drivers”.
Enter the “Date and Time range”.
Select “Summary Only” or “Group by day”.
Press “Create Report” to generate the report.
www.fleetminder.com.au
1300 1 fleet (35338)
©fleetminder 2015
66 | P a g e
Trip Report (Detailed)
This function provides users with a report on the trips completed by a selected
vehicle over a specified date and time range. It will show all details including start
date and time, start location, end date and time, end location, trip distance, travel
time and onsite time. Please complete the following steps.
•
•
Select “Trip Report (Detailed)” from the report menu.
Select “Vehicles” or “Drivers”.
www.fleetminder.com.au
1300 1 fleet (35338)
©fleetminder 2015
67 | P a g e
•
•
•
Enter the “Date and Time range”.
Select “Summary Only” or “Group by day”.
Press “Create Report” to generate the report.
www.fleetminder.com.au
1300 1 fleet (35338)
©fleetminder 2015
68 | P a g e