1
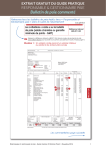
SUPPLEMENTAL CONFIGURATION G UIDE
1. Introduction
This document describes the Scan & Store feature
specially built into this particular barcode scanner. All
the information concerning the operation and
configuration of this feature is contained herein and
this document acts as a supplement instead of
replacement to the user’s manual.
2. Scan & Store
A large capacity non-volatile memory (32 KB
EEPROM) is built into this scanner. Data can be store
in this memory instead of transmitting them when
barcodes are read. The data stored in the memory can
be transmitted to the computer in a batch way upon
user’s demand.
This scanner can even work like a simple portable data
collector, if the optional battery pack is attached. Since
the memory for storing data is non-volatile, the
scanner can be powered on and off without losing data.
The data is erased (cleared) only when user requests to
do so.
3. Operation Mode
This Scan & Store feature is an enhancement to the
original scanner. All the features and functions
described in the user’s manual are still supported and
remain unchanged. This scanner can work like a
normal scanner (without Scan & Store function) if
user desires.
What follows is the configuration procedure for
enabling/disabling the Scan & Store function.
1. Read the “Start” label if the scanner is not in
configuration mode. There will be 6 beeps to
indicate that the scanner is in configuration mode.
2. Read the “Enable Scan & Store” label to enable the
function, or “Disable Scan & Store” label to disable
it. The scanner will beep twice after label is read.
3. Exit the configuration mode by reading the
“Exit“ label. There will be total 7 beeps from the
scanner, including the power on beep after the
scanner restarts itself.
Nov 5, 1998
Page 1 / 4
SUPPLEMENTAL CONFIGURATION G UIDE
4. Memory Full
As user keeps collecting data under Scan & Store
operation mode, if the memory should become full,
there will be 4 beeps from the scanner to indicate this
condition.
5. Transmit Stored Data
What follows is the procedure for transmitting the
stored data. The data still remains intact in the memory
after transmission.
1. Read the ‘Start” label if the scanner is not in
configuration mode. There will be 6 beeps to
indicate that the scanner is in configuration mode.
2. The scanner will beep twice and start to transmit the
stored data after the “Transmit” label is read. After
all the data is transmitted, there will be 2 beeps from
the scanner to indicate completion.
3. User can exit the configuration mode by reading the
“Exit“ label. There will be total 7 beeps from the
scanner, including the power on beep after the
scanner restarts itself.
6. Clear Stored Data
What follows is the procedure for clearing the stored
data.
1. Read the ‘Start” label if the scanner is not in
configuration mode. There will be 6 beeps to
indicate that the scanner is in configuration mode.
2. Read the “Clear Data” label. There will be 2 beeps
from the scanner after the label is read.
3. Read the “Confirm” label. There will be 2 beeps
from the scanner after the label is read. The data is
cleared after both “Clear Data” and “Confirm”
labels are read. If only one label is read, or the two
labels are read in reverse sequence, the data will not
be cleared.
4. User can exit the configuration mode by reading the
“Exit“ label. There will be total 7 beeps from the
scanner, including the power on beep after the
scanner restarts itself.
Page 2 / 4
Nov 5, 1998
SUPPLEMENTAL CONFIGURATION G UIDE
7. Transmission Time Delay
When receiving the data from the scanner, the
computer might need some time to process the
received piece of data before it can accept the next one.
A user selectable time delay is inserted after
transmitting each piece of data to allow this computer
processing time. The available selections are No Delay,
0.25, 0.5, 1, 2, 3, 5, and 8 seconds.
What follows is the procedure for setting the time
delay.
1. Read the ‘Start” label if the scanner is not in
configuration mode. There will be 6 beeps to
indicate that the scanner is in configuration mode.
2. Read the desired delay time label. There will be 2
beeps from the scanner after the desired label is
read.
3. User can exit the configuration mode by reading the
“Exit“ label. There will be total 7 beeps from the
scanner, including the power on beep after the
scanner restarts itself.
Nov 5, 1998
Page 3 / 4
SUPPLEMENTAL CONFIGURATION G UIDE
Start Configuration
Start
Operation Mode
Enable Scan & Store
< Disable Scan & Store >
Transmission Delay TIme
< No Delay >
2 Sec
0.25 Sec
3 Sec
0.5 Sec
5 Sec
1 Sec
8 Sec
Transmit Stored Data
Transmit
Clear Stored Data
Clear Data
Confirm
Exit Configuration Mode
Exit
Page 4 / 4
Nov 5, 1998