1
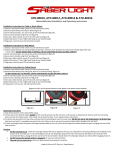
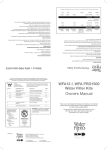
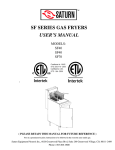
AUTO REWIND HOSE REEL
USER MANUAL
Models: 3315, 3320, 3325, 3330
IMPORTANT:
READ BEFORE USE AND
KEEP FOR FUTURE REFERENCE
Welcome to hassle-free watering at its best!
The Hoselink Auto Rewind Hose Reel is manufactured from a range of quality materials, including a
powerful spring mechanism that is designed to retract the hose automatically and a high-quality hose,
which has been rigorously pressure tested by Hoselink.
The reel features an easy to use “lock anywhere” system to ensure the hose remains in place as you
water and a bracket that allows for a full 180 degree range of motion. When installed and used correctly,
this product should provide years of good service.
**WARNING**
DO NOT ALLOW THE HOSE TO RETRACT AT HIGH SPEED UNASSISTED!!! THIS MAY DAMAGE
THE HOSE REEL AND SPRAY GUN.
Always walk the hose back to the hose reel at a steady pace.
DO NOT OPEN THE HOSE REEL CASING.
Unless instructed to do so, unscrewing the case will void the warranty. If leaking or retraction problems
occur, please contact Hoselink’s Customer Care team for advice and assistance.
USING THE HOSE REEL
How to lock the hose off
To lock the hose off at the desired length, simply release tension and it will lock.
To extend the hose further, simply start pulling and release tension again at the new length.
Retracting the hose
To unlock the hose, give the hose a small tug to start retraction. If you pull the hose too far, it will
lock again rather than start to retract.
To shorten the hose, start retraction then once at the desired point, stop and walk back out a
little to lock it at the new length.
Do not let the hose retract unassisted as you may damage the hose reel unit and spray gun.
When walked back at a steady pace, the hose self-layering mechanism neatly layers the hose into
the reel, ensuring it remains kink and tangle free.
Full extension
Red tape marks the end of the hose length so take note of this when using the hose reel at its full
extension. Avoid pulling the hose to its absolute limit.
Recommended usage
Before retracting the hose, turn off the tap and squeeze the trigger to release extra pressure.
Always retract hose after use.
17/12/13
2
CARE AND MAINTENANCE
Cleaning the hose
Keep the hose clean by wiping with a damp cloth. Stand at the reel with a damp cloth over the
hose and retract the hose through the cloth. This will prevent dirt and sand from being pulled
into the reel, potentially damaging the locking and retraction mechanisms.
Avoid contact with chemicals
Do NOT use any chemicals or substances with this hose such as acetone, white spirits, lactic acid,
etc. to clean the unit. Use of these chemicals will void the warranty.
Do not submerge
Do not submerge the hose reel into water to clean it. Simply wipe the case with a damp cloth.
Prolonging the life of your hose reel
When not in use for long periods of time, we recommend storing the hose reel indoors. The hose
reel casing has been UV stabilised and should last a long time. However, if your hose reel will be
exposed to extreme temperatures on a regular basis, you may wish to use a cover (sold
separately) to prolong its life.
BOX CONTENTS
1 x Spring-loaded Auto Rewind Hose Reel unit with 2m Leader Hose attached
1 x Premium Ned Kelly Starter Kit, includes:
2 x Hose Connectors pre-fitted to the hoses
1 x Tap Connector
1 x Accessory Connector
1 x Swivel Connector
1 x Metal Spray Gun
1 x Mounting Bracket plus Screw Kit, that includes:
Hoselink’s No-burst
Hose Fittings
4 x Screws
4 x Masonry Plugs
4 x Washers
1 x Blaster Watering Accessory (included free)
1 x User Manual
Example of a mounted
Auto Rewind Hose Reel
17/12/13
3
INSTALLATION
Choosing a location
The bracket must be mounted on to a strong surface, due to the weight
of the reel when full of water and the pulling action during use. Brick or
timber post surfaces are suitable.
Where possible, we recommend mounting the base of the bracket 1m
above ground level and up to 1.5m away from the tap. Leader Hose
Extension pieces can be purchased if the hose reel is situated further
from the tap.
TIP
Ideally, mount
the reel so the
opening is at the
user’s waist
height.
Installing the bracket
Brick Installation
Tools: electric drill (hammer or rotary), 12mm
masonry drill bit, hammer, socket set (10mm
socket)
1. Use the bracket to mark the 1st hole
position.
2. Drill the hole with 12mm drill bit, 50mm
deep. (Tip: depth is important, use sticky
tape around the drill bit to mark 50mm
depth)
3. Hammer plug into the first hole.
4. Now use the bracket to mark the 2nd hole
position, then drill hole as above and
hammer in plug.
5. Repeat process 1-3 to drill the remaining
2 holes.
6. Set bracket in place, add washer then
screw and use socket set to tighten.
7. Repeat on all holes.
17/12/13
Timber Installation
Tools: electric drill, 5mm drill bit, socket set
(10mm socket)
1. Use the bracket to mark 4 hole positions.
2. Drill 4 holes with 5mm drill bit, 60mm
deep.
3. Set bracket in place, add washer then
screw and use socket set to tighten.
4. Repeat on all holes.
4
INSTALLATION Continued…
Setting up the hose reel
Once the bracket is installed, lift the reel and place in the bracket hole.
Attach the Tap Connector to the tap (if appears to be too small, unscrew the reducer in the top in
order to attach the main body to the tap)
To connect the hose to the tap, line up the white lugs and use a point and twist action to connect.
Screw the Swivel Connector into the Metal Spray Gun, then screw the Accessory Connector into
the opposite end of the Swivel Connector. Now attach to the hose end, with a point and twist.
Your hose reel is now set up and ready for use.
17/12/13
5
TROUBLESHOOTING GUIDE
PROBLEM
Hose will not retract the
entire length
Hose can neither be
retracted nor extended
Leaking near the leader
hose entry point
Leaking from bottom of the
main hose reel case
Rusty brown muck in
casing screw holes
Bracket is coming off the
wall
Hose is too difficult to pull
out
Hose is kinking
Water pressure greatly
reduced (this product is
not suitable for use with
very low water pressure)
SUGGESTED ACTION
1. Turn off tap and pull the hose out completely.
2. Squeeze the spray gun trigger to release excess pressure
3. Twist to unlock and disconnect the spray gun from the hose
4. Slowly retract the hose back into the reel
5. Check for physical damage (reel making clunking noise, visible cracks in
side cover disc, hose reel box smashed, etc.)
1. Hose will need to be pulled until fully extended. This may require a lot
of pulling force.
2. Check to see if the hose has come off its drum, if so please contact
Hoselink Customer Care.
1. Use a flat screwdriver to remove the side cover located on the same
side as the leader hose.
2. If leaking is occurring where the hose connects to the reel, try
tightening with a 7mm spanner. Tighten ¼ turn at a time.
3. Also check the elbow join for breaks or cracks.
1. Remove side disc to ensure it is a not a leader hose problem.
2. Inspect internal side disc for breaks or cracks.
3. Does the hose roll out smoothly or does there appear to be physical
breakage?
4. If leaking is from internal join to reel, please contact Hoselink
Customer Care.
1. This is not rust as stainless steel screws are used throughout. It is from
a bug that has made a home in the screw hole.
2. Clean out holes with hot soaping water.
3. You may wish to use a hose reel cover to prevent this problem again.
1. Check bracket has been installed the right way up. Refer Diagram A.
2. All holes must be secured to the wall.
3. Send a photo of the problem to Customer Care for assistance.
1. Is the hose reel mounted high enough? Should be parallel to user. If
too low, the hose may rub on the aperture making it harder to pull out.
1. Extend the hose and turn tap on full to remove any kinks. The hose
should not retain a memory and kinks should fill out.
2. Ensure the hose reel is mounted high enough, if too low the hose can
rub on the aperture and cause kinks.
3. Always walk the hose out as needed, do not stand at the hose reel and
pull the hose out, allowing it to pool at your feet because a kink can
occur when you then walk it out.
4. Ensure the hose reel is mounted on a wall so it can swivel freely 180⁰.
1. Check pressure when spray nozzle is detached.
2. Fully extend hose, inspect for kinks, turn tap on full to remove possible
pinch points.
3. Reverse the leader hose with the end of the hose that connects to the
spray gun (to dislodge any blockage).
FOR FURTHER ASSISTANCE, PLEASE CONTACT CUSTOMER CARE:
Tel: 1300 900 617
Email: [email protected]
17/12/13
6
WARRANTY
Hoselink’s mission is to offer excellent products and exception after sales support. Your hose reel carries
a 24 month warranty from the date of purchase. Should you require trouble-shooting advice or after
sales care, please contact us via telephone or email and our Customer Care team will assist you.
Our goods come with guarantees that cannot be excluded under the Australian Consumer Law. You are
entitled to a replacement or refund for a major failure and for compensation for any other reasonably
foreseeable loss or damage. You are also entitled to have the goods repaired or replaced if the goods fail
to be of acceptable quality and the failure does not amount to a major failure.
If a Product has a minor defect, we will provide a repair or offer you a replacement or a refund. If you
think that a Product is defective you should contact our Customer Care team within 14 days and a
Customer Care representative will assist you. A photo may be requested to assist with the assessment of
your claim.
Where a Product is defective and needs to be replaced or repaired, return shipping will be arranged at
the expense of Hoselink. This must be arranged with Customer Care prior to the item being returned. If a
Product is replaced, your replacement Product becomes your property and the returned Product
becomes our property. When a refund is given, the returned Product becomes our property.
Should you ever require any assistance with your Hoselink product, please do not hesitate to contact us
for a speedy resolution.
FOR ALL WARRANTY CLAIMS, PLEASE CONTACT CUSTOMER CARE:
Tel: 1300 900 617
Email: [email protected]
SPECIFICATIONS
Model SKU
Hose Length
3315
15m Internal
Hose + 2m
Leader Hose
20m Internal
Hose + 2m
Leader Hose
25m Internal
Hose + 2m
Leader Hose
30m Internal
Hose + 2m
Leader Hose
3320
3325
3330
17/12/13
Weight
(Without water)
10.15kg
Hose
Material
PVC
Max Working
Pressure
150psi
Hose Inner
Diameter
½” (12mm)
10.85kg
PVC
150psi
½” (12mm)
15.05kg
PVC
150psi
½” (12mm)
15.75kg
PVC
150psi
½” (12mm)
7
OPTIONAL HOSE REEL ACCESSORIES
Covers
Polypropylene covers are now available to fit your Hoselink Auto
Rewind Hose Reel. A cover may be of assistance where your hose
reel is placed in a full sun position. It will also stop insects (such as
wasps) from nesting in the screw holes around the casing.
Padlocks
If security is a concern, a padlock will secure the hose reel unit to
the bracket. Hoselink now supplies padlocks to fit through one of
the holes at the base of the aluminium pin of the hose reel.
Leader Hose Extensions
Should you need to extend the length of the Leader Hose because
the reel is to be mounted away from the tap, you can now
purchase a Leader Hose Extension. Made from a length of the
same hose used in the hose reel, it arrives fitted with a Hose
Connector on either end, ready to attach between the Leader Hose
and Tap Connector.
Hose-Pro International Pty Ltd
Unit 8/106 Old Pittwater Road
Brookvale NSW 2100
17/12/13
Tel: 1300 900 617
Web: www.hoselink.com.au
Email: [email protected]
8