1
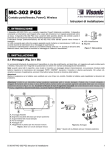
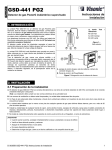
.) .)3* 3* GB Wireless PowerG 2-Way Keyfob - User's Guide ES Mando 2 Vías PowerG Inalámbrico - Guía del usuario PT Dispositivo de Chaves Seguidas de 2 Vias PowerG Sem Fios - Guia do utilizador *% *% 1. INTRODUCTION KF-235 PG2 is a PowerG keyfob, for use with the PowerMaster panels. Commands are invoked by pressing any of the four command buttons. Status is indicated via the Status LEDs and buzzer after every command. 2. INSTALLATION 2.1 Enrollment Refer to the PowerMaster panel's Installer Guide and follow the procedure under the "=21(6'(9,&(6 =21(6'(9,&(6" =21(6'(9,&(6 option of the Installer Menu. Step 1 Step 2 Enter the Installer menu and select “02:ZONES/DEVICES” @ 02.ZONES/DEVICES Step 3 button and release it as soon as the yellow LED lights, or, enter the device ID (on the back of keyfob) @ ADD NEW DEVICES Step 4 Enroll the keyfob by holding the Select "ADD NEW DEVICE" See Note 1 @ ENROLL NOW or Select the desired Keyfob Number for the new keyfob F02:Keyfob @ ID No. 301-XXXX ENTR ID:XXX-XXXX MODIFY DEVICES Step 5 Step 6 Enter PARTITIONS. See Note 2 Step 7 Assign partitions by pressing the , and buttons @ F02:PARTITIONS F02:P1 P2 @ P3 @ means scroll Notes: Select "Device Settings" and see below to configure the (AUX) button. @ F01:DEV SETTINGS and select 1. If the keyfob is already enrolled, you can configure the keyfob parameter and assign partitions via the “Modify Devices” option – see Step 2. 2. PARTITIONS will appear only if PARTITIONING was previously enabled in the panel. 2.2 Configuring the New Keyfob Template Enter the menu and follow the configuration instructions for the KF-235 PG2 keyfob as described in the following table. Option Configuration Instructions Here you select the function of the " " button on the keyfob device. Options: Arm instant (default); Not Used; Status, Stop Beeps, Skip exit delay, and PGM. Not Used: No function assigned to the AUX button. Status: Control panel displays and announces* the system status. Stop Beeps: The control panel and other devices in the system stop beeping (for example during exit or entry delays). Skip exit delay: Immediately stops the exit delay and causes the system to arm. PGM: Activates the PGM output.. Arm instant: While exit delay is in progress, this will cause the system to arm instant – (the entry delay is canceled). * Applicable only to control panels that support the voice option. 3. USING THE KEYFOB 3.1 Keyfob Functionality Step Functions User Actions ARM/DISARM LED Indication Arm AWAY Blue LED above AWAY button lights 1 Arm HOME Blue LED above HOME button lights Disarm (OFF) Blue LED above DISARM button lights D-303486 KF-235 PG2 User's Guide / Guía del usuario / Guia do utilizador 1 Step Functions 2 LATCHKEY 3 PANIC alarm 4 AUX User Actions ARM/DISARM LED Indication Blue LED above AWAY button lights and Press the buttons simultaneously (| 2 sec.) According to the state of the alarm system, see section 2.2 3.2 Keyfob Response When executing a command, the keyfob's Transmission LED blinks red once to indicate transmission of the command to the control panel. If the operation is successfully completed, the green LED lights momentarily and a "happy tune" is heard. If the operation fails or cannot be completed, for example, when the system is "not ready", the red LED lights steadily and a "sad tune" is heard. When executing a command and there is a communication failure between the keyfob device and the control panel, the keyfob's Transmission LED remains off and no tune is heard. 3.2.1 Primary LED and Buzzer Response to Keyfob Commands Panel Response Buzzer Indication Success: Operation is successfully completed Happy (success) beep Transmission LED Indication Momentary GREEN Momentary RED Sad (failure) beep None None No communication: For example, control panel is out of range. Depends on the operation that is performed Blinks yellow 2 sec. Keyfob low battery: Note: If transmission is still possible despite the battery condition, the unit will send a low battery signal to the control panel. Lights yellow 2 sec. Depends on the operation that is performed Trouble in system: When forced arming (bypass zones) is performed, the keyfob buzzer “protests” by emitting a continuous tone during the exit delay for 5 seconds (for more details, see the PowerMaster Installer Guide, section 5.5.2). Fail: Operation failed 3.2.2 Arming LED indication When executing a command using the keyfob device, the status of the control panel is indicated by the status LEDs that light blue. System State ARM/DISARM LED Indication Exit from DISARM to AWAY Exit from DISARM to HOME Entry from HOME Entry from AWAY Exit from HOME TO AWAY Exit from AWAY TO HOME Installer mode, Sync mode or when the system is otherwise reachable but unavailable AWAY lights HOME lights DISARM blinks DISARM blinks AWAY lights HOME lights AWAY, HOME, DISARM all blink twice, wait, then blink twice again 4. MAINTENANCE 4.1 Replacing the Battery When the keyfob device stops operating due to low battery and until the time the battery is completely depleted, all LEDs will light blue. A replacement 3V battery, CR-2032, is available from hardware and electrical supply stores. Replace the battery as shown in Figure 2. Caution! Risk of explosion if battery is replaced by an incorrect type. Dispose of used batteries according to the manufacturer's instructions. 4.2 Cleaning Clean the keyfob only with a soft cloth or sponge moistened lightly with a mixture of water and mild detergent, and wipe it dry immediately. The use of abrasives of any kind is strictly forbidden. Also never use solvents such as kerosene, acetone or thinner. 4.3 Periodic Test Wireless equipment should be tested regularly to determine whether there are sources of interference and to protect against faults. Refer to the PowerMaster Installer Guide, Chapter 6 Periodic Test, for instructions on how to conduct a periodic test. 5. TROUBLESHOOTING Problem Diagnosis Keyfob does not enroll 1. Keyfob was pre-enrolled 1. Enroll the keyfob again in the vicinity of the control panel. 2. The wrong ID number was 2. Reenter the ID number entered 3. No free location 3. If the maximum number of keyfobs has already been enrolled the alarm system will not allow enrolling any more keyfobs. 4. Unknown device 4. Make sure the frequency used for the device is the same as the control panel frequency. Replace the battery Low battery condition Keyfob LED does not light when button is pressed Proposed actions CAUTION! Wireless control panels may be blocked by radio signals occurring on or near their operating frequencies. 6. COMPLIANCE WITH STANDARDS Compliance with Standards 2 Europe: EN 300220, EN 50131-1 Grade 2, Class II and (EN 50134-2 Class II if used for social alarm), EN 301489, EN 50130-4, EN 60950, EN 50131-6 The KF-235 PG2 is compatible with the RTTE requirements - Directive 1999/5/EC of the European Parliament and of the Council of 9 March 1999 and EN50131-1 Grade 2 Class II. Certified by the Dutch testing and certification body Telefication BV to the following standards : D-303486 KF-235 PG2 User's Guide / Guía del usuario / Guia do utilizador