1
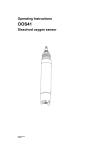
Operating Instructions
OOS61
Dissolved oxygen sensor
BA387e/00//06.05
71007927
Brief overview
Here is how to use these Operating Instructions to commission your sensor quickly and safely:
Safety instructions
→ ä4
→ ä5
General safety instructions
Explanation of the warning symbols
You can find special instructions at the appropriate position in the chapter in question.
The positions are indicated with the icons Warning #, Caution " and Note !.
Æ
Installation
→ ä7
→ ä 10
Here you can find installation conditions such as sensor dimensions and the angle of
installation.
Installation examples can be found here.
Æ
Wiring
→ ä 14
Refer to these pages for sensor wiring.
Æ
Sensor design and measuring principle
→ ä 16
→ ä 17
→ ä 17
Here you can read about the sensor design.
The measuring principle is explained on this page.
Here you can find the possible calibration methods.
Æ
Maintenance
→ ä 21
→ ä 25
Regular maintenance tasks, such as cleaning the sensor, are absolutely essential and
prolong the operating time of the sensor.
Here you can find an overview of the spare parts which can be delivered as well as an
overview of the system.
Æ
Troubleshooting
→ ä 24
If faults occur during operation, use the checklist to locate the cause.
Æ
Æ
Index
→ ä 29
You can find important terms and keywords on the individual sections here. Use the
keyword index to find the information you need quickly and efficiently.
OOS61
Table of contents
1
Safety instructions . . . . . . . . . . . . .4
1.1
1.2
1.3
1.4
1.5
1.6
Designated use . . . . . . . . . . . . . . . . . . . . . .
Installation, commissioning and operation . .
Operational safety . . . . . . . . . . . . . . . . . . . .
Return . . . . . . . . . . . . . . . . . . . . . . . . . . . . .
Notes on safety icons and symbols . . . . . . .
Cross-reference symbols . . . . . . . . . . . . . . .
2
Identification . . . . . . . . . . . . . . . . . .6
2.1
2.2
Product structure . . . . . . . . . . . . . . . . . . . . . 6
Scope of delivery . . . . . . . . . . . . . . . . . . . . . 6
3
Installation . . . . . . . . . . . . . . . . . . . .7
3.1
3.2
3.3
3.4
3.5
Incoming acceptance, transport, storage . . . 7
Installation conditions . . . . . . . . . . . . . . . . . 7
Installation instructions . . . . . . . . . . . . . . . . 8
Installation examples . . . . . . . . . . . . . . . . . 10
Post-installation check . . . . . . . . . . . . . . . . 13
4
Wiring . . . . . . . . . . . . . . . . . . . . . . .14
4.1
4.2
4.3
Direct connection to the transmitter . . . . . . 14
Connection via junction box . . . . . . . . . . . . 14
Post-connection check . . . . . . . . . . . . . . . . 15
5
Device description. . . . . . . . . . . . .16
5.1
5.2
5.3
Sensor design . . . . . . . . . . . . . . . . . . . . . . 16
Measuring principle . . . . . . . . . . . . . . . . . . 17
Calibration . . . . . . . . . . . . . . . . . . . . . . . . . 17
6
Commissioning . . . . . . . . . . . . . . .20
6.1
6.2
Function check . . . . . . . . . . . . . . . . . . . . . . 20
Calibration . . . . . . . . . . . . . . . . . . . . . . . . . 20
7
Maintenance. . . . . . . . . . . . . . . . . .21
7.1
7.2
Cleaning the sensor . . . . . . . . . . . . . . . . . . 21
Regenerating . . . . . . . . . . . . . . . . . . . . . . . 22
8
Accessories . . . . . . . . . . . . . . . . . .23
8.1
8.2
8.3
Connection accessories . . . . . . . . . . . . . . . 23
Installation accessories . . . . . . . . . . . . . . . 23
Measuring, monitoring and cleaning . . . . . 23
9
Troubleshooting . . . . . . . . . . . . . .24
9.1
9.2
9.3
Troubleshooting instructions . . . . . . . . . . . 24
Sensor checks . . . . . . . . . . . . . . . . . . . . . . 24
Spare parts . . . . . . . . . . . . . . . . . . . . . . . . 25
4
4
4
5
5
5
9.4
9.5
Return . . . . . . . . . . . . . . . . . . . . . . . . . . . . 25
Disposal . . . . . . . . . . . . . . . . . . . . . . . . . . 26
10
Technical data . . . . . . . . . . . . . . . . 27
10.1
10.2
10.3
10.4
10.5
Input . . . . . . . . . . . . . . . . . . . . . . . . . . . . .
Environment . . . . . . . . . . . . . . . . . . . . . . .
Process . . . . . . . . . . . . . . . . . . . . . . . . . .
Performance characteristics . . . . . . . . . . .
Mechanical construction . . . . . . . . . . . . . .
27
27
27
27
28
Index. . . . . . . . . . . . . . . . . . . . . . . . 29
3
Safety instructions
OOS61
1
Safety instructions
1.1
Designated use
The oxygen sensor is suitable for continuous measurement of dissolved oxygen in water.
Typical applications are:
• Measuring, monitoring and regulating the oxygen content in activated sludge basins.
• Monitoring the oxygen content in the sewage treatment plant outlet.
• Monitoring, measuring and regulating the oxygen content in public waters and fish farming
water.
• Monitoring of oxygen enrichment in drinking water.
Any other use than the one described here compromises the safety of persons and the entire
measuring system and is, therefore, not permitted.
The manufacturer is not liable for damage caused by improper or non-designated use.
1.2
Installation, commissioning and operation
Please note the following items:
• Installation, electrical connection, commissioning, operation and maintenance of the
measuring system must only be carried out by trained technical personnel.
The technical personnel must be authorized for the specified activities by the system
operator.
• Technical personnel must have read and understood these Operating Instructions and must
adhere to them.
• Before commissioning the entire measuring point, check all the connections for correctness.
Ensure that hose connections are not damaged.
• Do not operate damaged products and secure them against unintentional commissioning.
Mark the damaged product as being defective.
• Measuring point faults may only be rectified by authorized and specially trained
personnel.
• If faults cannot be rectified, the products must be taken out of service and secured against
unintentional commissioning.
• Repairs not described in these Operating Instructions may only be carried out at the
manufacturer’s or by the service organization.
1.3
Operational safety
The sensor has been designed and tested according to the state of the art and left the factory
in perfect functioning order.
Relevant regulations and European standards have been met.
As the user, you are responsible for complying with the following safety conditions:
• Installation instructions
• Local prevailing standards and regulations.
4
OOS61
Safety instructions
1.4
Return
If the device requires repair, please send it cleaned to the sales center responsible.
Please use the original packaging, if possible.
Please enclose the completed "Declaration of contamination" (copy the second last page of
these Operating Instructions) with the packaging and the transportation documents. No repair
without completed "Declaration of contamination"!
1.5
#
"
!
Warning!
This symbol alerts you to hazards. They can cause serious damage to the instrument or
to persons if ignored.
Caution!
This symbol alerts you to possible faults which could arise from incorrect operation.
They could cause damage to the instrument if ignored.
Note!
This symbol indicates important items of information.
1.6
Èä1
Èå2
Notes on safety icons and symbols
Cross-reference symbols
This symbol stands for a cross-reference to a specific page (e.g. Page 1).
This symbol stands for a cross-reference to a specific graphic (e.g. Fig. 2).
5
Identification
OOS61
2
Identification
2.1
Product structure
Certificate
A Version for non-hazardous area
Cable length incl. extension cable
0 Cable length: 1.5 m / 4.9 ft
1 Cable length: 7.5 m / 23 ft
2 Cable length: 15 m / 49 ft
8 No cable (for replacement for TOP 68 version)
9 Special version upon request
Sensor head
F Thread G1, fixed cable with SXP connector
S Thread G1, TOP68 connector
Accessories
0 Without accessories
OOS61-
2.2
Complete order code
Scope of delivery
The following items are included in the delivery:
• Oxygen sensor with transport protection cap for membrane protection
• Operating Instructions, English
If you have any questions, please contact your supplier or your sales center responsible.
6
OOS61
Installation
3
Installation
3.1
Incoming acceptance, transport, storage
3.2.1
Dimensions
186 / 7.32
220 / 8.66
Installation conditions
186 / 7.32
3.2
Ø40 / 1.57
Ø40 / 1.57
a0004083-en
Fig. 1:
Fixed cable version
220 / 8.66
• Make sure the packaging is undamaged!
Inform the supplier about damage to the packaging.
Keep the damaged packaging until the matter has been settled.
• Make sure the contents are undamaged!
Inform the supplier about damage to the delivery contents.
Keep the damaged products until the matter has been settled.
• Check that the scope of delivery is complete and agrees with your order and the shipping
documents.
• The packaging material used to store or to transport the product must provide shock
protection and humidity protection. The original packaging offers the best protection. Also,
keep to the approved ambient conditions (see "Technical data").
• If you have any questions, please contact your supplier or your sales center responsible.
a0004084-en
Fig. 2:
TOP 68 plug-in head version
7
Installation
OOS61
3.2.2
Orientation
The sensor can be installed up to the horizontal in an assembly, support or a suitable process
connection.
Other angles and overhead installation are not recommended. Reason: possible sediment
formation and resulting falsification of measured value.
A
a0004087
Fig. 3:
A
!
Angle of installation
Recommended angle of installation: 0 ... 180 °
Note!
Make sure you comply with the instructions for installing sensors. You will find them in the
Operating Instructions for the assembly used.
3.2.3
Mounting location
• Select the installation location so that there is easy access for later calibration.
• Make sure that upright posts and assemblies are secured safely and vibration-free.
• For immersed operation in an activated sludge basin, select an installation location which
produces a typical oxygen concentration.
3.3
Installation instructions
3.3.1
Measuring system
A complete measuring system comprises at least:
• Oxygen sensor
• Transmitter, e.g. OOM223/253
• Special measuring cable if extension necessary
• Assembly, e.g. flow assembly OOA250, immersion assembly OYA611 or
retractable assembly OOA451
Optional:
• Universal suspended assembly holder OYH101 for immersed operation
• Junction box VS (with cable extension)
• Automatic spray cleaning system Chemoclean
8
OOS61
Installation
a0004102
Fig. 4:
1
2
3
4
Measuring system (example)
Immersion assembly OYA611
Junction box VS (optional)
Transmitter OOM253
Oxygen sensor OOS61
3.3.2
!
Installing a measuring point
Note!
For immersed operation, install the individual modules away from the basin on a solid base.
Only carry out the final installation at the intended installation location.
For a complete installation of a measuring point, proceed as follows:
"
#
1.
Install a retractable or a flow assembly (if used) into the process.
2.
Connect the water supply to the rinse connections (if you use an assembly with cleaning
function).
3.
Install and connect the oxygen sensor.
4.
Install an immersion or a suspension assembly (if used) into the process.
Caution!
• For immersed operation, the sensor must be installed in an immersion assembly (e.g.
OYA611). Do not install the sensor suspended from the cable.
• Screw the sensor into the assembly so that the cable is not twisted.
• Avoid exerting excessive tensile force on the cable (e.g. from jerky pulling).
• Select the installation location so that there is easy access for later calibration.
Warning!
When using metallic assemblies and installation equipment, comply with national grounding
regulations.
9
Installation
OOS61
3.4
Installation examples
3.4.1
Immersion operation
Universal assembly holder and chain assembly
For large basins, where sufficient installation distance is required from the basin edge
(activated sludge basin, especially), it is advisable to use the upright post and chain assembly
(→ å 5, → å 6). The free swinging of the immersed assembly practically rules out vibrations
from the upright post.
A good self-cleaning of the fluorescence caps is reached due to the swinging of the assembly.
According to this effect, the sensor life time can be extended.
a0004103-en
Fig. 5:
1
2
3
4
5
6
10
Universal assembly holder OYH101 with
immersible pendulum assembly OYA611
Weather protection cover
Upright post, square pipe SS 1.4301 (AISI 304)
Transverse pipe SS 1.4301 (AISI 304)
Star handle
Second fixing possibility for transverse pipe
Immersion assembly OYA611
a0004104-en
Fig. 6:
1
2
3
4
5
Immersible pendulum assembly OYA611
Protection cap
Worm drive hose clip
Pipe clips (detailed drawing in right half)
PVC pipe
Threaded coupling
OOS61
Installation
Universal assembly holder and fixed immersion assembly
The preferable type of installation for strong or turbulent flow (> 0.5 m/s) in the basin or open
channels is to secure the device to an upright post and a securely mounted immersion tube
(→ å 7). If the flow is very strong, a second transverse pipe can be installed with its own pipe
support.
a0004105-en
Fig. 7:
1
2
3
4
Universal assembly holder OYH101 with immersion tube OYY105
Star handle
Pipe support
Fixing bracket
Immersion assembly (= immersion tube)
Basin rim mounting with immersion tube
For fixing to the sides of the basin or channel, we recommend immersion assembly basin rim
mounting (→ å 8, → å 9).
5
1
5
2
2
4
4
3
3
a0004106
Fig. 8:
1
2
3
1
Horizontal basin rim mounting
Protection cover for cable entry
Pipe support
Immersion assembly SS 1.4301 (AISI 304)
a0004107
Fig. 9:
4
5
Vertical basin rim mounting
Basin rim mounting
Star handle
If there is strong turbulence or flow, a second basin rim mounting must be used for the
immersion assembly.
11
Installation
OOS61
Floating body
To aid installation in strongly fluctuating water levels, e.g. in rivers or lakes, the floating body
OOA110-50 is available (→ å 10).
mm/inch
3
4
5
220/8.66
2
Ø200/7.87
3
6
7
800/31.50
4
500/19.69
Cable route with strain relief and rain protection
Mounting ring for ropes and chains with locking
screw
Lugs Ø15, 3 x 120 ° for anchoring
Saltwater-resistant plastic float
Pipe 40x1, stainless steel SS 1.4571
(AISI 316Ti)
Shock absorber and weight
Oxygen sensor
1
2
1
G1
5
6
7
a0004108-en
Fig. 10:
3.4.2
Floating body
Flow operation
The OOA250-A flow assembly (→ å 11) with automatic self-venting is suitable for use in
pipelines or hose connections. The inlet is at the bottom of the assembly, the outlet at the top
(connection thread G¾). It can be installed in a pipe by using two 90° pipe brackets to allow
inflow to the assembly (→ å 12, item 6).
1
8
3
7
6
5
2
4
a0004114
Fig. 12:
Bypass installation with manually actuated
valves or solenoid valves
a0004113-en
Fig. 11:
1
2
3
4
5
12
Flow assembly OOA250-A
Screw-in part for sensor
Screw ring
Meter body
Connection thread G¾
Dummy plug (connection for spray head
OOR3)
1
2
3
4, 7
5
6
8
Main line
Medium return
Oxygen sensor
Manually actuated or solenoid valves
Flow assembly OOA250-A
90 ° pipe bracket
Medium removal
OOS61
Installation
3.4.3
Retractable assembly
The assembly is designed for installation on tanks and pipes. Suitable nozzles must be
available for this.
Install the assembly at places with constant flow. The minimum pipe diameter is DN 80.
Detail A, rotated 90°
(side view)
2
Detail A,
(top view)
3
3
1
4
5
a0004117-en
Fig. 13:
1
2
3
4
5
!
Permissible and impermissible sensor installation positions
Ascending pipe, best position
Horizontal pipe, sensor top down, impermissible due to air cushion or foam bubble forming
Horizontal pipe, installation with permissible installation angle (acc. to sensor version)
Overhead installation, critical due to possible sediment buildup on fluorescence cap
Down pipe, impermissible
Note!
• Do not install the assembly at places, where air cushions or foam bubbles can be formed or
where suspended particles can settle on the sensor optics (→ å 13).
• Measuring errors can occur, if:
– the sensor is not immersed into the medium
– suspended particles are settled on the sensor membrane
– the sensor is installed overhead.
3.5
•
•
•
•
•
Post-installation check
Sensor and cable undamaged?
Fluorescence cap undamaged?
Compliance with permissible sensor installation position?
Is the sensor installed in an assembly and is not suspended from the cable?
Avoid moisture by rain by fitting the protective cap to the immersion assembly?
13
Wiring
OOS61
4
#
Wiring
Warning!
• The electrical connection must only be carried out by an electrical technician.
• The electrical technician must have read and understood the instructions in this manual and
must adhere to them.
• Ensure that there is no voltage at the power cable before beginning the connection work.
4.1
Direct connection to the transmitter
4.1.1
Field installation
Connect the sensor directly to the transmitter (OOM253-WX/WS) by means of the special
measuring cable with the SXP connector (→ å 14).
a0004118
Fig. 14:
4.1.2
SXP connector
Panel mounting
• Remove the SXP connector (transmitter side!) from the cable.
• Refer to the following table for the cable assignment and the assigned terminals for
OOM223-WX/WS.
• Please note that the cable assignment changes depending on the sensor version (fixed
cable or TOP68 connection).
Terminal
COM223
Sensor with fixed cable (OMK)
Sensor with TOP68 connection (CYK71)
Core
Assignment
Core
Assignment
85
Yellow
+UB
Yellow
+UB
0
Gray
0V
White
0V
96
Pink
Comm. (digital)
Green
Communication (digital)
97
Blue
Comm. (digital)
Brown
Communication (digital)
88
Brown
–UB
Coax,
inner
–UB
4.2
Connection via junction box
To extend the sensor connection beyond the length of the fixed cable, the connection has to
take place using a junction box VS (→ å 15, → å 16).
Always connect the sensor cable to the junction box with the SXP connector.
The extension to the transmitter depends on the transmitter version, i.e. field device or panelmounted instrument.
14
OOS61
Wiring
1
82 / 3.23
80 / 3.15
4
YE
87
GY
0
PK
96
BU
2
3
2
BN
97
88
GN
19
WH
18
mm / inch
a0004130
a0004129-en
Fig. 15:
1
2
Fig. 16:
Junction box VS to the field device
SXP connector to the field device
SXP connector from the sensor
2
3
4
4.3
Junction box VS to the panel-mounted
instrument
SXP connector from the sensor
Special measuring cable to the transmitter
(OMK)
Transmitter connection compartment
Post-connection check
Instrument status and specifications
Remarks
Are the sensor, assembly, junction box or cable damaged?
Visual inspection
Electrical connection
Remarks
Does the supply voltage of the transmitter match the specifications
on the nameplate?
110/230 V AC
24 V AC/DC
Are the installed cables strain-relieved and not twisted ?
Is the cable type route completely isolated?
Power cable/weak current cable
Are the power supply and signal cable correctly connected to the
transmitter?
Use the connection diagram of COM
2x3.
Are all the screws terminals properly tightened?
Are all the cable entries installed, tightened and sealed?
Are all the cable entries installed downwards or lateral?
For cable entries lateral: cable loops
downwards for water to be able to drip
off.
15
Device description
OOS61
5
Device description
5.1
Sensor design
1
5
2
6
3
7
4
8
a0004151
Fig. 17:
1
2
3
4
5
6
7
8
Sensor design
Sensor cable
Sensor shaft
O-ring
Protection guard
Threaded connection
Detector
Emitter diode
Fluorescence cap
The sensor consists of the following function units:
• Sensor shaft
• Sensor head with optics (emitter and detector)
• Fluorescence cap
• Protection guard
!
16
Note!
• Alternatively to the protection guard, you can use a spray head OOR 3 (optional, see
"Accessories") for use in immersed operation with cleaning function.
OOS61
Device description
5.2
Measuring principle
5.2.1
Oxygen measurement based on the principle of fluorescence
quenching
• Sensor design:
– Oxygen-sensitive molecules (markers) are integrated in an optically active layer
(fluorescence layer).
– The surface of the fluorescence layer is in contact with the medium.
– The sensor optics are directed at the underside of the fluorescence layer.
• There is an equilibrium between the oxygen partial pressure in the medium and that in the
fluorescence layer:
– If the sensor is immersed in the medium, the equilibrium is established very quickly.
• Measuring process:
– The sensor optics send green light pulses to the fluorescence layer.
– The markers "answer" (fluoresce) with red light pulses.
– The duration and intensity of the response signals is directly dependent on the oxygen
contents and the partial pressure.
– If the medium is free from oxygen, the response signals are long and very intense.
– Oxygen molecules "quench" the marker molecules. As a result, the response signals are
shorter and less intense.
• Measurement result:
– The sensor returns a signal that is in proportion to the oxygen concentration in the medium.
– The fluid temperature and air pressure are already calculated in the sensor.
5.2.2
Fluorescence cap
The oxygen dissolved in the medium is diffused into the fluorescence cap.
Suitable flow is not necessarily mandatory but it does improve the speed at which the
measuring system responds and ensures a more representative measured value compared to
a measurement in static medium.
The cap is only permeable for dissolved gases. Other substances dissolved in the liquid phase
e.g. ionic substances, will not penetrate through the membrane. Therefore, medium
conductivity has no impact on the measuring signal.
5.3
Calibration
Calibration is a means of adapting the transmitter to the characteristic values of the sensor.
Normally, sensor calibration is seldom necessary. It is necessary after:
• Changing the fluorescence cap
Within the framework of system monitoring and supervision, for example, the calibration can
also be cyclically monitored (at typical time intervals, depending on operating experience) or
renewed.
!
Note!
Ideally, use the calibration vessel (see Accessories) for calibration.
5.3.1
Types of calibration
Types of calibration:
• Air (preferably saturated water vapor, e.g. near the water surface)
– Measured values between 70 and 130 % SAT result in the calibration of the measured
value at air
– Measured smaller than 15 % SAT result in the calibration of the zero point
• Air-saturated water
– Like air calibration
17
Device description
OOS61
• Reference measured value (entry at transmitter, sensor remains in the medium).
– Measured values between 50 and 150 % SAT result in the calibration of the measured
value to the reference value while maintaining the zero point
– Measured values smaller than 20 % SAT result in the calibration of the measured value to
the reference value while maintaining the measured value at air
If necessary, calibrate OOS61 practically:
• In the air (water-vapor saturated) type of calibration in order to calibrate the measured value
at air.
• In the air-saturated water type of calibration, but while using oxygen-free water, (see
"Sensor check" section), to calibrate the zero point.
5.3.2
Calibration intervals
1.
If you want to calibrate the sensor in the meantime due to a special application and/or a
special type of installation, you can determine the intervals with the following method:
2.
Check the sensor one month after its being put into operation by taking it out of the fluid,
drying it and then measuring the oxygen saturation index at air after 10 minutes.
Decide using the results:
a. If the measured value is not at 100 ±2 %SAT, you have to calibrate the sensor.
b. Otherwise, double the length of time to the next inspection.
3.
!
Proceed as per Point 1 after two, four and/or eight months. In this way, you can determine
the optimum calibration interval for your sensor.
Note!
Be sure to calibrate the sensor at least once a year.
5.3.3
!
Calibration in air
1.
Remove the sensor from the medium.
2.
Clean the outside of the sensor with a damp cloth. Then dry the sensor membrane e.g. by
using a tissue.
3.
Then wait while the sensor adjusts to the temperature of the ambient air. This takes about
20 minutes. Check that the sensor is not in direct sunlight during this time.
4.
If the measured value display on the transmitter is stable, carry out the calibration in
accordance with the Operating Instructions of the transmitter.
5.
Place the sensor in the medium again.
Note!
Make sure you comply with the instructions for calibration in the Operating Instructions of the
transmitter.
5.3.4
Calculation example for the calibration value
As a check, you can calculate the expected calibration value (transmitter display) as shown in
the following example (salinity is 0).
18
1.
Determine:
– the sensor temperature (ambient air)
– the altitude above sea level
– the current air pressure (=rel. air pressure to sea level) at the time of calibration. (If
undeterminable, use 1013 hPa for an approximate calculation.)
2.
Define:
– the saturation value S acc. to the first table
– the factor K acc. to the second table
OOS61
Device description
°C
S [mg/l]
°C
S [mg/l]
°C
S [mg/l]
°C
S [mg/l]
0
14.64
11
10.99
21
8.90
31
7.42
1
14.23
12
10.75
22
8.73
32
7.30
2
13.83
13
10.51
23
8.57
33
7.18
3
13.45
14
10.28
24
8.41
34
7.06
4
13.09
15
10.06
25
8.25
35
6.94
5
12.75
16
9.85
26
8.11
36
6.83
6
12.42
17
9.64
27
7.96
37
6.72
7
12.11
18
9.45
28
7.82
38
6.61
8
11.81
19
9.26
29
7.69
39
6.51
9
11.53
20
9.08
30
7.55
40
6.41
10
11.25
Altitud
e [m]
K
Altitud
e [m]
K
Altitud
e [m]
K
Altitud
e [m]
K
0
1.000
550
0.938
1050
0.885
1550
0.834
50
0.994
600
0.932
1100
0.879
1600
0.830
100
0.988
650
0.927
1150
0.874
1650
0.825
150
0.982
700
0.922
1200
0.869
1700
0.820
200
0.977
750
0.916
1250
0.864
1750
0.815
250
0.971
800
0.911
1300
0.859
1800
0.810
300
0.966
850
0.905
1350
0.854
1850
0.805
350
0.960
900
0.900
1400
0.849
1900
0.801
400
0.954
950
0.895
1450
0.844
1950
0.796
450
0.949
1000
0.890
1500
0.839
2000
0.792
500
0.943
3.
Determine:
– L = current air pressure in bar (1013 hPa=1.013 bar, if unknown)
4.
Calculate the calibration value C:
C=S.K.L
Example
• Air calibration at 18 °C, altitude 500 m above sea level, current air pressure 1009 hPa=1.009
bar
• S = 9.45 mg/l, K = 0.943, L = 1.009
Calibration value C = 9.17 mg/l.
19
Commissioning
OOS61
6
Commissioning
6.1
Function check
Before first commissioning, check if:
• the sensor is correctly installed
• the electrical connection is correct.
If using an assembly with automatic cleaning, check the correct water connection at the
assembly rinse connection.
#
Warning!
Danger of medium leaking off
Before applying compressed air to an assembly with cleaning facility, make sure the
connections are correctly fitted. Otherwise, the assembly may not be insert into the process.
6.2
Calibration
The sensor is calibrated at the factory. A new calibration is only needed in special situations.
20
OOS61
Maintenance
7
Maintenance
Maintenance work must be carried out at regular intervals. To ensure that it is carried out, we
recommend you enter the maintenance dates into an operations logbook or in an operations
calendar in advance.
The maintenance cycle primarily depends on the system, the installation conditions and the
medium in which measurement is taking place.
The following activities must be carried out:
• Cleaning the sensor
• Check the measuring function:
1. Remove the sensor from the medium.
2. Clean and dry the membrane.
3. After about 10 minutes, measure the oxygen saturation index in air (without recalibration).
4. The measured value should be at 100 ± 4 % SAT
(Display O2 saturation with OOM 2x3: press plus key four times).
• If necessary, replace a defective membrane or one which cannot be cleaned any more.
• Recalibration
(if desired or required)
7.1
Cleaning the sensor
The measurement can be corrupted by sensor fouling or malfunction, e.g.:
• Buildup on the fluorescence cap
--> causes longer response times and a reduced slope under certain circumstances.
To ensure reliable measurement, the sensor must be cleaned at regular intervals. The
frequency and intensity of the cleaning operation depend on the measuring medium.
Clean the sensor:
• before every calibration
• at regular intervals during operation as necessary
• before returning it for repairs.
Depending on the type of soiling, proceed as follows:
"
Type of soiling
Cleaning
Salt deposits
Immerse the sensor in drinking water or in 1-5% hydrochloric
acid (for a few minutes). Afterwards, rinse it with copious
amounts of water.
Dirt particles on the sensor body (not cap!)
Clean the sensor body mechanically with water and a suitable
brush.
Dirt particles on the fluorescence cap
Clean the membrane with water and a soft sponge.
Caution!
After cleaning, rinse the sensor with copious amounts of clean water.
7.1.1
Cleaning the optics
The optics only need to be cleaned if medium has penetrated through a defective fluorescence
cap.
To clean it, proceed as follows:
1.
Unscrew the protection guard and fluorescence cap from the sensor head.
2.
Carefully clean the optical surface with a soft cloth until the buildup is fully removed.
21
Maintenance
"
OOS61
3.
Clean the optics with drinking or distilled water.
4.
Clean the optics and screw on a new fluorescence cap.
Caution!
The optical surface may not be scratched or damaged in any way!
7.2
Regenerating
7.2.1
Replacing the sealing ring
Replacing the sealing ring is only necessary when it is visibly damaged. For replacement, use
only original sealing rings.
7.2.2
Changing the fluorescence cap
Removing the old fluorescence cap
1.
Remove the sensor from the medium.
2.
Unscrew the protection guard.
3.
Clean the outside of the sensor.
4.
Unscrew the fluorescence cap.
5.
Clean and dry the optical surface if necessary.
Installing the new fluorescence cap
!
22
6.
Make sure that there are no dirt particles on the sealing surface.
7.
Carefully screw the fluorescence cap onto the sensor head until the stop.
8.
Screw the protection guard back on.
Note!
After replacing the fluorescence cap, the sensor must be recalibrated. Then insert the sensor
into the medium and check that no alarm is displayed on the transmitter.
OOS61
Accessories
8
Accessories
8.1
Connection accessories
• Junction box VS
with socket and 7-pole connector,
for cable extension from the sensor (COS71, COS61, COS31, COS3 with SXP connector)
to the transmitter, IP 65 degree of protection;
Order No. 50001054
• Measuring cable OMK
for extension between junction box VS and transmitter, unterminated, yard good;
Order No. 50004124
8.2
Installation accessories
• Immersion assembly OOA110
for sensor immersion in the basin, PVC pipe resp. PUR floating body with SS 1.4571
(AISI 316Ti) immersion tube
• Flow assembly OOA250
for sensor installation in pipe lines, PVC
• Retractable assembly OOA451
Manual stainless steel retractable assembly with ball valve shutoff for oxygen sensors;
• Universal suspended assembly holder OYH101
for pH, redox, oxygen, conductivity assemblies and oxygen and turbidity sensors;
• Pendulum assembly OYA611
for sensor immersion in basins, open channels and tanks, PVC;
• Basin rim mounting OYY106
for sensor immersion in basins, SS 1.4301 (AISI 304);
• Immersion assembly OYY105
for sensor immersion in basins, SS 1.4404 (AISI 316L) pipe, SS 1.4571 (AISI 316Ti) fitting;
8.3
Measuring, monitoring and cleaning
• OOM223/253
Transmitter with integrated sensor function monitoring, measured value monitoring, free
configuration of alarm contact, field or panel mounting, HART® or PROFIBUS possible;
23
Troubleshooting
OOS61
9
Troubleshooting
9.1
Troubleshooting instructions
Problem
No display, no sensor
reaction
Displayed value too high
Check
Remedial action
Mains voltage to the transmitter?
Connect mains voltage.
Sensor connected correctly?
Set up correct connection.
Medium flow available?
Create flow.
Buildup on the fluorescence cap?
Clean sensor
With a TOP 68 connection: Humidity or
dirt in plug?
Clean connection (cleaning alcohol)
and dry it.
Temperature display clearly too low?
Check sensor, if necessary send
sensor in for repair.
With a TOP 68 connection: Humidity or
dirt in plug?
Clean connection (cleaning alcohol)
and dry it.
Sensor calibrated?
Recalibrate
Medium flow available?
Create flow.
Displayed temperature clearly too high?
Check sensor, if necessary send
sensor in for repair.
Buildup on the fluorescence cap?
Clean sensor
Fluorescence cap worn out?
Replace
Fluorescence cap damaged?
Fluorescent cap replacement
EMC interference on the measuring
system?
Remove outer shielding of sensor
and extension cable at terminal S.
Cut measuring and signaling lines
from h.v. power lines.
Displayed value too low
Strong deviations in
displayed value
!
Note!
Make sure you comply with the instructions for troubleshooting in the Operating Instructions of
the transmitter. If necessary, carry out a test of the transmitter.
9.2
"
Sensor checks
Caution!
Only authorized and trained personnel may test the sensor!
You will also require a multimeter (voltage, resistance).
Check
Action
Setpoint
Voltage inspection
With the sensor connected, test the
operating voltage on the OOM 2x3
transmitter
between terminals 87 and 0: +8 V
between terminals 88 and 0: –8 V
Slope inspection
Place the sensor in the air, and dry with
a paper towel.
After 10 minutes:
Approx. 102 % SAT (4 times O key)
Immerse the sensor in zero solution1.
Display near to 0 mg/l (0% Sat)
Zero point inspection
24
Open the measuring chamber and dry
the electrodes.
OOS61
Troubleshooting
Check
Temperature sensor
check
1
Action
Setpoint
Disconnect the sensor and measure the
resistance:
– between TOP68 pins 3 and 4
– between SXP pins 3 and 4 (with fixed
cable version)
depending on temperature:
5 °C: 74.4 kΩ
10 °C: 58.7 kΩ
15 °C: 46.7 kΩ
20 °C: 37.3 kΩ
25 °C: 30.0 kΩ
30 °C: 24.3 kΩ
How to use the zero solution:
1.
Fill a large beaker (1.5 - 2 l) with approx. 1 l of water.
2.
Pour a cap-full of the zero solution into the water.
3.
Immerse the sensor into the water and wait a sufficient period of time (15 min. for oxygen
depletion).
The display drops to around 0 mg/l (0 %SAT).
Depending on the conditions (contact surface water/air), the zero solution is stable for up to 12
hours.
!
Note!
If there are deviations from the reference values, follow the troubleshooting instructions or
contact your sales office.
9.3
Spare parts
Position
Spare parts kit
order no.
1
Sensor
see product
structure
2
Sealing ring
– 2 pieces
51518597
3
Sensor cap (fluorescence cap)
51518598
4
Protection guard
on request
Zero solution
– 3 units to produce 3 x 1 liter oxygen free solution
50001041
1
2
without
fig.
3
4
a0004166
Fig. 18:
9.4
Return
If the device requires repair, please send it cleaned to the sales center responsible.
Please use the original packaging, if possible.
Please enclose the completed "Declaration of contamination" (copy the second last page of
these Operating Instructions) with the packaging and the transportation documents. No repair
without completed "Declaration of contamination"!
25
Troubleshooting
9.5
OOS61
Disposal
The device contains electronic components and must therefore be disposed of in accordance
with regulations on the disposal of electronic waste.
Please observe local regulations.
26
OOS61
Technical data
10
Technical data
10.1
Input
10.1.1
Measured value
Dissolved oxygen [mg/l, % SAT, hPa]
Temperature [° C, ° F]
10.1.2
Measuring range
with OOM 223/253:
0 ... 20 mg/l
0 ... 200 % SAT
0 ... 400 hPa
10.2
Environment
10.2.1
Storage temperature
–20 ... +70 °C at 95% relative air humidity, not condensing
10.2.2
Ambient temperature range
–5 ... 50 °C
10.2.3
Degree of protection
IP 68
10.3
Process
10.3.1
Process pressure
Max. permitted overpressure: 10 bar
10.3.2
Process temperature
–20 ... +60 °C
10.4
Performance characteristics
10.4.1
Response time
t90: 60 s
10.4.2
Maximum measured error
±2 % of end of measuring range
27
Technical data
10.4.3
OOS61
Repeatability
±0.5 % of end of measuring range
10.4.4
Operating life of sensor cap
1 year (protect against direct sunshine)
10.5
Mechanical construction
10.5.1
Weights
For cable length 7 m (23 ft): 0.7 kg (1.5 lbs)
For cable length 15 m (49 ft): 1.1 kg (2.4 lbs)
With TOP68 connection: 0.3 kg (0.66 lbs)
10.5.2
Materials
Sensor shaft:
Cap with fluorescence layer:
Fluorescence layer:
10.5.3
Stainless steel 1.4571 (AISI 316Ti)
POM
Silicone
Process connection
G1
10.5.4
Sensor cable
Shielded 7-core fixed cable or double-shielded coaxial cable with 4 pilot wires (for TOP68
connection)
10.5.5
Cable connection to transmitter
• SXP connector (field device)
• Terminal connection (panel-mounted instrument)
10.5.6
Maximum cable length
Max. 100 m / 328 ft (including cable extension)
10.5.7
Temperature compensation
Internal
10.5.8
RS 485
28
Interface
OOS61
Index
A
Accessories
Assemblies . . . . . . . . . . . . . . . . . . . . . . . . . . .
Cleaning. . . . . . . . . . . . . . . . . . . . . . . . . . . . . .
Connection accessories. . . . . . . . . . . . . . . . . .
Deflector . . . . . . . . . . . . . . . . . . . . . . . . . . . . .
Measuring . . . . . . . . . . . . . . . . . . . . . . . . . . . .
Membrane protection guard. . . . . . . . . . . . . . .
Ambient temperature range . . . . . . . . . . . . . . . . .
Fluorescence cap . . . . . . . . . . . . . . . . . . 17, 22, 28
23
23
23
23
23
23
27
B
Basin rim mounting . . . . . . . . . . . . . . . . . . . . . . . . 11
C
Cable connection . . . . . . . . . . . . . . . . . . . . . . . . . 28
Cable length . . . . . . . . . . . . . . . . . . . . . . . . . . . . . 28
Cable length incl. extension cable . . . . . . . . . . . . 28
Calculating the calibration value . . . . . . . . . . . . . . 18
Calibration. . . . . . . . . . . . . . . . . . . . . . . . . . . . 17, 20
Chain assembly . . . . . . . . . . . . . . . . . . . . . . . . . . 10
Check
Electrical connection . . . . . . . . . . . . . . . . . . . . 15
Function . . . . . . . . . . . . . . . . . . . . . . . . . . . . . . 20
Post-installation . . . . . . . . . . . . . . . . . . . . . . . . 13
Cleaning
Sensor . . . . . . . . . . . . . . . . . . . . . . . . . . . . . . . 21
Commissioning . . . . . . . . . . . . . . . . . . . . . . . . . 4, 20
Connection
Cable extension . . . . . . . . . . . . . . . . . . . . . . . . 14
Direct connection . . . . . . . . . . . . . . . . . . . . . . . 14
Cross-reference symbols . . . . . . . . . . . . . . . . . . . . 5
D
Degree of protection . . . . . . . . . . . . . . . . . . . . . . . 27
Designated use . . . . . . . . . . . . . . . . . . . . . . . . . . . . 4
Device description. . . . . . . . . . . . . . . . . . . . . . . . . 16
Dimensions . . . . . . . . . . . . . . . . . . . . . . . . . . . . . . . 7
Disposal . . . . . . . . . . . . . . . . . . . . . . . . . . . . . . . . 26
Drift . . . . . . . . . . . . . . . . . . . . . . . . . . . . . . . . . . . . 27
E
Electrical connection . . . . . . . . . . . . . . . . . . . . . . .
Electrical technician . . . . . . . . . . . . . . . . . . . . . . .
Error
Sensor check . . . . . . . . . . . . . . . . . . . . . . . . . .
Errors
Troubleshooting instructions . . . . . . . . . . . . . .
14
14
24
24
F
Fault . . . . . . . . . . . . . . . . . . . . . . . . . . . . . . . . . . . 24
Floating body . . . . . . . . . . . . . . . . . . . . . . . . . . . . 12
Flow assembly . . . . . . . . . . . . . . . . . . . . . . . . . . . 12
I
Identification . . . . . . . . . . . . . . . . . . . . . . . . . . . . . 6
Immersion assembly . . . . . . . . . . . . . . . . . . . . . . 10
Immersion tube . . . . . . . . . . . . . . . . . . . . . . . . . . 11
Incoming acceptance. . . . . . . . . . . . . . . . . . . . . . . 7
Installation . . . . . . . . . . . . . . . . . . . . . . . . . . . . . 4, 7
Installation instructions . . . . . . . . . . . . . . . . . . . 7–8
Examples . . . . . . . . . . . . . . . . . . . . . . . . . . . . 10
Flow operation . . . . . . . . . . . . . . . . . . . . . . . . 12
Immersion operation. . . . . . . . . . . . . . . . . . . . 10
Installing the measuring point. . . . . . . . . . . . . . 9
Mounting location . . . . . . . . . . . . . . . . . . . . . . . 8
Orientation . . . . . . . . . . . . . . . . . . . . . . . . . . . . 8
Premounting . . . . . . . . . . . . . . . . . . . . . . . . . . . 9
Retractable assembly . . . . . . . . . . . . . . . . . . . 13
Interface. . . . . . . . . . . . . . . . . . . . . . . . . . . . . . . . 28
M
Maintenance . . . . . . . . . . . . . . . . . . . . . . . . . . . . 21
Materials . . . . . . . . . . . . . . . . . . . . . . . . . . . . . . . 28
Maximum measured error . . . . . . . . . . . . . . . . . . 27
Measured value . . . . . . . . . . . . . . . . . . . . . . . . . . 27
Measured value at air . . . . . . . . . . . . . . . . . . . . . 18
Measured variable . . . . . . . . . . . . . . . . . . . . . . . . 27
Measuring point . . . . . . . . . . . . . . . . . . . . . . . . . . . 9
Measuring principle . . . . . . . . . . . . . . . . . . . . . . . 17
Measuring range . . . . . . . . . . . . . . . . . . . . . . . . . 27
Measuring system . . . . . . . . . . . . . . . . . . . . . . . . . 8
Membrane thickness . . . . . . . . . . . . . . . . . . . . . . 28
Minimum flow. . . . . . . . . . . . . . . . . . . . . . . . . . . . 27
N
Notes on safety icons . . . . . . . . . . . . . . . . . . . . . . 5
O
Operating life . . . . . . . . . . . . . . . . . . . . . . . . . . . . 28
Operation. . . . . . . . . . . . . . . . . . . . . . . . . . . . . . . . 4
Operational safety . . . . . . . . . . . . . . . . . . . . . . . . . 4
Ordering. . . . . . . . . . . . . . . . . . . . . . . . . . . . . . . . . 6
P
Polarization time . . . . . . . . . . . . . . . . . . . . . . . . . 27
Post-connection
Check . . . . . . . . . . . . . . . . . . . . . . . . . . . . . . . 15
Post-installation
Check . . . . . . . . . . . . . . . . . . . . . . . . . . . . . . . 13
Premounting . . . . . . . . . . . . . . . . . . . . . . . . . . . . . 9
Process . . . . . . . . . . . . . . . . . . . . . . . . . . . . . . . . 27
Process connection . . . . . . . . . . . . . . . . . . . . . . . 28
Process pressure. . . . . . . . . . . . . . . . . . . . . . . . . 27
29
OOS61
Process temperature. . . . . . . . . . . . . . . . . . . . . . . 27
Product structure. . . . . . . . . . . . . . . . . . . . . . . . . . . 6
R
Regenerating. . . . . . . . . . . . . . . . . . . . . . . . . . . . . 22
Repeatability . . . . . . . . . . . . . . . . . . . . . . . . . . . . . 28
Replacement
Sealing ring . . . . . . . . . . . . . . . . . . . . . . . . . . . 22
Replacing the sealing ring. . . . . . . . . . . . . . . . . . . 22
Response time . . . . . . . . . . . . . . . . . . . . . . . . . . . 27
Retractable assembly . . . . . . . . . . . . . . . . . . . . . . 13
Return . . . . . . . . . . . . . . . . . . . . . . . . . . . . . . . . 5, 25
S
Scope of delivery. . . . . . . . . . . . . . . . . . . . . . . . . . . 6
Sensor
Calibration . . . . . . . . . . . . . . . . . . . . . . . . . . . . 17
Cleaning. . . . . . . . . . . . . . . . . . . . . . . . . . . . . . 21
Design . . . . . . . . . . . . . . . . . . . . . . . . . . . . . . . 16
Measuring principle . . . . . . . . . . . . . . . . . . . . . 17
Monitoring . . . . . . . . . . . . . . . . . . . . . . . . . . . . 27
Sensor cable . . . . . . . . . . . . . . . . . . . . . . . . . . . . . 28
Sensor cap . . . . . . . . . . . . . . . . . . . . . . . . . . . . . . 28
Sensor check . . . . . . . . . . . . . . . . . . . . . . . . . . . . 24
Slope . . . . . . . . . . . . . . . . . . . . . . . . . . . . . . . . . . . 27
Spare parts . . . . . . . . . . . . . . . . . . . . . . . . . . . . . . 25
Storage . . . . . . . . . . . . . . . . . . . . . . . . . . . . . . . . . . 7
Storage temperature . . . . . . . . . . . . . . . . . . . . . . . 27
Symbols . . . . . . . . . . . . . . . . . . . . . . . . . . . . . . . . . 5
Cross-references . . . . . . . . . . . . . . . . . . . . . . . . 5
T
Technical data. . . . . . . . . . . . . . . . . . . . . . . . . . . . 27
Temperature compensation . . . . . . . . . . . . . . . . . 28
Transmitter . . . . . . . . . . . . . . . . . . . . . . . . . . . . . . 23
Transport. . . . . . . . . . . . . . . . . . . . . . . . . . . . . . . . . 7
Types of calibration . . . . . . . . . . . . . . . . . . . . . . . . 17
U
Universal assembly holder . . . . . . . . . . . . . . . 10–11
Use . . . . . . . . . . . . . . . . . . . . . . . . . . . . . . . . . . . . . 4
W
Weight . . . . . . . . . . . . . . . . . . . . . . . . . . . . . . . . . . 28
Weights . . . . . . . . . . . . . . . . . . . . . . . . . . . . . . . . . 28
Wiring . . . . . . . . . . . . . . . . . . . . . . . . . . . . . . . . . . 14
Z
Zero current. . . . . . . . . . . . . . . . . . . . . . . . . . . . . . 27
Zero point . . . . . . . . . . . . . . . . . . . . . . . . . . . . . . . 18
30
BA387e/00//06.05
Printed in Germany / FM+SGML 6.0 / DT
71007927